
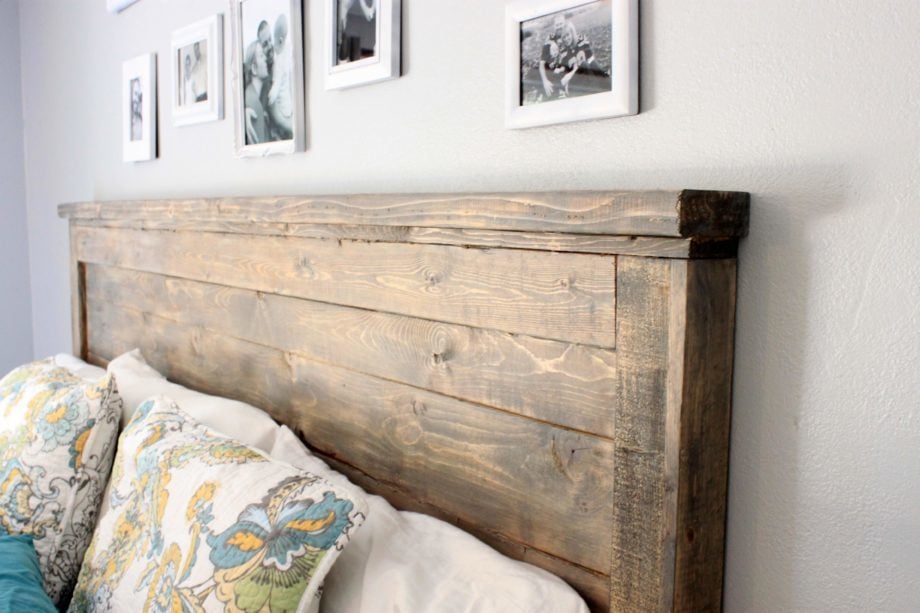

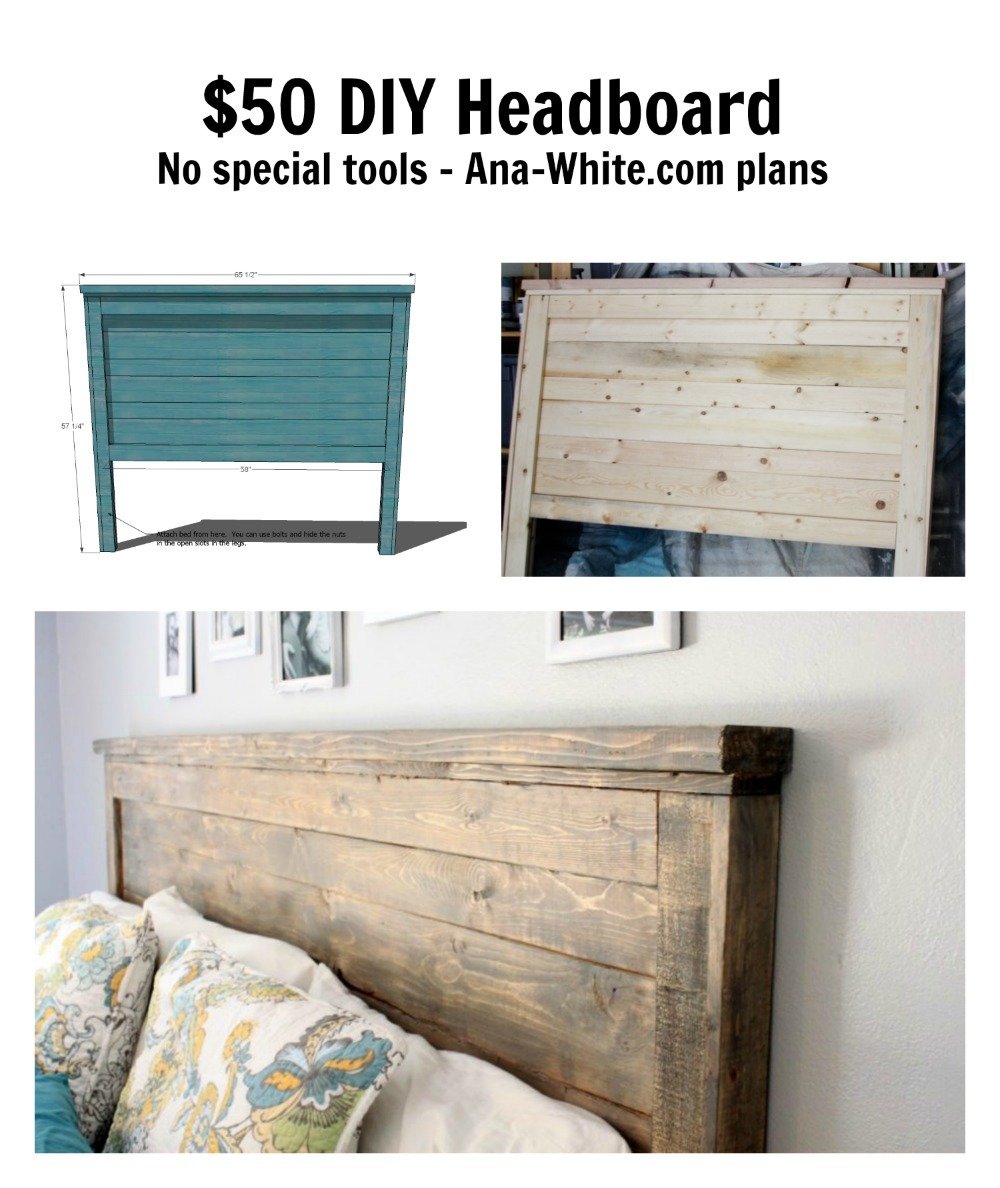
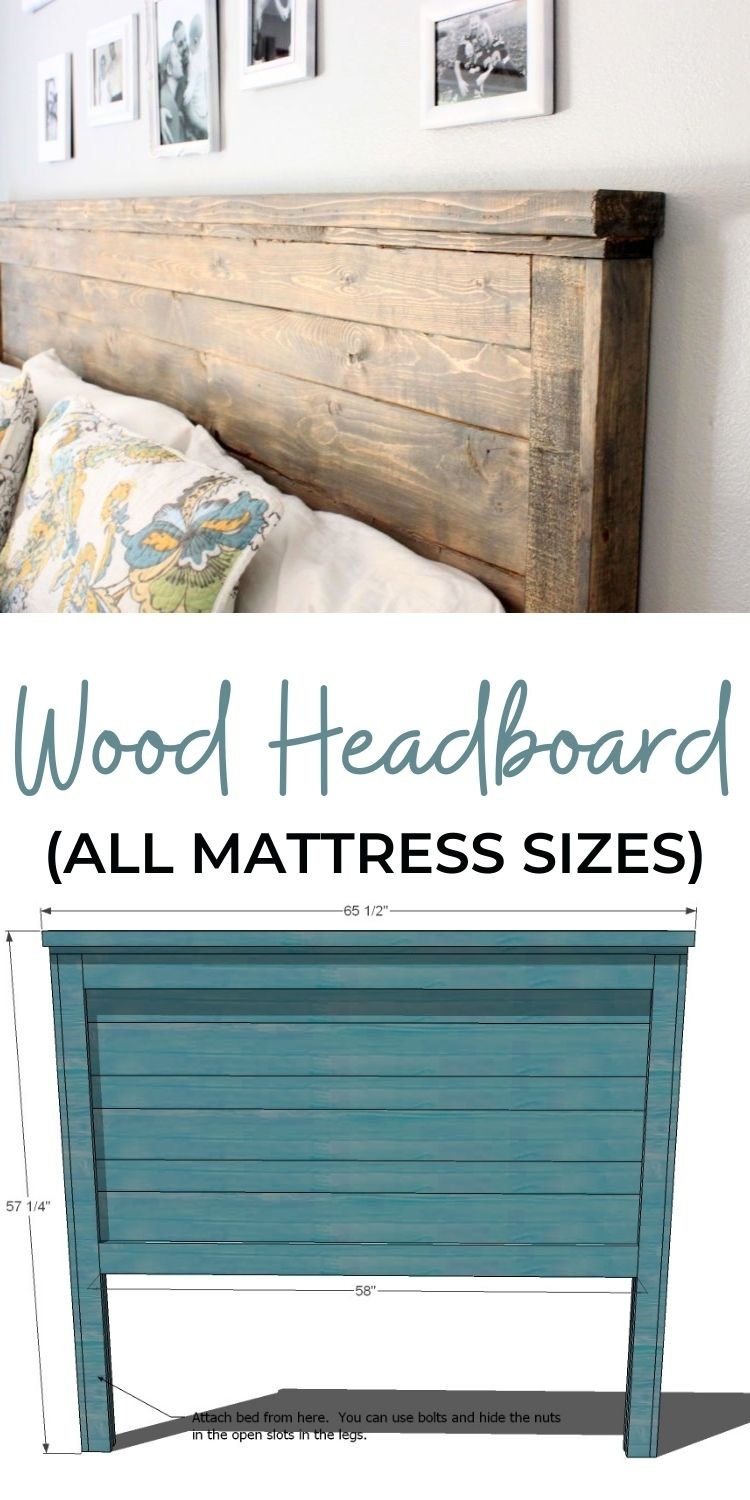
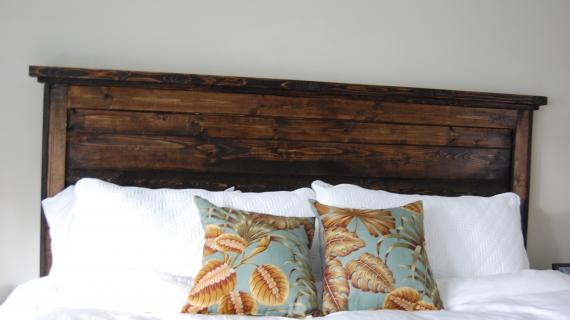
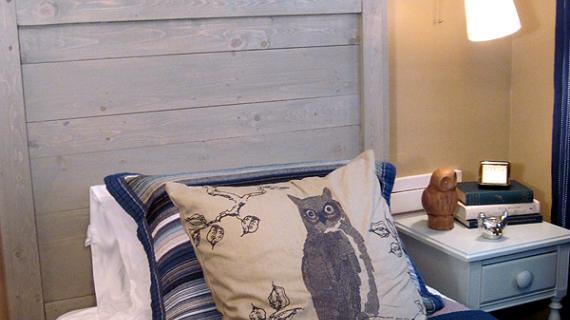
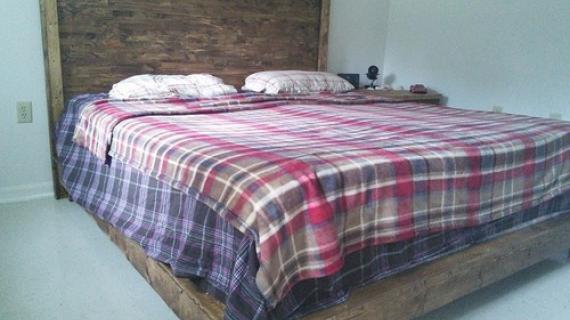
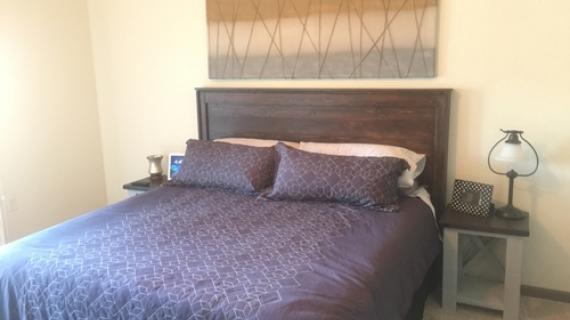
Easy DIY planked wood headboard build - no special tools required! This beautiful headboard gives that wood texture to your bedroom - without costing a fortune or being a huge project. You can use inexpensive pine boards or furring strips. Free step by step plans by ANA-WHITE.com
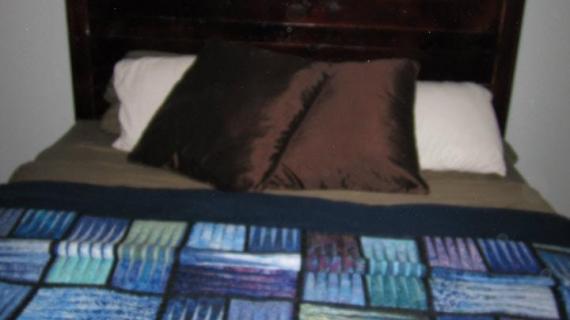
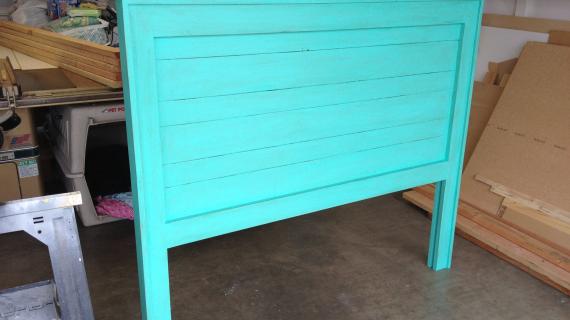
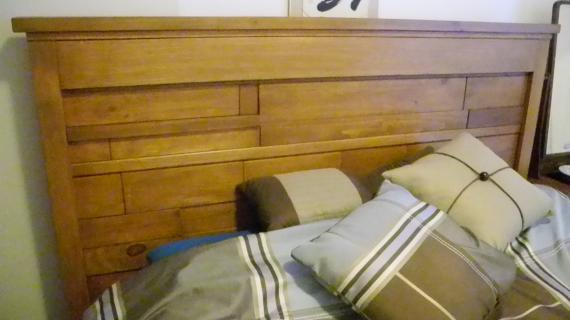
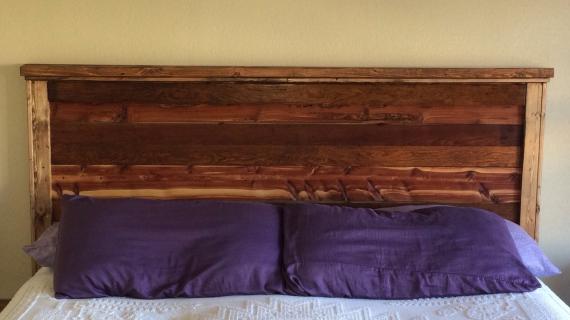
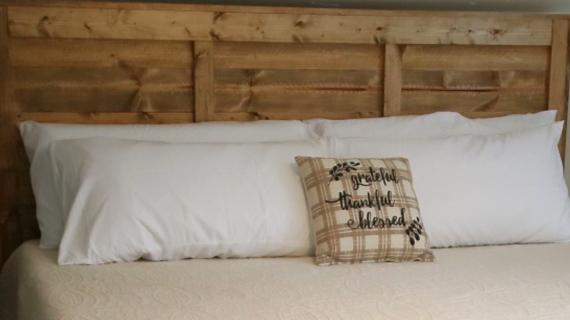
Photos submitted by Cynthia and Nicole.
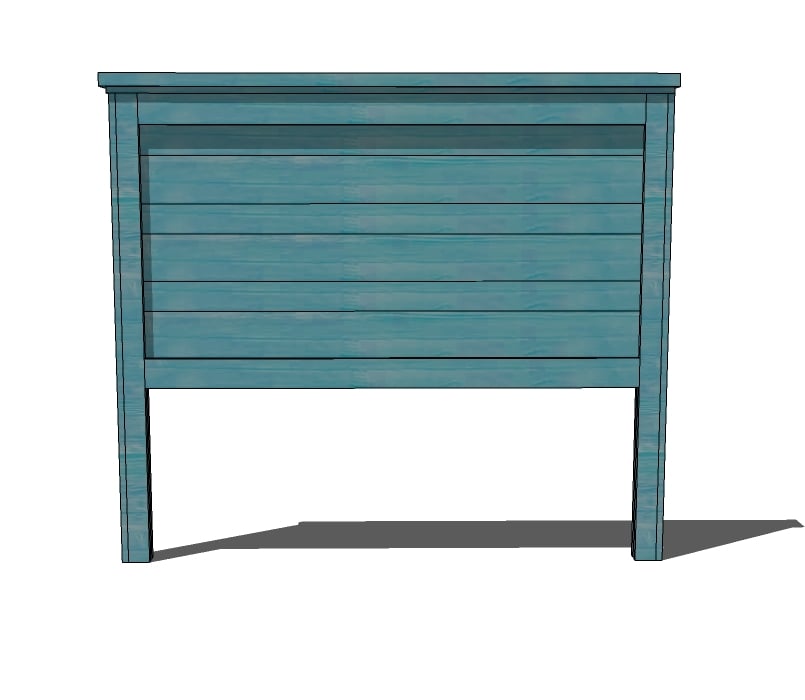
Simplicity and the beauty of soild wood come together in this headboard to transform a room. This project can be completed in just a few hours. Available in all standard bed sizes.
Easy to build, all you need is a saw and nails - you can even use a hammer and nails!
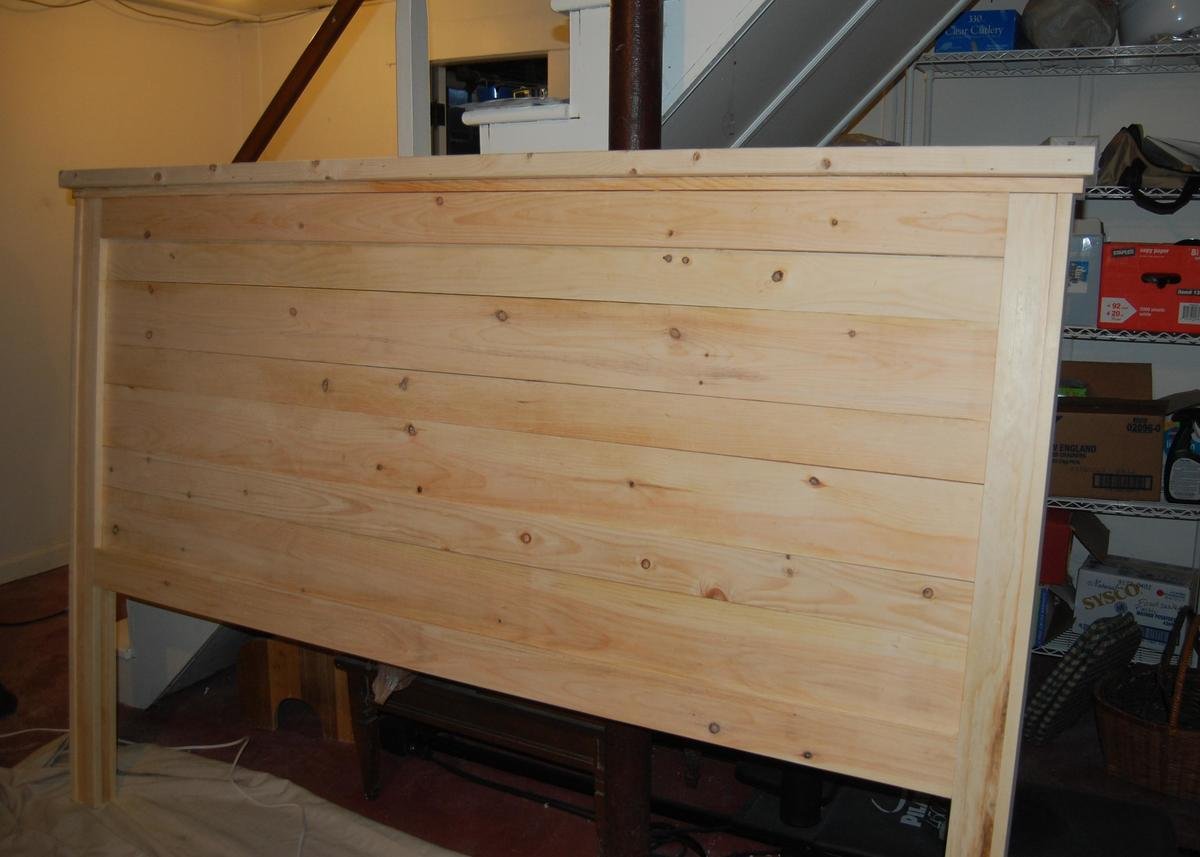
Most builders are spending about $50 making this beauty. Be sure to check out brag posts.
Free plans follow!
Pin For Later!
Preparation
Twin Lumber Shopping List
- 2 – 1×2 – 8′ Length
- 7 – 1×3 – 8′ Length
- 3 – 1×4 – 10′ Length
- 1 – 1×6 – 10′ Length
- 1 – 2×4 – 8′ or Stud Length
Full Shopping List
- 2 – 1×2 – 8′ Length
- 7 – 1×3 – 8′ Length
- 4 - 1×4 – 10′ Length
- 1 – 1×4 – 6′ Length
- 3 – 1×6 – 5′ Length
- 1 – 2×4 – 8′ or Stud Length
Queen Lumber Shopping List
- 2 – 1×2 – 8′ Length
- 7 – 1×3 – 8′ Length
- 4 - 1×4 – 10′ Length
- 1 – 1×4 – 6′ Length
- 3 – 1×6 – 5′ Length
- 1 – 2×4 – 8′ or Stud Length
Standard King Shopping List
- 2 – 1×2 – 8′ Length
- 7 – 1×3 – 8′ Length
- 9 - 1×4 – 8′ Length
- 3 - 1×6 – 8′ Length
- 1 – 2×4 – 8′ or Stud Length
California King Lumber for California King
- 2 – 1×2 – 8′ Length
- 7 – 1×3 – 8′ Length
- 5 - 1×4 – 12′ Length
- 4 - 1×6 – 6′ Length
- 1 – 2×4 – 8′ or Stud Length
Cut List for Twin
- 6 - 1×3 @ 55″ (Fronts and backs of Legs)
- 2 – 1×2 @ 55″ (Inside of Legs)
- 5 – 1×4 @ 39″ (Panel Pieces)
- 3 – 1×6 @ 39″ (Panel Pieces)
- 4 – 1×4 @ 37″ (Panel Trim, Front and Back)
- 1 – 1×3 @ 43 1/2″ (Top Trim)
- 1 – 2×4 @ 44 1/2″ (Top of Headboard)
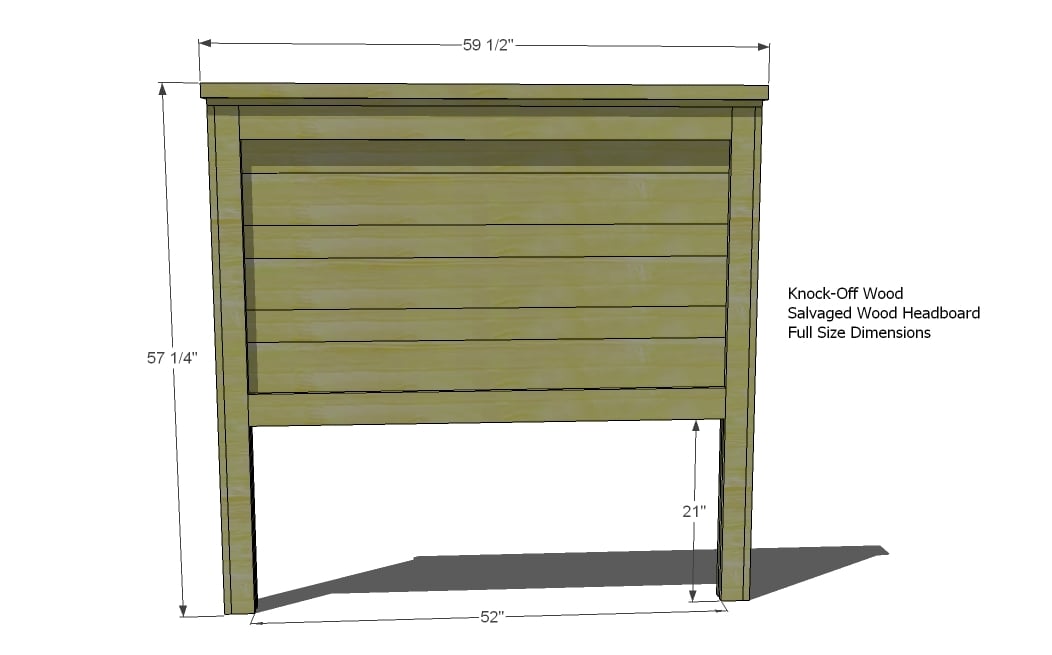
Cut List for Full
- 6 - 1×3 @ 55″ (Fronts and backs of Legs)
- 2 – 1×2 @ 55″ (Inside of Legs)
- 5 – 1×4 @ 54″ (Panel Pieces)
- 3 – 1×6 @ 54″ (Panel Pieces)
- 4 – 1×4 @ 52″ (Panel Trim, Front and Back)
- 1 – 1×3 @ 58 1/2″ (Top Trim)
- 1 – 2×4 @ 59 1/2″ (Top of Headboard)
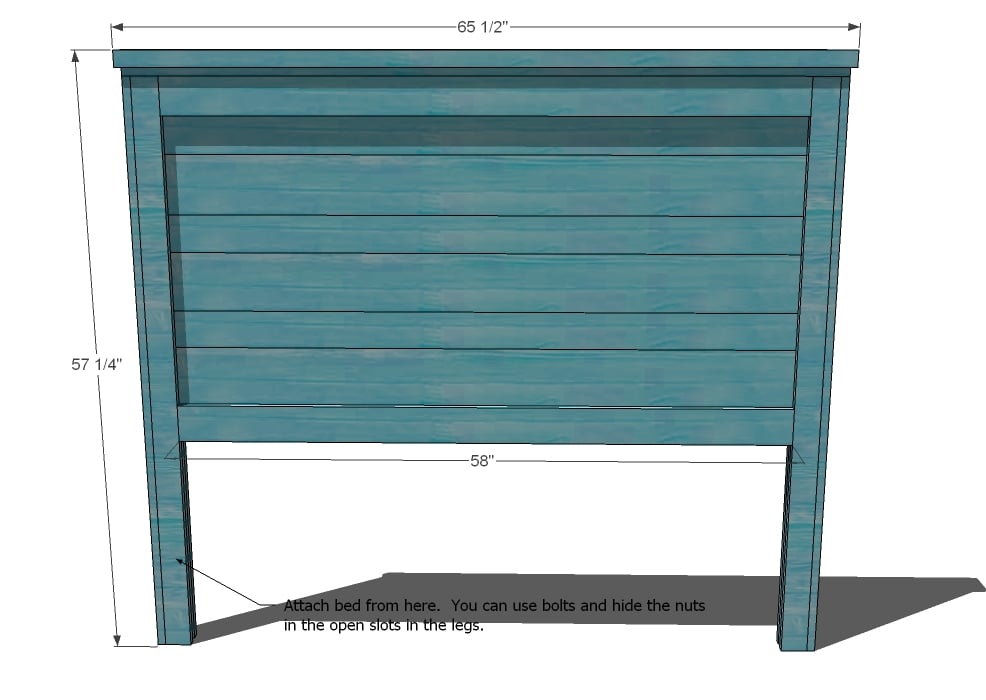
Cut List for Queen
- 6 - 1×3 @ 55″ (Fronts and backs of Legs)
- 2 – 1×2 @ 55″ (Inside of Legs)
- 5 – 1×4 @ 60″ (Panel Pieces)
- 3 – 1×6 @ 60″ (Panel Pieces)
- 4 – 1×4 @ 58″ (Panel Trim, Front and Back)
- 1 – 1×3 @ 64 1/2″ (Top Trim)
- 1 – 2×4 @ 65 1/2″ (Top of Headboard)
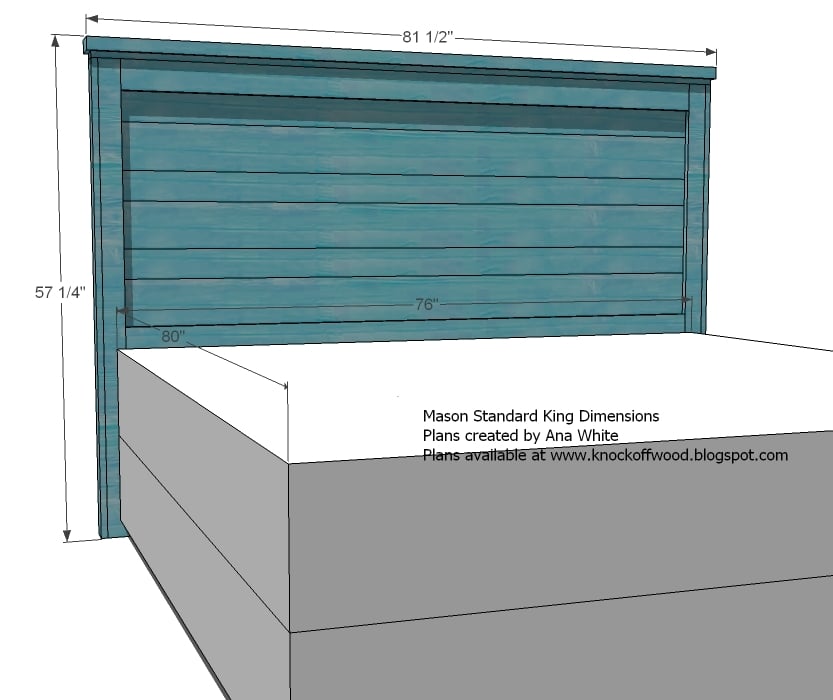
Cut List for Standard King
- 6 – 1×3 @ 55″ (Fronts and backs of Legs)
- 2 – 1×2 @ 55″ (Inside of Legs)
- 5 – 1×4 @ 76″ (Panel Pieces)
- 3 – 1×6 @ 76″ (Panel Pieces)
- 4 – 1×4 @ 74″ (Panel Trim, Front and Back)
- 1 – 1×3 @ 80 1/2″ (Top Trim) (measure before cutting)
- 1 – 2×4 @ 81 1/2″ (Top of Headboard) (measure before cutting)
Cut List for California King
- 6 – 1×3 @ 55″ (Fronts and backs of Legs)
- 2 – 1×2 @ 55″ (Inside of Legs)
- 5 – 1×4 @ 72″ (Panel Pieces)
- 3 – 1×6 @ 72″ (Panel Pieces)
- 4 – 1×4 @ 70″ (Panel Trim, Front and Back)
- 1 – 1×3 @ 76 1/2″ (Top Trim) (measure to fit)
- 1 – 2×4 @ 77 1/2″ (Top of Headboard) (measure to fit)


Work on a clean level surface. Use necessary safety precautions. Measure and cut your boards to fit your piece – measurements given are for a perfect build, and you may find your headboard off a tiny bit. So on the trim and top pieces, measure to fit, using the given cut list as a approximate measurement. Use glue and check for square after each step.
Standard King Dimensions
Dimensions for Full
Instructions
Step 1

Legs. Begin building the legs by fastening the 1×2 middle piece to the 1×3 front leg piece, as shown above. To hide your nail holes, fasten for the 1×2 board into the back side of the 1×3 board. Keep outside edges flush.
Step 2

Panel Pieces. Starting on the top, fasten the panel pieces as shown above. The red pieces are 1×4 boards, the blue are 1×6 boards. Use 1 1/4″ nails and glue. Check for square. Hide your nail holes as you did in step 1.
Step 3

Back of Legs. Use 2″ nails and glue to fasten the back of the legs in place. Fasten to the panel pieces and the middle leg piece. Keep outside edges flush.
Step 4
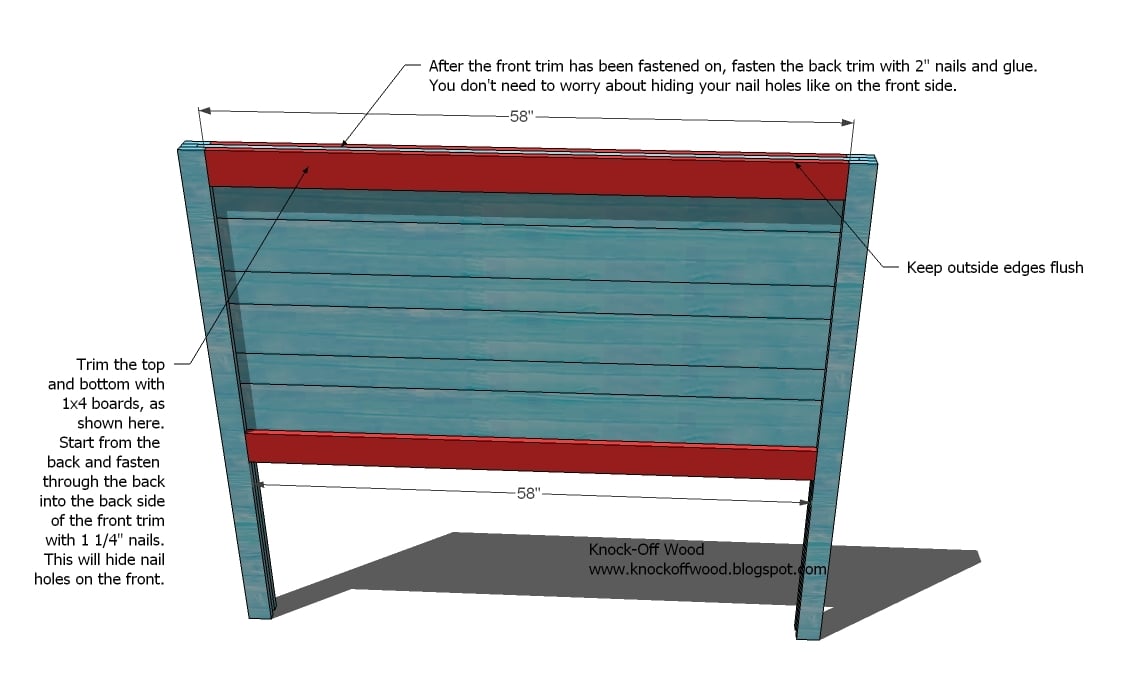
Trim Pieces. Start by fastening the front trim pieces by using 1 1/4″ nails and nailing through the back into the back edge of the front trim. This will hide your nail holes. Then fasten the back trim in place using 2″ nails and glue.
Step 5

Step 6
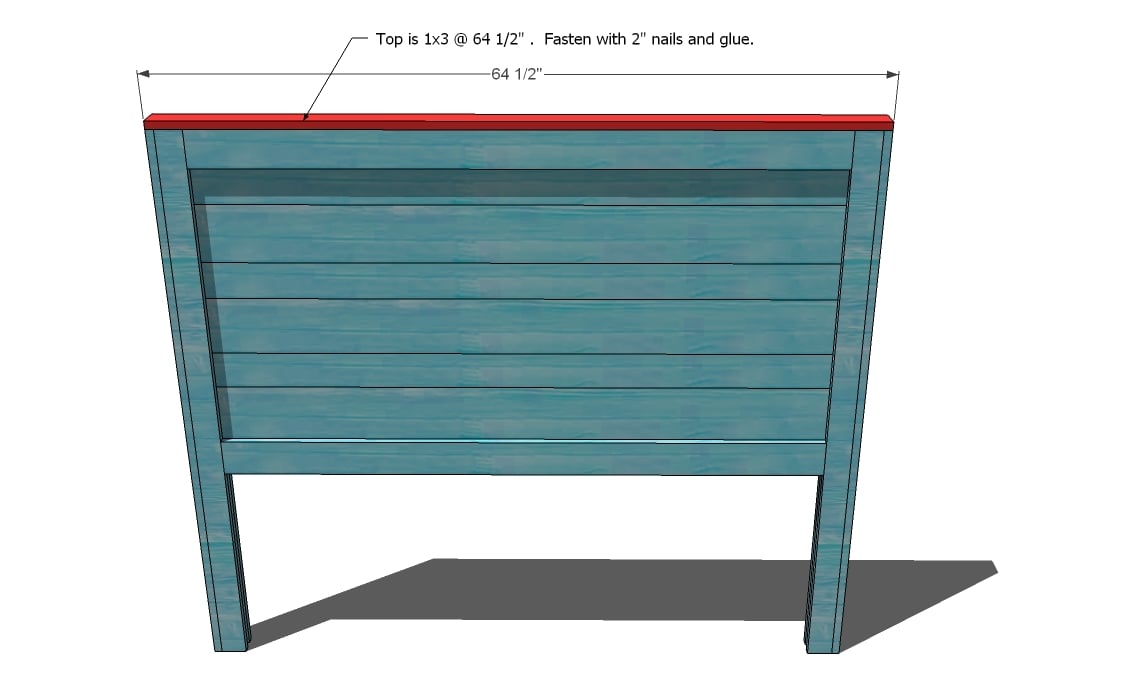
Top Trim. As shown above, measure and cut your top trim piece. The distance will be the overall width of the headboard at this step. Keeping the top trim flush with the outer leg and the front of the headboard, use 2″ nails and glue to fasten in place.
Step 7

Top of Headboard. Cut the top of the headboard piece 1″ longer than the trim piece from step 6. Mark 1/2″ in from all sides. Center on top of the headboard and fasten in place with glue and 2″ nails.
Step 8
Finishing. Fill any visible nail holes with wood filler and sand and finish as desired. A bed frame can be attached by drilling holes in the fronts of the legs, and using bolts and nuts inserted in the slots open in the insides of the legs.

Comments
JerseyGirl80 (not verified)
Sat, 04/14/2012 - 15:17
Cost of wood
Not sure what I did wrong. Bought Pine at the Hardware Store today to the plans for this headboard which I've been DYING to make and the cost came out to $92.00!! Everyone keeps saying their total cost was under $50, and I didn't even buy the hardware yet. What type of pine is everyone getting that's it's so cheap?
claydowling
Sat, 04/14/2012 - 16:37
Wood Source
The hardware store has a pretty stiff markup on the wood they sell. Home centers like Lowes or Home Depot don't mark up as much. The best place to buy the wood is from a regular lumber yard, where No. 2 pine is quite affordable, and generally nicer than what is sold in the home centers.
I wrote a little about it over at my blog: http://claydowling.com/articles/01302012-2029/buying-lumber
jerseygirl80 (not verified)
Mon, 04/16/2012 - 20:08
Got my wood, but not from my local lumber yard
Upon reading your response Clay, I wished I had a local lumber yard, but I didn't think I could fine one (I live in New Jersey, where it's mostly all big brand name stores). I returned my wood from one big brand lumber store and purchased new wood from another, somehow saving $40 and later......found a family-owned lumber yard 6 blocks away from home!!! Bummed I didn't find them earlier, but now I know for the future and did buy some hardware from them today. Thanks for your article, spent all day making a work table and cutting my wood! Plan on putting it all together before work tomorrow :)
In reply to Wood Source by claydowling
claydowling
Thu, 05/17/2012 - 05:07
There's always something local
I was able to find small local lumber dealers near Toronto, a city not known for its smallness. If they can be found there, they can be found anywhere. Your own experience suggests that it's just a matter of hunting.
I think the biggest problem is that when we go to buy things, we're accustomed to looking for advertisements, or looking for somebody selling in the regular retail areas. Lumber dealers of course don't have a presence in those places, because that's not where their customers are.
I have had decent luck using google. That tipped me to some local suppliers I wouldn't have noticed. Also, keep an eye out for small signs by the road. I found a decent hardwood dealer from a sign by the highway.
Batterie ordin… (not verified)
Wed, 05/16/2012 - 23:45
Batterie ordinateur portable
Batterie ordinateur portable
http://www.acheter-batteries.fr
batteries, chargeurs et alimentations secteur pour ordinateur portable
Acheter-batteries.fr vour propose un catalogue en ligne de batteries, chargeurs et alimentations secteur pour ordinateur portable..Toutes les marques et les modèles pour vos appareils portables. Grand choix de références et qualité garantis!
ArroffInvaria (not verified)
Thu, 05/24/2012 - 04:52
Good resourse
Gays you create a wonderful resourse =)
Damien Considine (not verified)
Sun, 06/03/2012 - 13:56
Cushions
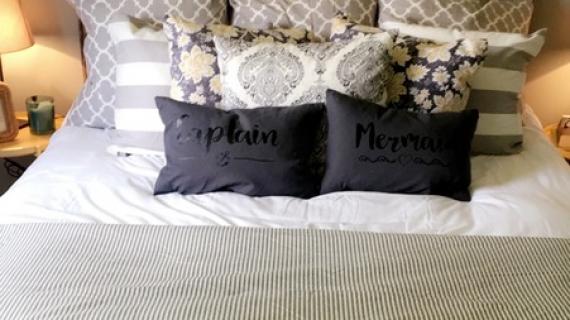
Where did you get the cushions in this shot? They match up fantastically with my own colour scheme. Thankyou
Skiziks (not verified)
Wed, 06/20/2012 - 17:06
Is that really a 2x4?
The directions show and illustrate using a 2x4 for the top of the headboard. Looking at the picture of the finished headboard it sure doesn't look like a 2x4 on the top. And the trim on the outside edges of legs, the instructions say to keep them flush. The finished picture show the trim pieces extending about a quarter of an inch in the front. Anyone following these directions are not going to end up with what is pictured as the final product. Have you ever compared you just purchased hamburger or sandwich to the advertised picture? Seems to be the trend not to get what you expect.
davidmac (not verified)
Wed, 06/27/2012 - 13:50
The picture was not built
The picture was not built exactly to the plan. The top looks more like a 1x4. If you follow the plans it will look like the sketch up picture and not the actual picture.
Monica M. (not verified)
Fri, 06/22/2012 - 18:38
color and pillow?
I would love to know what brand and color you painted this with as well as where to get that pretty floral pillow on the right!?!
Jaclyn (not verified)
Wed, 06/27/2012 - 11:56
How do you find inexpensive wood!
Everyone seems to be spending about $40-50, I spent $100! I want to do more projects, but wood is pricey!!
Jedeexoxefs (not verified)
Tue, 07/17/2012 - 01:02
SDGSADDFHAD Today, I helped an old man ADFHGASDGASDADFHAD
Trend is now a household phrase within the previous number of years. Commencing from headgear to underwear to toe rings, every single accent comes at intervals the purview of fashion. Even necessities like spectacles, make contact with lenses and sunglasses are an integral portion of an individual's type statement.
o Currently, you can go for broad, sleek, patterned or maybe, inscribed frames. Some people finish up shopping for frames suited to your apparels that happen to be housed in their wardrobe. Shopping for any lot of than one specs could seem very lavish for you. But trust me, should you search for them on the internet, you are able to get them at low-cost expenses than the ones bought [url=http://www.uklouisvuittonoutletoffical.com][b]louis vuitton handbags[/b][/url] from retail outlets. This is normally attainable due to the fact the net small business model is therefore designed that it assists the consumer reap gains.
A ton of price goes into setting up a land based mostly search and keeping it. However this isn't the case for an entrepreneur who conducts business enterprise on-line. The share saving that is certainly made through the vendor is made available from the kind of low cost to your customer. Conjointly, branded merchandise are extremely priced. It really is nothing however the title that incurs the exorbitant cost. Precisely the same frames, could be much more trendy and of a higher excellent, may be accessible at a abundant lesser value, if you're ready to compromise with that decorative name.
hannahhalexiss (not verified)
Wed, 07/18/2012 - 23:15
What would the dimensions be
What would the dimensions be for a Full size bed?! I need a headboard desperately!!
cakes26 (not verified)
Thu, 10/04/2012 - 19:17
Dimensions for full size bed.
Full size bed headboard dimensions, 59" wide...
Rebecca Mitchell (not verified)
Fri, 07/20/2012 - 11:42
King Size Plans
Hi Ana,
I would love the king size plans if/when you have a spare moment! This is what I have been looking for and cannot wait to start it!
BP (not verified)
Tue, 09/18/2012 - 07:47
The Finish...
There seems to be many questions concerning the finish. I recently did this project with the same color with the slightly antique look. I did a little research on glazing. I followed this post. http://ana-white.com/2012/05/distressed-turquoise-chocolate-glaze
BP (not verified)
Tue, 09/18/2012 - 07:50
The Finish...
There seems to be many questions on the finish color and look. I recently just completed this project. I used a chocolate glaze to achieve the antique look. I found this post very helpful. http://ana-white.com/2012/05/distressed-turquoise-chocolate-glaze
TonyM (not verified)
Tue, 09/25/2012 - 08:00
Kreg Jig?
HI
Thank you for posting this very nice design, but I am a little confused about the shopping list. You suggest buying 11/4 inch, 2 inch 1 1/4 inch pocket hole screws and 2 1/2 inch pocket hole screws, along with the previously mentioned Kreg Jig, but I don't see any mention of inserting screws in the description. Is there an alternative plan using screws instead of nails? Thanks
Robert Seal (not verified)
Thu, 10/04/2012 - 05:40
Structural Integrity?
First and foremost since this is my first comment on your blog, you've done an amazing job Ana. Very inspiring and educational content.
My question for this piece however is in concern for the strength of the bed. It seems just by looking at your plans that any frame connected to this headboard would only be attached to a 1x3 plank.
Do you (or any of your readers who've built this) feel that this is enough support to last over time? Beds take a lot of abuse, especially with my having two boys that use it as a trampoline when we're not looking.
Anyway, I could also be miscalculating how far down the cross-planks go and that would easily offer about 2.25" inches of support.
Let me know :)
vqbbstea (not verified)
Sun, 11/18/2012 - 22:07
canada goose mens jackets nyocqvju
Supra ShoesSupra FootwearSupra SkytopSupra SkylowSupra TkSupra VaiderSupra BabySupra SkytopSupra Suprano HighSupra TKSupra VaiderSupra Vaider LowSupra Vega EESupra ThunderSupra SkylowSupra MuskaSupra Bandit MidSupra EE Diablo 1.5Supra BulletSupra CubanSupra NewsSupra CruizerSupra DixonSupra AvengerSupra WomemASICS ShoesVibram FivefingersSupra Baby Skytop NS Yellow/BlackSupra Baby High Black SuedeSupra Baby Skytop NS Red/BlackSupra Baby Tuf Blue CrackleSupra Baby Skytop GoldenSupra Baby TK Society Pink with BlackSupra Baby Skytop WhiteSupra Baby Skytop BlackSupra Baby Skytop NS Spots black/redSupra Baby Skytop RedSupra Baby Skytop NS Spots White/YellowSupra Shoes Skytops II woman Gray/Black/PinkSupra Shoes Skytops II woman White/Black/RedSupra Shoes Skytops II woman White/RainbowSupra Shoes Skytops II woman Silver/Yellow/GreenSupra Shoes Skytops II woman White/MediumturquoiseSupra Shoes Skytops II woman Silver/Purple/GoldSupra Shoes Skytops II woman Silver/MidnightblueSupra Shoes Skytops II woman Black/White/GraySupra Shoes Skytops II woman White/Blue/YellowSupra Shoes Skytops II woman PureSupra Shoes Skytops II woman OrangeSupra Shoes Skytops II woman White/Red/GraySupra Shoes Skytop NS Blue/PurpleSupra Shoes Skytop NS BrownSupra Shoes Skytop NS Black/WhiteSupra Shoes Skytop NS Brown/Red/WhiteSupra Shoes Skytop NS Blue/Zebra GrainSupra Shoes Skytop NS Black/Yellow/PatternSupra Shoes Skytop NS Blue/BlackSupra Shoes Skytop NS Brown/OrangeSupra Shoes Skytop NS Black/YellowSupra Shoes Skytop NS Black/Zebra GrainSupra Shoes Skytop NS Blue/YellowSupra Suprano High Black SuedeSupra TK Society Purple SuedeSupra TK Society (Red Carpet Series) Tuf Black SatinSupra TK Society Black/Green NylonSupra TK Society Black Perf LeatherSupra TK Society Burgundy Patent SuedeSupra TK Society Black SuedeSupra TK Society Grey Patent LeatherSupra TK Society Tuf Blue CrackleSupra TK Society Rose GoldSupra TK Society White Perf LeatherSupra TK Society Navy Black LeatherSupra TK Society Red Perf LeatherSupra Vaider Black Gunny TufSupra Vaider Green Black RedSupra Vaider Brown SuedeSupra Vaider Blue SuedeSupra Vaider Black SuedeSupra Vaider Burgundy Patent SuedeSupra Vaider Tuf BlackSupra Vaider Tuf Neon GreenSupra Vaider Low Black RastaSupra Vaider Low Tuf Black Perf [url=http://www.uggbootsalede.com]uggs online outlet[/url]
[url=http://www.canadagooseonlineoutlet.co.uk]canada goose outlet[/url] new canada goose jacket canada goose chiliwack
canada goose jackets sale toronto Ulhymagfh [url=http://www.sislead.com]Canada Goose Trillium Parka[/url]
Laura L (not verified)
Tue, 11/27/2012 - 23:41
Ana, I'm a little confused
Ana, I'm a little confused about the width measurement. You list the panel trim as 58 inches and the legs as 3 inches wide each. That's 64 inches across already. But then you said to add the other 1x3x55 pieces as outer trim. Wouldn't that make the total width 66 inches instead of 64.5? That would mean the top trim would have to be 1x3x66 and the top would have to be 2x4x67. I definitely want to make this, but I only want to pay for the wood cuts once and something doesn't seem to be adding up to me?
Joe (not verified)
Sat, 12/22/2012 - 06:05
Pocket hole screws
I love this plan and am going to build it for my wife for christmas. I see in the plans that the kreg jig is listed along with the pocket hole screws, but after reading through all the steps, I dont see the jig or screws even mentioned. It looks like just nails. Am I missing something? I am just wondering because after investing alot in wood I dont want to ruin the project.
kshat
Mon, 07/15/2019 - 18:53
I have this same question. …
I have this same question. What did you end up doing?
Erin M. (not verified)
Wed, 01/02/2013 - 20:20
I would LOVE the plans for
I would LOVE the plans for the king size bed please?! This is perfect for our new master bedroom!
Thanks!
Erin M. (not verified)
Wed, 01/02/2013 - 20:22
King plans please! I love
King plans please! I love this, an dI would love the plans for the king size!
Kevin W (not verified)
Thu, 01/03/2013 - 16:42
Kreg joiner
Where/when did you use the Kreg jig in the project? Hoping to build this weekend. Thanks
Paul F (not verified)
Mon, 01/14/2013 - 12:01
Headboard..
I am confused... why would we purchase 1x2 and 1x3 in 8 ft. lengths if they are being cut down to 55-60"?? shouldn't we purchase 6 ft. boards?
thanks
matthewsx3
Sun, 03/17/2013 - 21:41
Attach?
Hey Ana! We recently made the King version of this headboard. It was so easy to do, and I am in LOVE with the finished project! We just put the final coat on to seal it, but I am curious.....How do we attach it? We have the standard metal base that the box springs sit on, no wooden base or footboard. Am I supposed to attach it to the wall? The metal frame? Nothing?! HELP PLEASE!
samieh
Wed, 04/03/2013 - 13:51
King Size
I would also love the king size plans, please!
TheStylishNest
Fri, 07/12/2013 - 17:24
King?
Where do we find the plans for a king? Or do we just up the sizes ourselves? Thanks.
rustics
Thu, 01/23/2014 - 06:21
Love this!
I own my own furniture company at www.foxdendecor.com and would love to add something like this to our line! It's beautiful and the green is the perfect color!
sjvirchow
Wed, 05/07/2014 - 10:58
King size please
Just bought my first house and I have been searching and searching for a headboard....I love this!!!! Need King Size bed plans please and THANKS SO MUCH!
MomWifeNurse
Thu, 07/17/2014 - 18:27
Full Size plans please...
Would love a cut list and instructions for full size headboard. I'm sure it's simple math, but I'm a true beginner and not ready to start designing and altering existing plans....yet.
Thanks
denisealbert
Sat, 09/13/2014 - 17:52
Love the headboard.
Can I please get the plans for the headboard in King size. So excited to make it!
katielake89
Thu, 07/02/2015 - 09:22
King size
Hello, I am new here and I was just wondering if there was anyway to get king size dimensions for this project?!?!?
In reply to King size by katielake89
Ana White
Thu, 07/02/2015 - 13:22
King
http://ana-white.com/2010/03/plans-reclaimed-wood-look-headboard-king-s…
Kpedonesi
Mon, 07/27/2015 - 08:37
Screws
What do you use the screws for they aren't in the plan
Godfada13
Sun, 11/22/2015 - 14:45
Headboard-queensize
What a great set of plans....plenty of room to do your own thing...I used a mixture of vinegar and steel wool to green and grey the wood...what is shown is 3 hours of the mix sitting, I used brillo pads
Kmstring
Tue, 01/19/2016 - 16:40
Screws, nails, pocket screws
Silly question....where are pocket screws on plans? Where would they be used? So I use nails or screws? Sorry...rookie
where are full and King plans?
thanks!!
Ana White Admin
Wed, 01/20/2016 - 11:22
Nails
Sorry about the confusion, this one doesn't use pocket holes, just nails.
Full plan http://www.ana-white.com/2010/03/plans-reclaimed-wood-headboard-full-an…
King http://www.ana-white.com/2010/03/plans-reclaimed-wood-look-headboard-ki…
Fiddletownfloey
Fri, 04/08/2016 - 18:35
Question about design
Love the headboard! But have a couple of questions. Plan states front edges are flush. There appears to be some dimension on the sides that doesn't appear in the plan. Also, is the top piece really a 2x4? Appears thinner in the picture, maybe 1x or did you mill it from 2x?
hannant
Tue, 04/12/2016 - 08:52
Reclaimed wood look headboard and bedside tables
I really want to build this for my new bedroom addition to our cottage but we are planning to have our bed float so we can wake up looking at our pond. We are inexperienced at building furniture and need to figure out how to make the back of these pieces look as good as the front since they will be visible. We would appreciate any help anyone can give us.
amandalowey15
Tue, 07/05/2016 - 09:15
Kreg Jig
Do I absolutely need to buy a kreg jig for this or can it be done without one?
Mikebogg
Wed, 06/27/2018 - 17:54
Enhancing the grain
Hey everyone, the wood I used was actually white wood and the grains are pretty faint. I used a blow torch to lightly burn the wood. This not only enhanced the grain but gave the whole headboard a very rustic and aged look!
PhD_Phil
Mon, 01/21/2019 - 13:35
Trim Question
Per step 4: What is the purpose of adding trim on the back? Seems like it's not needed
Supergirl13
Sun, 06/02/2019 - 22:31
Hi! Does anyone have king…
Hi! Does anyone have king size plans for this headboard? I’d love them. I guess I’m not sure if the legs would be the same width or not, otherwise I could just add the length of the planks....
princygirl18
Tue, 06/04/2019 - 07:14
Jig Saw?
Is a jig saw needed? The twin and full size instructions list it as a tool that is needed but I don't see it in the actual instructions. Thanks!
tvandoeselaar
Mon, 06/24/2019 - 00:36
It's not needed but can be…
It's not needed but can be used to cut the planks down to size depending on the tools you have
tvandoeselaar
Mon, 06/24/2019 - 00:35
Added centered back support
I completed this build today. I suggest adding a 1x3 vertical support of 27 inches that fits inside the trim at 29 in on center. I then used 1 inch nails and glue to attach this support to the horizontal planks. It added support and keeps the planks flat on the front. I was able to make this piece using some of my cut off from this build.
MadisonMacken
Mon, 02/24/2020 - 10:29
I'm looking for this with…
I'm looking for this with the double size measurements?