Community Brag Posts

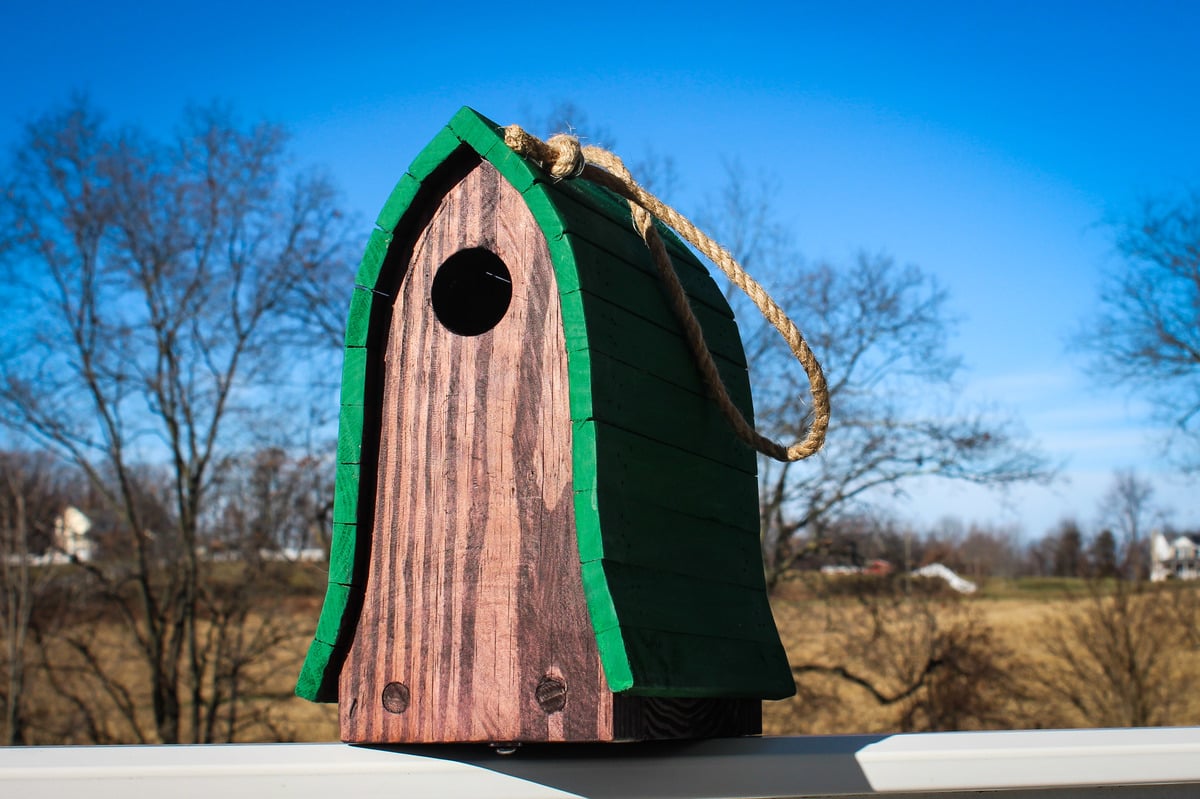
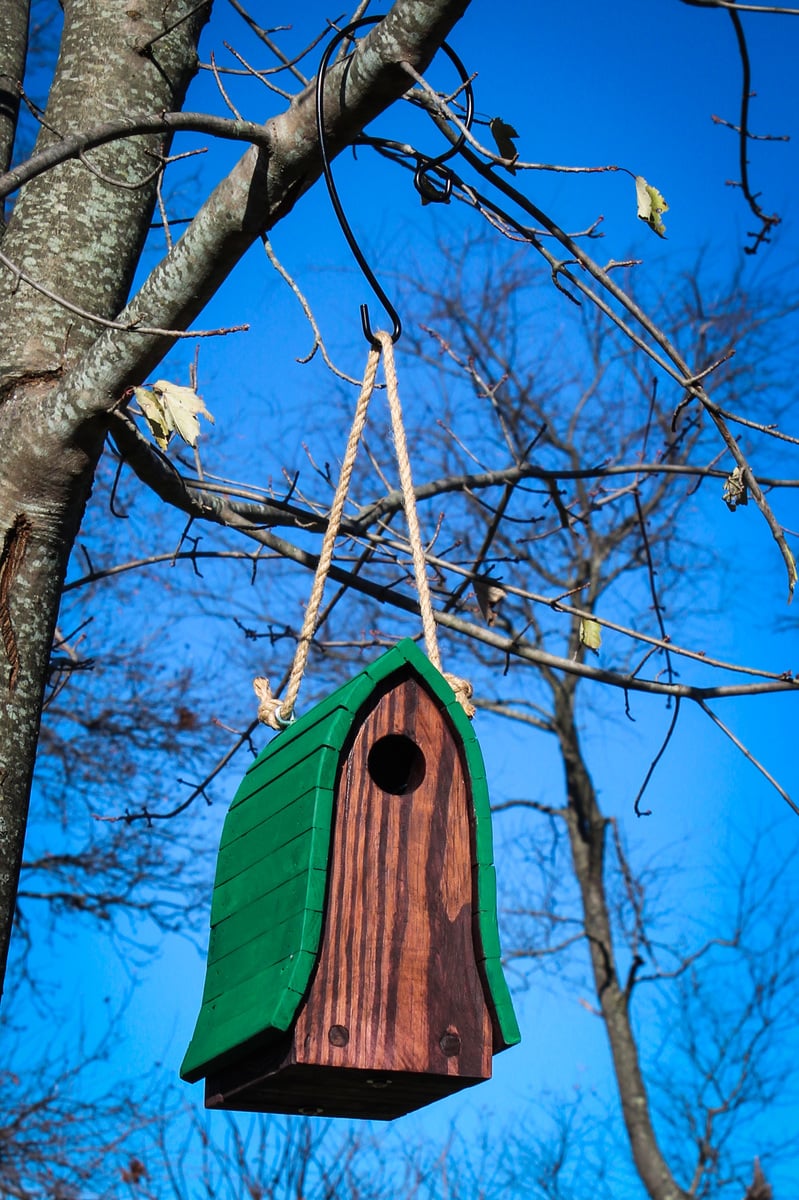
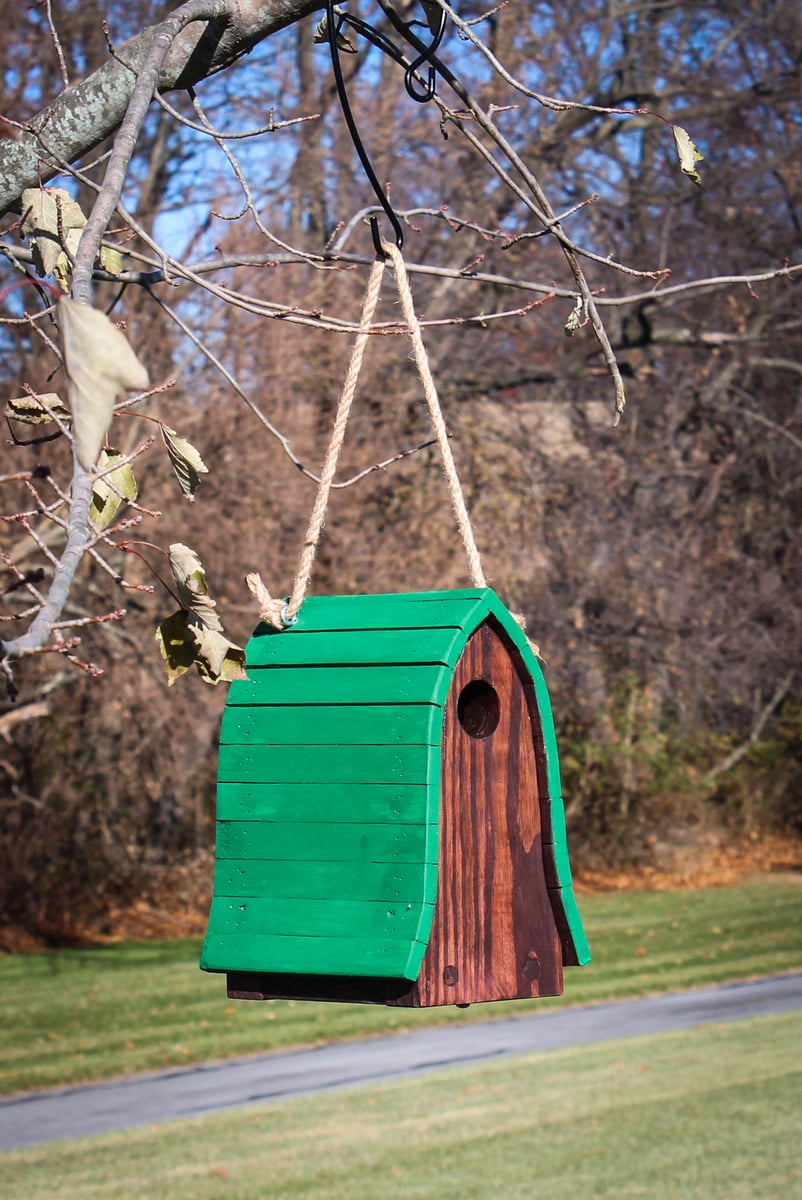
Bluebird Birdhouse Made From Pallets

Submitted by mtairymd on Sat, 11/25/2017 - 15:20

Build Instructions: https://www.instructables.com/id/Bluebird-Birdhouse-Made-From-Pallets/

This is a very easy project to make for attracting bluebirds to your yard. I wanted to reuse some of the wood I have from with the pallets I broke apart last year. This project uses a combination of industrial strength pallets made from 2x6s and standard pallets which provide slats in the 3/8" to 1/2" thick range. As for the house, I tried to hit the basic bluebird birdhouse dimensions for this build:

  • Hole Entry Size: 1.5"
  • Hole Distance Above Floor: 6" to 7"
  • Floor Dimensions: 4"x 4" to 5" x 5"

Feel free to leave the birdhouse exterior to weather unfinished or stain/paint it. I finished the house with a combination of stain for the bottom and sides and green paint for the roof.

Estimated Cost
$2
Estimated Time Investment
Afternoon Project (3-6 Hours)
Finish Used
Dark Cherry & Paint
Recommended Skill Level
Beginner

Tryde Coffee Table

Submitted by bishop2001 on Fri, 06/14/2013 - 07:00

Tryde Coffee Table made of mahogany and stained used several layers of boiled linseed oil and a few top coat layers of wipe on satin polyurethane. It came out really nice. This is my first project.

Estimated Time Investment
Week Long Project (20 Hours or More)
Finish Used
boiled linseed oil
Recommended Skill Level
Beginner

Comments

Pottery Barn headboard with barn wood finish

Submitted by Abentley10 on Tue, 05/19/2015 - 02:31

Pottery Barn inspired headboard was created by using a modified version of the Reclaimed Wood headboard. I turned the planks vertical and cut them 32" long. I added a piece of rope ceiling trim. For the finish, I spray painted the whole piece black. After it was dry, I dry brushed cream paint on top. I finished it off with polyurethane.

Estimated Cost
Around $50. I used wood from the 70% off rack at Home Depot.
Estimated Time Investment
Afternoon Project (3-6 Hours)
Finish Used
Barn wood faux finish. Rustoleum black spray paint, cream latex paint, spray polyurethane.
Recommended Skill Level
Beginner

Comments

RenoRustic

Tue, 05/19/2015 - 09:04

I was thinking of running planks vertically for the Reclaimed Headboard too but ended up doing a different headboard all together at the last minute. I really like how yours turned out. Great job on the cost too. I don't think I've ever seen a 70% off rack at Home Depot. Now I want to run up there real quick to find it!

Abentley10

Fri, 05/22/2015 - 22:23

Thank you. Home Depot usually has a cart in the lumber aisles with stacks of wood with minor imperfections. We have scored big when they included the specialty wood.

Coffee Bar

My husband building this using Ana White plans.  I just love getting to put a bunch of different items almost as a display.  I love this coffee bar  and it is now almost the focal point in our dining room.  I just love the presence it has in this room.

Built from Plan(s)
Estimated Cost
$200.00
Estimated Time Investment
Weekend Project (10-20 Hours)
Recommended Skill Level
Intermediate

Comments

Queen Farmhouse Storage Bed

Submitted by foxy024 on Wed, 11/24/2021 - 01:40

First time building anything like this! The drawers were a challenge getting them square but they work!

Comments

Kids Adirondack chairs

Submitted by redhead_61 on Fri, 04/08/2011 - 13:39

This was admittedly a little harder than I thought.  The first one turned out short of perfection trying to get things looking great.  The second one was better using a level and being more careful.  However, the fact that my nail gun totally went out halfway through made the project a long one.  But my kids LOVE them and they look so cute and luxurious out in my grass.  I love it. 

Built from Plan(s)
Estimated Cost
$10
Estimated Time Investment
Afternoon Project (3-6 Hours)
Finish Used
off white paint and poly
Recommended Skill Level
Beginner

King storage bed

Submitted by Ken Kelly on Sat, 06/15/2013 - 22:43

This King size storage bed has 6 large pullout drawers. It's made by the plans we got from Ana's queen size and Twenty five to life's plans we found on this site(THANK YOU). Just like they say in their plans I'm not sure how much I actually spent because I made some mistakes and had to rebuild my bottom piece. But I loved putting this together, and it's worth every penny and beyond. The compliments from visitors and the swollen chest pride I get when I hear my wife say, "My husband built this for us." Can't put a price on that.

Estimated Cost
Around 200-250
Estimated Time Investment
Week Long Project (20 Hours or More)
Finish Used
Min-wax stain and polyurethane.
Recommended Skill Level
Intermediate

Turned leg table made in India

I loved working on this project and my sincerest thanks to Ana and Elisha for this design. The picture is missing one drawer handle, because, erm, I lost it. I didn't want to wait to find it before posing this brag :).

Built from Plan(s)
Recommended Skill Level
Intermediate

Comments

Doll cradle

Submitted by JBachelor on Sun, 12/17/2017 - 20:14

My husband and I used your plans to make this cradle... He built it, and I painted it.  I’m so excited to give it to our granddaughter for Christmas!!

Estimated Cost
We used wood and paint we already had, so it was basically free.
Estimated Time Investment
Weekend Project (10-20 Hours)
Recommended Skill Level
Beginner

Comments

JBachelor

Sun, 12/17/2017 - 20:52

I put that it took 10-20 hours... that was mostly the painting and drying time between each coat, and doing the A for her name.

Fire Truck Bed

I started this project several weeks ago, and I am very happy with the outcome.  Please see my Blog since there is so much information.  www.atouchofarkansas.com


Estimated Cost
$500
Estimated Time Investment
Week Long Project (20 Hours or More)
Finish Used
I used red & white paint & primer in one.
Recommended Skill Level
Intermediate

Mid Century Modern Changing Table

Submitted by Mizthng67 on Tue, 06/18/2013 - 08:54

I had been looking everywhere for an antique Mid Century Modern buffet table to use as a changing table for my daughter but found that these vintage pieces ran about $1200 to $3000 and still needed refinishing. That was out of my price range so I came here and found plans for a console table that had the look I was going for.

The plan I found was too short in length and height so I reworked them a little to fit my needs. I just added a second cabinet in the same dimensions as the first onto the other end of the drawers to increase the length and bought 12" legs instead of 6" ones to increase the height. I used the same hardware that was recommended in the original plans but added a magnetic door stopper to make the cabinet doors flush with the frame when closed. I also added dowel rods in the cabinets because my daughter doesn't have a closet and I needed a place to hang her clothes.

It is great to have 2 cabinets because the left side holds clothes that are too big for her and the right holds all of the clothes she wears now. The drawers are nice and deep so I can put all her changing stuff like diapers and lotion in the top and fit all her socks, diaper covers, and pajamas in the other drawers.

I will say that I used 1x6's to make the drawers first but found that I am really bad at picking straight boards as there were a lot of gaps between the sides and the bottom of the drawer. I went back and used scrap pieces of 3/4" plywood for the drawer sides and they came out much better with no gaps, plus, the exposed top of the drawer sides look better.

This was a fairly fast project. I put it as a weekend project due to the down time between staining and poly coats. It was my first time working with edge banding and I loved it. It was super easy and kind of relaxing! Over-all, this project was easy and fun! This table meets all of my needs AND it looks great! Thanks Ana for the plans and thanks Brooke for the inspiration and tips!

Estimated Cost
$200
Estimated Time Investment
Weekend Project (10-20 Hours)
Finish Used
1 coat of Rustoleum Ultimate Wood Stain in Kona followed by 3 coats of matte poly.
Recommended Skill Level
Beginner

Comments

dyank021

Tue, 09/23/2014 - 11:05

I am so impressed. Where did you get the beautiful hardware and gold rimmed midcentury feet?

Small Dresser - Barn Wood Drawer Face

Submitted by CustomPulp on Wed, 05/27/2015 - 06:25

My son needed a dresser that would fit a small space (no more than 40 inches wide). I modified the Cabin Collection plans to fit the small space. Looking at the plan, I wanted to brighten up the wood and opted not to stain. Instead I purchased an airless sprayer and was very pleased with the finish. For the drawer faces, I found old barn wood. The barn wood was a little tricky because some of the boards were warped. I brushed the wood with a stiff nylon brush to bring out the deep grain texture of the wood. Finally, purchased bronze finished drawer handles. Very pleased with the outcome. Thanks for the plans. Can't wait to start my next project.

Estimated Cost
Lumber $90.00. Barn wood drawer fronts were free (driving around in the country looking for barns that have collapsed. Farmer agreed to give me enough lumber for 3 dressers). Promised I would mention his name in the post. Thanks, Jerry Parker!!!
Estimated Time Investment
Weekend Project (10-20 Hours)
Finish Used
Valspar interior - Dove White
Minwax Clear Polyurethane - Drawers
Drawer Fronts were not finished
Recommended Skill Level
Intermediate

Christmas Tree Wall Shelf

Submitted by PhD_Phil on Wed, 12/20/2017 - 10:44

Christmas Tree Wall Shelf

Stockings hung using cabinet/drawer pull knobs that I found on Amazon

Built from Plan(s)
Estimated Cost
<$20
Estimated Time Investment
Day Project (6-9 Hours)
Recommended Skill Level
Beginner

Faux Fireplace

Submitted by bobgaivin on Thu, 12/16/2021 - 07:41

This is a modified version of Mimi's fireplace, adjusted to fit an area only 24" wide.
Fireplace is 21" wide at the mantle.
The Yule log was made from a supermarket log by cutting off the face and cutting down the rest of the log to make the planter.

Comments

Rustic X Coffee Table, End Table and Console

Submitted by jbayer80 on Thu, 06/20/2013 - 07:07

This was a blast to build. This was all a gift for my wife since the traditional 5th anniversary gift is wood.

The coffee table and console are both awesome! The only thing I would change/modify is the end table, because its kinda big and doesn't really look its part of the set other than the "X". I would maybe take about 2 or 3 inches off all sides or maybe 3 off the sides so its not such a box.

Estimated Cost
$500
Estimated Time Investment
Week Long Project (20 Hours or More)
Finish Used
Kona on top and shelf (s) with 4 coats of polyurethane. Currently there is nothing on all other parts because I wasn't sure what I was going to do. I think I'm just going to put a few coats of poly on the "naked" parts and call it a day. I thought about painting the other pieces but that would hide the beautiful grain in the Douglas Fir. I don't like the idea of the entire thing being Kona because it looks too dark on the others I've seen on here (for my house only), then I thought about a very light stain but think I settled on it being naked with the poly. I would honestly love to hear what you guys think as I have not touched it yet.

Actually I was thinking it would be nice for Anna to have a section with a "poll" for someone like me who is kinda stuck on a finish to post a picture and have other vote on a few options....thoughts??? Anna??
Recommended Skill Level
Beginner

Comments

Val Manchuk

Thu, 06/20/2013 - 07:31

I'll start one! Go for the poly. You're absolutely right, it will bring up the beautiful grain, and show off the "X" accents. Nice work, by the way!

Val Manchuk

Thu, 06/20/2013 - 07:32

I'll start one! Go for the poly. You're absolutely right, it will bring up the beautiful grain, and show off the "X" accents. Nice work, by the way!

spiceylg

Thu, 06/20/2013 - 08:39

Beautiful builds! Wow, they look wonderful. What an amazing gift! From the pics, the end table looks fine, too, as the furniture isn't a small scale. I love the two-tone so I say go for just the poly!

WorkShopWendy

Thu, 06/20/2013 - 12:08

I think you did an amazing job :) love the contrast of the two tones. Using poly for the rest would be beautiful. I cant wait to do this project myself.

JoanneS

Thu, 06/20/2013 - 15:47

What a wonderful gift! These tables are beautiful, great job on this build! I love the two-tone - One more vote for the poly! :)

jbayer80

Fri, 06/21/2013 - 13:04

I'm going to go with only the Poly over the bare wood. Thanks for the comments and advise! It will be a few weeks due to work and travel but I'll send updated pics once its done.

Jbird

Sat, 02/24/2018 - 21:18

I like the naked/poly look too. The other option I think would look good would be painting it white. The contrast between the white frame and darker kona top and shelf would be cool. 

Farm House Table

Submitted by tedwarm on Fri, 05/29/2015 - 05:50

I used local Colorado beetle killed pine. I based the table on Anna's Farm House Table plans. I used the bread ends to create pull outs for 11 inch extensions on each end.

Estimated Cost
$350, not counting the planer that burned out during the milling of the wood.
Estimated Time Investment
Week Long Project (20 Hours or More)
Finish Used
seven layers satin wipe on poly, two layers finish wax using steel wool
Recommended Skill Level
Intermediate

Last minute Christmases gift. Bunny hutch.

Submitted by jlsomers on Sat, 12/23/2017 - 14:27

Thank you Ana for the plans. Our daughters dolls needed some pets and this project was the perfect home for her New bunnies!  I can't wait for her to open this gift Christmas morning. 

Estimated Cost
Used all scrap wood
Estimated Time Investment
Afternoon Project (3-6 Hours)
Recommended Skill Level
Starter Project

Farmhouse Doll Bed

Submitted by jkjackson on Thu, 12/23/2021 - 19:39

Created from scraps using Ana’s plans for the bed and the mattress.

Comments

jkjackson

Fri, 12/24/2021 - 14:33

Thanks for the great plans and making the mattress so simple (for those of us who feel like just threading a sewing machine is like playing the game Mouse Trap while under the influence! 😄)

Side Table with Pallet Top

I wanted to make a custom sized side table to fit just right between our two recliners. And I really wanted to make use of some pallet scraps. So I built this frame the same as Ana's plan (adjusting for my size), and then came up with a layout for the top to make use of my small 15 inch pieces of pallet wood.

Built from Plan(s)
Estimated Time Investment
Afternoon Project (3-6 Hours)
Finish Used
I screwed the top on, filled the holes, sanded like a mad woman, and stained with a gel stain. I then applied two coats of shellac. It accidentally purchased the shellac but I really like the way that it turned out and it has held up quite well so far!
Recommended Skill Level
Beginner

Cedar Table/Stool

Made with western red cedar from Lowes. So pretty!

Built from Plan(s)
Estimated Time Investment
Afternoon Project (3-6 Hours)
Finish Used
none
Recommended Skill Level
Starter Project

Comments

KennyBoy

Wed, 08/21/2019 - 09:00

Did you use any kind of finish on the cedar? I’m making one as an indoor end table. 

What grit sand paper did you use? 

Looks great by the way. Excellent job!