Community Brag Posts

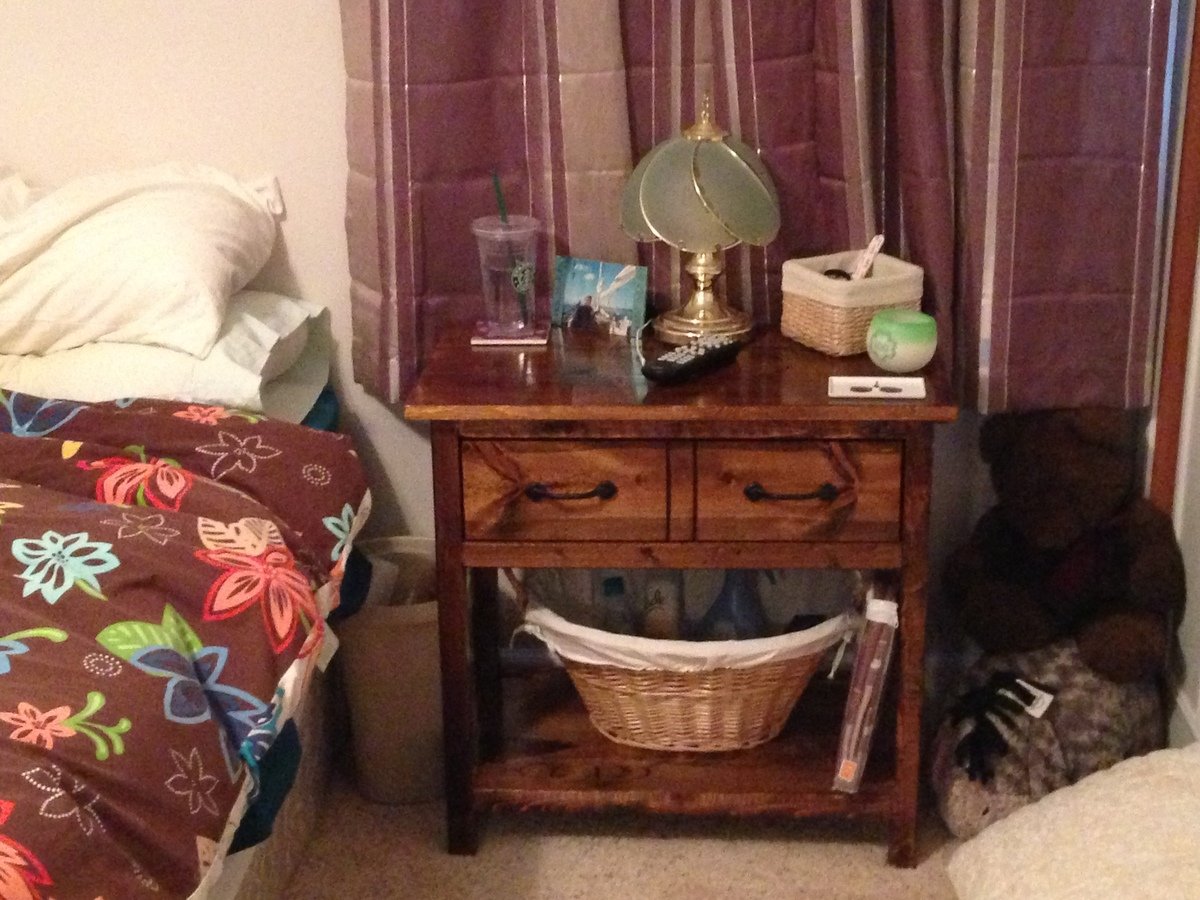
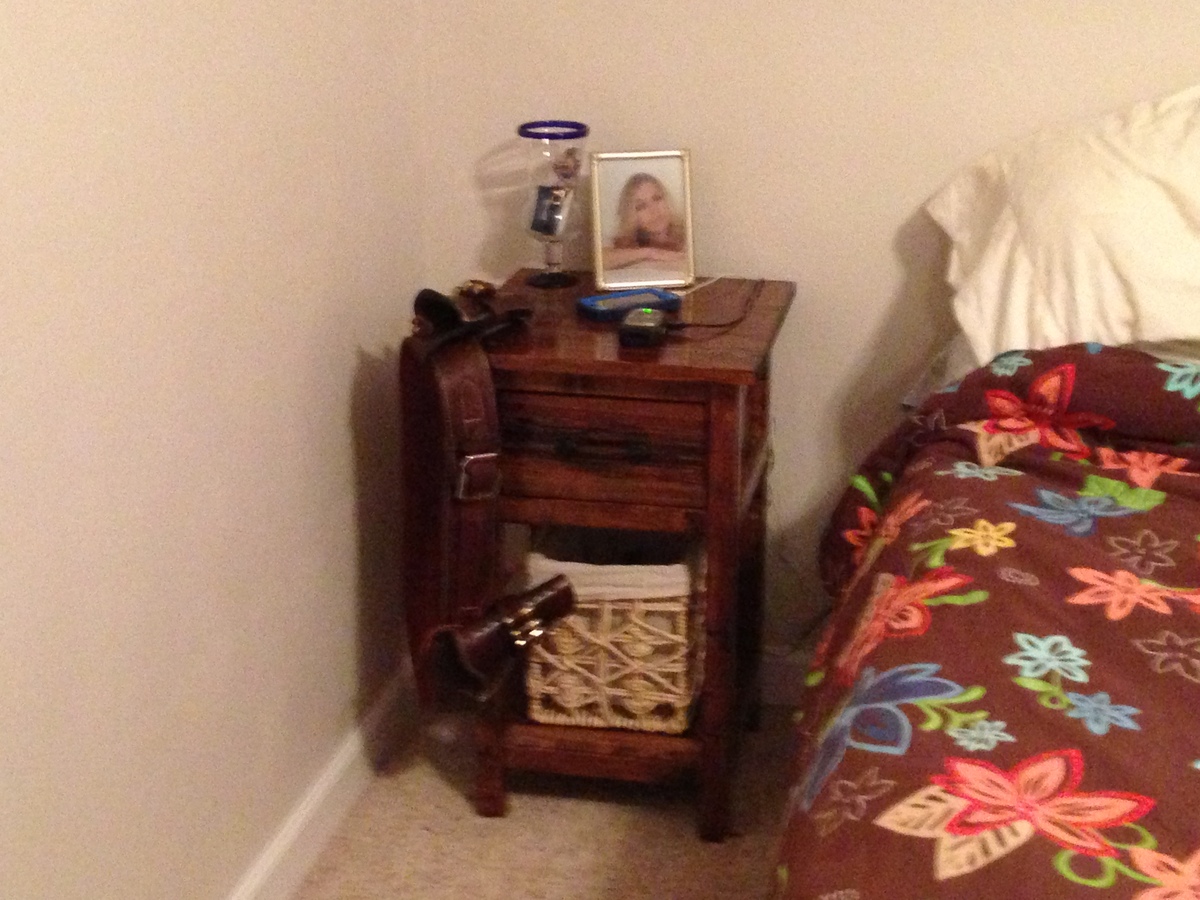
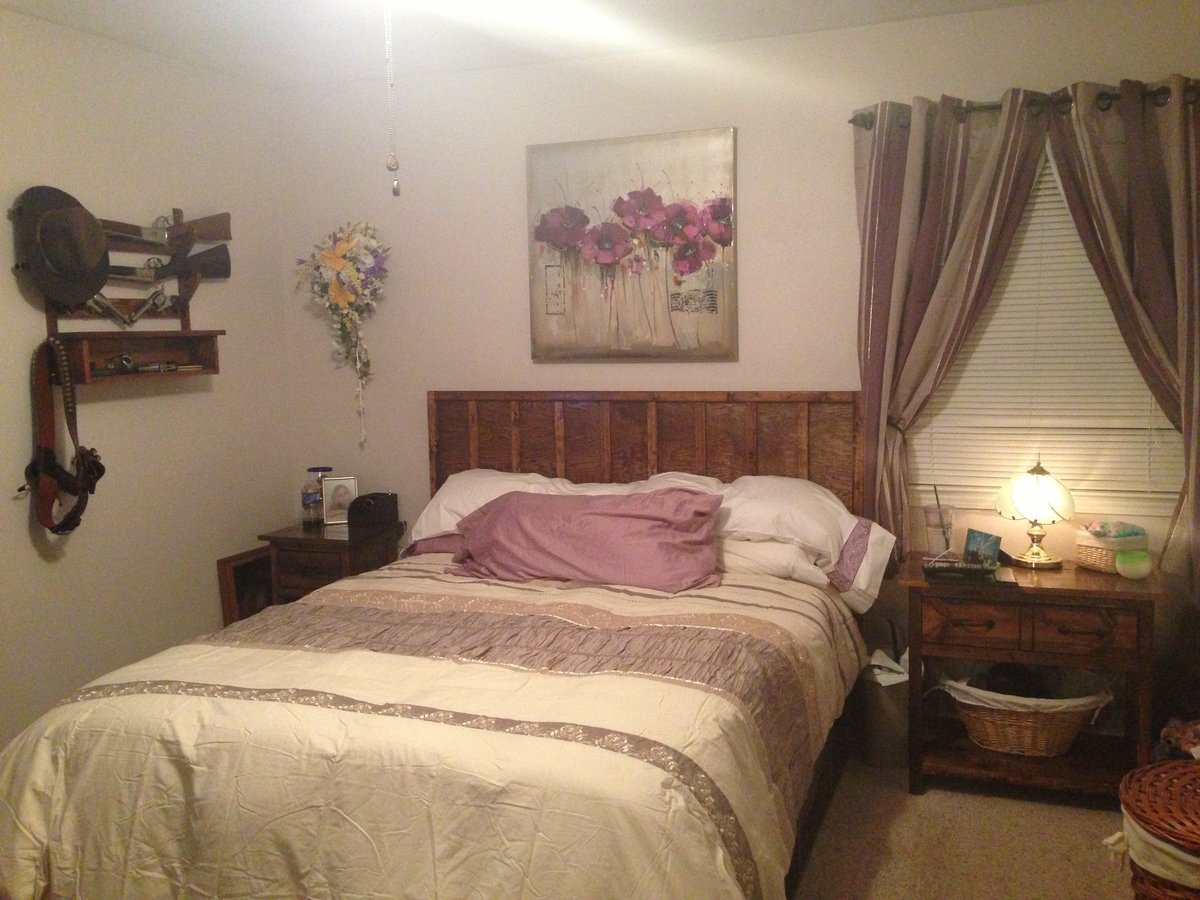
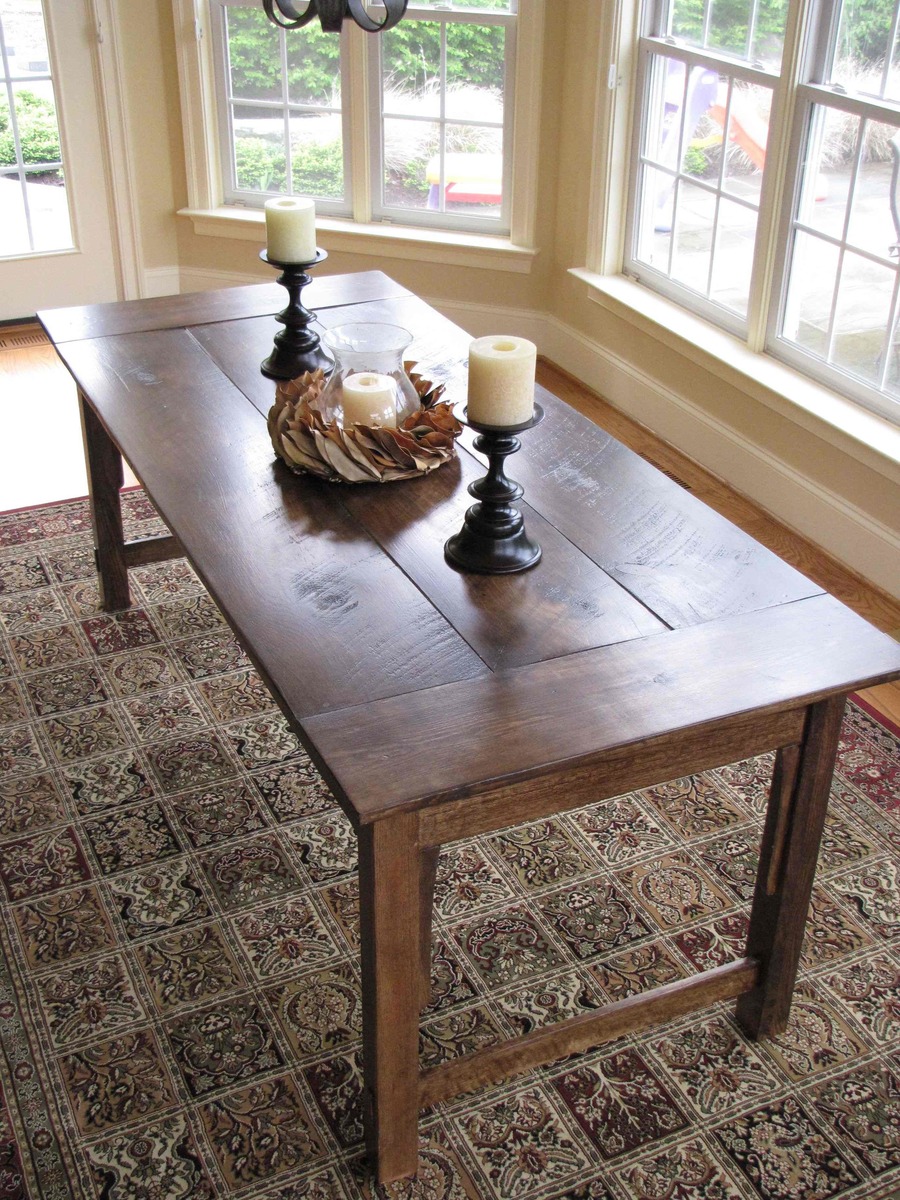
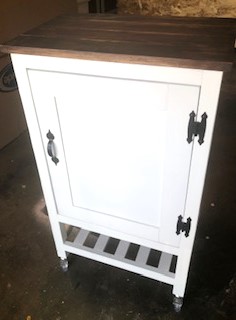
My First Project - Farmhouse Bedroom

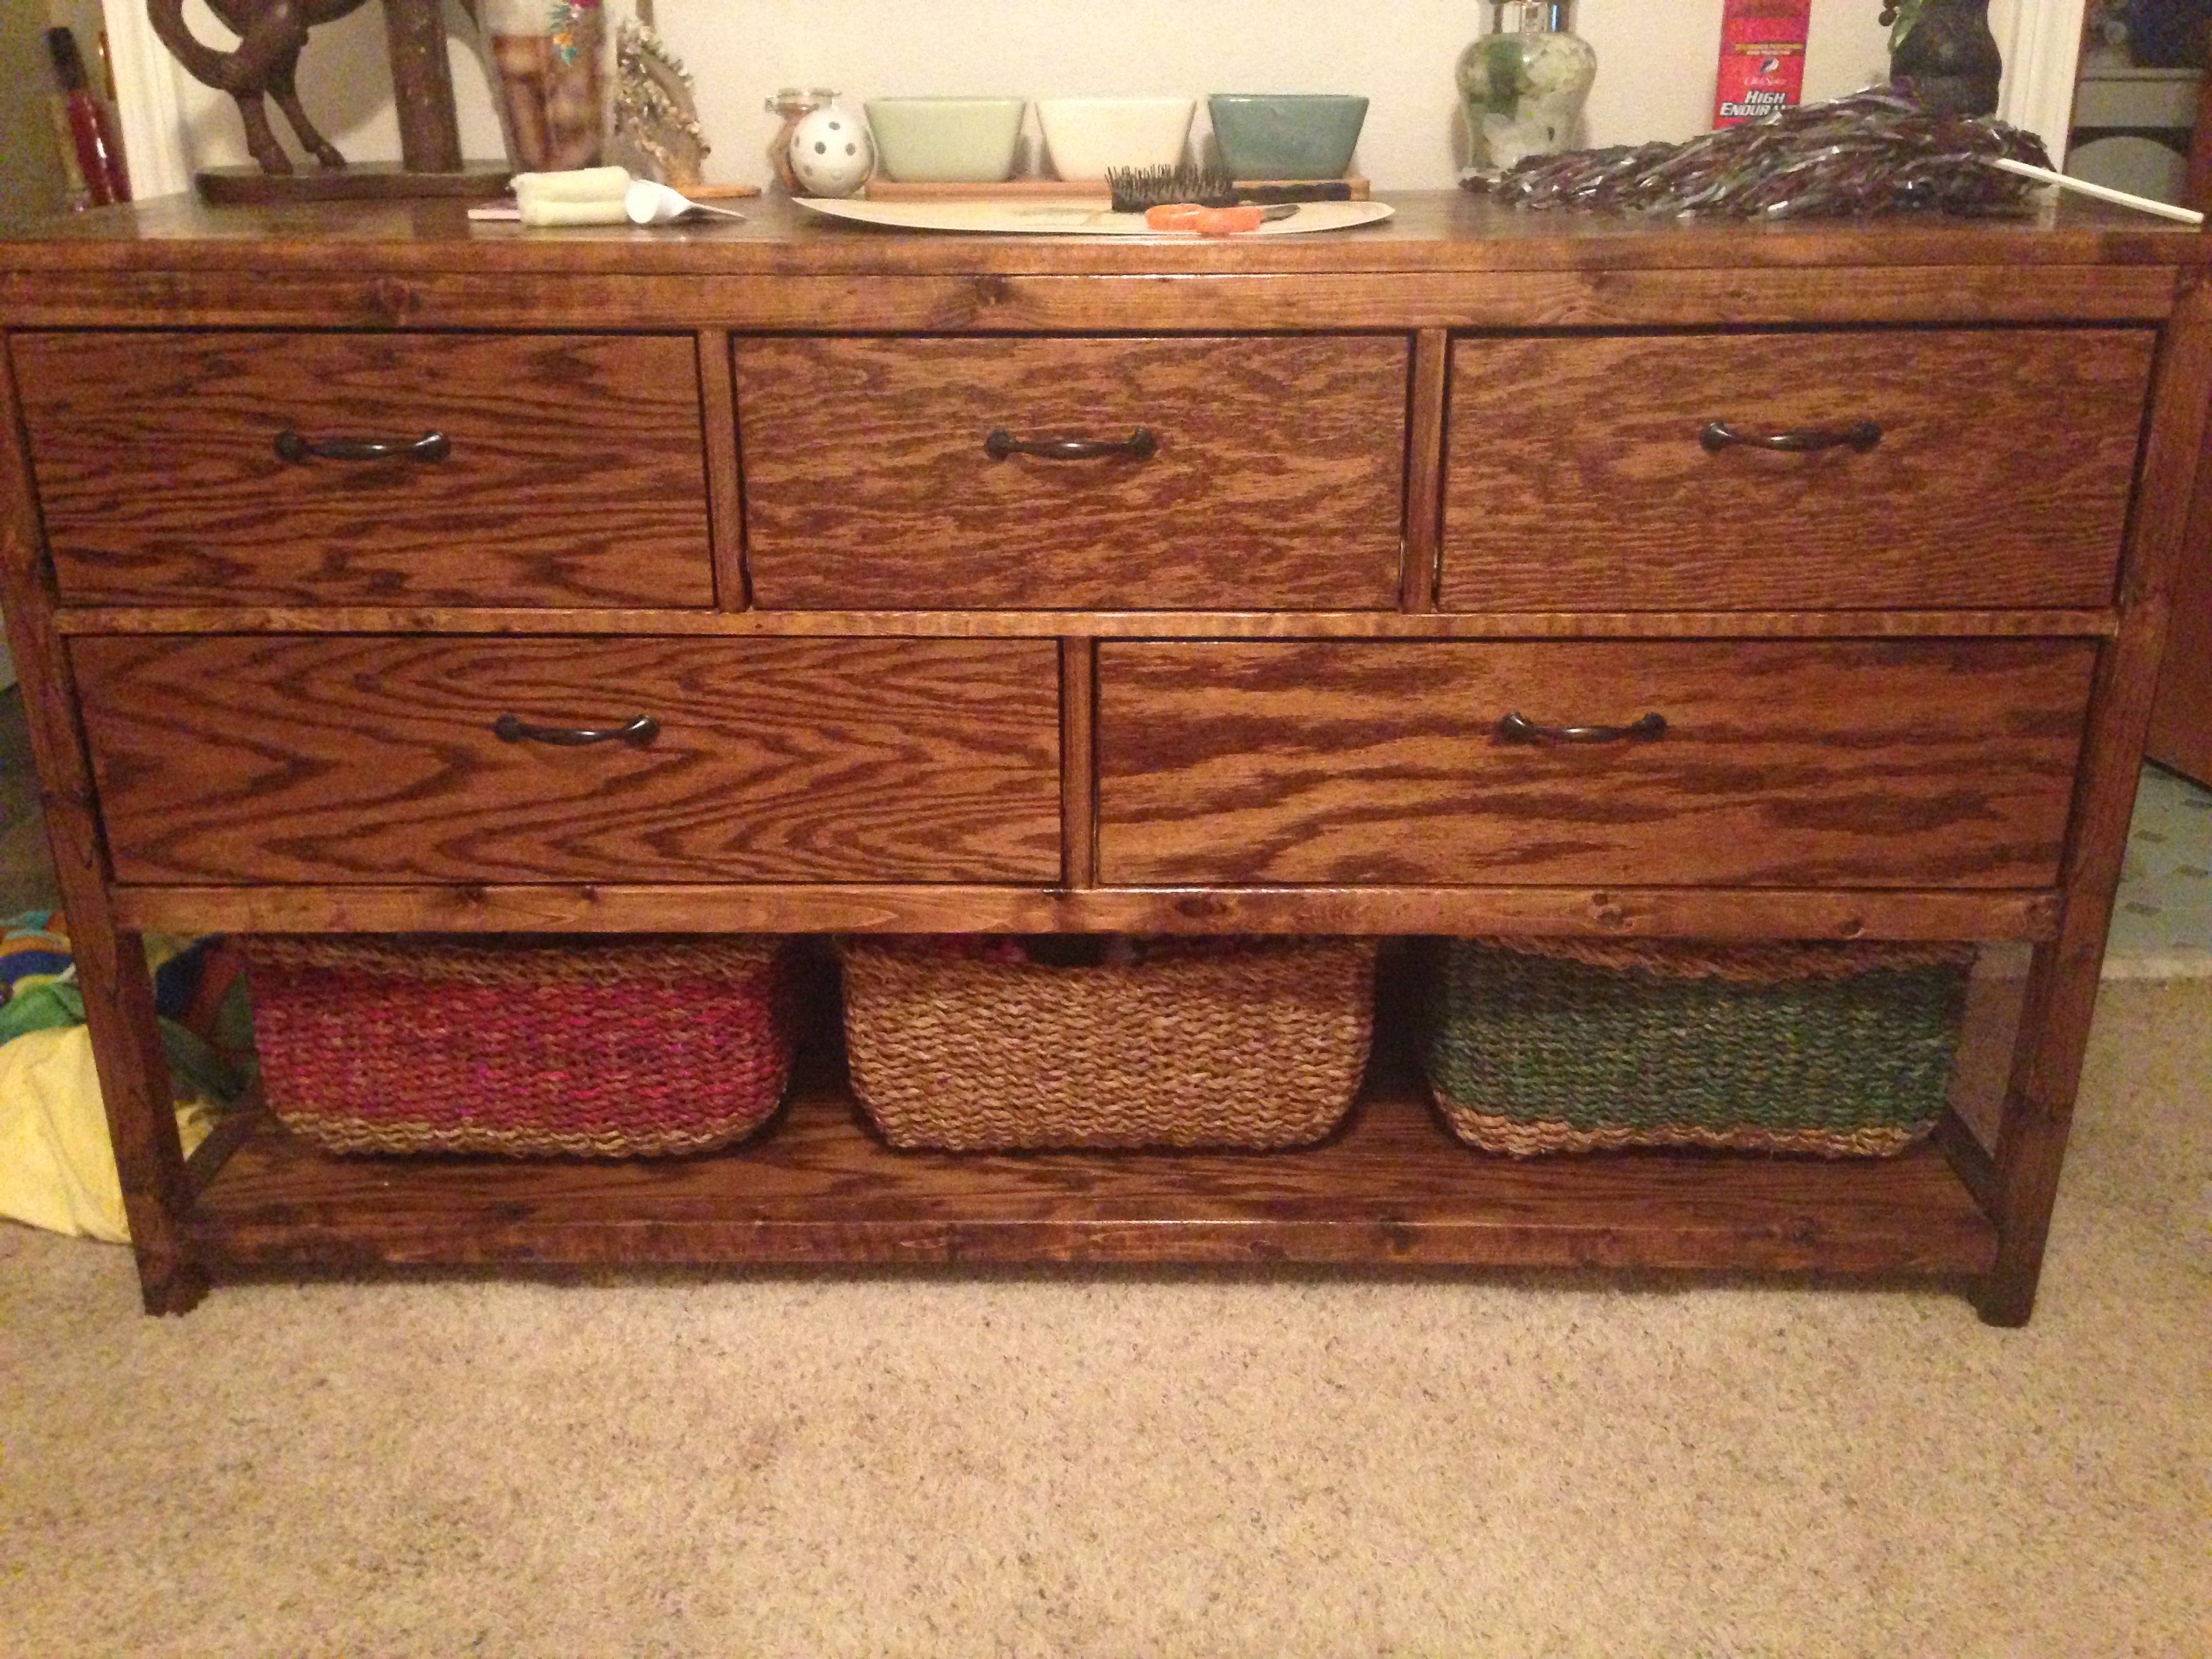
This was my first big project...I wanted to get rid of the store-bought bedroom set that overwhelmed our small room, but I still needed to keep all of the storage space it provided. I started small with the Farmhouse Nightstand, then moved to a double size nightstand. I couldn't stop once I got rolling! The most challenging was the dresser, but I have no complaints! It was a wonderful challenge. Lastly, I made a queen platform storage bed - it has open cubbies underneath with baskets for drawers. I couldn't be happier or prouder of how this came out, our bedroom looks 10 times bigger! I've always been a do it yourself kind of gal - but I surprised myself with this one!

The tables were quick to build, they can both be done in a day. The dresser was a weekend project as was the bed. The finishing has to be done over several days. I'd say this could be done over a week if you have the time. I did this over 3 weekends and finishing in the evenings after work.

Estimated Time Investment
Week Long Project (20 Hours or More)
Finish Used
I used Minwax stain in "Provincial" for all of these. Final finish was done with 3 coats of glossy polyurethane.
Recommended Skill Level
Intermediate

Comments

JoanneS

Fri, 01/31/2014 - 20:47

Your farmhouse bedroom looks awesome! Looks like you used all your available space beautifully and to its best advantage. And the finish is gorgeous! Great project!

Master Closet - Wraparound

Submitted by Anonymous (not verified) on Fri, 04/29/2016 - 11:41

I thought I'd wait and take these glorious after photos once I was done - but nevermind that idea.  Here are some pictures of progress, start to finish.  I still plan to build some shoe cubbies for the towers so that my wife has a little more shoe-room.

We have a 5th bedroom directly off the master with a double door entrance where the 5th bedroom's closet would have been.  The room had been an office for the previous owner and my wife decided it would be a perfect closet for her.  I followed the plans quite closely for the towers.  I wish I had considered my 8+ foot ceilings and just built the towers taller because 1) storing stuff on top will look messy, and 2) The hanger rods aren't spaced quite well enough for longer clothing.  Because of this, I had to build her another hanger on the other side of the wall, which increased the complexity of the project (corner shelves, more wood, more staining, more finishing, etc).  In the end, I think it turned out great.  I will walk through the process very quickly.

  • Bought premium birch plywood, had them cut it down in the store.  They did a good job.  If I were doing it again, I would buy Aspen or Pine in precut boards, and I estimated it would have cost less than $100 more with a much higher quality and more workability, especially considering I stained instead of painted.
  • Built Towers - used my kreg pocket hole jig a TON on this project.  For boards across the top, I put the pocket holes on top, where they will be out of site.  For bottoms, I was able to use finishing brads to nail down my boards to the frame.
  • Stained wood.  I used an oil stain.  After letting it dry 24hours+, I used finishing wax to turn make the plywood very smooth.  I painted on the wax real heavy and then buffed with an electric polishing wheel.  *tip* no matter what you are thinking, stain your wood before cutting and assembling.  It will save you hours.
  • Built 2x4 bases for the frame of the system.  I used my bases as a template for cutting back the carpet.  I then fastened the bases into the wall studs and sub flooring.
  • Installed towers, played with spacing until it felt right and then fastened them into the walls and into the base.
  • Cut wood down to size for the top and bottom pieces and installed and nailed down.
  • Cut down scraps into strips to support the corner shelves and nailed them into the wall.
  • Cut down scraps into corner shelves.  I used 2 pieces of wood for each shelf and added supports on the underside so that they can bear decent weight.  I should have just done more pocket holes.  It would have been stronger and cleaner.
  • Installed mini crown molding along top border.  Installed 1/4 inch trim on all facing edges (rather than mess with laminating strips). Installed baseboard trip to cover frame and clean up border of frame and carpet.
  • Built drawers using scrap plywood from the project (via the drawer plans on this site).  I didn't mess around, just cut my wood down to the right size and brad nailed the heck out of it.  They are very sturdy.  A thinner bottom and back would have decreased their weight, but I don't see any issues the way they are built.  I opted for the 1/2 inch gap around the border of the drawers.

That is pretty much it.  I think I have about $500-600 in it. Probably 60-70 hours.  If I did it all over again, I could do it better and faster and on the same budget.  As noted in the plans, SQUARE is the most important thing.  I had to fix all the tower shelves once I had them mounted to the wall because they just were not level/square enough.  

Estimated Cost
$500-600
Estimated Time Investment
Week Long Project (20 Hours or More)
Finish Used
Varathane Premium Fast Dry Oil Wood Stain and MinWax Dark Finishing Wax
Recommended Skill Level
Intermediate

Hall tree build

Submitted by Anonymous (not verified) on Thu, 01/23/2020 - 16:34

These plans were awesome! Thank you so much for sharing!! I added a few hooks on top for my keys and found this top board at Lowe's for $10, no I have a place to lay my wallet and phone. I tweaked mine to fit my needs but again, this plan was amazing, that KS for sharing! I look forward to making more of your projects.

Note: I chose this project as a weekend long project because I applied paint and it did take much longer for the paint to dry in this cold weather. The build was approximately 1 day.

Built from Plan(s)
Estimated Cost
$150
Estimated Time Investment
Week Long Project (20 Hours or More)
Finish Used
Paint
Recommended Skill Level
Intermediate

DIY Custom Wood Table

Submitted by Anonymous (not verified) on Mon, 09/18/2023 - 15:11

Modified two building plans into one farmhouse style table. Two of Ana’s benches as well.

Grace LeBlanc

Comments

Rosie's Baby Doll Bed

Submitted by nveelover on Sat, 04/21/2012 - 10:13

Made this based on the Oliva's Doll Crib plans with changes to the shape of the top of the ends (to better match my daughter's crib), taller end pieces (about 2 inches), and a shelf under the drawer. To keep the drawer from falling out, I built the crib as usual, then turned the crib upside down, and screwed two rubber stoppers to the front of the underside of the crib bottom. I then put the drawer in place, placed the bottom shelf, and then screwd it in through the bottom (which is on top right now because the whole thing is upside down). I also put in some spacers so that the drawer doesn't get stuck, squished between the bottom of the crib and the shelf.

Built from Plan(s)
Estimated Time Investment
Day Project (6-9 Hours)
Recommended Skill Level
Beginner

Comments

kad050209 (not verified)

Mon, 09/10/2012 - 15:49

Can you tell me the measurements of wood you used? Piece by piece?

nveelover

Thu, 11/15/2012 - 16:05

I really did just follow the plan that Anna made. The ends, the tallest solid pieces of wood that I added length to, are about 21 inches long. Ana had them at 18 or 19 inches long. Everything else was the same.

Porch Swing for a 1924 FourSquare Home

I was shopping for a porch swing for my 1924 Four Square home and I couldn't find any to my liking...I stumbled across this web site on Shanty2Chic's Blog via Pinterest....and I am thrilled by what I have found!

Attached is a photo of the swing I built. I need to finish sanding, filling in the holes and then paint it. I will post a pic of the hanging on my front porch once the weather breaks.

The only deviation in the plan design is that I made the back 2x4 50' long so I could attach eye bolts to support the back. If you have scrap lumber, it would have cost me hardly anything.

Think spring!!

Estimated Cost
$90
Estimated Time Investment
Afternoon Project (3-6 Hours)
Finish Used
Will use an exterior white paint and poly on it for additional protection from the elements.
Recommended Skill Level
Starter Project

Toy room shelving

Submitted by Ybrown118 on Mon, 05/02/2016 - 15:14

Super easy project. My space is smaller so I modified to 6ft instead of the 8ft used in the plana. I plan to make the white board crates to finish the project. 

Built from Plan(s)
Estimated Cost
$31
Estimated Time Investment
An Hour or Two (0-2 Hours)
Recommended Skill Level
Beginner

Farm House jewelry Cabinet

Submitted by Anonymous (not verified) on Tue, 01/28/2020 - 12:23

The plans were simple to follow. Made some small changes, used some pine wood wall paneling from Lowes. The pine paneling was used on the back and door. Both were inset with a routed step the same thickness as the panels.

Estimated Cost
$50
Estimated Time Investment
Day Project (6-9 Hours)
Finish Used
minwax stain espresso
Recommended Skill Level
Beginner

Table Top Just Add Legs

Submitted by Anonymous (not verified) on Thu, 09/21/2023 - 12:21

I built a simple, yet very classy table using table legs from Bear Hollow Supply. All you need is a table top, which in my case I used a nice looking wood slab. Then you just attach the legs and you're done. It's a very simply process and the final results is a great looking table.

https://bearhollowsupply.com/blogs/news

Farmhouse Table

Since I am in the middle of a divorce, my ex- took my dining room furniture. I decided instead of buying something new, or getting a hand me down, I would build a new table. The wood top was made of 3 wood planks from my sister in laws hardwood flooring leftovers. It was sooo fun to make this. The stain was a mix of Minwax Providence and Ebony 3 to 1 mix appx. I did not add the bottom wood piece, as I did not think it needed it, it is plenty strong without it. I am working on the bench and chairs now. This has been by far my most fulfilling project ever. Enjoy!

Estimated Cost
$100 for stain, trim, poly etc. I had a lot of the wood, not the breadboards
Estimated Time Investment
Weekend Project (10-20 Hours)
Finish Used
2 coat mix of Minwax Providence and Ebony (3 parts to one part)
4 coats Polysealant

Recommended Skill Level
Beginner

Comments

brookifer86

Tue, 04/24/2012 - 09:55

I think you came up with a great solution to your dining room problem. As a victim of the "ex furniture snatch" myself, I also decided to build my own instead of buying. It was quite the confidence boost! Love the table with the wider boards. I also didn't use a stretcher for my Farmhouse Table, and it's held up perfectly for over a year now.

KellyJo1180

Thu, 09/27/2012 - 08:38

I am looking to do the same design with the larger boards in the middle. What size are the boards running vertically on the ends? 1 x 6?

justjack5454

Fri, 12/12/2014 - 13:59

I love the table you built thanksgiving day my table went
awol, so I need to get going on your design. P. S. I'm lipstick, sawdust, n wheelchair.

Compass rose plywood table

Submitted by katieclapp on Fri, 02/07/2014 - 15:07

Compass rose dimensions: 22×22 (90 degree cross) tilt 45 degrees 16×16 (90 degree cross) then connect lines with a ruler, start with the 16" lines connect from outer point to 2" from center of the 22" crossed lines, once that star is complete make lines from point of the 22" lines to 2 1/2" down side of star adjacent to that point (hint: it's much easier to look at a picture of a compass rose while trying to sketch it). Cut sizes should turn out to be: 8- 9"×7"×2 1/2" triangles and 8- 8"×7"×2" triangles (hint: we had best results using a table saw to make all the cuts)...

Estimated Time Investment
Week Long Project (20 Hours or More)
Finish Used
Minwax stains (black cherry (half the star and the frame), golden oak (other half of the star and strips), golden pecan (strips), and American walnut (strips)); minwax water based polyurethane (blueish green can) for the finish (Awesome Finish Because It Can Be Used With Both Oil and water based stains).
Recommended Skill Level
Beginner

Comments

Double loft / desk combo with storage ladder

Submitted by sylvialh on Thu, 04/26/2012 - 05:23

Our den is an awkward spot and we wanted to have a usable double bed as well as desk space for two people, but putting in two desks and a futon made it really cluttered and took up a lot of space, plus we were always having to move one of the desks in order to use the futon as a bed. So we combined all three items!

I changed the dimensions of the loft to accomodate the futon frame (I actually just dropped the futon bed support into the top of the loft) and then I used a long counter I already had as a desktop. The desk is sitting on large shelf brackets that are attached to the uprights of the loft, and then at the front there are shelves to hold up the front part of the desk.

It's ideal because most of the time we are not both working and so we can take advantage of the other person's space, but if we are both there there is enough room as well.

The plan I used below is awesome because everything is really firm but you can still take apart the key parts to get it out of the room. So I built it outside but put it together in the room itself.

We call it the sky bed and my friends love it. I also ditched the ladder and built the shelving unit you see that is both a ladder and shelves, and takes advantage of the shape of the room.

Built from Plan(s)
Estimated Time Investment
Day Project (6-9 Hours)
Finish Used
none.
Recommended Skill Level
Intermediate

Jewelry Cabinet

Building this Jewelry Cabinet was really fun and easier than I expected. I made one to give away as a birthday gift, could not resist making another to keep. I don't really have that much jewelry, I just think its gorgeous! I loved the look of the original posted project, that I wanted to duplicate it just as it was.

Built from Plan(s)
Estimated Cost
$35 for wood, hardware, and hardware cloth
Estimated Time Investment
Afternoon Project (3-6 Hours)
Finish Used
Rustoleum Weathered Gray, then sanded for weathered look
Recommended Skill Level
Starter Project

Slanted x coffee table

Submitted by ephr0n on Sun, 05/08/2016 - 23:01

Weekend Project :)

Estimated Cost
$75
Estimated Time Investment
Day Project (6-9 Hours)
Recommended Skill Level
Beginner

Mudroom bench

Submitted by Anonymous (not verified) on Mon, 02/10/2020 - 05:00

We built upon the mudroom bench plans. The length dimensions had to be modified to fit our room, but for the most part we stuck to the directions. We switched to metric for this project and it was the best decision. Make sure you have a Kreg Jig.

Built from Plan(s)
Estimated Cost
350
Estimated Time Investment
Week Long Project (20 Hours or More)
Recommended Skill Level
Intermediate
Seasonal And Holiday

Standing Desk

Submitted by Anonymous (not verified) on Mon, 10/02/2023 - 10:53

I built this table be ie for a medical student w hi o wanted a standing desk. It’s a basic butcher block design ( my own design) and made from pine 2x10’s. I’m a self taught novice woodworker.

Scott F Hiorns ( Buggies Birdhouses and Other Crafts)

Finally I Finished My Bench

Submitted by Jake on Sat, 04/28/2012 - 14:18

It is a great storage bench. It took me a while to finish it because I made the decision to make the storage area deeper to 4.5 inches without thinking about how that would change the side panels. So I had some adjusting to do. I took my medicine and moved on. I was going to use the bench in the garage to store tools but it came out so well that now I may find a place in the house. Great bench and very sturdy. I was going to paint it entirely black but the idea of the flip top being a different color hit me and I kinda like it. If I do it over I would go with black hinges, which I can still do.

Estimated Cost
$30
Estimated Time Investment
Weekend Project (10-20 Hours)
Finish Used
Valspar flat black and satin red paint..
Recommended Skill Level
Beginner

Barn beam ledge with hidden storage

I modified this plan to allow for interior storage space within the shelving. Rather than nailing the front board on, I attached two lower hinges so that it functions as a drop-down panel. The front panel then secures to the top board with a centrally located screw-in hook and eye (not visible if the top of your ledge is above eye-level).

Built from Plan(s)
Estimated Cost
$15
Estimated Time Investment
Afternoon Project (3-6 Hours)
Finish Used
Finish in photos created using: http://ana-white.com/2013/08/rustic-yet-refined-wood-finish

...Later discovered a similar but less toxic approach using green tea followed by steel wool dissolved in vinegar.
Recommended Skill Level
Starter Project

Bar door console

Submitted by Anonymous (not verified) on Sun, 02/16/2020 - 21:18

Hand made barn door console with drawers

Built from Plan(s)
Estimated Cost
160
Estimated Time Investment
Weekend Project (10-20 Hours)
Finish Used
Stain and varnish
Recommended Skill Level
Intermediate
Back