Community Brag Posts

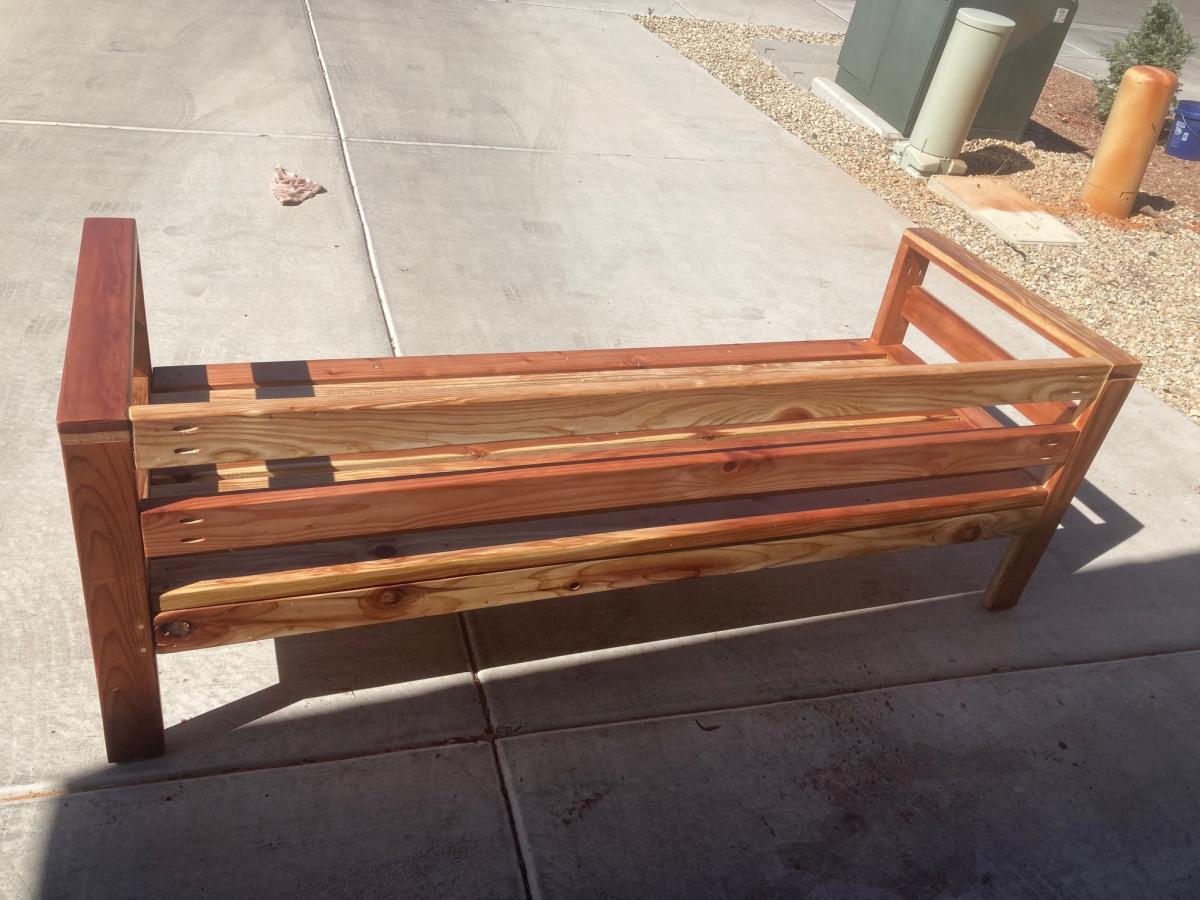
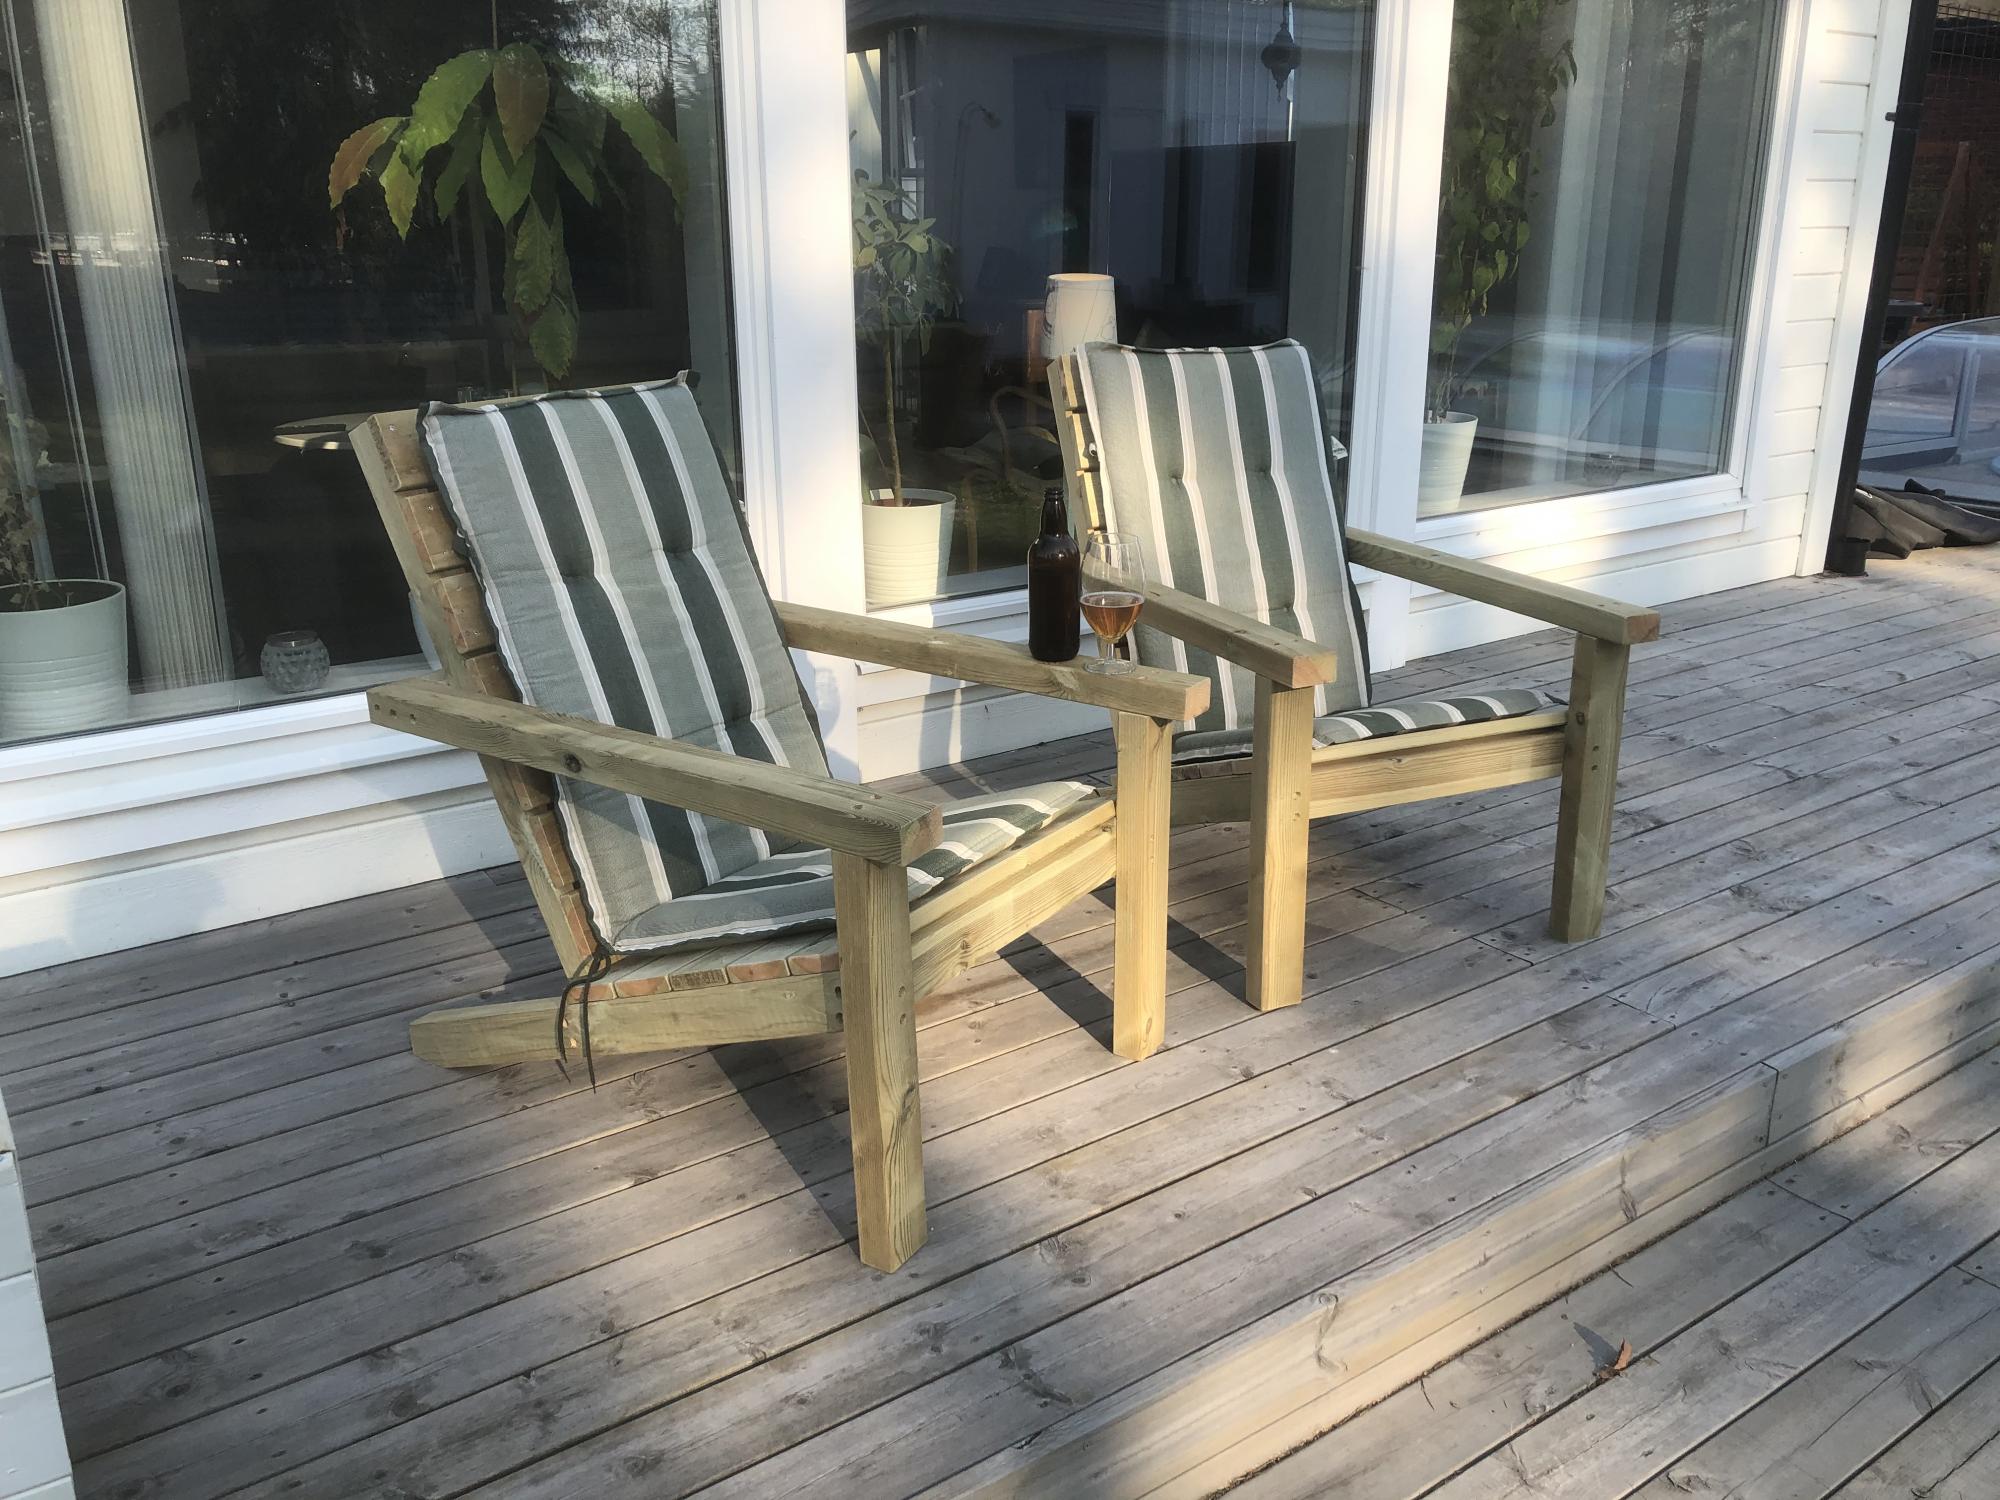
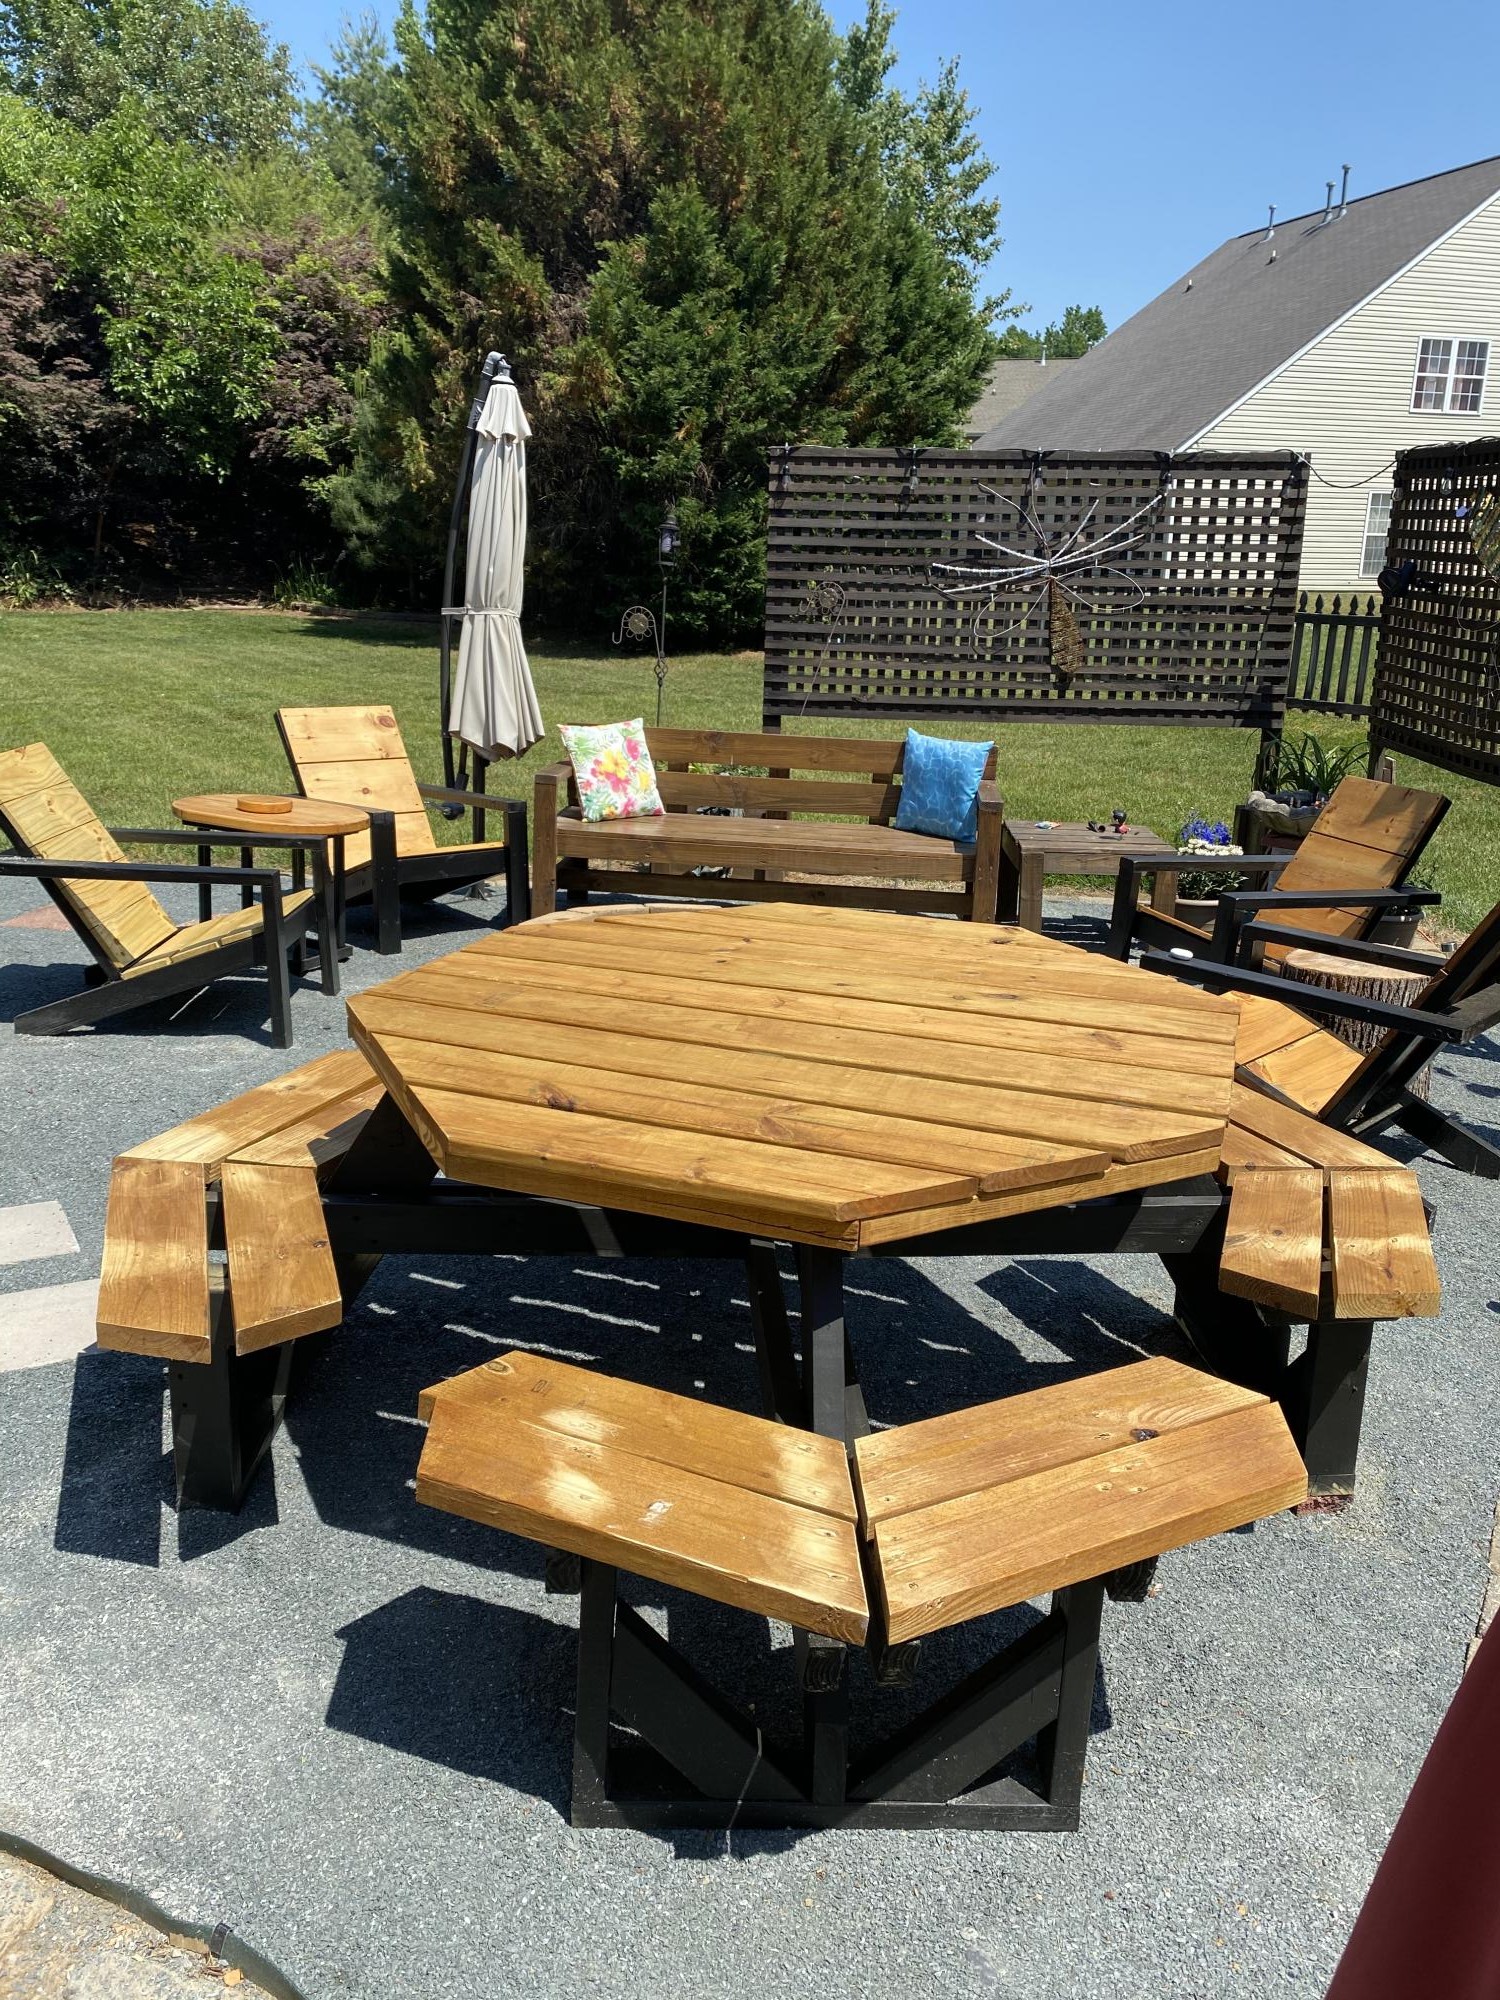
Redwood 2x4 outdoor sofa (Cushions on order, due Monday)

Submitted by Anonymous (not verified) on Wed, 04/21/2021 - 15:31

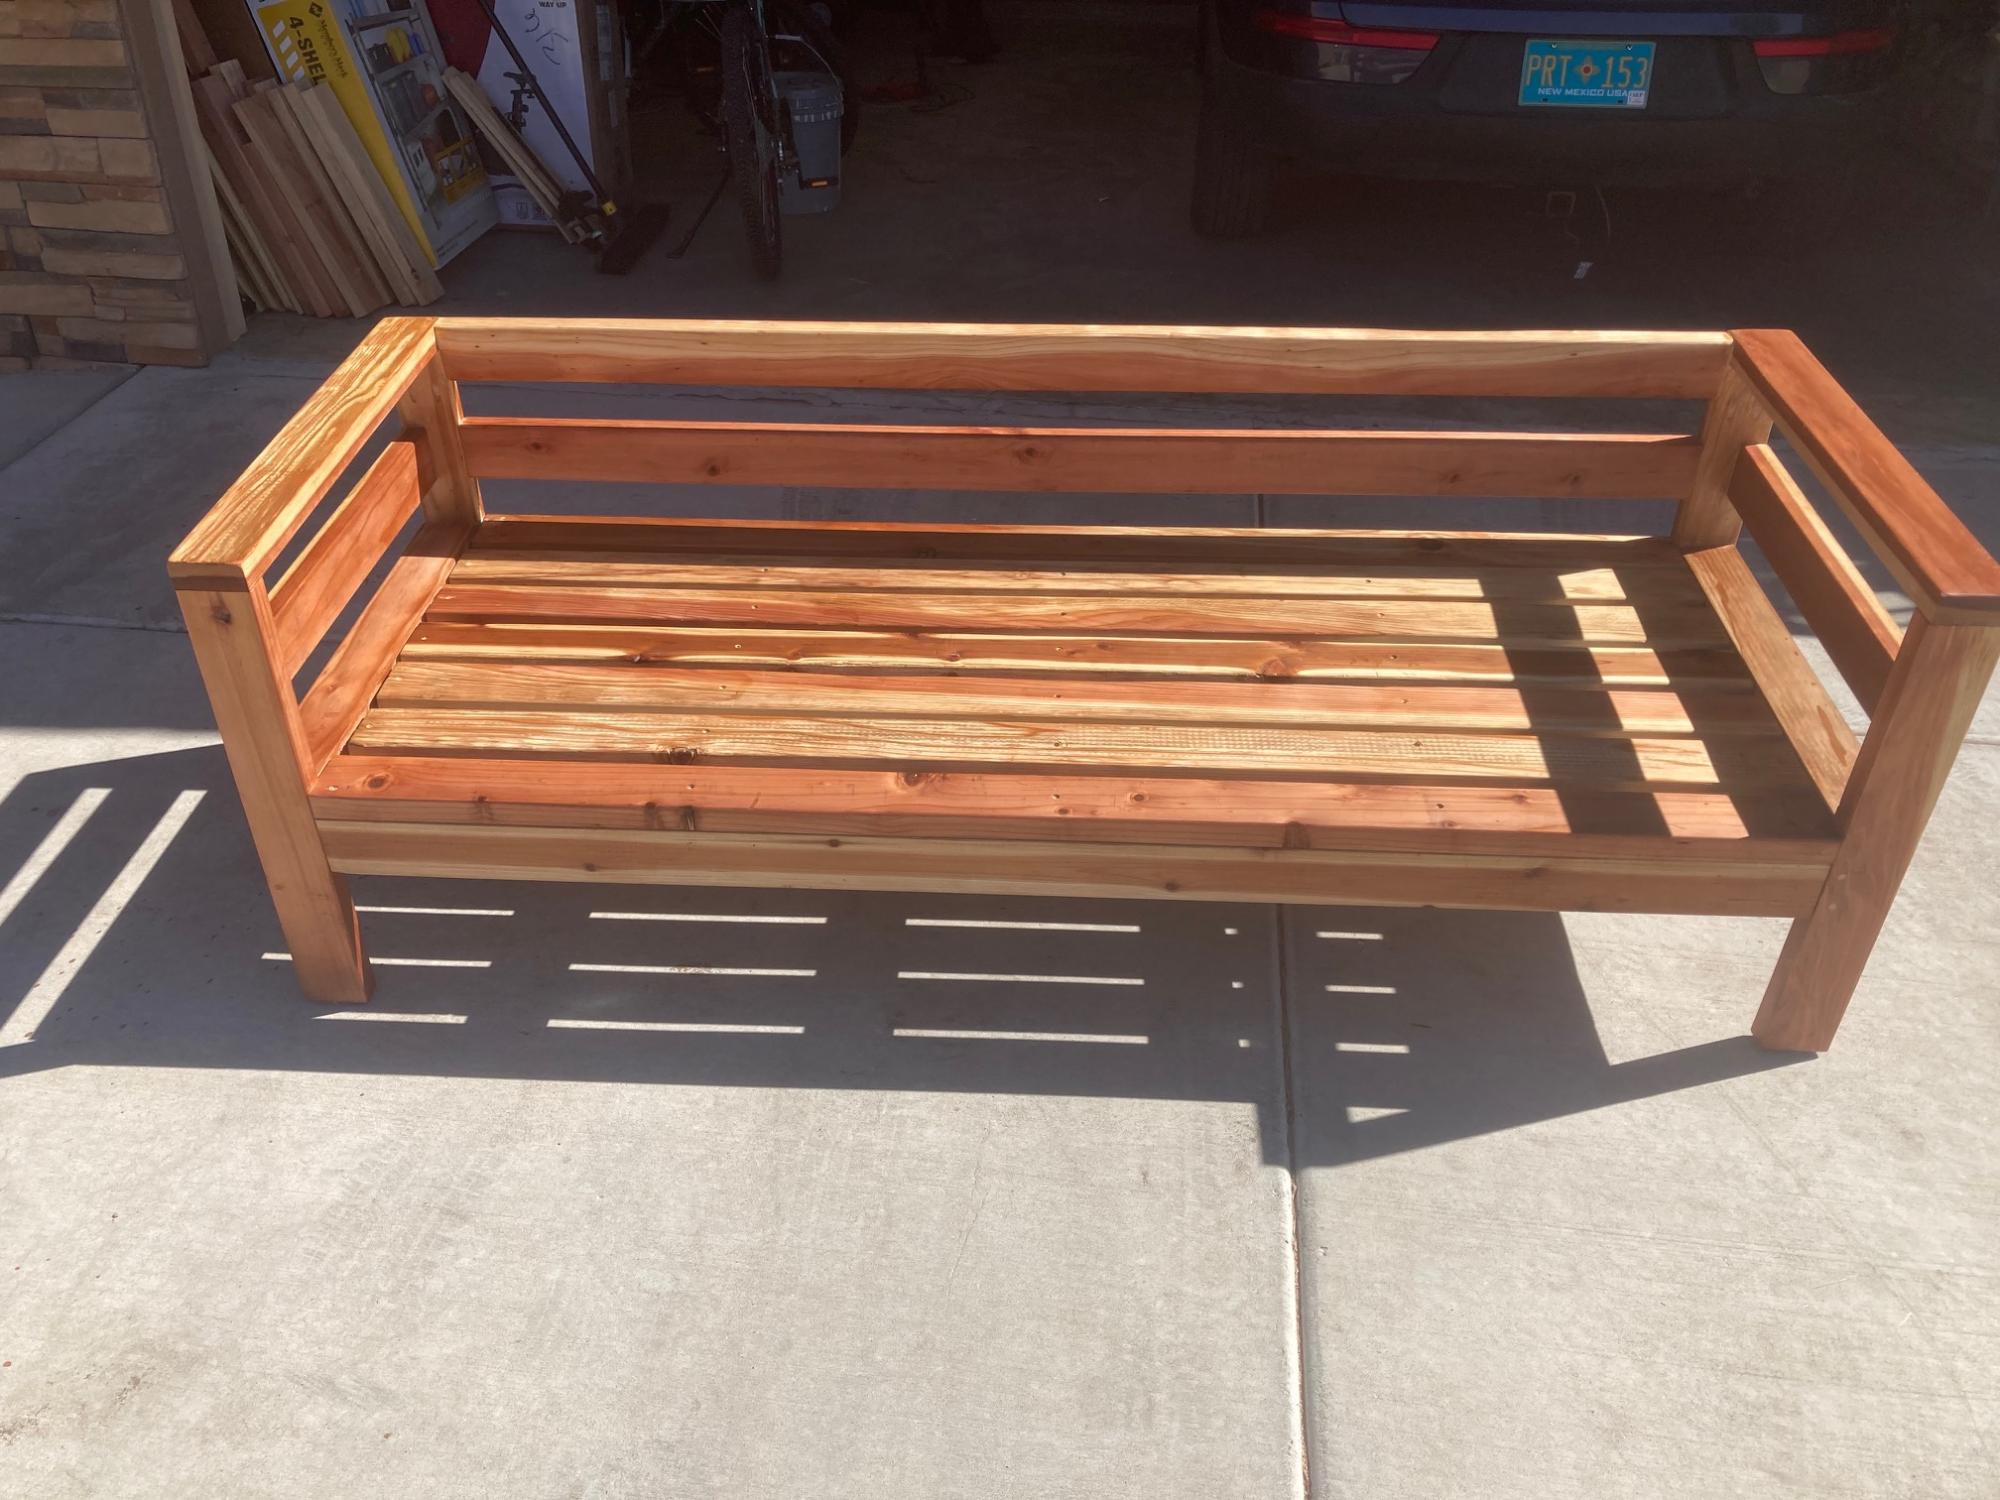
I love Ana White's 2x4 sofa project. I chose a couple of upgrades: bought redwood 2x4's and a pocket-hole jig to reduce visibility of screw holes and, of course, installed the additional side and back rails. I finished with Tung oil and then read the directions on the can afterwards: 'This product is intended for interior projects only!' Oh well.

We ordered these cushions: https://www.walmart.com/ip/Arden-Selections-Plush-BlowFill-Sapphire-Blu…
which were rather expensive but I read too many negative reviews from customers who bought and used cheap cushions.

This was the perfect project for a retiree with too much time on his hands and some basic building skills.

Thank you for this!

Michael Smith

Estimated Cost
$500 with cushions?
Estimated Time Investment
Weekend Project (10-20 Hours)
Finish Used
Tung oil...but I won't make that mistake again.
Recommended Skill Level
Beginner

Comments

Camp Loft Bed with side stairs and landing

Submitted by dmel on Wed, 03/27/2013 - 09:48

I used Ana's camp loft bed plans. Built it directly in the room since I had the kiddo's with me and hubby working late couldn't help carry pieces upstairs. Built this "big girl" bed for my three year old and she loves it. Hubby and Bro-in Law got the mattress and it was a little high for the plans, so I have since added a foldable side rail for extra security. Plans worked great as is, no changes made.

Estimated Cost
70
Estimated Time Investment
Weekend Project (10-20 Hours)
Finish Used
Paint (light pink)
Recommended Skill Level
Beginner

Kid's kit doll bed

Submitted by capt jack on Sat, 02/07/2015 - 18:11

My granddaughters requested beds for their multiple American Girl dolls.  I found this project and it looked like it would be fun to make.  Well, the girls have friends so the order soon totalled 19 beds.  After making a prototype I realized this would be time consuming and the results erratic if I didn't fashion some jigs for constructing the beds.  The jigs added speed and precision to the project.  Also, after building a few and puttying the screw countersinks, I tried connecting side rails to the head and foot boards using pocket screws.  This works great..Pictures of the jigs are attached.

Estimated Cost
$15
Estimated Time Investment
Afternoon Project (3-6 Hours)
Finish Used
Satin finish latex paint
Recommended Skill Level
Beginner

X Entertainment Stand

Submitted by Anonymous (not verified) on Sat, 05/06/2017 - 03:48

My friend and I made this together and it was my first time using the Kreg pocket hole system. I was very impressed. The base of the piece is pine finished with a white-wash stain so the grain is still visible. The top is a restored piece of walnut finished with a simple clear coat of polycrillic. Thank you so much for the design idea! My friends love it in their living room!

Estimated Cost
60-80
Estimated Time Investment
Weekend Project (10-20 Hours)
Recommended Skill Level
Intermediate

Comments

DIY Board Game Cabinet

We tweaked the Ana White Barn Door bookcase plan for a bathroom linen closet, made it a hair too wide (it was soooo close), and decided to use this for board games instead. It's PERFECT for storing long games like Monopoly, as well as puzzles, cards, and more. I decorated it with vinyl cut with my Cricut to give it that "game night" feel.

The project ended up being fairly time consuming because painting the shelf took a lot of time... if I did it again, I'd probably use a paint sprayer. I just don't have a great space for spraying furniture builds.

Built from Plan(s)
Estimated Time Investment
Weekend Project (10-20 Hours)

Comments

Farmhouse Toddler Bed

Submitted by SkyGold on Fri, 03/29/2013 - 18:58

This is a cross between the Farmhouse toddler bed plans and the Brookstone storage bed. My youngest son's bedding was all western stuff that I had made and wanted a bed that did it justice. We combined the headboard from Brookstone with the Farmhouse plans. I think it looks pretty good considering it was our first project!

Estimated Time Investment
Weekend Project (10-20 Hours)
Finish Used
Minwax Dark Walnut
Recommended Skill Level
Beginner

Bare Legs and Milk Paint

Submitted by KiraLynne on Tue, 02/10/2015 - 12:01

Hey, y'all. Here is how our milk paint dining table turned out. We are proud of it. Keep checking the blog and I will have more pictures of our complete dinning room flip posted. 

Thanks,

Kira

Estimated Time Investment
Weekend Project (10-20 Hours)
Recommended Skill Level
Beginner

Rolling canon shelves.

Submitted by Anonymous (not verified) on Tue, 05/09/2017 - 13:14

Free wood from a local builders "trash pile" (I did ask) kreg Pocket Jig ($120, I needed it) 2 dollys from Harbor Freight $7.99 each.  2 handmade tennis ball shooting canons.  6x3x6. Thanks so much for the confidence! My first build ever!


Estimated Time Investment
Afternoon Project (3-6 Hours)
Recommended Skill Level
Starter Project

My builts Ins.

So easy when you have the right tools. It is exactly what we needed. I can't wait for my next project!

Estimated Time Investment
Week Long Project (20 Hours or More)
Finish Used
Semi-Gloss Latex White
Recommended Skill Level
Beginner

Comments

Pub table

Submitted by Anonymous (not verified) on Sat, 05/13/2017 - 07:01

A full write up of this build, including photos & dimensions, is here: http://imgur.com/gallery/YyawW

Estimated Cost
The wood cost $40.
The Kreg K5 pocket hole jig cost ~$130.
The stain & polyurethane cost ~$15 total.
The lag bolts + washers + nuts cost ~$10 total.
Estimated Time Investment
Weekend Project (10-20 Hours)
Finish Used
1) Sand all individual pieces (prior to assembly) by hand. I believe I used only 60 grit sand paper, because I wanted to retain the look of lumber.
2) Varathane brand stain; color "Early American." Applied with a rag, not a brush.
3) Varathane brand Triple Thick Polyurethane; satin finish. Applied with a rag, not a brush. Polyurethane applied to the 2x6 table top surface boards only (i.e. I did not apply polyurethane to the table's skirt or to the table's legs).
4) Lightly sand the dried polyurethane by hand with 300 grit sand paper to obtain a smooth-to-the-touch surface finish.
Recommended Skill Level
Beginner

Adirondack chair

Submitted by Anonymous (not verified) on Sun, 05/16/2021 - 02:33

Sligthly modified based on what I could find in Sweden. Very, very happy about this 😃 Thanks Ana.

Estimated Cost
30$
Estimated Time Investment
Afternoon Project (3-6 Hours)
Recommended Skill Level
Intermediate

Comments

Shirley Console Table (modified)

Submitted by wenikio on Thu, 04/04/2013 - 14:48

This was a modification of the Shirley Console Table. I had to change the dimensions to fit our entryway, and I wanted some color variation. Because I used two different stains, the pieces had to be fit together, sanded accordingly, taken apart, stained, and then glued/screwed together again. I learned how to use a router on this project, so it was a learning experience (thank goodness for wood filler!). I also inset the sides and back, though it's not really obvious in the picture. The drawers slide on a tongue and groove track. The pulls are white porcelain covered in teal sharpie (baked then coated with acrylic). Definitely learned a lot on this project! As this was made basically from wood scraps, I'm not sure what the cost was. The drawers, minus the facing, is 3/4" oak veneer plywood.

Built from Plan(s)
Estimated Time Investment
Week Long Project (20 Hours or More)
Finish Used
MinWax Red Mahogany and Golden Oak
Recommended Skill Level
Intermediate

Comments

JoanneS

Thu, 04/04/2013 - 17:15

Great project! It's beautiful! Your porcelain knobs method sounds fascinating -- did you sharpie them first and then bake in the oven (what temp & how long?) - that's a super creative idea!

Little Kids picnic table

Submitted by Anonymous (not verified) on Mon, 05/15/2017 - 21:16

Getting back into projects. Started with this little table. It was well received!! 

Built from Plan(s)
Estimated Cost
$20
Estimated Time Investment
An Hour or Two (0-2 Hours)
Finish Used
Chalk board paint, blue paint
Recommended Skill Level
Beginner

Outdoor living space inspired by Ana’s plans

Submitted by Anonymous (not verified) on Thu, 05/27/2021 - 17:49

I started this backyard project at the beginning of the Pandemic. I used Ana’s plans for the Adirondacks and the picnic table and the bench.

Thanks for your ideas ams inspiration!!!!

Sincerely
Spencer Friedlander

Estimated Cost
$700
Estimated Time Investment
Week Long Project (20 Hours or More)

Comments

Vintage Stool with a Twist

Submitted by bobmireau on Fri, 04/05/2013 - 20:41

Saw your plan for the vintage stool and had to build it for my grand daughter. I added a little twist to it by adding a saying found on stools back in the 70s. Used a router sign kit for the lettering. The last picture shows the grand daughter's approval

Estimated Cost
$15
Estimated Time Investment
Afternoon Project (3-6 Hours)
Finish Used
Used a cabinet paint for a tough finish
Recommended Skill Level
Beginner

Modified Reclaimed Wood Look Bedside Table-Now With Hutch

I couldn't find a kitchen hutch to fit my space/needs so I modified this bedside table plan. I widened it 3 inches then extended it up! Now I have room for all my cook books! I love it!

Estimated Time Investment
Weekend Project (10-20 Hours)
Finish Used
Minwax early american stain with Minwax water based oil-modified polyurethane in clear satin.
Recommended Skill Level
Intermediate

Simple Rope Puzzle

Submitted by Anonymous (not verified) on Sun, 05/21/2017 - 07:47

This puzzle is similar to the other puzzles I posted over the last year. The goal is to remove the rope/ball from the piece of wood. With very little parts, it was really easy to make – less than 15 minutes. Go to the video for the solution if you cannot mentally figure it out from the pictures.

More Info: https://www.instructables.com/id/Simple-Rope-Puzzle/
Solution: https://youtu.be/NmcurEs-BIA

Estimated Time Investment
An Hour or Two (0-2 Hours)
Finish Used
None
Recommended Skill Level
Starter Project

Chunky canopy daybed without canopy

Submitted by a_hard on Sun, 04/07/2013 - 22:09

We (myself and my girlfriend) decided to build this daybed after considering several options for a new sofa. With three big dogs we knew we wanted a big sofa and after looking at many $400+ options we saw several issues (besides cost), The biggest was the availability of slip covers for easy cleaning. We went with the daybed route because a mattress is far cheaper than foam for sofa cushions and twin sheets are readily available for low prices in many colors.

Obviously I altered the plans significantly as I wanted a chunkier, heavier frame that would withstand the abuse of day to day life. Also I removed the canopy as it's not needed indoors. The rear legs are 4x4 nominal which I resawed to 3x3 actual. The rear frame is 1x3 nominal horizontal pieces with 2x3 nominal boards as the verticals. These have rabbets cut in them to join with the horizontal pieces. The bottom support for the mattress is a 2x6 resawn to 2x5 actual and rabbeted to fit each vertical and the legs. Also, the top two horizontals are longer to fit into rabbets in the legs - this allows the back structure to be far stronger.

The sides are constructed of 1x3 horizontals with the leg and arm cap being 2x4 nominal resawn to 1x3 actual. The verticals were rabbeted like the rear to accept the horizontal pieces. The front crossmember is a 2x6 nominal block planed to match the front legs.

Joinerys consists of the following -
All rabbeted joints are glued and brad nailed together.
The legs and arm/top caps are pockted screwed to the horizontal crossmembers.
The front, sides, and rear join with 3 1/2" deck screws and 5 1/2" lag bolts.
Stringers/mattress supports are 2x3 nominal.

Finish is Behr premium plus interior latex eggshell paint/primer sprayed with an HVLP sprayer.

If anyone is interested I can take some measurements and more photos. Right now we just have our old futon mattress on (we're saving to do some other projects).

Built from Plan(s)
Estimated Cost
$375 (including mattress, pillows, and paint)
Estimated Time Investment
Weekend Project (10-20 Hours)
Finish Used
Behr Premium Plus Paint/Primer - Tibetan Orange
Paint applied with HVLP sprayer (the type used in automotive finishing).
Recommended Skill Level
Intermediate

School Room Bookshelf

Very quick and easy project. Used the plans but adjusted the width and used pocket hole screws. We made ours 54" wide. After building the entire box and horizontal shelves with pocket holes you can secure the vertical pieces with brad nails. Start with the top row first and you can secure all of those with brad nails. Then use pocket holes on the top of the bottom vertical pieces because it won't really show. You won't be able to nail it since the top vertical piece will be in the way. 

I put some extra 1x2 scrap pieces on the bottom of the shelves for extra support but it would probably be fine without it. We just knew we were going to be loading this thing up and wanted it to last forever and it's not visible anyways.


Built from Plan(s)
Estimated Cost
$85 - We only needed three 8 foot 1x2 pieces because we weren't putting it on wheels and the back we didn't trim since it was going to be against the wall. 1x12 common boards were about $18 each and 1x2 select pieces are $5 Adds up quick but it is some much better than cheap particle board shelves.
Estimated Time Investment
Afternoon Project (3-6 Hours)
Finish Used
White paint
Recommended Skill Level
Beginner

Comments

RyobiNATION Potting Bench

Submitted by Anonymous (not verified) on Tue, 05/23/2017 - 09:26

Easy build for a teen

Estimated Cost
$130
Estimated Time Investment
Day Project (6-9 Hours)
Finish Used
Thompson' penetrating oil
Recommended Skill Level
Beginner

Workbench

Submitted by Binda B on Thu, 04/11/2013 - 10:34

I needed a workbench to be able to create all of these wonderful plans. I used one of Ana's table plans and modified a little. I followed exactly, then I added a second top made out of birch pure bond plywood. I then put 1x2 edging to hide the edges. I used some pretty heavy duty casters with the double locking feature, I had to buy this off the internet.
This was my second build, the first being a 10 dollar ledge.
The plan is from Ana's book, the kitchen island. I can't seem to find it online.
This took me a long time due to limited time, because of work and kids. About 4-6 hours per week, for 2 1/2 months.

Estimated Cost
$ 250, this includes expensive casters, stain and extra plywood. $100 dollars for the wood if doing the table from the plan
Estimated Time Investment
Week Long Project (20 Hours or More)
Finish Used
I needed experience in staining and wanted some protection, so that is why I stained this workbench. I used Minwax pre stain, Rust-oleum early American on the base, and left the top raw (I figured it would get scratched up). Then I used Tung oil 5 coats on the bottom and 6 for the top. Finished with one coat of furniture wax. It is a bit slick, I should not have had so many coats of Tung oil, but I was experimenting :)
Recommended Skill Level
Intermediate

Comments