Community Brag Posts

Modern Potting Bench

Submitted by Anonymous (not verified) on Sat, 08/26/2023 - 12:20

I was tired of having potting plants and soil stacked up at the end of my driveway taking away from the aesthetic of the gardens so I built myself a potting stand. I love the two tone although I wish I decided on the colours prior to assembling. It would have saved me a lot of masking.

Mary Wikene

Platform bed

Submitted by joja on Thu, 04/05/2012 - 07:02

Inspired by Ana!

Estimated Time Investment
Day Project (6-9 Hours)
Finish Used
Paint.
Recommended Skill Level
Beginner

Comments

Ally (not verified)

Tue, 04/17/2012 - 11:21

Now this is my kind of project! Looks easy but polished. Do you have plans for this?

joja

Tue, 04/17/2012 - 12:03

Platform bed measures:

- Deck: 18x120 mm, width = matress width + 10 cm, length = matress length + 5 cm.
- Headboard: Height 80 cm, width = matress width + 10 cm.
- Beams bed: 36x150 mm, length = matress length - 5 cm.
- Beams headboard: 36x150 mm, height = headboard height - 5 cm.

joja

Wed, 04/18/2012 - 14:00

Sorry, forgot to write that the headboard "deck" is made from 18x120 mm.

PS) We used fir, but pine or cedar or the like is fine.

Sdash

Thu, 04/11/2013 - 23:04

I would love to make this but I would require plans in order to build it. So if there is any way I could get plans you would make me quite happy.

Work bench with 3/4 blonde plywood (2sheets) top

Submitted by tommybo76 on Mon, 01/20/2014 - 16:20

I based my work bench on the "sturdy workbench" plan. I made my top using two sheets of blonde 3/4 inch plywood. I glued/screwed and clamped two 3' x 6' sheets together (had the store cut 4x8 sheet to my dimensions). I didn't stain it but did coat with 3 coats of poly. The legs and supports are 2x4s (i think i used 7 though some was left over scrap) and the shelves were built from scrap MDF I had left over from a previous project. I designed my top to hang over at least two inches (longer in some areas depending on where the supports line up) to make clamping easier and it sits 37" from the floor. I wanted to ensure i had adequate space for my shopvac and air compressor so I lowered the base from the original design to avoid making the workbench too tall. This work bench is a very good size for my needs and extremely sturdy!

Built from Plan(s)
Estimated Cost
100
Estimated Time Investment
Day Project (6-9 Hours)
Finish Used
Polyurethane satin
Recommended Skill Level
Beginner

Famhouse Dining Table

Submitted by kristyzed on Wed, 04/13/2016 - 11:27

I wanted a really long table for my dining room to use at family gatherings so I can host more dinners. This table is 9 feet long and has plenty of space for our needs. I used knotty pine and finished it with Minwax Espresso wood stain. I then added 1 coat of polyurethane as I didn't want the table to appear shiny but still wanted some protection in case of spills.

This project was definitely a labour of love but I'm thrilled with the results.

Built from Plan(s)
Estimated Cost
$200
Estimated Time Investment
Week Long Project (20 Hours or More)
Finish Used
Minwax Espresso stain
Polyurethane
Recommended Skill Level
Intermediate

Special Family Bench

Submitted by Anonymous (not verified) on Wed, 08/30/2023 - 09:52

Made my wife a Ana White DIY porch bench for our 10 year wedding anniversary. Had a custom plaque made: Sarah’s Bench.

Looks beauty on our front porch.

Jesse Micak, Ontario, Canada 

Built from Plan(s)

Comments

Simple Beds

Submitted by sophie on Sun, 04/08/2012 - 09:32

I used the basic design for this bed but altered it quite a lot to make the joins stronger, the edges smoother and the whole thing generally easier to take apart and put back together.
I used beech wood and completed the project at a woodworking club, so it's quite hard to estimate the time taken, as I only did it one evening a week and spent most of the time bringing the wood out, putting it away and clearing up each time I was there!
I am still undecided whether to give it an oil finish or to paint it white with chestnut wood stain on the headboard and footboard tops.

Built from Plan(s)
Finish Used
Possibly oil or maybe white and chestnut wood stain - haven't decided yet!
Recommended Skill Level
Intermediate

Hut tree house

Submitted by dreamworx on Wed, 01/22/2014 - 10:47

I used all scrap wood that I had laying around. even the 2X4s were old painted wood and looked beautiful when sanded down.

Estimated Cost
if you buy the wood 150.00
Estimated Time Investment
Week Long Project (20 Hours or More)
Recommended Skill Level
Beginner

Outdoor sofa

Submitted by Anonymous (not verified) on Sat, 04/16/2016 - 07:25

I built the sofa and loveseat from 2X4's and used 1X4's for the top of the coffee table. I used standard patio cushions for the sofa and cut the tops off to use at the side for arm rests.

Estimated Cost
$130.00 (I already had the cushions stored)
Estimated Time Investment
Weekend Project (10-20 Hours)
Finish Used
latex wood conditioner followed by exterior CIL woodcare exterior stain by home depot
Recommended Skill Level
Beginner

Family Cabin with Flip up bed

Always wanted an Alpine lodge, we live in London so a Garden cabin for the kids (and Dad) will have to do! 

flip up bed and storage cabinet (for mattress)

sofa bed, foam cushions with leftover curtains  

mini storage boxes from wine boxes

inspired by tiny house (especially the sofa!)

Still more to do. Desk on its way and bulk head lights fitted soon. 
 

no real plans just rough sketches and trial and error

Estimated Cost
£300 for interior
Estimated Time Investment
Week Long Project (20 Hours or More)
Finish Used
Old white paint and fence paint

Little Helper Tower

Submitted by h.abbott on Tue, 04/10/2012 - 05:55

We decided to make a helping tower for my little guy for Christmas after I saw it on Pinterest. The curves were not the easiest, but I think they turned out fine. He's just finally starting to use it more as a helping tool rather than a playing platform. Definitely happy that it keeps him from standing on the chairs.

Thank you so much for this plan. I love this site!

Estimated Time Investment
Weekend Project (10-20 Hours)
Finish Used
green spray paint to match kitchen.
Recommended Skill Level
Beginner

Comments

Hall tree from lockers plans

We modified these plans for a customer down to two lockers. We also added a divider for the cubbies on the top per her request. We found the whole thing to be a bit top heavy and easy to get a wobble. Recommend securing it to the wall with a tether or L bracket. Also, it is CRITICAL to not skimp on the quality of wood and getting straight boards for this. We did not and it was seriously skewed for a while until we did a lot of adjusting...and it still has a bow! Also I recommend doing the build all in one day. I think since we broke it up into two days it allowed the wood to warp more than had it all been assembled and fastened/tightened at one time. Message us with any questions! The stain is Minwax Jacobean- one coat. We got the hooks from Home Depot. The customer wanted plenty of storage so per her request we used 8 hooks! Good luck with this build!

Built from Plan(s)
Estimated Time Investment
Day Project (6-9 Hours)
Finish Used
Minwax Jacobean
Recommended Skill Level
Beginner

Our Kitchen Table

Submitted by Anonymous (not verified) on Mon, 04/18/2016 - 15:25

We wanted to build a new kitchen table for the home we moved into. I had just bought a new table saw and needed a project. We searched through a lot of plans and settled on the Benchmark Octagon Table that Ana White had. My 14 y/o son and I built this over a few nights in our garage and my wife did the finishing. We were thrilled how it turned out. It comfortably seats 8 adults (yes we have had 8 adults at it). My wife and I always sit in the bench that is pictured and we easily eat side by side on one end. It is a great project. I would recommend being very careful attaching the table top support to the base column and also reinforcing the joints of the diagonal upper and lower supports to keep the table top from twisting easily. All in all a fantastic project and people are shocked when I tell them my son and I built it, particularly from off the shelf pine.

Estimated Time Investment
Week Long Project (20 Hours or More)
Finish Used
Dark Walnut Stain and about 5-6 coats of Satin Poly
Recommended Skill Level
Intermediate

Lavander Moon Bassinet

Submitted by papamike on Sun, 01/05/2020 - 13:39

My daughter-in-law asked me if I could build a doll crib for my granddaughter. I had no idea how to do that, so of course I said "Absolutely!" Then I immediately came to the Ana White site!!

I found a few options and checked with my daughter-in-law to see what style she wanted.  She chose the "Baby Doll Furniture Moon Bassinet" and said that it needed to be "lavander".  

As usual, Ana's plans made me look like a hero!  My granddaughter liked it so much she insisted on sleeping on the floor next to it during her nap!   

Estimated Time Investment
Afternoon Project (3-6 Hours)
Finish Used
Paint and satin clear coat.
Recommended Skill Level
Beginner

Tall Cedar Planter

Submitted by zzjb2 on Fri, 09/08/2023 - 08:29

Made a tall wood planter from cedar and pine fence posts using Ana’s plans this weekend! Modified slightly and added a frame around top to give it a more finished look.

Awesome plans! Thanks Ana.

Built from Plan(s)

Add Metal Accents to Furniture

Here's a small tutorial on how to add simple metal accents to furniture. We used something as simple as door knobs at your local home improvement store to make it happen!

Check out the tutorial here http://sawgrasshome.com/?p=1443

Estimated Cost
$20 - $30
Estimated Time Investment
An Hour or Two (0-2 Hours)
Recommended Skill Level
Beginner

Comments

birdsandsoap

Sat, 04/14/2012 - 23:14

so clever. I love when others figure out how to do awesome things like this and then show me how! Thanks!

Kristen Davis

Wed, 03/25/2015 - 11:26

Hello,

I am very interested in this tutorial, "Add Metal Accents to Furniture", but it appears that the link provided, is a dead link. Do you happen to remember anything about this tutorial? Thank you!

Kristen Davis

Wed, 03/25/2015 - 11:25

Hello, I am very interested in this tutorial, "Add Metal Accents to Furniture", but it appears that the link provided, is a dead link. Can you please assist me in finding the direct link to this tutorial? Thank you!

My version of ten dollar picture ledges/galley shelves.

I think I get more compliments on these galley shelves/picture ledges than anything else I’ve made, and these were probably the easiest things to make!

It cost me about $25 a piece but they were nearly 8 feet long each. I used a paint sprayer to paint them, WAY easier than brushing on the paint! watch for drips though (my first time using a sprayer, treat it like spray paint, light easy coats!)

Built from Plan(s)
Estimated Cost
$100
Estimated Time Investment
Afternoon Project (3-6 Hours)
Finish Used
used a satin white paint. that is the same as our molding in the house.
Recommended Skill Level
Starter Project

First project ever

Submitted by Anonymous (not verified) on Thu, 04/21/2016 - 18:53

I challenged my husband who is new to any woodworking project to make me this table! That he did!!

Estimated Cost
$250 (benches and table)
Estimated Time Investment
Weekend Project (10-20 Hours)
Finish Used
Rustoleum American walnut
Recommended Skill Level
Starter Project

First Ever Woodworking Project - Modified Farmhouse Table

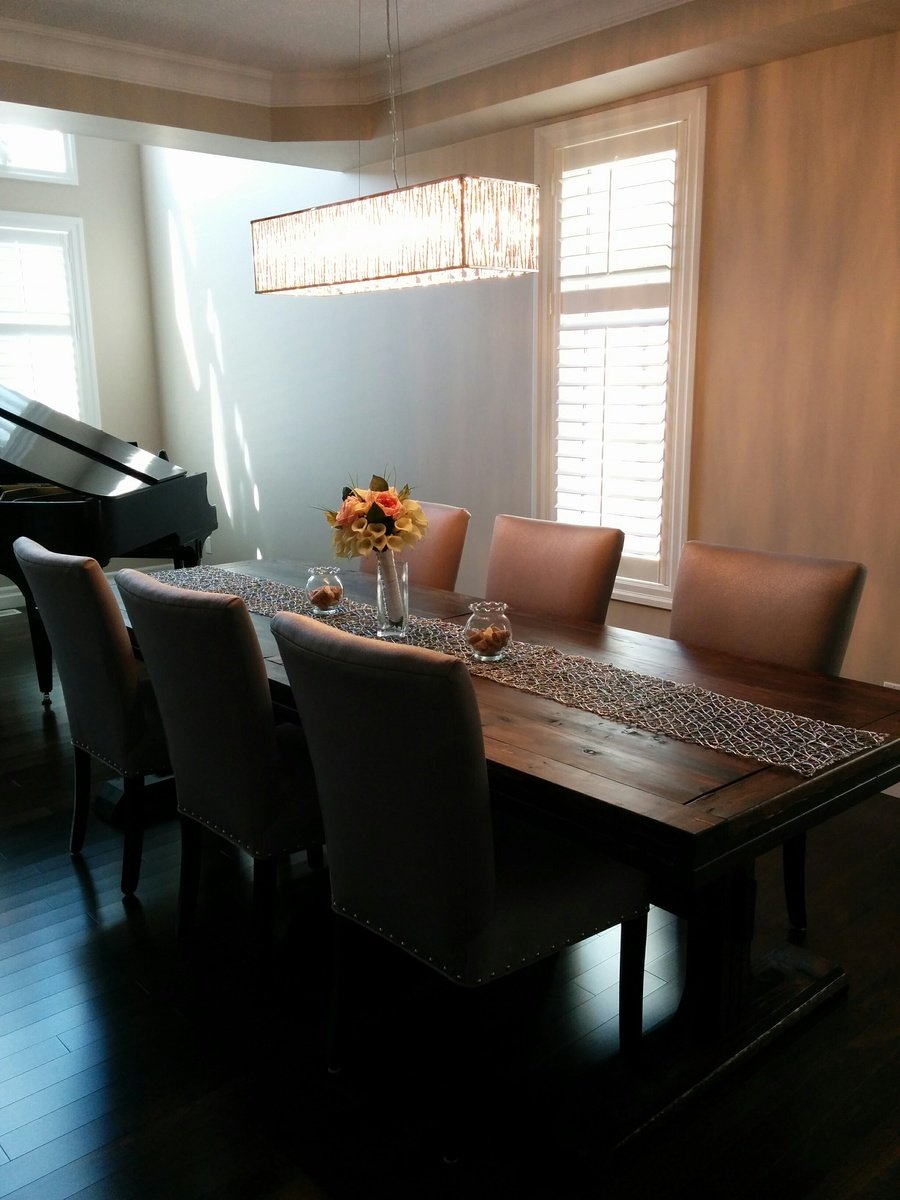
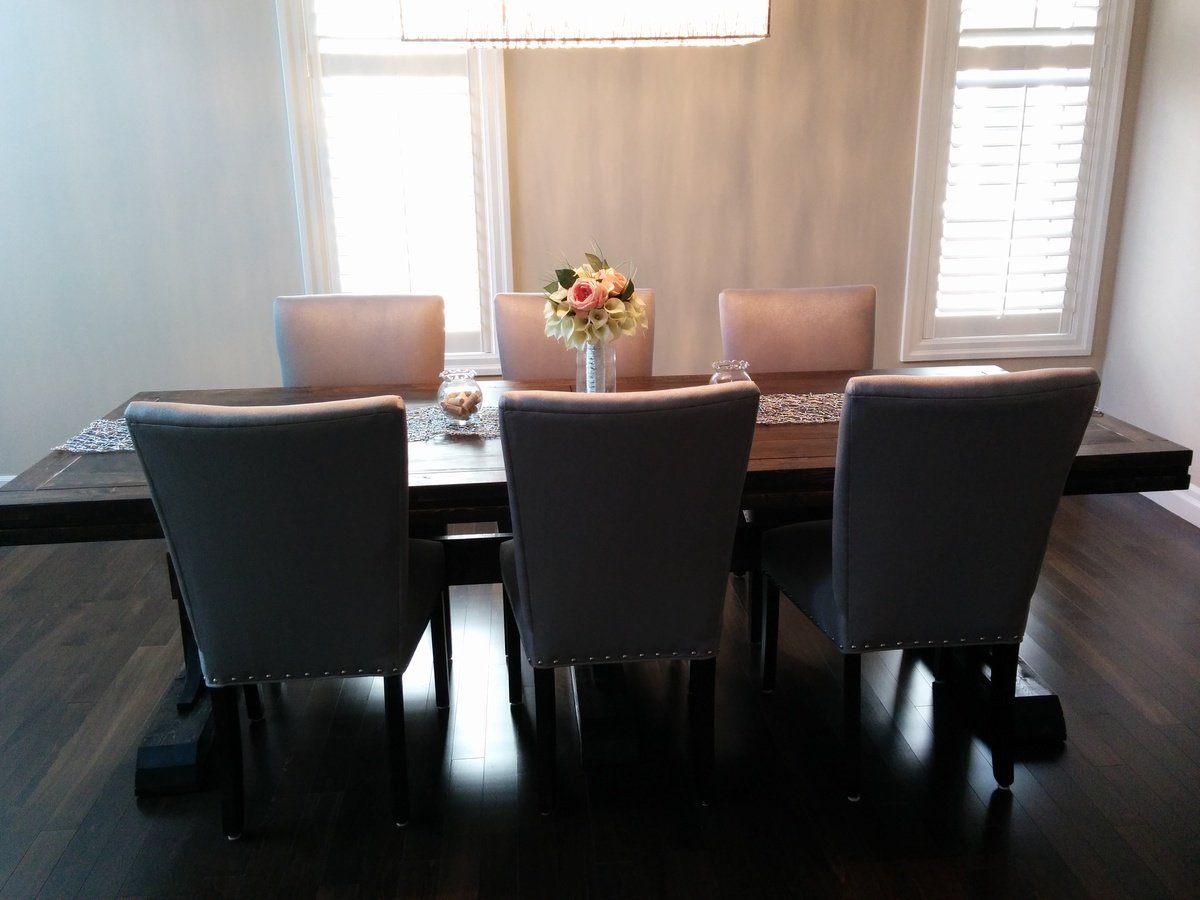
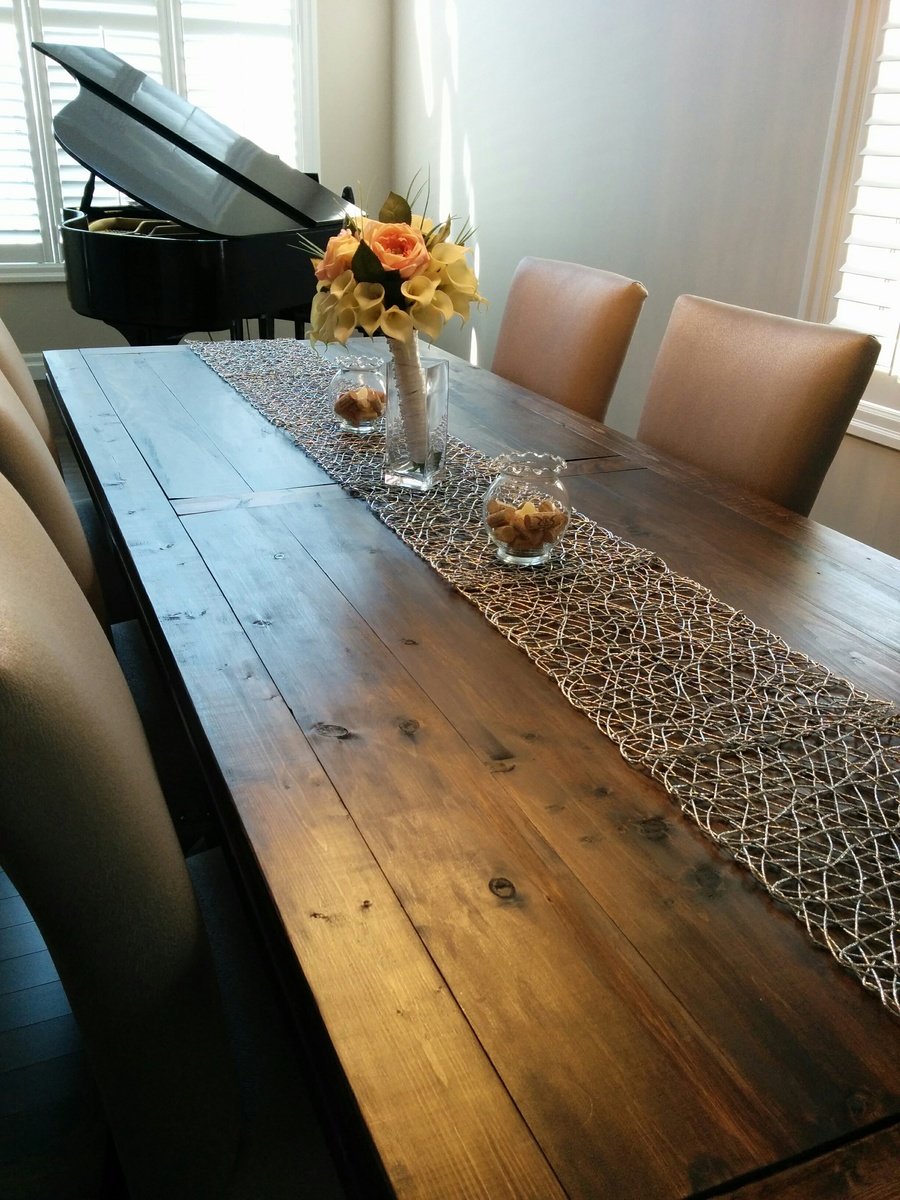
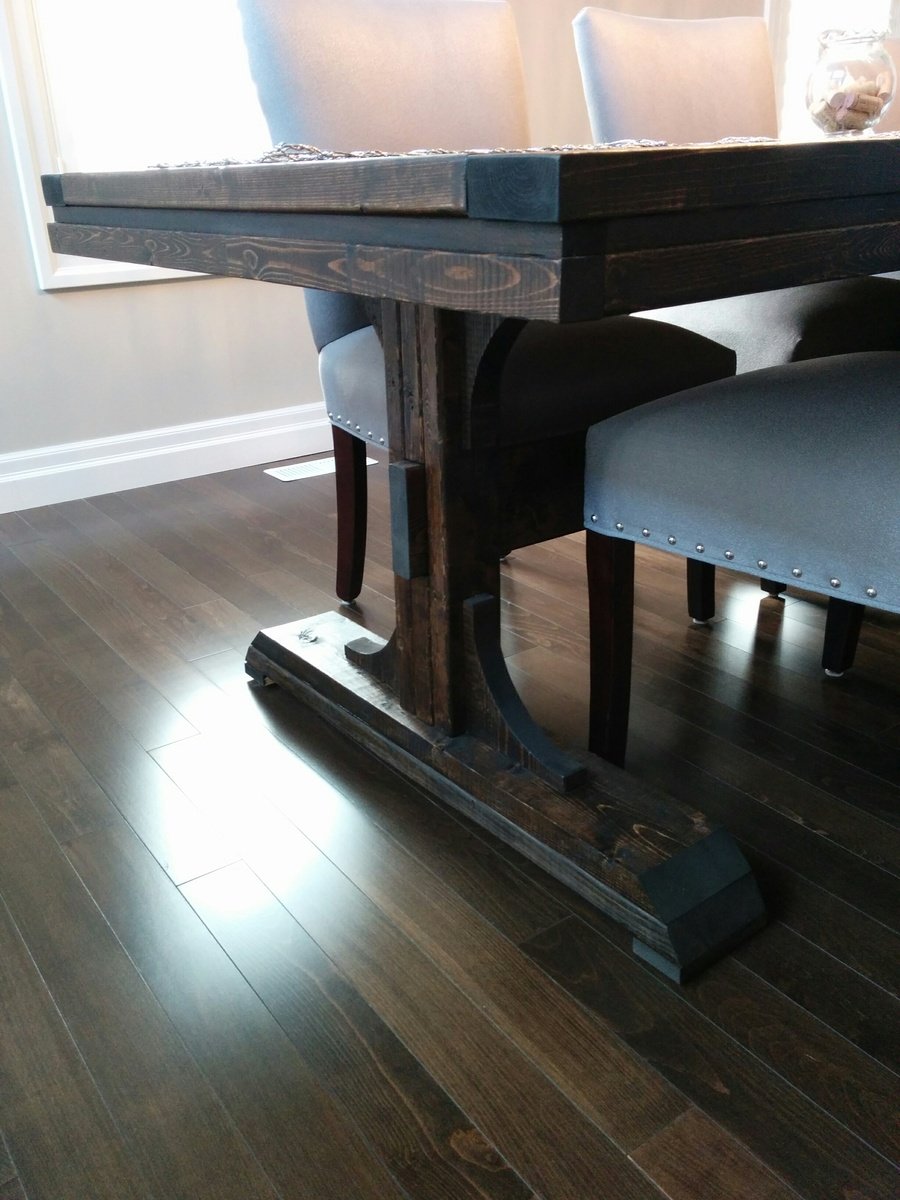
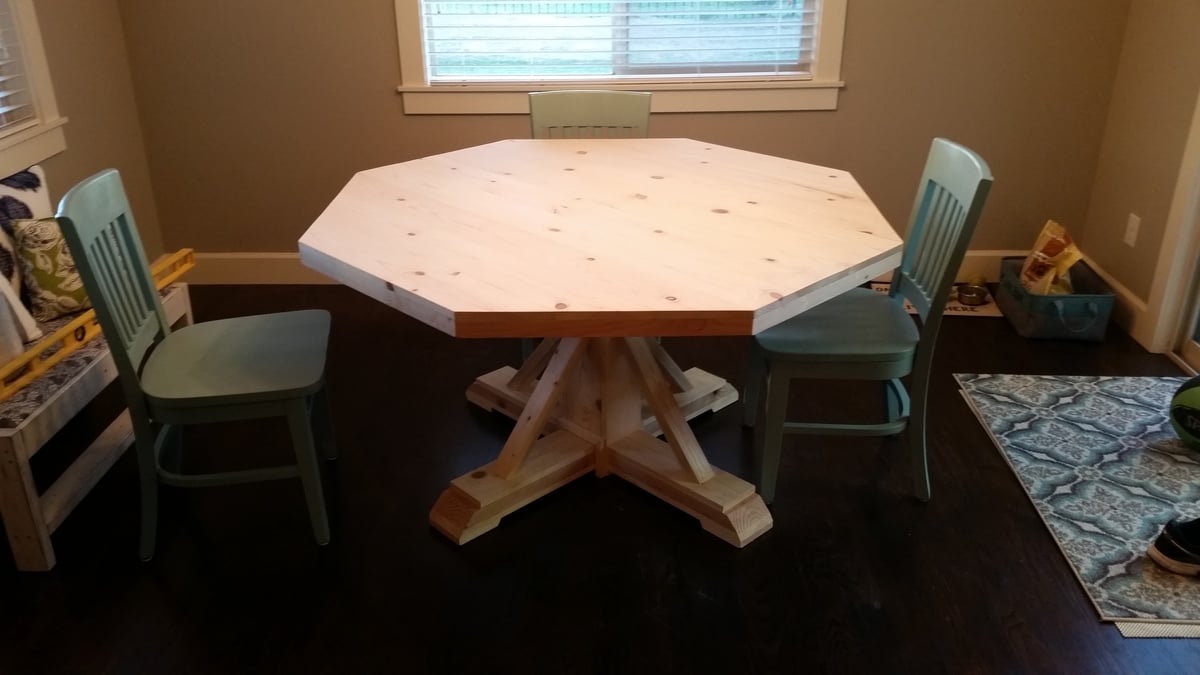
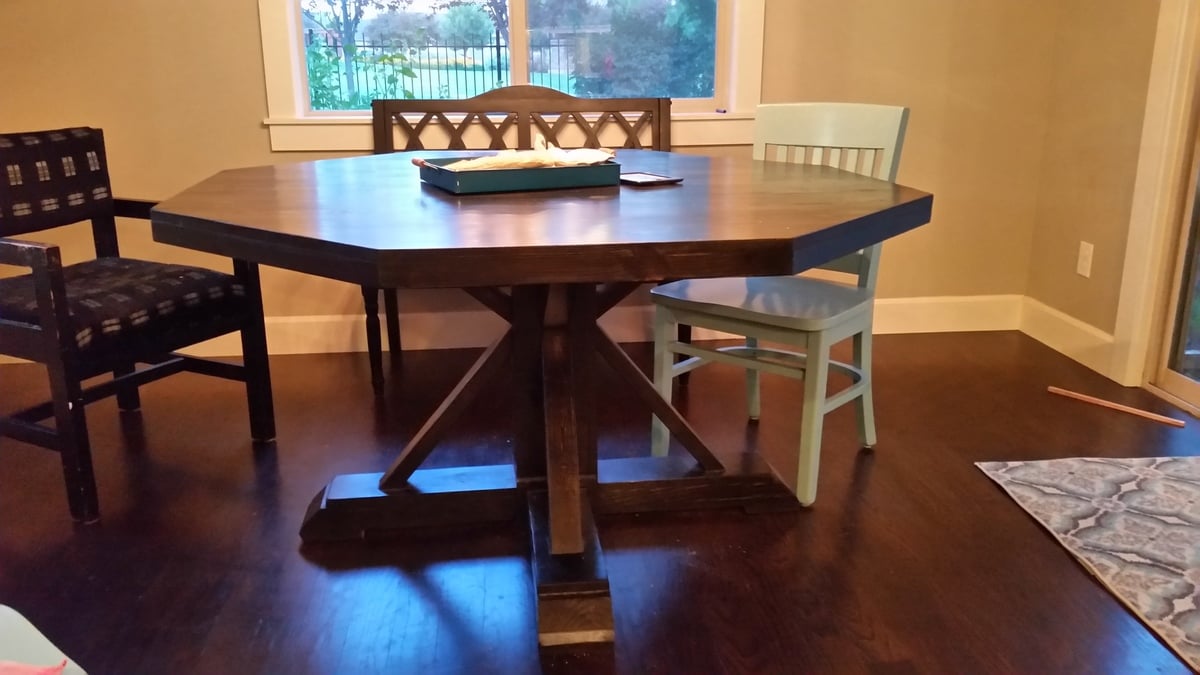
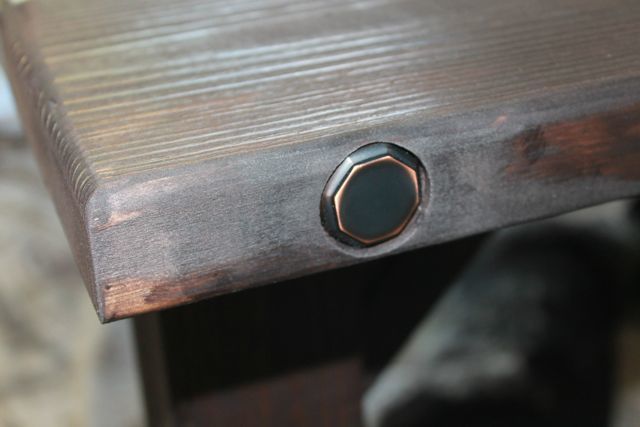
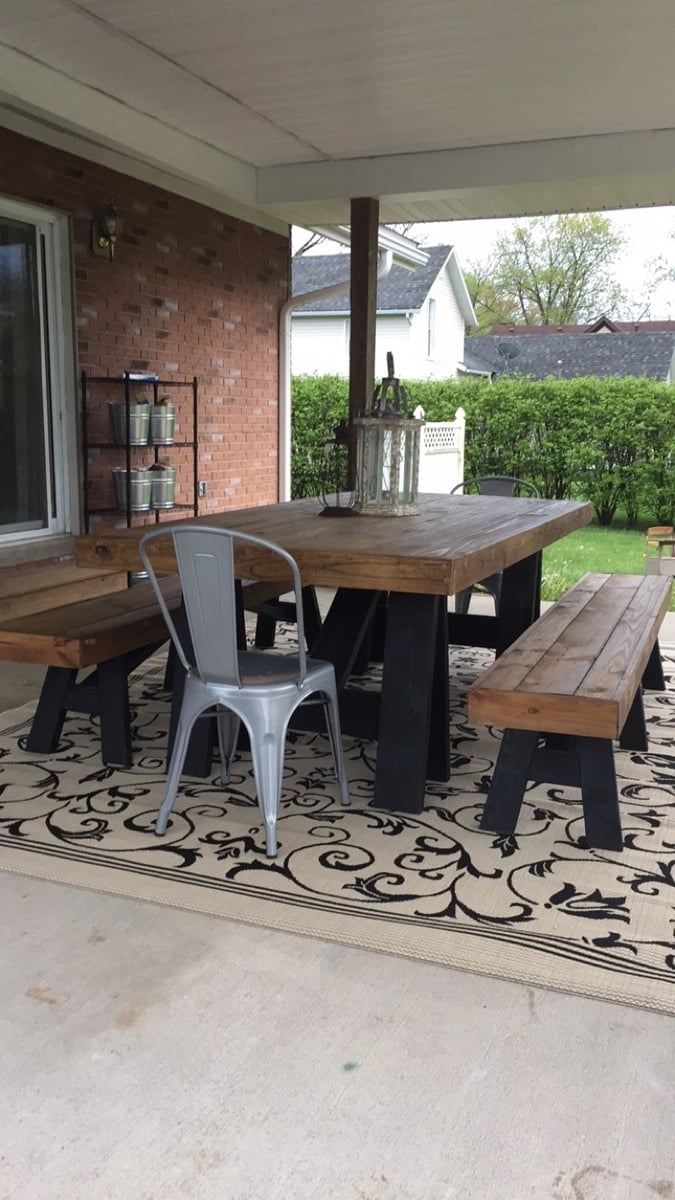
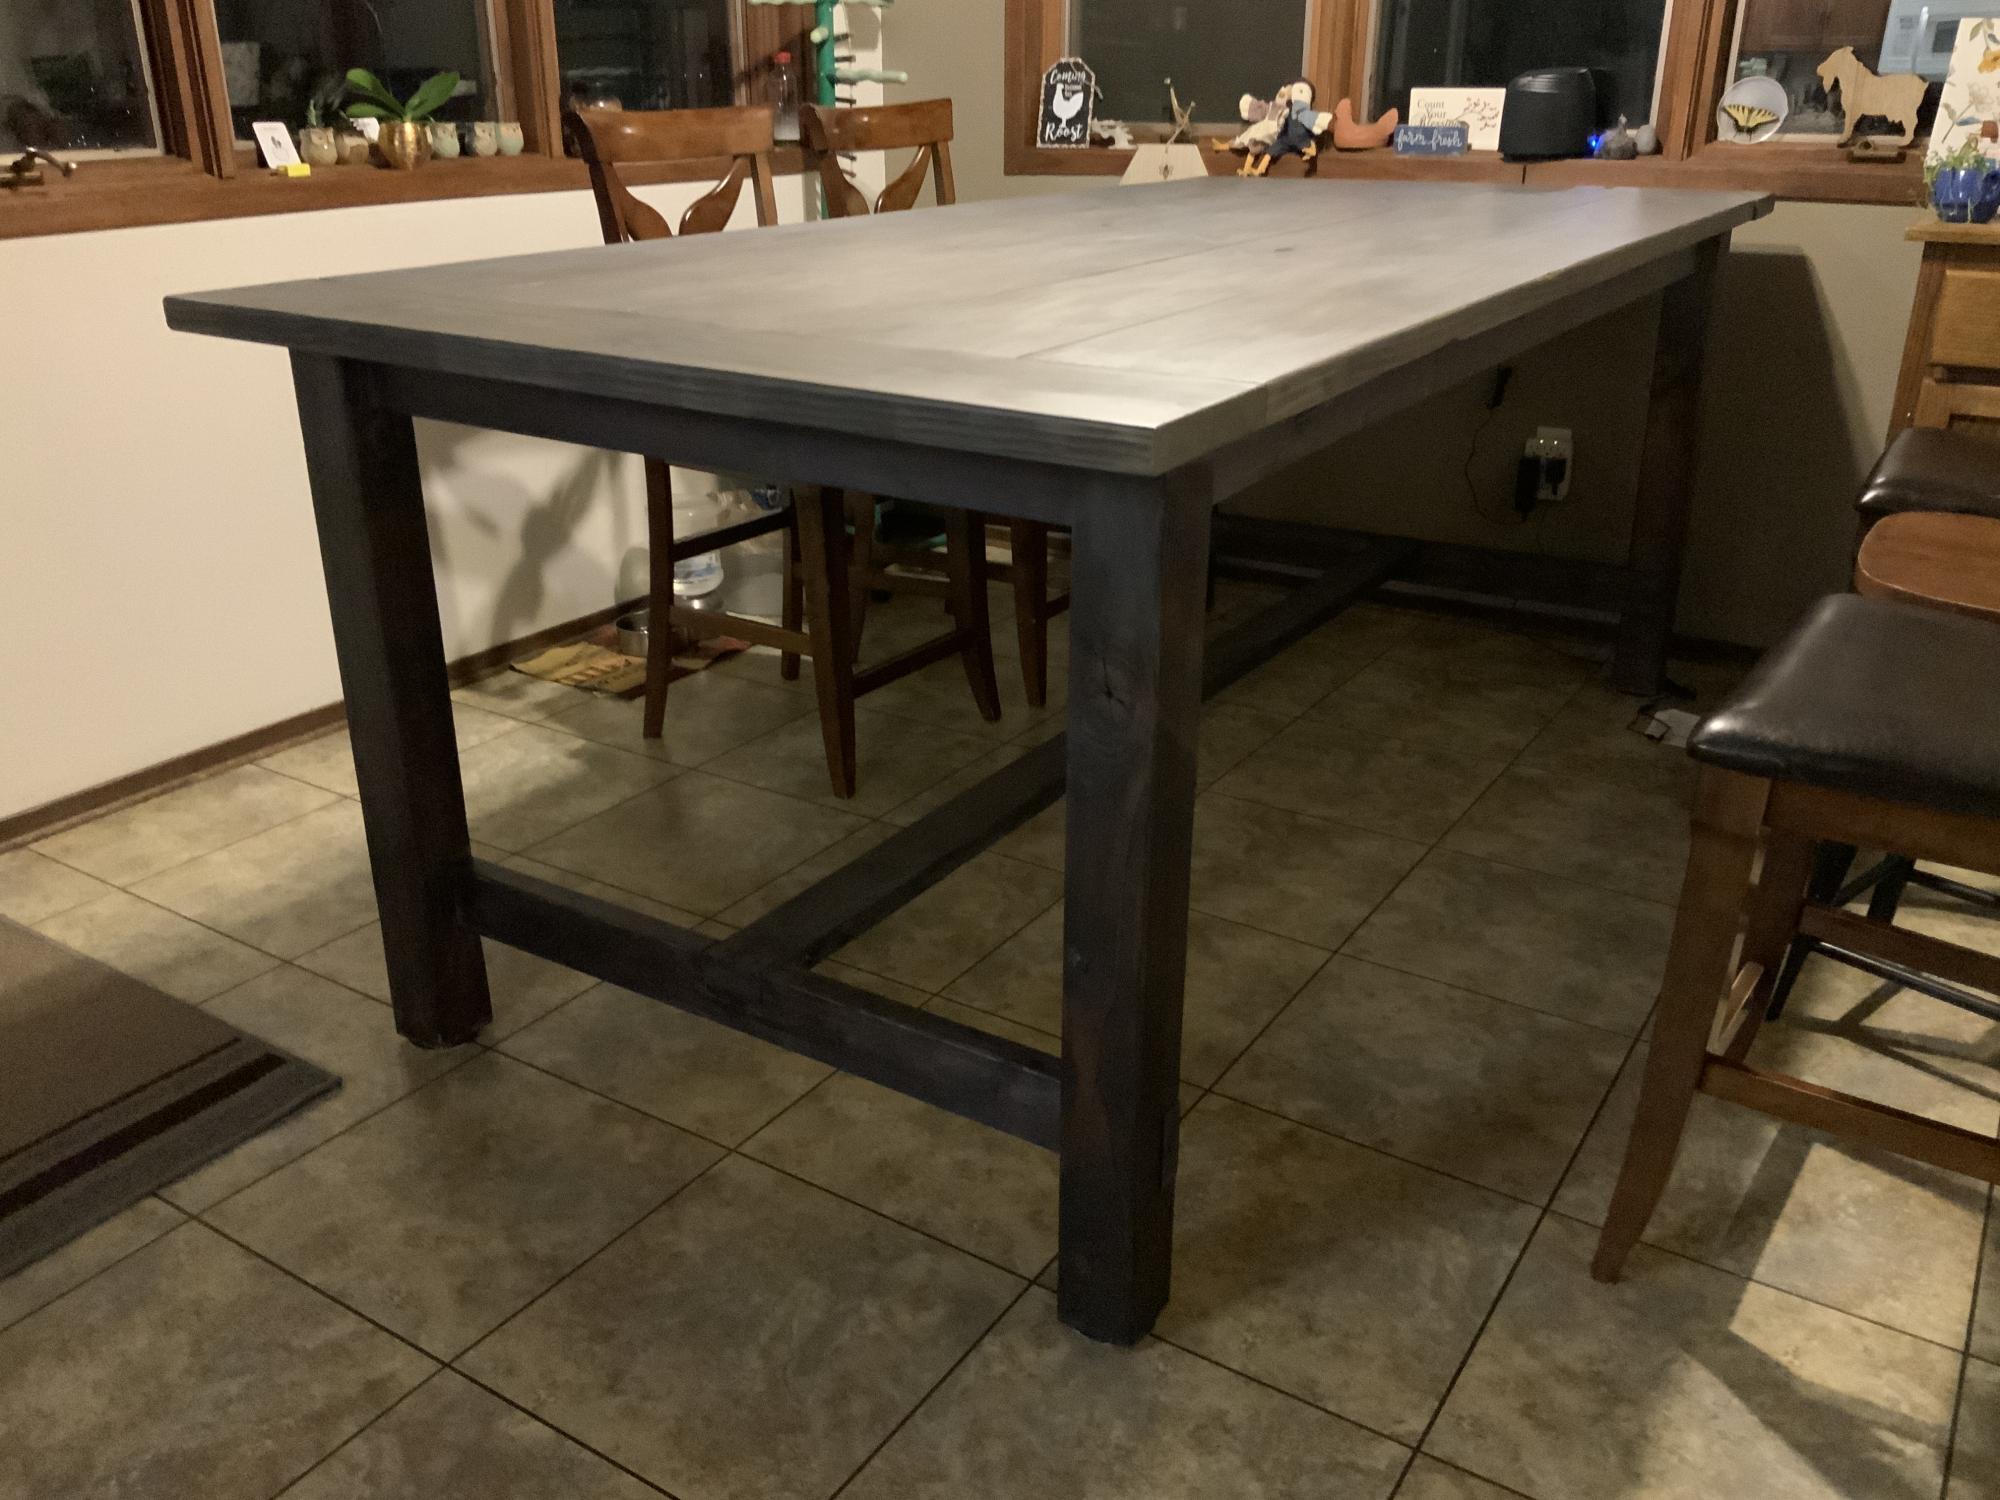
I modified the Farmhouse Table With Pocket Holes plans to make the table counter height for our views of the woods from the dining area. We also have large family gatherings every Sunday evening so made the overall length 95” and the width 46” using 2x10s instead of 2x8s. I also made a little extra foot room on the ends by moving the stretcher support to the inside of the legs. All of the lumber was run through a planer multiple times to get everything nice and even. Large knot holes where left by choice for character, and I filled them with epoxy and sanded smooth.

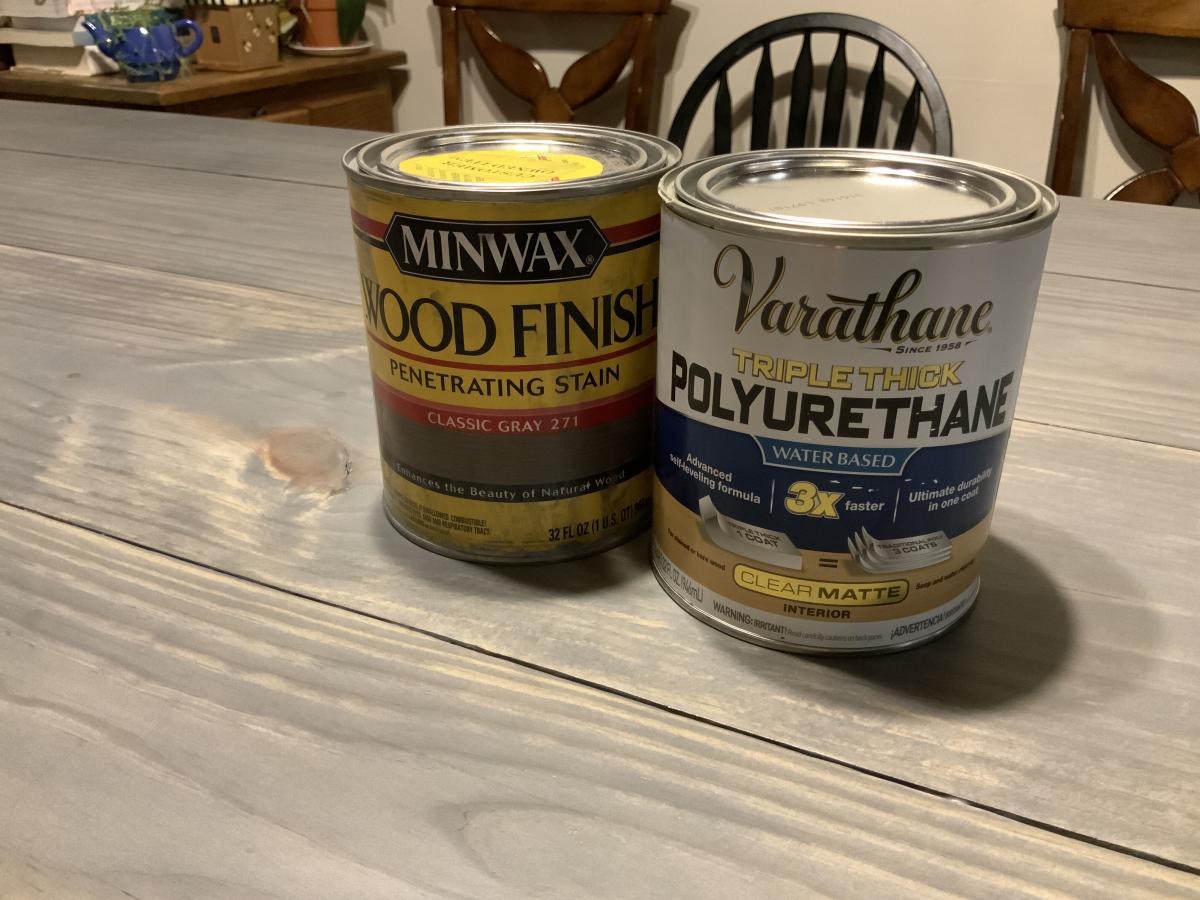
I started the project with lumber that was not completely dry. As a result, my tabletop width shrunk by nearly 3/4” over the first few weeks after completion. I would recommend bringing your lumber package inside for several weeks before you begin the build to allow it to dry and shrink. Do not bother to glue the table top if your lumber isn’t dry as it will simply pull apart like mine did.

This table is a BEAST, and will definitely be our shelter in the event of an earthquake. Because of the size, I had to build it in the dining area and I wish I had sanded everything to final finish before I built it. There was a lot of creative shopvac help from the kids.

Thank you for the great plans and inspiration to take on my first major woodworking project!

Estimated Cost
$130
Estimated Time Investment
Weekend Project (10-20 Hours)
Finish Used
Minwax Classic Gray and Varathane Triple Thick Water Based Clear Matte Finish Polyurethane. I also chiseled out a few chunks from the edges and sanded them smooth to make a “used” appearance, as well as using a torch to “toast” the long edges and corners of some of the lumber to give it character and dimension.
Recommended Skill Level
Beginner