Community Brag Posts

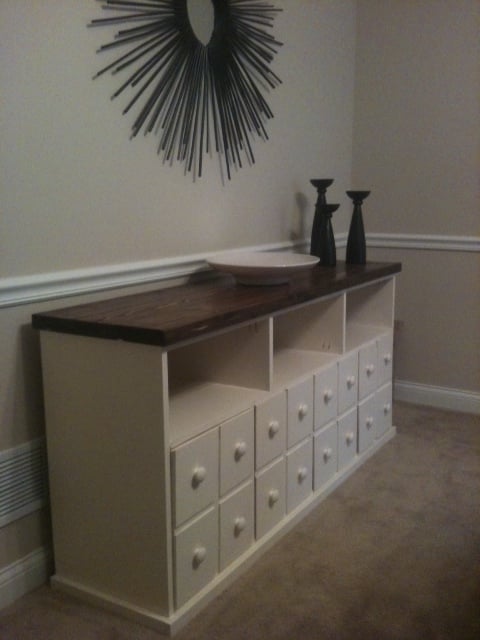
Bathroom storage tower

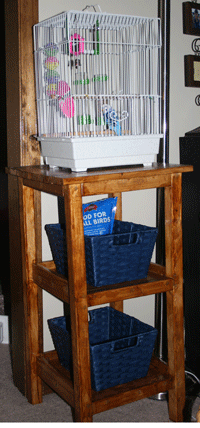
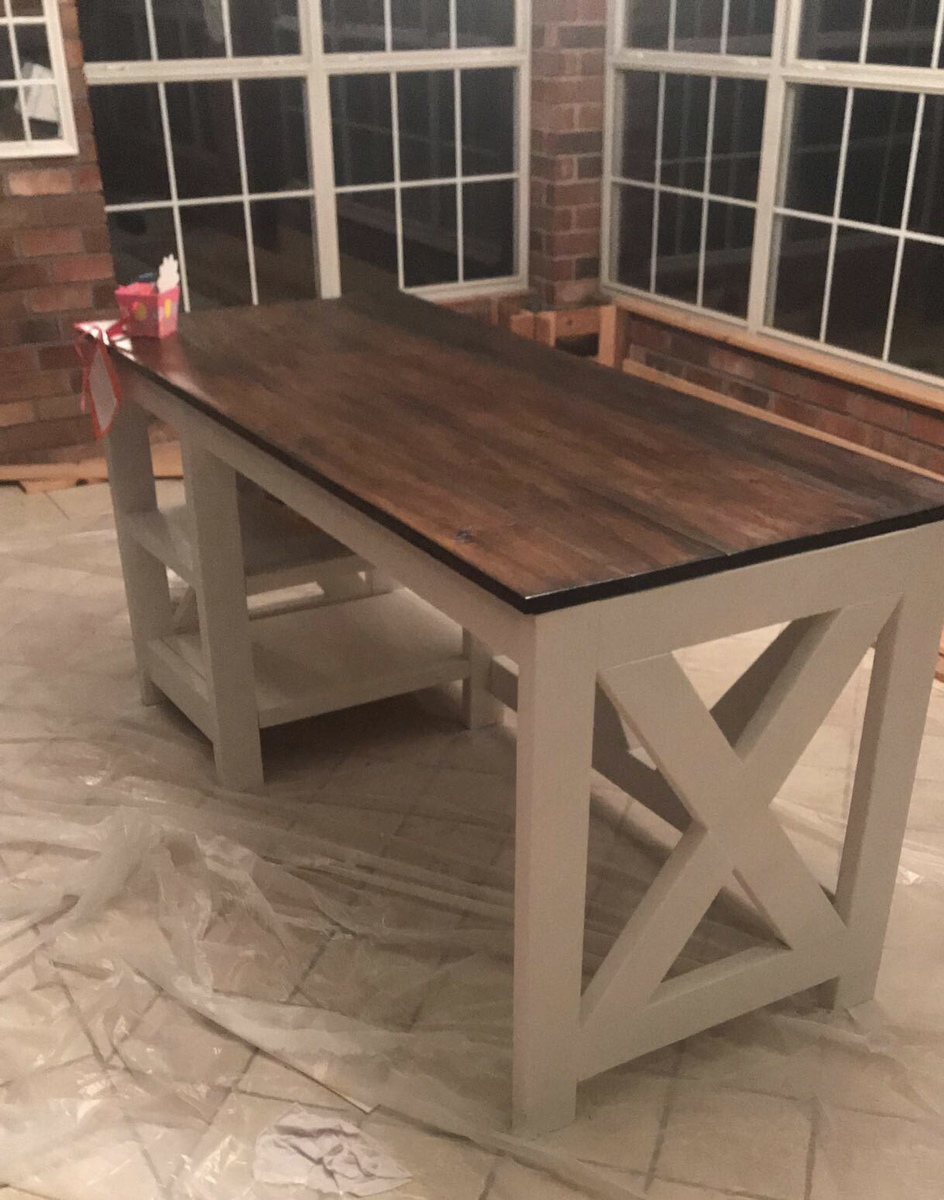
I just recently decided to try my hand at woodworking. This was my second project, first one from Ana, super easy instructions. I hadn't gotten the straightest 2x2s, since I had done my shopping with a two year old in tow, but I got it to work. After I completed it, my husband tells me it actually looked good--he seemed surprised. Anyway, I built this tower so that our new parakeet will have somewhere to live and I can conceal his food and other supplies in the baskets underneath. Without making any adjustments to Ana's plan with the exception that out 1x12s are only 11 1/4 it is the perfect size for our little bird cage. Thanks Ana for the design and inspiration to do it myself!

Built from Plan(s)
Estimated Cost
$15
Estimated Time Investment
Afternoon Project (3-6 Hours)
Finish Used
Cabot Golden oak stain
Recommended Skill Level
Beginner

DIY stackable chairs (added arms) and table

I added arms to the stackable chairs. This table and 8 chairs set came out great and I was able to build everything (including the chair cushions found on clearance) for under $350.00 thanks to this website!

Estimated Time Investment
Weekend Project (10-20 Hours)
Recommended Skill Level
Beginner

Burnt X Farm Table

Submitted by jeffwill on Thu, 11/05/2015 - 18:34

This is built off the Farm House X Table but I changed a few things around. The lower support beam has been raised up to the middle of the table. The table height has been raised to 40". The top of the table is floating. The top most 2x4s are secured directly to the top. They are also notched out a little to match the notch I put into the top support beam. The 2x4 is the female side and the support beam is the male. I finished the table by burning the top with a hand held torch and 2 coats or varnish. The base of the table has been white washed with 1 good coat.

Estimated Cost
Estimated cost of the wood, screws, varnish, and white wash is just shy of $90. I did buy extra screws, varnish, and white wash for future projects though.
Estimated Time Investment
Day Project (6-9 Hours)
Finish Used
burnt with varnish on top and 1 liberal coat white wash on base.
Recommended Skill Level
Intermediate

Keurig K Cup Holder Drawer

Submitted by Anonymous (not verified) on Sun, 12/30/2018 - 12:43

Was easy to make

Estimated Time Investment
Afternoon Project (3-6 Hours)
Recommended Skill Level
Beginner

Comments

JD_2030

Thu, 01/02/2020 - 13:02

Looks great! We were hoping to add a drawer as well but I’m not really sure where to start. What adjustments did you make to create the open drawer? Can you post a photo of the side of the drawer? Thank you!

Narrow planked bedside tables

Submitted by Anonymous (not verified) on Sun, 09/11/2022 - 08:43

I made these, then had to re-make them once I realized they were just too wide for our narrow bedroom. Each shelf is now three slats wide, not four. Modifications were easy: cut cross supports to 10 1/2” (not 14) and tabletop planks to 15”.

Thanks for the plans! Simple enough and stylish. -Katie

Comments

First Finished Project!

Submitted by MrsD2008 on Tue, 08/16/2011 - 17:00

I decided to not paint it, but we sanded it REALLY well. I also decided to forgo the caster wheels just so it would fit under an entryway table. Right now I'm using it for dog toys!

Built from Plan(s)
Estimated Time Investment
Afternoon Project (3-6 Hours)
Recommended Skill Level
Starter Project

Our 67.5 square trestle table and matching benches

The square table project obviously modified the original plans a bit. We always use 4" brackets to further stabilize and level our tops. This table we used L brackets on the insides at the top of the trestles. The final finish was Minwax Special Walnut for the tops and an antique white that we color matched for our client. Oh and SEVERAL coats of poly to seal her and make her pretty!

This table was table number 22 that we have built from the plans provided here. We have modified widths, lengths and heights many times over! Come find us on Facebook book or follow us on Pinterest. Just put a /youreunique after and you are there. I would be happy to give tips on our finishes if you email me or send me a PM. Thanks for looking and have a blessed day!

Estimated Time Investment
Afternoon Project (3-6 Hours)
Finish Used
The final finish was Minwax Special Walnut for the tops and an antique white that we color matched for our client. Oh and SEVERAL coats of poly to seal her and make her pretty!
Recommended Skill Level
Advanced

Loft bed

Submitted by Kyjo5 on Sat, 11/14/2015 - 13:19

Built this bed from the look of the project done by Ana. Used 4x4s for the legs and used a router to make slots for the 1x8s to fit in. Everything was built as I went because our house was built in 1907 and nothing is square and it also has vaulted ceilings. 

Built from Plan(s)
Estimated Cost
$100
Estimated Time Investment
Weekend Project (10-20 Hours)
Finish Used
High gloss white latex paint
Recommended Skill Level
Intermediate

Fancy X-Brace Farmhouse Table and Bench

Submitted by Anonymous (not verified) on Mon, 09/26/2022 - 12:53

My employer asked for an "upscale farmhouse table" to act as a feature in our new training facility. After perusing designs online, I found this one and decided to upgrade it just a bit for the stated purpose.
Made entirely of white oak (over $1600 worth!) purchased as 4/4 and 5/4 stock, I milled all the lumber to spec in our shop. As it was to be 10' in length, and I was unable to acquire acceptable wide stock for the tabletop in that length, I went with breadboard ends, which also seems to have served to upgrade the appearance over "picnic table" to elegant showpiece. All joinery is invisible, using mostly dowels and glue where joints had to be hidden.
Final treatment was with tung oil, and it took up residence in its permanent home last week. I had to assemble it on-site, as there is NO way to move a table of this size in and out of the building. It's there to stay.

As my lumber wasn't exactly spec-size (1X4, 2X10, etc), I had to do the math and make some adjustments to achieve spec height, but the final product is a rousing success.

Thank you for the inspiration.

Comments

My modified simple, cheap, and easy console

Submitted by cbrowan on Sun, 08/21/2011 - 11:35

I wanted a simple table to highlight this retro sewing machine I inherited from my grandma. I had to modify a few of the dimensions of this table and add a different trim up top, but I really like the results!

Estimated Cost
FREE (used leftover boards/paint from a different project)
Estimated Time Investment
Afternoon Project (3-6 Hours)
Finish Used
2 coats of Minwax Dark Walnut stain
1 distressed coat of Valspar Sea Breeze, semi-gloss
1 coat of Minwax Polyurethane finish, satin
Recommended Skill Level
Beginner

Dresser For Little Girl's Room

Submitted by sraper2 on Thu, 09/12/2013 - 10:45

I built this dresser for a little girl. It was my first time doing drawers and I was a little intimidated but it wasn't bad at all! I'm going to be building one for my sons room too. Thanks for the great plans!!

Estimated Time Investment
Day Project (6-9 Hours)
Recommended Skill Level
Intermediate

My spin on kentwood nightstands

I included some pictures of very rudimentary drawings I did of all the cuts of wood you would need to build these if anyone wants to take a stab at it.  The drawings are rudimentary but you can definately build from them

Another idea I got from the kentwood posts.  Actually this was a brag from another user that got the idea from the kentwood nightstand post.  So I took to building it.  It is built out of solid pine.  For middle shelf and bottom shelf are cut from 3/4 thick plywood as my local store didnt cary pine large enough for the shelves and I did not feel like gluing slabs of pine together.  Though I ending up putting slabs of pine together for the top, because I wanted that to be pine like the rest of the nightstand.  I drilled a few pocket holes in each piece of pine.  Glued the edges and screwed them together with pocket holes which worked out great and I didnt have to clamp and wait for them to dry.  The inlay on the door is something I found at my local home depot.  It I glued it on and put a couple of pin nails around the eadges.


I finished the night stands with a cream white latex paint and glazed over the paint with valspar antiquing glaze which gave it a great ages grayish look.  Then sprayed it with a couple coats of Varethane Soft Touch Matte Polyurethane.  Which I dont recomend using.  I only used it because it was the only matte poly I had laying around.  If I were you I would opt for a much better poly to go over waterbased paint like General Finishes High Performance Poly.  The top I stained with General Finishes java gel coat and Gel coat poly.  I wasnt digging the way the gel coat looked on the pine nor did I like the color of the stain paired with the color of the nightstands.  so I have since then sanded off the gel coat and stained the top an onyx which to me looks a lot better.  Sorry I do not have any pictures of that.

Estimated Time Investment
Weekend Project (10-20 Hours)
Finish Used
Kilz Premium pimer and sealer
Off white water based paint
Valspar Antiquing glaze
General Finishes Gel Stain
General Finishes Gel Top Coat Polyurethane
Recommended Skill Level
Beginner

Comments

kbdesigns

Wed, 11/18/2015 - 08:09

Very nice attention to detail! All the small things that you've done different/better that have made this piece unique, very talented!

In reply to by kbdesigns

diversity210

Wed, 11/18/2015 - 16:56

Well thank you very much.  I like to be unique or at least try to be unique.  Though sometimes it can be hard to pull away from the cliche and the usual.  I dont take all of the credit though.  Got the idea from another users brag post on the kentwood nightstand page.  I added my own person touches to the build but its still fairly similar. 

Love My Desk

Submitted by Anonymous (not verified) on Sat, 01/05/2019 - 13:16

I absolutely love how this turned out! Great plans! I used a lot of old wood my grandfather had so this project was extra special. 

Built from Plan(s)
Estimated Time Investment
Weekend Project (10-20 Hours)
Finish Used
Antique White Chalk Paint and Kona Rustoleum Stain for Top
Recommended Skill Level
Intermediate

Comments

King Farmhouse Bed

Submitted by Martinec97 on Tue, 10/04/2022 - 06:46

This is a King size farmhouse bed that I made based off of Ana's plans. I love it! I painted it a light gray and then glazed over it with a darker gray. Thanks for looking! - Wendy

Comments

My Apothecary Cabinet

Submitted by Sarah A. on Mon, 08/22/2011 - 17:41

I have always loved apothecary consoles! Then my grandmother gave me her huge collection of pottery, which I have admired since I was a kid. I had nowhere to put it, so it was a perfect excuse to build this.

I used MDF for the cabinet and pine for the top. I did a thick top, I stacked two 1x6s on top of each other, giving me 1.5" thick top. I also distressed in and filled in with Ebony Wood filler. I absolutely love how it turned out. I hadn't used pine before, I always use poplar. This project made me love pine!

I modified the plan slightly...I made 4 doors instead of drawers. I also made the top cubbies 2" taller, just to add extra height. I still need baskets for the cubbies, though!

Built from Plan(s)
Estimated Cost
$180
Estimated Time Investment
Weekend Project (10-20 Hours)
Finish Used
For the top, I used Minwax stain in Provincial. I then distressed it with a screwdriver and filled in the scratches with ebony wood filler. I did two coats of wipe on poly on top, sanding between coats. For the base, I used Vaslpar kitchen and bath paint, can't remember exact color.
Recommended Skill Level
Beginner

Comments

Kristi Hays

Fri, 08/26/2011 - 08:29

You did an amazing job! This piece has been on my to-do list for awhile now. I think that's the beauty of Ana's site, seeing the wonderful finished projects of other amateur builders gives us all the confidence to tackle things we'd never otherwise dare. I hope when I finally get around to building this, it will turn out as lovely as yours has, thanks for sharing.

Sarah Crawford (not verified)

Mon, 08/29/2011 - 12:12

This looks really great! This is next on my to-do list to make as a tv stand... it'll be my biggest project yet & I'm nervous, but this looks wonderful & makes me think it'll be worth it :)

First Build Bedside Table

Submitted by pemmo on Mon, 09/16/2013 - 01:15

My first build, a small side table for our newly decorated guest bedroom. Adapted from the Mini Farmhouse Bedside from Ana's website and the side table from her book.

The top and shelf were made from reclaimed oak panels from an old wardrobe.

I now have a second table and a farmhouse bed to make. I constructed without a Kreg jig but am thinking of buying one now to make construction cleaner.

Built from Plan(s)
Estimated Cost
£25
Estimated Time Investment
Day Project (6-9 Hours)
Finish Used
Annie Sloan Old White chalk paint for the frame (with clear wax), water based satin floor varnish for the oak sections.
Recommended Skill Level
Beginner

Comments

Bunnie1978

Mon, 09/16/2013 - 08:16

Trust the 5 million people on this site that have said "it's the best thing ever" and go buy it! You don't have to get the whole set if you can't afford it, there is a $20 one that you just have to clamp right to your wood. Takes longer but still totally awesome.

Good job.

Bar Cabinet

Submitted by BobC on Fri, 11/20/2015 - 20:31

I had this wine refridgerator that my wife gave to me years ago for a birthday and it really needed a home since it's been sitting in the corner of our dining room for several years.  After seeing some of the adaptations of the Printer Cabinet, I decided to try to modify if for my use.  I put pencil to paper and came up with a two sided design that would hold the refridgerator and all of our wine/bar glasses as well as some liquor.  It came out much better than I expected since this was my first real go at making any kind of cabinetry.  Measure twice, cut once really works.  I am eager to start my next project.  Thanks for the inspiration!

Built from Plan(s)
Estimated Cost
$450 (300 was for the piece of Granite I purchased for the top)
Estimated Time Investment
Week Long Project (20 Hours or More)
Finish Used
Minwax - Sedona Red stain, Poly
Recommended Skill Level
Beginner

Cherry Hardwood Fancy Hall Tree

Submitted by Anonymous (not verified) on Tue, 01/08/2019 - 16:23

I built this Fancy Hall Tree with cherry hardwood and cherry plywood. The lower bench is done with rabbet joints and dados instead of pocket hold screws but the upper portion is all pocket hole screwed together but instead of laminating a large piece of plywood tot he back I cut individual panels and dropped them into rabbets like a picture in a frame.  The supporting wings are connected to the base and the back panel with pocket screws as is the panel to the base.

Estimated Time Investment
Week Long Project (20 Hours or More)
Finish Used
I finished with a natural danish oil and then three coats of polyurethane.
Recommended Skill Level
Intermediate

BEST DIY Garage Shelves (Attached to Walls)

Submitted by Anonymous (not verified) on Mon, 10/17/2022 - 13:28

Total cost $87. This project was very easy and did not take much time.

Comments

Shoe crates

Submitted by stcarroll on Fri, 08/26/2011 - 10:08

We desperately needed something next to the door to put shoes in. I didn't quite yet have the courage to attempt the shoe dresser (http://ana-white.com/2011/01/shoe-dresser) and there are lots of scraps in our shop from my husbands projects. I tried these crates out and they were super easy and super fast to throw together during nap time. I primed and painted because I used plywood instead of 1x12.

Built from Plan(s)
Estimated Cost
FREE!!!!!
Estimated Time Investment
An Hour or Two (0-2 Hours)
Finish Used
primed and painted with left over paint we had from misc. projects.
Recommended Skill Level
Starter Project

Comments

clucaswvu04 (not verified)

Fri, 09/09/2011 - 08:54

I loved the vintage crate plans but hadn't thought of a good use. We have a shoe problem in our house too. With 3 kids, they all get mixed up and it drives me crazy! We've tried an over the door shoe organizer; but that hasn't been especially helpful because the 2 youngest would need a stool to reach anything about the bottom 2 rows. I think I just found my weekend project - one for them each in a different color should do the trick. Thanks for sharing