Community Brag Posts

Play Kitchen

Submitted by kld182 on Tue, 09/20/2011 - 12:31

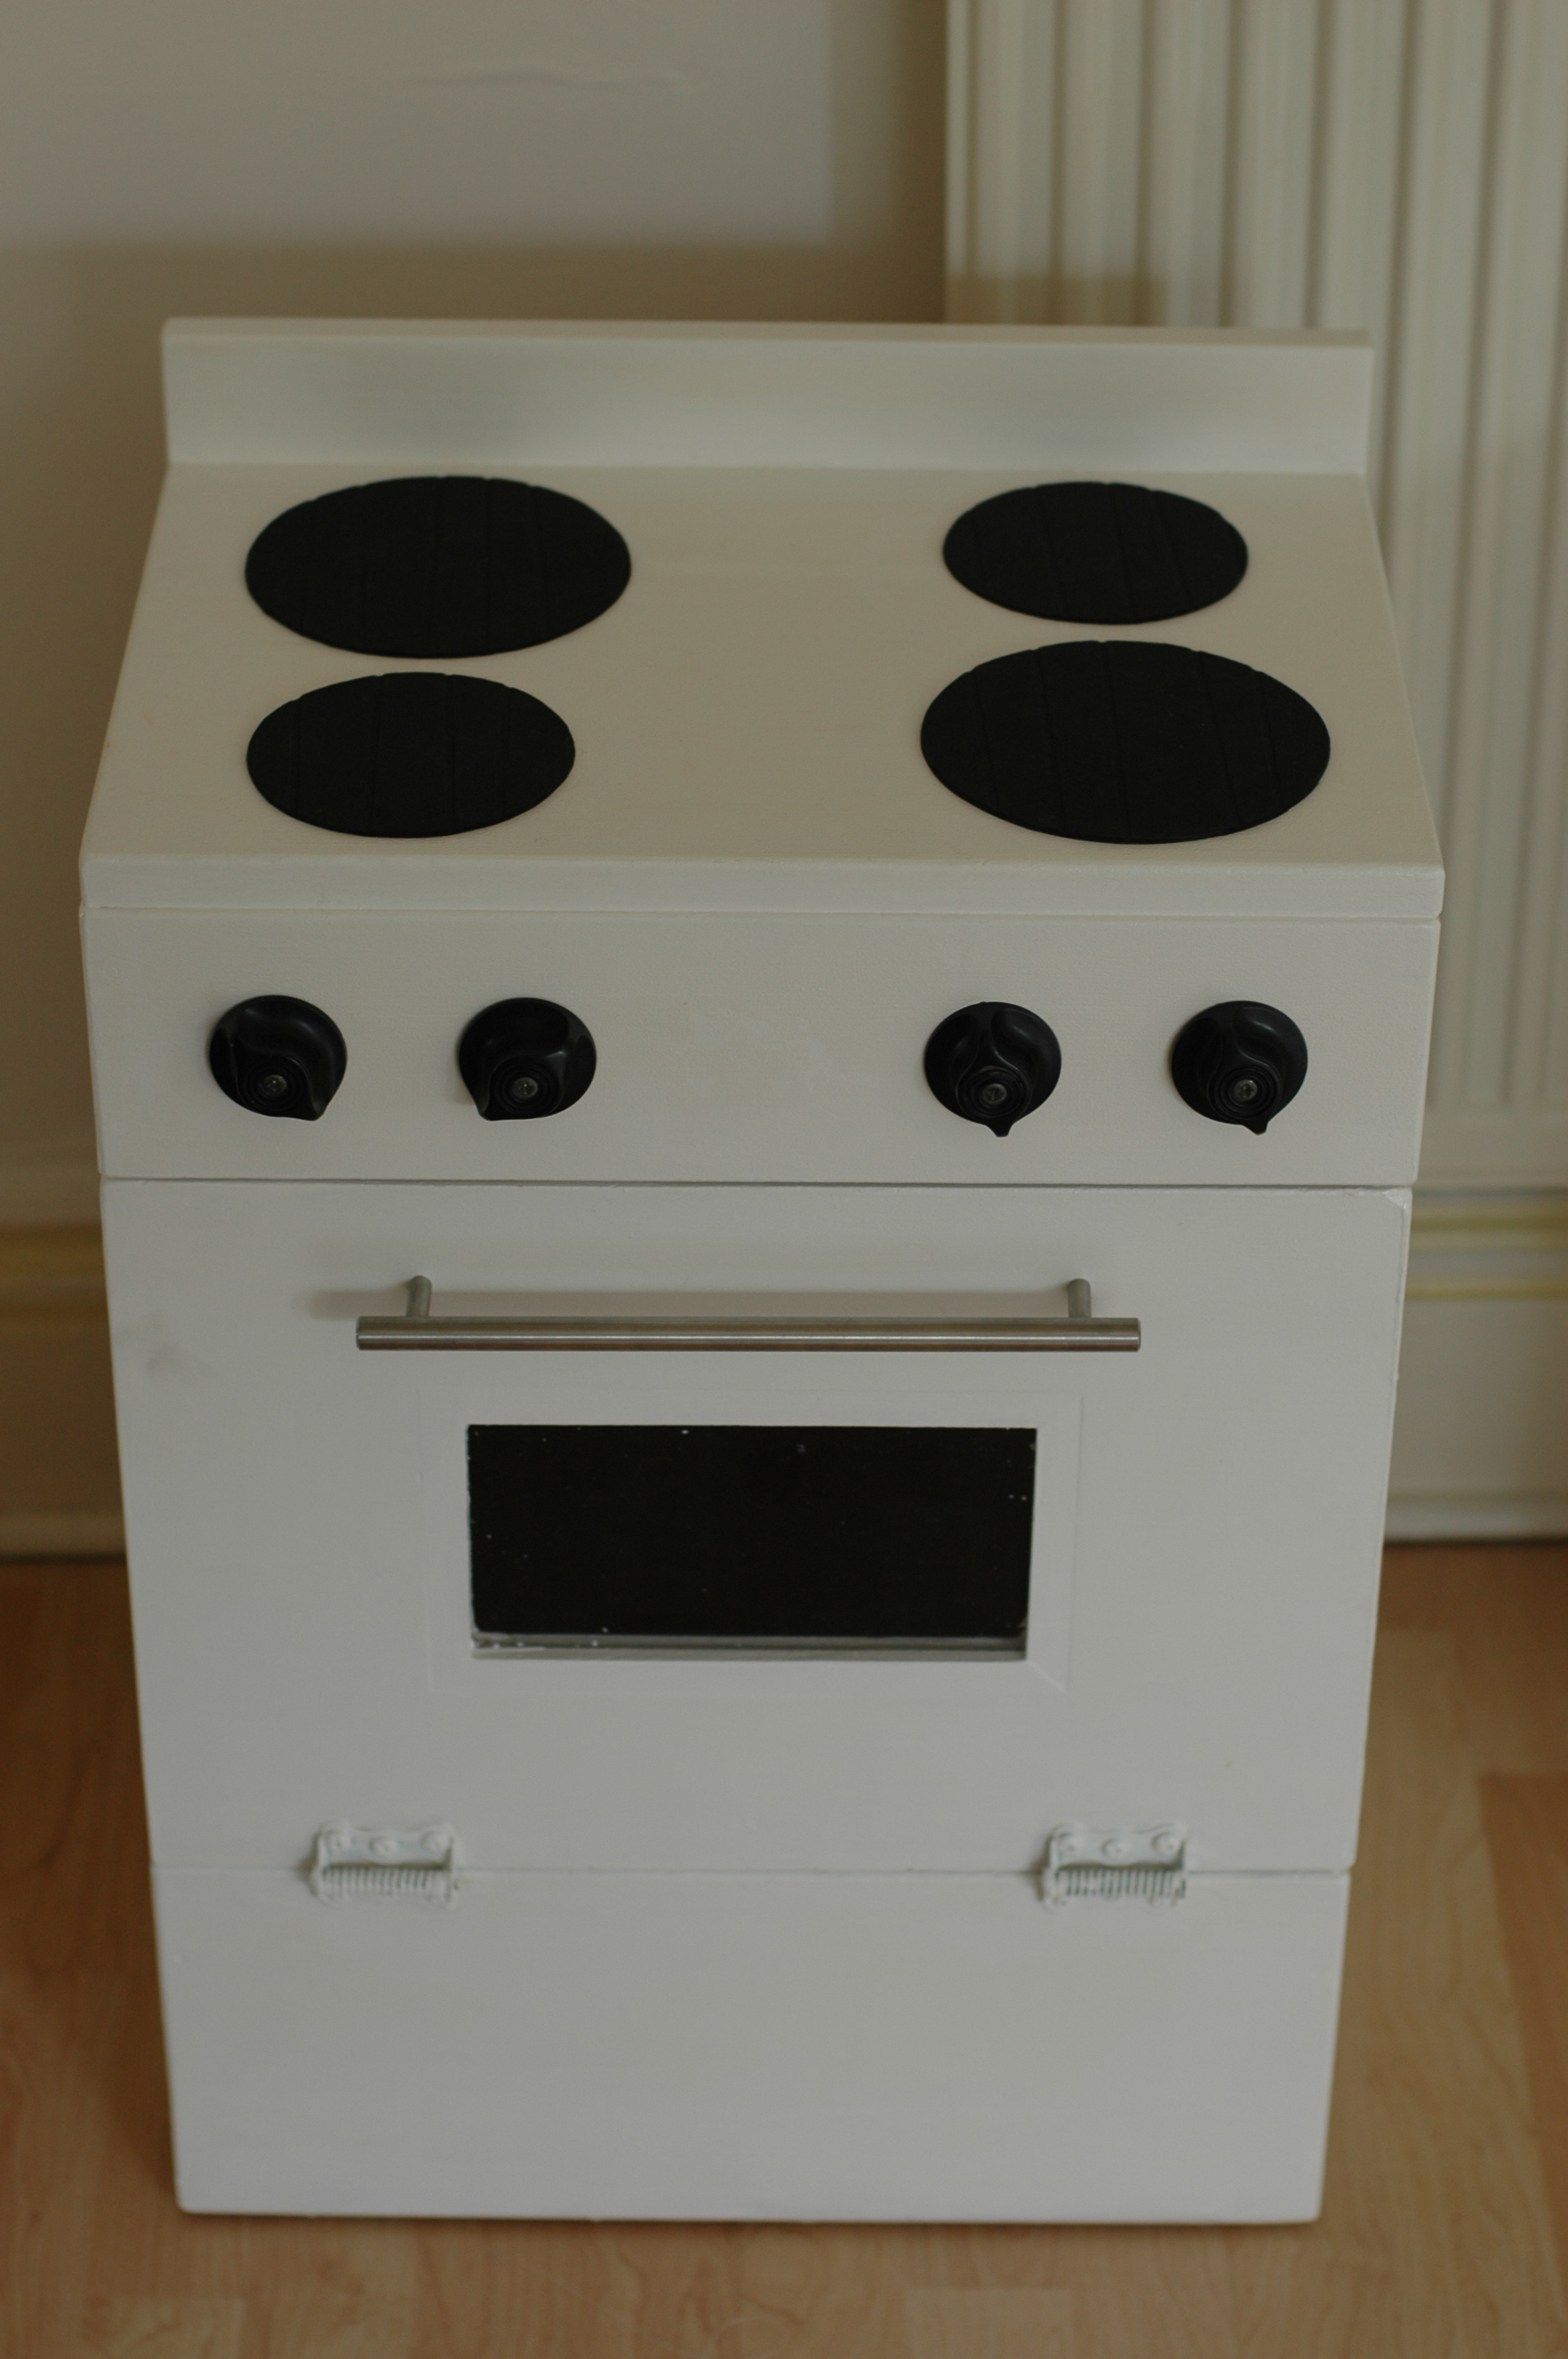
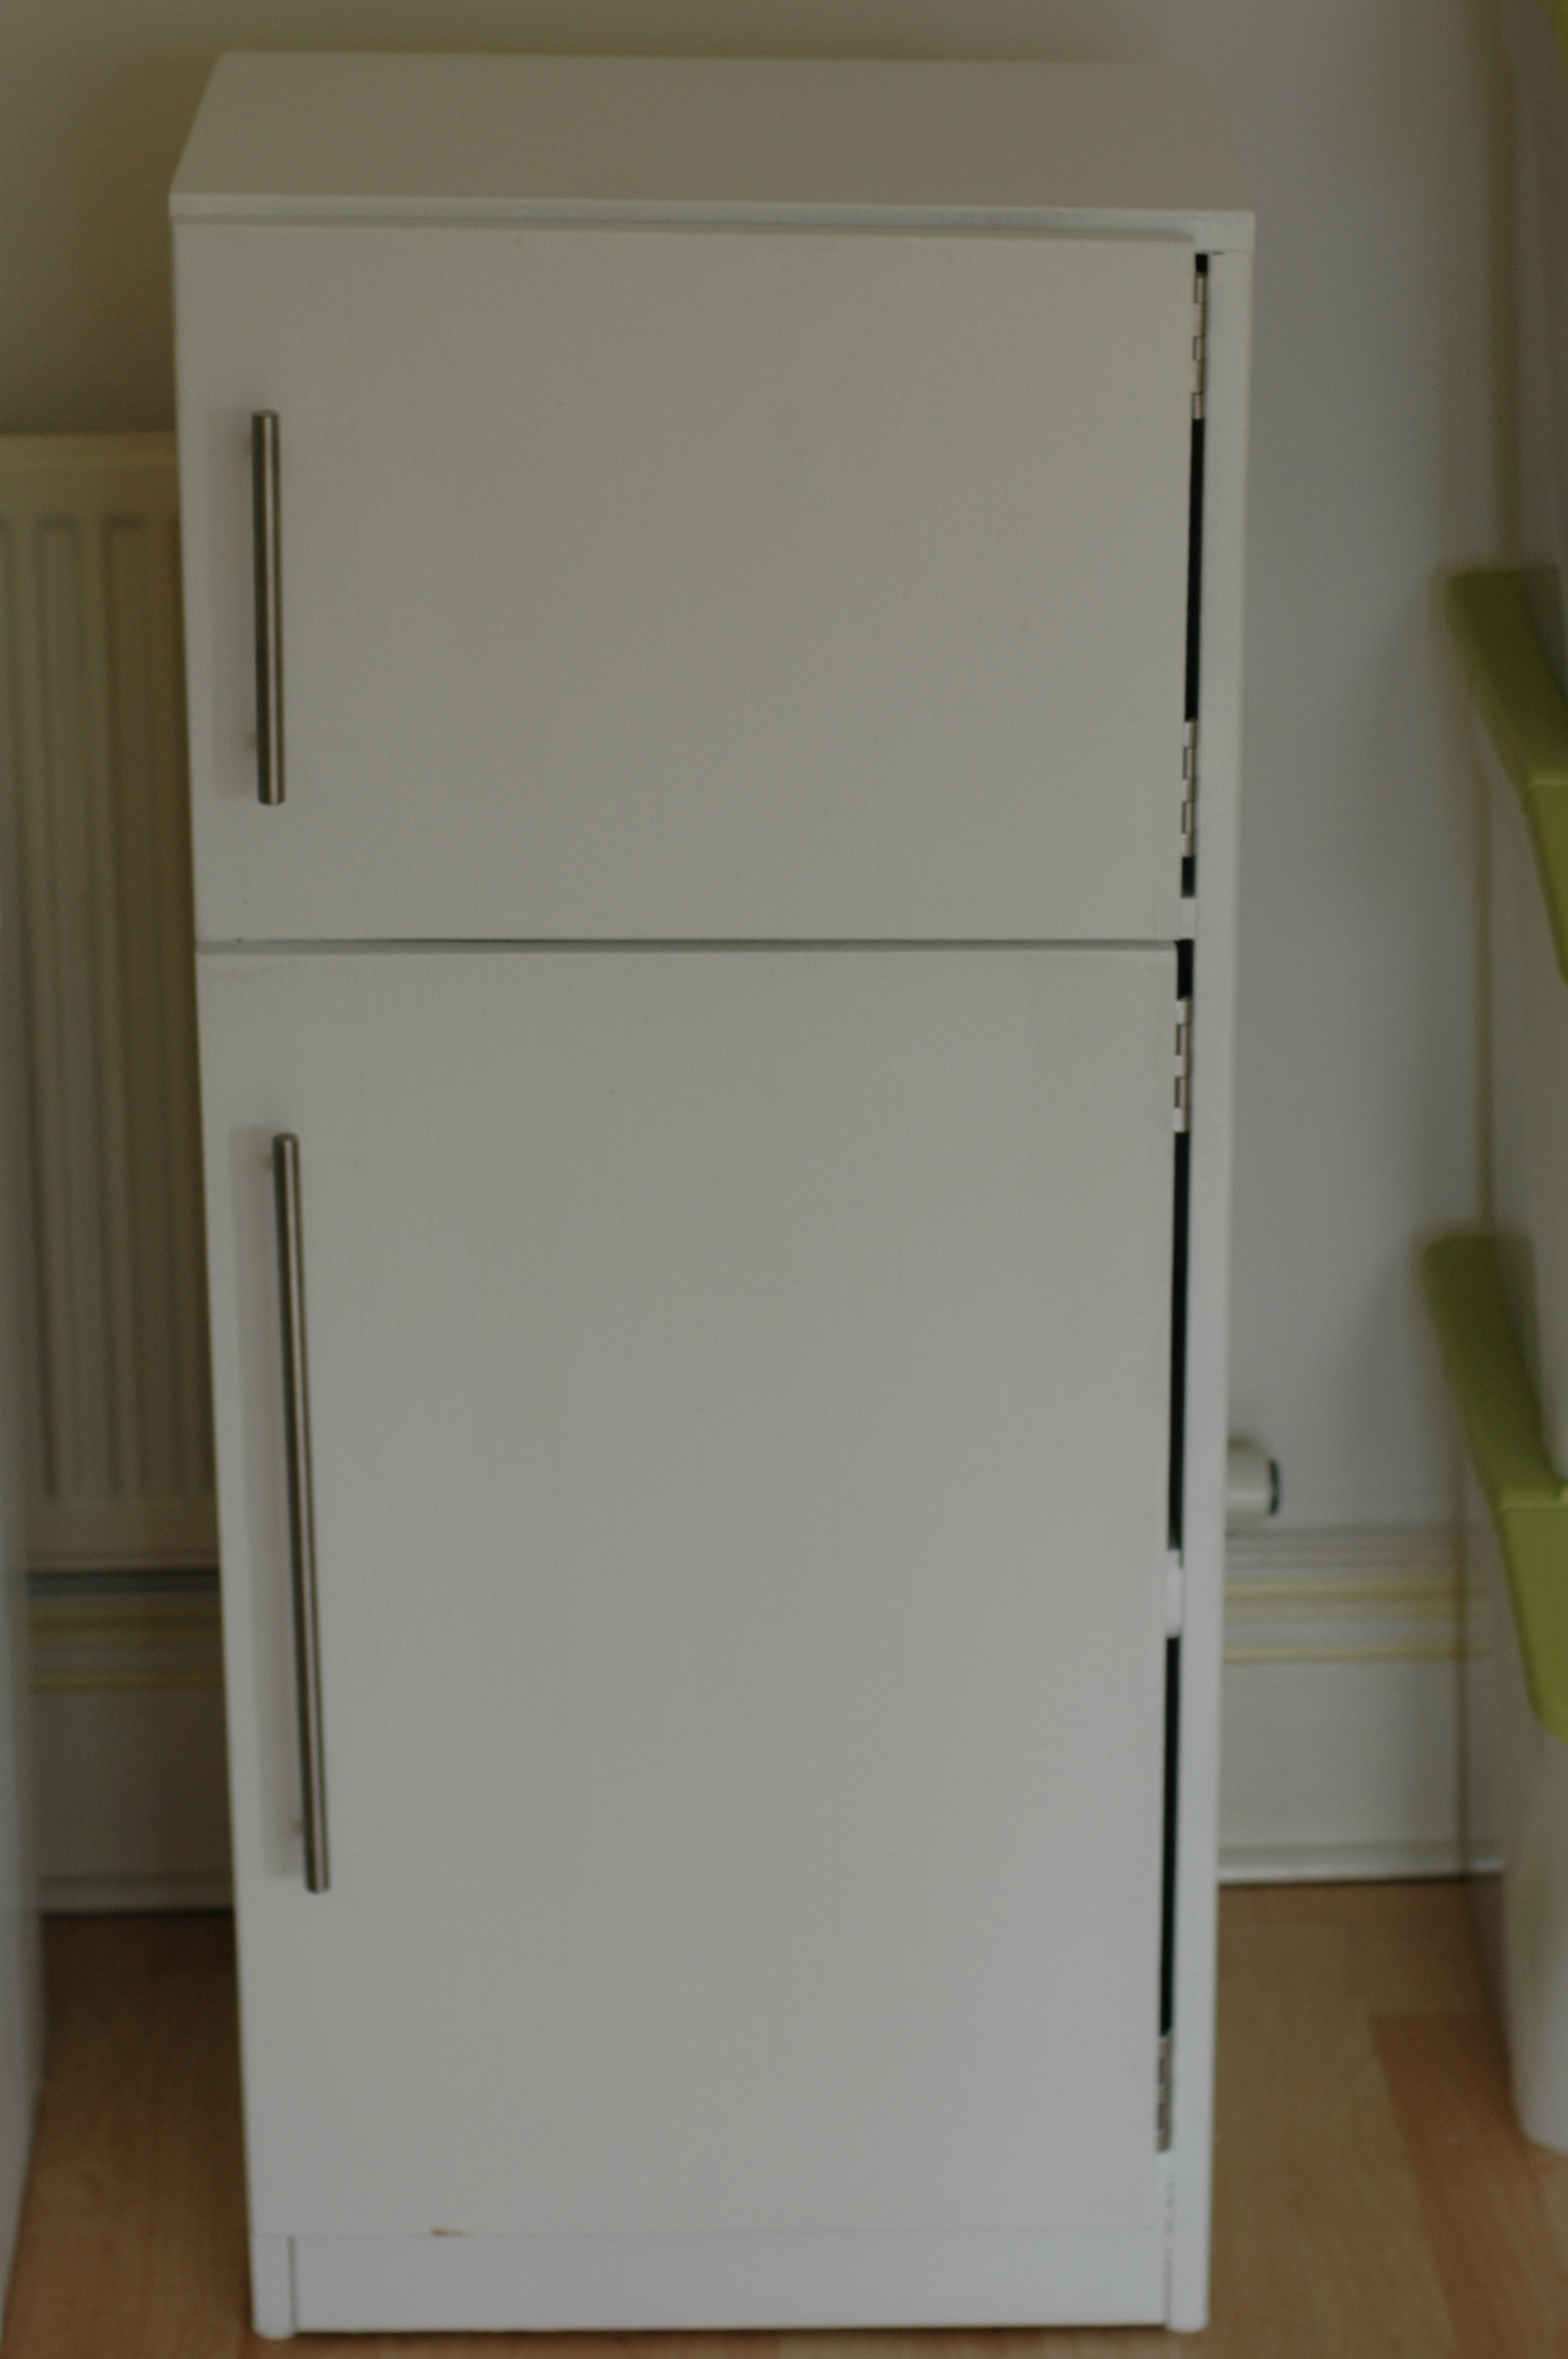
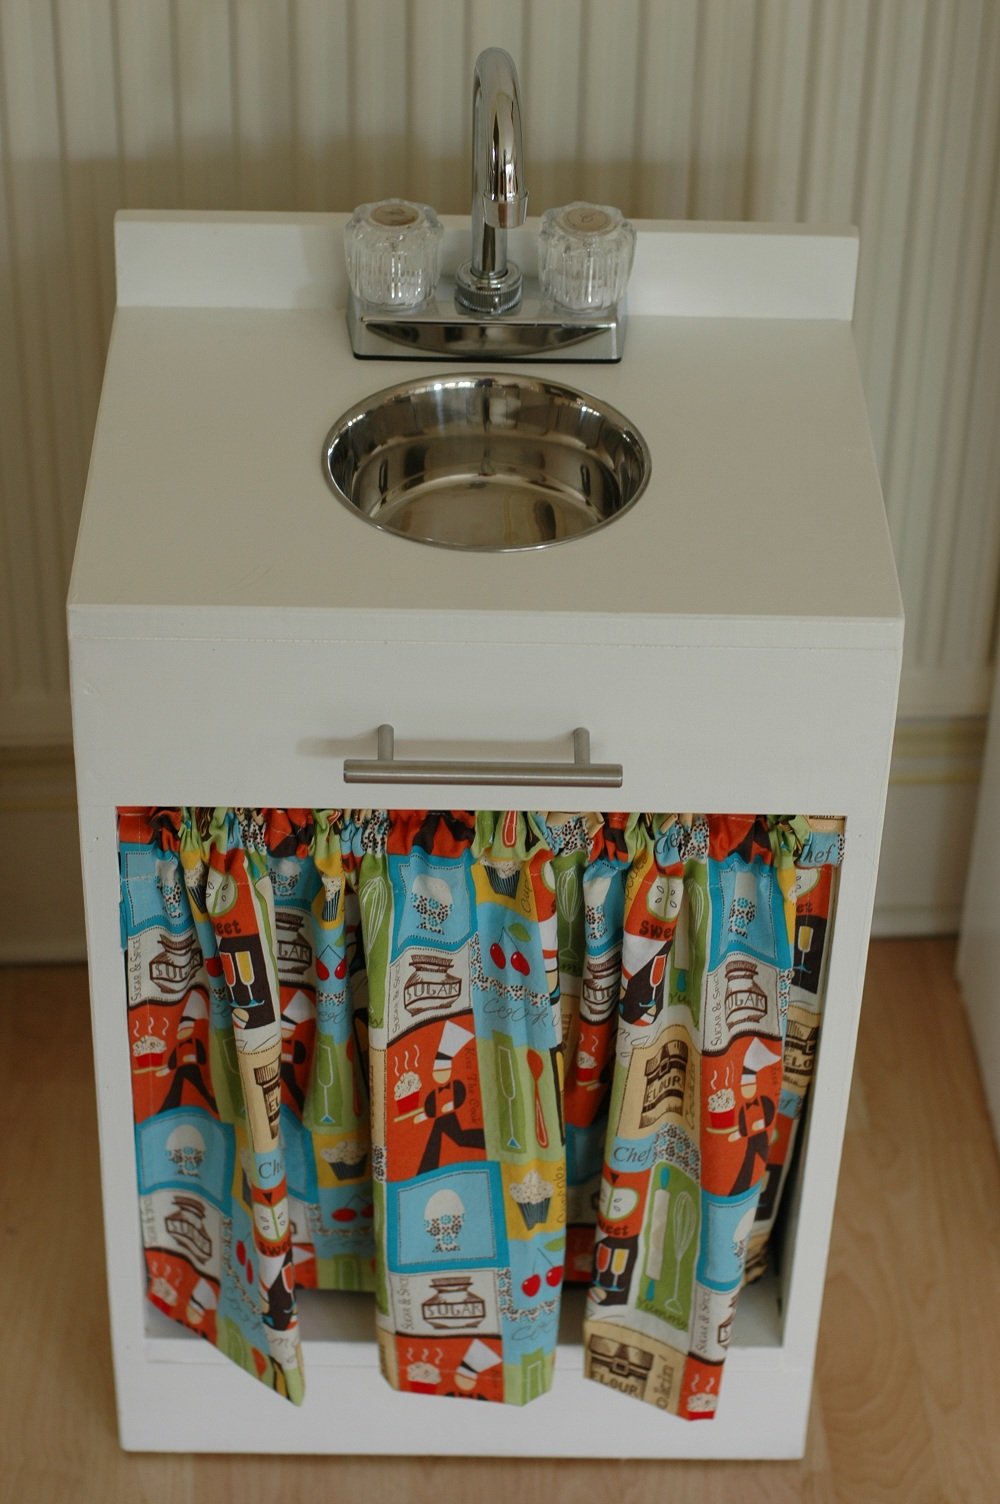
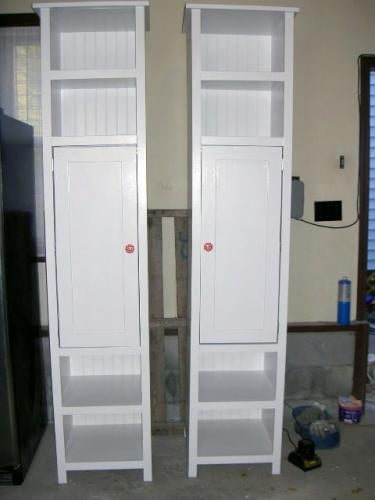
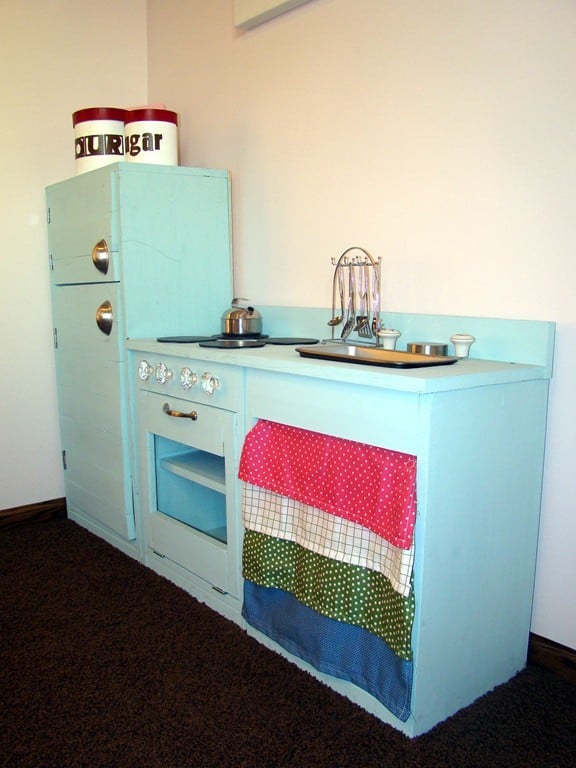
I spent lots of time looking at all the photos posted on this site of people's amazing renditions of "Grace's Play Kitchen." I was so inspired by everyone's creativity! I found an old wooden play stove at a flea market and decided to make a matching sink. I took Ana's plans to the carpenter at the wood shop on the military base where I am stationed and asked if he could help me build a matching piece. We spent about 4 hours one Saturday building the sink. The carpenter had so much fun helping me, he suggested I build a matching refrigerator. So that was created in another couple hours the following Saturday. I did as much of the building as I could, but definitely had some help from the carpenter as I'm a novice. (Thanks, John!) I made the curtain and matching towels, but found the apron and chef's hat on Etsy. (Thanks, "SweetApronzNCupcakes"!). The play kitchen is in my kitchen, so my two year old daughter can pretend play while I'm working on meal preparation. Thanks again, Ana and all the creative folks who contributed ideas! I foresee many hours of play enjoyed by this play kitchen, and hope it can be passed on to future generations!

Estimated Cost
$150 (this is a rough estimate, everything purchased was in Euro and the exchange rate stinks!)
Estimated Time Investment
Day Project (6-9 Hours)
Finish Used
water based acrylic paint
Recommended Skill Level
Beginner

Comments

Greenheart Bathroom Vanities

I've been working on these bathroom vanities for a family building a home. These are made of gorgeous Greenheart lumber. I have only worked with pine and spruce up to this point, but this wood is truly stunning. It has been quite the adjustment to work with, and I've broken my share of bits and screws :)

All of these together took me about a week to complete. Had I been working with a softer wood it would have taken no time hardly, but the hardwood....that's a whole other ballgame to me!

They will be adding 2'' thick concrete counter-tops on these when they get installed. I love the simplicity of their look!

Built from Plan(s)
Estimated Cost
No idea on what this wood costs (and the costs to get it to where I live)
Estimated Time Investment
Week Long Project (20 Hours or More)
Finish Used
Unfinished in these photos. They are still trying to decide the final finish.
Recommended Skill Level
Intermediate

Comments

NimbleShopper

Tue, 10/01/2013 - 07:35

These vanities are beautiful. It would be really neat if you could add pictures when they are installed with the counter tops! I am contemplating replacing a vanity with a DIY one, and I love seeing how other people have made things beautiful with their own 2 hands.

Stained pressure treated Folding Plant Stand

Submitted by ginnever on Sun, 12/20/2015 - 06:37

Lesson learned....... Drilling straight holes is critical.

Built from Plan(s)
Estimated Cost
Used treated lumber....... about $12 for lumber, $16 for bolts, $5 for exterior screws, $2 for button plugs, $10 for stain ( plenty left for additional projects).
Estimated Time Investment
Afternoon Project (3-6 Hours)
Finish Used
Min wax
Recommended Skill Level
Beginner

Chunky leg bedframe

Submitted by Anonymous (not verified) on Tue, 02/12/2019 - 17:43

I got tired of sleeping on the floor like college kids, but I didn’t want to buy a junky particle board bedframe. My husband and I are novice woodworkers. Even still, we bought the lumber around noon and managed to finish the whole project in about 5-6 hours! We used a Kreg jig for the first time and it was pretty simple. I am really pleased with how this turned out, and I can’t wait to try more of Ana’s plans in the future.

Estimated Cost
$100 including the cost of pockethole screws and finishing nails.
Estimated Time Investment
Day Project (6-9 Hours)
Recommended Skill Level
Beginner

Floating bed

I built a floating bed using Ana's plans. In my case, I built a twin size bed which now my daughter enjoys every night. The bed turned out beautiful and very sturdy.

Comments

Photo Ledge from $10 ledges, slightly modified

Submitted by sshelby on Tue, 09/27/2011 - 06:47

8 foot long photo ledge inspired by $10 ledges project plan, http://ana-white.com/2010/10/ten-dollar-ledges.html

I used a 1x4, 1x3, and a 1x2 and added some crown molding to the bottom for a little something extra.

Estimated Cost
$15 in lumber
Estimated Time Investment
Afternoon Project (3-6 Hours)
Recommended Skill Level
Beginner

Comments

Reclaimed from 100 year old farmhouse

Submitted by Richard714 on Thu, 10/03/2013 - 07:27

I was so excited to see this plan and knew what to do with the wood I had recently acquired when an old home was being destroyed near my house.
Love the site and the projects are too much fun!

Estimated Time Investment
Week Long Project (20 Hours or More)
Finish Used
Lacquer over danish oil
Recommended Skill Level
Intermediate

Comments

Pottery Barn knock off

Submitted by Anonymous (not verified) on Wed, 12/23/2015 - 12:13

I painted mine black and distressed it. Stained the top and distressed parts with MinWax American Walnut poly stain. Hardware from Van Dykes Restores. Used piano spring loaded lid supports for lid.

Built from Plan(s)
Estimated Cost
$110
Estimated Time Investment
Weekend Project (10-20 Hours)
Finish Used
Minwax poly
Recommended Skill Level
Intermediate

Modern Farmhouse railing on a deck

Submitted by Anonymous (not verified) on Fri, 01/13/2023 - 09:07

Inspired by the modern farmhouse railing we decided to install the same style on our deck. Our old railing was aged an deteriorated. The project took about two weekends, one to treat the metal with black magic, another to build the actual railing. We love how it looks!

Comments

Kitchen play set

Submitted by amym on Sun, 10/02/2011 - 12:13

I made this for my daughter for Christmas last year. Well, actually Santa did, or at least that's what she tells people. I had one of the big companies cut the lumber for me, but a few boards were cut incorrectly. I live about 25 minutes from a local hardware store and needed to have them re-cut. Luckily for me, my father-in-law is handy and he brought out his circular saw and helped me even out my boards. Then, for Christmas I got a gift too - a table saw.

Built from Plan(s)
Estimated Time Investment
Weekend Project (10-20 Hours)
Finish Used
I used a tip from Ana and looked to the OOPS section at Home Depot. I had this color matched with a swatch, it didn't come out quite the color I intended, but I am happy with it. Its a little difficult to see in the picture, but the finish is quite flat.
Recommended Skill Level
Beginner

Rustic X coffee table and end tables

WOW this was our first build. We had some money to get started so went and bought new miter saw and sander, kreg jig, basically everything we needed to build it. Tools aside we spend only about $100 on the lumber to build the coffee table and 2 side tables.

Eric cut notches in the X instead of using 2 separate pieces for the other side, so they fit together like a puzzle piece. it was a learning experience of trial and error, but he got better and better each time.

For the finish i used the tutorial of dissolving steel wool in vinegar and then added a coat of strong coffee which made an ugly green-gray color. I happened to have picked up a can of "autumn" wood stain that when applied made the color pop and look amazing. (thank goodness because i was so frustrated and wanted to give up) when we do this again (cuz i just sold the set we made) i will be better at sanding everything nice and smooth, and do staining/painting of the Xs and the top separately before putting everything together.

I dont recommend the steel wool and vinegar stain, it smelled terrible and was hard to apply because it was watery and ran a lot plus you cant see the color develop for a long time so its hard to see what was wet and what wasn't. yuk. The Minwax "gray" stain they just released would most likely work a lot better. those small can of stains for $6 are big enough for all 3 pieces we built so really i don't think i saved money buying the steel wool and vinegar.

Anyway this was way fun! Cant wait to build again :)

Estimated Cost
$100 of lumber, $500 of power tools and supplies
Estimated Time Investment
Weekend Project (10-20 Hours)
Finish Used
steel wool and vingear, plus a coat of coffee, then a coat of Rustoleum Autumn stain, coat of spray-can poly
Recommended Skill Level
Beginner

West Elm Knockof Chevron Queen Bed

Submitted by jpurp on Sat, 12/26/2015 - 21:33

I pretty much just followed the plans.  It turned out a bit more colourful that I expected but I've already sold it so I guess its okay.  I'm going to make another one with a bit more toned down colours.  I also created a matching night stand.  I didn't follow any plan.  Just used the ideas from the bed build.

Estimated Time Investment
Week Long Project (20 Hours or More)
Finish Used
Old Masters Wiping stain in Provincial, Cherry, Cedar, Weathered gray, Ebony
Recommended Skill Level
Intermediate

Bedroom Set

Submitted by Anonymous (not verified) on Mon, 02/25/2019 - 20:19

King Bed made with wood shims. Matching nightstands and mirror

Estimated Cost
$500
Estimated Time Investment
Week Long Project (20 Hours or More)
Finish Used
MinWax "honey" stain with semi-gloss polyurethane
Recommended Skill Level
Intermediate

Connor's Table

Submitted by Anonymous (not verified) on Mon, 12/28/2015 - 17:03

Clara table with chalkboard top.

Built from Plan(s)
Estimated Cost
$100
Estimated Time Investment
Week Long Project (20 Hours or More)
Finish Used
Paint
Recommended Skill Level
Beginner

Truss bench

Submitted by Anonymous (not verified) on Wed, 03/06/2019 - 15:08

This was an easy fun project for me! Alot of first finish wise, really like how it turned out, and so does the Mrs.

Built from Plan(s)
Estimated Cost
$50
Estimated Time Investment
Weekend Project (10-20 Hours)
Finish Used
Minwax stain & spar.
Recommended Skill Level
Intermediate

King Farmhouse Bed

Submitted by Pswag on Tue, 10/11/2011 - 14:08

Modified the bed so that is was not as tall as the original project plan. We also changed the molding on the top to a 2x4 with a angle cut and then a 1x4 on top. The bed can only be positioned one way in the room and we didn't want to cover the window with a real high head board. Thank you Ana! You rock!!

Estimated Cost
$250
Estimated Time Investment
Week Long Project (20 Hours or More)
Finish Used
We used Cabot Red Oak stain and sprayed with Polyurethane clear gloss spray.
Recommended Skill Level
Beginner

Kentwood Nightstand

Submitted by Hippychic on Wed, 10/09/2013 - 19:01

Kentwood night stand and matching headboard!

Estimated Time Investment
Afternoon Project (3-6 Hours)
Finish Used
custom
Recommended Skill Level
Beginner