


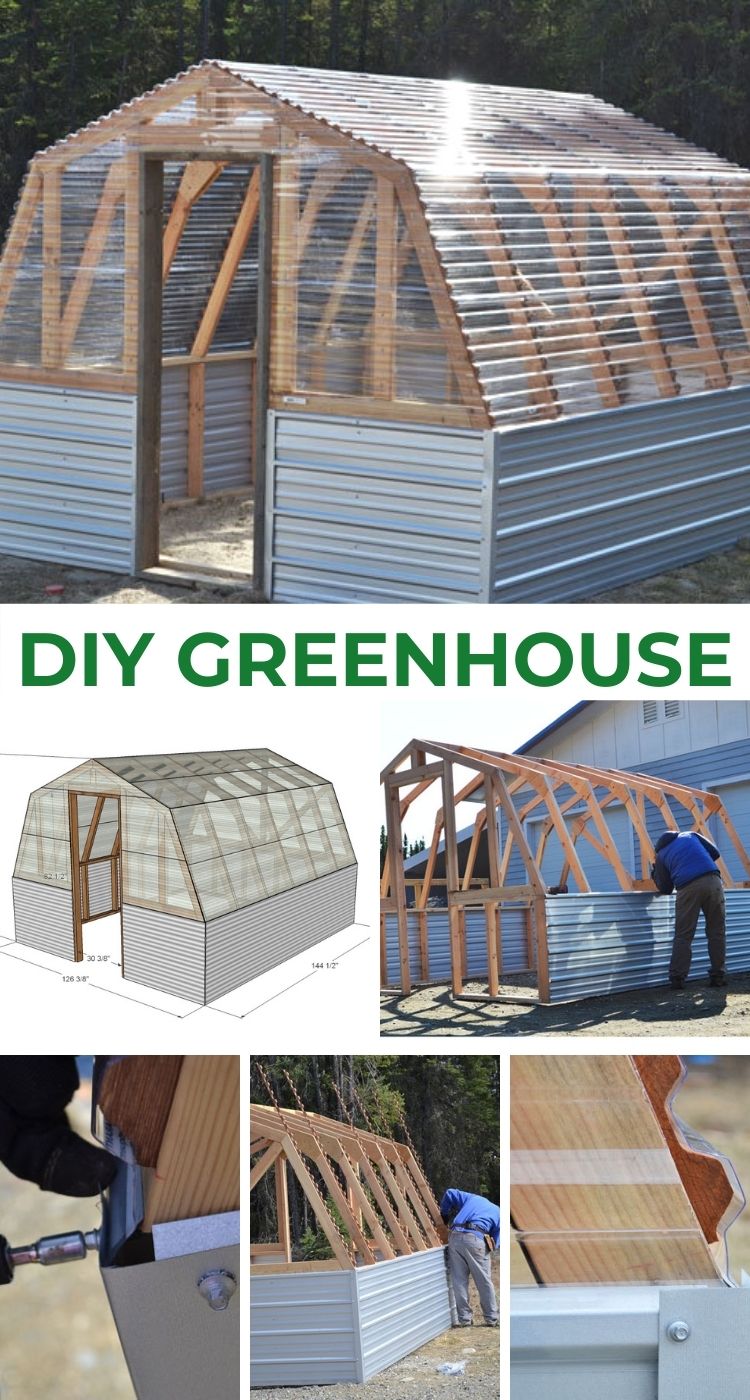
DIY Greenhouse plans - build your own DIY greenhouse, free step by step plans by ANA-WHITE.com
Building your own greenhouse is something you can tackle and save a ton. We built this greenhouse about six years ago, and it still looks brand new and is as sturdy as ever. We are happy to share our plans with you - see below.
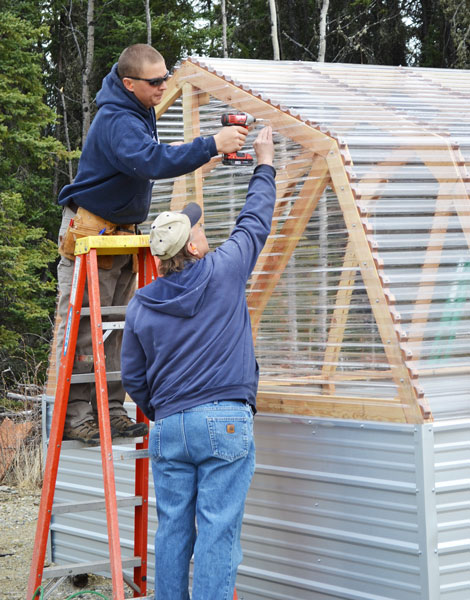
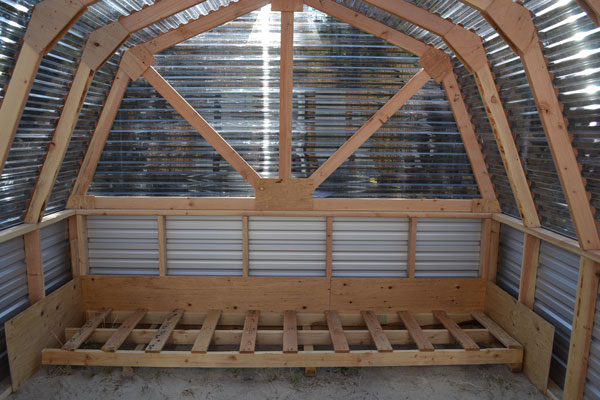
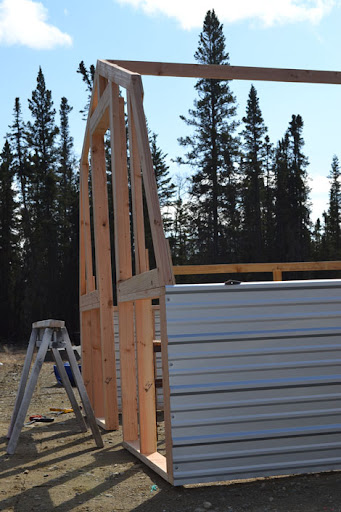
Here's some photos of the build -
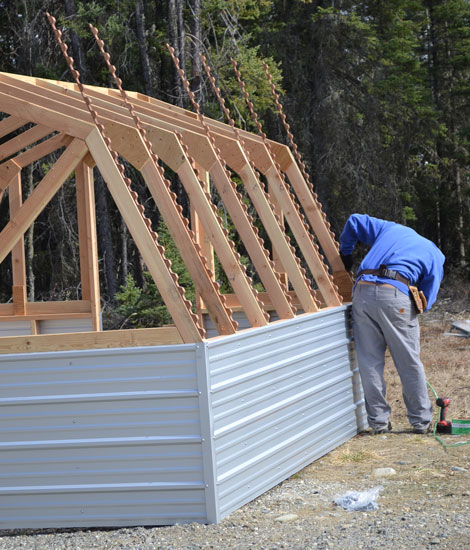
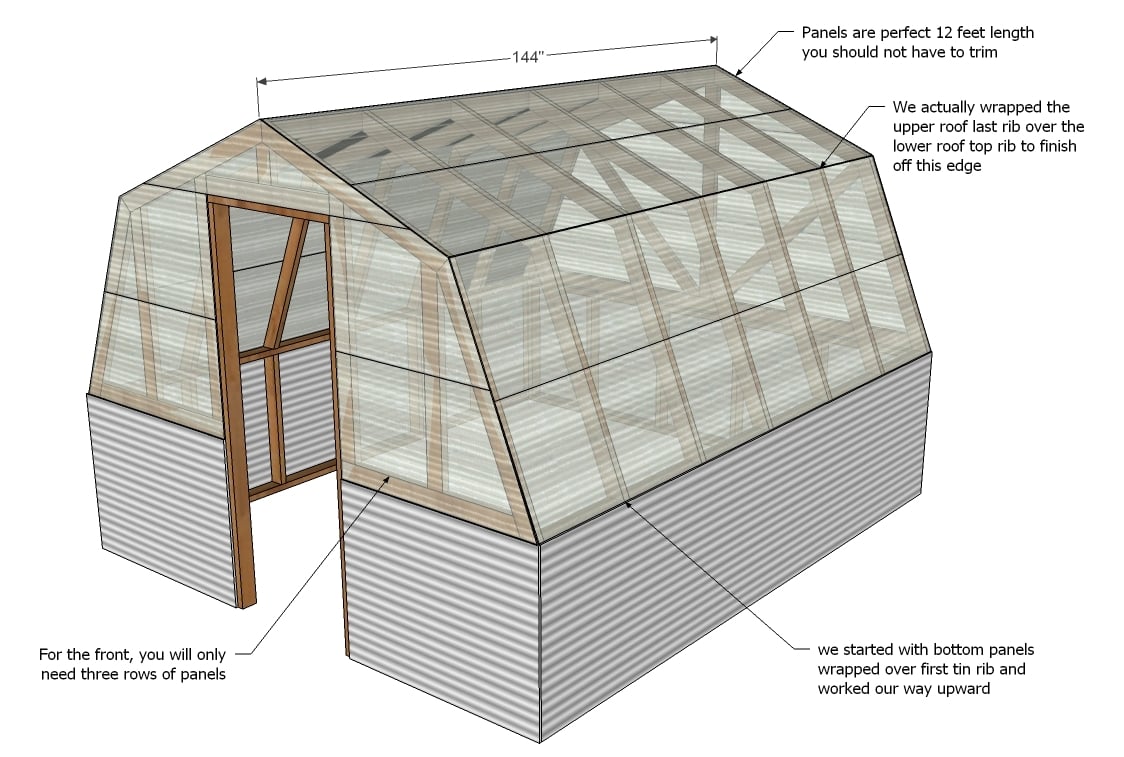
Near completion of the framing stage. We used 12' long pieces of corrugated metal roofing for the side walls.
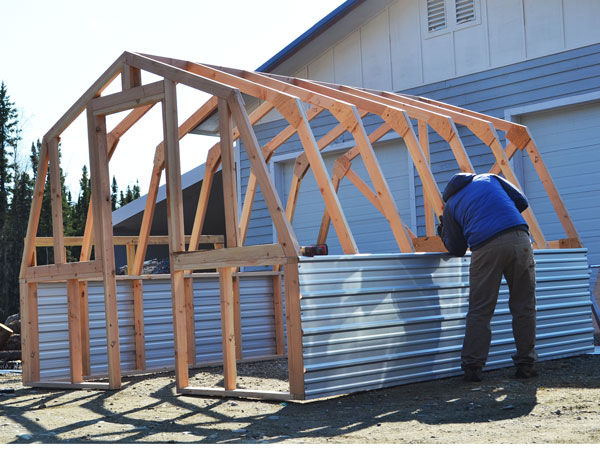
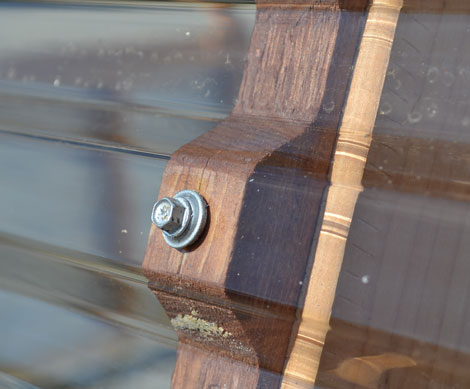
We ran the corrugated roofing horizontal. This was very easy to install and we have had zero issues with this design.
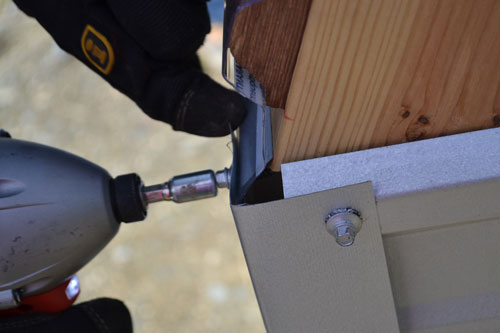
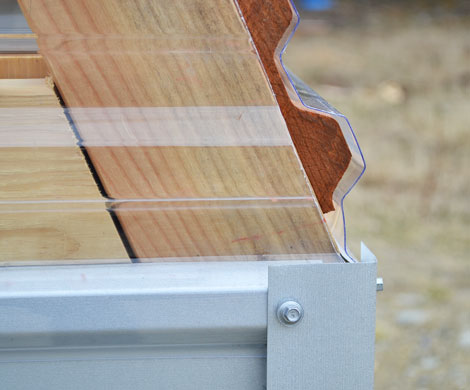
We also trimmed the corners out with metal flashing to make everything look nice and finished.
The greenhouse plastic wrapped right over the corrugated metal - like it was meant to be!
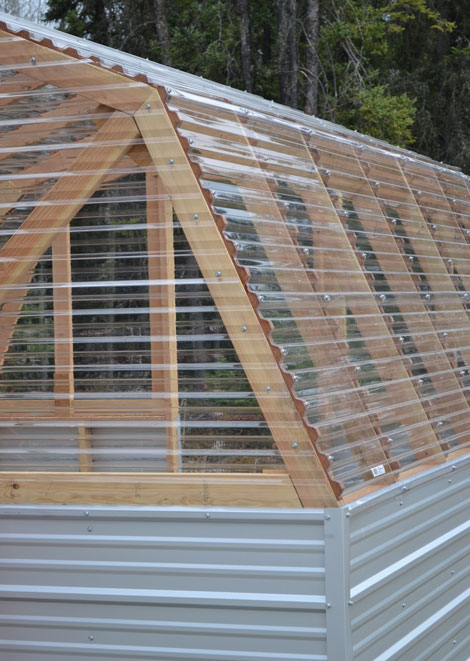
The only part that was slightly tricky was the ends - but really no big deal to add the greenhouse plastic panels.
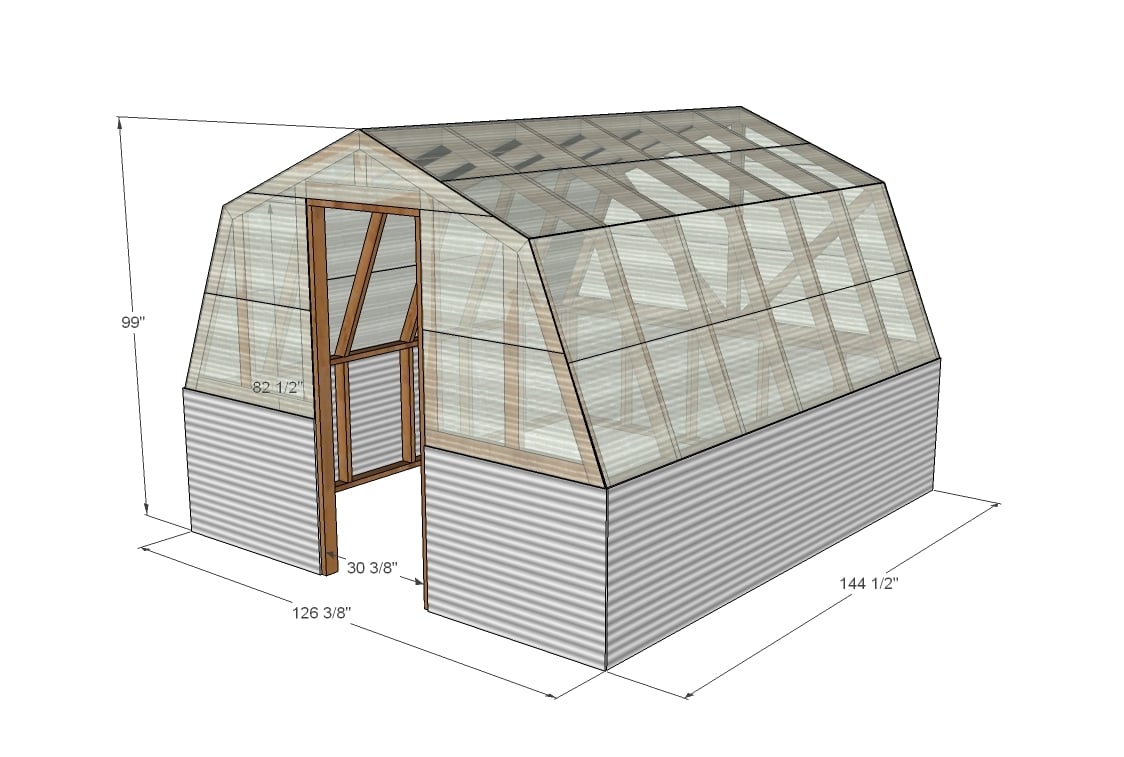
Our DIY greenhouse turned out great and we are so excited to share the plans with you.
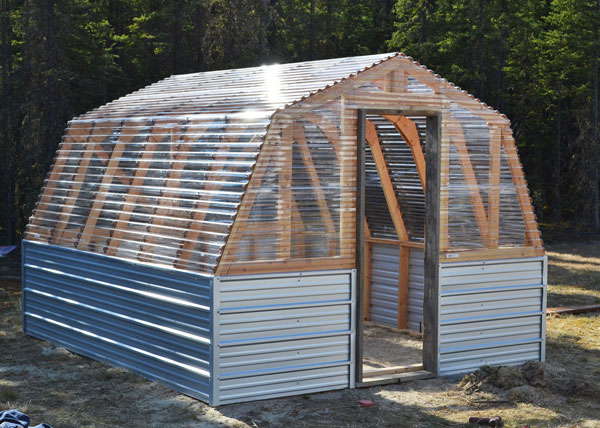

Please post a pic or share if you build!
Pin For Later!
Preparation
- 3 - 2x4 @ 10 feet long - use on back wall
- 5 - 2x4 @ 12 feet long - use on sides/ridgepole DO NOT CUT
- 32 - 2x4 @ 8 feet long
- 11 - 12 foot x 26" standard corrugated plastic greenhouse panels
- 1 - 8 foot long x 26" wide standard corrugated plastic greenhouse panel (use on door side)
- 3 - 12 foot long tin panels (use on sides and back)
- 1 - 8 foot long tin panel (use on front)
- Tin screws
- 28 - 4' long ribbing strips
- L flashing (optional for the corners)
- You'll need either metal gussets for the trusses or to cut plywood ones from 1/2" plywood
Cut list is in plan at each step


Instructions
Step 1
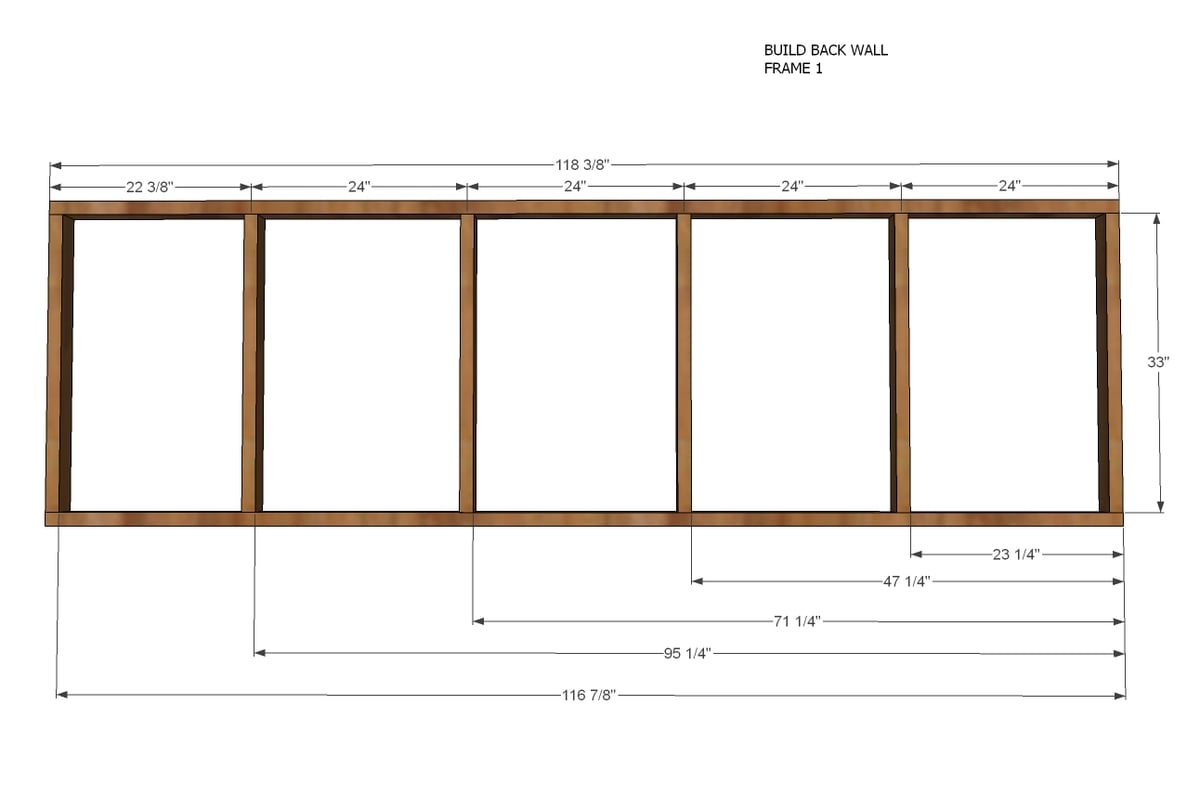
Back wall framing. Cut 2x4s as listed below. Screw together with 3" screws or nail together.
- 2 – 2x4 @ 118 3/8”
- 6 – 2X4 @ 32”
Step 2
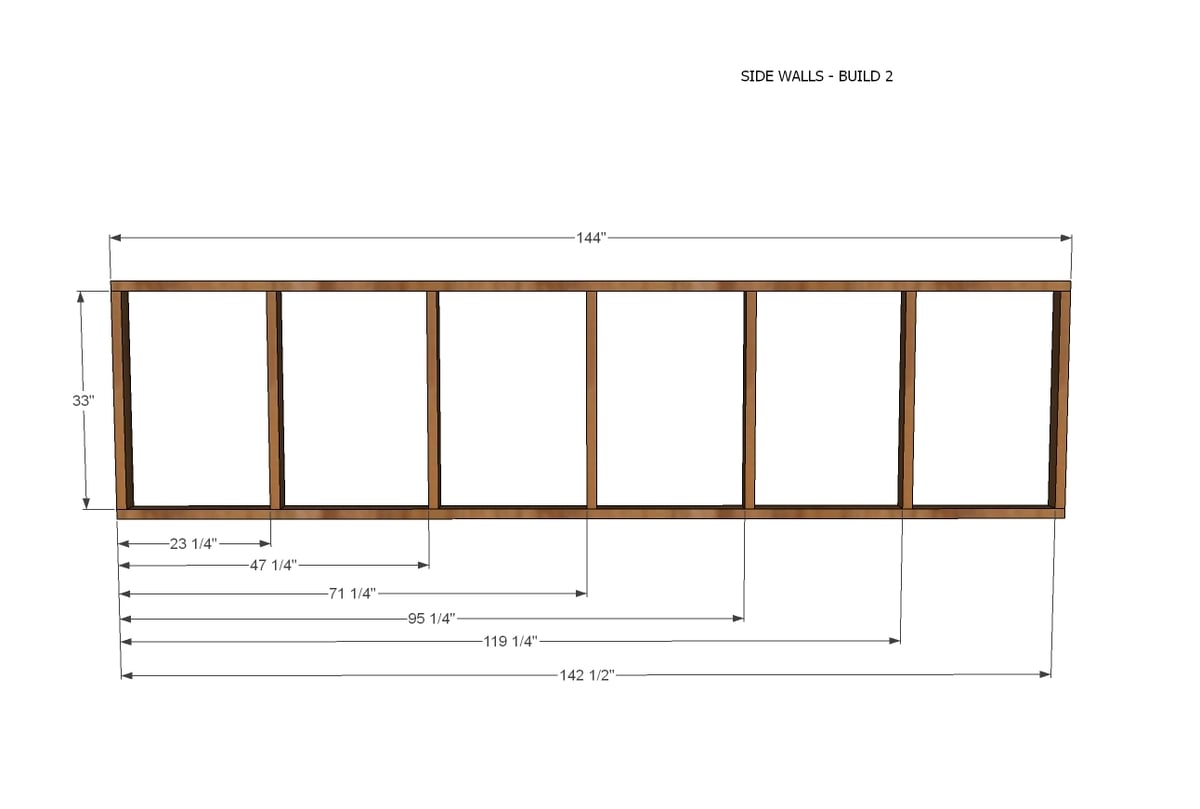
Side Wall Framing - Build TWO
- 4 – 2X4 @ 144”
- 14 – 2X4 @ 32”
Step 3
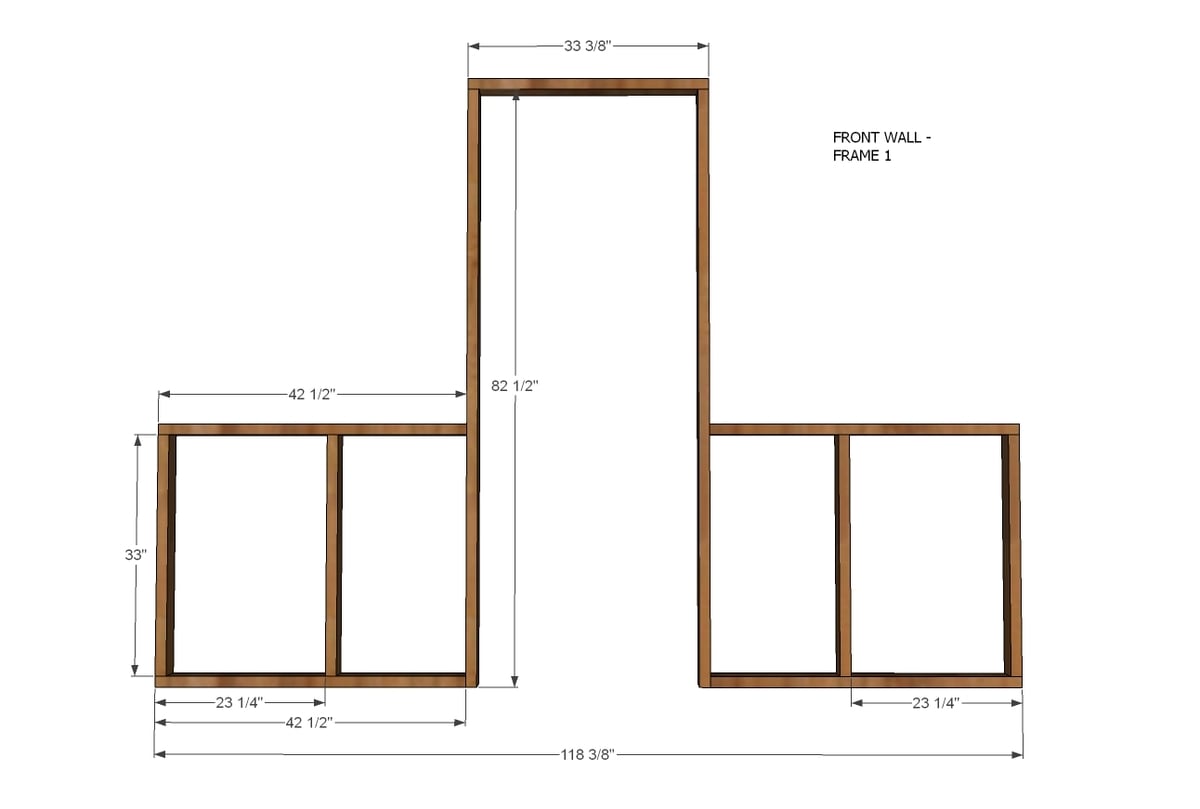
Front Wall Framing
- 4 – 2X4 @ 32”
- 4 – 2X4 @ 42 ½”
- 2 – 2X4 @ 81 ½”
- 1 – 2X4 @ 33 3/8”
Build the front walls as shown.
Step 4
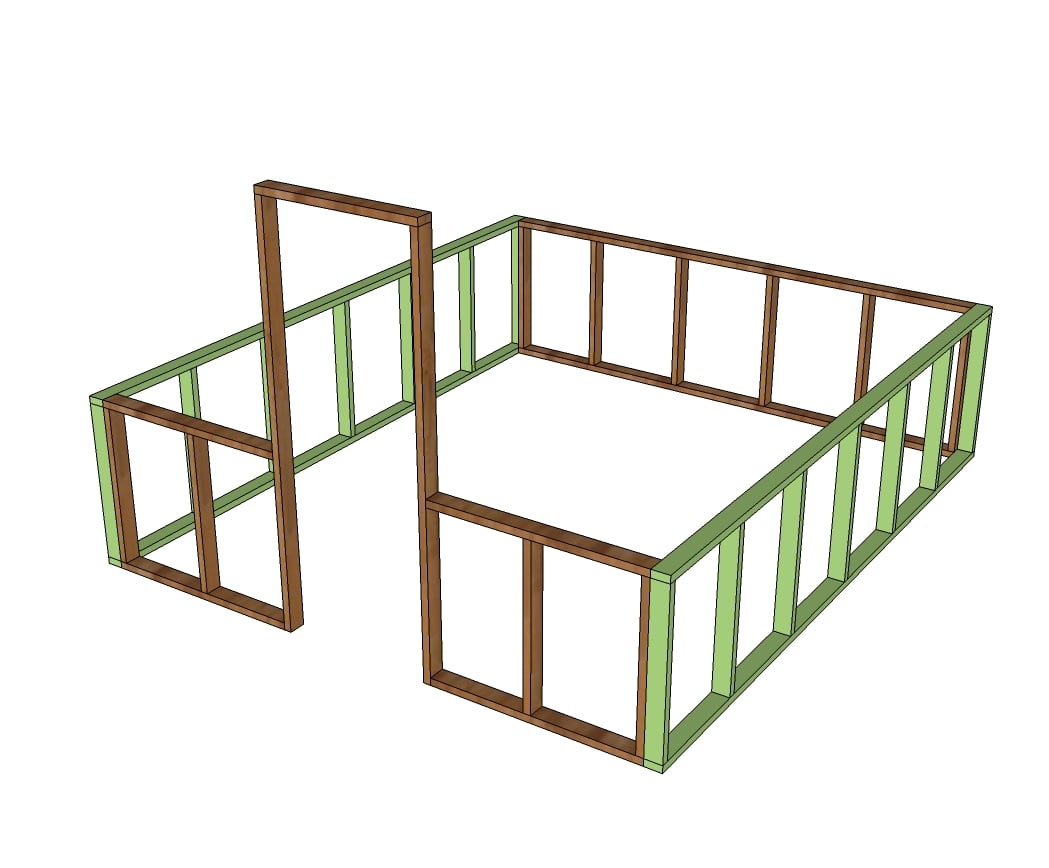
Attach the four walls together with 3" screws at corners.
Step 5
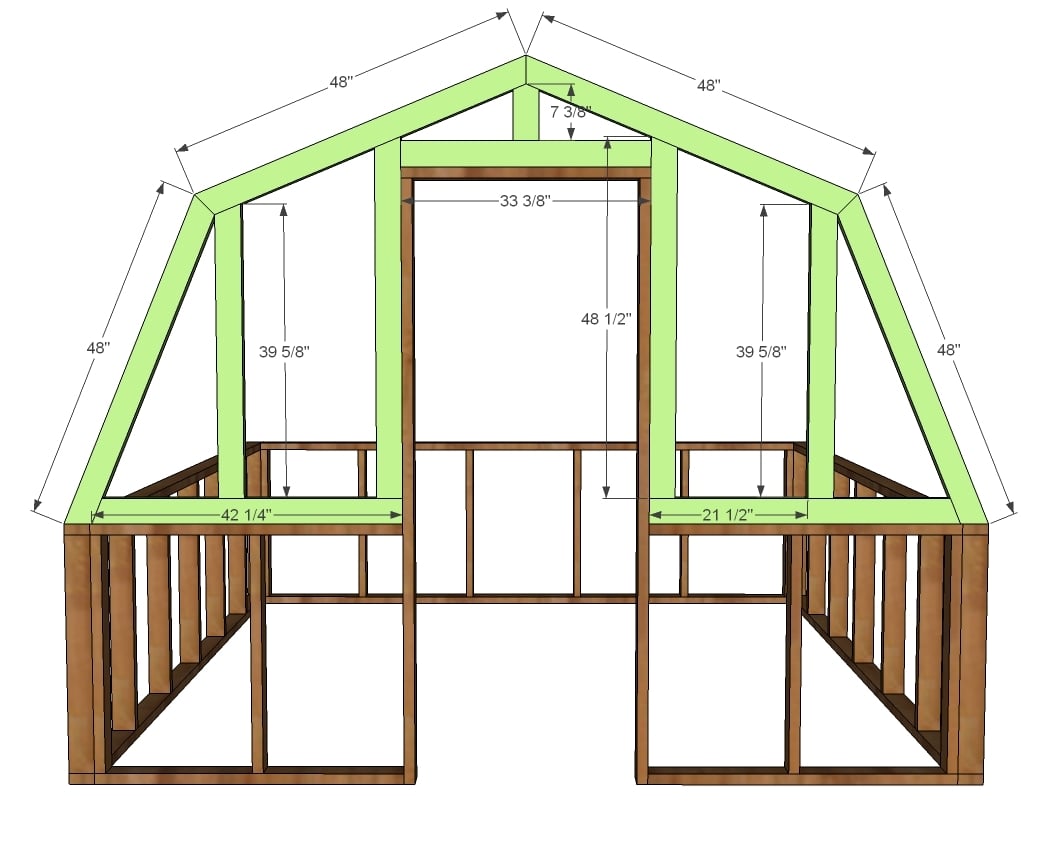
Step 6
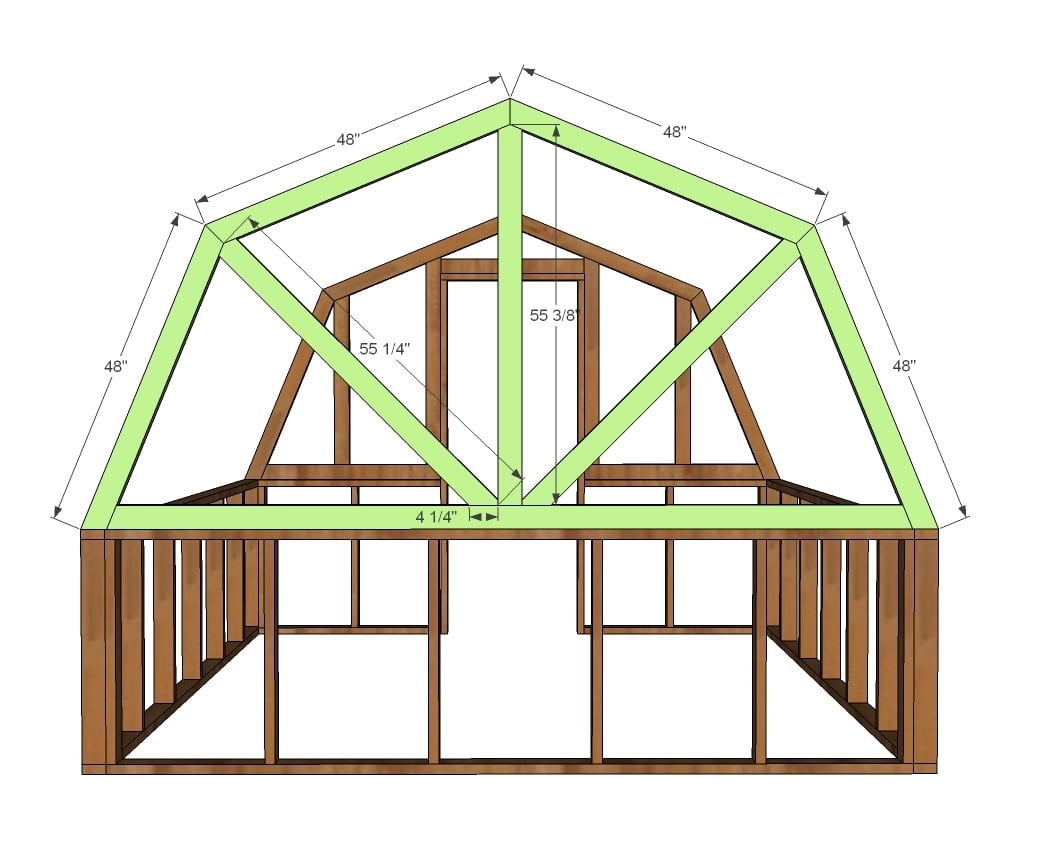
- 4 – 2X4 @ 48” (BOTH ENDS CUT AT 22 ½ DEGREES, ENDS NOT PARALLEL)
- 1 – 2X4 @ 117 7/8” (BOTH ENDS CUT AT 22 1/2" DEGREES, ENDS NOT PARALLEL)
- 1 – 2X4 @ 55 3/8 (TOP CUT TO DOGEARED POINT, 22 ½ DEGREES)
- 2 – 2X4 @ 55 ¼” (TOP CUT TO DOGREARED POINT, BOTTOM CUT 45 DEGREES OFF SQUARE, END CLIPPED)
The back truss is built same as front. See next step for close up of the center cuts
Step 7
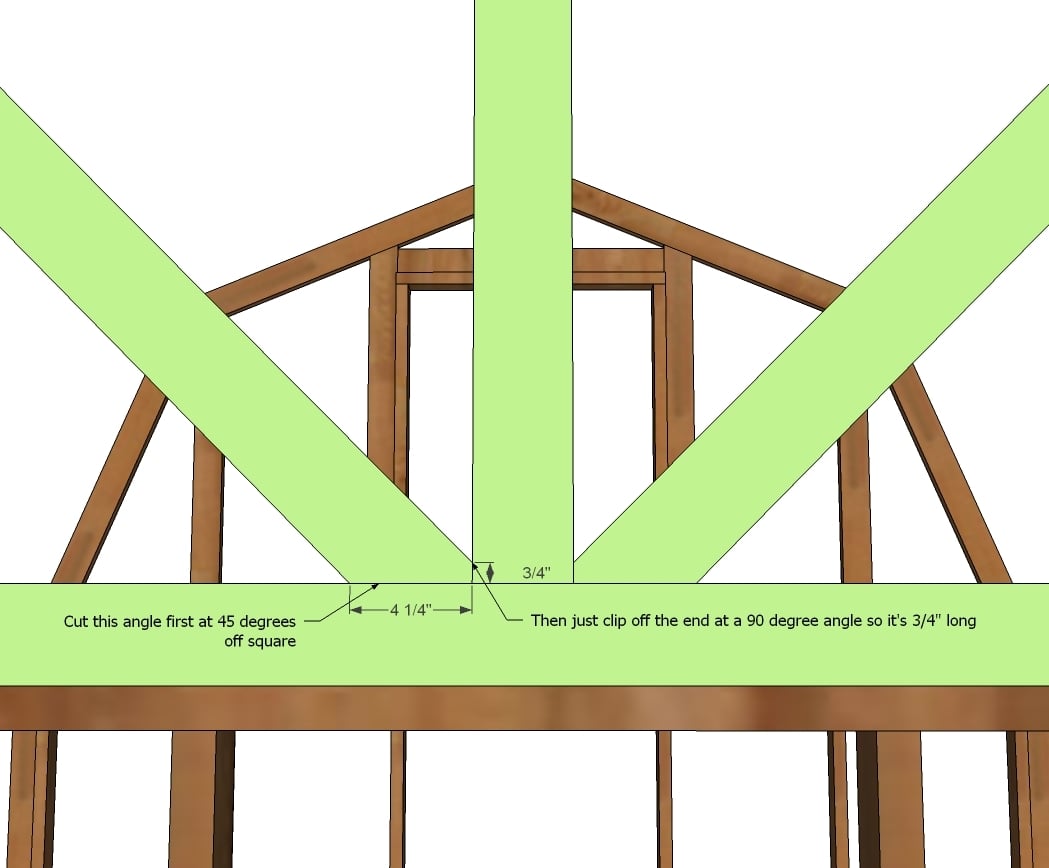
This board was a little tricky to cut - practice first!
Step 8
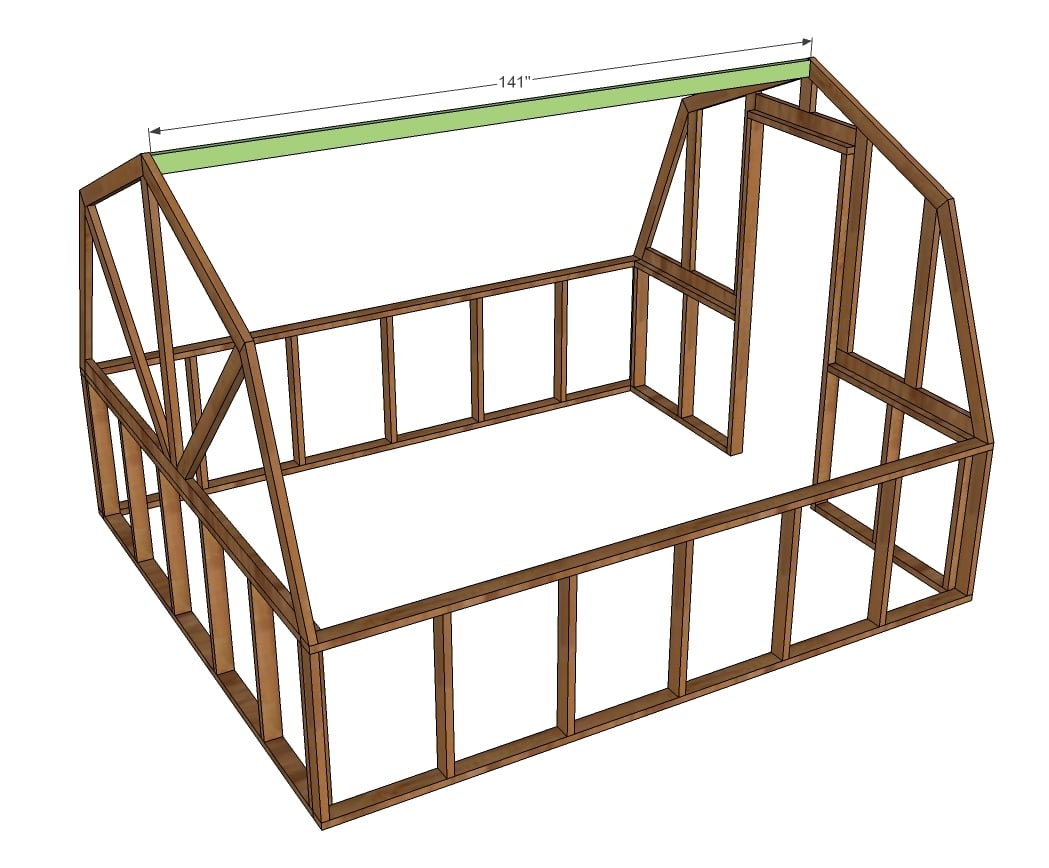
1 – 2X4 @ 141”
NOTE: If you use gussets - we used 1/2" plywood - this will affect your ridgepole length.
Step 9
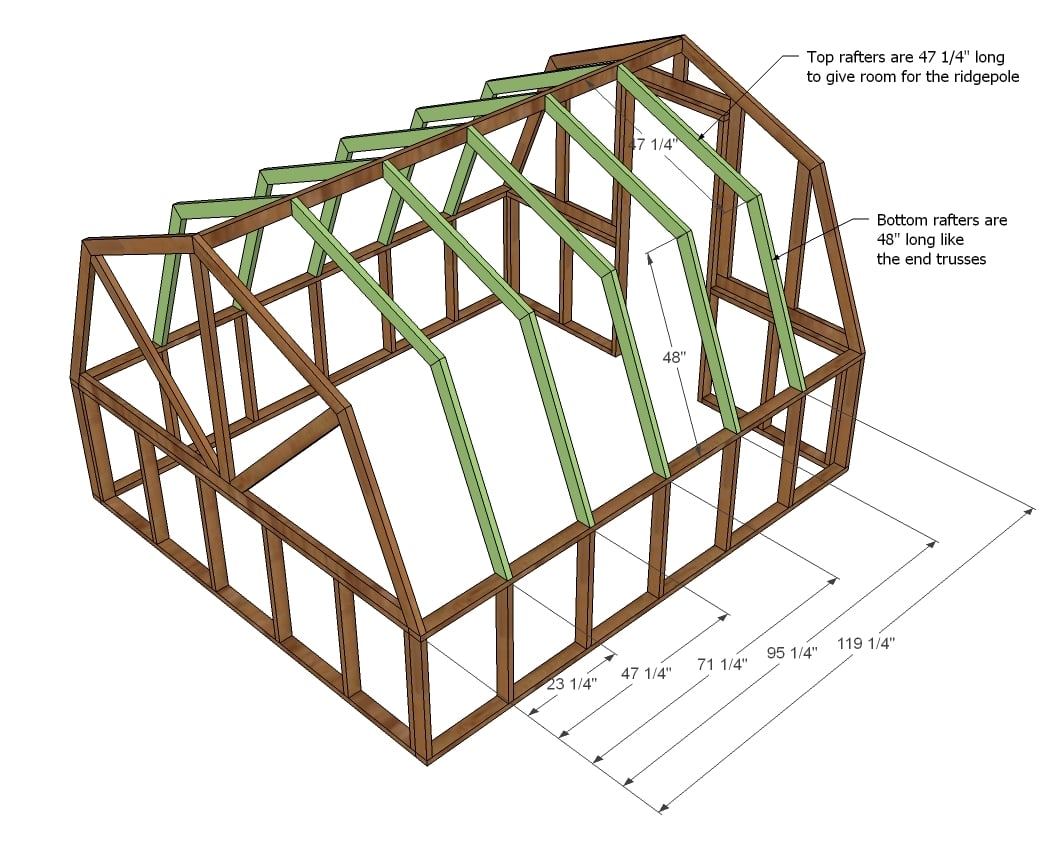
- 10 2X4 @ 48” (BOTH ENDS CUT AT 22 ½ DEGREES ENDS NOT PARALLEL)
- 10 2X4 @ 47 1/4” (BOTH ENDS CUT AT 22 ½ DEGREES ENDS NOT PARALLEL) - shorter rafters go up to meet the ridgepole. I marked all shorter rafters to avoid confusion.
For the common rafters of this barn style greenhouse, we ended up using plywood gussets to save money. After cutting quite a few, I figured out how to cut gussets the super quick and easy way - got gusset cutting down to less than a minute each.
We put gussets on both sides of each rafter joint with glue and screws. We made all of the small trusses first on the ground, then it was just a matter of stacking them on the ridgepole and attaching to the studs. We used 8 screws per gusset. Common rafters are installed flush to top of ridgepole and flush to outside of side walls. We had to "toenail" the screws in - meaning they are screwed in at an angle. We used glue and 3" screws from both sides.
Step 10
The plan will get you through the framing.
At this point, you could use plastic paper, lexan glass panels, you name it to seal the frame in.
We used the corrugated plastic panels detailed earlier for installation. IMPORTANT: If you do not use panels you will need some sort of lateral support to keep the greenhouse from swaying side to side. Try 12 foot long 2x4s.
It is always recommended to apply a test coat on a hidden area or scrap piece to ensure color evenness and adhesion. Use primer or wood conditioner as needed.

Comments
4sandgoddess
Wed, 10/21/2020 - 11:52
Everyone's questions are not getting a response....
Hello. I am new here. I absolutely LOVE everything you build Anna!! Thank You so much for sharing your talent with us all.....
I am just wondering if you or someone on your team still reads these comments? From reading all of them start to finish, I now have several questions myself, that others have asked, that have not been answered.
#1 Is it 32 inch or 33"?
#2 The ballets (I think I named that correctly?) The piece you can buy or make yourself to connect the joints? More info. Please?
#3 In respect to the corrugated plastic panels being attached horizontally verses vertically? Snow load, leaking inside from rain, etc.?
#4 Last but not least, how to adjust the plans correctly for a 10 x 18 Greenhouse?
Any response will be GREATLY APPRECIATED!!
Thank You....
4sandgoddess
Wed, 10/21/2020 - 11:55
OOPS! Sorry to repeat…
OOPS! Sorry to repeat comment... not sure what I was doing... lol
4sandgoddess
Wed, 10/21/2020 - 11:54
Everyone's questions are not getting a response....
Hello. I am new here. I absolutely LOVE everything you build Anna!! Thank You so much for sharing your talent with us all.....
I am just wondering if you or someone on your team still reads these comments? From reading all of them start to finish, I now have several questions myself, that others have asked, that have not been answered.
#1 Is it 32 inch or 33"?
#2 The ballets (I think I named that correctly?) The piece you can buy or make yourself to connect the joints? More info. Please?
#3 In respect to the corrugated plastic panels being attached horizontally verses vertically? Snow load, leaking inside from rain, etc.?
#4 Last but not least, how to adjust the plans correctly for a 10 x 18 Greenhouse?
Any response will be GREATLY APPRECIATED!!
Thank You....
4sandgoddess
Wed, 10/21/2020 - 11:56
GEEZZZ... Really sorry this…
GEEZZZ... Really sorry this time too!! Total Newbie... lol
yesabsolutely
Sun, 01/10/2021 - 02:01
Is Step 9 missing a picture…
Is Step 9 missing a picture where you're explaining how you saved time to cut the gussets? I'm confused about that part.
fallbrookjohn
Tue, 01/26/2021 - 18:33
Cut length
The plans depict 33” long 2x4’s for the walls, yet the cut list states they are 32”. Which is correct?
Frosty Garden
Wed, 01/27/2021 - 11:44
You can do any length you…
You can do any length you want on the studs, technically. We used 32" on ours, which allowed us to get (3) studs per 2x4x8 when you split the kerf. We guessed that the original plans were for 33", but it was later realized this was very lumber inefficient.
gfm2965
Fri, 03/05/2021 - 09:47
RE: Question on lower wall studs
Thanks for your response! But it does make a significant difference, 32" or 33" studs. For one thing, the tin panels are 36" wide, and the 33" studs bring the wall height to exactly 36" Using a shorter stud means an inch extra on the panels, so you would need to cut an inch off (a pain). Also, the height of the tall verticals supporting the ridgepole depend on this measurement, so what height should they be? Thanks again!
kateandnatie
Mon, 03/29/2021 - 22:00
Are there plans for 10x25…
Are there plans for 10x25 greenhouse?
1231georgekay
Thu, 04/01/2021 - 07:44
Instructions for the plans
On the instructions it indicates the studs in the side walls are 33" yet the instructions say to cut them 32". Which is correct the 33"on the picture or the 32" on the instructions?
AndiAndi
Fri, 04/16/2021 - 13:13
Totally love this very do…
Totally love this very do-able greenhouse. Two questions: 1) If I wanted to increase the length of the GH, what do you suggest? Would I need to repeat a variation on the framing ends for support? and 2) as a botanist and horticulturalist a primary concern is often green houses that are too hot and need cooling methods such as shade cloth, AC and ventilation. IF I were to make both ends framed for a door, will the structure still be sound?
chapaev666
Sun, 04/25/2021 - 04:22
Great project!
Great project!
Elle123
Sat, 05/08/2021 - 07:51
What about adding a floor…
What about adding a floor...would make a nice gardening shed too, but i want a floor so snakesabd mice can't get in. And we would finish it all out with Wood or metal as we want to put tiller and other garden supplies...fertilizers, hoes, shovels etc...
will2568
Mon, 06/14/2021 - 14:36
Measurement inconsistencies
These plans are inconsistent in measurements. The diagrams show a measurement of 33 inches for the wall studs, but the cut list shows the measurement of 32 in. Which is it?
will2568
Mon, 06/14/2021 - 14:41
I'm just going to go ahead…
I'm just going to go ahead and assume that the cut list is correct and the diagrams are in error because you can cut an 8 foot plank into three 32" pieces with no waste. I have to wonder how many more inconsistencies I'm going to encounter.
maddog67
Fri, 09/10/2021 - 09:57
Correct height for walls: 32 or 33?
On the sidewall image, it shows a measurement of 33 inches, but in the instructions below the image it says to cut 14 2 x 4 by 32 inches. Is the correct length 32 or 33? It's the same issue on the front and back sidewalls.
Thanks!
chilkat
Mon, 12/06/2021 - 20:59
What has everyone used for a…
What has everyone used for a door on this?
PeterSmith54
Fri, 12/10/2021 - 11:02
New textures
I love this design! I may add some different textures like the ones from Metal roofing to mine!
PeterSmith54
Fri, 12/10/2021 - 11:03
Metal roofing
Metal roofing
Mizurati
Tue, 01/04/2022 - 05:51
The height of the side…
The height of the side panels (36") exceed the width of the metal sheets by 9".
You didn't specify the tin width in the materials list. How did you get the extra 9"? Do I need to rip another 12' sheet?
romdos
Fri, 01/28/2022 - 22:07
Setting us up for failure
This is my first project on this site. I'm pretty disappointed by the lack of detail in the "instructions" and measurements showing 33" in the sketchup images and 32" in the plans. I especially like the way they made a big deal telling us they made the gussets in less than a minute, but gave us NO CLUE on how they did it. I also can't believe that not one of these comments were deemed valid enough to get a response from Ana or her crew. Especially the discrepancy on the stud lengths.
AndyHadz
Wed, 04/20/2022 - 07:28
Great design but with 2 slight flaws
Looks great but I'm afraid it's slightly flawed.
The frame is sound and would work as a shed (with timber cladding and felt or corrugated steel/bitumen roof.
There are 2 problems
- the corrugated sheeting is layed the wrong way. The grooves should run down the roof and ideally run down the walls. This would stop dust/dirt/dead leaves etc gathering in the grooves.
- there is no facility for rainwater harvesting. If the plastic sheeting issue was fixed, you could fix a gutter to the edge of the roof and collect rainwater.
Change the direction of the panels and add a gutter then it would be perfect.
@Greenhouse@
Sun, 04/24/2022 - 06:25
I plan on building this…
I plan on building this greenhouse this summer. I noticed a Kreg Jig in the tools section, yet i see no mention of it in the build plans. Are the gussets holding the trusses together or was a Kreg Jig also used on them? Any thoughts...