
Difficulty
Starter Projects
| 
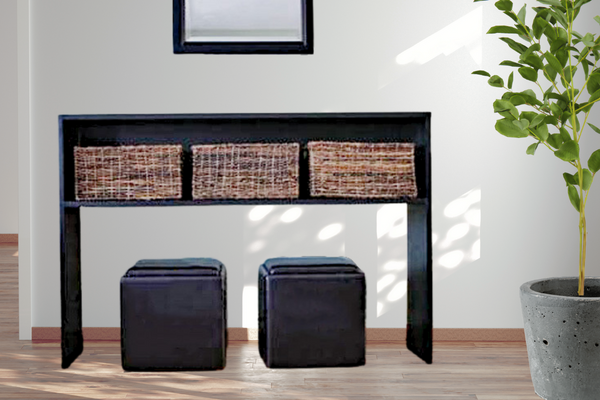
Build your own rustic modern console table! This easy to tackle DIY project just uses a few boards and you can nail it all together. Free step by step plans from Ana-White.com
Dimensions
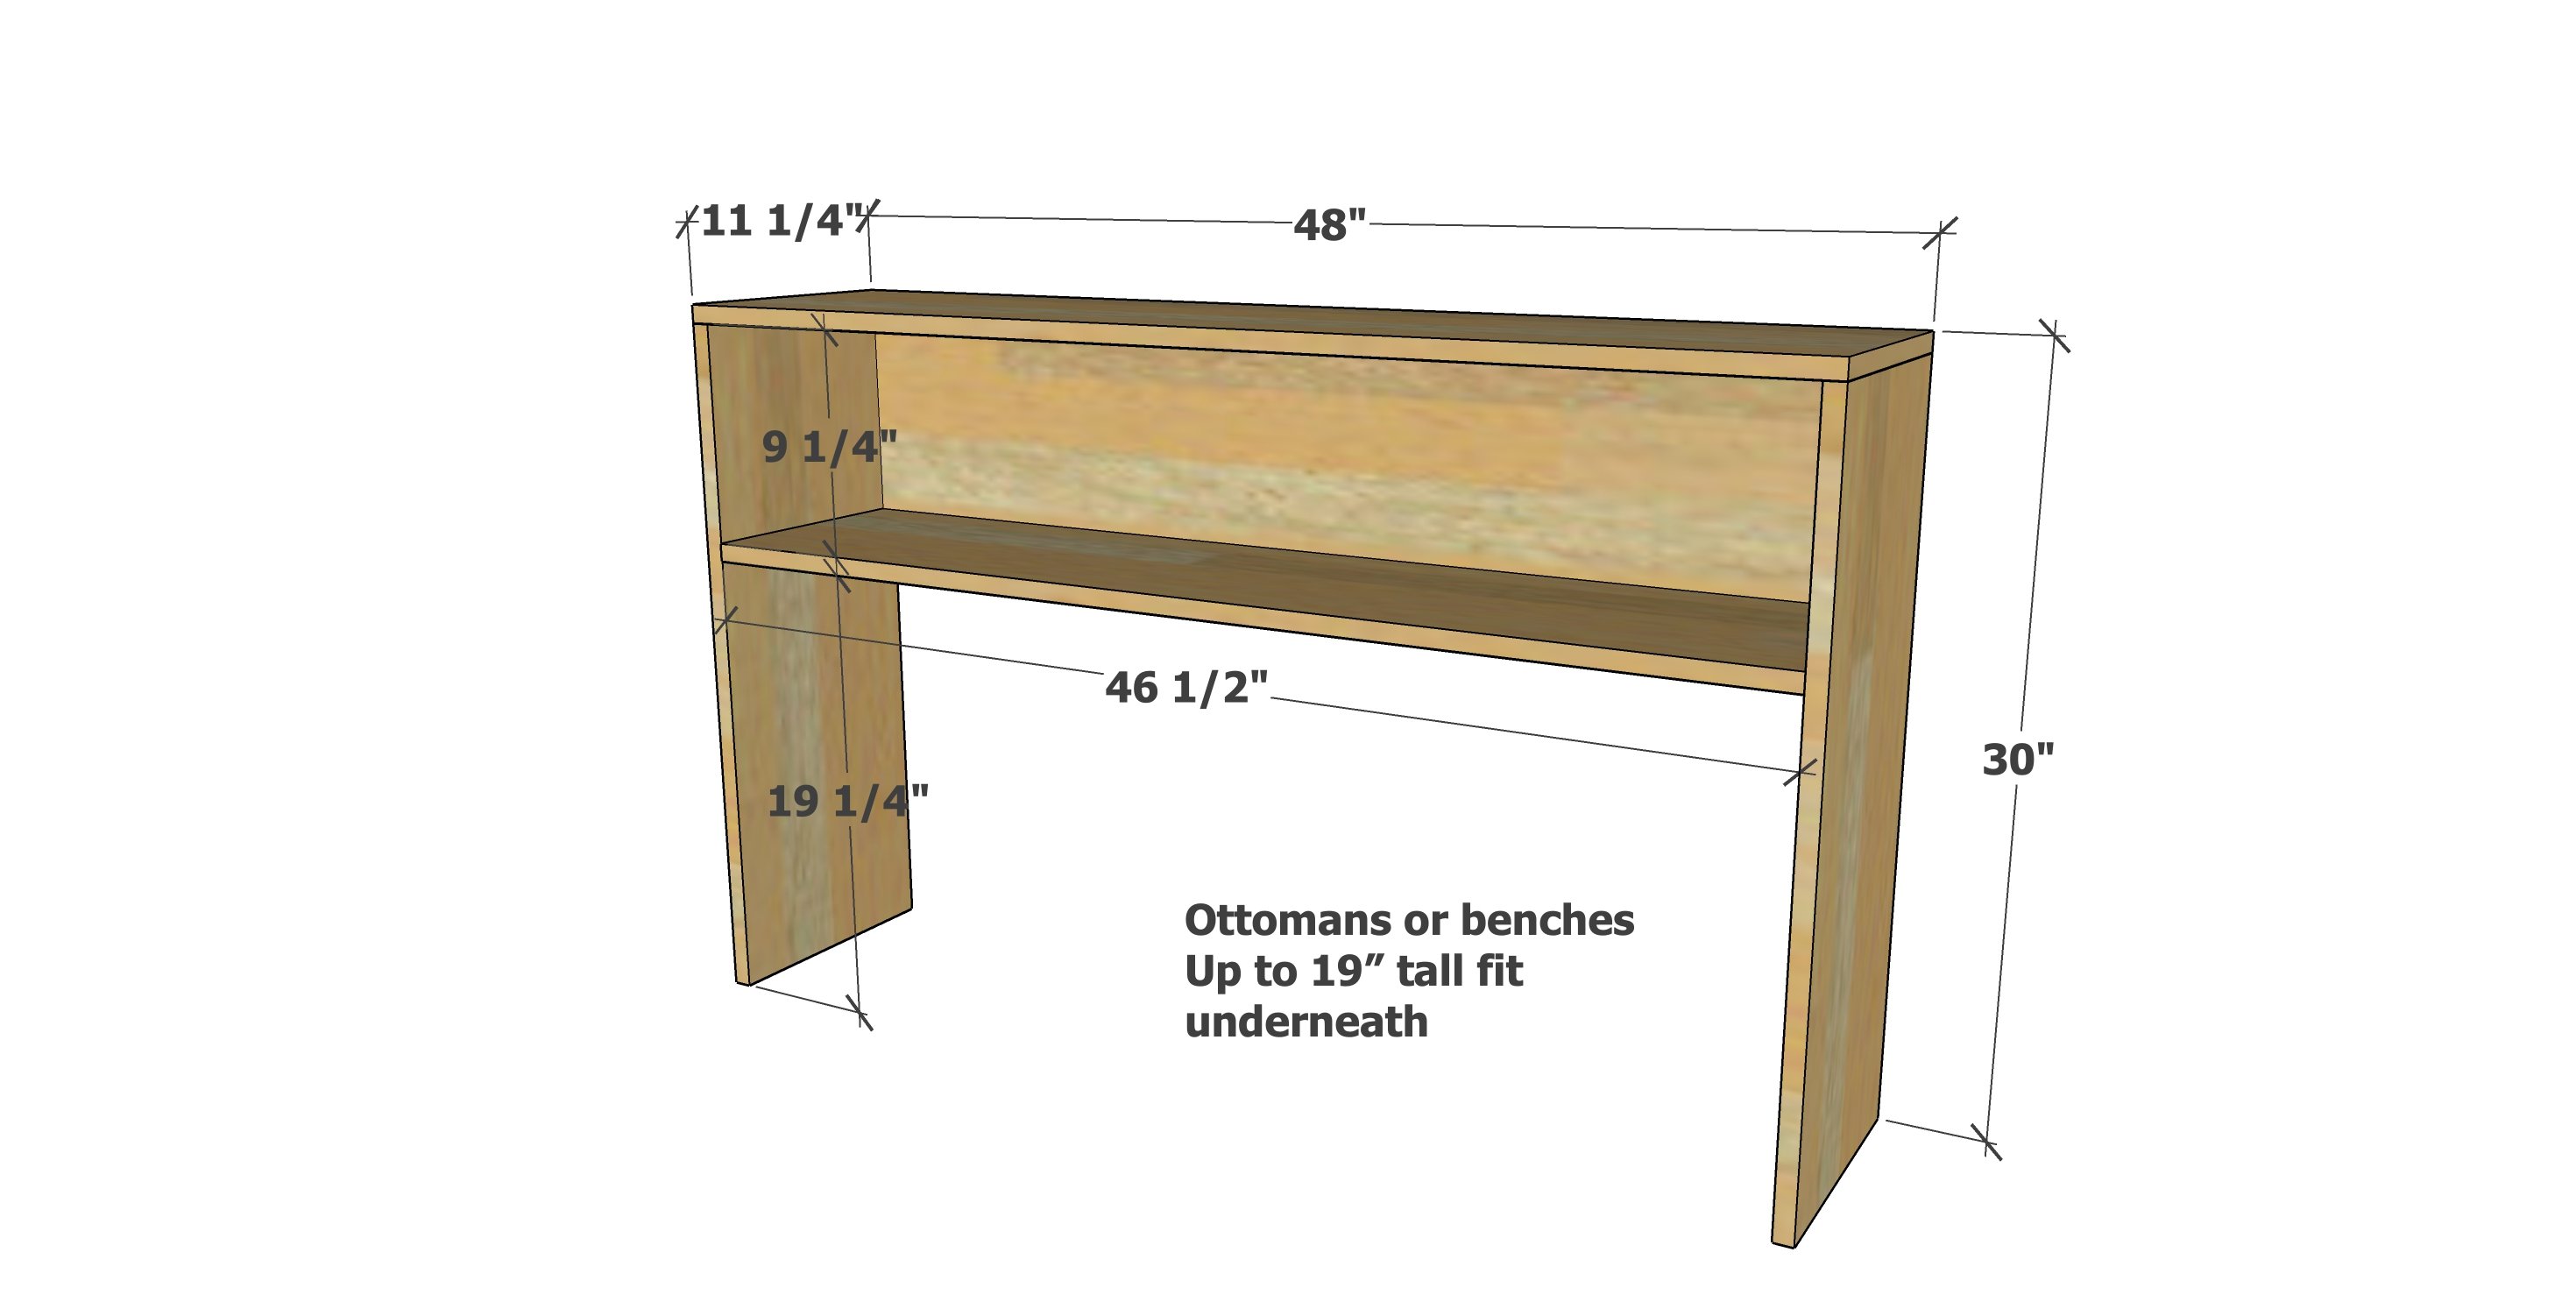
48" wide x 11-1/4" deep x 30" tall
Preparation
Shopping List
- 1 - 1x12 @ 12 feet long (can be cut into 4 and 8 foot pieces for transport, do NOT cut in half)
- 1 - 1x10 @ 4 feet long
- 1-1/4" brad nails or 1-1/4" pocket hole screws if using a Kreg Jig
- wood glue
Wood used is whitewood or pine boards from Home Depot or Lowes
Cut List
- 2 – 1×12 @ 29-1/4″ - legs
- 1 – 1×12 @ 48″ - top
- 1 – 1×12 @ 46-1/2″ - shelf
- 1 - 1x10 @ 46-1/2" - back
Tools


Instructions
Step 1
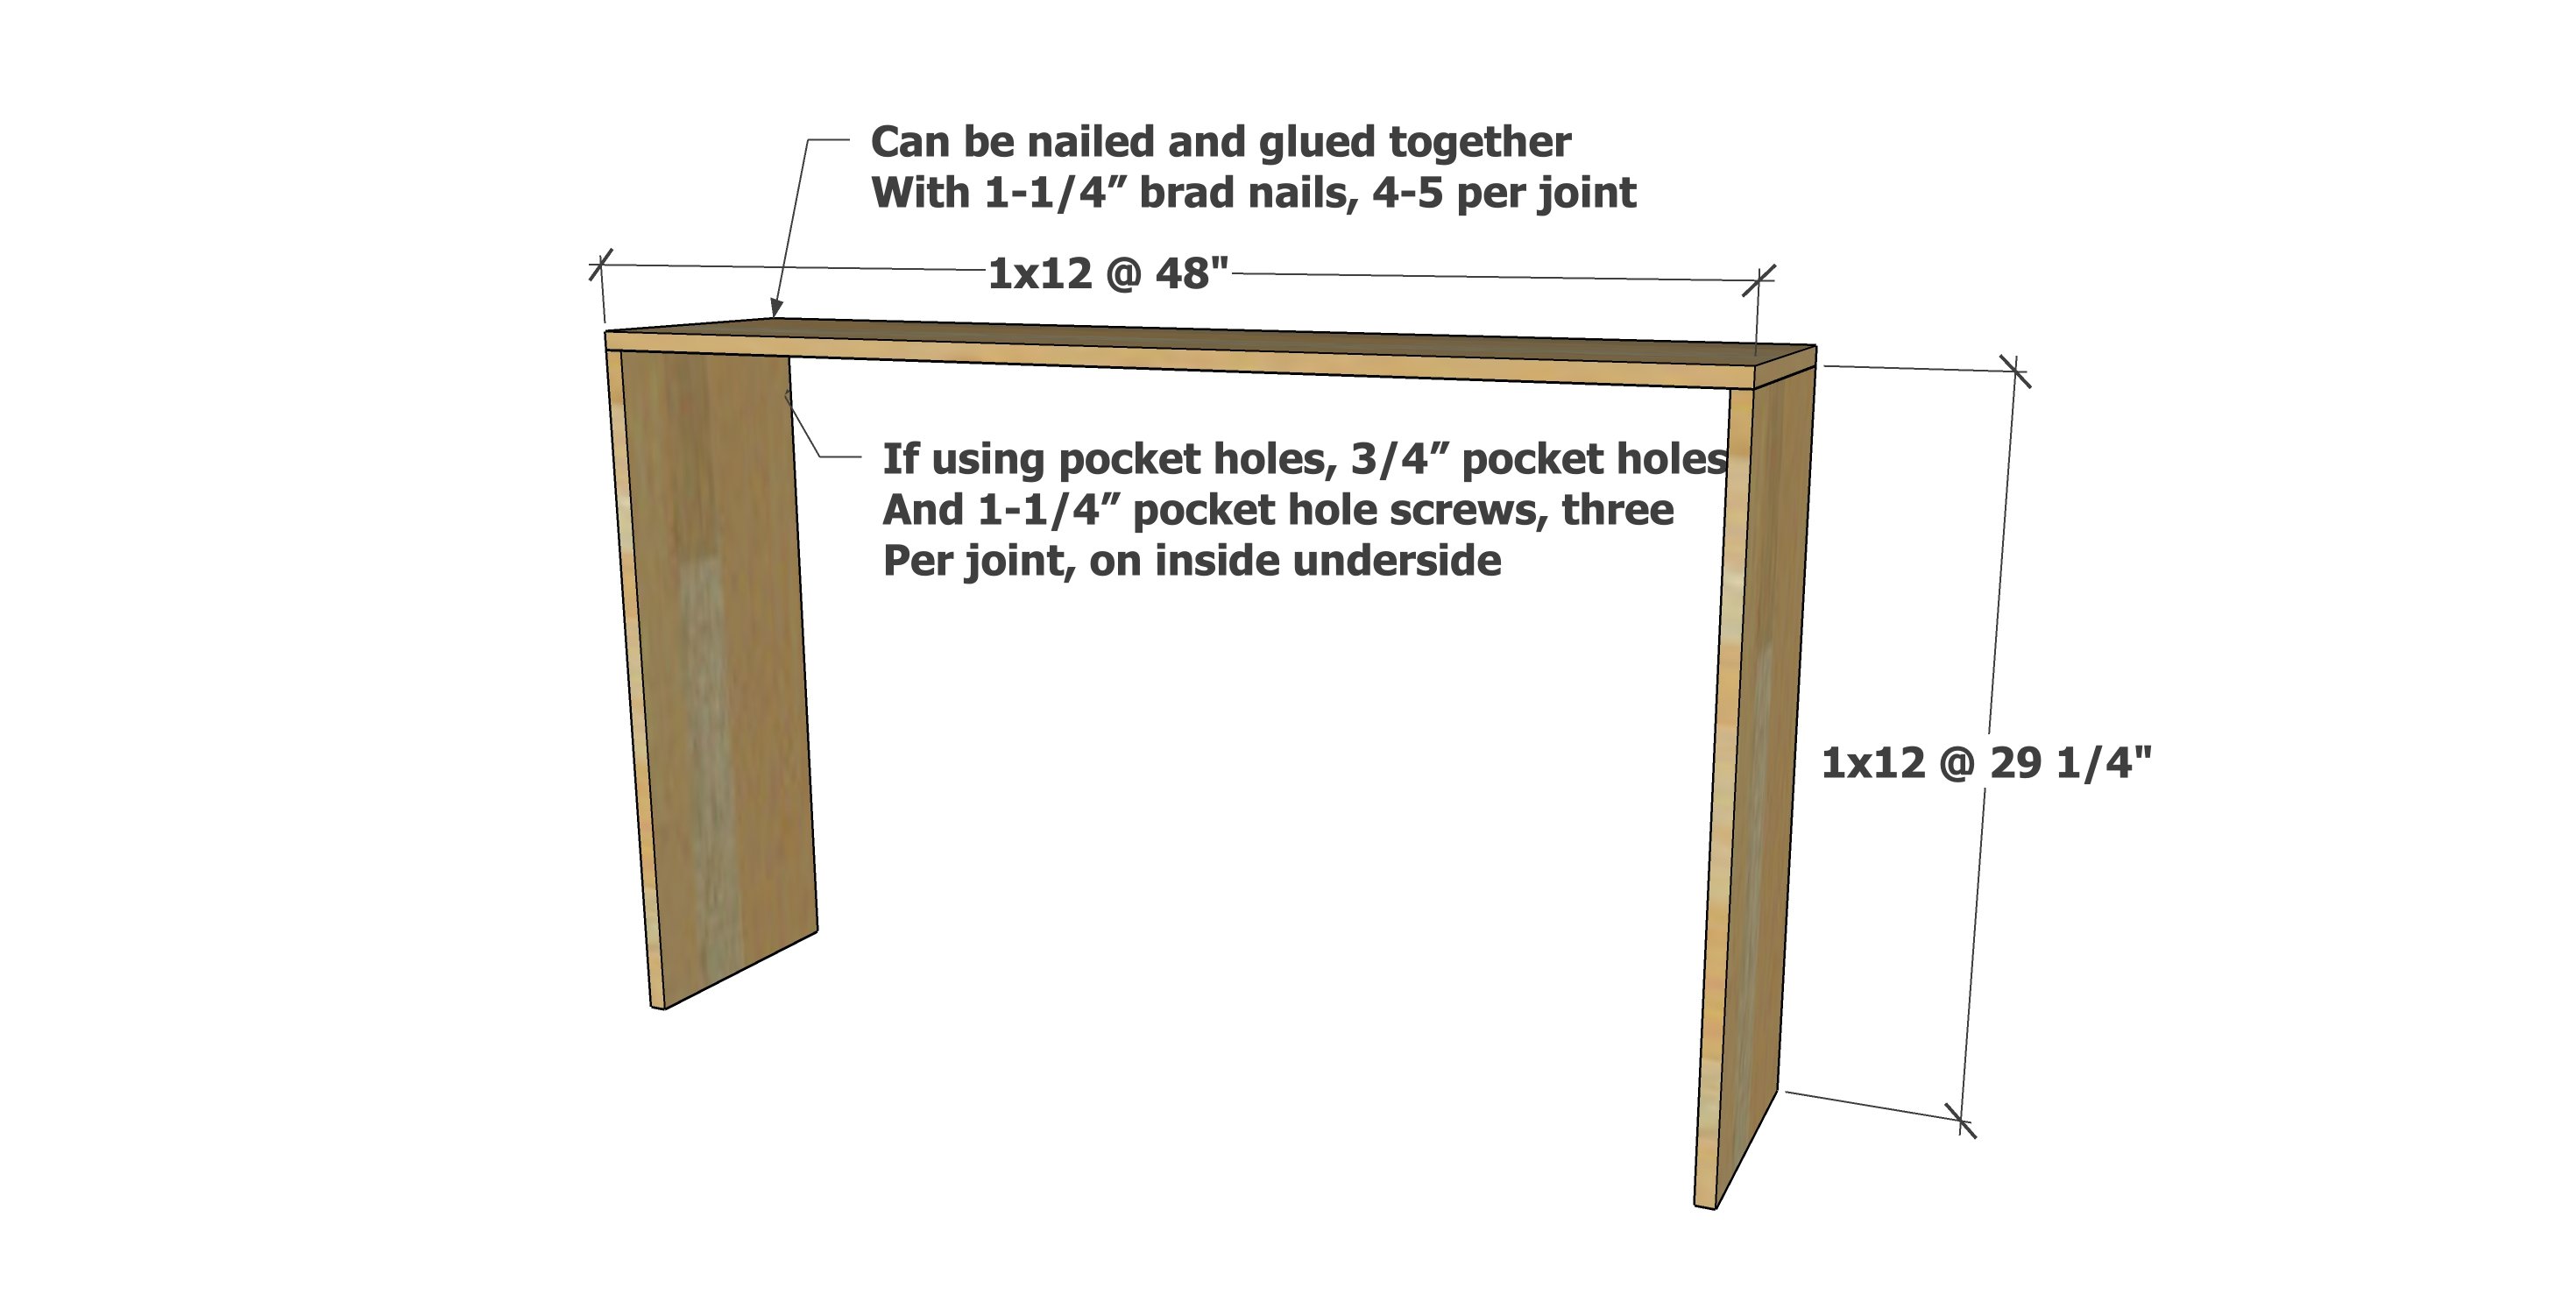
Attach the top to the legs with 1-1/4" brad nails and glue or use your Kreg Jig on the 3/4" setting with 1-1/4" pocket hole screws.
You can alternatively use nails and glue.
Step 2
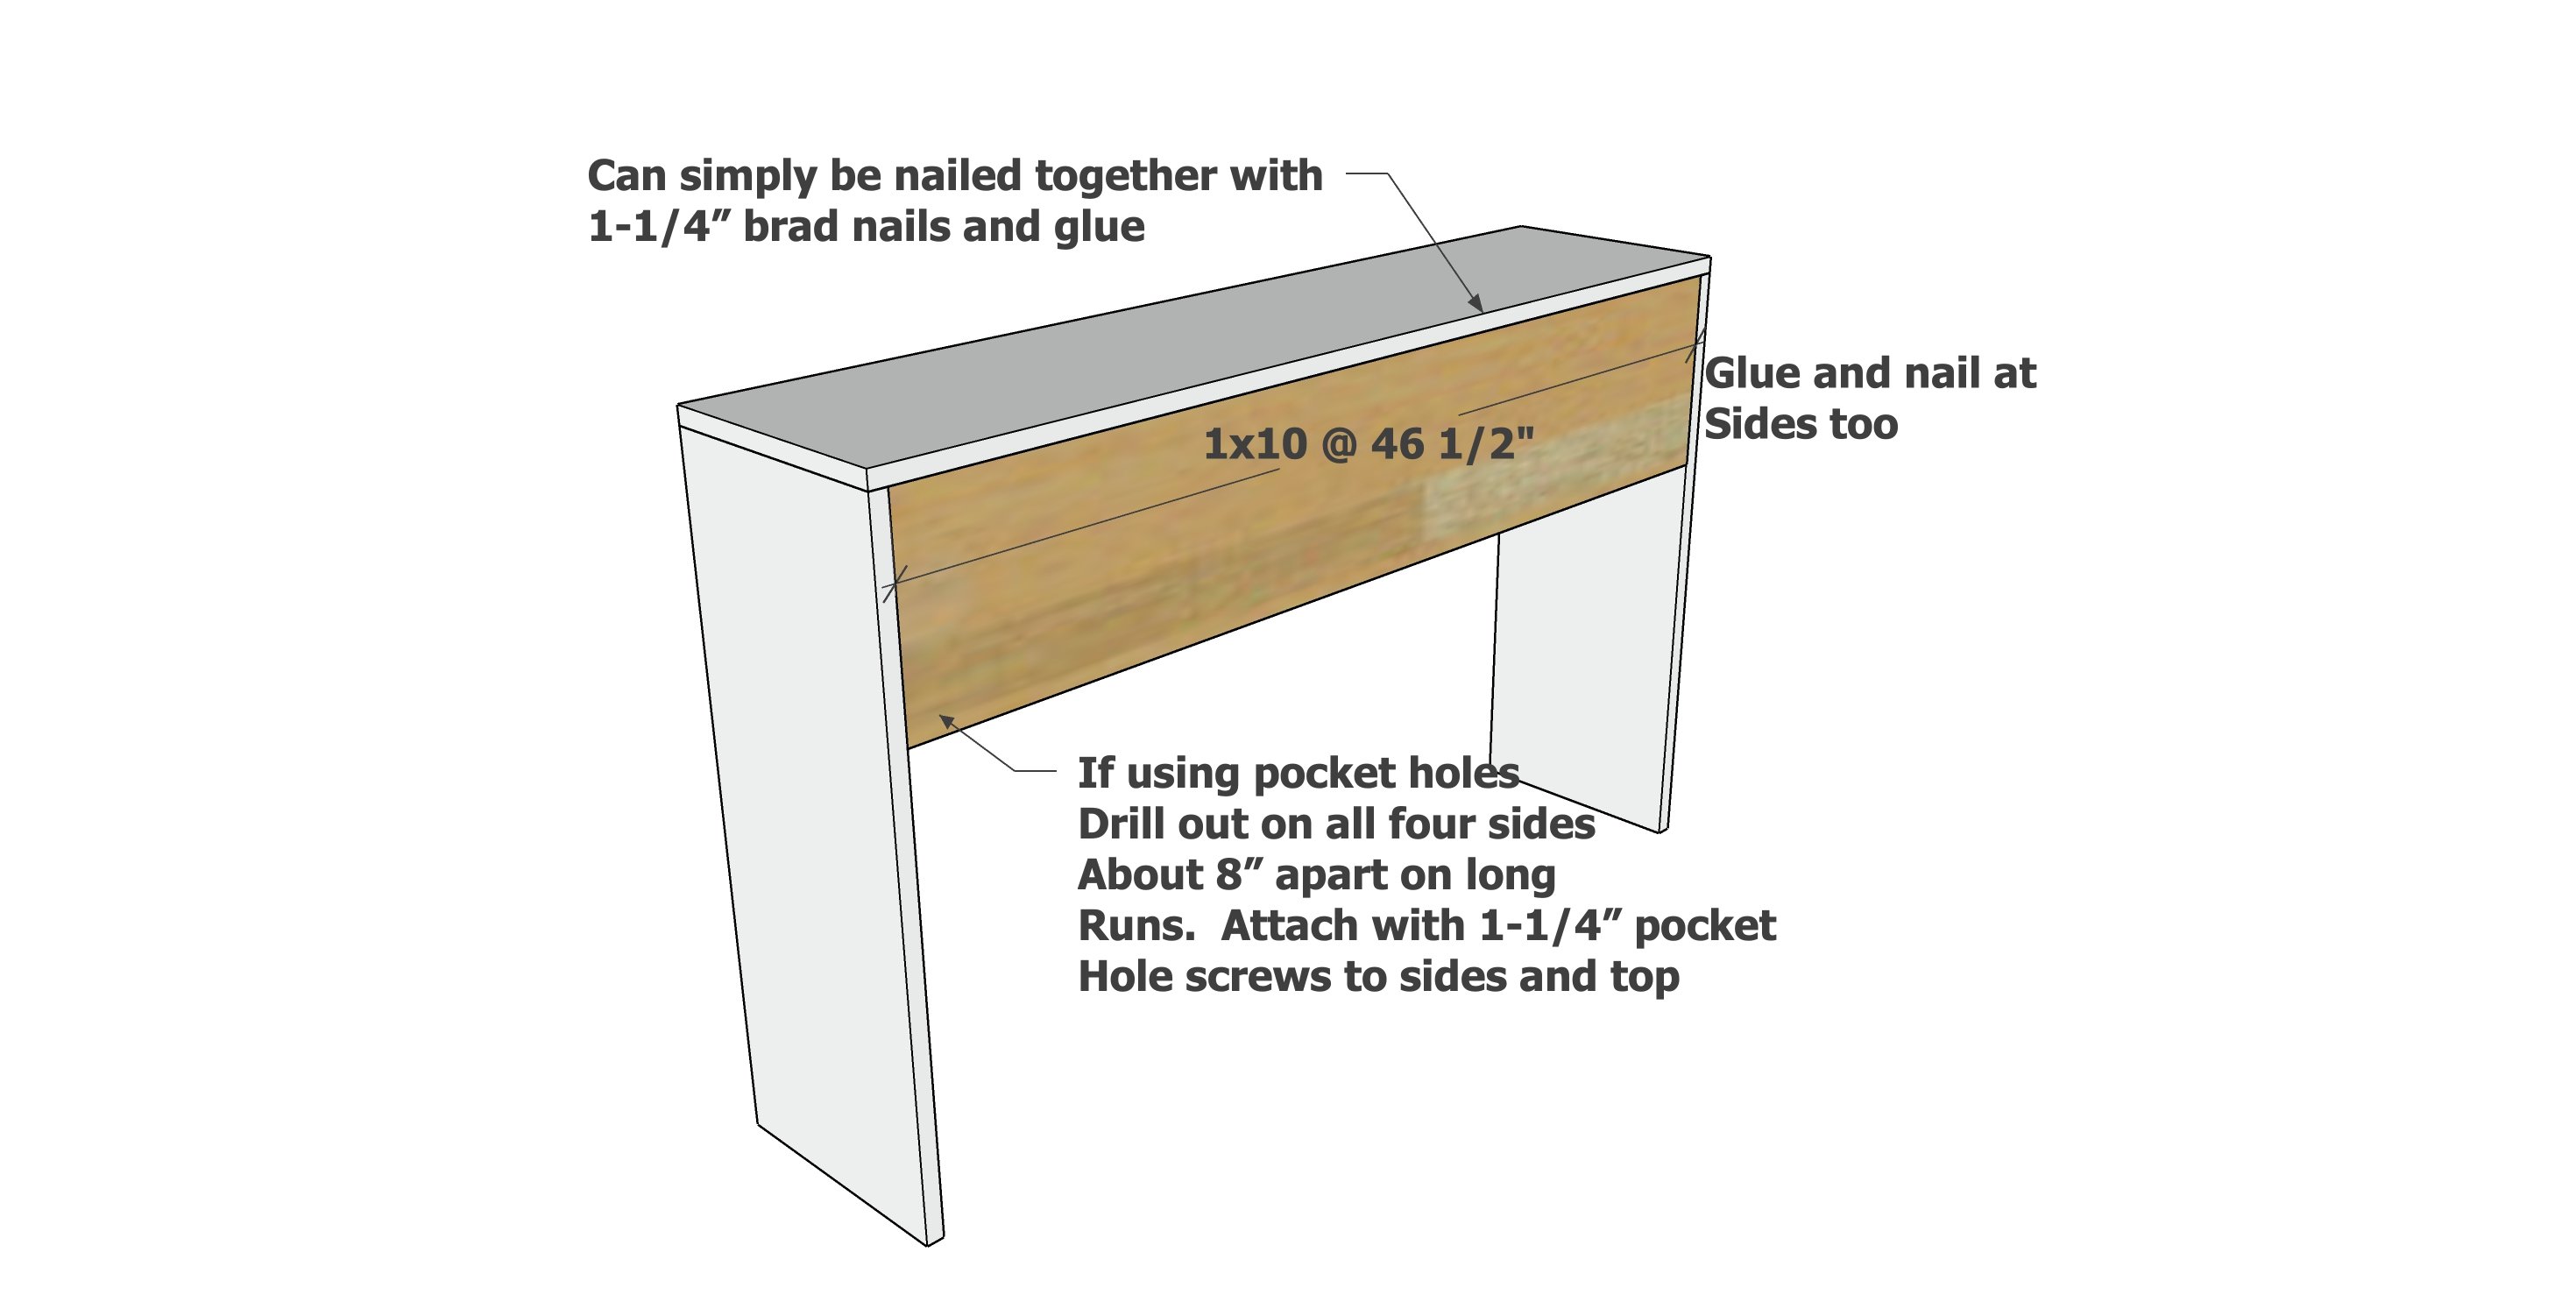
Attach the 1x10 inset in the back as shown.
Step 3
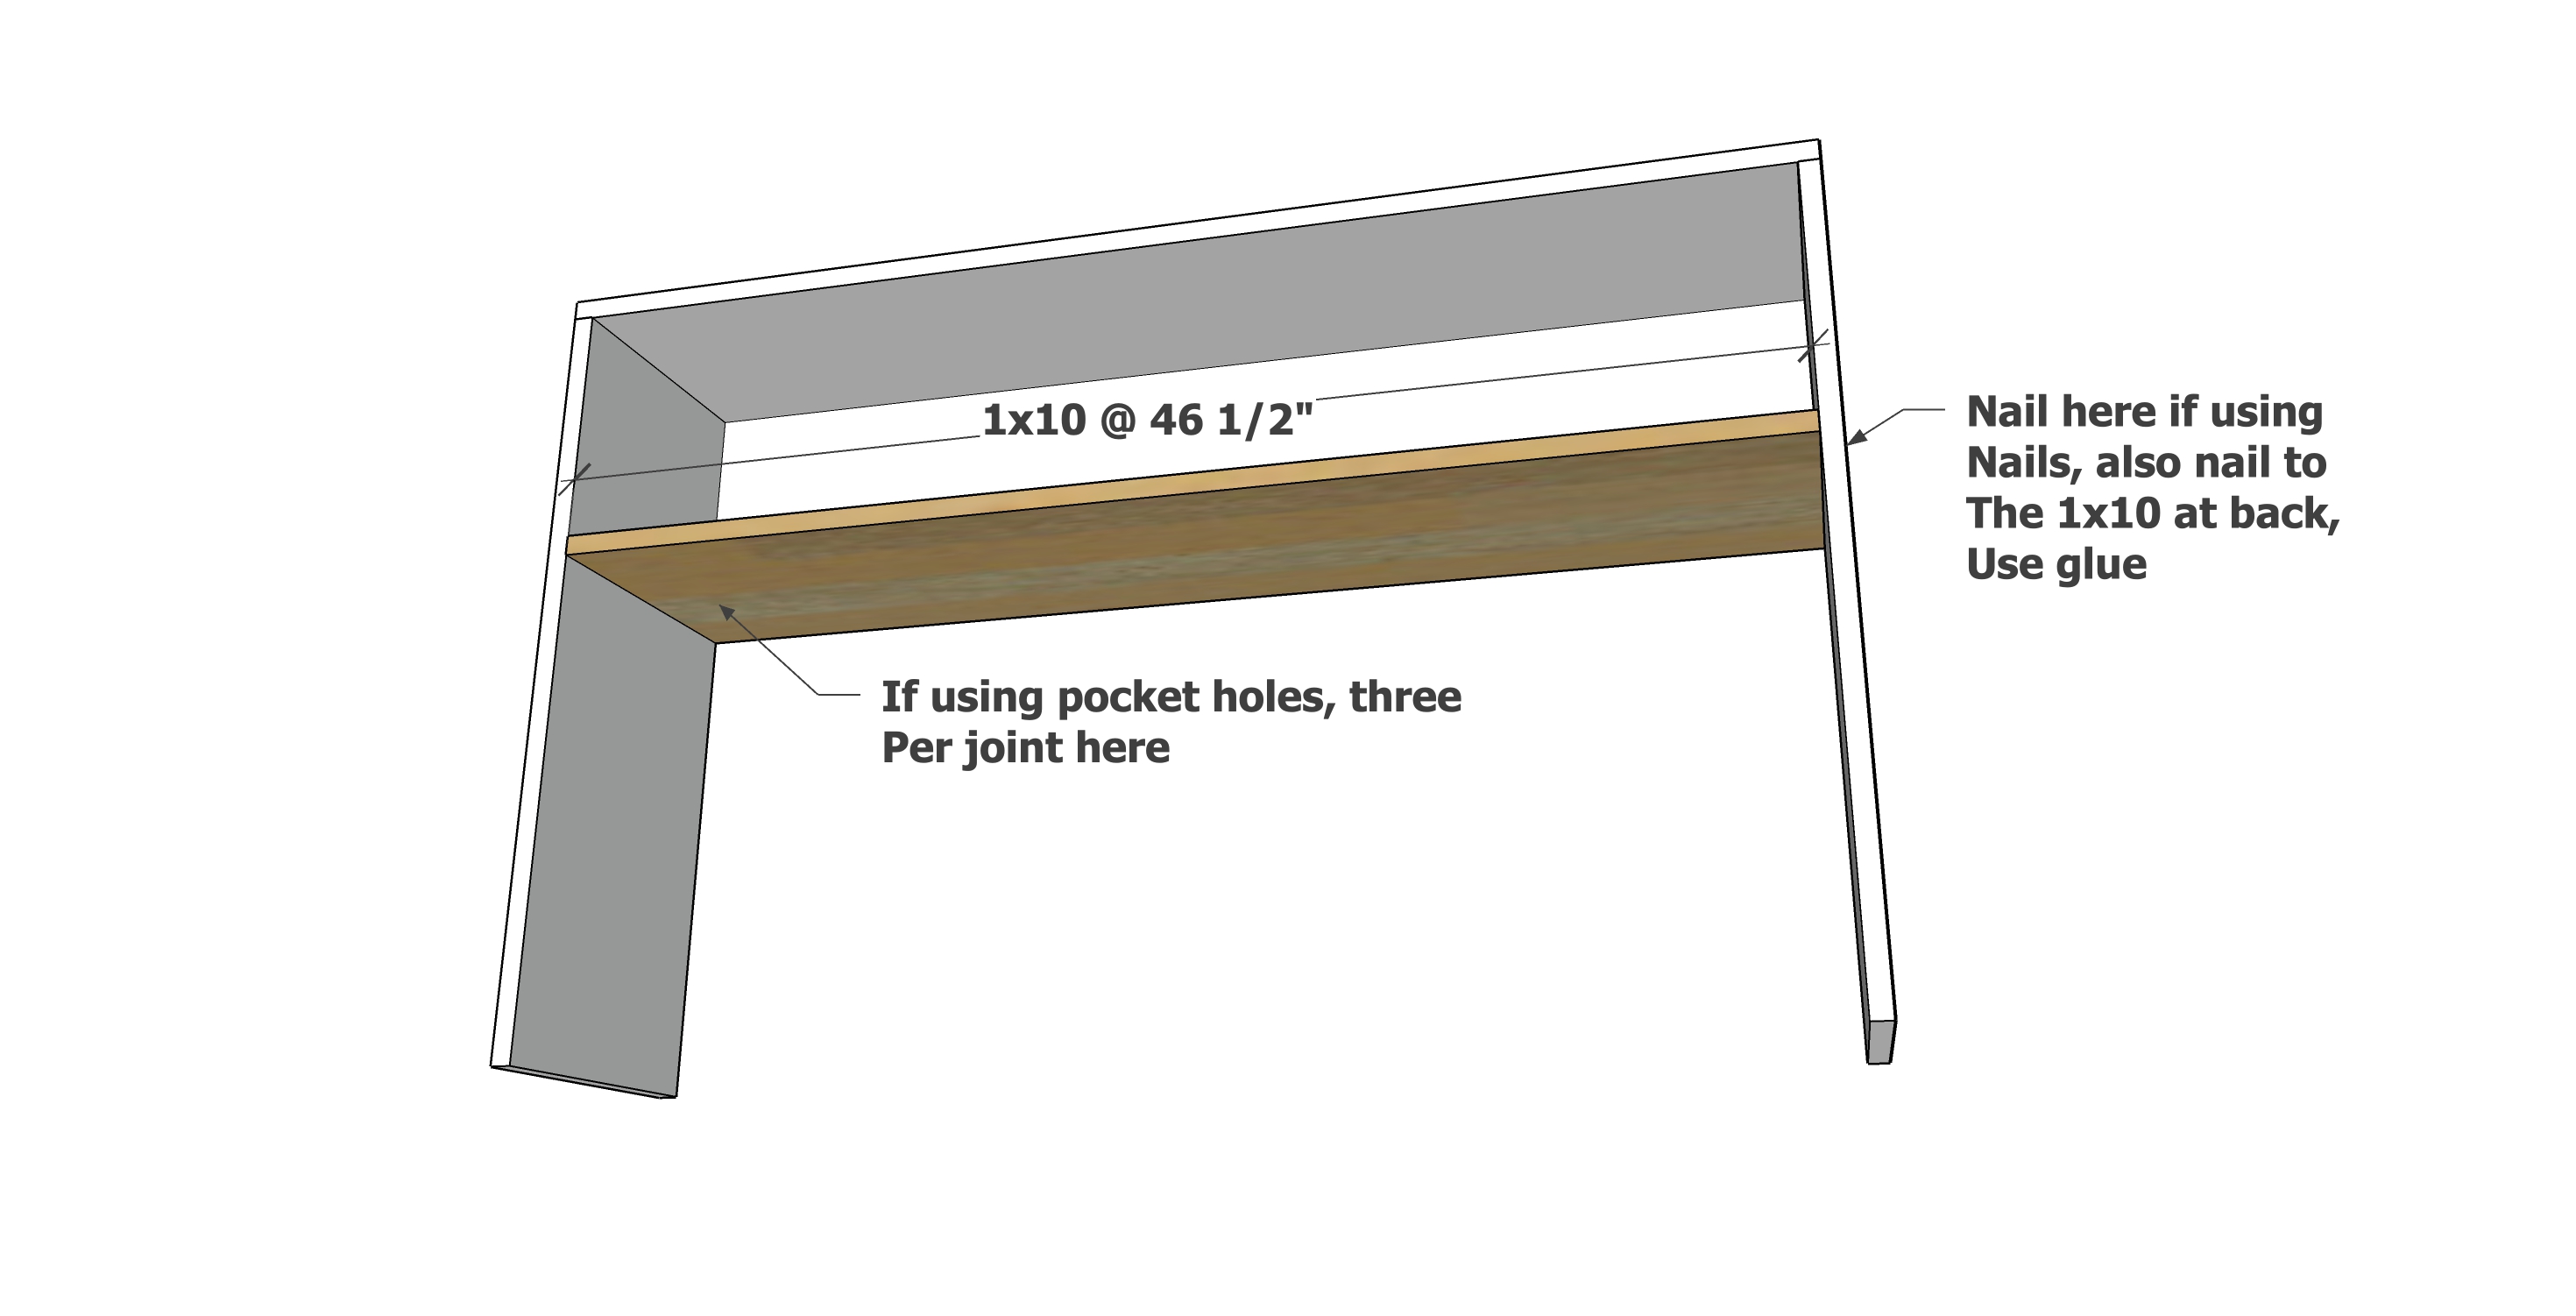
Attach the bottom shelf to the sides and back 1x10.
Finishing Instructions
Preparation Instructions
Fill all nail holes with wood filler. Let dry.
Sand well in the direction of the wood grain with 120 grit sandpaper.
Remove sanding residue with vacuum and damp lint free cloth.
Sand well in the direction of the wood grain with 120 grit sandpaper.
Remove sanding residue with vacuum and damp lint free cloth.
Finish Used
Apply finish as desired.
This project will accept paint and stain well, as it is solid wood.
Protect top with polyurethane.
This project will accept paint and stain well, as it is solid wood.
Protect top with polyurethane.

Comments
The Faveros (not verified)
Mon, 01/25/2010 - 07:30
Wow!! That is super easy - I
Wow!! That is super easy - I think this is my new project for wedding gifts!! Thanks so much for posting this idea
Marcella (not verified)
Mon, 01/25/2010 - 07:34
omg! this is what i just told
omg! this is what i just told my hubby yesterday we needed for our stereo system! lol.. thank ana! it's like you're reading my mind on what we need in the house!
Amy Morris (not verified)
Mon, 01/25/2010 - 08:33
My little front entrance is
My little front entrance is dying for this. I'll have to make it a bit shorter, but I could put this baby together in no time! Perfect, thank you!
Katie (not verified)
Mon, 01/25/2010 - 09:32
Could the sides be shortened
Could the sides be shortened to make a bench?
Is that a supid question? :)
Anonymous (not verified)
Tue, 01/26/2010 - 00:56
Hi Ana,I'm in love with your
Hi Ana,
I'm in love with your site! Have you ever built a crib? My baby is due in july and I would love to see (and try to build) some baby furniture!
Enjoy your holidays and best luck with your TV show!
Yoli
Ana White (not verified)
Tue, 01/26/2010 - 08:11
Go ahead and shorten the
Go ahead and shorten the legs, just remember a standard bench height at the top is 18", so the legs would need to be 17 1/4" long.
Dustin and Eri… (not verified)
Tue, 01/26/2010 - 19:58
Oh my gosh, I am absolutely
Oh my gosh, I am absolutely in LOVE with this website! I'm always saying how I wish I could build things...and now I think I CAN! I think I'll start with this, but I have plans to make many many things on your website. THANK YOU!!!
MarieC (not verified)
Wed, 09/01/2010 - 13:41
Hi Ana The actual picture
Hi Ana
The actual picture from a reader shows a shelf. How would I incorporate this into your plans?
Ana White (not verified)
Wed, 09/01/2010 - 14:23
Hi Marie, adding a shelf is
Hi Marie, adding a shelf is easy to do! Simply cut another 1x12 the same length as the back piece and attach it directly below the back piece, level with the top. Good luck!
bex (not verified)
Mon, 09/06/2010 - 06:18
My entryway is calling for
My entryway is calling for one of these...with two shelves. And this piece will allow me to do a closet re-do as well! Can't wait to share pics :)
Crystal (not verified)
Wed, 09/15/2010 - 17:18
This will be my first
This will be my first project!! Can't wait!
barbara (not verified)
Wed, 10/13/2010 - 07:45
Ana, you are awesome!! I
Ana, you are awesome!! I can't wait to find time to starting building - like so many others, my wish list is getting quite long ;)
Is this piece sturdy enough to hold a small (20 gallon) aquarium? We just moved the aquarium out of my daughter's room and it's now sitting on a bookshelf that's way too high. this would be ther perfect first project for me.
Baby Steps | S… (not verified)
Sun, 11/07/2010 - 13:45
[...] even hung pictures. But
[...] even hung pictures. But then I took a deep breath and built both the picture ledges and simple console to help whip my dining room into shape. I need to do some serious picture arranging (and maybe pick [...]
Crystal R (not verified)
Sun, 11/14/2010 - 05:07
Just to update, Hubby and I
Just to update, Hubby and I built this last night. It's a GREAT first project, super simple. Seriously it's so easy I felt like I was cheating! I'll post pics on the forum when I get the finishing done :-) Thank you!
Building stuff… (not verified)
Mon, 01/03/2011 - 06:35
[...] built Ana’s Easiest
[...] built Ana’s Easiest Rustic Modern Console Table EVER which kind of mocks me with its claims of being so easy. Kind of like my friend Carrie going skiing [...]
ingrid (not verified)
Tue, 01/18/2011 - 06:38
i made it this weekend!
i made it this weekend! thanks so much, i love it!
FIRST BUILD! E… (not verified)
Tue, 01/25/2011 - 11:00
[...] in Brag Blog Put on
[...] in Brag Blog Put on my TO-DO List Save as PDF Print this PostShare/Bookmark Builder: Ingrid Blog or Website:http://yocklaw.blogspot.com Experience Level: Some Experience Estimated Cost: $40 Estimated Time Investment: 2 hours, mostly for the paint to dry From Plan: http://ana-white.com/2010/01/plans-easiest-rustic-modern-console.html [...]
jrees09
Mon, 03/28/2011 - 14:01
Do I have to use a pocket
Do I have to use a pocket hole jig for this project? It will be my very first, and I am looking for the simplest and least expensive method, but I also want a sturdy piece...
Lady Goats
Mon, 03/28/2011 - 15:07
Pocket Hole Jig Not Necessary
This is a simple build that does not require a pocket hole jig. Make sure you have a countersink bit, however, and don't pre-drill your holes RIGHT on the edge of the board. I think that was my biggest mistake on my first builds.
jrees09
Tue, 03/29/2011 - 18:19
Thanks so much!!
Thanks so much!!
Guest (not verified)
Wed, 05/25/2011 - 14:44
Please update printable version
Would it be possible to update this so the print version has readable images like the other projects do? On this one, everything appears very tiny.
Guest (not verified)
Tue, 08/16/2011 - 19:07
Question on Length
Would it be possible to shorten the length on this? I LOVE this table but need something that isn't any longer then 40".
Thanks Maria
Guest (not verified)
Fri, 01/20/2012 - 14:04
Screws
I've never done anything like this before but I've always wanted to. I'm just a little confused... the plans call for screws, nails and pocket hold screws but then it doesn't really tell you when to use them. Can somebody clarify how many screws I'll need and where to use each type?
Thanks!!
Guest (not verified)
Wed, 02/08/2012 - 19:37
Wood requirements
Hi,
Could you please clarify the width of wood used, I'm in Australia and the materials list says 2-1x 12 (8"). Not sure what that means, I'm feeling a little silly for asking but oh well :)
In reply to Wood requirements by Guest (not verified)
spiceylg
Thu, 02/09/2012 - 06:05
wood requirements answer
Hello and don't feel silly. It actually says 8' which means 8 feet (in length), while 8" would mean 8 inches. You probably use metric, and my apologies, I don't know the conversion.
In reply to Wood requirements by Guest (not verified)
claydowling
Thu, 02/09/2012 - 07:31
Wood dimensions
The bigger problem is that lumber is specified differently in North American than in Australia. A 1x12 is one inch thick and 12 inches wide when rough. Final dimensions after surfacing will be 3/4" thick and 11 1/2" wide. That's the dimension you'll pick up at the lumber dealer.
In the event local products are specified in metric units, you might consider picking up a tape measure and a rule that measure in both units. I have one of each and it makes it a lot easier to build from metric plans.
AlliB
Sun, 02/10/2013 - 20:49
Sorry if this is naive, but
Sorry if this is naive, but could you define surfacing for me? I guess I'm confused why the dimensions say it's 30" high when at 29 1/4" and another 1" on top it wouldn't be 30 1/4?
Guest (not verified)
Thu, 02/09/2012 - 12:20
Wood measurements
Thank you both for your replies, I appreciate it :) I'm off to the hardware store today to get my timber to start this project. Wis me luck!
Christy_Roseveare
Wed, 03/19/2014 - 07:42
First Project
I would like to tackle this as my first project. I would also, however, like to have the shelf to hold the baskets. It is in the picture but does not seem to be part of the plan. Could someone help me know how to incorporate it?
JenniferMary
Thu, 01/28/2016 - 10:00
First ever project
I have never built anything before and would like to start with this. I read through the plan, but I feel unclear where the screw or nails goes. For example step 2 says
Step 2 Instructions:
Using either screws or nails, 2″ length, fasten the sides to the back. You will need to predrill and countersink you screws. Use glue. Keep the top and back edges flush.
It says to fasten sides to back but not where and the diagram only shows measurements not where or how many screws or nails are needed. Or is this just use best judgment on how many and where? Thanks so much and sorry if this is obvious.