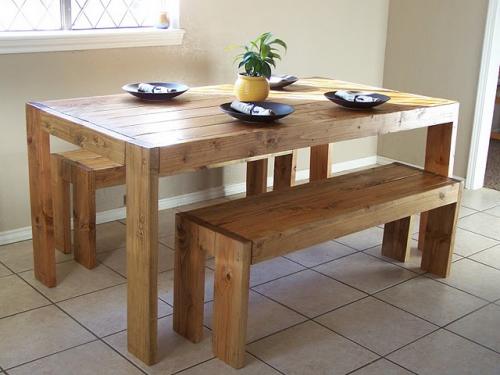


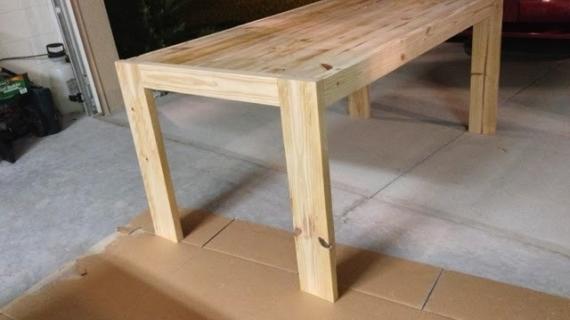
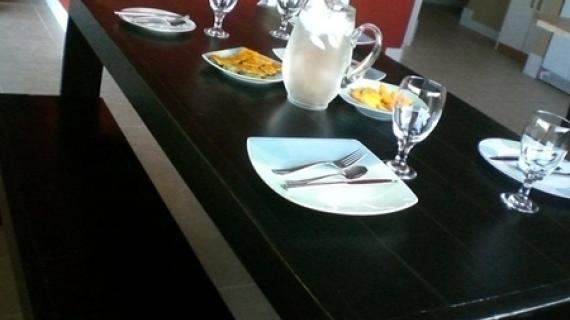
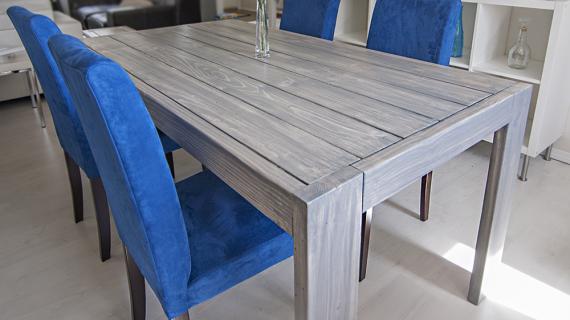
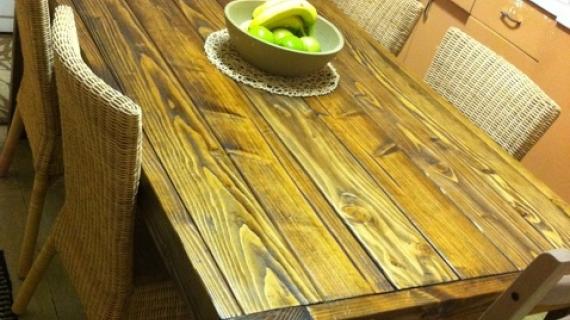
This easy to build modern farm table plan will add that touch of rustic modern to your contemporary space. Plans also available for matching modern farm bench and square modern farm table. By Ana-White.com Reader submitted photos.

Preparation
- 6 - 2x6 boards (make sure these boards are VERY straight) (about $2.50 each)
- 5 - 2x2 board (under tabletop supports) (about $1 each)
- 2 - 2x4 boards (about $1 each)
- 2 1/2" wood self tapping screws
- Sandpaper, ranging from coarse to fine
- Wood Filler
- Stain or Paint of choice
- A) 4 - 2x6 cut at 30" (Legs)
- B) 2 - 2x2 cut at 33" (Inside End Supports)
- C) 2 - 2x4 @ 63" (Side Apron)
- D) 2 - 2x4 @ 25" (End Apron)
- E) 7 - 2x2 cut at 33" (Under tabletop supports)
- F) 6 - 2x6 cut at 63" (Tabletop pieces)
It is very important that you measure the width of your boards and make sure they are 5 1/2" wide (tabletop boards) otherwise, your aprons could be short or long. See the Square Modern Farm Table Plans for a tutorial on how to build the tabletop first with pocket hole screws, and then attach the legs and aprons. That way you can adjust your aprons as necessary.


For long term durability and more professional results, I recommend using a pocket hole joinery system for wood joints. Here is a video with tips for using a pocket hole jig:
Instructions
Step 1

Start by taking 2 of the leg pieces, A and marking 1 1/2" down from the top, and 1 1/2" in from the outer edge. Then screw one of B, the outside end support, to the two legs as shown above. Do the same for the other set of legs.
Step 2
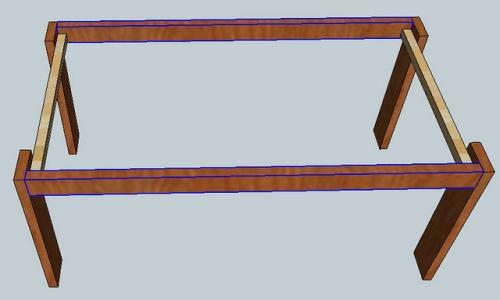
Now add the side aprons, C, as shown above, screwing into the end support, B. Also, screw through the outside of A, the legs, into the end edges of C, the side apron. Now is a good time to check for square. If you do not know how to check for square, see the HOW-TO section for a tutorial.
Step 3
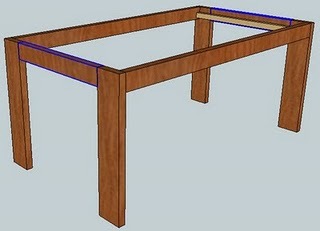
Now add the end aprons, D, screwing into B, the end supports. Again, check for square.
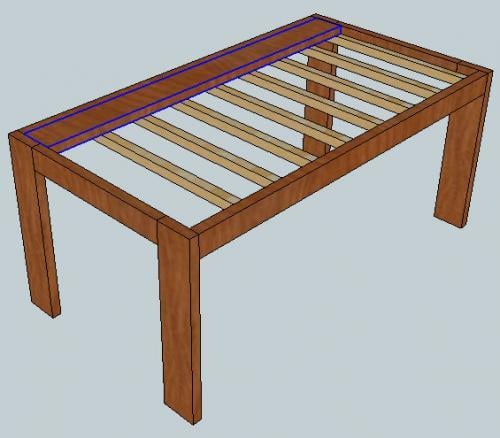
Step 4

Measure down 1 1/2" down from the top of the side apron, and mark all the way down the length of the apron. This will be the top side of the tabletop support pieces, E. Then mark every 6" and place a board E, keeping the top edge 1 1/2" below the top of the table, as shown above. Do not worry about the last support piece not being exactly 6" from the end - this does not matter. Make sure your project is square.
Step 5
Step 6

Screw pattern for the tabletop pieces shown above.
Step 7

Flip the table over on it's top and predril through all the 2x2 support pieces, drilling two holes per tabletop piece, per support piece. You will drill a total of 108 holes. Screw the top to the 2x2 support pieces through the predrilled holes.

Comments
The Powells (not verified)
Sun, 01/10/2010 - 09:50
I am going to make this
I am going to make this table! Oh I am so excited about your blog! We just bought a house and I can see so many possibilities for furniture now that I found your blog. :-) ah it makes my heart sing. My only request that you do a post just for beginners to give simple instructions on some of your terms or directions, ie how do I predrill holes? or how exactly do I use the wood putty? I have never built anything in my life so a post like that would be way helpful to me. :-) you are awesome and I am excited to start building things! AH!!
earthbybike
Sun, 11/30/2014 - 11:01
Answers to your questions
Wood Putty - https://www.youtube.com/watch?v=MHQCqnoTBXM
Predrilling How to's: https://www.youtube.com/watch?v=OA8qIM6HtHg
I totally understand your confusion! If you cannot find one of Ana's videos that explains, there are tons of them on YouTube! Good luck!
Ana White (not verified)
Tue, 01/12/2010 - 07:10
photos here of a reader
photos here of a reader modified (square) modern farm table
http://knockoffwood.blogspot.com/2010/01/bragging-board-more-awesome-ta…
Christina (not verified)
Sun, 01/31/2010 - 12:28
My table legs don't feel as
My table legs don't feel as sturdy as they should. I followed directions but maybe I need to add more screws? Any advice. Other than that it looks good but I don't want it to wobble (its level but the legs don't feel strong).
earthbybike
Sun, 11/30/2014 - 10:37
Stability
Christina,
Unfortunately, the 2 x6 legs are inherrently more unstable than a 3x3 or 4x4 post would be. Other than adding additional screws or inserting diagonal or horizontal leg braces, I am uncertain if there is anything you can do at this point. Sorry to rain on your parade :( I typically steer away from plans that have 2x6 legs for this very reason.
pk24
Fri, 08/07/2015 - 16:35
hi!
hi!
Can you tell me what other adjustments to the measurment and cuts would be neccessary to accomaadte 3x3 post legs insead of the 2x6 as listed in these plans. Is it just a matter of also adding thicker aprons to fit flush with these wider legs? thanks for any help....
earthbybike
Sun, 11/30/2014 - 11:30
Stability
Christina,
I was wondering if you applied wood glue in all of your joints in addition to the screws? A great wood glue will make all the difference in the world.
AdronsCatherine (not verified)
Sun, 01/31/2010 - 14:50
I just discovered your blog
I just discovered your blog this afternoon, and am SOOOOOO inspired!!! I have been driving myself crazy trying to find storage solutions for my sewing room, wanting a nice bed to go with the king size mattress set we just bought, and the need to replace a worn out hand-me-down kitchen table. I am more than just a little intimidated by the whole process, but you make it look doable!
Would it be possible to build this table longer by adding more supports? We have 5 kids and need to be able to seat more than 8 people if we have ANYONE over ;o) I love that it doesn't have a stretcher for the kiddos to climb on lol!
Ana White (not verified)
Mon, 02/01/2010 - 16:56
Hi Cristina, I haven't had
Hi Cristina, I haven't had any complaints about sturdiness from anyone else, so I think the plan is fine. I would try adding more screws, even try screwing from an angle from the bottom corners of the aprons up into the legs so the screws are hidden. Make sure you take a square before doing this.
Also, I encourage you to go wobble your existing table. You are always more critical of what you build than what you buy.
If there is still a wobble, you can corner brace the legs with either metal 90 degree corners or a piece of wood cut at an angle (check out the underside of a table to see how corners are braced).
Kate Bailey (not verified)
Tue, 02/02/2010 - 09:53
Ana, I love this table! I
Ana, I love this table! I want to make it a little wider though, so it fits better in my dining room.... more like 4 feet x 6 feet. I can figure out how to adjust the cuts, but do you think I'll have any problems with support if it's larger? I'm thinking if I do the benches, I'll have them be on the shorter sides of the table and put chairs on the longer sides so I don't have to worry about them being able to support the extra weight. Anyway, let me know if you think I'd run into a problem with this... if not, I'm going to give it a try!
Kate Bailey (not verified)
Tue, 02/02/2010 - 10:55
After reading the
After reading the instructions really thoroughly, I have a couple questions.
In recalculating the cuts for a different sized table, do we assume that a 2x6 actually measures 1.5 x 5.5?
In step 4, when you place the support pieces, do you drill them into place from the side aprons, or do they just stay in place because of the tension of the rest of the table?
In step 5, when you mark and predrill the holes on the tabletop pieces, do you also predrill through the end support pieces?
In step 7, I'm guessing you predrill from the support pieces up through the table top to make sure they're lined up. When you actually put the screws in, do you flip the table back over so the top of the screw is showing on the table top, or do you do it from the underside of the table?
Also, just a general question... do you generally sand all of the wood before you start building, and then stain or paint once it's all assembled?
Sorry to ask so many questions.. I just want to make sure I do this all correctly! :)
earthbybike
Sun, 11/30/2014 - 11:17
The Answer to the 2 x 6 question is . . . .
Short Answer: Lumber is rough cut at 2" x 4", then it is plained down on all sides and then it shrinks a bit when it drys out.
Longer Answer: https://www.youtube.com/watch?v=VrTQHp65iSM
earthbybike
Sun, 11/30/2014 - 11:52
History of Lumber Sizes
http://www.fpl.fs.fed.us/documnts/misc/miscpub_6409.pdf
Liz (not verified)
Mon, 02/15/2010 - 12:28
Hey Kate I just built this
Hey Kate I just built this table this weekend. I don't know the answer to all your questions but I can at least tell you what I did on a few of them.
For step four I did drill the 2x2s in place. I didn't want there to be enough tention that they held themselves and risk bowing the table. Not sure if that is correct but that was my thought. Plus to get your 2x6s in top took just a hair of hammering on my part and they all would have fell out.
Not sure I understand your question all the way on step 5.
On step seven I skipped this cause I didn't have anyway of flipping the table over so all my holes are on top and its seems to be fine.
I sanded my table all after it was built then finished it. You can see pictures on my blog http://tinyurl.com/yjex5jb
Anna Jo (not verified)
Mon, 02/15/2010 - 16:43
Just got home from purchasing
Just got home from purchasing all the lumber for this table and the benches. :) I am beyond thrilled! Lowe's cut it all for us, and the guy triple checked the measurement of each cut. They were so friendly and wished us luck! I am so ready to get started on the building of this table! :)
Brandye (not verified)
Tue, 02/16/2010 - 08:26
I have wanted a patio dining
I have wanted a patio dining set for years, but I am WAY too frugal to lay down hundreds of dollars for one! I am considering building this table to use for outdoor dining. We have a large covered patio, but I am really unsure what to put over it to really protect it from the elements. Any suggestions?
3Gs4me (not verified)
Tue, 02/16/2010 - 14:56
I love this table (and the
I love this table (and the blog in general as it has so many great plans and ideas)and really want to make it. While washing my current table today though after my three kids ate breakfast I wondered if using several boards on the top would make for loads of food in between the boards. Has anyone made this and had or not had this issue?
shauna (not verified)
Wed, 02/17/2010 - 06:46
I LOVE all your plans Ana. I
I LOVE all your plans Ana. I can't wait until it warms up a little outside so I can start making this table. I have been looking in stores for one we love and afford but I was definitely coming up short. This looks perfect...and the benches too. You must have been reading my mind. Thanks for having such a fantastic site and for being so generous with sharing your plans. I can't wait to send you photos of our table when it is done!
Monique (not verified)
Wed, 02/17/2010 - 09:20
I was wondering if I could
I was wondering if I could change the legs to a turn style. I want to make the table look a little more decorative. By changing the legs would I need to make any adjustment to attaching them to the table? I found the legs at Lowe's for $10 each. Thanks and love your blog.
dilsy (not verified)
Mon, 02/22/2010 - 09:19
Hi AnaI'm building this
Hi Ana
I'm building this modern farmhouse table but I'm a little bit concerned that drilling and gluing the table-top will not allow the tabletop to float. Any thoughts on this issue? Do you ever use tabletop clips or fasteners to alleviate this issue? I'm giving this table to a friend and I don't want it to crack after a while.
Let me know what your thoughts are when you get the chance.
Thanks so much btw. Your blog has given me the confidence to work on things I otherwise wouldn't.
Thanks so much
Hilary
amynicole717 (not verified)
Wed, 03/03/2010 - 09:03
Oh gosh, I love this table
Oh gosh, I love this table and though I just ran across it yesterday, I love your blog! Our house was built in 1900, so it's been tough finding a table to fit in our dining area that matches the "look" of the house, but doesn't overpower the dining/living room combo. It also needs to utilize the built in window seat for one of the benches...I didn't even think about having another bench, but it will work perfectly!
P.S. You don't happen to have any plans for a corner TV stand that I'm just not running across, do you? It will be in the same room as this table...I hope you do and I just didn't find them.
Kate Bailey (not verified)
Wed, 03/10/2010 - 18:55
Liz,Thanks for responding to
Liz,
Thanks for responding to all of my questions! We have built our table and I'm super proud of it! We did flip our table to screw those support pieces from underneath... we had to get a neighbor to come help us flip it without putting too much tension on the legs... that thing is heavy! We also adjusted the size so that it measures 52.5" by 72". We had to make our legs two 2x6s thick to help support the weight, but it worked out well. We also used 2x4s underneath for the support instead of 2x2s. We just used less of them (I think they're every foot instead of every 6 inches), but it saved us a bit of money on the project. I did sand the wood before assembling, and I'm glad I did just because a lot of places would have been hard to reach once it was assembled. Once it was assembled I distressed it and then finished it. Ours definitely isn't perfect, but we are so proud of it and we learned a TON in the process. I'd definitely recommend this project to anyone who's considering it! It's very do-able, even if you've never built anything before! We actually started with a bench as practice, since it's assembled pretty much the same way, and once that went well we moved on to the table. :)
IB (not verified)
Tue, 03/16/2010 - 09:03
Is there any reason that I
Is there any reason that I would need to use a screwgun instead of a drill with a phillips-head bit?
I understand the screwgun might be a little more convenient, but the drill will do the job, right?
k.crowley (not verified)
Thu, 03/18/2010 - 05:53
My husband and I have been
My husband and I have been dreaming of a new table - this is it! Hopefully I can convince him to build this weekend. We are hoping to make it a bit longer. More like the 93" farmhouse table you have as well. We currently have a family of 7 so we need more room. Any pointers? Thanks so much!
chelle (not verified)
Thu, 05/06/2010 - 14:50
EEEEK! Ok for real Thank you.
EEEEK! Ok for real Thank you. Seriously. We needed a new table, it took us forever to finish it, and now it is there PERFECT for us.
You rock.
http://soodz.com/blog/
Virginie (not verified)
Mon, 05/17/2010 - 08:28
Coffee Table version of this
Coffee Table version of this would be spectacular too ;)
Kelblue (not verified)
Wed, 06/02/2010 - 04:14
We just built this table and
We just built this table and benches but made our table 8 ft long.
A few suggestions:
1) Can't stress enough how much easier this is to build if you buy STRAIGHT boards
2) Sand and stain/paint BEFORE you assemble. Hard to get between tabletop cracks afterward and you can see the unfinished wood
3)as another person suggested...build a bench from start to finish (sand/paint or stain and all). You will learn a lot and have a better looking table in the end.
Happy building! And thanks Ana for the amazing plans. We did a dark chestnut stain on top boards and semi-gloss white for sides and legs. Looks beautiful (pics to come).
Desiree (not verified)
Sat, 06/12/2010 - 10:08
I am planning on making a
I am planning on making a square version of this this weekend. But can I double the 2x6's for the legs for stability? My dh is worried that our kids (almost 5 now!) will climb on it and it won't be stable enough.
Carolann (not verified)
Thu, 06/17/2010 - 18:37
Kelblue,I'm so glad you
Kelblue,
I'm so glad you posted because I want to build this table, but need it to be 8 ft long and wasn't confident about changing the measurements. Thanks for the pointers! Where can I see pictures of your two-tone table!? Now I'm debating how to finish mine!
M (not verified)
Mon, 07/05/2010 - 06:18
We are very excited to try
We are very excited to try this. Thanks Ana!
Quick question - will this comfortably seat 6 adults?
Also, if we pair this table with black resin wicker chairs, what stain or paint color should we use to keep a contemporary modern look?
mil cositas bellas (not verified)
Sun, 08/01/2010 - 08:46
i just came across this plan
i just came across this plan and i am super excited to build it. hoping to have it done before new baby comes in october. my question: we need it to seat at least 8 people preferable 10. i am comfortable doing the modifications but will the 2x6 legs be enough support or should i make it 2 2x6 like someone else suggested?
Maclyn (not verified)
Sun, 08/01/2010 - 14:48
Hello Ana, I discovered your
Hello Ana,
I discovered your website from my sister. I want to build this table but i was wondering if you can modify to fit 8 people. I have a big family and I really like this table, i saw somewhat similar table at Pier 1 its to expensive. If you have time.....
Thank you....
Jesus Would’ve… (not verified)
Tue, 10/05/2010 - 16:47
[...] a step-by-step (sorta)
[...] a step-by-step (sorta) through my furniture build adventure. Props go out to Ana White for her blueprint on this. And I gotta say, there’s nothing more fulfilling as a dude than to wield a power [...]
MandT (not verified)
Sun, 11/07/2010 - 14:49
We're almost done this (I say
We're almost done this (I say "we" but I've been sick in bed most of the week-end and my husband has done most of everything, including running after our baby and toddler!). We've only hit two snaggles thus far: 1. When we measured the tabletop after we got home from Lowe's and everything was already cut, the table supports and the short aprons were a little too long. (We wish we'd done a rough assembly at Lowe's so we wouldn't have had to cut those parts again at a friend's). 2. When drilling for the tabletop supports, the instructions said to mark out every 6 inches, which would require 9 supports instead of the 7 in the cut list. Basically, we just dropped the marks on the end and started 15 inches in from the edge. Maybe we didn't read it correctly, but this all worked out fine in the end. Thanks!
Have a Seat | … (not verified)
Wed, 12/08/2010 - 14:09
[...] Elm/Crate & Barrel, in
[...] Elm/Crate & Barrel, in addition to her own designs. I fell in love with the look of a farmhouse table and bench set (especially when stained like this), and emailed the links to the bf with just [...]
jenn (not verified)
Mon, 12/27/2010 - 12:28
ana, i was wondering if you
ana, i was wondering if you have the steps to build the benches that go with this table? i have ALWAYS wanted a table with benches.
Candice S (not verified)
Mon, 01/10/2011 - 06:52
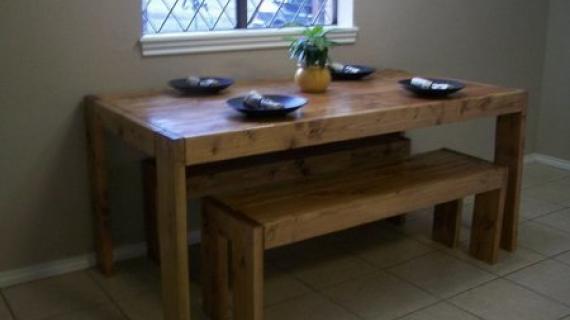
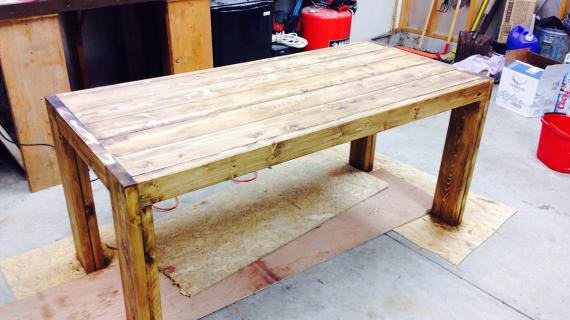
Hello! I really liked the
Hello! I really liked the finished picture (the 4th one down). This is exactly the type of table I've been looking for but they all are so expensive in the stores. Also, do you happen to know what's the name of the teal wall paint in that picture? Thanks!
Modern Farm ta… (not verified)
Wed, 01/12/2011 - 08:38
[...] in Brag Blog Put on
[...] in Brag Blog Put on my TO-DO List Save as PDF Print this PostShare/Bookmark Builder: Taryn Experience Level: Some Experience Estimated Cost: 100 Estimated Time Investment: 15-20 hours From Plan: http://ana-white.com/2009/11/plan-modern-farmhouse-table-knock-off.html [...]
Cheryl Kindred (not verified)
Thu, 01/13/2011 - 12:41
I'm jusr echo'ing Jenn, any
I'm jusr echo'ing Jenn, any bench plans laying around? ;)
Thanks Ana, I can't wait to get building some of your beautiful designs!
Jen (not verified)
Sun, 01/16/2011 - 09:26
Thank you for posting, this
Thank you for posting, this is what I have had in my head for our family. We are a family of 5 and we have grown out of our 4 top table. This is what I have been explaining to my husband what I want. Maybe seeing your plans will help me give my husband a clear picture of what I want.
Daqurie (not verified)
Mon, 01/24/2011 - 08:59
Can I make this table longer?
Can I make this table longer? I am wanting it to sit 10-12. Also. is there a way to seal the top so food and stuff does not get into the spaces between the boards? ( I have 8 littleones right now ;0)
Juleah
Tue, 04/05/2011 - 20:22
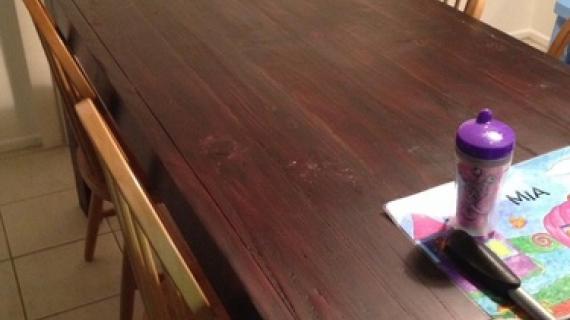
What Color Stain
I just finished making this table with a few of my personal alterations and LOVE it!!!! I can't wait to post pictures but I still need to stain and seal it. I am curious what color stain you used, I really like it.
trailergypsy
Tue, 05/03/2011 - 14:50
Bench Plans?
Where are the bench plans? I feel like I've been going in circles trying to find them and they're probably right in front of my face somewhere. I don't want to build the table until I'm sure I can make the benches as well. Thanks.
JES
Tue, 05/03/2011 - 16:35
Modern Farm Benches
http://ana-white.com/2009/11/modern-farm-benches
I think is the link you want - I want to buile one of these too! :)
cheers
J
nicole Renssen (not verified)
Sun, 06/05/2011 - 17:19
modern farm table - plans benches
Hi Ana
I had found your site 6 months ago and after not finding my benches anywhere or for too much of an asking price decided to go for it myself. You inspired me too!
Would it be possible for me to get your plans for the benches you have next to the farmhouse table? I will be making them longer - but have never made anything myself from wood so would love your directions.
Thank in advance for any help,
Nicole
Guest (not verified)
Sun, 02/05/2012 - 14:06
hi Ana! I love your work, you
hi Ana! I love your work, you are an inspiration for me:-) I am planning on making this with my husband and was wondering what kind/color of paint did you use to finish this. I love the color, it is very natural!
Guest (not verified)
Wed, 03/21/2012 - 22:00
addicted!
Hi Ana,
First, thank you for all your time and effort into your building plans. My husband and I have built the Fillman Platform Bed for our son recently and it turned out fabulously. Will post a picture soon. We are new to building and you have given us the confidence to do more.
We are looking at building your Modern Farmhouse Table but have a question... We want the table top to be one solid piece of wood instead of slats, is it possible to build the frame as you have done and secure the table top to the frame using glue and screws? I'd like the top NOT to overhang the sides of the frame (hubby does) or if so, very minimally.
Thank you for your time!
-Andrea
Maria Bennink (not verified)
Fri, 04/27/2012 - 17:59
Square Table
Can I change the dimensions and make this table square?
In reply to Square Table by Maria Bennink (not verified)
Lady Goats
Fri, 04/27/2012 - 19:57
You don't have to
Ana's done that for us! http://ana-white.com/2010/09/square-modern-farmhouse-table
Waters (not verified)
Fri, 06/08/2012 - 11:29
Ana, can you share what
Ana, can you share what finished you used on this set? It's so gorgeous and I think it's what I want to do, too! Thank you!!