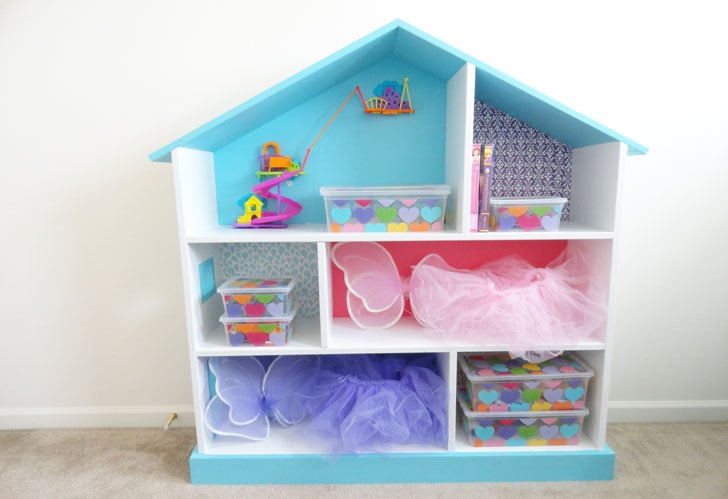


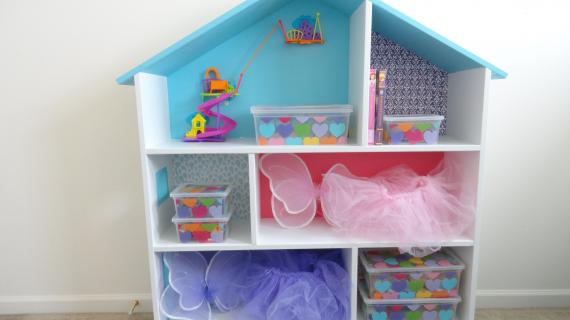
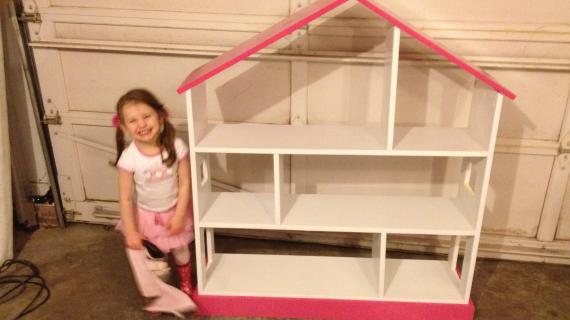
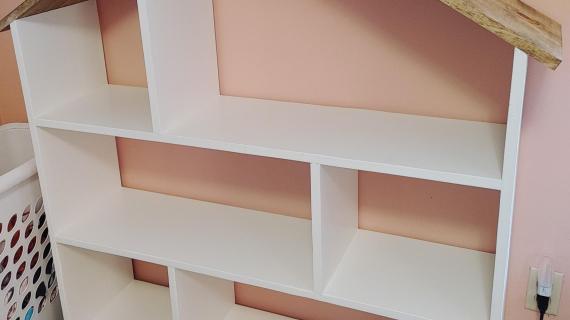
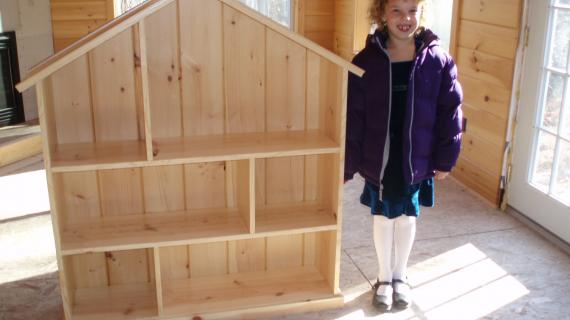
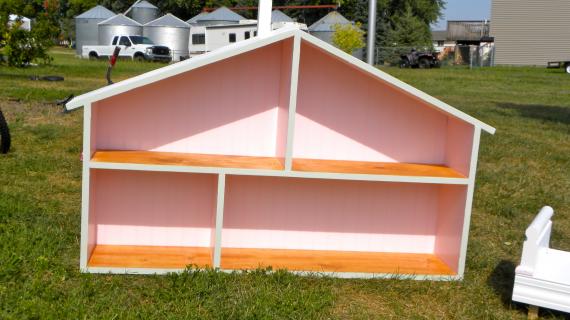
Build your own dollhouse bookshelf with our free woodworking plans. Uses off the shelf 1x12s and basic joinery.
If you’ve got a good miter saw, you can make this bookcase in no time. I have always loved this simple design. Our free plans include step by step diagrams, shopping list and cut list.
Pin For Later!

Preparation
- 4 - 1x12 @ 8 feet
- 1 - 1x4 @ 4 feet
- 1 - 1x2 @ 8 feet
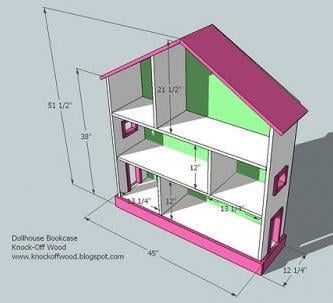
- 1/4″ plywood cut 45″ wide x 51 1/2″ high, cut in a house shape with the vertical ends at 38 1/2″ (measure for exact fit)
Main Carcass
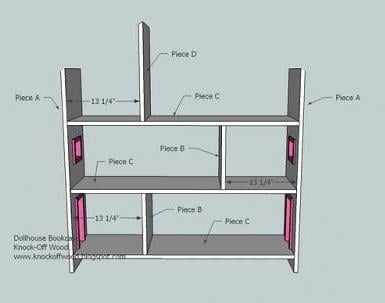
A) 2 – 1×12 @ 38 1/2″ (top edge cut off at 30 degree angle)
B) 2 – 1×12 @ 12″ (Bottom Vertical Dividers)
C) 3 – 1×12 @ 42″ (Shelves)
D) 1 – 1×12 @ 17 1/2″ (Top Vertical Divider, top edge mitered down at 30 degree angle)
E) 2 – 1×4 @ 1 1/2″ (Side Footer)
F) 1 – 1×4 @ 45″ (Front Footer)
G) 2 – 1×12 @ 27 1/2″ (Top Edge Mitered down at 30 degrees)
Trim for Windows and Doors
H) 6 – 1×2 @ 4″
I) 4 – 1×2 @ 4 3/4″
J) 4 – 1×2 @ 10 1/4″ Plywood 1/4″ plywood cut 45″ wide x 51 1/2″ high, cut in a house shape with the vertical ends at 38 1/2″ (measure for exact fit)
Start by cutting all the boards as directed above. Review the diagrams to see how the angles are cut. Unless otherwise directed, use 2″ nails and glue on all joints.


Instructions
Step 1
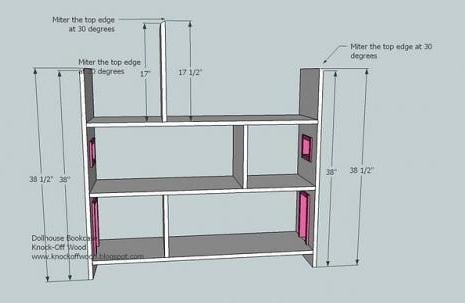
Use the above diagram to help guide you. Please note that the measurements are close approximations and the miter saw will cut the exact angle for you.
Step 2

Windows and Doorways. From Boards A, cut the window holes out as shown above.
Step 3
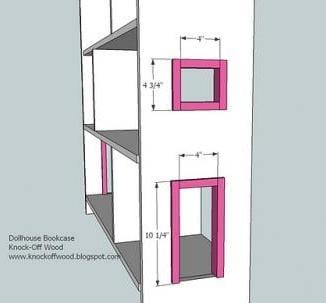
Windows and Doors. First build the window and door frames as shown above, using 1 1/2″ nails. Then center the frames on the openings cut in step 2 and nail the frames into the openings. If you are painting the frames different colors, you may wish to paint and finish the bookshelf and the frames seperately, and then fasten the frames to the bookshelf.
Step 4
Once the sides, A, are complete, begin working on the center. First nail boards B and C together, as shown above. Then fasten D to the top shelf. Once B, C, and D are completed, nail the sides A on.
Step 5

Step 6

Footer. Now fasten the front footer, F, to the front of the bookshelf as shown above.
Step 7

Top. Fasten the top as shown above. Make sure you nail from each of the top pieces into the opposite top piece at the top of the gable end.
Step 8

Cut and add the plywood to the back, using glue and 1 1/2″ nails.
Step 9
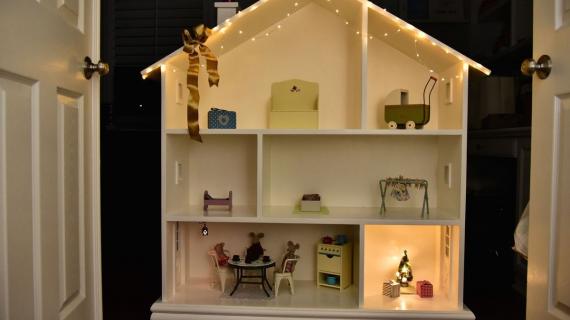
Finishing. Fill nail holes with wood filler and sand and finish as desired.

Comments
mary (not verified)
Mon, 12/14/2009 - 07:16
You are awesome! Lucky little
You are awesome! Lucky little girl.
Miss Muffin (not verified)
Mon, 01/18/2010 - 08:16
Oh no, I SO wish I would have
Oh no, I SO wish I would have found your blog before Christmas. My father in law build a dollhouse for my daughter and we were searching for a plan for ages ... I came across one of those bookcase-dollhouses to buy but never found a plan. I SO LOVE yours!!! It's so adorable!!! And it is so kind of you for sharing your plans! I wish I would be a carpenter. :-/
Caithlin (not verified)
Sun, 02/21/2010 - 15:35
Hi,I like these plans. Thanks
Hi,
I like these plans. Thanks for sharing with us.
What type of wood did you use?
Can you recommend someone's wood glue that you have found to work best?
Thanks
Madame Samm (not verified)
Wed, 03/03/2010 - 09:21
OHHHH my we are talking...I
OHHHH my we are talking...I love this...a friend of mine sent this to me and gosh I am sewwwwwwwww glad she did..you are a present ...
blessings madame samm
Nathan (not verified)
Sat, 03/13/2010 - 08:15
I noticed the measurements
I noticed the measurements for the side 1x4s are about an inch too long. Might want to correct that...
@Catihlin: Elmer's wood glue has never let me down.
Ana White (not verified)
Sun, 03/14/2010 - 07:07
Thanks Nathan, elmer's fan
Thanks Nathan, elmer's fan here too!
Rachel (not verified)
Mon, 03/22/2010 - 07:32
Thank you for posting this!!
Thank you for posting this!! My husband and I had a blast making this for our little ones playroom this past weekend. A couple tips we found was 1) that when painting/finishing we used caulk on the joints before painting, and it really looks better for it (forgot in one place and umm...you can tell :) and 2)when assembling the whole piece if you have it in the floor to piece together-use whatever side was on the floor as the front. Not all of our cuts were exact, but thanks to gravity all the pieces line up perfectly...Trying to decide on how to finish the roof and then we'll send some photos.
vwilliams624 (not verified)
Sat, 04/10/2010 - 15:11
How much paint so you think I
How much paint so you think I might need? If anyone has painted theirs I'd love to know how much paint was needed!
Lexi's Mommy (not verified)
Thu, 05/13/2010 - 11:40
I love this!! It's so
I love this!! It's so ridiculously cute! I am so glad I have a girl. I might have to talk my husband into making this for our daughter :)
Dee (not verified)
Wed, 06/02/2010 - 04:51
Hi there,Extremely helpful
Hi there,
Extremely helpful post. Really good job with all the designs. So easy to follow. Just a few questions:
1. What kind to material you have used? MDF? Plywood?
2. I have heard there are some issues with painting MDF. Can you share your exp please?
Thanks
Dee
Ana White (not verified)
Wed, 06/02/2010 - 07:58
Dee, I find finishing MDF to
Dee, I find finishing MDF to be super easy. Just prime and paint! Oh, and I would take a second to sand any exposed cut edges to make them pretty, but I personally have had a great experience painting MDF. I'm painting some right now!
Dee (not verified)
Tue, 06/08/2010 - 05:07
Thanks Ana. Do you think I
Thanks Ana.
Do you think I can use 3/4" thick MDF for it? or should it be 1"?
e.g. your cut list says it is 1x12x12"
Dee (not verified)
Tue, 06/08/2010 - 05:38
Got my answer
Got my answer :)
http://www.knock-offwood.com/2009/12/how-to-choose-you-type-of-wood-for…
should hv read it before posting. thanks so much.
Jennifer (not verified)
Wed, 06/09/2010 - 16:59
Is there a supply list for
Is there a supply list for this? By my calculations I would need 3 1x12's at 8 ft for the main part of the dollhouse. Would I be better off getting a sheet of mdf and cutting my 1x12's from that?
Sara (not verified)
Fri, 06/25/2010 - 09:49
My dad built this for my
My dad built this for my daughter August 2009. Too bad we didn't know about your plans then. I just gave him the picture ripped out of the Pottery Barn catalog and he showed up to her first birthday party with it. We LOVE it and get lots and lots of compliments!
I love your site. Now I can hand him "pictures" with all the building details :)
Rareview Interactive (not verified)
Sat, 07/17/2010 - 10:22
My wife saw this in pottery
My wife saw this in pottery barn and asked me to build one. I have never seen this site before, but I was looking around google and came across this. I followed the instructions and just finished today. I built it for less than half the price of the PB one and it's sturdier, nicer, and made by dad for my daughter. These plans helped a lot! I just put it in my daughter's room today and she LOVES it. I'm really really excited about this. Thanks for sharing the plans; it made my life a lot easier. I'm looking around your site now for my next project! :)
I just wish I could post a picture of what it looks like!
Sarah (not verified)
Tue, 07/20/2010 - 05:47
Hi Anna,Love this plan, thank
Hi Anna,
Love this plan, thank you for offering this and all of your plans to the world.
Question, where did you get those cute baskets that are in the dollhouse. What are the made of?
Thanks!
Where can I fi… (not verified)
Fri, 09/03/2010 - 21:29
[...] Build a Dollhouse
[...] Build a Dollhouse Bookcase — Ana White [...]
LPiccolo (not verified)
Wed, 09/08/2010 - 08:48
I am so, so, so excited about
I am so, so, so excited about your website and can't wait to build some of these things! This bookcase is one of my favorites. Thank you for sharing these wonderful plans with us! Have you ever designed a puppet theater? I've been looking for plans so I can build one, but haven't found anything I love.
Brenda (not verified)
Tue, 10/05/2010 - 20:33
HI i'm wondering around how
HI i'm wondering around how much does it cost to make this? i tried searching in the cost part of the site but i can't seem to find this project thanks so much
Jenna Burke (not verified)
Fri, 11/05/2010 - 13:45
Our miter saw is for
Our miter saw is for moulding...and says it can handle 2 x 4...but how owuld you miter a 1x 12? Does it need some mondo-saw?
Cassie (not verified)
Sun, 11/07/2010 - 13:40
Thank you , Grandpa is going
Thank you , Grandpa is going to build this for Christmas for my son and we our going to add a ramp for his trucks to park . My son has been using his sisters doll house to park his cars
AVZ (not verified)
Sun, 11/07/2010 - 16:30
E) 2 – 1×4 @ 1 1/2″ (Side
E) 2 – 1×4 @ 1 1/2″ (Side Footer)
Has anyone else thought that this measurement is wrong? I read 'one and a half inches' in length - that doesn't seem correct.
Anyone know what the correct measurement should be for the sides? Thanks in advance...
When did toys … (not verified)
Tue, 11/09/2010 - 07:56
[...] got a Doll House
[...] got a Doll House bookcase on there which you could pretty easily pass for a doll house, I think. Build a Dollhouse Bookcase ? Ana White recently on oneprettything.com (yesterday, I think... probabaly on their "before and [...]
Rooms You Can … (not verified)
Wed, 11/10/2010 - 06:59
[...] designed the rocket
[...] designed the rocket bookcase as an alternative to the dollhouse bookcase for [...]
Kit (not verified)
Fri, 11/12/2010 - 18:26
thank you so much...we cant
thank you so much...we cant pay for real thing but atlast we can build it.
TheDancingLlama (not verified)
Wed, 12/01/2010 - 12:53
@AVZ, The pictures show the
@AVZ, The pictures show the side footer length at 12 1/4", does that seem more accurate?
Thanks for pointing that out, I'm going through the parts list in preparation for building this myself.
I noticed someone mentioned building this in MDF, but I can't find the right stuff at Home Depot. The person I talked to said they didnt have any boards wide enough in MDF.
I'm thinking about building this w/ pine instead. Any preferences either way? Is pine fairly easy to coat w/ paint?
Also, do you paint the wood before you nail / construct the dollhouse?
Ritchie (not verified)
Thu, 12/02/2010 - 12:12
I haven't built it yet but in
I haven't built it yet but in cutting out the material and comparing them to the schetch I noticed the same thing. If you plan to butt joint the corners, I think the correct length should be 11 1/2" (eleven and one-half) (the the width of side panels "A"),. If you miter 45 degree angles you may want to add 2 more inches for a better fit then cut to proper length. Keep this in mind for the window dressing as well.
Melissa (not verified)
Wed, 12/08/2010 - 04:44
You have inspired me, I shall
You have inspired me, I shall now go to Lowe's to check lumber prices before continuing ahead. I will post once I have completed the project. You rock!!!
Jen (not verified)
Fri, 12/10/2010 - 04:45
Hubby and I are working on
Hubby and I are working on this now. I believe the Side Footer should be cut to 11 1/2" rather than 1 1/2".
Jeff B (not verified)
Sat, 12/11/2010 - 09:16
I just picked up the wood for
I just picked up the wood for mine, made a few changes.
I'm using premium hardwood (poplar) which is priced by the foot, quite a bit more expensive than MDF or select pine. The trade off for cost is dead straight boards, and a stronger grain. I am making the sides, floors and supports out of 1x10, and the roof panels out of 1x12. This will allow the roof to extend out past the front of the dollhouse, which I think gives it a slightly more realistic look. Also I can save about $1 per foot on the premium 1x10s vs. 1x12s. I got select pine for the bottom trim and window/door trim, no need for premium hardwood for that.
However, the trade off is that the 1x10s will be narrower front to back, and therefore more "tipsy". We plan to keep the dollhouse in a specific spot in our daughter's room, so we will anchor it to the wall anyway. But just an idea for others out there.
The other trade off with the hardwood is you need to be very careful to pilot drill the holes (through the face and a bit into the joining end) before nailing as the hardwood can split a bit easier. And yes, always use glue.
I purchased one 11 foot 1x10. This = 132". I will cut the three 42" floors leaving me just less than 6" scrap. I also purchased one 10 foot 1x10 (102") From this I will cut the 38 1/2" sides, the two 12" supports and the 17 1/2" top support. This only leaves about 1" scrap, so you will have to be very precise with your cuts, and use a sharp/thin finish saw blade. If you use a nice blade and hardwood, you can cut the angle on the 38 1/2", and then flip over and square cut the other end with no waste there. Getting two 11 foot 1x10s may be advisable for those who want a little more room for error. I then only need one 5 foot 1x12 to cut the two 27 1/2" roof panels, with about 5" of scrap. I plan to use the 1x4 clamped in place as a saw guide to cut out the main house for accuracy.
I bought all the wood, the finish saw blade (7 1/4") for my circular saw, nails, wood glue, and a framing square for about $160. Wood only would be closer to $135. Prices will definitely vary by state. I already have primer & paint for the main house, but will probably grab a quart of some green or pink color for the trim. This is still about half the cost of the PB version, and it will probably be strong enough to give to my grandkids.
Hope this helps!
Jeff B (not verified)
Thu, 12/30/2010 - 17:05
Here is the finished
Here is the finished product...

Dollhouse Book… (not verified)
Tue, 01/04/2011 - 18:01
[...]
[...] http://ana-white.com/2009/12/plan-dollhouse-bookcase-knock-off-of.html to do. ana white, bookcase, dollhouse [...]
Bill s (not verified)
Wed, 01/05/2011 - 04:30
Jeff, thanks for your post,
Jeff, thanks for your post, very good. My wife wants this for our daughter. In your opinion, would pine be acceptable? And my biggest concern is the joinery method. Nails and glue seem weak. I think I may go with pocket hole screws.
Tania (not verified)
Fri, 02/04/2011 - 01:20
wow just searched through
wow just searched through EVERY SINGLE flickr photo in the fan album! hahah I added about 15 things I MUST make!!
anyway I was looking to see if this was ever made in a boys design? I couldnt find one (I found one painted green which was cute!) and I found a tall rocket ship but that was a bit different... anyway gave me an idea to make THIS as either a rocket ship or pirate ship but not sure they are lasting themes... I reckon this style would suit a girl till early teens if not longer!
Any suggestions people? much appreciated! x
Tania (not verified)
Fri, 02/04/2011 - 01:21
wow just searched through
wow just searched through EVERY SINGLE flickr photo in the fan album! hahah I added about 15 things I MUST make!!
anyway I was looking to see if this was ever made in a boys design? I couldnt find one (I found one painted green which was cute!) and I found a tall rocket ship but that was a bit different… anyway gave me an idea to make THIS as either a rocket ship or pirate ship but not sure they are lasting themes… I reckon this style would suit a girl till early teens if not longer!
Any suggestions people? much appreciated! x
Tania (not verified)
Fri, 02/04/2011 - 01:22
sorry Dee didn't mean to
sorry Dee didn't mean to reply here! hehe
Trishdish
Wed, 03/16/2011 - 14:11
Barn Bookcase
Someone built this as a barn instead of a doll house, does anyone know how to find the picture of that one? It used to be under photos on the old site, but now I can't find it on either. I want to build it for my son's room and want to look at the picture for help altering it.
Stephanie Cain (not verified)
Mon, 09/17/2012 - 16:52
Wondering the same
Wondering the same thing...did you ever find out? Thanks!
Guest (not verified)
Tue, 10/18/2011 - 16:08
doll house furniture
Love the plans for a doll house - next question - what about the furniture - store bought just breaks so easily - any info?
thanks,
deb
Austin (not verified)
Thu, 06/14/2012 - 18:22
I was thinking about making
I was thinking about making this Doll Houses for my niece but I am not sure what type of wood to use to build it. I was wanting to build it with wood that is relatively light but is also strong and durable. This is really my first big project and I would like wood that is easy to work with but also very durable.
Thanks,
Austin
shookup1
Tue, 11/25/2014 - 18:22
inside gabel angle in degrees
I'm attempting to build this doll house. But I need to put a trianglular piece of wood under the peak of the roof for more stability. Since I cut both roof pieces at the 30 degrees..... what would the angle in degrees be under the peak?
Thanks,
Sharon
cprisco
Sun, 12/17/2017 - 19:26
Joining the roof problem
How are you guys joining the two roof halves together? its a strange angle and im having trouble. I tried glue and nails, but its not strong at all. then what did you do to secure the roof to the bottom section? Thanks!
paul2727
Mon, 12/18/2017 - 07:50
roof triangle angles
All angles in a triangle add up to 180 degrees. I.E. 30+60+90 = 180. or 30+30+120 = 180
sgt_waddle
Wed, 10/14/2020 - 09:20
What kind of boards are used?
What type of wood is recommended for this or was used initially? Select 1x12x8 are running about $45 now. I'm hoping there is a better option.