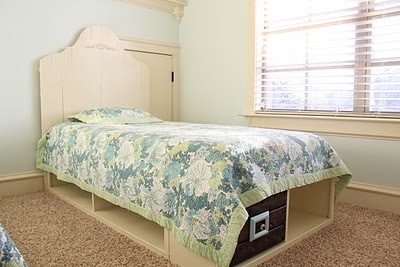


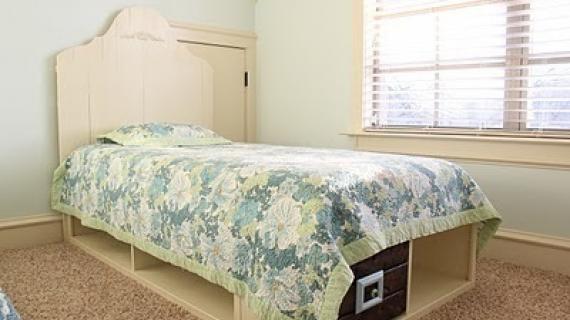
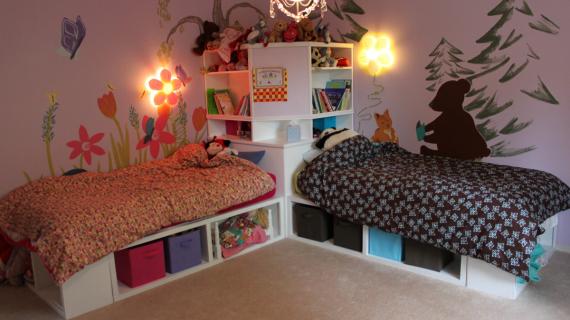
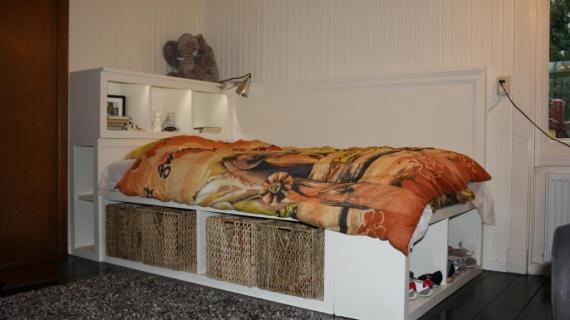
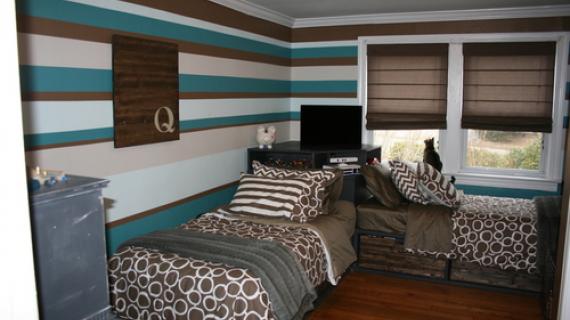
We already have a storage daybed plan, and it has been very very popular. But this plan is for a twin storage bed, meaning it has storage on three sides. This bed is also (in my opinion) easier to build. But the downside is the cubbies are not as deep and there is less storage. Special thanks to Shanty 2 Chic for sharing their amazing photos with us.
Preparation
Please reference the full size bed for a materials list here.
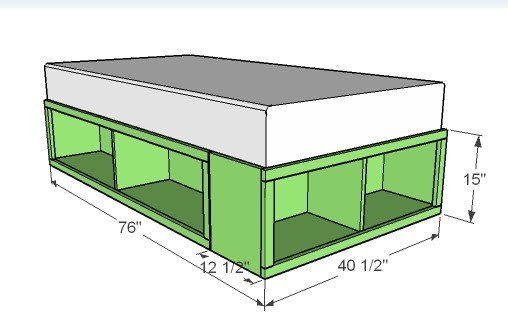
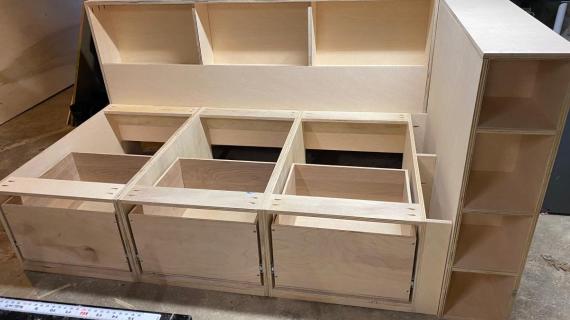
CUT LIST FOR TWIN END BASE UNIT ONLY
2 – 1×12 @ 39″ (Tops and Bottoms of the Boxes)
2 – 1×12 @ 15″ (Sides of the Boxes)
1 – 1×12 @ 12 3/4″ (Center Divider of Boxes)
1/4″ Plywood or MDF @ 15″ x 40 1/2″ (Back of Box)
2 – 1×2 @ 40 1/2″ (Top and Bottom Trim)
2 – 1×2 @ 12″ (End Trim)
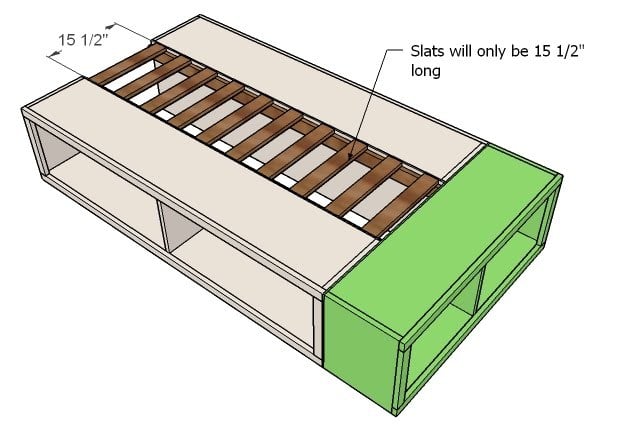
11 – 1×3 @ 15 1/2″ (Slats) (you can buy a couple less 1x3s for the twin version)
You will need to review the <a href="/2010/05/furniture-plans-full-size-storage-bed.html">Full Size Bed Plans</a> to make the longer side cubbies first. This plan is simply for the end bench to convert the Full to Twin.


REFERENCE THE FULL SIZE PLAN
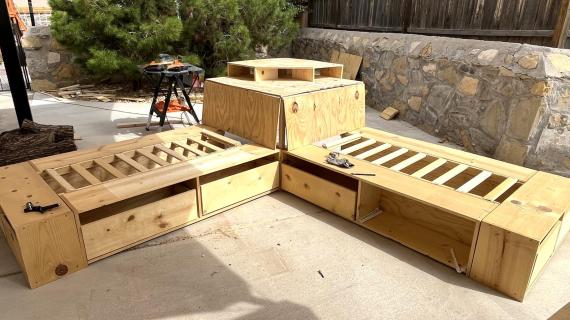
This plan is a basic modification of the full size bed that you will find here. Please reference this plan for the shopping list, tools, and general instructions. Remember, you will need to build (2) side bases from the full size plan, but DO NOT BUILD the end base unit. The following plan will replace the end base unit from the Full Size Storage Bed Plan.
Instructions
Step 1

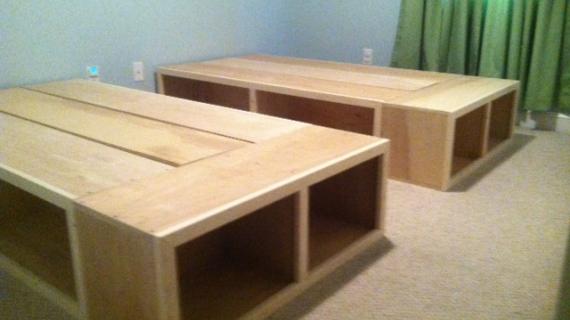
Build the two side benches from the full size bed (shown above). DO NOT build the end bench. Instead, you will build this bench as follows, sized for a twin mattress.
Step 2
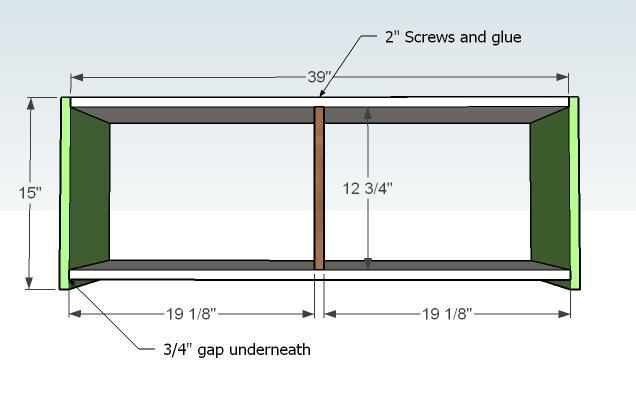
BUILD THE BOX
Build your box using 2″ screws and glue as shown above. Check for square.
Step 3
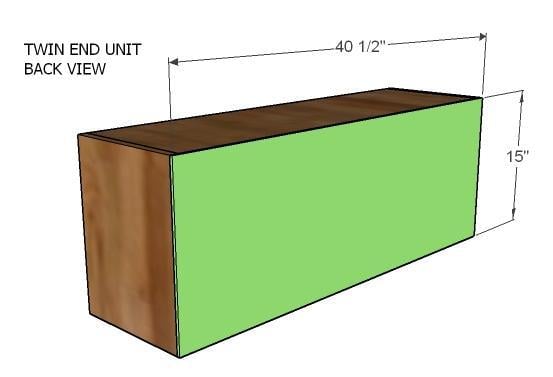
BACK
Attach the back with 1 1/4″ Screws and glue
Step 4

TRIM
Fasten with 1 1/4″ finish nails and glue the trim to the face. You can alternately use screws, but if you are staining, the screw heads will be difficult to hide. Another option is to build the frame using a Kreg Jig™ and then attach to the face.
Step 5
Comments
artkdz (not verified)
Thu, 05/20/2010 - 14:00
this would be cool even in a
this would be cool even in a single kid's bedroom where one side is used as a bed and the other as a couch/ sleepover area. Just put some cushions or big pillows along the wall behind it and presto - a couch. Will definitely have to consider this when my munchkin is older.
The Trees (not verified)
Thu, 05/20/2010 - 15:44
Wow, i love these plans!
Wow, i love these plans! Thanks so much! Such a great use of space. Would you be willing to make some plans for that top hutch part to the center unit. I'm so greatful you are so willing to share your talents. I'm a beginner and so far your plans have made building easy and inspire confidence. Thanks!
Yolanda (not verified)
Thu, 05/20/2010 - 16:06
Wow. What a gift, Ana. Thank
Wow. What a gift, Ana. Thank you for posting the entire collection in a single day. I bet these would be great with a hinged door and a simple magnetic latch. Could hide a lot of clutter and no drawers to build.
Liana Brooks (not verified)
Fri, 05/21/2010 - 01:47
Perfect! We're going to buy
Perfect! We're going to buy bed this morning and this is just what I wanted. It's going to be my first wood working project (this and a bookcase). Hopefully I can follow directions well enough to send you some pretty pictures.
*hugs and warm weather from the south*
L
Ahren (not verified)
Fri, 05/21/2010 - 04:56
Ana, I would really like to
Ana, I would really like to see your plan for a basic workbench to build all your awesome plans. I'm curious to see what your workbench looks like at the moment too. The workbench is the basic of all woodworking projects I am told. But I don't currently have one because they all seem rather complicated to build. If anyone can design it simple, affordable and chic, I know it would be you. ~Ahren in Austin, TX. (for Big Z Creations)
http://bigzcreations.blogspot.com
Jenni (not verified)
Fri, 05/21/2010 - 09:49
So cool! Are you going to be
So cool! Are you going to be "designing" the hutch as well?
vanesavesalot (not verified)
Fri, 05/28/2010 - 03:57
the plans shown in this blog
the plans shown in this blog are great.
I'm really on a budget and don't have money to spend in expensive furniture.
I found great ideas here.
Thanks
Cara (not verified)
Tue, 07/06/2010 - 04:48
I would also like to see the
I would also like to see the hutch that goes along with this collection. This is going to be my project this winter!
cjojo43789 (not verified)
Thu, 09/16/2010 - 08:51
We can't wait to build two of
We can't wait to build two of these for our twins' new 'big boy' beds! Unfortunatly there room is too small to add the corner hutch, so we'll just have the two beds. So excited to look through the rest of the plans to finish their room!
cjojo43789 (not verified)
Thu, 09/16/2010 - 08:51
We can't wait to build two of
We can't wait to build two of these for our twins' new 'big boy' beds! Unfortunatly there room is too small to add the corner, so we'll just have the two beds. So excited to look through the rest of the plans to finish their room!
amanda (not verified)
Sun, 11/07/2010 - 10:56
Does anyone know what the
Does anyone know what the estimated cost of this bed is?? Also I am new to this so a little confused. Where can I get the list of materials and directions for this whole bed and not just the end box?
Laura (not verified)
Fri, 01/07/2011 - 12:27
WOW! Thank you soo much for
WOW! Thank you soo much for sharing all your wonderful plans:) I'm recently married with a 9 year old and now a 6 year old step daughter and this is going to be our first project! These plans fit my daughters room perfectly and gives her a place for sleepovers when her step sis isn't here! We plan to use many more of your plans as we have lots of mismatched furniture from both of us but its just not in our budget to go out and buy all brand new stuff BUT with your fabulous plans we can take it room by room and make exactly what we want/need for WAY less money. I really can't tell you how much I appreciate your site <3
farm-marm (not verified)
Mon, 01/10/2011 - 13:06
Has anyone modified this plan
Has anyone modified this plan for toddler size? I am in the process of adding on a room to the house for my 2 & 4 yo's. I have the crib mattresses but not the beds. I love the corner/hutch idea for the headbord end of the beds. I would do Bunks but they would fight over the top one and my sweet 4yo has delayed abilities, so is not quite able to master climbing the stairs. Besides all that, the room is only going to be 10x12 with the closet taking up some of that floor space...if anyone knows how to do this in toddler size and has the plans please send them to me!! :o) We'll be done with th remodel in a few weeks!!
Style and Stor… (not verified)
Tue, 01/25/2011 - 17:42
[...] in Brag Blog Put on
[...] in Brag Blog Put on my TO-DO List Save as PDF Print this PostShare/Bookmark Builder: Whitney Blog or Website:http://shanty-2-chic.com Experience Level: Intermediate Builder Estimated Cost: $110 Per Bed Estimated Time Investment: 3-4 Hours Per Bed From Bed Plan: http://ana-white.com/2010/05/furniture-plans-twin-storage-bed-modificat… [...]
Katrina (not verified)
Mon, 06/20/2011 - 18:48
drawers
Is there any reason why I wouldn't be able to or wouldn't want to extend the cubbies under the bed to the center and put 4 drawers under there?
May (not verified)
Fri, 01/06/2012 - 20:38
Do you happen to have the
Do you happen to have the dimensions for a toddler size bed?
Karla (not verified)
Fri, 05/25/2012 - 19:22
Under bed storage
Do you have dimensions for a King size bed?
Lizz (not verified)
Thu, 06/21/2012 - 13:45
King
I love the idea! Do you know what dementions I would need to do this for a king bed? Does anyone know if I would be just changing dementions or if I would have to do different support?
Zoe (not verified)
Wed, 11/28/2012 - 12:35
husband making the bed this weekend!
Hey! Loved your combo plan so much, I chose it for my husband to make this weekend when I am out of town. We've been married 20 years, and still don't have a head board. 7 kids. No headboard. Needless to say, we've got plenty of use out of the mattress (at least 7 times, right). I am excited to come home Sunday night and see the bed done as my Christmas present. I want an expresso Pottery Barn look. Do you recommend dark brown paint or stain? We'll keep you posted on finished product. Thanks for your inspiration!
Bill (not verified)
Mon, 01/07/2013 - 17:04
Drawer
it would be really cool if you could either provide the inside size or dimensions for a Drawer. i love these plans though. thinking they are on my agenda next.
nickkarim
Mon, 08/17/2015 - 14:37
adding supports under center dividers.
Great plan, I'm building this, but adding a support piece under the center dividers...the 3/4" gap underneath with bow under weight. I would also have the top plywood piece rest on top of the end panels for added strength.