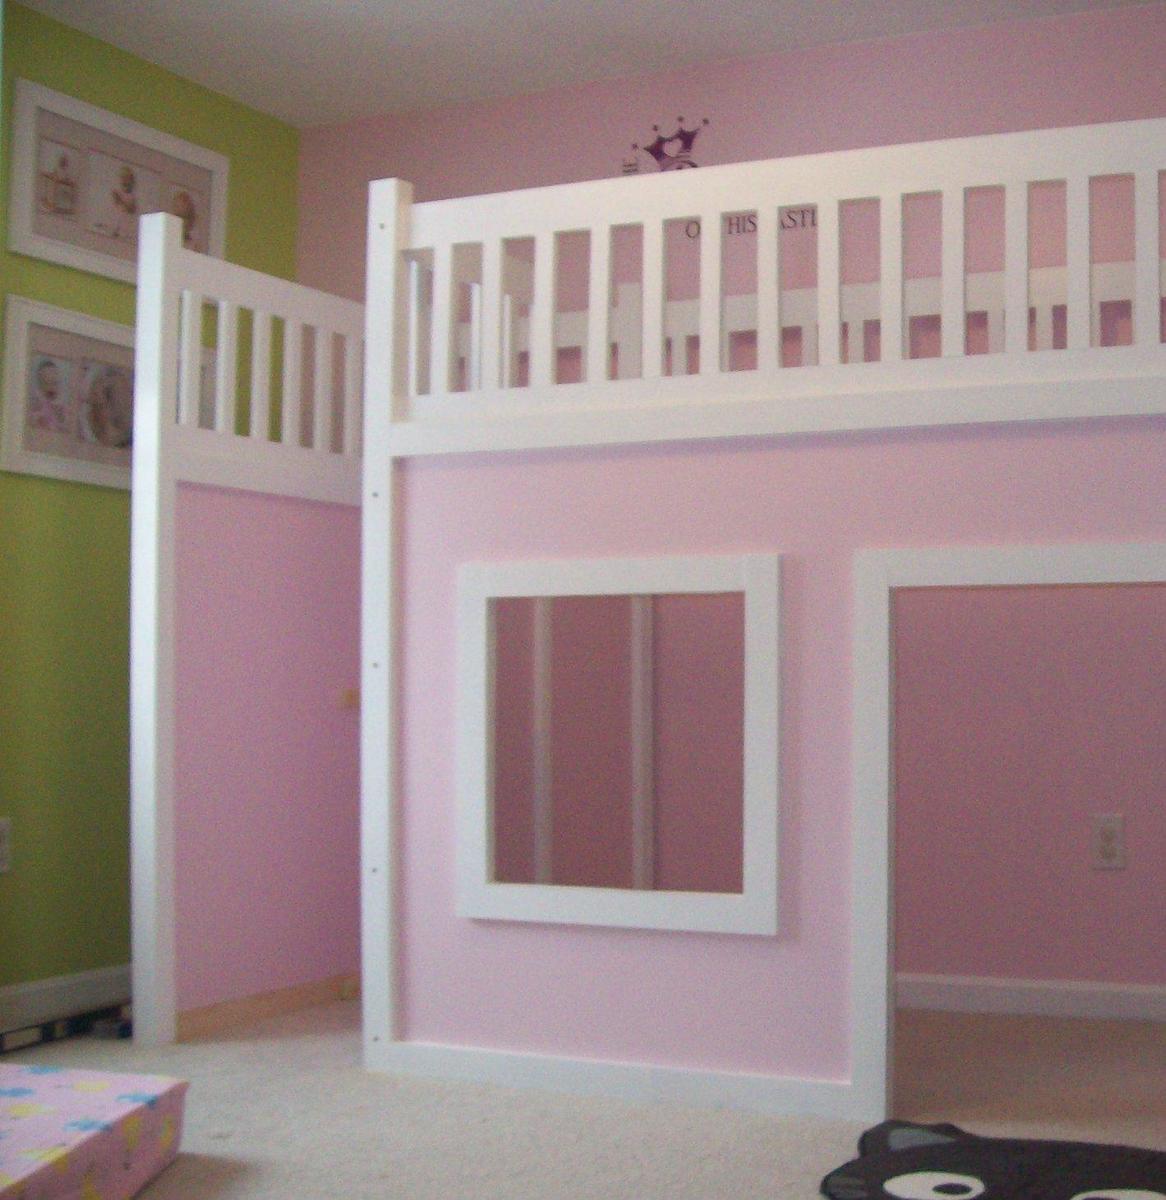


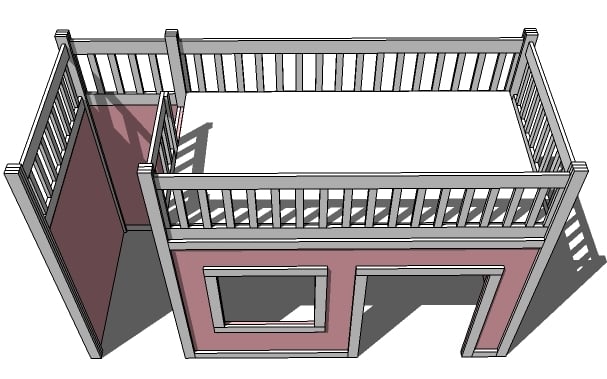
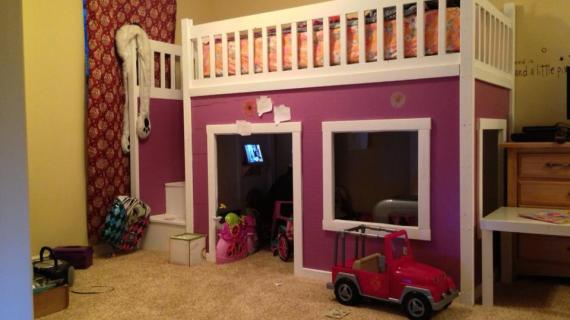
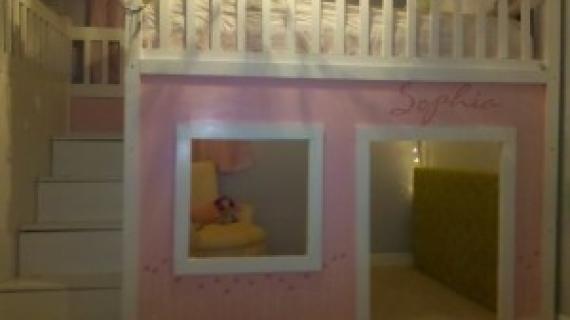
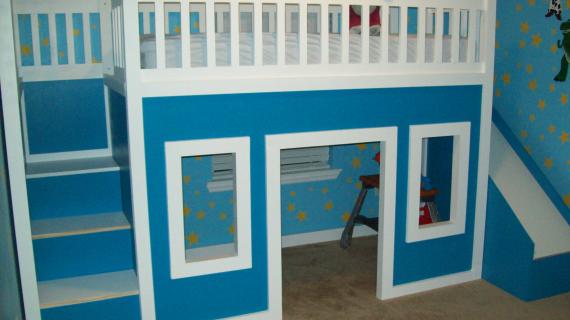
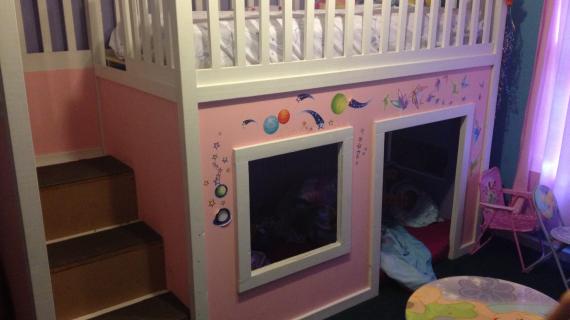
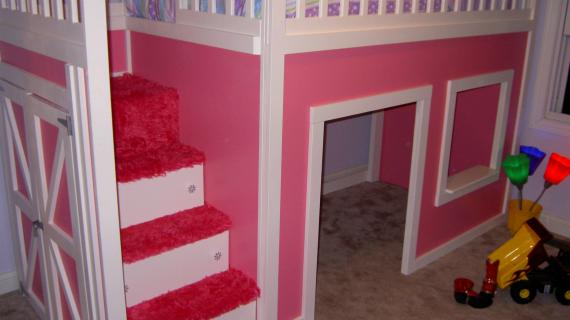
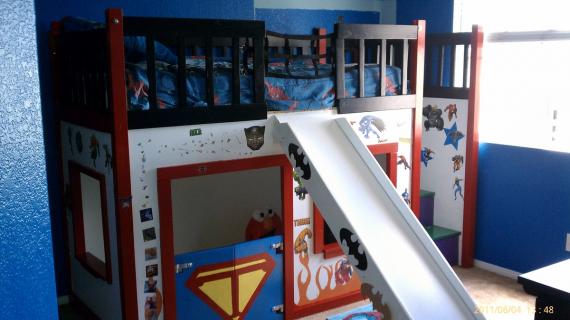
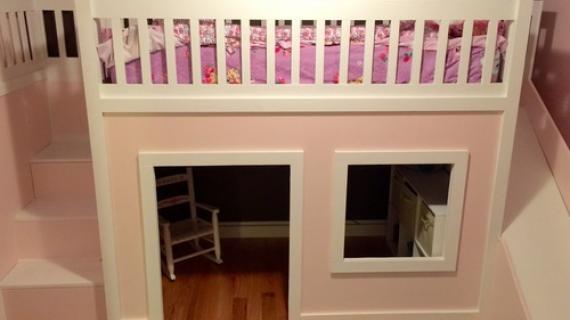
Stairs for the playhouse loft bed. Featuring lift top storage, behaving much like a large hidden toybox. Give your child easy safe access to their bed!
Special thanks to Kimberly for sharing her
You have our community project request forum to thank for today's plan.

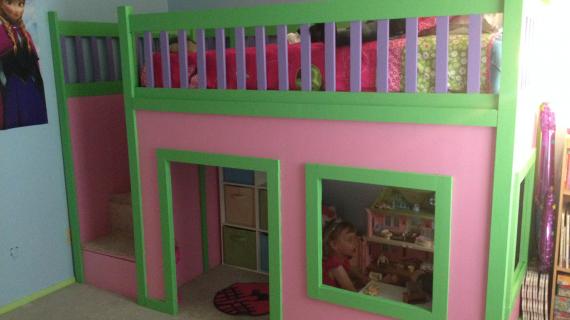
Because I certainly didn't believe I had the skills to develop a plan like this. But you believe in me. So I try, and what do you know? We got a playhouse loft bed with stairs.
 There are unlimited number of ways to approach building stairs with storage. And I thought of all the options. And this one seemed to make sense. Because there is a window on the other side of the bed, this side would most likely be in a corner, removing all access from the stairs side of the bed. So drawers could be done, but there would be a huge amount of wasted space in the very back. We'll do a different type of design for stairs on a different bunk bed where we use drawers.
I personally love the idea of lift top stairs because they are inexpensive to do - just three sets of hinges is all you need for hardware - and they take advantage of all the space in the stairs. You could stash suitcases, costumes, stuffed animals, sleeping bags, extra bedding - what couldn't you stash in those stairs? And the lower stairs could be a toy box that your child uses regularly.
Preparation
In addition to what you purchased for the playhouse loft bed without the stairs, you will need:
Another sheet of 3/4″ MDF or Plywood or Particle Board
4 feet of 1×10 Boards
6 – 1×3 Boards
6 – 1×2 Boards
2 – 1×4 Board, 10 feet long
1 – 1×3 Board, 10 feet long (you can use a 1×4 here if you can’t find a 1×3)
3 – Sets of Hinges
Because of the complexity of this plans and since it is a modification of a previous plan, cut list will go with each step.
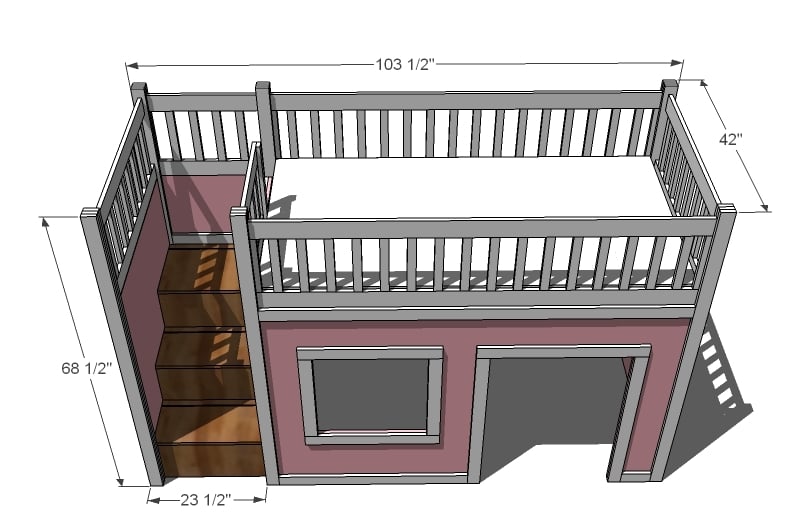
Well, you already got half the story in yesterday’s post of the Easy Playhouse Loft Bed. Go through and read that post. You will need to build the front and the side wall without the ladder. The cut list will change, as some of those pieces will change for the modifications. So update the cut list - the one shown below is ONLY for the back wall and the stair wall and the stairs.
Instructions
Step 1
The top platform is 18″ (bench height) below the mattress slats, so your little one (and probably you too) will have somewhere to stand and climb on to the mattress from. The stairs are 10″ rises – a full 3″ greater than what they should be for regular stairs, but I did quite a bit of research on these types of bed stairs, and concluded that what you buy is built to these same standards. And a big improvement over a ladder for little ones.
Step 2
Build the Front and Side Wall
Follow the directions in the ladder Playhouse Loft Bed plans to build the front wall and the wall without the ladder. ONLY BUILD ONE FRONT RAILING. Do not cut all the boards shown in the cut list, as the cut list changes with the addition of the ladder.
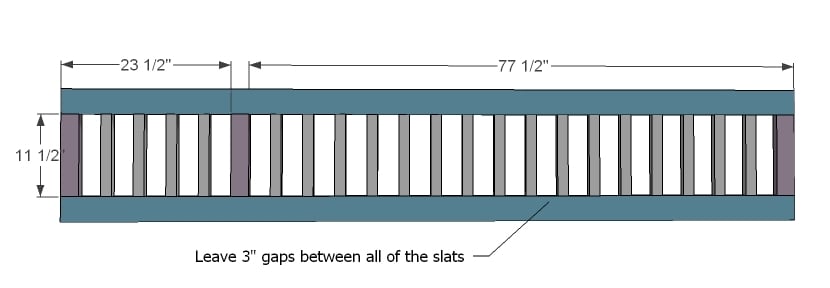
2 – 1×4 @103 1/2″ (Top and Bottom Trim)
3 – 1×3 @ 11 1/2″ (Rails for Back Legs)
20 – 1×2 @ 11 1/2″ (Rails)
Instead of building two of the front rails, build only one front rail, and the back rail as shown above. The purple boards are 1x3s, blue are 1x4s and white are 1x2s. Leave a 3″ gap between the boards. Mark the joints on the top and bottom trim and drill pocket holes on both ends of all the rails. Attach with 1 1/4″ pocket hole screws and glue.
Step 3
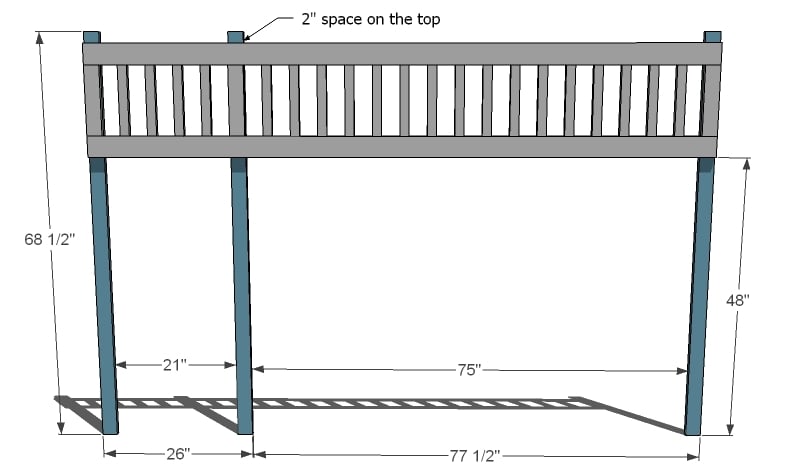
3 – 1×3 @ 68 1/2″
Attach the back legs to the railing as shown above. Use 1 1/4″ screws and glue. Adjust for square.
Step 4
1 – 1×3 @ 103 1/2″ (Bottom Support)
If you can’t find a 1×3 103 1/2″ long, go ahead and use a 1×4. Check for square and attach to the bottom of the legs, as shown above. Use 1 1/4″ screws and glue.
Step 5

Step 6

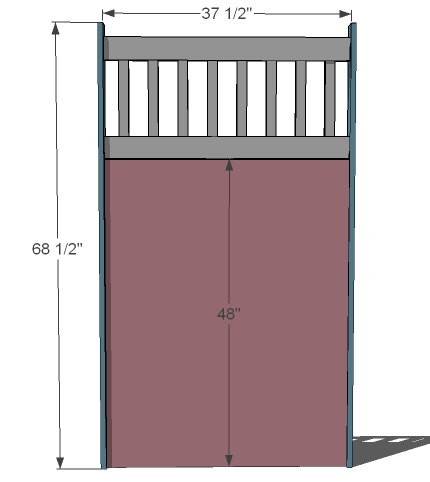
2 – 1×4 @ 37 1/2″
8 – 1×2 @ 11 1/2″
Outside Stair Wall Railing
Build your railing with pocket hole screws as you did all the other railings. Space railing as shown in the diagram directly above.
Step 7
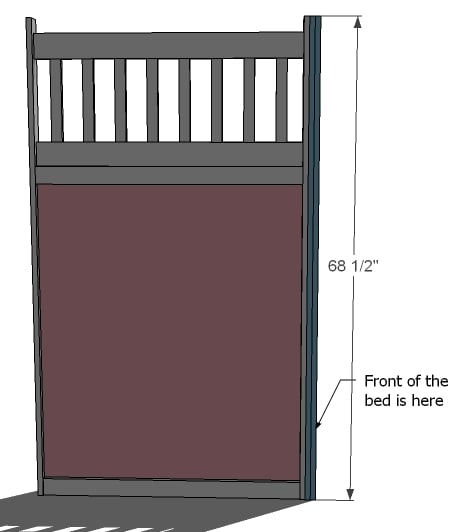
2 – 1×3 @ 68 1/2″ (Legs)
Outside Stair Wall Legs
Attach the legs to the sides of the stair wall. At this step, it is very important that you leave 3/4″ on the inside of the leg and 1″ on the outside of the leg as opposed to centering the leg on the plywood and railing.
Step 8

2 – 1×3 @ 37 1/2″ (Trim Boards)
Outside Wall Exterior Trim
On the outside side of the outside wall (the side you left 1″ of space) attach with 1 1/4″ nails or screws the trim pieces as shown above.
Step 9
2 – 1×3 @ 68 1/2″ (Legs)
Front Legs for the Outside Wall
Attach two more legs to the front leg of the outside wall as shown above. Keep all outside edges flush and use 2″ finish nails and glue.
And this finishes the outside wall! Just one more wall and the stairs to go! Click on page 3 below to see the next wall.
Step 10

5 – 1×3 @ 11 1/2″ (Rails)
2 – 1×4 @ 21 3/4″ (Top and Bottom Trim)
Inside Stair Wall Railing
As you have built the other railings, mark out the rail joints on the trim boards. Then drill two pocket holes in both ends of the rails. Attach to the trim boards with 1 1/4″ screws and wood glue.
Step 11

2 – 1×3 @ 68 1/2″ (Legs)
1 – 1×2 @ 66 1/2″ ( Interior Railing Support)
Putting the Interior Wall Together
As you did with the other walls, attach the railing and the plywood panel to the legs with either pocket hole screws from the plywood and railing into the legs or with 2″ screws (predrilled) from the exterior of the legs into the plywood panel. Leave 3/4″ on the legs on the inside (where the stairs go) and 1″ on the playhouse side (shown above. Attach the stair support to the railing with 1 1/4″ screws and glue. Attach to the plywood all the way down.
Step 12

1 – 1×3 @ 15 3/4″
Inside Stair Trim
Attach the inside stair trim to the top edge of the inside of the wall (where the mattress goes) with 1 1/4″ screws or nails and glue.
Step 13

1 – 1×3 @ 37 1/2″ (Trim)
Trim on Stair Side
Flip the wall over and add the final piece of trim, as shown above. Overlap the trim on the railing by 1″ to secure the railing in place. You may wish to add one additional 1×2 to the inside top exposed edge of the plywood (the 1×2 would be 15 3/4″ long). This completes the inside stair wall. See next page for details on assembly and constructing the stairs.
Step 14
Assembly
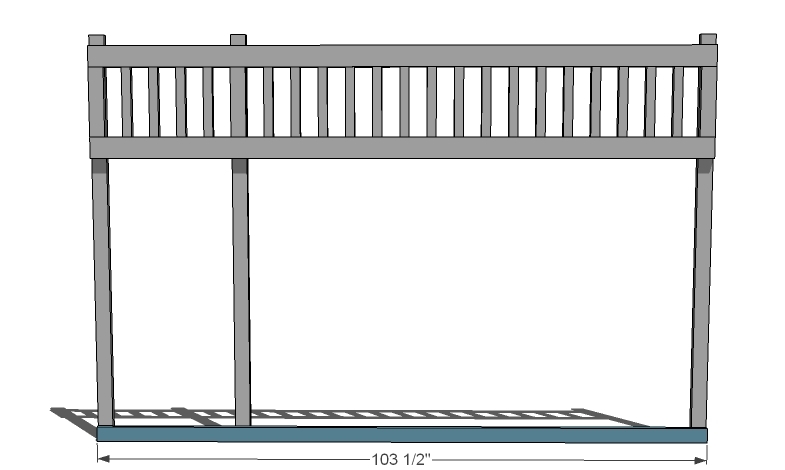
With the five walls built, assemble the bed by attaching the three short walls to the back wall. Use 2″ screws and glue, screwing together the leg pieces. Then attach the front wall to the side walls. The remaining end wall will feel flimsy at this stage – not to worry, the step will “beef” it up. You can also attach your cleats and slats as directed in the playhouse loft bed plans with ladder.
Step 15

1- 1×3 @ 21″ (Top Stair Trim)
Stair Back Trim
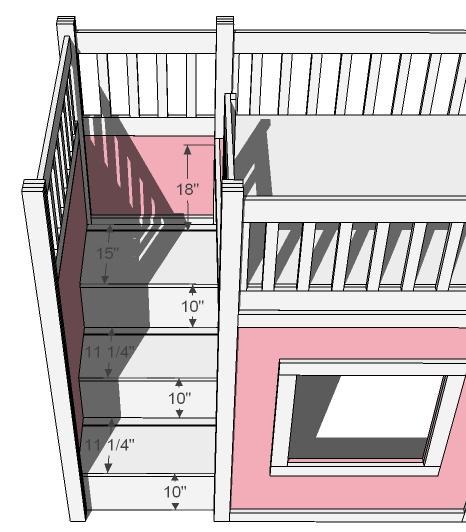
Now we begin to build the stairs. Use glue and 1 1/4″ screws or nails to fasten the back trim piece inside the stairs, with 29″ below the piece. This is just a trim piece.
Step 16

4 – 1×2 @ 14 1/4″ (Top Stair Cleats)
Top Stair Cleats
Now measure up 29″ from the tops and bottoms of the stairs and glue and screw the cleats in place. Use a level to make sure the cleats are level. The top of the cleat sits at 29 1/4″. Do this on both sides. Also add the bottom cleats.
Step 17
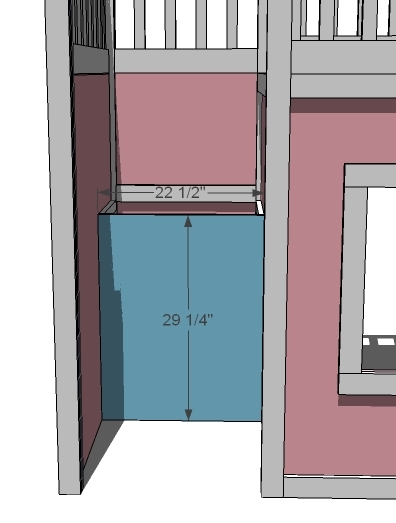
3/4″ Plywood, MDF or Particle Board @ 29 1/4″ x 22 1/2″
Top Step Plywood Panel
Slide the plywood in place. Place just two screws near the top of the plywood so that you can easily slide it out when dis assembling the bed. DO NOT USE GLUE.
Step 18
4 – 1×2 @ 10 1/2″ (Middle Stair Cleats)
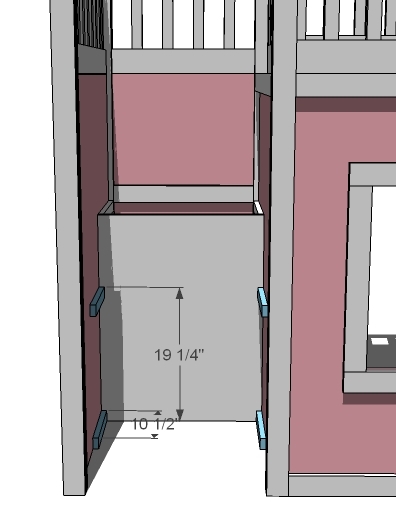
Middle Stair Cleats
Measure up 19 1/4″ and attach the middle stair cleats. These cleats will hold the top stair plywood in place as well. Use glue and 1 1/4″ screws and glue. By using this method, you can simple pull take out just a few screws and pull the plywood panels out to dis assemble the bed.
Step 19

1 – 3/4″ Plywood @ 22 1/2″ x 19 1/4″
Middle Stair Plywood
As you did the top stair, place the middle stair plywood flush with the cleats and screw to the cleats with just two screws. Image is shown a
Step 20

4 – 1×2 @ 10 1/2″ (Bottom Stair Cleats)
Bottom Stair Cleats
Measure up 9 1/4″ from the bottom. This is the top of your bottom stair cleats. Attach the cleats with glue and 1 1/4″ screws to the plywood. Use a level to ensure that the cleats are level. Make sure there is a 3/4″ gap between the cleats and the front legs. You may need to adjust the length of your cleats accordingly.
Step 21

1 – 3/4″ Plywood or MDF @ 22 1/2″ x 9 1/4″
Bottom Stair Plywood
Slide the bottom stair plywood in place. It should fit snugly. You can screw from the inside of the plywood into the wall legs if necessary.
Step 22

3 – 1×2 @ 22 1/2″ (Stair Hinge Supports)
Step 22: Stair Hinge Supports
Attach the stair hinge supports with 2″ screws and NO GLUE. You want these to be easily removeable. Keep edges flush with the plywood panels on the stairs behind the supports.
Step 23

2 – 1×10 @ 22 1/2″
1 – 3/4″ Plywood, MDF or particle board @ 13 1/4″ x 22 1/2″
Step 22: Stair Treads
Use the hinges to attach the stair treads to the supports from step 21. Remember, the real support comes from the cleats, not the 1×2 hinge support.
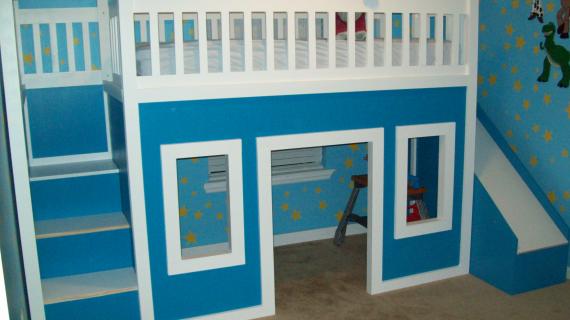
This completes the easy part. Finishing is going to be quite the project! I highly recommend painting the entire bed white, and then cutting in the color afterward on the panels. A sprayer would be a luxury too!

Comments
Viola (not verified)
Wed, 09/08/2010 - 07:55
Ana this is such a great
Ana this is such a great child/parent friendly plan. Love the bed, play area, storage, and of course the safer stairs with built in storage. I have never liked ladders for small children. I am sharing this with my daughters.
Roxy (not verified)
Wed, 09/08/2010 - 10:00
This is great. Good job
This is great. Good job Anna! The only thing I think I am going to change is instead of putting in the top storage stair, make it a regular but put in a small closet in the playhouse...or keep it a storage drawer and put in a secret passage! Not sure yet, but I love this. Thank you.
LindsayAnneLopez (not verified)
Wed, 09/08/2010 - 14:04
LOVE this plan!!! Am
LOVE this plan!!! Am wondering what other parents think about what age is appropriate for this though? I have a (almost) 5yr old and a 2.5yr old. Obviously too early for my 2.5yr old but what about older kids? Thoughts from other parents?
Maria (not verified)
Wed, 09/08/2010 - 15:46
I LOVE this so much!
I LOVE this so much! Wonderful Job! Ana, you never cease to amaze me! Thank you!
Roxy, I love your ideas of the closet or secret passage too!
K (not verified)
Wed, 09/08/2010 - 20:28
Great job Ana! I LOVE this
Great job Ana! I LOVE this playhouse loft bed w stairs!!!
A few questions: 1) what size mattress would be used?
2) what is the estimated cost for this project?
3) what age of children would this be appropriate for?
Thanks so much! Love your work!
Ana White (not verified)
Wed, 09/08/2010 - 21:14
Hi K, thank you! This bed is
Hi K, thank you! This bed is designed for a twin sized mattress. I'm going to give an out there ballpark guess of $200 for this bed, using the most inexpensive options - but prices vary greatly by location, so please check your local hardware store before making actual purchases. As a mother of a little girl, three is perfect, but I am going to guess, a preteen is going to want something more grown up. Thanks so much for stopping by and commenting!
aSprinkling (not verified)
Thu, 09/09/2010 - 17:18
So...can you fit a twin
So...can you fit a twin mattress in the bottom?
Ana White (not verified)
Thu, 09/09/2010 - 17:27
Yes! But there isn't a ton
Yes! But there isn't a ton of headroom under the loft bed.
K (not verified)
Sat, 09/11/2010 - 10:14
Thanks Ana! I appreciate you
Thanks Ana! I appreciate you taking the time to respond. I can't wait to make this for my daughter. I think I will love it more than her, until she gets a lil older. She is only turning one,but, I figure she can play in the playhouse once she starts walking until she is ready to sleep in the loft bed. Or atleast Mommy can play in it!!! ha! Ha! Thanks so much for all your wonderful plans and ideas. You are a genius, and so inspiring!
Sherri @ Luv a… (not verified)
Sun, 09/12/2010 - 15:00
I am SO excited to find your
I am SO excited to find your site today!! We decided very quickly that we just HAD to make this! So we have already made our trip to Home Depot and I have already cut out the front! Yay!
Thanks so much for sharing!! I will be sure to post pictures of our finished project.
Beckie Taylor (not verified)
Wed, 09/22/2010 - 16:48
Do you think that this bed
Do you think that this bed could be altered to have a queen size bed on top versus a twin bed, possibly as a balcony of some sort?
Sherri @ Luv a… (not verified)
Mon, 09/27/2010 - 03:17
Hey Ana! We finished.....well
Hey Ana! We finished.....well almost. Just have to paint the staircase.
Here is my post with our finished masterpiece and more pictures.
http://www.luvabargain.com/2010/09/theres-been-a-project-going-on/
I did make it to fit a full -size mattress, which was adding 15 inches to each of the 3 ends and the railings for those too.
Thanks again for these great plans!!! We had such a great time!!
Gwenevere (not verified)
Mon, 09/27/2010 - 09:50
hmmmm....I'm thinking of
hmmmm....I'm thinking of Christmas and how I can convert this to a play house for my son's webkins.....Any chance you could provide a scaled down plan?
Alyssa (not verified)
Sun, 10/17/2010 - 11:36
We are actually going to
We are actually going to build him this one for his birthday, first project we are attempting from your website :D
kristy (not verified)
Sun, 11/14/2010 - 15:40
Hi ana, me and my 10 year old
Hi ana, me and my 10 year old daughter LOVE this bed, we were wondering if it would be appropriate for her age what do you think?
Sherri @ Luv a… (not verified)
Mon, 11/15/2010 - 12:12
Hi Ana, I completely
Hi Ana,
I completely forgot to post new pictures after we painted the stairs and got the fort decorated :)
We absolutely love, love, love it!!
http://www.luvabargain.com/2010/09/theres-been-a-project-going-on/
stephanie (not verified)
Thu, 12/02/2010 - 16:20
I love the idea of this bed
I love the idea of this bed but I want to make it a bunk bed for my young daughters who share a room. Do you think it is possible to shorten it by about a 12" or 18", make a wider opening and use it as a bunk bed?
Kristine (not verified)
Tue, 12/28/2010 - 10:42
I absolutely love this! I am
I absolutely love this! I am in the process of talking my husband into building it. :) Hopefully we'll be able to correctly change it to a full size bed! Fingers crossed!
Addi Austin (not verified)
Fri, 01/07/2011 - 14:26
Hello Ana, I was wondering if
Hello Ana, I was wondering if there was any way to make this bed into a full sizzed bed?? I would greatly appreacite it if you would help me on how to make it a full sized bed.
thanks, addi
Nicole (not verified)
Sat, 01/08/2011 - 15:28
These plans are great! My
These plans are great! My husband and I started building this for our little girl tonight and in no time we had the front side done. We are doing something a little different for the rails though. Pictures will be up when it is done! Thanks so much Ana- you really are great!
Nicole (not verified)
Sat, 01/08/2011 - 15:37
We are making this for our 2
We are making this for our 2 year old, she easily climbs up and down the ladder on my nieces bunkbed but I dont like the whole idea of her climbing up that so I'm very glad the stairs are on this plan!
2011: January … (not verified)
Sat, 01/08/2011 - 17:10
[...] is a plan for the upper
[...] is a plan for the upper loft bed with stairs if you know anyone good at woodworking: DIY Playhouse Loft Bed with Stairs — Ana White __________________ [...]
Jessie (not verified)
Sat, 01/08/2011 - 17:13
I put my 2.5 year old in a
I put my 2.5 year old in a Store-bought bed like this, but with a built in dresser below, with a hide-out space behind that, it just depends on the child, and how coordinated and how good they are in bed/at obeying rules about not walking/jumping on a bed, etc! Mine has been in hers since 2.5 and is now 4 and still loves it!
Piero (not verified)
Sat, 01/15/2011 - 04:36
Hello to you all. I would
Hello to you all.
I would like to thank Ana for putting up and sharing those great ideas with us.
I have 2 girls, 1 1\2 and 5 1\2 and the I have been looking all over for bunk bed plans for my daughters and finally landed here. I am building off the "How to Build a Loft Bed" plans and to that I added the stairs from this plan and to all of that I am adding two towers and a new facade to make it a castle. As soon as I have new pictures I will post one or link it up to my website.
Thanks for all the inspiration.
Heather@It'sTw… (not verified)
Sat, 01/15/2011 - 15:18
Thank you Ana! These plans
Thank you Ana! These plans were so easy to follow and our bed turned out to be just awesome! I was surprised that it only took a couple of days to build (although it took forever to paint!) If I can build this, anyone can. Thank you again for the amazing playhouse bed!
Here are more pictures of how ours turned out:
http://www.itstwinsanity.com/2011/01/secret-project-complete.html
Theresa (not verified)
Sun, 02/13/2011 - 08:27
Love your loft. I'm making
Love your loft. I'm making this but have a question. Do you think it's sturdy enough for an adult to lay in? Our daughter requires that we lay down with her while she's going to bed. Thanks.
Playhouse Loft… (not verified)
Sun, 02/20/2011 - 19:41
[...] in Brag Blog Put on
[...] in Brag Blog Put on my TO-DO List Save as PDF Print this PostShare/Bookmark Builder: Niki Blog or Website:http:// Experience Level: Some Experience Estimated Cost: About $300 Estimated Time Investment: I couldn’t even begin to guess. Working around the shedule of an active toddler an hour or two at a time over a month. From Plan: http://ana-white.com/2010/09/easy-playhouse-loft-bed-with-storage-stair… [...]
ALZorko (not verified)
Thu, 02/24/2011 - 20:46
I love the idea of the
I love the idea of the storage stairs . . . but my daughter's room doesn't have room for them on the side. Could you make a plan that has them going the width of the back? Thank you.
Andrea (not verified)
Mon, 02/28/2011 - 10:50
I am so completely addicted
I am so completely addicted to your site. Addicted. I can't make a darn thing, but I am in LOVE! I want my dad to make this for my 2.5 year old son!!
Laura (not verified)
Mon, 03/21/2011 - 04:08
Spent hours on your site
I found your site the other day and I just keep coming back and looking at plans. I love the idea of the steps going up to the top bed instead of a ladder. In fact I had looked at the bed with storage steps that someone posted a few comments ago. Is there any way to just add steps like this to the "simple bunk beds" plan that's on your site? I'm trying to figure out how to make an opening in the top footboard so that the kid can easily get from the steps to the bed, but still make the beds able to be separated.
ShellyV
Sat, 04/02/2011 - 20:32
Error in plan?
I found your website about three weeks ago and I'm hooked. My husband and I made the potting bench one Saturday afternoon. We were so surprised we accomplished it. We've started on the loft bed with stairs. Is there an error in step 10? Should it be 5 - 1x2s at 11 1/2 inches?
Trishdish
Wed, 04/20/2011 - 12:18
Kreg Jig
Just a tip for anyone getting ready to build this bed...buy the Kreg Jig not the other brand. When I went to the store they only had a different brand pocket hole jig. I figured there was no difference, but there is a huge difference! After building all my rails I went and bought the Kreg to finish the bed with, now I'm re-doing all the rails. The wood cracked all the time with the other brand, you could only fit one pocket hole on each rail instead of two and without the Kreg clamp it was super hard to get the rails to stay flush with the 1x4.
jphiggins2
Fri, 04/29/2011 - 00:52
Doggy bed stairs
I am wanting to build similar stairs with storage to put at the foot of my TALL bed for my small dog to use... (I have 17" think mattress, box springs and frame, I even have to step up some to get in... needless to say my dog cannot jump up high enough, I have to help her).
I'm thinking this would be the best plan to adapt for it, do you think so? Or is there one I have not found that would be better?
Bridgette (not verified)
Sat, 05/14/2011 - 14:23
I want to build this bed with
I want to build this bed with the storage stairs, but in a full size. Is there any way to get the info to build it for full?
craftymom
Wed, 06/22/2011 - 09:35
Loft Beds
My Girls have queen sized beds. My oldest is getting a storage bed, but my youngest wants a loft bed (well, they both do) but my issue is I dont want to fight with changing the sheets every time they need it. I am trying to come up with something half way between, and I know she wants stairs. Anyone built this to a queen size? or something similar?
That Girl Emma (not verified)
Sat, 08/06/2011 - 19:40
Curtains
Hi, we live in Houston and are planning on building this bed for my daughter. I am a little concerned about the airflow underneath the bed when they are playing in there. Does it get hot under there, sometimes its all we can do to get out a/c to keep up in the summers. I was thinking about leaving the front piece with the door and window off. Maybe hanging a rail from IKEA and some curtains so I could still close it off. This would be beneficial if we wanted to put another mattress under there later too. Do you think this could work or would it compromise the strength of the bed? Thanks a lot.
Lance (not verified)
Wed, 11/30/2011 - 20:49
possible correction
I believe the 1x3s in step 10 are supposed to be 1x2s
C (not verified)
Tue, 01/10/2012 - 17:14
sorry but were are the plans
sorry but were are the plans for the bed itself? i have the stairs one here but I can't find one that has the list of materials ect? thanks
C
bakwoodj
Sun, 01/22/2012 - 15:18
Built this bed
I built this bed for my 3 year old. She absolutely loves it. Her, my other daughter and their friends have spent every minute they can in the playhouse. I made it a full size bed. I made a few modifications to the dimensions. I also added a support 1x3 to the middle of the mattress slats.
https://www.facebook.com/media/set/?set=a.317194951656199.71003.2485254…
This is the link to my photos.
Guest (not verified)
Mon, 03/12/2012 - 18:53
Loft bed
Just wondering if you could tell me the modifications you made for the full size bed? The dimensions and such? Thank you for your time
Guest (not verified)
Sun, 01/29/2012 - 10:35
?
I really would love to make this for my son. But my husband is in the miltary and we move about every 4 yrs. My only question would be is the bed easy to move or to take apart for a move?
Tsu Dho Nimh
Fri, 02/03/2012 - 05:09
Make it with bolts
I'd make it as panels, like a regular bed, and hold it together with bolts, threaded inserts, and bed rail hardware. Make the stairs out of several layers and bolt them together.
When moving time comes, take out the bolts, tape them in a plastic bag inside the staircase box, and you are ready to go. TAKE PICTURES of how it goes together!
http://www.ehow.com/how_7525502_use-tnuts-wood.html
http://www.provenwoodworking.com/woodworking-supplies.html (scroll down for pictures. Wherever possible, use the T-nuts with a washer under the bold. The threaded inserts
Guest (not verified)
Thu, 02/02/2012 - 22:04
Confession: I am 17, a senior
Confession: I am 17, a senior in high school, and I totally want this bed.
Tsu Dho Nimh
Fri, 02/03/2012 - 05:37
Trim painting tip ... Paint first, then cut.
This has a kazillion bits of molding and is a PITA to paint.
To save time, prime and paint the flat panels after you make the cutouts. Prime and paint the molding while it is uncut, Cut the pieces to length, then paint any cut edges that will show.
You'll have to be more careful during assembly to protect the finish, but it's far faster than doing all the masking and fiddly bits of painting after it's assembled.
For priming small bits, lay one or more lengths of wood down (depending on size), separated by an inch, and use a wall-sized roller to spread the primer coat (or a sprayer if you have it - it can do both sides and the top at once). Clean up the drips with a brush and let it dry. Turn it over and repeat. Then do the sides.
Then cut.
Bunnie1978
Mon, 02/06/2012 - 14:53
I can't wait
I can't wait to make this bed for my almost 4 year old son! I already ordered a nailer/compressor and a rotory tool (couldn't help it.) It will be SOOO awesome to have my bed to myself again, AND I can go T-Rex WILD on the decorations... My son is obsessed with dinosaurs. I've been looking for dinoshapes that I can make wood cut-outs with and attach them to the bed rails to give it a little bit of dino-love! Any thoughts on where I can find some? I'm also going to put in some $10 shelves for his books to face out inside and maybe a toybox. :) I totally can't wait!
Jon (not verified)
Thu, 03/22/2012 - 20:26
Nice design
My daughter asked me to build this for her 3 year old daughter (my grandaughter) and I said sure. I didn't realize what a chore was in store, but the end result was beautiful. My daughter wanted me to build it to a full size matress, so I cut all the pieces to accomodate a standard full matress. She then informed me, "oh, by the way, this is an oversized full matress". Thats where the chore came into play. I had to a lot of redesigning on the supports to extend the frame size for a larger matress. By doing this, I was able to (barely) fit the oversized full matress. I extended the width and length by adding a 2X2 on each corner and altering the 1X3's configuration. I also extended the rails vertically 6" and extended the stairs to 30" wide. With the bed width being more than the twin, I added 2 more steps with an 8" verticle between steps. I also elevated the playhouse door clearance by 6" since my grandaughter is so tall. I painted the outside wall of the stairs with a magnetic primer and chalkboard paint on top of it, so now she can draw with chalk and use magnetic numbers or letters to learn and play. The playhouse portion of the bed is lined on the interior with rope lights It turned out beautiful, but don't know how to post pictures. Thank you Ana for the preliminary design.
Laurie keller (not verified)
Wed, 04/18/2012 - 13:52
Storage stairs loft bed
Do you by chance have blueprints or plans for this bed in a full size mattress? We want to make our daughter this bed when we move into our new house this May!!
Laurie keller (not verified)
Wed, 04/18/2012 - 13:53
Do you by chance have
Do you by chance have blueprints or plans for this bed in a full size mattress? We want to make our daughter this bed when we move into our new house this May!!
Randi Morrison (not verified)
Sat, 07/21/2012 - 15:32
Stairs with Full-Sized Bed
Is there any reason we couldn't use this storage stair plan with a full-size loft or bunk bed? It would just be narrower at the bottom, right?
MickeyB (not verified)
Sun, 09/30/2012 - 06:25
I'm almost done with all the
I'm almost done with all the railings for the plans with the storage stairs. Looking down at the assembly instructions, I'm worried about 'disassembly' as we will be moving soon and will need to break it down for the move.
The plans with the ladder seem straight forward for disassembly, but I'm worried that the stairs will keep this from being such an easy task.
Has anyone had experience with this? Any suggestions, (besides don't use glue when attaching the walls together)?
My hope is that I will be able to detach the three side walls and the top stair cleat from the back wall, leaving me with the stairs (2 side walls still attached), the back wall, the non-stair side wall, the front wall and all of the mattress slats.
From someone who has already completed this, does this sound reasonable? Thanks in advance!