

An upholstered bed that requires no sewing!
Meet my sister Lydia.

This is a sad, sad post for me.

Lydia moved away from Alaska a couple of years ago.
Over the years, Lydia and I have worked on so many projects together. Most recently, when Lydia was visiting, we built the storage sofa together. Have you ever worked with someone who knows exactly what you are thinking? Who is working on the next step without even having to discuss it? That's my sister Lyds. She's always a step ahead of me.

Or a few steps ahead of me.
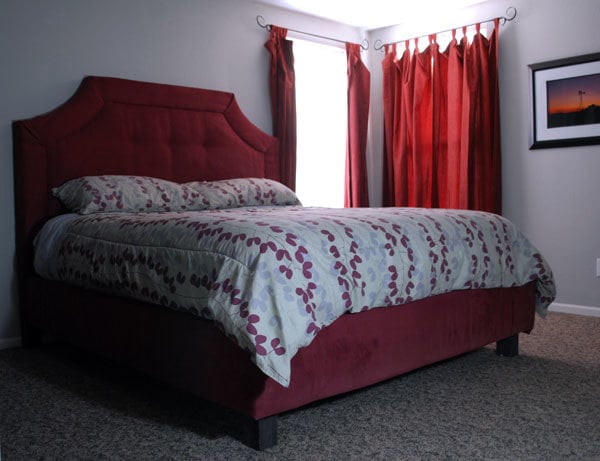
This is Lydia's king size upholstered bed that she made in about 8 hours for a little over $100. And the best part? You too can make this upholstered bed with these plans without even having to sew! That's right, no sewing required!
Lydia is sharing her plans with us today.
Preparation
2 Sheets cheapo plywood, 1/2 – OSB is what Lyds used
2 – 1×12 @ 6 feet long
2 – 1×12 @ 6 feet long (instead of the 1x12s, you could purchase a third sheet of OSB and have it ripped into 11 1/2″ wide strips)
2 – 8′ 4×4 posts
1 – 1×4 @ 3 feet long
9 – 2×4 @ 8 feet or stud length (whatever is cheaper)
Approximately 6 yards of fabric, jute and batting (patterns NOT recommended)
1″ screws
2 1/2″ screws
3 1/2″ screws
staples
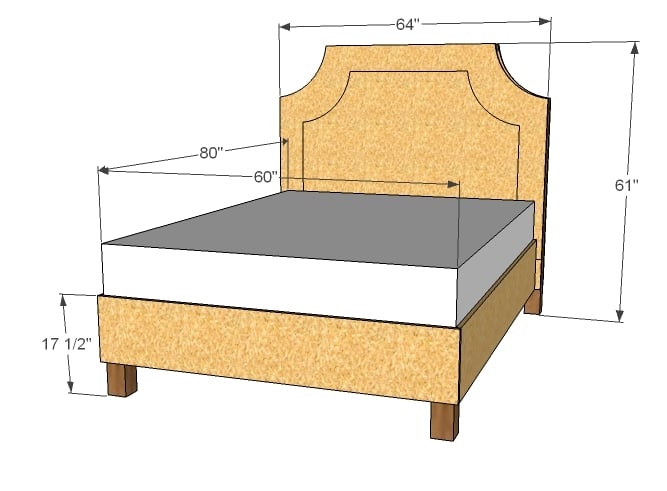
2 – 1/2″ plywood or OSB @ 48″ wide x 64″ long (Headboard Panels)
3 – 2×4 @ 57″ (Headboard Joists)
2 – 4×4 @ 49″ (Headboard Legs)
1 – 2×4 @ 40″ (Headboard Top Joist)
2 – 2×4 @ 10 1/2″ (Headboard Top Spacers)
1 – 1×4 @ 28″ (Panel Cleat)
2 – 2×4 @ 60″ (Bed Frame Top/Bottom)
4 – 2×4 @ 77″ (Bed Frame Joists)
2 – 4×4 @ 13″ (Bottom Legs)
2 – 1×12 @ 80″ (Siderails)
1 – 1×12 @ 61 1/2″ (Footrail)
1×3 wood slats @ 60″ or plywood @ 60″ x 80″ or boxspring


Instructions
Step 1
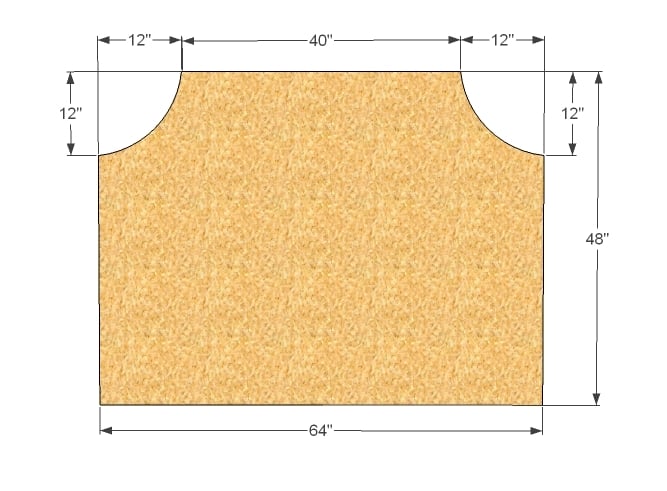
Cut Panels
From the OSB/Plywood pieces, cut two identical panels as shown above, or as desired for your headboard. TIP: Use the first corner piece that you cut off as a pattern for the other side and for step 2 (below). You will need to use a jigsaw for angled cuts.
Step 2

Front Panel
From one of the plywood or OSB panels, mark the center as shown above. Use the pattern from step 1 to mark the sides. Carefully cut out with a jigsaw. You will need to use both pieces, so only cut on the line shown above.
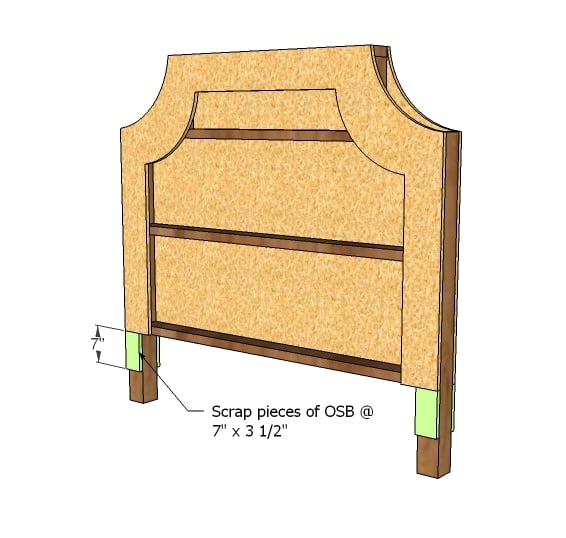
Step 3

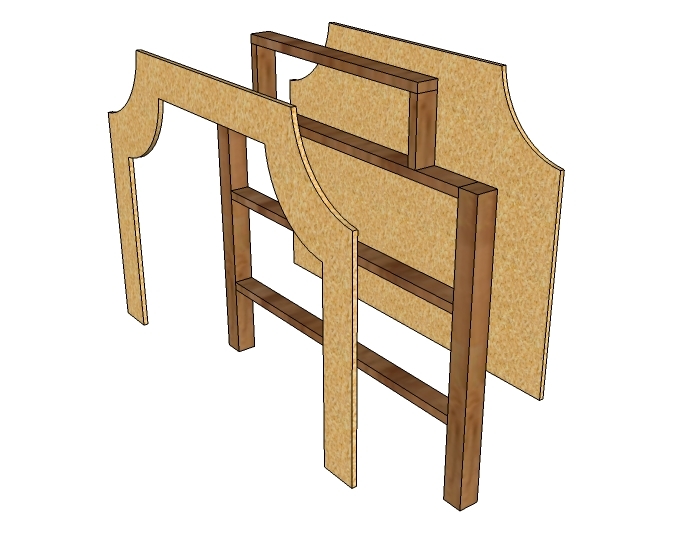
Headboard Frame
Build the headboard frame as shown above. You will need to predrill holes in the 4×4 posts 1/2 way through with a bit sized to the heads of your screws. Then predrill the remaining distance with a bit sized to the shaft of your screws. Use wood glue and 3 1/2″ screws for the 4×4 posts. If you have a Kreg Jig™, you can of course just attach the 2x4s to the inside of the 4x4s. Also, for those of you having trouble locating 4x4s – what you can do is build as shown above, but instead of a 4×4, screw a 2×4 to the joists (blue boards). Then add a second 2×4 to the outside of the first 2×4. This will change your leg dimensions slightly, so you will need to increase the length of your joists (blue boards) by 1″.
Step 4
Plywood
After building the frame, attach the plywood pieces as shown above to the frame. Use 2″ screws and glue.
Step 5
Step 6
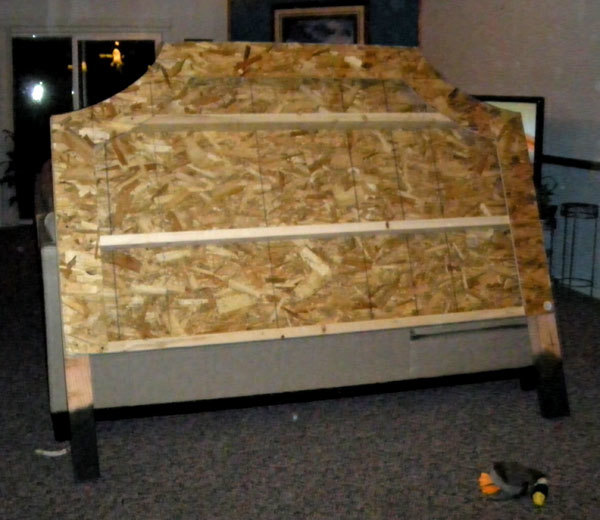
Here is Lydia’s bed at this stage. You also might want to paint or stain your legs at this point.
Step 7
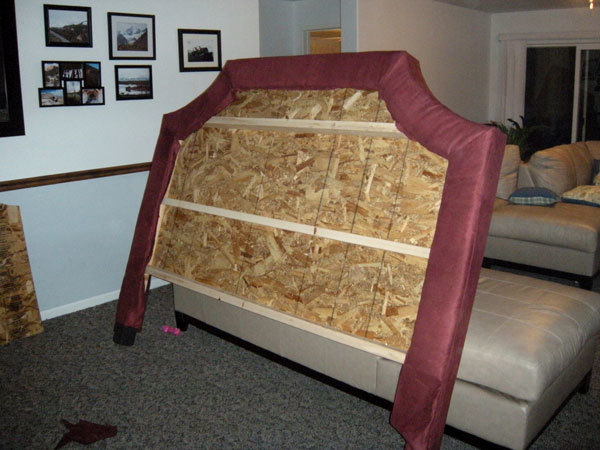
Upholstering Outside of Headboard Frame
Cut a piece of batting, a piece of burlap, and a piece of fabric 5 yards long by approximately 20″ wide (save the scraps for the siderails). The headboard shown above is the front side of the headboard. Staple the burlap snugly over the outside of the headboard, followed by batting, and then followed by the fabric. Take your time at corners, neatly folding the fabric around the corners for a tailored look. Staple to the inside and to the back of the headboard. Trim excess fabric. Make sure you upholster to the bottom of the plywood spacers on the legs.
Step 8
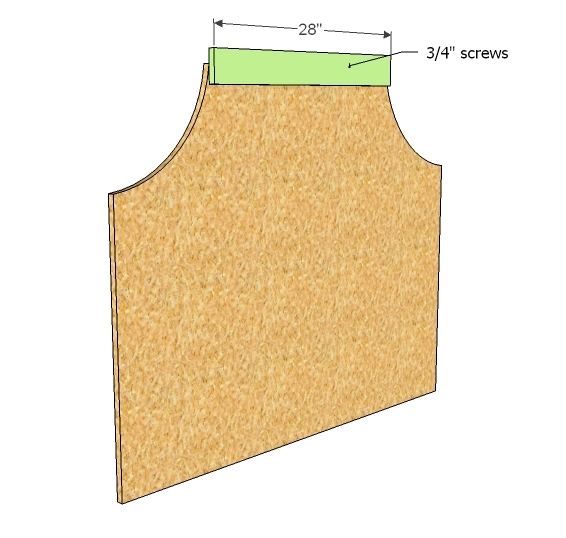
Center Panel
Start by covering the center panel in burlap, batting (I like to spray glue the batting on) and fabric. Staple to the back side. Then on the back side, attach a 1×4 cleat to the top as shown above. The cleat should overhang 1/2 way on the top (approximately 2″). Use 1″ screws from the back of the cleat so no screws show in your fabric. If you wish to add buttons, drill holes in the center panel as desired and thread a button through, tying the thread off to a staple in the back of the headboard.
Step 9

Inset Panel
Insert slide the upholstered panel into the upholstered headboard as shown above. Screw the bottom of the panel to the bottom joist in the headboard as shown above.
Step 10

Your headboard should look like the above bed. Now it’s time for the sideboards and footboard.
Step 11
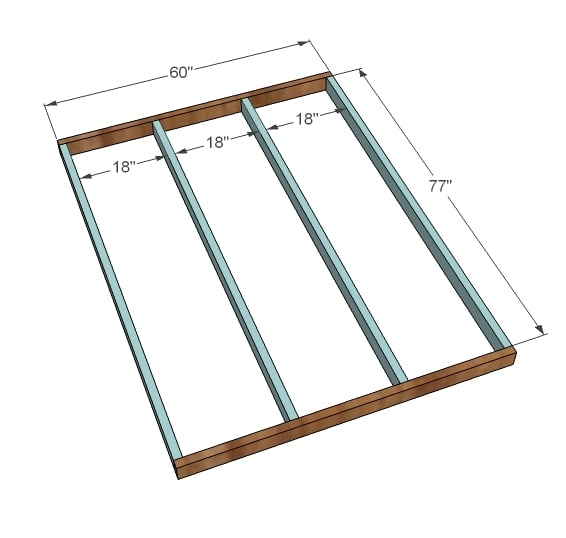
Bed Frame
Lydia often remarks that it’s not just the bed that she would have had to buy, but also a box spring. And Lydia’s entire bed costs about as much as a box spring alone would have been. Or a bed skirt. This bed does not require a box spring, but if you already have one, no worries. The box spring will just sit on top of the frame.
Step 12
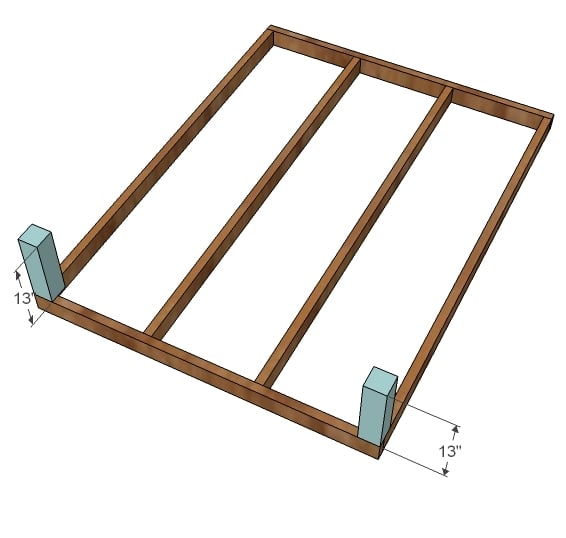
Bottom Legs
You will need to attach the bottom 4×4 legs to the bed frame. If you have a Kreg Jig, go that route. Otherwise toenail a few 3 1/2″ screws in (screwing at an angle from the leg into the frame) or use brackets like in this post.
Step 13
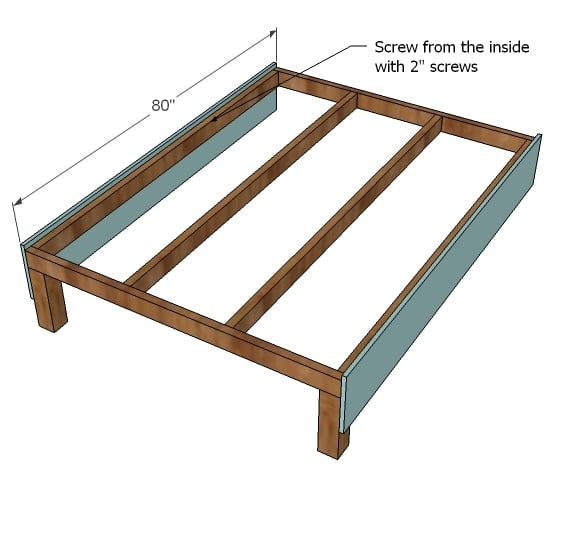
Sideboards
Wrap the sideboards in burlap, followed by batting and fabric and neatly staple to the inside of the sideboards. Then screw to the frame as shown above.
Step 14
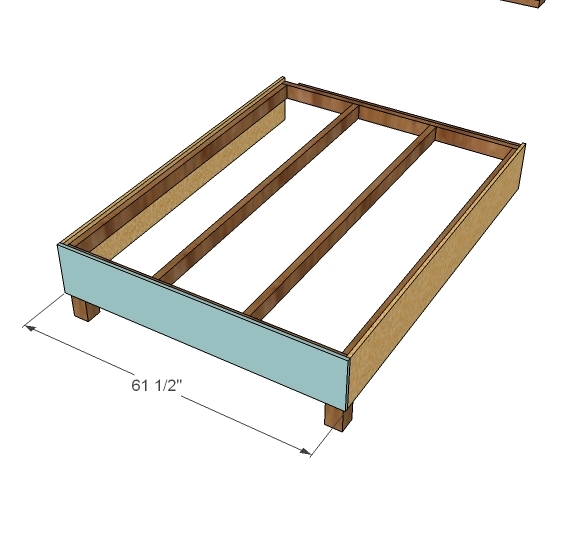
Footboard
Just as you did the siderails, wrap the footboard in burlap, batting and fabric, neatly stapling to the inside. Screw the frame to the end board.
Step 15

Assembly
The bed can be transported into the desired room in two pieces. To assemble, screw from the frame into the headboard as shown above.
Step 16
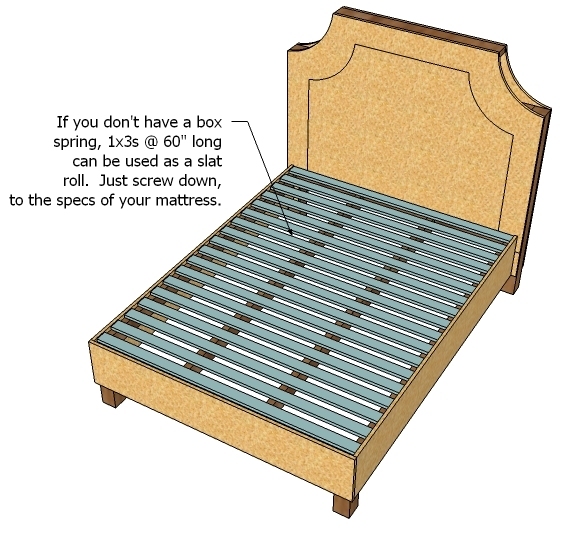
Slats
If you live in a humid environment, air circulation is important, so use slats as shown above or a box spring to support your mattress. You can also use plywood, but this is not recommended, as mildew can build up under your mattress. Make sure you screw the slats down.

Comments
Tabitha Brouhard (not verified)
Sun, 01/30/2011 - 17:21
What a fabulous headboard. I
What a fabulous headboard. I love how easy your plans make it look!
Rachel (not verified)
Sun, 01/30/2011 - 17:50
Beautiful! And this, minus
Beautiful! And this, minus the scallop, is exactly what I was interested in coming out with mixing some other plans. I'm thinking this design with just a rectangular headboard and the chunky leg design. Props to Lydia!
moiety (not verified)
Sun, 01/30/2011 - 18:06
Nicely done! I'm tempted to
Nicely done! I'm tempted to do just the headboard.
Dan at Manhattan Nest did an upholstered bed on an existing Ikea bedframe using surplus army blankets. They look like $50/yd wool, but they're super cheap. http://manhattan-nest.com/2010/07/23/a-whole-mess-of-staples/
Linda Carpenter (not verified)
Sun, 01/30/2011 - 19:07
Wow! I love it! Thanks,
Wow! I love it! Thanks, Lydia!
Britt (not verified)
Sun, 01/30/2011 - 19:50
I'm working on a wingback
I'm working on a wingback version of this right now. There is literally a half built bed frame sitting in my bedroom (next to my current bed!).
Lydia's bed came out great!
Tracy Smith (not verified)
Sun, 01/30/2011 - 20:45
Thanks for sharing Lydia...
Thanks for sharing Lydia... it's a gorgeous bed and my teen age daughter wants to have a more grown up look... she's in love with this bed. Thanks Ana for posting it!
Roxy (not verified)
Sun, 01/30/2011 - 20:46
Great link. Thanks! Great
Great link. Thanks! Great instructions for the fabric part.
Roxy (not verified)
Sun, 01/30/2011 - 20:49
If the second picture is
If the second picture is where Lydia lives now...we might be neighbors!
CarolineRN (not verified)
Mon, 01/31/2011 - 01:53
Thanks Lydia! Gorgeous bed!!!
Thanks Lydia! Gorgeous bed!!! And Thanks Ana for the wonderful website!
orangesugar (not verified)
Mon, 01/31/2011 - 03:53
Thank you so much for sharing
Thank you so much for sharing Ana!
Mrs. J @ Road … (not verified)
Mon, 01/31/2011 - 03:55
Love this idea! And it's so
Love this idea! And it's so simple. Thanks Lyds! Your bed looks amazing. And there is so much satisfaction knowing you made it yourself! :)
Tali (not verified)
Mon, 01/31/2011 - 05:52
Yessssssssssss! I've been
Yessssssssssss! I've been dreaming of this bed and love, love, LOVE it! Can't wait to get started on my first project :) I'll be making a King though - any steps on how to up-size?
Elizabeth (not verified)
Mon, 01/31/2011 - 06:00
What a beautiful bed!
What a beautiful bed!
Lori (not verified)
Mon, 01/31/2011 - 06:09
Beautiful bed! Thanks for
Beautiful bed! Thanks for sharing.
Cherie (not verified)
Mon, 01/31/2011 - 06:21
That is such a beautiful bed.
That is such a beautiful bed. No I can't decide which one I want to make.
Stefanye (not verified)
Mon, 01/31/2011 - 09:17
Love, Love, Love, LOVE, LOVE
Love, Love, Love, LOVE, LOVE this bed!!!!!!!
Shalee (not verified)
Wed, 02/02/2011 - 17:01
i WAS WONDERING ABOUT
i WAS WONDERING ABOUT MEASUREMENTS WITH KING TO. hOW TO??
Ana White (not verified)
Wed, 02/02/2011 - 22:05
Shalee, a king measures 78"
Shalee, a king measures 78" wide (18" wider than a queen) - or at least a standard king does. There are actually several different king sizes, so measures yours first and foremost. Then take the dimensions that run the width of the bed and add 18" to them - so you would cut your plywood 18" longer, cut your 2x4 joist boards 18" longer, and cut your footboards 18" longer. Because a king and queen are the same width, and the headboard height does not change, you will not need to make mods to the siderails or the height of the headboard. Hope this makes sense.
Shalee (not verified)
Fri, 02/04/2011 - 05:23
thanks so much. You are
thanks so much. You are amazing
orangesugar (not verified)
Sat, 03/05/2011 - 05:05
I was wondering why you wrap
I was wondering why you wrap the boards in burlap before covering with fabric?
Brieanne (not verified)
Sat, 03/05/2011 - 05:11
this is so much nicer than
this is so much nicer than anything I could buy! I like low bed frames though, do you think I could make this without the legs?
Scorpion7
Fri, 06/17/2011 - 19:56
that`s cool
very nice
margjack
Fri, 11/04/2011 - 06:30
I'm planning on using a
I'm planning on using a boxspring and making a similar bed. Would it be best to make legs shorter so the frame is lower relative to the siderails?
Guest (not verified)
Mon, 12/05/2011 - 11:50
6 yards for Queen, how much for King?
Unfortunately, taking measurements of anything are not what of my talents. Could you or someone tell me how many yards of fabric I would need for a King?
breck (not verified)
Fri, 07/13/2012 - 15:26
what size bed is this? i am
what size bed is this? i am looking to build a california king..
sivette
Wed, 04/24/2013 - 05:45
how can i add tacks?
Im planning to build this bed but i want to add tacks around it but i cant figure it out how to do it after I insert the middle panel? would you give me your advice
Ivette