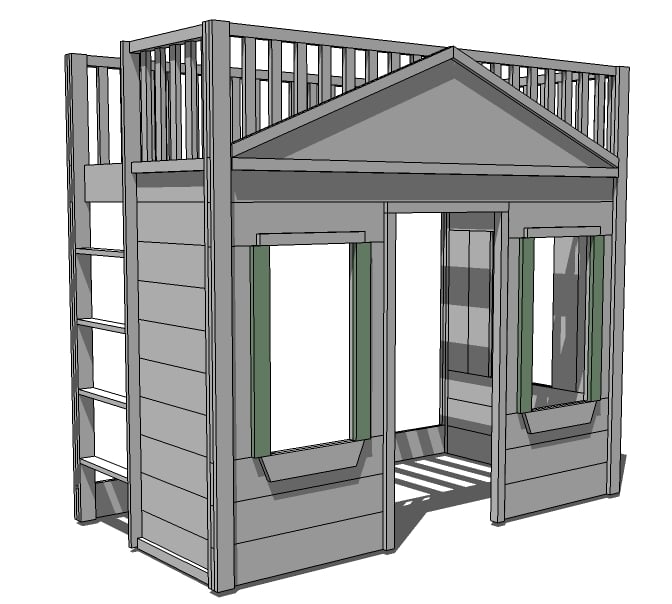


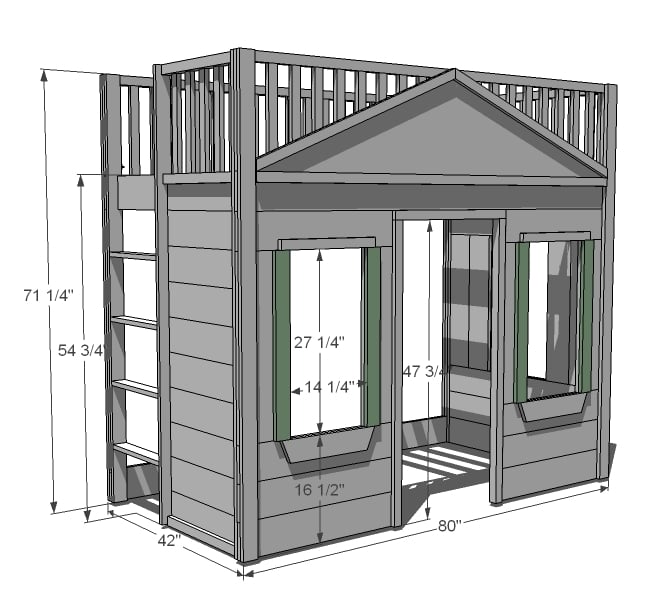
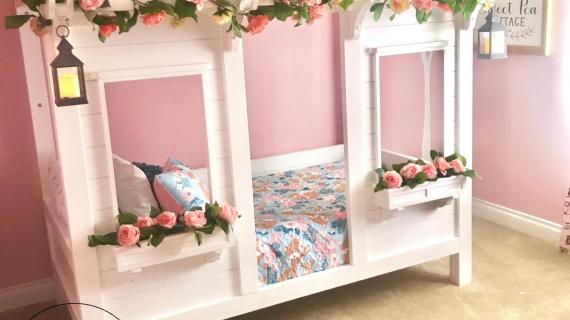
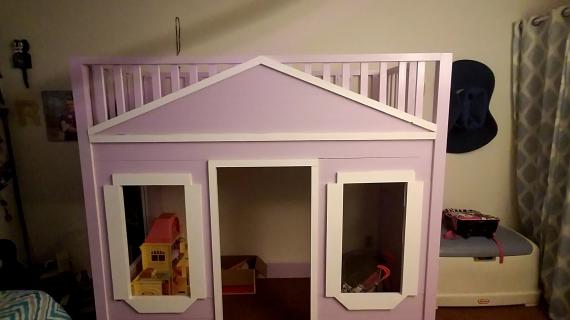
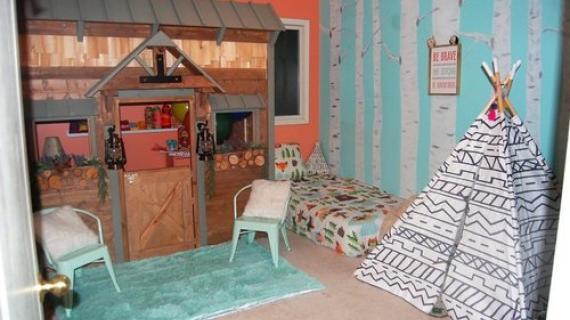
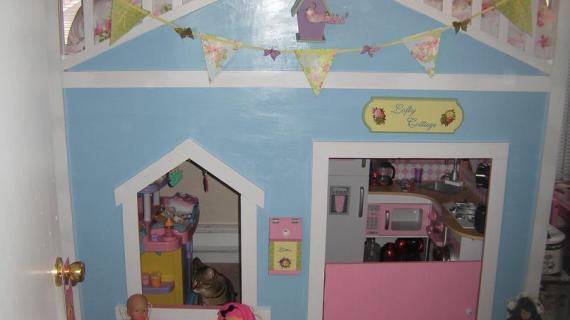
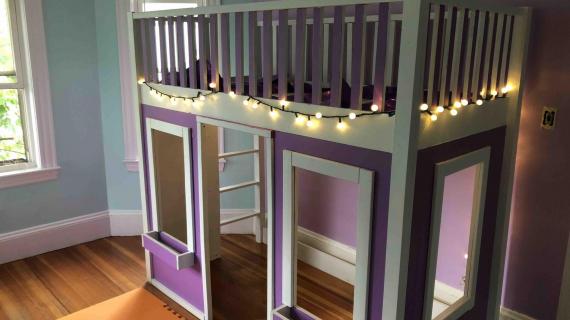
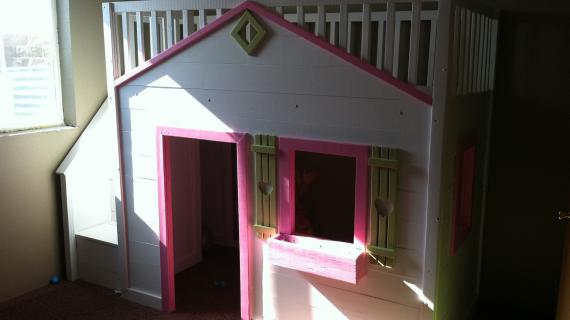
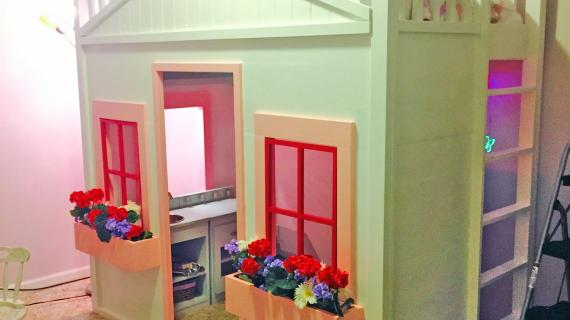
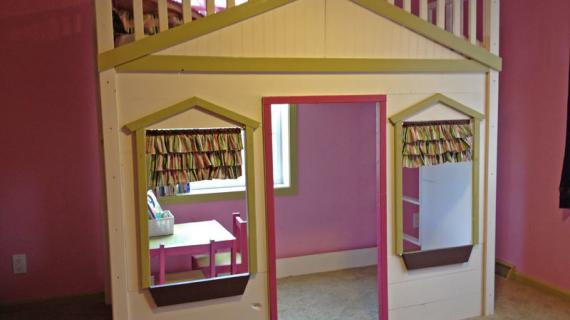
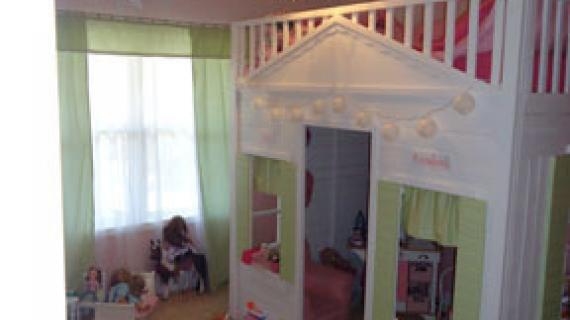
A totally buildable playhouse loft bed that can be easily assembled in rooms. Features cottage styling, open ladder, full railings, three large windows and a doorway. Freestanding.
Preparation
10 - 1x2 @ 8 feet long
50 - 1x2 @ 15" (Rails)
For a project of this size, it is always a good idea to cut as you go. It is also a good idea to grab a few extra boards in each size.


Please read through the entire plan and all comments before beginning this project. It is also advisable to review the Getting Started Section. Take all necessary precautions to build safely and smartly. Work on a clean level surface, free of imperfections or debris. Always use straight boards. Check for square after each step. Always predrill holes before attaching with screws. Use glue with finish nails for a stronger hold. Wipe excess glue off bare wood for stained projects, as dried glue will not take stain. Be safe, have fun, and ask for help if you need it. Good luck!
Instructions
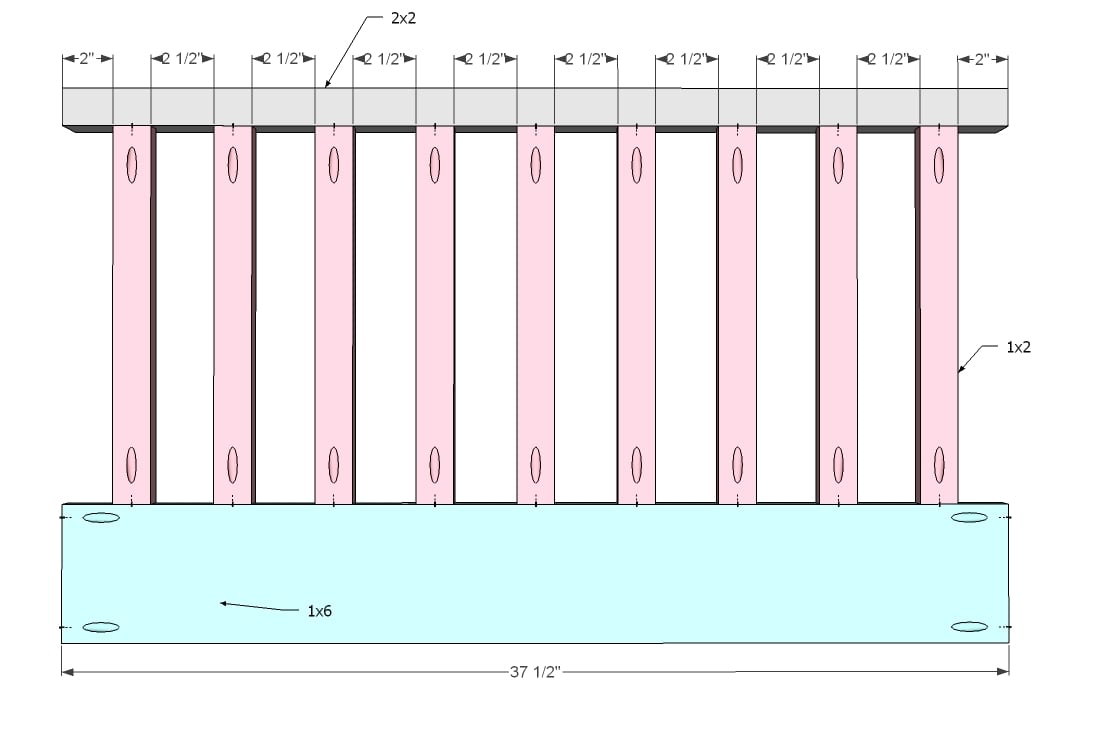
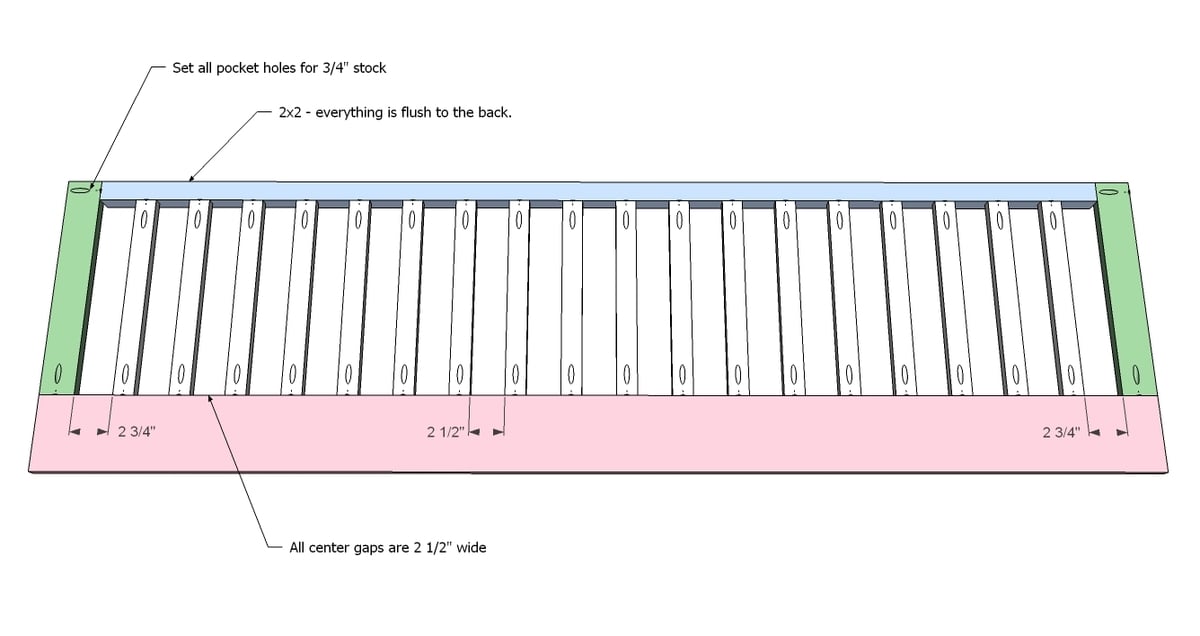
Step 1
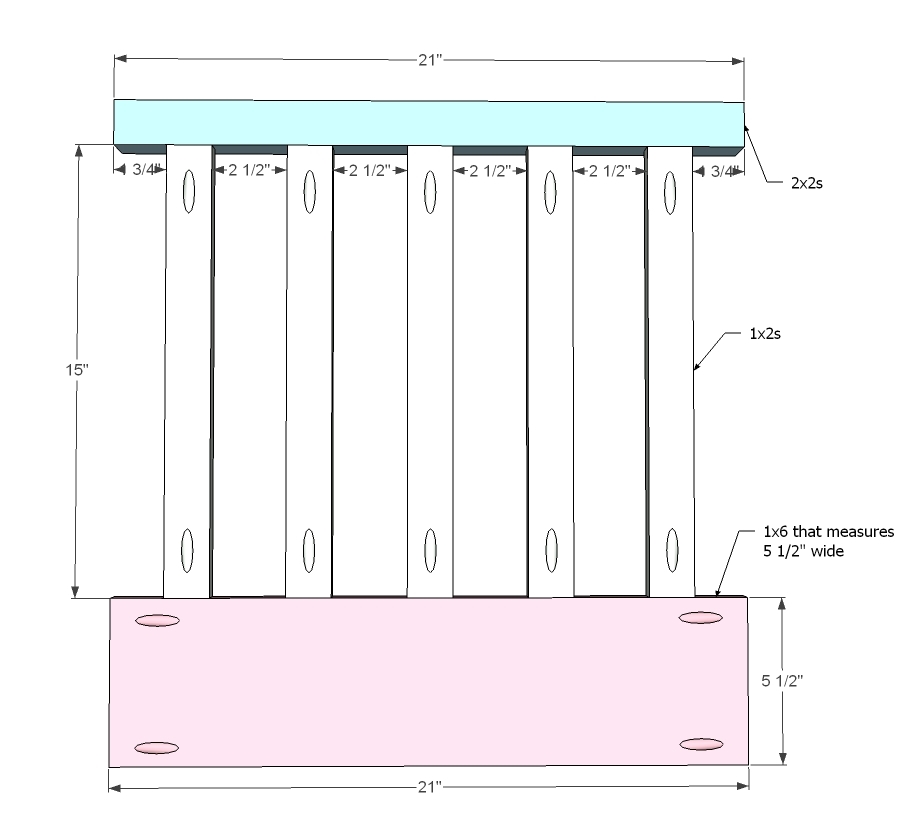
This is for the ladder side. The top is a 2x2, and the bottom is a 1x6. Mark out all the rail spacings as shown above and predrill holes with a Kreg Jig™ set for 3/4" stock. Fasten the rails to the top and bottom, keeping the back side flush.
Try placing a 3/4" thick board under the rails to bring them up to flush with the 2x2 as you fasten. Little tricks like this can save you a ton of time.
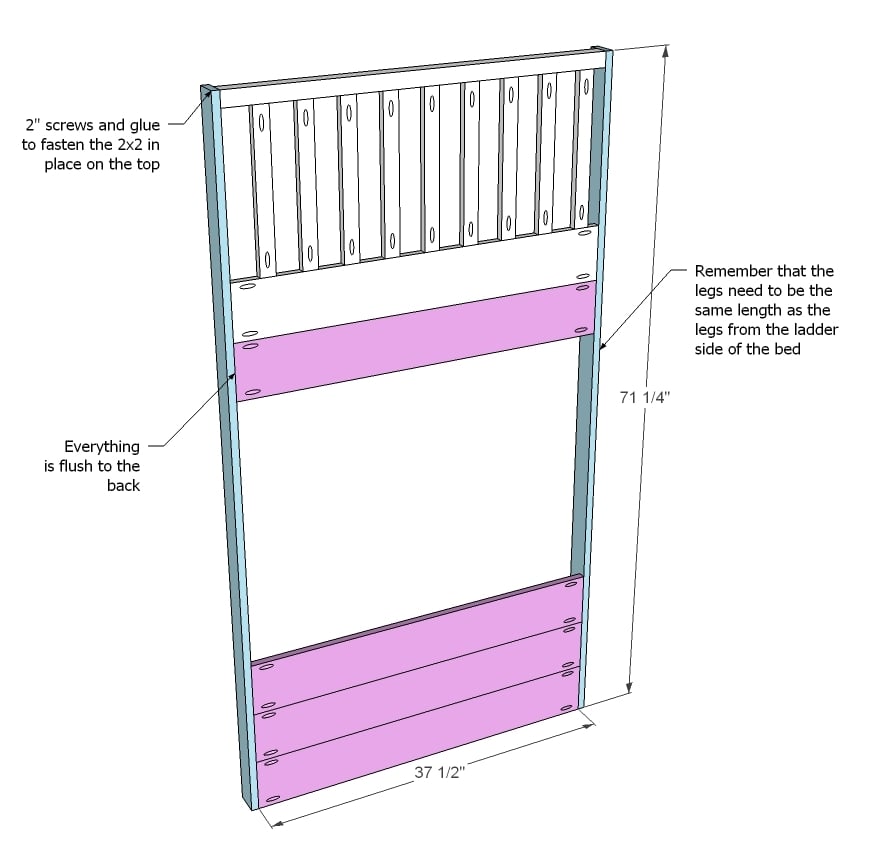
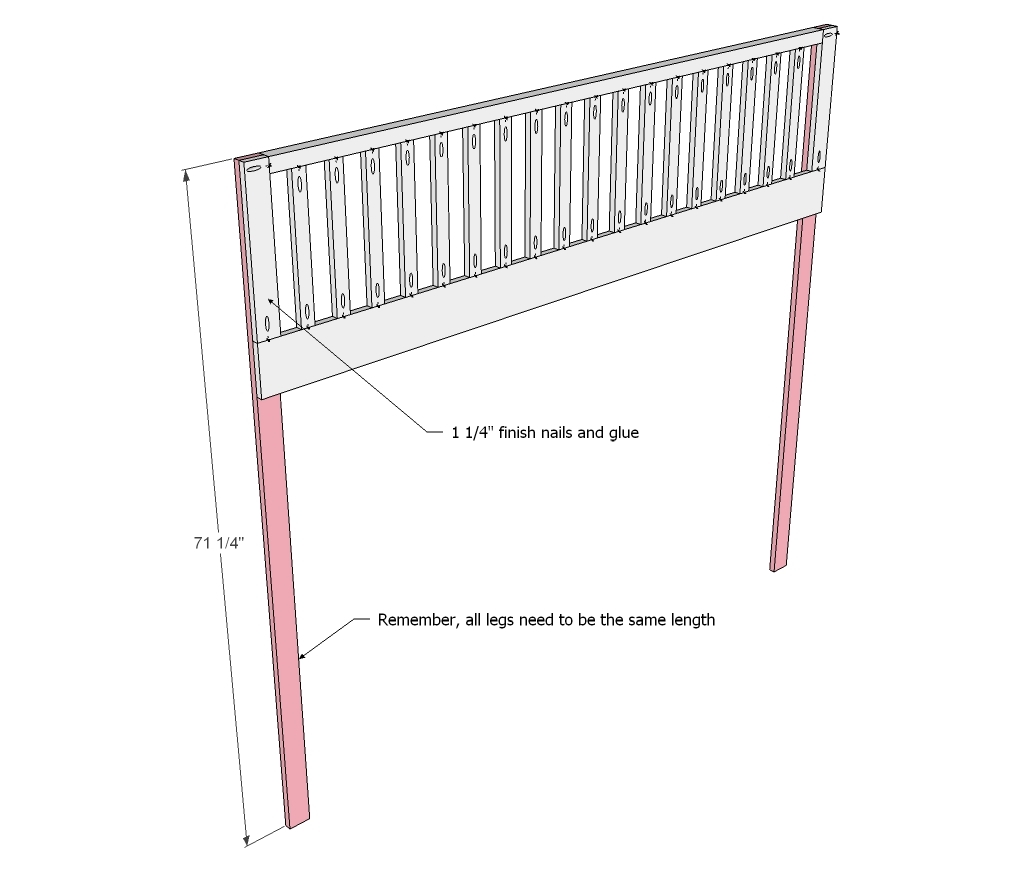
Step 2

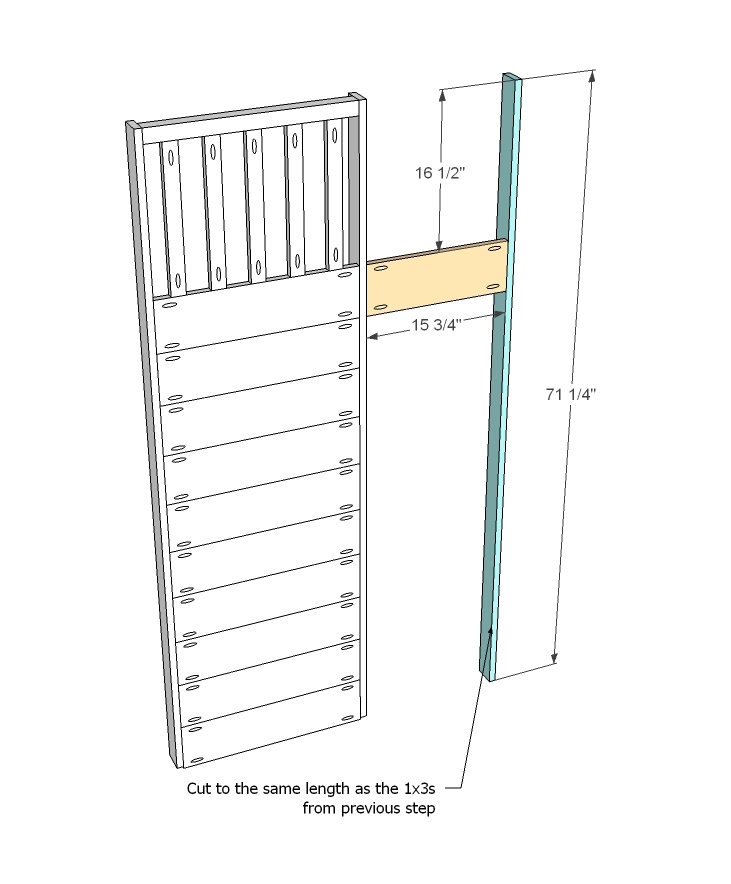
With your ladder side rails done, attach the legs and the 1x6s with pocket holes as shown above. Remember that all boards on the back side are flush. Use glue and 1 1/4" pocket hole screws.
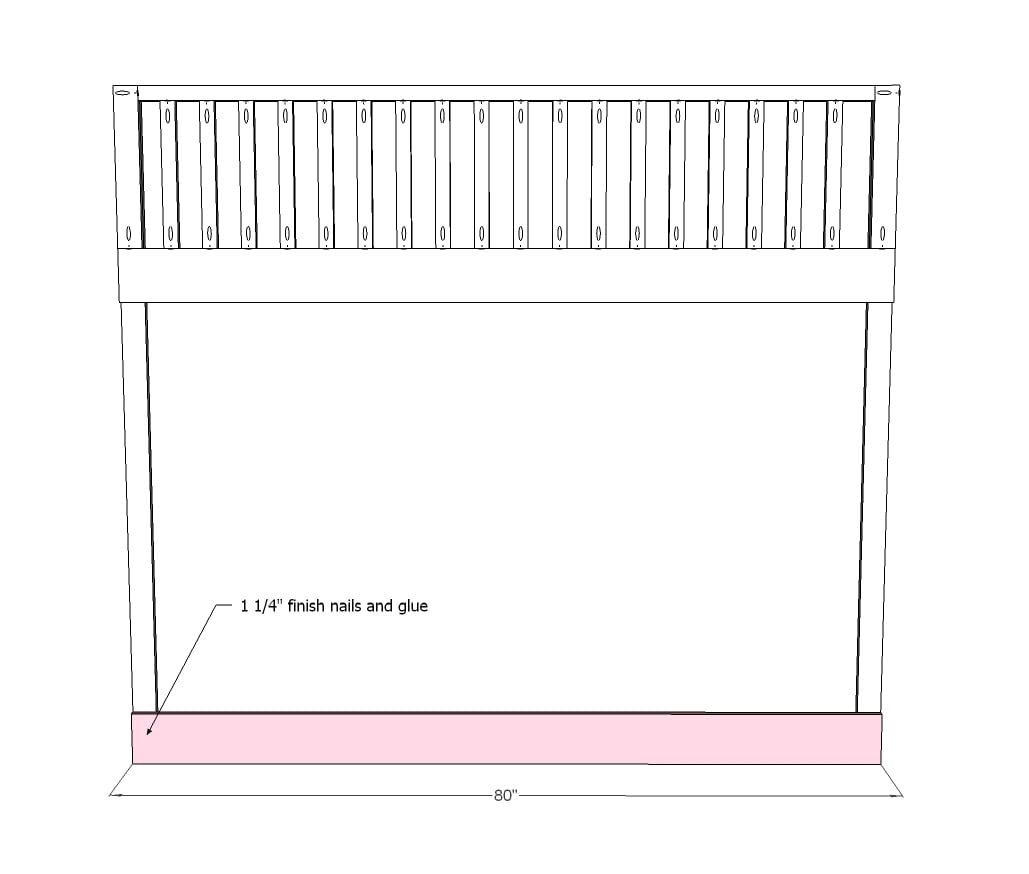
Step 3
Now it's time to start constructing the ladder. Attach the ladder top trim and the remaining leg as shown above.
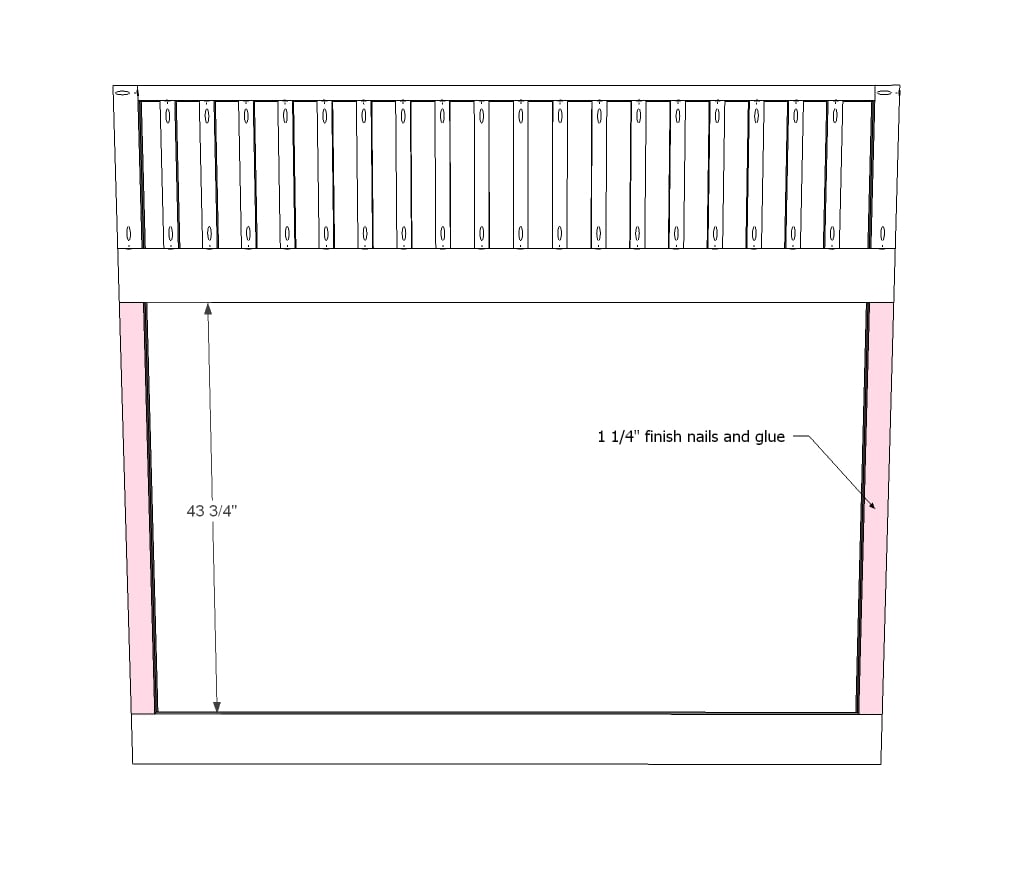
Step 4
And now the ladder rungs.
Depending on the quality of your 1x6s, you may wish to add a pocket hole screw in the center of each 1x6, joining 1x6s to each other.
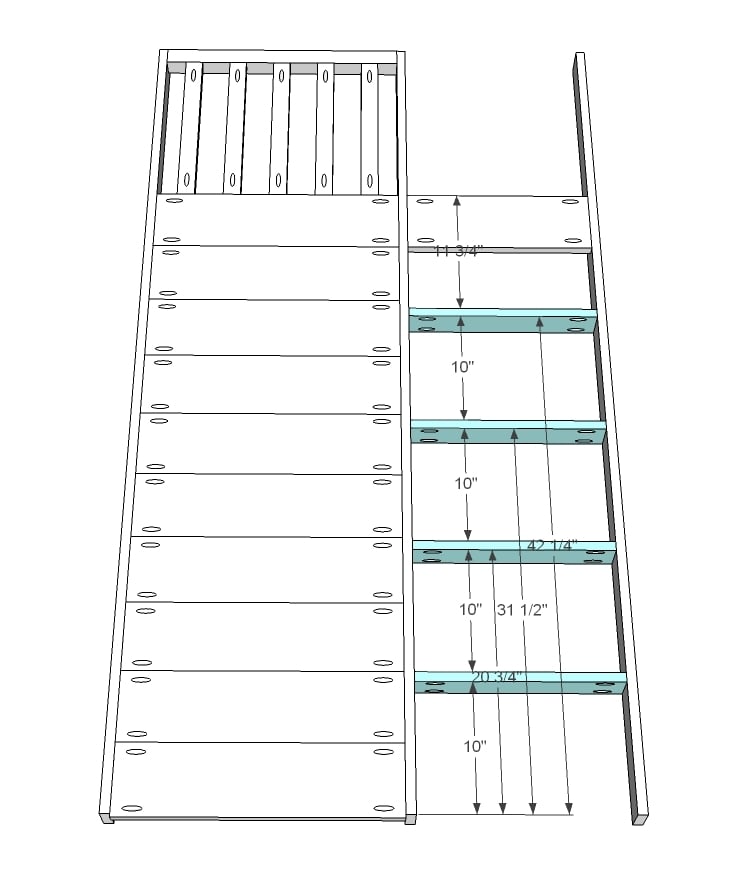
Step 5
Step 6
Now build the window side railing as shown above, in the same manner as the ladder side.
Step 7
And add the legs and the horizontal panel boards.
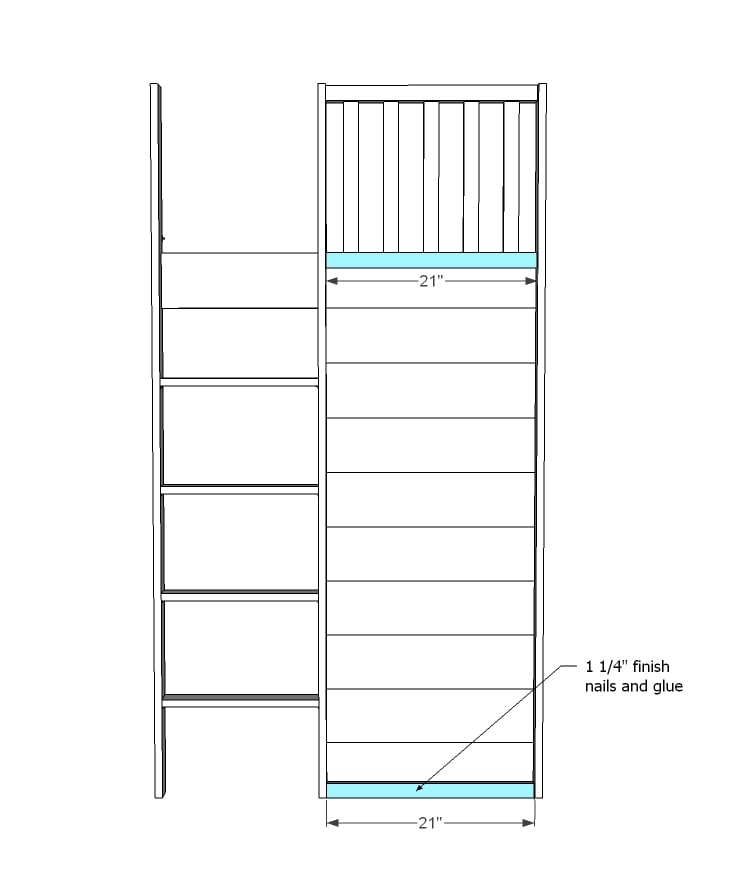
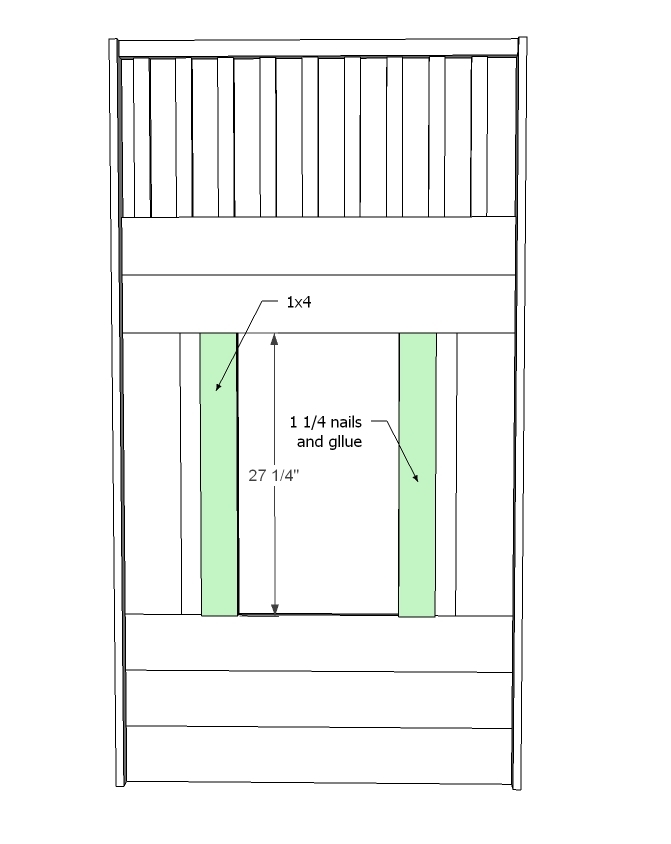
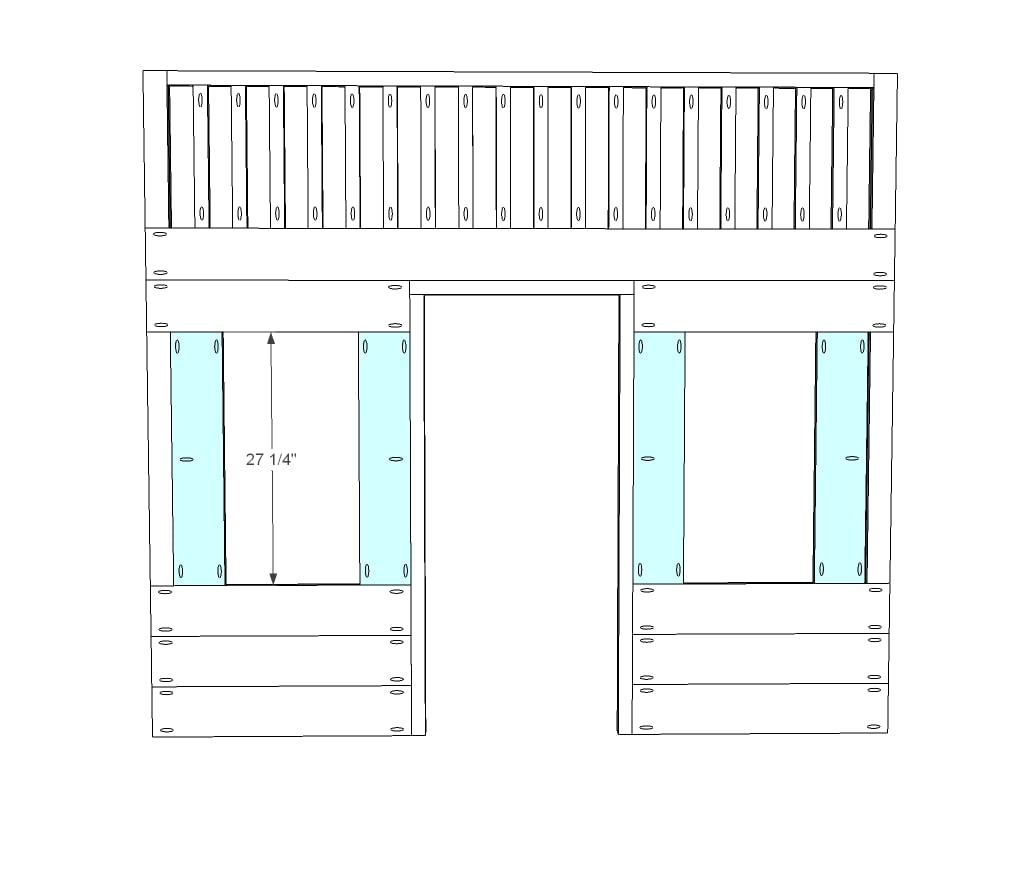
Step 8
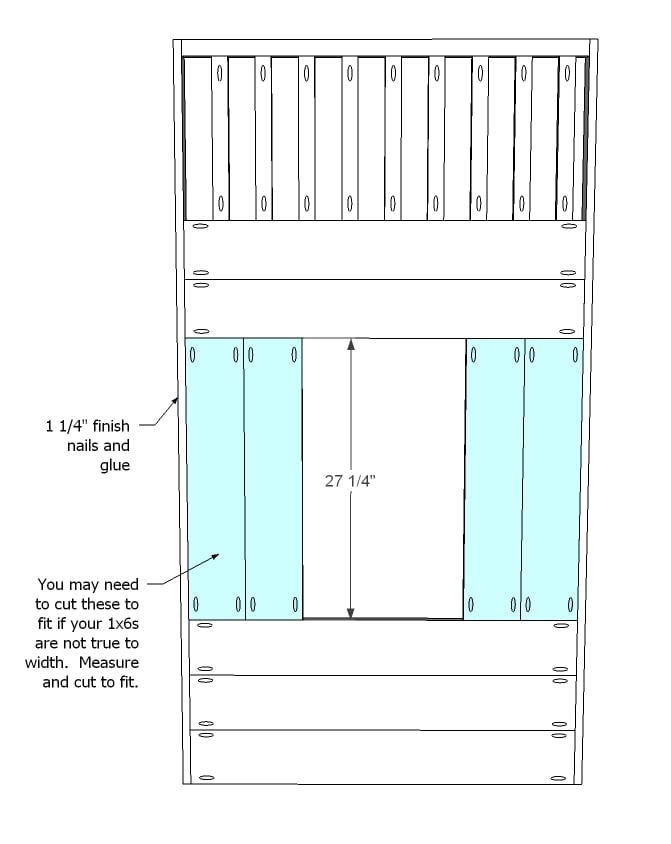
Now measure and cut the vertical panel boards as shown above. Fasten in place. From the leg, attach the panel board with 1 1/4" finish nails and glue.
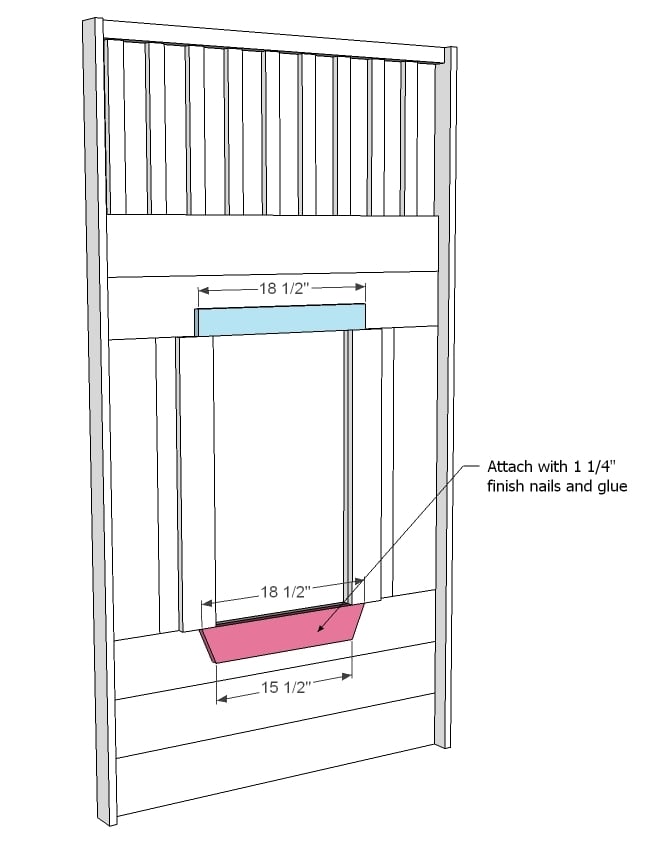
Step 9
Some window trim. Attach with 1 1/4" finish nails and glue.
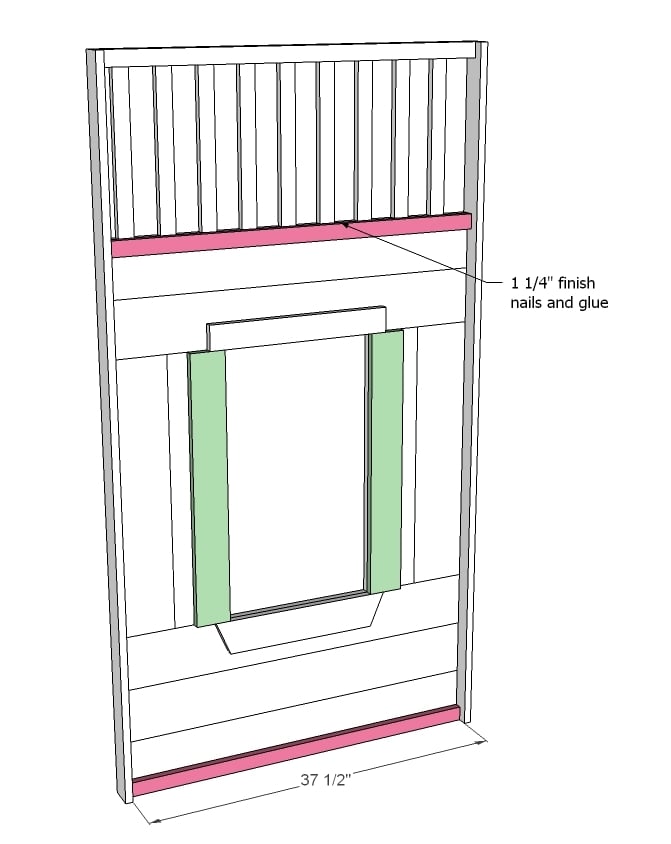
Step 10
You don't have to do the trim in this manner - use your imagination and be creative! Attach with 1 1/4" finish nails and glue.
Step 11
A little trim will finish up the window side of the bed.
Step 12
You will need to build two of these, one for the front, and one for the back.
Step 13
To both of these railings, attach legs as shown here.
Step 14
To the back panel, attach a base support as shown above.
Step 15
And now fill in the legs as shown above. Use 1 1/4" finish nails and glue. This completes the back panel.
Step 16

On the remaining panel attach boards with 1 1/4" finish nails and glue. Use pocket holes to attach the door trim in place as shown above.
Step 17
Now add in the vertical panels as shown above. You may need to cut these to fit.
Step 18
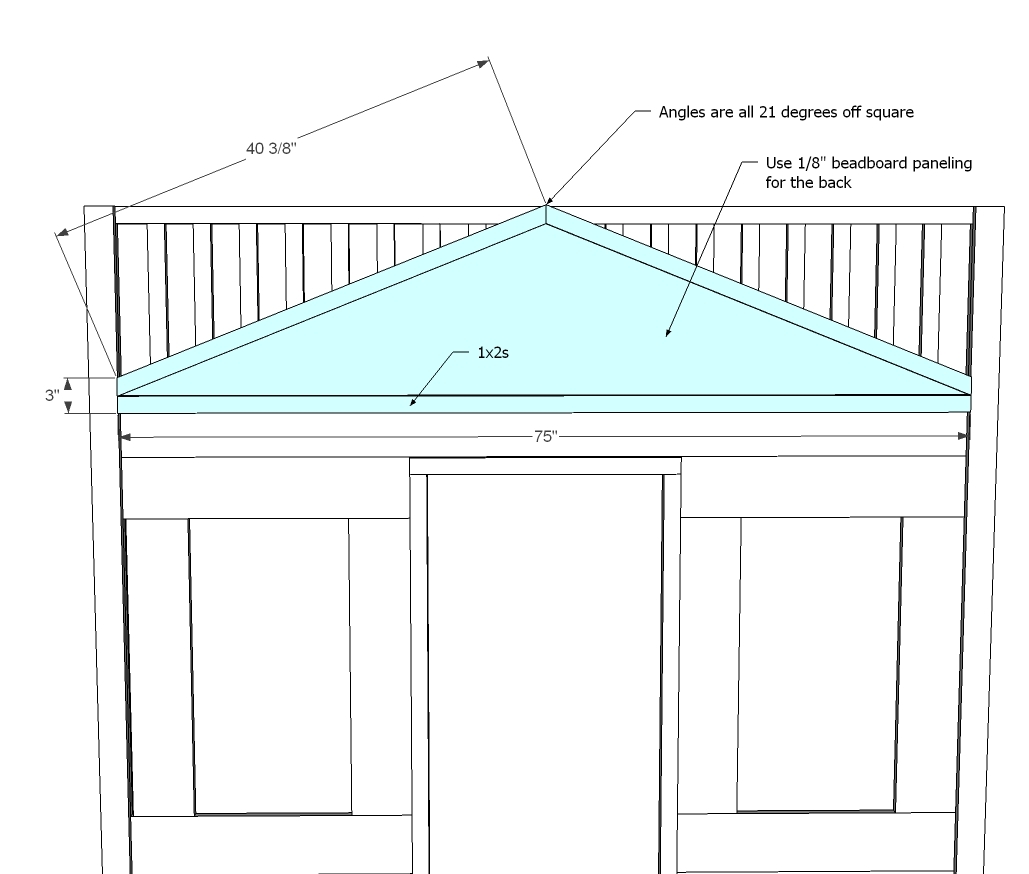
Use your Kreg Jig to build a triangular frame as shown above. Then tack 1/8" beadboard paneling to the back with 3/4" finish nails or brad nails and glue. Then attach the gable end piece to the front of the bed with 1 1/4" finish nails and glue as shown above.
Step 19
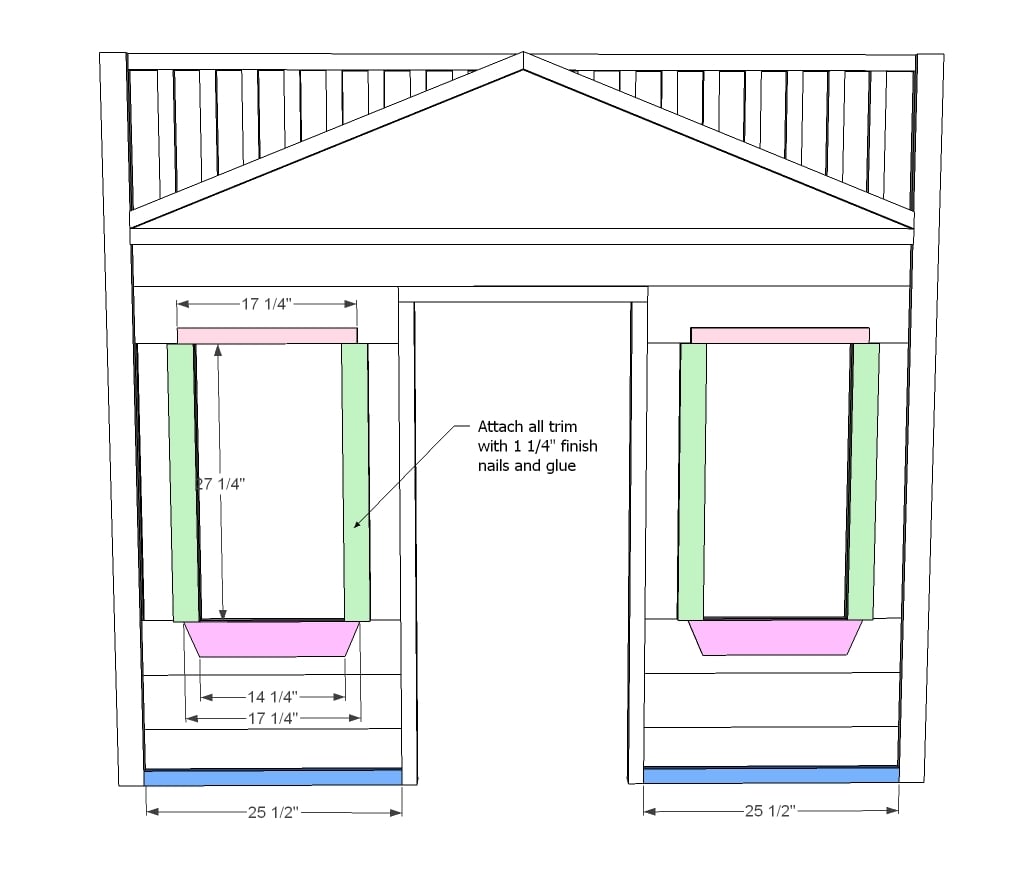
Time for window trim. Same as the side window, use 1 1/4" finish nails and glue.
Step 20
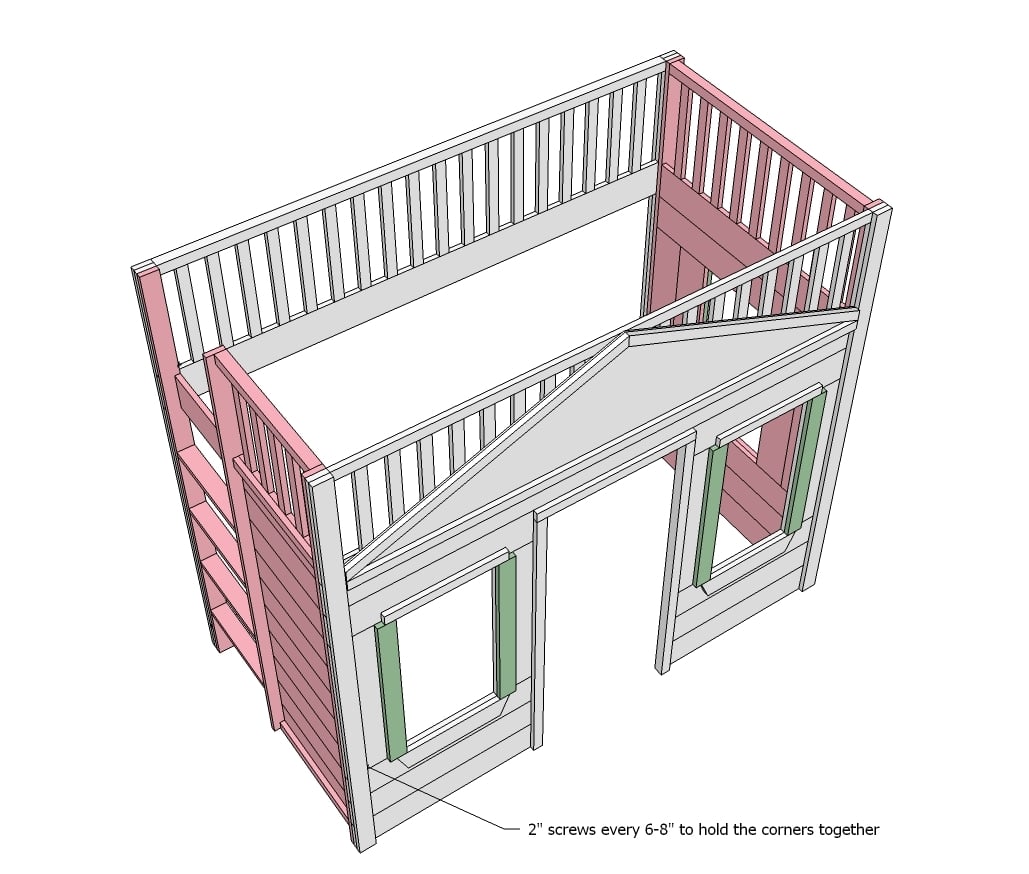
This bed is easy to assemble in the room. Simply move all four panels into the room, and screw the walls together as shown above.
Step 21
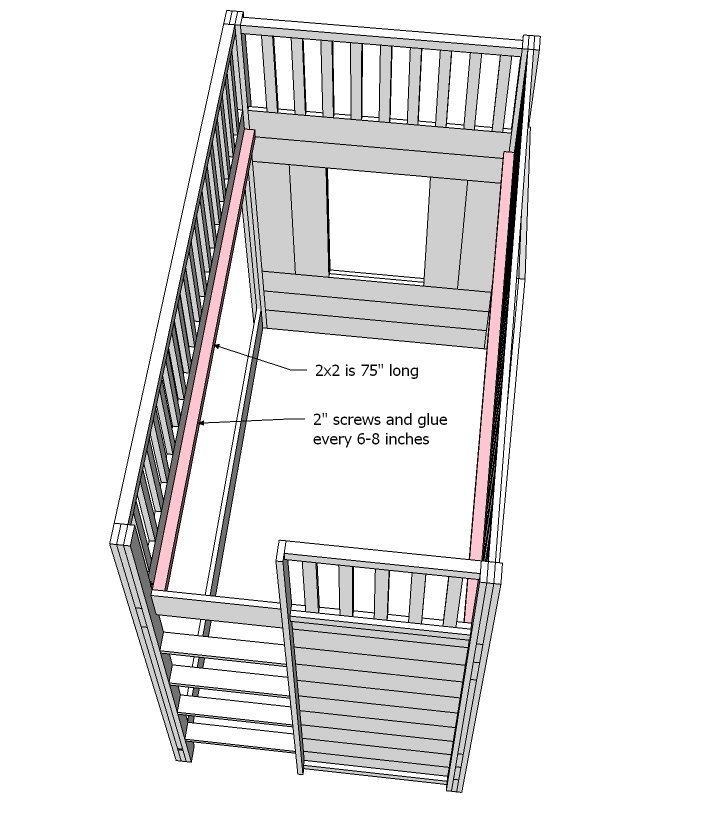
Attach cleats to the inside of the bed as shown above with 2" screws and glue, every 6-8".
Step 22
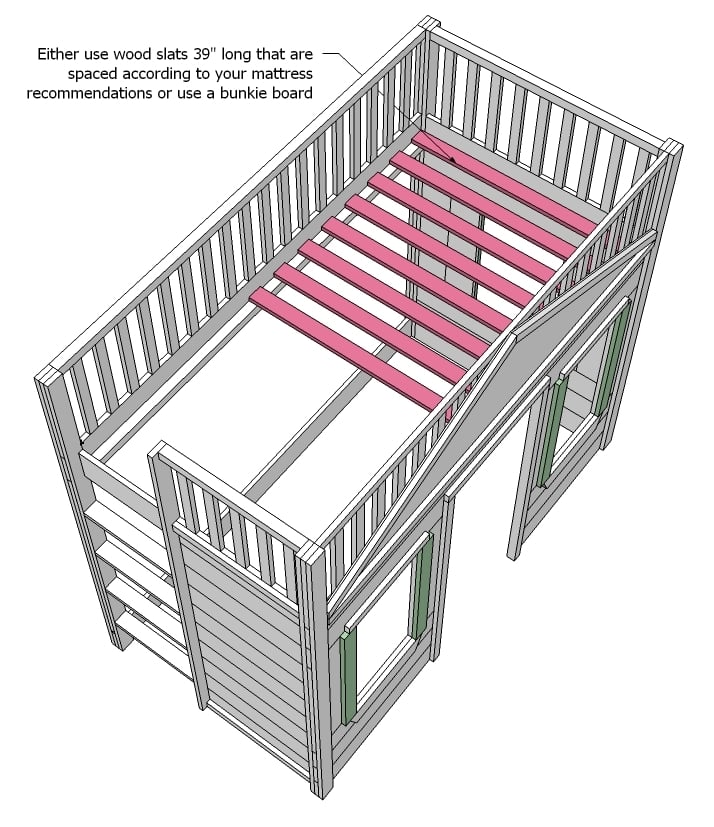
Finally, lay slats across the cleats as recommended by your mattress, or use a bunkie board. If you use cleats, screw your cleats down with 2" screws.
It is always recommended to apply a test coat on a hidden area or scrap piece to ensure color evenness and adhesion. Use primer or wood conditioner as needed.


Comments
CindyLynn
Tue, 04/12/2011 - 07:33
Hmm. I love this...But could
Hmm. I love this...But could you do it with the storage stairs?? My next project was going to bed the "girlie" loft beft with storage stairs, Also contemplating a full, which I have dimensions for. Cant wait to post my pictures for my Fancy Farmhouse bed....With a matching footboard in a King!!!!! Loving it so far! Just trying to figure out what kind of sealer(minwax) to do, its white and I dont want the yellowish tones, that I hear some of them can leave... Thank you so much for such a great site!! =)
In reply to Hmm. I love this...But could by CindyLynn
claydowling
Tue, 04/12/2011 - 08:19
A clear finish
Acrylic sealers dry clear. I think the Minwax version is named Polycrylic, but in general you just need to look for a water-based polyurethane. There are plenty of sources if you're willing to look. If there's a Woodcraft store in your area, they'll carry the products from General Finishes.
Guest (not verified)
Tue, 04/12/2011 - 09:41
Thank you sooo much! Thats
Thank you sooo much! Thats what I was thinking about using, thanks for clarifying that it will dry clear. Wouldnt want all of my hard finishing work to go to waste on the final step. =)
In reply to A clear finish by claydowling
CindyLynn
Fri, 04/15/2011 - 07:47
Help with finishing
I have a few questions. I was told to sand inbetween paint coats with 220 grit(very fine) sandpaper. I did this to what I thought was my "final coat" of semi gloss paint in antique white on My fancy farmhouse bed. It seems as if its now discolored and you can tell where it was sanded. Is this normal, or should i apply another coat of paint and not sand.
2nd..Once i figure this out im ready for the polycrylic(minwax)..That also says sand between coats. Will the minwax hide the discoloration of the proir sanding with out re-painting? And should I sand between coats of the minwax? Also it says use a brush to apply but at lowes they told me to use the foam brush to avoid brush marks. I have the foam brushes but again this goes against the directions of the minwax.
PLEASE help...Im so anxious to get this project wrapped. =)
artkdz
Tue, 04/12/2011 - 07:41
stairs
I agree with CindyLynn. Would it be possible to add on the storage stairs to this one?
Tsu Dho Nimh
Tue, 04/12/2011 - 07:58
Girly? Boyly? Depends on the paint job
Just change the marketing approach and you can make it anything you want:
Paint it brown and dark green and it's a Forest Service cabin.
Do some faux logs running sideways and it's a pioneer log cabin or Shrek's house in the swamp.
Do the faux logs running vertically and it's a frontier stockade.
Paint it gray fake stone block and put bars in the windows, it's the sheriff's office and jail.
In reply to Girly? Boyly? Depends on the paint job by Tsu Dho Nimh
Chair
Wed, 04/13/2011 - 10:54
Exactly
Boys live in houses, too. :)
Marci (not verified)
Tue, 04/12/2011 - 08:59
Totally Do-able with storage stairs!
So I have this...well almost this, in my garage being painted as we speak! LOVED the Cottage style of the bed out of the catalog, and decided it reallly couldn't be that hard to replicate. I used the picture in the catalog, a couple of Ana's diagrams for the stairs, and a TON of imagination....I will post pictures and such when it's painted completely to show it off...my toddler moved into it when it only had 2 walls and I had to pry her out of it to take it out to paint.
Allison (not verified)
Tue, 04/12/2011 - 10:24
Girly Bunk Bed?
Hi Ana,
Just curious if this plan is the one you were mentioning in the cabin bunk system comments? Or is there an actual girly bunk bed plan coming our way?? :)
sgacek
Tue, 04/12/2011 - 11:07
Mattresses
Is the assumption for this, and any of Ana's AWESOME beds that a box spring WOULD or WOULD NOT be used? Seriously thinking about this one, only 10" shorter, since we have a VERY tiny room with ceiling fans for twin four yr olds. Love Tsu's ideas that it's all in the marketing. I think we will have to do some serious compromising on colors, even though we have 2 girls!
dee
Thu, 04/14/2011 - 18:18
I believe this is designed
I believe this is designed for use without box spring, just put the mattress right on slats or board. If you wanted to use a box spring, I think you'd want to make the top railing higher for safety.
dw33 (not verified)
Thu, 04/14/2011 - 08:12
tight fit for mattress?
I notice that in this and other loft bed plans, the length and width are sized exactly the same as the mattress. I'm concerned that this will be too tight a fit.
Those who have built beds like this: Is there really room for the mattress plus sheets and enough space to get it in and out easily for sheet-changing?
Would building the bed 1" longer and wider than my mattress have some unforeseen negative consequences?
Chris Hill (not verified)
Fri, 04/15/2011 - 06:22
Re: Tight fit for a mattress
@dw33 - I'd recommend a little wiggle room to allow for bedding in any bed project. I've designed several for Lowe's Creative Ideas where we added 1-2 inches (1/2- to 1-inch on each side/end) to allow for sheets, blankets, comforters, etc. You don't want to add too much room, however, that might allow limbs to get caught between the frame and mattress.
dw33 (not verified)
Fri, 04/15/2011 - 08:08
Thanks!
Thanks, that's exactly along the lines I was thinking.
Idahospud (not verified)
Tue, 04/19/2011 - 03:02
full size mattress?
Would making this bed wide enough to accomodate a full-sized mattress (my girls sleep together) need extra support underneath?
dee
Fri, 04/22/2011 - 19:46
full size mattress
That's my plan - whether it's really necessary or not, I don't feel comfortable going without an extra support in the center for the full-size. I saw these at Rocker:
http://www.rockler.com/product.cfm?page=5287
and am thinking these or something like that would be a good way to have the center support but still make it removable for moving in the future.
Guest (not verified)
Fri, 04/29/2011 - 06:12
Making the bed?
This is a really lovely project but how on earth is a small child supposed to make either bed? - I'm a firm believer in the child making his/her own bed. - The top bunk would be especially difficult. It's hard enough for them to make a bed that simply up against a wall. Not strong enough to move the bed out from the wall, make it, and put it back. Not strong enough to kneel on the bed and bend a corner of the mattress up to get a sheet under.
Guest (not verified)
Thu, 06/16/2011 - 06:23
Double bed
Is there a way to modify the plan and have a double bed on bottom with storage in sides?
Kelly Phillips (not verified)
Tue, 07/12/2011 - 11:45
Cabin Loft Bed
Hello, first and foremost... I LOVE YOUR ARTWORK WITH THE WOOD! Everything on your site is beautiful! I know that its furniture but its also art.
I was interested in making a cabin loft bed for my three year old daughter (because this is what she wants for Christmas) but I did not see the one with the plans that had the stairs on the side. I am sure that I can figure out how to make drawers in them but I did not know where to find the plans for the steps. I greatly appreciate any help that you may have for me.
Thank you
Amy Meier (not verified)
Thu, 07/28/2011 - 07:30
Stairs
Would it be possible to use the stair plans from the playhouse lofted bed with this cottage loft bed? My daughter would love the stairs and I would feel more comfortable having her use them for storage and easy access in and out of the bunk until she is a little older. Any ideas on how to make stairs work for this plan as the height on the cottage loft bed is slightly taller than the playhouse loft bed? Any help is much appreciated. I am thinking of tackling this project for her 4th birthday which is coming up. Thanks!
Madeline Layson (not verified)
Sat, 05/19/2012 - 20:38
Staircase height
I am also curious about staircase height for this bed
samdahl
Thu, 07/28/2011 - 19:23
Mods to make 2-story play center
I'm hoping to modify this plan to use it as a 2-story play center. It will be used by 5 and 6 year-olds (max of 3 on second floor at a time) in a classroom environment. The modifications I'm looking at are reinforcing the "2nd floor" by placing plywood over the slats then reinforcing with a pair of 2 x 4's running underneath the slats. I also plan to increase the rail length by 10" to ensure children can stand up safely. I'm using Select Pine for all weight bearing sections and the rails. I'm a novice with this stuff and want to make sure this is reasonable. Any suggestions would be greatly appreciated.
Thanks!
Guest (not verified)
Mon, 09/05/2011 - 19:21
Cottage Loft Bed
Love the bed and just wondering if you have an cost estimate. Thanks!
claydowling
Tue, 09/06/2011 - 05:13
Cost
Will depend on when you buy and where you are. Lumber prices fluctuate based on local demand and also where you buy it. For example, if you're in Texas, where there's going to be a lot of reconstruction in the next month, lumber prices are going to be quite high. Here in Michigan, our construction season is just wrapping up, and lumber prices are going to go down.
Guest (not verified)
Mon, 10/10/2011 - 11:50
shopping list
Does anyone have a lumber shopping list
Stormie (not verified)
Fri, 11/18/2011 - 23:03
Price?
Just wondering an estimate on price please? for just the lumber! Thanks ;)
In reply to Price? by Stormie (not verified)
claydowling
Sat, 11/19/2011 - 04:45
Two posts up
Is the only reasonable answer that can be given. You can use the MyLowes.com service that Ana mentioned to get a good idea of prices in your area. Even if you don't buy at Lowes, local lumber suppliers should all have similar pricing.
KJelinek (not verified)
Mon, 01/16/2012 - 13:44
Lumber costs
I just purchased all of my lumber for this project and it came in at $120 I felt good abut that, considering a similar bed retails for $1400!
Guest (not verified)
Mon, 02/13/2012 - 09:48
I was wondering with the
I was wondering with the cottage loft bed, if i could add a twin mattress on the bottom instead of a playhouse. I was wondering if that would work without making any changes to plans. I have two daughters and no more room for a bed then a bunkbed for them. The outher houses want to come out be to big. Would i need to build a box to put the matress or what would you sugest. I will want to later turn it into a playhouse on bottom later, as my daughters are 5 years apart. I catching one at the end of her age and one at the atarting of enjoing it.
MrsDelaney (not verified)
Fri, 02/24/2012 - 12:36
Cottage playhouse loft bed, standing room and mattress height.
Hi Ana, your plans look great! Thanks! Can you tell me how much standing room there is inside the playhouse area on this bed? Also, can you please tell me the distance from where the mattress sits to the top of the rails? Thanks? Need to kow if we need to make adjustments as we have a 12 inch thick mattress! Also, can you suggest if we need to make any major support changes to make this to fit a full size mattress? Or just adjust the side walls accordingly? Thank you for your help!
MrsDelaney (not verified)
Fri, 02/24/2012 - 12:41
Cottage playhouse loft bed, standing room and mattress height.
Hi Ana, your plans look great! Thanks! Can you tell me how much standing room there is inside the playhouse area on this bed? Also, can you please tell me the distance from where the mattress sits to the top of the rails? Thanks? Need to kow if we need to make adjustments as we have a 12 inch thick mattress! Also, can you suggest if we need to make any major support changes to make this to fit a full size mattress? Or just adjust the side walls accordingly? Thank you for your help!
In reply to Cottage playhouse loft bed, standing room and mattress height. by MrsDelaney (not verified)
claydowling
Fri, 02/24/2012 - 13:07
Sizing
The plan would indicate a 47" interior height. The rail height you should adjust to meet the needs of your mattress. There is no standard thickness for a mattress, so if you don't think there will be enough height, raise the rails. My advice would be to not cut any of the rail components until you know the height you'll need. My gut is that you'd want to raise it a few inches for a mattress that thick.
The support slats for the mattress will probably be fine as is. You can increase the strength by standing the slats on edge and putting a piece of 3/4" plywood over them. I've never been a particular fan of flat-lying slats. It's too easy to cause them to flex and pop off the cleat, especially if there's a 200 pound man in hot pursuit of a cat that doesn't want to go to the vet today.
MrsDelaney (not verified)
Fri, 02/24/2012 - 23:03
Sizing
Thank you for your help! How much higher should the rail extend above the top of the mattress? And is the door height 47 inches? Or the standing height inside the playhouse? To me it looks like the door is at that measurement so the "ceiling" of the playhouse would be a little higher? Wondering as we have 8 foot ceilings and with a 12 inch mattress thinking we might have to make it a few inches shorter. I think? That way there is room to sit up while in bed. Not sure what clearance is " normal" for top bunk. Also, could I just screw down the slats to the cleats and then top,with plywood? And then would it be okay adjusted to accommodate a full size mattress, rather than a twin? Without any additional structural supports?
Kim W (not verified)
Thu, 01/03/2013 - 07:12
Wrong window height?
We just finished building this bed and are in the process of finishing the storage stairs to go on the side. We had a problem with the height of the window though. There are ten 1x6's that make up one side, and then five 1x6's and a window that make up the other side. But the measurements don't add up. The side that is supposed to have the ladder (we're building stairs) is 1/4 inch taller than the other side. We had to trim the bottom. A 1x6 is actually 5.5 inches tall. So 5 of them would be 27.5 inches tall. The plans say for the window to be 27 1/4" tall. It does says that we might need to cut the vertical window boards if our 1x6's aren't true to width. But if they were actually 6 inches wide, that would be a whole different dimension and change the plans completely. Any 1x6 that you go buy will be about 5.5 inches wide. So, unless we missed something somewhere, the window needs to be 27 1/2 inches tall. And the same goes with the front, and 1/4 inch needs to be added to the back. Or you can trim 1 board off the ladder wall 1/4 inch and leave everything else the same.
Joshua Woodsman
Sun, 12/08/2013 - 09:27
not bad
I tried to find some cabin plans. do you have some tips?
I just find: www.pinuphouses.com ..It´s my favorit..
sgariety
Tue, 01/31/2017 - 17:56
aumbries bed
build for auction
Kayla Tanner
Thu, 03/02/2017 - 11:31
Beadboard ?
Cv2065
Thu, 12/21/2017 - 18:22
Incorrect Measurements on Some Pages
Just wanted to make everyone aware that some of these measurements are incorrect, so make sure that you are mock setting everything before screwing in. Step 1 has the incorrect spacing in-between the spindles on the side. Step 2 says to cut the side rails 71 1/4"...this is also incorrect and off by 1/4". This is as far as I've gotten but taken too long due to these issues. Plans are great, just take your time.
Lindsayjean071…
Tue, 12/31/2019 - 08:27
This was such a fun build…
This was such a fun build. The plans are so easy to follow and spot on. My daughter loves it. I had to modify and add stairs with a platform because she didn’t love the ladder. Thanks for such a great project. Next I will be building the surf house bed for my little guy!
akmarfani
Tue, 08/04/2020 - 12:00
Brad nailer
You say to get a brad nailer but it says to use finishing nails. Which nailer snd ehich nails do I use?
Thanks