


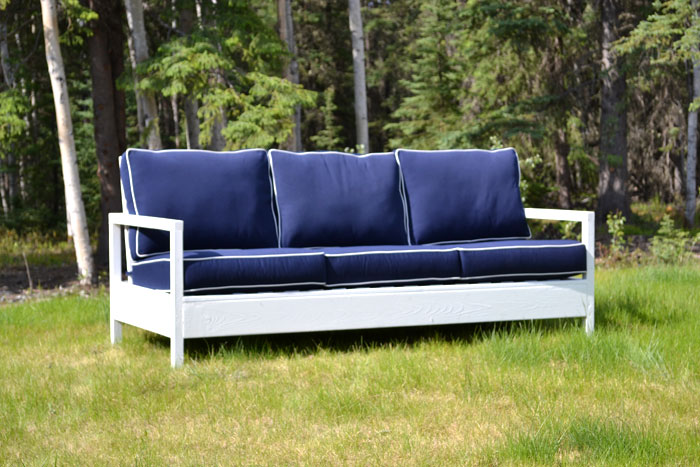
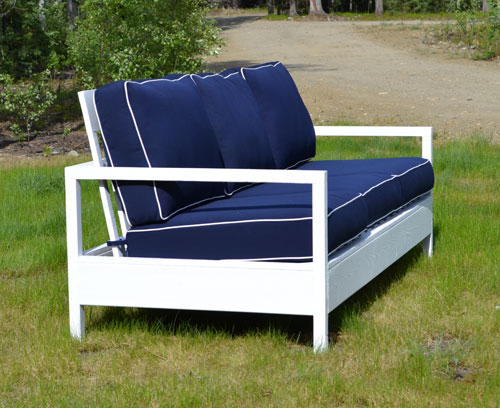
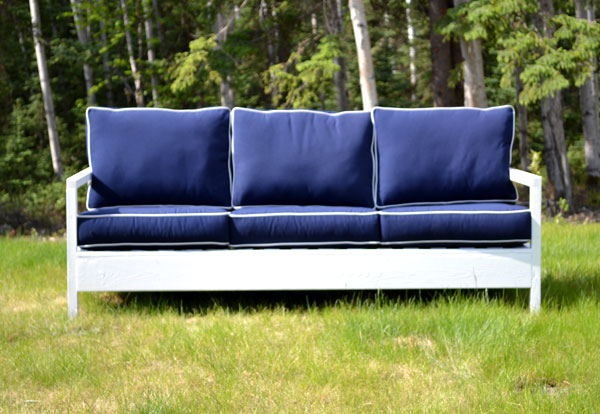
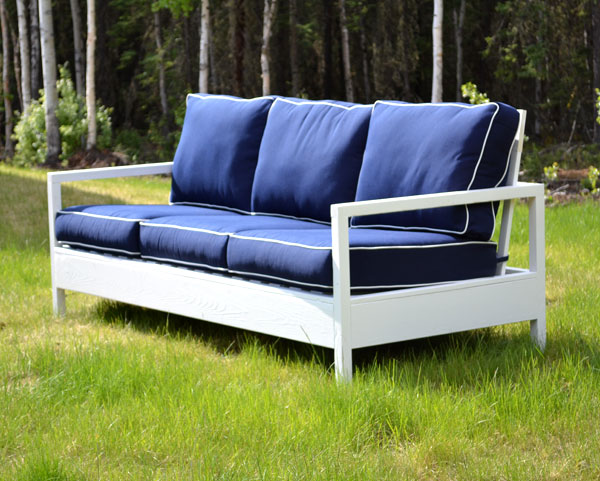
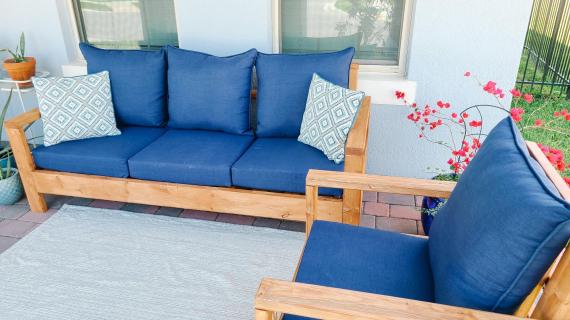
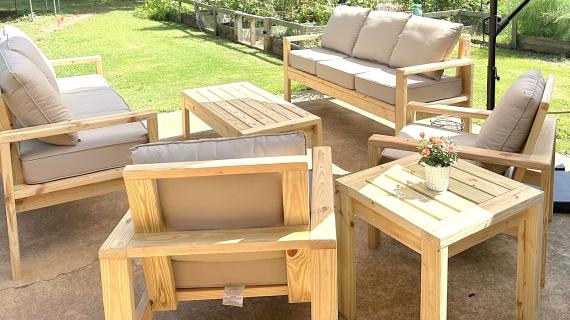
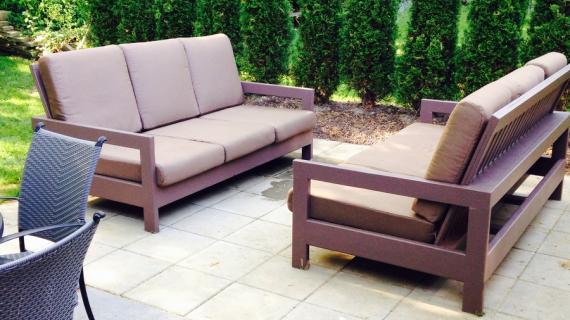
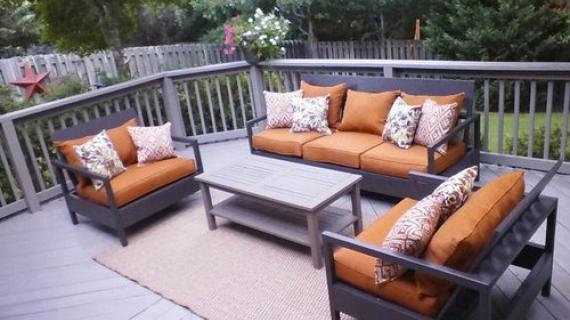
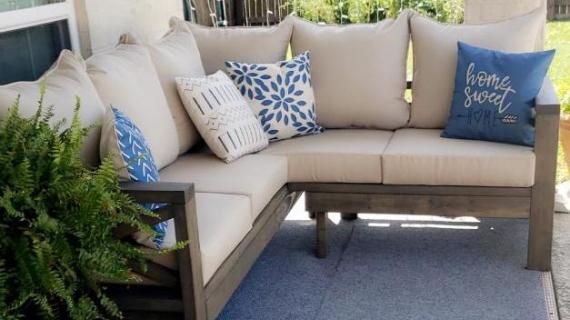
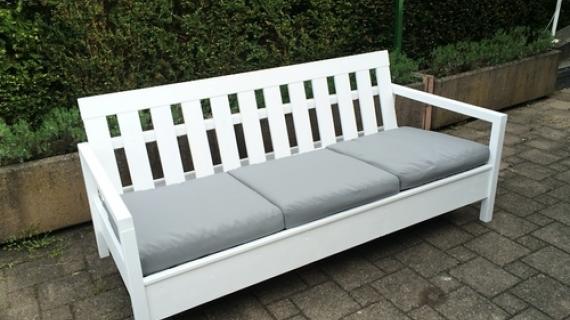
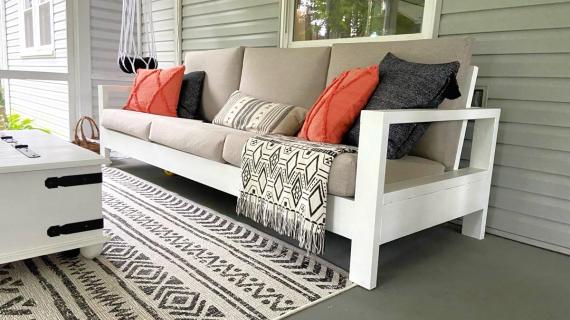
Build your own outdoor sofa. Modern style, reclined seat and back for increased comfort. Fits standard 25" x 25" deep seat cusions. Free step by step plans from Ana-White.com
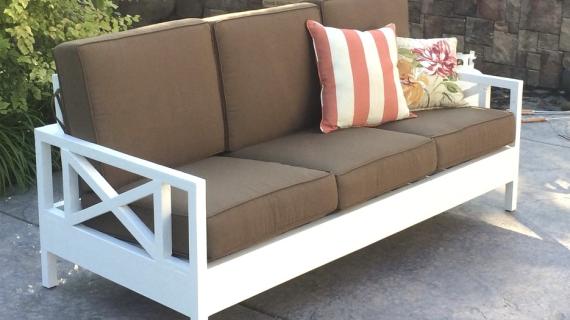
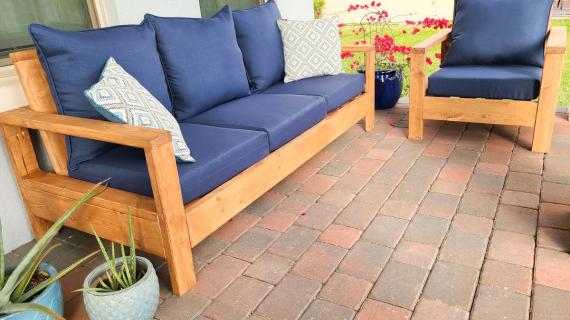
Matching loveseat plans available here and matching chair plans available here.
What Type of Wood to Use?
Where to Get Cushions?
- This plan is based off a 25" x 25" x 5" deep seat cushion and a 25" x 22" x 5" deep back cushion (most popular option Amazon affiliate link).
- You can also use a 24" x 24" deep cushion with minimal modification, but will need to make the distance between the arm rests 3" less.
- If you use 24" deep x 22" wide cushions, you will need to make the distance between the armrests 9" less.
- Back cushions should match width of the seat cushions, the pillow height should be between 18" and 25" to cover the wood back rest.
Updated Plans


Preparation
3 - 2x2 @ 8 feet long
4 - 2x6 @ 8 feet long
6 - 2x4 @ 8 feet long
2 - 1x4 @ 10 feet long
(50) 2-1/2" self tapping exterior wood screws
(50) 2-1/2" pocket hole screws
(20) 1-1/2" self tapping exterior wood screws
4 - 2x4 @ 22" - legs
2 - 2x4 @ 34" - arm rests
2 - 2x4 @ 31" - arm supports
2 - 2x6 @ 31" - arm supports
2 - 2x6 @ 75-1/2" - bases
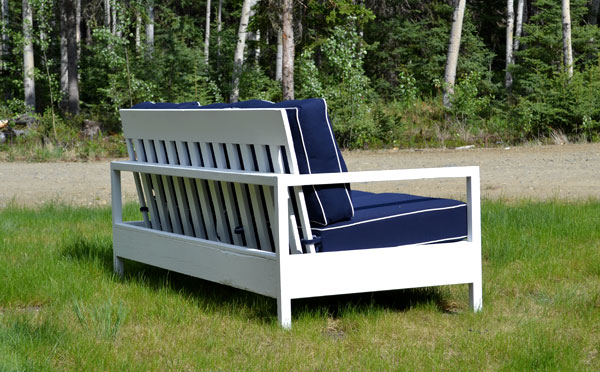
1 - 2x4 @ 75-1/2" - back
1 - 2x2 @ 75-1/2" - back rest top
9 - 2x4 @ 23-3/4" - back slats
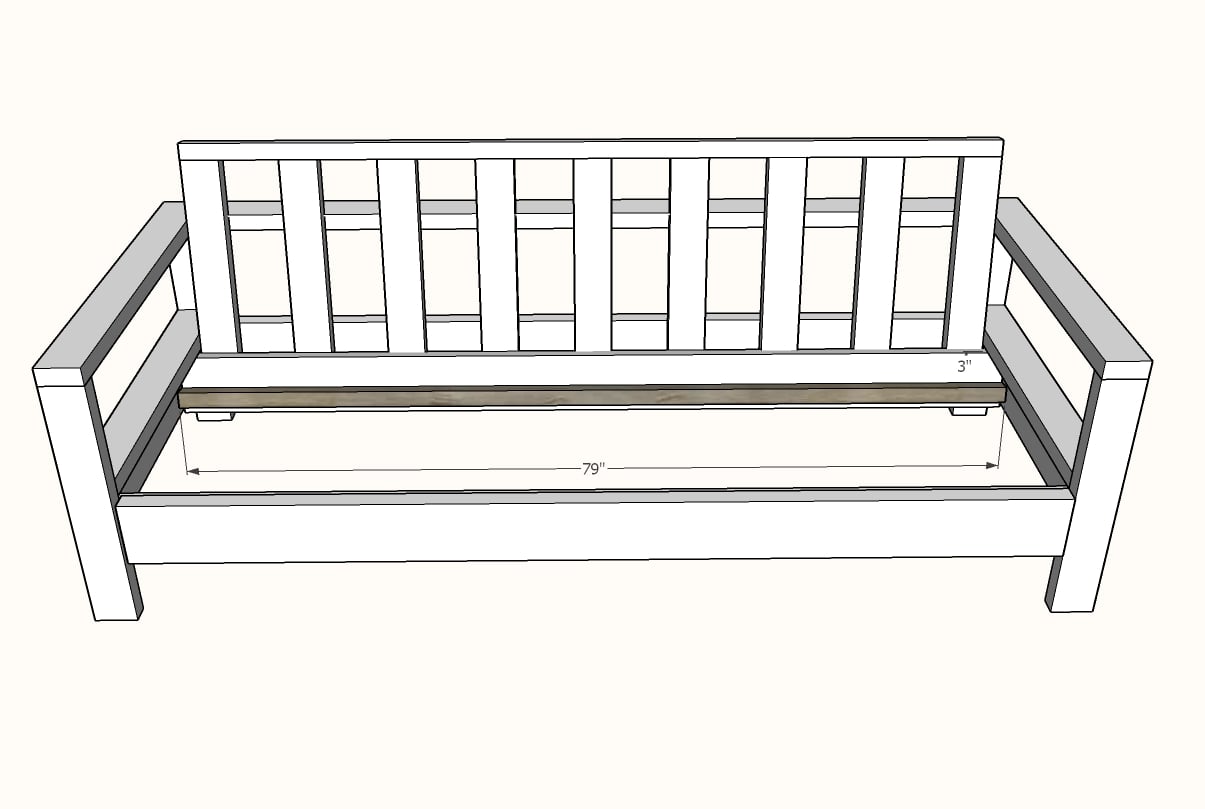
1 - 2x6 @ 79-1/2" - back base
2 - 2x2 @ 79-1/2" - seat slat cleats
10 - 1x4 @ 23-1/2" - seat slats
Cut boards with a compound miter saw.


Instructions
Step 1
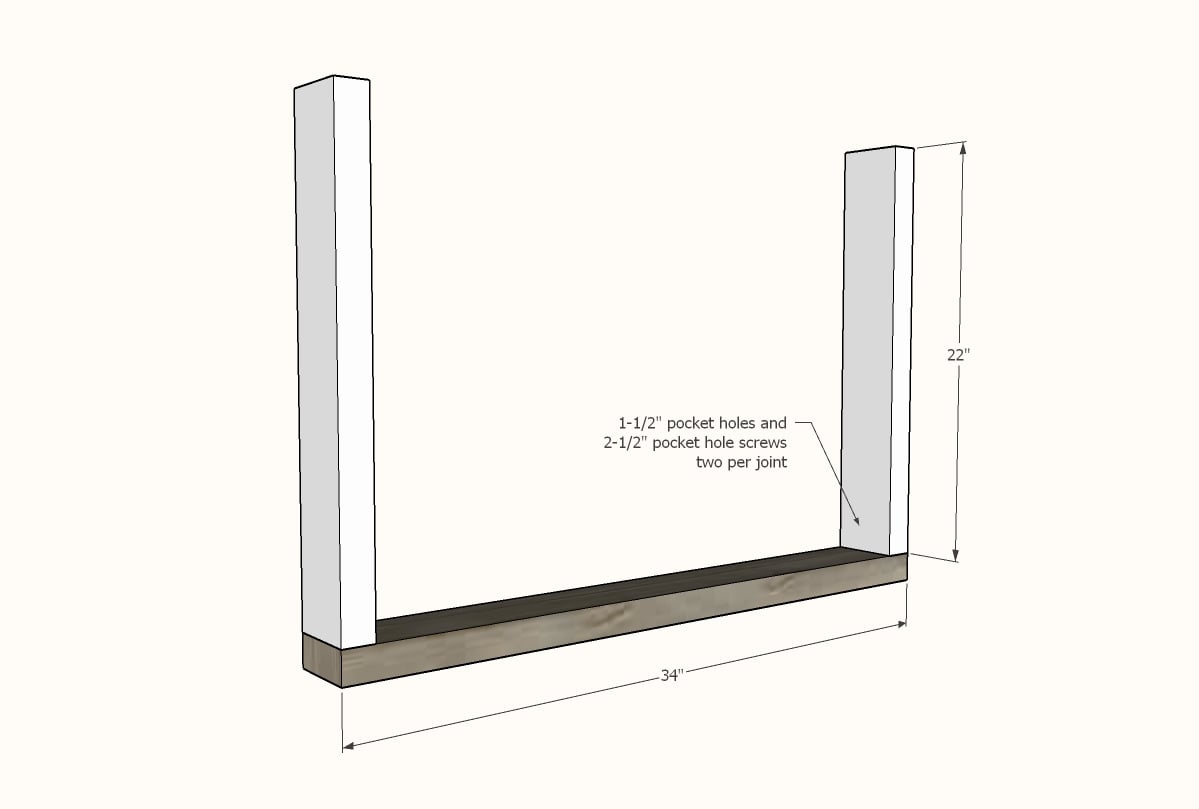
Drill two 1-1/2" pocket holes on top of each of the legs.
Attach to the arm rest from underneath with 2-1/2" pocket hole screws.
Leg is shown upside down.
Step 2

Drill two 1-1/2" pocket holes on each end of the 2x4 side supports.
Attach to the insides of the legs with 2-1/2" pocket hole screws.
Leg is shown upside down.
Step 3
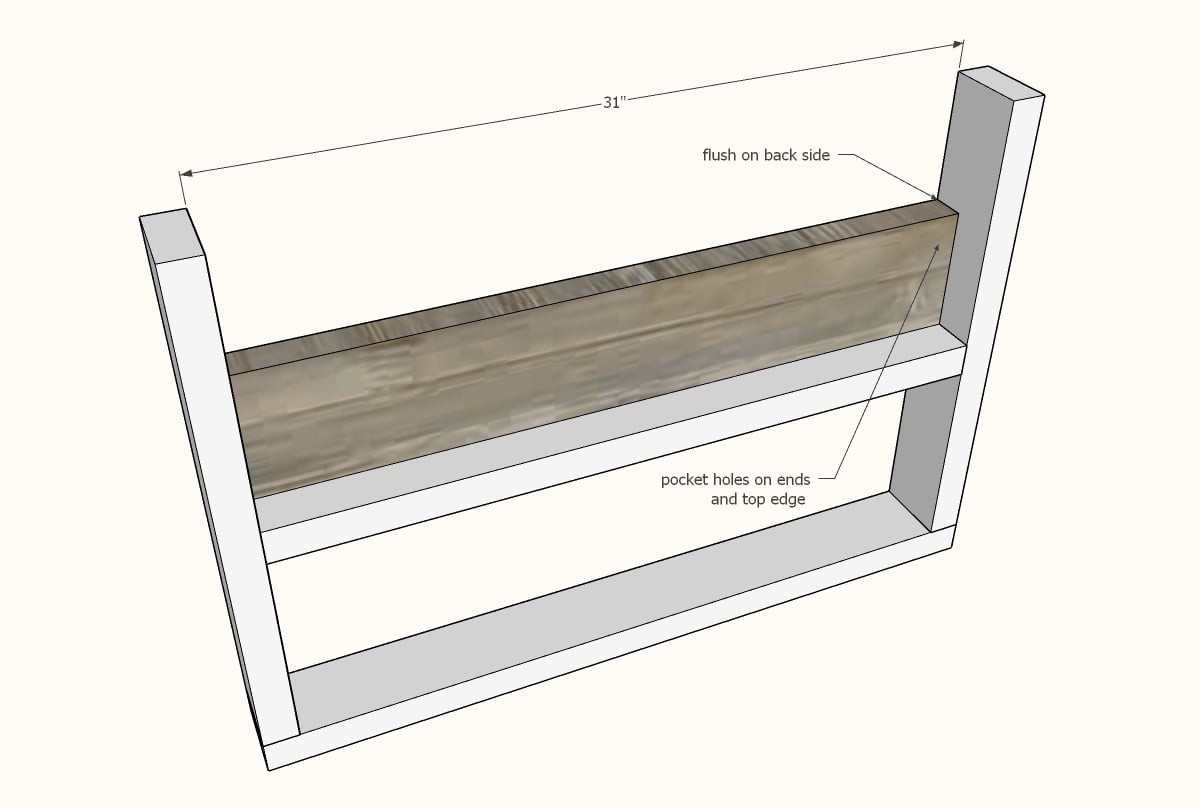
Drill two 1-1/2" pocket holes on each end of the 2x6 end aprons. Also drill three 1-1/2" pocket holes along one edge.
Attach inside the leg, flush to the outside, pocket holes hidden on insides, with 2-1/2" pocket hole screws.
Leg is shown upside down.
Step 4
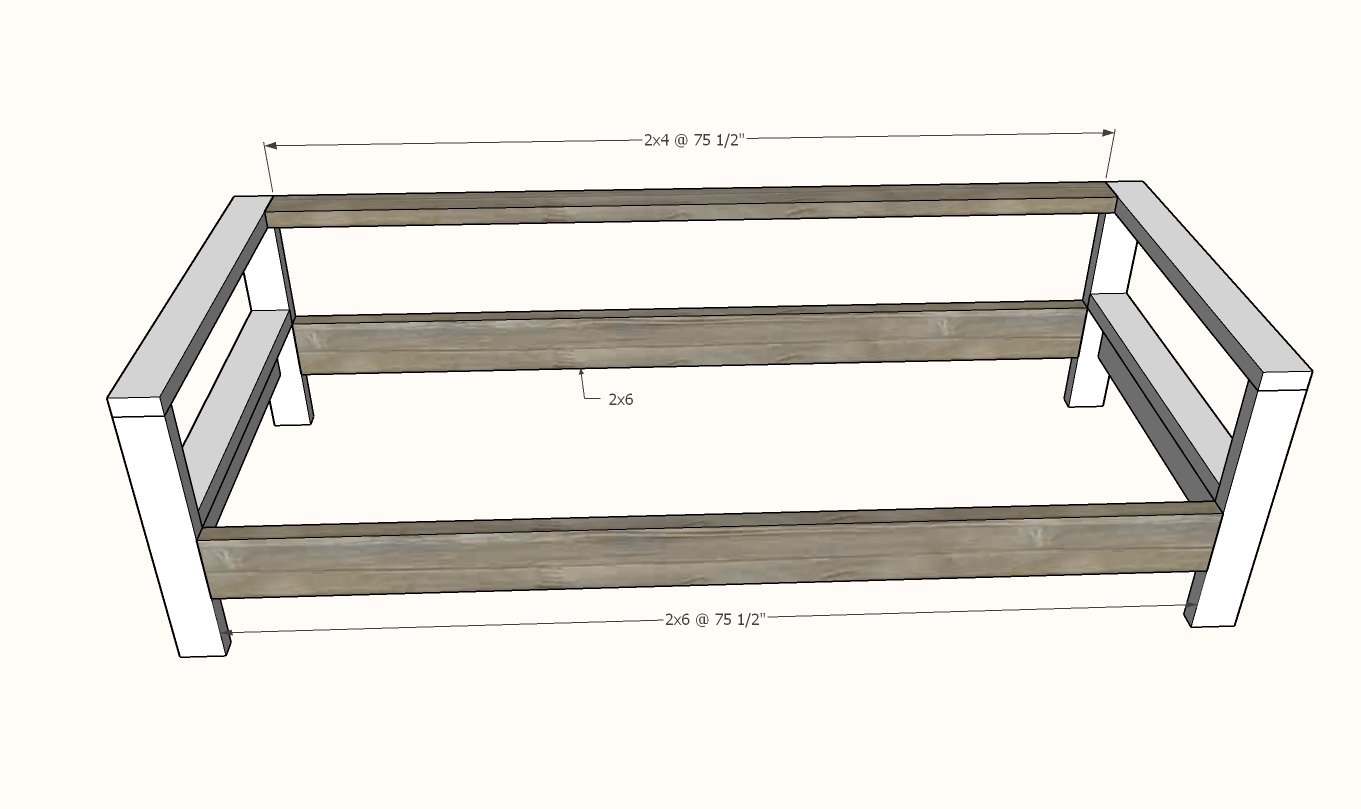
Drill two 1-1/2" pocket holes on each end of the 2x6 and 2x4s shown.
Attach with 2-1/2" pocket hole screws to the legs, all pocket holes are on the insides, or facing downward.
Step 5
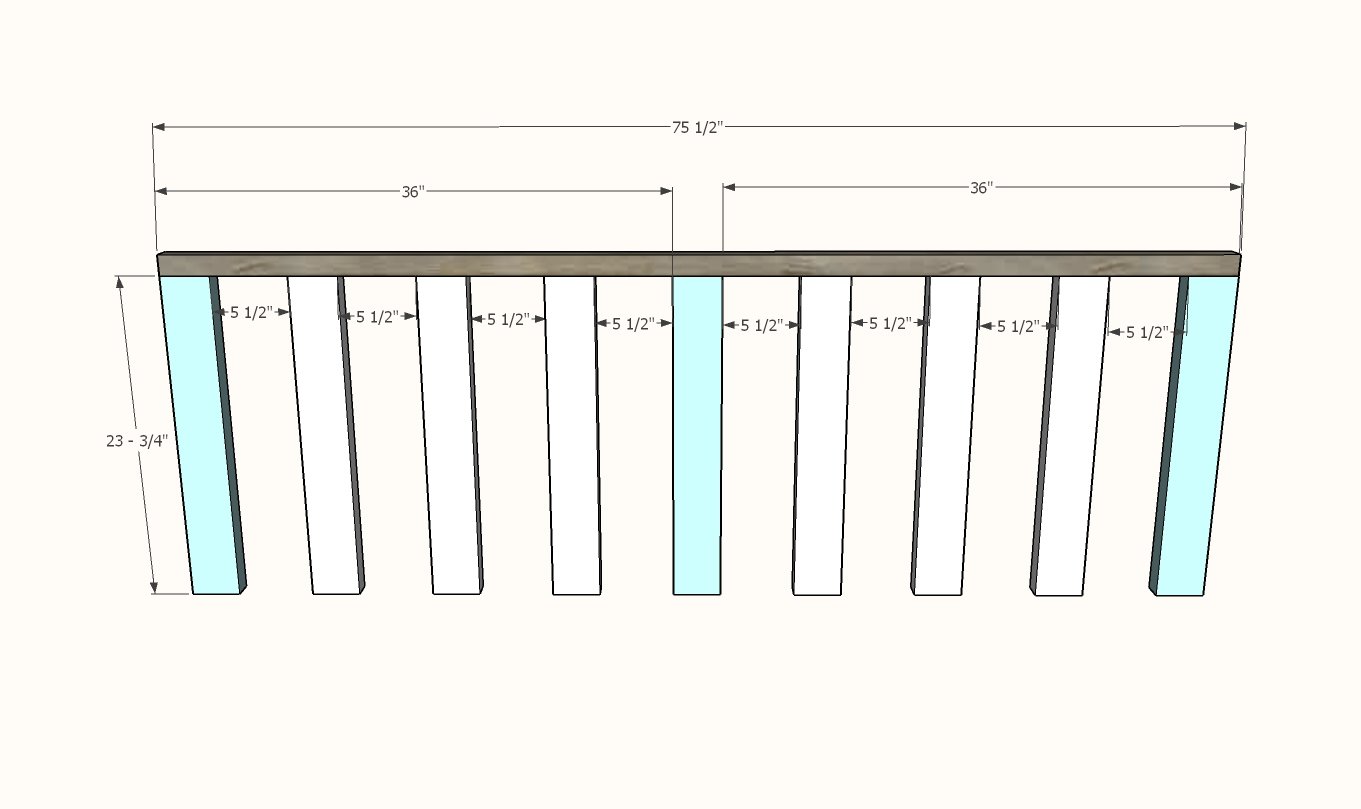
Attach 2x2 to the back slat pieces with 2-1/2" exterior self tapping screws. Two screws per joint recommended.
TIP: Attach ends and middle first, then evenly space remaining, to avoid uneven gaps between the back slats.
Step 6
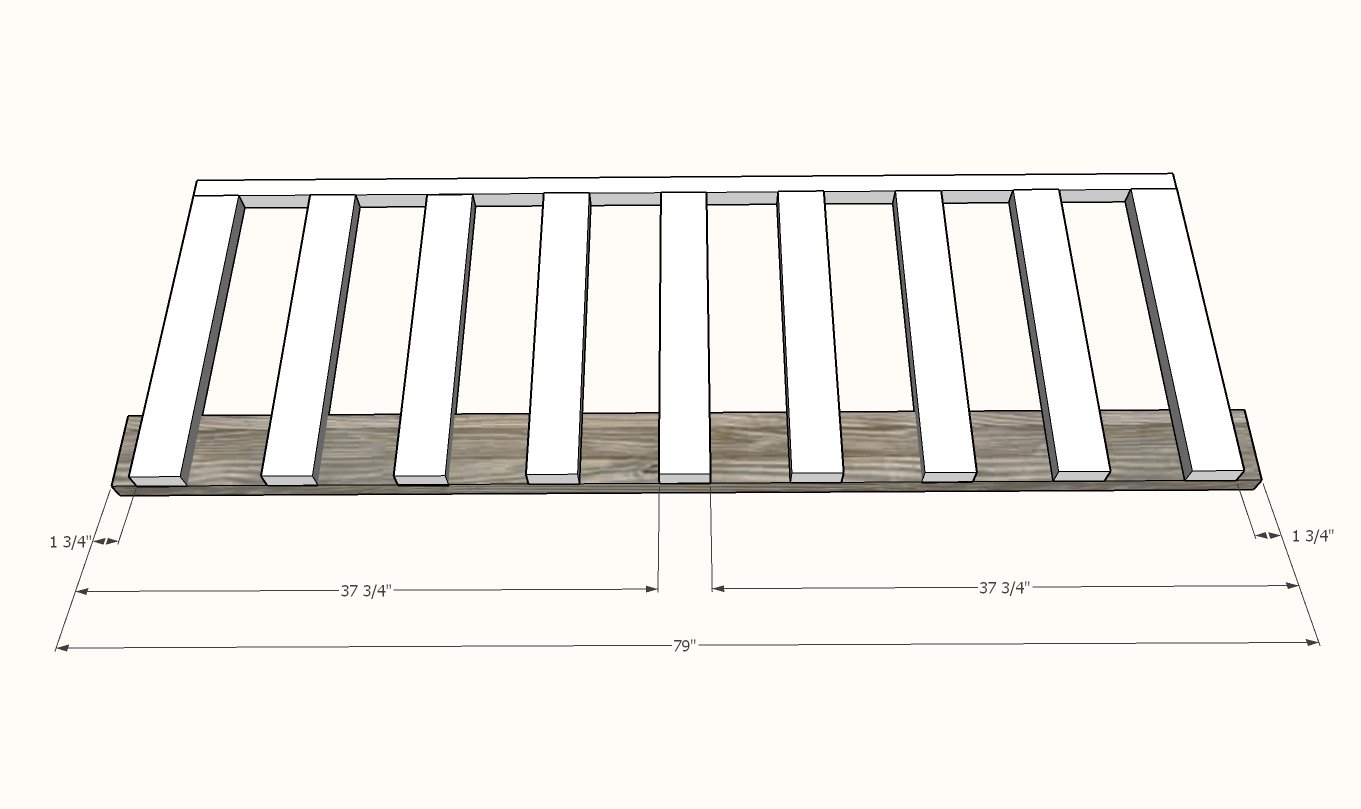
Attach back to the base with 2-1/2" self tapping wood screws, with a 2" gap on each end, keeping the same spacing as the top.
Two screws per joint recommended.
NOTE: There is an error in this diagram, the base should be 79-1/2" long and the overhangs on the ends should be 2" long.
Step 7
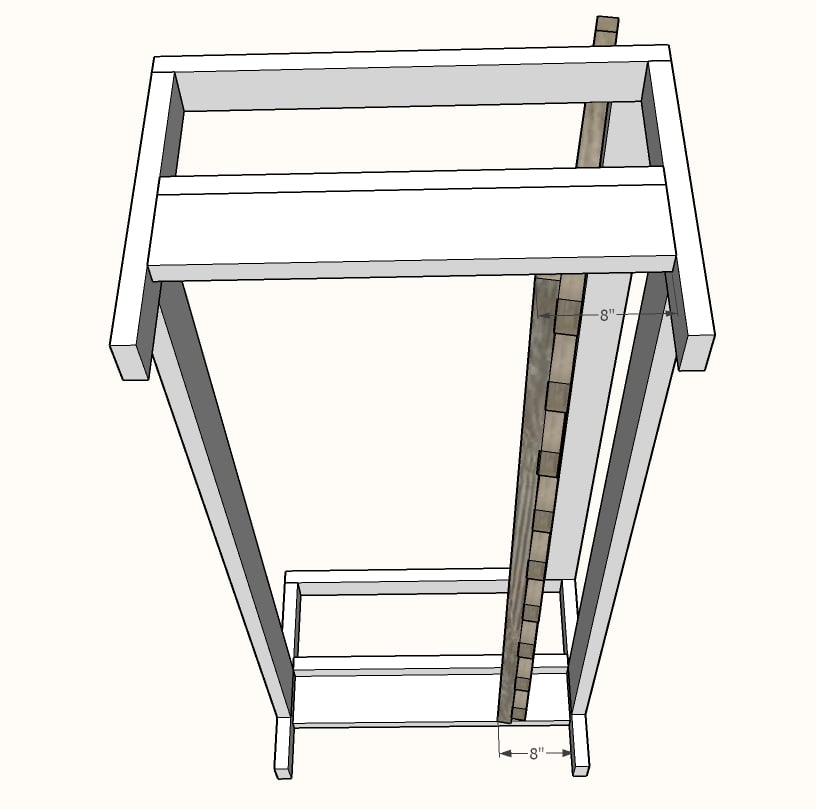
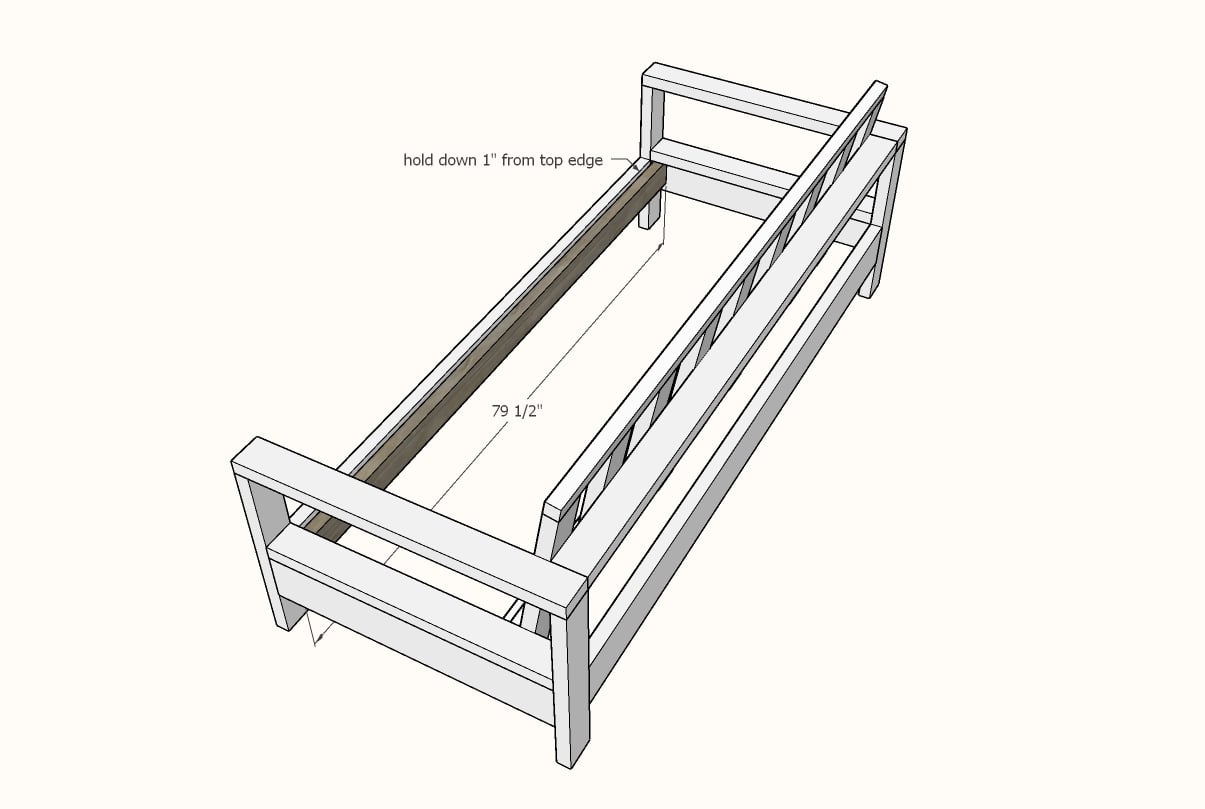
Place the back inside the sofa frame and attach at the base 8" inward with 2-1/2" self tapping screws.
The top leans on the back (see next step).
Step 8
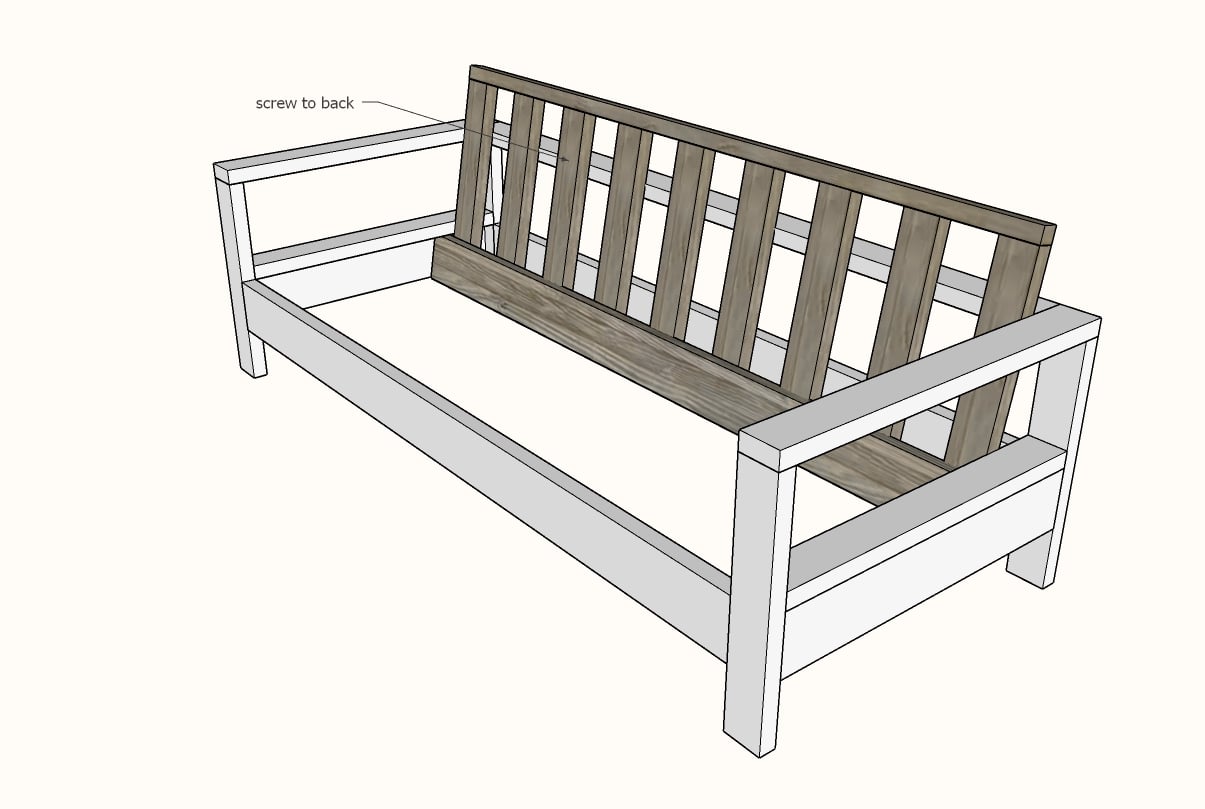
Attach a few of the back slats to the back with 2-1/2" self tapping screws.
Step 9
Attach 2x2 to 2x6 with 2-1/2" self tapping screws, screws about every 12".
Step 10
Add the front cleat with 2-1/2" screws to the front, about 1" down from the front top edge.
Step 11
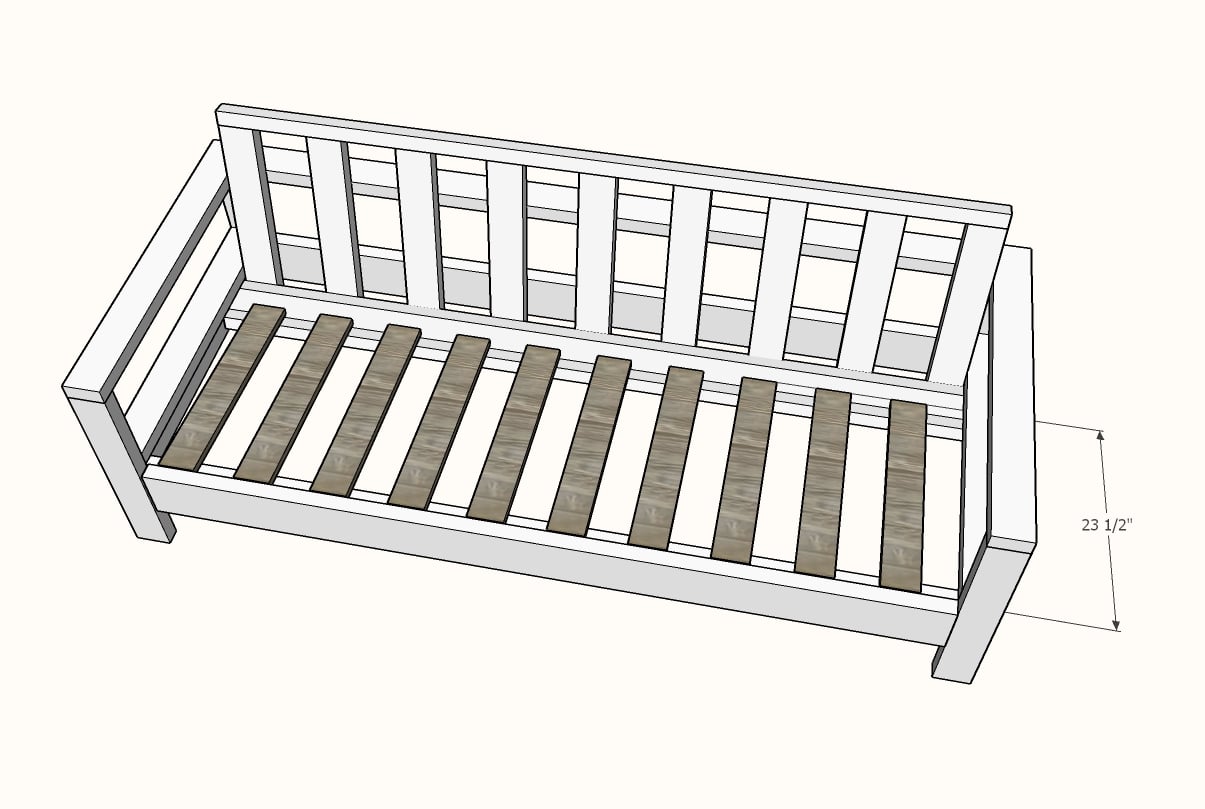
Place seat slats on top of the 2x2s and screw down with 1-1/2" screws (only one per joint is needed).

Comments
Kelly B (not verified)
Mon, 06/06/2011 - 00:13
Love this! You are truly
Love this! You are truly amazing, Ana. I can not wait til I have some of my other projects done so that I can tackle this one.
Thank you SO much for all you do.
In reply to Love this! You are truly by Kelly B (not verified)
Ana White
Mon, 06/06/2011 - 09:54
Thank you! I so hope you
Thank you! I so hope you tackle this one, we are just loving it! Thanks for being a part of our site too!
E Barbosa (not verified)
Mon, 06/06/2011 - 01:13
love it!
Love the sofa, can't wait for vacation to be over, this is my goal along with some great shelves you have on here for my playroom by end of summer with my hubby! Thank you for sharing!
Jorie (not verified)
Mon, 06/06/2011 - 05:54
Soooo love it! Question for
Soooo love it! Question for you.....did you use the kreg jig screws that won't rust or do you think the regular kreg jig screws will be ok? Thanks for all you do!
In reply to Soooo love it! Question for by Jorie (not verified)
Ana White
Mon, 06/06/2011 - 09:56
I use the outdoor ones, but
I use the outdoor ones, but really, the pocket holes are pretty hidden (with the exception of the back) and get filled and sealed with paint and topcoat. I'd invest the extra few bucks . . . consider that the Restoration Hardware Nantucket Sofa retailed for about $2500!
RebKnitz (not verified)
Mon, 06/06/2011 - 06:10
No, thank YOU!
I just discovered you on Friday...such great projects and I love the step by step directions. I can't wait to have my own house (in my mind, a house is a requirement for having tools like table saws and power sanders) so I can make your storage sofa and have a yard to have a reason to make sling chairs. (And yes, perhaps this sofa!)
In reply to No, thank YOU! by RebKnitz (not verified)
Ana White
Mon, 06/06/2011 - 09:59
Hi, and welcome! I'm so glad
Hi, and welcome! I'm so glad you found us! We can't wait to see your projects!
marlaandwilliam
Mon, 06/06/2011 - 06:23
OMG!
OMG Ana, I have GOT to have this! You have done it in the EXACT colors that I am in love with at the moment! we gutted our master bath and I re-did it in 5' tall beadboard that i painted in bright white and i painted the walls a pure NAVY which is the actual paint color name by Martha Stewart paint colors. and i just wish i could put this couch in my bathroom! i am DEFINITELY going to build this!!!
marlaandwilliam
Mon, 06/06/2011 - 06:35
forgot to ask...
what do you think about putting spindles/slats in the arms like it has in the back?? that was my instant thought of what i'd do to it... do you think that would work? should i used 1x2s or 2x2s for that?
In reply to forgot to ask... by marlaandwilliam
Ana White
Mon, 06/06/2011 - 10:01
Hi Marla, I think it would
Hi Marla, I think it would work! You don't need support there - it would be decorative, so you could use any width board. And thank you and LOVE your bathroom too!
Calluna
Mon, 06/06/2011 - 07:03
1 x 3s for back slats and seat slats
Thank you for the wonderful plan! It looks so great I want it to be my first project.
I was going over the plan and noticed that the 1 x 3s for the back and seat slats are listed in the Cut List but not in the Shopping List. I am in the process of trying to figure out how many I need, but will wait for your confirmation.
Thanks for all you do!!!
In reply to 1 x 3s for back slats and seat slats by Calluna
Ana White
Mon, 06/06/2011 - 10:03
Calluna, thank you for
Calluna, thank you for catching this! I put the 1x3s in the cut list, not the shopping list! All fixed, thanks for noting. Ana
Guest (not verified)
Mon, 06/06/2011 - 07:42
This makes me very sad. I've
This makes me very sad. I've been wanting an outdoor sofa (not a loveseat) for months and I finally broke down and bought one :( I love the set I have, just really wanted to build one. Oh well, I guess I'll just have to tackle my 'to do list' of other awesome projects :)
Pam the Goatherd
Mon, 06/06/2011 - 08:28
My son is moving from renting
My son is moving from renting a room to having an entire one bedroom apartment for himself. He has no living room furniture and I was thinking yesterday about building him a sofa. Before I could sit down and draw up plans, here you come up with this design! Thanks, Ana! Eventually I am going to have furnished almost my entire house, and my children's homes, with handmade furniture!
ferbit
Mon, 06/06/2011 - 10:51
Beautiful! Are matching chair plans next?
The is such a beautiful couch!!! I love it! We have an all-weather-wicker (resin) set on our deck right now, but I'd love to make a beautiful wood version to replace them. :) The chairs look like a mini version of the couch, so I'm guessing the plans would be easy to adapt... unless you're planning on posting chair plans. :) Thank you!!!!!!!!!
In reply to Beautiful! Are matching chair plans next? by ferbit
Ana White
Mon, 06/06/2011 - 11:05
Hi Jennifer, I do plan on
Hi Jennifer, I do plan on getting to the whole collection right away - in time for summer! Thank you!
Wyatt (not verified)
Mon, 06/06/2011 - 11:15
This is awesome!
I just want to say that this is truly inspiring... I'm usually hesitant to get involved in projects like this, but the results here are just so stunning (and so inexpensive, relative to the cost of buying the RH model!).
I've got a question about the cushions that you might have the answer to: are they Sunbrella fabric? I've heard that Sunbrella makes great stuff and I was wondering if they're worth the investment for outdoor sofa cushions.
Again, I love this project and this blog... bravo!
In reply to This is awesome! by Wyatt (not verified)
Ana White
Mon, 06/06/2011 - 12:00
Hi Wyatt, the cushions are
Hi Wyatt, the cushions are Sunbrella, just marvelous! They bead water and are just beautiful. I'd wait - RH will put these on sale at some point because the frames are actually sold out - and buy them at a discount. I'll be checking - my family wants some outdoor sofas, so if RH does put the cushions back on sale, will be buying more!
fethiye
Mon, 06/06/2011 - 11:55
legs from 2x3?
Would it be so hard to change the legs to be from 2x3?
For the life of me I cannot get a decent 2x2 in Lowe's or HD around me!
In reply to legs from 2x3? by fethiye
Ana White
Mon, 06/06/2011 - 11:58
You know, I actually thought
You know, I actually thought 2x3s would be ideal, but we don't get 2x3s up here in Alaska . . . so wanted to make plans fair to everyone. You could easily substitute 2x3s for the legs and arm rests. I'd love to see this done!
Joe_C (not verified)
Thu, 06/09/2011 - 15:55
Legs
I would reccomend ripping them from 2x6 douglas fir.
fethiye
Mon, 06/06/2011 - 12:06
So, the change is very
So, the change is very minimal, right? Unless I am mistaken they can be just substituted with no more changes to any other part. Sure the end product will look different then yours; the Side Apron Top Trim will look a bit inside than the arms and legs.
Would it be so much time for you to post alternative plans to use 2x3 for legs and arms?
In reply to So, the change is very by fethiye
Ana White
Mon, 06/06/2011 - 14:03
How about when I post the
How about when I post the loveseat, we'll do the different 2x3 arms?
In reply to How about when I post the by Ana White
fethiye
Mon, 06/06/2011 - 14:06
sure, that sounds really
sure, that sounds really great. Thank you so much.
binah06
Mon, 06/06/2011 - 13:08
Awesome!
I am so excited about this sofa! It looks just like the one I emailed you last week. Not sure if that was a coincidence or fate but thank you!!! I can't wait to build this with my husband! $30 for the lumber is amazing!
Guest (not verified)
Mon, 06/06/2011 - 13:48
Are there any Canadians on
Are there any Canadians on this site that would know where to find 24 x 24 cushions? If not then I think I'll have to adjust this to fit 18 x 18, which is all I can seem to find here :(
Carol H. (not verified)
Mon, 06/06/2011 - 23:33
A love seat?
Will you be doing the love seat? (Pretty please!)
In reply to A love seat? by Carol H. (not verified)
Ana White
Tue, 06/07/2011 - 00:08
Yes! Love this sofa too much
Yes! Love this sofa too much to NOT do the whole collection! It's a must!
creativecarol
Tue, 06/07/2011 - 16:48
I'm loving it too
Thanks for the love seat! I can hardly wait!
groovymom2000
Wed, 06/08/2011 - 04:26
cushions
I was at Target yesterday, and noticing their cushions. Just a FYI, they are carrying some that are 24"X24" and about 4-5" thick for 25.00. Still not "cheap", and the color selection was limited, but it might work for someone. They had coordinating "back" cushions that were a different size.
Vicky (not verified)
Wed, 06/08/2011 - 05:41
outdoor sofa
Love the sofa! It's exactly what I'm looking for. I was already in the process of trying to design one for my Dad & I to build together and this saves us a lot of work! Just a few questions, though.
I actually want 4 2-seater love seats. Originally I wanted armeless love seats so I could push 2 together to make an extra long sofa. Any ideas for a very very simple way to do armless (or 1 armed, so they can be pushed together)?
I am a little worried about the weight of this furniture because we will have to carry it up to our deck and then down again to be stored for the winter. This makes me consider a whole bunch of single seater chairs pushed together.
How about a design for a removable back so they can easily be stacked for winter storage? I was inspired by my boys wagon that has the wooden sides that lift off.
Sorry for all the questions, I'm just really excited to get started on something.
Guest (not verified)
Wed, 06/08/2011 - 18:29
I was wondering if anyone has
I was wondering if anyone has any suggestions for assembling the back for people who don't own a Kreg Jig? I want to make this in time for a party in a couple of weeks but I won't be able to order one in time so I'll have to make it without.
Guest (not verified)
Mon, 01/02/2012 - 15:56
no Kreg Jig
Same here. I don't own a Kreg Jig and was wondering whether I can use plain screws and patch up the screw holes. For the back, I am thinking that a solid back to eliminate the need for Kreg Jig holes. Appreciate any suggestions and feedbacks on how to revise the plan without using the Kreg Jig tool.
In reply to no Kreg Jig by Guest (not verified)
MikeB
Mon, 01/02/2012 - 20:02
NO KREG JIG
You can use a dowel jig and glue. I picked up a self centering dowel jig for less that 15 bucks at Harbor Freight. Not a top of the line jig, but I have used it a lot for attaching slats, just like in the back of this bench. Hope this helps...
Emilo (not verified)
Sat, 06/18/2011 - 06:22
More Drawing
I did the design of the sofa on Google Sketchup (metric) and also put a video on YouTube 3D design
Emilo (not verified)
Sat, 06/18/2011 - 06:25
Drawing
There is an inconsistency in the drawing. The arm tops should be 35 "
Thomas (not verified)
Sat, 06/18/2011 - 14:20
How to attach back?
Can you give any more advice on attaching the back? Since the back is at an angle and the back support and bottom support are both square (to gravity, anyway), do they just attach as best they can?
Guest (not verified)
Fri, 07/08/2011 - 17:02
Drainage?
Plus, where the back attaches to the bottom cleat will form a V. Water will well up in there, won't it?
guest (not verified)
Wed, 07/13/2011 - 11:02
Easy modification for drainage
I made an easy modification that I think will help with drainage. I have yet to actually build this, but am in the process of it.
http://sketchup.google.com/3dwarehouse/details?mid=92373022868b812fe9aa…
There's the Sketchup model for details. Remember that my nominal 2x4 was actually 1 5/8 x 3 5/8!
I moved the back cleat up 1 inch and shortened the seat slats by 1 inch. I also added to the back bottom corners of the back cleat some 1 x 2 (cut 1 5/8" long to be square). This is actually what the back attaches to, leaving the middle wide open for drainage. It does create 2 small v's, but they're open on the inside. (And as I type this, maybe not having them against the outside edges, but in 1" will alleviate really all problems.)
Hope this helps!
Maidelin (not verified)
Sat, 07/09/2011 - 19:41
Lindo!
Son hermosos todos tus trabajos. Siempre aprendo algo en tu Blog!
Lindsay (not verified)
Mon, 09/05/2011 - 19:54
Hi Ana, I just finished
Hi Ana, I just finished building this and i'll put a brag post once it's painted, but I think I found an error - in the instructions you refer to the back seat support as a 2x3, but everywhere else it's a 2x4.
Other than that it was a cinch to build, thanks for the great plans!!
Guest (not verified)
Mon, 09/12/2011 - 12:17
type of wood to use
Hello Ana,
I am new to carpentry and I am having a hard time picking out wood types for outdoor projects. What type of wood did you use for this project? And does the type you choose vary depending on whether you are just staining or sealing it versus painting it in a solid color as you did here?
Thanks!
Kristen
Sarahsdawn (not verified)
Sun, 10/16/2011 - 05:31
Just got finished building
Just got finished building your classic bunk beds...my kids LOVE them! We built and added a slide, which they love even more!
Just curious.....do you think you might be able to put up plans for an "L" shaped sofa? I'm planning on building this, as INSIDE furniture! I just adore the way it looks, I can sew the cushions easily, and I'd love to have a big L couch in my formal living room, so that all of our friends and family have a place to sit.
Thanks so much! I love your site, and all you do!
Peridot (not verified)
Tue, 10/25/2011 - 05:46
Outdoor sofa
These plans look interesting; I was going to purchase an outdoor sofa for my deck from Pottery Barn, but they want a fortune.
I plan on doing a variation on this and using your plans as a basic template and combining it with the style of the one from Pottery Barn: will use pressure treated lumber as I live in Florida & plan on using it nearly year round..I also already have a Kreg jig, skilsaw, table saw, chop saw and many tools.
Hope to spend many hours entertaining and sleeping on it.
Thanks for sharing it with all of us.
hgraves1
Thu, 03/08/2012 - 09:54
Kreg Jig?
Hello, I want to build this sofa but I do not have kreg jig. I was thinking of taking the back from the simple outdoor chair plan and using it for this plan. Obviously I have to make a few adjustments but I was wondering if you think this would work?
By the way I love your website! You are awesome Ana!
claydowling
Thu, 03/08/2012 - 10:38
Dowel tenons
You can pick up a doweling jig very inexpensively from any hardware store, and use that instead of a kreg jig to make dowel tenons. They're very strong and the tools are inexpensive.
Guest (not verified)
Mon, 03/12/2012 - 13:13
Love the couch - a question...
Can this unit be built without the arms and yet remain stable? I really love the overall design, but am looking for an "open ended" couch and chairs. I can see from the plans how I would modify the ends to exclude the arms, but will the unit remain stable without them?
Thanks and keep up the GREAT work!
Barbara Richard (not verified)
Tue, 04/24/2012 - 07:03
The Wood Used.....
Hi Anna, Love all that you have done and we are hoping to try a few of your plans in the coming months.
I noticed another person asked this earlier, but didn't get an answer. Did you just use regular pine for this outdoor sofa? wouldn't this deteriorate soon since it's outdoors? I have looked online for suggestions using regular pine for outdoor furniture and it seems everyone says that even with stain and or paint it isn't a good idea. I was wondering if you (or anyone else out there) had some way of preserving it to make it last. (I would cover it in the winter months) It would make this much more affordable to make... Not sure if sitting on pressure treated wood is a good idea, so we'd have to find redwood or cedar which could get pricey... Thank you....
Jarmahead
Tue, 05/29/2012 - 20:19
Great plans
Thanks for the great plans. My wife and I built this sofa over the weekend. We used Pine Boards and then stained it with Behr Weatherproof Bordeaux color. Overall very easy to follow plans. I do believe wood is much more expensive here in Texas because our total cost for wood was around $115.
We also added 4 support "feet" using leftover 2x4s.
The only issue we ran into was during the last step (attaching the back rest to the overall sofa). It wasn't clear on how high or low rest should be installed. Also, definitely screw in the bottom part of the back rest first! It was pretty difficult to get to this area with a drill as well haha.
Also, I believe on future projects like this, I'll sand /stain before assembly then do touch ups....it gets old quick trying to paint/stain in between all of those slats!
Here is a pic of the finished product:
http://s14.postimage.org/oq09tunld/Jarmahead_Outdoor_Sofa.jpg
We still have to find some cushions for it though. We will be moving on to the outdoor coffee table next to match the sofa.
Again, thanks for the plans and they worked out great! The Kreg jig is my new favorite tool.
Peter Cwik
Fri, 07/06/2012 - 11:31
How to attach the back?
Nice job, looks beautiful. I'm at the last step too and not sure how to attach. How did you do it? Did you slip it behind the 2x4?