
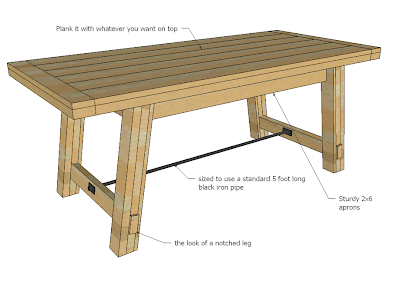
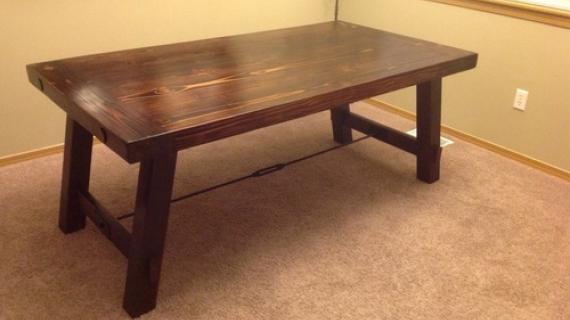
Free step by step woodworking plans to make an industrial style Farmhouse Table. Features metal stretcher and lots of details to make your table interesting and unique.
We also have matching bench plans available here.
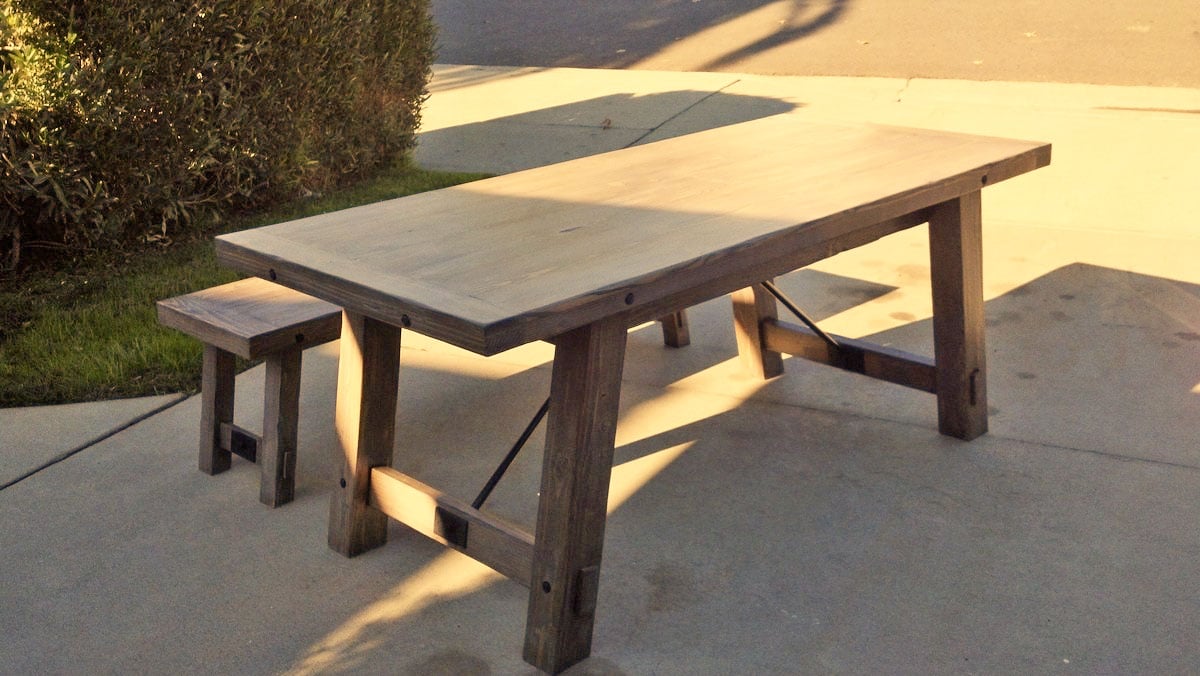
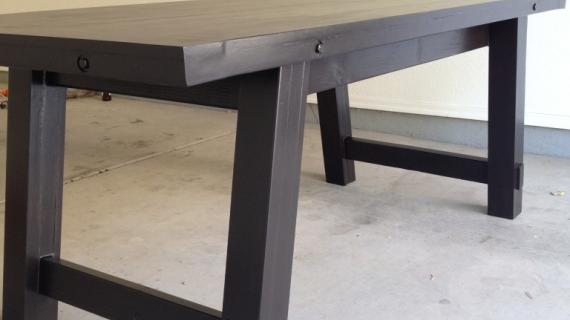
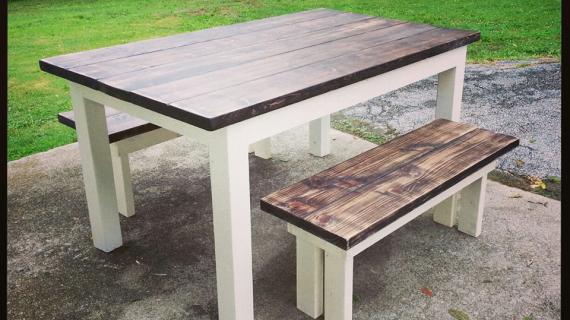
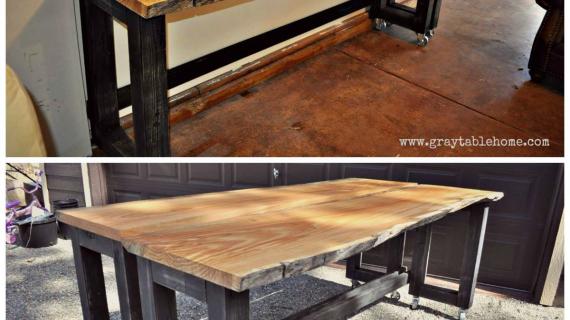
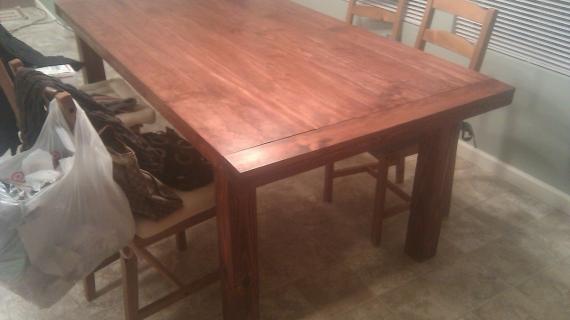
Reader submitted photo by SGILLY
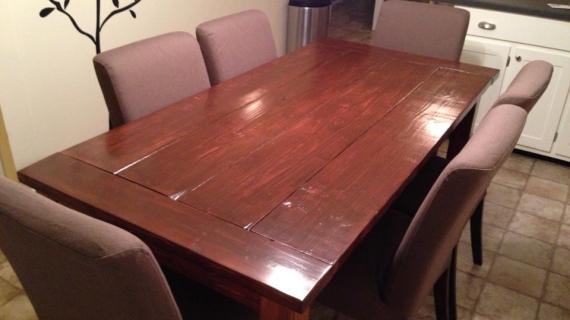
Similar Plan Option
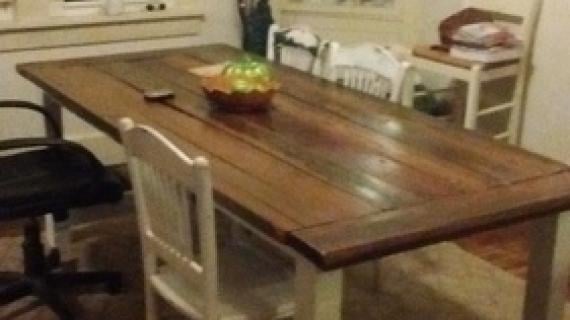
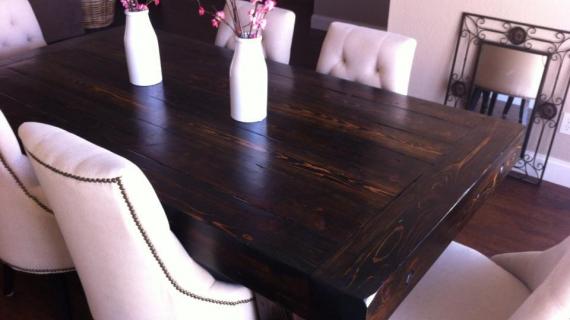
Pin For Later!

Preparation
6 - 1x6 @ 6 feet long
2 - 1x4 @ 8 feet long
2 - 2x4 @ 8 feet or stud length
2 - 1x2 @ 8 feet long
3 - 2x6 @ 8 feet long
3 - 2x2 @ 8 feet long
1 - Black Iron Pipe 60" long, both ends threaded Bolts/Caps and Washers for decorative touches
4 - 6" Black Bolts with washer and Nuts (1/4" would work fine)
Legs
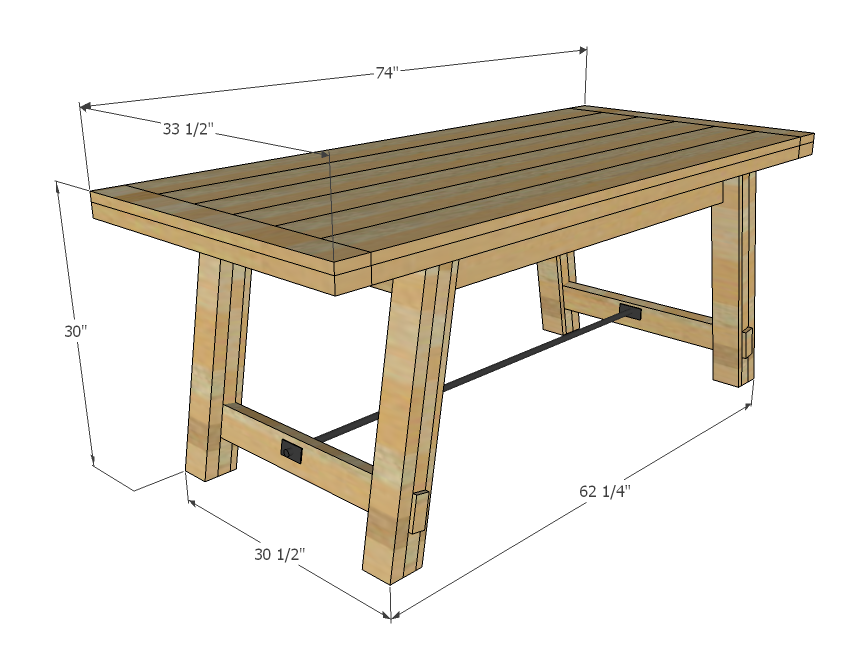
- 4 - 1x4 @ 29 3/8" (Bevel both ends at 10 degrees off square, short point to long point)
- 4 - 1x2 @ 21 5/8" (Both ends cut at angle 10 degrees off square, short point to long point)
- 4 - 2x4 @ 29 3/8" (Bevel both ends at 10 degrees off square, short point to long point)
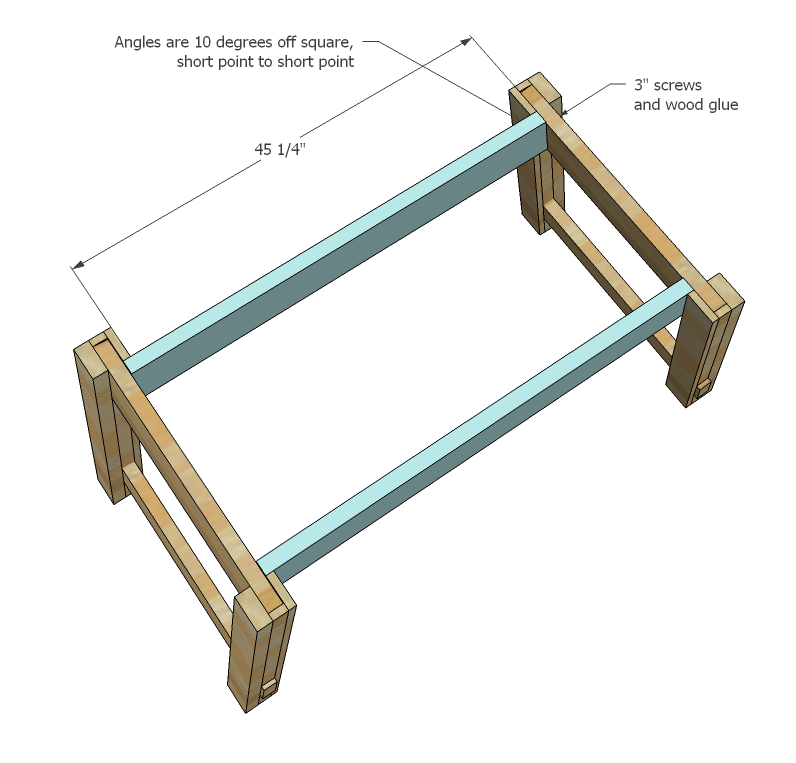
- 2 - 2x6 @ 28 1/2" (End Aprons)
- 2 - 2x4 @ 31" (Stretcher)
- 8 - 1x2 @ 4 1/4" (One end cut at 10 degree angle, longest point measurement)
- 4 - 1x2 @ 16 1/8 (cut to fit - spacer)
Table
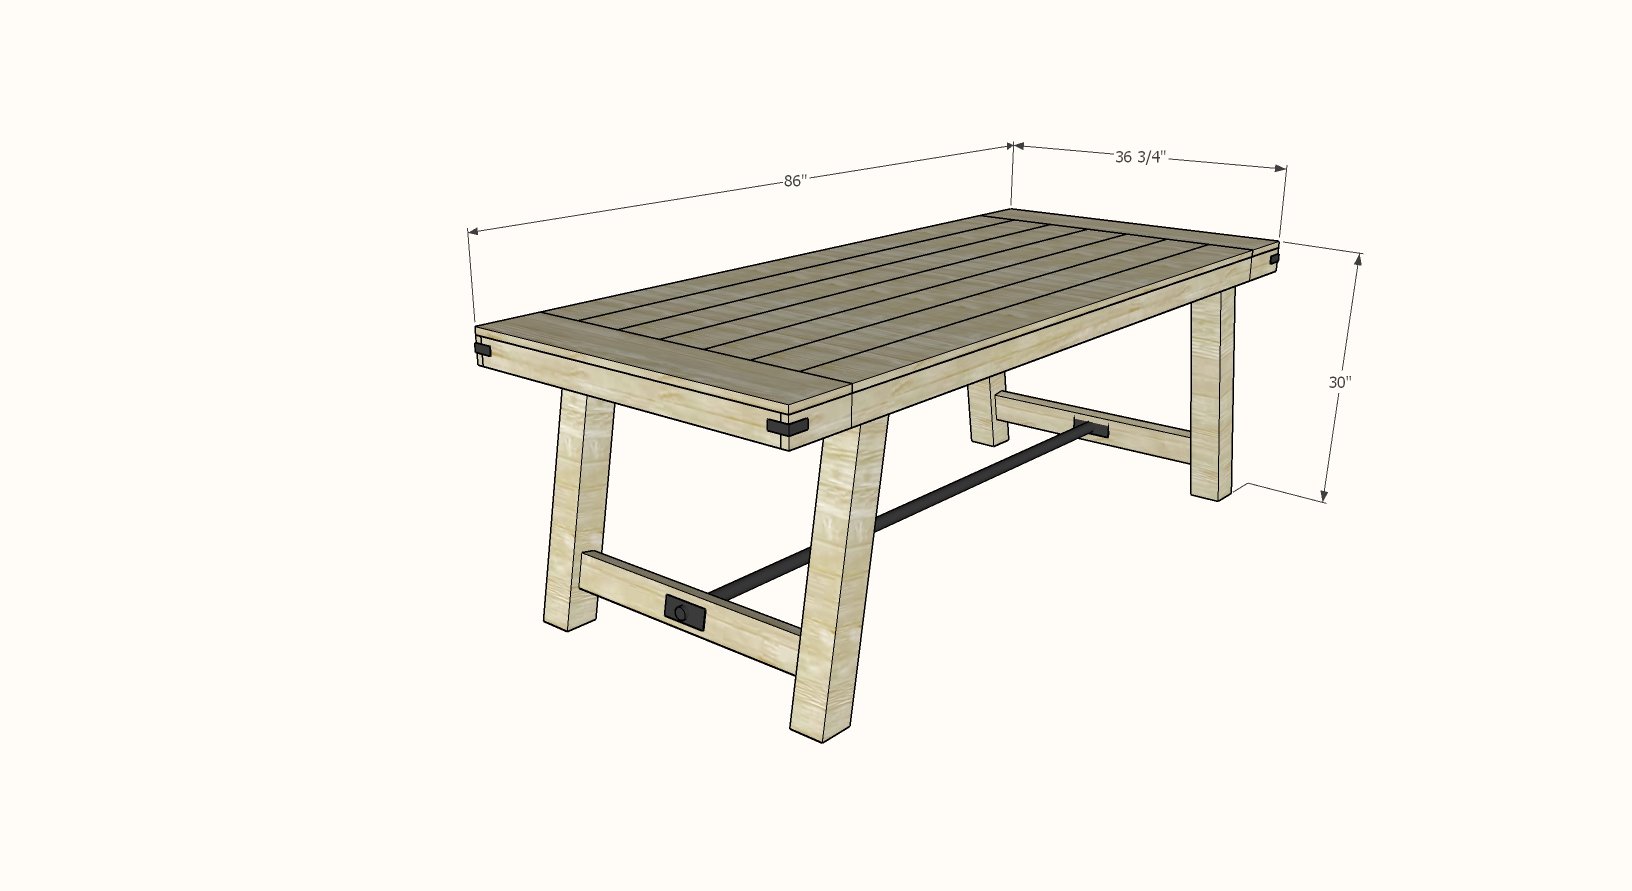
- 2 - 2x6 @ 45 1/4" (Side Aprons - short point to short point measurement, both ends cut at 10 degrees off square)
- 3 - 2x2 @ 20" (Supports)
- 2 - 2x2 @ 67" (Sides)
- 2 - 2x2 @ 30" (Ends)
- 2 - 2x4 @ 33"
- 2 - 1x4 @ 33"
- 6 - 1x6 @ 67 1/8" (cut to fit)


Please read through the entire plan and all comments before beginning this project. It is also advisable to review the Getting Started Section. Take all necessary precautions to build safely and smartly. Work on a clean level surface, free of imperfections or debris. Always use straight boards. Check for square after each step. Always predrill holes before attaching with screws. Use glue with finish nails for a stronger hold. Wipe excess glue off bare wood for stained projects, as dried glue will not take stain. Be safe, have fun, and ask for help if you need it. Good luck!
Instructions
Step 1

We'll start by making the legs. The most important part of the legs is getting your cuts right. Some of the cuts are bevels and some are angles, so pay attention in the diagrams. All angles will be ten degrees off square. Remember, you will need to assemble two sets of legs, and the legs are mirrors of each other. You can use finish nails and glue. Start by attaching the 1x4 to the top 1x2 as shown above.
Step 2
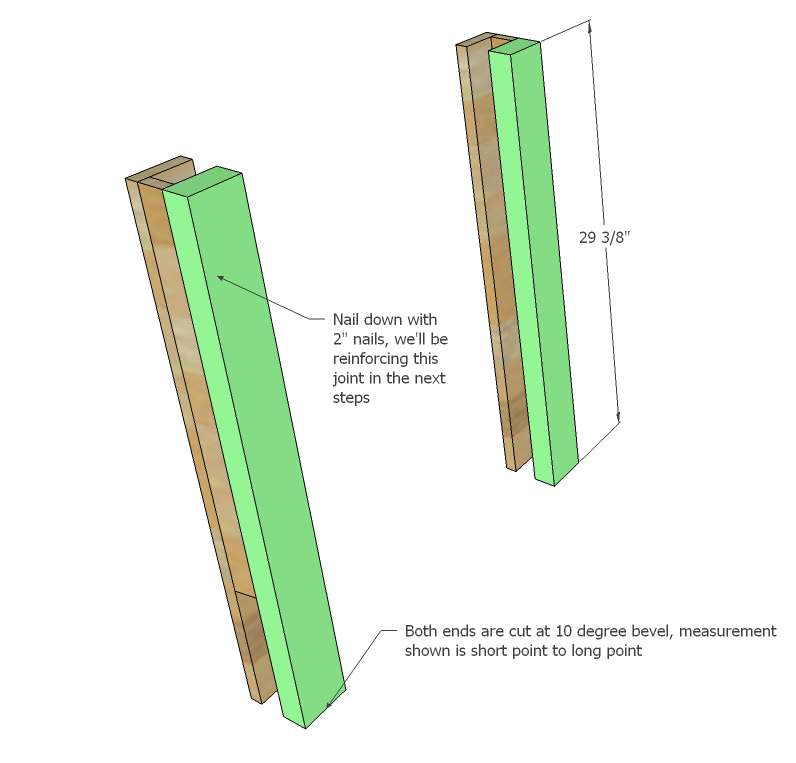
Now attach the 2x4 to the legs as shown above. Use glue and 2" finish nails - don't worry, we'll be further suporting this leg shortly.
Step 3

Now sandwich in the apron and stretcher as shown above. Stretcher will overhang 1/2" on each outside end.
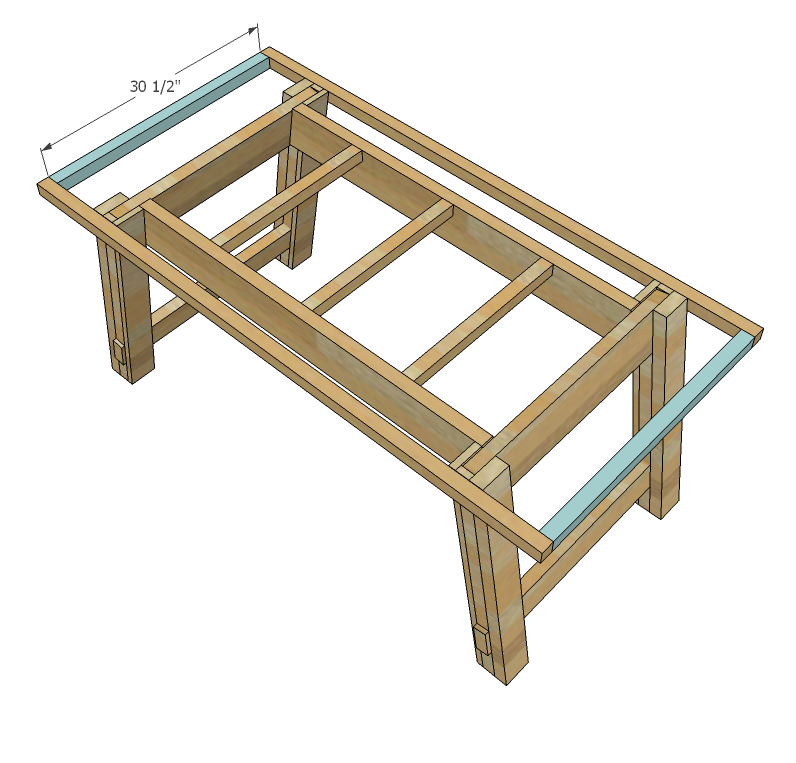
Step 4

And now simply fill in the blanks.
Step 5
Step 6
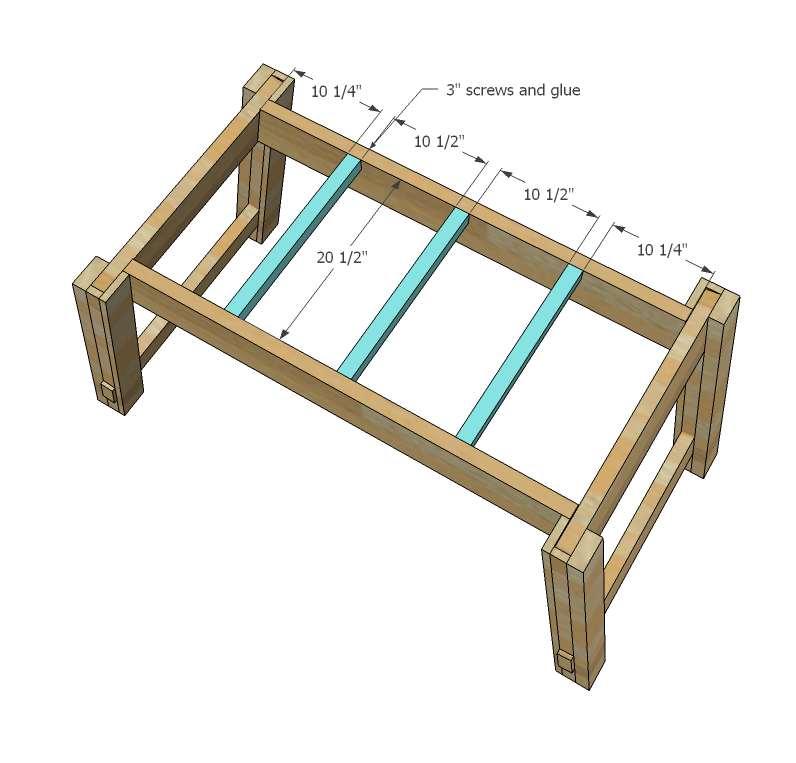
And attach the supports - these will give you something to nail your top boards on too.
Step 7
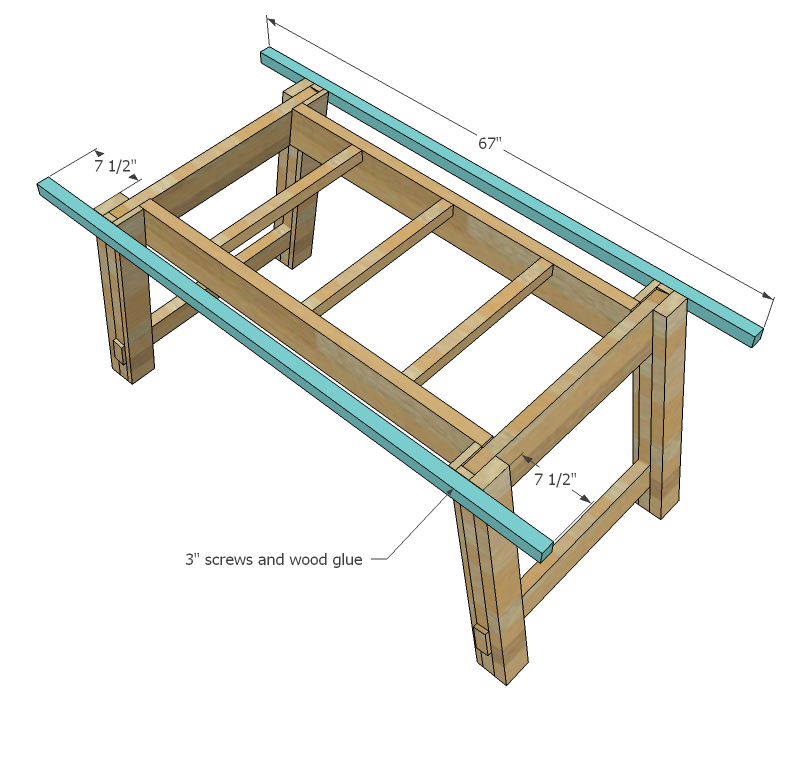
I'd love to see these bolted on with a iron bolt for a little extra touch. Attach with 7 1/2" overhangs on ends.
Step 8
Now the end supports. Attach with screws and glue.
Step 9

Bolt the breadboard end on as shown above. Use 6" bolts with washers as done here.
Step 10
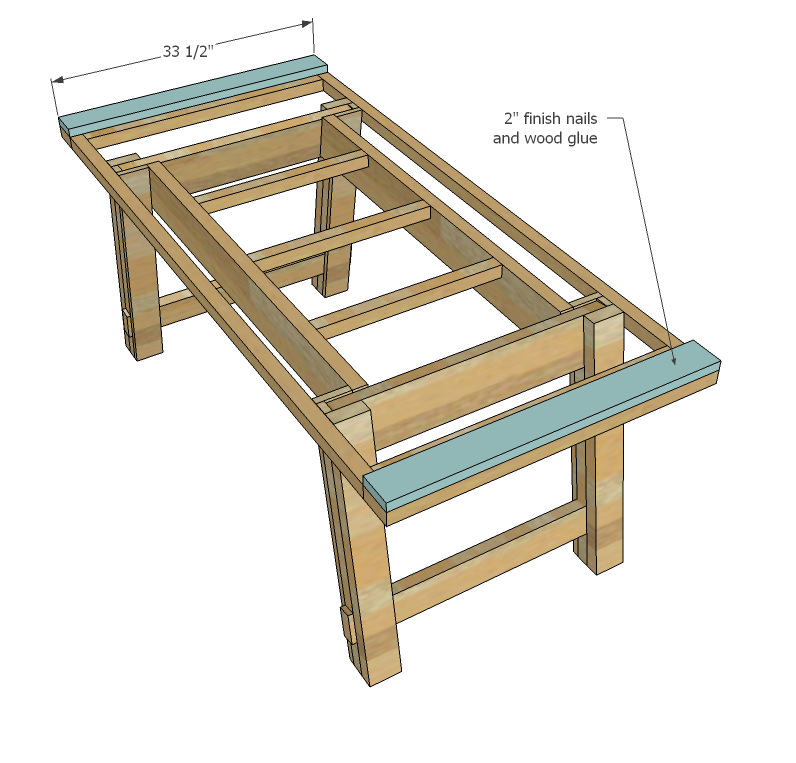
Nail down the 1x4 to the ends as shown here.
Step 11
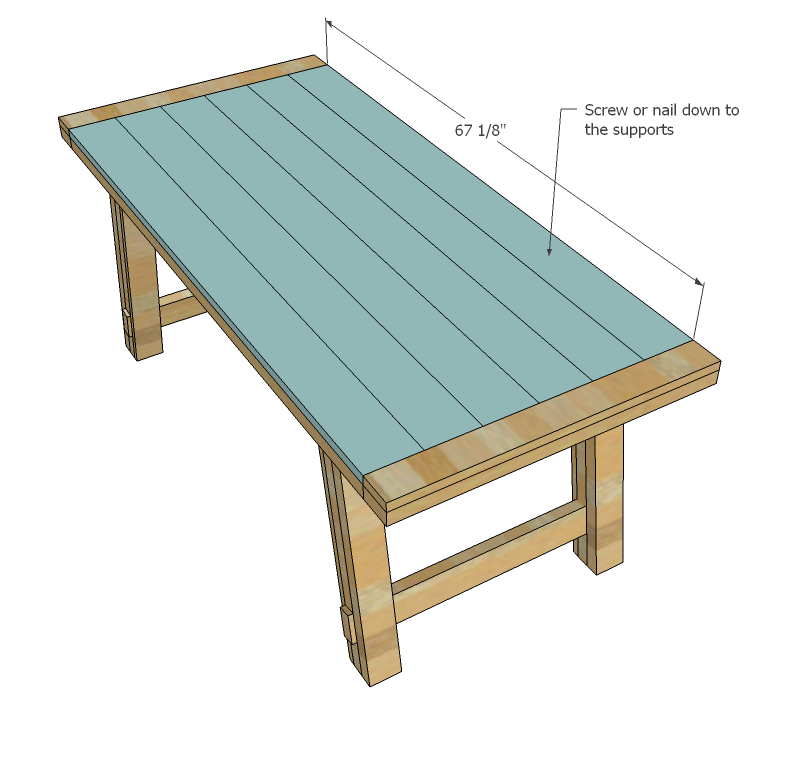
And finally top with the 1x6s. Note, you can use other boards for the top, for example reclaimed wood boards for a more rustic look.
Step 12

Drill holes in the stretchers and add iron pipe. Use fittings to secure pipe in place.
It is always recommended to apply a test coat on a hidden area or scrap piece to ensure color evenness and adhesion. Use primer or wood conditioner as needed.

Comments
thisgirlkim
Wed, 07/20/2011 - 11:53
Happiest Girl Ever!
Oh finally, finally!!! Thank you so much, Ana!!!! I have been wanting this one forever!! I even tried to figure it out in sketch-up, but never got it right. As always, you are so amazing and I can't wait to have a house full of your furniture! (Getting there, slowly but surely!) :)
thisgirlkim
Wed, 07/20/2011 - 12:04
PS
I guarantee this one is much more sturdy than the PB counterpart...my 2 year old bumped into theirs and set all the dishes on top wobbling. Most of the bulk of this piece on theirs is illusion.
In reply to PS by thisgirlkim
Ana White
Wed, 07/20/2011 - 12:50
I have to tell you . . . I
I have to tell you . . . I drew this plan up a while back, but just couldn't post it quite yet because I didn't feel it met Farmhouse Table requirement #1 - STURDY. But after adding the 2x6 aprons, this is going to be a heavy and sturdy table. Thanks for commenting, it's always good to hear from owners of the pieces that inspire us!
dananryan
Wed, 07/20/2011 - 12:11
Another great plan!
I would love to build the round table. Do you think there is a slight chance that you might find the time to draw up the plans for the round (extendable) table? Thank you for all your hard work!
Amber2839 (not verified)
Wed, 07/20/2011 - 13:59
YayYayYayYayYayYay!!!!!!
Ana, I have been waiting and waiting and waiting for these plans. I've been coveting this table from PB but couldn't swallow the price tag. I figured I'd save and save and save to buy, but now I don't have to! Thank you soooooo much!
Stephanie (not verified)
Wed, 07/20/2011 - 15:24
AWESOME!
I LUV this table. I had a Pottery Barn Outlet 5 miles away (it closed), this table was $900 there and the wood was junk and easily scratched. Thanks Anna for your awesome plan!
gabbiegal
Wed, 07/20/2011 - 16:48
Square???
Do you think this would look okay converted to be square? I really want a square dining room table. NOt sure if it would work though.
kristen
Thu, 07/21/2011 - 05:48
Love it
I saw this on Pottery Barn not too long ago and I really liked the iron and wood look. Thanks for the plans! I've been a very regular member for the better part of a year now, and you STILL manage to surprise me even after all this time. I didn't think a plan would show up for this table due to the iron in it, but that can't stop Ana ;)
I've considered building a much-needed new table for our home, but I really want it to be able to expand (I know that even the PB one cant'). This plan may change my mind though...
Pete L (not verified)
Fri, 07/22/2011 - 11:14
Materials List Adjustment
The 5th item down on the materials list, 3 - 2x4 @ 8 feet long, should be 3 - 2x6 @ 8 feet long
In reply to Materials List Adjustment by Pete L (not verified)
Ana White
Fri, 07/22/2011 - 13:35
Thanks for the catch - just
Thanks for the catch - just fixed it. Appreciate you taking the time to let us know. Ana
Ashley Ez (not verified)
Mon, 07/25/2011 - 14:44
Winter?!?!?
I can't even imagine already thinking about winter! We still have sunny, HOT days ahead of us AT LEAST through November. And usually Christmas day is spent in shorts here on the gulf coast. Gorgeous plans!
bulcaoma
Tue, 07/26/2011 - 13:46
rectangle hardware fittings?
I like the look of the rectangular iron hardware at the base, but no idea where to purchase this or if I'll have to 'fake it' with paint and wood. Any thoughts. I've worked through how to finish out the pipe with fittings, but still stumped on this.
Also thinking of making it expandable at the breadboards rather than middle(easier and the base can be fixed)--rockler.com has some extensions that do this.
Guest (not verified)
Thu, 08/04/2011 - 05:11
Mistake in cutting directions??
Just finished the legs...I think the "4 - 1x2 @ 21 5/8" (Both ends cut at angle 10 degrees off square, short point to long point)" direction should read "one end cut at 10 degree angle, other end square" it created a 10 degree gap where the 2x4 stretcher meets and Im trying to figure out the best way to fill it...am I wrong? Either way I have this gap to deal with :\
Allie (not verified)
Fri, 08/12/2011 - 14:45
You are correct
There is a mistake in the cutting directions. I got lucky and only had enough scrap to get one and a half legs done before I had to run out and get more, so only one of my legs are goofed. After I stained it, your don't even notice.
C (not verified)
Wed, 08/01/2012 - 16:14
Quite right. I had to trim
Quite right. I had to trim the 1x2 to make the bottom edge square, and lengthen the 4 1/4" 1x2. Luckily I hadn't cut the 4 1/4 piece yet before I realized something didn't seem right.
mebohn
Thu, 10/13/2011 - 07:26
Anyone added depth?
Has anyone made it 38" deep like the PB table dimensions? If I tweak it, will it make the table less sturdy? I'm just thinking 33 1/2" might be too narrow. Please let me know if you've done this already!! Thanks!
Guest (not verified)
Mon, 12/26/2011 - 16:41
Desk adaptation?
Has anyone tried adapting this for a large writing desk?
Thanks!
Guest (not verified)
Wed, 01/18/2012 - 16:32
Added depth
It would be easy enough to modify the depth/width, just add an extra 1x6 to the top and make all width measurements 5 1/2 inches wider and that should line up just fine. Your legs would be wider apart which could/should make the table more stable.
Guest (not verified)
Thu, 01/19/2012 - 18:01
there seems to be an additional problem
there seems to be an additional problem with the legs.
the cut list has 2 - 2x6 @ 38 1/2 for end aprons the diagram shows the end aprons at 29"
what is the length that should be used?
thanks
Guest (not verified)
Thu, 01/19/2012 - 18:07
above problem
that should read 2 - 2x6 @ 28 1/2 not 38.
Ana White
Thu, 01/19/2012 - 23:55
Cut list not matching diagrams
Hey everyone, sorry for any confusion. I just went through the cut list and diagrams, and the cut list is actually 1/2" less in width than the diagrams show to get the table down to 33" total width to match the width of 6 - 2x6 boards (33"). I hope this makes sense?
Guest (not verified)
Sat, 01/21/2012 - 04:21
We will be having our 10th
We will be having our 10th child in May, our current table is woefully inadequate. Structurally, would this exact design work for a 12 foot table or would it need some additional support? Many thanks
Guest (not verified)
Sat, 01/21/2012 - 15:40
so in building follow the dimensions
So in building this I would want to follow the dimensions on the cut list and scale down the diagram widths by 1/2" when referring to the diagram? I can do that simple enough. Thanks for the clarification.
Matt Palmer (not verified)
Mon, 01/23/2012 - 09:22
Type of Wood
Hey! Great plans, do you have a recommendation on type of wood that would most closely resemble the Pottery Barn table?
Thanks,
Matt
Rachel Pickens (not verified)
Tue, 01/24/2012 - 19:50
Two questions
Hi! My husband and I are so excited to have found your page with all of these great plans. We were wondering if you had a price estimate for building this table, and also as the previous commenter asked, what type of wood you would use?? Thank you so much!
Rachel
claydowling
Wed, 01/25/2012 - 05:54
Project pricing
Lumber prices are pretty radically different in different areas. You'll need to price them in your area to get a good idea. It also depends on where you buy the lumber from in your area. I can buy the lumber cheaper at a lumber yard than a home center.
As for the wood to use, buy pine or another softwood. If you're asking this question, you don't have the tools or techniques necessary for hardwoods. Of the softwoods, I most strongly recommend white or yellow pine. That means avoid anything labeled "whitewood" which may be spruce or fir. Yellow pine typically has a stamp on it somewhere (often the ends) with the letters SYP (Southern Yellow Pine). I don't know what the markings are for white pine, but if you go to an actual lumber yard (not a home center) and ask for it they'll be able to get it for you.
Look for No. 2 pine to get the most bang for your buck. It's not as clear as the Select & Better grade, but it's free of major knots and generally decent wood. It will have a lot less twisting and bowing. Home centers usually sell a grade lower (don't remember what it's called) that will be full of ugly knots and have a tendency to be twisted, warped and bowed.
wesleyjack
Thu, 03/01/2012 - 10:10
pipes
I just finished this table and a set of benches to match it and they turned out great. I followed these plans almost exactly. Mine is 1/2 inch narrower to accommodate the slightly narrower old barn siding I used for the top. It looks great and I am super excited about it. The only issue is that on the benches and the table the bottom spreader is about 57" apart not 60" so the pipes won't fit. I'm working on a solution to that and will do a brag post of these after I get them stained and sealed in two to three weeks.
Omar (not verified)
Wed, 03/07/2012 - 23:07
Table Built Stuck on Stain
Hi I've been working on this table for over a week now and its finally built. Like many I was inspired by the pottery barn table as well. What I have absolutely no clue on and could REALLY use some guidance is how to achieve the stained look? I used ash as my wood and really want to get near the color of this table or the one I saw on Shaunna's page. Can you help me and point me in the right direction?
Britterz (not verified)
Thu, 03/29/2012 - 09:58
Benchwright Bench?
I just finished building this table and Oh My Goodness it is beautiful! I want to build benches for it, but I'm not a smartie and wanted to know if Ana or someone else has done this? Or has some dimensions for me? I will also be submitting my brag post soon :). Tip for those interested in building: Listen to Ana when she says to Read Through All Directions AND Comments Before Building!
BTW- Ana you are AWESOME!
Stephanie (not verified)
Mon, 04/02/2012 - 06:33
finish?
we want to get the look of this table and we don't want a shiny lacquer look. we bought a light pecan stain that we think will look great but what do we do about sealing so that it is resistant to red wine stains? etc? is there a super matte sealant we can get?
claydowling
Mon, 04/02/2012 - 16:10
Finish sheen
Stephanie,
You can buy both water based and oil based polyurethanes with a matte or flat finish. You just need to remember to stir it before you use it, because the bits that make it matte settle to the bottom.
ajmccallister
Mon, 05/28/2012 - 19:43
Thoughts on how to make it extendable?
I am hoping to tackle this table project for my in-laws lake cabin but they are concerned about having enough seating, but they also have limited space. Any idea how to add the leaves on the end of the table to this plan? I am assuming a metal rod or maybe 2'x2's. Any help would be appreciated!
wesleyjack
Tue, 05/29/2012 - 07:08
I've tried the 2x2's and it
I've tried the 2x2's and it worked pretty good. I basically did what restoration hardware did for this table
http://www.restorationhardware.com/catalog/product/product.jsp?productI…
It was really easy to do (just notch the cross supports before you attach them), and seems sturdy enough you just wouldn't sit on that part of the table but they will hold diner plates no problem.
ajmccallister
Tue, 05/29/2012 - 18:59
That makes sense. Few
That makes sense. Few clarifying questions: If you just kept pulling the end of the table it would pull out, right? How did you attach it to the end of the table and how long were the 2x2s? Any pictures you can show of your table? I was thinking I might drill into the end-piece and use a narrow pipe. Thanks a bunch!
Dee Kuzman (not verified)
Wed, 06/06/2012 - 14:58
2 inch wood pieces
I'm committed to building this table and have gone to Lowes and Home Depot in Orlando Florida to get all wood pieces in Red Oak or Pine but they do not carry any of 2 inch pieces. One inch is fine. I've had both stores check with their suppliers and also called all of the local wood mills in Orlando but no luck. Any ideas where I could find those 2 inch pieces in Red Oak or Pine?
In reply to 2 inch wood pieces by Dee Kuzman (not verified)
claydowling
Thu, 06/07/2012 - 20:04
Oak and Pine
You should be able to pick up 2x southern yellow pine in Florida quite easily. There is something called red oak for sale in Florida in those dimensions, if you go to a hardwood dealer (ask for 8/4 oak). It's different than the red oak that we have up here, but it's probably still nice to work with. But go for the pine.
Be aware that the actual thickness of 2x pine is likely to be 1 1/2" or 1 3/4". That was figured into the design.
dee kuzman (not verified)
Fri, 06/08/2012 - 22:04
Thank you. I'll reach out to
Thank you. I'll reach out to hardwood dealers for 8/4 oak but now at least I have a fallback on pine.
wesleyjack
Wed, 06/06/2012 - 16:32
I don't have any pictures
I don't have any pictures unfortunately. It was a quick build and then given away right when it was finished. The supports for the leaf stick into the table almost 3 feet and if you pull on it it will start to slide out. I could have put some fort of latch on the bottom but the friend I was making it for was not even sure they would ever use the leaves just wanted them in case so I wasn't about to put to much extra time into them as they were only paying for supplies.
Brenda and Steve
Thu, 06/28/2012 - 07:17
Is it possible to use 4x4s for the table top?
Looking to start work on this table tomorrow. We saw a table with 4x4s on it (wood not vehicles) and it looked very nice. Is it possible to do this without too many modifications?
Craig E. (not verified)
Mon, 07/16/2012 - 05:55
Is the top too wide?
I'm in the process of building this now. I have run into a problem because in cutting the breadboard pieces 33 1/2" wide, I've found the 6 1x6" to be 1/2" less than needed. What I plan to do is to score the 2x2's running the distance of the table and notching out 1/4" on each side; however, I just thought it might be good to note this discrepancy...unless I'm just missing something.
Lucia Oei (not verified)
Fri, 10/05/2012 - 06:55
It's actually 33" not 33 1/2"
Hi Craig!
We ran into this problem as well but Ana mentions it in the comments. The width should be 33" not 33 1/2" like the diagram says. We had to compensate for that by narrowing wider boards(1x8"; you will probably need a table saw for this) so that they are 1/4" wider than the other 1x6". I wish we would've remembered this when we were building it. It would've saved us a lot of grief!
C (not verified)
Wed, 08/01/2012 - 16:05
Need 3 2x4's?
Either I'm doing something wrong, or the materials list should be 3 2x4's.
Amount of 2x4 required from cut list in inches:
245.5"
Two 2x4 @ 8 ft = 192"
Two 2x4 @ 10ft = 240"
One 2x4 @ 10ft would let you cut all 4 bevels from the same piece of wood. Then two 2x4 @ 8ft would leave you with a long piece of scrap in case you missed up any cut. So by my calculations the materials list should read:
1 2x4 @ 10ft
2 2x4 @ 8ft
C (not verified)
Tue, 08/07/2012 - 21:44
Supporting the weight of the breadboards
Once I got to step 9 and attached the 2x6 breadboards to the 2x2 supports, I found that the weight was making the ends sag. I'm sure that once the 1x6 top pieces were all fastened to each other, and to the 2x6's, they may have supported the weight but I was concerned about how it would hold up long-term. So I took some 2x4 scrap and cut 4 pieces 6 5/16" long point, one end beveled 10 degrees. I placed this support piece between the 2x2 end support and the 2x4 on the leg. Use glue and 4 inch screws. Use two screws to attach the support to the leg's 2x4. Use two screws on the 2x6 breadboard, and drill through the 2x2 support to attach to this 2x4 support piece. A kreg jig is helpful for this. Also measure your own table to get the right measurements for you, because you want this piece to be very snug. Once I did this, the ends did not sag. It also adds a little more weight and makes the table a little more sturdy.
ShaneG (not verified)
Mon, 09/03/2012 - 19:38
Room for end chairs?
This plan looks great! Has anyone modified it for end chairs? It looks like there may not be enough room as it is... should I just make the table top longer?
Alicia Collard (not verified)
Thu, 01/10/2013 - 09:19
I am so in love with this
I am so in love with this table and plan, and about to start building it this weekend. But I have noticed there are some comments above that correct a few minor errors in the cut list and measurements.... Can someone tell me if the original list has been updated or should I go through and make note of all the changes in the comments?? Or if I just follow the steps in the plan written will I be ok? Thanks so much! Ana this is awesome!!!
Alicia Collard (not verified)
Thu, 01/10/2013 - 09:20
I am so in love with this
I am so in love with this table and plan, and about to start building it this weekend. But I have noticed there are some comments above that correct a few minor errors in the cut list and measurements.... Can someone tell me if the original list has been updated or should I go through and make note of all the changes in the comments?? Or if I just follow the steps in the plan written will I be ok? Thanks so much! Anna this is awesome!!!
Nelson55
Wed, 10/23/2013 - 07:14
good question
I am getting ready to start this too and was wondering the something! Do we follow the cut list now or do we make the changes? Thanks
Nelson55
Wed, 10/23/2013 - 07:15
good question
I am getting ready to start this too and was wondering the something! Do we follow the cut list now or do we make the changes? Thanks
NancyO
Mon, 06/10/2013 - 16:48
This is awesome!
Ana I love your plans!! They are encouraging me greatly! So next on y list is a larger new table! I plan to make this one at 10 ft long. Any chance you'll be updating these plans for assembling with a Kreg jig? I'm also looking at other ways to add support without eating up so much leg room ( the 2x6 apron)
Thanks again for the inspiration!
amandamarie
Mon, 11/18/2013 - 10:15
Inconsistencies in the plan
My husband and I are currently building this table and have run into many issues with these plans. I've built many things off of this site before, but this is the first to really cause us problems! I see many listed in the comments but thought it would be worth it to note them all in one post for those that would like to try to build this.
First of all, we ended up with an extra 2x6 and missing a 2x4. I have noticed some people in the comments mentioning 2x6's for the breadboard ends but the plans above show 2x4's... Was this changed at some point and the shopping list for the wood never adjusted? We were planning on doing the breadboard with the stacked 1x4 and 2x4 as shown above currently, but there just is not enough wood for this...
It should read as a previous commenter mentioned:
2 - 2x4's at 8' and 1 - 2x4 at 10'
2 - 2x6's
Second, the cut list and the plan diagram dimensions also do not match. After reading the comments, we found that we should just ignore the lengths in the diagrams and rely on the cut list. For example, step 3 shows the end aprons as being 29" when the cut list says 28 1/2". Also, as previously mentioned in the comments, the table is 33", not 33 1/2" wide.
Third, the 4 1x2's in step 1 should NOT both be cut at a 10 degree angle because then the stretcher will not sit with it squarely. The top should be angled and the bottom square. We thankfully caught this before cutting!
Now we are adapting this plan by adding extending leafs on either end to be over 8' for larger parties (will seat 10). Same table base, but just cutting notches in the 2x6 end aprons for support rods (using 2x2's). Figuring out a good stain has been tricky but I will post photos when we are done!