


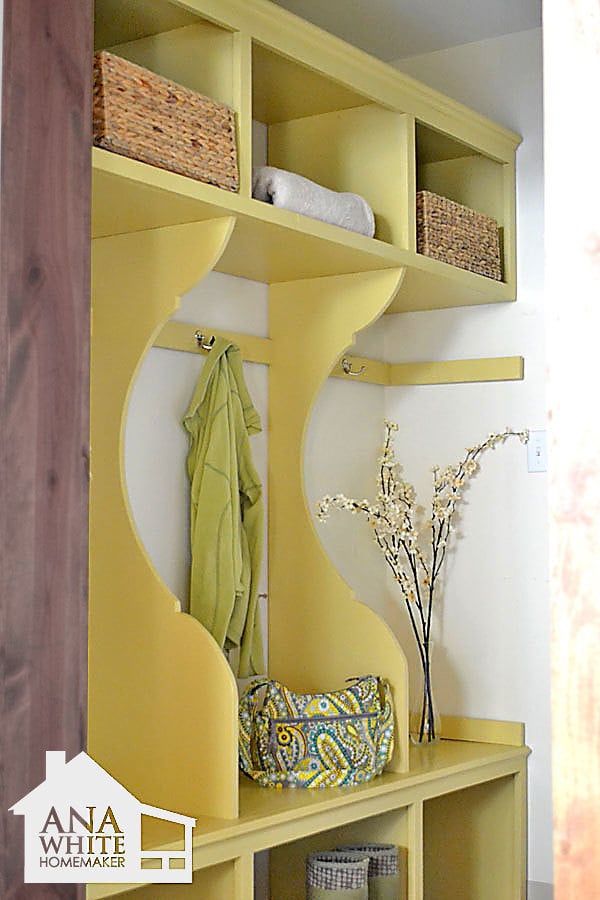
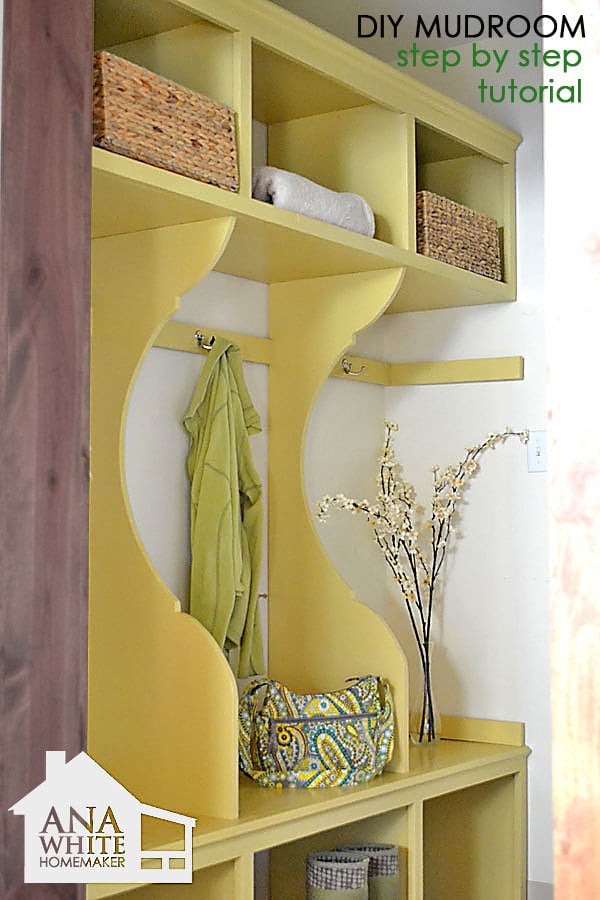
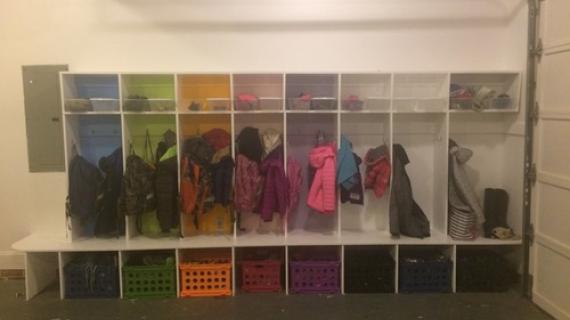
This mudroom cabinet system is DIY and I spent less than $150 (back in 2011) on it! Check out the full tutorial, you will be amazed at how easy it is to build yourself! Free plans with step by step diagrams, shopping and cut lists from Ana-White.com


Why I Built this Mudroom
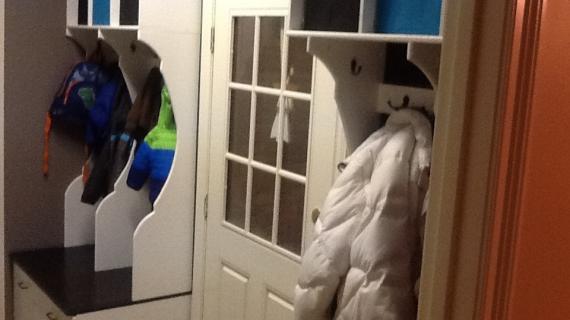
This mudroom really appealed to me because it had a little extra fancy too it, and my blah tiny 6x7 mudroom with cheap peeling linoleum flooring really needed it.

Perfect Fit
Painful Decisions

You Can DIY This Too!
Pin For Later!

Preparation
- 2 - Full Sheets 3/4" thick hardwood plywood
- 3 - 1x3 @ 8 feet long
- 4 - 1x2 @ 8 feet long
- 1 - strip small crown moulding, 6 feet long
- 1 - edge moulding, 6 feet long
- Hooks
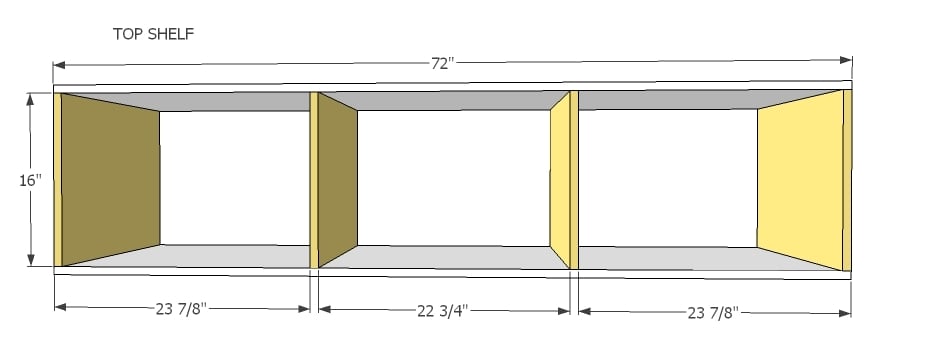
TOP SHELF CUT LIST
- 2 - 1x16 @ 72"
- 4 - 1x16 @ 16"
- 1 - 1x3 @ 72"
- 1 - 1x2 @ 72"
- 4 - 1x2 @ 13 1/2"
- 1 - Crown Moulding Strip @ 72"
- 2 - 1x3 @ 23 1/8" (Sides - Optional if need to support shelf from back)
- 1 - 1x3 @ 22 3/4" (Center - Optional if need to support shelf from back)
BENCH CUT LIST
- 1 - 1x16 @ 72"
- 4 - 1x16 @ 17 1/4"
- 1 - 1x3 @ 72"
- 4 - 1x2 @ 15 1/2"
- 1 - Edge Moulding Strip @ 72"
CENTER CUT LIST
- 2 - 1x16 @ 47 7/8"
- 2 - 1x3 @ 23 7/8" (cut to fit)
- 1 - 1x3 @ 22 3/4" (cut to fit)
- 2 - 1x3 @ 14 3/4" (Optional sides for extra hooks)
Have the Home Depot cut your PureBond plywood into 15 1/2" wide strips, 8 feet long. The strips will be easier to transport and cut. These strips will be referred to as 1x16 boards throughout the plan.


Make sure you measure your mudroom carefully and are certain you can move the piece in. Mine was so tight of a fit, we had to remove moulding to get it in place. Please read through the entire plan and all comments before beginning this project. It is also advisable to review the Getting Started Section. Take all necessary precautions to build safely and smartly. Work on a clean level surface, free of imperfections or debris. Always use straight boards. Check for square after each step. Always predrill holes before attaching with screws. Use glue with finish nails for a stronger hold. Wipe excess glue off bare wood for stained projects, as dried glue will not take stain. Be safe, have fun, and ask for help if you need it. Good luck!
Instructions
Step 1
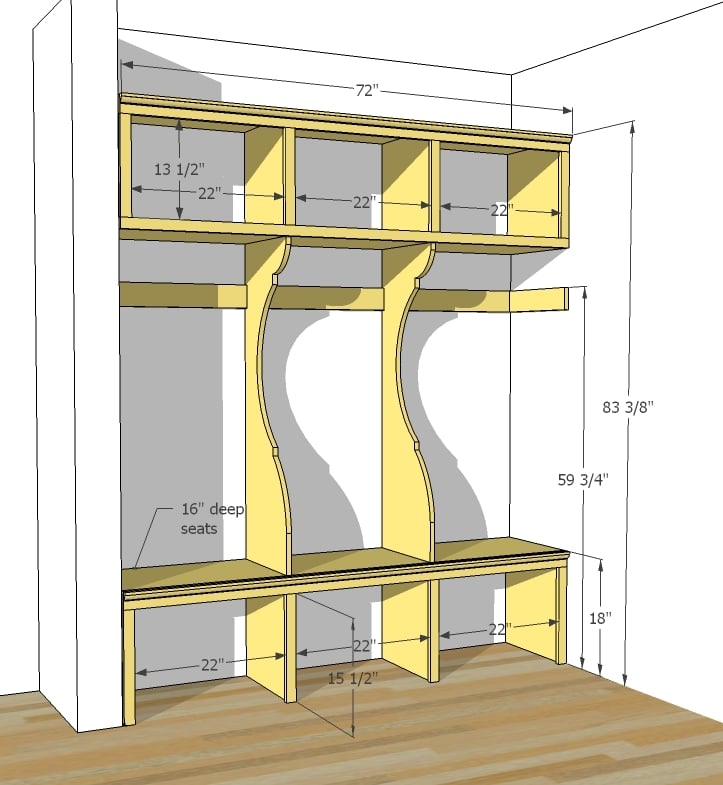
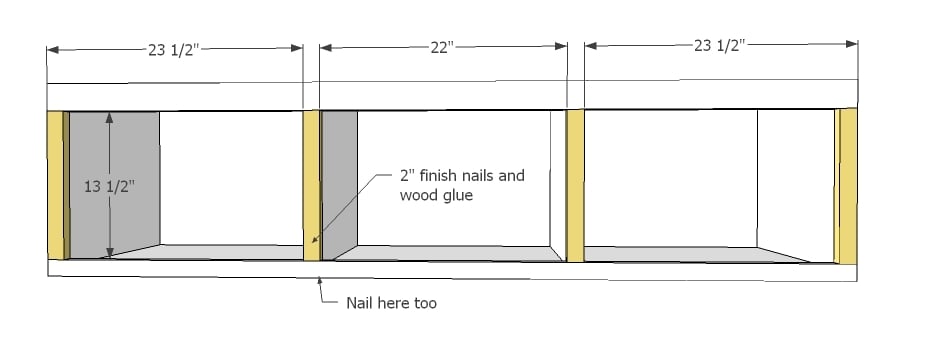
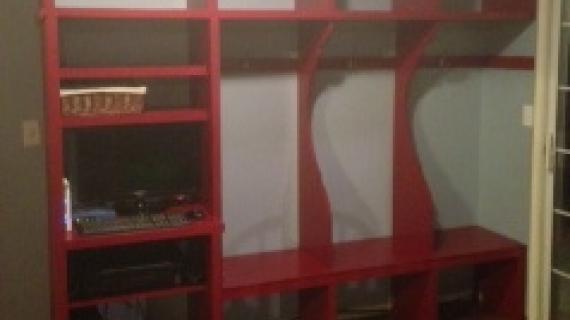
Build the box. This is the basic frame for the upper shelf. It will be fully framed, so nailgun lovers, nail away. I used Kreg Jig pocket holes, but you can also use 2" screws or nails - just adjust for square and use glue.
Step 2
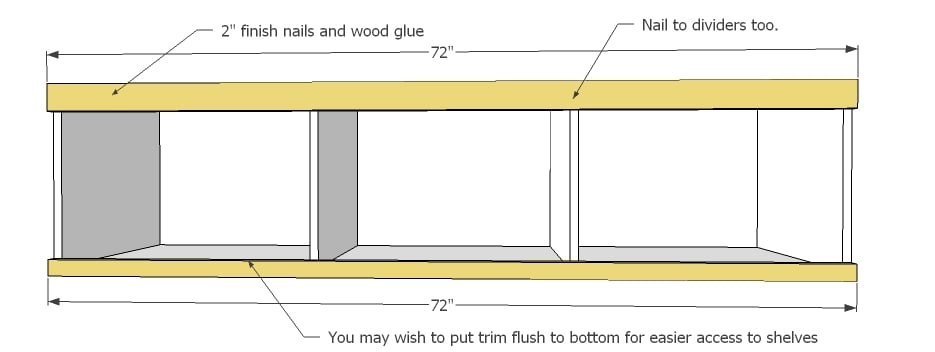
On your shelf, nail the tops and bottom on. One thing I don't like about my shelf is the bottom trim makes pulling baskets straight out impossible - there's a little lip. This could be a good thing for you, I'll let you make the call.
Step 3
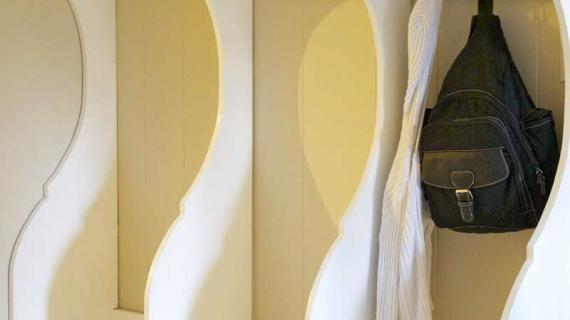
Trim exposed shelf dividers as shown above.
Step 4
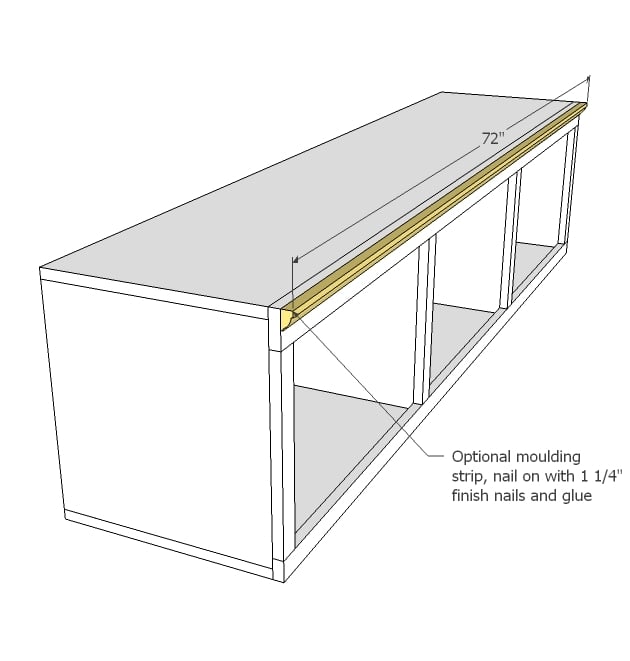
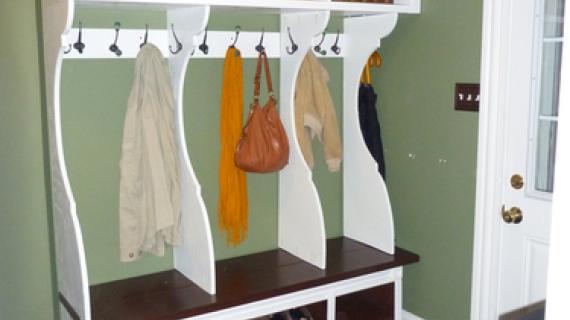
And tack on some moulding for an added touch of fancy.
Step 5
Step 6
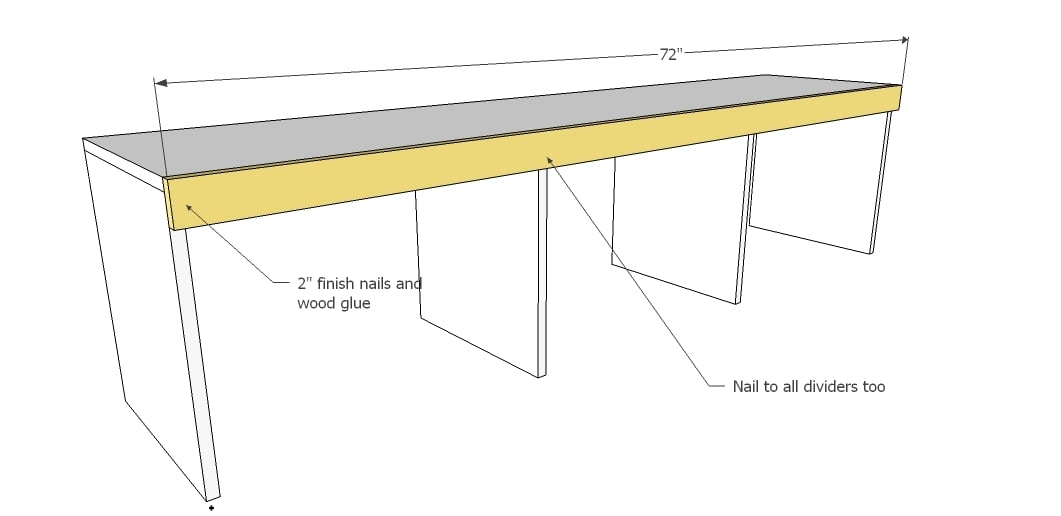
Just the top gets trim. Attach to all dividers for added structure and support.
Step 7
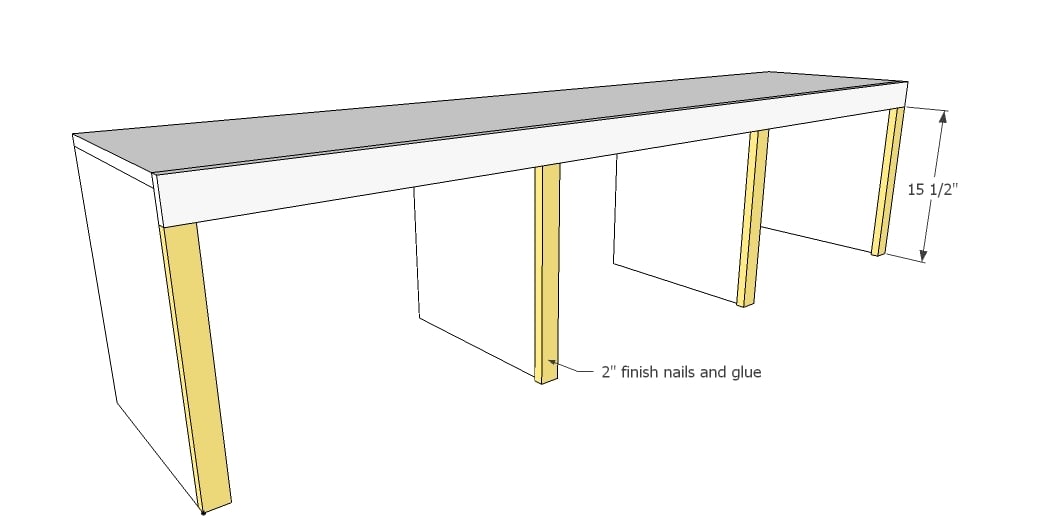
Now trim legs too.
Step 8
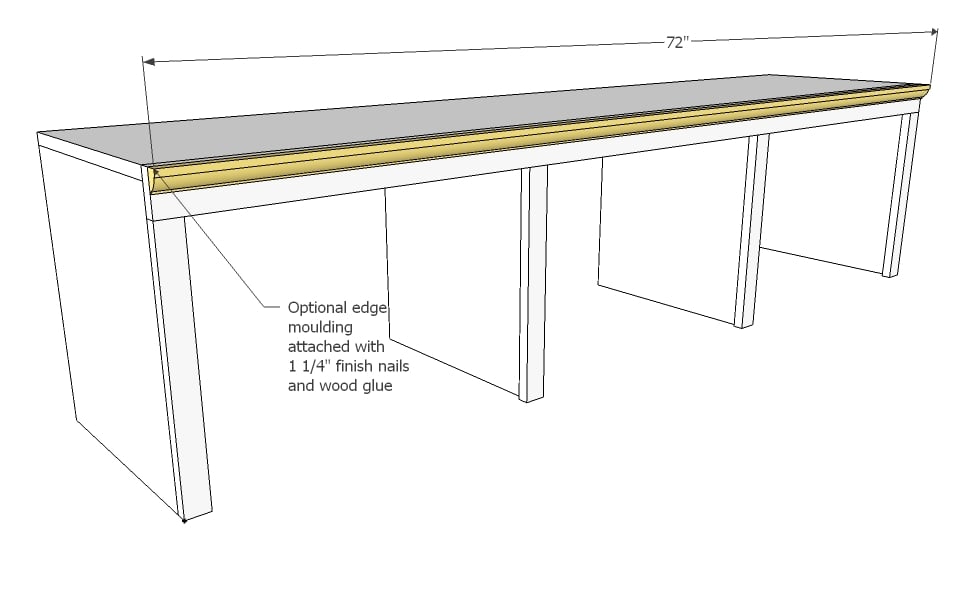
Followed by a touch of decorative edge moulding.
Step 9
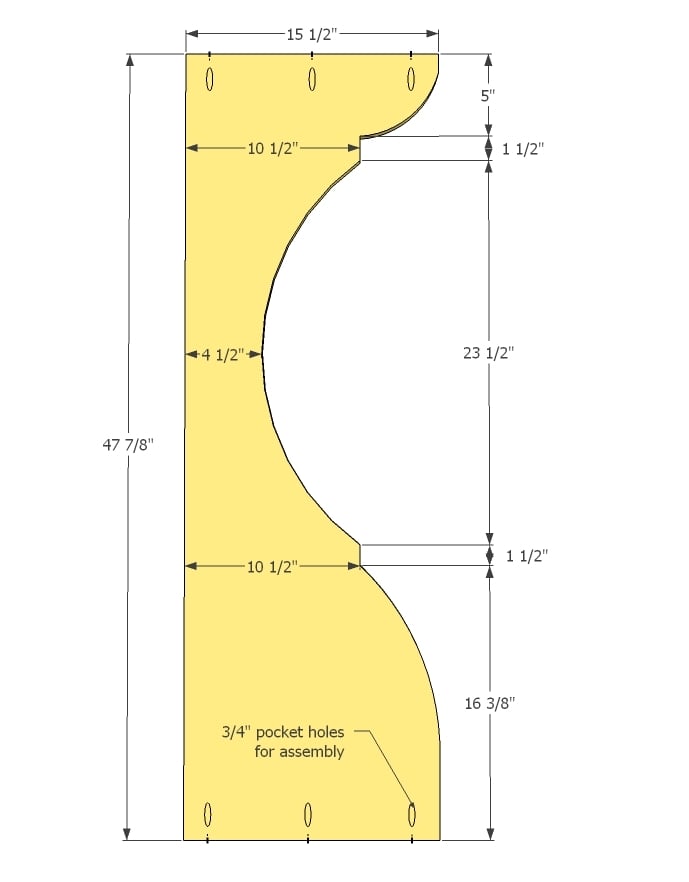
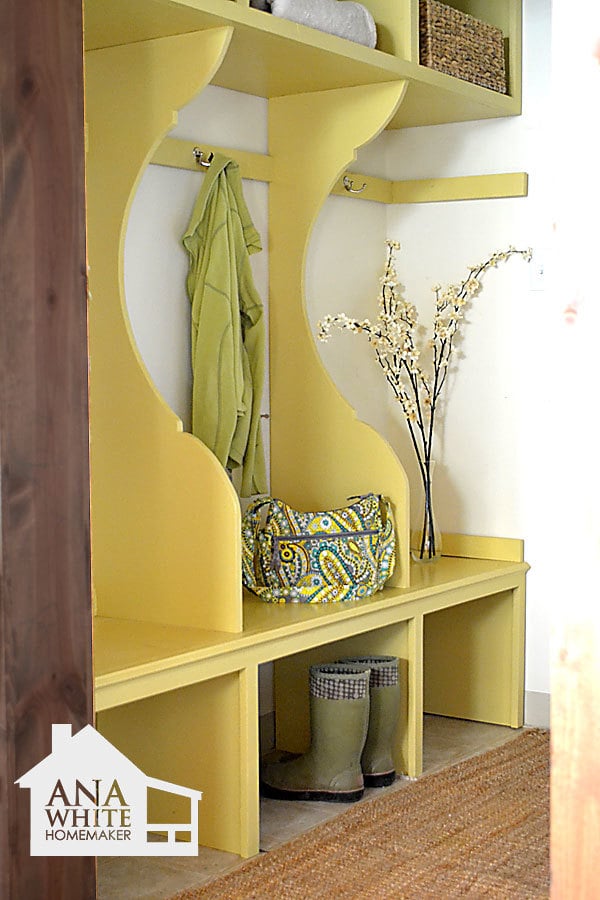
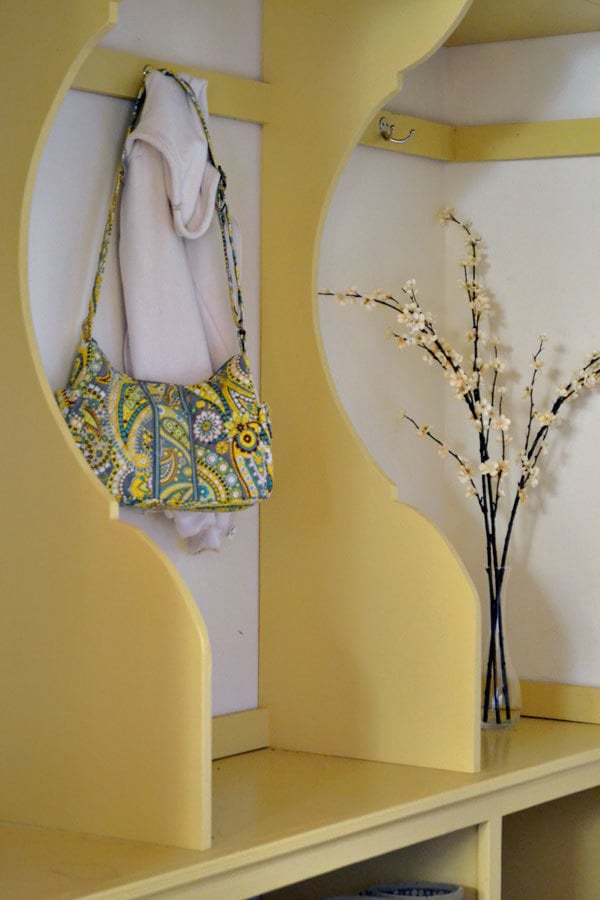
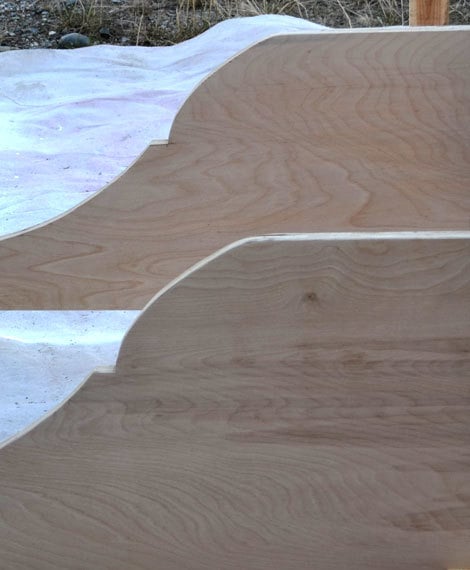
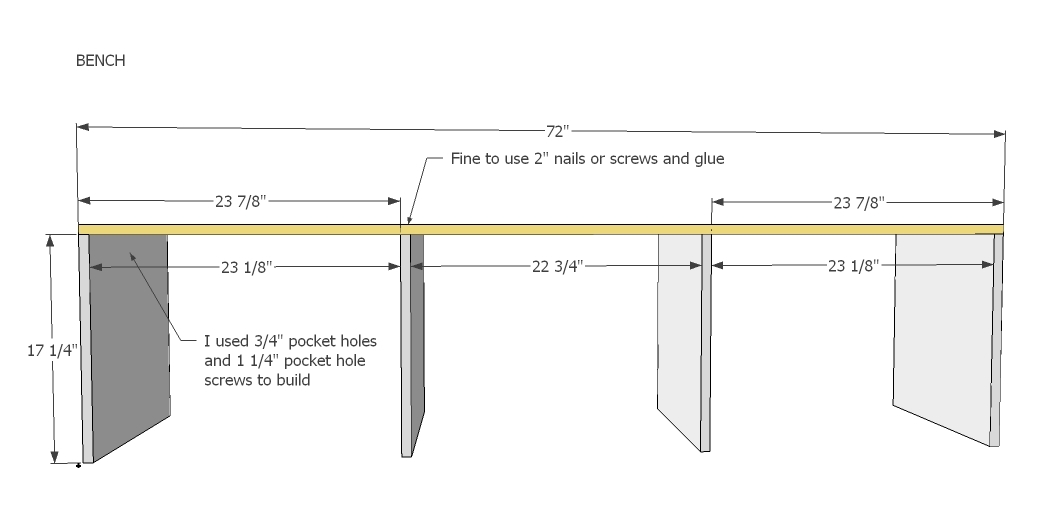
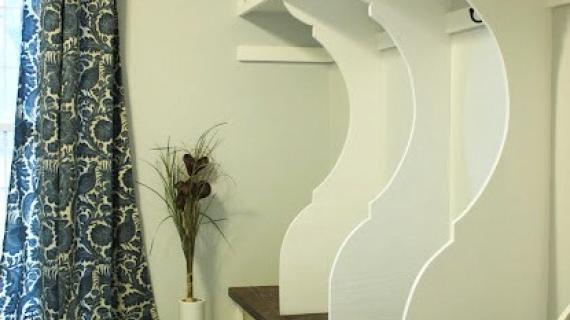
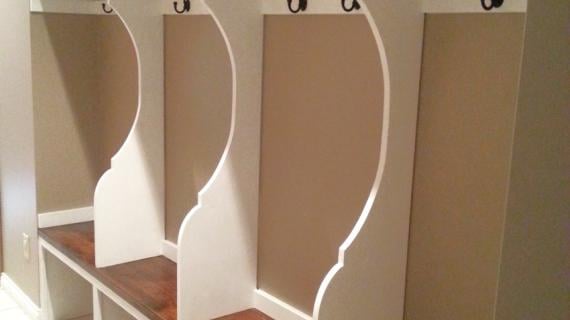
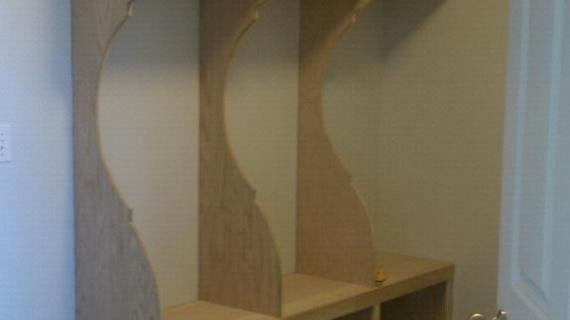
Carefully draw out pattern as shown above. Cut with a jigsaw and sand rough edge. Make sure your two match. We actually clamped the two together and cut to ensure a perfect match.
Drill pocket holes along the top and bottom edge for assembly.
Step 10
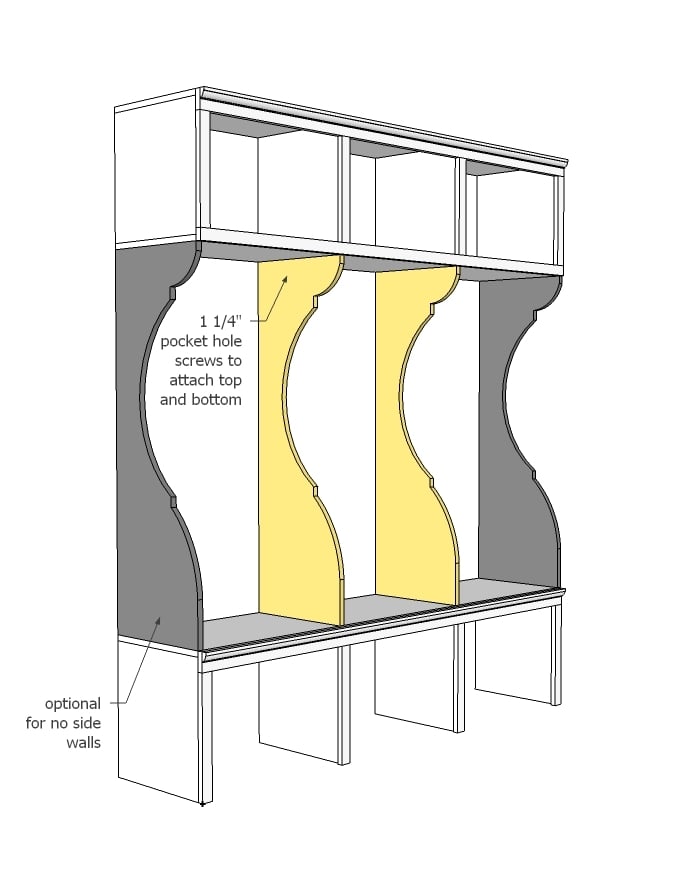
Start assembling from the bottom up, installing bench and then dividers and then finally the top. Attach dividers to bench and shelf through pocket holes.
For a freestanding mudroom, you can add end dividers but you MUST support that top shelf by hanging it to studs in the wall (see next step).
Step 11
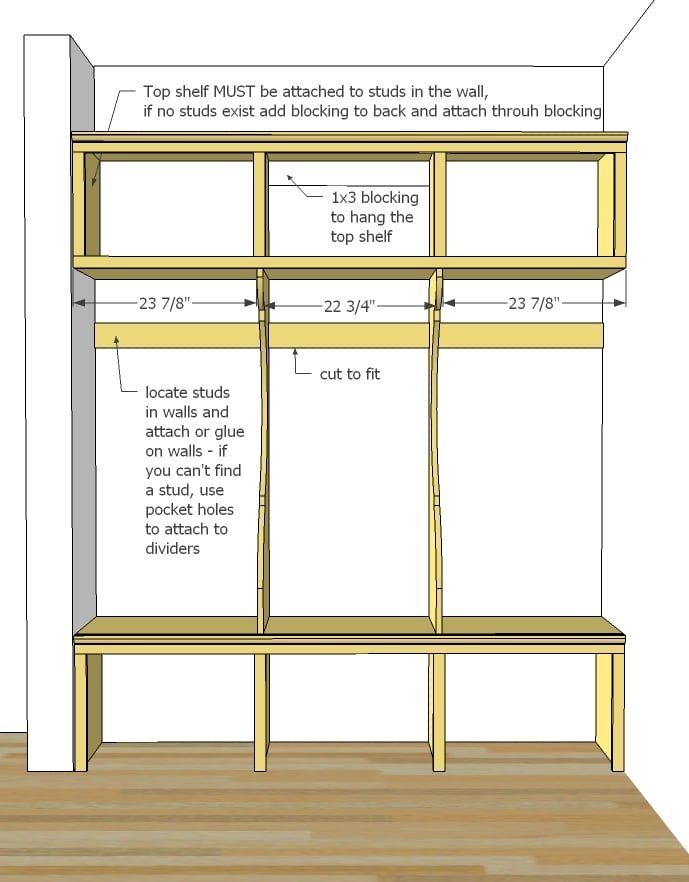
Make sure your upper shelf is well supported, screwed to at least two studs in the wall at minimum, on each end. If you used a freestanding design (no side walls) you MUST add blocking as shown above and screw through the blocking.
Attach the hook blocking as well. I used pocket holes to attach, and also nails and glue into the wall.
Step 12
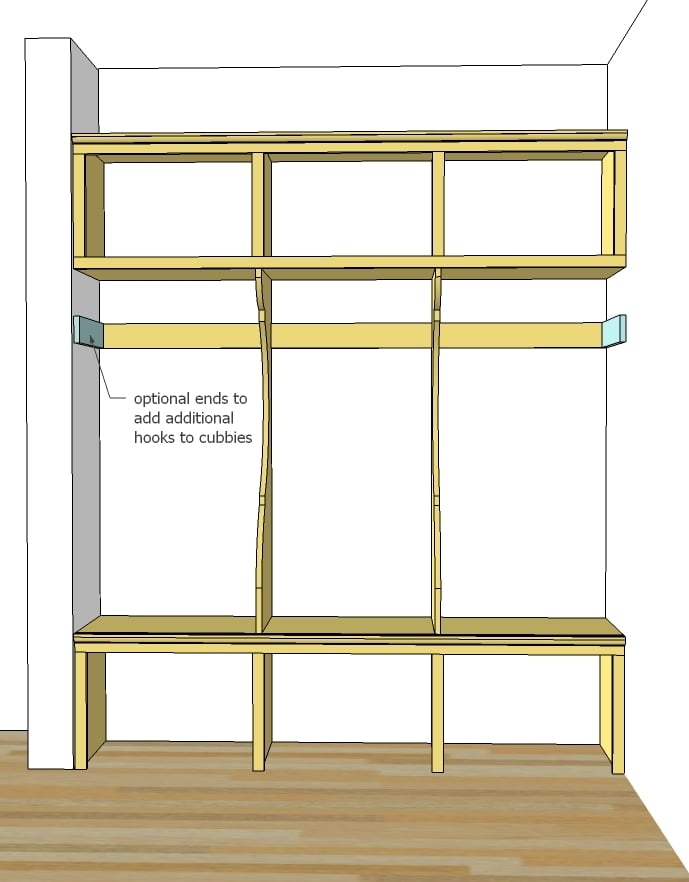
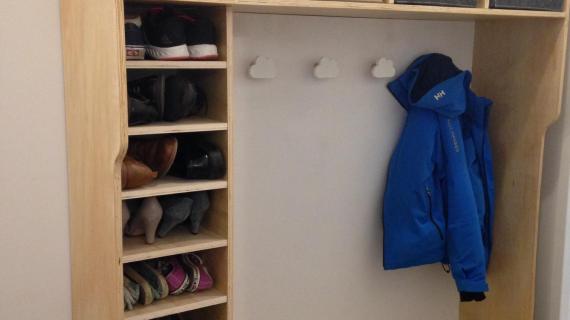
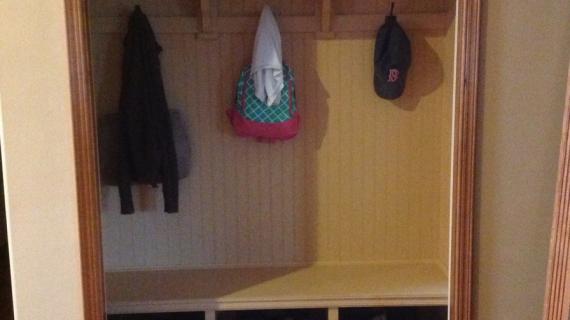
And this is just to add a few more hooks. And a little more fancy.
Step 13
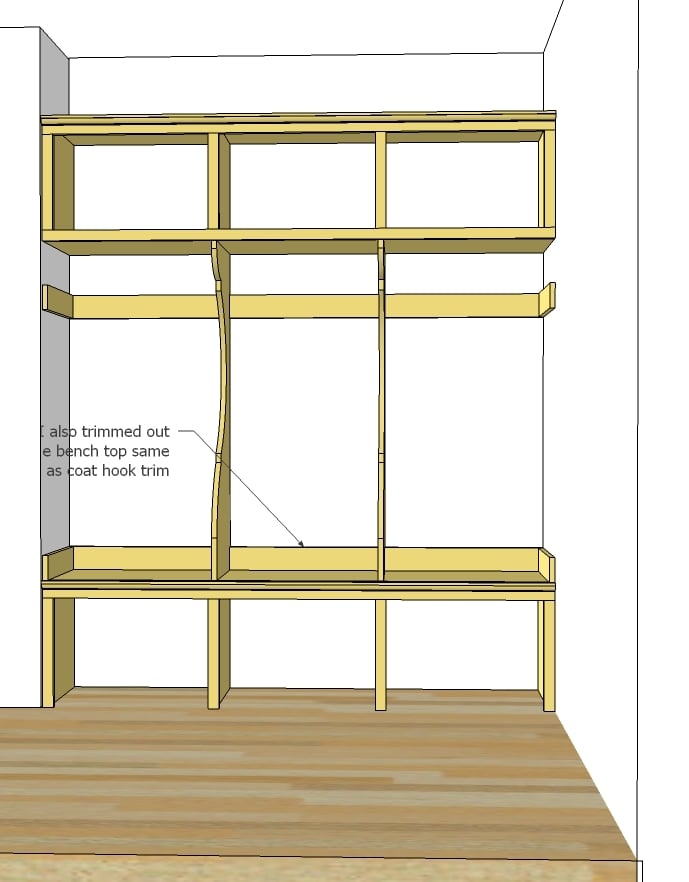
And this is not in the cut list, but with just 1 more 1x3, you could trim out the bench top as I did. Just in case your bench doesn't sit flush to the wall, or for a little extra color.
It is always recommended to apply a test coat on a hidden area or scrap piece to ensure color evenness and adhesion. Use primer or wood conditioner as needed.


Comments
spiceylg
Mon, 09/12/2011 - 01:00
Fab!
I absolutely love this! Down the road when we do some reno, I'm keeping this in mind. I already have a pop of color on the walls, because I don't do white walls. Looks great and the color is indeed cheerful! Again, I ask, do you even sleep? Honestly, how do you find the time for this with the Momplex built and all. You are an amazing inspiration!
Guest (not verified)
Mon, 09/12/2011 - 01:29
Love it
Ana its georgous! And yellow is my favourite colour :)
What tool do you use to cut the small squares out of the big squares? (I know you use a jigsaw to cut the scrolly edge bits but do you use it to cut the straight cuts as well?)
babysteps
Mon, 09/12/2011 - 05:09
Beautiful
I love it without the drawers, the drawers would have just filled up with little bits of sand and grass and gravel. The yellow is great. My mudroom walls are painted a bright yellow.
Guest (not verified)
Mon, 09/12/2011 - 09:04
Edges?
Hey Anna!!
Love it!! I have to add this one to my growing list of projects!!! Just one question - what do you do to the edge of the plywood when you paint? Do you edge trim then paint or fill with wood putty then sand and paint - or some other technique?? Thanks Ana for all the inspiration to build yourself, and design yourself!!
In reply to Edges? by Guest (not verified)
Ana White
Mon, 09/12/2011 - 11:25
Hi, the only edges that are
Hi, the only edges that are exposed are the scalloped edges - everything else is face framed. We found the edges of the PureBond plywood to be very easy to simply patch up with wood filler where it is needed, then sanded and primed and painted. You could also do edge banding for a stained finish.
Helen Williams (not verified)
Mon, 09/12/2011 - 10:11
Hi Anna, I adore the color of
Hi Anna, I adore the color of the built in mudroom. Could you please share with me what color it is? Thanks, Helen Williams
In reply to Hi Anna, I adore the color of by Helen Williams (not verified)
Ana White
Mon, 09/12/2011 - 11:23
Hi Helen, the color is
Hi Helen, the color is Willow's Gold by Dutch boy in semigloss. Goes with everything too!
Guest (not verified)
Mon, 09/12/2011 - 10:22
I love this project. Too bad
I love this project. Too bad my entry way is too small for it. Thanks for the safe plywood tip. I found a supply near me and I can't wait to check it out. I'm trying to build only with safe materials why not that's one of the benefits of DIY.
Sheela (not verified)
Mon, 09/12/2011 - 10:42
Love the color!
I agree with Helen - I love the yellow color. What color and brand is it? Thanks, and the mud room looks great!
In reply to Love the color! by Sheela (not verified)
Ana White
Mon, 09/12/2011 - 11:55
Yellow Paint Color
Hi Sheela, the paint color is called "Willow's Gold" by Dutch Boy. Thank you so much!
Virginia (not verified)
Mon, 09/12/2011 - 11:53
Under bench
Try big aluminum baking sheet pans as boot trays. You can slide them in and out and they contain all of the mud. Easily hosed off, too!
In reply to Under bench by Virginia (not verified)
Ana White
Mon, 09/12/2011 - 11:58
What a great idea! Thanks
What a great idea! Thanks for sharing - those would fit perfect!
In reply to What a great idea! Thanks by Ana White
fethiye
Mon, 09/12/2011 - 13:42
with pebbles :)
Actually, I was going to suggest the same thing with one more twist; with pebbles on the tray so that lets your boots dry out, not to mention the extra cuteness it will bring. Saw this idea somewhere that I do not remember.
Shea (not verified)
Mon, 09/12/2011 - 11:56
That yellow does make me
That yellow does make me smile. And I have to say your project out did the original inspiration.
lyndyjo@iowate… (not verified)
Mon, 09/12/2011 - 13:00
turning the corner
Ana -- I love that this is built in with no back so you don't have to spend as much on wood. We have 8 people in our family and a perfect place to build something like this, but it will need to turn a corner and be an L shape. How would you suggest we handle the corner? Put shelves in it cut in an odd shape to fit? Just box it in and have empty space?
I also was thinking, how cool would it be to stencil something with your yellow paint on the white walls inside the lockers?
Amazing work, as usual. You inspire me!
Lynn
5 tater tots (not verified)
Mon, 01/30/2012 - 11:08
Corner
This mudroom makes me smile! We have 7 people in our family and also need to make this In an L-shape. I'm wondering what would look the best, diagonal corner locker or boxed in dead space? Ana and her readers have the best ideas, I would love to hear some.
Beautiful mudroom, can't wait until I have one in my home!
justjayma (not verified)
Mon, 09/12/2011 - 14:26
This is so fabulous! I love
This is so fabulous! I love the cutouts, they really "fancy up" the cuts! Also, they make it appear so much more open! I love it.
Pam in Colorado (not verified)
Mon, 09/12/2011 - 16:06
Made me smile!
I've never been a lover of yellow until the past couple of years. It is such a cheerful color for sure. Nice job. Glad you stepped out of your comfort zone!!
mrsmillikin
Mon, 09/12/2011 - 17:53
And this one was just right...
Perfect! In the process of an entire house renovation from roofline to foundation on a 40k budget...we are doing everything ourselves...everything. Just designing the mudroom and this one is perfect. THANK YOU.
Question for you Anna,
Does the seat feel deep enough and comfortable? The Braden is 24 inches and I like this depth because of space.
Thank you
In reply to And this one was just right... by mrsmillikin
Ana White
Mon, 09/12/2011 - 18:07
Sounds like you've got quite
Sounds like you've got quite a project on your hands!
I think the seat is fine, but I'm pretty short. It would be no trouble to just make the bench 24" or the entire project for the matter - it would only cost one extra sheet of plywood. More storage too!
Best of luck!
In reply to Sounds like you've got quite by Ana White
mrsmillikin
Mon, 09/12/2011 - 19:42
Thanks for getting back to me so quickly
Yes we do! We couldn't have done it without your site. I've made all the vanities, cabinets and cubbies from your plans. We are sincerely grateful to you Anna.
Amy Eavou (not verified)
Mon, 09/12/2011 - 18:32
This is EXACTLY what I was looking for :)
This is exactly what I was dreaming up for my mudroom in my new house. I have to have tall spots for boots also as we have mud season 6 months a year here, and snow the other 5 :o). Great job, love it!
ferbit
Tue, 09/13/2011 - 08:05
That looks sooo awesome!!!
Oh Ana, I wish I had a mudroom! I would build this immediately! *sigh* I have a long, narrow utility room and that's it. Ugh! Yours turned out adorable! Love the yellow!
Rboyd (not verified)
Tue, 11/22/2011 - 08:35
Awesome!
This is absolutely wonderful!! I'm a big DIY-er and have yet to get into building things...I stick to sewing and crafting lol...but when we have our own house I will be visiting your site again!!! Love the yellow too- so cheery :D Thanks for sharing this awesome project!
Guest (not verified)
Wed, 01/04/2012 - 12:54
Don't have a mudroom, but...
our "mudroom" is the laundry room. It's where we come in from the garage, and the boys come in from playing in the grove. I'm thinking that I can close off the front of the benches and make them into laundry bins with a hinged top. That way we can still have a place to put dirty clothes and place to sit and take off our shoes and jackets. Thanks Ana!
mrsmc
Wed, 01/18/2012 - 15:04
Question
Hi! I cannot wait to get started on this project! I have the perfect place for it in our entry way and its exactly what needs to go there. I am readying over the instructions tho and I have a question I'm hoping you can shed some light on. On the dividing panels, the plans call for 3/4 " pocket holes for assembly on the top and bottom. How are these used? I do not see anywhere in the instruction where it mentions applying these anywhere. I'm a visual person but I don't see what you're suppose to do with these holes! Thanks for the help!
Kali
Jordan Crompton (not verified)
Mon, 04/23/2012 - 07:52
Amazing Creation!
Wow, this is truly amazing! This mudroom organizer looks like a custom piece that you would pay thousands for, especially in that gorgeous yellow!
Great instructions. I am going to attempt this myself in a very small entry area!
Thanks!
Jordan
www.picklee.com
Heather T (not verified)
Fri, 07/27/2012 - 09:06
So excited to do this!
I found that same built in picture (blue shelves) on pinterest and have been trying to figure out how to build it into our small mudroom. After a few failed "google" attempts I've stumbled across this posting. Perfectly clear and easy to follow. I'll have to send photos once I've convinced my husband to let me do this myself. :)
NAVVAN (not verified)
Wed, 12/19/2012 - 19:39
Pictures Gone
Hi Ana,
I REALLY want to do this in my mud room- but all your pictures are gone!! I'm a visual learner- can you please fix the pictures? I want to start this project after Christmas!!
TammyHunsinger
Sun, 02/17/2013 - 10:19
L-Shape
I would love to build this for the hallway coming from our garage door but would need to create an L-shape. Has anyone figured out how to convert this plan into an L-shape or does anyone have any idea how I could do this?
LisasCreativeDesigns
Sun, 03/24/2013 - 08:04
Love this!
I just found this website and love all of the projects lisetd on here. I am an avid DIYer and am no stranger to power tools. I see a couple of projects on here I am going to give a try. Love this one!
kally
Fri, 05/17/2013 - 13:16
Look at that, it's so bright
Look at that, it's so bright and beautiful. You wouldn't say it's a mudroom, nice color choice. When you live in the country you definitely need a mud room, it would spare you of a lot of cleaning trouble. I am thinking about having one myself.
Kim Wester
Sat, 05/10/2014 - 08:30
PDF version
Hi Ana -- The PDF version ends before the materials and cutlist section. The print version works fine, so that's what I used, but thought you might want to check on the PDF version. Thank you! I will share pictures if/when we get this done.
MmeKerr
Fri, 10/21/2016 - 17:33
Scrolly Bit
Is there a way to print off the divider pattern so I can just trace it onto my wood? It's giving me crazy-brain.