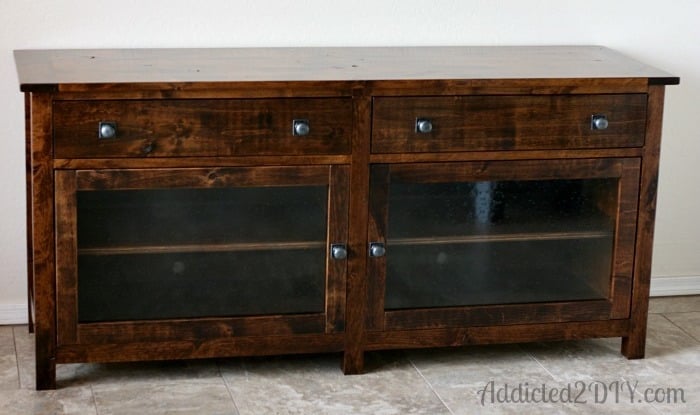


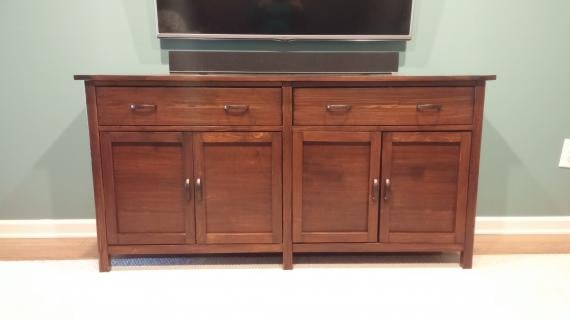
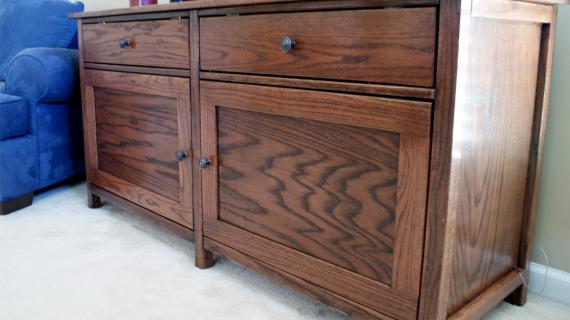
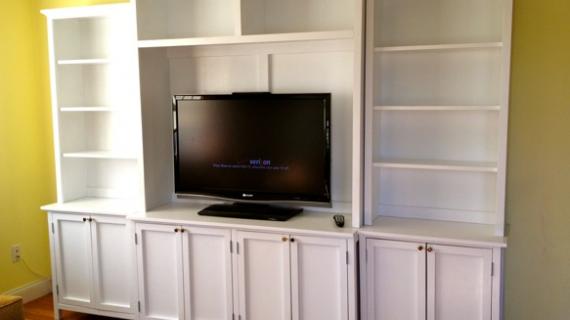
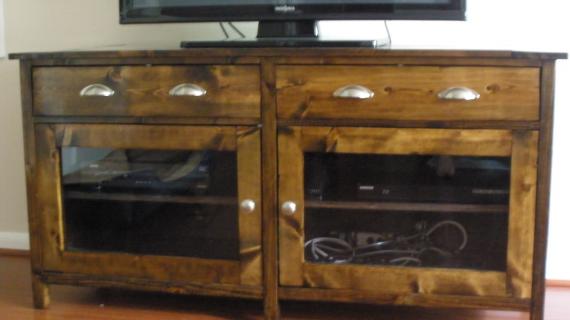
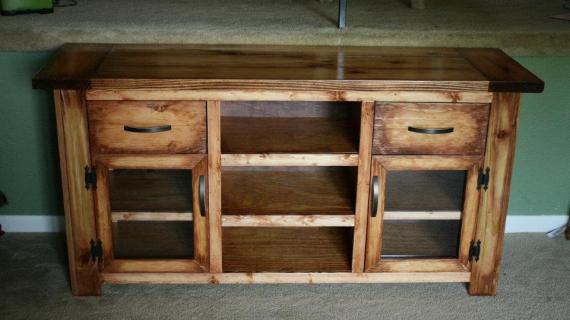
Build your own tv media console with our free woodworking plans! Stain or paint any color. You can also build the matching side towers with these free plans.
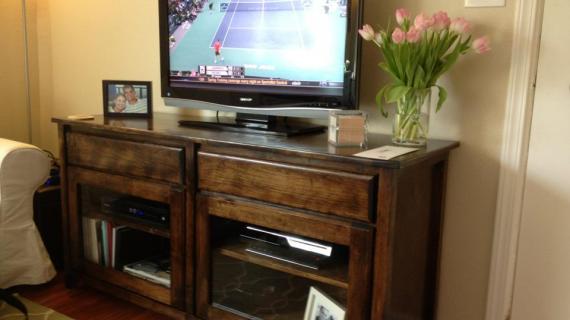
Photo by KATIE0910
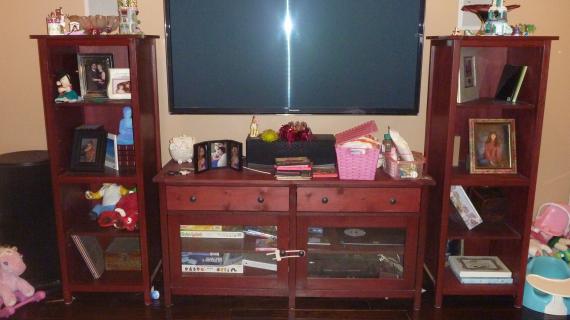
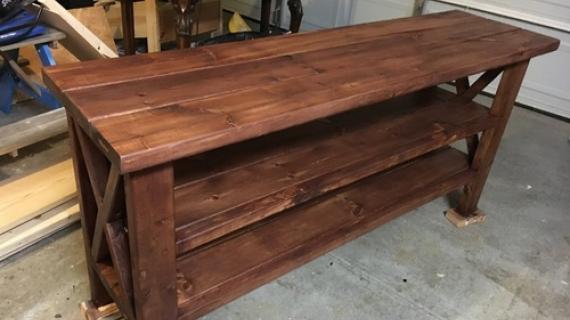
Build the Matching Bookshelf Towers to Make this a Media Suite
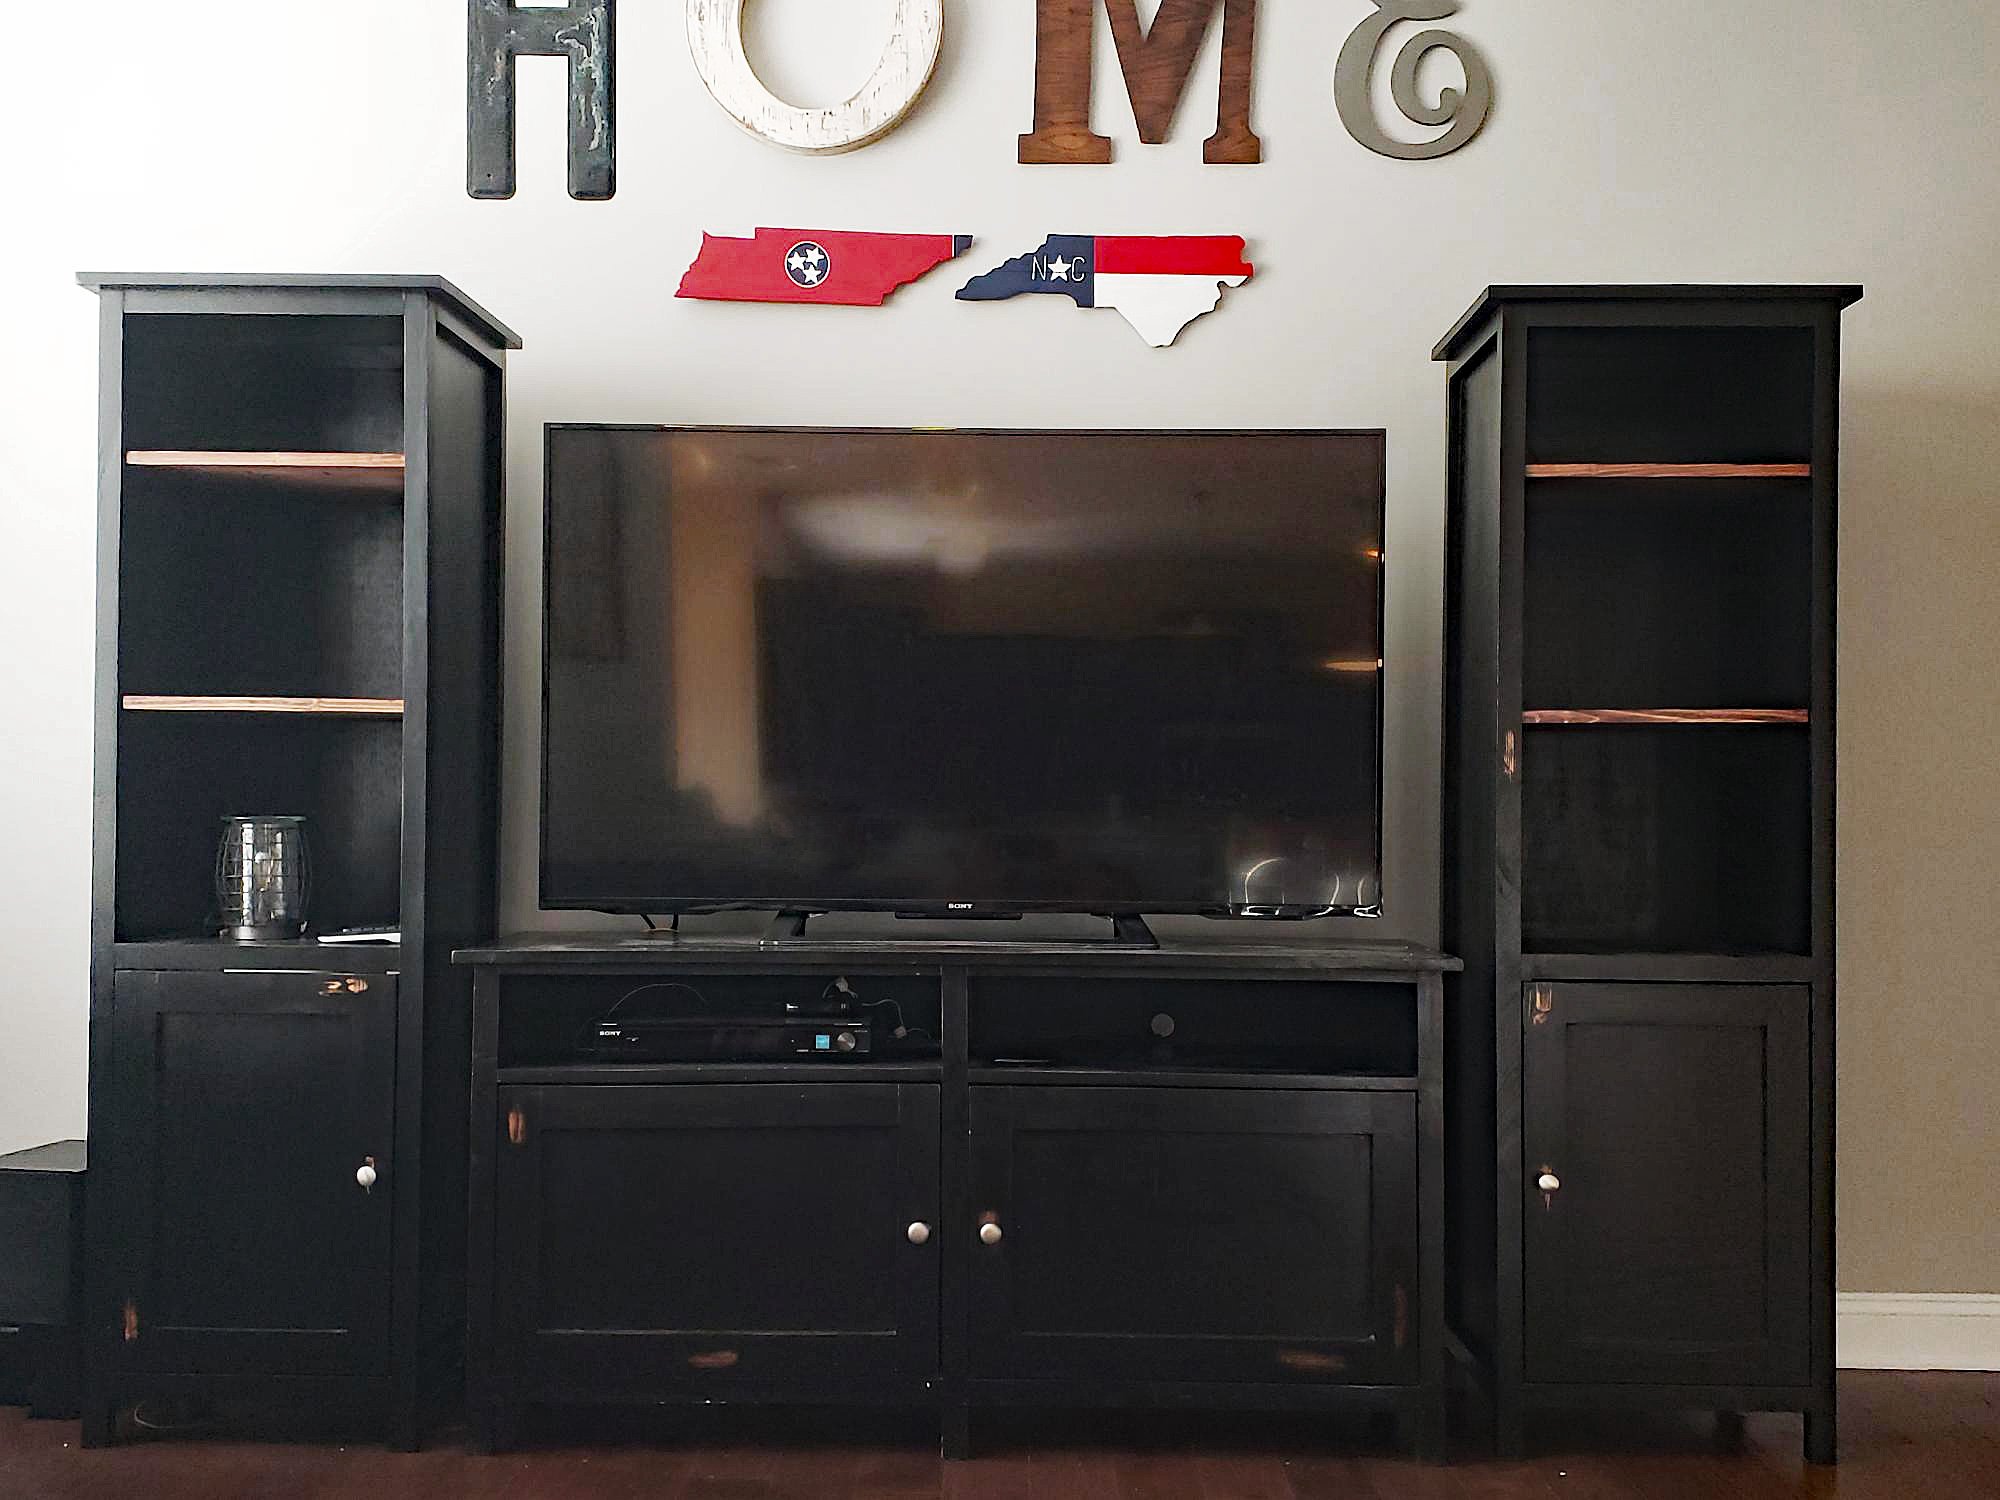
Free plans to build the matching towers to make this project an entire media wall.
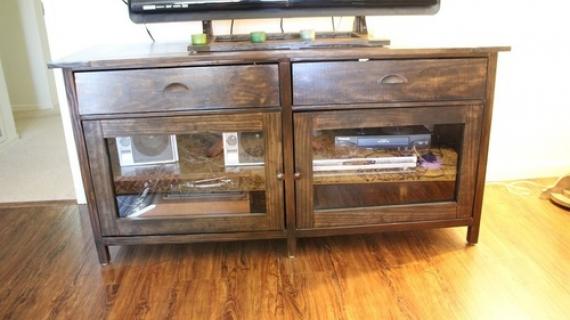
Photo by DGROSECLOSE
Pin For Later!

Preparation
- 1 and a half sheets of 3/4" Plywood, cut into strips 15 3/4" wide, 8 feet long, cut with the grain. For the half sheet, cut into strips 4 feet long, with the grain.
- 1 sheet 1/4" plywood for the back
- 4 - 1x2 @ 8 feet long
- 4 - 2x2 @ 8 feet long
- 1 - 1x6 @ 6 feet long
- 3 - 1x3 @ 8 feet long
- 1 sheet acrylic glass 1/4" thick, 30" x 24"
- 6 knobs
- 4 sets Euro Style Hinges
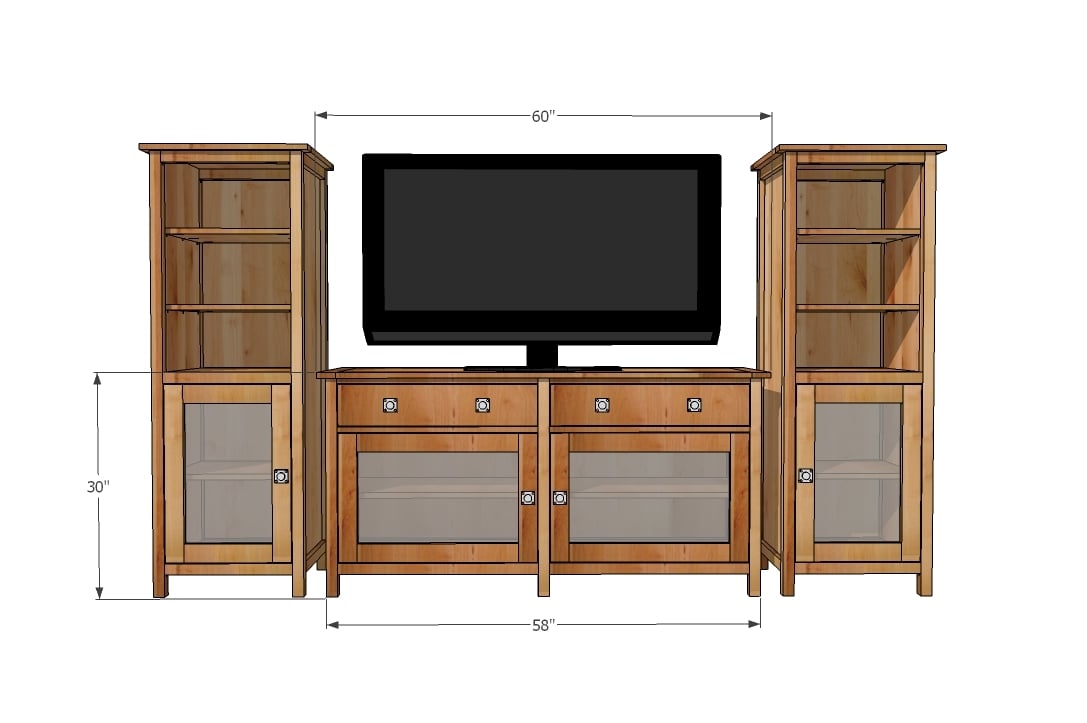
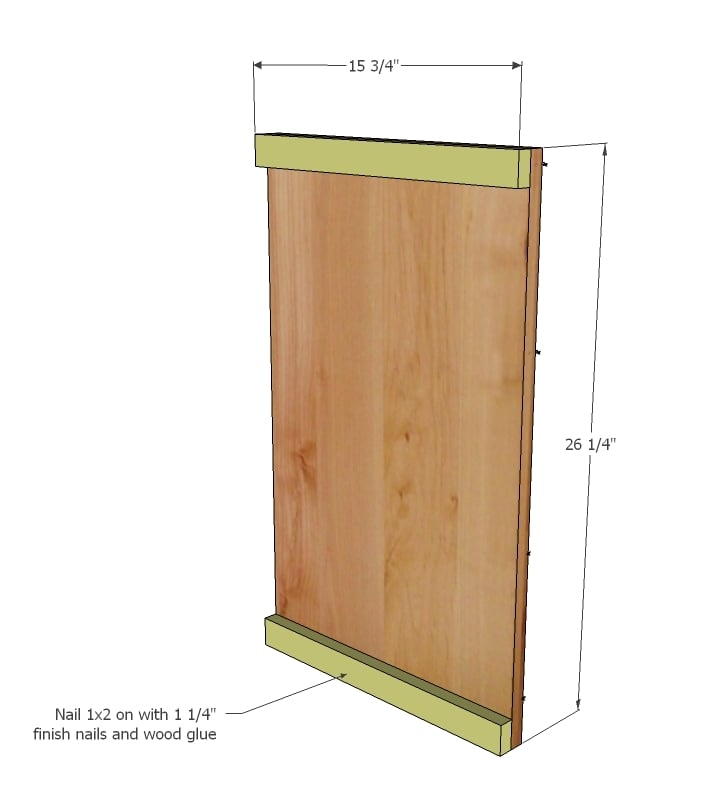
- 2 - 3/4" plywood @ 15-3/4" x 26 1/4" (Sides)
- 3 - 3/4" plywood @ 15-3/4" x 55" (Main Shelves and Top)
- 1 - 3/4" plywood @ 15-3/4" x 17 1/2" (Center Divider)
- 2 - 3/4" plywood @ 15-3/4" x 27 1/8" (Shelves)
- 4 - 1x2 @ 15 3/4" (Side Trim)
- 6 - 2x2 @ 29 1/4" (Legs)
- 4 - 2x2 @ 26 3/4" (Bottom Trim)
- 8 - 1x2 @ 26 3/4" (Top Door Area Trim)
- 2 - 1x3 @ 19 3/4" (Top Breadboard Ends)
- 1 - 1x3 @ 55" (Top Front)
- 1 - 1x2 @ 55" (Top Back)
- 1 - 1/4" plywood 58" x 26 1/2" (Back)
DOOR/DRAWER FACES
- 2 - 1x6 @ 26 1/2" (Doors - CUT TO FIT)
- 4 - 1x3 @ 17 1/4" (Door Frames - CUT TO FIT)
- 4 - 1x3 @ 21 1/2" (Door Frames - CUT TO FIT)


Please read through the entire plan and all comments before beginning this project. It is also advisable to review the Getting Started Section. Take all necessary precautions to build safely and smartly. Work on a clean level surface, free of imperfections or debris. Always use straight boards. Check for square after each step. Always predrill holes before attaching with screws. Use glue with finish nails for a stronger hold. Wipe excess glue off bare wood for stained projects, as dried glue will not take stain. Be safe, have fun, and ask for help if you need it. Good luck!
Instructions
Step 1
Go through the plan and mark and predrill all Kreg Jig pocket holes prior to assembly.
Glue and nail side trim to outsides of the sides, flush with top and bottom edges as shown in diagram.
Step 2
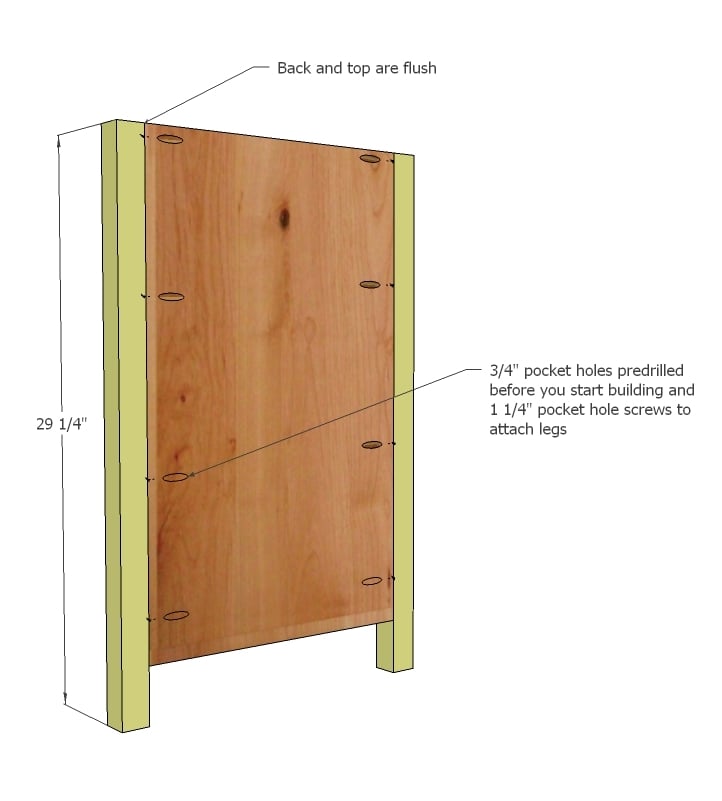
Through predrilled pocket holes, attach legs to sides with 1 1/4" pocket hole screws. Do this on both sides.
Step 3
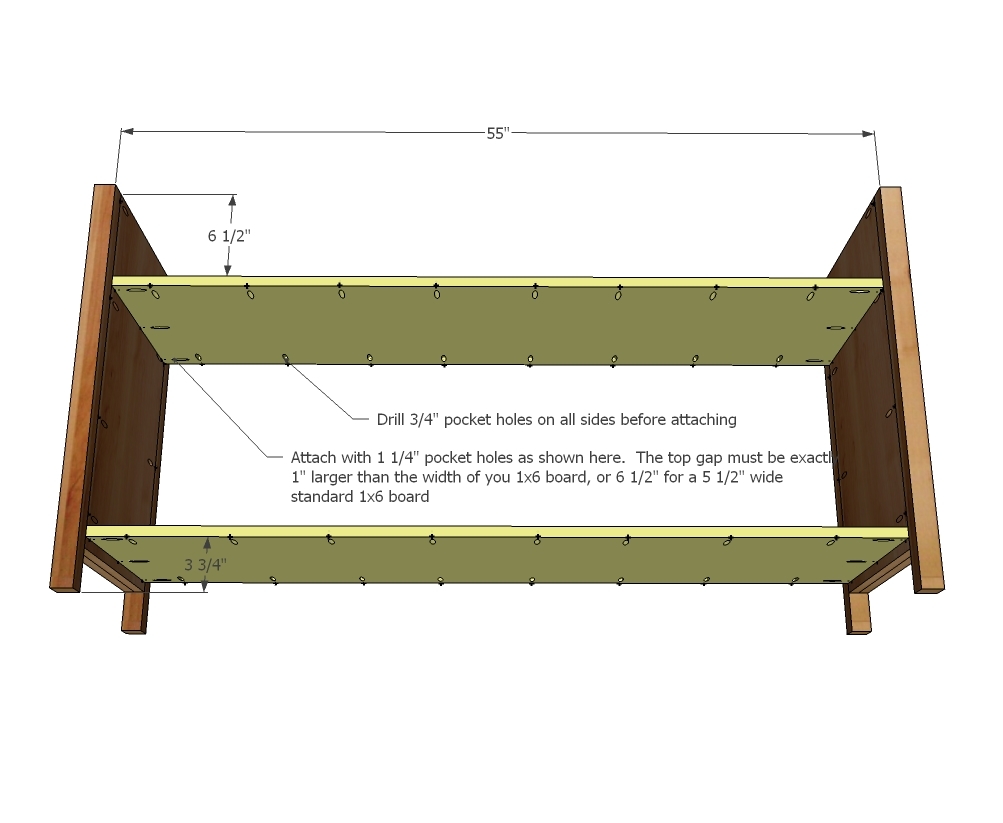
Mark the sides as shown in diagram and attach two main shelves with pocket holes.
Step 4

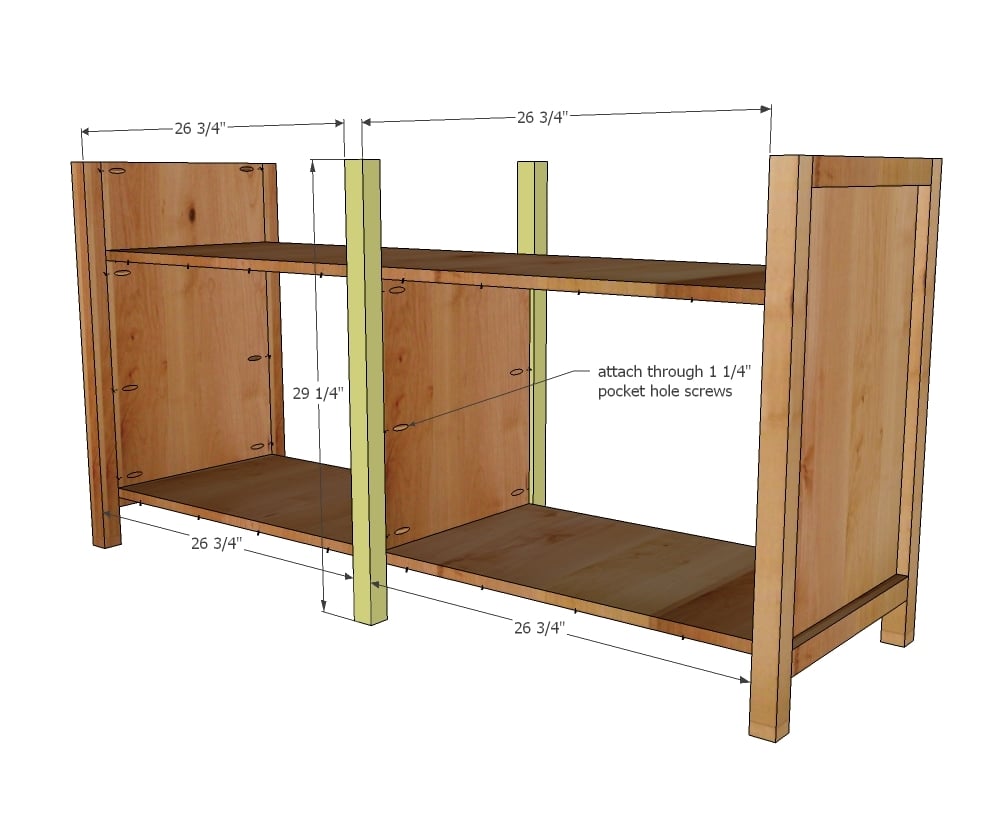
Carefully mark location of center divider and attach with 1 1/4" pocket hole screws.
Step 5
Step 6
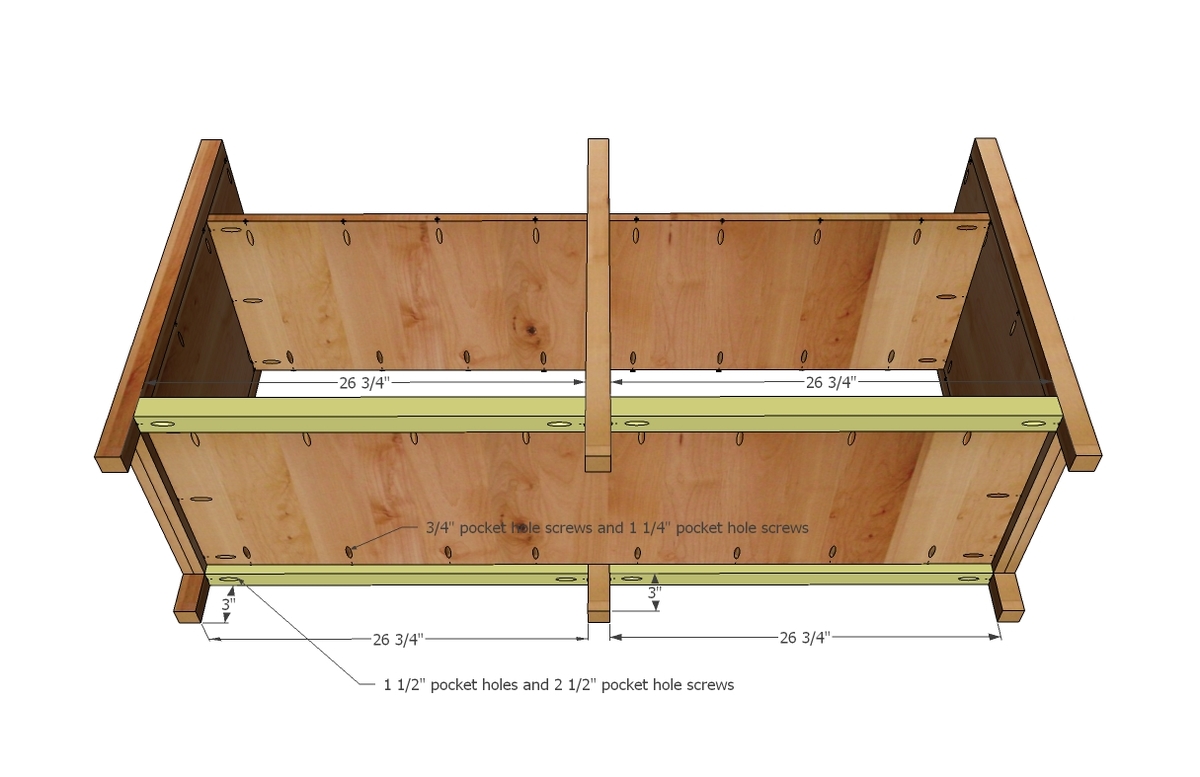
Attach bottom trim, flush on top.
Step 7

Top trim needs to be added on front and back.
Step 8
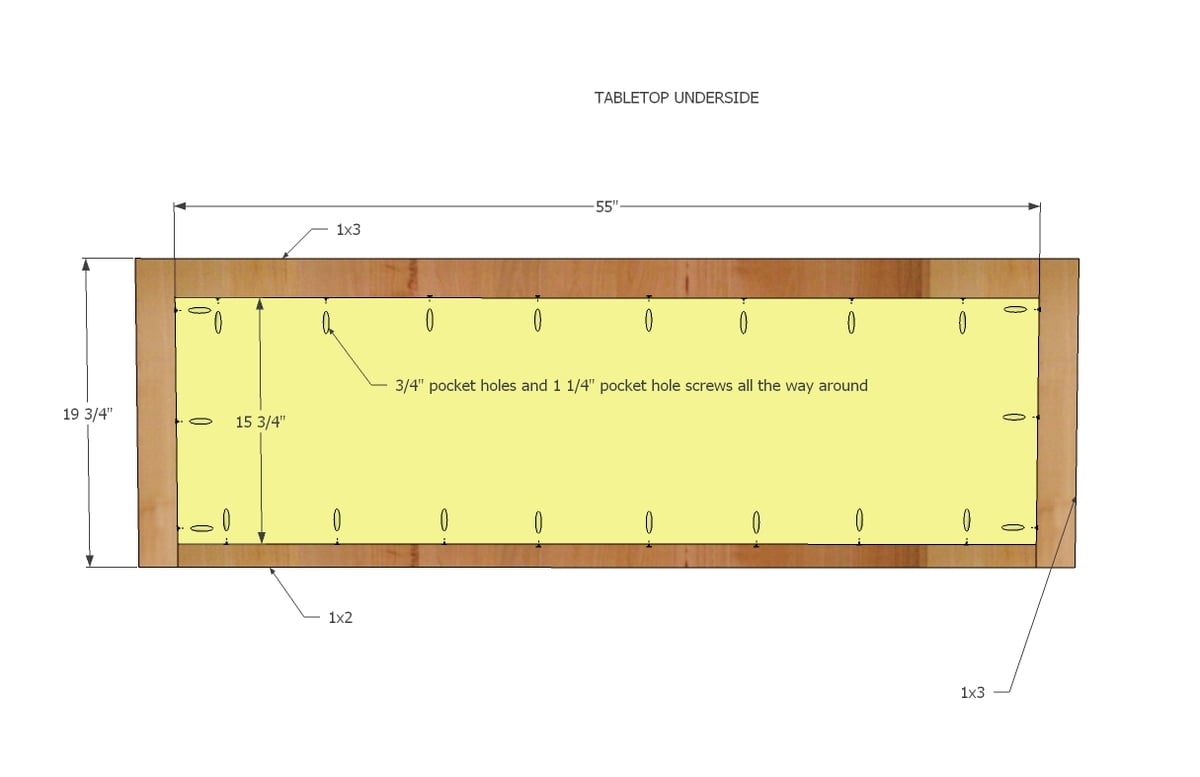
Build your top on a flat level surface, using clamps to ensure a smooth, even joint.
Step 9

Mark the top 1" in on front and sides. Attach as shown in diagram.
NOTE: You may wish to install the 1x6 doors BEFORE adding the top if you do not have a right angle drill - or at least the hinges. See step #12.
Step 10
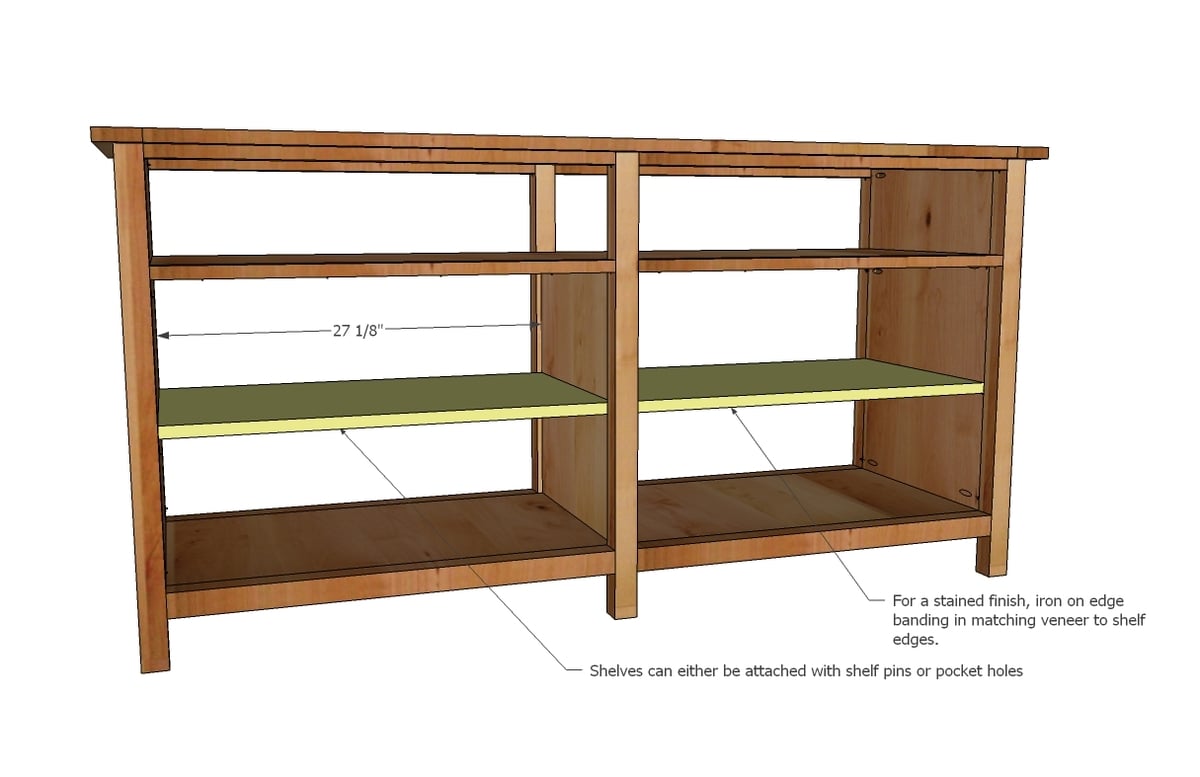
Shelves can be installed with either 3/4" pocket holes and 1 1/4" pocket hole screws for fixed shelves, or you can predrill holes for use with shelf pins for adjustable shelves.
Step 11
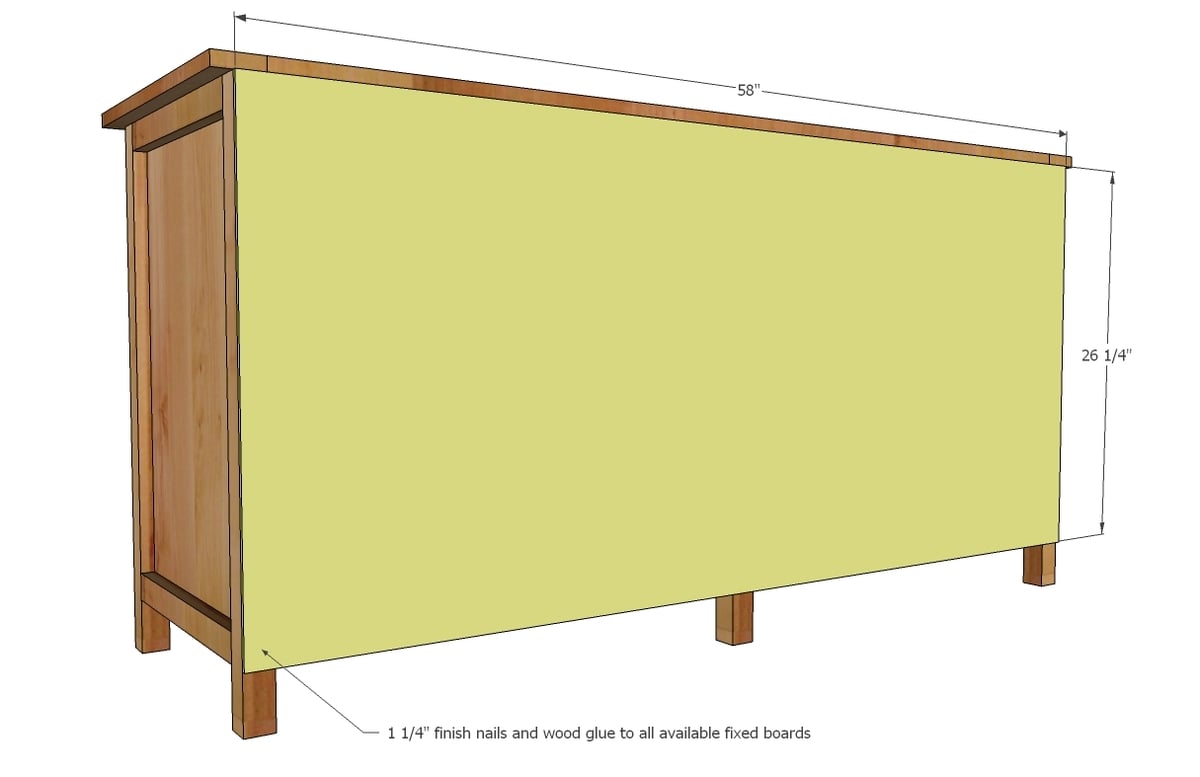
Cut the back from your 1/4" sheet of plywood. Tack on with 1 1/4" finish nails and wood glue.
Step 12
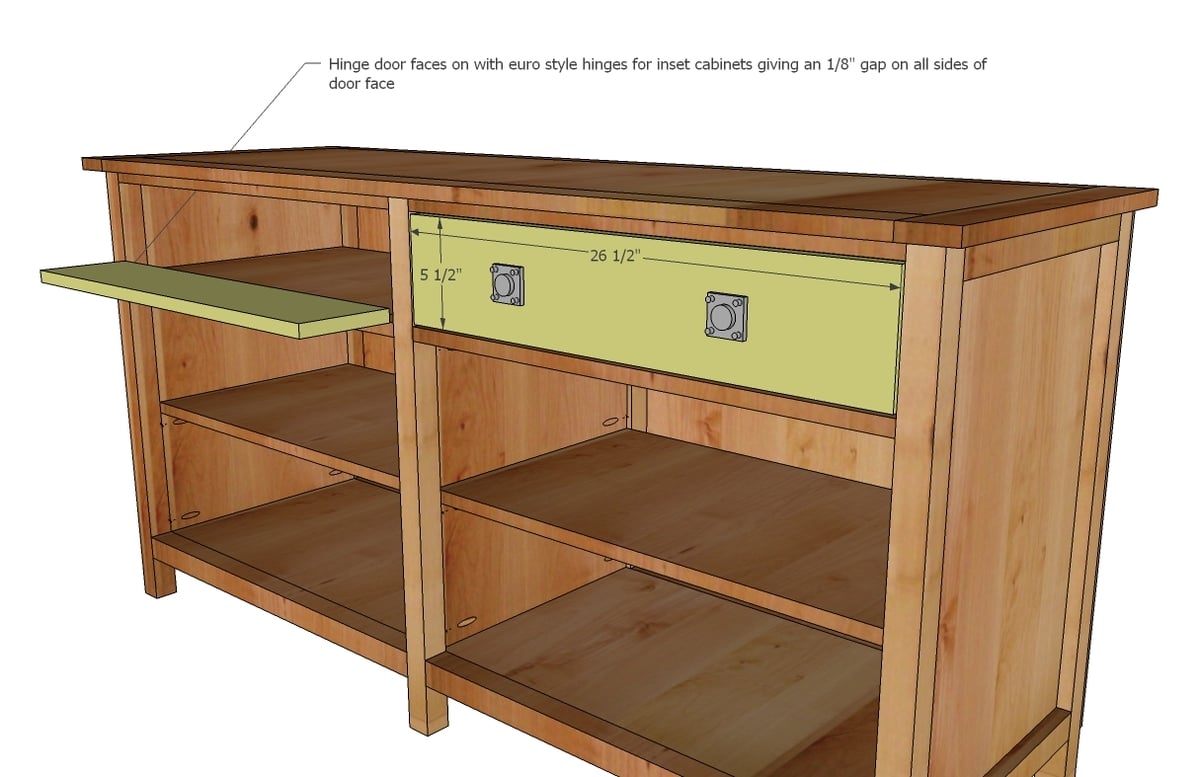
Cut your 1x6 boards to fit the door openings. Install with the Euro hinges, shown below:

Step 13
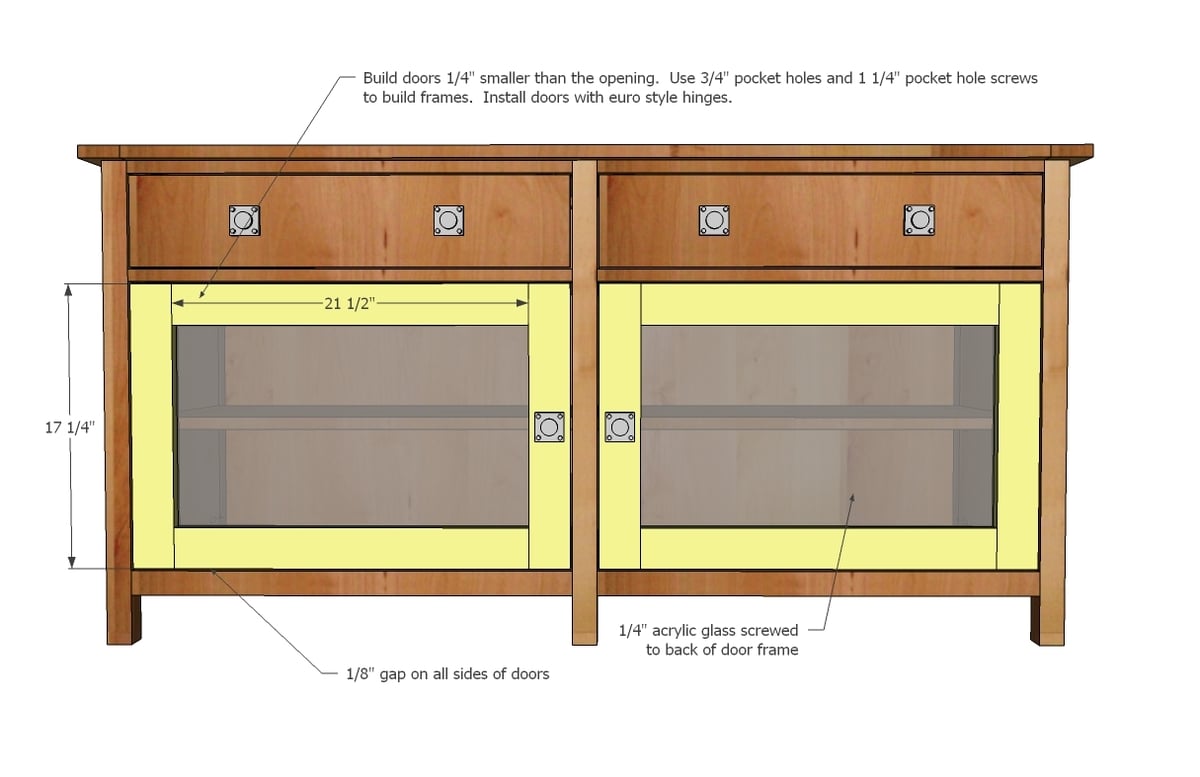
Measure the openings of your cabinet and build doors 1/4" smaller overall. Attach acrylic glass to backs and install in cabinet with Euro hinges.
It is always recommended to apply a test coat on a hidden area or scrap piece to ensure color evenness and adhesion. Use primer or wood conditioner as needed.


Comments
benfoldsfivealive
Fri, 10/07/2011 - 15:21
YAAAAY!
Thanks, Ana!
Lynn P (not verified)
Thu, 10/13/2011 - 08:21
Very nice!
This looks beautiful Ana. Thanks for another great project.
Guest (not verified)
Fri, 10/14/2011 - 21:23
Does anyone know where to get
Does anyone know where to get knobs like the ones in this collection? I have been eyeing the coffee table too, would love those plans...
Thanks!
Guest (not verified)
Thu, 11/03/2011 - 06:18
source for knobs
http://www.leevalley.com/en/hardware/index.aspx
try lee valley
Megan W
Sat, 10/15/2011 - 09:14
TOP PIECE
Hey Ana, how do we attach the top piece? the diagram points to a screwhole being used for the side pieces, right? thanks for your help and the plan...it is turning out beautiful so far!
Guest (not verified)
Thu, 11/03/2011 - 06:16
looking for similar knobs
Try lee Valley hardware hey have a pretty extensive selection
http://www.leevalley.com/en/hardware/index.aspx
Jean-Léo Gagnon (not verified)
Thu, 11/03/2011 - 16:42
Svp, du français
Bonsoir,
Vous avez un super beau site, seulement, si on pouvait avoir un peu de français, ça serait exytaordinaire!!!
Merci
storchinsky
Sat, 11/12/2011 - 06:04
Attaching top?
I have the same question as Megan W. above and I'm really hoping to build this this week. How do you attach the top? The diagram points to a screwhole which is used to attach the side pieces. I know the easiest thing to do would be to attach with nails from the top, but I had hoped to avoid the visible holes. I know you are busy with the Momplex (Awesome job, by the way, I can't believe what you guys are capable of!) but would appreciate the clarification.
Thanks for all the great plans!
Sherry
nicwolford
Thu, 01/26/2012 - 05:59
Attaching Top
I just drove a couple 1 1/4" self tapping pocket hole screws up through the top rail (the piece above the top doors) into the top. You're really just holding it in place since picking the whole unit up by the top would not be recommended (mine ended up being VERY heavy).
storchinsky
Thu, 01/26/2012 - 06:10
Thanks! I actually already
Thanks! I actually already built it, and did something similar. I predrilled holes at a slight angle through the top rail and used regular wood screws (countersunk). I still don't love that solution. We move frequently (husband is in the Cdn. military) and I am totally expecting that it will get lifted by the top at some point when I'm not watching! I do love the look of the finished piece!
stmartin84
Wed, 03/07/2012 - 13:01
Quick Question
This is exactly what my wife and I have been looking for. My question is where can I find the plans for the bookcases on each end? Also, does the remotes work with the electronics through the smoked glass when the doors are closed?
JessieAileen (not verified)
Sun, 05/27/2012 - 08:40
Book shelves
My husband wants us to make this really bad. We have been enjoying your site more than you can know. I was wondering if you were going to go the plans for the book shelves also? I think that I could figure something out that would look nice without plans, or make my own plans... it would not be the first time. But yours look amazing!! :D
Austin D (not verified)
Wed, 10/31/2012 - 08:14
Kreg Jig
Hello Ana, :) i am wondering about the kreg Jig not sure what one to purchase for these projects, which one would work best for all projects?
am building the whole Tryde collection including the media center and 2 towers for the entertainment center, help with what kreg jig to buy that would work for all projects so i don't have to buy more than one KREG JIG, would really help, thanks.
Austin.
mlydunt
Wed, 05/15/2013 - 18:32
Do you have plans for the
Do you have plans for the side book cases?
mikejoe13
Tue, 12/03/2013 - 17:04
Looks great
I've built a couple of your pieces already following your detailed instructions. They are very helpful. Planning on tackling this tv stand this weekend. Do you also have plans for the book cases, they look great as well. Thanks.
In reply to Looks great by mikejoe13
JoanneS
Tue, 12/03/2013 - 17:40
Plan link for media console tower
Here's the link to the plan for the media console tower:
http://ana-white.com/2011/10/benchmark-storage-or-media-tower
:)
Bev.Waltrip
Tue, 08/05/2014 - 17:11
Kreg jig wanna be
Ana, my daughter used this plan for her first project and purchased all the supplies she needed with one exception: an authentic kreg jig. She purchased an off shoot and now she knowers why you use the real deal. The screw holes were too close to the edge and the wood broke away from the screws. She now has a true kreg jig and she said she will not go the knock off route any more.
paarlberg
Fri, 07/31/2015 - 08:12
Just built a modified version of this.
Mine is 100 wide across the top. To secure the top properly, I used cleates on the bottom side of the top and were attached prior to installing the top. I predrilled the cleates for pocket screws to attach to the end panels and the legs. This allowed me to get the top nice and tight and then set it into place and then used screws to attach to the frame. It was my first furniture build (100% by myself). I haven't done the doors yet, just finished the rest a couple days ago and not sure if I want glass or solid panels..
I have been having issues uploading pics to ana-white.com, so no pics at the moment.