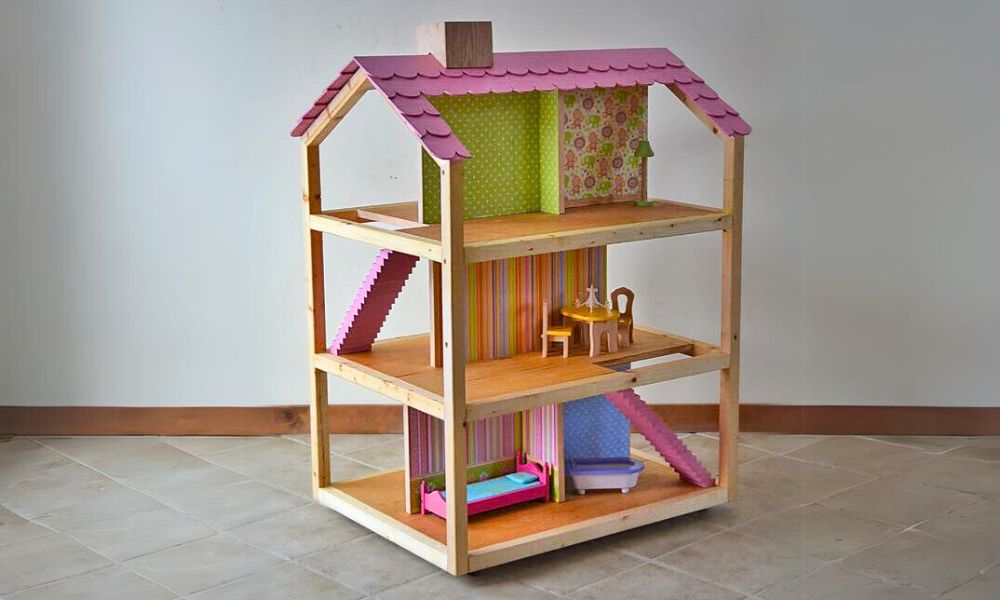


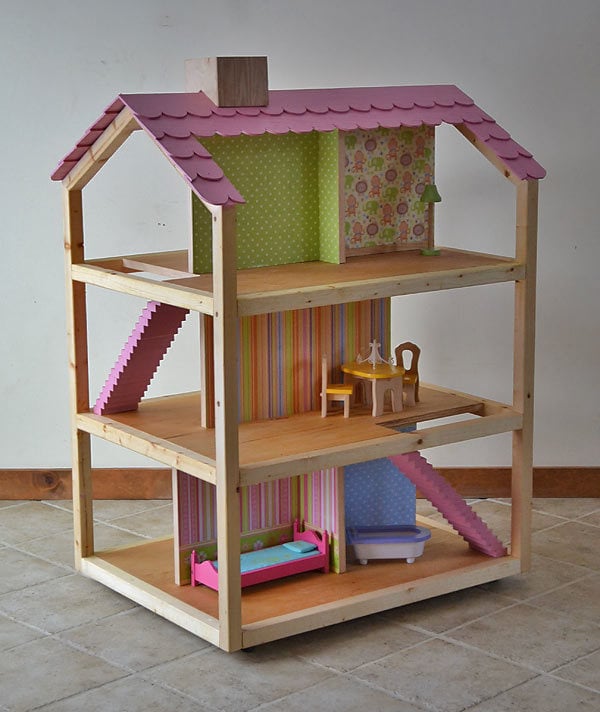
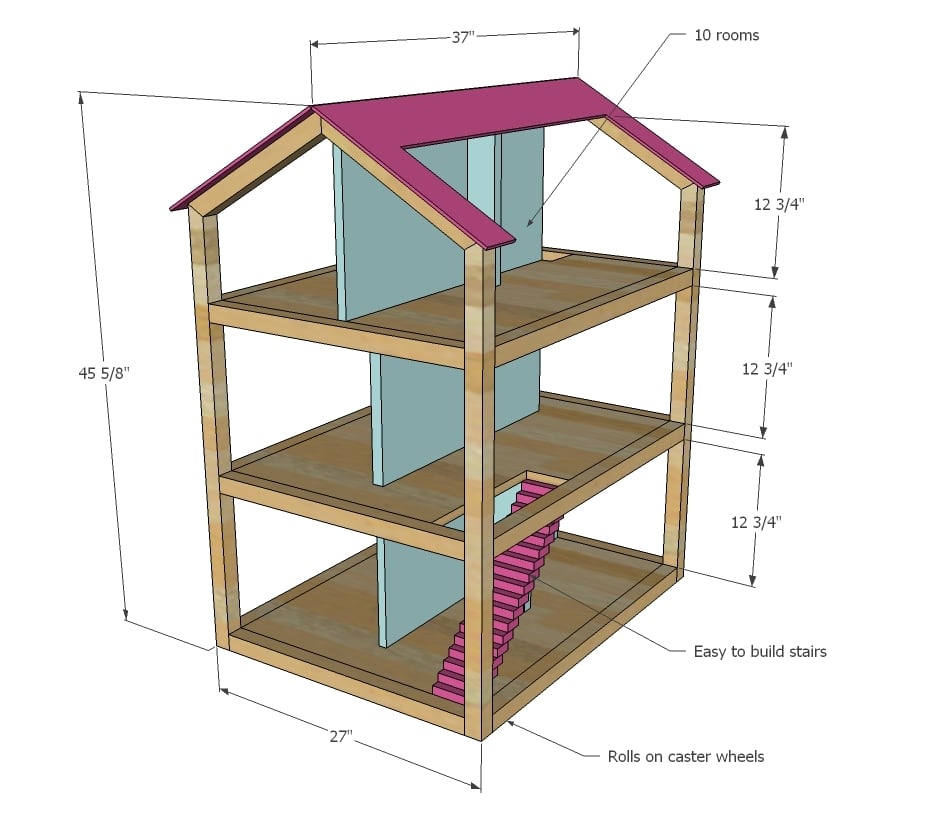
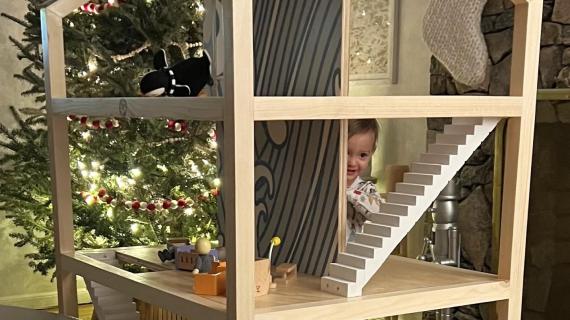
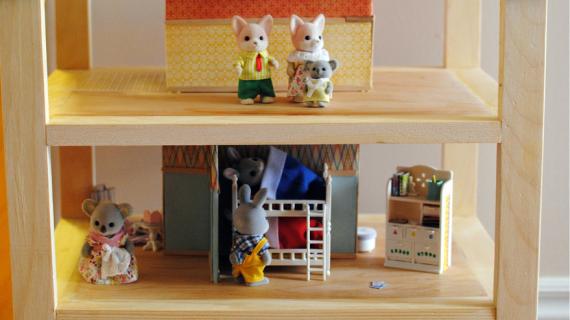
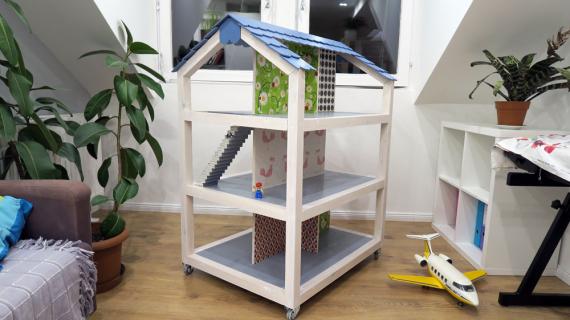
Build a three story open frame dollhouse perfect for 12" dolls with these free easy step by step do it yourself dollhouse plans! Hours of play from all sides makes this a dream gift!
Free step by step plans with detailed diagrams, shopping and cut list from Ana-White.com
Okay, you know that feeling, right before you go to bed on Christmas Eve, all the gifts wrapped, everything is perfect, and you are exhausted ... but you still can't sleep. Because you are just so excited to wake up and see the happy faces of your family enjoying Christmas morning.


Preparation
- 1 - sheet 3/4" PureBond Plywood
- 7 - 2x2 @ 8 feet long
- 1/4" plywood scraps for roof
- 2 - 1x2 @ 8 feet long for stairs
- 4 - 2" caster wheels and screws for 3/4" stock
- use either 3" self tapping star bit screws or 2 1/2" pocket hole screws, depending on your joinery technique
- 7 - 2x2 @ 32"
- 6 - 2x2 @ 24"
- 4 - 2x2 @ (Both ends cut at 30 degrees off square, ends are NOT parallel, long point measurement)
- 4 - 2x2 @ 37 5/8" (One end cut at 30 degrees off square, long point measurement)
- Plywood cut to diagram


Please read through the entire plan and all comments before beginning this project. It is also advisable to review the Getting Started Section. Take all necessary precautions to build safely and smartly. Work on a clean level surface, free of imperfections or debris. Always use straight boards. Check for square after each step. Always predrill holes before attaching with screws. Use glue with finish nails for a stronger hold. Wipe excess glue off bare wood for stained projects, as dried glue will not take stain. Be safe, have fun, and ask for help if you need it. Good luck!
Instructions
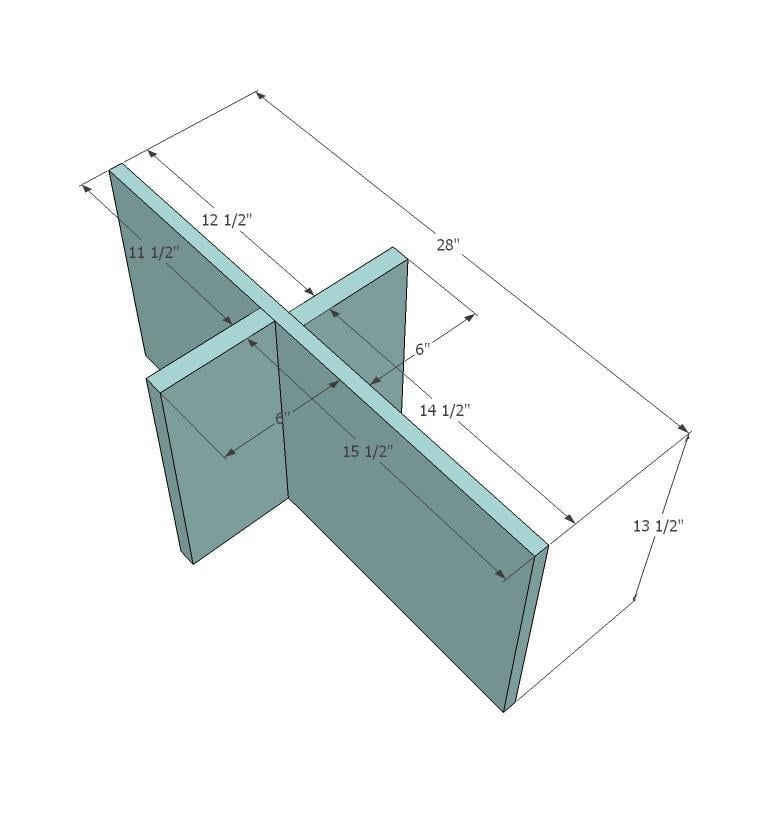
Step 1
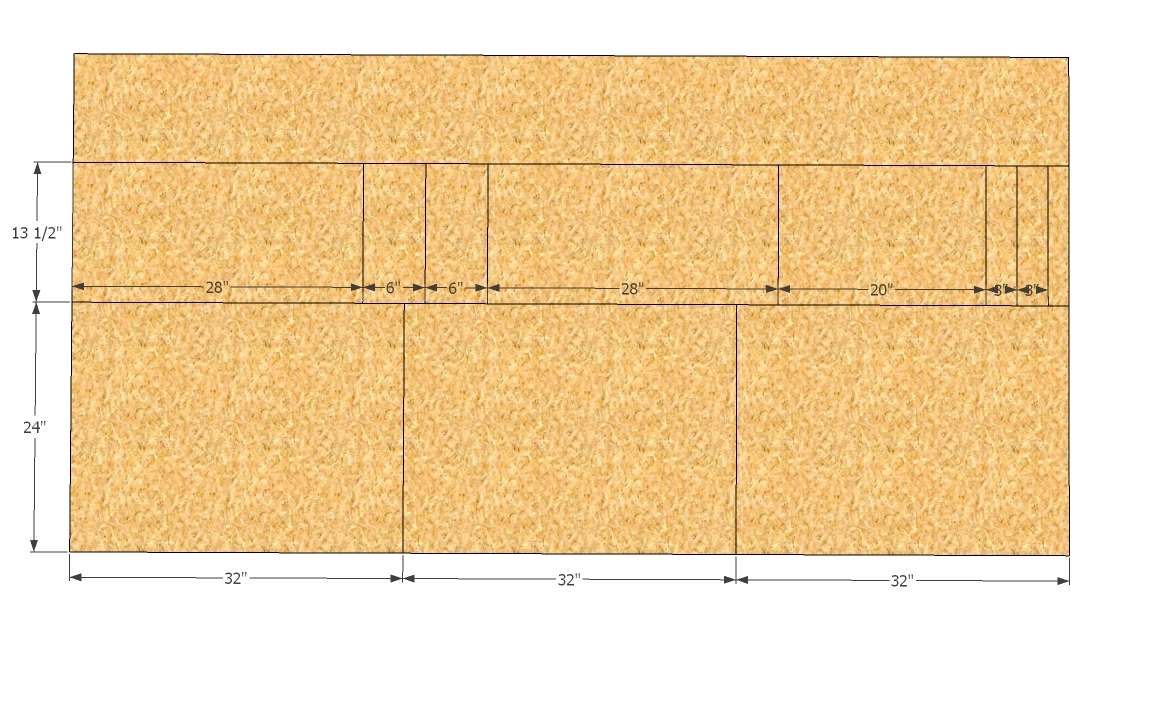
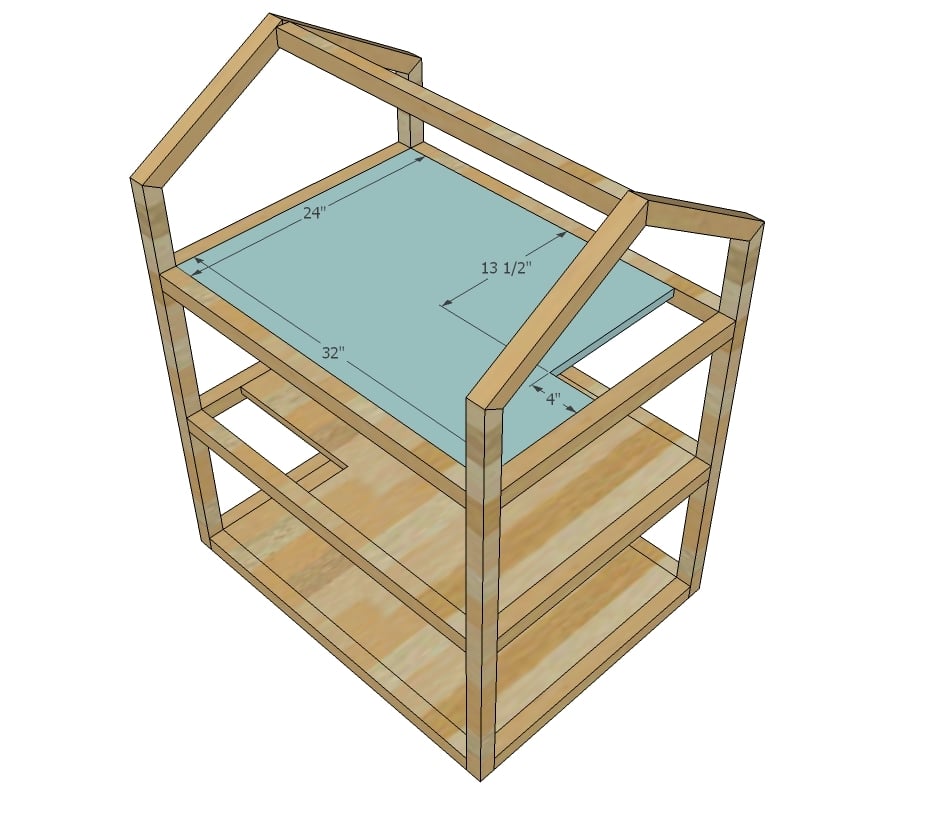
Have your home improvement center rip your plywood into a strip 24" wide and a strip 13 1/2" wide as shown in diagram. Then all you have to do is make the crosscuts.
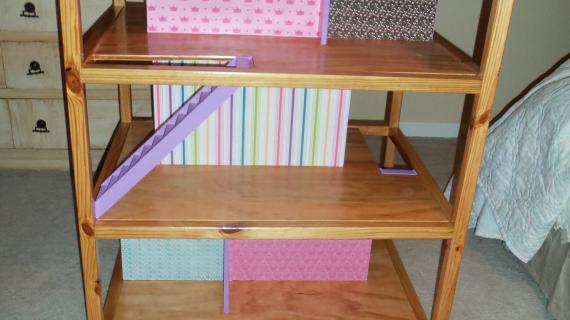
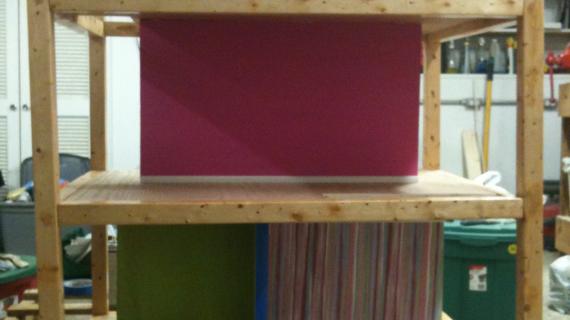
NOTE: I really considered using 1/4" plywood for the floors, but wanted to create a dollhouse that would last and last - and could even be used as a bookshelf later on. The 1/4" plywood is just too flimsy for that. Then I considered 1/2", but the price difference between 1/2" and 3/4" is only a few bucks, and 3/4" is just so much easier to work with because you have a wider area to work with. Of course you can modify this plan - if you made this dollhouse with 1/4" plywood, it would be CHEAP to make ... like $30 cheap.
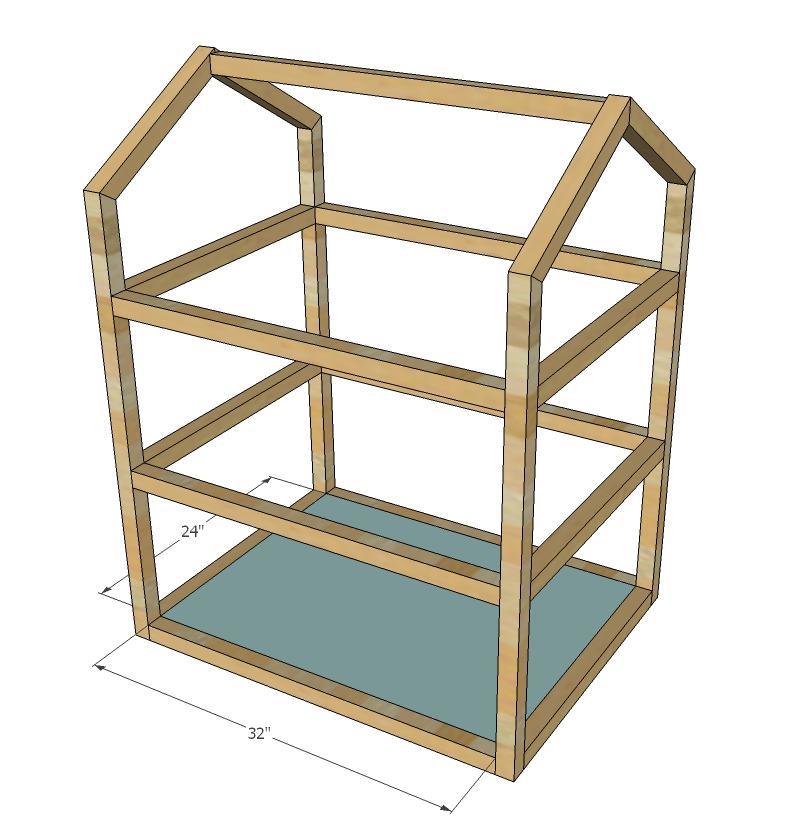
Step 2

Build the ends as shown above. You can use a countersink bit and 3" screws or the Kreg Jig and 1 1/2" pocket holes and 2 1/2 pocket hole screws. For the angled joints, just clamp, glue and predrill holes with a countersink bit. I only used one screw (and alot of glue) for each joint to avoid splitting the wood.
Step 3
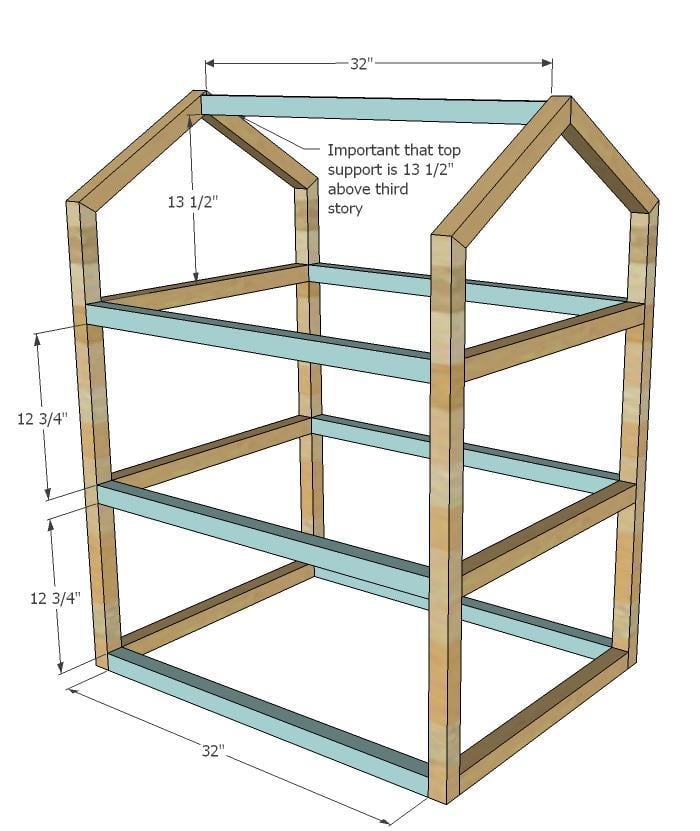
Now just join the two sides with the longer 2x2s. This is easy stuff. Just make sure that the top 2x2 is exactly 13 1/2" above the top story 2x2 - this does matter.
Step 4
I used pocket holes set for 3/4" stock and 1 1/4" pocket hole screws drilled on all sides of the plywood to secure to the frame. If you do not have a pocket hole jig, you can cut corner braces out of scrap 1x2s and fasten, or countersink (very carefully) long screws into the edges of the plywood.
Step 5
Step 6
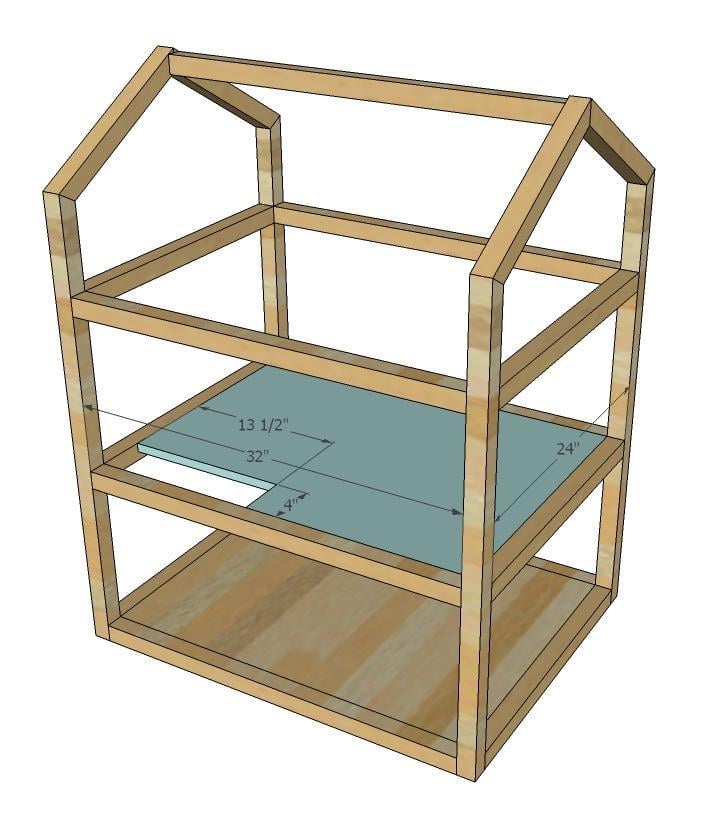
Cut stair openings out as shown in diagram and place 2nd story shelf as you did bottom story shelf.
Step 7
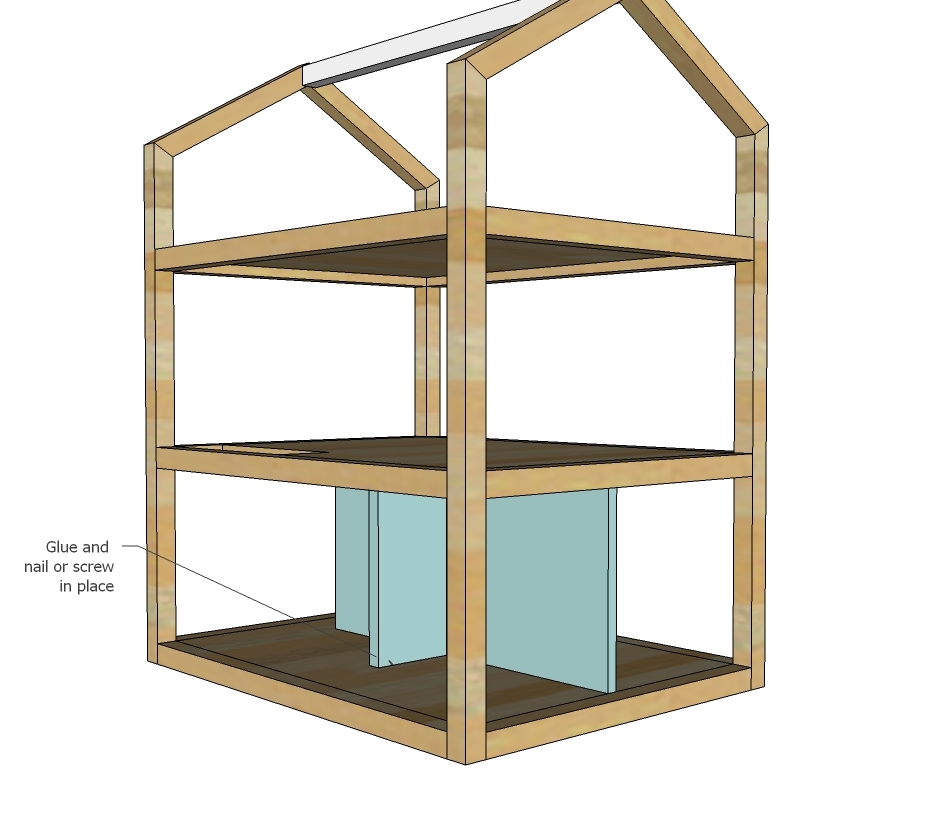
Add the bottom story walls. I used pocket holes, but you can also use nails here. TIP: Offset the walls between stories a tad so you have a spot to nail if you are using nails.
Step 8
Add the top story as you did the lower two stories.
Step 9
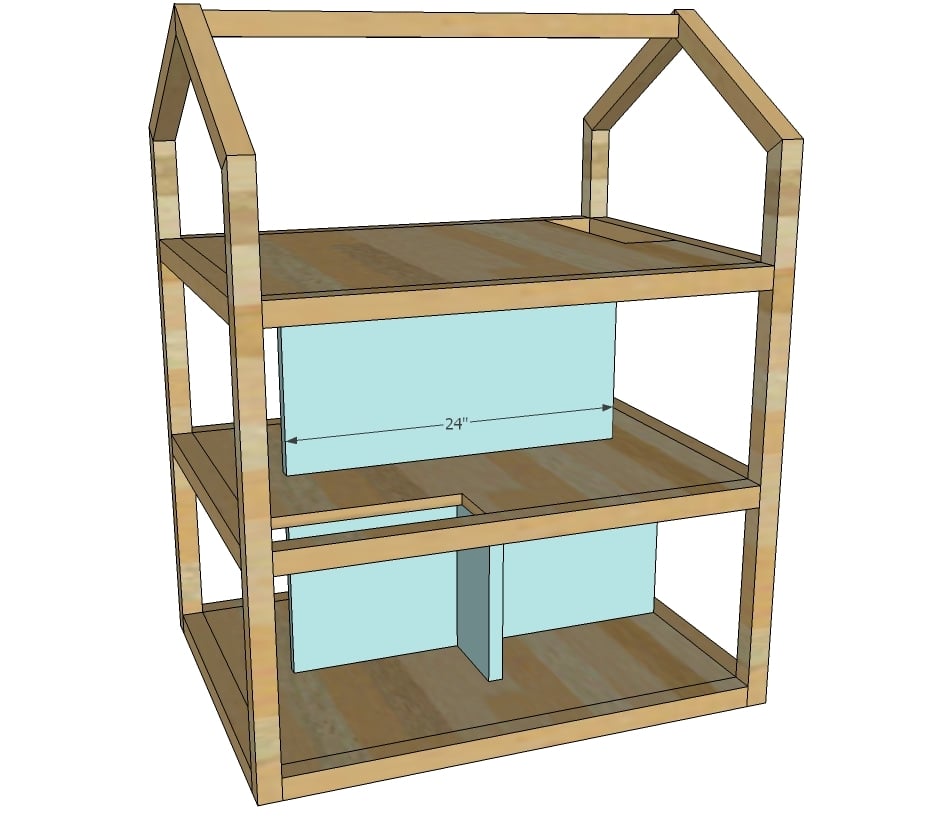
Followed by the middle story interior wall.
Step 10

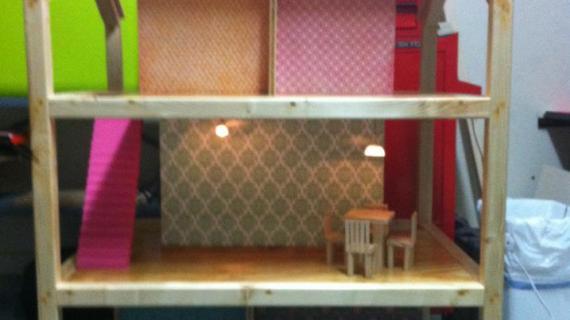
Finally, add the top story interior walls system.
Step 11

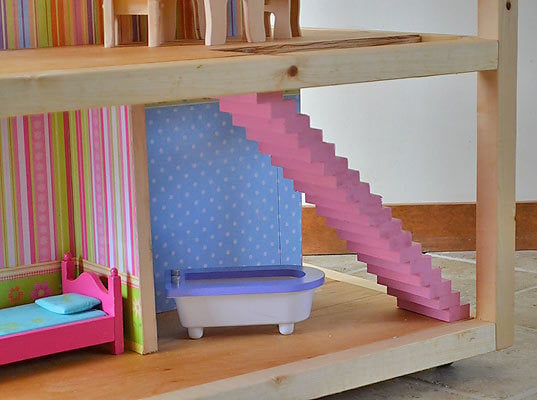
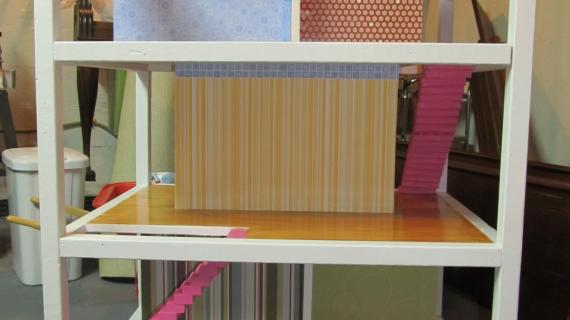
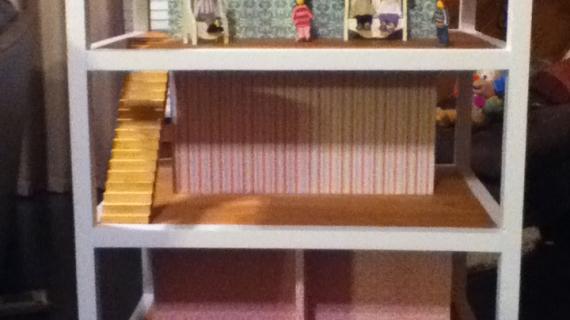
Stairs are built by stacking 1x2 boards staggered as shown above. Be very careful when nailing and use lots of glue.
Step 12
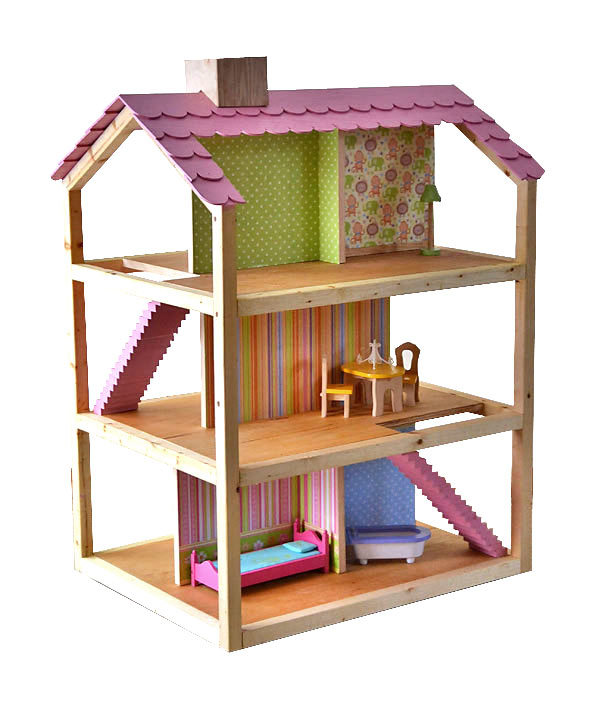
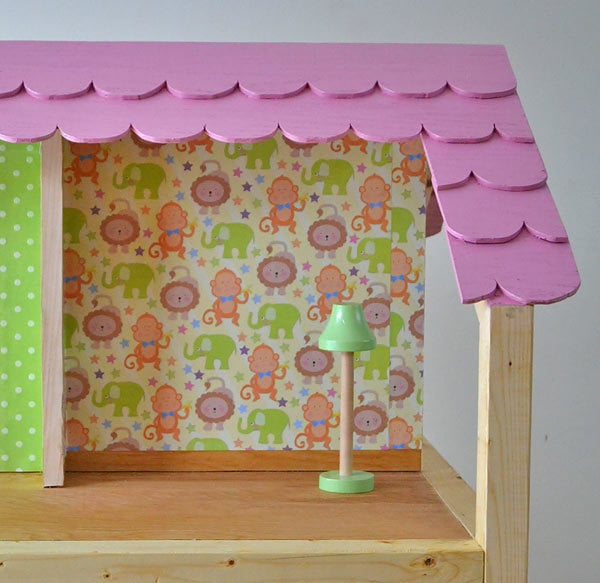
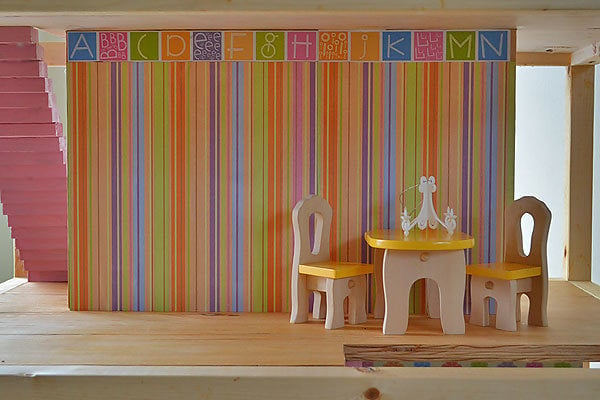
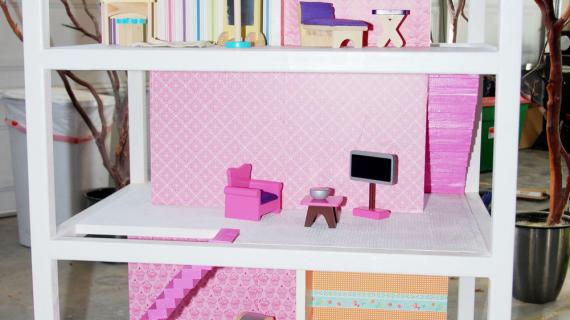
I then simply decoupaged the interior walls with contrasting scrapbooking paper. The roof is simply strips of 1/4" plywood - you could use 1/4" hobby stock as well - cut with a scalloped shape, lapped and nailed down.
Step 13
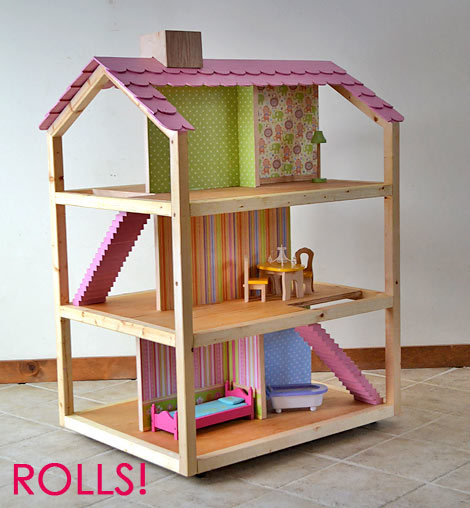
Attach 2" caster wheels to the 3/4" plywood base so wheels can swivel easily.
It is always recommended to apply a test coat on a hidden area or scrap piece to ensure color evenness and adhesion. Use primer or wood conditioner as needed.


Comments
NaviniFiji (not verified)
Sun, 10/30/2011 - 21:48
I'm So Happy I'm Practically Crying!
JUST a few hours ago I was scouring the web and your blog for an easy DIY dollhouse for my daughter. No offense to most of the others out there, but they're all so gawdy and over the top. I wanted something a little more classic looking and this is perfect. I'm planning on making this for my daughter for Christmas and I'll be able to completely customize every last decoration thanks to you. You're the best!!!
In reply to I'm So Happy I'm Practically Crying! by NaviniFiji (not verified)
Draftmen888
Sat, 12/12/2015 - 03:19
Dream house
My daughter also like to play with her dolls using different dollhouses.
To my mind Kidkraft is on of the best in the world!
In reply to I'm So Happy I'm Practically Crying! by NaviniFiji (not verified)
Smartmiltoys
Fri, 11/10/2017 - 05:07
This so chik dollhouse really
This so chik dollhouse really very cool! To my mind Annabelle dollhouse also not so bad. The best of them you may find on my website or on web shop Kidkraft.
loniwolfe
Sun, 10/30/2011 - 21:56
This is so Beautiful!!!
This is absolutely amazing! Great job!
(What is decoupaged?)
In reply to This is so Beautiful!!! by loniwolfe
Pam the Goatherd
Mon, 10/31/2011 - 07:37
Decoupage is when the paper
Decoupage is when the paper is glued to the surface of the wood and then completely coated with a top coat of a clear glue which dries to a protective coating. Mod Podge is the popular decoupage product these days. When I was younger we just used a watered down form of Elmer's White Glue because it dries clear.
Tsu Dho Nimh
Mon, 10/31/2011 - 07:45
decoupaged?
Decoupaged = Glued on with diluted white (Elmers) craft glue and water. Sealed on with another coat.
It might be easiest to mark the floor levels and wallpaper the walls before assembly.
navinifiji (not verified)
Sun, 02/26/2012 - 16:48
I'm decorating the walls now.
I'm decorating the walls now. I have to say I think it's easier once the walls are nailed together, but before you assemble the floors. After I decorated one side of the walls, I realized that I would eventually have to nail through the paper and leave a mark! So I would suggest building the walls, and then decorating, and then assembling the floors. Good luck!
In reply to This is so Beautiful!!! by loniwolfe
loniwolfe
Mon, 10/31/2011 - 09:11
Thanks!
Thanks!
leigh7911
Sun, 10/30/2011 - 22:00
Holy crackers.
Ana, you amaze me. I was going to do a dollhouse for my small human's third birthday, but ran out of time and just sewed a quick (robot!) cape instead. Was giving some serious thought to just buying her one for Christmas 'cause I couldn't find or make any plans I actually liked, but here you are...
Also, the stairs are *ingenious*, but thinking of cutting and nailing and gluing so many tiny pieces is kinda doing my head in a little. :)
April Tottle (not verified)
Sun, 10/30/2011 - 22:51
little girls
I'm so glad we have little girls around the same age. Every new project you post I absolutely adore and usually have been thinking about buying. I'm so glad you posted this in time for building it before Christmas! Your decorative touches are super adorable. What a great project, but now what can I build for my son? hmmmmmmmm, we'll see.
Thanks Ana, once again, you've impressed and inspired.
Guest (not verified)
Sun, 10/30/2011 - 22:53
Looks Great!
I was JUST looking at the KidKraft version online a few days ago! Yours totally looks store-bought (better actually!). My daughter already has a KidKraft doll house, but I love that this has three floors and is double sided - even if it is huge!
I'm thinking I have an unused set of Jenga type blocks that would work for the stairs...if there's enough.
Love, love, love the scrapbook paper wallpaper - looks awesome!
For accessories, we totally need a toilet plan! My 6 year old complains that hers is just a picture on the wall. :)
April Tottle (not verified)
Sun, 10/30/2011 - 23:10
Barn for the BOYS!
http://www.amazon.com/Plan-Toys-0714700-PlanToys-Barn/dp/B001E87B0O/ref…
Maybe next you can draw up plans for the little boys in our lives, actually the barn could be for both!
Alycia Woolsey (not verified)
Mon, 10/31/2011 - 10:25
barn for my girls!
My 4 year old daughter would LOVE a barn for this to put her animals in. This is going to be a year long project for me (for next Christmas) and would love to have a barn to go with it) :)
ashcolton (not verified)
Mon, 10/31/2011 - 04:53
I don't know what to say...
I was prepared to think about spending around $200 for my daughter's Christmas present. You have totally ROCKED my world this morning and I don't know how to thank you. I honestly don't know what to say!
Guest (not verified)
Mon, 10/31/2011 - 05:40
boys too
first thing I think is "darn,I have my gift already for my little girl,but this would make a cool BatCave for the boys" I'm hopping I can talk my husband in to making this as a Batcave or something and just paint it darker and the boys can use it for all there little action figyers. I'd have loved to have a dall house like this growing up.
Margaret Kubiszyn (not verified)
Mon, 10/31/2011 - 05:54
Bat Cave
It would be so cool to make it as if it is Bruce wayne's mansion - have the top two floors be a "normal" house, and the bottom floor a bat cave with a fire pole instead of stairs!
Jamie Yates (not verified)
Mon, 10/31/2011 - 06:30
I might just skip the stairs altogether...
I remember my Barbie dream house had an elevator. I wonder if we could rig one up some how? I love this. My son loves his Playmobile doll house, but the pieces are just too small. We also just had a daughter and I wanted to build something they both could play with in the coming years. Perfect.
Pam the Goatherd
Mon, 10/31/2011 - 07:41
I was so excited to see these
I was so excited to see these plans this morning! Printing this out to put in the "build for the grandchildren" file! Thanks, Ana!!!
MicheleC (not verified)
Mon, 10/31/2011 - 10:41
I have also been hunting for
I have also been hunting for plans for a sturdy doll house, so Ana you are a Christmas miracle. I'm thinking maybe my son would like one made into a firehouse/police station. Some upstairs sleeping quarters, a pole instead of stairs and a place for the cars on the bottom. Even add a jail cell if doing a police station.
Thanks again Ana!
Indiri (not verified)
Mon, 10/31/2011 - 14:15
simpler stairs from a 2x4
If I could make a suggestion for the staircase? My dad showed me an easier and faster way to build stairs out of a single 2x4 that I loved (I say this because I should point out that I didn't think of this myself). It's also a little stronger to stand up to a child beating on it.
If you have a tiltable miter saw or circular saw:
Tilt the blade at a 45 degree angle and cut along the 2x4 to make the front of the stairs. Then turn the board around and cut the other direction to make the tops. The end board, if you lay it down, will be flat on the bottom but look like triangles (or teeth) on the top. Tip up and nail it in for instant stairs.
There's a picture of his staircase here:
http://indigoamethyst.blogspot.com/2011/05/once-upon-dollhouse-complete…
Also, if you want a chandelier in your dollhouse you can use layered mirror clips (the little clear flower things) and an eyelet screw to make a chandelier really quickly. There's a picture of it on the same link.
Indiri (not verified)
Wed, 11/02/2011 - 21:08
2x4 Stairs
I added another post to explain the 2x4 stairs and how to make them. It has a new side profile so it's easier to see what my dad did. I hope it helps.
http://indigoamethyst.blogspot.com/2011/11/dollhouse-stairs.html
Linda7
Mon, 11/07/2011 - 18:07
2 x 4 stairs for dream doll house
Thanks so much for taking the time to illustrate how to build the stairs from a 2 x 4. The post is very useful!
josheli
Mon, 10/31/2011 - 14:53
doll house plans
Again you came up with awesome plans! Is there any way to make the floors separately and then be able to put it together? I would like to have DH make this for one of our grand kids but since it's so large and heavy shipping it to South Carolina from SoCal is out of the question. :-)
annavg (not verified)
Mon, 10/31/2011 - 15:03
:D
This is the most adorable dollhouse I've ever seen. You did an awesome job! i love your blog!
k g (not verified)
Mon, 10/31/2011 - 20:04
What about a barn/batman
What about a barn/batman mansion on one side and a more girly side on the other? (For those that want to do something for boys.)
Ana, this is amazing! And yes, I like so many others am totally making this for Christmas. Thanks so much!!! (I didn't even know the other existed and I LOVE this one!) Yay Yay!!
YOU are amazing. Thanks again!
Melanie (not verified)
Tue, 11/01/2011 - 07:16
This is hardly a furniture
This is hardly a furniture *plan*, but as a kid, I used wooden thread spools as table bases and stools for the dollhouse at my babysitter's home. I would glue a larger circle of balsa on top of a larger one for a nice pedestal table, etc. Craft stores also sell very small wooden flower pots that would be good for lamp shades if turned upside down and placed on dowels w/ a little base, like the standing lamp in your pictures.
Guest (not verified)
Tue, 11/01/2011 - 09:45
Dollhouse furnishing ideas
For those that are looking for dollhouse furnishing ideas, here are a few:
I made Ana's other dollhouse last Christmas but modified it to fit Barbies. For those that wonder what "decoupage" looks like, I decoupaged scrapbook paper onto the floors and walls to act as tile, rugs, and wallpaper. You can see that project here:
http://piecesforreese.blogspot.com/2011/01/barbie-ana-white-new-dollhou…
Also, http://myfroggystuff.blogspot.com/ is a blog dedicated to Barbie DIY! She has lots of cute ideas, like a TV, wall clock, a laundry room, bathroom, mailbox, kitchen, and even a sofa! They're all made from RECYCLED materials in her own home, but always turn out looking ADORABLE!
I use http://www.printmini.com/printables/pp.shtml for miniature printable items, like Barbie sized posters, books, magazines, assorted food boxes, and even a passport and laptop! Just print, fold, and tape or glue. I took the wall posters to my local teacher's supply store and had them laminated (just under $1) to help them last longer.
Barbie couch out of recycled materials: http://familyfun.go.com/crafts/doll-couch-670121/
OR
http://www.angelfire.com/ab/lisasdolls/sofa.html
OR
http://www.dolldivas.net/Dioramas/2010%20Dioramas/DD-diorama-Debi-Sofa…
Barbie bed: http://obsessivelystitching.blogspot.com/2011/03/barbie-bed-dollar-proj…
Barbie kitchen: http://www.dolldivas.net/Dioramas/2010%20Dioramas/DD-diorama-StinkersKi…
This whole website has lots of ideas: http://www.dolldivas.net/dolldivas-dioramas.html
Hope that helps to liven up the creative spirit! :)
nealandlori
Tue, 11/01/2011 - 11:51
LOVE IT!
I love this dollhouse, but have no idea where to put it....may have to get creative! I just finished a barbie camper that I made for my daughter's birthday, and I compketely furnished it. Chairs and couches can easily be made with leftover scraps of 2x2 and small pieces of plywood, then just make little slipcovers for them and they would be perfect. And I never did come up with a toilet....ended up buying the barbie i can be babysitter that had a toilet, sink and two barbies fo $12. I will try to post plans for all soon! And i LOVE this dollhouse!
bhoppy
Wed, 11/02/2011 - 05:15
furring strips
I so want to build this for my munchkin for Christmas!! BUT I gotta say that the selection of 2x2 furring strips at the local Blue and Orange stores never look as good as the ones you use Ana!! They are always so knotty and crooked. I love the natural look on the wood but I always have to use so much wood filler on the furring strips I've used on projects... but they've all been painted afterwards. Do you think I'd have better luck finding nicer ones at a lumber yard?
In reply to furring strips by bhoppy
ltl_lisa
Wed, 11/02/2011 - 08:15
Create your own
I have the same issue with 2x2. The ones kept indoors seem to be the worst. If you have access to a table saw you can create your own by ripping them down the middle and they are STRAIGHT!
mebohn
Wed, 11/02/2011 - 06:15
Boys and girls!
I have a little boy and a little girl that I would love to build this for Christmas! I LOVE that some of you have suggested a Bat Cave for the boys - mine would go nuts over it! Now to do a little research for what the inside of the mansion would look like. Hmmmm.... Can't wait to see some of yours for inspiration!
ltl_lisa
Wed, 11/02/2011 - 10:20
Drawers???
I am building this for my niece for Christmas, right after I finish my Farmhouse Table.
I was wondering how I could build little drawers or 1 larger drawer underneath it?
I don't think adding a couple of inches to the heigh would make a big difference, but it might make mom very happy to have that storage space.
Tsu Dho Nimh
Wed, 11/02/2011 - 12:06
Put a drawer underneath?
A box underneath for storing dolls and furniture would be great.
Make a 3/4 plywood box under the house, for an elevated base, using the bottom floor as the top of the box. Put the wheels on the base. Add drawers to the box.
This would mean cutting one more "floor", and the sides of the storage part, then whatever you need for the drawers. I'm lazy, so I would probably make the box tall enough to stick plastic drawers from the housewares department into and call it good.
http://www.amazon.com/Melissa-Doug-Self-Storing-Furnished-Dollhouse/dp/…
http://www.manhattandollhouse.com/html/barbie_dollhouse_1.html
Tiffanie (not verified)
Wed, 11/02/2011 - 22:53
Homemade dollhouses!
Hi Ana,
The dollhouse is really cute, and has something I find very important in dollhouses....stairs! I dislike having to pretend there are stairs in our Playmobil structures. I mean to include one someday in this dollhouse I built from scrap material for my daughter, but haven't gotten around to it yet!
I also really like the ability for your dollhouse to be played with from more than one side. I did that with my daughter's as well. It is very open. Here's the link to it, and it was also featured in Ohdeedoh this summer!
http://bloggingcornerblog.blogspot.com/2011/08/building-dollhouse-from-…
I am glad to have found your website today via Ohdeedoh and look forward to sitting down and peeking around in it!
Tiffanie
corner blog
http://bloggingcornerblog.blogspot.com/
Guest (not verified)
Thu, 11/03/2011 - 23:28
This is actually the So Chic
This is actually the So Chic dollhouse manufactured by KidKraft. Nice try!
idahoowl (not verified)
Mon, 11/07/2011 - 00:32
'Nice try!' yourself, lol.
'Nice try!' yourself, lol. Maybe go have a look at the So Chic, 'k?
In reply to This is actually the So Chic by Guest (not verified)
loniwolfe
Mon, 11/07/2011 - 05:16
Perhaps if you'd read the
Perhaps if you'd read the post you'd have seen where she mentions that this dollhouse was inspired by KidKraft's So Chic dollhouse.
This blog was, after all, originally titled Knock-off Wood.
Tim Gary (not verified)
Sun, 11/18/2012 - 07:38
True, but I believe she
True, but I believe she admits this. And, that one goes for $200! I built mine for under $100, and had so much fun doing it. My daughter loved watching me build it, and that is worth so much more than money!
SherI (not verified)
Fri, 11/04/2011 - 03:24
Stairs
For stairs I was wondering if you could just take dominos and glue them together rather than all of that cutting. Might give it a try! love the dollhouse...it is like the So Chic but a heck of a lot cheaper to make it yourself! And more fun!
CassieD
Sat, 11/12/2011 - 18:30
Ideas for funiture
I had been hoping someday I would find time to write up how I did my kids dollhouse furniture, but never got the time. Here a link of the page on my very neglected website: http://bluedinosaurs.com/dollhouse-furniture-wood/
Maybe this request will spur me into action to write the instructions up.
Guest (not verified)
Mon, 11/14/2011 - 20:40
is this dollhouse barbie doll
is this dollhouse barbie doll sized or smaller? i know the kidkraft ones say for 12 in dolls or whatever
Karlise (not verified)
Sat, 11/19/2011 - 06:23
My dad and hubby are in the
My dad and hubby are in the midst of building this dollhouse at this very moment for my baby girl. I've been looking for furniture and wonder if this furniture looks like it would fit in your opinion. It's ugly, but paintable. http://www.amazon.com/Badger-Basket-Doll-House-Furniture/dp/B004LWXAXW
Karlise (not verified)
Sun, 11/20/2011 - 09:23
Dollhouse is huge!
Went ahead and bought the furniture...after seeing an actual photo of our dollhouse in progress, I don't think it will be a problem to fit. This house is so much bigger than your photo makes it seem. LOL I've got to make room!
JohnBen (not verified)
Thu, 11/24/2011 - 18:34
Who cares if it's from another design
Building one for my granddaughters. And raising them the way I was raised I know in my heart that this dollhouse built by ME will mean more to them later than anything made overseas by slave labor. Hats off to you Ana. You helped alot of people make life a little better by sharing this.
Ana White
Thu, 11/24/2011 - 20:32
Thanks everyone, yes, this
Thanks everyone, yes, this dollhouse is most definitely inspired by the Kid Kraft So Chic dollhouse .... that was most likely inspired by the Voila Dollhouse ...
Christine (not verified)
Sat, 11/26/2011 - 20:31
Missing from cut list
Hi Ana!
Thank you so much for the plans!
My husband and I are about to build two of these for our girls and we just realized we are missing a few pieces because they were not on the cut list.
The 15 5/8th pieces that make up part of the roof.
We didn't notice until now as we are about to put it together.
Thanks again! :)
Nuccatree (not verified)
Sun, 11/27/2011 - 19:52
Just SIMPLY Amazing
What a great set of plans! Full assembly within four hours. Just did a final sanding and my wife is very excited for Christmas to give this to our little girl.
ROOF CONSTRUCTION: I used a scrap piece of beadboard which I cut as a two-pcs roof section, one for each side. Gives the appearance of the steel roof structure and saves even more time.
Thanks for a great set of plans!
Maren (not verified)
Tue, 11/29/2011 - 10:16
Pocket holes on angled joints
After some experimentation today I discovered the perfect formula for using pocket holes on the 30 degree angled joints. Set your pocket hole jig for 1 1/4" stock and use 2" pocket hole screws. Worked perfect!
Thanks Ana for the wonderful plan. My daughter will be so excited to get this on Christmas morning!
Emily W. (not verified)
Mon, 12/19/2011 - 14:20
RE: Pocket Holes on Angled Joints
While I really appreciated the guidance, these settings didn't quite work for me; the 2" screw ended up being too long and piercing through to the other side. I played around with some scrap, and these settings worked best for me:
bit collar set at 1"
hole guide set at 1 1/4"
using 1 1/2" screw
I just thought I'd comment in the case that someone else was also experiencing this problem. Well, back to building... Christmas is soon approaching!
MicheleC (not verified)
Mon, 12/05/2011 - 08:50
What did you spend building this?
This is for everyone who has built one of these. How much did you spend building it?
Thanks!