

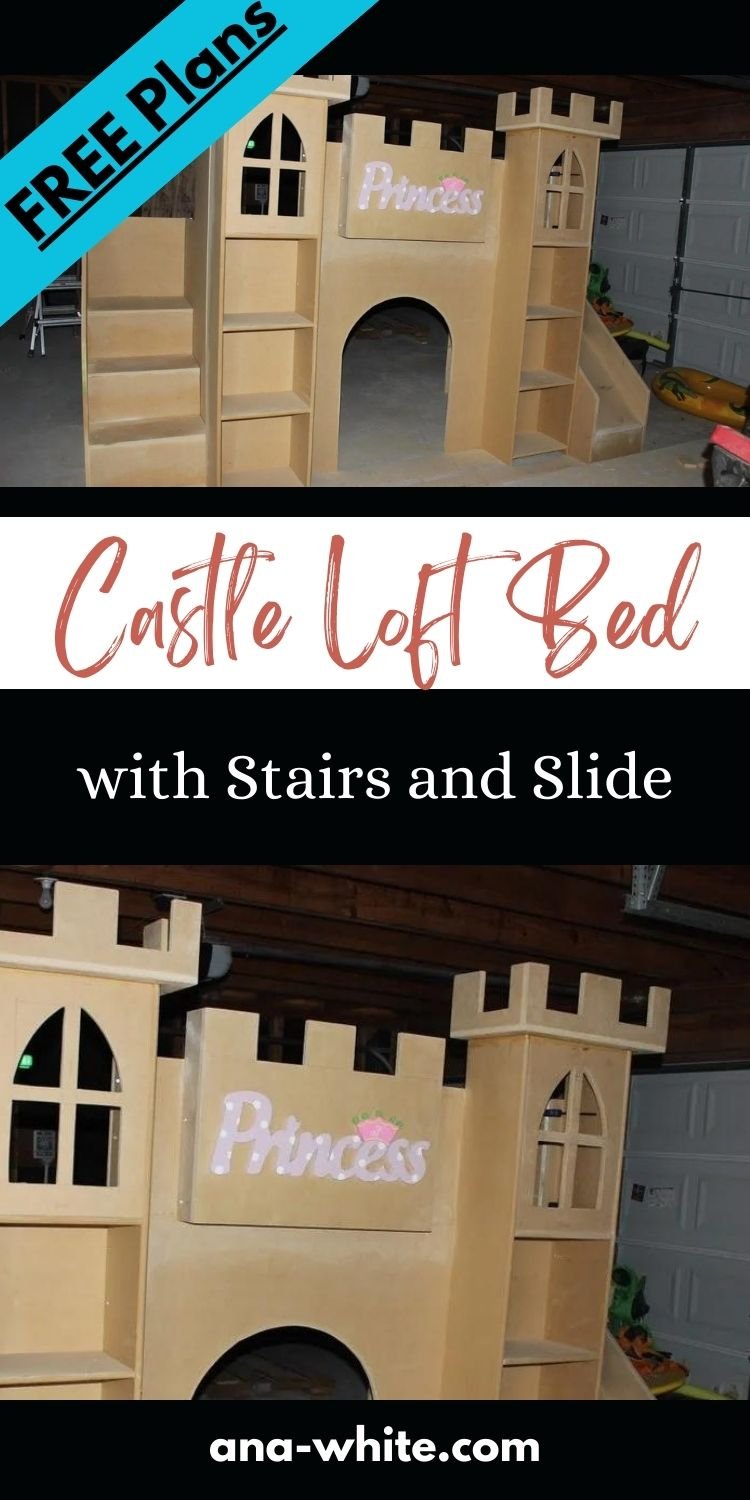
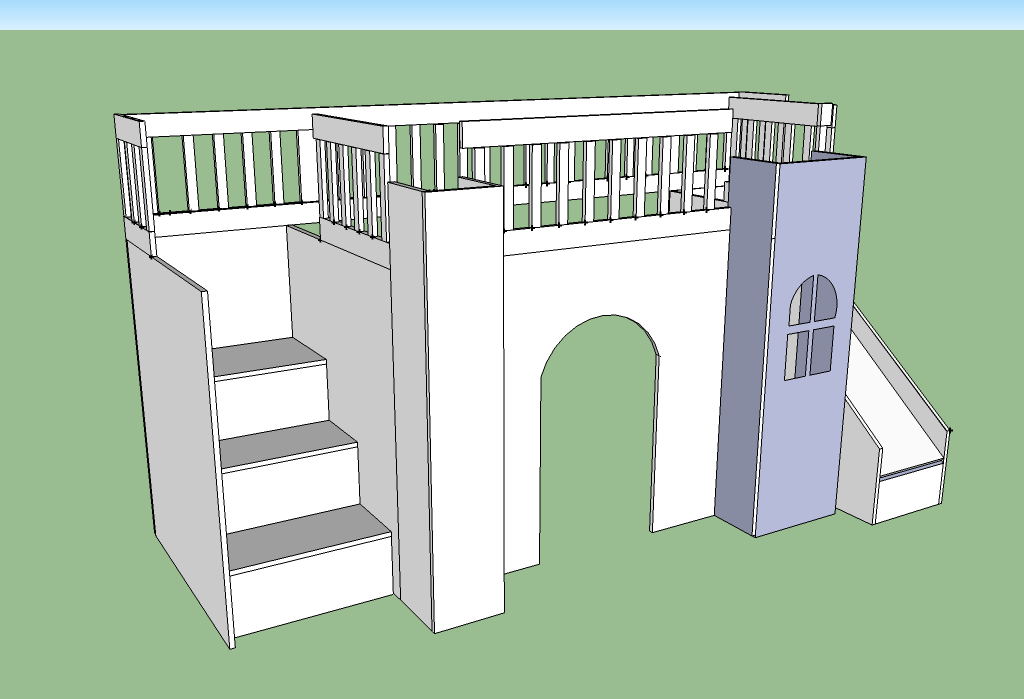
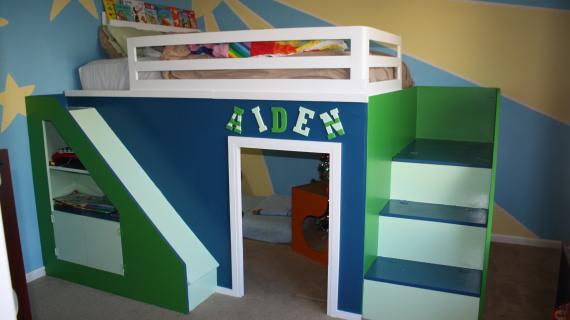
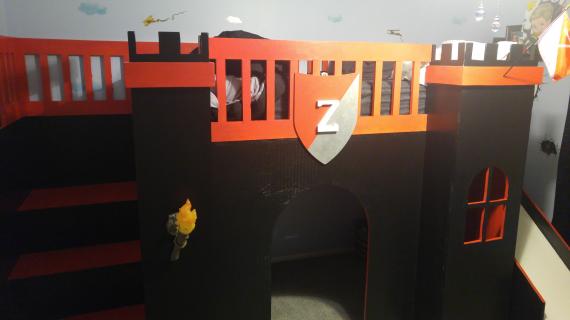
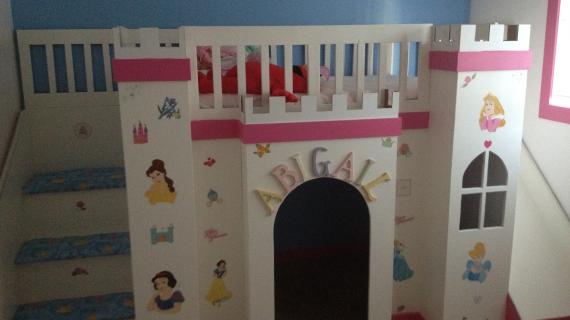
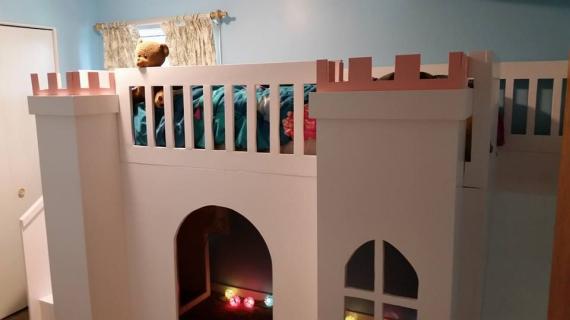
You don't have to be royalty to give your kids a castle. Build your own DIY castle loft bed with our free woodworking plans. Browse reader submitted photos for ideas and advice.
Plans created by fsmumford
Pin For Later!
Preparation
- 6 sheets of 3/4" plywood
- 11 - 1x2 at 8'
- 8- 1x3 at 8'
- 7 - 1x4 at 8'
- 2- 2 x 2 at 8'
- 1/8" plywood (1/4 sheet or 1/2 sheet depending on how you finish the towers)
- 2 - 3/4" Plywood 56.5" x 48" (Slide sides)
- 1 - 3/4" Plywood 17.25" x 48" (Slide back)
- 2 - 3/4" Plywood 40" x 48" (Stairs side)
- 1 - 3/4" Plywood 26" x 48" (Stairs back)
- 1 - 3/4" Plywood 2.25" x 48" (Front right section)
- 1 - 3/4" Plywood 47" x 48" (Front middle)
- 1 - 3/4" Plywood 11" x 60" (Tower front)
- 1 - 3/4" Plywood 18" x 60" (Tower front)
- 4 - 3/4" Plywood 10" x 60" (Tower sides)
- 1 - 3/4" Plywood 15" x 24.5" (Top Stair)
- 2 - 3/4" Plywood 11.25" x 24.5" (Lower Stairs)
- 1 - 3/4" Plywood 24.5" x 29.25" (Top Stair Support)
- 1 - 3/4" Plywood 24.5" x 19.25" (Middle Stair Support)
- 1 - 3/4" Plywood 24.5" x 9.25" (Bottom Stair Support)
- 1 - 3/4" Plywood 15.75" x 13" (Slide platform)
- 1 - 3/4" Plywood 15.75" x 57" (Slide)
- 1 - 3/4" Plywood 15.75" x 41.25" (Slide platform support)
- 1 - 3/4" Plywood 15.75" x 7 5/8" (Slide bottom support)
- 2 - 3/4" Plywood 16.5" x 10" (Tower seat and shelf)
- 4 - 3/4" Plywood 9.5" x 10" (Tower shelves)
- 4 - 1x2 at 14.25" (Upper stair support)
- 8 - 1x2 at 10.5" (Lower stair supports)
- 2 - 1x2 at 54" (Slide supports)
- 2 - 1x2 at 11.5" (Slide platform support sides)
- 2 - 1x2 at 12.25" (Lower slide platform support)
- 1 - 1x2 at 15.75" (Slide platform support rear)
- 2 - 1x4 at 15 7/8" (Railing outside stairs)
- 2 - 1x4 at 25" (Railing inside stairs)
- 2 - 1x4 at 47" (Railing front center)
- 2 - 1x4 at 2.25" (Railing front right)
- 2 - 1x4 at 25" (Railing inside slide)
- 2 - 1x4 at 13" (Railing inside stairs)
- 2 - 1x4 at 115.75" (Railing back)
- 56 (approx) - 1x2 at 11.5 (Railings)
- 2 - 2x2 at 77.5 (Mattress supports)
- 16 - 1x3 at 40" (Mattress supports)
- 1/8" Plywood cut per instructions (depends on how you want to finish)
While I have double checked the accuracy of my figures, I would recommend cutting as you go to verify that your measurements are exact for your project.


Please read through the entire plan and all comments before beginning this project. It is also advisable to review the Getting Started Section. Take all necessary precautions to build safely and smartly. Work on a clean level surface, free of imperfections or debris. Always use straight boards. Check for square after each step. Always predrill holes before attaching with screws. Use glue with finish nails for a stronger hold. Wipe excess glue off bare wood for stained projects, as dried glue will not take stain. Be safe, have fun, and ask for help if you need it. Good luck!
Instructions
Step 1
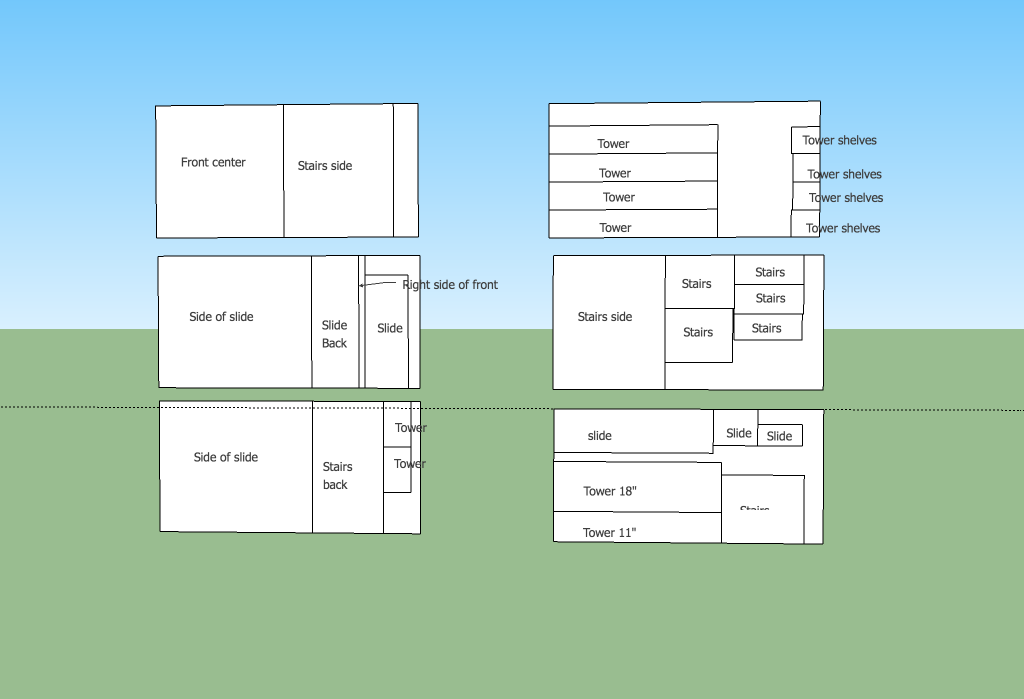
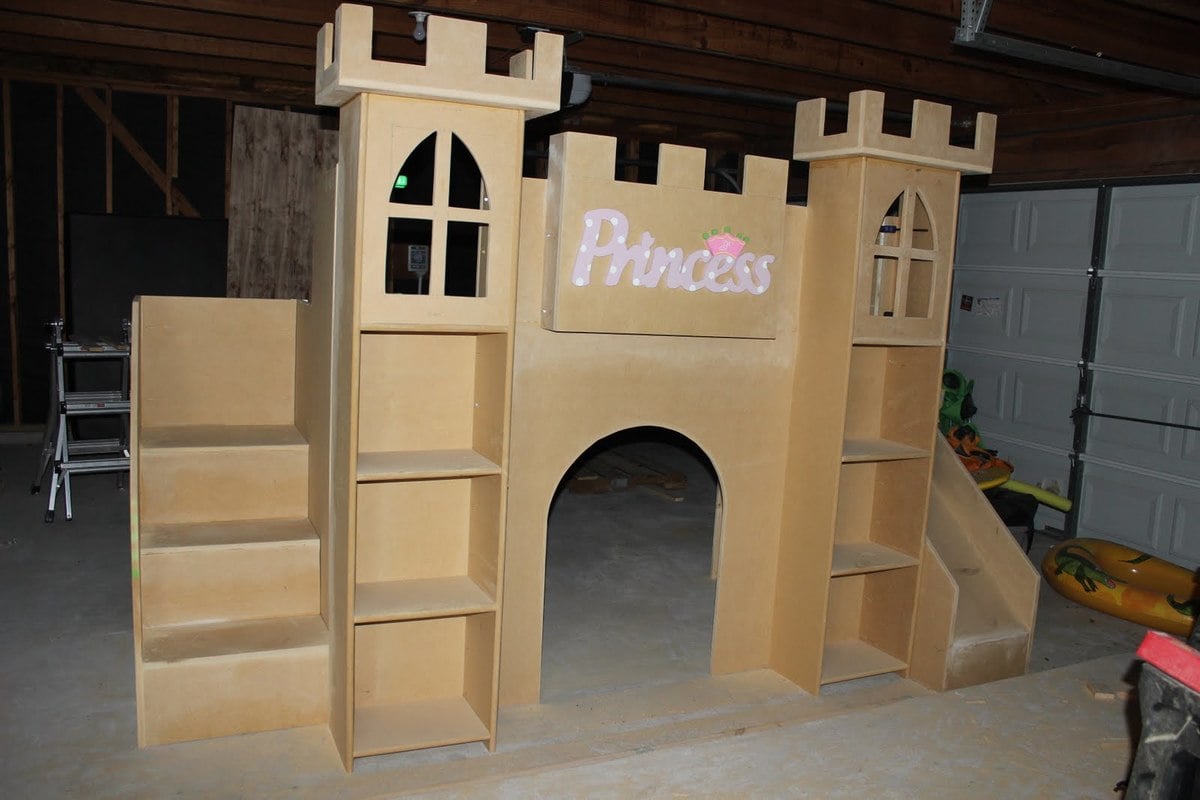
As mentioned above, I recommend cutting as you go. Here is an approximate look at how you can cut the plywood to get the above pieces.
Step 2

I worked in sections. I made the front section first, then the slide sections, then the stairs. Each section will stand up on it’s own (and is very heavy). Then, I put them all together and added the railings and bed slats.
Connect the sides (10” wide) of the tower to the front of the towers (11” & 18”). I used a Kreg jig with 1-1/4” screws to connect them. The sides are connected to the back of the tower fronts, so that the total width of the towers are 11” and 18”.
Step 3

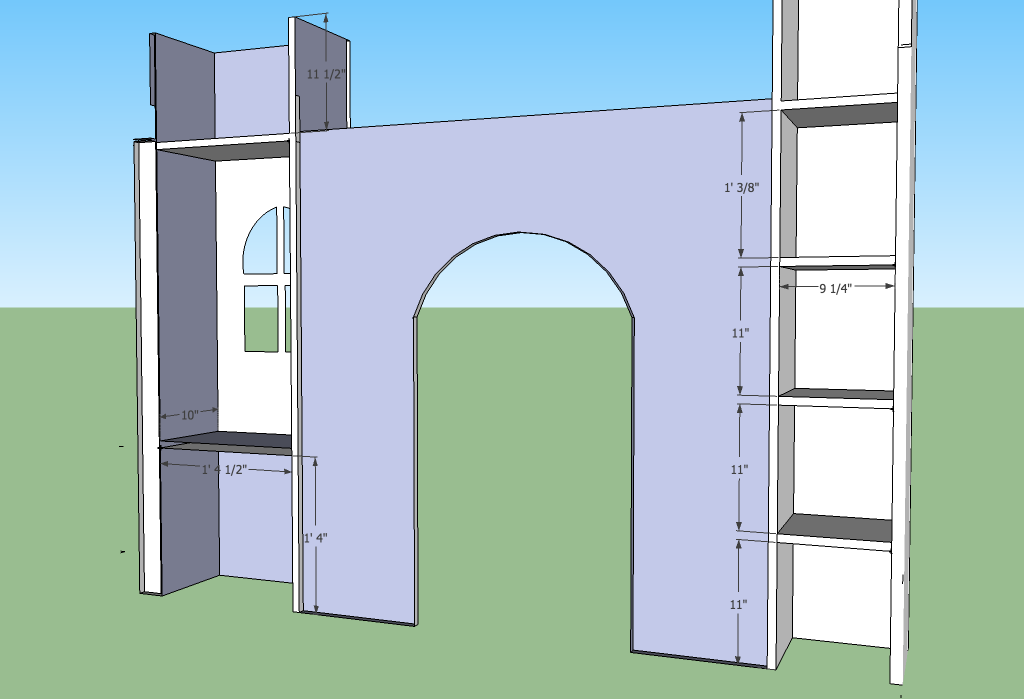
Working on the front center, cut out the door. I made the door 22” wide and 38” high in the middle. Draw with pencil first and then cut out with a jigsaw. Connect the middle to the two towers so that the back of the middle is flush with the back of the two towers.
Step 4
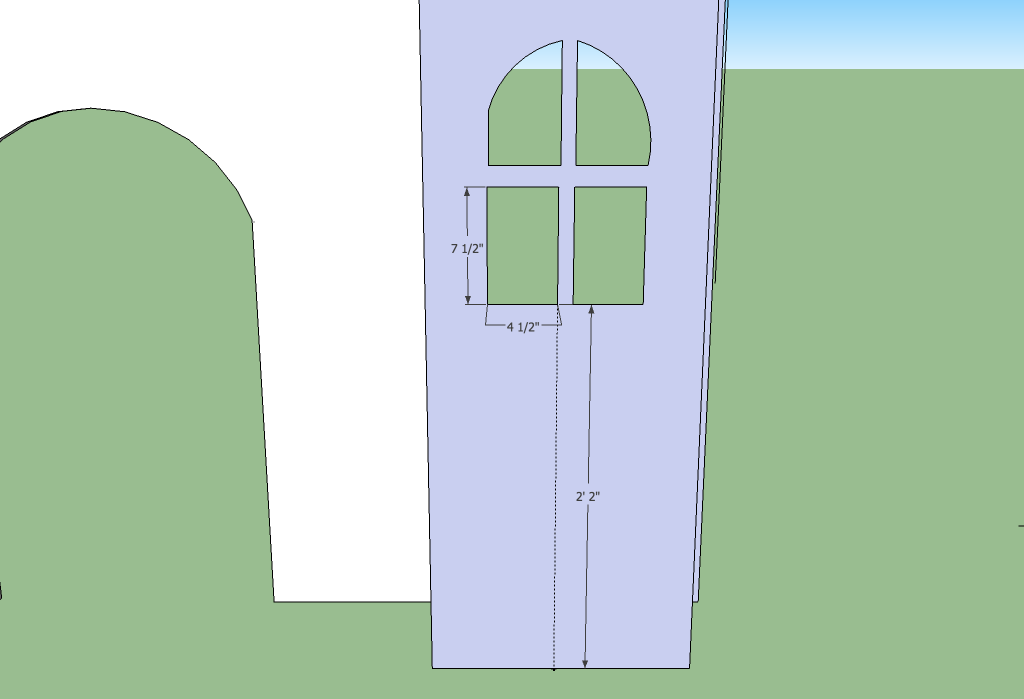
I wanted the larger tower to be a little window seat. To cut the window, I measured up 26” from the bottom. Then, I made each of the windows 4 ½ x 7 ½ with 1 inch in between. I rounded the top windows for looks. Again, I drew on the windows with pencil, used a drill in the corners to get started, and cut out with a jigsaw. You might want to adjust the height according to how tall your child is.
Step 5
Step 6

Add the 2 1/4 “ piece of plywood onto the end. This is to make it long enough to fit the twin mattress. You can forego this and instead make a tower or the center piece wider, but I liked how this made the front and slide connect better.
Step 7
Next, the slide. Probably the hardest part of the entire bed for me. Trying to figure out how to make it so that it wasn’t too fast or too slow. The dimensions I give you are for a fairly fast slide. My 3 year old does great, but it might be too fast for a two year old. If you want it slower, just drop the same distance down, but make the side a little longer to make the slope a little slower.
The dimensions I give you are for a slide that is wide enough for kids and a tight fit for most adults. If you plan on going down the slide a lot yourself, you may want to make the slide wider.
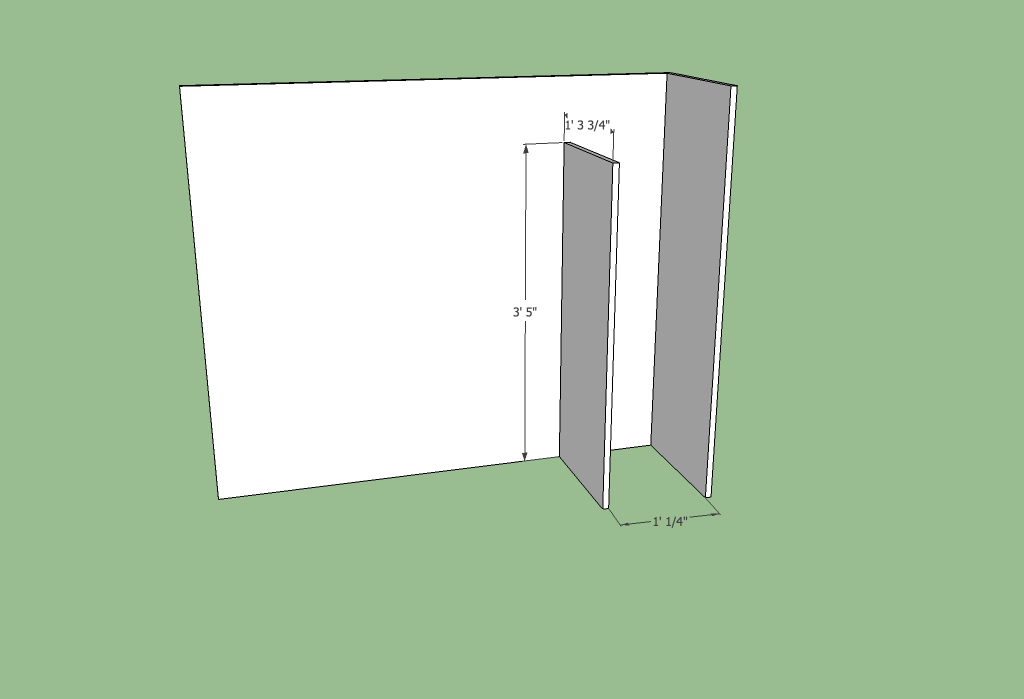
Take the two 56.5” pieces of plywood for the two sides and the piece 17 ¼” for the back. This part gets a little tricky, because you can put the sides and back together now, but it is narrow enough it makes it hard to work inside that area. I would suggest putting some of the supports on first and then putting it all together.
Take the 15 3/4 “ wide by 41 1/2” piece and attach this to a side 12 ¼ “ from the back. This will help support the slide platform.
Step 8
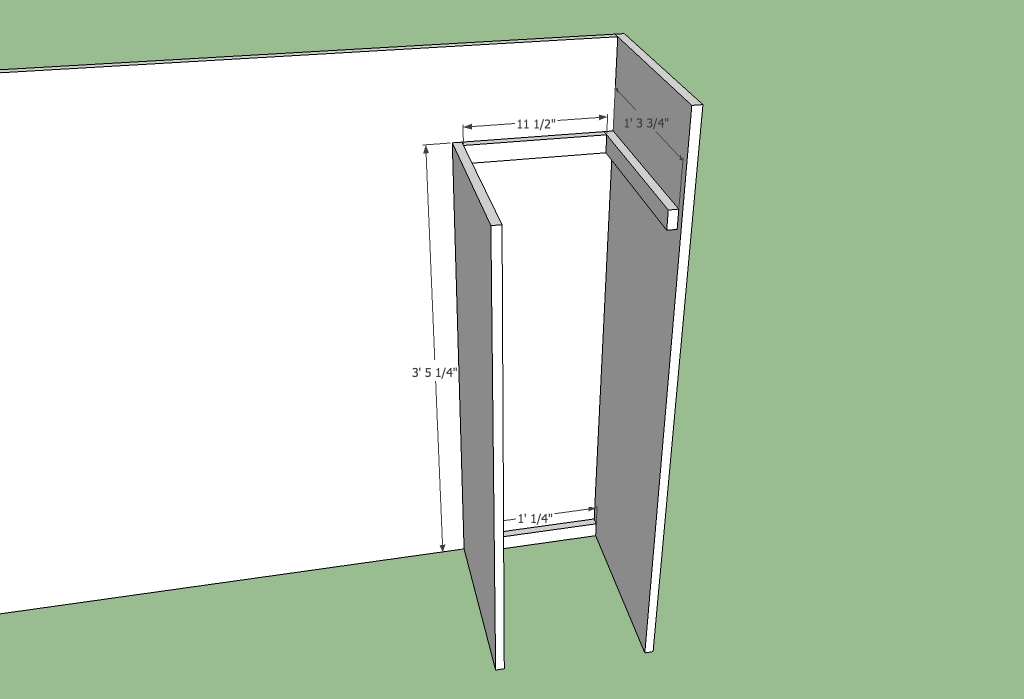
Get your 1x2 boards that are 11 ½”, 12 ¼” and 15 3/4” long. Connect the 15.75” long one to the back of the slide, with 3/4 “ on each side (on the side already attached, it will be right up against the side), with the top of the board being 7 ½” from the top. Then attach each of the 11 ½” to the sides, also 7 ½” from the top, inset from the back by ¾”. The 12 ¼” pieces go along the floor, flush with the back of the sides to give added support between the back and the platform support.
Step 9
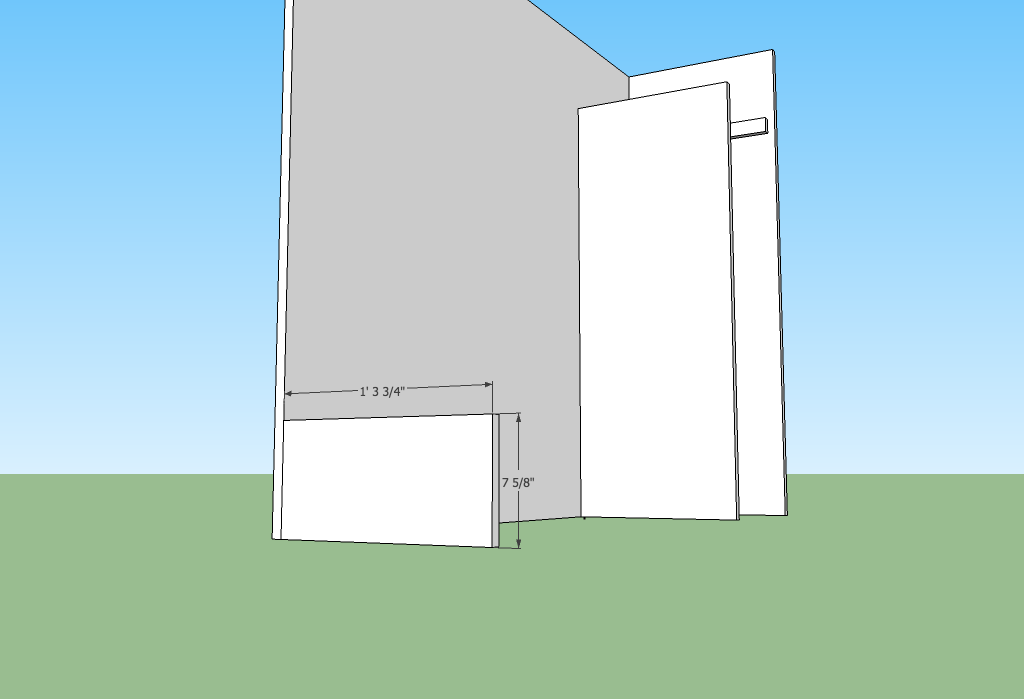
Attach the 7 5/8” by 15 ¾” wide piece to one of the sides, flush with the front edge. This will be the bottom support for the slide.
Step 10
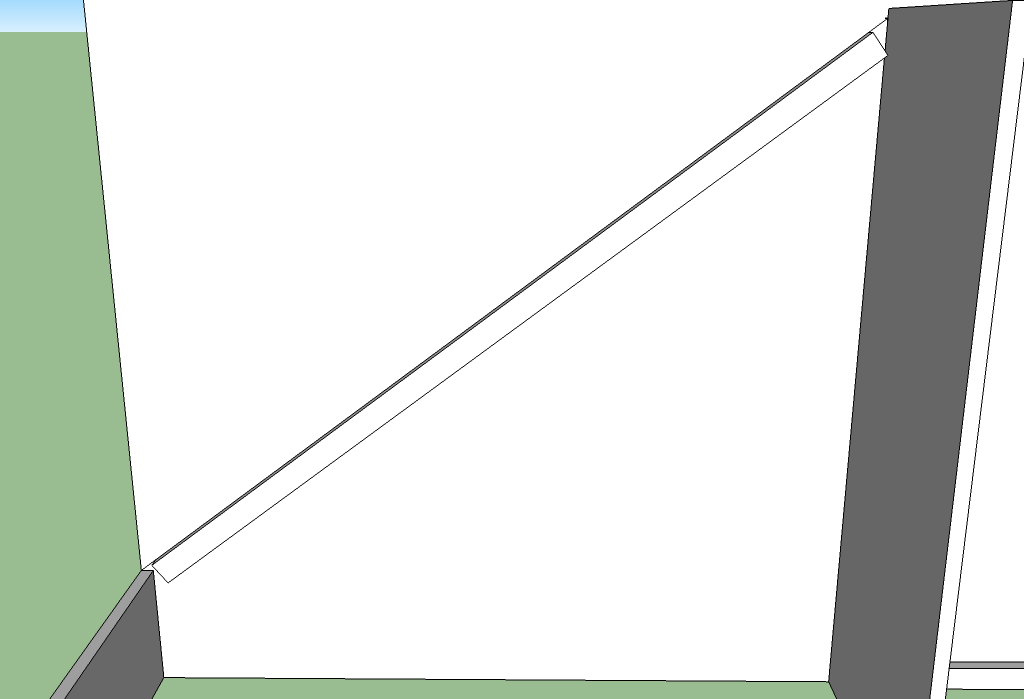
Now, draw a line of where the slide will sit. Go from the front of the slide support to the front of the bottom support. Directly under this is where you will put the 1x2 slide supports on each side. The 1x2 does not have to go the entire length – I left an inch or so on each end so that I didn’t have to mess with cutting the ends at the right angle. Attach this to each of the sides.
Step 11
Finally, put all the sides together and attach.
Step 12

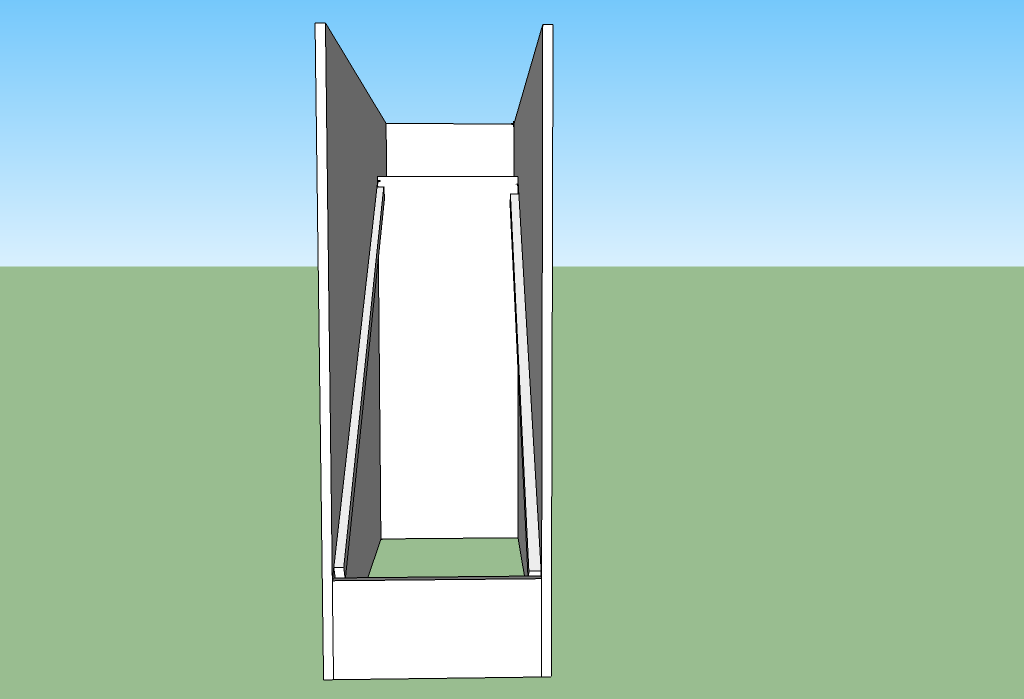
This step isn’t essential, but just for looks. I wanted to leave the sides of the slide open as much as possible. On the outer side of the slide, starting at the front edge of the platform I went down 2 ½”. At the bottom of the slide, I went up 13 1/2” and made a mark. I drew a straight line between these two marks and cut with my jigsaw.
On the inside wall of the slide, I measured up the same 13 1/2” at the bottom of the slide. Then, I determined where the edge of the bed would be, 40 ¾” from the back of the side. I drew a line straight down for 23”, then drew a line from this point to the front of the slide and made two straight cuts.
Step 13

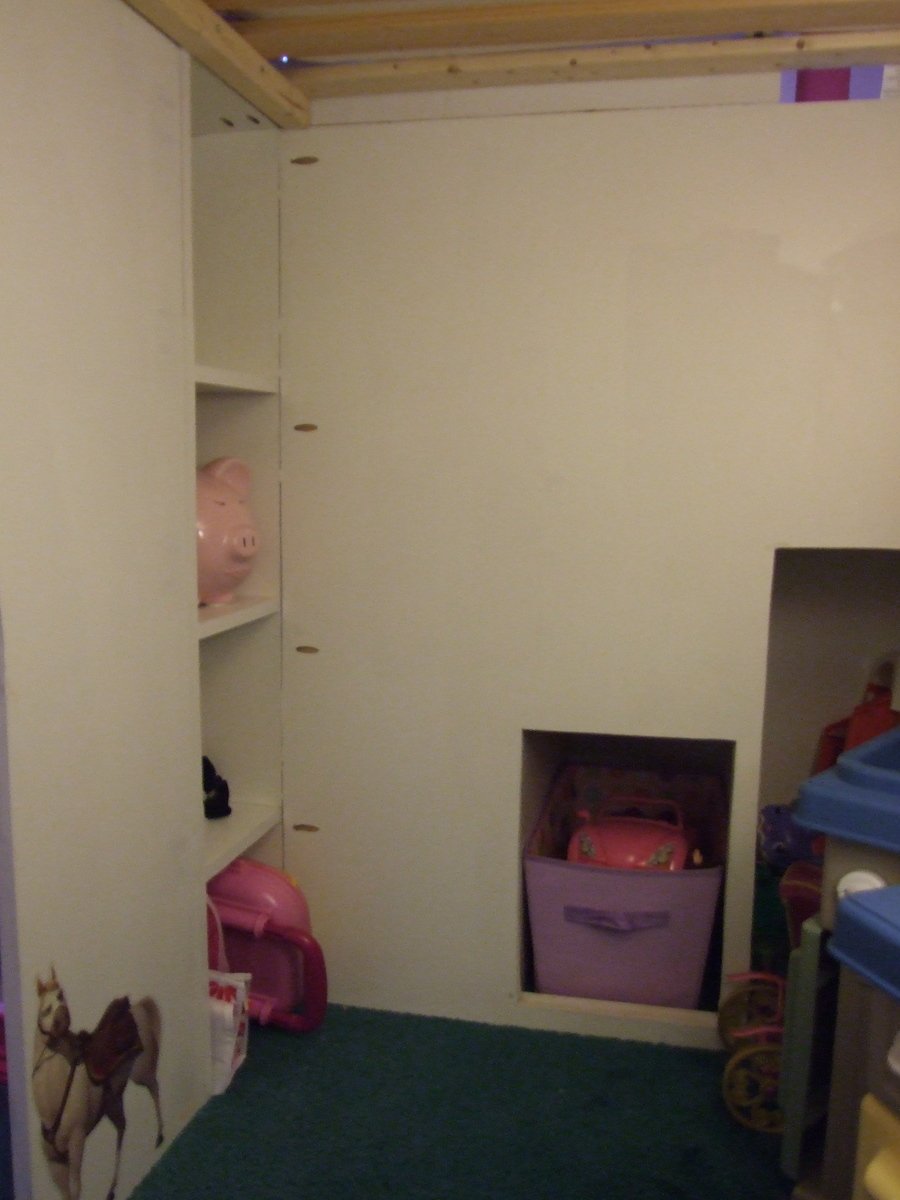
Not wanting all that space under the slide to go to waste, I cut out underneath to make two closets. I again just drew on and cut out with the jigsaw.
Step 14

Now time for the platform and slide! Take the piece 15 ¾” by 13” for the platform and attach to the supports.
Step 15

Then comes the slide. This is the one time when using melamine plywood really helped out. It is very slick, even once painted (at least after the one coat I put on). I would recommend using it for this piece. You can always get a piece in the section of the box store that sells closeting products if you want just one board, although you may have to adjust the width of the slide accordingly. This piece is 15 ¾” wide by at least 55 3/8” long. I made mine a little long (57”) because I liked the thought of it hanging off the end a little and wanted to be able to cut some off to make the end of the slide straight up and down.
Another tricky part for me was at the top of the slide. The top of the slide needs to be cut at an angle so that it fits snugly with the platform. I laid the slide on the supports and estimated the angle to cut it at. Then I cut it and laid it on the platform again until I was happy with the fit. Finally, attach the slide to the supports. I just countersinked some screws and screwed the slide directly into the supports underneath.
Step 16
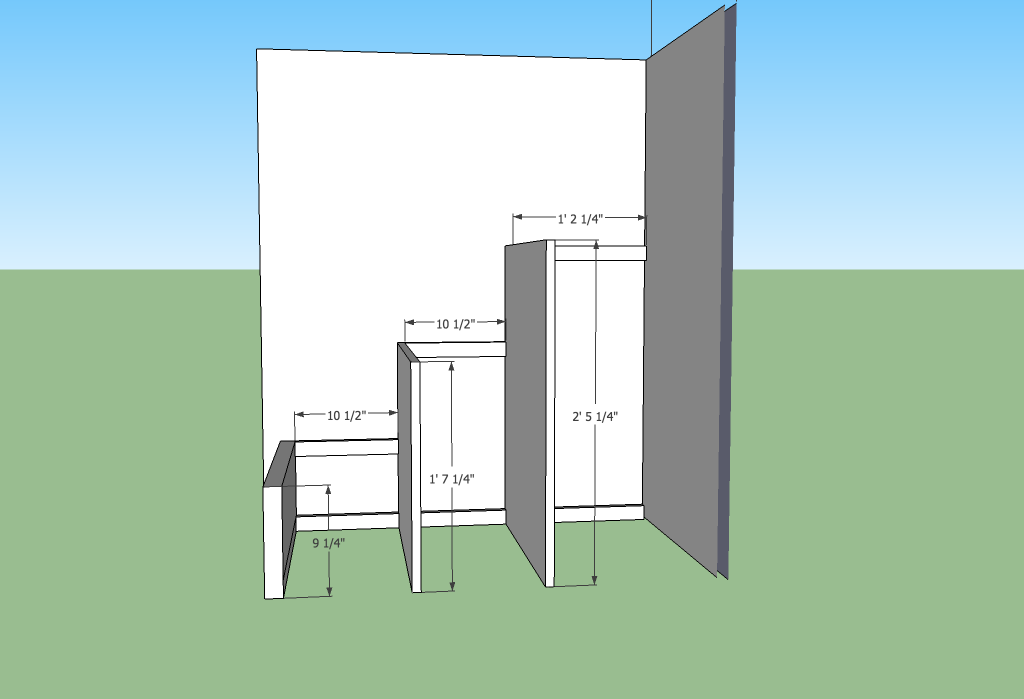
The stairs. Attach the sides to the back, just like the slide sides. It is wide enough that you can put both sides on first if you want, although it is a little tight to work if you do that. Then, attach the 1x2 step supports on both sides, at the top and bottom of each step, as shown in the diagram. Also at this stage attach the larger 29.25”, 19.25”, and 9.25” stair supports in.
Step 17
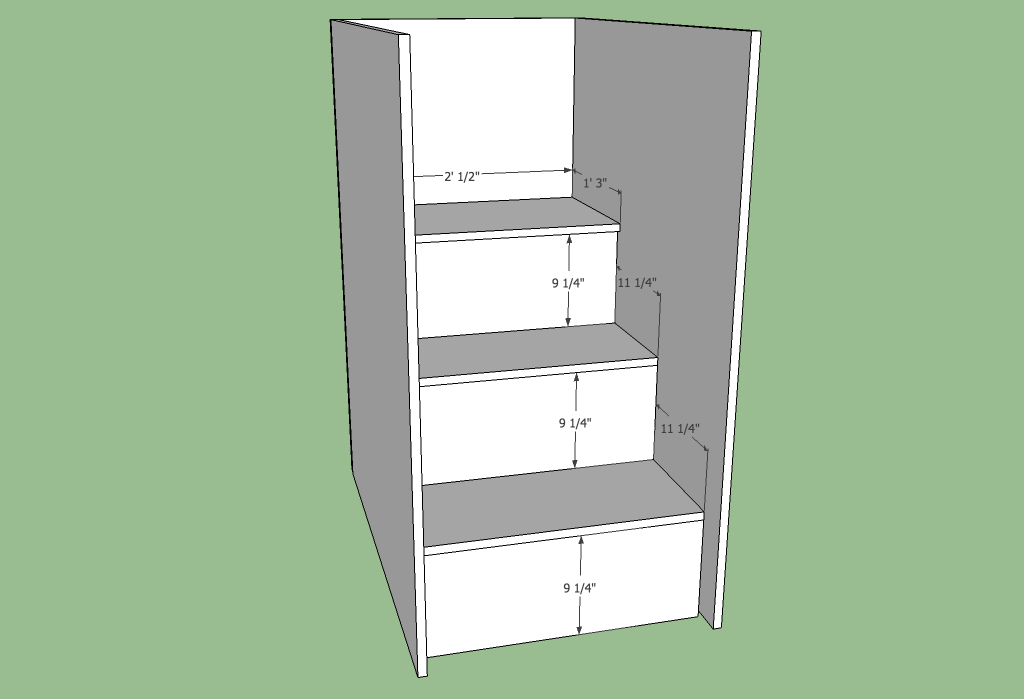
Attach supports to sides, then attach steps to the top of the supports. At this point if you want to cut off some extra from the outside of the stairs, I recommend measuring up approx. 29” from the bottom of the front of the stairs and measuring 16” from the back of the top. Draw a line between these and cut a straight line. If you want to finish this edge off, I used a 1x2 on it’s side to make a sort of railing.
Step 18

Cut out under the stairs, just like under the slide, to make a couple of closets.
Step 19
Attach all the pieces together. Then, make the railing. Use 1x4’s for the top and bottom of the railings with 1x2’s cut at 11 ½” long for the up and down part of the railings. Space evenly with 3” between slats. Note: Especially on the back, please cut length to exact measurement, as yours may differ slightly!
Stairs outer edge: Cut 1x4’s to 15 7/8”, use 4 slats
Stairs inner edge: 1x4’s to 25”, use 6 slats
Front center: 1x4’s to 47”, use 10 slats
Front right: 1x4 to 2 ¼”, use 1 slat
Slide inner side: 1 x 4 to 25 ½”, use 6 slats
Slide outer side: 1 x 4 to 13 1/16”, use 3 slats
Back: 1 x 4 to 115 ¾”, use 26 slats
I used 1x3 instead of 1x2 at some of the intersections of pieces, just a preference.
Attach all the slats to the bed. Since the railing against the wall supports the mattress, I then used bolts to attach the top railing to studs in the wall. I did this about four times across the bed and it really helped with the support and to keep the railing from being pulled away from the wall.
Also, for the slide inner edge and the stairs inner edge, there wasn't as much support as I wanted. So, I bought a couple of L brackets (used to put up shelvings and such) and attached one to each set of railings, with the other end of the L bracket being attached to the under bed slats.
Step 20
Cut two 2x2s to 77 ½” long. Attach one to the front of the back railing, flush with the bottom using 2” screws and glue.
Step 21
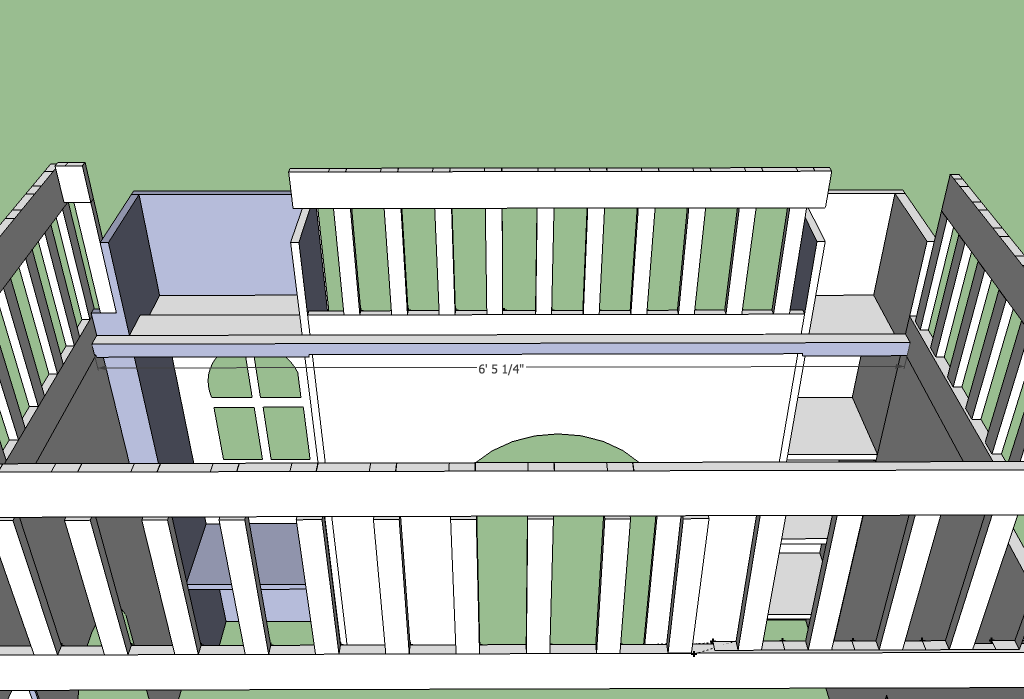
Attach other 2x2 inside of the front of the bed, flush with the bottom of the front railing.
Step 22

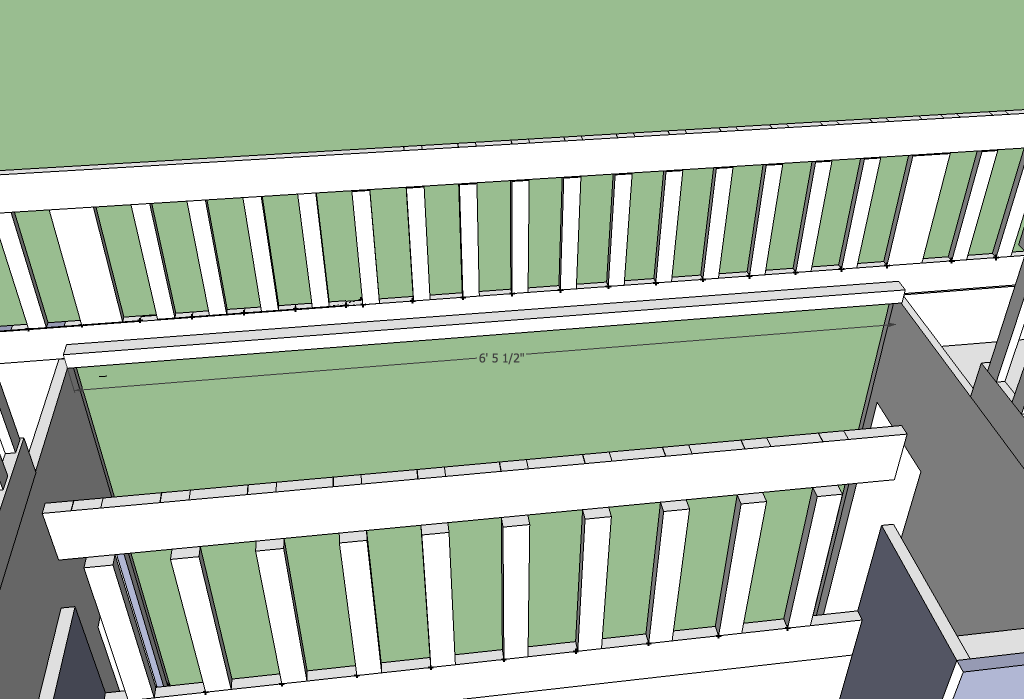
Mattress support slats. Cut 1x3s to 40” long. I wanted there to be a lot of support since us adults wanted to be able to be up on the bed, so I placed them every 2 1/2” apart. Use approximately 16 slats, depending on your desire of support. Attach to the 2x2s.
Step 23
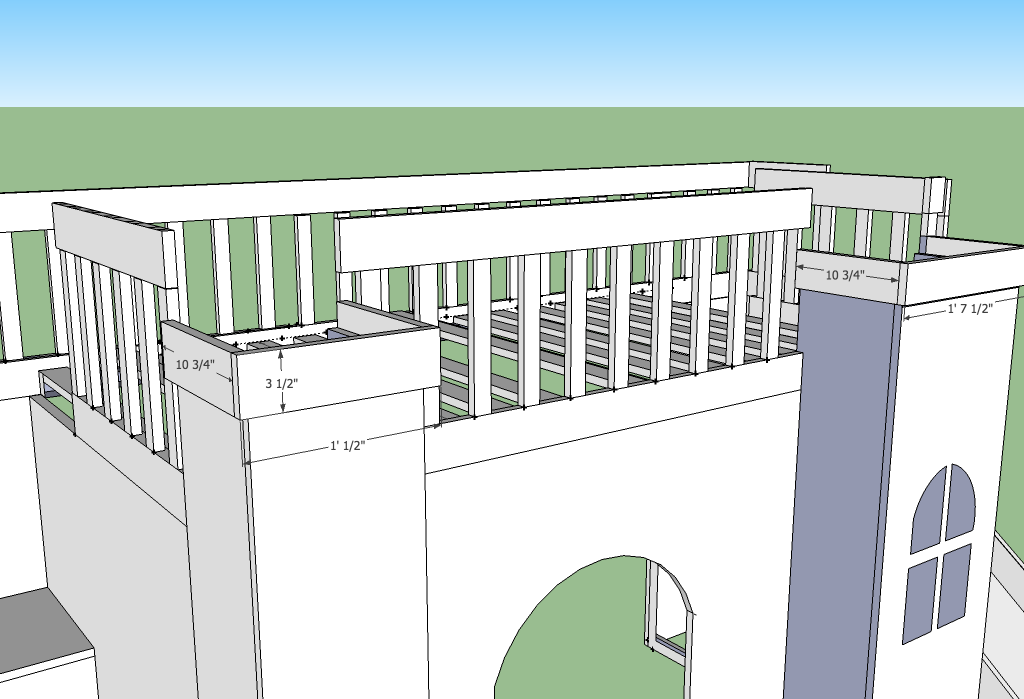
Tower decorations.
Cut 1x4s to the following legths: four at 10 3/4”, one at 12 1/2”, and one at 19 ½”. Attach these to the top, outside of the tower, about half (1 ¾”) sticking up above the tower.
Step 24
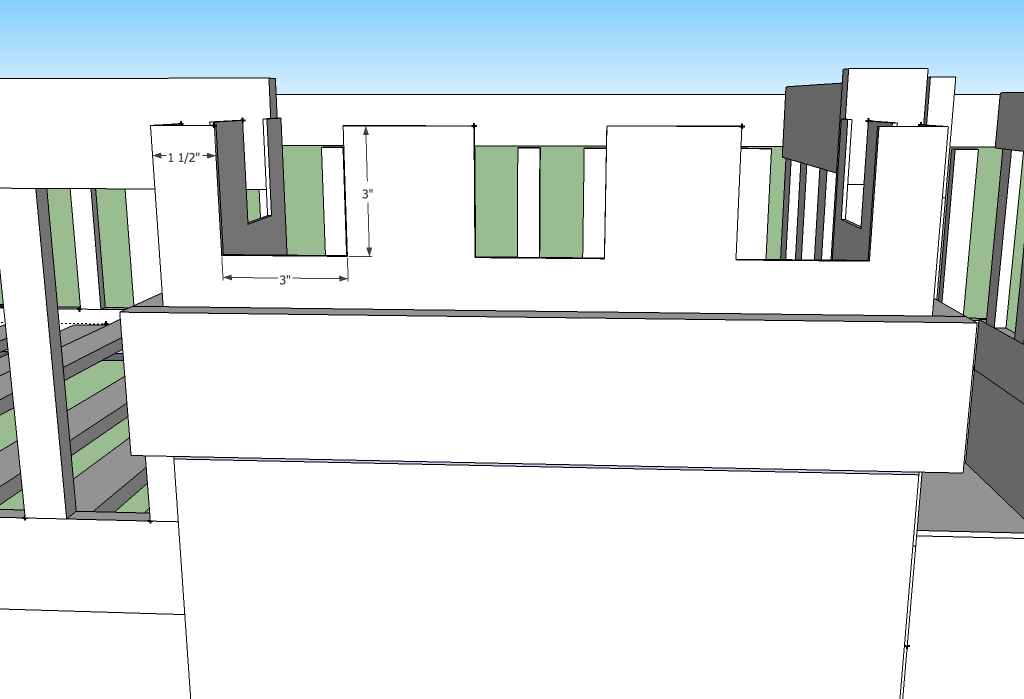
Cut 1/8” plywood to be 6” wide. Out of this, cut one at 11 1/8, one at 18” and four at approx. 10” (measure to get exactly how deep you want these to be). Then, cut the up and down parts. I found that cutting down 3”, over 2 ½” or 3”, up 3”, over 2 ½” or 3”, etc. was a good pattern, centering these cuts over the piece of plywood. So, on the front, I might go in from the edge 1 ½”, then start the pattern, ending up with 1 ½” left on the other end. Just play with it and draw it on to make sure you like the results. Then either use your jigsaw or just a knife to cut out.
Attach these behind the 1x4’s and they will sit on top of the original tower. Nail to the 1x4’s.
Step 25
Other finishing touches:
Apply edging to raw edges.
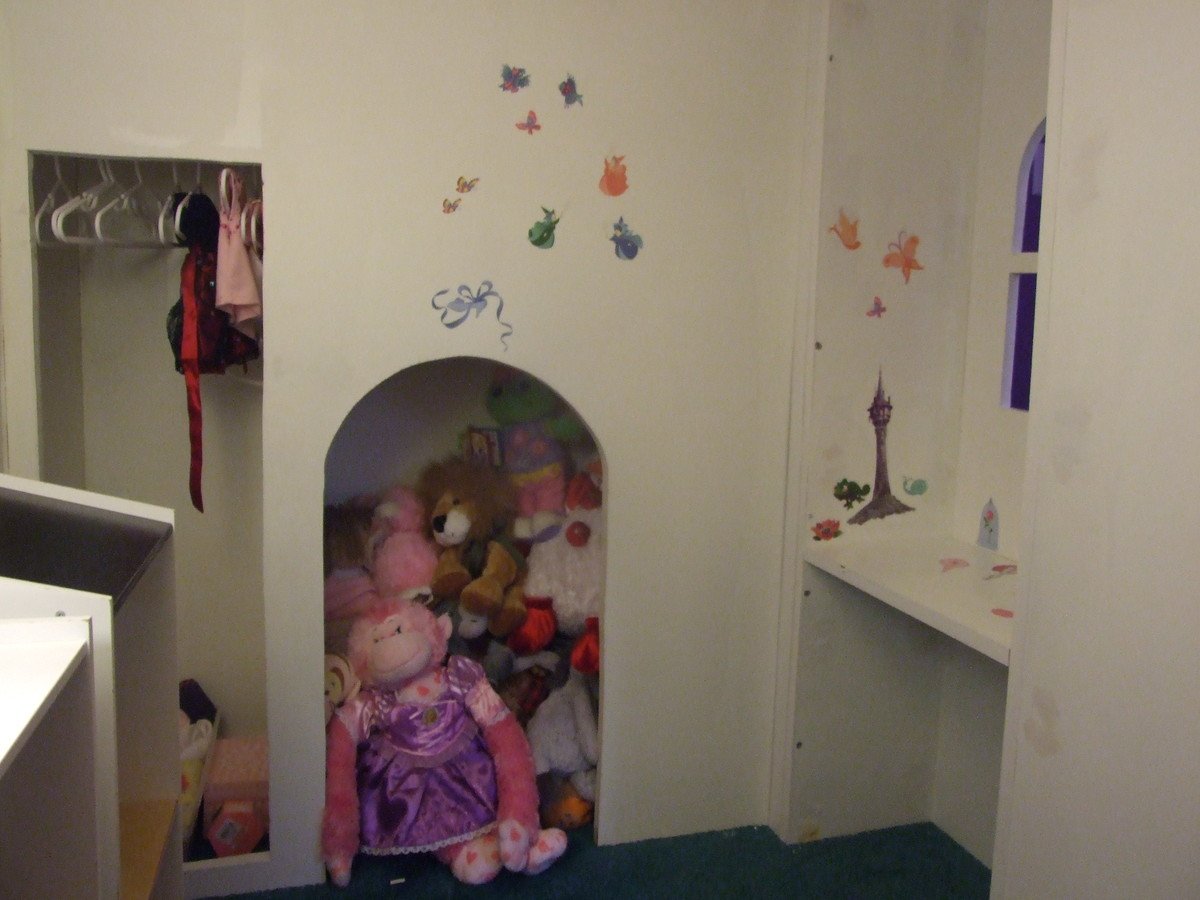
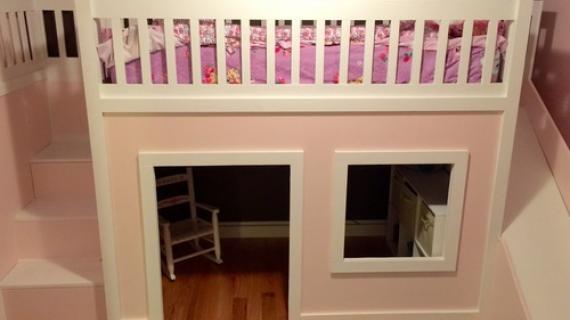
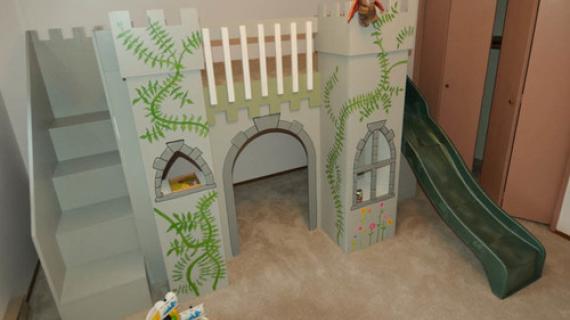
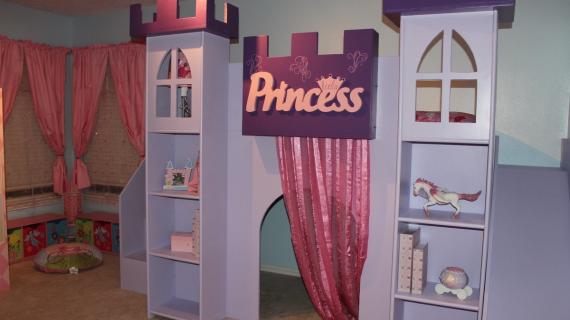
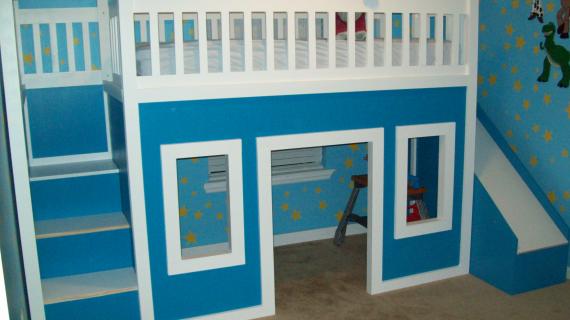
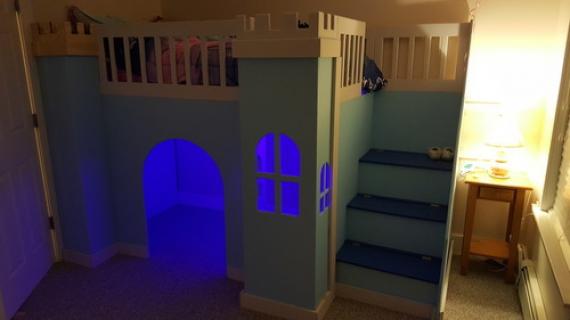
See picture of my finished project. I used more 1/8” plywood to make a point on top of the one tower. I used tape and glue to put it together.
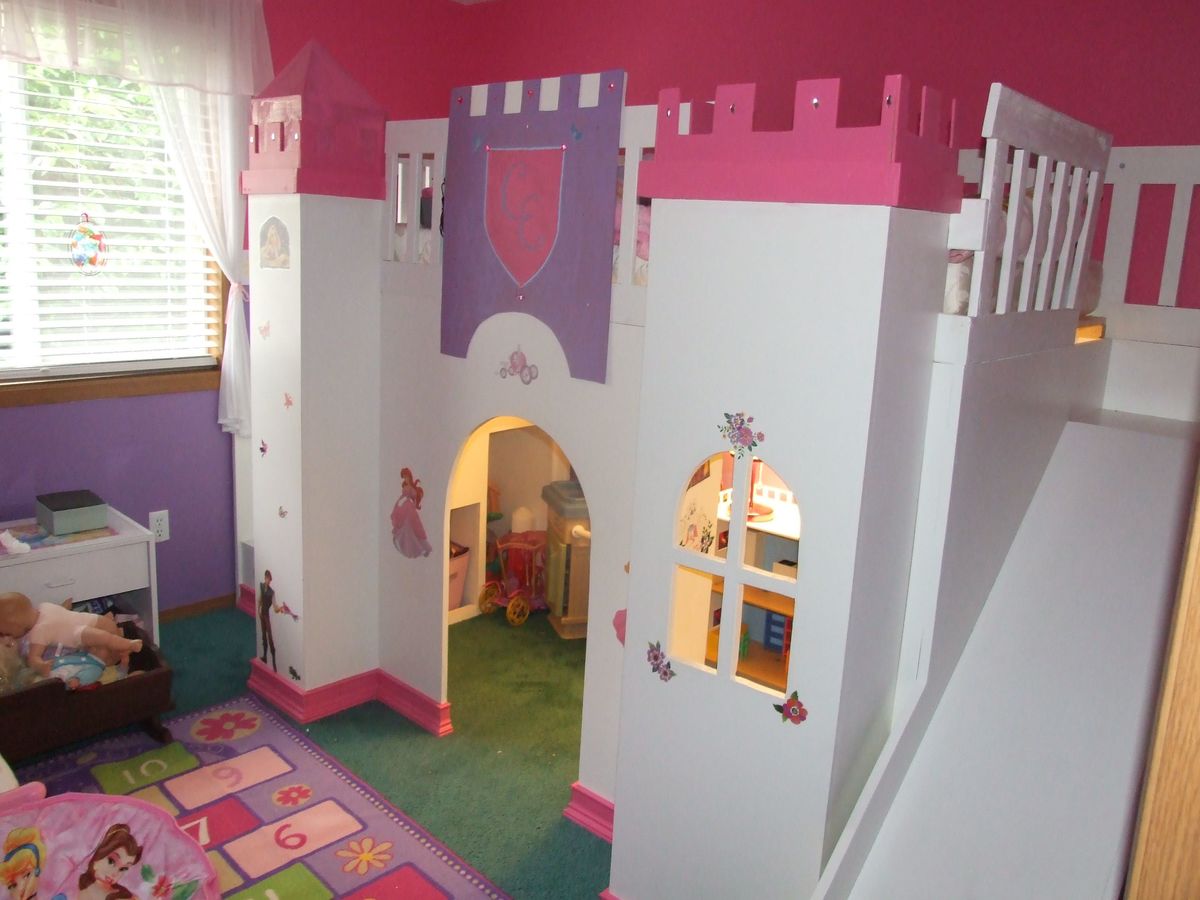
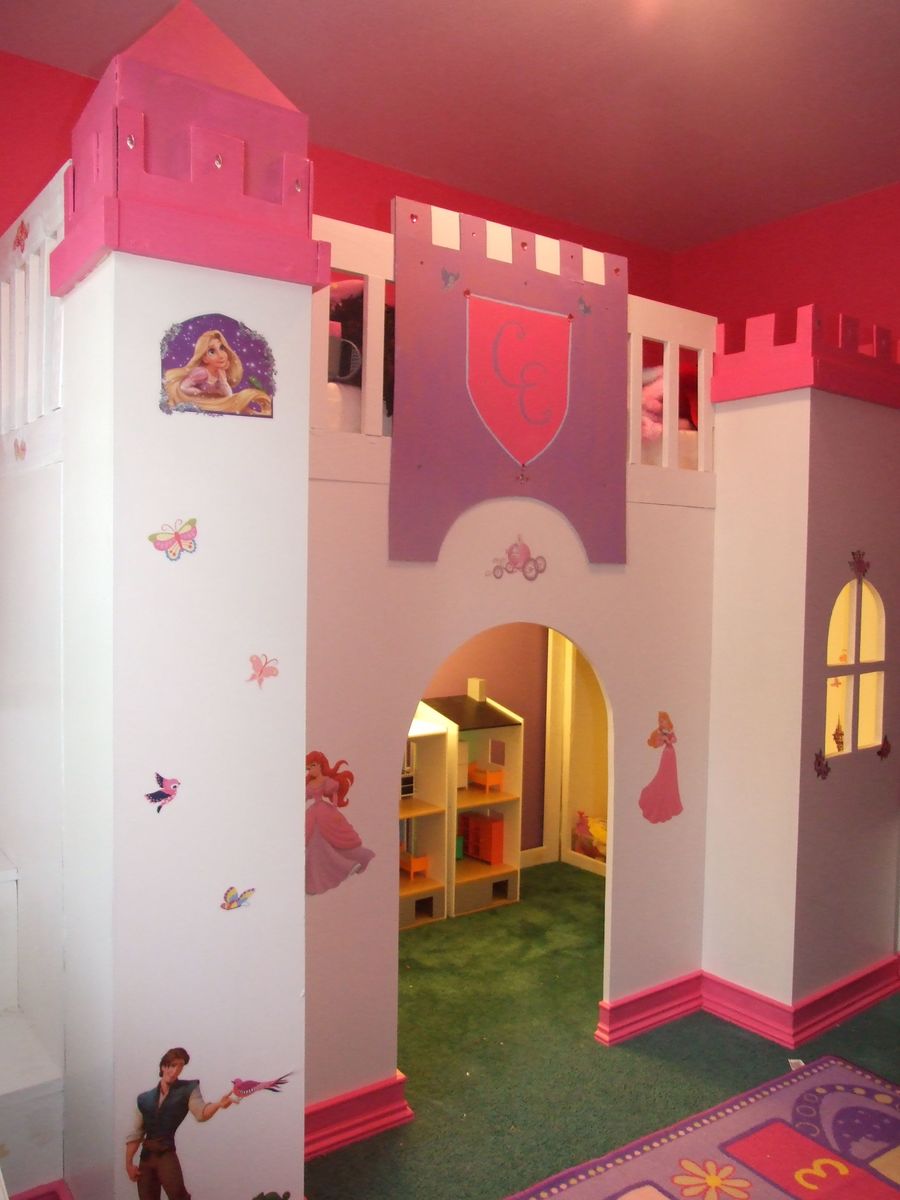
I wanted to do something over the rails in the front. I again used 1/8” plywood, cut it to an overall size of 27” high by 24” wide, then used a jigsaw to shape it the way I wanted. Paint and screw to the rails. Mine goes above the rails by 2 ½”. If you do that, I suggest putting a 1x3 24” wide behind it to keep the top from getting broken (I didn’t do this at first and part of it got broken right away).
I wanted a more finished bottom edge, so I purchased some molding, painted it before installing, then cut using a miter saw and nailed to the bottom of the front of the bed. I really liked the finishing look it gave.
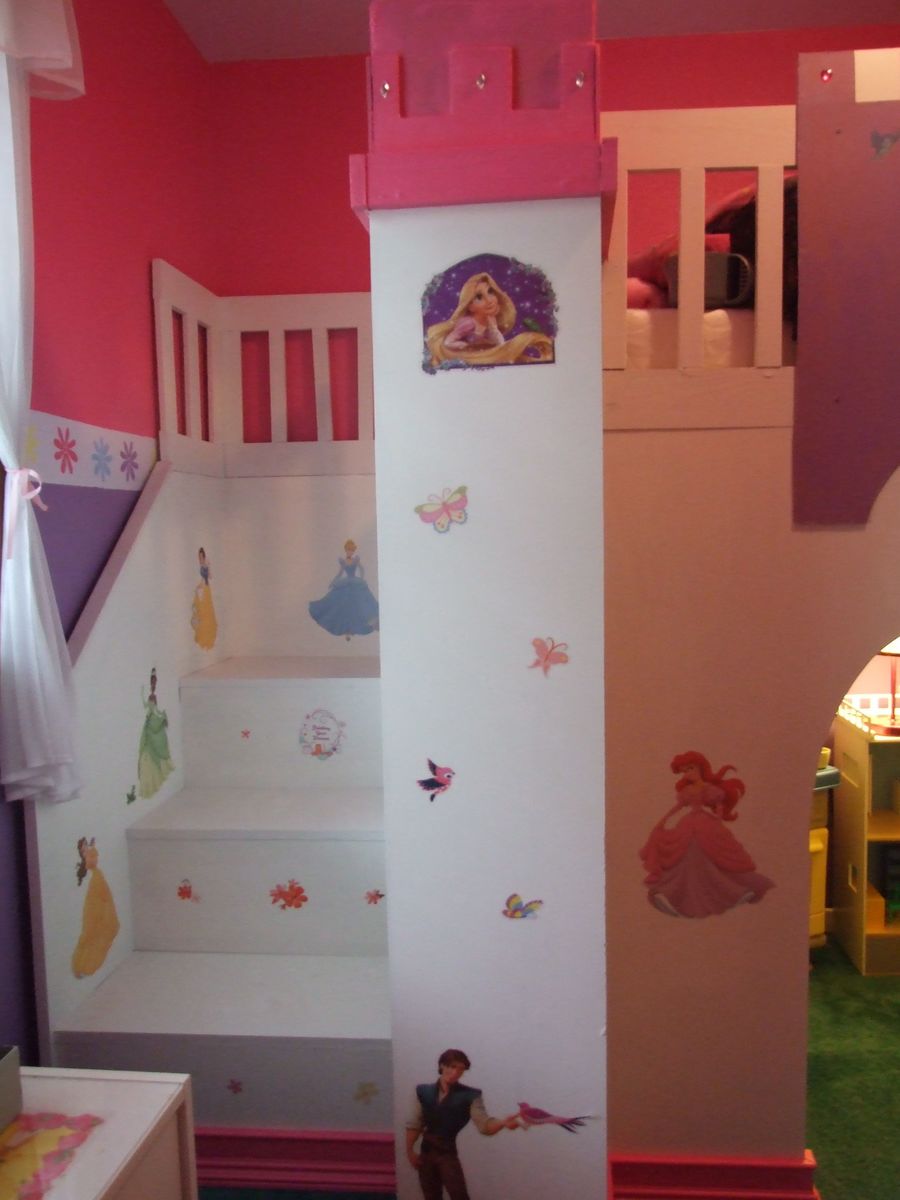
Finally, I purchased wall decals so that it really had that princess touch!
It is always recommended to apply a test coat on a hidden area or scrap piece to ensure color evenness and adhesion. Use primer or wood conditioner as needed.

Comments
Cindy from Indiana (not verified)
Wed, 10/19/2011 - 09:07
GREAT job!
Wow! Great job! It turned out great.
Ana White
Wed, 10/19/2011 - 10:19
This bed is gorgeous! Thank
This bed is gorgeous! Thank you so much for sharing!
Guest (not verified)
Wed, 10/19/2011 - 11:06
Love It!!!
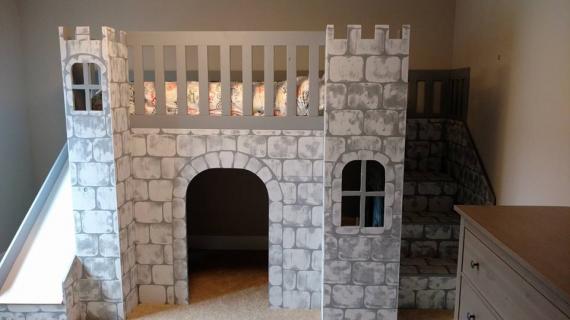
That is awesome, and it would be great for a little boy as well, all U would need to do is a stone faux finish it to masculine it up. Again, love it!!!
stcarroll
Wed, 10/19/2011 - 11:16
Your daughter must love
Your daughter must love this!!!! Very nice job, looks great!
Guest (not verified)
Wed, 10/19/2011 - 12:18
Oh my I think I just found
Oh my I think I just found two of my kids' Christmas presents. Where is my saw and my husband?? (I want to warn him before he dies after seeing how much I spent on wood ;)
Crystal Fisher
Wed, 10/19/2011 - 13:21
Yay!!!!
I have been trying to figure this one out since my son and I stumbled on it! He saw the boy's version with the slide in the middle and has been asking fior a "slide bed" ever since, his birthday is soon, and it's time for his toddler bed upgrade to a "big boy" this is perfect!!!! (with a few boy modifications ;) )
Thank You sooo much for posting this.
Pswag
Wed, 10/19/2011 - 18:08
WOW
Almost wishes my kids where little again. ALMOST!! LOL
What a terrific job you did.
Guest (not verified)
Wed, 10/19/2011 - 20:36
Lucky girl
To have a mom that would work so hard, you are very creative.Thank you for sharing your photos an plan.
Guest (not verified)
Thu, 10/27/2011 - 15:25
Dimensions
What are the finished dimensions of this bed?
fsmumford
Thu, 10/27/2011 - 16:25
Dimensions
The final dimensions are 10' 5/8" long by 4' 9 1/4" wide, by 5' 7 1/4" high. If the length is a problem, you can always make the stairs or slide slightly narrower.
Guest (not verified)
Thu, 11/17/2011 - 10:00
bed weight
First I want to say thank you for posting it. It is giving me some real inspiration to make a bed for my kids as Xmas presents. I have two questions for you...
1) What size mattress will this hold?
and 2) Do you happen to know the weight limit on the bed?
My son is 5 and crazy so I know him and his friends will want to get up in the bed at the same time so I don;t want to worry about it breaking.
fsmumford
Thu, 11/17/2011 - 10:24
Re: Questions
Your welcome!
1) It holds a twin mattress
2) I don't know the weight limit, but I put in twice the number of slats my mattress recommended to add support. Also, I bolted the side support to the wall, which added support. My daughter is 5 and we get on top of the bed with her all the time to read. Also, we have had 5 kids up there at a time with no problems. I figure if someone jumps really hard, it might break a slat, but with so many slats, there wouldn't be any problem holding the mattress in place until you replace the slat. I made this 6 months ago and I do check frequently to make sure that all the joints look good and solid. We haven't had any issues at all.
I hope that answers your questions!
Guest (not verified)
Thu, 11/17/2011 - 11:45
Time
How long did this take to make!? I am super excited to get it ready for my 5 year old and am sooooo sooooo very happy to have found this! Thank you so much for sharing!!!
fsmumford
Thu, 11/17/2011 - 12:00
Re: Time
I'm not sure how many hours. If I had to guess, 40-50 maybe. It took me 3 months, but that is because with 3 little kids I had to work a little here and there :) Good luck and have fun!
Guest (not verified)
Fri, 11/25/2011 - 20:39
Material
What do you think about using particle wood for this bed? We are going to try to make this in time for Christmas... but cost wise, would particle board work?
Thanks soooo much for sharing, these are our favorite plans!
fsmumford
Sat, 11/26/2011 - 12:15
Re: Material
I'm sorry to say I don't know much about particle board. The only thing I would be worried about would be the strength of it. It might be good to ask someone at the box store you are buying at and ask them about the particular one you are looking at. Happy building!
Guest (not verified)
Fri, 11/25/2011 - 20:46
Slide...
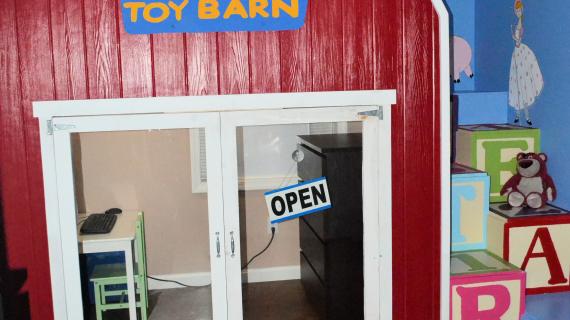
Very cool plans! I am actually thinking about tweaking this slightly to put in a play room. Will make the bottom portion a little grocery store and the upstairs a baby nursery:) Question about the slide: I am confused at how it works? Can you slide down plywood? THank you!
fsmumford
Sat, 11/26/2011 - 12:19
Re: slide
What you are planning on doing sounds awesome! As for the slide, I think it is all about the finish. I actually used melamine plywood which has a very slick, slippery surface already on it. I would probably recommend using it for the slide even if you use regular plywood for the rest of the project. You can buy pieces of it already cut in the closet shelving section of the store. You might have to adjust the slide width accordingly, but I can attest to the fact that it makes a great slide. And I did one coat of paint over it to help cover the screw holes and that hasn't affected how well it works as a slide. I hope that helps :)
Mariana (not verified)
Wed, 12/21/2011 - 14:08
WOW! this projects are awesome!
One more time I would like to know what the cost of making this bed was... I have 3 girls and 2 of them have been asking for one of this beds and what a better thing that making it myself :) please let me know a rough idea on the cost
thx
fsmumford
Wed, 12/21/2011 - 14:36
Cost
Mariana,
It cost me around $350, including everything on the bed (princess stickers, moulding, etc). I hope this helps!
Sarah
Jacquie (not verified)
Tue, 01/03/2012 - 20:27
Stair height
Is there a large rise from the top stair to the actual bed platform? I couldn't find an exact dimension, but it looks like there is about 20 inches from the top of the step to the bottom of the bed platform. WIth the mattress on top, that would be about 28" from the top step to the top of the bed- is that correct?
fsmumford
Wed, 01/04/2012 - 15:07
Stair height
Yes, there is a large rise. It is actually 25.5" to the top of our mattress. I used the same height stairs Ana used for her play loft bed stairs. It is a large step, but I like it. My 3 year old has no problems getting up, but my 17 month old isn't big enough to climb up :)
Jacquie (not verified)
Wed, 01/04/2012 - 20:42
Stair rise
Thanks for clarifying that- you did an amazing job!
Chris A (not verified)
Wed, 01/11/2012 - 08:04
Wow this is just amazing. I
Wow this is just amazing. I saw it and thought I need to see if I have the time to make this for my daughter. The final bed just turned out great. You have any photos of inside underneath it. Wonder what it looks like. My idea was to remove a dresser if I could have enough room in it.
fsmumford
Thu, 01/12/2012 - 19:26
Re inside
Thank you! For some reason I'm having trouble adding more photos. If you email me at fsmumford@aol.com, I'd be happy to email you a couple pics of underneath.
Elizabeth W. (not verified)
Thu, 01/12/2012 - 13:32
Oh man, my husband and I have
Oh man, my husband and I have been plotting a castle bed for our three-year-old for months, thinking about how to modify the loft bed to meet our needs... and now that the garage is finally clear and we have work space, voila, there are plans for us to use so we don't have to think at all except to convert it to a full mattress! You rock, thank you :)
Guest (not verified)
Sat, 02/18/2012 - 23:22
Full size castle bed
I am also wanting to make this into a full size bed. If you have the dimensions for the full size, I would love to get them from you! Thank you!
wchee1
Wed, 09/25/2013 - 10:51
Full Conversion
Did you ever convert these plans to a full size mattress? If so, would you be willing to share your plans with me?
Guest (not verified)
Thu, 01/12/2012 - 17:52
How much total time spent minus stickers etc
How much total time did you spend cutting and fitting it all together minus the stickers etc?
fsmumford
Thu, 01/12/2012 - 19:29
Re: Time
That's hard to say. I didn't have firm plans going into this, so there were some sections I didn't like how they turned out and ended up doing them over again. Plus, I could only work on it a few hours here or there when my husband could take the kids. I'm guessing probably 30-40 hours. Sorry I can't be more precise.
emilybdixon
Sun, 01/15/2012 - 20:35
So awesome
i found our spring time project. i showed my 4 yr old and 2 yr old and they loved it. can't wait to start.
Guest (not verified)
Mon, 02/20/2012 - 10:05
Overall dimensions?
I may have overlooked it but what is the overall size of the bed?
fsmumford
Mon, 02/20/2012 - 12:36
Dimensions
It is 10' 5/8" long, 5'7 3/6" tall (at the rails, slightly higher for the tower), and 4' 9 1/4" deep at the slide, which sticks out the farthest. I hope this helps!
Guest (not verified)
Mon, 02/20/2012 - 18:38
making it into a bunk bed
I love the bed, and have been looking for plans and ideas for months, but was wondering how it would work to add another level above, to make it into a bunk bed, since I have two small children, and their room is 13' wide x 13' deep x 8' high.
fsmumford
Thu, 02/23/2012 - 09:53
Bunk Bed
I don't think it would work to add another level, but you could always put a mattress inside the castle on the bottom level since it is the same size as the top. Otherwise, I just plan on having my girls share the top mattress when my little one gets bigger. I've even slept up there with my daughter when she was sick and it had plenty of room for me. But that's just preference :)
Guest (not verified)
Tue, 02/21/2012 - 18:15
You did a great job. You
You did a great job. You think you would ever build another one and sell it? If so how much?
Guest (not verified)
Tue, 02/21/2012 - 18:27
WOW
You did a great job. You think you would ever make another one and sell it? If so, how much?
fsmumford
Thu, 02/23/2012 - 09:56
I've had people ask, but I
I've had people ask, but I don't think I would. The main reason is since the pieces are so heavy, I had to do much of the joining of the wood inside the room where it was going. Thanks so much for the compliment :)
Guest (not verified)
Wed, 03/07/2012 - 16:54
Hello, This bed is
Hello,
This bed is wonderful! My husband is in the military so we move often. Looking at your bed do you think this is something that could be built and taken apart for moves and then re-built?
Thanks!
Janaye
fsmumford
Thu, 03/08/2012 - 10:17
Moving
Janaye,
Thank you! When building this bed, I made it in the three main sections (slide, front, stairs), then moved all three pieces into my daughters room and connected them together and added the slats and rails. I purposefully left the holes connecting the pieces unfilled so I could take it apart later.
Saying this, I now don't think I ever would try and move it. While it is possible, each section is so large and hard to move (it took both my husband and myself to move the sections down the hall into my daughters room they are so heavy). The front you have to be careful of since it is so long. If you really wanted to move it, I would probably recommend not filling in the holes connecting the towers to the middle section and taking those apart to make it easier to move.
So, it is possible, but it would take a lot of work and prayer that nothing got hurt in transit.
I hope this helps! And thank you and your family so much for your service!
Sarah
Bunnie1978
Mon, 03/12/2012 - 15:17
Slide
I incorporated your slide into the loft bed for my son. That was easily the trickiest part for me! Thanks for sharing!
Vikki (not verified)
Tue, 03/13/2012 - 14:16
Castle bed
Hi just a quick question I'm wanting to make this bed for my daughters do u think if I brought the wood already cut it would be a lot easier to build or do you think I should cut it as I go incase I got confused? I just want it now lol want the quickest possible way to do it as have 3 children running about :) x
fsmumford
Sun, 03/18/2012 - 08:31
Vikki, I would say the
Vikki,
I would say the easiest would be to have the wood already cut since that does take a lot of time. My main hesitancy is if you have the box store cut it, they aren't always accurate and you may have some inconsistencies. But it could very well be worth it for the time saved.
Have fun building! I hear you about the kids - I had a 4 year old, 3 year old and 5 month old when I was building this. You get creative in finding time to work on it :) Good luck!
ChrisM (not verified)
Mon, 03/26/2012 - 19:34
Question about stairs and slide
Im going to start this project on the weekend, my daughter will LOVE it!
I had a question about how the stair and slide modules were attached to the main tower module. It looks like the side of the stairs is flush with the side of the tower. Did you strap the inside or are the three modules not connected to each other.
fsmumford
Mon, 03/26/2012 - 20:00
Re: Question
ChrisM,
I was able to add a couple pictures of under the castle, which might help a little. They are all attached together. On the stairs side, the side of the stairs and the tower are flush, and I just used pocket holes to attach them together.
On the slide side, I have a small spacer of wood between the tower and the side of the slide. To screw the spacer to the tower, I just screwed from inside the tower directly into the spacer. Then, I screwed from the slide section directly into the spacer as well. It's kind of hard to explain, so I hope this makes some sense :)
Please let me know if you still have questions or if I can help any more. If I'm not clear, I could take a couple closer up pictures to try and explain better.
Good luck building and have fun!
AJ (not verified)
Tue, 04/17/2012 - 19:58
Mattress Area
Thanks a lot for posting this plan! It inspired me to build one for my daughter's 3rd birthday with some modifications. I noticed that the mattress area is 40" by 77 1/4" but the size of a twin mattress and other bunk beds on here are at 39" x 75". Any reason for the added length and width? Thanks again for this wonderful plan!
KAD050209 (not verified)
Sun, 01/20/2013 - 18:41
I think she added the space
I think she added the space to make changing sheets easier. I've heard people doing this in other plans =)
Rob B (not verified)
Fri, 08/17/2012 - 06:55
full matress plans
Sarah,
Thank you so much for posting your wonderful project. I'm going to try to massage your plans to accommodate a full mattress, but before I possibly reinvent the wheel, I thought I'd ask if anyone has done these calculations yet?
Thank you!
Rob
Serena (not verified)
Fri, 08/24/2012 - 22:07
Have you ever thought about
Have you ever thought about making a shell for a playhouse. I already have and existing loft bed made out of 2x4's and 2x6's. I would like to add stairs and a slide to each end. So what would I do to make the rest of the playhouse. I want to be able to take it apart for when my kids grow out of what they have and maybe do something different to it later on. I would want something light enough for the front and back walls of the loft bed.
Scott S. (not verified)
Wed, 10/03/2012 - 10:39
Castle Loft Plans
This is wonderful!
I am planning a princess loft bed for my 4 year old daughter - for practical reasons, and for her... :) She has limited space... She loves your design and subsequent photos!
I am very familiar to Sketchup, and have already built her room to scale, including several different beds... Then I stumbled upon your design!
This being said, is it possible that you might have the .skp file available? I would LOVE to just "drop it in" her room, as it were, and see what it does to the space.
Thanks for such great inspiration!