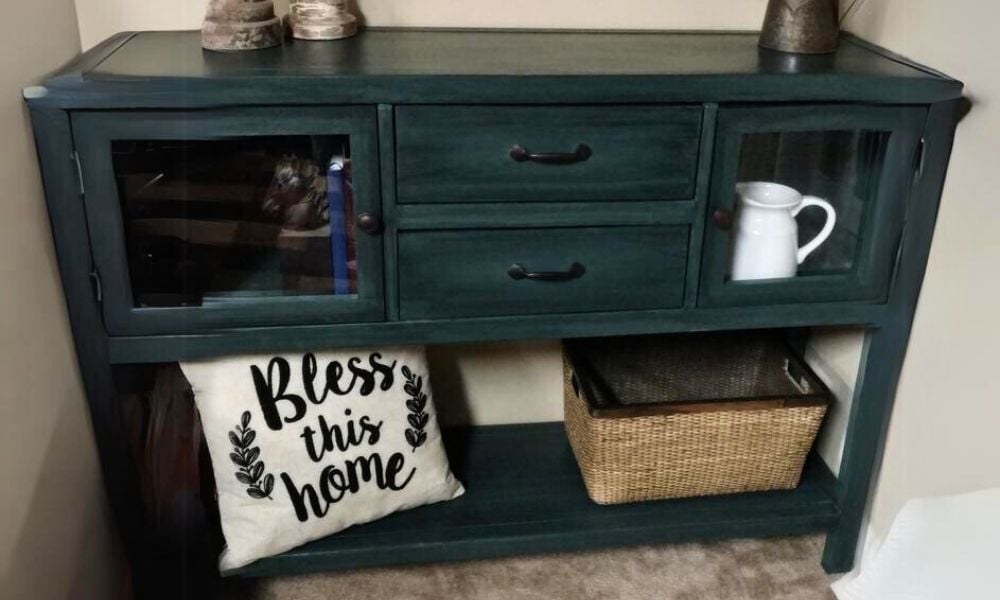


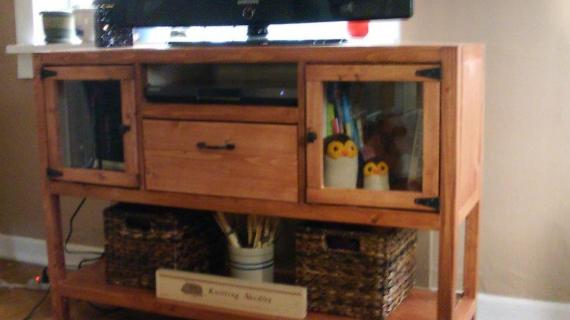
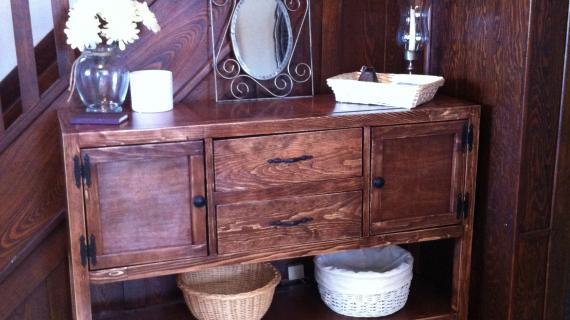
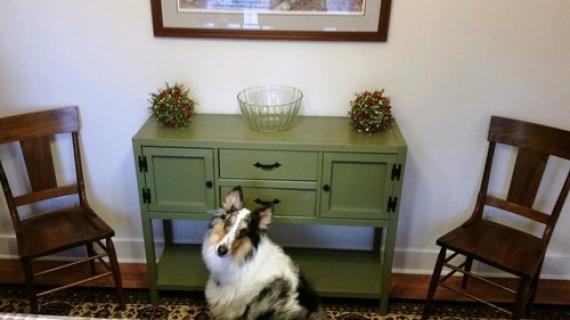
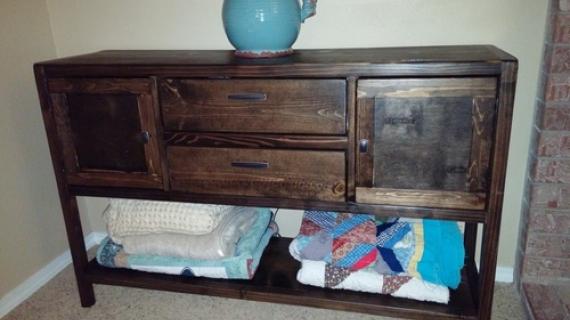
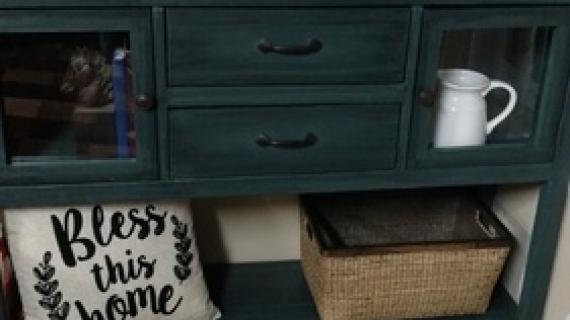
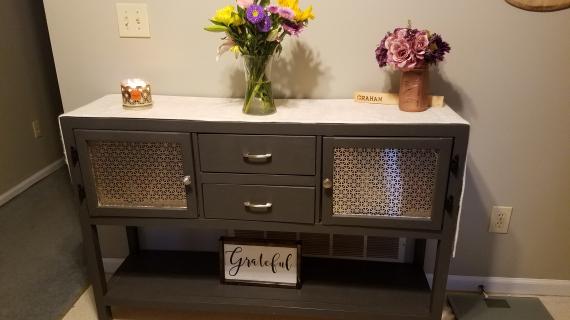
Free DIY plans to build a beautiful console table based on the Pottery Barn Rhys console table, which is no longer available.
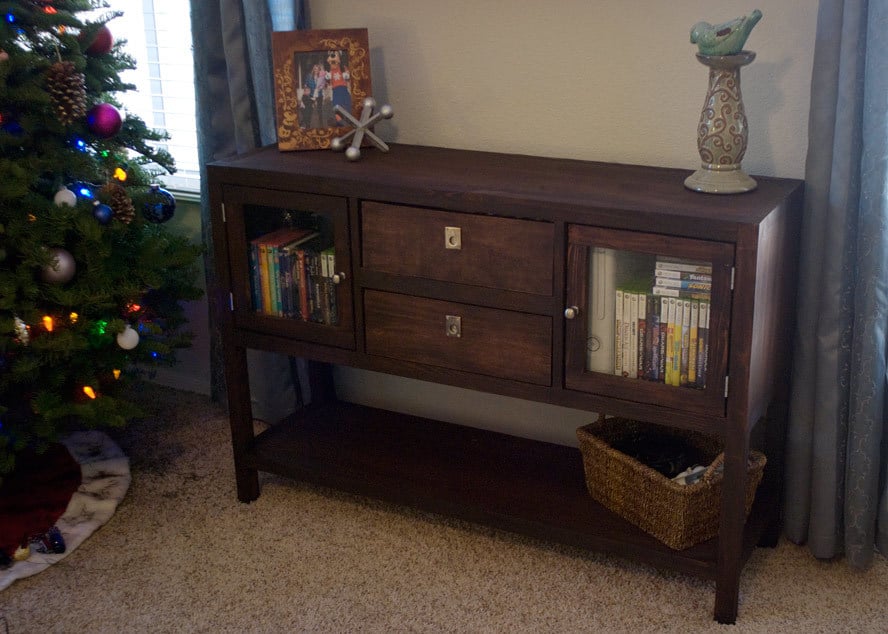
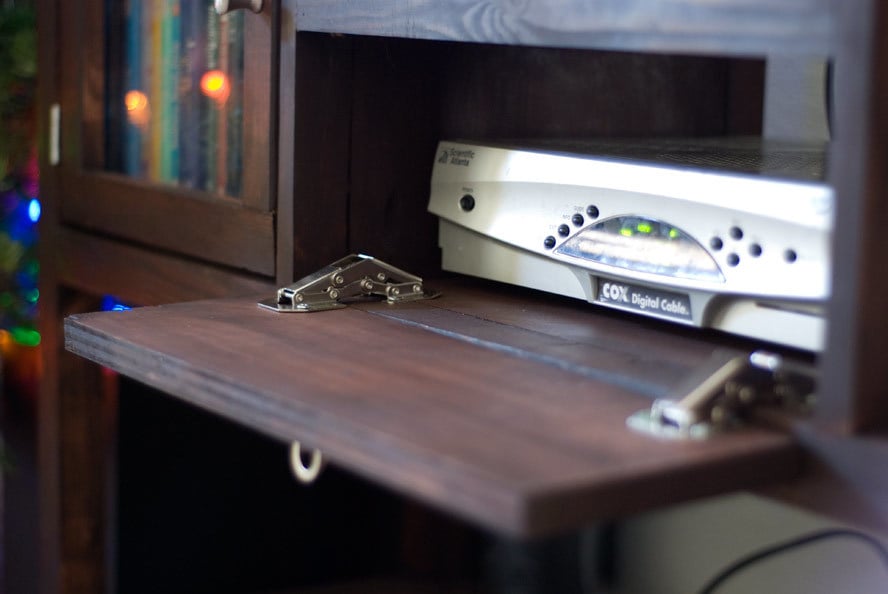
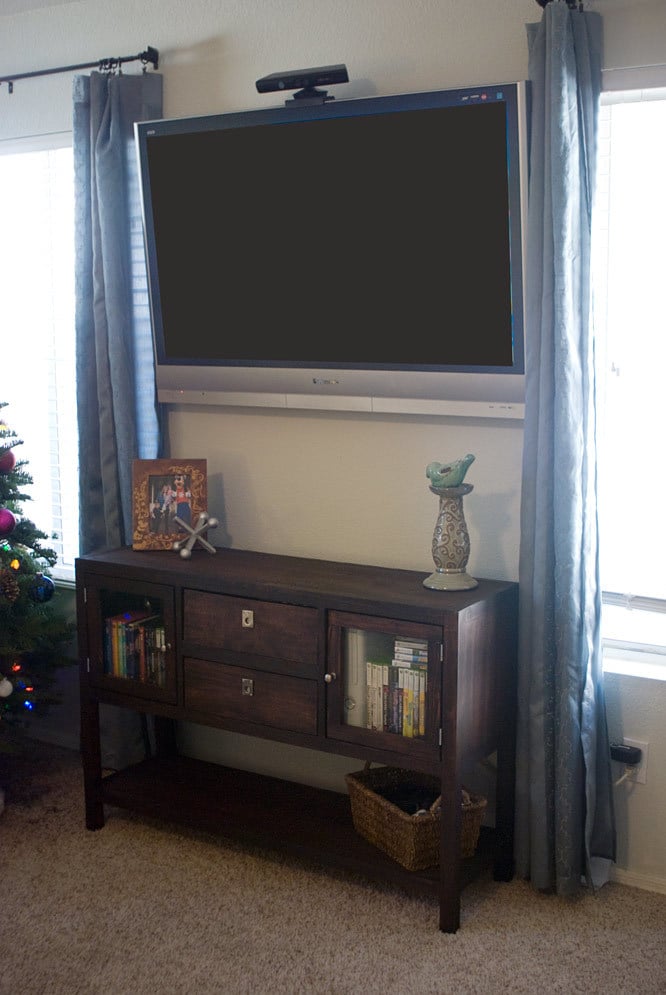
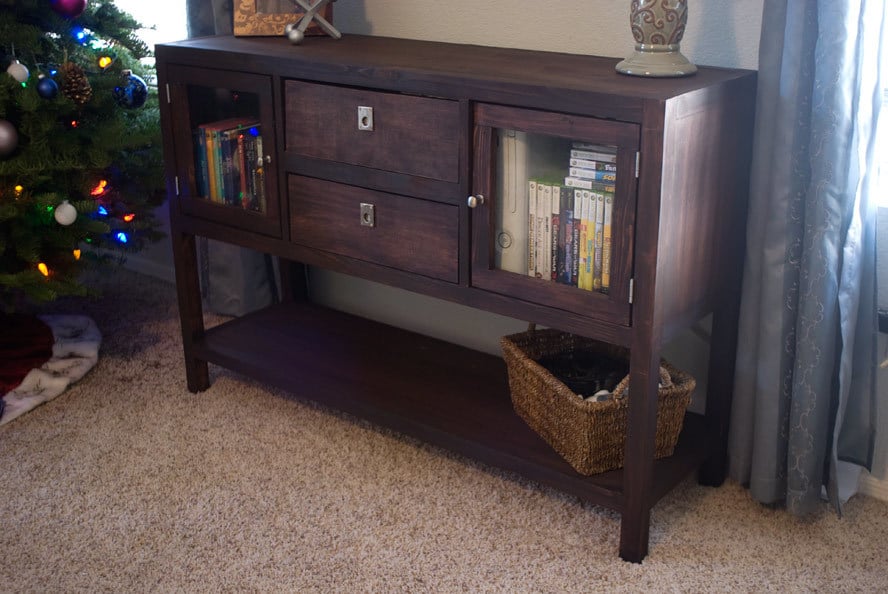
This console table has enough style to carry an entire room. I've been in love with it since first seeing it in Pottery Barn's catalogue, and have been trying to figure out how to incorporate it into my living room. When the doors [finally] fell off of my TV stand, I KNEW this would work to hold all of our TV accessories! Thankfully, Ana sent the plan over to me so that it could be built before being posted, to make sure the plan's accurate. In addition to a drawer, I also added Euro hinges inside the top drawer face to easily open for cable box access. The hardware for the drawers was purchased here
Preparation
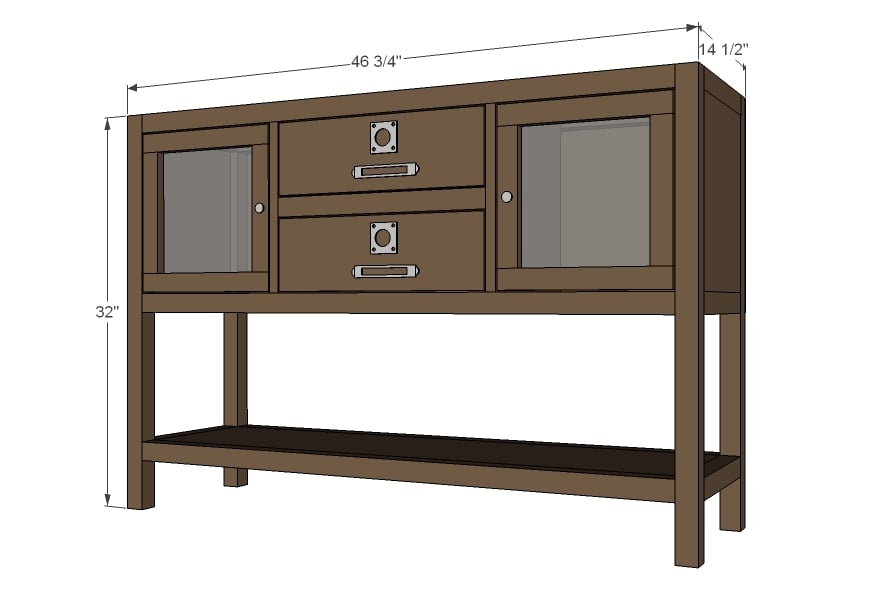
- 1 – 1x4 @ 10 feet long
- 1 – 1x6 @ 3 feet long
- 2 – 1x2 @ 8 feet long
- 1 – 1x12 @ 8 feet long
- 1 – 1x12 @ 10 feet long
- 5- 2x2 @ 8 feet long
- ¼ sheet of ¼” plywood or hardboard
- 2 sets 12” white drawer slides euro style bottom corner mount
- 2 sets narrow profile hinges and magnetic clasps OR Euro Style non mortise butt surface mount hinges
- Knobs and handles
- 2 – 12x12 sheets ¼” acrylic glass and mirror clips
- 3 – 1x12 @ 43 ¾”
- 6 – 2x2 @ 11 ¼” (cut to width of 1x12s)
- 2 – 1x12 @ 13”
- 2 – 1x12 @ 13 ¾”
- 4 – 2x2 @ 32”
- 6 – 2x2 @ 43 ¾”
- 4 – 1x2 @ 13”
- 2 – 2x2 @ 17 ¼”
- 1 – ¼” plywood @ 16” x 46 ¾”
- Drawer and Door cut list in instructions


Please read through the entire plan and all comments before beginning this project. It is also advisable to review the Getting Started Section. Take all necessary precautions to build safely and smartly. Work on a clean level surface, free of imperfections or debris. Always use straight boards. Check for square after each step. Always predrill holes before attaching with screws. Use glue with finish nails for a stronger hold. Wipe excess glue off bare wood for stained projects, as dried glue will not take stain. Be safe, have fun, and ask for help if you need it. Good luck!
Instructions
Step 1

Drill ¾” pocket holes along all sides of the shelves (only ends are shown, but go ahead and drill front and back sides too). Attach with 1 ¼” pocket hole screws and glue the end trim, keeping top edges flush.
Step 2

Put one shelf aside (shown at bottom of diagram). From remaining two shelves, attach dividers and sides as shown above, hiding pocket holes to insides. Use ¾” pocket holes and 1 ¼” pocket hole screws and glue.
IMPORTANT: When pre-drilling the pocket holes in the dividers, go ahead and do some on the front and back, as well as the top and bottom. These will help when attaching the face frames.
Step 3

The face frames will use a mixture of 1 ½” and ¾” pocket holes. If you are using any ¾” stock, revert to the ¾” pocket hole and 1 ¼” pocket hole screws. For joints of 1 ½” stock to 1 ½” stock, use 1 ½” pocket holes and 2 ½” pocket hole screws.
As you build the face frames, make sure the frame stays true to measurements and matches up with the storage boxes. Check to make sure door and drawer openings measure true to size.
You will build two of these.
Step 4

Attach face frames to box and bottom shelf through predrilled holes using glue and ¾” pocket hole screws. Add additional fasteners where needed to secure face frame to shelves and storage box.
Step 5

Step 6

DRAWERS
4 – 1x4 @ 12 ¾”
4 – 1x4 @ 14 ¾”
2 – 1x6 @ 17”
1 - 1/4" ply @ 12 3/4" x 16 1/4"
Build drawer boxes 1” less in width than the opening with 1x4s. Attach plywood to bottom. Attach drawer slides to sides of bottom and install drawer in cabinet. Drawer should sit inset when closed ¾” from outside of cabinet to give room for drawer face.
Step 7

With drawer fully pushed in, align drawer faces up with drawers, with an even 1/8” gap on all sides. Nail on with 1 ¼” finish nails and glue. Remember to avoid areas you will add hardware to.
Step 8

Next build doors from 1x2 stock. When satisfied with doors, test fit with hinges. Add acrylic glass to back using mirror clips. Install clasps to keep doors closed when shut.
Step 9

It is always recommended to apply a test coat on a hidden area or scrap piece to ensure color evenness and adhesion. Use primer or wood conditioner as needed.

Comments
Ana White
Fri, 12/09/2011 - 11:38
Gorgeous!
Thank you Gina for building - you did such an amazing fine job!!! I'm so excited to see the photos!!!
spiceylg
Fri, 12/09/2011 - 11:53
Beautiful!
Lady Goats you are so talented! Amazing plans as always Ana. Beautiful piece!
Ellie (not verified)
Fri, 12/09/2011 - 11:56
Talent
wow - that's a great piece of furniture. I wish I could do that. Do you have a lot of power tools?
In reply to Talent by Ellie (not verified)
Lady Goats
Sun, 12/11/2011 - 11:35
Thanks!
Ellie, you can totally do this! Maybe not as a first project... but get a few under your belt, get comfortable with how things work, then you'll have no problem throwing something like this together! I wouldn't say I have more tools than most. Sometimes, you really don't need a lot :-)
Heather McKenzie
Fri, 12/09/2011 - 15:20
Wow!
Looks absolutely fantastic!
Aida (not verified)
Fri, 12/09/2011 - 21:47
Console Table
Hi,
I saw the console table and I'm in love with it....never used any power tool other the a drill.. How easy is this to make and do you think that home depot will cut this pcs. for me?
I will like to use it in my dinning room as a buffet table or credenza to put the fabric napkins and wine glasses.
I will like to try it, please help.
thank you!
In reply to Console Table by Aida (not verified)
Lady Goats
Sun, 12/11/2011 - 11:39
Advanced Project
Hi Aida, I listed this as an "advanced" project because inset doors and drawers aren't an easy thing to master (if you look closely, I actually need to move a hinge in the right door because they're not even. I'm just so lazy!!). I bet this would look amazing as a buffet in your dining room, but I'd suggest getting a few other projects under your belt before tryin' this one. You don't need much more than a saw and a drill (and kreg jig!)... but everything has to be very square for this to work... which takes a few tries! Can't wait to see what you come up with!
lhynx28
Sat, 12/10/2011 - 03:36
this is a beauty! :)
this is a beauty! :)
acgosiger
Sat, 12/10/2011 - 06:13
Beautiful!
I love this! You did a fabulous job on it! I think this will be my next project, have the end tables already built, get this done and then all i need is the coffee table!
claydowling
Sun, 12/11/2011 - 04:52
Great cabinet
I'm not normally a fan of pine with a dark stain, but I think you've demonstrated to me that it's a matter of design, not the color. Because this design is great, wonderfully executed, and the stain actually looks really good.
Aida (not verified)
Tue, 12/13/2011 - 07:42
Thank you Lady Goats, I will
Thank you Lady Goats, I will take you advice and start with something less advance....... provably by spring I will be ready to make it and yes, I will post the picture........ waiting to see more new projects :)!!
matthew harmatuk (not verified)
Tue, 12/13/2011 - 15:36
love it
i was wondering if you could help out with some plans on making it 38 inches high by 54 wide for a big entryway piece. by the way i really do love the piece, just trying to make a little bigger.
In reply to love it by matthew harmatuk (not verified)
rconversenv
Mon, 01/27/2014 - 14:31
Sizing
I would prefer 38 x 54 as well; Matthew Harmatuk, has your comment been addressed? I didn't see it in the thread. Thanks!
In reply to Sizing by rconversenv
Lady Goats
Mon, 02/17/2014 - 09:55
Sizing
Hi Renee, Sorry for the delay! The change in height would be simple, just cut the legs longer (there'll be a bigger gap between the bottom of the middle shelf and the bottom shelf). To make it wider will change door/drawer proportions, but you can make this more simple by just widening the width of the drawers and keeping the doors the same (finding bigger glass for the doors will add to the cost more than any other modification you can make, I think). Does this help?
In reply to love it by matthew harmatuk (not verified)
rconversenv
Mon, 01/27/2014 - 14:30
Sizing
I would prefer 38 x 54 as well; has your comment been addressed? I didn't see it in the thread. Thanks!
birdsandsoap
Mon, 12/19/2011 - 02:26
I love it! And I LOVE the
I love it! And I LOVE the hardware, good choice!
Lauryn5381
Mon, 12/19/2011 - 04:07
I love this!
This is gorgeous. You did an awesome job! I really like the finish and hardware too. Do you mind sharing what stain and products you used? It looks great!
In reply to I love this! by Lauryn5381
Lady Goats
Mon, 12/19/2011 - 16:29
Stain
I am SO sorry for not posting this before. It's been asked so much on FB and my blog, I figured I'd already answered! The stain is General Finishes Gel Stain in Java. It took two coats (I would have totally left it at one - it was beautiful even then - but I stained in the dark and left it streaky... OOPS!). The General Finishes gel stains have polyurethane in them already, so you would only have to poly if you wanted a different feel (semi gloss, or whatever). It was used on Purebond plywood for the body, and spruce trimming out the face... and it's pretty uniform. Hope this helps!
claydowling
Mon, 12/19/2011 - 06:34
Stain Guess
Lauryn,
I don't know what stain Ladygoats used, but you could make a good approximation by mixing raw umber acrylic paint with water based polyurethane (or raw umber universal tint, if you have an art supply store like Blick Art Supplies near by). You'd have to try the proportions, but it's pretty straight forward. You have to seal with with a final untinted coat of water based polyurethane too, or the pigments will leach out.
Shasta Brown (not verified)
Sun, 01/01/2012 - 18:27
I went to Lowe's last
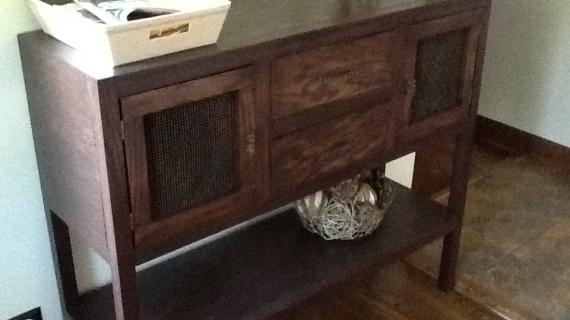
I went to Lowe's last Saturday and I bought the wood for this project. I just can't wait to build it!!! I even have the stain picked out for it. YAY!!!! This will be going in my entryway. Instead of using the glass-I will be putting bead board there-to give it more of a rustic look and to give it the durability I need with having 4 kids that will be using it.
Question though-where did you find 2x2 wood that was long enough?? (the 43 3/4") Lowe's has pine that long-but I'm using poplar. I don't want to mix it. Is the 43 3/4" used for the legs or for trim? Thanks for posting this!!! I will definitely post pics once I am done with it. :)
Shasta Brown (not verified)
Sun, 01/01/2012 - 18:27
I went to Lowe's last
I went to Lowe's last Saturday and I bought the wood for this project. I just can't wait to build it!!! I even have the stain picked out for it. YAY!!!! This will be going in my entryway. Instead of using the glass-I will be putting bead board there-to give it more of a rustic look and to give it the durability I need with having 4 kids that will be using it.
Question though-where did you find 2x2 wood that was long enough?? (the 43 3/4") Lowe's has pine that long-but I'm using poplar. I don't want to mix it. Is the 43 3/4" used for the legs or for trim? Thanks for posting this!!! I will definitely post pics once I am done with it. :)
In reply to I went to Lowe's last by Shasta Brown (not verified)
Lady Goats
Mon, 01/02/2012 - 20:54
2 x 2s
Hi Shasta! I'm so excited for you to build this! I'm still amazed by how amazing this looks in my home! Bet you're gonna LOVE it! And I love the modifications you plan. Can't wait to see!
The 2x2s that I used were furring strips, which, in my area, are spruce. If you absolutely insist on NOT using furring strips, you may have to glue 1x2s together, and if they're not 1.5x1.5 (the real size of a 2x2), adjust the rest of the dimensions for that. If you do that and you plan on staining, MAKE SURE you wipe all excess glue away before it dries!! And CLAMP, CLAMP, CLAMP!
If you're going to paint this piece... I see no reason that you couldn't mix the species.
Hope this helps!
Nanthida (not verified)
Wed, 01/11/2012 - 19:44
hinges
HI ! great work! I wish I saw this post last year ! :S we bought one.. and spent waay too much for looks of it and this one looks way better. anyhoo... maybe i can amend it to use in another space....but quesion. how did you get those hinges to fit? actually what I really mean to ask is HOW do you install it?? dont you need a special tool? Appreciate the help. again JOB WELL DONE! congrats!
In reply to hinges by Nanthida (not verified)
Lady Goats
Thu, 01/12/2012 - 07:41
Special tool for hinges
Hi Nanthida! The hinges were actually the one of the easiest parts (compared to drawer slides and the drawer face hardware)! No special tool. They're these from Home Depot (I actually bought mine at Lowe's, but can't find them on their site) http://www.homedepot.com/webapp/wcs/stores/servlet/ProductDisplay?store…
They provide the measurements to instal them, and you just measure, predrill and screw the hardware into place inside the opening, and on the door.
Nanthida (not verified)
Thu, 01/12/2012 - 07:57
Had no clue!
THanks so much! I had no idea it was THAT easy.. I have those similar hinges on our kitchen cabinets and they seem to be embedded in the cupboard making it hard to move them around..(different project we were trying to do). But thanks, I think I will attempt this. (my husband is going to kill me... ). Home depot is the closest to us so thats where will shop so that's convenient. thanks again! x
In reply to Had no clue! by Nanthida (not verified)
Lady Goats
Thu, 01/12/2012 - 08:10
OMG Don't Die! :-p
There are similar hinges that are set into the wood (there's a circle routed out underneath the hinge), but I didn't have a router when I built this (got it for my birthday a couple weeks ago), so I went with the hinges above. The only downside (and it's a minor one), is that they take up a tad more space than the other one, so stuff has to be pushed a little further back. Not a big deal, but something I didn't think about when I bought them.
claydowling
Thu, 01/12/2012 - 09:02
Inset hinges
The inset hinges are often drilled out using a forstner bit, making them a bit easier to install. For that you just need a drill, a forstner bit (a wide bit designed to drill a very flat hole) and a steady hand. And it doesn't need to be that steady, because I can do it.
In reply to Inset hinges by claydowling
Lady Goats
Thu, 01/12/2012 - 10:21
Very true
I did it with a paddle bit, so there are definitely a lot of ways to do it!
Lady Goats
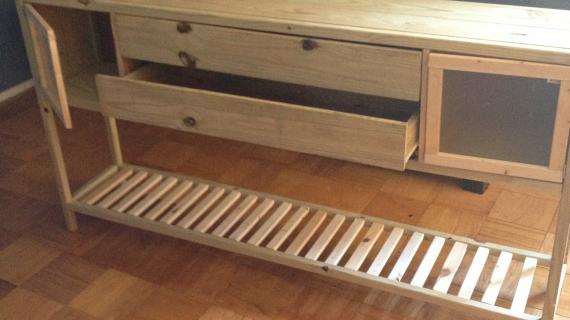
Sun, 01/29/2012 - 18:34
Additional Pocket Holes
Hi everyone! It came to my attention that I wasn't very clear with the pocket holes in step one. So here's a picture to demonstrate what I meant by drilling your holes along all sides. The black ovals are where the additional holes will be drilled.
Hope this helps!
davidmac (not verified)
Thu, 02/02/2012 - 07:21
Do you also fill the pocket
Do you also fill the pocket holes with wood filler? If so, what kind of wood filler do you use that will take the stain well?
In reply to Do you also fill the pocket by davidmac (not verified)
Lady Goats
Thu, 02/02/2012 - 18:40
Filling pocket holes
I always fill the pocket holes that are going to be seen. Honestly, I didn't fill the pocket holes on the undersides of any of the boards (just went over the whole board with poly) since I knew the pocket holes wouldn't be seen. The ones on the insides of the cabinets are actually the only ones that are visible in this plan (and you can make less of them visible if you put the pocket holes in the middle dividers facing inward so the drawers will cover them).
To fill them, I just use the Elmer's wood filler (I've had horrible experiences with the ones in tubes - they're a P.I.T.A. to get out! So I get the Elmer's because it comes in a tub and I can use my putty knife with it). It's supposed to resist shrinking, but... it still shrinks. So I fill the hole, let it dry, sand, fill it again, let it dry & sand. You can see the filler that's stained, but it definitely takes stain (I've tried using glue and wood shavings, and it didn't take stain well at all). Just make sure you get stainable filler. HTH!
In reply to Do you also fill the pocket by davidmac (not verified)
claydowling
Thu, 02/02/2012 - 19:42
Filling with wood
When I fill pocket holes, I glue in a dowel and cut it off with a flush cut saw. I usually have to clean it up with a chisel. Gina's solution works and probably looks better in the end, but I've patched enough walls that I've developed a dislike of dealing with shrinking fillers.
In reply to Filling with wood by claydowling
Lady Goats
Thu, 02/02/2012 - 23:54
Dowels
Clay, I've been debating trying dowels, so can I pick your brain?
Well, first, I want to ask why the wood filler would look better? I couldn't imagine too big a difference? Also, would a hand planer clean it up better than a chisel? Dowels seem (to me) to be a much simpler way, since you don't have to wait for filler to dry... And it doesn't shrink..
Tsu Dho Nimh
Fri, 02/03/2012 - 04:51
There is a saw for this
I've seen a $20 saw at Rockler for cutting off dowels.
http://www.rockler.com/product.cfm?page=19731
The handle is offset so you can keep the blade flat with no banged-up knuckles.
You can also cut your own plugs with this:
http://www.rockler.com/search_results.cfm?srch=usr&filter=plug+cutter&S…
claydowling
Fri, 02/03/2012 - 05:15
Dowels
The first problem is the sizing. Unless you're purchasing from a woodworking source, rather than a hardware or home center, the sizes are nominal, and can't be matched to a known drill size.
The wood used is also something strange in most cases. It seems to be very soft and absorbant, so I think it will stain like end grain, even though it's in a face. If you can match species, or use a hardwood like birch, you might be okay.
As for the plane, it might work, but I wouldn't count on it. You need to have full-length strokes to keep from leaving tracks, which is going to be unlikely with an assembled piece. A chisel is easier to get in there.
Nate (not verified)
Mon, 04/02/2012 - 06:53
Paint/Stain Color
I love the coloring in your piece. Can you tell me what exactly you used?
In reply to Paint/Stain Color by Nate (not verified)
Lady Goats
Mon, 04/02/2012 - 13:53
Stain
Hi Nate - I used General Finishes Gel Stain in Java for this!
victorsac1
Sat, 09/01/2012 - 14:11
WWOOWW
this is amazing !! great job !!
Hokulani1
Fri, 11/02/2012 - 05:04
No Kreg jig yet! :(
Hi Lady Goats! Awesome job! It looks great! So, I'm saddened to say that I don't have a Kreg jig yet. I'm hoping for one from my hubby for Christmas! :) For countersinking, does that mean that I will drill and screw almost everything from the opposite sides or outsides? I'm trying to look and figure out all the right locations for the screws. Please help! Also, I'm planning to do this table without the drawers. I have a smaller space, plus it will be easier because this is only project #3 for me. What do I need to add or do for the center part? Thank you so much for your help. This is my mom's birthday gift! I gotta impress her! :)
Lady Goats
Fri, 11/02/2012 - 15:55
Countersinking
Hi Hokulanil! Yes, countersinking is just what you asked :-) To do shelves instead of drawers, add a 1x12 @ 17 1/4" to your cut list and install it in step 2 (before adding the tops and bottoms) between the two middle dividers 6 1/2" from the top (the top of the 1x12 will be 6 1/2" from the top of the middle dividers). Then proceed as usual, excluding the drawers (which means you can take the 1x6s and x4s off of your shopping list!).
Hope this helps!
Miriam (not verified)
Wed, 01/02/2013 - 13:12
rhys console table
I love this piece and I began building it, but I'm having some difficulty-The three main shelves at the ends have 6-2x2 @11 1/4 but the length of the shelves are 1x12's. so the end pieces come up short. Cutting to the width of 1x12's also throws off the rest of the measurements because then it's thinner then the intended 2x2's. It throws off all the measurements of the entire piece going forward because it doesn't line up. The frames then won't meet the 2x2's and then won't be flush with the shelves. Am I missing something? before I go back to recut my wood to make it work, is there something I'm not understanding? Thank you so much!!
Miriam (not verified)
Wed, 01/02/2013 - 13:20
measurements
Hi-I love this console table and began building it, but I'm having trouble with some measurements. The three main shelves have 6- 2x2's at the ends measured to 11 1/4 " but the shelves measure 12" how does this work? Then the frames won't sit flush with the piece. And if you use the width of 1x12's then it throws off all the measurements of the rest of the piece. Please clarify so that I don't have to recut all of my wood. Thank you!
Not-Rob (not verified)
Sat, 01/12/2013 - 10:19
Lumber measurements
http://mistupid.com/homeimpr/lumber.htm
JameyD
Sun, 12/06/2020 - 09:02
Awesome! Well done
That is a beautiful console! I loved it so much I built one for my mom as a gift for Christmas. Great job!