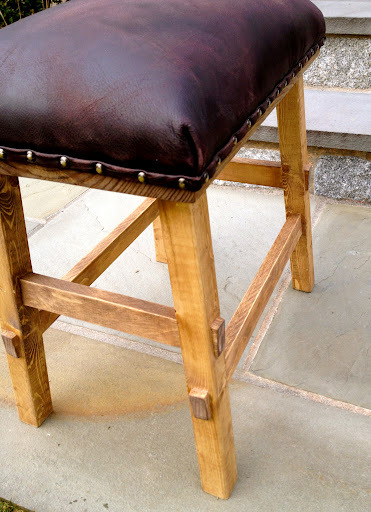


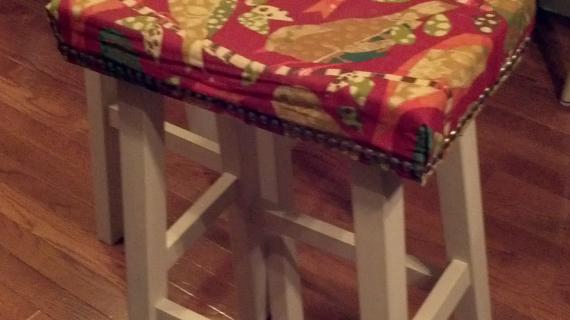
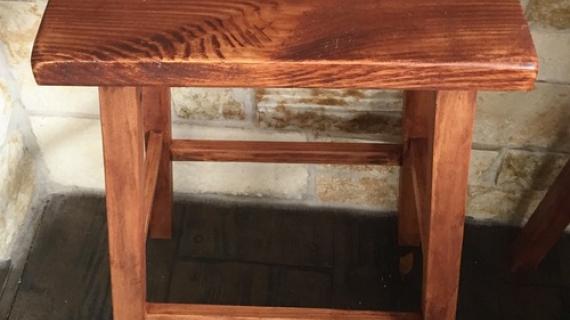
How to build a no sew nailhead leather upholstered stool. Free step by step plans. This plan shows how to build with pocket holes.
It only seems right that after putting together plans for the bench height and counter height stool that we also add plans for bar height stools, featuring Jaime's no sew nailhead upholstered top. Friends don't let friends spend $300 on a stool that they could make for $30. What if you need 4? Don't worry, I've got your back. Or at least seating for the backside hehe ...
Preparation
1 - 2x12 @ 18 1/2" long
1 - 2x2 @ 10 feet long
1 - 1x2 @ 8 feet long
2" foam pad, at least 18 1/2" x 11 1/2"
batting to cover foam pad
staples
leather or fabric
decorative nails (available at most hobby stores)
This plan is shown built with pocket holes. To build without pocket holes, please review this plan
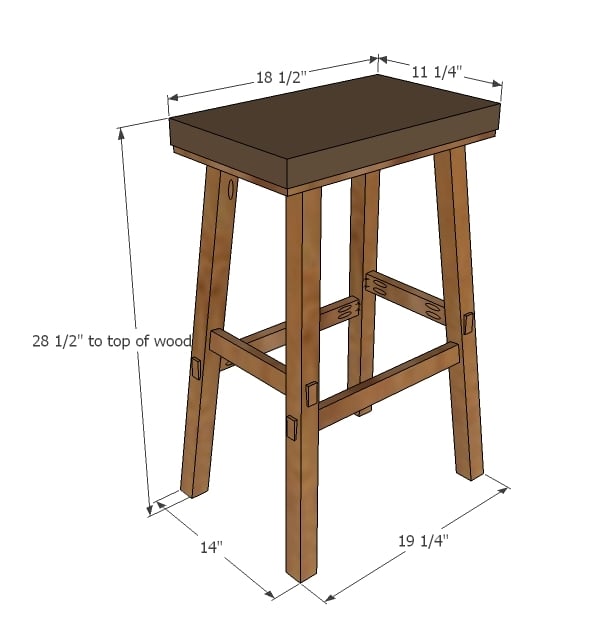
1 - 2x12 @ 18 1/2"
4 - 2x2 @ 27 1/2" (long point to short point, ends cut parallel at a 5 degree double bevel)
2 - 1x2 @ 8 7/8" (long point to long point, ends NOT parallel, ends cut at 5 degrees off square)
2 - 1x2 @ 14 3/8" (long point to long point, ends NOT parallel, ends cut at 5 degrees off square)
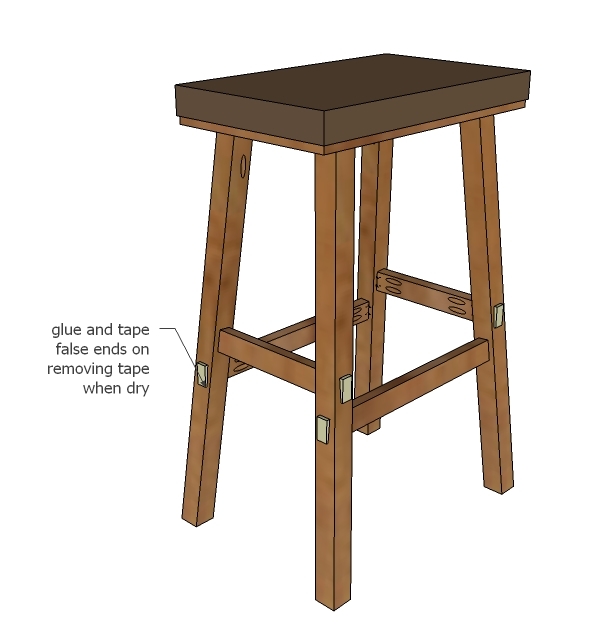
8 - 1x2 @ 1/2" - one end cut at 5 degrees off square


Please read through the entire plan and all comments before beginning this project. It is also advisable to review the Getting Started Section. Take all necessary precautions to build safely and smartly. Work on a clean level surface, free of imperfections or debris. Always use straight boards. Check for square after each step. Always predrill holes before attaching with screws. Use glue with finish nails for a stronger hold. Wipe excess glue off bare wood for stained projects, as dried glue will not take stain. Be safe, have fun, and ask for help if you need it. Good luck!
Instructions
Step 1
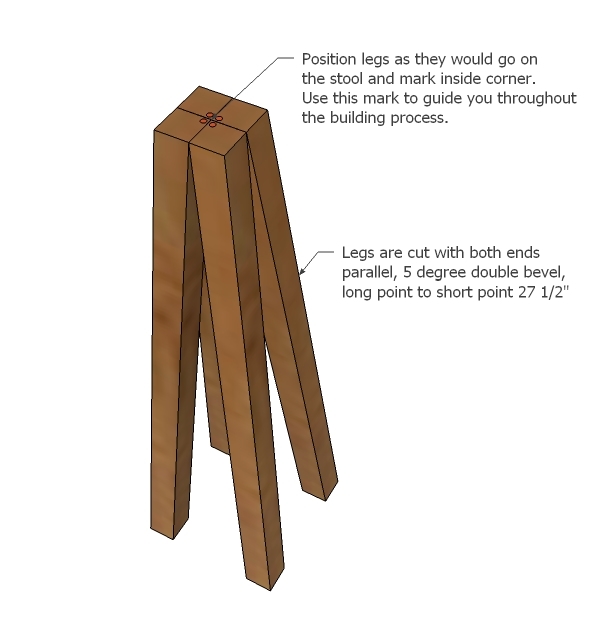
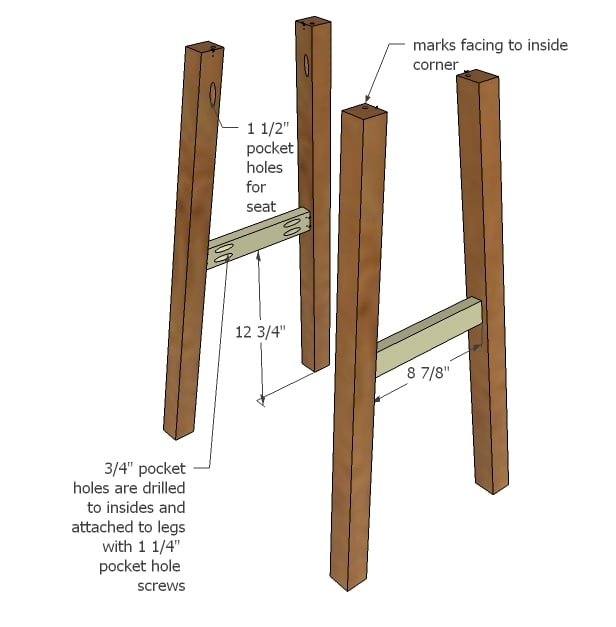
To cut legs, set your miter saw for a five degree double bevel - meaning the saw cuts at a 5 degree angle and 5 degree bevel at the same time. Cut the end of the 2x2 off, as close as possible to the end. Then without rotating the 2x2, slide down 27 1/2" and cut. This is one leg. Simply slide the 2x2 down another 27 1/2" and cut again. This is another leg. Continue until you have all four legs.
Once you have all four legs, position as the legs would be on the stool. Mark inside corners. Trust me - once you start building, it will be difficult to judge which way the leg angles go.
Step 2
As noted earlier, this plan is designed for Kreg Jig users, but if you do not own a pocket hole jig, no worries, the bench height plan has the step by step on how to put together this stool with countersunk screws.
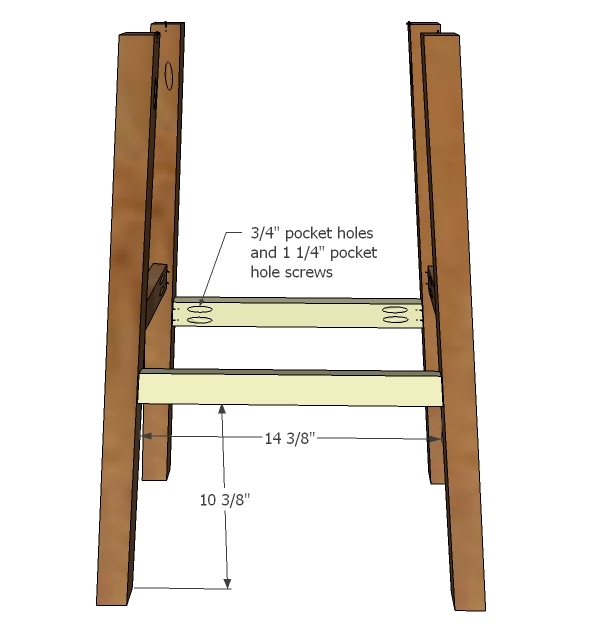
The stretchers are a little tricky because the distance they are measured up is from the floor, not up the side of the angled leg. The best way to do this is to position legs against a flat square edge. Elevate the stretcher on perhaps a piece of 3/8" plywood. Then adjust until the distance between base and bottom of stretcher is correct. Then attach. Take your time here, being off can result in a crooked stool.
Step 3
Now it will even get a little trickier because you are working with a 3D project. Just take your time and get it right.
Step 4
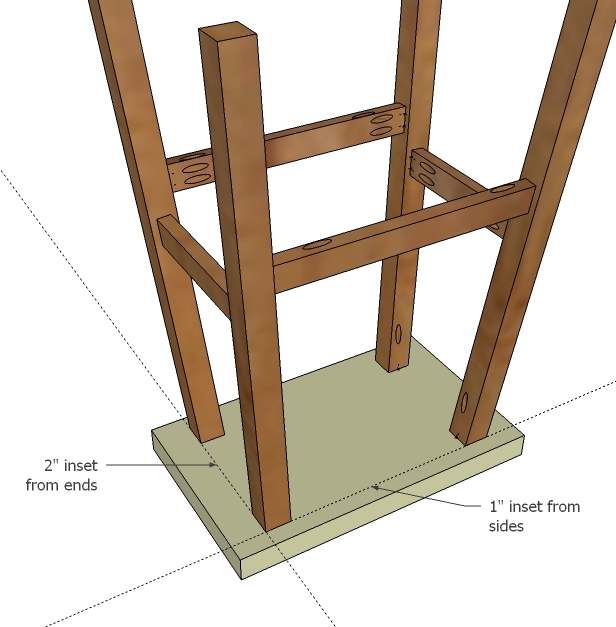
Mark the bottom edge of the seat underside as shown in diagram and attach the seat.
Step 5
Step 6

It is always recommended to apply a test coat on a hidden area or scrap piece to ensure color evenness and adhesion. Use primer or wood conditioner as needed.

Comments
Robohead
Thu, 02/16/2012 - 11:17
One more plan added to my
One more plan added to my to-do list. The first time I saw the shorter version of this stool, I thought that would make a great looking bar stool.
Rachel Barney (not verified)
Thu, 02/16/2012 - 12:00
Beautiful Bar Stool
Ana,
This is gorgeous, thank you so much for sharing. In fact, my mom just bought a few new stools and for more than $100, and these look much better than hers. Keep the new projects coming!
Rachel Barney (not verified)
Thu, 02/16/2012 - 12:04
Beautiful Bar Stool
Ana,
This bar stool is gorgeous. My mom just bought new stools, and I have to say these are much nicer than hers, and a fraction of the cost. Thanks for the great project, keep the ideas coming!
Patticake777
Thu, 02/16/2012 - 13:05
Thank you
Ana,
Your tutorials & plans are a great blessing to others, you are doing what you were meant to be doing! Thank you so much, you are a great inspiration to me also! Just got my Kreg jig in the mail, can't wait to get building!!
Tom Killian (not verified)
Thu, 02/16/2012 - 15:59
Why use pocket screws and false caps?
I don't see why you use pocket screws and false caps when a through-tenon would be so much stronger and not have the unsightly pocket screws. You should be proud of your joinery and show off your craftsmanship by making true mortise and through-tenon joinery. It looks no better than a store-bought Ikea stool. It will also not stand the test of time.
Molly (not verified)
Thu, 02/16/2012 - 20:01
Speaking only for myself, I'm
Speaking only for myself, I'm an amateur builder. I don't know how to do a through-tenon or true mortise, and if they require special equipment, I don't have it. That's why I use pocket screws. I can do it. I never took shop class, but thanks to Ana's site, I've gained confidence and experience. And where I live, we don't have an Ikea. If I can build it instead of buy it, I'm going to do it.
Tom Killian (not verified)
Thu, 02/16/2012 - 16:05
Why use pocket screws and false caps?
I don't see why you use pocket screws and false caps when a through-tenon would be so much stronger and not have the unsightly pocket screws. You should be proud of your joinery and show off your craftsmanship by making true mortise and through-tenon joinery. It looks no better than a store-bought Ikea stool. It will also not stand the test of time.
In reply to Why use pocket screws and false caps? by Tom Killian (not verified)
spiceylg
Fri, 02/17/2012 - 02:31
No negativity
Ana does us a wonderful service by providing plans for free. She provides basic techniques for the novice but the more advanced are free to use advanced techniques. Mortise and tenon joinery is just that, more advanced. So if you have that knowledge, use it, but please don't put down her efforts for those of us just beginning. If it wasn't for her, a lot of us would never have gotten into woodworking in the first place.
In reply to Why use pocket screws and false caps? by Tom Killian (not verified)
claydowling
Fri, 02/17/2012 - 10:59
Through tenons
Through tenons aren't hard, but they're outside of the skill set that's been established as the baseline for this site. I was thinking of putting together a tutorial this weekend on making them.
In reply to Through tenons by claydowling
spiceylg
Fri, 02/17/2012 - 12:17
Offers
That would be nice Clay. You are more advanced as we know, but offer assistance instead of criticism and it's much appreciated!
dananryan
Mon, 02/20/2012 - 22:46
Great!
Sounds great! Looking forward to learning more about woodworking.
In reply to Through tenons by claydowling
claydowling
Tue, 02/21/2012 - 06:33
Not dodging
Well, not a lot. I managed to mill the stock for the tutorial, but I spent my entire weekend gluing up panels for a very behind customer project.
Fair warning that this is going to be a hand-tool tutorial. That's because machines to do this are expensive and for a small project take too much time. Fortunately the hand tools to do this are cheap, even if you have to mail order some of them.
stcurry
Fri, 02/17/2012 - 09:35
I love it
Thanks for the plan I love it. I just bought a house that has a large bar downstairs and need 8 stools. That was more on stools then I wanted to pay and couldn't find good quality ones for less then $200 each. I ordered my Kreg Jig just waited for it to arrive but I wanted to ask do you use Kreg Jig screws or just any pocket hole screw.
Thanks again for all the plans I have a long list of things to complete.
In reply to I love it by stcurry
Lady Goats
Fri, 02/17/2012 - 09:51
Pocket hole screws
Any pocket hole screws will do, but there generally isn't much of a price difference between the Kreg brand and other brands (at least at my local home improvement stores). Just make sure you get the right screw for your material (course, fine, and the right size). Hope this helps! :-)
5 tator tots (not verified)
Fri, 02/17/2012 - 09:53
You almost make me feel
You almost make me feel guilty for enjoying the warmest winter that I can remember here in Minnesota! In fact, this is the first year that I haven't heard some radio announcer pointing out that "its warmer in Alaska than in Minnesota today..." I've never known anything but harsh winters on the prairie, so I know how it can drag a girl down. I've often wondered how Alaskans make it without even the gray skies that we have here.
I just want to let you know that your plans, like this barstool, make it possible for us to have furniture despite our limited budget. In fact your plans for storage (mudroom cubbies, children's bedrooms, media consoles, etc.) our family of 7-soon to be 8- would never last in a house this small. Thank you Ana!!