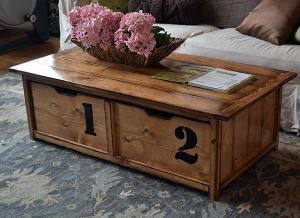


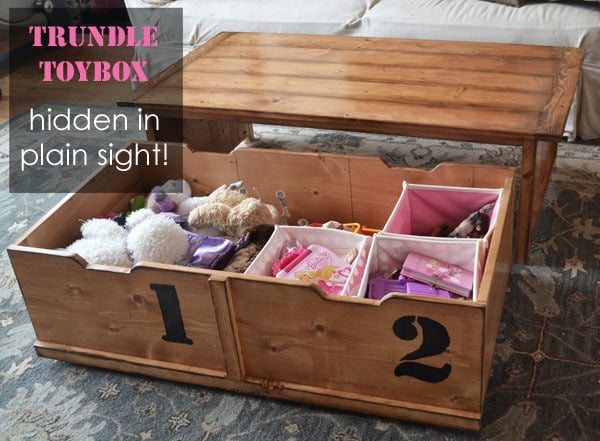
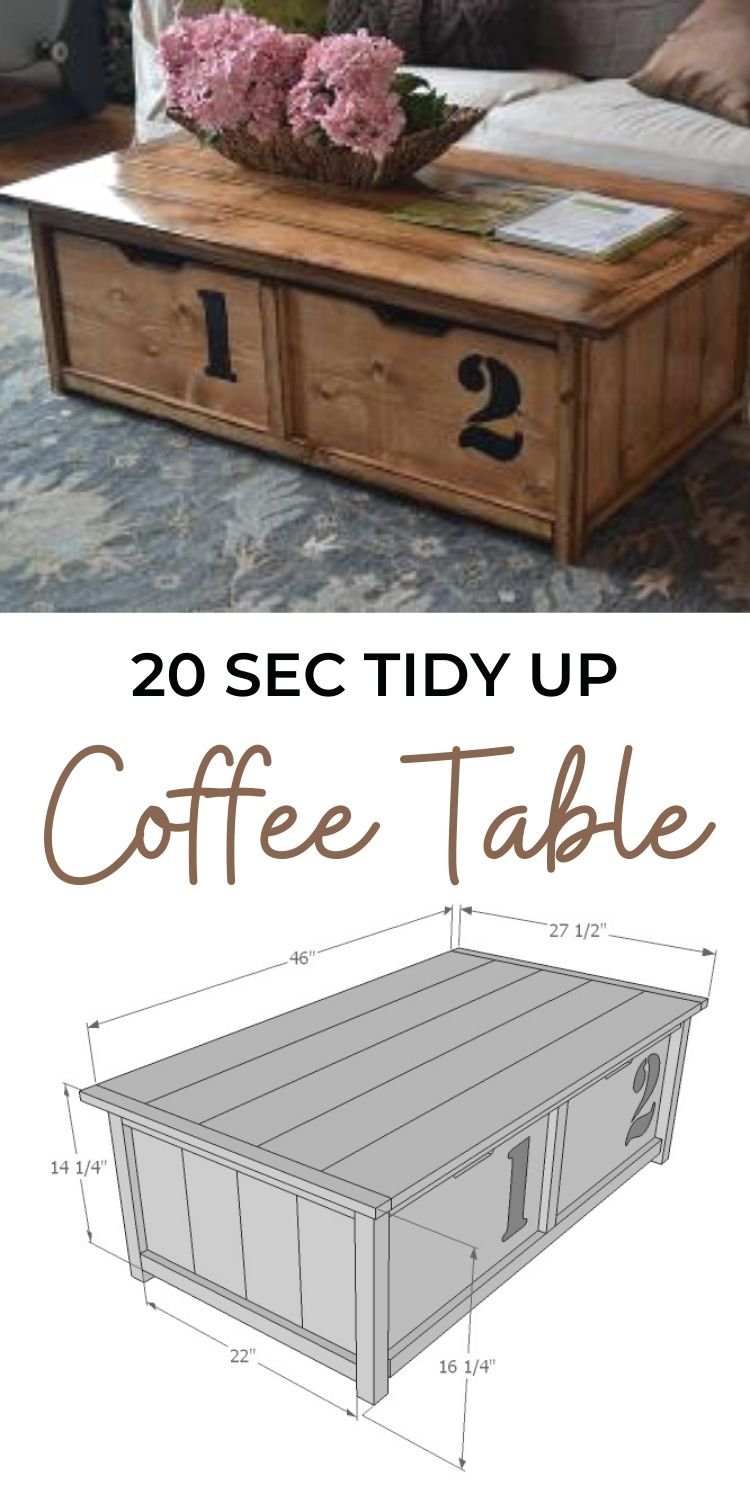
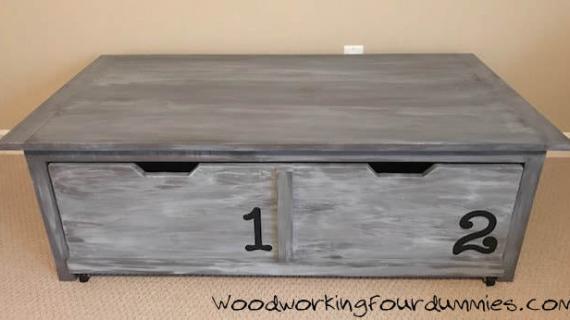
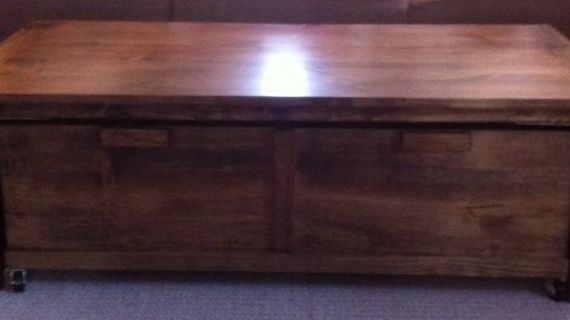
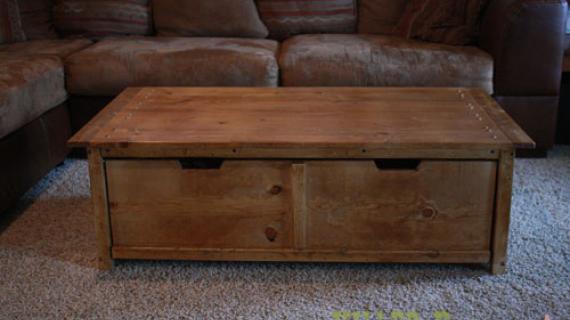
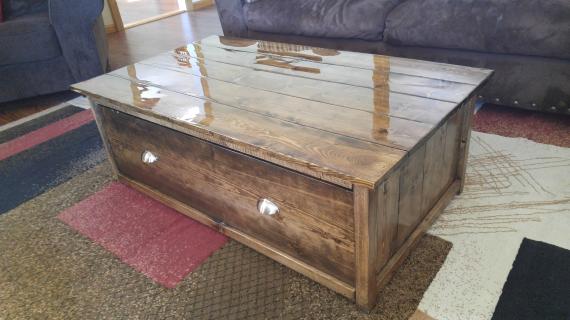
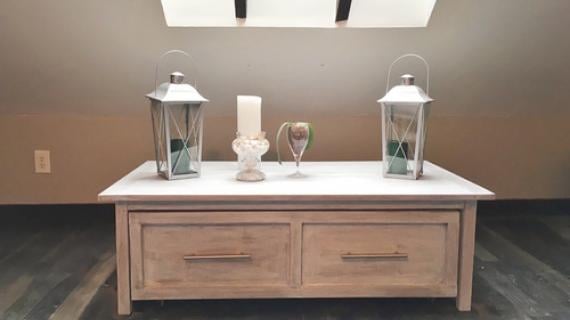
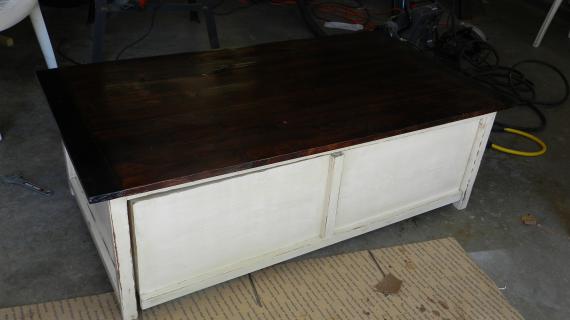
This coffee table features a huge trundle drawer that can be used to store blankets, pillows, or act as a toybox!
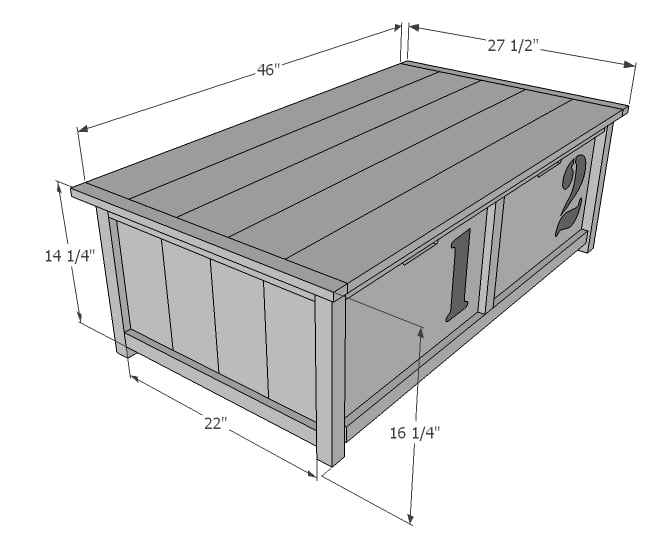
This is a free woodworking plan with step by step diagrams, shopping and cut list - everything you need to build your own coffee table with trundle drawer.


Pin for Later!
Preparation
- 4 - 1x6 @ 8 feet long
- 3 - 2x2 @ 8 feet long
- 1 - 1x3 @ 6 feet long
- 1 - 1x12 @ 12 feet long
- 1 - 1x2 @ 10 feet long
- 1/4 sheet of - 1/2" plywood
- 4 - 1 1/2" caster wheels with an overall clearance of 2"
- 4 - 2x2 @ 21 3/4" (cut to length of your leg sides)
- 2 - 2x2 @ 43 1/2"
- 5 - 1x6 @ 45"
- 8 - 1x6 @ 14 1/4"
- 4 - 1x2 @ 22" (side trim - cut to fit)
- 2 - 2x2 @ 15 1/2" (for caster wheels with overall clearance of 2" - most commonly 1 1/2" diameter wheels)
- 2 - 1x3 @ 27 1/2" (cut to width of tabletop)
TRUNDLE
- 2 - 1x12 @ 43"
- 2 - 1x12 @ 23 1/4" (1/4" less in length than the side trim)
- 2 - 1x2 @ 43"
- 2 - 1x2 cut to fit most likely around 11" 1/2" plywood cut to fit bottom


Please read through the entire plan and all comments before beginning this project. It is also advisable to review the Getting Started Section. Take all necessary precautions to build safely and smartly. Work on a clean level surface, free of imperfections or debris. Always use straight boards. Check for square after each step. Always predrill holes before attaching with screws. Use glue with finish nails for a stronger hold. Wipe excess glue off bare wood for stained projects, as dried glue will not take stain. Be safe, have fun, and ask for help if you need it. Good luck!
Instructions
Step 1
There's a number of different ways you can go about putting this pretty simple coffee table together. I actually put mine together in a different set of steps: I first built the top, then the leg sides, then added the top to leg sides, followed by trundle construction. But what happened is this table is highly dependent on the tabletop as the main structure, and I had some not quite straight tabletop boards. This created a ton of problems for me, so I wanted to present these plans in a different order to help alleviate issues for you.
If you have straight boards and a Kreg Jig, it may make the most sense to just build the tabletop, build the leg sides, the frame, and the trundle, and then put the pieces together.
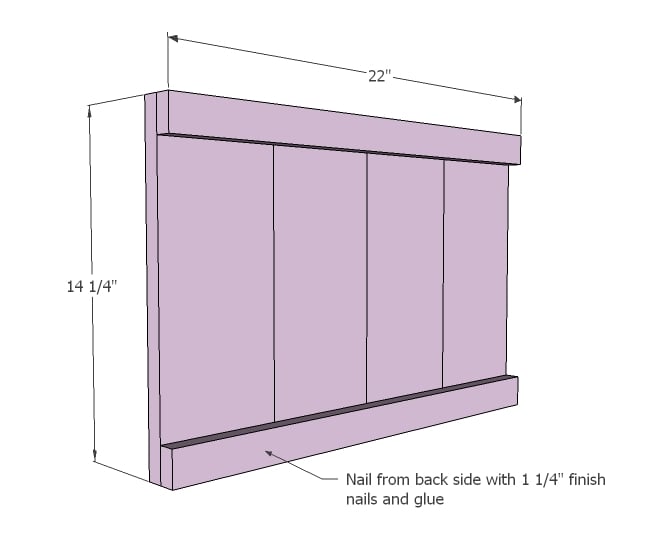
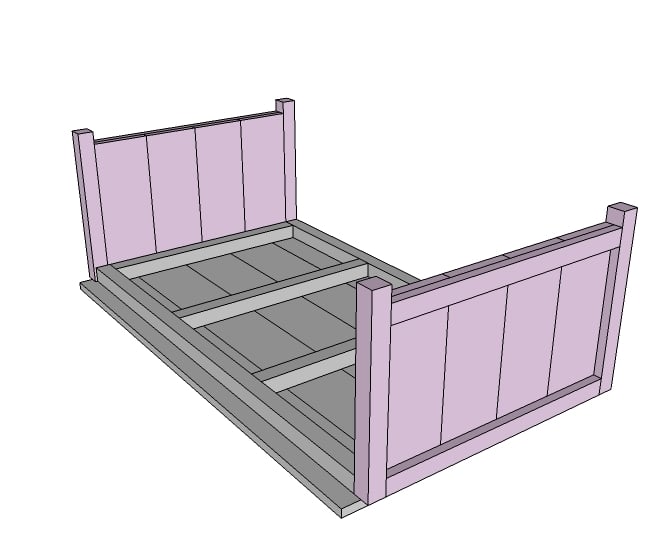
Either way we go, let's build those sides first. Because 1x6 boards can be a little "off" and end up changing overall widths, cut the trim pieces to match the width of four 1x6s as shown above. Nail and glue on.
TIP: for pocket hole jig users, also join center of each 1x6 to neighboring 1x6 edge to edge.
Step 2
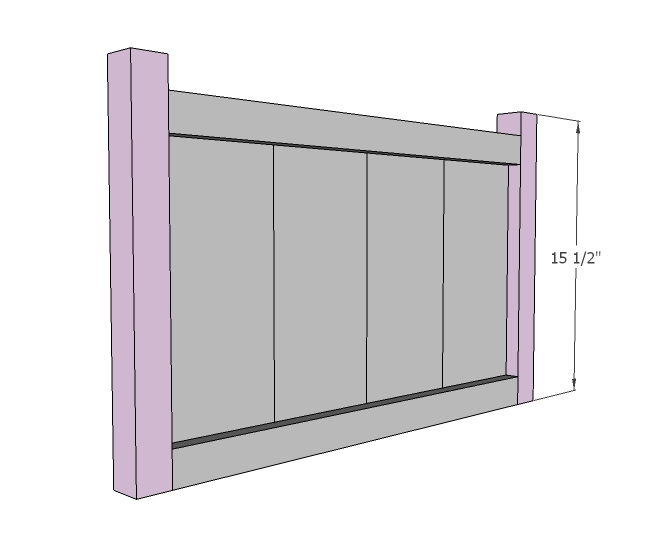
Now add the legs to the sides. You can either use countersunk screws at least 2 1/2" long or 3/4" pocket holes and 1 1/4" pocket hole screws.
Step 3
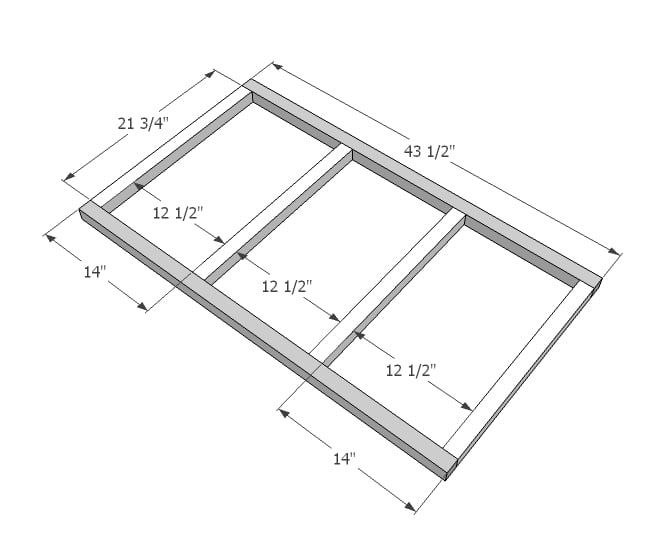
Now we will build the 2x2 frame. Remember, because the sides can vary ever so slightly in widths, you will want to build the 2x2 frame to the same width as the sides. Easiest way? Cut the 2x2 supports to the same length you cut the side trim too.
It's super important to use straight 2x2s and build the frame square, so take your time here and get it right. Because the trundle basically acts like one big drawer, it's exceptionally important that the table is square so we don't have on giant cockeyed drawer that sticks. Ugh!
Step 4
If you have a pocket hole jig, you may wish to build the tabletop first, including breadboard ends.
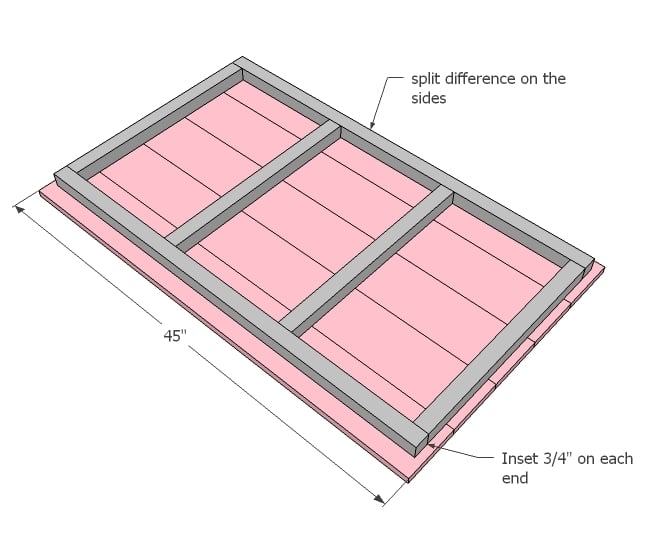
Otherwise, starting in the center and working outward, screw from bottom the tabletop boards through 2x2 supports with 2" countersunk screws. Overhangs are equal to sides, 3/4" on ends.
Step 5
Step 6
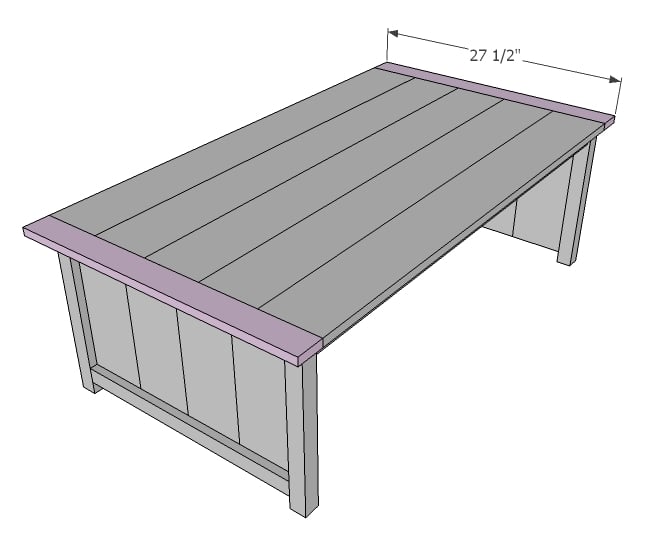
And then the breadboard ends can be attached to the tabletop boards. Of course if you are using a pocket hole jig, you would have already attached in earlier steps.
Step 7
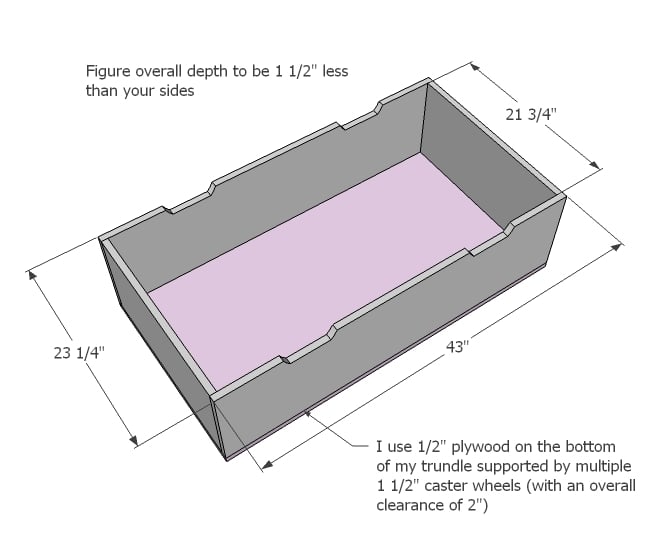
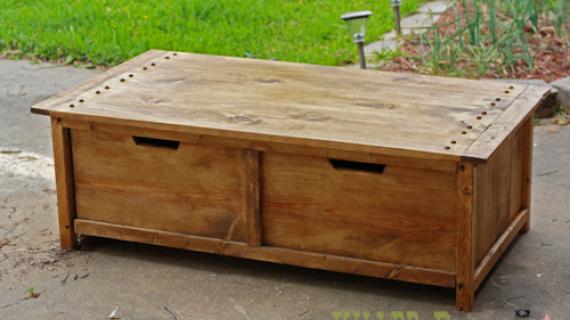
Build the trundle as shown here. I simple screwed the plywood to the bottom with a countersink bit and 2" screws and glue.
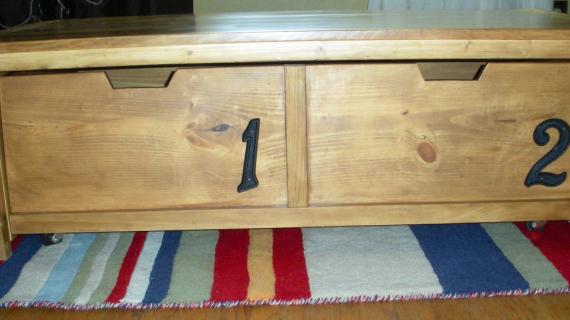
Notch out the handles if desired.
For the caster wheels - I added only four and it's fine, but for a heavier load, you may consider adding another in the center.
Step 8
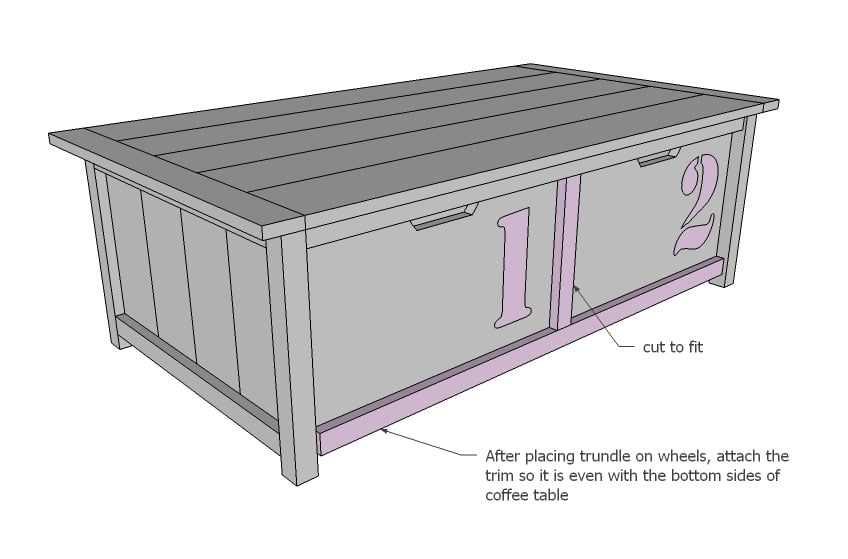
Because wheels and 1x12 widths and every your plywood might vary, what I did here was position the trundle under the table, and then match the trim to the sides level. I used glue and 2" finish nails.
Then I added the center trim with 1 1/4" finish nails and glue.
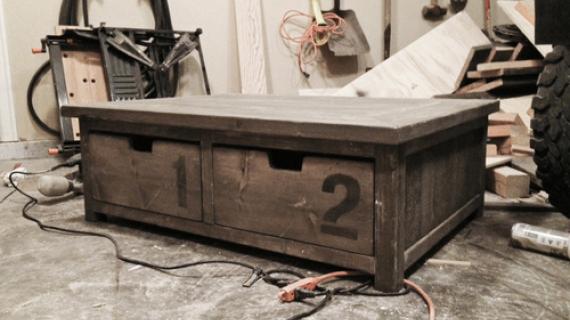
Step 9

The number were painted on with acrylic paint and an angled brush.
Step 10

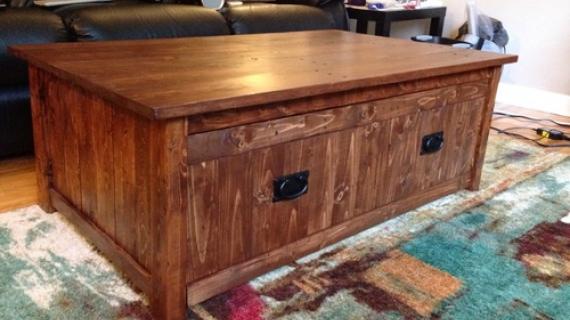
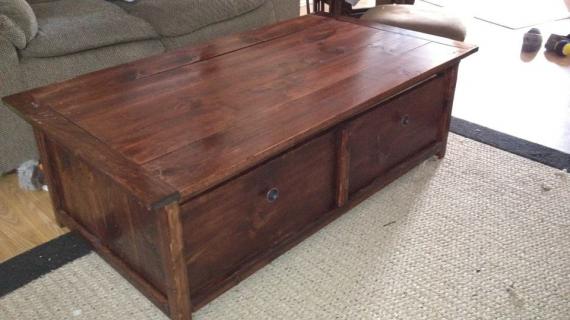
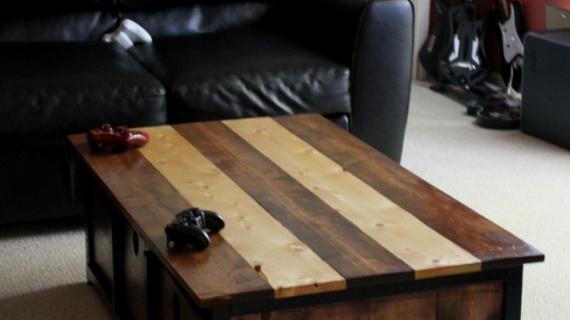
For the finish, I sanded well. Then one coat of Minwax Ipswich Pine, folowed by Minwax Dark Walnut rubbed on with a rag over edges. We sprayed four coats of polyurethane on to get that ultra smooth glossy finish.
It is always recommended to apply a test coat on a hidden area or scrap piece to ensure color evenness and adhesion. Use primer or wood conditioner as needed.
Comments
bundaboy
Tue, 03/06/2012 - 00:50
Best DIY Blog
Hi Ana (or anyone) - how can I vote for you? Is there a link?
Ana White
Tue, 03/06/2012 - 01:14
Thank you! The link is here:
Thank you! The link is here: http://www.apartmenttherapy.com/best-diy-blog-nominations-the-homies-2012-166618
bundaboy
Tue, 03/06/2012 - 04:51
Done! Come on every one - get
Done!
Come on every one - get behind Ana and vote!
In reply to Thank you! The link is here: by Ana White
spiceylg
Wed, 03/07/2012 - 03:01
Still time to vote!
Please go over to that site and vote for Ana now, the clock is ticking!!!
spiceylg
Tue, 03/06/2012 - 02:56
HURRY AND VOTE FOR ANA, TIME IS RUNNING OUT!
See the link in her comment above. Please vote! Ana, you deserve all the kudos for sure. You rock. I LOVE this coffee table! In the current configuration of our furniture I don't have room, but for future, I'm keeping this in mind. BTW - yours is much better than the inspiration piece!
Bunnie1978
Tue, 03/06/2012 - 06:38
Ditto
`"yours is much better than the inspiration piece!" I second!
This coffee table is wonderful. The finish is so charming. I am now giving second thoughts to doing the Tryde coffee table.. This would so much more functional!
At the very least, I am making a mental bookmark of this table to refer back to for the wonderful finish.
Maria R (not verified)
Tue, 03/06/2012 - 06:48
What a great idea!
This would be so great in a living room even in a home without kids!
Bunnie1978
Tue, 03/06/2012 - 06:51
Actually..
As I think more about this....
I'm planning to do the apothocary style console table to replace my current TV/Computer cabinet so that I can build in a sliding shelf to put the printer inside the cabinet with the computer....
Perhaps it would also be easy to merge the apothocary style into the trundle and have them coordinated... Perhaps a row of small drawers and under that a shallow trundle for my son?
Hm... it could then replace the big black plastic trunk in the living room that I'm currently using to tidy up toys that migrate from his room (because I am a stuff-things-out-of-the-way-type too!)
What do you think?
Ana,
Thank you so much for your site... I love building and making my home a better representation of myself! It is so fulfilling to visualize something and then bring it to fruition. It's also so much more cost effective... most of the time you can build good solid pieces for cheaper than getting something comparable in the particle-board isle at Wal-Mart! LOL.
In reply to Actually.. by Bunnie1978
Ana White
Tue, 03/06/2012 - 09:58
Hi Bunnie, I think your idea
Hi Bunnie, I think your idea is really smart! And even easier to make than this table. I would use plywood for the ends, and then just add the apothecary details to the trundle. Oh now you have me thinking!!!
@Everyone, thank you so much for voting, supporting, commenting! I'm so glad you like the coffee table - we love it too (especially me!).
On the finish, I'm now loving stain more than paint! Give it a try on scrap wood first or the underside of the table. We did lots of testing to get the finish we wanted.
Good luck building and thanks tons for reading and supporting!
mebohn
Tue, 03/06/2012 - 06:55
Thinking now...
Thinking I need to build this right now. Anything beautiful with storage is for me! Oh yes, and already voted for you! Hope you win!
GUEST (not verified)
Tue, 03/06/2012 - 07:12
Kreg jig -less :(
I love this site and have my eye on so many things that I want to make! I have purchased my very own drill ( cause the boys wouldn't let me play with theirs), talked my husband into a miter saw ( boys are so easy to manipulate)so that I can make my own cuts ( boards up to 12 inch in width), and have the gumption to start cranking projects. However, I find that so many of your projects call for a Kreg jig. That I do not have. I want to make a few things before I make my next big purchase. Is it possible to make all of these wonderful projects the old fashion way? With a countersink and screws? I have yet to build up the confidence to start changing plans at my own whim . . . .
Advice Please :D
babysteps
Tue, 03/06/2012 - 08:05
Of course you don't need the
Of course you don't need the kreg to complete any of these projects. You can use a countersink drill bit and wood plugs. I think in many cases it looks nice to have the contrasting plugs showing, it looks like old fashioned wood peg joinery. Many of Ana's older plans don't enlist the kreg in the directions. Save up for the kreg though, especially if you plan on making any kind of shelves or cubbies, as you will love it forever once you DO get one. Good luck, I hope you post in the brag blog soon.
In reply to Of course you don't need the by babysteps
Ana White
Tue, 03/06/2012 - 10:15
Hi there! For this project,
Hi there! For this project, you most definitely do not need a pocket hole jig. I suggest using a solid top - maybe plywood or a premade pine project panel. The only real struggle joints you will have is the legs being attached to the side panels. Definitely doable though!
We have so many readers using a pocket hole jig, it's hard to balance how plans are presented, but definitely, most every project can be made with a variety of joinery techniques.
Good luck building! Can't wait as well to read about you on the brag blog!
GUEST (not verified)
Tue, 03/06/2012 - 10:45
Solid Top ?
Thanks for the quick reply. I am almost star struck at your personal response; I think you are just that wonderful!
Anywho . . . . why do you recommend a solid top as opposed to the planked looked?
In reply to Hi there! For this project, by Ana White
claydowling
Tue, 03/06/2012 - 12:22
Ease of contruction
If you don't use a pocket hole jig, the solid top is the easiest solution. There are alternatives though:
Glued edge joint. Requires the ability to make the edge extremely smooth, usually with a long plane. This process is called jointing. Very strong.
Dowel pins. With a good doweling jig, you can secure boards to each other by using dowel pins. Nearly as strong as the glued edge joint. Also improved by jointing the edges as for the glue joint.
Both techniques require that you buy very flat wood, because you can't use mechanical force to hold it in place the way you do with a pocket hold joint. That means you'll have to go to a lumber yard, but it's worth it.
violasurvey (not verified)
Tue, 03/06/2012 - 15:39
You can also use thickened
You can also use thickened epoxy and edge join. The joinery doesn't have to be as tight as it does for hide glue. Still better to do a good joinery job, but you can glue up on a flat surface with very little clamping pressure, and "peanut butter" consistency epoxy. Just put plastic down first :-)
In reply to Ease of contruction by claydowling
claydowling
Sat, 03/17/2012 - 19:41
Thickened epoxy
Is thickened epoxy something I can buy at the hardware store, or is it something I do to my epoxy? This seems like a useful thing to know about.
Bunnie1978
Tue, 03/06/2012 - 14:54
Best $20 ever spent...
I just have the $20 Kreg Jig... you don't need the big one. In fact, I can't even IMAGINE that I could possibly love the $100 one an ounce more than I love the one I have. Seriously, it's that awesome. Good luck to you.
allthosedelgados
Tue, 03/06/2012 - 07:17
love
love this! I just scored a ton of wood on my latest dumpster dive, including some wonderful pallets and really rustic 1x8s!
this is now on my list!
SingleMomThriving
Tue, 03/06/2012 - 07:36
This is my next project
If you saw my living room right now, you would understand why this is an answer to an ongoing problem.
Adding this to my to do list. I love the style and the finish is wonderful.
~Dona~
jaymeej
Tue, 03/06/2012 - 09:45
My husband is going to love
My husband is going to love that I want to build a new coffee table to replace the Tryde table I just built a week ago!
Bunnie1978
Tue, 03/06/2012 - 14:55
LOL.
That's it... just LOL.
Torr10 (not verified)
Tue, 03/06/2012 - 16:18
Looks great for
Looks great for Grandparents.....girl toys on one side and boy toys on the other side. Yep, I'm sexist...sue me. lol...
CassieD
Thu, 03/08/2012 - 15:09
Great Design
I love how practical this build is. It's like a DIY storage ottoman, but better looking than the store bought stuff. I'm not planning on building it, as I'm big fan of coffee tables, but this plan's is gonna be a hit. It's awesome.
P.s. I'm glad you outlined how you finished/sealed it, it looks great!
bhoppy
Sat, 03/17/2012 - 19:12
pocket hole screws
are 1 /14 pocket hole screws long enough for the 2x2 frame? It's essentially the same as the frame for the harriet table and that plan calls for 2 1/2 inch screws.
linseylouwho
Mon, 03/26/2012 - 09:43
Notch Handles?
I'm about to start building this coffee table, but the only thing that makes me a bit nervous is the one thing there aren't any measurements for; the notch handles. I like the look of the trundle with them more than without but don't want to mess anything up. Does anyone have any measurements for them? Thank you! :)
In reply to Notch Handles? by linseylouwho
cdswhite
Mon, 03/26/2012 - 19:26
Notch Handles
Hi linseylouwho - We did the same type of notches on some drawers that we built for our entry way closet (see them here - http://29ruehouse.blogspot.com/2012/01/drawers-are-done.html).
We also didn't have measurements so I just googled images to get an idea of what shape I wanted the notch to be and drew it out on paper to use as a template. I figured the width should be wide enough for mine and my husband's hands to fit through. Since we free-handed the drawing (I think we used a cup to help us shape out the rounded bottom part), it wasn't perfect but it worked for us.
Our measurements ended up being about 4.5in at the top of the notch which is the widest part, about 3in at the bottom of the notch where it has curved in and the height of the handle from the bottom of it to the top of the box is 1.25 in. I'm still happy with these dimensions. Good luck!
claydowling
Mon, 03/26/2012 - 16:58
No measurements
I don't have measurements, but I can help you figure out something that will work for you. This may not be the final of what you want, but it provides a starting point for you to make changes from.
Mark the midpoint of the long edge. Then mark the midpoint of each half. This is going to be the center of the handle notch.
Now measure the thickness of your hand at the base of your fingers. Mine is about an inch. This is how far down from the top the bottom of the notch will go.
Now measure the width of your hand across the base4 of you fingers. This is the width of the bottom of the notch. Mine is about four inches. If in doubt, add an inch.
You can connect the bottom line to the top with a forty-five degree line from your speed square.
Now that you have the handle drawn, make sure you're happy with the lines and make any adjustments that you think it needs. Then fire up your jig saw and cut it out.
You can make this more repeatable with a couple of simple tricks. You can mark the bottom of the cut by holding your pencil along the edge of your speed square at the right mark, and then slide it along the length of the line you need to mark.
If you have a compass, you can use it to set the distance from the center to the edges of the cut for the bottom. That way you can very quickly mark out all of the cuts.
bhoppy
Mon, 03/26/2012 - 18:47
wish i read your trick before...
Clay are you an engineer? LOL So I made this table last weekend and finished the last coat of poly yesterday... I posted a pic on the FB page. I just sort of did what Clay describes but not as detailed. I found the center then measured in about 8 inches from each end, made the notches 6 inches wide and about 3/4 down from the top of the board. The other thing I did was that I cut the notches before I put the drawer together. I clamped the two long boards together and cut them out at the same time with the jig saw... then sanded the heck out of them so they would line up and match. Does that make sense?
claydowling
Mon, 03/26/2012 - 19:46
Sounds right
I think you've probably done it in a more sensible way than I described, especially with ganging the two boards together to reduce the number of cuts. My brain thinks more in terms of hand work, where ganging like that isn't as practical. As for the sizing, so long as your hand fits in there, your technique is at least as good as mine, and might be easier for people to follow.
The extent of my formal training for engineering is a drafting class in junior high, but I did pay attention and I did apply the skills later. A lot of math and physics helps too. I'm not sure I recommend that approach though. Higher math and psychedelic drugs are a lot more alike than they are different.
Guest (not verified)
Fri, 03/30/2012 - 22:36
Stain questions
I love this piece, and I think the stain is what really completes it. It's beautiful! I'm wondering about a few more specifics of how the stain is applied. Is the Ipswitch pine applie with a normal brush or a sponge brush? How long did you let it sit before wiping it off? How long did you let the Dark Walnut sit before wiping it off to get that great contrast? Thank you so much for your help.
Anton (not verified)
Wed, 04/11/2012 - 12:11
I love the plans! This'll be
I love the plans! This'll be a nice project one of these weekends. I had one question though....how do you actually cut out the notched handles for the drawer faces?
calli (not verified)
Sat, 07/07/2012 - 08:06
So here's my question... I'm
So here's my question... I'm considering modifying this plan into a octagon version of the same table. I have a TINY living room, and circular/multifaceted shapes are just better for versatility and design in small spaces. That being said, would anyone have any pointers for a somewhat novice builder on how to modify these plans in the most *efficient* and smart way? Thanks in advance! Ana, you're wonderful!
ps. I do own a kreg jig and I would like to avoid gluing anymore than absolutely necessary.
Szu (not verified)
Fri, 07/27/2012 - 10:06
Measurements and breadboard ends
I had two questions on measurements.
The first is that in the first diagram it looks like the width of the table is 46" or that the width of the 1x6 of the top of the table is 46". However the cut list says to cut the top 1x6s to 45" and then you add the breadboard ends which I think would bring the total width up to 50". Which is it?
The second question on measurements is that the cut list for the trundle says to cut the sides at 23 1/4" however the drawing shows these at 21 3/4" so that when the front/back boards are added the total width would be 23 1/4". Again which should it be? I think this one should be 21 3/4".
Last question (unrelated to measurements) - I was thinking about extending the top boards and not using breadboard ends - why would I go one way vs the other? Is it only asthetics?
Thanks in advance - this plan is PERFECT as a toy box for my expected baby!!!
Szu (not verified)
Sun, 07/29/2012 - 07:03
more observations..
Two other "issues" - the first is that the shop list only has one 1x2 and you need two. One 8ft and one 10ft (to include the wood needed for the trundle and the base). The other is minor - you say you used 2" finish nails to nail the horizontal board to the trundle but the shop list only lists 1 1/2" finish nails which is what I ended using.
Vs (not verified)
Sun, 01/06/2013 - 20:56
Starting this tomorrow
Starting this tomorrow morning!
Can anyone please comment on these measurement? Am new to this and don't want to make any wrong cuts!
Marie Proudman (not verified)
Sat, 07/28/2012 - 09:28
Attaching the legs
Hi Ana,
I have been building this table for the past month (don't laugh....I'm new to building.) It is going great, but I am stuck trying to figure out how to attach the legs to the table top. My son occasionally sits on our current coffee table so I would like to be as strong as humanly possible. We used a Kreg jig to attach the top boards together and then again to add the breadboards. However, when we go to attach the legs we are unsure of what to do. Are you using the Kreg jib again to attach them from the inside? the outside? How many screws should I use? Are you using L-brackets? What is the best method to go about doing this? I am in the home stretch but need a little guidance if you don't mind! Thanks a bunch!
Szu (not verified)
Sun, 07/29/2012 - 07:00
attaching legs
I'm building this this weekend as well! I'm not sure if you are asking about attaching the 2x2s to the rest of the side or to add the full leg assembly to the table...
For the 2x2 only I used the kreg jig on the inside of the 1x6's to attach to the 2x2 legs.
For adding the leg assembly I added L-brackets on top of the 2x2 frame and attached it to the leg to provide extra stiffness (I used on each leg two 2" brackets and two 1.5" brackets - the 2" one is near the front/back on the long section of the 2x2 frame and it shows a bit depending on how the drawer is positioned) and then I screwed a 2 1/2" screw through the top's 2x2 frame into the top of the leg. It seems solid. One warning - I thought I was being great at checking square but I was a bit off on one leg (it angles in from the top) and this is quite noticeable with the trundle inside... I'll have to fix it. So make sure to be super careful on square!!!!
In reply to attaching legs by Szu (not verified)
MarieP
Sun, 07/29/2012 - 08:10
Attaching Legs
I am attaching the full let assembly to the table. It sounds like "L" brackets it is! Thank you for the help Szu!
MarieP
Sun, 08/26/2012 - 07:32
Wood glue removal?
I FINALLY finished making my coffee table last night and was SO excited to slide my trundle underneath to see how beautiful it looked. I slid it into position and it truthfully looks beautiful. I can't believe I made it. However, just as I standing there admiring my work my husband said I needed to look at the other side. It appears that my trundle is longer than it is supposed to be. So much so that when I slide it into position on one side, it sticks out approximately 2 inches on the other side. I glued the sides together before screwing them with my Kreg jig. What is the best way to disassemble the box so that I can cut down the sides without completely destroying them? Can they be selvaged even though I used glue? Do I have to use something on them to dissolve the glue? Any suggestions would be appreciated! Thank you!
Tsu Dho Nimh
Sun, 08/26/2012 - 15:33
Salvaging the trundle?
Sounds like you used a piece that's the wrong size, and weren't checking as you went to make sure things would fit.
I would make a whole new trundle box, because the cuts are going to be tricky and you probably have wood filler in all the screwholes, making them impossible to get out. Salvage the wood for a smaller project, or turn it on its side and add shelves for a bookcase, and reuse the casters in the new trundle.
If you cut the trundle box down to the right size and install one new side on the shorter body, here's how:
1 - Remove the screws and carefully slice off the side, close to the end. DISCARD THIS, or salvage the wood for shelving.
2 - Cut the box down to the correct size, using the table as the measurement. (carefully, use clamped guides for your saw, and removing any screws that might be in the way).
4 - Build a new side, drill pocketholes and attach it to the trundle.
In the future, instead of using measuring tapes and drawings, cut pieces to fit "as built" ... use the depth of the table as the marking guide for the sides of the trundle, etc.
Jaime04285
Wed, 09/12/2012 - 12:46
casters
I can't seem to find 1 1/2" casters. I was just gonna use 2" with an overall clearance of 2 1/2" but thought I'd ask if anyone ran into this problem before so I wouldn't have to alter the plans any.
slpcolleen (not verified)
Tue, 10/16/2012 - 13:29
Angled trundle?
Am I imagining it, or are the sides of the table and the trundle angled? I love that - anybody have a guess at the angle of the cuts?
Vs (not verified)
Sun, 01/06/2013 - 20:59
Measurements
Hi folks, building this tomorrow. Can anyone comment on the measurements szu mentioned in a previous post? Don't want to screw up!
Szu (not verified)
Mon, 01/07/2013 - 05:40
The measurements I mention
The measurements I mention are the ones that I used and worked for the trundle. My trundle is complete and holding baby-stuff as we speak! I don't think this thread is monitored (notice how long ago I posted without reply) and I only noticed because my inbox showed a reply to my posting.
Good luck.
mrsevans88
Sat, 02/23/2013 - 05:31
Needing the storage
I love this piece! I'm planning on trying to attempt to make this as my first project!
michaelramsgate
Sat, 07/06/2013 - 11:48
assemble 2x2 frame
In Step 3: Do you install the 2x2 with your kreg jig or countersink screws? Or do you not install them at all and just install them square to the boards?
edub327
Fri, 12/06/2013 - 21:32
Want to build with small mod
My wife wants a coffee table badly. I think this will fit the boll with the kids toys not making their way to the playroom every day. With our new home having 1970's shag carpet, I think a good mod would be spacer blocks and plastic furniture movers/pads. I could easily remove these later and add the wheels.
Bmo
Sat, 08/30/2014 - 07:23
stability?
Can anyone comment on the stability of this table? Particularly while the trundle is not inside...