


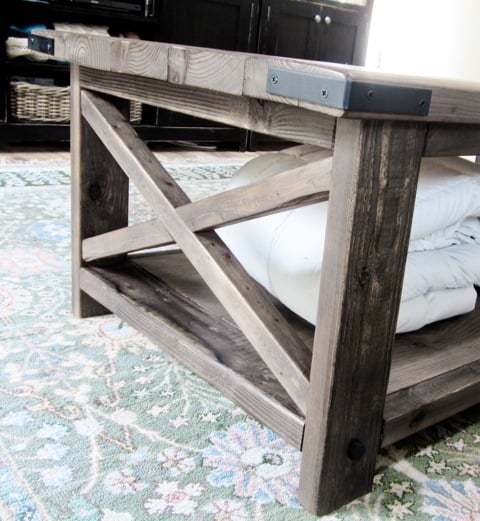
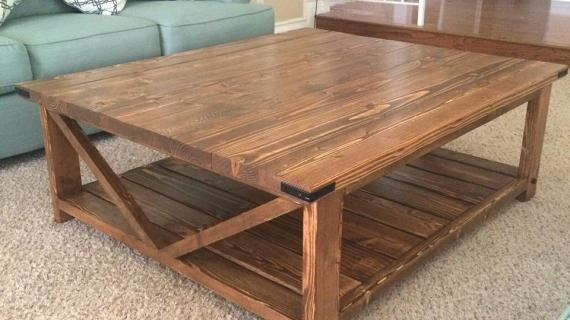
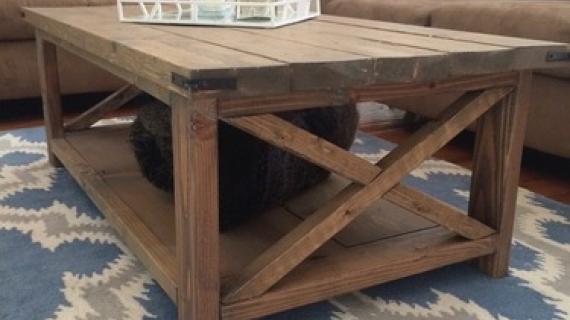
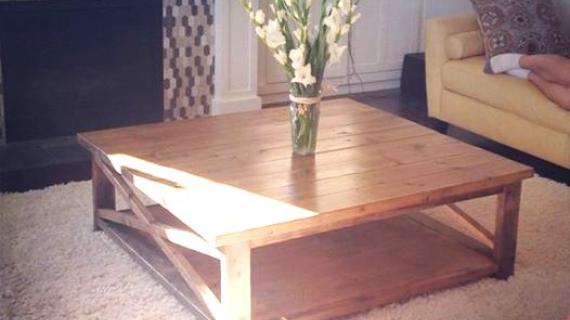
You can build a beautiful coffee table out of lumber! For about $50 in materials, this solid wood coffee table with it's X detailing could be yours. Our free plans include step by step diagrams, shopping lists and cut list - everything you need to get started.
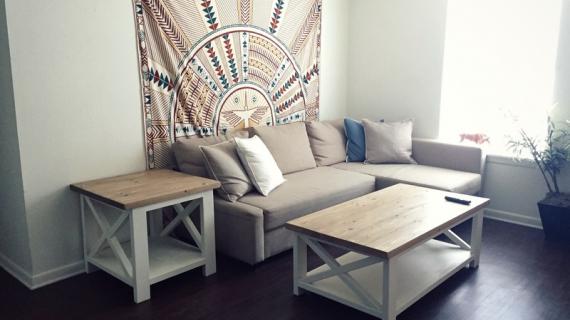
Also in this collection: Rustic X Console Table, Rustic X End Table, and Rustic X Bench Plans


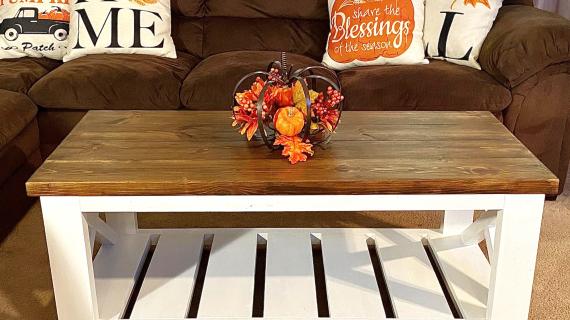
Beginner Friendly Option
With the popularity of this plan, we have created a Beginner Friendly plan that is very similar. It uses less tools and the overall cost is under $40.

The beginner plan is slightly smaller and has a slatted bottom shelf. You can find the plans here.
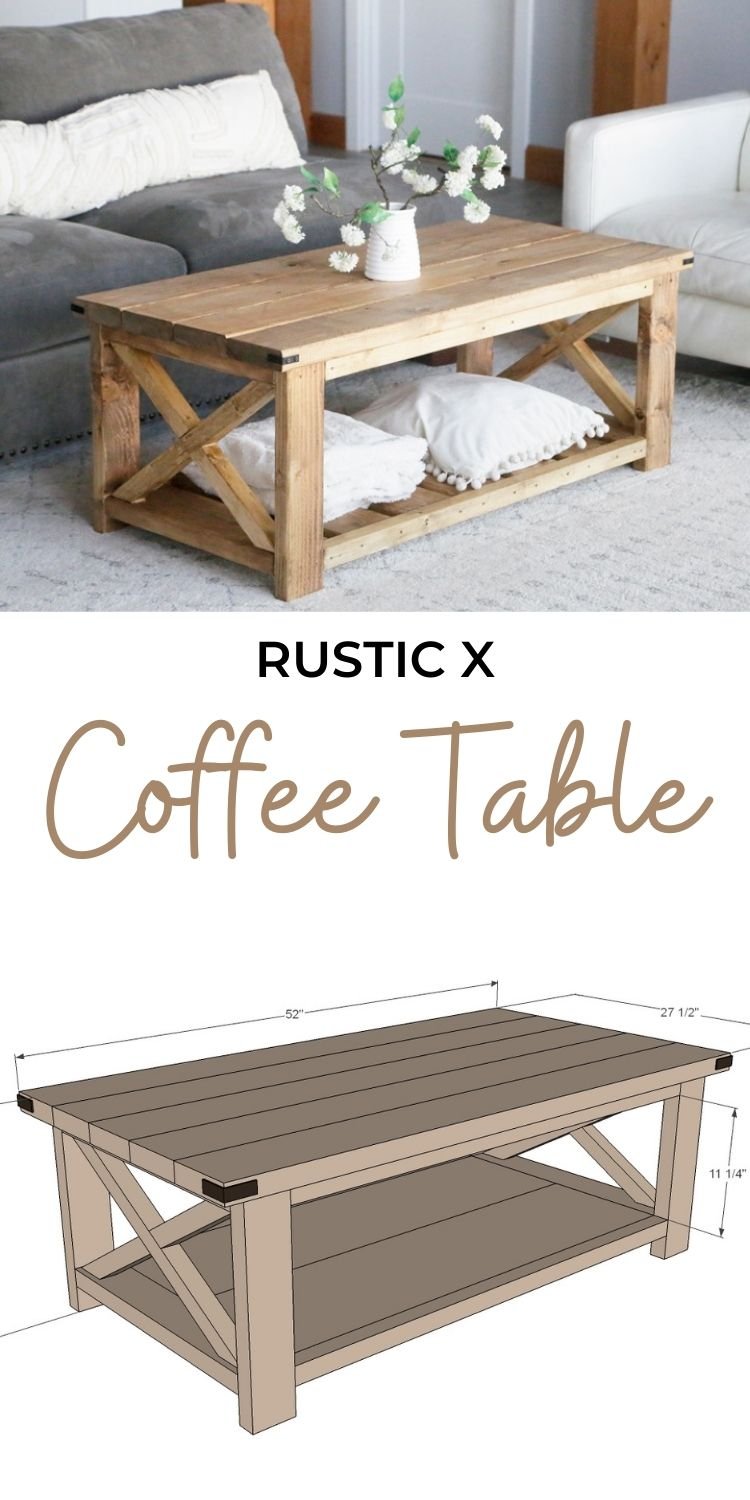
Rustic X Coffee Table Plans
Remember a bit back when Hillary from The Friendly Home built this amazing Rustic X Console Table from 2x4s?
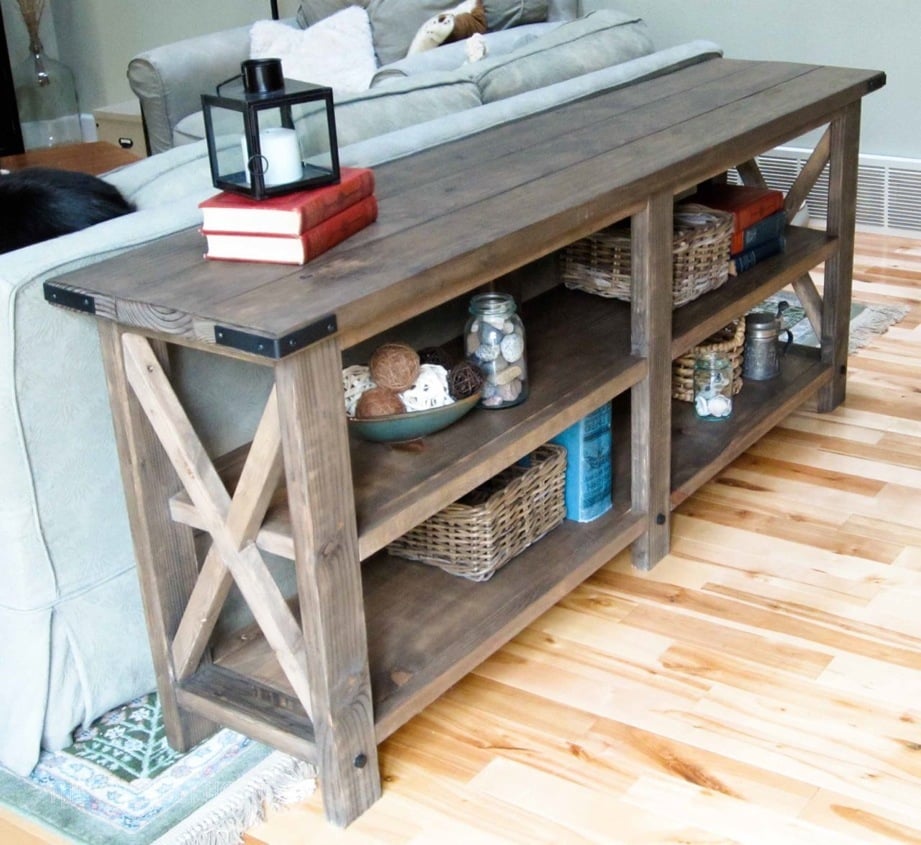
We've had so much interest from readers, we thought we'd add a coffee table plan to the collection.
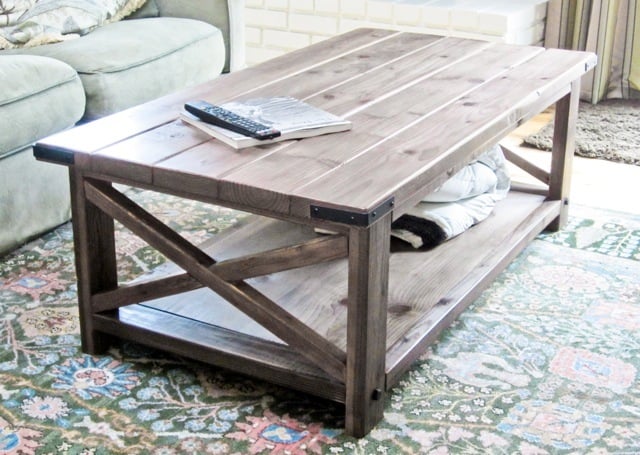
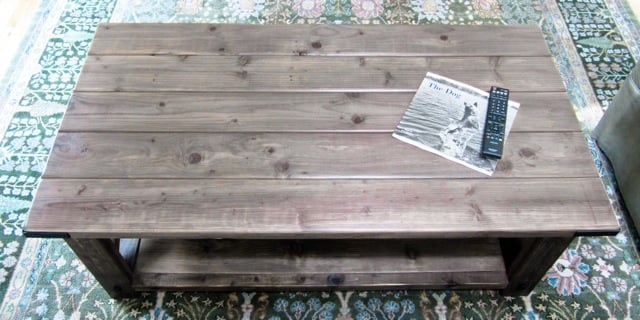
This coffee table is so gorgeous, it's hard to believe it's made from standard off the shelf lumber!

I ENCOURAGE you to stop over and visit Hillary and read about how she battled a wild fire to build this coffee table!
PS - Hillary is also sharing her finishing tutorial.
Pin For Later!

Preparation
- 2 – 2x4 – 8 feet or stud length
- 4 – 2x2 – 8 feet
- 1 – 1x12 – 8 feet long
- 5 – 2x6 – stud length
- 1 ¼” and 2 ½” Pocket Hole screws
- 4 – 2x4 @ 16 ½” (legs)
- 4 – 2x2 @ 41” (side trim)
- 4 – 2x4 @ 22 ½” (end trim)
- 2 – 1x12 @ 41” (bottom shelf)
- 2 – 2x2 @ 22 ½” (both ends cut at 60 degrees off square, long point to short point, ends are parallel)
- 4 – 2x2 @ 11 ¼” (long point to short point, one end cut at 60 degrees off square, other end cut at 30 degrees off square, ends are not parallel but are cut in same direction)
- 5 – 2x6 @ 52” (tabletop boards)


Please read through the entire plan and all comments before beginning this project. It is also advisable to review the Getting Started Section. Take all necessary precautions to build safely and smartly. Work on a clean level surface, free of imperfections or debris. Always use straight boards. Check for square after each step. Always predrill holes before attaching with screws. Use glue with finish nails for a stronger hold. Wipe excess glue off bare wood for stained projects, as dried glue will not take stain. Be safe, have fun, and ask for help if you need it. Good luck!
Instructions
Step 1
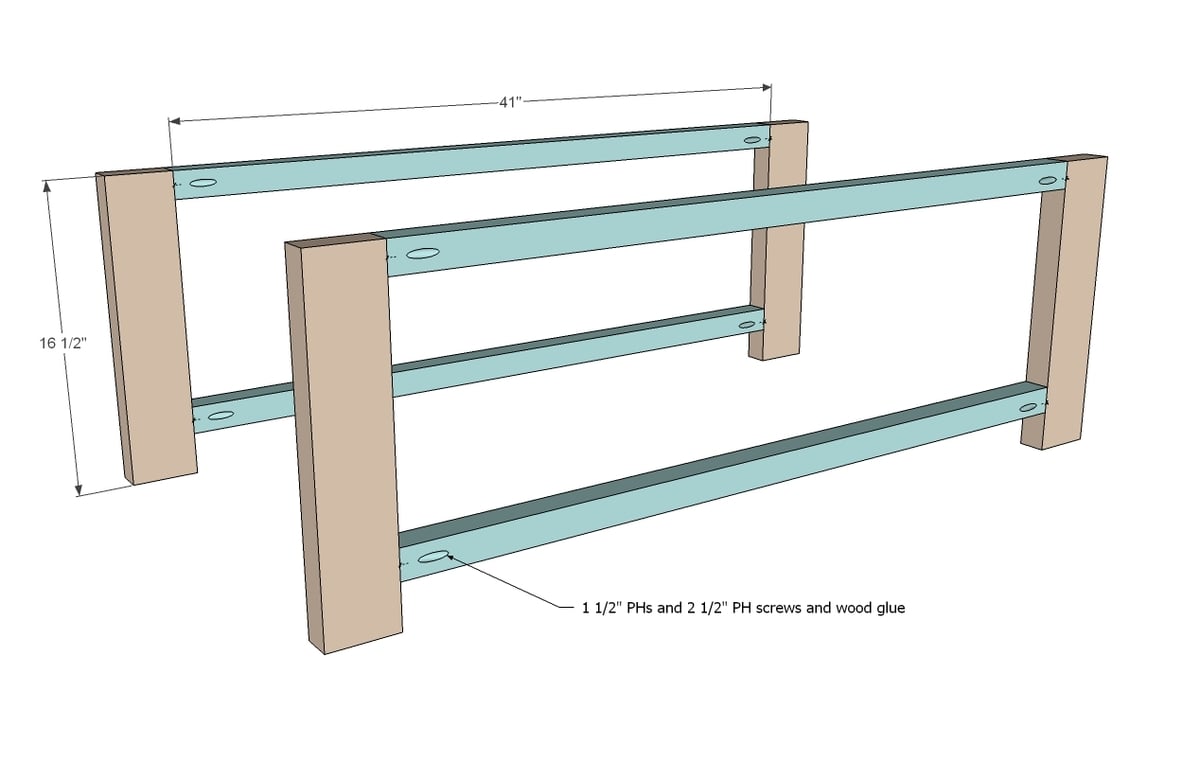
First build the two side trim pieces.
Step 2

Then connect together. Hide top pocket holes on top, bottom pocket holes on bottom. NOTE: This plan is sized for 1x12 boards measuring 11 1/4" wide - measure your 1x12 boards, double that number, and cut your side trim to fit - see next step.
Step 3
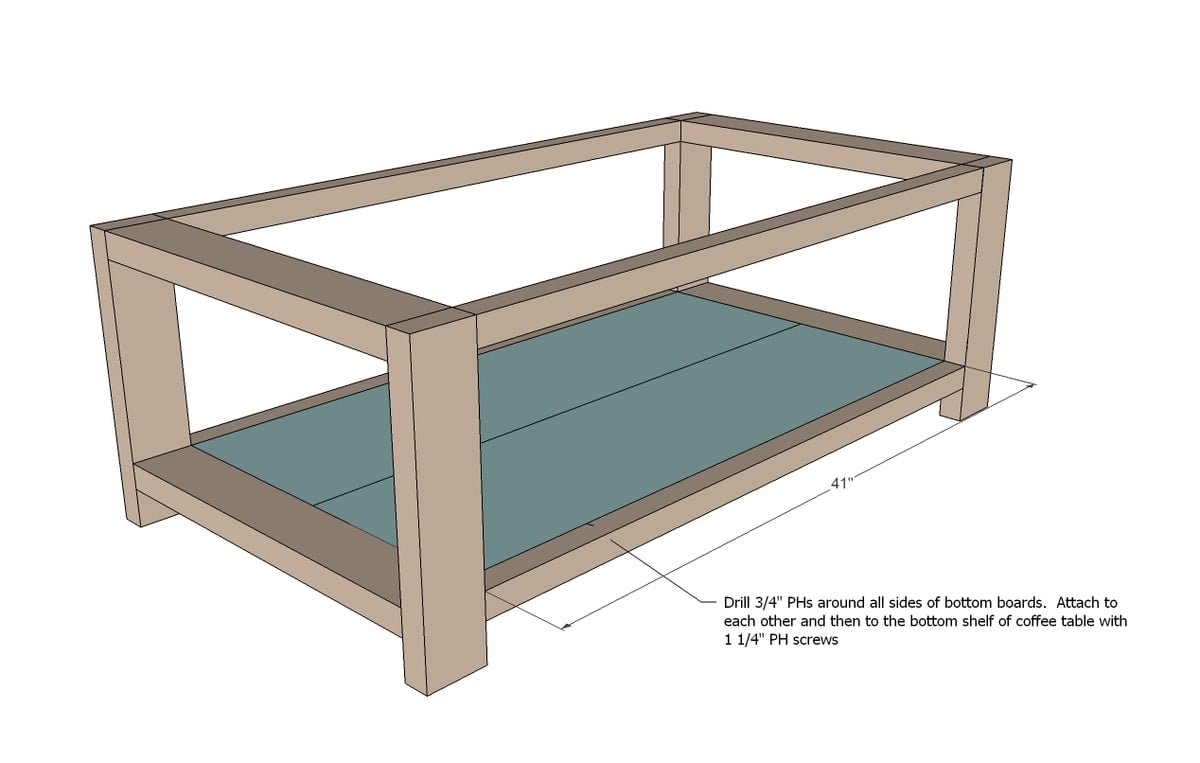
Build your bottom shelf with 3/4" PHs/1 1/4" PH screws down center. Then drill 3/4" PHs around all outside edges and attach to the bottom shelf.
Step 4
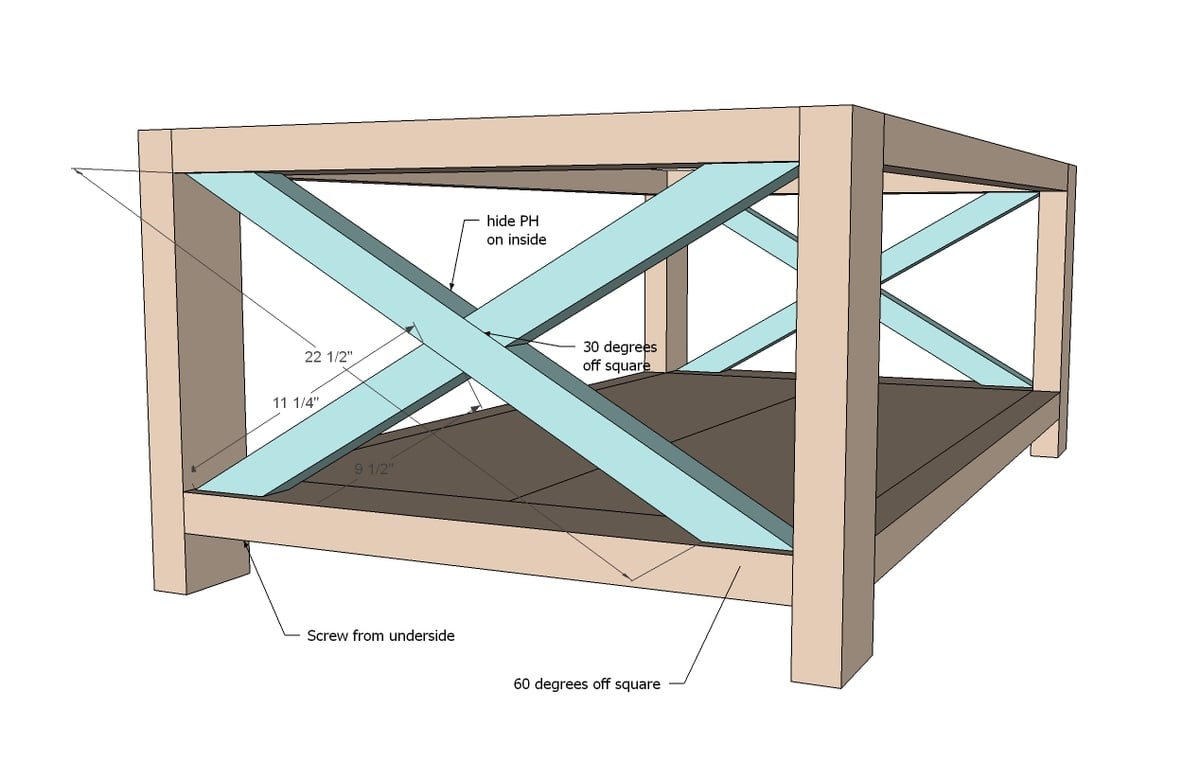
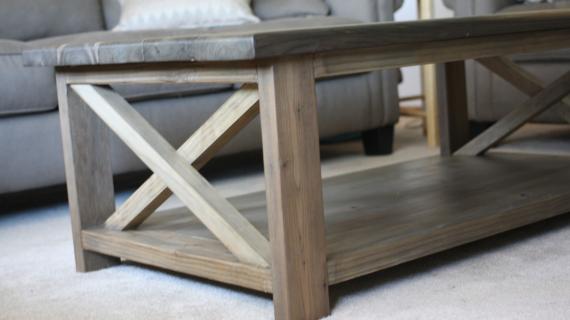
Now attach cut and build the X braces. Attach in place. These are mostly decorative, so don't stress about getting them super screwed in place. Some good glue and screws will do the trick.
Step 5
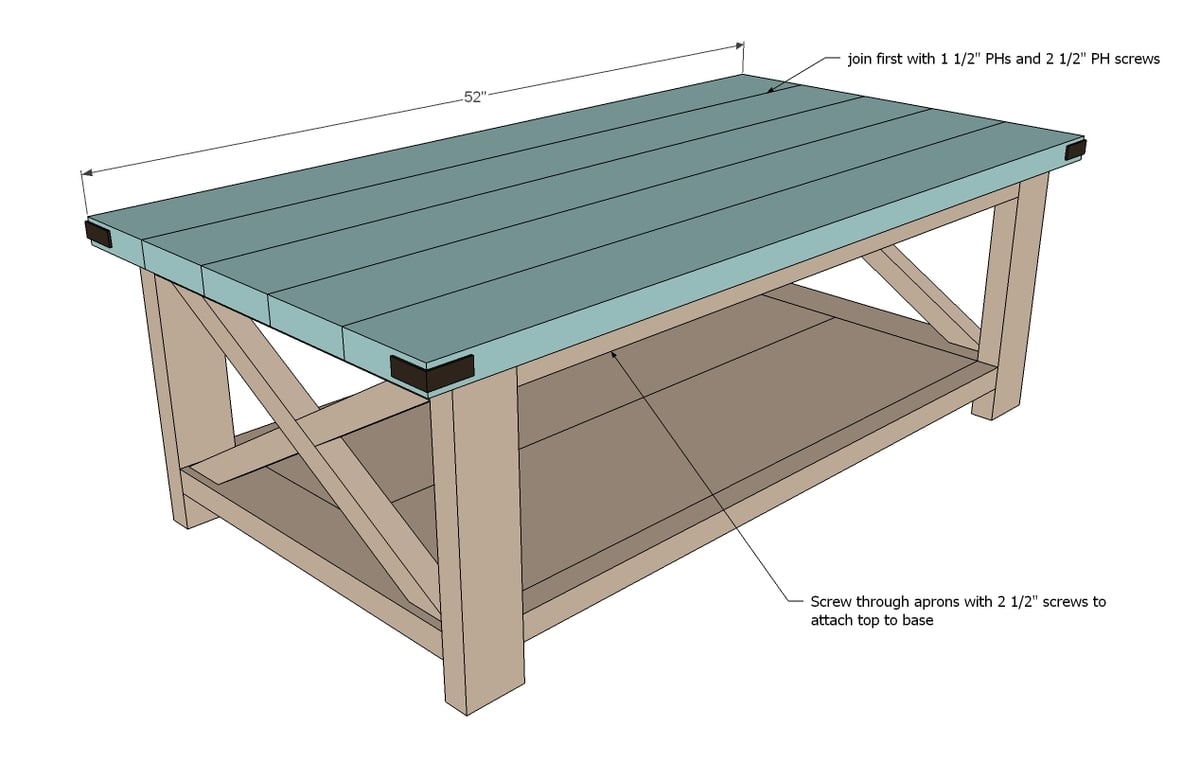
For the top, we recommend building the entire top with 1-1/2" pocket holes and 2-1/2" pocket hole screws on a flat level surface.
Then attached the completed top to the base.
It is always recommended to apply a test coat on a hidden area or scrap piece to ensure color evenness and adhesion. Use primer or wood conditioner as needed.

Comments
dmcarwin
Mon, 07/09/2012 - 11:13
LOVE!
Ana everything you do with this site is perfect! It is a happy moment in my day when I check to see what cool new thing Ana has that I might someday build! Keep up the great work! And I LOVE LOVE LOVE this table, thanks again for another amazing plan!
RHgaijin2
Thu, 09/12/2019 - 20:11
Breakfast Table Video
I made a breakfast table inspired by this coffee table. I have a youtube video of it
https://youtu.be/YnFJddyA7sA
RHgaijin2
Sat, 09/21/2019 - 07:41
matching benches
Video for the matching benches
https://youtu.be/eXnKF8CimNE
Matthew G Mooar
Sun, 12/22/2019 - 21:28
Thank you for the plans.
Thank you for the plans.
brookifer86
Mon, 07/09/2012 - 11:59
Another one?!
You just keep doing it! Every time I build a coffee table, you post plans for ANOTHER one I want to build! Love this. It's absolutely fantastic, and I just have to build it and find a friend who needs one ;)
zookeeperjay
Mon, 07/09/2012 - 16:30
Love love! The providence
Love love! The providence bench was beautiful and I can't wait to get this started! Maybe in a great aqua or bright sky blue. Thanks for the site and all of the encouragement Ana! Blessings. Warmly Jay. ;o)
smacneil
Wed, 07/11/2012 - 04:16
screeeeeech!!! (running to wood pile)
awesome awesome awesome. Can't wait to build it!!
I Rub
Wed, 07/11/2012 - 17:37
Great table !!! When you
Great table !!!
When you drill to attach the tablet top to the base, do you drill from above and fill the holes in the table to with wood filler ?
Hillary (not verified)
Wed, 08/01/2012 - 12:14
Nope, I turned the table
Nope, I turned the table upside down and screwed in the top from underneath. Less work. :)
MamaHowell09 (not verified)
Thu, 07/12/2012 - 10:29
End Tables....
CAN'T WAIT for the end table plans!!!!! This plan is so so beautiful!!!
Hillary (not verified)
Wed, 08/01/2012 - 12:15
No plans yet, but here is how
No plans yet, but here is how I did the end table. Hopefully plans will follow, although it was super easy to modify the coffee table plans. :)
http://thefriendlyhome.blogspot.com/2012/08/oxidized-x-end-table.html
Wilsjac1
Tue, 07/02/2019 - 16:08
Thanks!
Thanks!
Cheryl Lowery (not verified)
Fri, 07/27/2012 - 06:58
Wood finishing
Hi Chris,
Check out the link at the top for Hillary, she as step by step instructions on the oxidizing process she uses to get that awesome grayish color. I can't wait to make this!!
Cheryl
Cheryl Lowery (not verified)
Fri, 07/27/2012 - 07:04
Chris, you should check out
Chris, you should check out the link at the top of the page for Hillary. She has step by step instuctions for the process she uses to make the wood that beautiful grayish color. Check it out!
Meagan84
Thu, 08/09/2012 - 15:10
Supply list
I just finished building this table this morning! It is awesome but I still need to sand and finish it. I will submit a brag post later when finished (if my oxidizing finish turns out as good as Hillary's). The only thing that happened to me though was I needed 3-2x2's not just 2. I didn't see any way to cut the 2 that I had to be able to make the side aprons and the x braces. Maybe it was just me and my inexperience though. Either way, I'm very happy with my new table! Thanks Ana and Hillary!
Hillary (not verified)
Wed, 08/15/2012 - 17:02
I can't wait to see your
I can't wait to see your photos! Let us know how the oxidizing went. Crossing my fingers for you. I feel personally responsible. ;)
Meagan (not verified)
Fri, 08/17/2012 - 11:38
Hi Hillary. I submitted a
Hi Hillary. I submitted a brag post. I don't know why it's not showing up here, but it is on Ana's homepage. I'm really happy with the results, but if I could go back I would have sealed it with poly instead of wax. While I love the feel and subtle sheen of the wax, it is not holding up well against the kids. It's only been a few days and it is scratched from my little ponies and matchbox cars. It won't be long before I haul it back out to the garage and reseal it. :( we live and learn though, right?!
Hillary (not verified)
Mon, 08/27/2012 - 22:35
Bummer! The good news is that
Bummer! The good news is that it is really easy to take wax off. All you need is a rag and some vinegar -- that should take it off. I'll go find your brag post!
In reply to Bummer! The good news is that by Hillary (not verified)
Meagan84
Thu, 08/30/2012 - 16:53
Thank You!
Thank you for the tip! I was wondering how I was going to get the wax off. That helps a lot!
Autum (not verified)
Thu, 09/06/2012 - 14:01
Question about pocket hole placement
Hi. I am in the process of building this table. I have a question about the placement of the pocket holes for joining the top pieces. Lets call the top boards piece A,B,C,D and E. When joining A to B then B to C and so forth, do you recommend drilling all the pocket holes in board A with the screws going into board B or would it be better to alternate, drilling every other hole in A, with screws going into B, and the alternating holes would be drilled into B with screws going into A.
I hope this question makes sense. It sounds complicated but I have no idea how to word it more simply.
Thank you so much Ana and Hillary for the amazing plans and beautiful example. I am so excited to get this built. It will be a house warming gift for my best friend's son.
Hillary (not verified)
Sun, 09/23/2012 - 11:36
Hi, Autum. I just go one way.
Hi, Autum. I just go one way. So drill into one edge of each board except the last one, and then join A to B, B to C, C to D, etc. The joints are really strong, especially with glue between the boards. No need to complicate it. :)
georgeandjacksmom
Thu, 09/06/2012 - 15:37
number in parentheses
I was just wondering what the number in parentheses after kreg jig means.
Hillary (not verified)
Sun, 09/23/2012 - 11:39
Can you be more specific? I
Can you be more specific? I don't see it.
Natalie Spear (not verified)
Sun, 09/23/2012 - 14:19
My husband and i are getting
My husband and i are getting ready to make this - can't wait!!!! Thank you for all your plans - and even more for making them free!!! Its wonderful to be able to afford beautiful pieces!
WTG (not verified)
Sun, 09/30/2012 - 16:56
Material List Revision - 2x2's
If you are building this, be sure to purchase three (3) 2x2's by 8-ft long as the material list above is not sufficient. Also, if you are wanting to put baskets on the bottom shelf, be sure to measure the height of the baskets prior to cutting the legs - you may also want to modify the height of the legs or space between the bottom shelf and top support to allow enough space.
KevinPelo (not verified)
Sat, 10/27/2012 - 10:55
My wife and I really want to
My wife and I really want to build this table. However, I am confused about something... The tools list says that you'll need a countersink drill bit, but nowhere in the building instructions does it say anything about countersinking screws. According to the plans, all of the wood is joined with pocket holes and screws using the Kreg Jig.
Do I need a countersink drill bit?
orangesugar
Mon, 11/26/2012 - 15:51
Wood?
Where does everyone buy their 2x4's? Do you just use the dimensional lumber from orange or blue? It's usually pretty rough and dinged up. Can you buy better quality 2x4's somewhere?
billy (not verified)
Fri, 11/30/2012 - 19:48
Help!!
how is the bottom shelf held up????
Chris Hluchyj (not verified)
Sun, 12/02/2012 - 15:41
I used the pocket holes to
I used the pocket holes to secure the bottom shelf.
Chris Hluchyj (not verified)
Sun, 12/02/2012 - 15:42
Hardware
Where was the hardware bought from?
Mps5023
Sat, 06/04/2016 - 15:21
Did you ever figure this out?
Did you ever figure this out? I'm struggling to find the hardware also
Ben E. (not verified)
Wed, 12/05/2012 - 12:29
I like the design, made one
I like the design, made one for myself.
http://www.midsouthmakers.org/2012/12/diy-rustic-x-c…eekend-project/
This is what I purchased to cut down on waste.
SHOPPING LIST:
3 – 2x4 – 8 feet or stud length ripped excess boards down to 2x2's on the table saw.
1 – 1x12 – 8 feet long
2 – 2x6 – 10 feet
1 - 2x6 - 8 feet
1 ¼” and 2 ½” PH screws
jwarner (not verified)
Fri, 12/14/2012 - 10:19
X-design
I was looking at the diagram, and the X is attached at the top and bottom, but when it was made it was attached to the sides. Shouldn't the cut list be different if it is attached to the sides? Or is this just Hillary's version? Looks good either way, just curious.
jwarner (not verified)
Fri, 12/14/2012 - 10:20
X-design
I was looking at the diagram, and the X is attached at the top and bottom, but when it was made it was attached to the sides. Shouldn't the cut list be different if it is attached to the sides? Or is this just Hillary's version? Looks good either way, just curious.
Chad (not verified)
Sun, 12/16/2012 - 18:45
I have a silly question: is
I have a silly question: is the X strictly necessary? I'd prefer to have both ends open. Would I need to reinforce it some other way?
Carina Vause (not verified)
Mon, 01/14/2013 - 14:25
Few Questions...
Please excuse the simple nature of my questions. I have never done a woodworking project and hope to make this my first.
1) How many PH's per board to attach each of the top boards and shelf boards to one another?
2) When you attach the bottom shelf I assume you flip it over and attach them from the bottom with PHs. What holds the board in place while you are trying to screw it upside down. Seems ackward the way I am visualizing it, but I'm sure there is a way that you experience people know of.
Thanks so much!
Hillary @ The … (not verified)
Mon, 01/14/2013 - 17:36
1) I usually go every 8-10
1) I usually go every 8-10 inches.
2) I think I turned it on its side when I did this, and used a clamp to hold it all together.
JessicaB (not verified)
Mon, 01/14/2013 - 21:11
Do I need a compound miter saw?
Hi Ana! I'm obsessed with your site and am now convinced (and confident!) to build my own coffee table. I live in a small one bedroom in manhattan. I was hoping not to purchase a saw as this is 1) expensive and 2) takes up much needed storage! Do you think I would get by if I just had home depot cut the wood to the specified sizes? If not, is there a compact, affordable and safe saw that you would recommend? Thank you so much!
Hillary @ The … (not verified)
Mon, 01/14/2013 - 21:57
Hey, Jessica! I doubt that
Hey, Jessica! I doubt that you can get someone at Home Depot to make these cuts...unless you make good friends with one of the employees! Too many cuts for this and too much precision required. Plus, I've heard from Daniel at Manhattan Nest that the HDs in your city are pretty crappy with their cuts. A shop teacher from a local high school might be willing to make the cuts for you, for a small fee.
Any small miter saw will do most of what you need for Ana's plans and miter saws are the safest and easiest to use of all the saws out there, I think. Pawn shops and Craigslist are great resources for inexpensive ones -- you don't need a brand new one, though you might want to invest in a new blade. Or get yourself a nice handsaw and a miter box.
Good luck!
Jessicab (not verified)
Tue, 01/15/2013 - 08:58
Thanks Hillary!
That is some really great advice. I will also try some of the smaller lumber shops, they might be a bit more friendly!
Yanira (not verified)
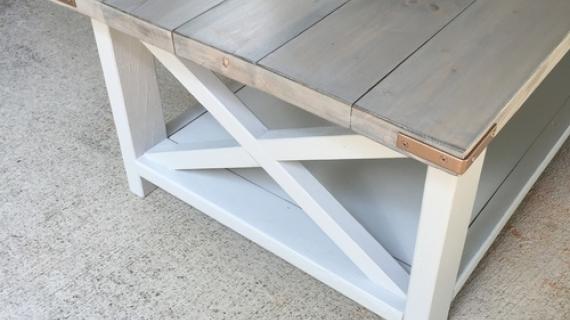
Fri, 01/18/2013 - 21:17
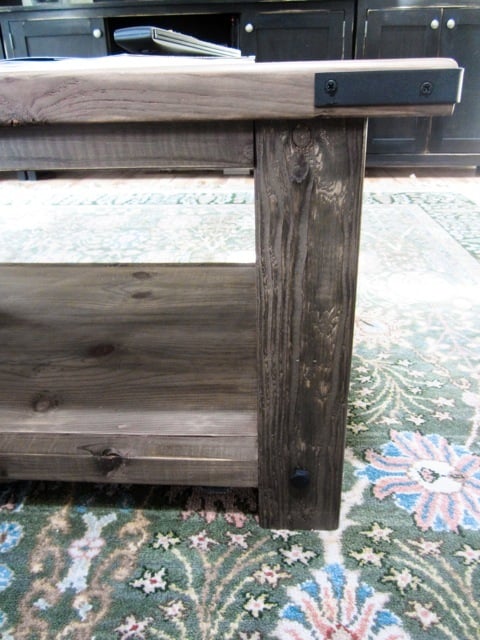
Dark L shape on corners
What are the dark L shape things on the corners? Is that purely decorative? Thank you for all the contributions everyone makes to this site. I'm so glad I came across it. You all have inspired me to start building furniture. This will be my first project. Looking forward to some daddy and me time. :)
techsun
Sun, 03/21/2021 - 13:39
I found similar ones on…
I found similar ones on Wayfair or Amazon. You can also find some at :
https://wildwesthardware.com/products/brk-table-11-blck?variant=1295260…
MyKidRides
Sun, 02/03/2013 - 22:01
My first
This was the first thing I built from your blog. I simply could not find anything in the stores that fit my style, that and I hate buying anything when I could build it myself. I had a lot of fun with this and it was great being able to get back into woodworking after so many years of metal fabrication. Wood is so much warmer. Thank you for the plans. I'll post a picture soon.
cnads
Sat, 04/13/2013 - 10:48
wood not straight
Thanks for the plans!
I have been working on building this. The only problem is that I just could not find enough 2x6es that are completely straight. Any tips for dealing with bent wood?
cnads
Sat, 04/13/2013 - 10:48
wood not straight
Thanks for the plans!
I have been working on building this. The only problem is that I just could not find enough 2x6es that are completely straight. Any tips for dealing with bent wood?
In reply to wood not straight by cnads
jbayer80
Wed, 04/24/2013 - 04:59
How to Repair Warped Wood
I'm sure you don't need this anymore but when I ran into this problem, I found the below link and it worked. I think it took about 2/3 days and was not perfect but was very improved. I seem to run into this problem with 2x2's from Lowes. I went to the mom and pop lumber yard yesterday and just about passed out when I was told the total to make this table. I will not be going back there for anything except 2x2's because everyone they had was perfect.
Good luck!
http://www.ehow.com/how_2078078_repair-warped-wood.html
jbayer80
Wed, 04/24/2013 - 04:54
60 degree cut!
How did everyone make the 60 degree cut? My miter saw does not go that far. I know I can "eye", cut and test until I get it to fit but was wondering if someone on here had a easier way to make the X's.
P.S. so far this is crazy easy to build. I hate to say that having to still cut the X's. NOTE: You WILL need 3 2x2's to make this.
In reply to 60 degree cut! by jbayer80
Lady Goats
Wed, 04/24/2013 - 09:25
60 degree cut
I think what people are doing is placing the boards against the wood at the angles they'll go, scribing with a pencil and then angling the wood/blade to match the cut. I saw one blogger do it that way, anyhow. What I have done to get a cut that excels my miter saw's angles is to place my board at a 90 to the blade (needed two people to do this - couldn't support the board and make the cut - but I was also doing a 6' long board so you may be able to get away with this) and then do the math to get it to the proper angle. Ok, I make no sense. In this case, if you put the board at a 90 to the saw, you would set your miter saw at 30 degrees. Depending on your saw and the board you're cutting, this may not be safe. Another option would be to use a protractor to mark the 60 degree cut and cut it with a circular saw.
In reply to 60 degree cut by Lady Goats
moore2579
Fri, 10/29/2021 - 18:00
You can also look online and…
You can also look online and they will show you how to make a jig I just used wood blocks as a wedge cut at 30 instead of making jig but either way would work. Here is one sight that explains it
https://www.finehomebuilding.com/2019/11/15/how-to-cut-extreme-angles-o…
mainman38
Mon, 04/29/2013 - 22:04
Hardware
Can someone point me in the right direction where to get the decorative bolts and the corner brackets in black or any decorative type of color.