


Free plans to build an open drawer base for media wall from Ana-White.com


Hey there!!!!
Have you seen our Cubby Storage Collection of Plans? Yes, of course they are inspired by the Pottery Barn Kids Cameron Storage Furniture set.

image from Shanty-2-Chic
We've got plans for an open base and bookshelf with doors.

image from Shanty-2-Chic
And the media base and bridge and lots more plans!
Today, I am so thrilled to add to this collection with a BRAND NEW PLAN that I worked on with Brook from Being Brook.
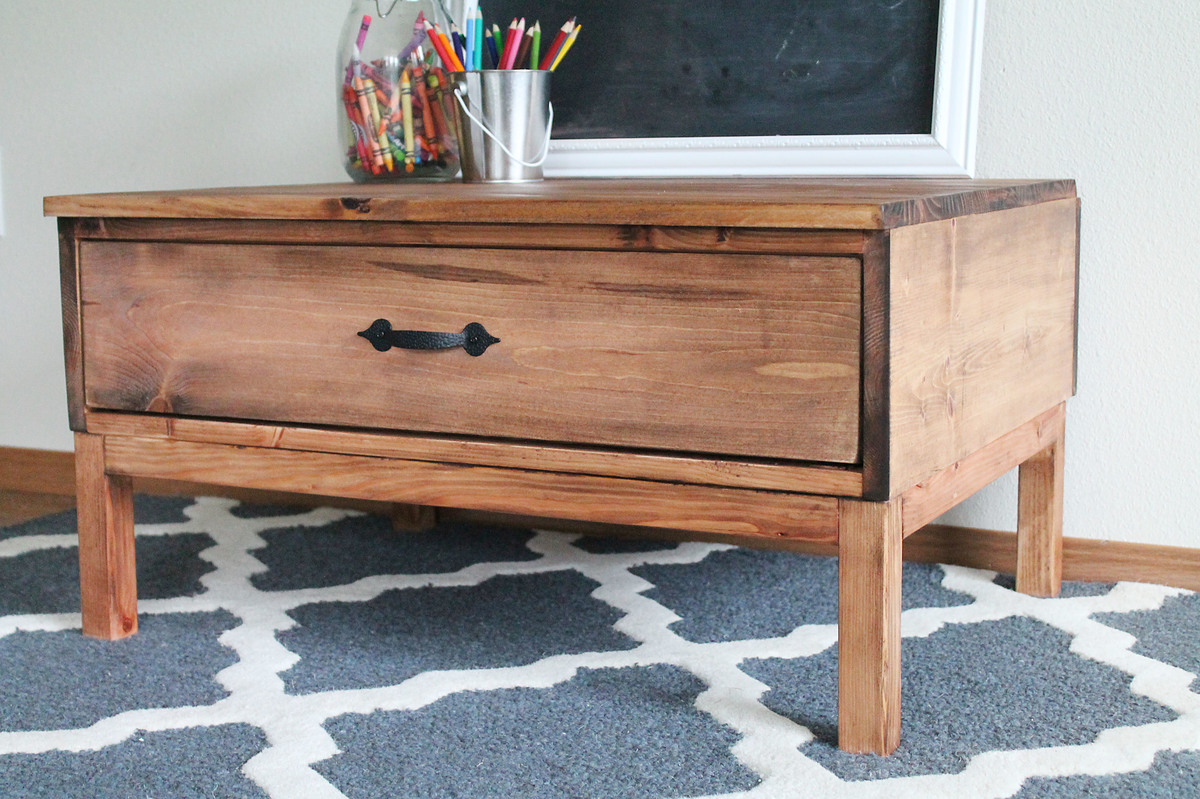
Isn't this little base beautiful? You can use it as an open base (anyone else have vents that can't be covered up?) in the Cubby collection of plans or just a fun little table! Add length to the legs to make a real table or nightstand!
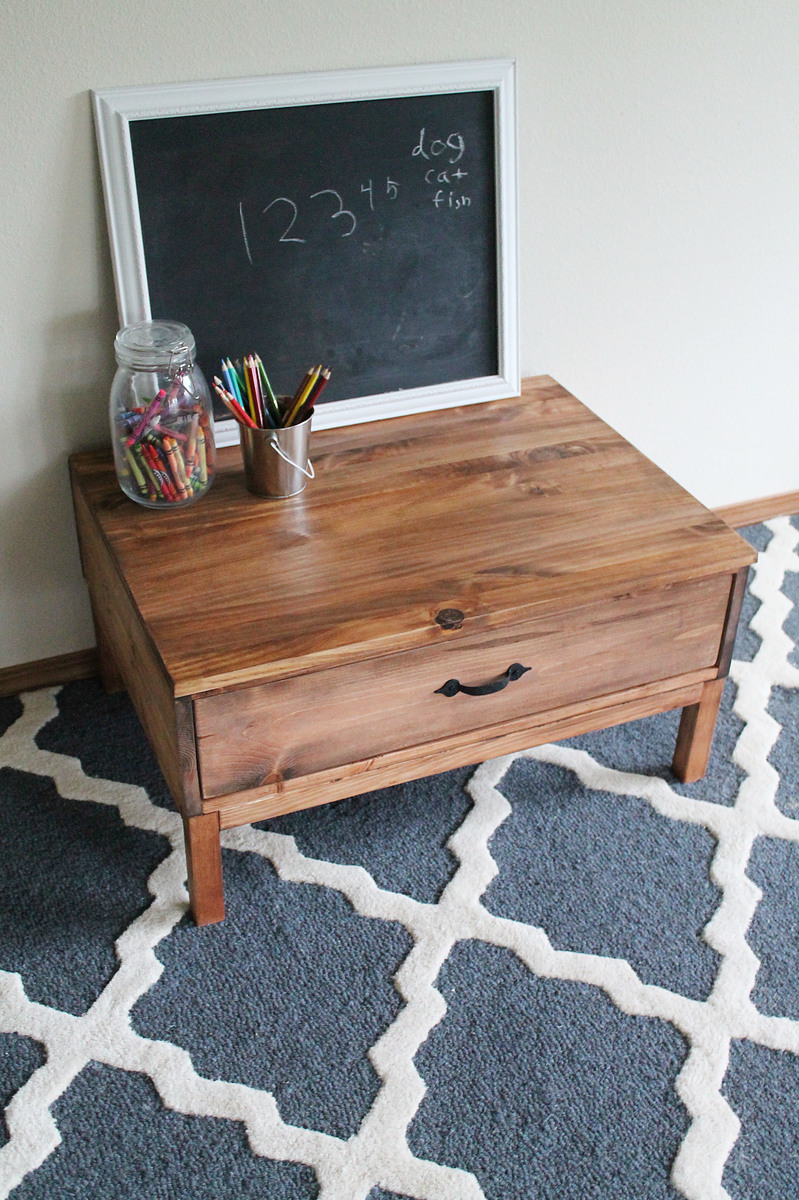
Are you also totally smitten with Brook's beautiful finish? Oh man, am I ever! Well, good news! Brook is going to share with us her finish tutorial so we can all get this same finish on pine on our own projects! Yippeeee!!!!
Before we get to the plans, please stop over and visit Brook at Being Brook for more details on how she built this project! Thank you Brook!
Thank you Brook!

Preparation
1 - 1/4 sheet of 3/4” hardwood plywood - or can use pine boards 1x8s for sides
2 - 1x2 @ 8 feet long
2 - 2x2 @ 8 feet long
1 - 1x4 @ 8 feet long
1 - 1x6 @ 3 feet long
1 1/4” and 2 1/2” PH screws
2 - 3/4” plywood 7 1/4” x 21” (could also use 1x8s for these)
4 - 1x2 @ 27 1/2”
4 - 2x2 @ 7 3/4”
2 - 2x2 @ 26”
2 - 2x2 @ 18”
1 - 3/4” plywood @ 29” x 21 1/2” (top)
DRAWER
2 - 1x4 @ 25”
2 - 1x4 @ 20”
1 - 1x6 @ 27 1/4”
Back is optional - 7 1/4” x 29”


Please read through the entire plan and all comments before beginning this project. It is also advisable to review the Getting Started Section. Take all necessary precautions to build safely and smartly. Work on a clean level surface, free of imperfections or debris. Always use straight boards. Check for square after each step. Always predrill holes before attaching with screws. Use glue with finish nails for a stronger hold. Wipe excess glue off bare wood for stained projects, as dried glue will not take stain. Be safe, have fun, and ask for help if you need it. Good luck!
Instructions
Step 1

Start by attaching sides together with the four 1x2s. If you use pocket holes, keep to outsides for a stronger joint that will be hidden in later steps. CHECK FOR SQUARE!!!! Set aside.
Step 2

Now lets build the leg bases. Start by attaching the legs to front and back aprons.
Step 3

Then form your leg base by attaching the two side aprons.
Step 4

Now it's time to attach the base to the drawer box. Easy stuff, just screws the base to the drawer box. We'll leave the top off for now so we can reach in and get that drawer put on right.
Step 5

Step 6

Install the drawer in the cabinet, giving 3/4" clearance to front for the false drawer face. Make sure it slides smoothly. You can shim the slides to get the drawer to slide perfectly.
Step 7

Attach the drawer face to the drawer, keeping an even 1/8" gap on top, bottom and sides. TIP: Attach handles or knobs first unless surface mount to avoid having to get longer knob/handle bolts or boring out the inside drawer face to fit bolt head.
Step 8

Remove the drawer and attach the top to the base. Reinstall the drawer.
Step 9

The back is optional.
It is always recommended to apply a test coat on a hidden area or scrap piece to ensure color evenness and adhesion. Use primer or wood conditioner as needed.
Comments
whitney_smith
Tue, 12/04/2012 - 09:30
<3
I am smitten with the finish AND that rug!!!!!!!!
JHodge (not verified)
Sun, 12/30/2012 - 19:36
I don't see info on the
I don't see info on the finish yet...is that coming?