


How to build a pull out drawer for cabinets - tutorial from Ana-White.com
Thank you so much for all the likes and pins on the turned leg vanity we just built for the Momplex!

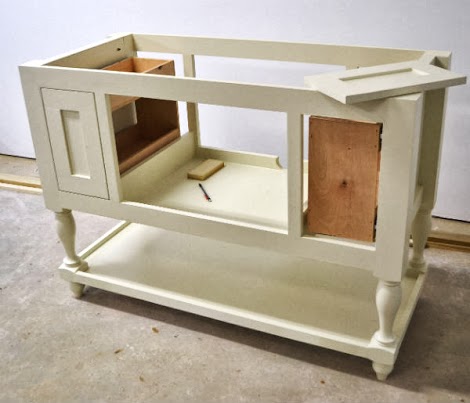
Did you get a second to peek inside???
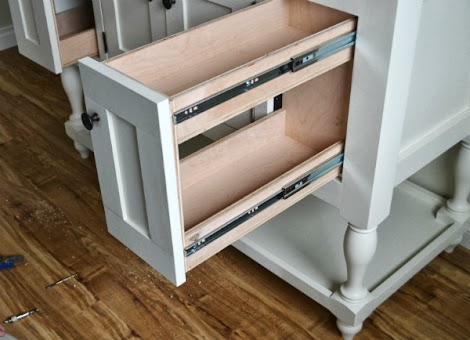
One of my favorite parts of this vanity is the pull out drawers on each side of the sink. We choose pull out drawers because the cabinet area ended up being so tall and thin, a cabinet shelving area just wouldn't cut it. But if I made two indvidual drawers, the drawers would have been tiny.
And I love that Mom could put her toothbrush on the top shelf, hair products on the bottom shelf!
This may look complicated, but we were even suprised at how easy it was to build these pull out drawers - read on and I'll show you just how easy and how you can build your own!
Please read through the entire plan and all comments before beginning this project. It is also advisable to review the Getting Started Section. Take all necessary precautions to build safely and smartly. Work on a clean level surface, free of imperfections or debris. Always use straight boards. Check for square after each step. Always predrill holes before attaching with screws. Use glue with finish nails for a stronger hold. Wipe excess glue off bare wood for stained projects, as dried glue will not take stain. Be safe, have fun, and ask for help if you need it. Good luck!
Instructions
Step 1

For this to work in a cabinet, the cabinet inside must be:
1. Square. Whenever you work with drawers, since they slide in and out, it's super important that the opening and especially where the slides attach is very square. Otherwise your drawers will slide in cockeyed and jamb. The best advice I can give here is to build meticulously square and use straight wood. If all else fails, you can shim your slides to get them to slide perfectly, but that should be a last resort.
2. Where the drawer slides are going to be mounted (on this cabient, it's the inside of the sides) needs to be flush to the face framing. This is so the drawer slide can slide all the way out without hitting your face framing. You can easily shim this area if needed to bring the slides out flush.
3. For this type of installation, with the side mounted drawer slides for a pull out drawer, it's best to have an opening that is taller than it is wide. Also, you'll need to use your best judgement on how many slides you'll need to support the drawer.
4. Make sure there is plenty of room to install the pull out drawer. You may wish to actually install the pull out drawer slides while you are building if the area is to be closed in and inacessible to a drill.
Step 2

Measure the depth of the opening in the cabinet. Purchase full extension drawer slides like the ones shown in this tutorial in a length that suits your cabinet. For us, the opening was about 21". But once I figured in the drawer face of 3/4" thick, I decided to build my pull out boxes 18" overall in length. So I purchased 18" drawer slides.
Then measure the height and width of the opening. Build your pull out drawer 1" smaller in height and width than the opening. What we did was rip 1/2" plywood to 1" less than the opening, and use it to make the shelves, front and back. Then we supported the shelves with more 1/2" plywood, this time ripped to 2 1/2" widths.
You could also get away with using dimensional lumber - the pull out drawer does not have to be exactly 1" smaller in width - I just recommend a minimum of 1" smaller in width to give you plenty of clearance with the drawer slides. So you do have some flexibility on the size of the pull out drawer.
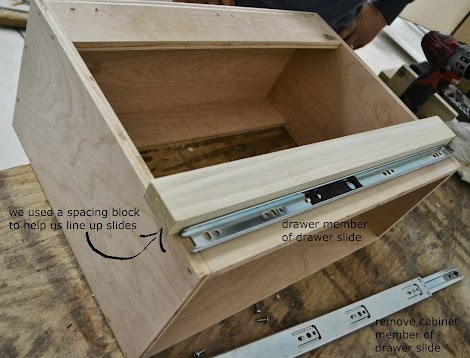
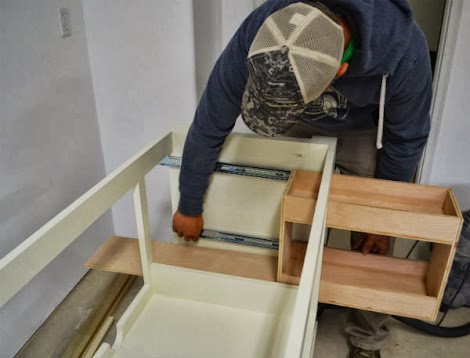
With the pull out drawer built, seperate the drawer slides. Take the cabinet members, and install on the sides of your pull out drawer. It is crucial that the two slides are installed parallel, so we used a 1x2 block to help guide us in installing the cabinet members.

The top drawer slide is screwed to the pull out drawer.

And then we replace the cabinet member of the drawer slide, sliding it onto the drawer member of the drawer slide.

The top is done.

Then the bottom is done, taking great care to make sure the slides are installed on the pull out drawer exactly parallel.
We are ready to install the pullout drawers in the vanity cabinet now!
Step 3

We planned to leave 1/2" gap around all sides of the pull out drawer, including the bottom.
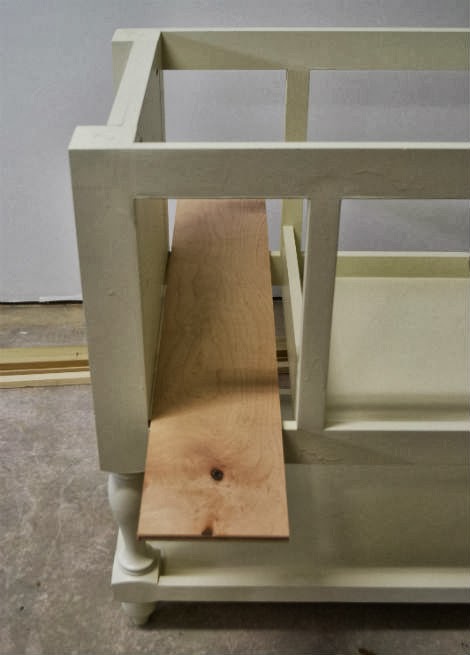
So we used a scrap piece of 1/2" plywood on the bottom of the opening.
And then rested the pullout drawer with slides attached on top of it. This of course ONLY works if you are 100% certain your front/back face framing is perfectly level.
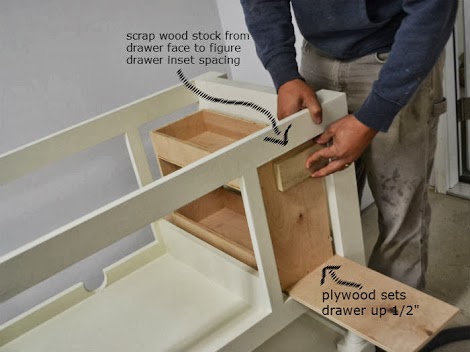
We positioned the pullout drawer inset 3/4" for the drawer face to be installed in later steps.
Then we very carefully marked the location of the drawer slides on the inside of the cabinet.
And then carefully pulled the drawer out, extending the slides, leaving the cabinet member part of the slides in place. We carefully matched up the cabinet member parts of the slides with our marks,

And then attached the cabinet member slides to the cabinet interior with screws.
We got pretty lucky that our slides slide very nicely, so no fine tuning needed, but most slides come with the ability to adjust to get your slides to slide easily.
Step 4

Now for the drawer face -

I held it in place, leaving an even gap around all sides, while the Ram screwed it on from the back.
One side done, on to the other!

The knobs we choose were designed to work with a 3/4" thick drawer face. This created an issue because of the pull out drawer added to the thickness of the drawer face. So we removed one screw of the drawer faces, installed the knobs, and then reinstalled the drawer face in the exact postion.
This actually was one of the easiest drawer installations I've ever done. And we are super proud of how well lined up those drawer faces are when the cabinet is closed!

Would you ever guess that much functionality is hidden behind that pretty drawer face?
It is always recommended to apply a test coat on a hidden area or scrap piece to ensure color evenness and adhesion. Use primer or wood conditioner as needed.
Comments
yurra-bazain
Thu, 09/12/2013 - 02:15
Gorgeous!
What a fantastic build from beginning to end! =D Love it. Will both bathroom vanities mirror each other, or will each mom have their own unique designs? =D
Ana White
Thu, 09/12/2013 - 09:28
Thanks! Jenny - don't feel
Thanks! Jenny - don't feel bad, drawers are one of those things ... but the good news is the slides are pretty adjustable, and you can shim slides to get things right. And a face on the drawer will hide just about anything!
@Yvonne - we are doing each unit seperate, so we can make sure we put lots of love into ever project per each unit. We will most likely do a different vanity for the other side.
Lynne19160
Sat, 11/28/2015 - 08:07
My drawer slides are just falling off
My drawer is just falling off the slides. The side mounts appear to be made so they are mounted on two sides, so there is no play. Can you tell me where you purchased yours?