


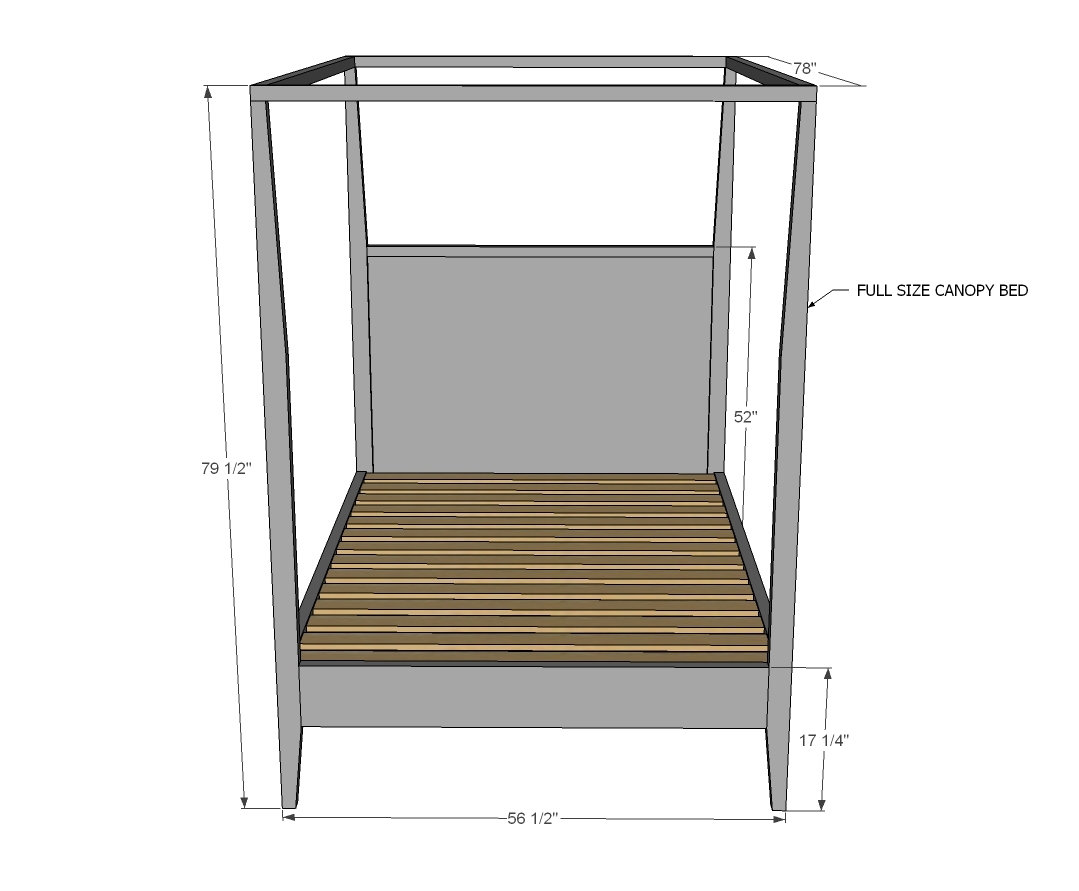
Pencil post canopy bed plans in full size from Ana-White.com
Hi everyone - so glad you liked my niece's new canpy bed in twin size!

Per your request - here's the full size plans - enjoy!
PS - Did I hear a queen size request too?

Preparation
4 - 2x3s or 2 - 2x6s ripped in half (for legs) 8 feet or stud length
5 - 2x2 @ 8 feet long
2 - 2x8 @ 12 feet long
3 - 2x4 @ 8 feet or stud length
1 - full sheet (4x8) hardwood plywood
boards for slats or box spring (measure box spring if using and make sure it is less than 53 1/2" wide x 75" long)
1-1/4" and 2-1/2" pocket hole screws
4 - 2x3 @ 78" (if you can't find 2x3s, you can rip a 2x6 in half and use it, or cut down 2x4s)
1 - 2x2 @ 51 1/2" (panel top)
2 - 2x8 @ 51 1/2" (panel bottom/footboard bottom)
1 - 3/4" hardwood plywood 51 1/2" x 33 1/4" (panel)
2 - 2x2 @ 56 1/2' (canopy top for headboard/footboard)
2 - 2x2 @ 75" (canopy sides)
2 - 2x8 @ 75" (siderails)
3 - 2x4 @ 75" (cleats)
slats are 53 1/2" long - cut to fit as needed


Please read through the entire plan and all comments before beginning this project. It is also advisable to review the Getting Started Section. Take all necessary precautions to build safely and smartly. Work on a clean level surface, free of imperfections or debris. Always use straight boards. Check for square after each step. Always predrill holes before attaching with screws. Use glue with finish nails for a stronger hold. Wipe excess glue off bare wood for stained projects, as dried glue will not take stain. Be safe, have fun, and ask for help if you need it. Good luck!
Instructions
Step 1

First cut the four leg tapers. We used a circular saw, and started at the end grain of each board, and cut toward the outside edge. The cuts were then sanded with a belt sander to smooth out.
Step 2

Now for the headboard panel. First, drill 3/4" pocket holes around all sides of the panel, about every 6-8 inches. Then drill 1-1/2" pocket holes on each end of the 2x2 and 2x8 boards. Then attach panel to the 2x2 and 2x8 boards, using 1-1/4" pocket hole screws.
Back and outside edges are flush.
Step 3

Drill a pocket hole on the top of each leg, on th back side (for attaching header in next step). Then attach legs to center panel. Use 1-1/4" pocket hole screws for 3/4" pocket holes, and 2-1/2" pocket hole screws for 1-1/2" pocket holes.
Step 4

Attach top header board - use glue to secure as well.
Step 5

Step 6

To assemble the bed, attach the siderails and canopy sides to the headboard and footboard panels. Since these are all 2x boards, use 1-1/2" pocket holes and 2-1/2" pocket hole screws.
Step 7

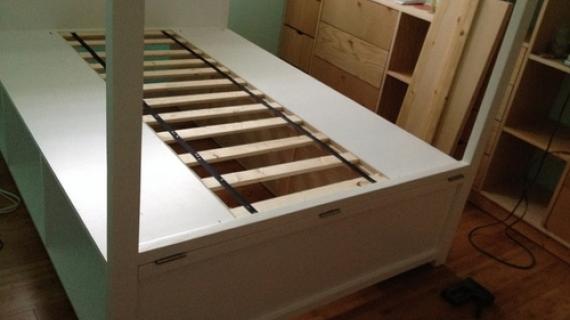
The cleats to support the mattress need to be attached as well - but don't need to be finished. Attach outer cleats to the siderail, center cleat to the headboard/footboard.
For additional support to the mattress, you can also add center "legs" to the center cleat - just a 2x4 board that extends from the cleat to the floor. This will add a ton of support to the bed.
Step 8

Finally, attach slats to the cleats. Slat spacing is determined by mattress recommendations. If you have a box spring, you won't need them at all.
It is always recommended to apply a test coat on a hidden area or scrap piece to ensure color evenness and adhesion. Use primer or wood conditioner as needed.

Comments
jaimecostiglio
Fri, 10/04/2013 - 14:38
Queen size?
Yes that was me asking for the queen. Some day when you have the chance I would love the queen. Thanks Ana.
ecardy
Sun, 10/06/2013 - 15:38
I would love the queen plans
I would love the queen plans as well!
ecardy
Sun, 10/06/2013 - 15:38
I would love the queen plans
I would love the queen plans as well!
jcorelli
Thu, 10/24/2013 - 17:25
Cutting tapers?
I've seen many taper jigs that are used on a table saw, but how did you cut those post tapers with just a circ saw? Isn't that a little unwieldy or do you have a DIY jig that works well with a hand held saw? I'd love to see it!
tylaw
Fri, 08/21/2015 - 11:35
Queen size modification?
Has anyone made a queen size version of this? Can you share the measurements?
Tristac11
Mon, 09/02/2019 - 09:31
I too would love the queen…
I too would love the queen size plans if you are able.