


Tall panel headboard using baseboard trim and moulding - no routing required! Free plans from Ana-White.com

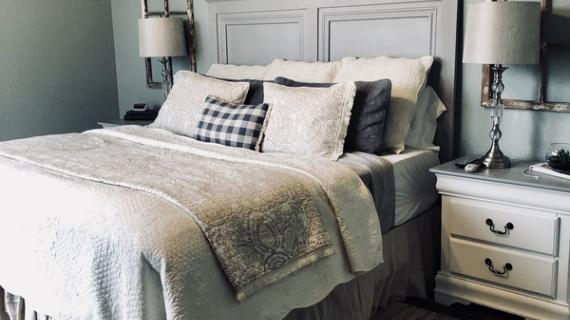
We are so thankful that Mom let us build her a new headboard for her room up at the Momplex. It was a fun project to work on, and we really love how it turned out!!!
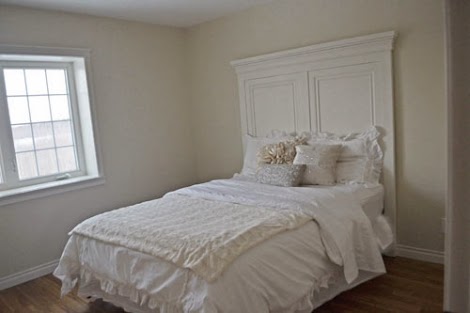
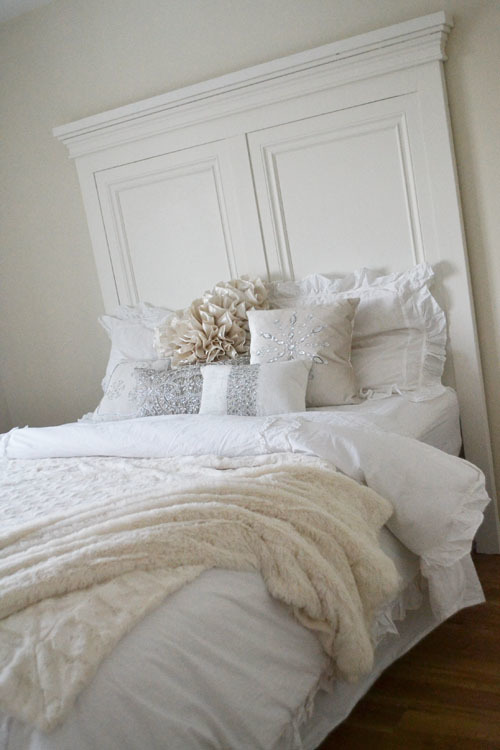
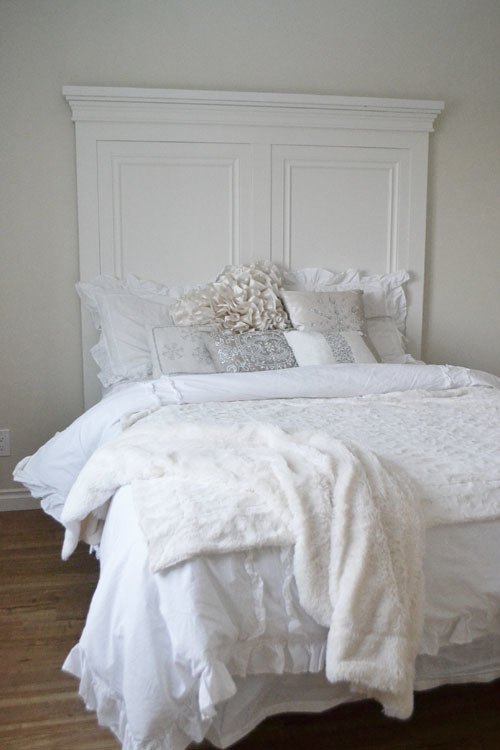
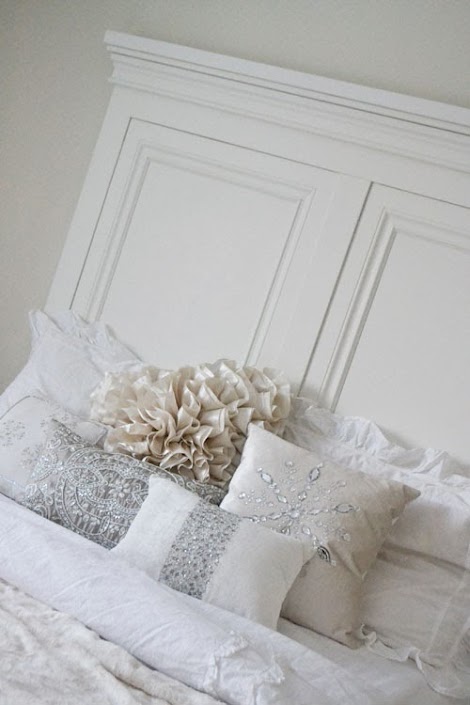
We (the Ram and I) went super tall with this headboard (over six feet!), so it really breaks up the room and adds some much needed architectural interest to what is otherwise just four plain walls.
And why not go super tall when you DIY a headboard? It's the same amount of work, just a little longer boards!

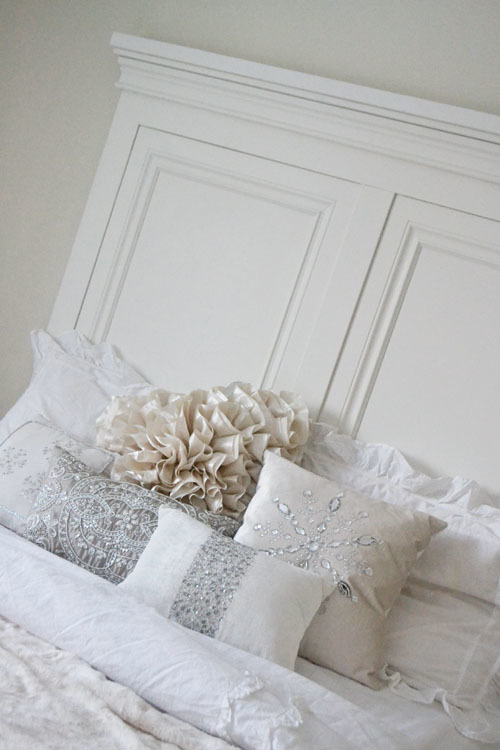
Because of the grand height of this headboard, there won't be a need to do much decorating on this wall or over the headboard.
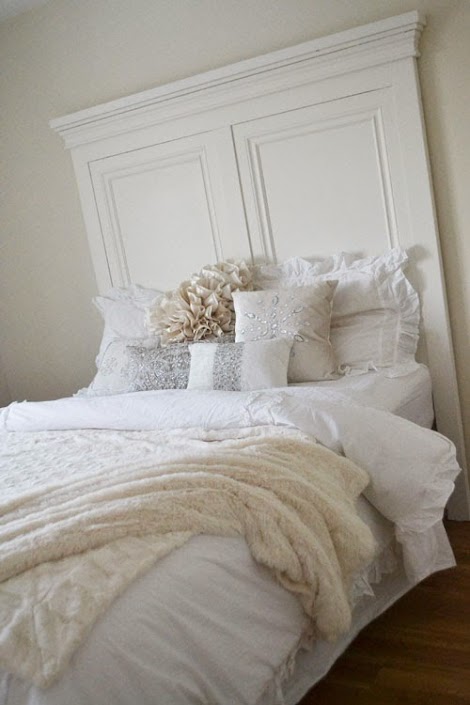
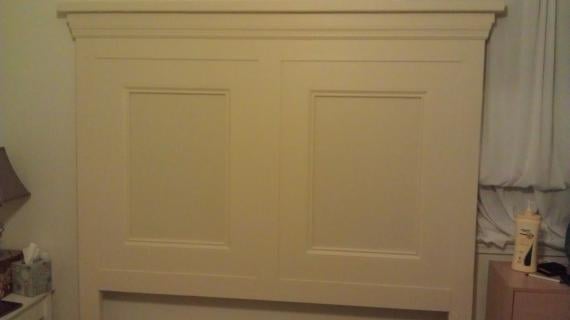
We opted to paint the headboard the same color as the moulding, trim and doors in the room to make it easy for Mom to update the room throughout the year.

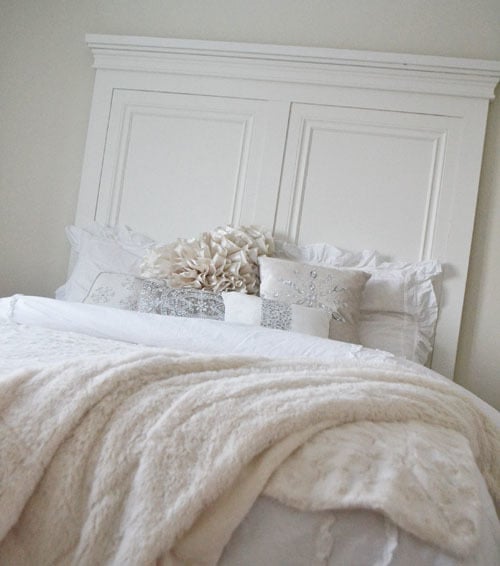
The white also makes the room appear larger and brighter - always a bonus up here in Alaska when the sun gets so scarce (forgive the grainy photos - we are sunlight deprived right now).
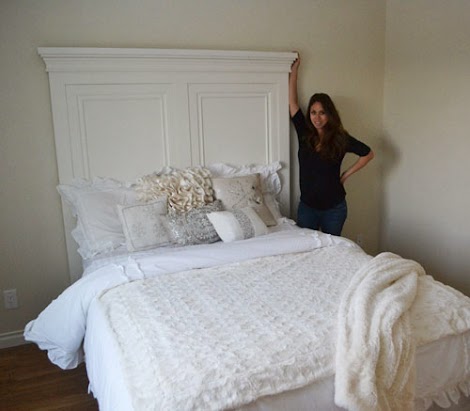
And who doesn't love a project that can make a preggers lady in her last month look (somewhat) normal sized, right??? (thanks for being kind!)
This lady sure does!!!
It totally made our day that Mom loved her new handmade headboard!!!

I guess the only question left is what nightstand should we build to match?
Well, pending our newest carpenter doesn't make an early arrival.
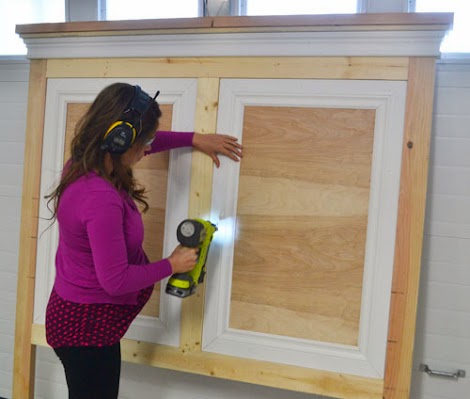
To build this headboard, I collaborated my awesome friends over at 3MDIY to be safe and to make sure we gave this headboard the best possible finish.

Well, here's my accessories - I love 3M™ Safety Products , especially these 3M Tekk WorkTunes Ear Muffs!

And I also love the orange earplugs - they work great too!
We have a pretty good sawdust collection system set up (finally broke down and invested in a system since we build constantly) in our workspace (it's a dream come true, I tell you!) so sawdust isn't a huge issues for us, but a respirator is also recommended when cutting.
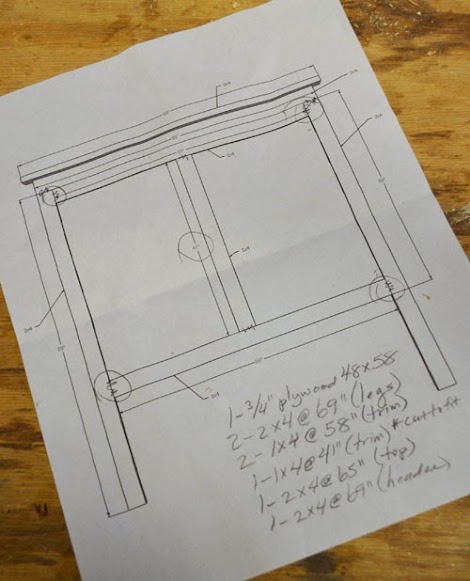
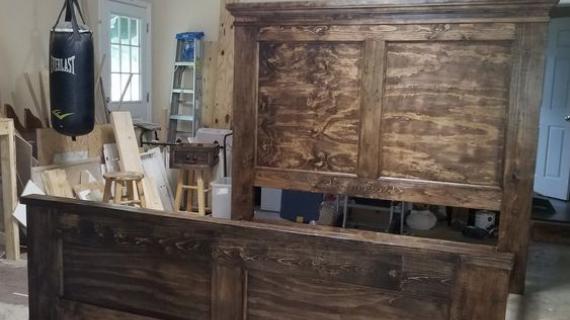
To build this headboard, first I started with a general sketch (got you covered with the full free plans below)
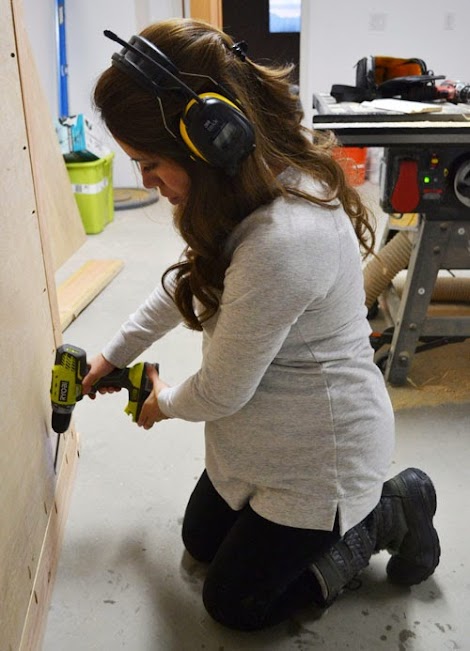
My most favorite way to build is with my Kreg Jig, so we circled all the spots we would need pocket holes,

And started drilling pocket holes. The Ram's on photography duty this time - but he's building too.

We clamp every joint, whenever possible. You drive each joint just once, might as well do it right, right?

When the joints are clamped, it's a no brainer - just drive the screws!
After we got the frame for the headboard built, we added 3/4" PureBond Plywood for the main panel. We chose PureBond because it's North American made, substainably harvested and formaldehyde free.
I really wanted a plywood panel because it will help keep the boards from warping, and will resist shrinking and expanding over time.
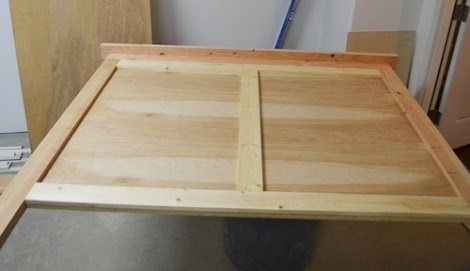
That, and it sure is pretty!!!
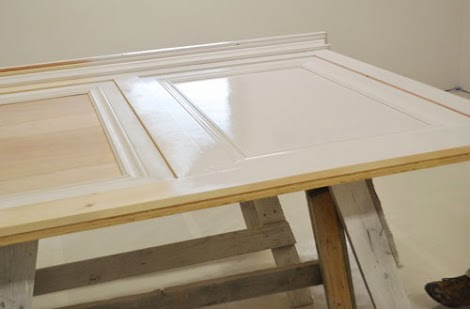
Here's the main headboard done, we just have to add moulding now!

We have a pile of leftover moudling from trimming out the Momplex, so we used baseboard and header moulding. But really - you could use just about anything to dress up your headboard.

Our header moulding ended up being just shy of corvering the top 2x4, so we threw a 1x2 board in, mitering the corners.
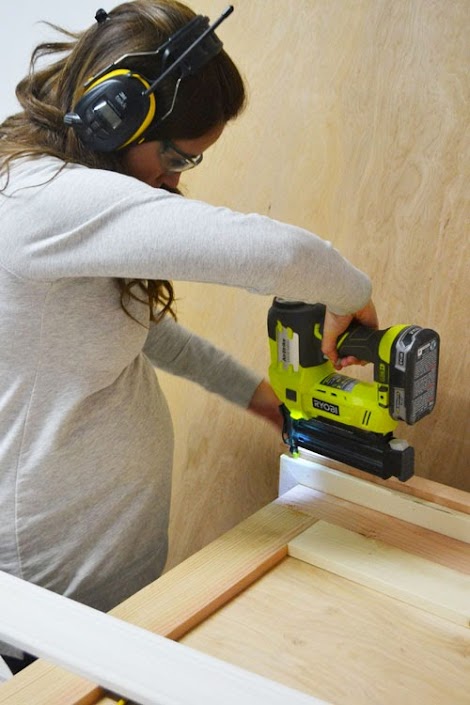
The moulding is just glued and nailed down. I used 2" finish nails to attach through the 1x2.

Then we attached the header moulding underneath the 1x2s. This really made the moulding look more substantial and grand too!
Then for the panels, we used 1" nails and glue to attach 5-1/4" tall baseboard, mitering corners. It's the exact same baseboard we used for trimming out the floor at the Momplex.
So how do we take rough, knotty 2x4 studs mixed with leftover moulding, and make it look like this:
It's pretty simple, really.
You just gotta have the right tools for the job!
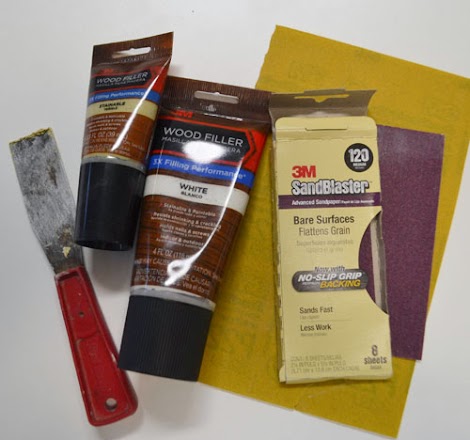
I used 3M Advanced Abrasives in varying grits to sand, and 3M Wood Filler  to hide imperfections in the wood and fill nail or screw holes.
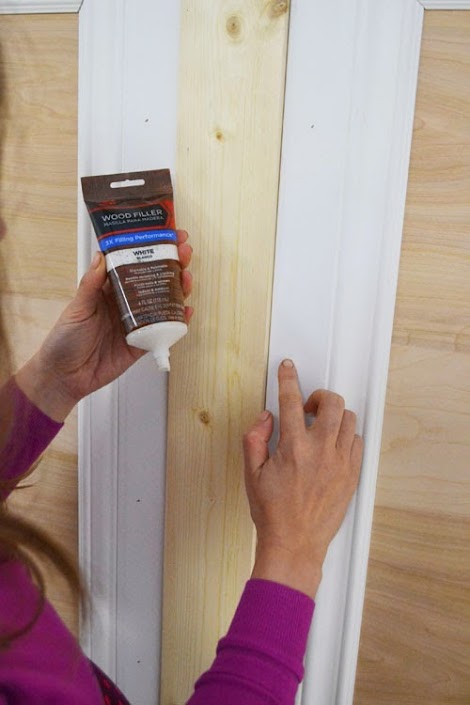
I filled all the nail holes with 3M Wood Filler
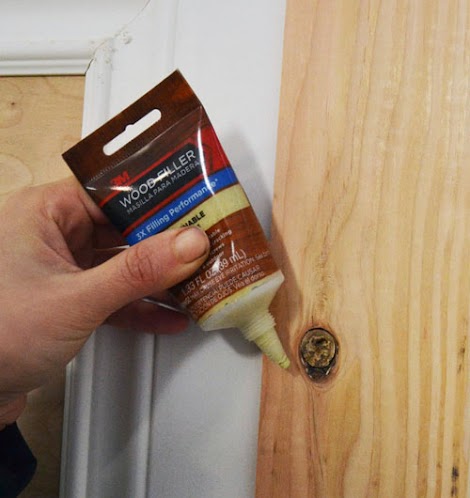
And also all knots and cracks in the 2x4s with more3M Wood Filler

Then I gave the headboard a good sanding with 3M Advanced Abrasives  sanding paper, starting with a medium, and working up to super fine.

For the moulding, I used a small piece of 3M Advanced Abrasives sandpaper to get in all spots too small for a power sander.
Then we cleaned the headboard up, getting rid of all sanding residue (it's the enemy when you paint!).

All ready for paint!!!

The Ram painted the headboard with his sprayer, stealing my 3M™ Safety Products (that's fine with me!)
Can you see how shiny that paint is??? Good sanding does that!
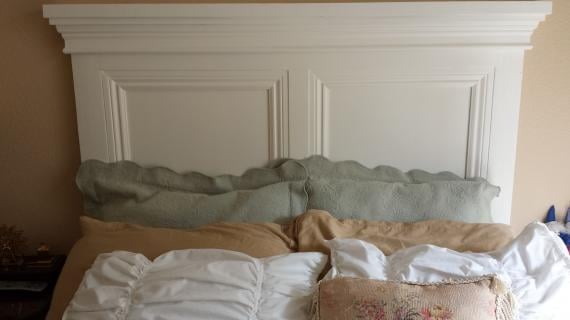
After we let the headboard fully dry, we moved it up the stairs into the room,

EEEK!!!
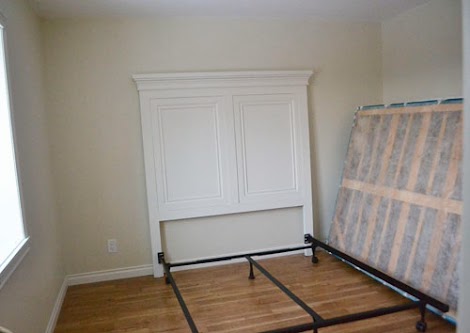
And then attached a bed frame to the headboard. Mom had a boxspring, and with how little the room is, we opted not to do a footboard or full wood bed frame, and just use the metal bed frame.
NOTE: Due to the height of this headboard, to prevent forward tipping, it is also recommended to attach it to a stud in the wall at the top. L brackets will do the trick.
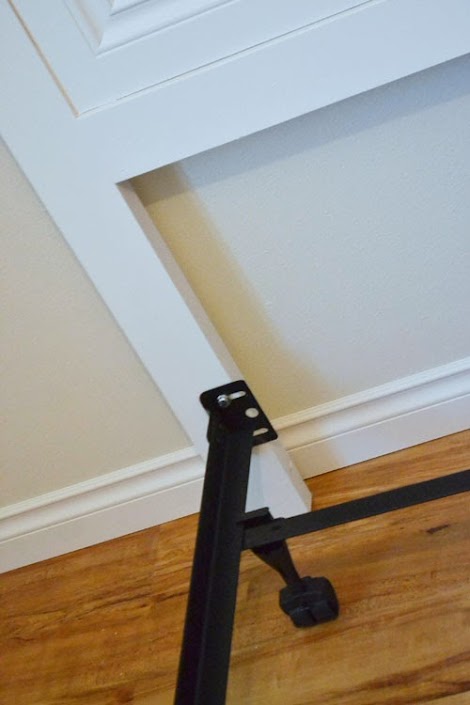
The metal bed frame just bolts right to the headboard with lag bolts.
Mom says she feels like she's staying in a fancy hotel with the new headboard!
Don't tell her we only spent about $100 on the headboard, okay? That'll just be between us.
And of course, the plans follow - so you can build this headboard too!!!


This post is a collaboration with 3M DIY. To keep up-to-date on projects, products and sampling visit 3MDIY.com.</p>
You can also connect with 3M DIY socially:


Preparation
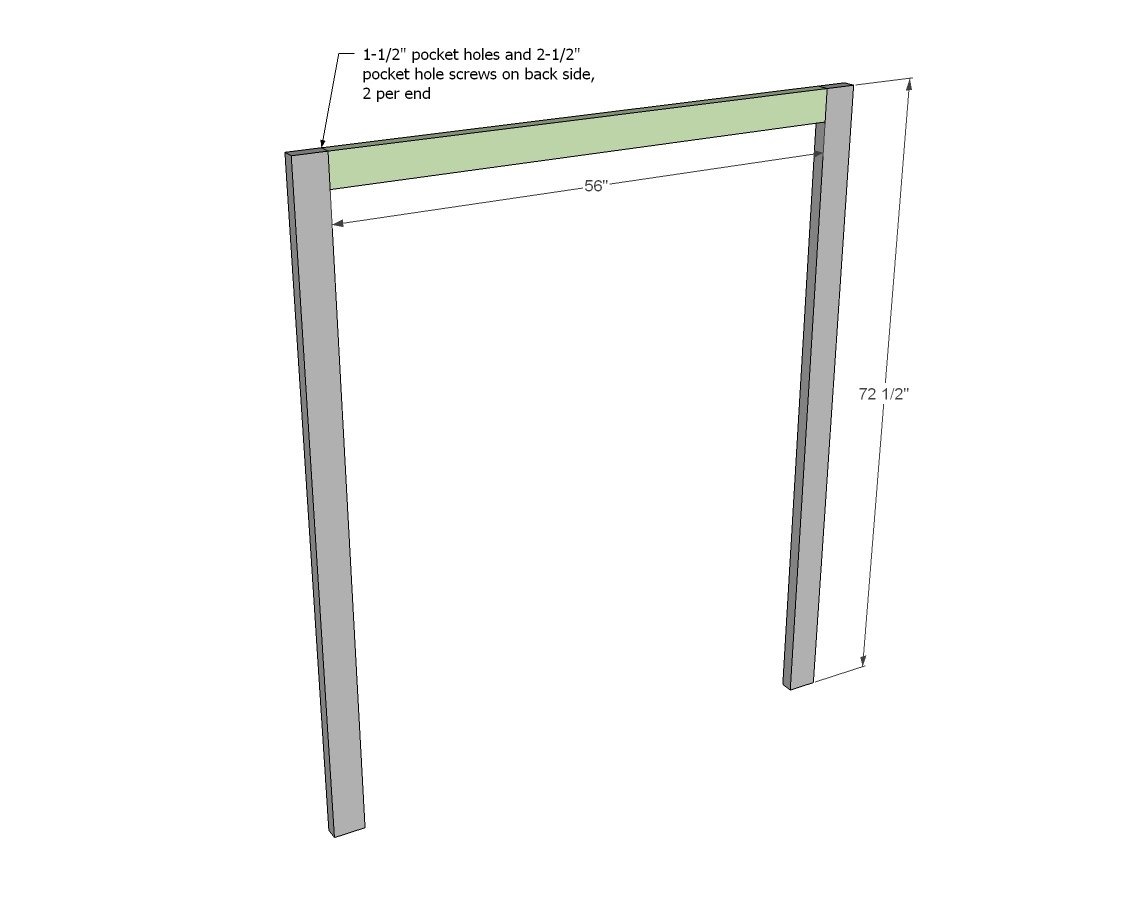
2 - 2x4 @ 72-1/2" (legs)
1 - 2x4 @ 56" (top header)
2 - 2x4 @ 56" (panel trim on front)
1 - 1x4 @ 41" (center panel trim on front)
1 - 3/4" plywood @ 48" x 56" (center panel)
1 - 2x4 @ 67" (top)
5-1/4" baseboard moulding cut to fit
header moulding cut to fit
optional 1x2 cut to fit


Please read through the entire plan and all comments before beginning this project. It is also advisable to review the Getting Started Section. Take all necessary precautions to build safely and smartly. Work on a clean level surface, free of imperfections or debris. Always use straight boards. Check for square after each step. Always predrill holes before attaching with screws. Use glue with finish nails for a stronger hold. Wipe excess glue off bare wood for stained projects, as dried glue will not take stain. Be safe, have fun, and ask for help if you need it. Good luck!
Instructions
Step 1
IMPORTANT: Due to the height of this headboard, you must secure the top to studs in the wall to prevent forward tipping.
Start by attaching the legs to the top 2x4.
NOTE: Also drill 1-1/2" pocket holes facing upward for attaching the top 2x4 in later steps.
Step 2
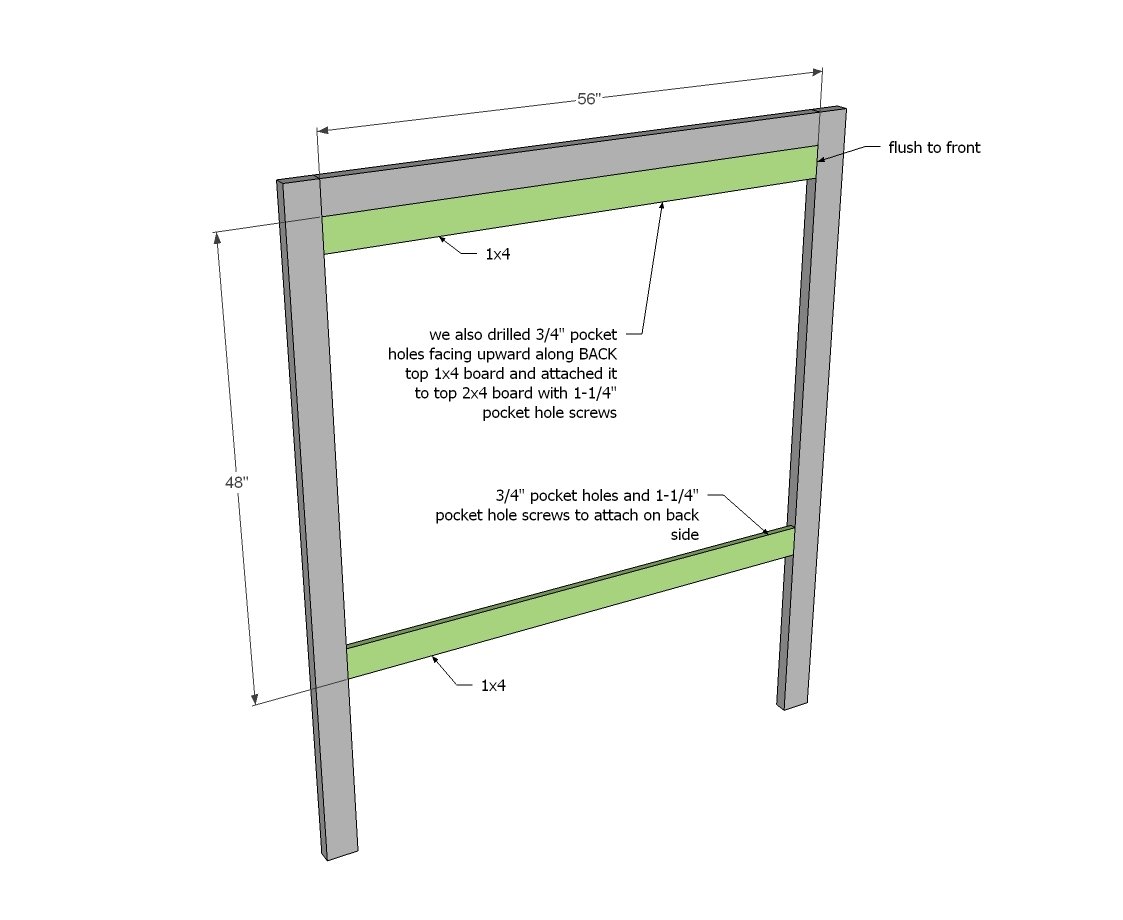
Next, attach the 1x4 pieces, all flush to the front.
Step 3

Then attach the center 1x4 - you may wish to measure and cut this piece to fit as 1x4s can vary in width.
Step 4
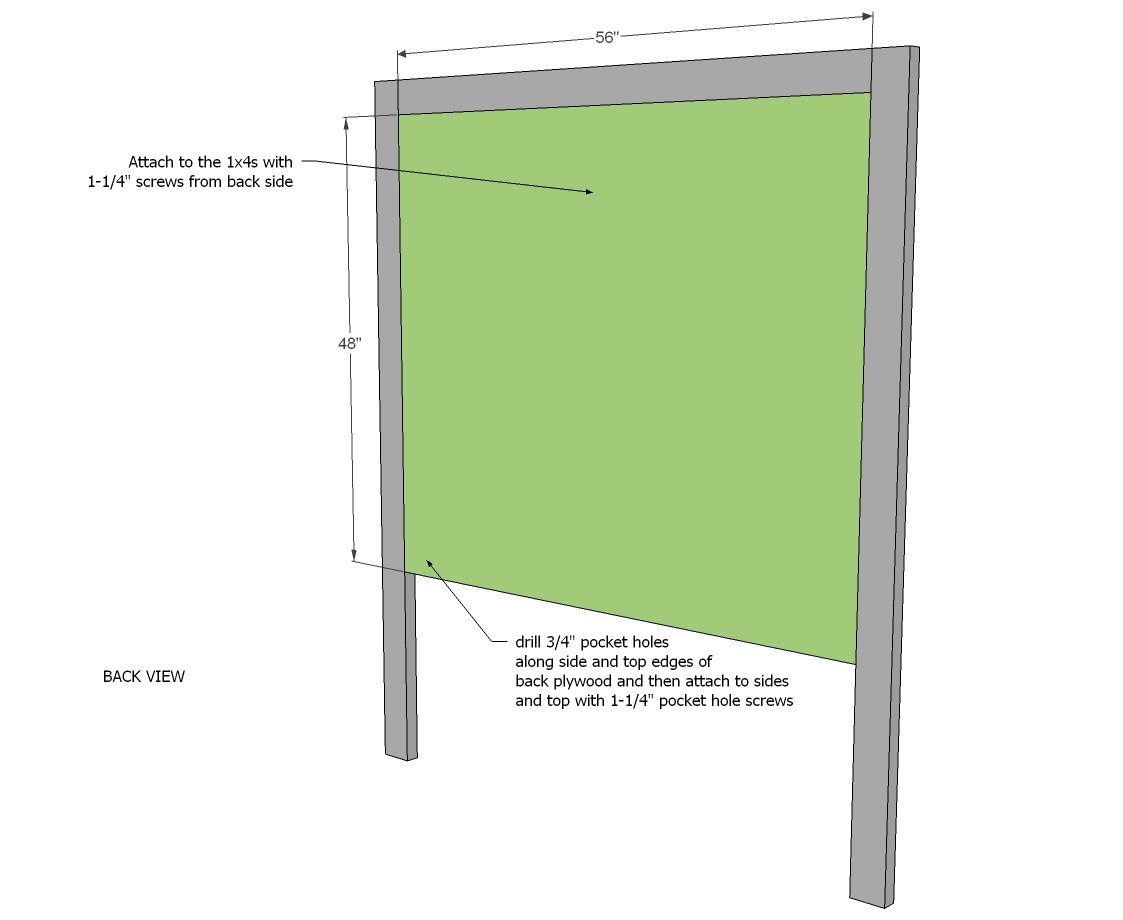
Cut the back plywood to fit, and attach to legs and header. Also attach to the front 1x4 boards with 1-1/4" screws (we just used pocket hole screws so we didn't have to buy special screws).
Step 5

Step 6
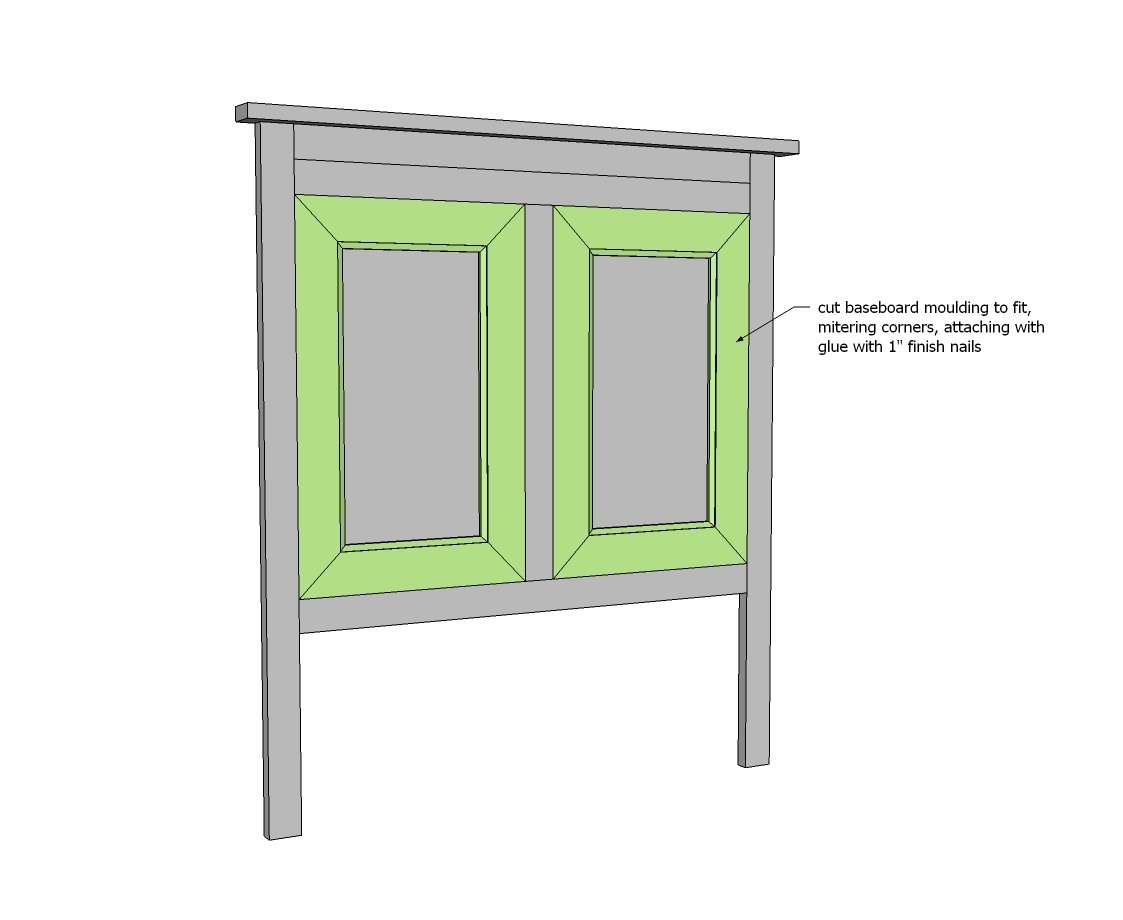
Next, attach moudling inside the 1x4 frames, mitering corners.
Step 7
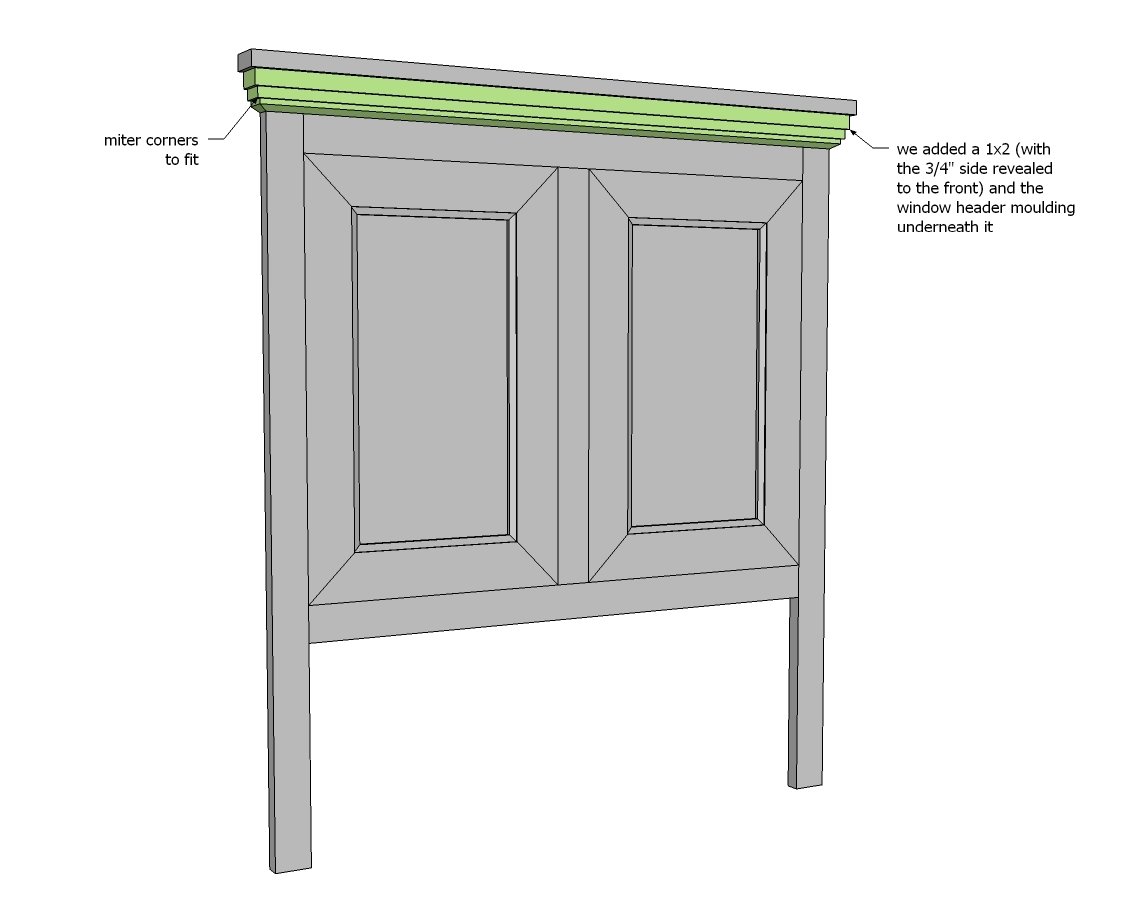
Finally, attach crown moulding or header moulding to the top.
IMPORTANT: Due to the height of this headboard, you must secure the top to studs in the wall to prevent forward tipping.
It is always recommended to apply a test coat on a hidden area or scrap piece to ensure color evenness and adhesion. Use primer or wood conditioner as needed.
Comments
spiceylg
Tue, 11/26/2013 - 19:10
Fabulous!!!
This headboard came out beautiful! I am sure your or the Ram's Mom will feel like a queen. Love it! Ana, will you be posting about the dust collection system you bought and why that particular one? I would like to invest in one eventually and would appreciate any information.
orangesugar
Thu, 11/28/2013 - 15:58
Dust Collection
Another vote for sharing info about your dust collection system.
Also curious as to what brand/line of paint you like to use to paint furniture with.
christinaprice09
Mon, 05/09/2016 - 07:34
FULL size headboard plans
Do you have plans for this headboard for a FULL size bed? Or know how to cut it down to fit?
sjaustin
Mon, 05/09/2016 - 13:52
Full size bed
A queen is 60" wide and a full is 54" wide. I would just subtract 6" from all of the measurements for the horizozontal pieces. You could also reduce the height of the legs so the headboard is more in proportion with the bed size, but obviously the headboard height isn't directly dependent on the width or length of the bed.
BrittJBritt
Fri, 07/22/2016 - 06:07
Video suggestion
Hi do you have any videos on how you built these beds. I was reading when you did the pocket holes but how did you know exactly where to put them for the headboard.
Dbeaux
Wed, 05/01/2019 - 09:06
Trim Question
In regards to the trim work, was the header moulding and the baseboards real wood or were they MDF?