


Free plans to build your own kitchen cabinets - standard sized above the fridge cabinet plans from Ana-White.com
Hello DIY Friends!
Thank you so much for your patience with me and understanding - our 10 day old baby has been exceptionally good and we are so blessed to have him .... but of course, he's been consuming a ton of our time - as any baby should.
But I know some of you are interested in building your own kitchens, so it's a big priority for me to finish up the kitchen cabinet plans and tutorials - baby allowing.
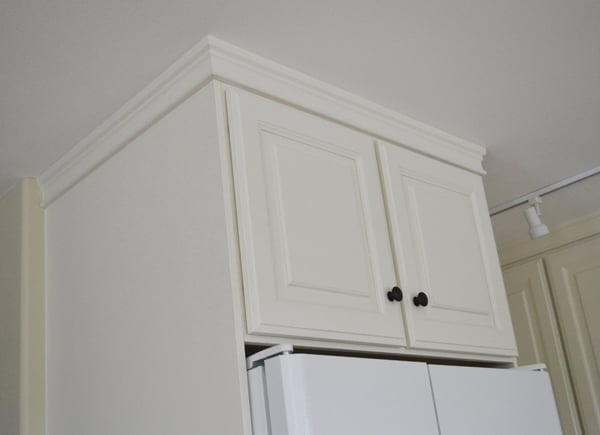
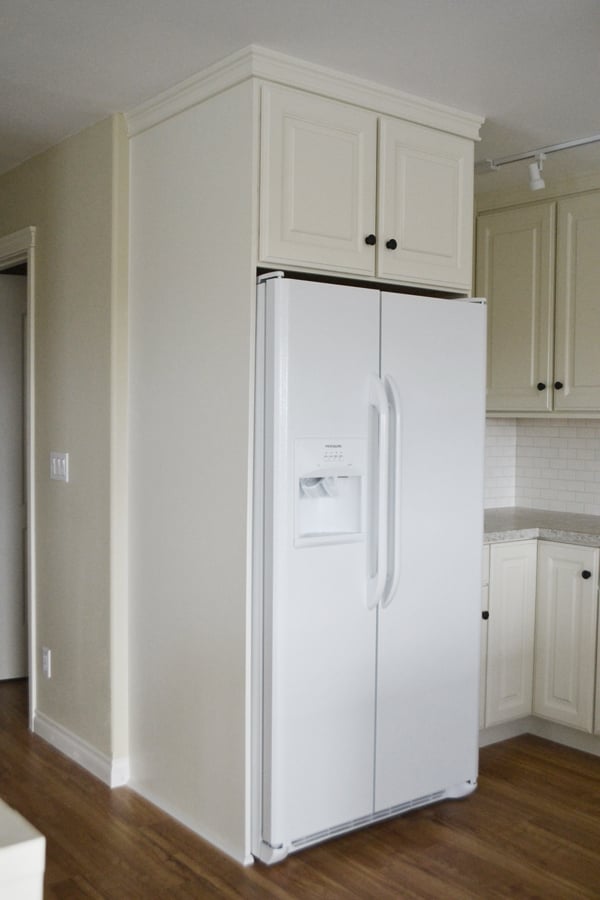
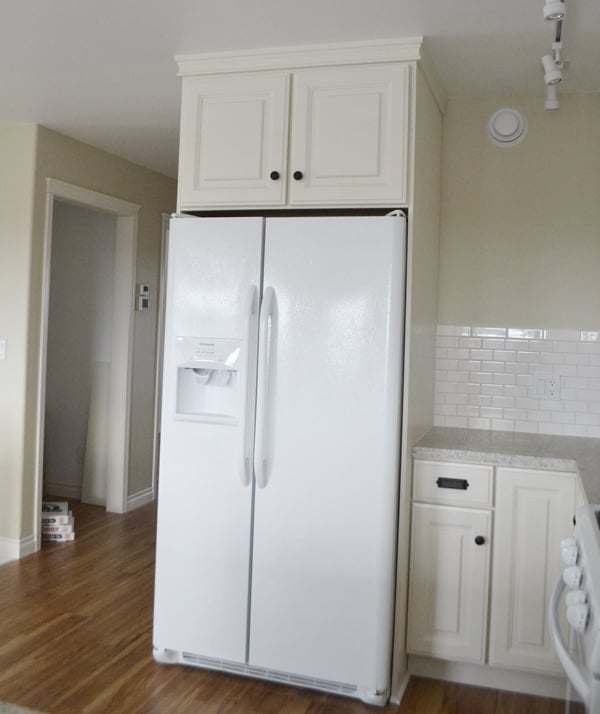
Today I'm sharing a standard 36" wide x 24" deep x 15" tall wall cabinet, designed to go over the fridge.

I'll be sharing next how we used this cabinet to box in the fridge completely as well.

PLAN MODIFICATIONS
Please note that we did extend the height of this cabinet so it consumed the space between the top of the fridge and the bottom of the added crown moulding (ended up being 20" tall for us). If you want to do the same and keep a "just right gap" between the fridge and cabinet, and go to the ceiling, it will require some modifications - as every fridge is different and your ceiling height could vary (ours is 95"). I'll go into more details on this when we do the boxing in the fridge post.
FINISHING DETAILS
We used PureBond Formaldehyde Free plywood in finished maple to build the carcasses so we did not have to do any finish work inside the cabinet. The face frames are poplar and we painted them before attaching to the cabinet. Then we painted the doors and attached.
For now - here's a standard 36" wide x 15" tall x 24" deep above the fridge cabinet plans.
Enjoy!
XO Ana + Family
IMPORTANT: There are lots of different cabinet plans on this site - make sure you build from the same collection of plans for your kitchen to get the cabinets to match. This plan is part of the Momplex Vanilla Kitchen.

Preparation
8 feet of 1x2s for face frame
3/4" plywood ripped into strips 22-1/4" wide
1x4 or 3/4" plywood scrap for the back support
1/4" plywood for back
1-1/4" pocket hole screws
3/4" finish nails for attaching back
edge banding for finishing shelf fronts
shelf pins for adding shelves
DOOR and 1-1/4" overlay concealed hinges for FACE FRAMES
2 - 3/4" plywood @ 22-1/4" x 15" (Sides)
2 - 3/4" plywood @ 22-1/4" x 34" (Top/Bottom)
1 - 3/4" plwyood OR 1x4 @ 34" (Back Top Support)
1 - 1/4" plywood @ 35-1/2" x 15" (Back)
2 - 1x2 @ 15" (Face Frame stiles)
2 - 1x2 @ 33" (Face Frame rails)
1 - 1x3 @ 12" (Face Frame mid stile)
FULL OVERLAY DOORS (2) SIZE 14" x 17-1/2"


Please read through the entire plan and all comments before beginning this project. It is also advisable to review the Getting Started Section. Take all necessary precautions to build safely and smartly. Work on a clean level surface, free of imperfections or debris. Always use straight boards. Check for square after each step. Always predrill holes before attaching with screws. Use glue with finish nails for a stronger hold. Wipe excess glue off bare wood for stained projects, as dried glue will not take stain. Be safe, have fun, and ask for help if you need it. Good luck!
Instructions
Step 1

DRILL POCKET HOLES FOR ATTACHING FACE FRAMES
On the outsides of the sides and top/bottom, drill 3/4" pocket holes along the front edges (outsides or less attractive side) of the pieces, for attaching the face frame in later steps. These pocket holes will be covered by neighboring cabinets, or if end cabinet, covered in 1/4" finished plywood to match doors and face frames.
ATTACH SIDES TO TOP/BOTTOM
Then on the outsides, drill 3/4" pocket holes on each end of the top and bottom, and attach to sides with 1-1/4" pocket hole screws and glue.
Step 2

ATTACH BACK SUPPORT (USED FOR HANGING CABINET)
Drill 3/4" pocket holes along top edge and ends of back support. Attach inset at back - this piece will be used to hang your cabinet. You can also add a second piece at the base for additional support.
We used leftover finished plywood for these pieces, but a 1x3 or 1x4 could also be used.
Step 3

ATTACH BACK - NOT USED FOR HANGING CABINET
The back is not structural - it just finished out the inside of the cabinet. Attach with 3/4" finish nails and glue.
Step 4

FACE FRAME CONSTRUCTION
Build the face frame separately on the table, and then attach the completed face frame to the front of the cabinet.
Step 5

It is always recommended to apply a test coat on a hidden area or scrap piece to ensure color evenness and adhesion. Use primer or wood conditioner as needed.
Comments
UlrikeDG
Wed, 01/08/2014 - 19:57
Don't apologize! I'm
Don't apologize! I'm impressed that you're back with a 10 day old.
madeofstarstuff
Wed, 06/11/2014 - 09:53
Boxing in the fridge
I see how you got the cabinets over the fridge, but how did you box it in? I can't find any instructions for this.