Community Brag Posts

American Girl Dollhouse with Farmhouse Bed, Bunk Bed, and Furniture

Submitted by Anonymous (not verified) on Tue, 01/08/2019 - 08:46

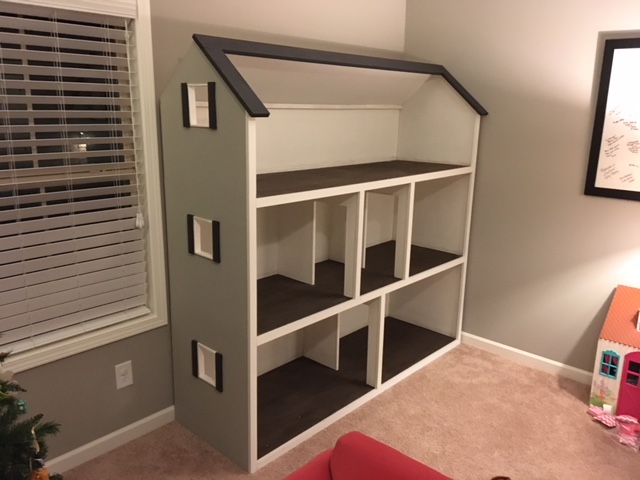
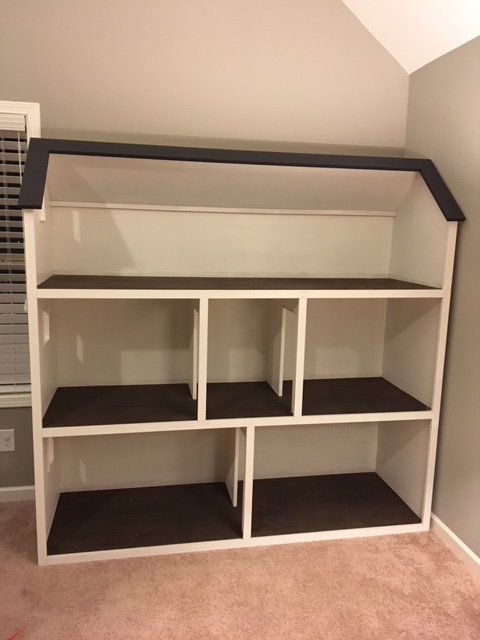
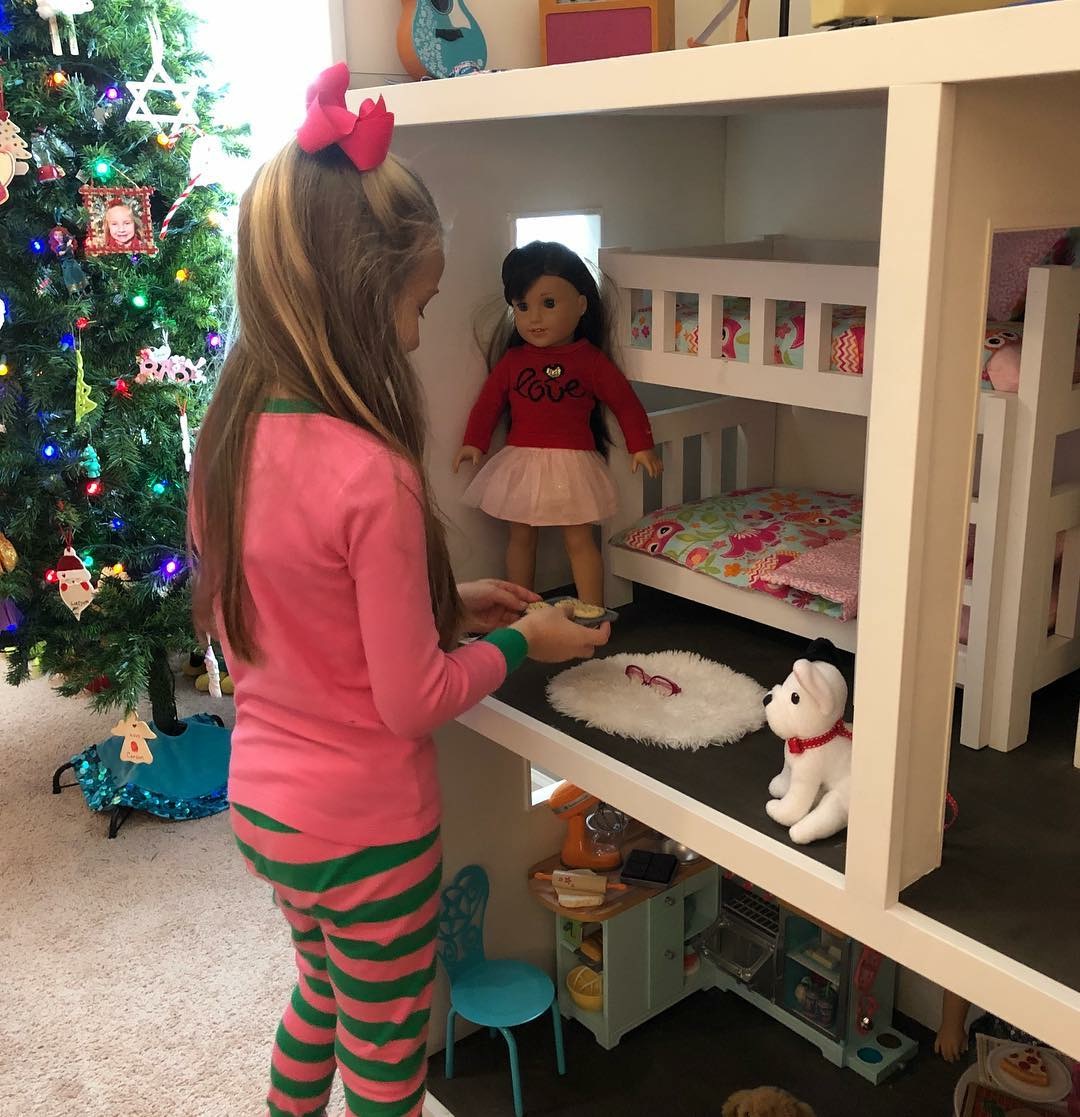
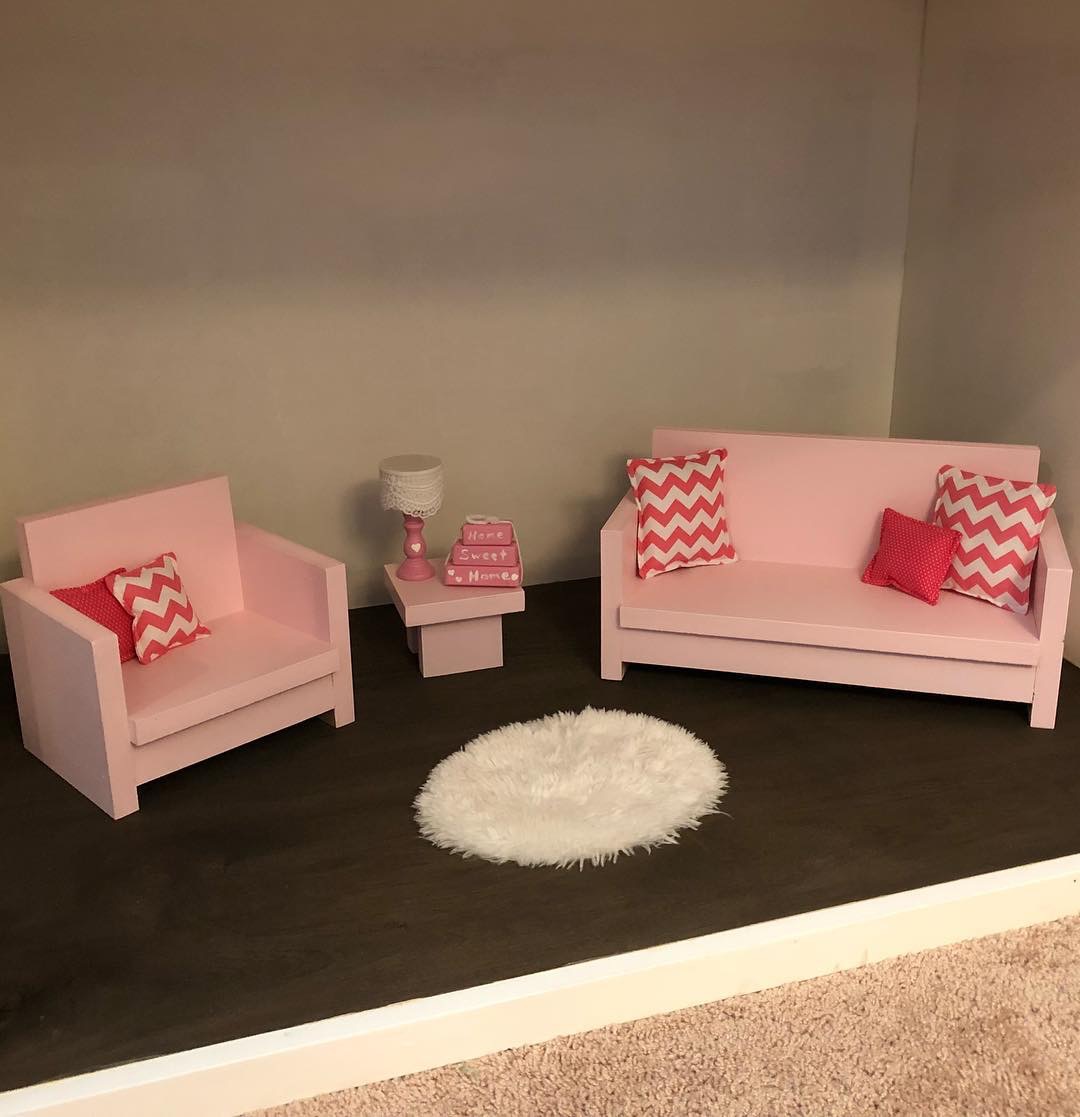
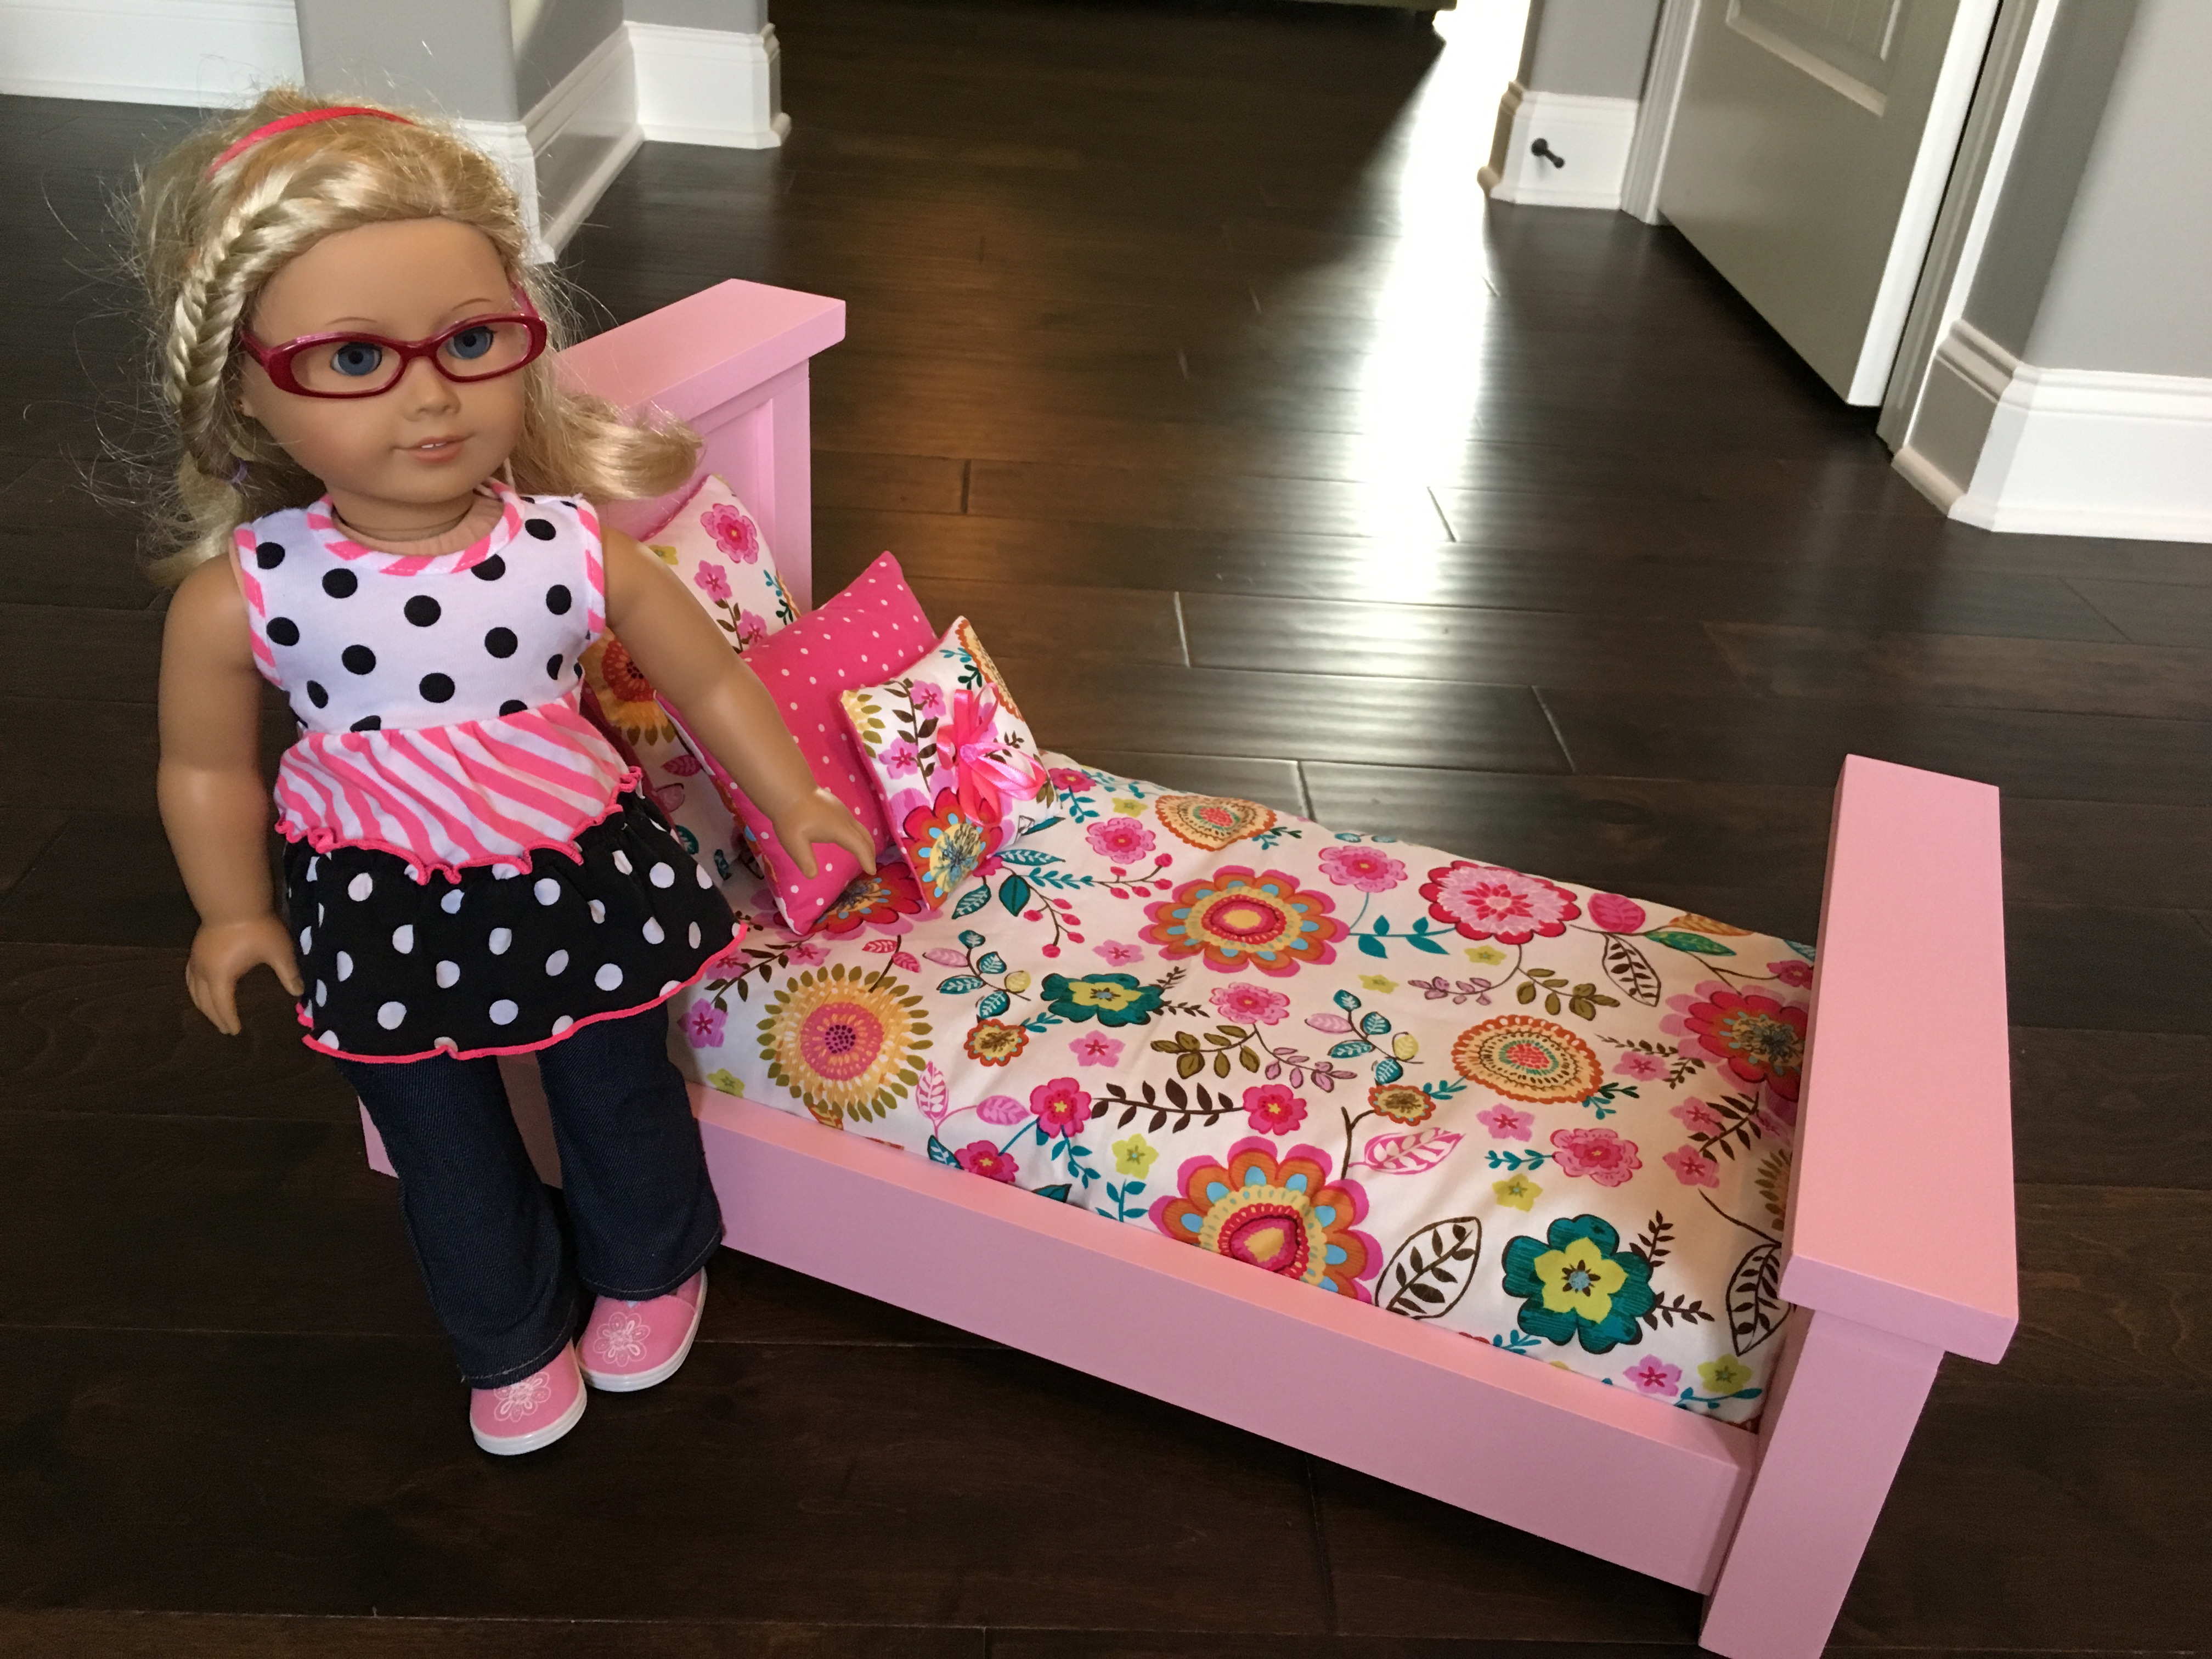
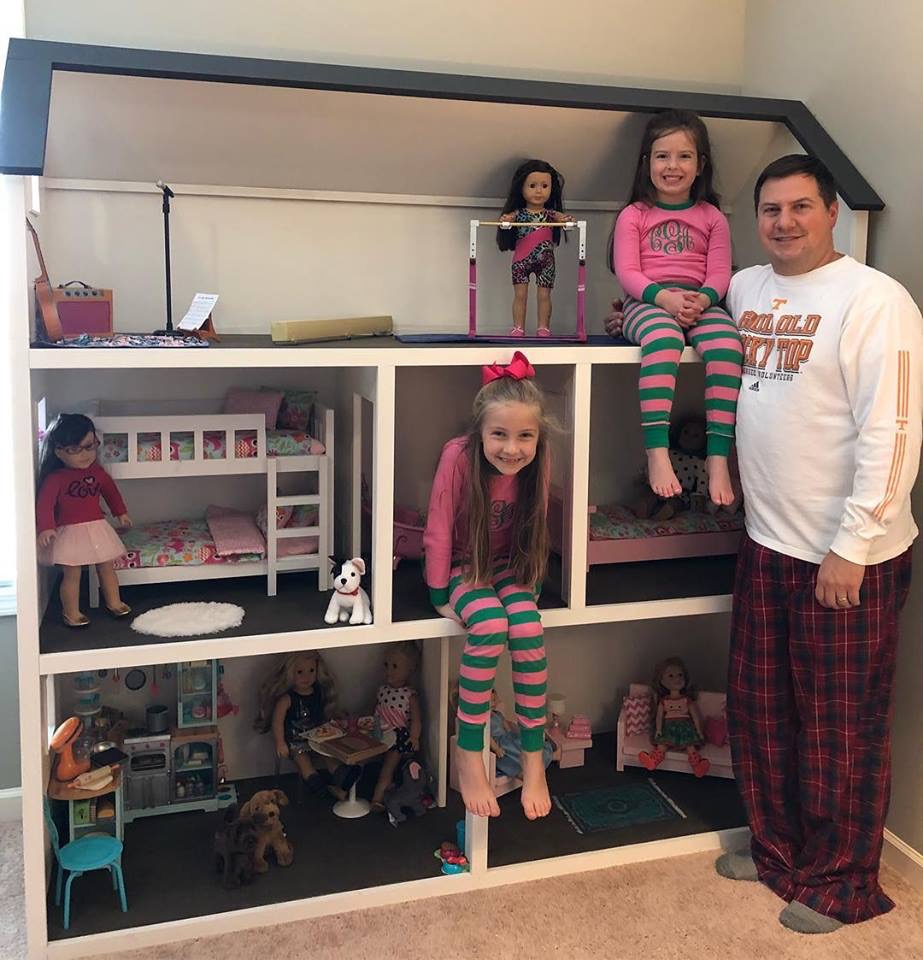
I've been building Ana White American Girl doll furniture for my two daughters for the last three years, culminating with my biggest build of all - a modified version of Ana's dollhouse.

My wife kept telling me it would end up being huge, and she was right.  The great news is that it doubles as storage when the girls aren't playing!  2 Bedrooms, kitchen, living room, bathroom, and upstairs bonus room for dance and gymnastics.  78" tall x 76" wide, mounted to the wall studs for safety.   Lots of joy in our home on Christmas day.  Thanks Ana!

Estimated Cost
$300
Estimated Time Investment
Week Long Project (20 Hours or More)
Recommended Skill Level
Intermediate

Comments

DIY twin bed

Submitted by Anonymous (not verified) on Fri, 02/01/2019 - 01:04

Fun and easy. Bed is extremely sturdy. I used pocket screws for all four corner connections.

Built from Plan(s)
Estimated Cost
$125ish.
Estimated Time Investment
Weekend Project (10-20 Hours)
Finish Used
Varathame early American stain, with clear satin poly.
Recommended Skill Level
Beginner

DIY Shed

Submitted by Anonymous (not verified) on Mon, 11/06/2023 - 11:07

8’ by 12’ shed with extra 15” of height. Thanks for the plans!

Built from Plan(s)

King size Farmhouse Bed

Submitted by Anonymous (not verified) on Sun, 04/19/2020 - 15:59

This is a plan that My 16 year old son chose to do for a project to fulfill a goal to learn some woodworking skills during our unexpected downtime from School.
Mom is thrilled with the new space.
He adjusted different sizes based on what lumber we already had. He used 1x7’s and routed a 45deg on the edges to give the tongue and groove look. Posts are 4x5 and top railing is 2x7.

Estimated Cost
$40 in paint and supplies. Wood was free from a friend.
Estimated Time Investment
Weekend Project (10-20 Hours)
Finish Used
Valspar Furniture Enamel.
Color - Web Grey
Recommended Skill Level
Beginner

Comments

Tilt-out recycling sorter --Modified Build

I attached the tilt out portion using a Kreg jig and eventually removed the brace (it wasn't necessary and removing the brace gave it a cleaner look.

I used 2 x 2 as a trim around the outside which also allowed me to hide the hinge.

Other than that -- followed the build pretty closely. I used a cable on either side to stop the tilt out from falling to the floor (which allows me to leave it open as well.

This was my first project and it was a battle to figure out how to install the hinges and I did not love my jig saw work with the plan feet so I bought and installed furniture replacement feet which turned out much nicer (IMO).

Good luck!

Built from Plan(s)
Estimated Cost
$150.00
Estimated Time Investment
Weekend Project (10-20 Hours)
Finish Used
General Finishes Java Gel
Recommended Skill Level
Intermediate

Husky farmhouse table

Submitted by wayne465 on Thu, 07/02/2020 - 11:19

This was a fun project to replace our old oak table. Anna’s project plans was very easy to follow. My wife wanted a semi plank look so I used a wood jointer and a wood planer to get the top nice and snug without many gaps. I used popular for the sides and I used 3 pocket holes for every frame connection to add strength. 2 pocket holes seemed a little weak. I used valspar aspire white for the paint and Minwax walnut stain. For the poly I used varathane 3x thick satin oil based polyurethane. I tried using semi-gloss but it was two shiny for us. I added 2 cross braces for added support for the lower portion of the table and to add more points of contact to keep the table flat. And secure. Don’t be afraid to have small imperfections. They give it the authentic look.

Built from Plan(s)
Estimated Cost
600-700
Estimated Time Investment
Week Long Project (20 Hours or More)
Finish Used
Minwax walnut stain
Varathane oil based polyurethane
Recommended Skill Level
Beginner

Antiqued dark walnut

Submitted by Anonymous (not verified) on Sat, 04/15/2017 - 20:42

My first project of this size.  I think it turned out great!  Did a gray weathered stain and drybrushed bright white over the base.  Sanded the top 60, 120, 220, 320, and just for fun I finished it with 1000 grit.  Stained dark walnut, finished with three coats of poly, sanding 320 in between coats.  Love this table!!!!

Built from Plan(s)
Estimated Cost
$89
Estimated Time Investment
Week Long Project (20 Hours or More)
Finish Used
Dark walnut and poly
Recommended Skill Level
Intermediate

Planter Box/Bench with trellis

I used Ana's planter box plans and I designed and built the bench out of pallet wood, and purchased the power coated trellis's and custom fit then to the planters.

Estimated Cost
$110.00
Estimated Time Investment
Day Project (6-9 Hours)
Finish Used
unfinished
Recommended Skill Level
Intermediate

Comments

2 x 4 Garage Shelves Built into Basement Storage!

Hello Everyone! This is my FIRST brag post here on Ana-White.com - but not the first project that we've built from her awesome plans. :) 

We have an unfinished basement that desperately needed some shelving because 1. It's our workshop in the Winter and 2. We don't have an official 'storage' room in the basement of our split level home. When I saw these plans I immediately thought they could be modified to fit our space and get my stuff off the floor! 

I modified the plans just enough to fit our space. After reading through them completely, I realized for an 8 ft wide space (beside the stairs) I only needed three supports for the shelves. Easy! The only trick was fitting the shelf into the space AFTER installing the shelves. Because I had walls on two sides (unlike the tutorial) I couldn't do the shelves as the last step. 

I LOVE how these turned out! They are a strong as a ladder (we tested them... :)) and they hold everything I need them to, and a little bit more. It's a definite improvement on my previously messy, cluttered, saw-dust covered space ... :) 

Estimated Cost
Our space was 8ft tall by 8ft wide, so we ended up purchasing about $60 worth of 2x4s to complete the project. We also used 2.5" screws, which are around $4 per box of 75.
Estimated Time Investment
Afternoon Project (3-6 Hours)
Finish Used
None - we left the wood bare and natural because it's just for storage - not for looks. :)
Recommended Skill Level
Beginner

Redwood Planters

Submitted by powerof2 on Thu, 09/09/2021 - 21:39

Planters from Easy Build DIY Planter Box. Some modifications, but essentially direct from the plans. I used redwood fence pickets for the slats, finished the frame with an "ancient oak" stain and the faces with spar varnish diluted with paint thinner.

Comments

Great Patio Set

Submitted by Anonymous (not verified) on Mon, 10/04/2021 - 13:02

I wanted sturdy seating for my patio. Ana White had the perfect plans for my L shaped seating and coffee table. It was simple to put together and we love it!

Comments

Seasonal And Holiday

Coffee Bar

My husband building this using Ana White plans.  I just love getting to put a bunch of different items almost as a display.  I love this coffee bar  and it is now almost the focal point in our dining room.  I just love the presence it has in this room.

Built from Plan(s)
Estimated Cost
$200.00
Estimated Time Investment
Weekend Project (10-20 Hours)
Recommended Skill Level
Intermediate

Comments

Raised Cedar Bed

Submitted by NitePagan on Sun, 06/30/2013 - 08:27

I built cedar raised beds out of cedar decking, 3 pieces 5/4" x 6" x 8', actual dimensions were 1" x 5.5" x 8', plus 1 - 2 x 4 cedar. I made 48" x 96" boxes. I cut 1 of the cedar deck pieces into 2 - 48" long pieces. For the corners, I cut the 2 x 4 into 8 - 5.5" long pieces. I then screwed 2 of the 2 x 4 pieces together to form a 4 x 4 block. I used these as the inside corner to screw the decking to. The total cost was $60 to build 2 cedar beds. The other option would have been to make them double height, by cutting the 2 x 4's 11 inches long. This is more expensive then the boxes Ana did, but I could not find cedar fence slats, they appeared to be Northern White Pine which would have deteriorated quickly. I obtained the lumber from Lowes.

Estimated Cost
$60.
Estimated Time Investment
An Hour or Two (0-2 Hours)
Finish Used
No Finish.
Recommended Skill Level
Beginner

Pottling bench/greenhouse/water collector

Submitted by richvide0 on Tue, 03/15/2022 - 08:58

I modified the simple potting bench into 3 components. The potting bench, a place for seedlings and a sink.

We get a ton of rain up here in the mountains of Puerto Rico. So much so that it tends to drown seedlings if they aren't covered. So I took the Simple 2x4 Potting Bench plans and modified them to fit the space I had picked out for the project. Since we get so much rain I wanted to collect it. So I added a clear pvc roof and with a gutter made with pvc pipe which flows into a 27 gallon storage container. This disperses into the sink. There is a bucket under the sink to collect the water.

Note: I had to add a 2x4 support under each shelf. I made the two big shelves a little longer so it needed it to support the 1x4s.

I am an avid gardener so I should have given myself this gift after years of not having any level/proper space to work.

Comments

Modern Rustic Outdoor Sofa Inspired by RH Merida

Submitted by susanshamp on Sun, 04/01/2018 - 14:19

I was in love with the RH Merida set because of its clean lines and modern style. Also, the plan seemed simple enough that I could re-create it without a pattern. The only thing that I did not like about it is the lack of arms. I really like to have a place to put my arm or my beverage :) - so I added arms to the design.

Estimated Cost
$150
Estimated Time Investment
Day Project (6-9 Hours)
Finish Used
Natural
Recommended Skill Level
Intermediate

Comments

bogle

Wed, 05/20/2020 - 10:45

This is Awesome. I'm halfway in the middle as i thought I could complete without plans. Do you have any plans could share. Please....

Backyard seating

Submitted by Anonymous (not verified) on Mon, 06/06/2022 - 13:17

We needed some additional seating in the backyard so I built 6 Adirondack chairs for the fire pit and the bench using the plans that you have shared on Facebook. They turned out really nice and so far they have been a big hit!!

Thanks!!

Comments

Building Built In Bookshelves

I decided to build bookshelves on either side of the fireplace, where it was just drywall. I wanted them to be flush with the wall, and the garage is behind the wall. So, I built them into the garage.
I put headers above where the bookshelves would be, and framed the back side in the garage with just 2x4's. I used full sheets of bead board to cover the backs and sides, and tops. Then I bought pre made shelves and put them up using quarter round to support the shelves on all three sides.
I then bought a door frame kit that I liked, that came with fluted pieces for the sides and top with decorative squares to put at the corners. I caulked and painted it all once it was built. I used a circular saw, framing nail gun, compressor, trim nail gun, chop saw and a hammer total. It was a pretty simple project but has made the space much more useable and pretty. My next project is to build a mantle and surround that matches the bookshelves.

Estimated Cost
$200
Estimated Time Investment
Weekend Project (10-20 Hours)
Finish Used
glossy white paint, Behr Polar Bear white.
Recommended Skill Level
Intermediate

Outdoor end tables

I made these two Ana White outdoor end tables for my patio. Next up will be the matching coffee table

Built from Plan(s)

Comments

Corner Cupboard, Corner Cabinet

Submitted by Anonymous (not verified) on Fri, 04/15/2016 - 21:33

I saw the plans on Ana White website and and used them to put this together. I changed it slightly to fit my needs. I made this for my in-laws and it was a lot of fun to do. Hardest part was using blue tape on stain and paint.

Built from Plan(s)
Estimated Cost
125$ includes four cans of Rustoleum White Satin primer and paint from Home Depot, hardware, and lumber. Measure twice Cut once and all will be well.
Estimated Time Investment
Week Long Project (20 Hours or More)
Finish Used
Min wax Red Oak
Min wax satin poly
Rust oleum White Satin Paint and Primer
Recommended Skill Level
Intermediate

John's Washer/Dryer Pedestal

Submitted by coveyjt on Sun, 06/12/2016 - 10:59

The wife has a hard time bending down so she wanted pedestals for the washer and dryer.  The metal ones with a drawer were too tall.  I showed her Sausha's and she really loved that design.  I basically used the same construction plans idea from Sausha's project and some tips from Ryan's brag post.  But, I wanted to beef it up some.  I didn't like the L-bracket to attach the top and 4X4 legs.  It didn't seem sturdy enough for me.  I used my table saw to square the edges on the 4X4 posts and the 2X6 rails.  Then I used my Kreg jig and glued and screwed everything together.  I liked Ryan's trim ideas, so I used baseboard trim for the bottom and flipped it for the top trim.  I made a 1/2" lip so if it were to vibrate, the washer/dryer would not fall.  I put the trim on the bottom of the legs and was considering putting on the top but I put some different trim all the way around the bottom of the 2X6 rails.  The wife liked that.  I also added some carpet on the top to cut down on vibration and to help keep the units in place. I also put some 4X4 pieces of carpet on the bottom to keep the noise down and to help in moving it. I primed and used an gravity sprayer to paint it.  Then I put 3 coats of polyacrylic to help in cleaning and to cut down on scratches from the laundry baskets. 

laundry pedestals diy

Estimated Cost
150.00
Estimated Time Investment
Week Long Project (20 Hours or More)
Finish Used
Paint
Recommended Skill Level
Intermediate

Comments

zoolander

Wed, 06/29/2016 - 14:31

I think you could probably drive a truck on top of yours.  :)  I was a bit concerned about the strength of the construction when I first decided to build it, but I decided that since it would be stationary once I have it in place and the only force would be straight down, it would be fine.  Once I got it put together, it was actually sturdier than I thought it was going to be...from a horizontal force perspective.  Virtically, that thing could hold 100 washer/dryer pairs...the plywould would give out before the 2x4s and 4x4s would even budge.

Anyway, nice work!  I love the Kreg Jig...I need one of those. 

Hidden Desk

Submitted by Anonymous (not verified) on Sat, 10/08/2016 - 12:24

I shrunk the size and dumbed down the plans to fit my skill level.

Built from Plan(s)
Estimated Cost
175
Estimated Time Investment
Weekend Project (10-20 Hours)
Finish Used
Walnut
Recommended Skill Level
Intermediate

Comments

Texastia

Mon, 10/10/2016 - 09:08

I love what you did! It looks so great! I prefer this style, which is more simplistic than the other. Great work!!


Jessi_ites

Tue, 10/11/2016 - 14:56

Thanks! I wish I would of set up an account before I posted so I could get notifications.  I honestly didn't think anyone would notice it :)

Jessi_ites

Tue, 10/11/2016 - 14:58

I am so excited that people noticed this :)  Is there any way of putting this under my account?  I didnt make an account until today and I would like to get notifications.   I have my project on my facebook page and can prove that I made it with other pictures. Thanks!

crstorm

Mon, 01/20/2020 - 07:44

I would love to see this in a farm-house (rather than rustic) aesthetic along with drawers under the seats for extra storage. Maybe on casters with a fold up extension on the other side? So many ideas running through my head with this!