Community Brag Posts

Garage Shelves + Work Bench

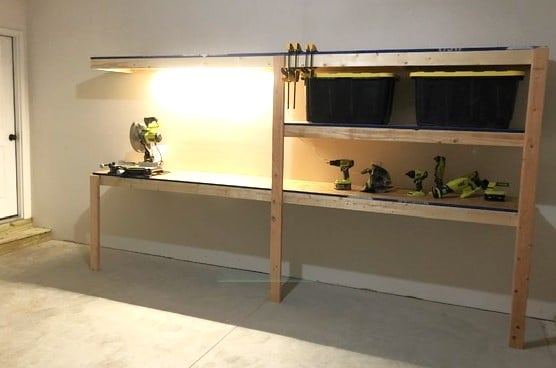
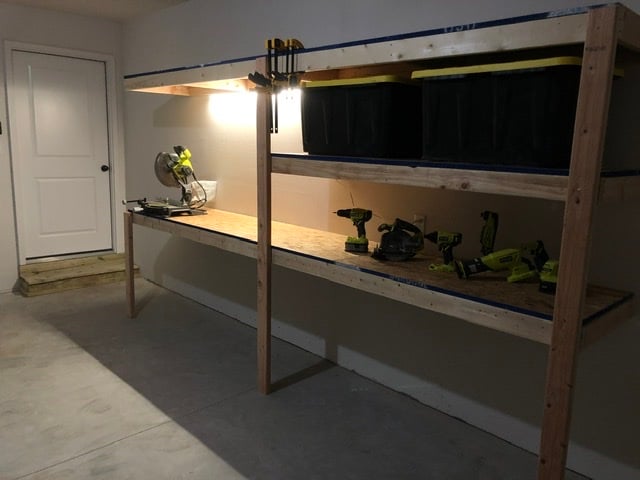
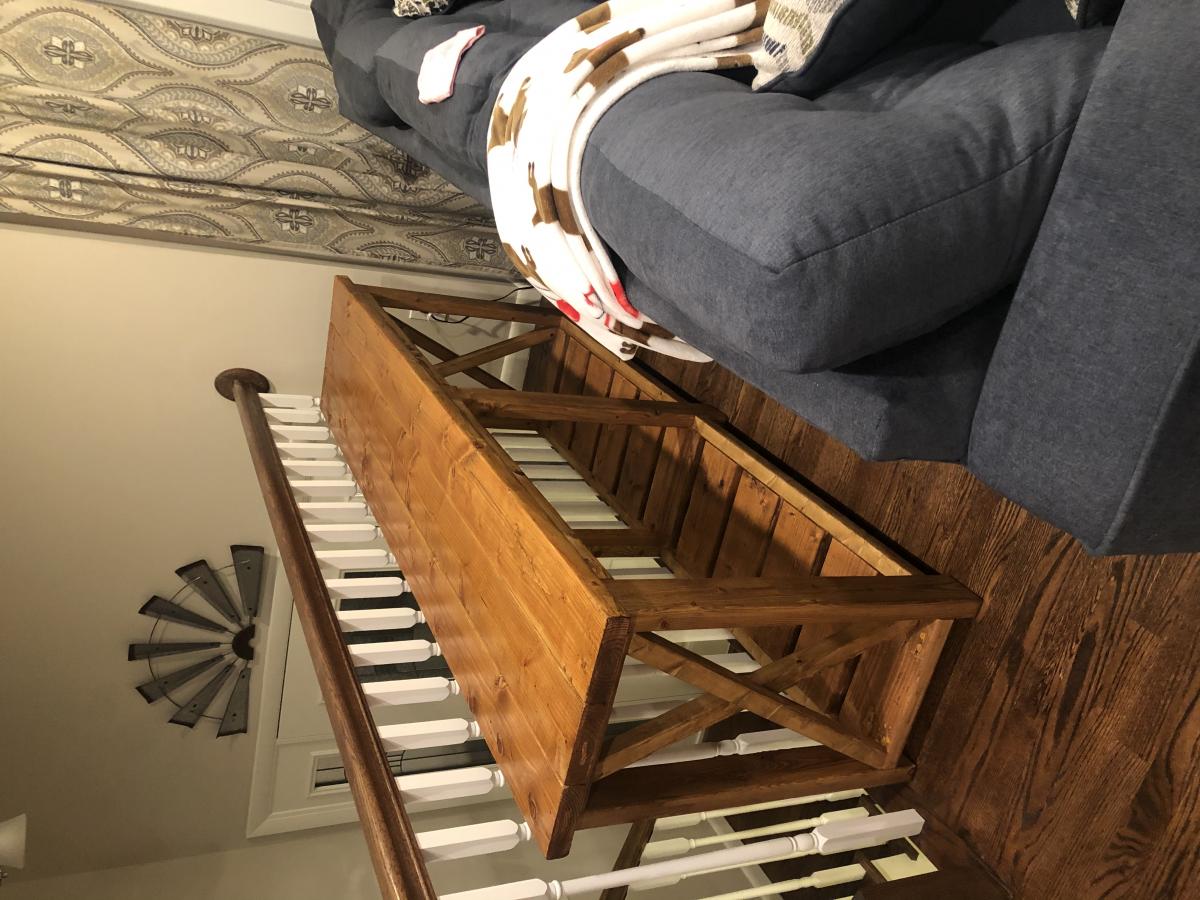
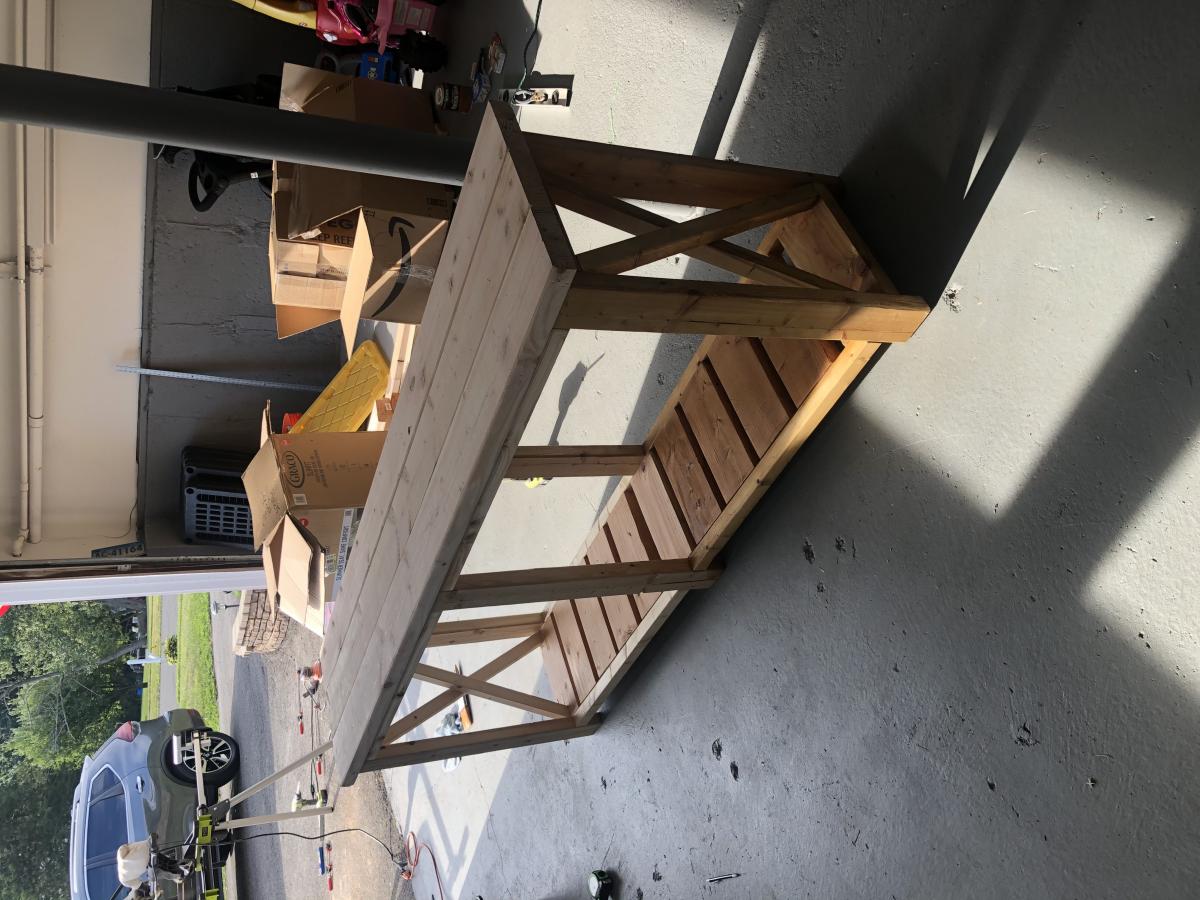
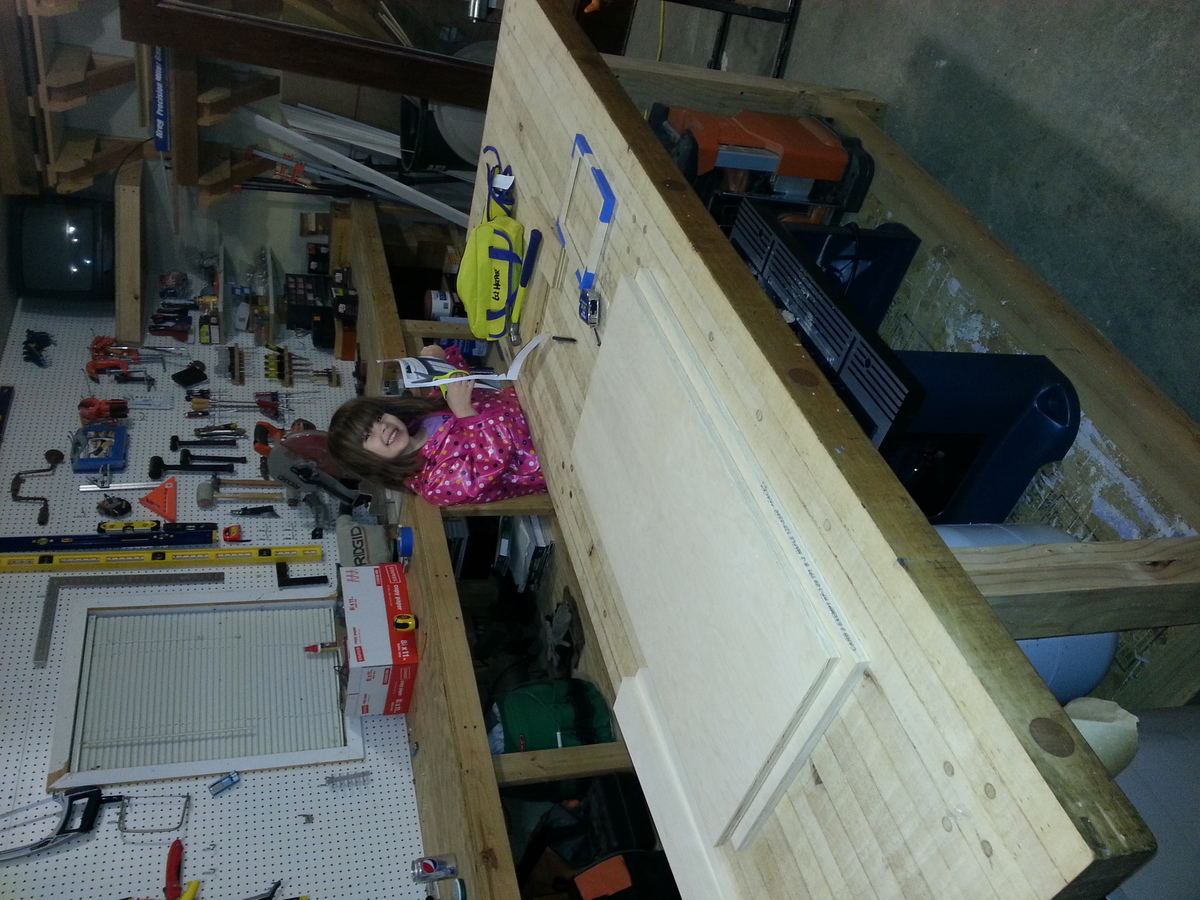
I used Ana’s plans for the garage shelves, but modified them to include a work bench. A lot of you tubers have done this, built a combination work bench and shelving, but I built nearly everything according to Ana’s plans. 12 feet long, 24 inches deep. I got some LED lights (two 1600 lumen strip lights) from menards that really brighten up my entire garage and make the work bench more useful. The one thing I really wanted was to not have a supporting pillar on the work bench to keep it open, and I loved how it turned out. I went for 3/4 plywood, mostly to have a stronger work surface, and I’m glad I did. I have since added a supporting 2x6 off of the study to support the top shelf above the bench and its strong enough to do pull-ups off of, and I have reinforced the support leg under the bench with a cross bar. Thanks for the great plans!!

Estimated Cost
~$200 (lumber prices have gone up recently due to supply issues with covid)
Estimated Time Investment
Weekend Project (10-20 Hours)
Recommended Skill Level
Starter Project

Comments

Extra tall bar stool

Submitted by Jbonacci3 on Sat, 01/26/2013 - 12:18

I built a breakfast bar into an existing wall shared between our kitchen and living room. I built it on the taller side of average since I wanted to have room to install new electrical outlets above the counter on the kitchen side. After the project was done we went to buy bar stools to use with the new bar and found that even the "tall" stools were too short to work. Research into extra tall stools showed that what we needed was going to $400-600 each! Luckily my wife found these stools on your site and we were able to make three of them for around $115. Also, they are much sturdier than anything we looked at to buy.

Built from Plan(s)
Estimated Cost
$115
Estimated Time Investment
Day Project (6-9 Hours)
Finish Used
Painted frames with Valspar paint + primer (black). Padded and covered seats with a canvas material.
Recommended Skill Level
Beginner

Comments

Breibee23

Mon, 11/11/2013 - 23:53

This is a saving grace... We didn't want to spend 600-1400 on extra tall bar stools that actually look good and this plan rocks as a stand in :)

Twin over full bunk bed with stairs

Submitted by Anonymous (not verified) on Sun, 01/03/2021 - 10:00

Liked the plan took way longer to sand and get everything cleaned up than it took to build.

1x3 slats for under the bed.

Made it extra high just full 8’ boards for the posts and added extra railing and dropped a 12” twin in.

It’s super sturdy, used scraps to add a headboard where the stairs are.

Turned out well

Comments

Farmhouse Console Table

Submitted by jburke3424 on Sat, 01/30/2021 - 17:43

Wife wanted it done without the middle shelf. Easy project! Love the plans.

Built from Plan(s)
Estimated Cost
$100
Estimated Time Investment
Afternoon Project (3-6 Hours)
Finish Used
Modern Oak Stain with Indoor Poly.
Recommended Skill Level
Beginner

Comments

Brook Laundry Basket Dresser

Submitted by krochelle on Thu, 01/01/2015 - 15:42

Used square laundry baskets instead of regular rectangular baskets. The square ones aren't as deep but are a bit taller so I had to modify the plans. I added a backsplash and some wooden tags to the baskets to designate them for certain colors. I also added some decorative trim and finished the bottom in a gray stain and used white chalk paint for the top.

Estimated Cost
$70
Estimated Time Investment
Day Project (6-9 Hours)
Finish Used
Weathered gray stain
White chalk paint
Recommended Skill Level
Beginner

Outdoor Entertaining Space

Submitted by ikeymedesu on Sun, 05/30/2021 - 06:09

A 2-month long project to create an entertaining space in our small backyard. I started with a dining set for 6, then went on to seating around our firepit. I actually doubled the size of the Modern Outdoor Loveseat and built a 4-seat couch (added a center section for support. I also built 2 loveseats, 2 small side tables, and took some creative liberties to design a coffee table/foot rest combo. The major modification I made to the couch and loveseats was adding a back for some additional height. This really improved the comfort when leaning back. Had a great time completing this project! When lumber prices come down I'll continue the build. (2 pictures keep uploading and converting to an upside down image - no idea why, but sorry for the weird view)

Estimated Time Investment
Week Long Project (20 Hours or More)
Finish Used
Behr Premium Transparent Natural Cedartone Weatherproof
Recommended Skill Level
Intermediate

Comments

Ana White Admin

Sun, 05/30/2021 - 09:58

Love the coffee table foot rest, would love to see more of the outdoor table as well! It all looks amazing and came together perfectly! Thank you for sharing, check out our Facebook page, just shared!

Seasonal And Holiday

2x4 Outdoor Chairs and Side Table

I built the 2 chairs and side table using Ana's plans. Wood in the UK is perhaps not as cheap and ubiquitous, so I managed to get hold of some rough siberian larch to build them. After what seemed like a lot of sanding I started cutting. I've used stainless steel screws and have used a plug cutter on a mahogany board I had to plug the screw holes. I really liked the contrast and neatness that this has given the project. I also used some rubber feet to raise it off the ground and try and reduce any water damage. The side table is reduced in size from the 2 foot version in the plans, this was easy enough once I'd worked out the impact on all of the other measurements. My wife has commented that I should have used less wood in my next project as they are very heavy, they certainly aren't going anywhere! My wife did produce the lovely grey cushions that you see in the pictures.

Estimated Cost
120
Estimated Time Investment
Weekend Project (10-20 Hours)
Finish Used
Used a wood preserver followed by a coat of stain to obtain the light finish seen
Recommended Skill Level
Intermediate

Comments

Toybox

Submitted by brianl on Mon, 04/29/2013 - 22:17

I loved this plan. Could not find anything else close. There is details on pocket screws from another user. I loved this. I did use plywood but edge the front and rear with a 1x2 (planed thickness to be flush with plywood). I also pocket screwed the 1x2 to the plywood. I loved this and it is way cleaner than exposed corner moulding.

Built from Plan(s)
Estimated Time Investment
Week Long Project (20 Hours or More)
Finish Used
General Finishes - Pre-condition, stained and 4 coats of poly!
Recommended Skill Level
Beginner

Comments

pam312

Wed, 05/22/2013 - 06:45

do you remember what color and brand of stain you used and what type of paint for the lettering?
thanks,pam

Drawer bases turned banquette

I took Ana's open base and drawer plans, added a few inches to the height (so that the base trim on the storage units would clear the base trim on our walls), and put them together to create a banquette-style bench with tons of storage underneath. We use the drawers for our family board games and photo albums.

Estimated Cost
$100-$150
Estimated Time Investment
Weekend Project (10-20 Hours)
Finish Used
Sherwin-Williams Pro-Classic in semi-gloss followed by Minwax Polycrylic.
Recommended Skill Level
Beginner

Funky Step Stool

I kept coming across photos of this step stool plan in the brag pages and felt very envious that I hadn't seen it before I built the other set of steps!  So I decided I likely had enough scrap wood lying around I could make one for our upstairs bathroom too!
I used two pieces of pine rough barn board for the sides and for the treads I used 1x4 scraps I had, two pieces that already had an edge routered in them from some trim I did for my sons World Map Mural. 
I used my Kreg Jig for everything except the treads which are nailed.

I'm thrilled with it!  It's nice and light and easy to move around and holds up my little guy with no trouble!

Estimated Cost
Free! I used leftovers!
Estimated Time Investment
An Hour or Two (0-2 Hours)
Finish Used
miniwax colonial maple rubbed on with a rag, no topcoat. (we'll see how it wears... didn't want a slippery finish.)
Recommended Skill Level
Beginner

Kid's Playhouse and Slide

Submitted by docfin02 on Mon, 03/28/2011 - 18:56

I LOVE these plans. This was my first project, and although it was a big one to start with, the plans were easy to follow. If I can do it, anyone can. I added the rock wall. My kids and I love it. Total cost for me (including all lumber, nails, paint, slide, etc.) is about $850.

Estimated Cost
$850
Estimated Time Investment
Week Long Project (20 Hours or More)
Finish Used
1 coat primer, 2 coats paint
Recommended Skill Level
Intermediate
Seasonal And Holiday

2x4 Rustic Outdoor Bench

Submitted by Anonymous (not verified) on Thu, 11/09/2017 - 09:46

Submitted by Carla Santiago on Facebook - 


We did a bench, I got your plans off Pinterest. We just put a slight slant to the back and we love it. Thanks for the great plans.

Built from Plan(s)
Recommended Skill Level
Beginner

Foldable Farmhouse Table 2

I recently published my first foldable farmhouse table last week here: http://ana-white.com/2013/06/foldable-farmhouse-table The first one I made was very heavy because I used 2x6 tops and 4x4 legs. I decided to make another one that would be lighter and easier to transport. The plans are basically the same just instead I used 1x6 for the top and put 2x4s together for the legs. I also shorted the length by about a foot. The only issue with making the table shorter length is that the legs don't fold completely flush. You could easily make the legs short enough to fold flush, but then the table was a little too short from the ground up for us. The same as before I simply used kreg joints to join the top boards together. I then made a 2x4 frame and attached it to the bottom. I made each of the legs separately by joining 2x4s together and sanding everything down. Everything was stained before putting the legs on using Miniwax Dark walnut stain. I used 2 coats of Miniwax water based clear coat to seal it. A notch was cut out on each of the bottom 2x4 supports on the legs and I glued in a small piece of wood cut to size. These are so I can put in a 2x4 support board under the table so that the legs do not fold in on themselves when it is standing up. The legs are just attached using door hinges you can buy in packs in the hardware section. Be careful when screwing into the 1x6 top not to use too long of screws or else you will over screw and have them come through into your table top. Table design was by Amber Veatch Designs and photographed by Andi Mans Photography

Estimated Cost
120.00
Estimated Time Investment
Day Project (6-9 Hours)
Finish Used
Sand to finish and then used Miniax dark walnut stain followed by Miniwax water based clear coat.
Recommended Skill Level
Beginner

Comments

Freddyflis

Tue, 07/07/2015 - 06:41

We have built something very similar and we have a good bit of wobble at the top, even though the stretcher down the center of the table is holding solid in there and secred with clasps. Were thinking of some sort of sliding pin into the top of the leg to the apron. Anyone run into this before?

Seasonal And Holiday

Christmas Tree Shelf

After watching Ana's video I decided to try to build the Christmas tree shelf this year in time for the season. It worked out alright. The build is straight forward. Doesn't take long and it's a fun seasonal project. Now I just have to figure out what to put on it.

Built from Plan(s)

Comments

OUTDOOR SOFA

Decided to build Ana's outdoor sofa for our Master Balcony and love the results. I was a bit impatient to finish the build and therefore did not take the time to use pocket screws for a more finished result, (which I will do next time). Regardless, I love how the sofa turned out and would reccomend for anybody to build. The cheapest outdoor cushions I could find were from Ikea and we spent around $160.

Built from Plan(s)
Estimated Cost
$100 BUILD, $160 CUSHIONS
Estimated Time Investment
Afternoon Project (3-6 Hours)
Finish Used
OUTDOOR STAIN
Recommended Skill Level
Beginner

Clubhouse based on Ana's Plan

Submitted by MattSl on Tue, 05/03/2011 - 09:18

I used Ana's plan as a base.

I changed it from 8x8 to 8x12, made the 4x4x8's to 4x4x10' for a higher main platform and swing platform, and added a 12' long monkey bar set to the other side. Also, an 8' climbing wall and a plank walkway to accompany the two slides.

For the clubhouse, I used Hardiplank 4x8 sheets for the siding and an EZ-Framer kit for the structure itself.

The slides I purchased from Lowes, monkey bars from Amazon, and the swing frame braces from Amazon as well. The swing kits I got from ebay.

Estimated Cost
1500
Estimated Time Investment
Week Long Project (20 Hours or More)
Recommended Skill Level
Intermediate
Seasonal And Holiday

Our new pantry

We bought a vacation home that has such a small kitchen. I knew we needed more storage. So I checked out Ana's plans and made this bad boy based on the Simplest Armoire plans.

The home is in the mountain/lakes area of northern New Hampshire, so I wanted to bring the outside colors in. I used Valspar Cabin Red paint and the Valspar Antiquing glaze over the top after distressing it a bit.

Built from Plan(s)
Estimated Cost
$200 +
Estimated Time Investment
Weekend Project (10-20 Hours)
Finish Used
Valspar Cabin Red paint
Valspar Antiquing glaze
Recommended Skill Level
Beginner

Tall trellis from coat tree plans

Submitted by bar1812 on Thu, 06/25/2015 - 18:38

I could not find a big enough, awesome enough trellis in stores, so I built my own out of cull lumber [the stuff on super-clearance no one else wants] for about $12 and a left-over post pocket. Thanks for the inspiration!!

Estimated Time Investment
Afternoon Project (3-6 Hours)
Finish Used
ebony stain and spar varnish to hold up to the elements
Recommended Skill Level
Beginner

Comments

Pantry Bin Storage

Submitted by vendo on Tue, 01/18/2022 - 10:21

I used Shelf Help for the plywood pieces, then planked the sides with some 1x's, and added a face frame for the top edge. Casters allow for it to be moved easily and cleaned under. This is a great way to add extra storage under the pantry shelves and this design is super easy to modify for any size and height!

Comments

Planters- modified

Submitted by Anonymous (not verified) on Mon, 03/07/2022 - 06:14

Used your youtube instructions for the square planters and revised them to create these! Thank you so much for your video it helped me so much. I was trying to make a small backyard for my dog at my condo without breaking any rules not to have a fence. Gary loves it!

Comments