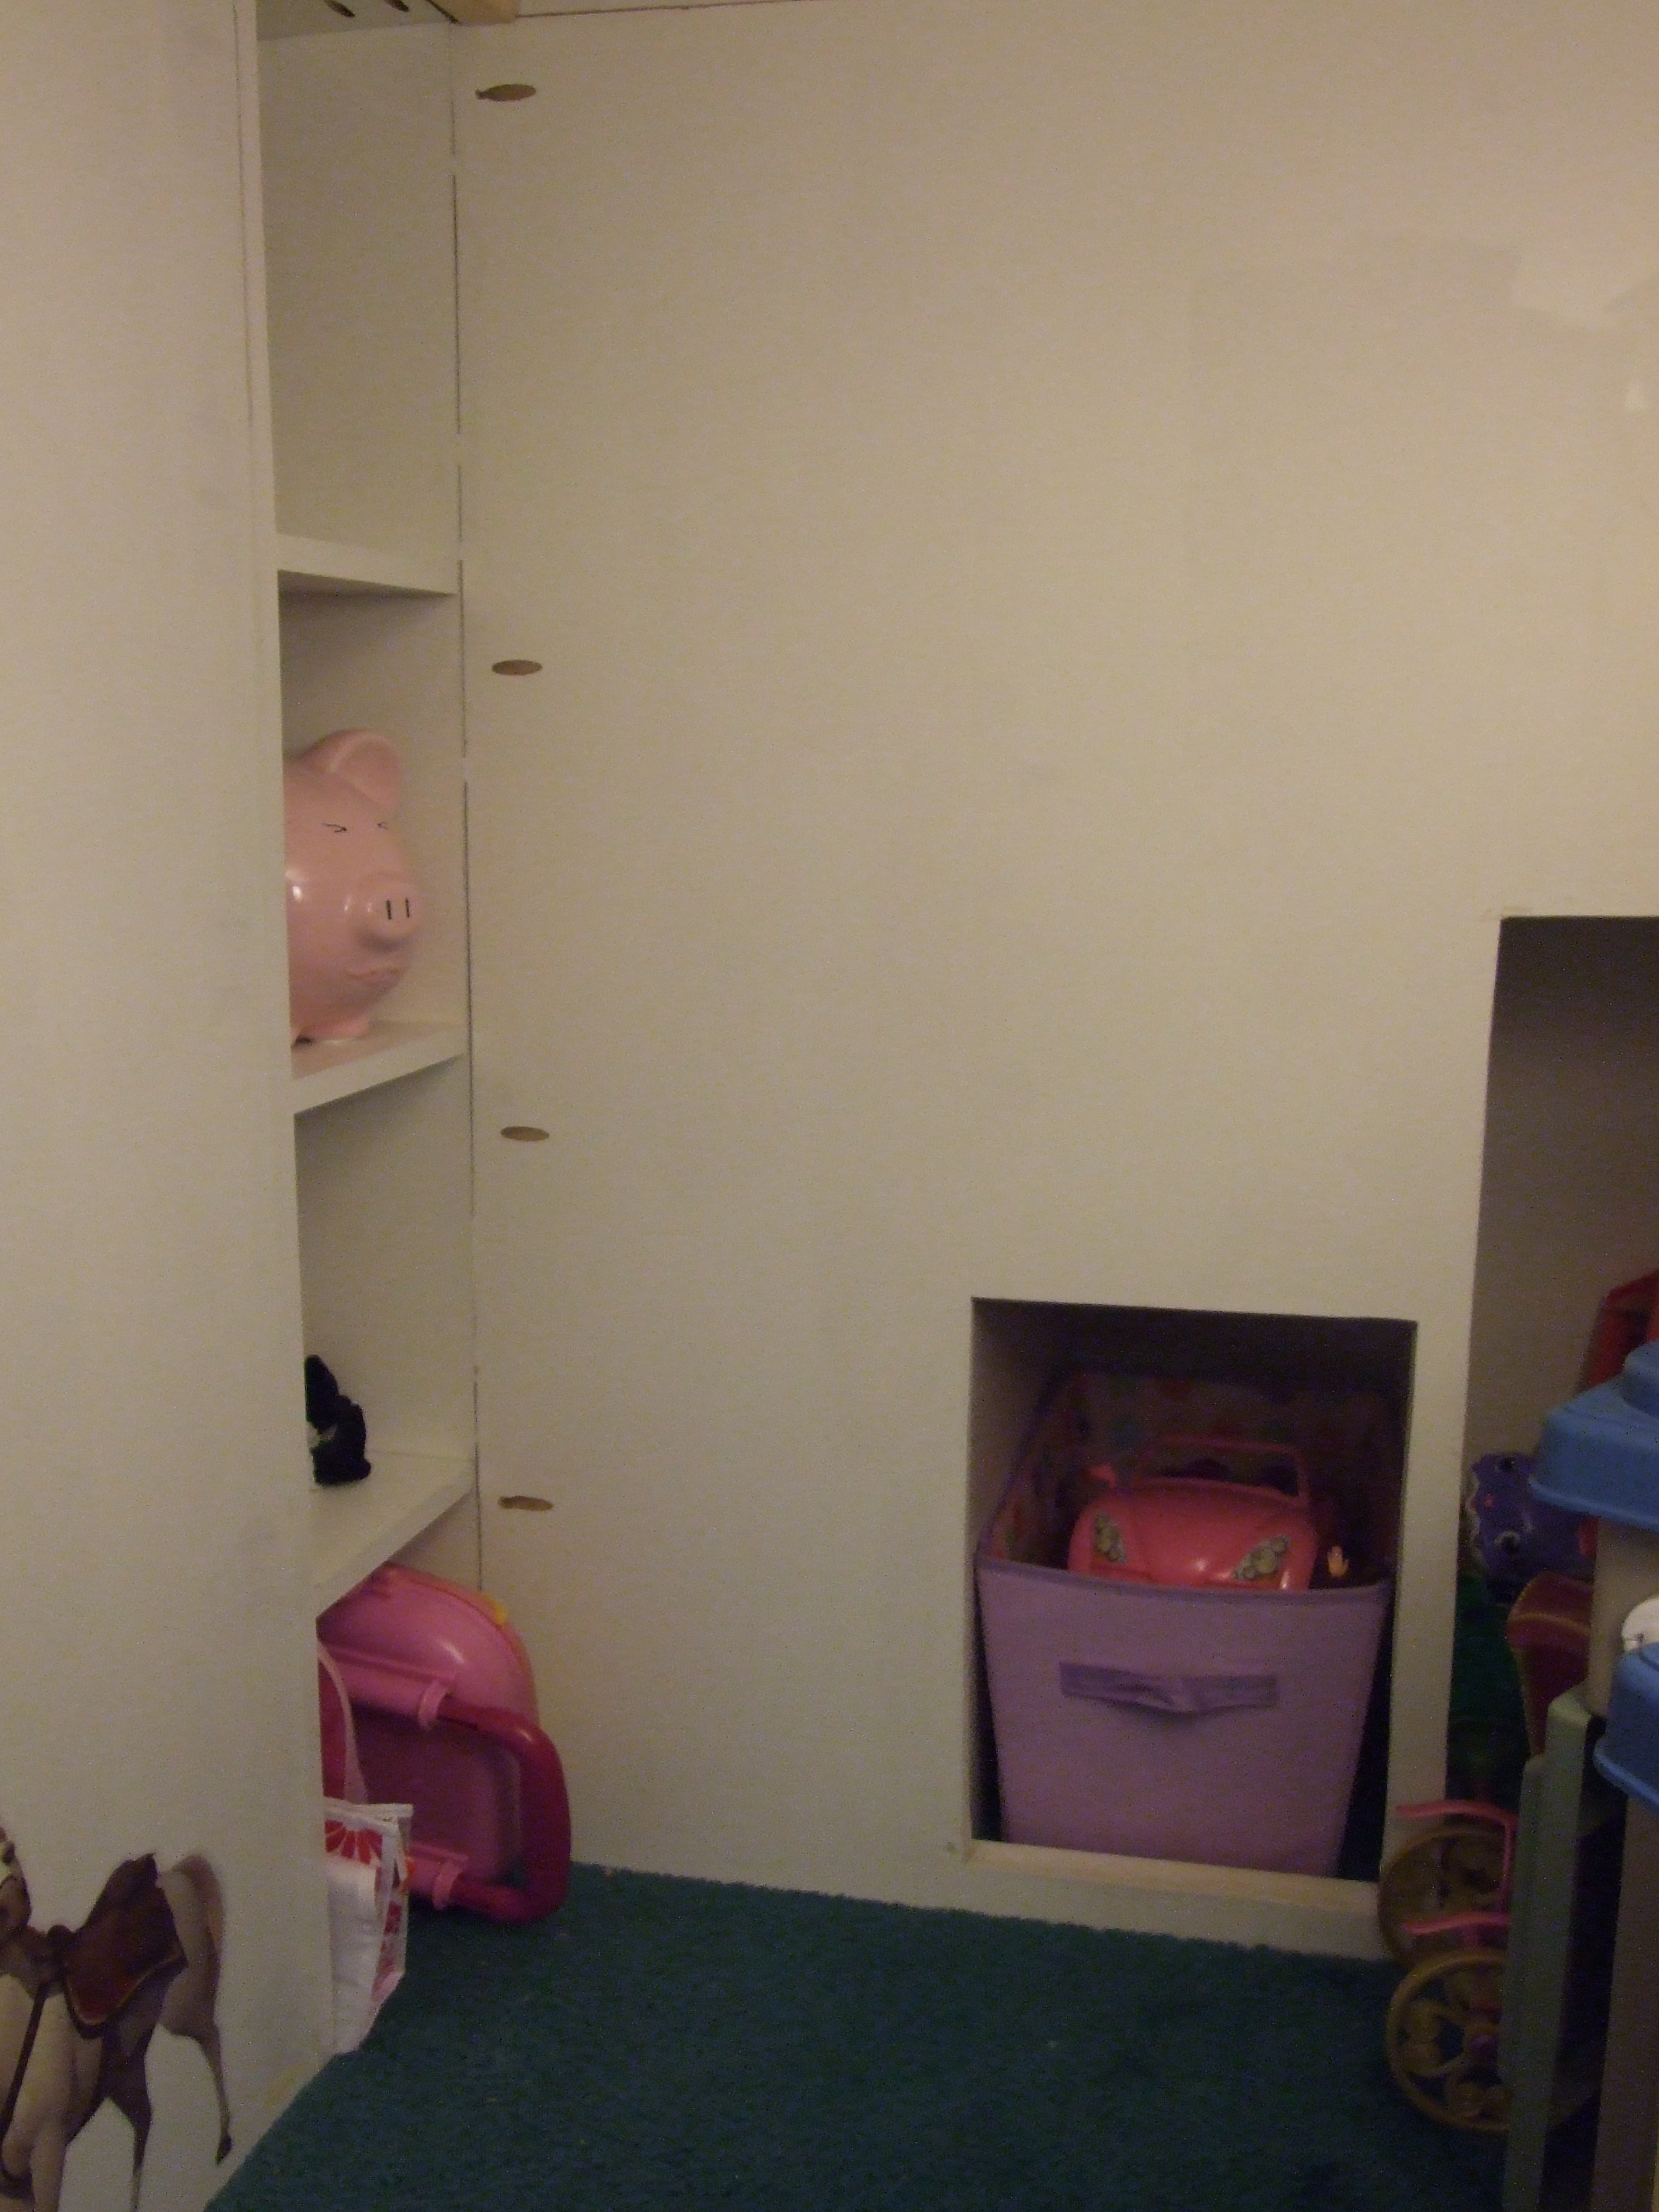
Small Outdoor Shed
Submitted on FB
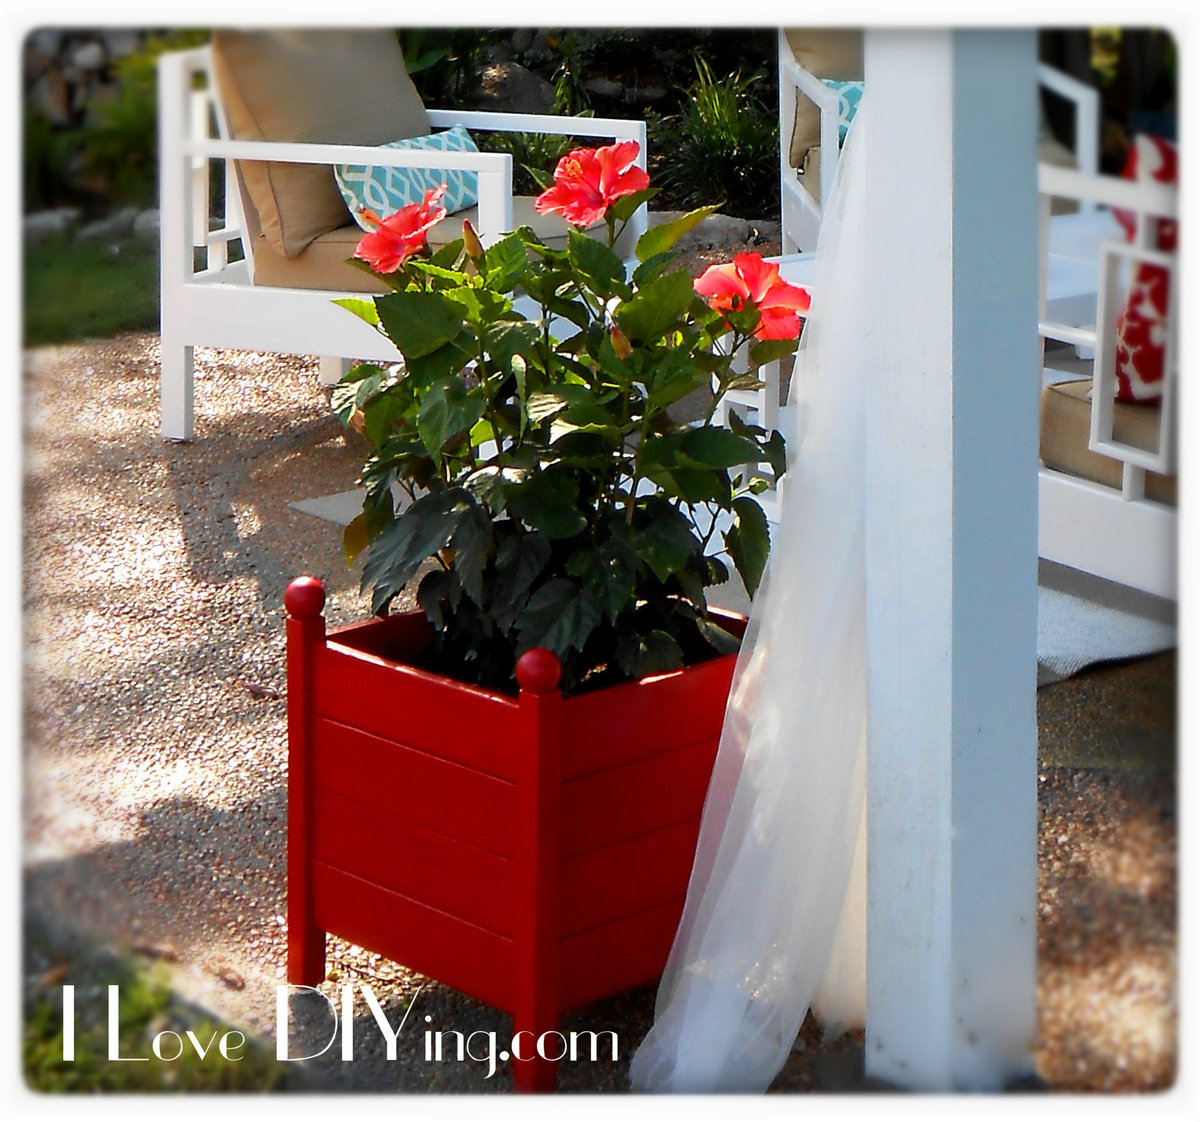
DIY small shed for trash and recycling.
Built from Plan(s)
Recommended Skill Level
Intermediate
Submitted on FB
DIY small shed for trash and recycling.
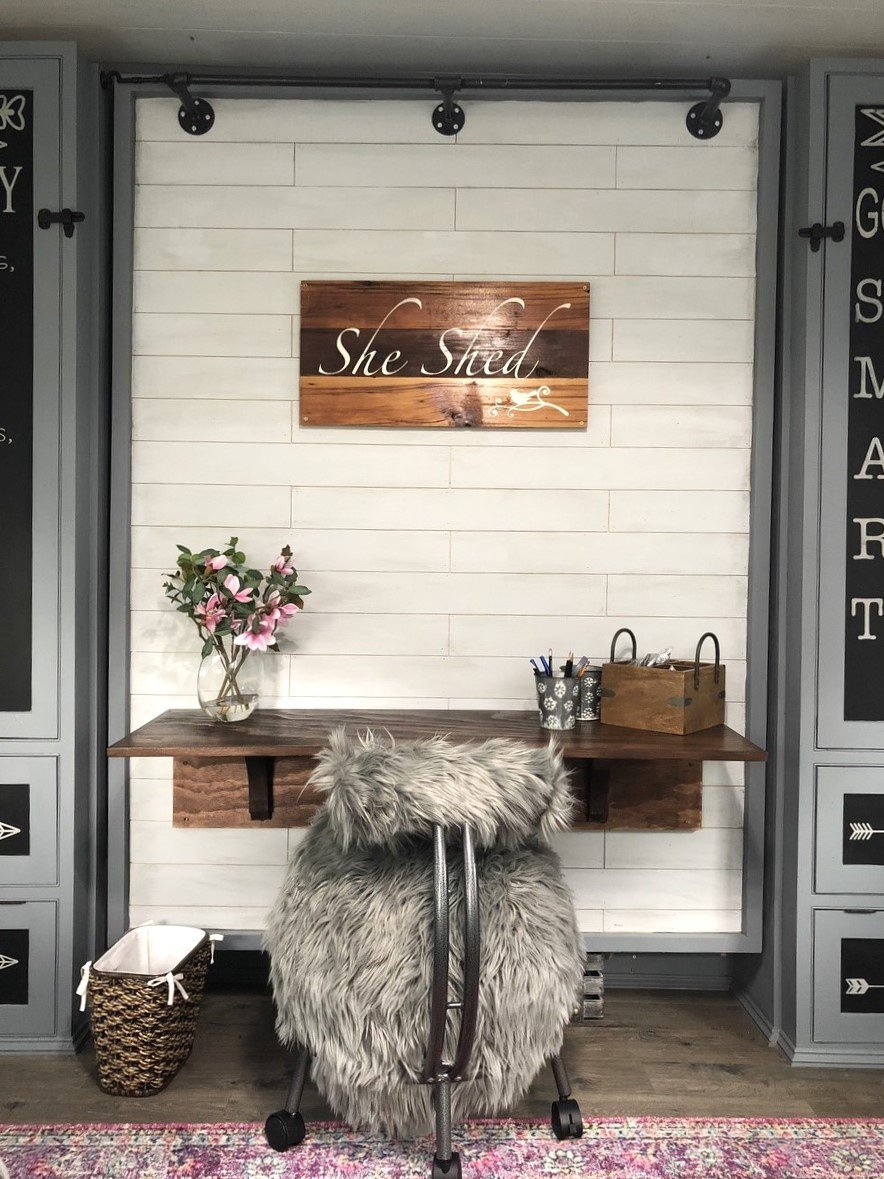
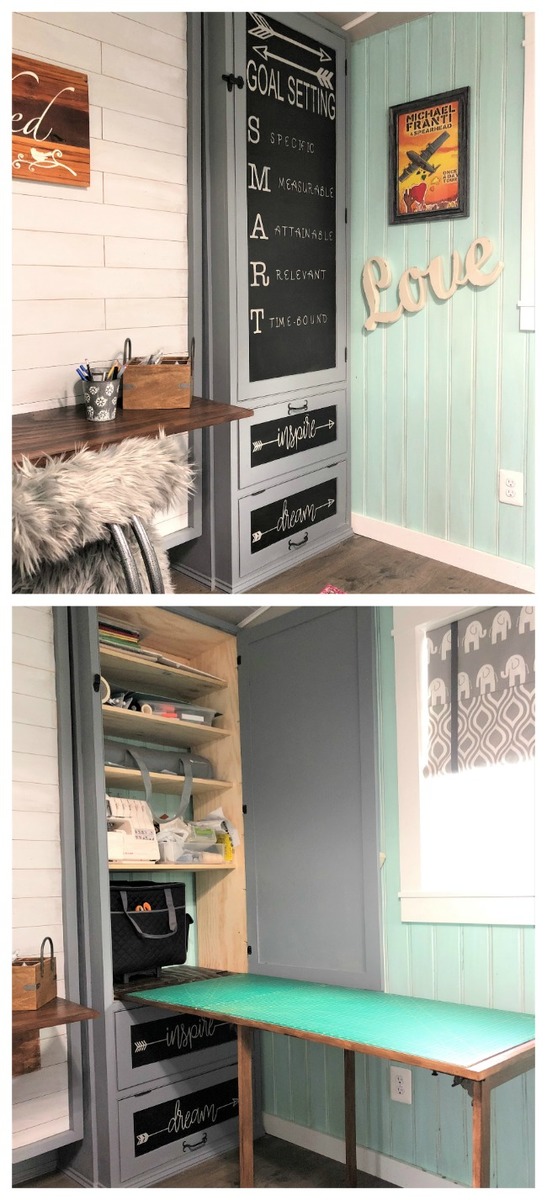
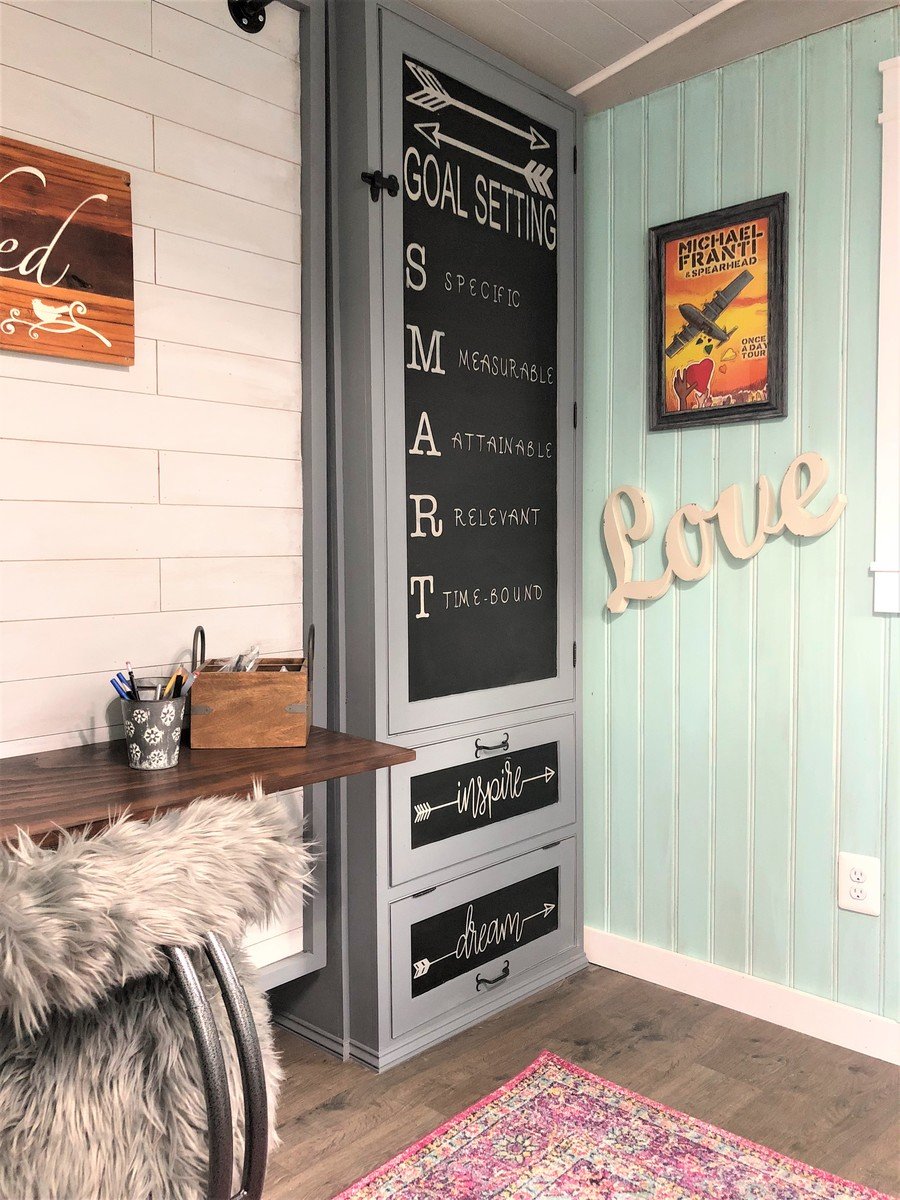
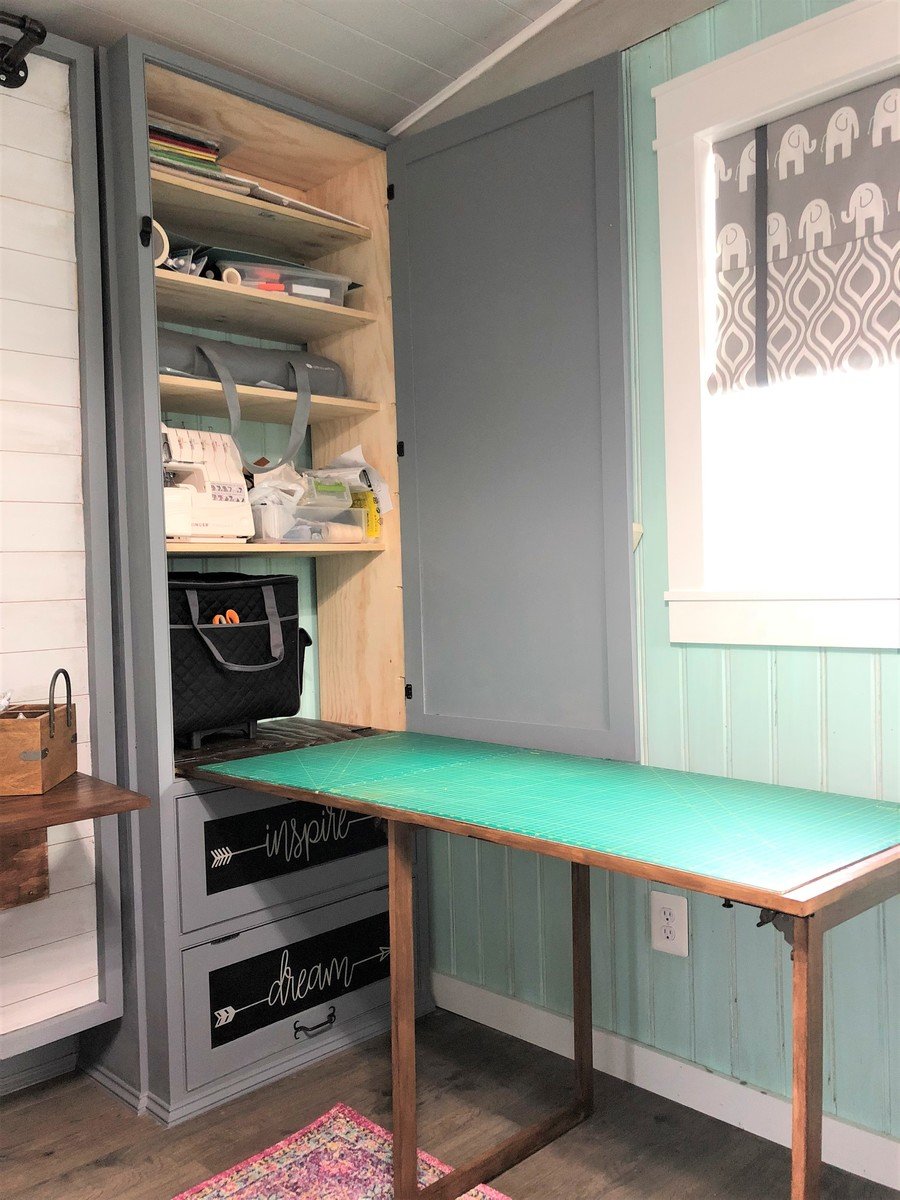
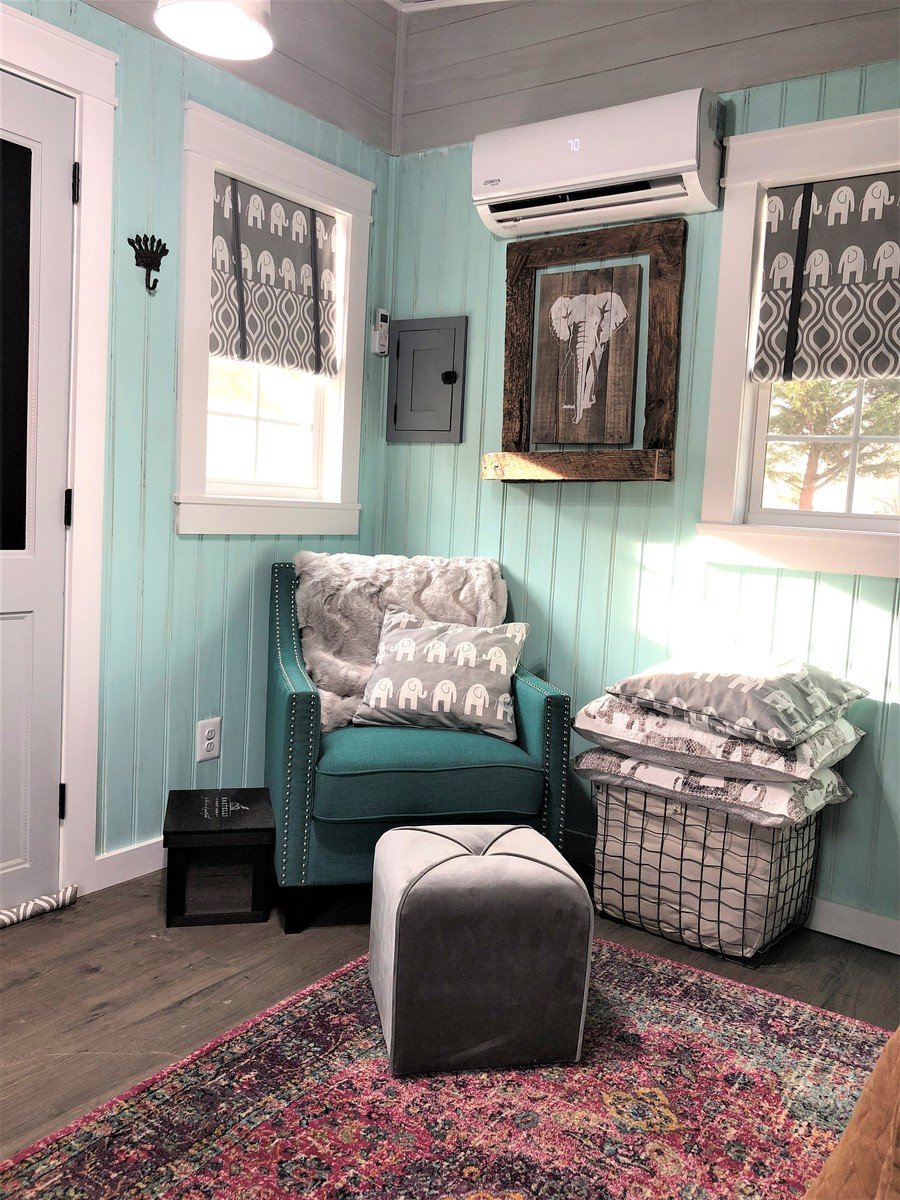
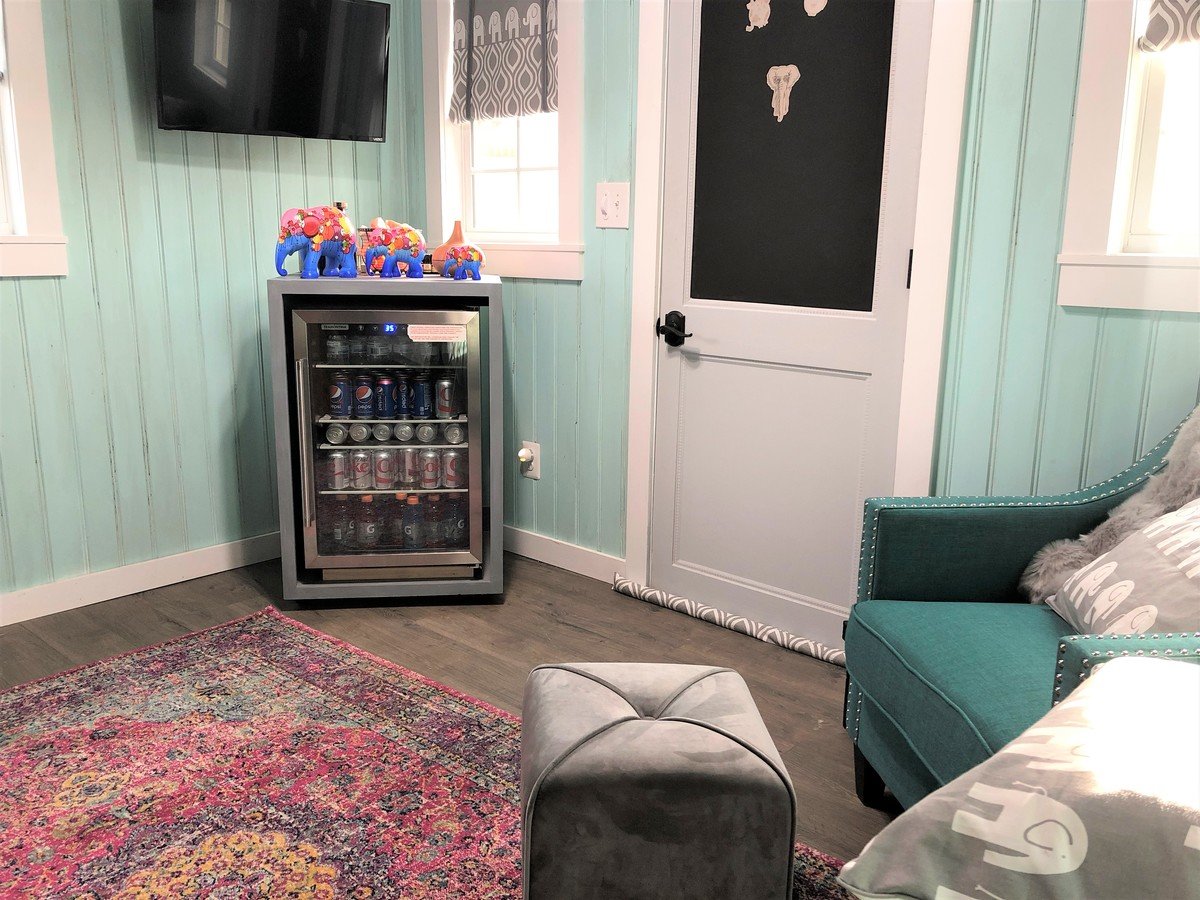
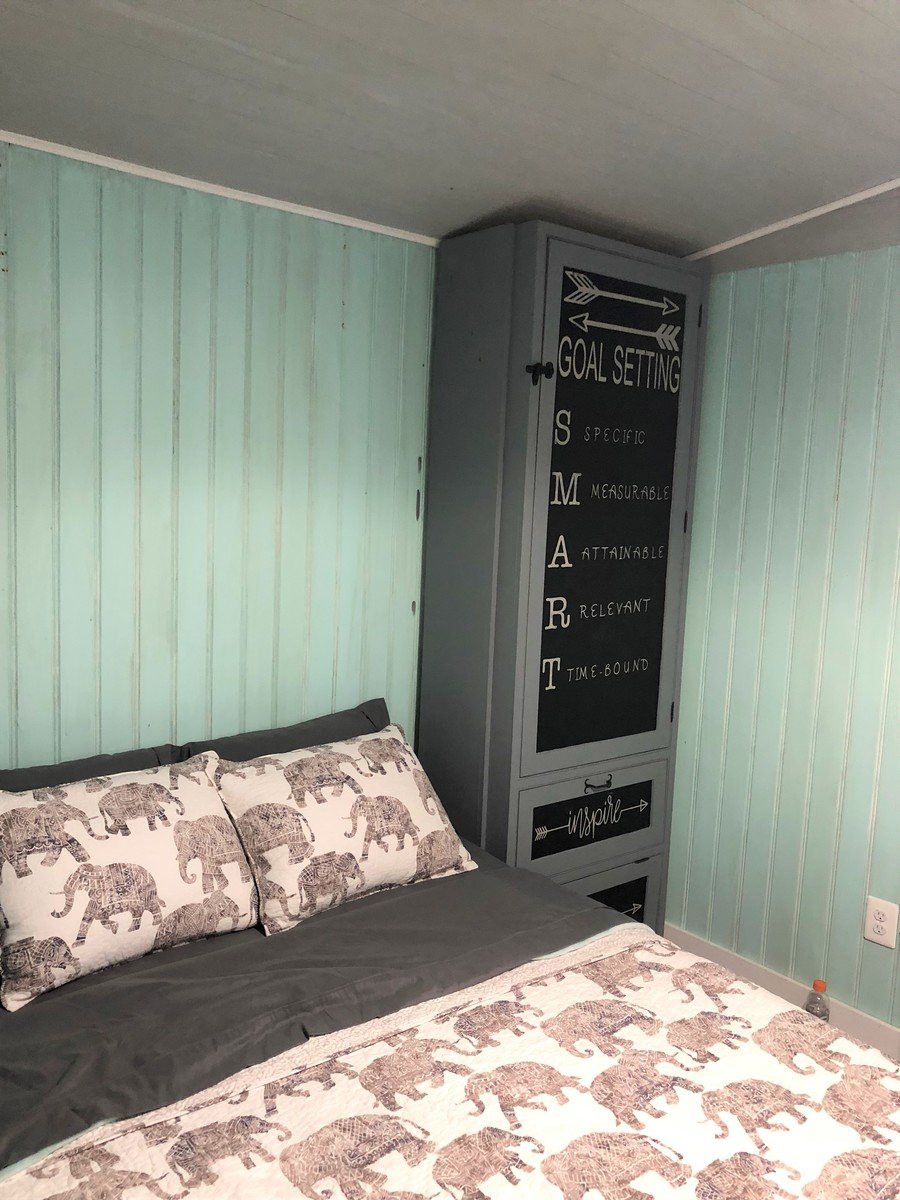
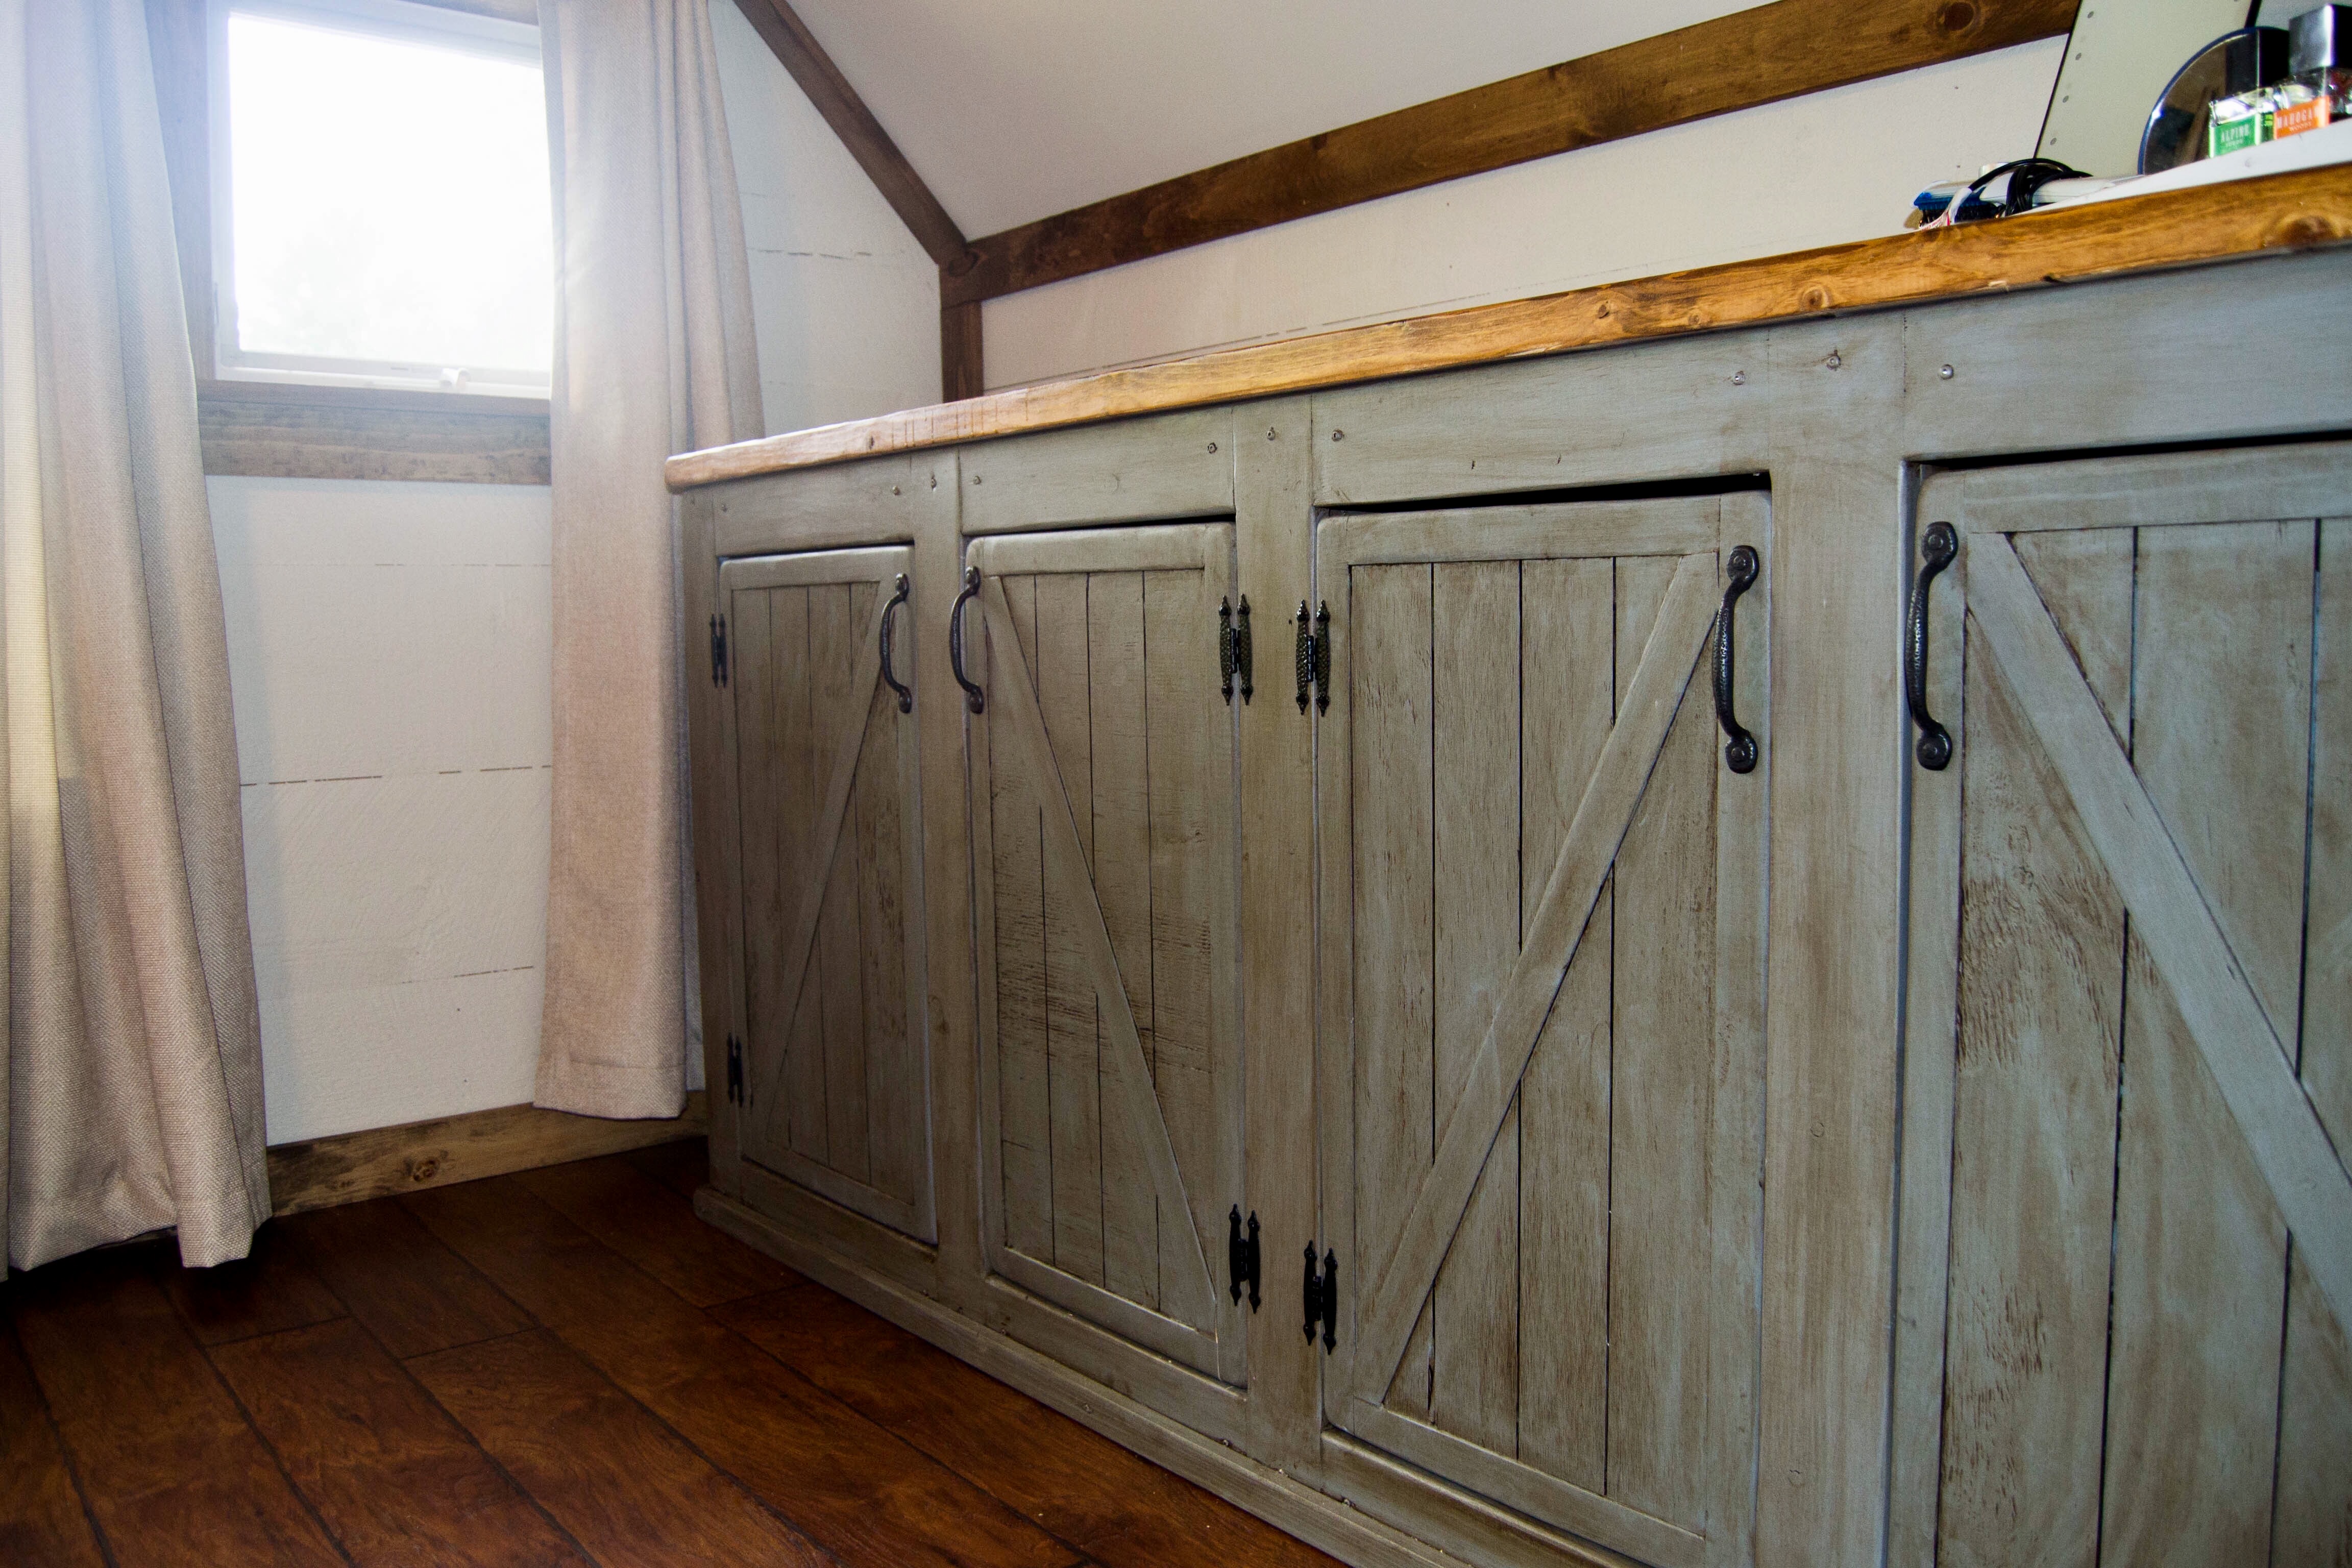
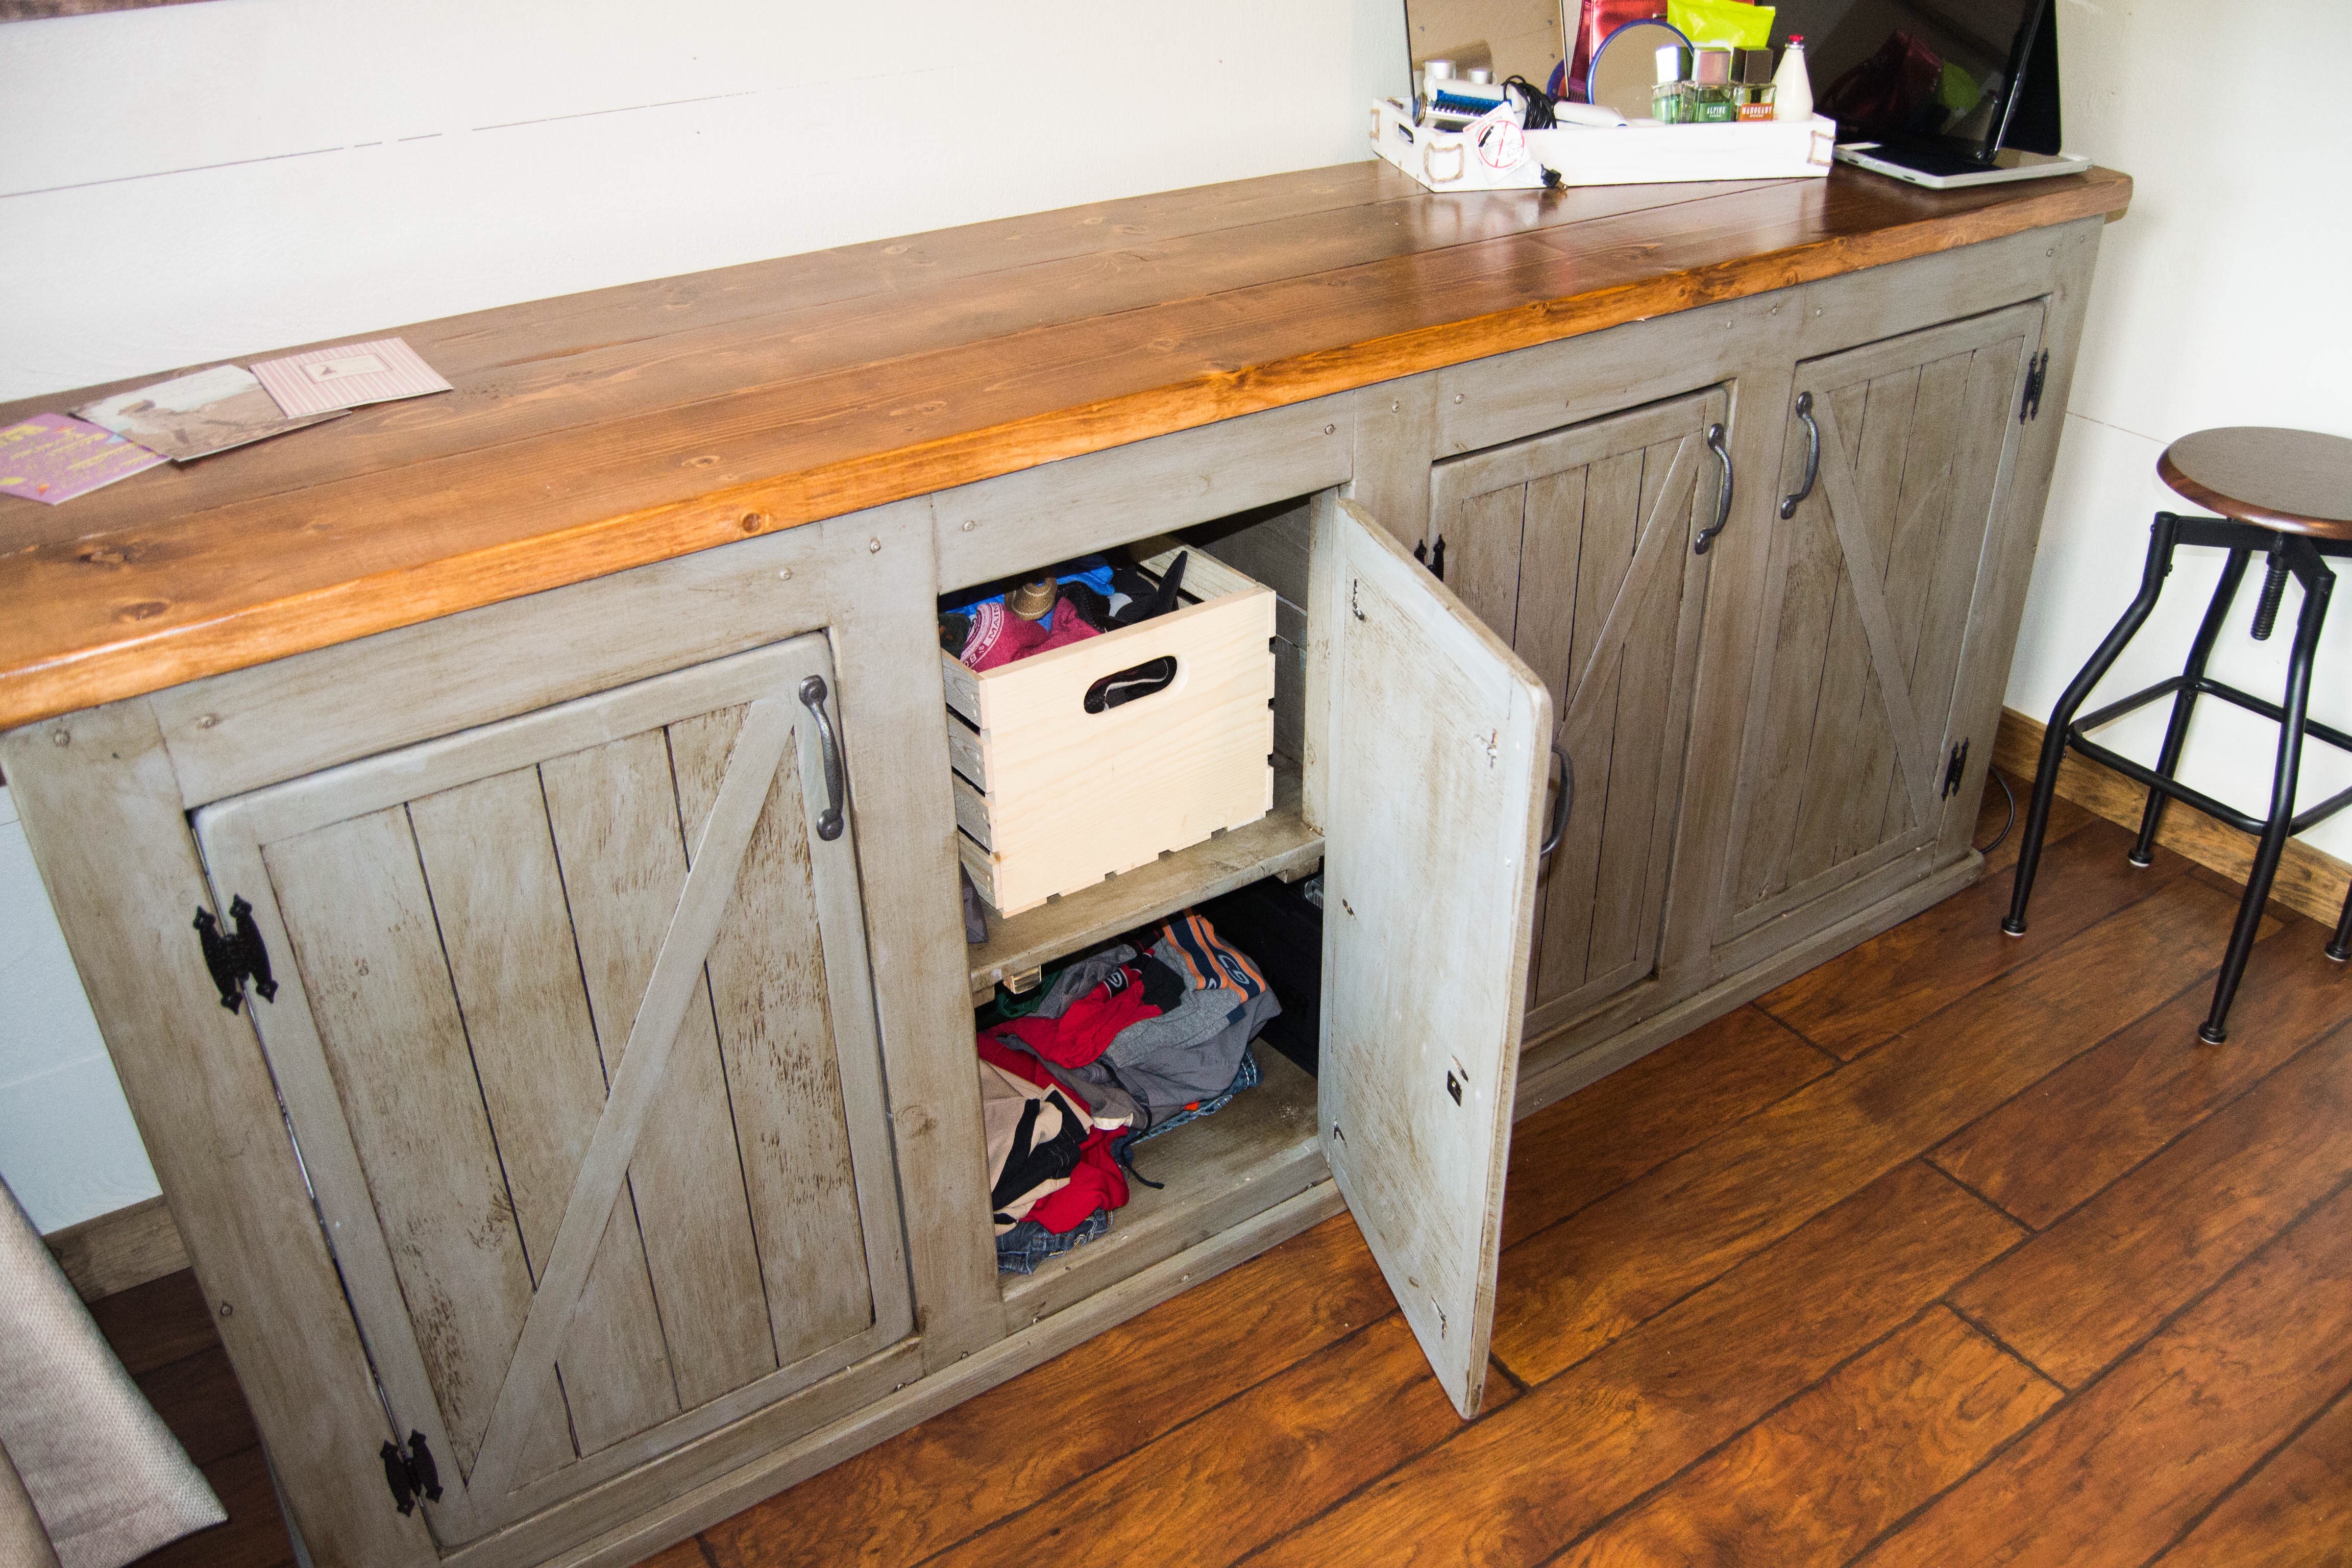
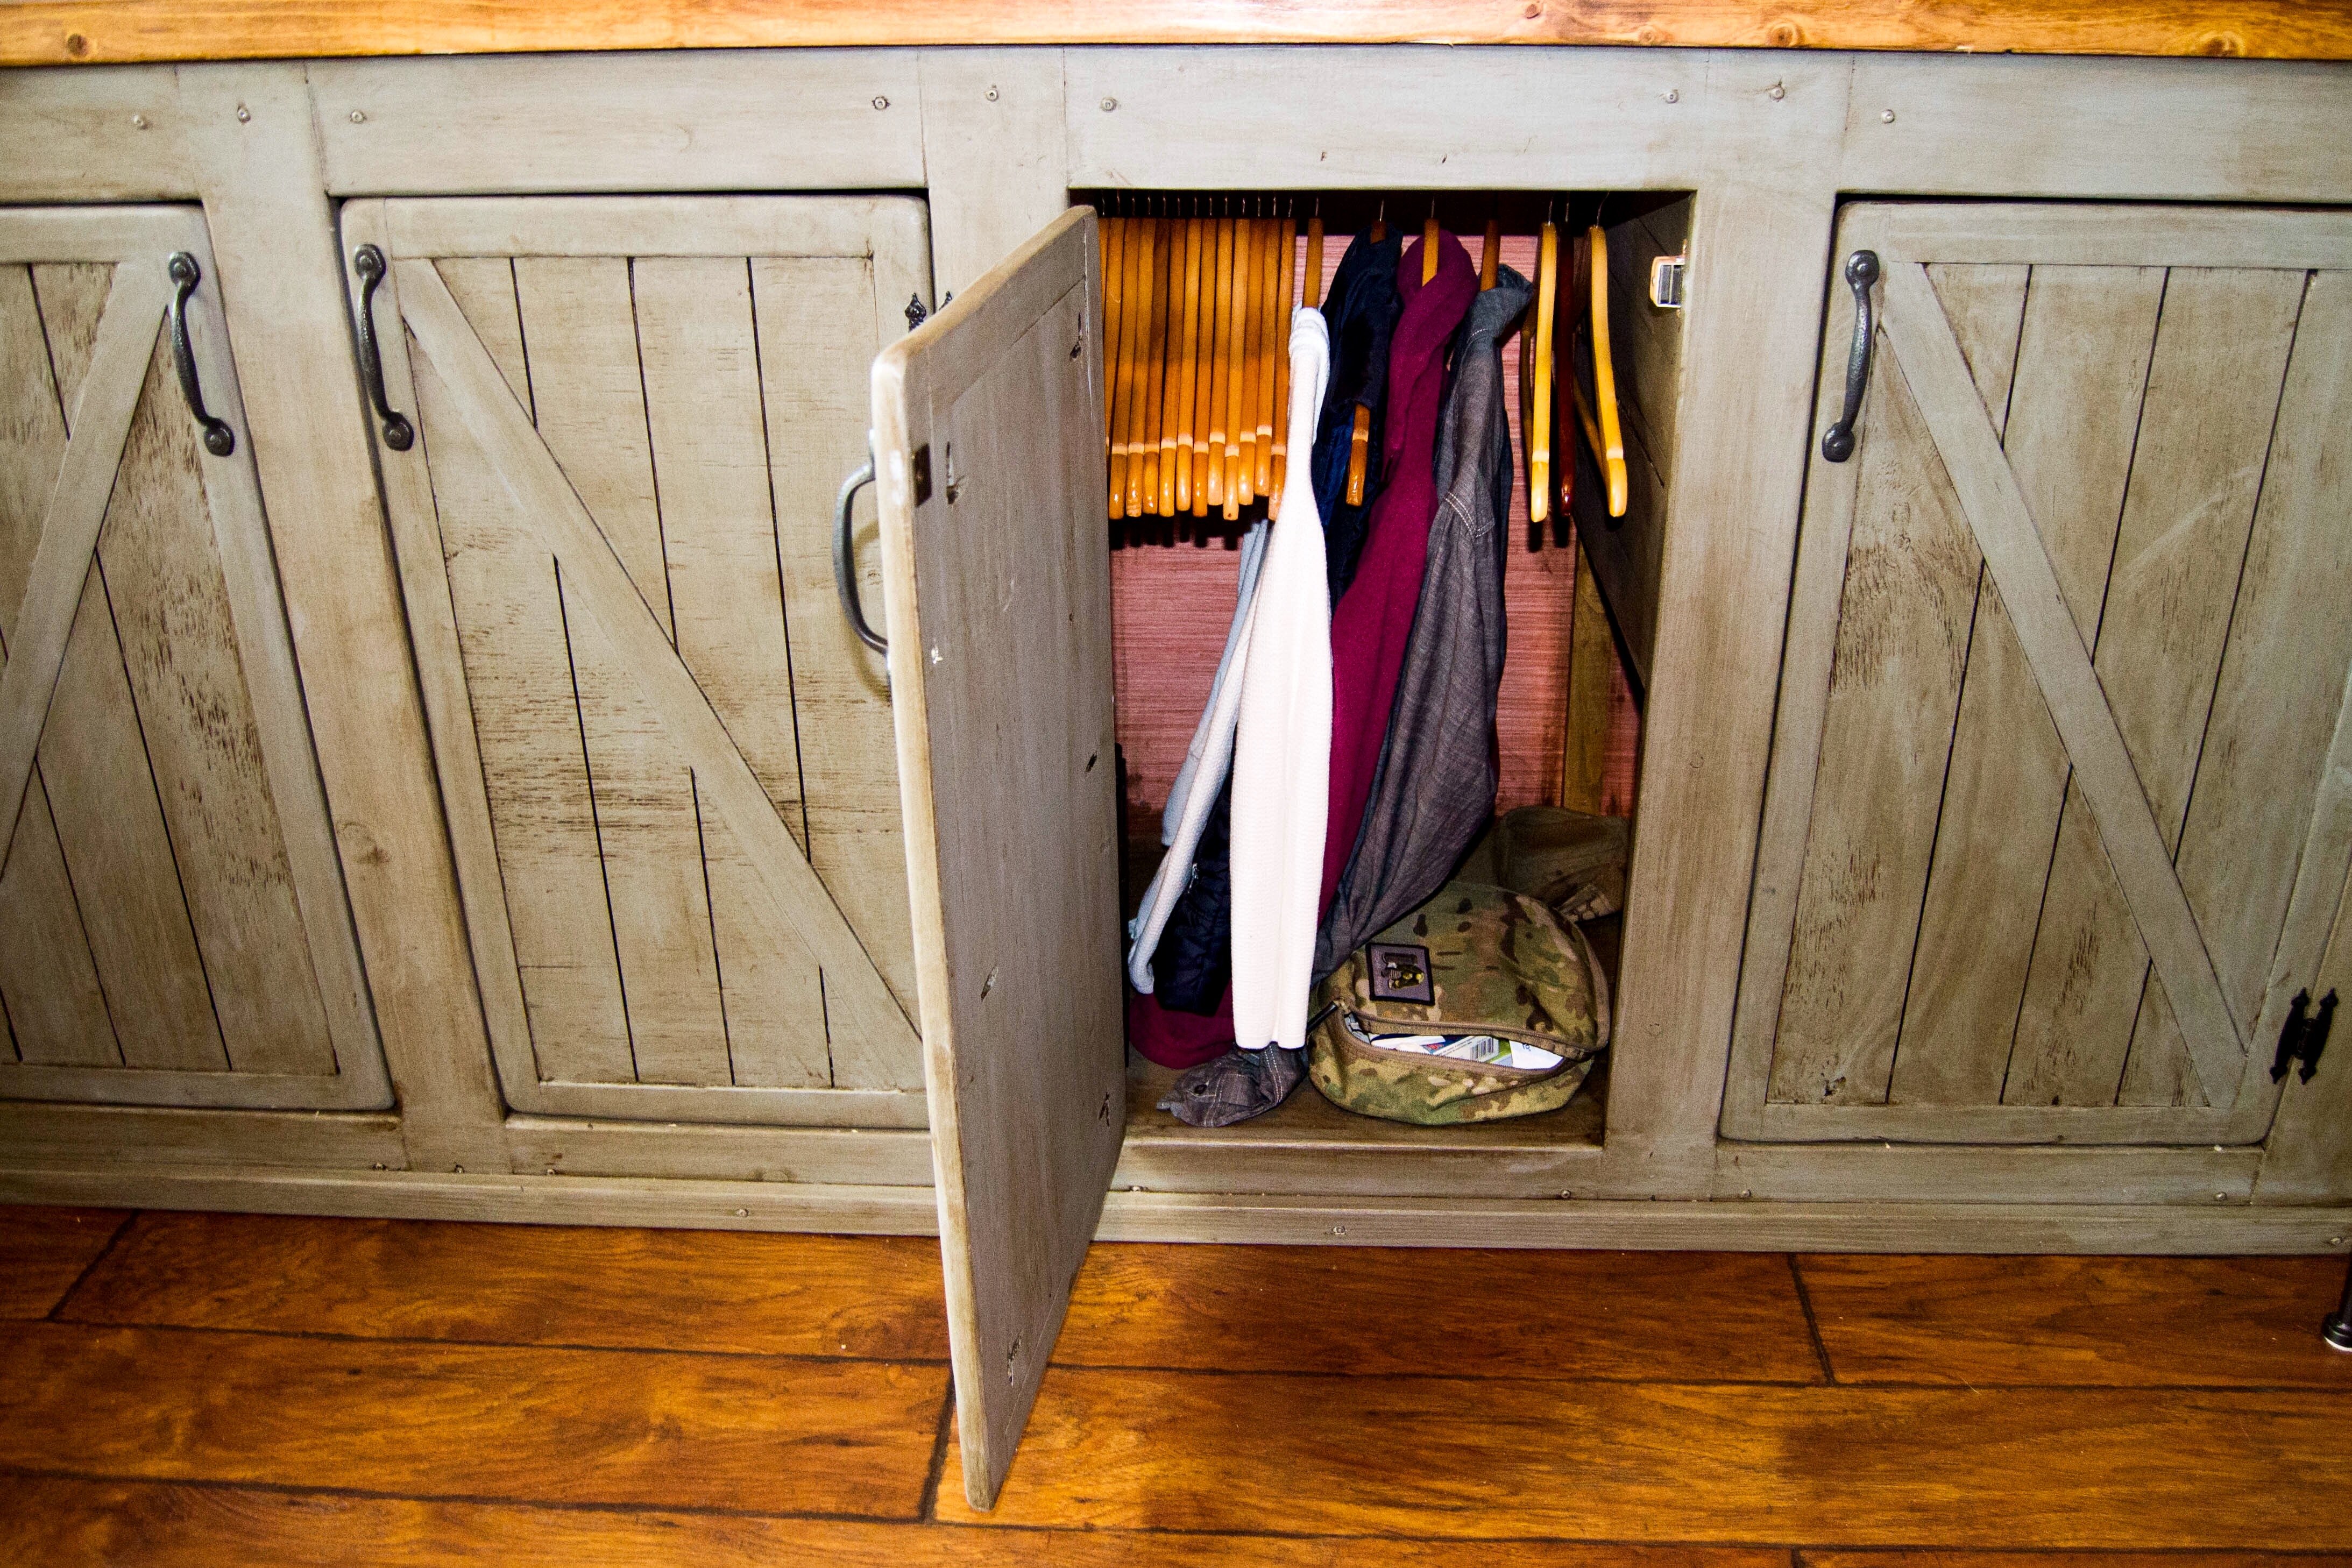
I needed an office and also a guest room so i built a she shed and all the furniture.
Thu, 01/25/2018 - 06:27
I love your murphy bed idea and would love to have plans for it. I too am looking for a guest bedroom and craft area and I know this would work in my space.
Mon, 02/05/2018 - 16:20
I didnt really have a plan when I was building my Murphy bed, I can do a sketchup plan for you if you would like. I used boat chair swivels instead of hinges and there is a YouTube video on how to do this.
Chris
Thu, 06/24/2021 - 23:11
Hi Chris! I would love to have a copy of the sketch up of this. I have a small she shed/guest cottage I would live to duplicate this in. Thanks in advance.
Mon, 11/08/2021 - 14:18
Hi Chris!
I know I'm coming late to this party but I just found your shed and I adore it. You did an amazing job and I cannot express how impressed I am! I would also like a sketchup plan of both the murphy bed and the adjoining side cabinets. Great job!
Thu, 06/06/2019 - 10:59
I absolutely love everything about this she shed!! I would be interested in a sketch up of the murphy bed as well as the cabinets next to it. I would at least like to know what the dimensions of it all is. You did an amazing job! It's so beautiful!
Tue, 06/25/2019 - 15:14
Me too!! I built a horizontal Murphy bed so I have that part done but I would like to see the plans for the cabinets on either side with the pull out desk!
so very cute!
Thu, 05/14/2020 - 05:53
I would love the plans for all of this please! This is exactly what I have been looking for! Thank you!
Sun, 09/20/2020 - 00:13
Hi Chris
Can you advise how I can receive a copy of the sketchup? I love the entire setup from the bed to the additional shelving.
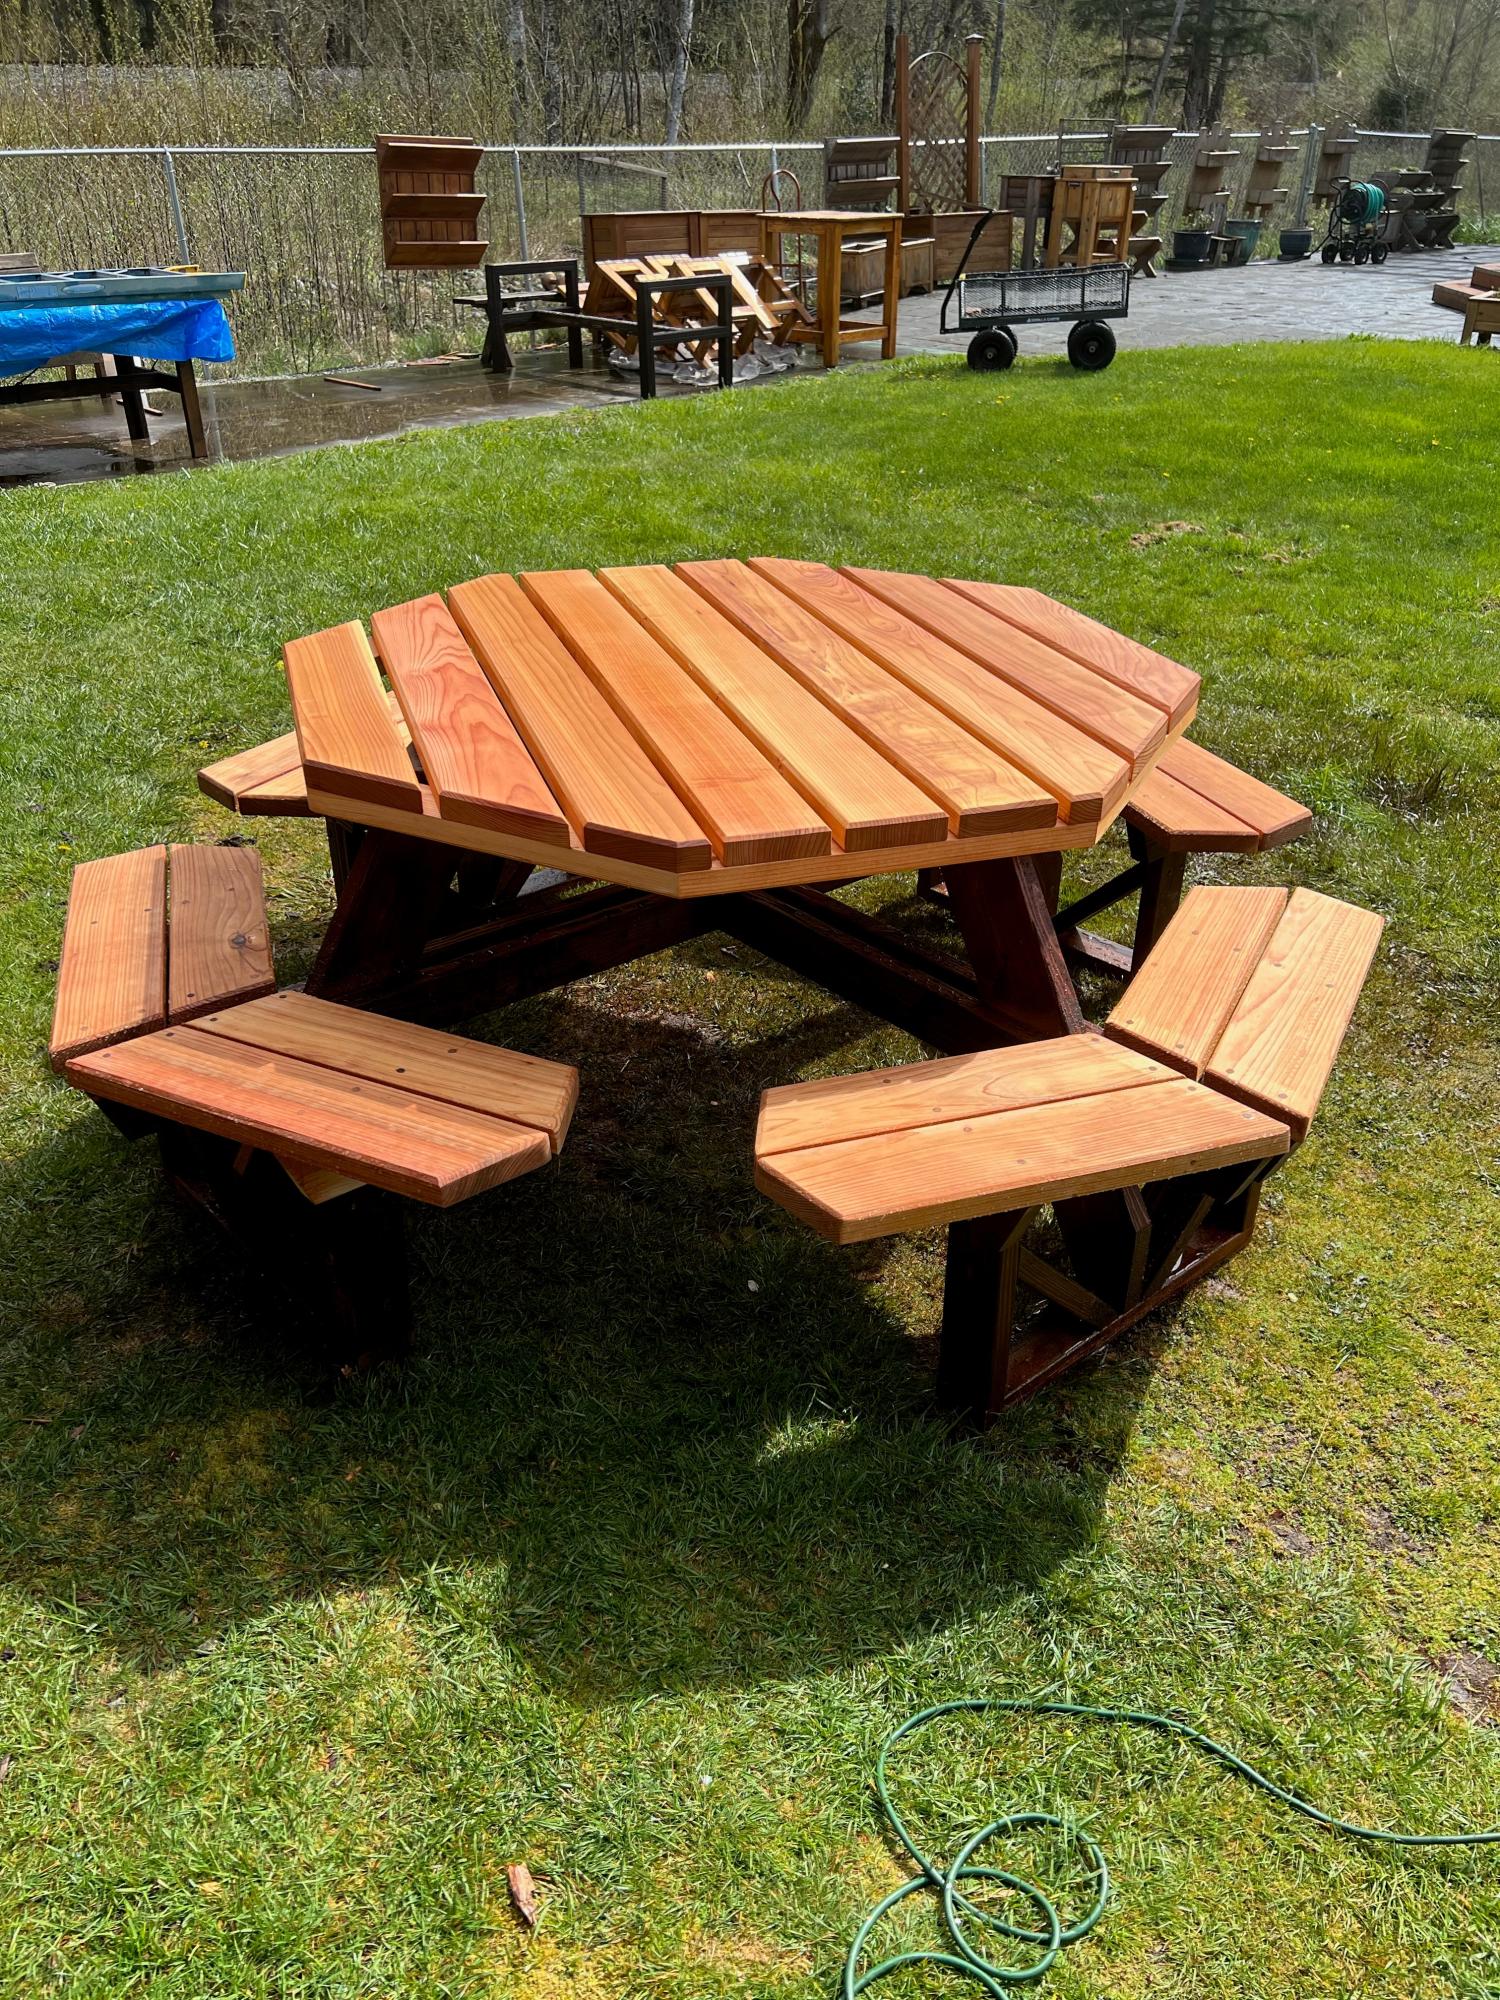
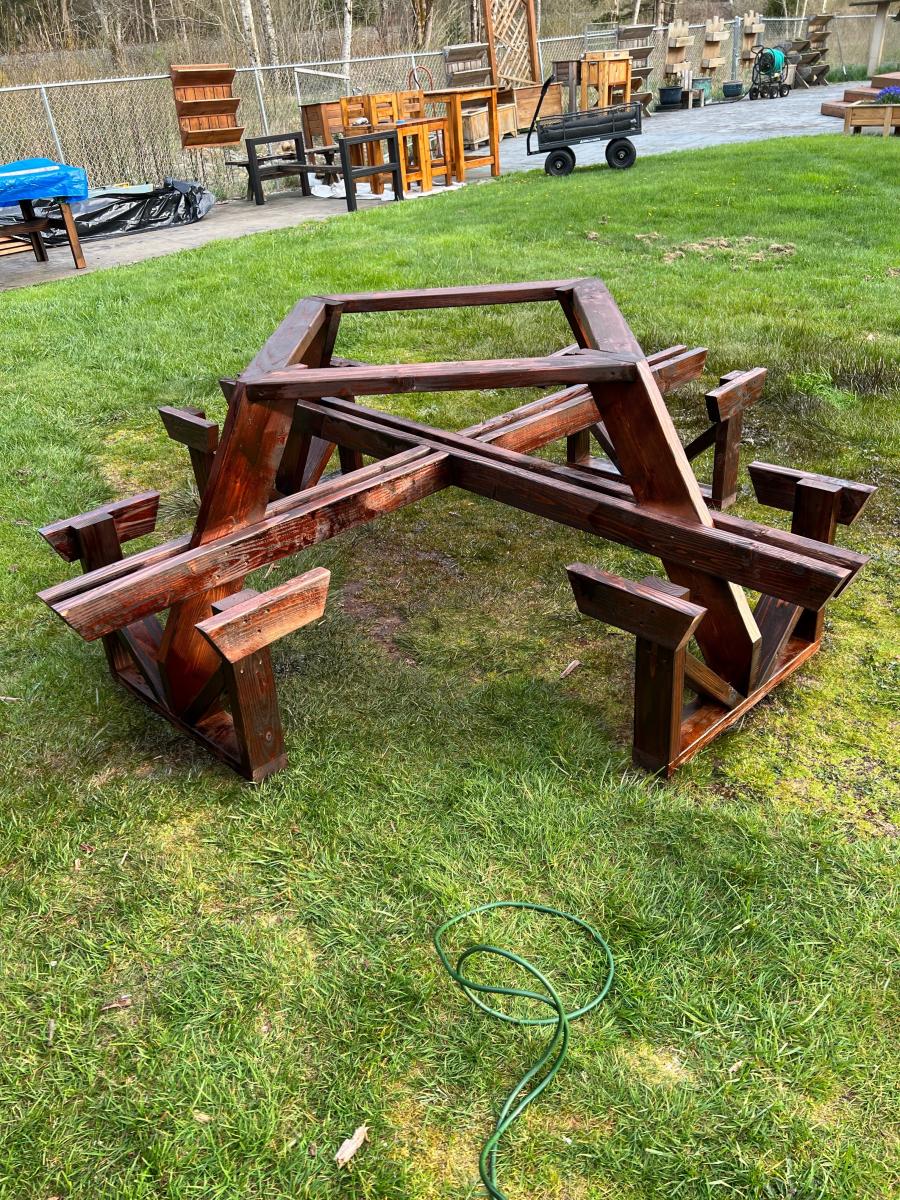
I just finished this octagon picnic table as per your plans
the 2x6 are all clear Western Red Cedar and the skeleton is
Douglas Fir. I think it turned out astonishingly excellent.
Thanks for the inspiration Ana.
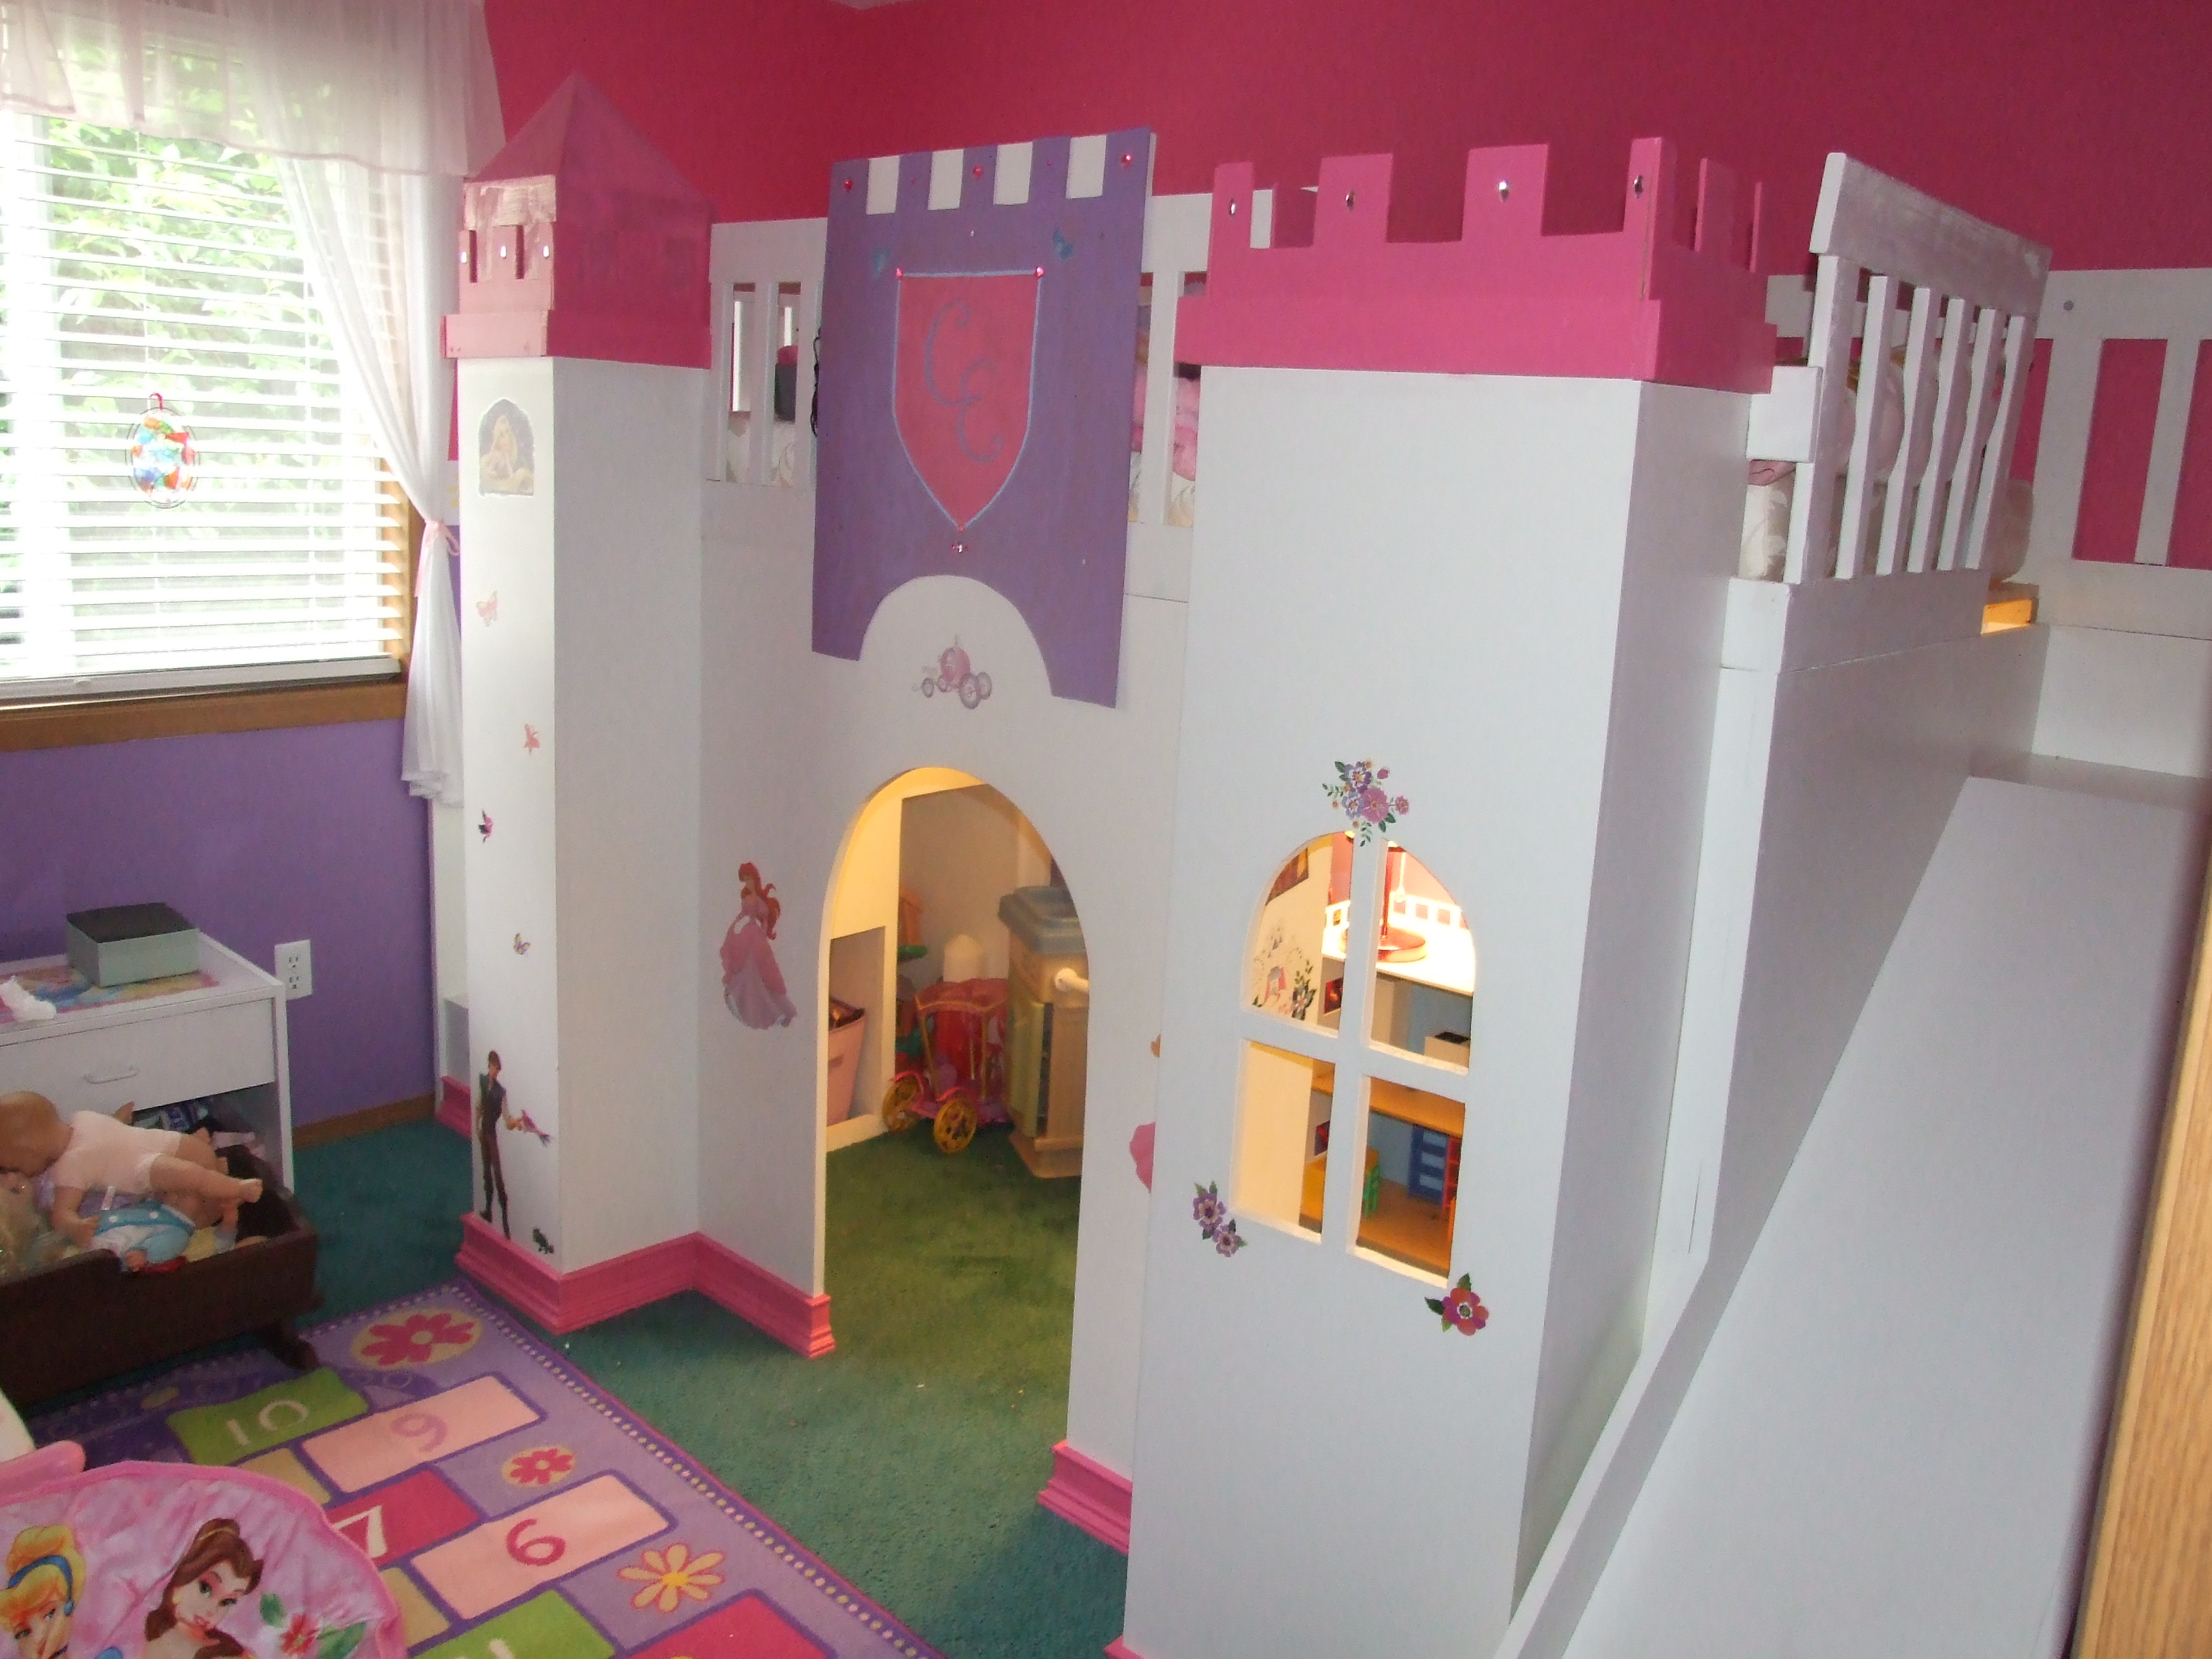
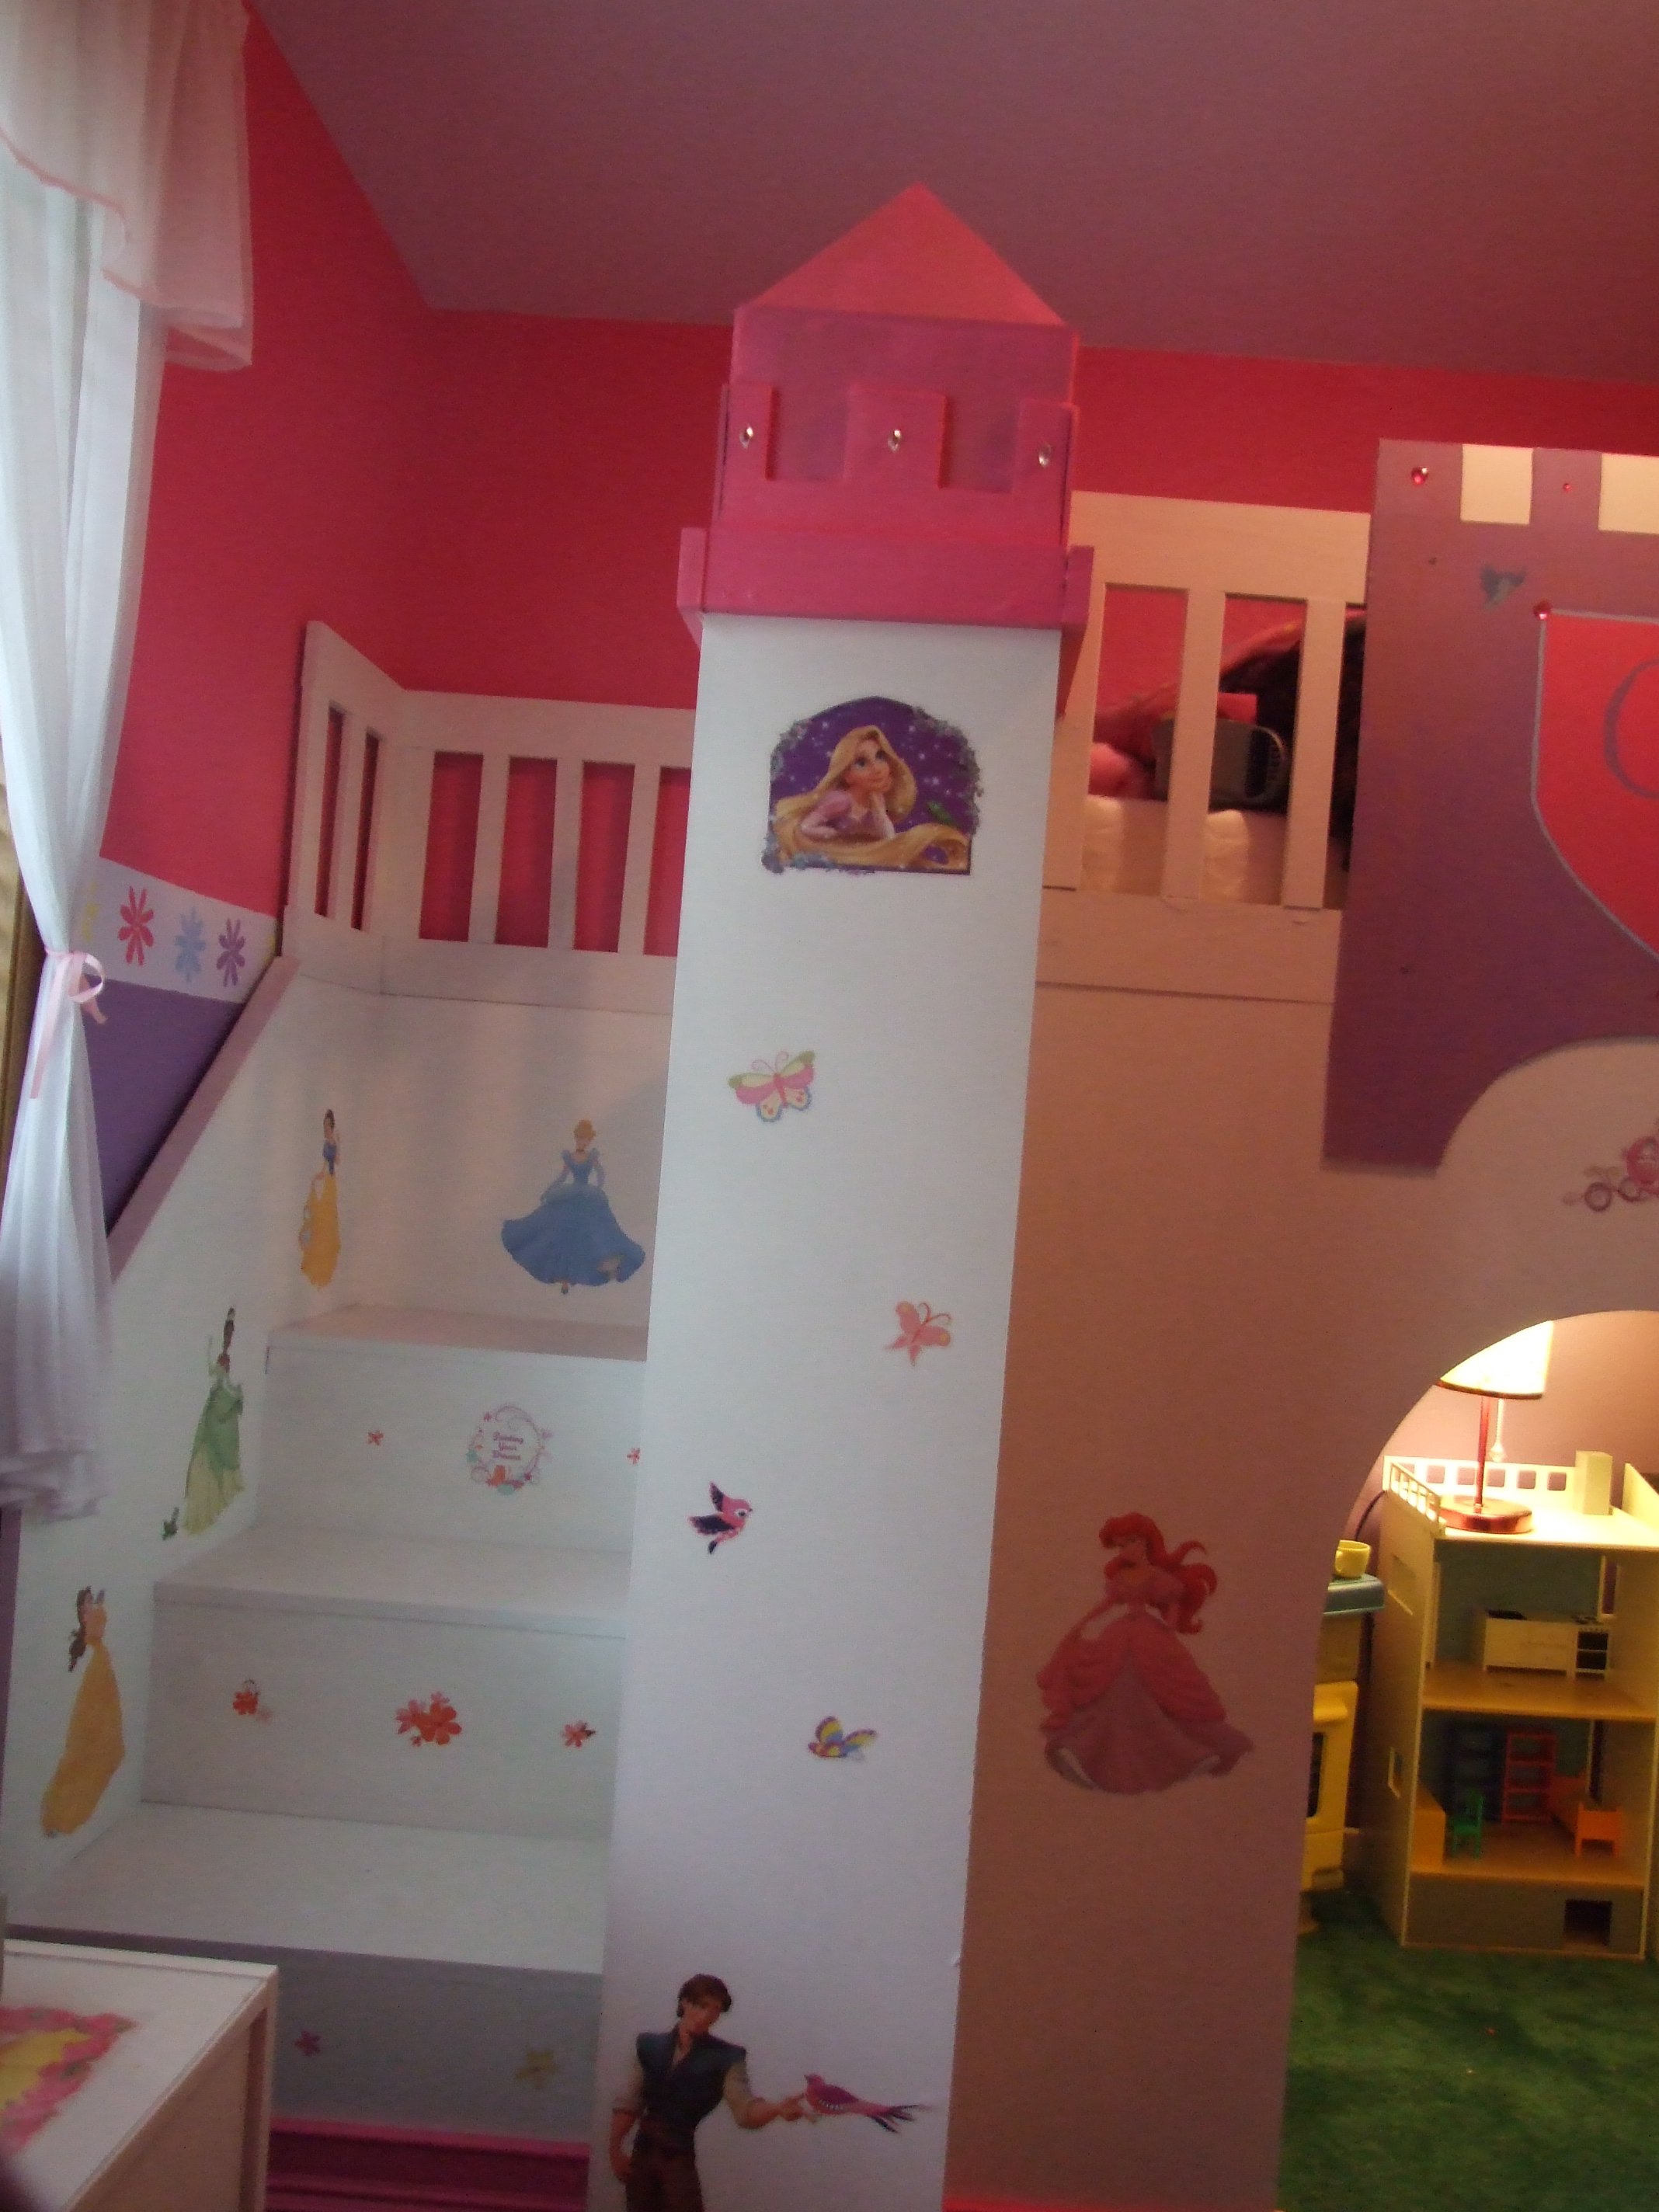
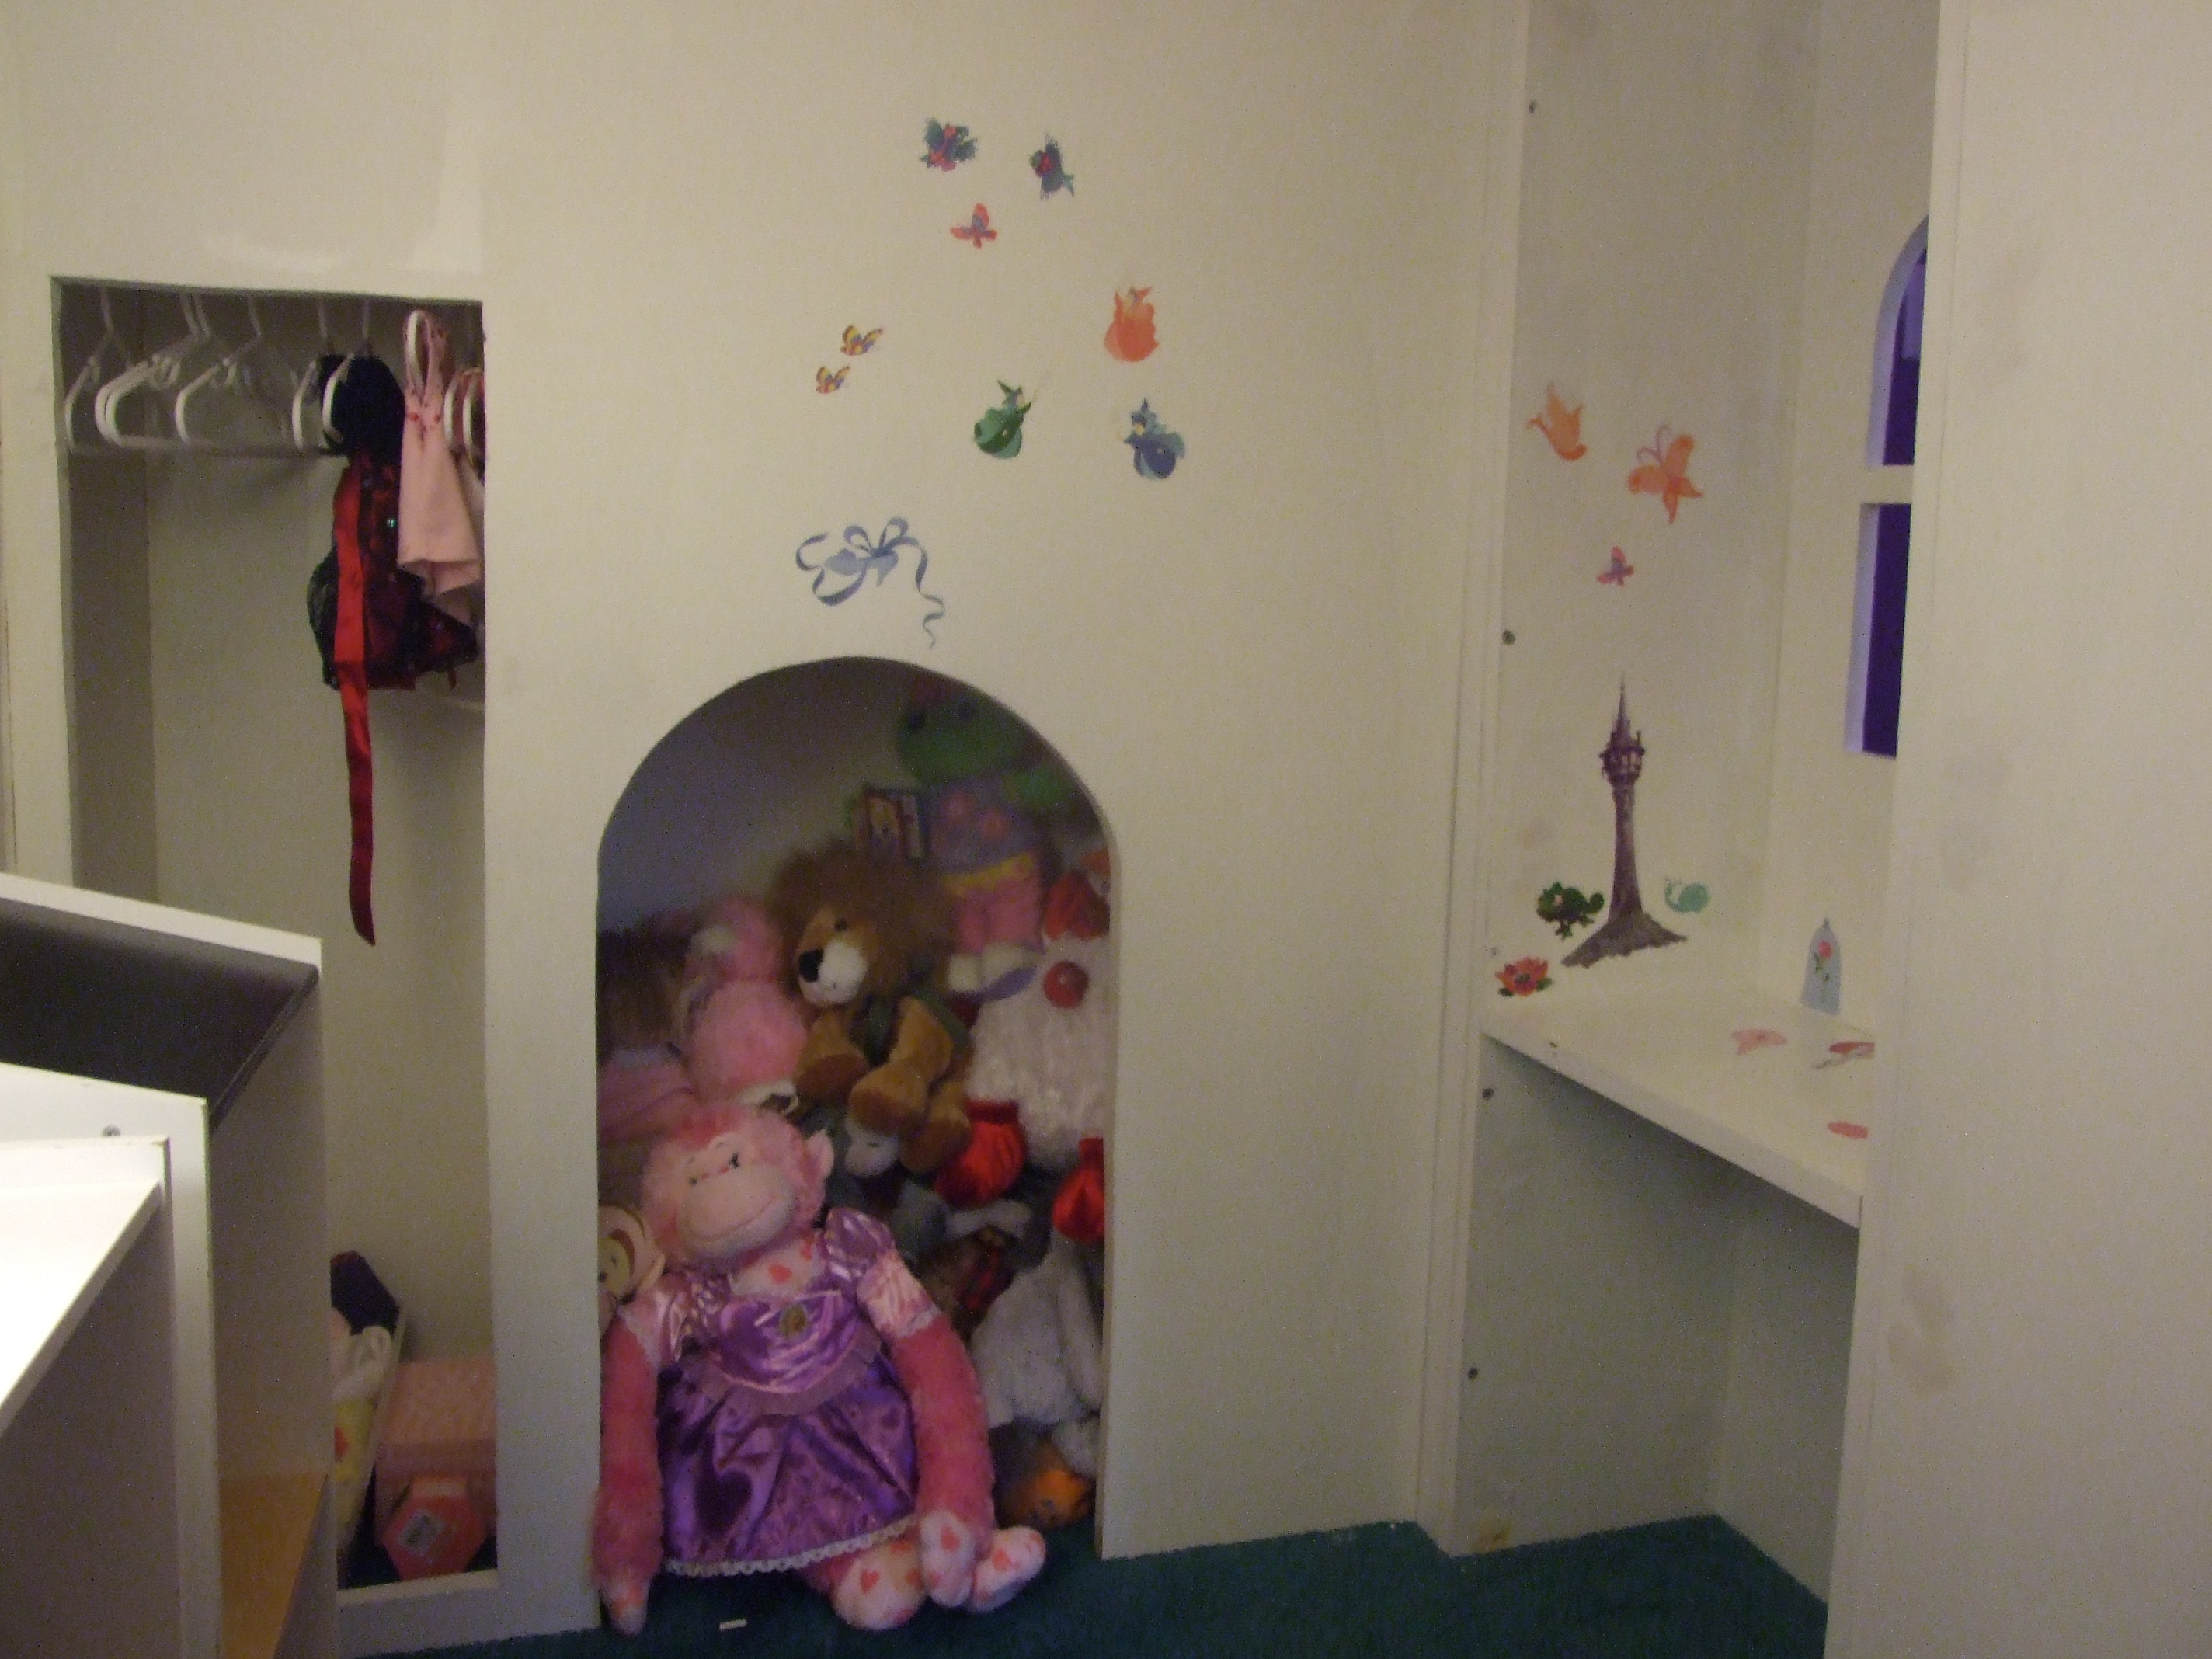
I love the play loft bed, but wanted to add a princess twist for my 5 year old's birthday. I found melamine plywood, which helped in the finishing since it was already white. It was a lot of work, but so worth it! I think the kid's favorite feature so far is the slide, which has seen a ton of use :) My favorite feature is all the storage! Thanks so much Ana! If it wasn't for you, there is no way I would have had the courage to tackle a project like this!

Wed, 06/22/2011 - 21:21
This will be such a dream come true for any 5 year old! Beautiful.
Thu, 06/23/2011 - 11:12
What a fantastic design for your daughter! She must pretend she's Rapunzel every time she gets into bed. The little cubbies to store toys were an excellent idea.
Mon, 07/11/2011 - 19:32
I started out by building the back and outer walls just like the stairs, just slightly narrower to fit my space and the side walls longer, coming out into the room more since the slide sticks out into the room farther. I then also did the top platform of the slide like the top step, having the top stair trim, cleats, and plywood support underneath the front of the platform. Then, I did some calculating to figure out how long to make the slide and what angle to use. I wanted it to come out into the room farther than the rest of the bed so that the slide wasn’t too fast, but I didn’t want it to stick out too far. So I used a piece of melamine board (nice and slick wood) that was 56” long. At the bottom of the slide, I put a piece of plywood that went from the ground up about 8 inches, so that the end of the slide would be up off the ground. So the slide ended up dropping a total of 34”, from the platform down to the plywood 8 inches off the ground. This made a fairly quick slide, but perfectly doable for my little ones. Then, before mounting the slide, I attached 1x2’s to each of the sides of the slide under where the slide was to be to support the slide from beneath. Then, I used a kreg jig to attach the slide to the sides and then screwed the slide into the supports. This made a very stable slide. If you have any more questions, I would be happy to try and help. I hope I’ve made sense ☺
Sat, 07/16/2011 - 15:45
Hello Slide! My daughter screamed when she saw this bed...can you please tell me how to build it all? I would love it if you could share...
Sat, 07/16/2011 - 20:54
I'll try :) I started by building the towers. It was just deciding how wide I wanted them (I did one narrower and one wider to use like a window seat). Each tower is essentially three sides of plywood with one having shelves in it and the other having one shelf to make a seat. I also put a shelf at the bed's height so that my daughter can use it to put things when she is in bed, such as her alarm clock. Then I knew how long I needed the bed to be and how wide each of the towers were, and I made the middle front section to be the remaining width. The rest of the bed is very similar to the Play loft bed with storage steps, but instead of making the steps storage, I just attached them down and then cut out on the inside underneath the stairs to allow access for storage from within the castle. I used a jig saw to cut out the window. The top pink parts of the tower are just decoration, so I bought a thin piece of plywood and used a jigsaw to cut the up and down cuts. And then on another post I talked about making the slide. I hope I helped some :) If you have any more questions, feel free to ask and I will try and help.
Sat, 10/01/2011 - 12:53
*I'm willing to pay you for your help*
I wish to start making this bed, but need some help. I'm novice and need more instructions. If I were to email you measurements, could you elaborate more in depth?
Please respond.
Thank you for your consideration.
Sat, 10/01/2011 - 12:53
*I'm willing to pay you for your help*
I wish to start making this bed, but need some help. I'm novice and need more instructions. If I were to email you measurements, could you elaborate more in depth?
Please respond.
Thank you for your consideration.
Thu, 10/06/2011 - 10:04
I would love to help in any way I can (free of course!) I have wanted to do the plans on the computer, but haven't been able to figure out the program :( So feel free to ask away and I'll try and help. You can post questions here, or email me at [email protected].
Tue, 07/19/2011 - 13:01
I was wondering what the dimension for your room are (especially the wall the bed is against. Just trying to figure out if the slide idea would work in our little room. Also would you mind telling me how wide the the n_n_n (That is my attempt to show the part of the castle that has the little rectangles/squares and then a space and another rectangle/square (the pink and purple parts of the bed) I have been drawing some trying to get spacing right and they never seem to look right, but your spacing looks great. And is the purple part that has the shield painted on it a seperate piece from the rest or is it cut out with the main part of the bed- if it's seperate how wide across and length down is it? We are in the process of attempting a similar bed for our little one and I have been playing around with ideas and so far yours looks like what I have been trying to show my husband in my drawings, only yours looks a lot closer to what I had in my mind than what I have on paper. Any help would be appreciated.
Mon, 07/25/2011 - 09:27
The wall the bed is against is 125.25", so a little over 10'. I still have a few inches of wall left and wish I had made the slide a little wider (the slide I made is 14.5" wide), but thought I would be tighter on space. For the pink on top of the tower, I first used 1 x 3 that I attached to the front of the tower. Then I used 1/8" plywood for the part that I cut the up and down parts. It is 6.5" tall, but part of it sits behind the 1x3, so only 5" is visible. I then cut the plywood 3" down, 3" across, 3" up, 3" over, etc. to make that up and down look at the top of the towers. And the purple part with the shield is separate. It is again just a thin piece of plywood that I nailed to the bed. When I put this up, part of the shield thing was sticking above the bed and I didn't think anything of it until someone broke off part of it. So now I've added a piece of wood behind the shield (the same width of the shield) so that it keeps the shield from being broken. The shield's overall size is 23.25" wide x 27" high. I hope this helps :) If there is anything else I can help with, please just ask. Good luck with your adventure :) !
Sun, 08/21/2011 - 22:19
I am incredibly curious to know if I can get plans for this bed. I have looked extensively throughout various internet pages for a bed/playhouse like this. I would like to make it with a queen mattress on top. I have look through your posts and haven't gathered enough information to proceed. I am willing to pay for the plans.
Is there anything different you would do, if you did this project again?
Thank You,
Guest
Tue, 10/18/2011 - 08:43
Hello:
First of all I have to say THANK YOU. I found the plans for the playhouse (which are fabulous) are there plans available for the princess castle?
Thu, 04/05/2012 - 15:40
I would love your directions or plans to build this my little princess. Thanks for any help. Just love this bed!
Thu, 04/05/2012 - 16:05
I posted plans at:
http://ana-white.com/2011/10/plans/castle-loft-bed
Hope this helps!
I've been wanting to build this bed for awhile and finally got around to it. I made a few small changes to the plans:
-I used 2x8's instead of 2x6s, so it wouldn't be so low to the ground.
-I ripped 3/8" off of the 2x8 supports in the middle so the mattress would nest inside the frame and not slide around
-I didn't add the headboard because it seemed a bit chunky/rustic for my taste. I will come back and do something else for the headboard. Maybe a cool paneled wall with built in sconces? We'll see!
Love these plans though, appreciate it!
Mon, 07/25/2022 - 21:44
Love the look and your mods, well done! Thank you so much for sharing.
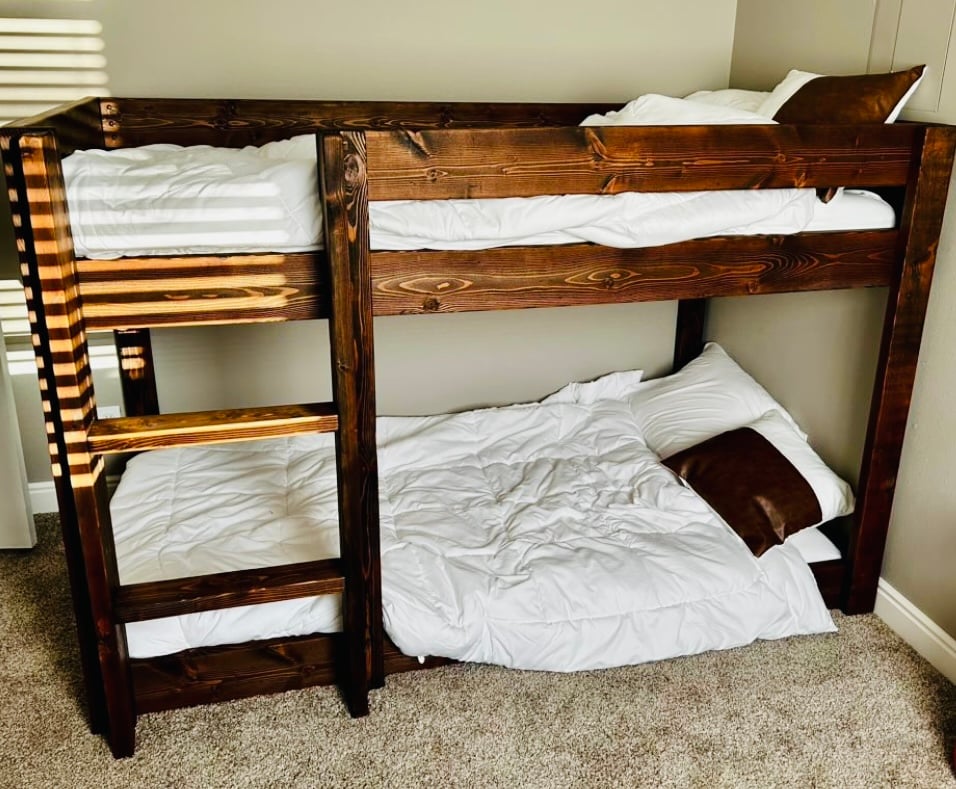
Essential Low Bunk Bed by Brian James
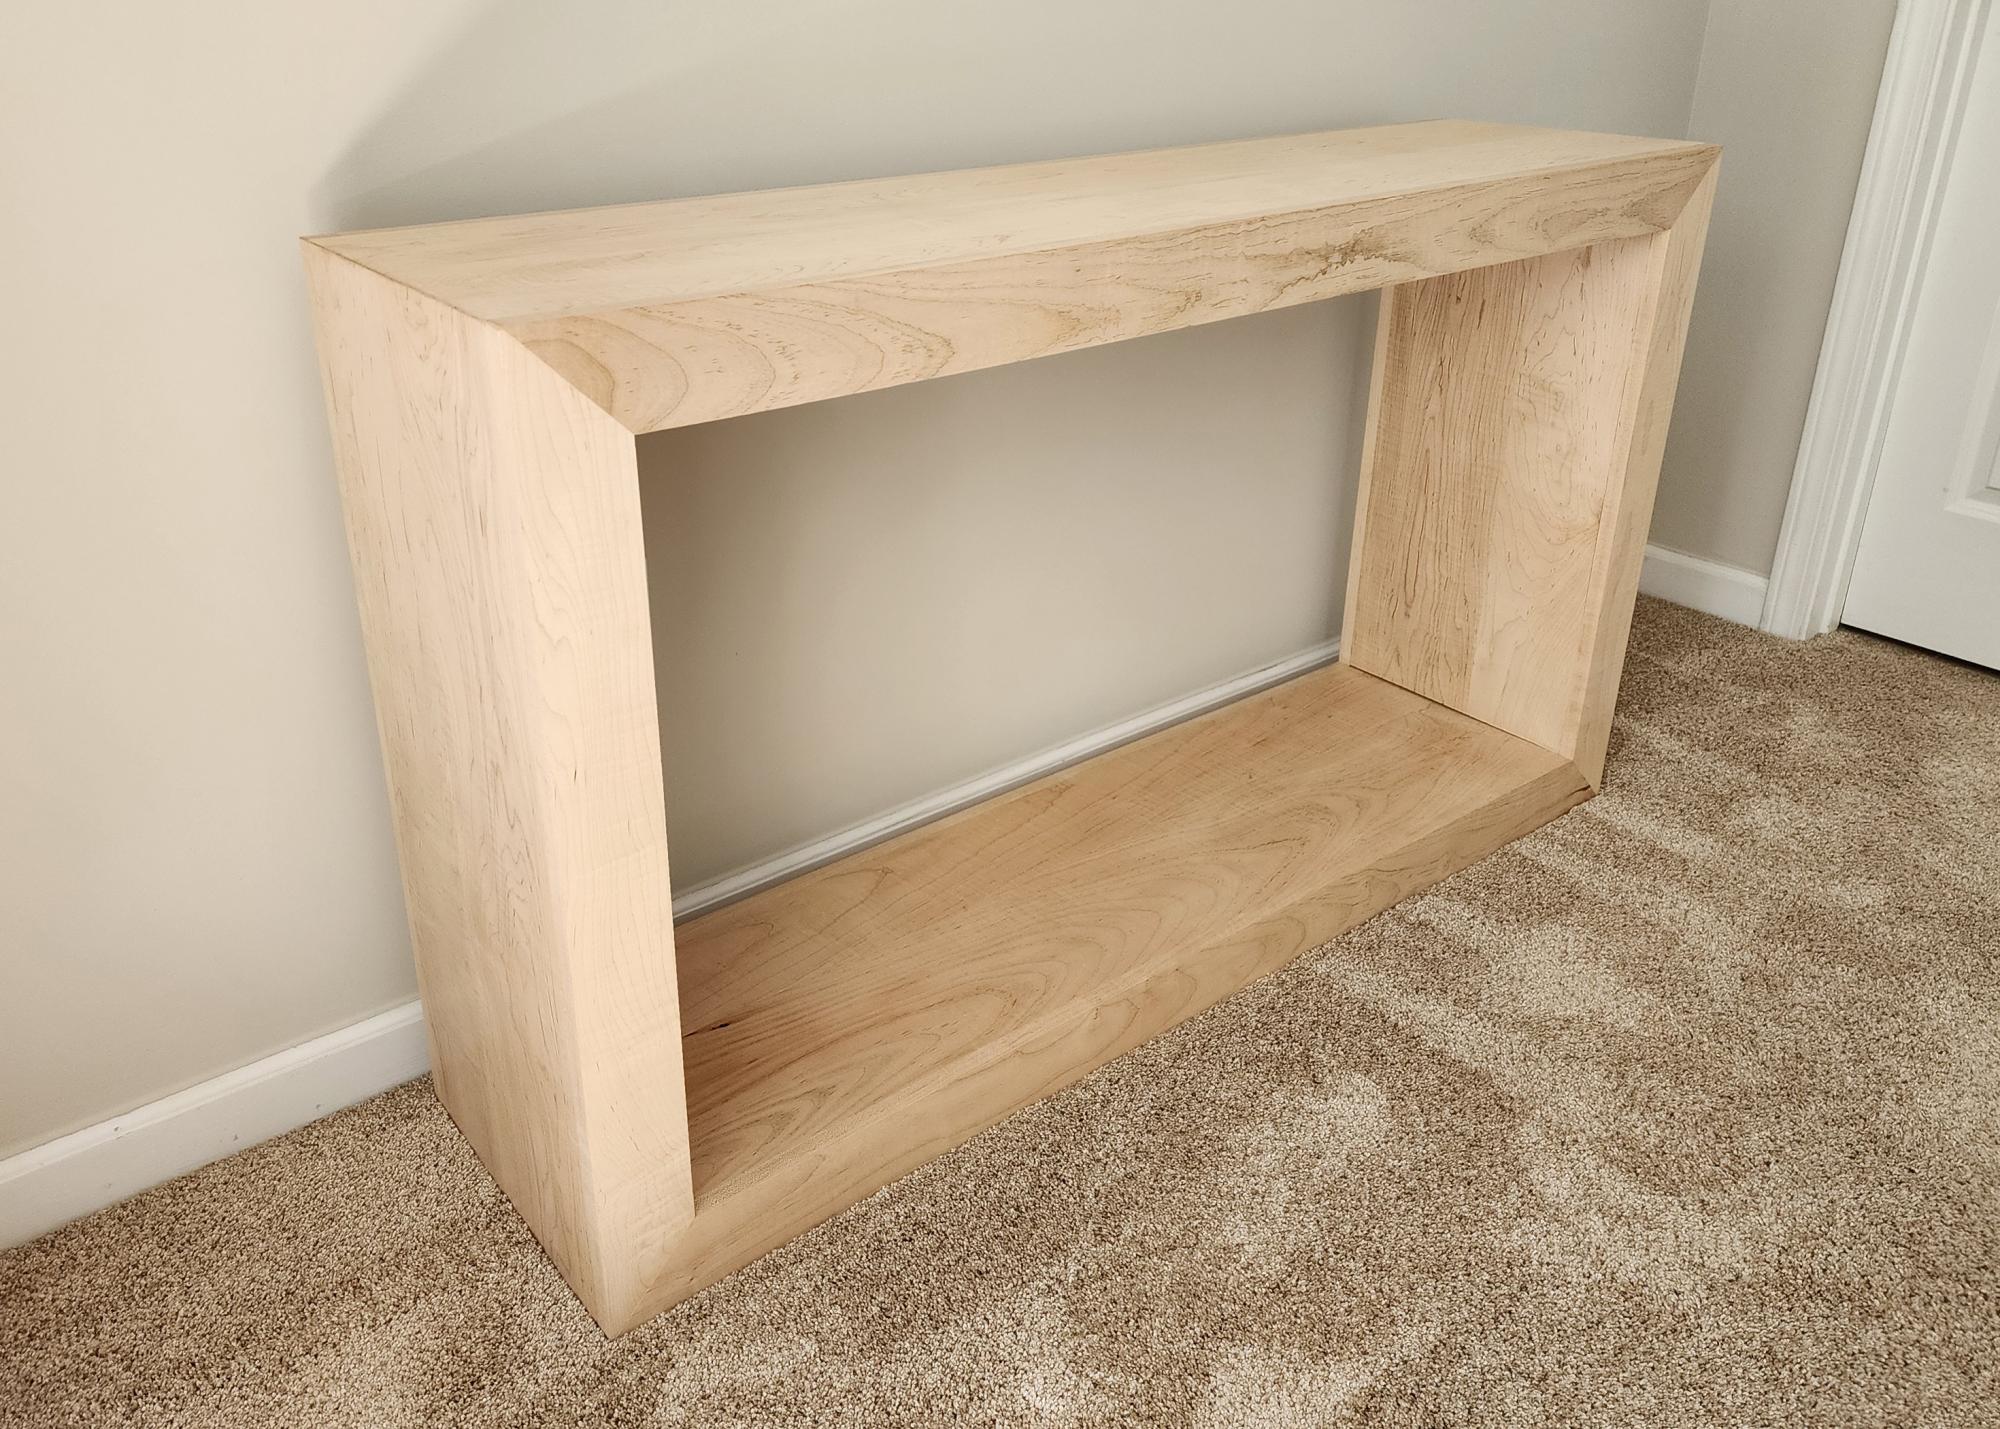
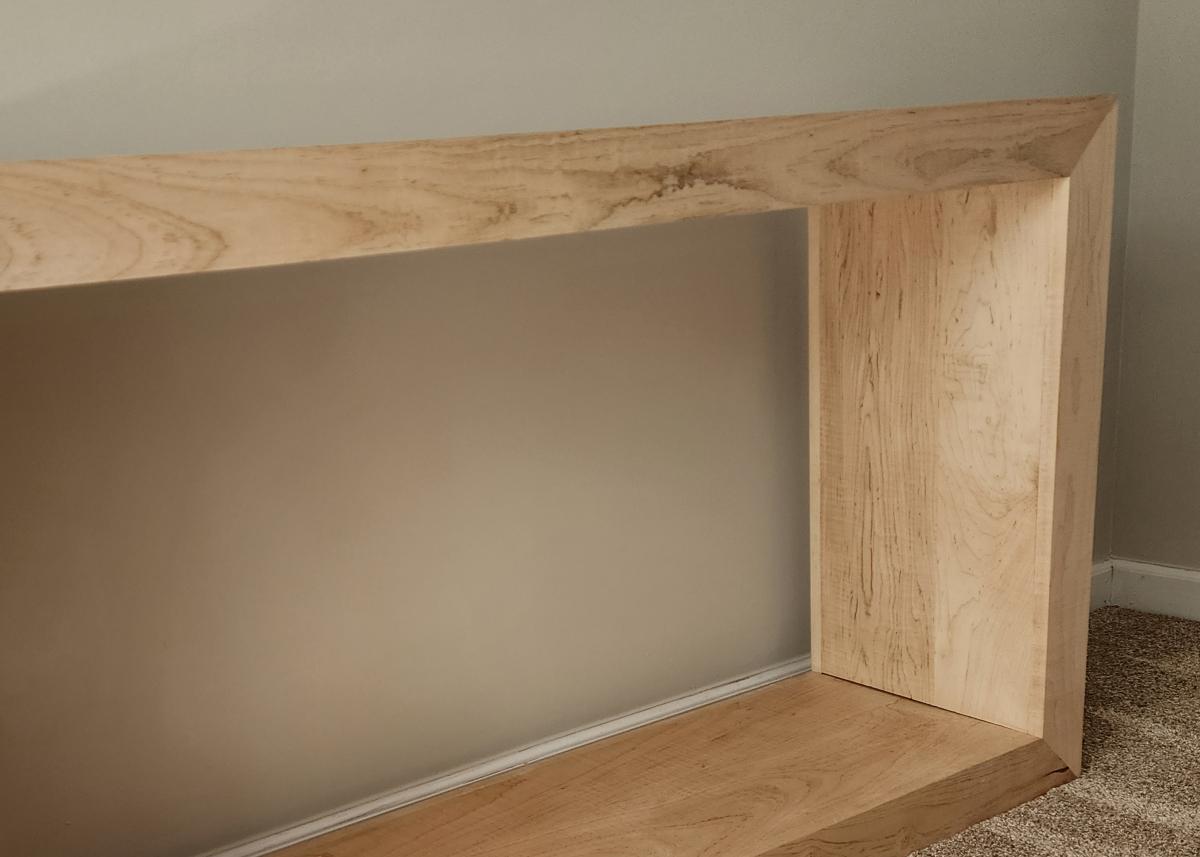
Table was made from curly maple that was glued into 12" widths to match the panel widths of 12". Client loved the look.
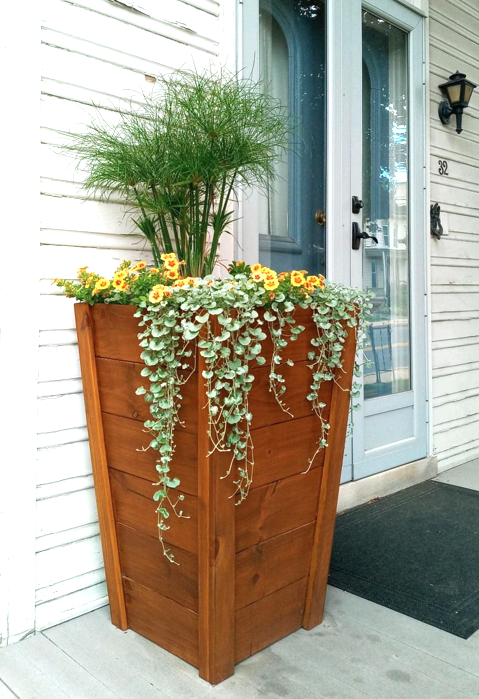
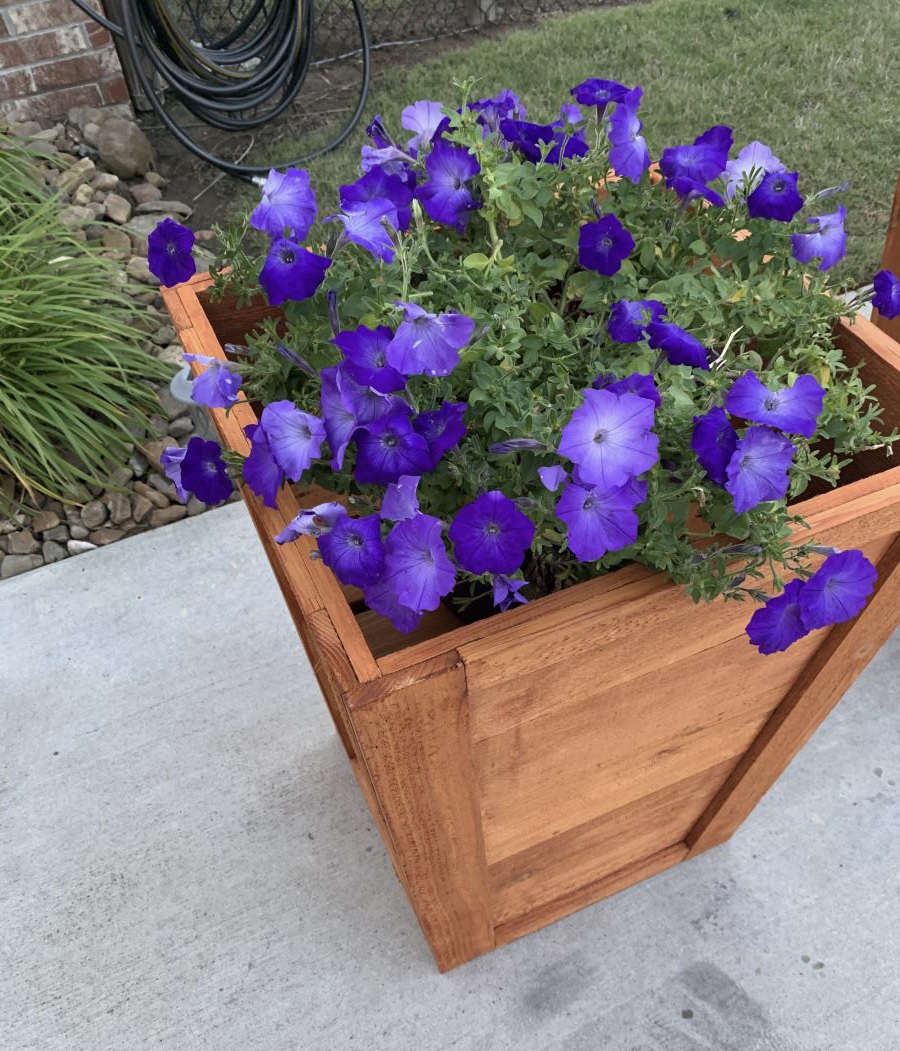
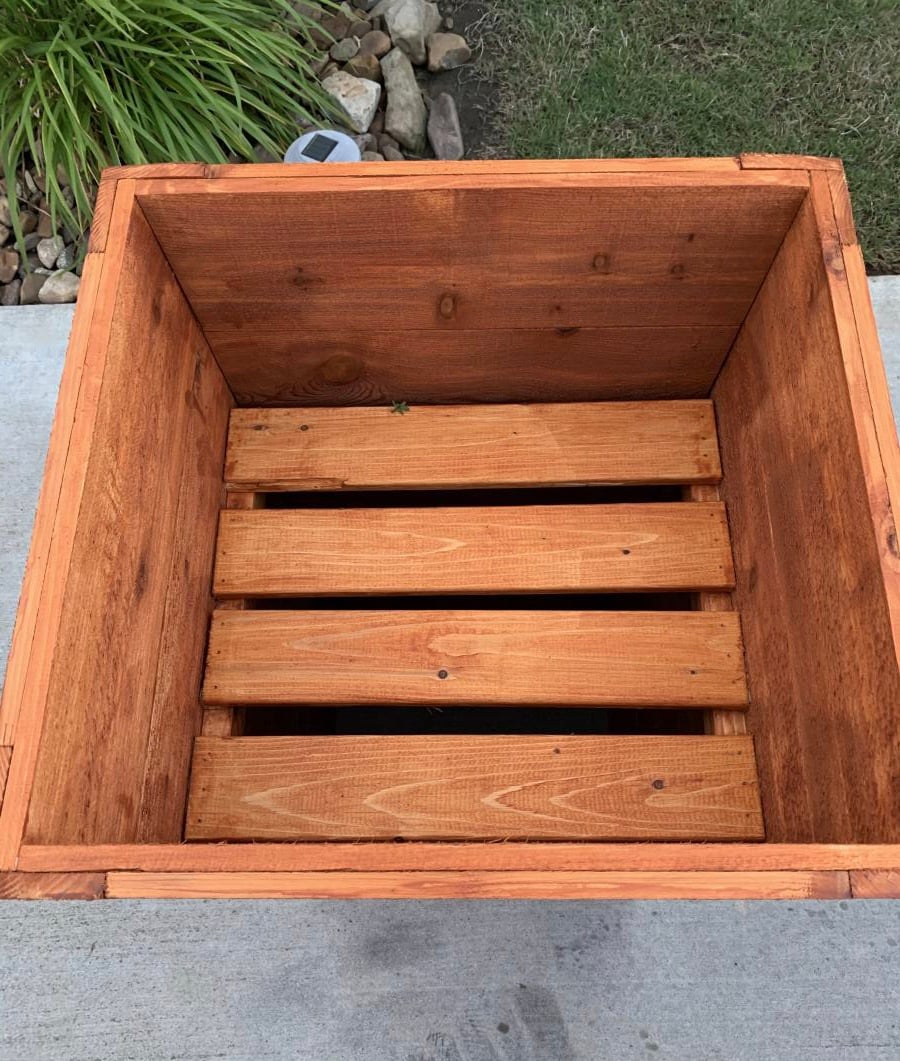
Check out this beautiful tapered Ana White planter that I made! Her videos are amazing and simple to follow be sure to check her out.
Alex
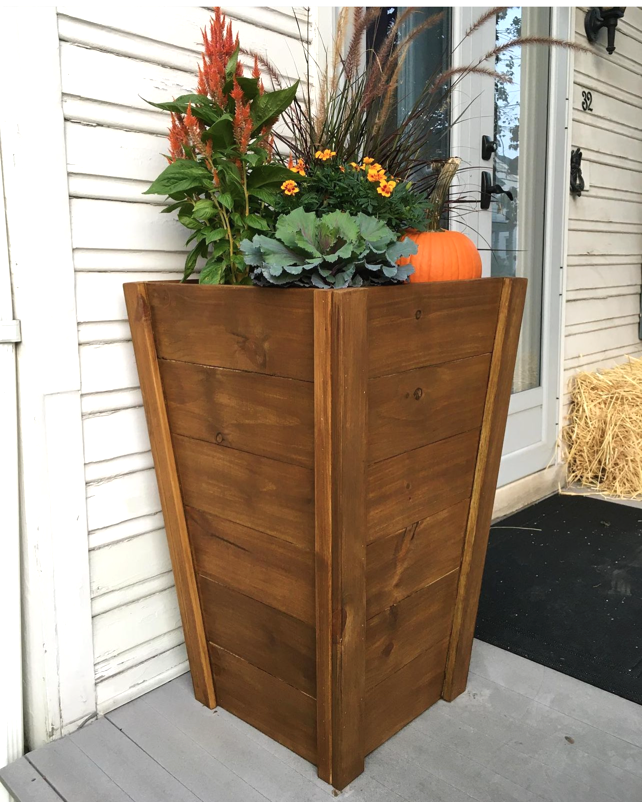
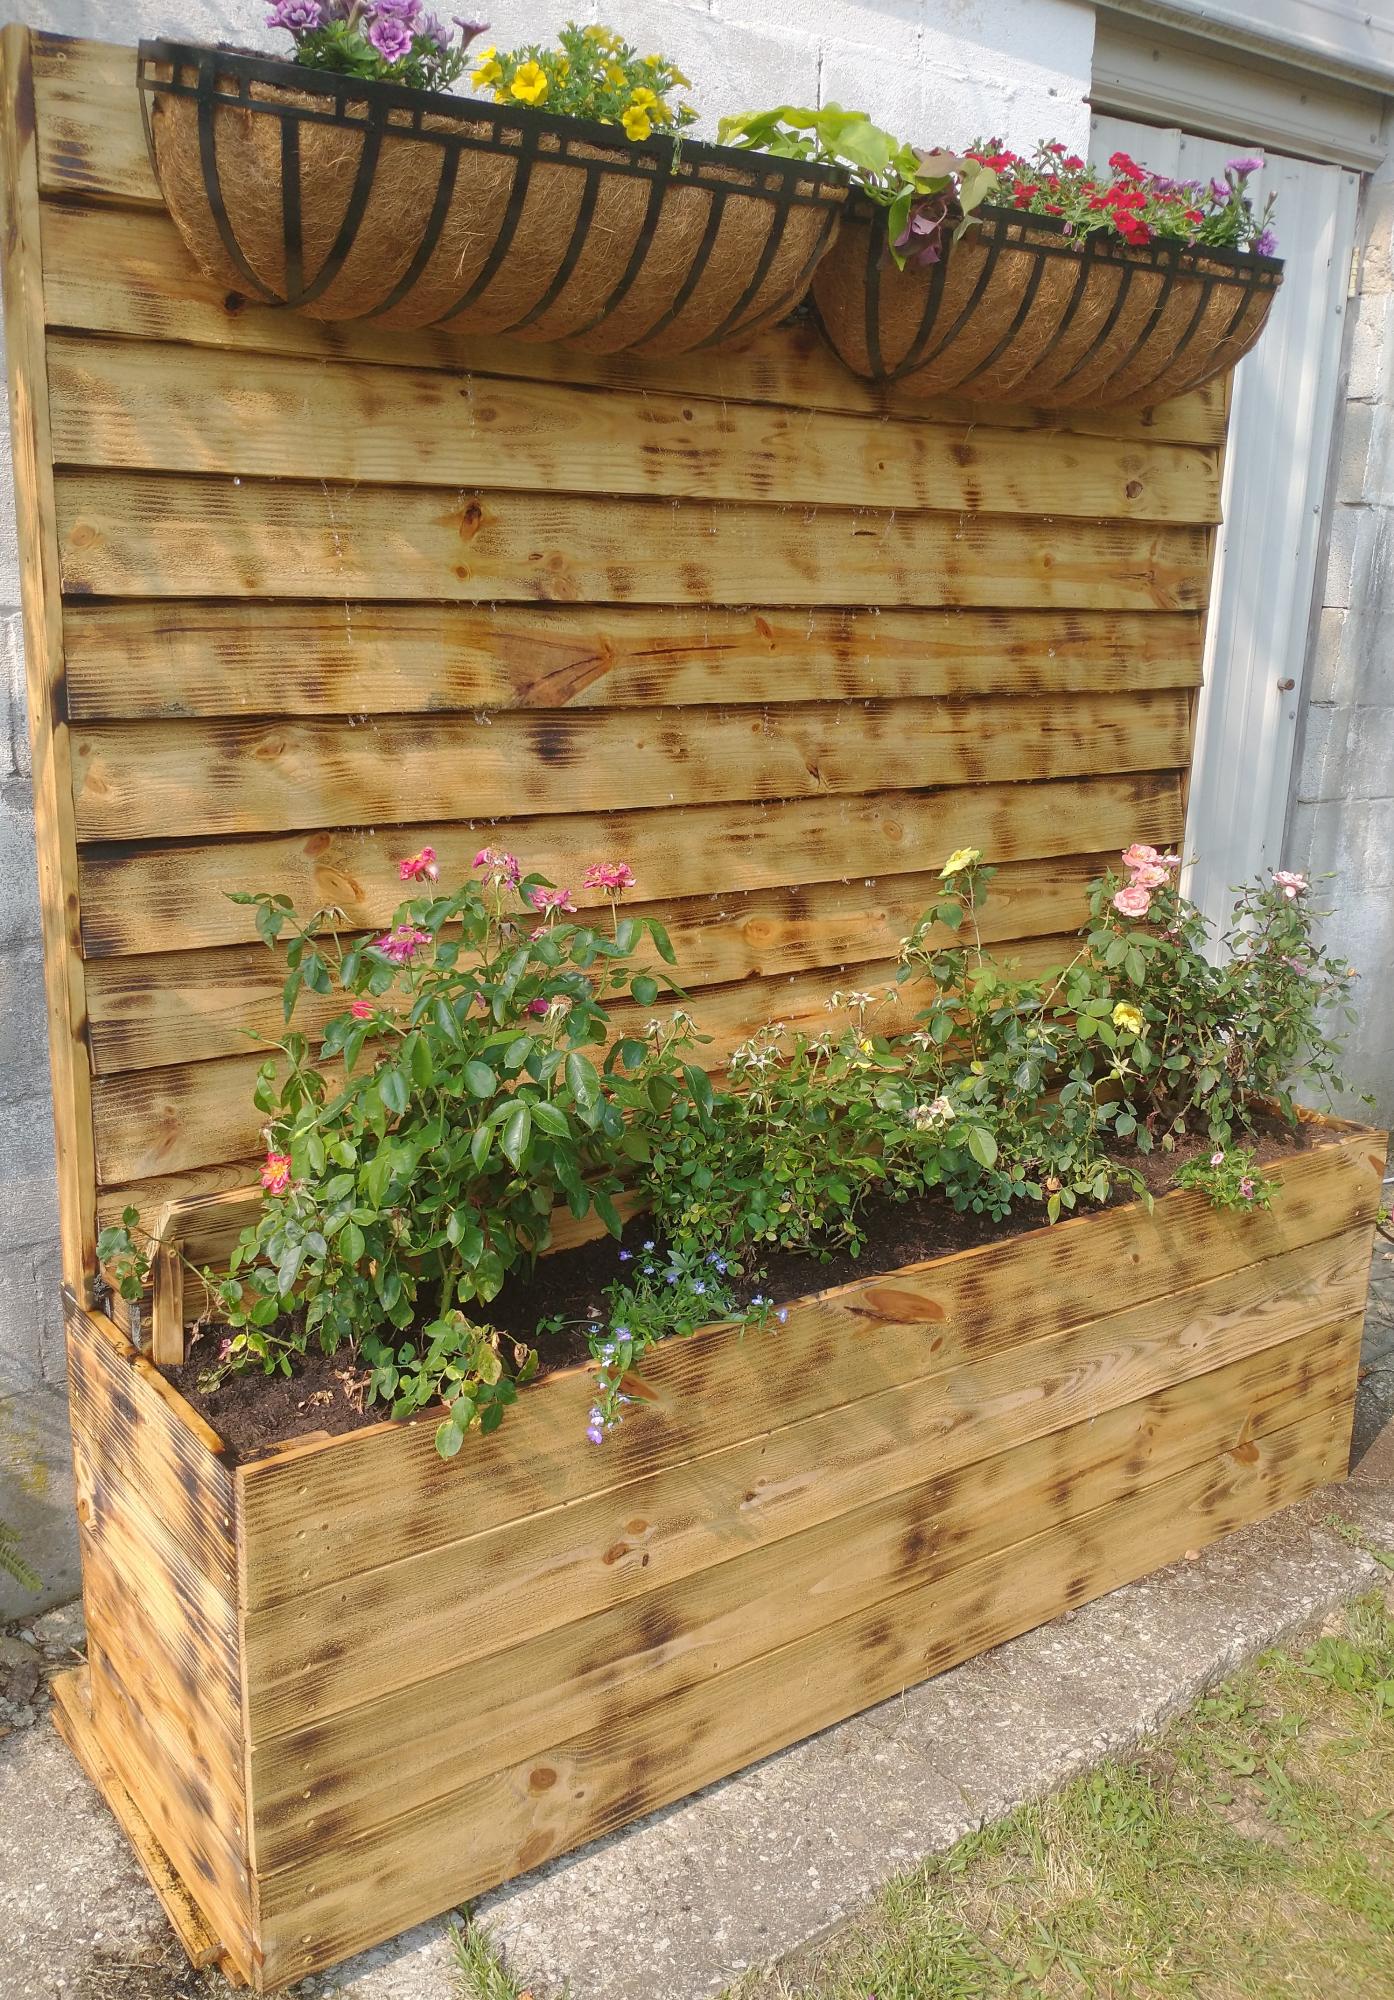
It's a take off of your privacy fence planter. But I added water to make it a water wall also.
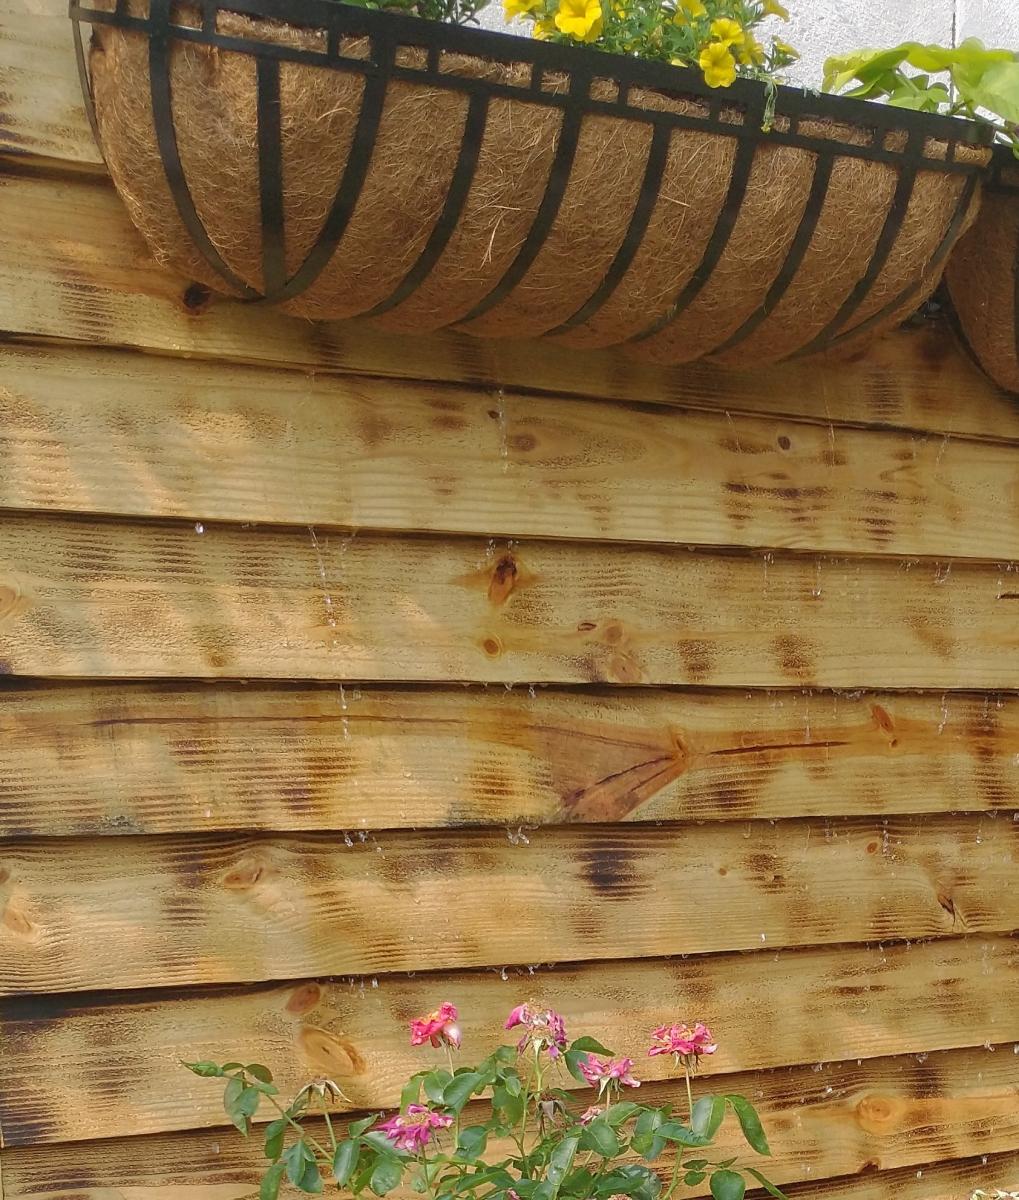
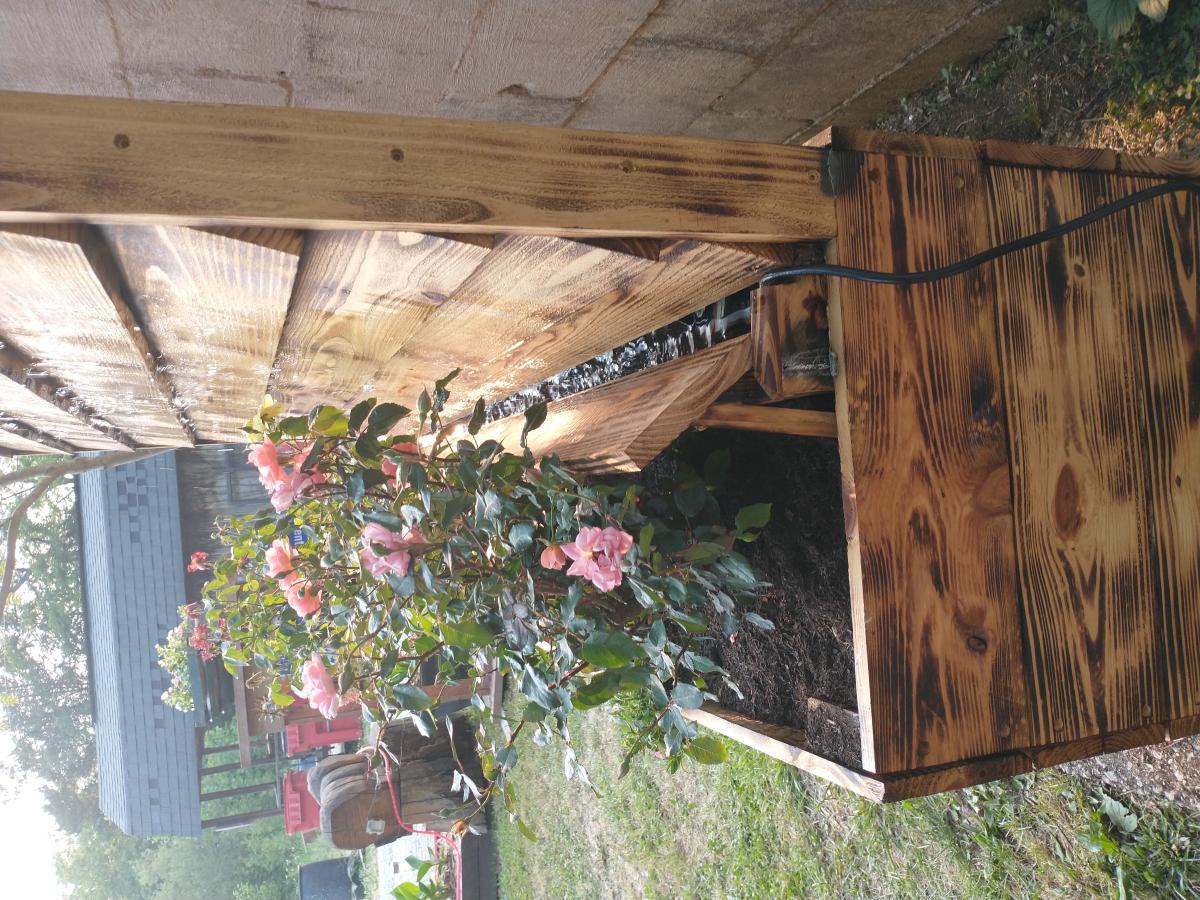
This is my first project ever built. I can't thank you enough for this site. I already have several other projects I want to build around the house because of this site. Thank you so much!
I started this project a few months ago for a friend. The build went easy enough and was complete is less than a day. The only issue I had was with the X's. My miter saw doesnt cut past 55 degrees and it called for 60 degrees. I had to eye it and the X's turned out less than perfect. It did give me a compelling arguement to upgrade from my 10" to a 12" sliding saw (we will see how that pans out). The finishing was the real problem for me. Ive had issues in the past with not liking the final color and having to sand the whole project over and over until I finally just settle. I was hesitant on the vinegar and steel wool finish but went for it anyway. The top turned orange, almost like a fresh cedar color. I whitewashed it the following day and roughed it up with some light sanding. It looked great. I added poly and the top turned orange again. It was horrible. I had to sand it and start over. I then went with a weathered grey with a whitewashed top coat and it looked great but my friend wasnt a fan. I sanded AGAIN and tried another color. Third time was a charm and the sunbleached stain with whitewash came close to what we wanted to acheive. He likes it, I like it, and eveyone is happy!

Added some extra trim pieces to finish it out. turned out really nice!!
Mon, 05/18/2020 - 17:25
These look great! Did you use the cedar tone water proofing?
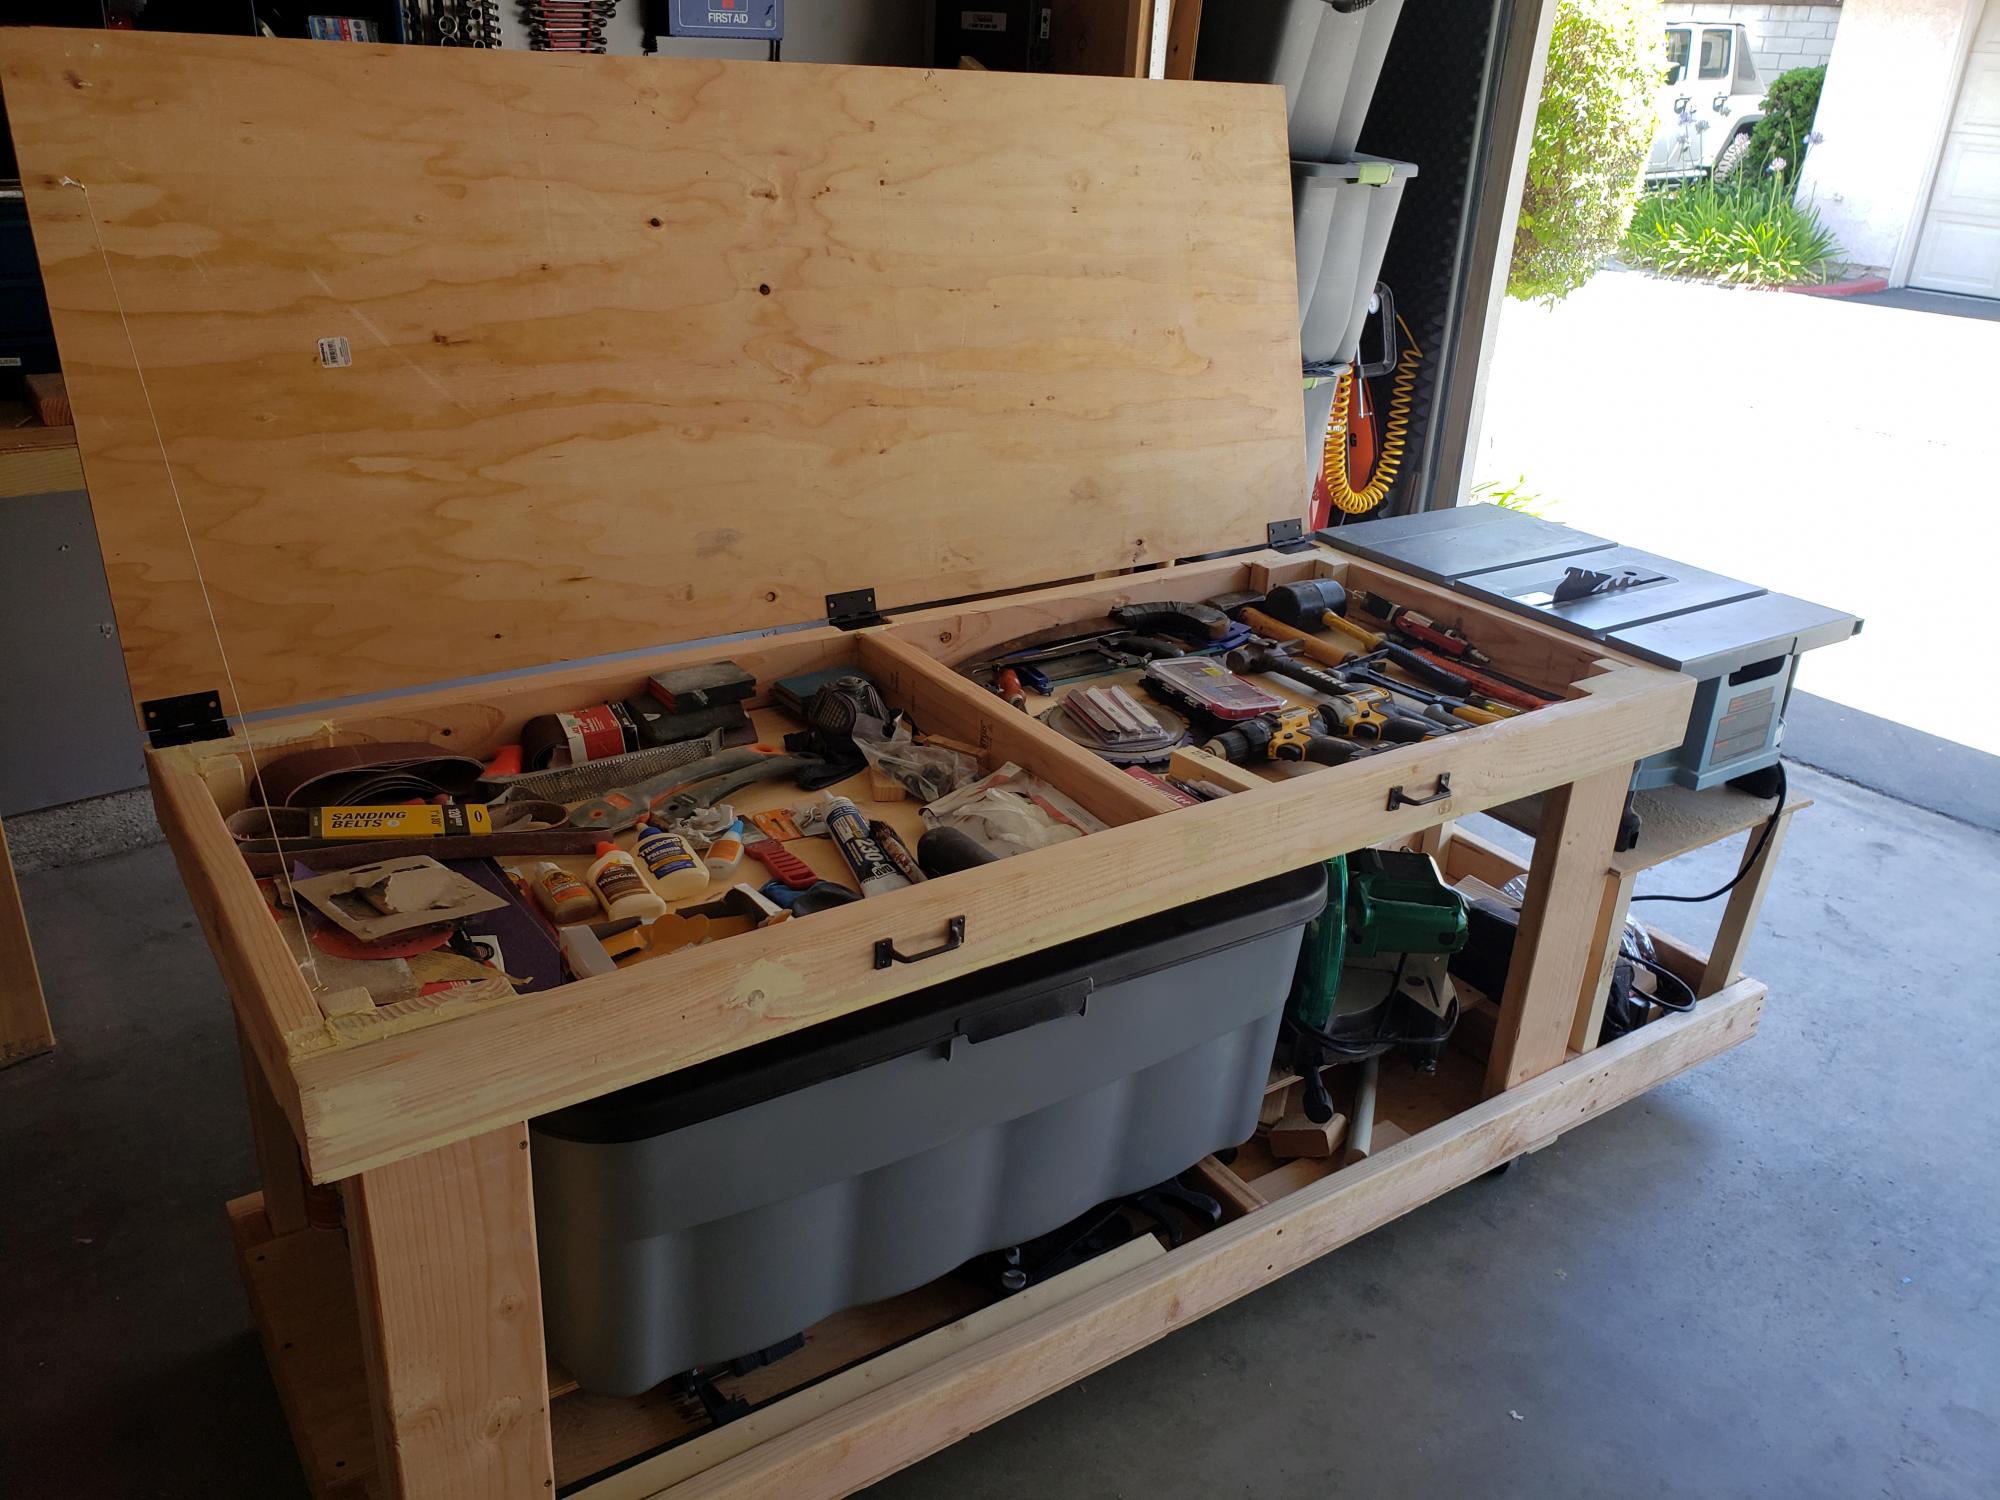
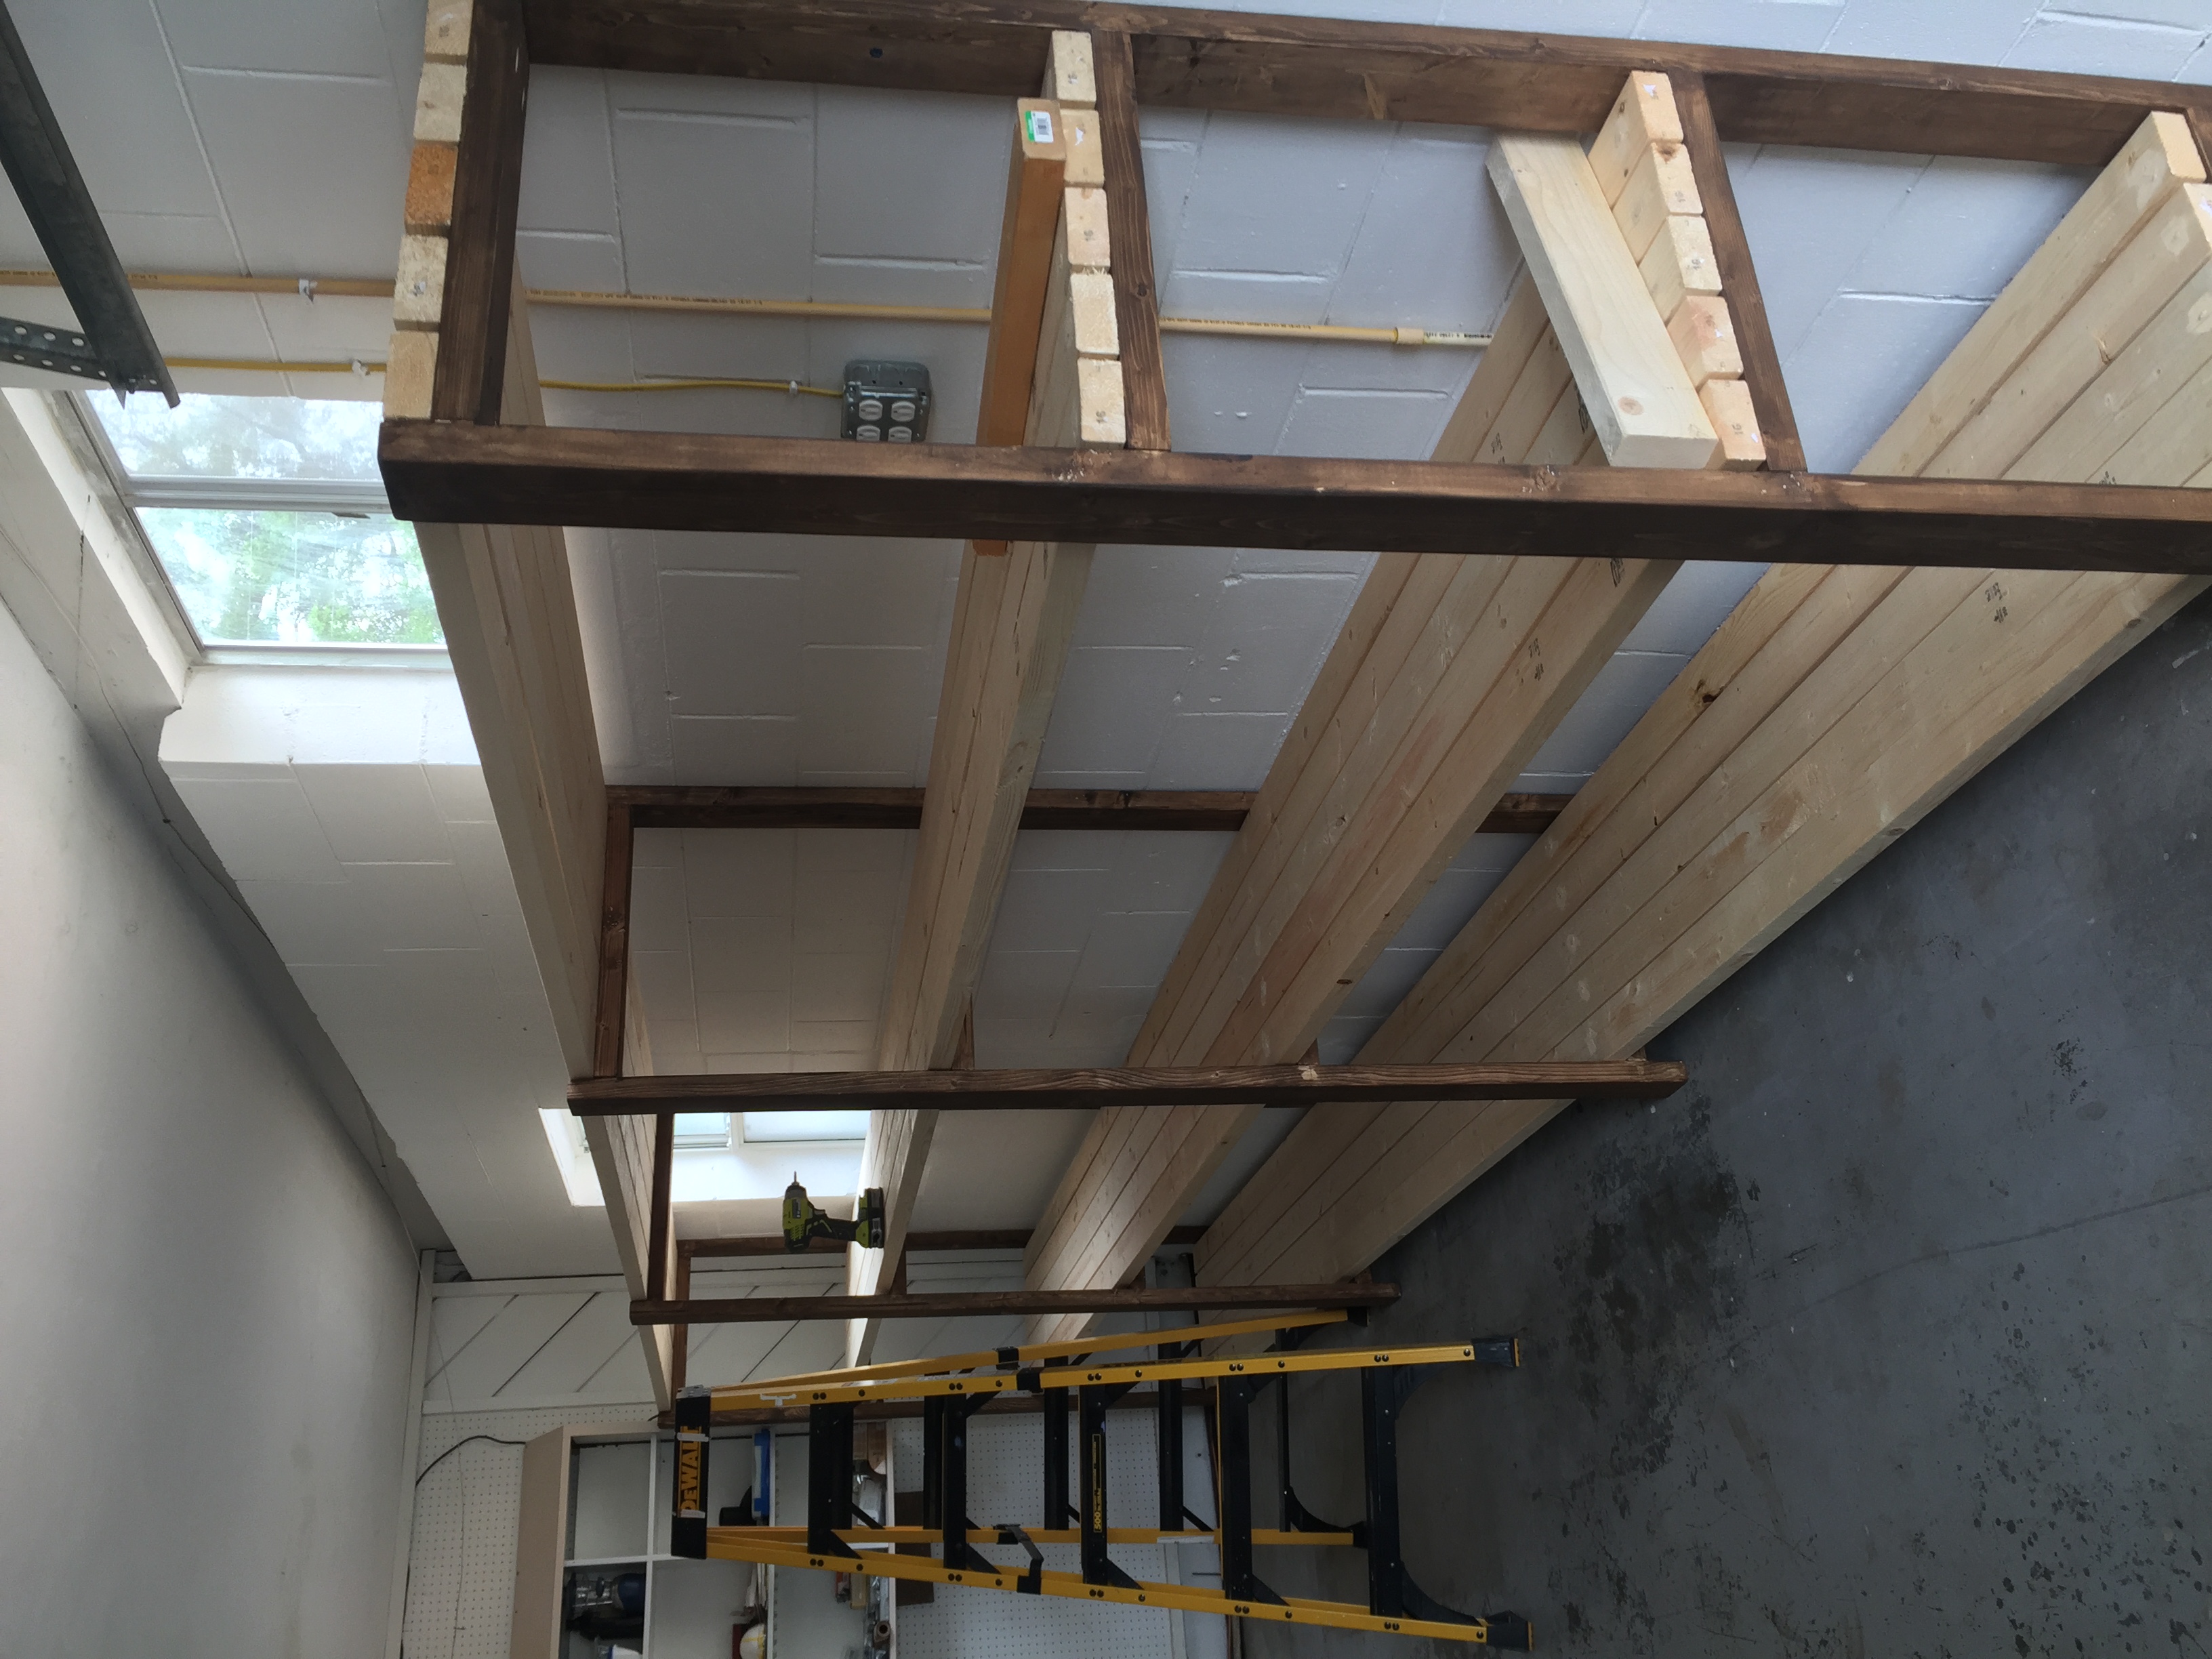
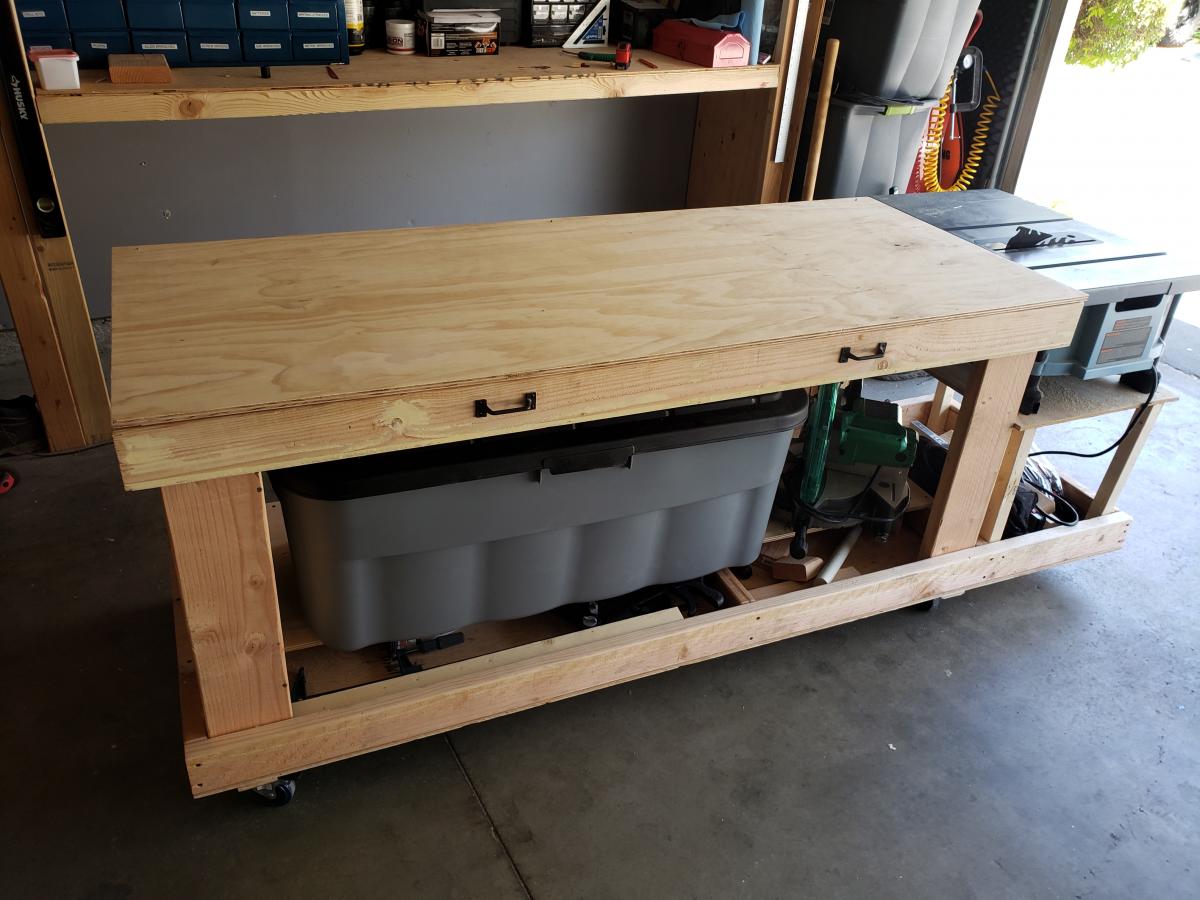
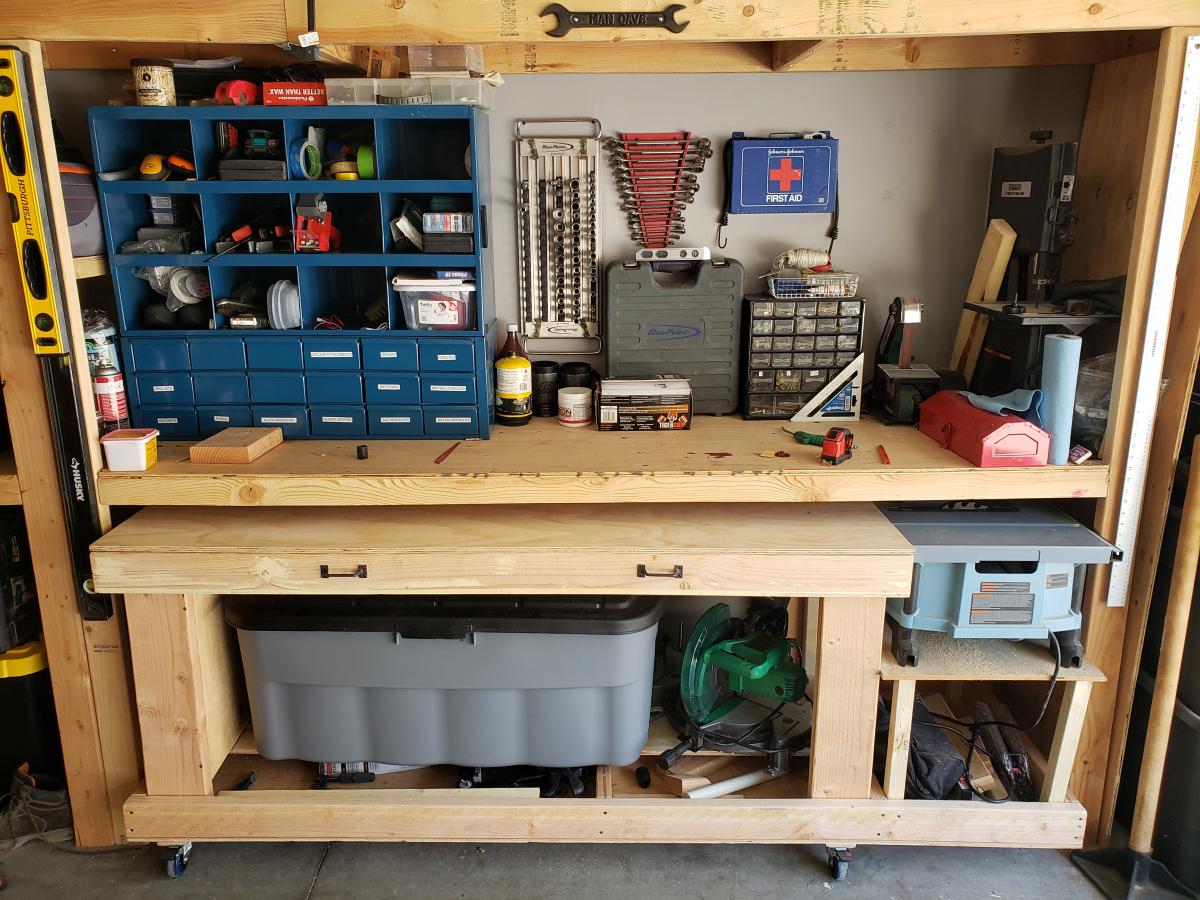
A modification of the traditional work bench. Great for storage. Bench area of 70 inches with 18 additional inches for the table saw.
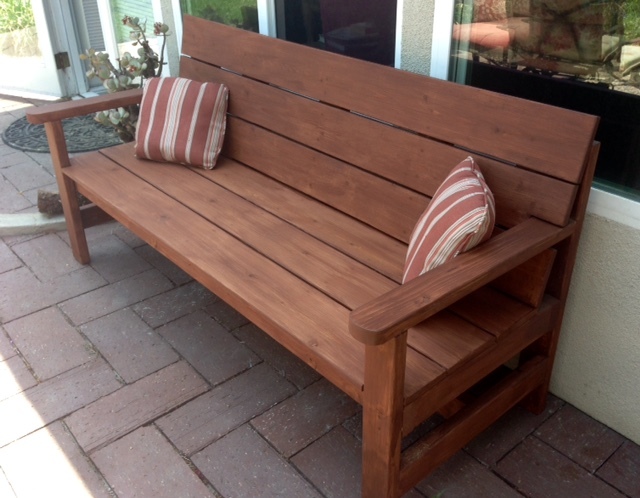
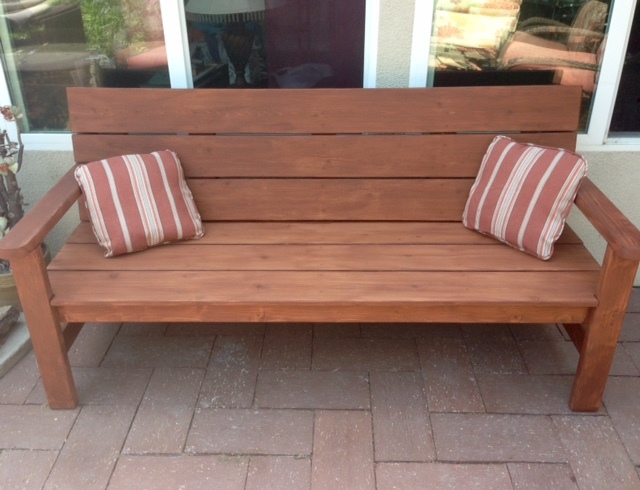
Great plans! I modified the bench by adding a slanted back (which enabled me to put the slats closer together), extending and curving the front of the arms and extended the seat to the outside of the legs.
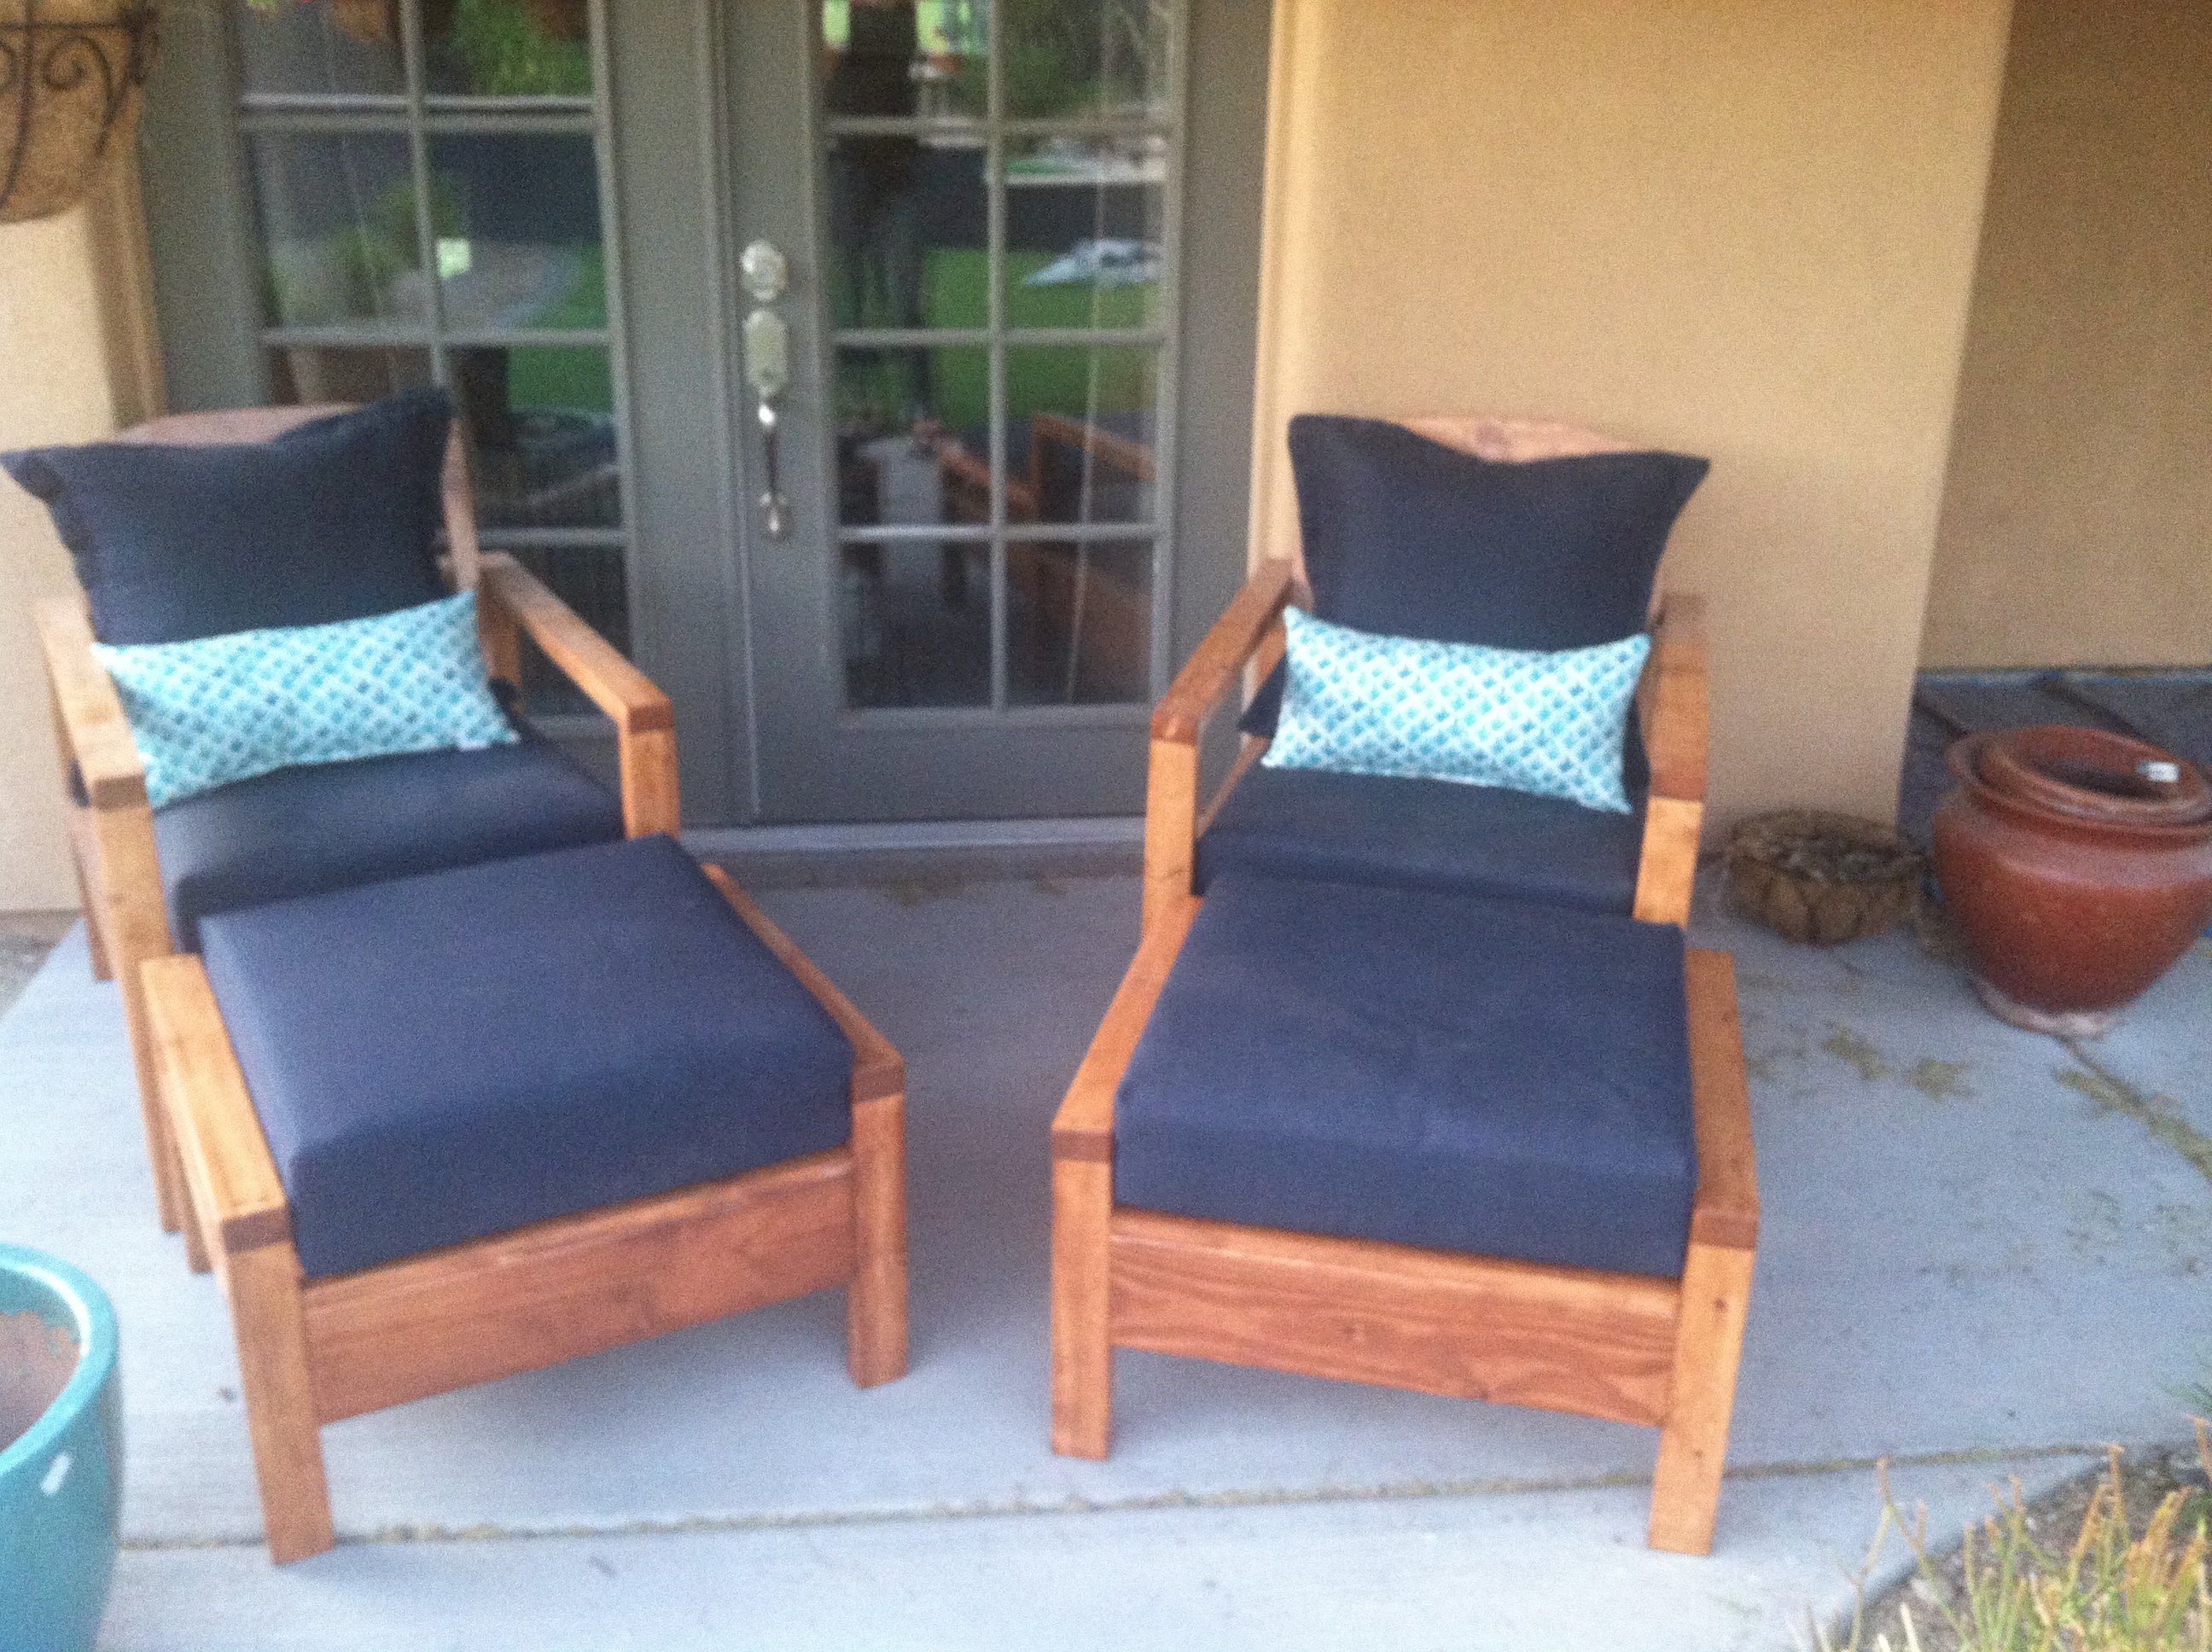
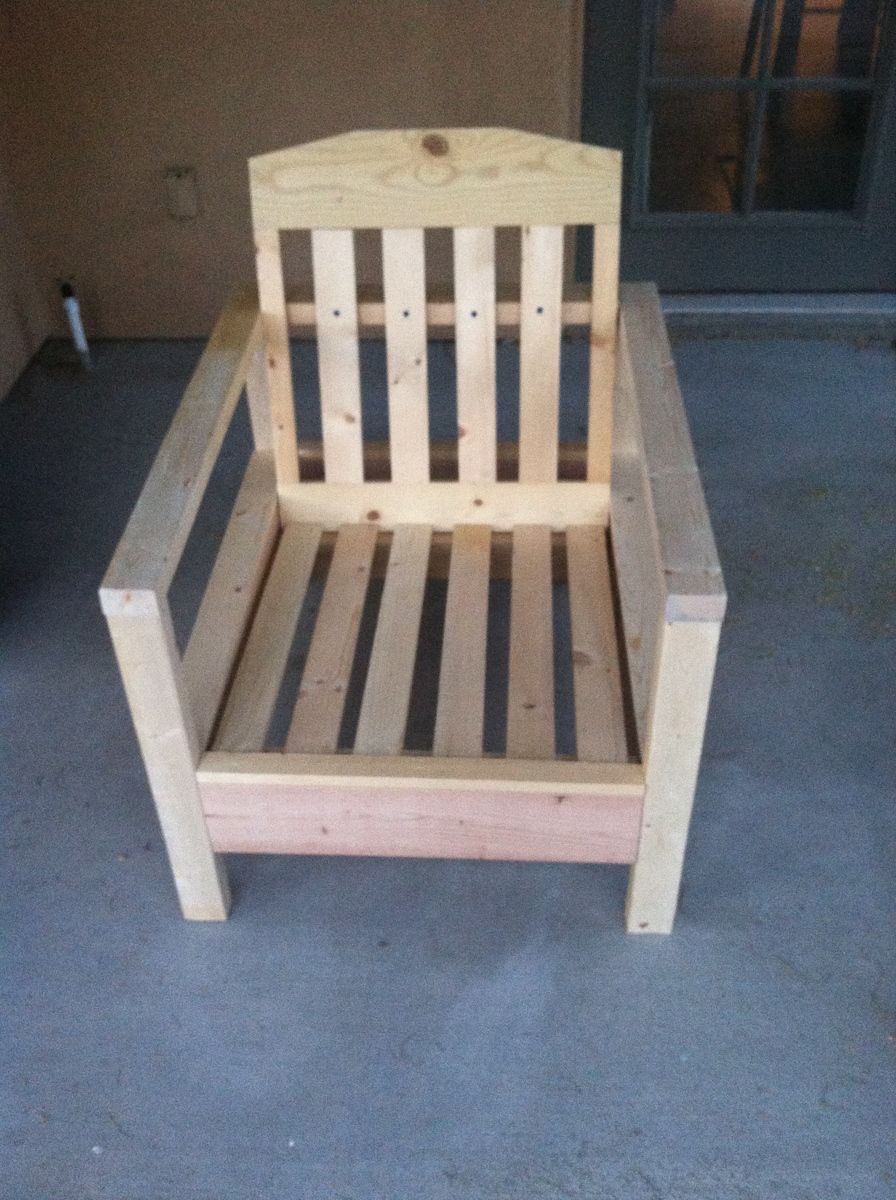
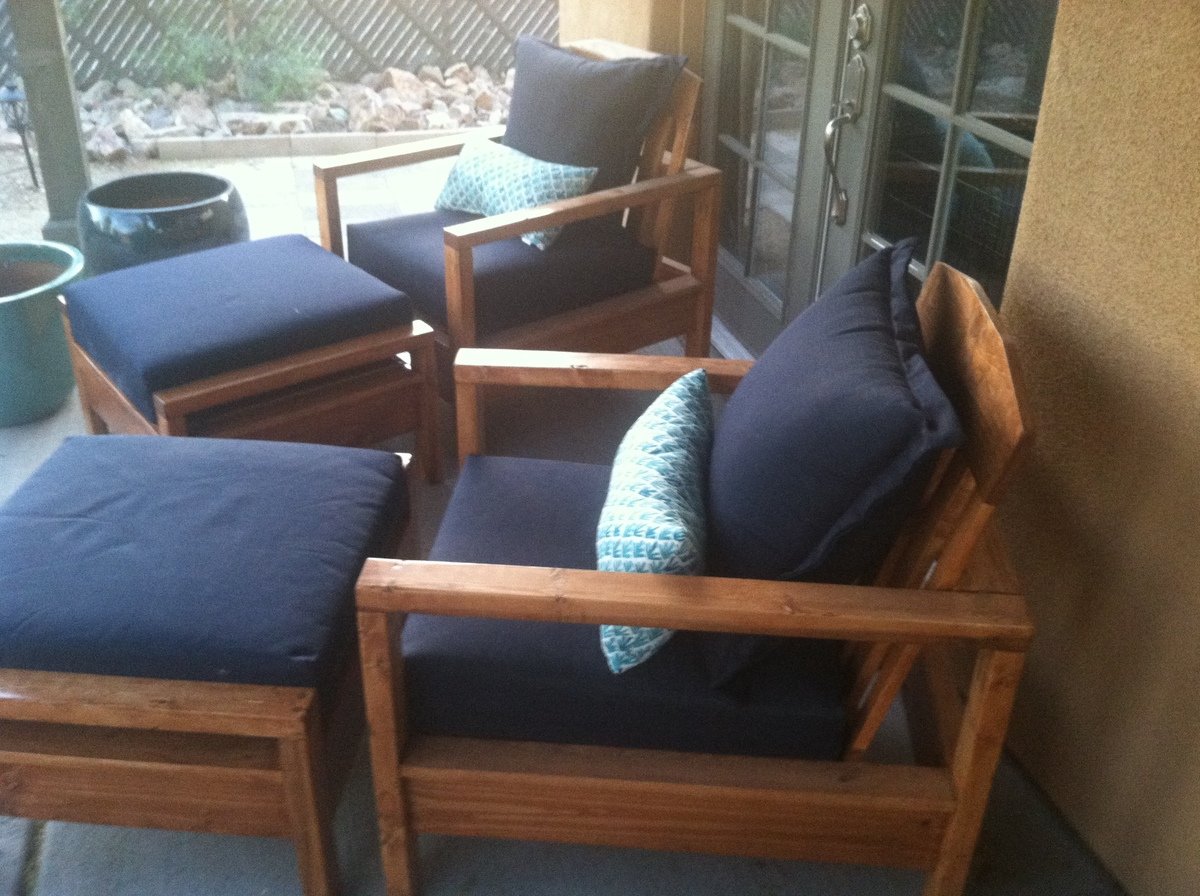
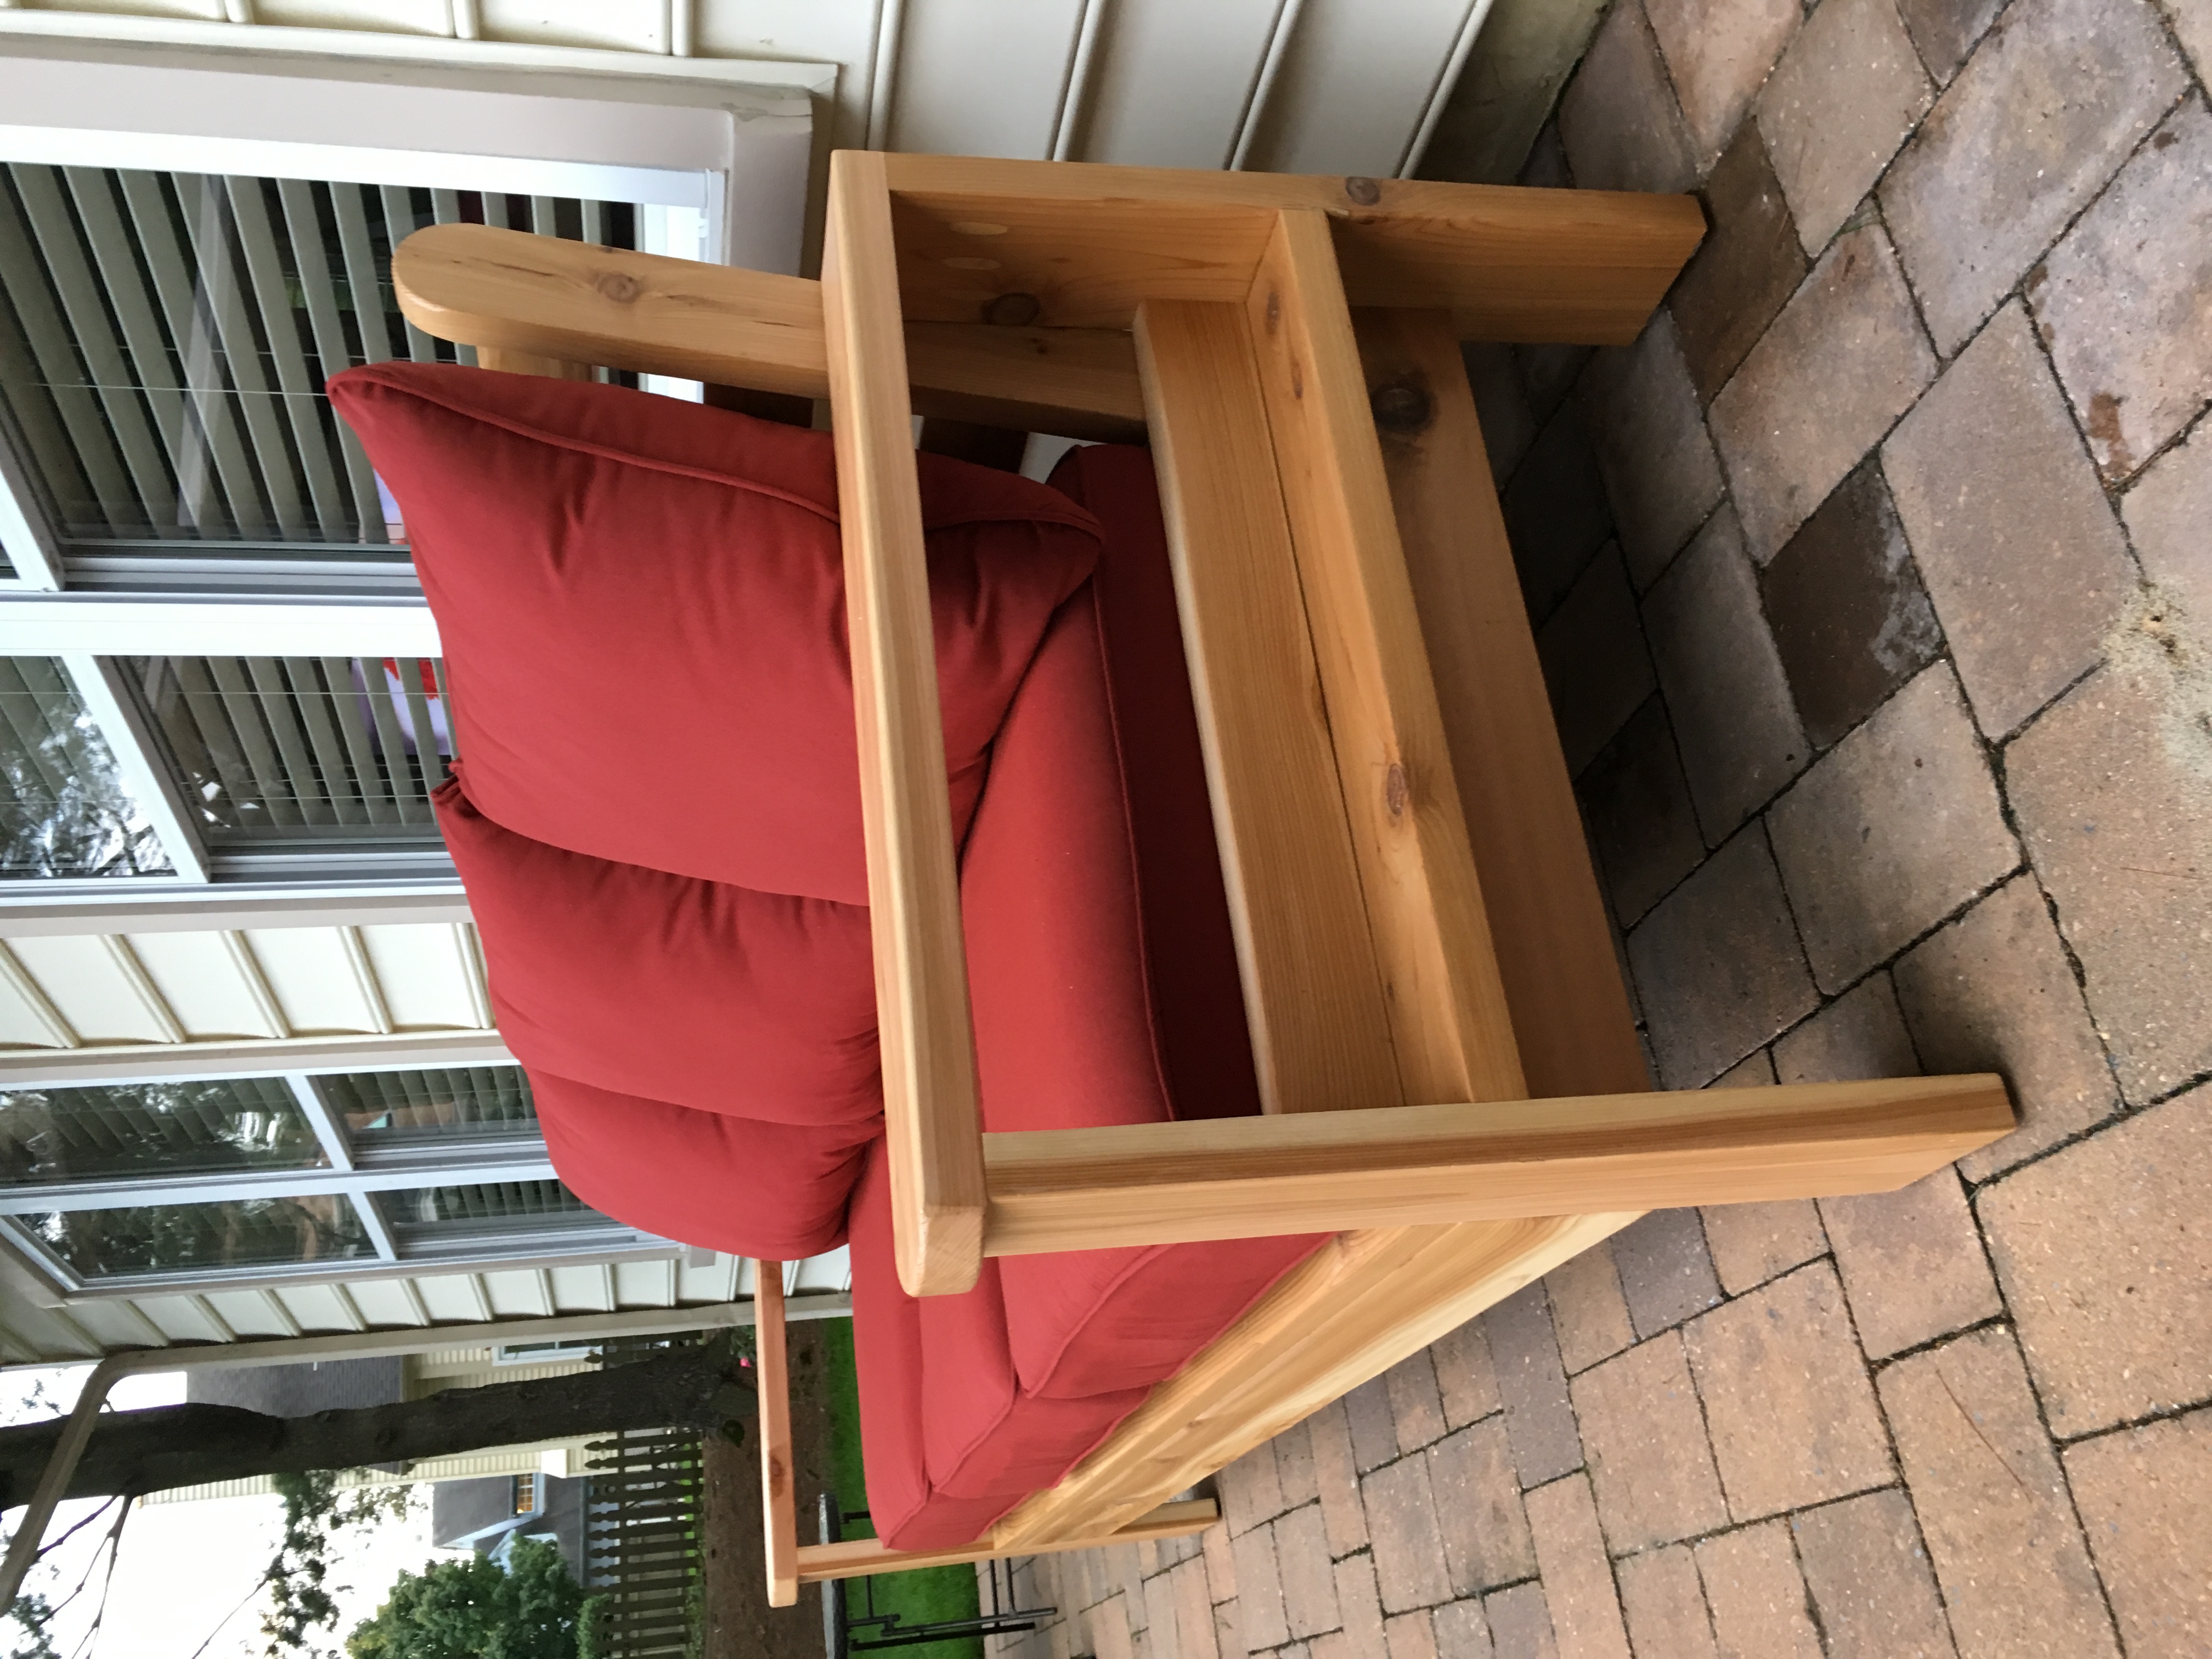
These chairs followed the simple white outdoor chair instructions. There were a few adaptations. I used 2x3s instead of 2x2s for the legs, like in the simple white outdoor loveseat instructions. I purchased my cushions from Target, and their dimensions are different than the cushions used in the instructions, so I changed some of the chair dimensions. I created the pattern for the ottomans, but it is very much based on the simple white outdoor chair instructions.
Fun project and happy with the results. Staining instead of painting probably made the project take twice as long.


Thu, 05/22/2014 - 13:37
Your chairs are gorgeous - I feel compelled to go copy your handiwork immediately. :)
Would you mind sharing a link to the Target cushions you used? They look great on your chairs.
Sat, 05/24/2014 - 10:56
Thanks!
Threshold Outdoor Deep Seating Cushion:
http://www.target.com/p/threshold-outdoor-deep-seating-cushion/-/A-1508…
Threshold Outdoor Deep Seating Back Cushion:
http://www.target.com/p/threshold-outdoor-deep-seating-back-cushion/-/A…
Just a note on the cushions, they are beautiful and highly economical, but that also means they likely aren't as supportive as cushions 2 or 3 times their price and the covers do not have a zipper, so you can't wash them. That being said, I am happy with cushions.
Fri, 05/23/2014 - 07:44
I built these chairs and love seat last summer and have sat on them wishing I had ottomans! You inspired me to build the ottomans. I have the same Theshold cushions from Target and they are great! Good job!
Sat, 05/24/2014 - 11:09
Thanks!
The only tricksy part about the ottomans for me was attaching the "armrests". There isn't enough room to use the pocket hole screws after attaching the side aprons. I tried screwing the "armrests" to the legs before the aprons, but that just caused problems. In the end I screwed the side aprons and legs together and then screwed the "armrests" down from the top. I used wood filler to fill in the holes above the screw heads. So it isn't quite as clean looking, but worked for me.

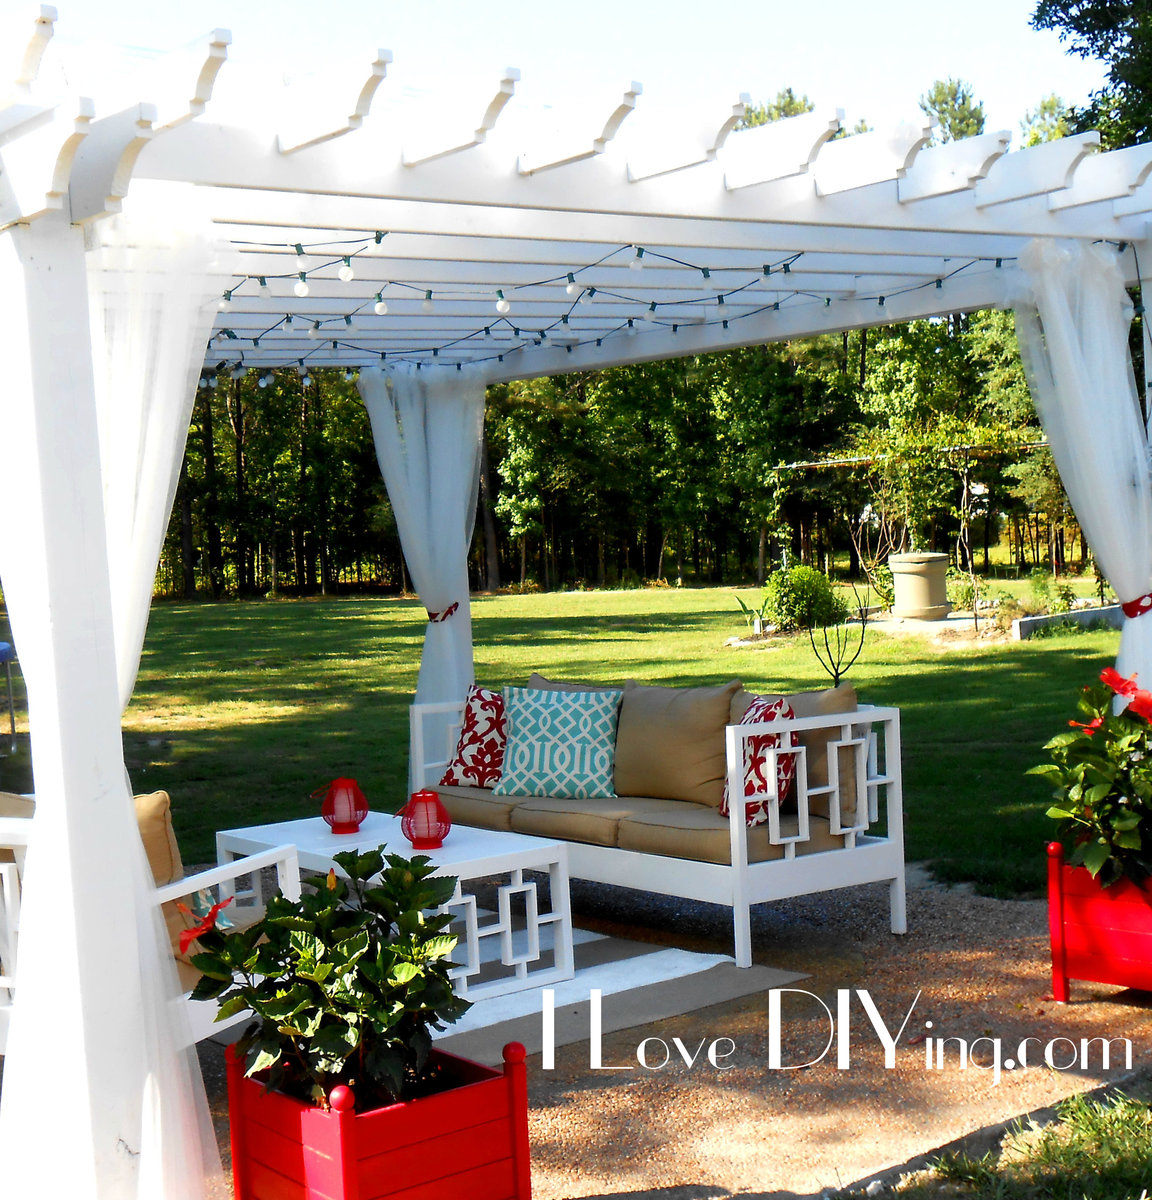
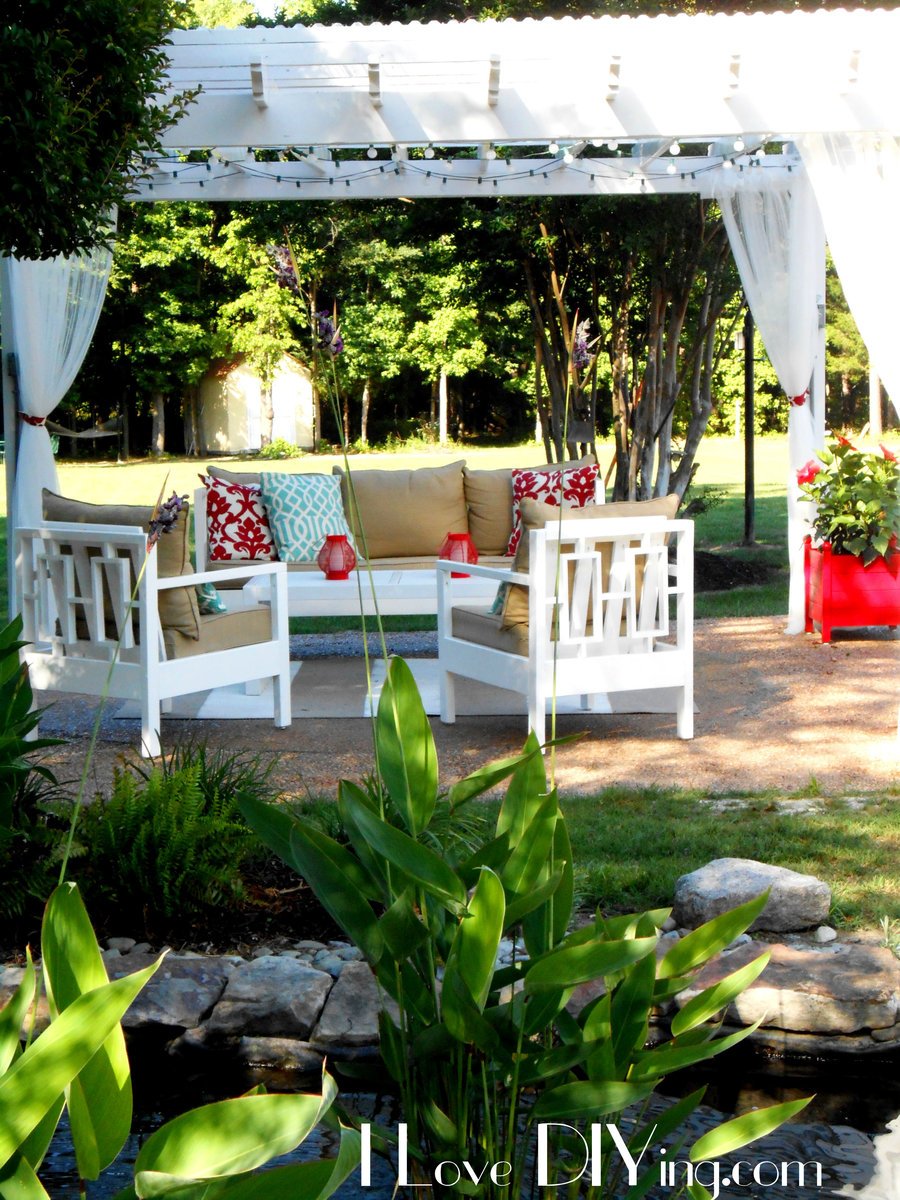
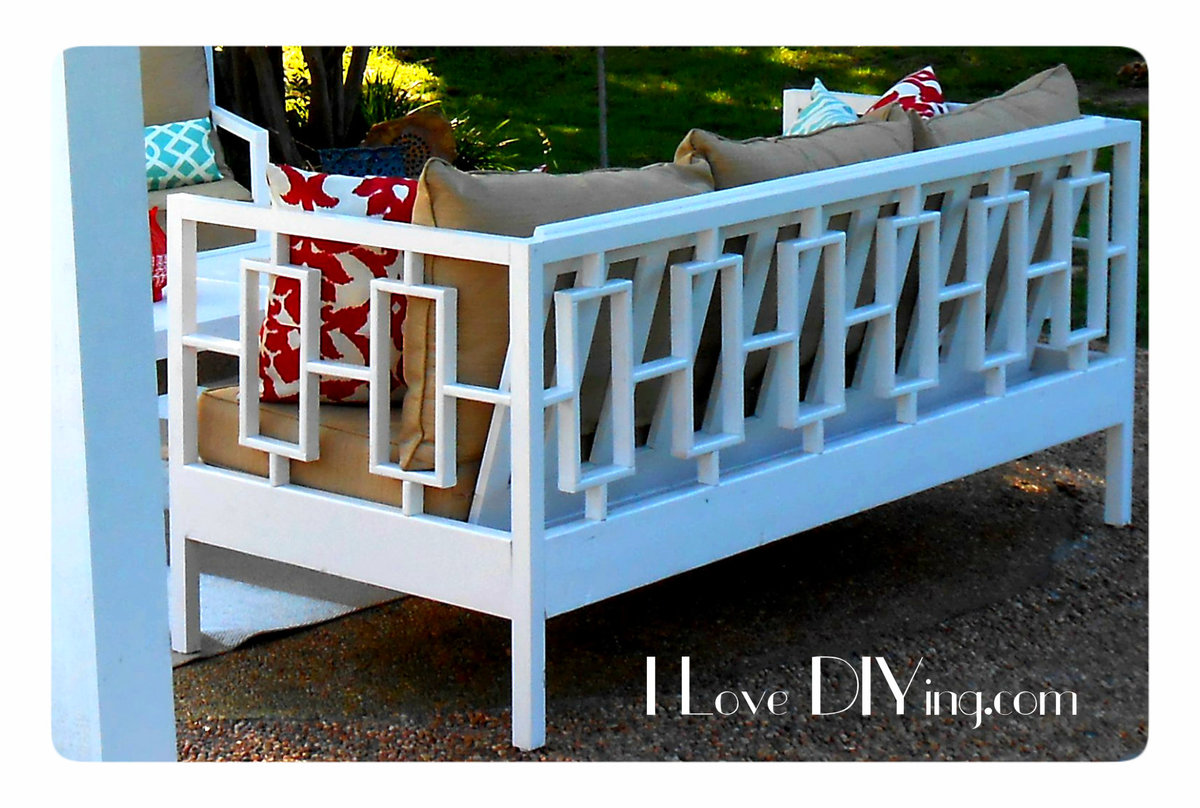
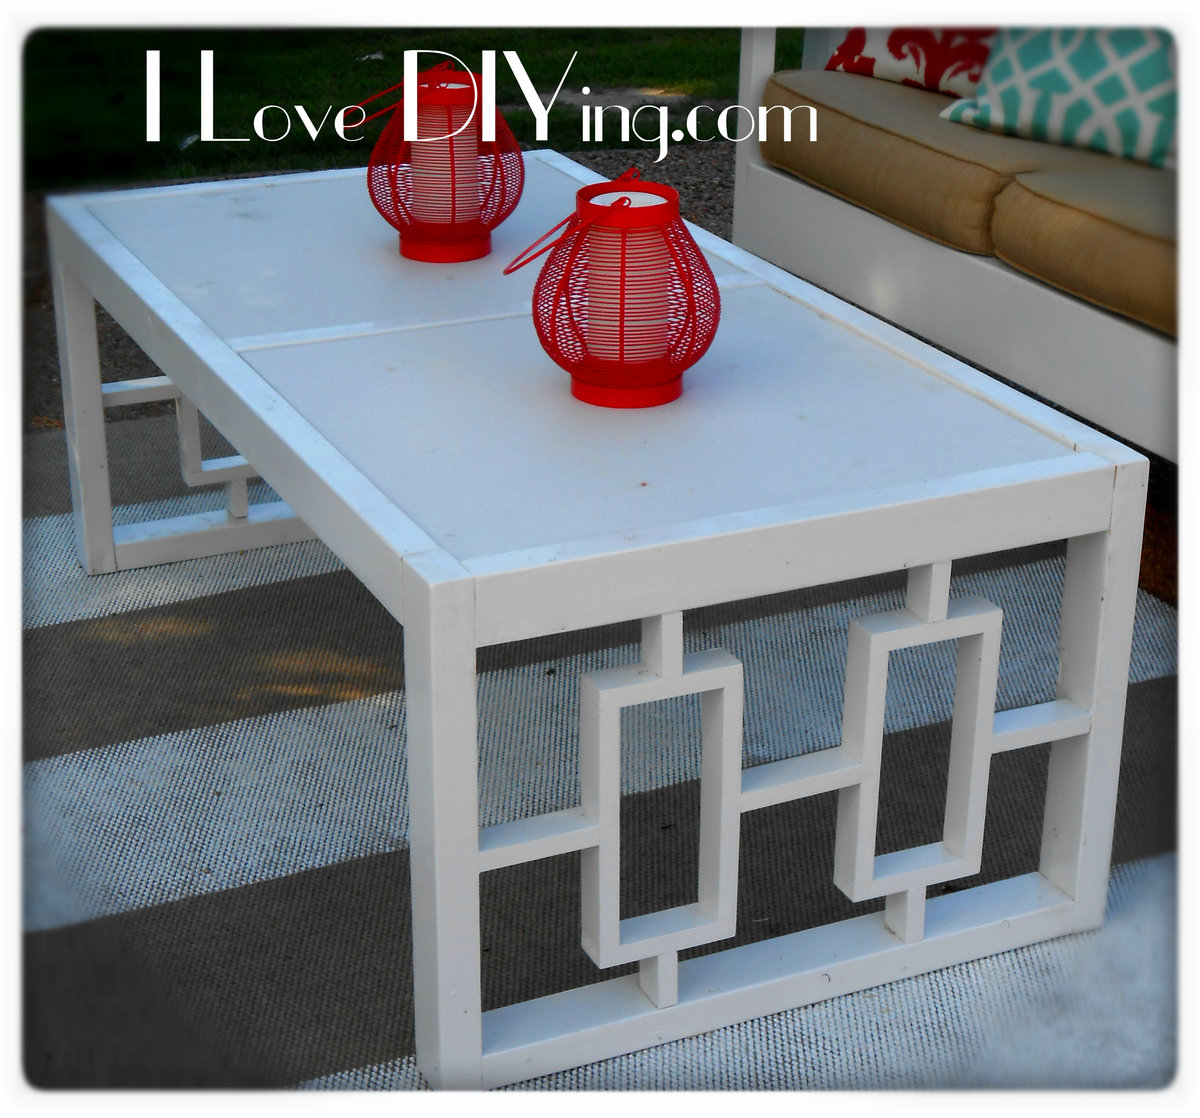
The pergola is finally complete! I'm sure I'll be adding some more things, but for now....I'm happy. I can not take credit for the Pergola, my husband built that, but there are lots of projects inside to tell you about. I built the sofa, coffee table, 2 chairs and 2 planters. It's a great spot for entertaining or just sitting with glass of wine. I really loved the Rectangles Daybed , but I really had no use for a Daybed, so with a few modifications, I came up with the sofa version. To make it more comfortable I used the slanted back idea from the simple outdoor sofa plan.I love how it turned out and it was fairly inexpensive too. Lumber cost was around $50. I used 2x 6′s, 2×2 furring strips, 1×2 furring strips and 1×4 furring strips. You really have to pick through the furring strips, with some patience I was able to find pieces that would work well for my project. Using the more expensive would would make things much easier, because there would be much less sanding and filling involved…but I love a bargain!! When I first built the sofa for this collection, it was for our covered porch. I was not intending to build any matching pieces. When we moved it to the pergola, I decided to build these 2 chairs. I used plan from the simple outdoor chair and modified the back to match the sofa. The lumber for the chairs cost about $25 per chair. I bought some 2X2 quartz tiles from the Habitat ReStore for $3 each! I thought they would work perfectly for the tabletop. I sketched up a quick design to match the other pieces and came up with this. I used 2×3′s and 1×2′s. The lumber cost was about $15. I also used the Square Planters with Finials plan. I love these planters do much and they were so simple! Thanks for all the fantastic plans and inspiration!!
Tue, 06/10/2014 - 11:05
Thank you so much Ana! I really love your work and can't thank you enough for all the fantastic plans!!
Thu, 05/12/2016 - 21:30
What a lovely space! Including the water feature behind the pergola. I'd love to pull it straight from your photos and drop it into my yard! (I'd better get to work!!) Thanks for sharing.
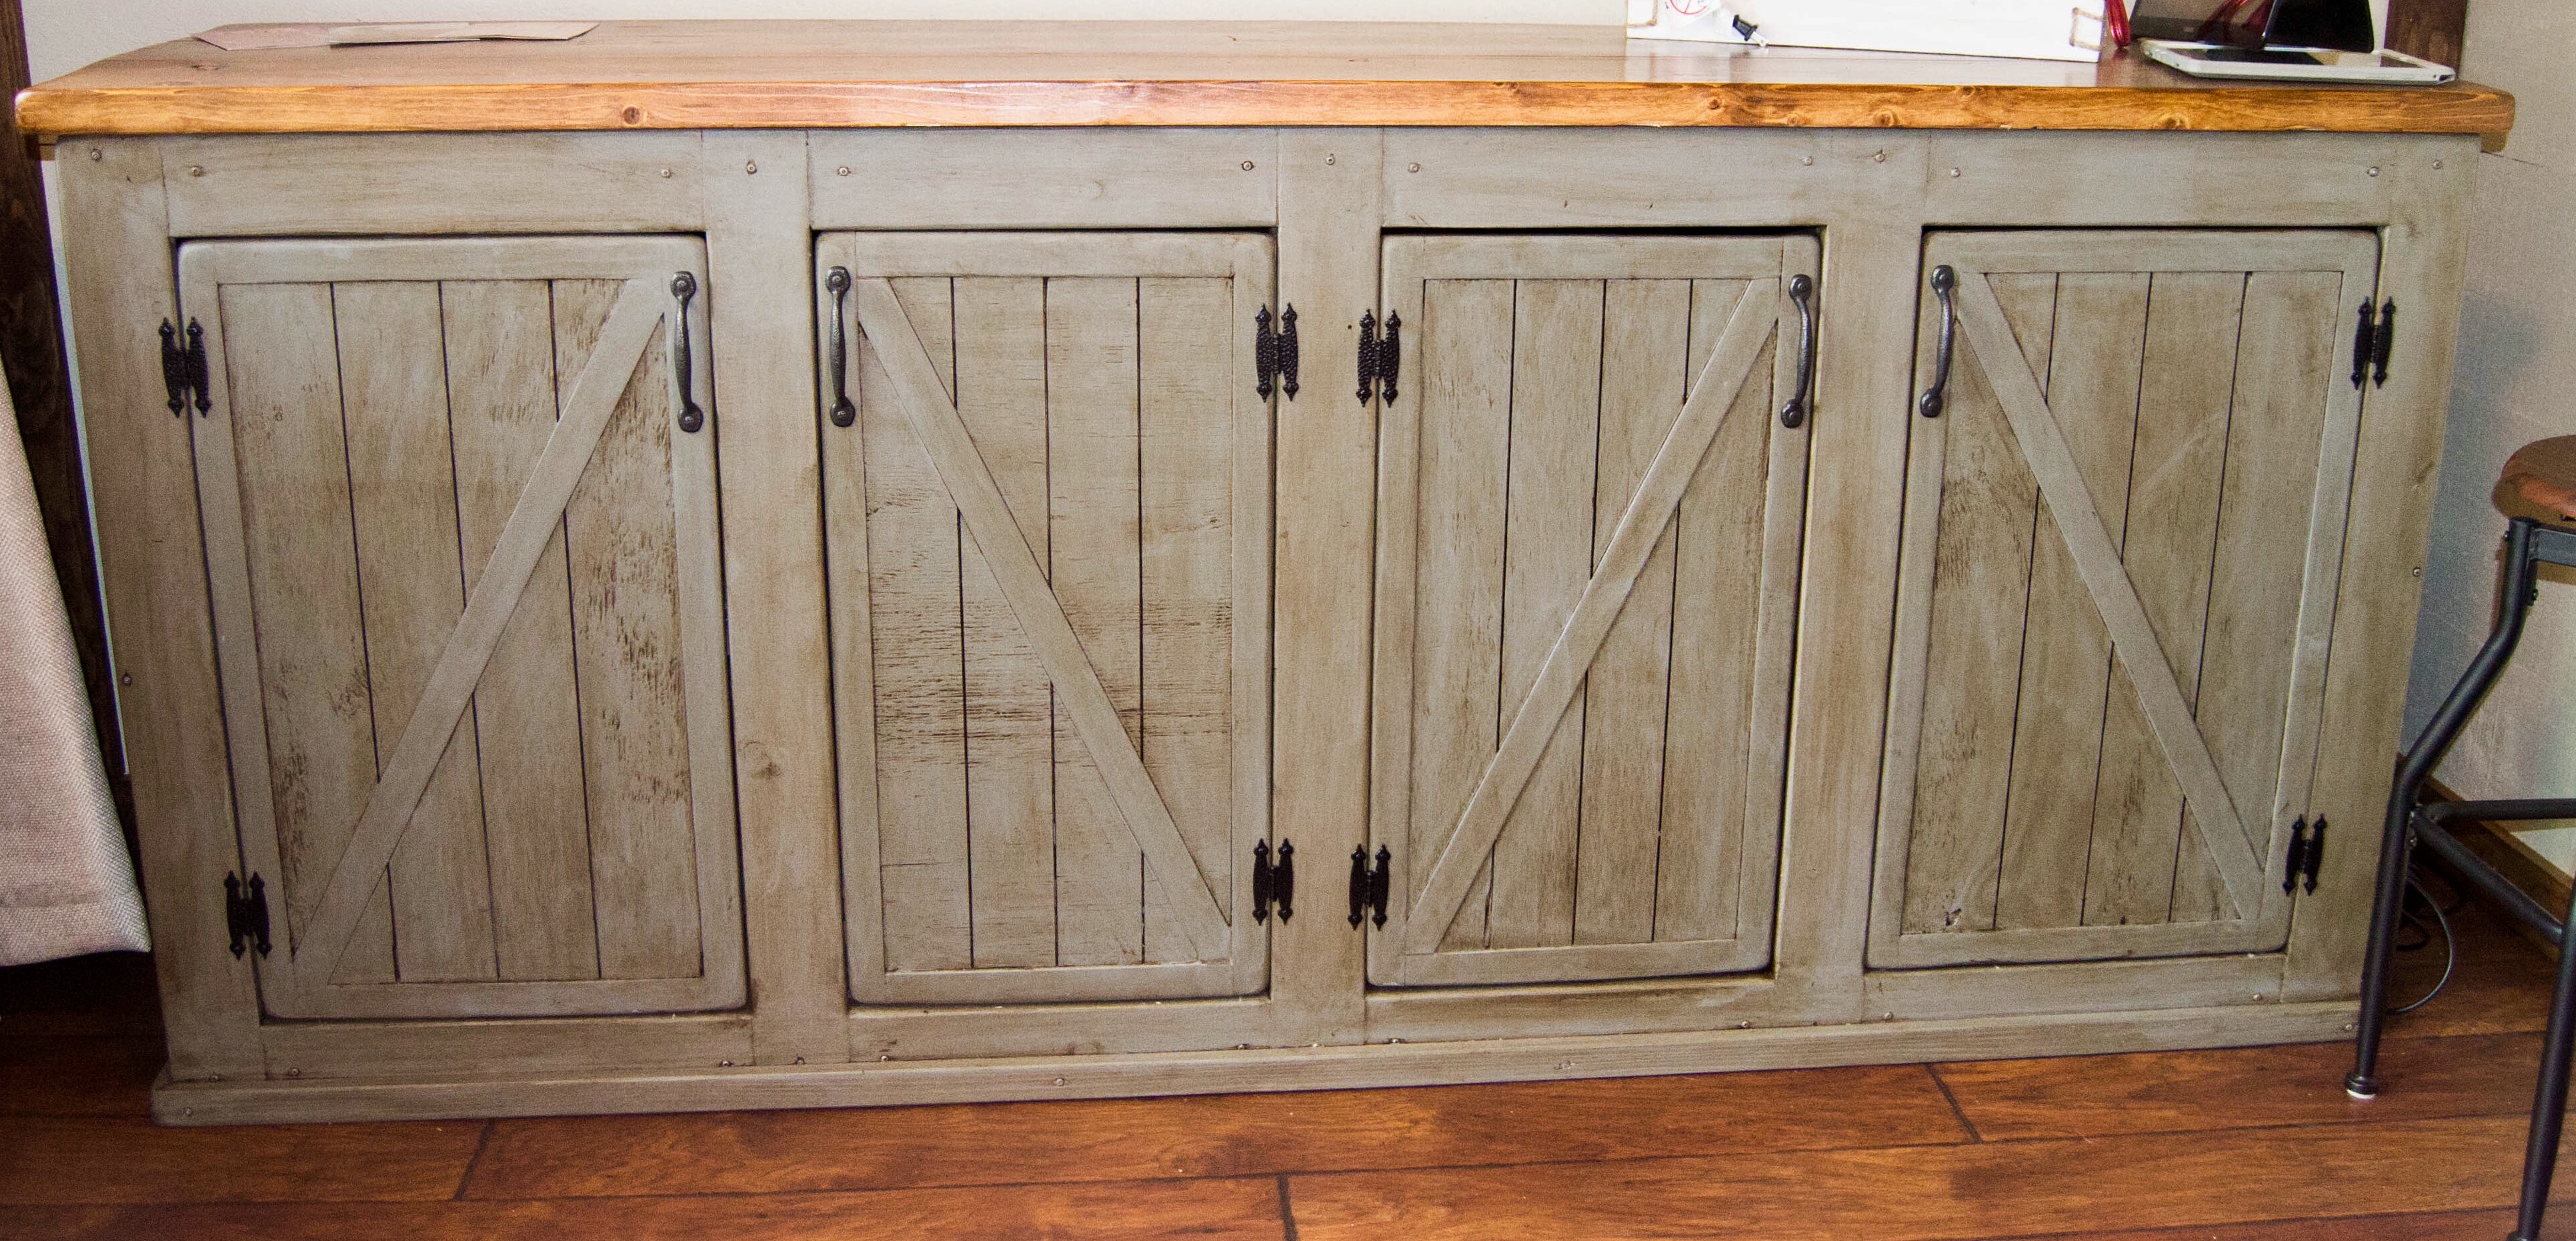
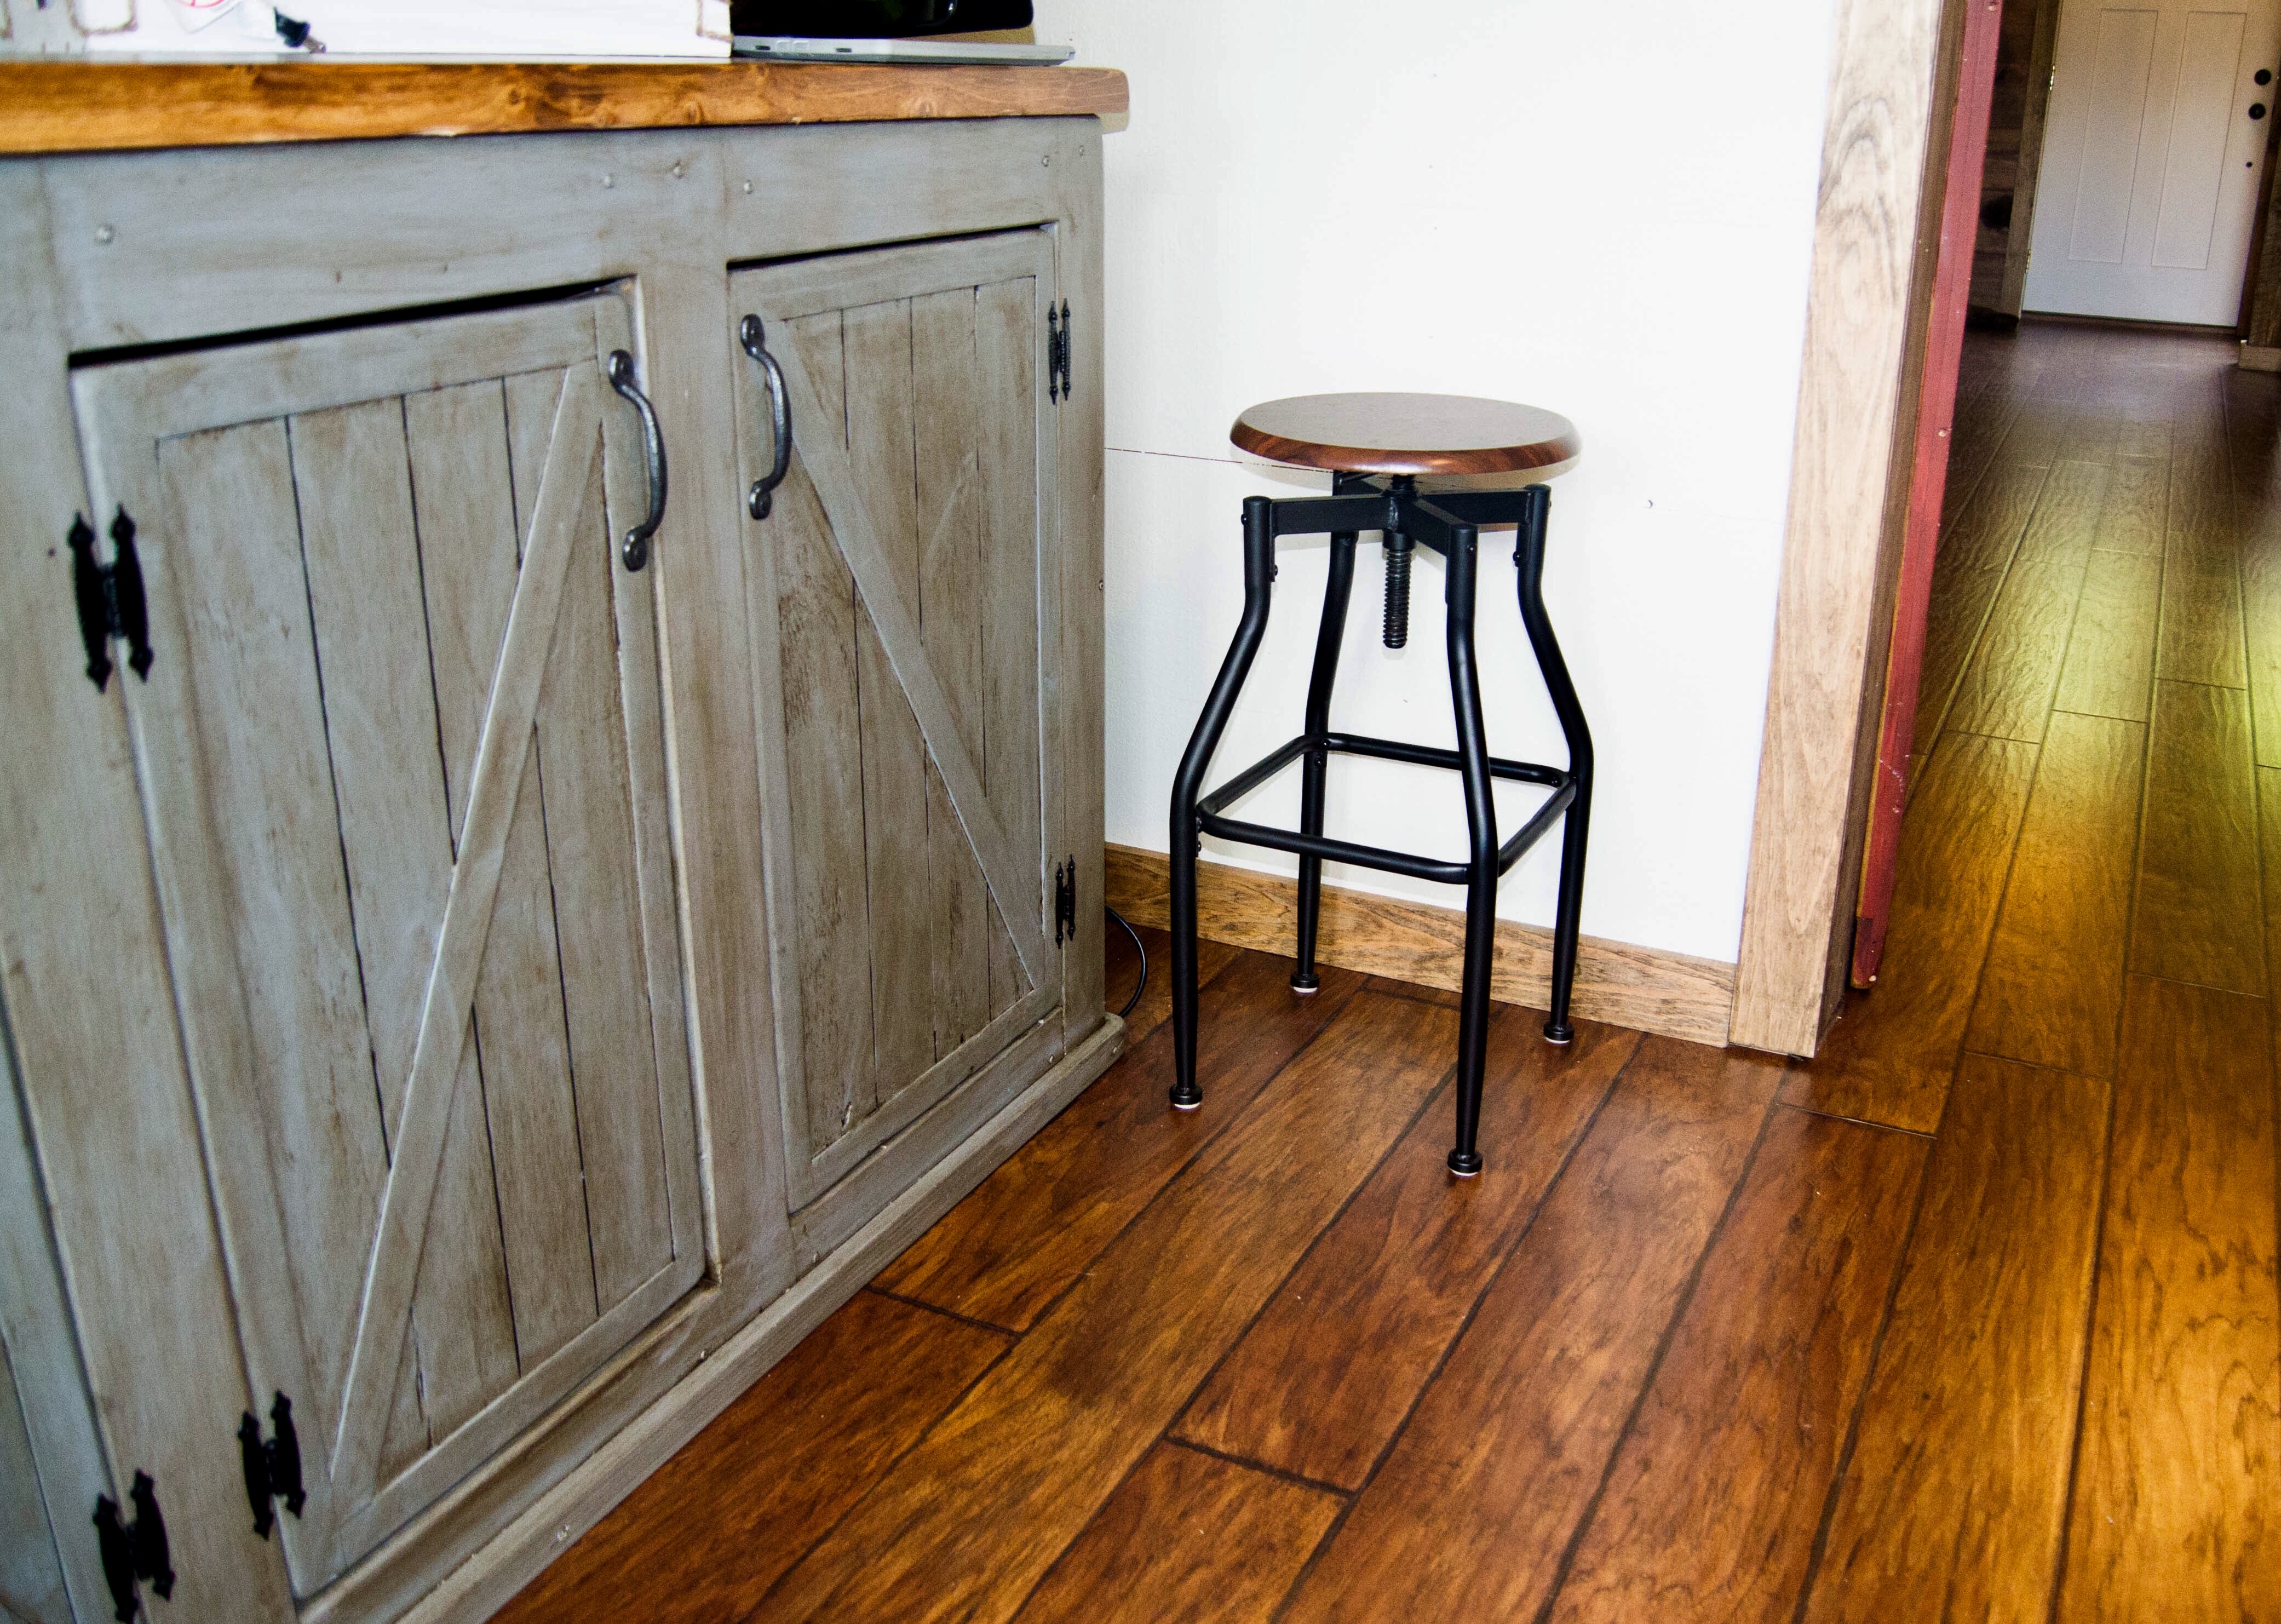
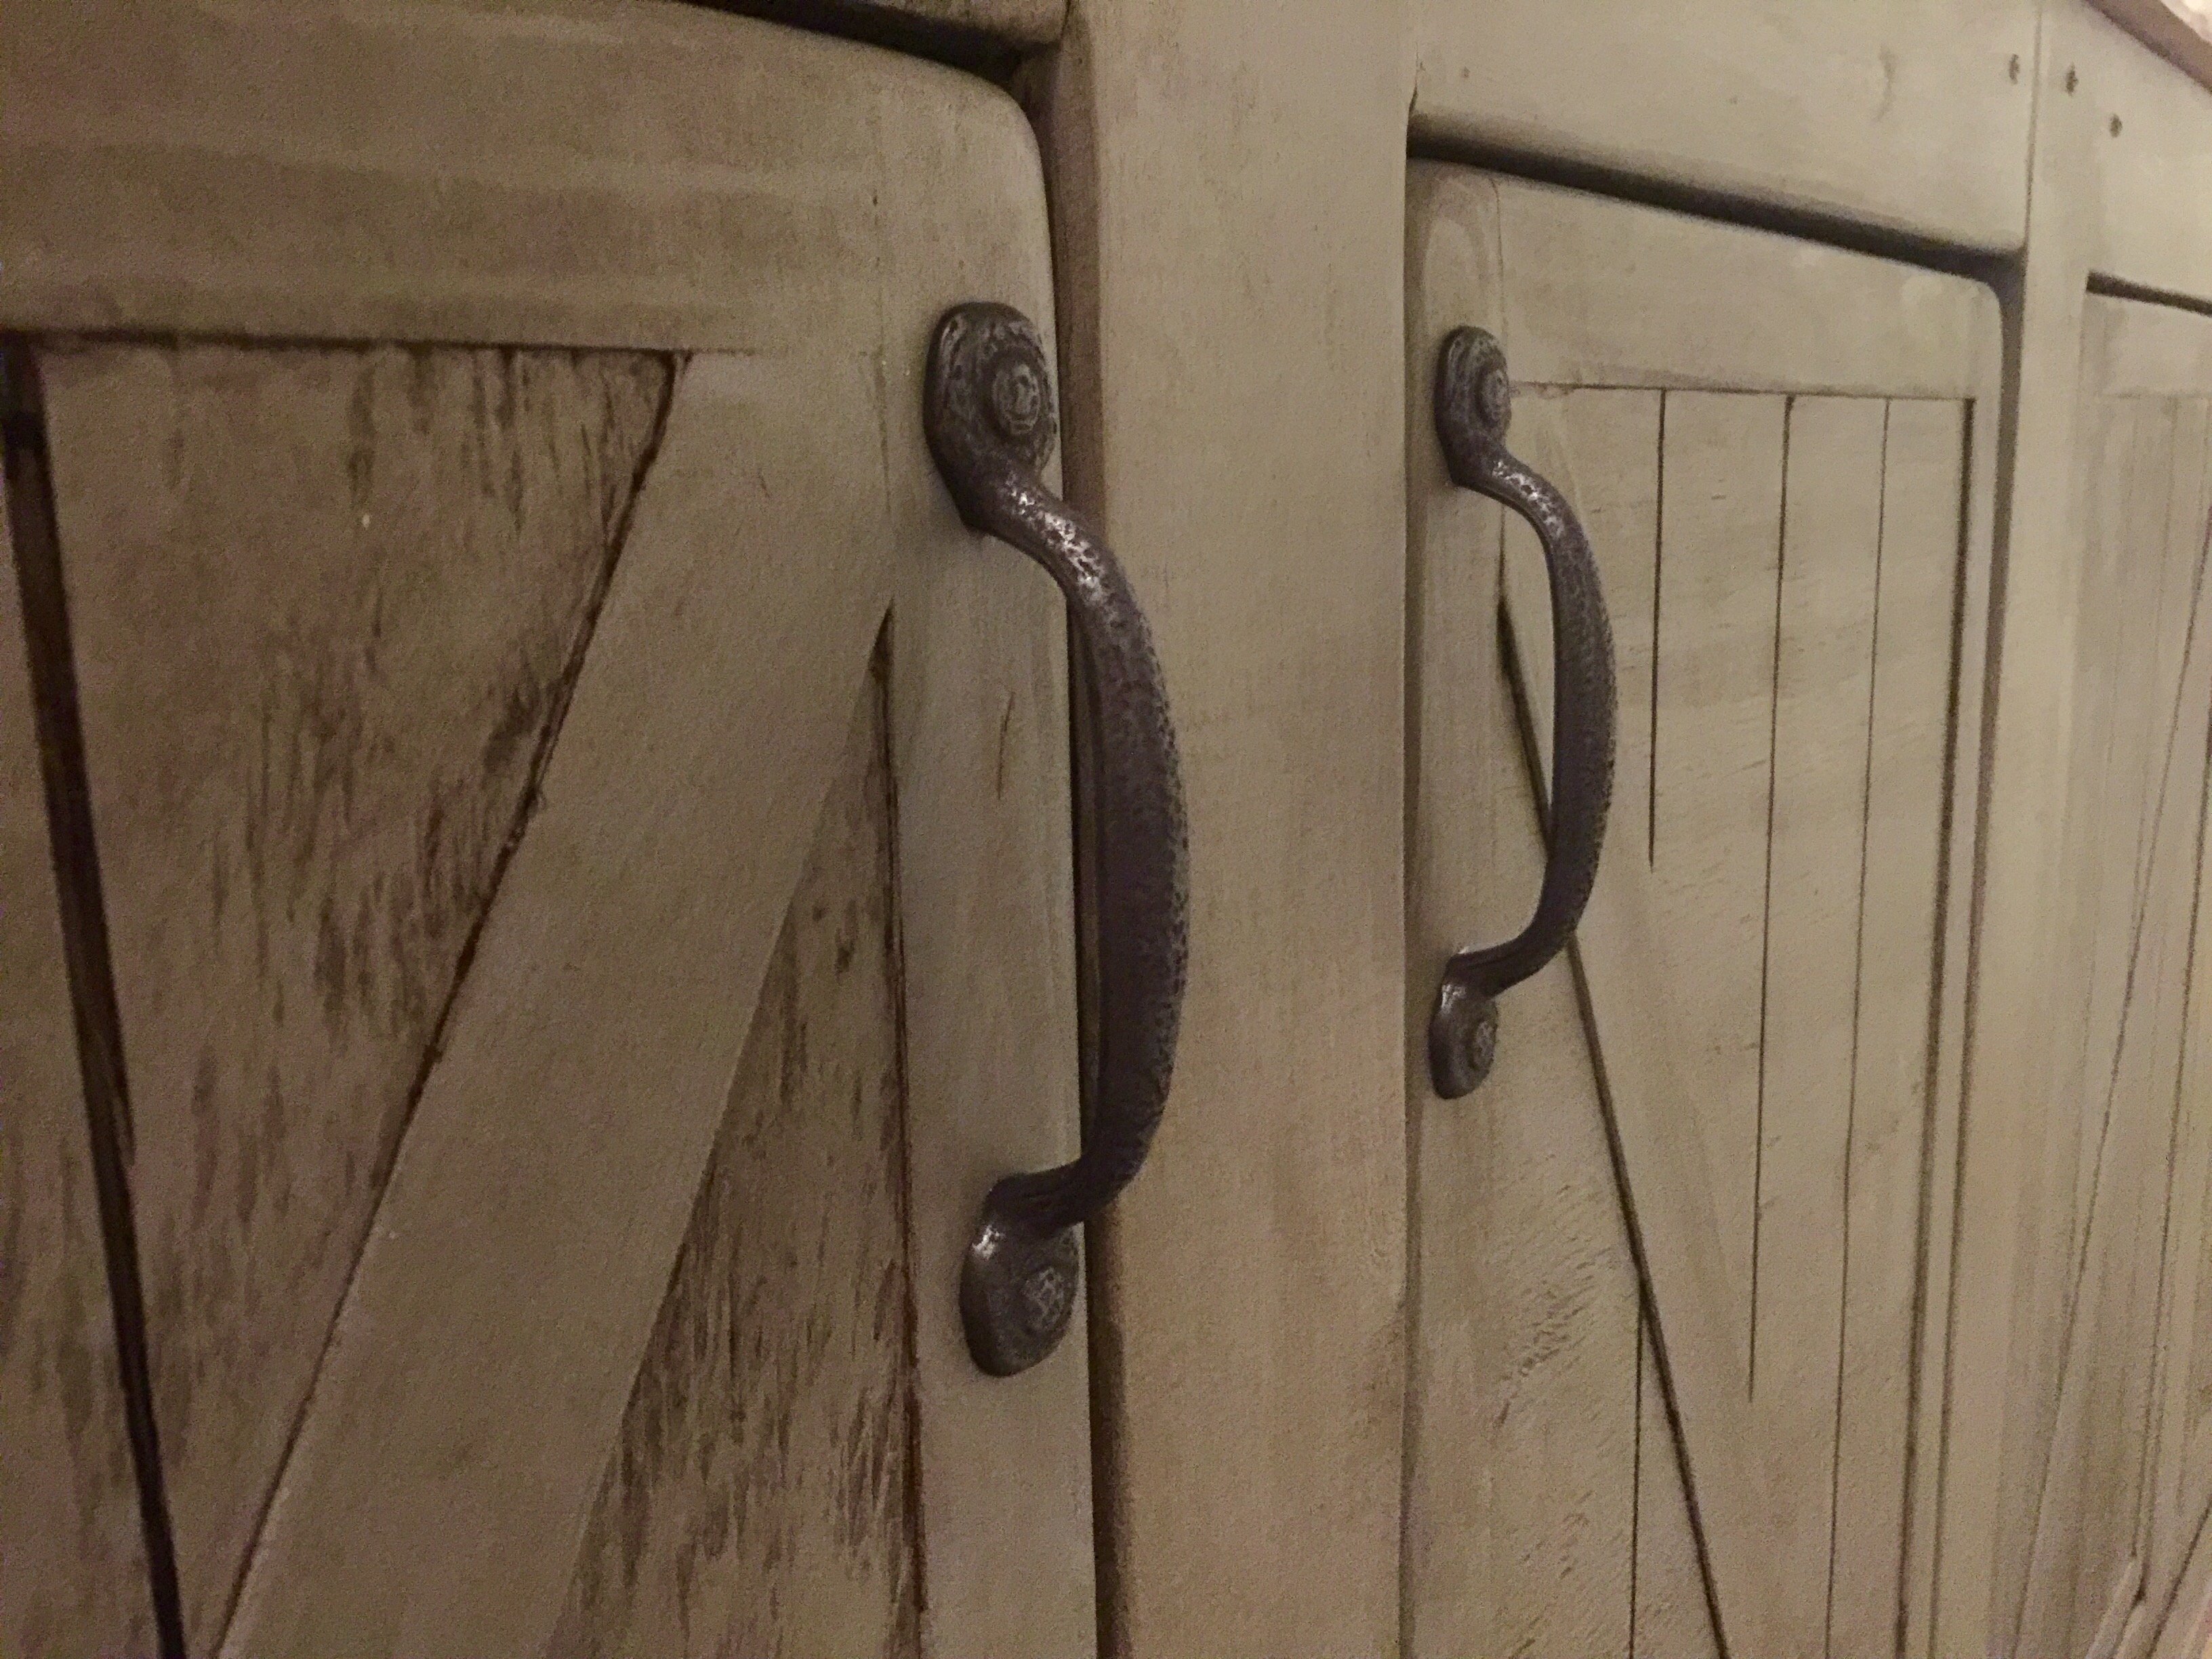
Changed up the plan a little, shortened the overall length, which changed the size of the door openings, but the biggest change was making four cabinet doors instead of two exposed sections and two sliding barn doors. Used Lowe's chalk paint products. Made this a dresser for our cabin in Maine.
Tue, 12/29/2020 - 19:01
I like it! Wondering what you used for the doors; did you use paneling or did you cut lines in 1/4" plywood to make it look like boards?
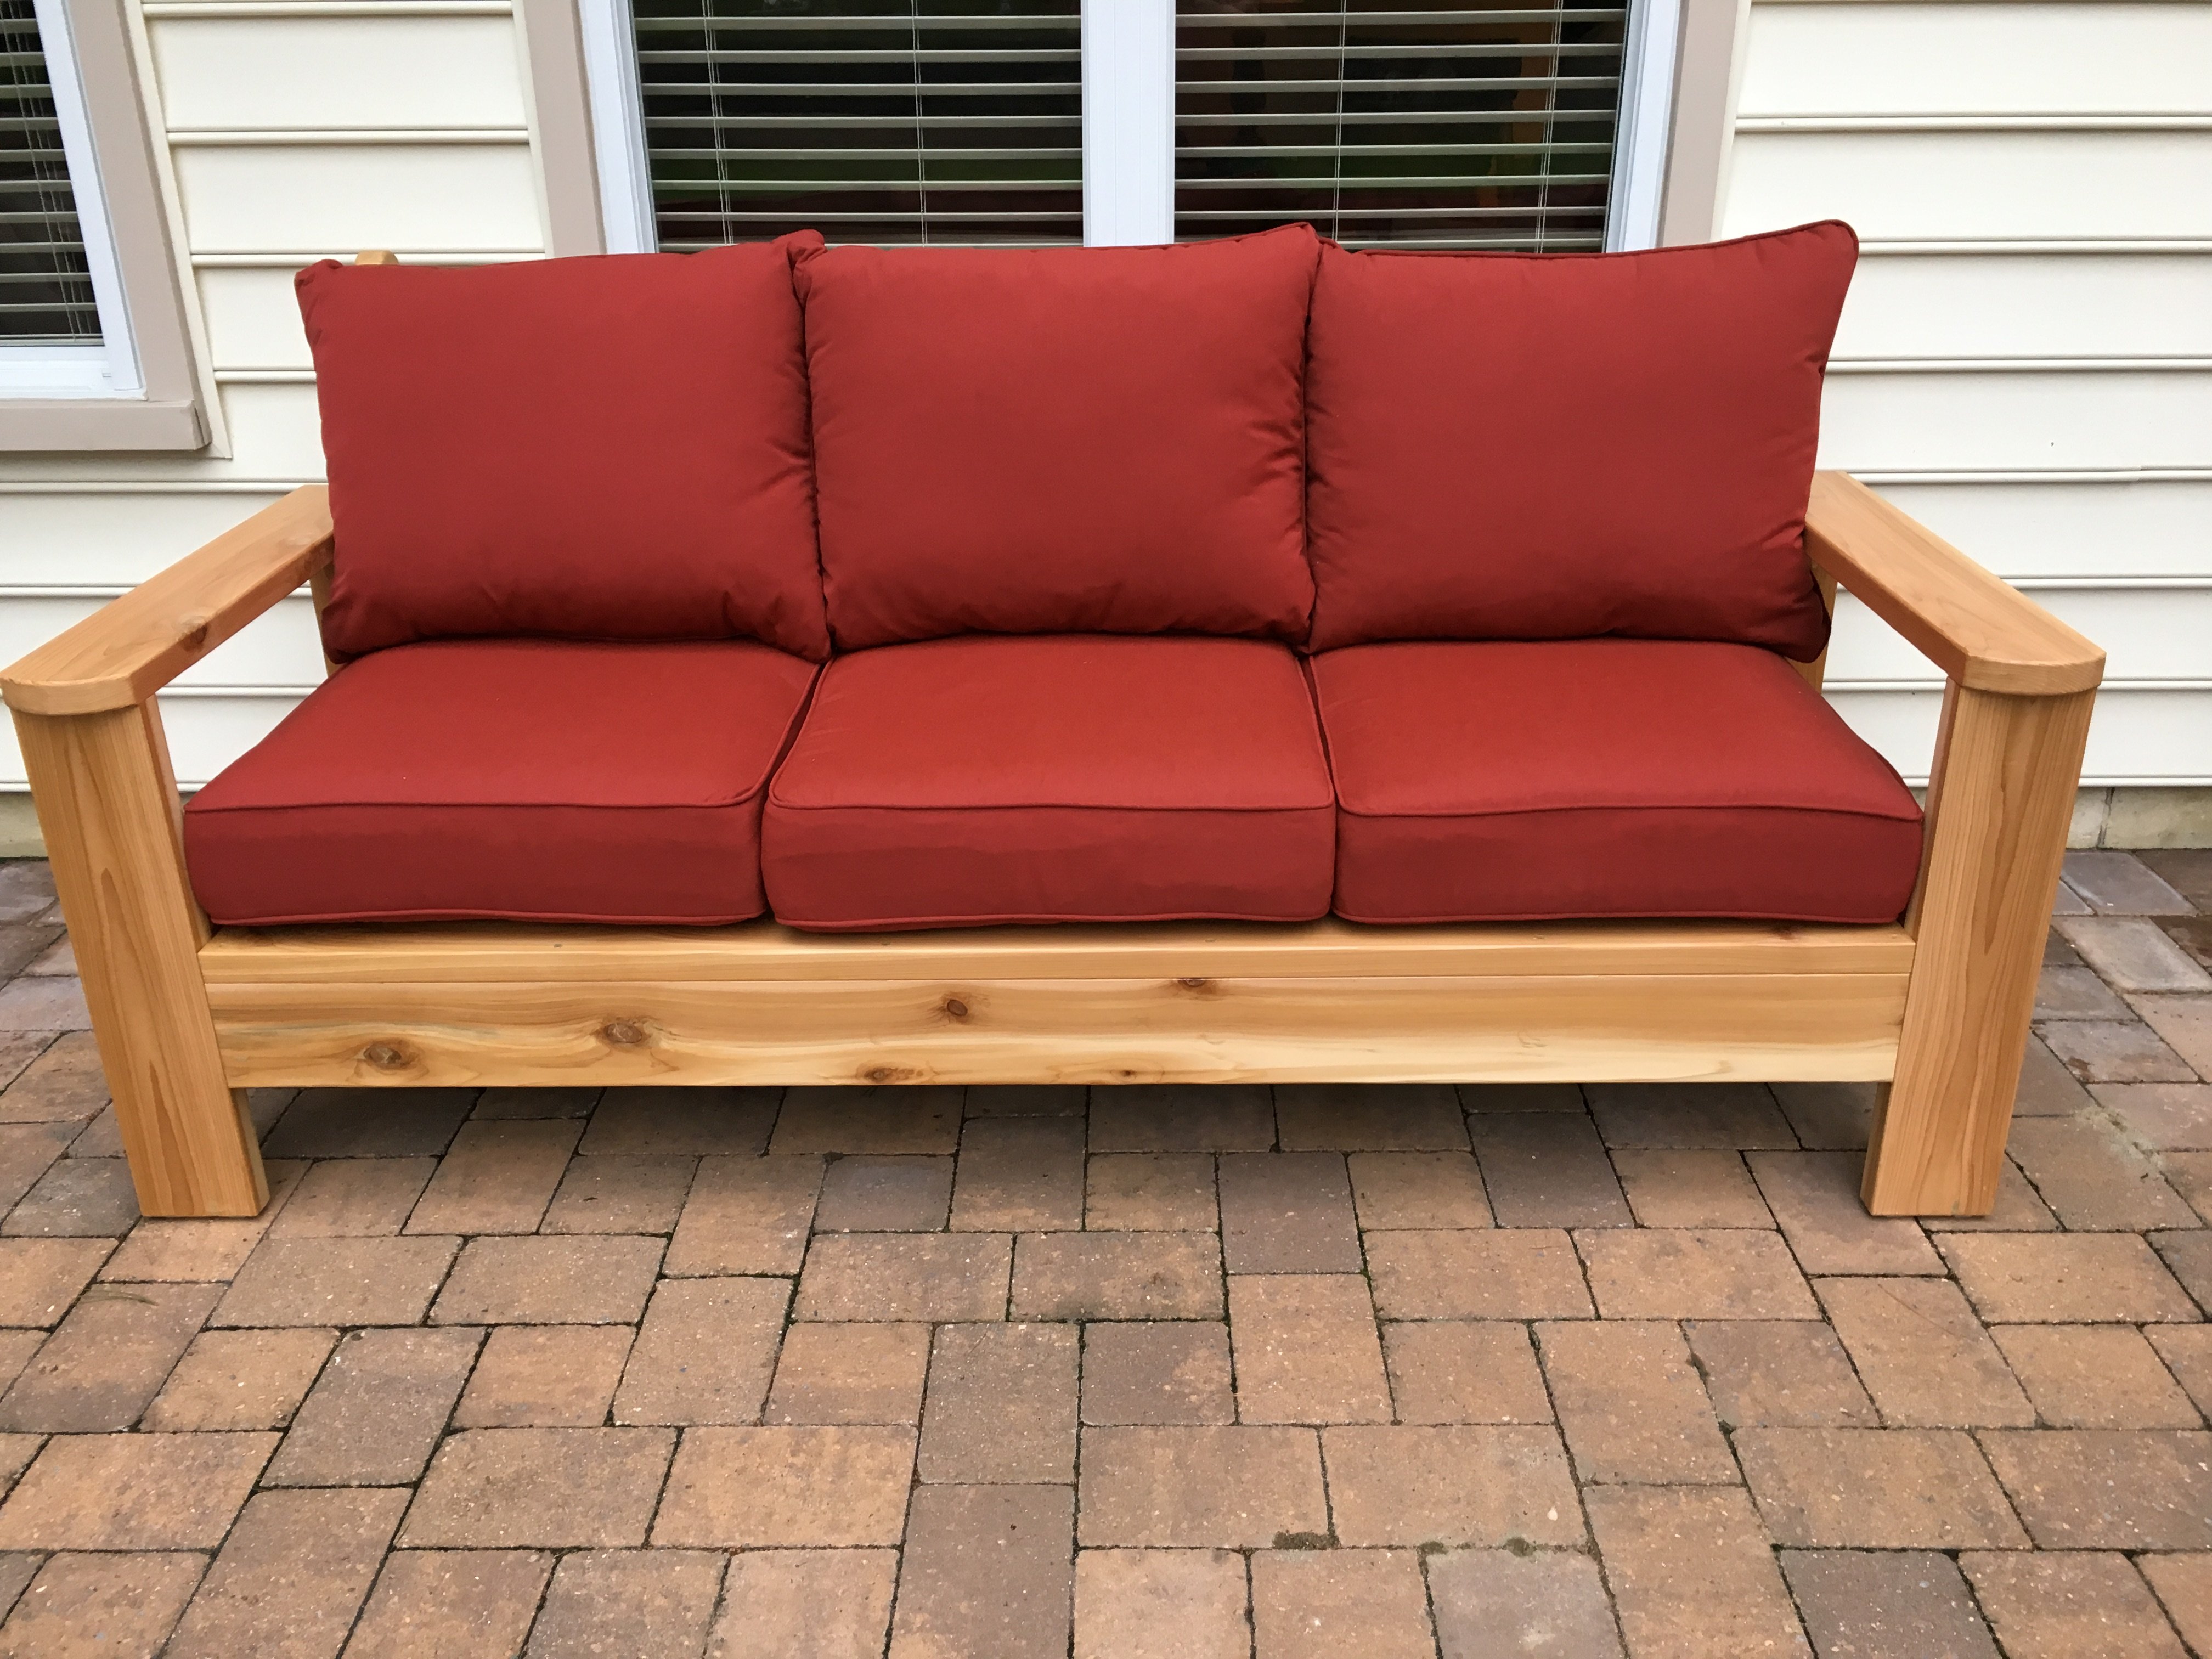
Made an outdoor sofa inspired by Ana White's plan. I made a few modifications including using 2x6's, hiding more of the non-pocket hole screws, using HD pocket holes in more areas and building an incline for the backrest. Cushions are Sunbrella from Lowe's.


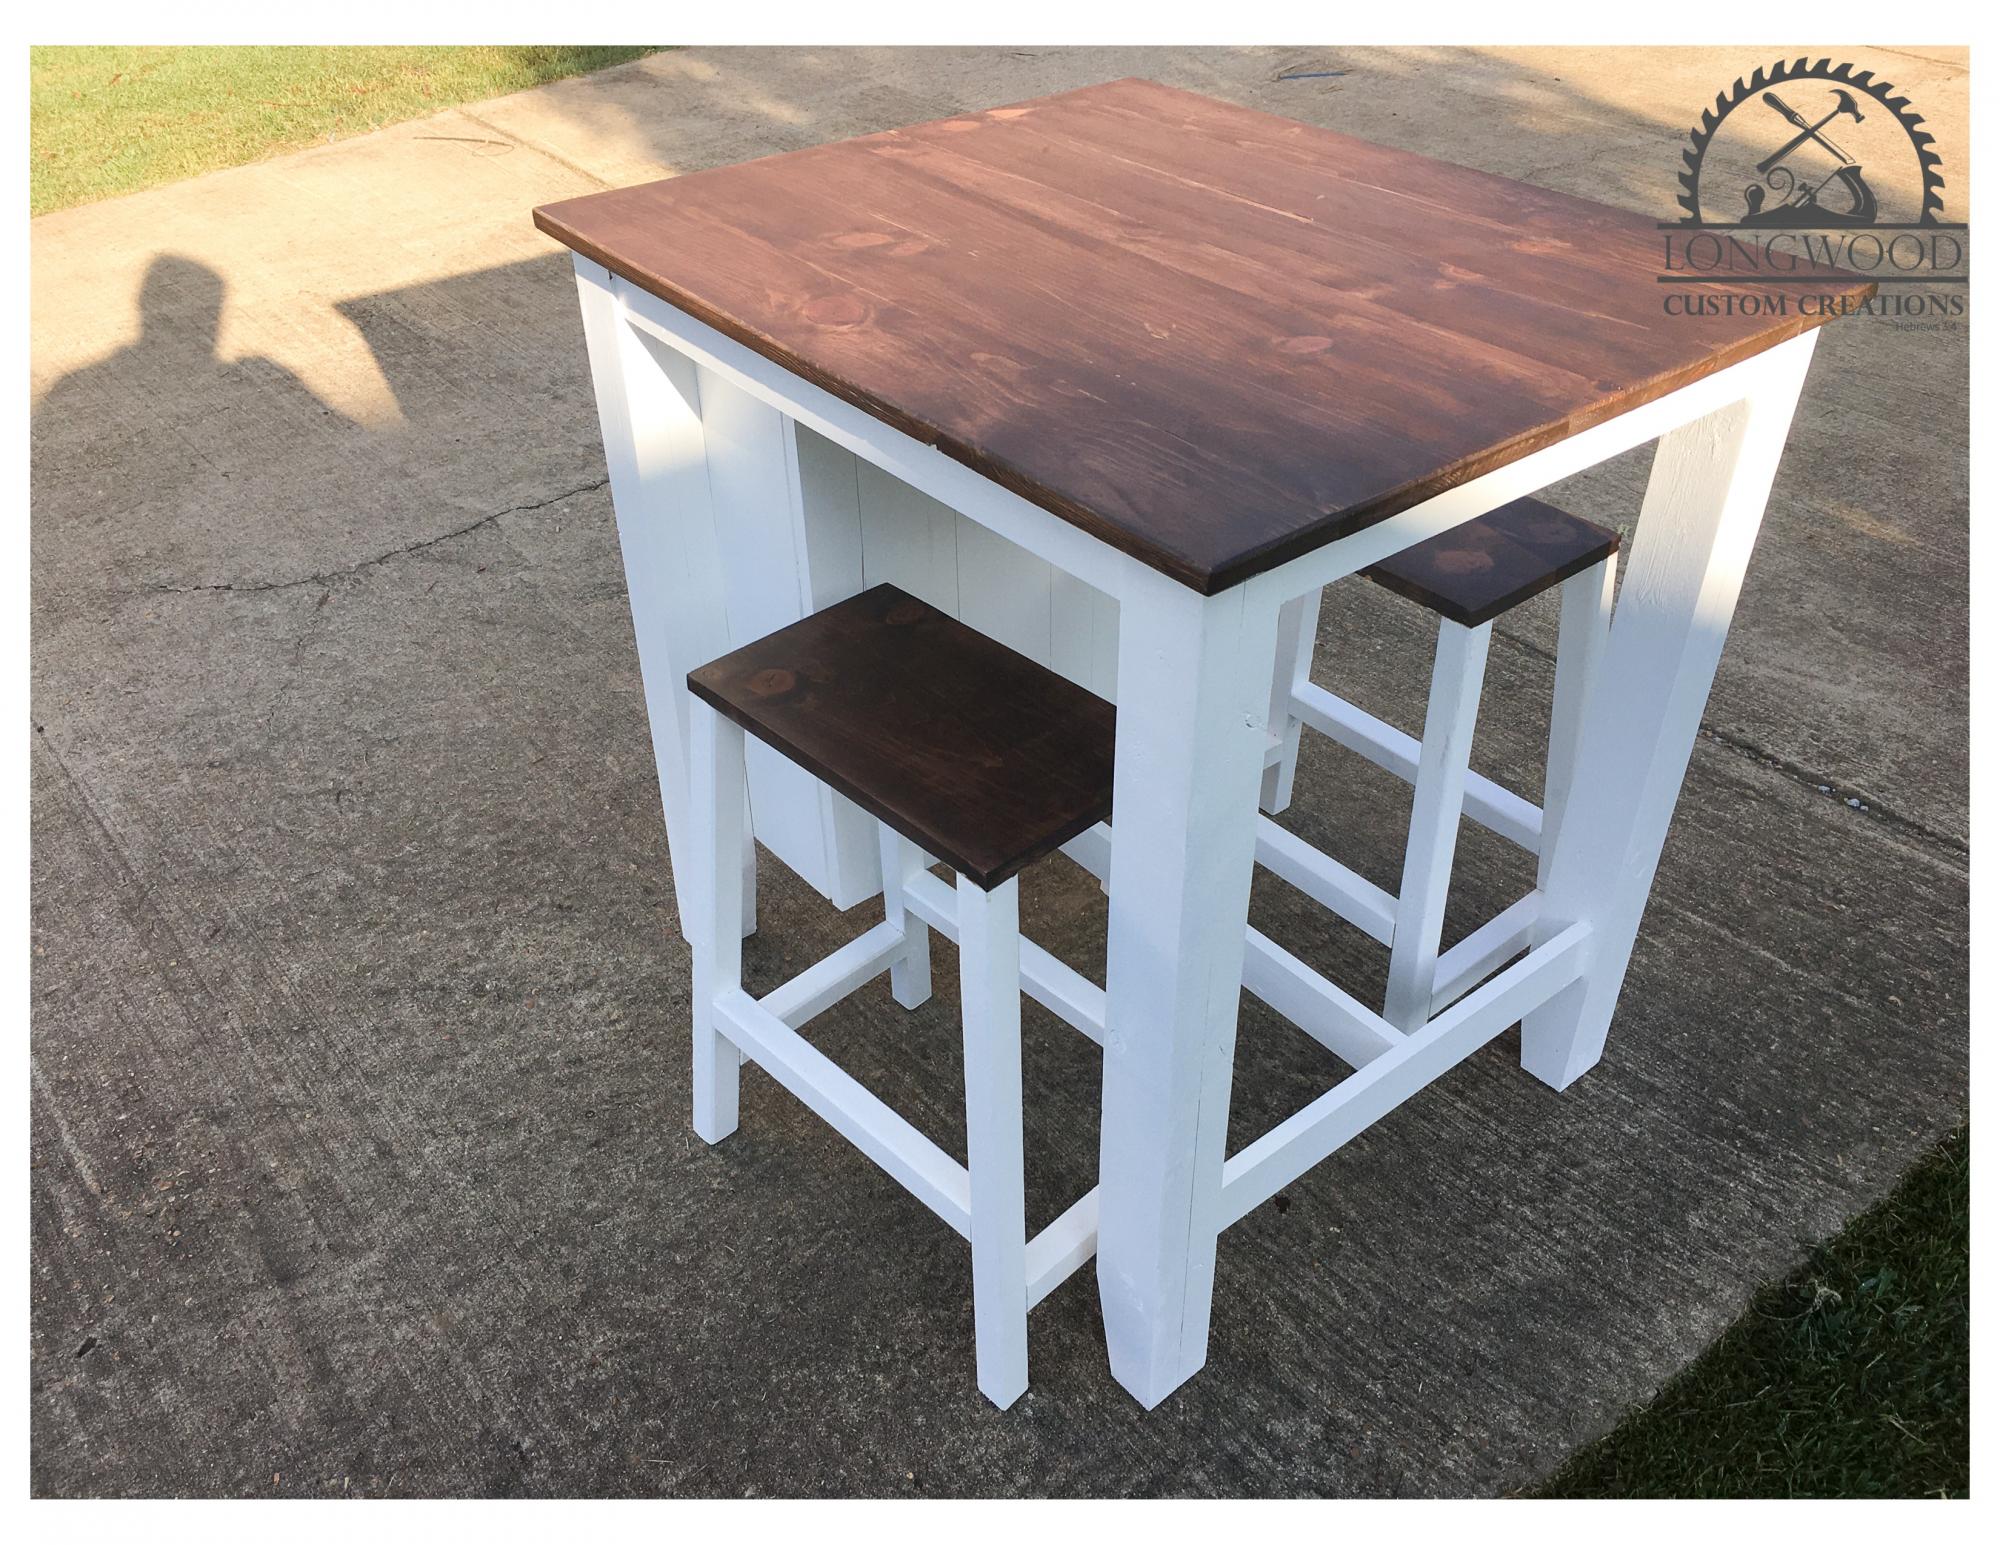
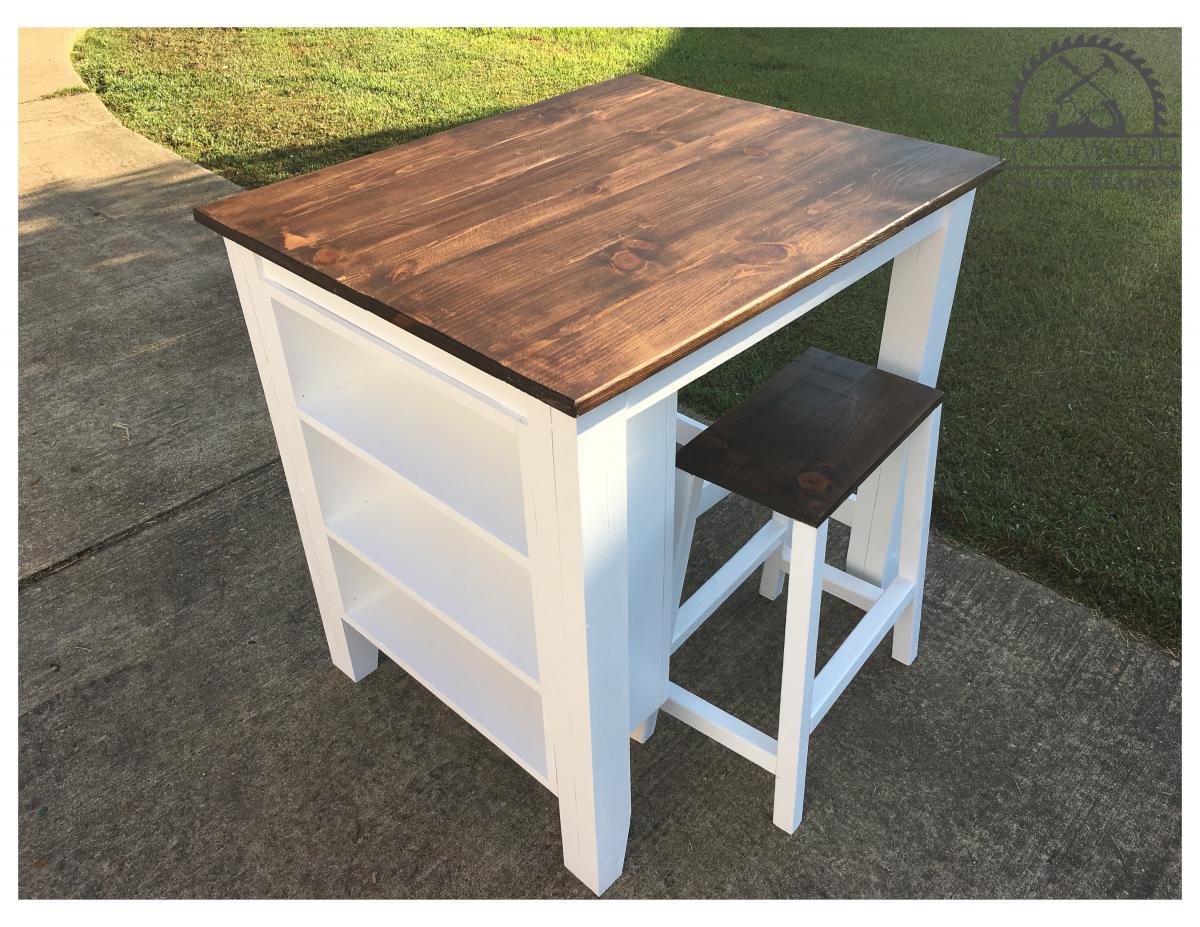
I had a friend who was interested in a small island with two stools that looked like this offered by a fancy home interior store. The reviews weren't all that great, even for the half off sale price. They needed something small to fit their space that would basically serve as a dining area for her and her husband. It is build out of spruce and whitewood lumber. White paint and dark walnut stain, with poly on top. The legs are two 2x4s glued together , then ripped each side to square it off making it an actual 3" x 3". The stools came from Ana's farmhouse counter stool plan. The island I just went with overall demensions and built it from there. Pocket hole screws and finish nails.

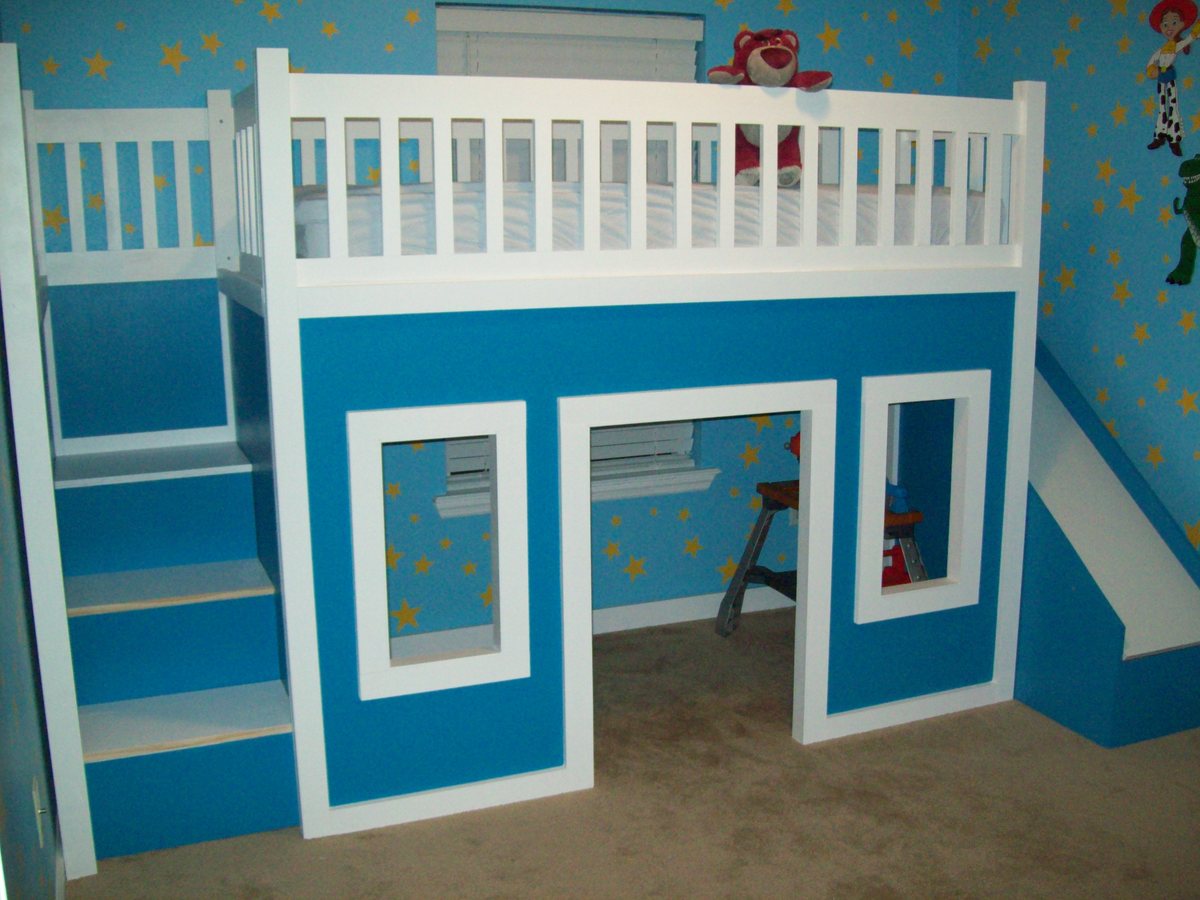
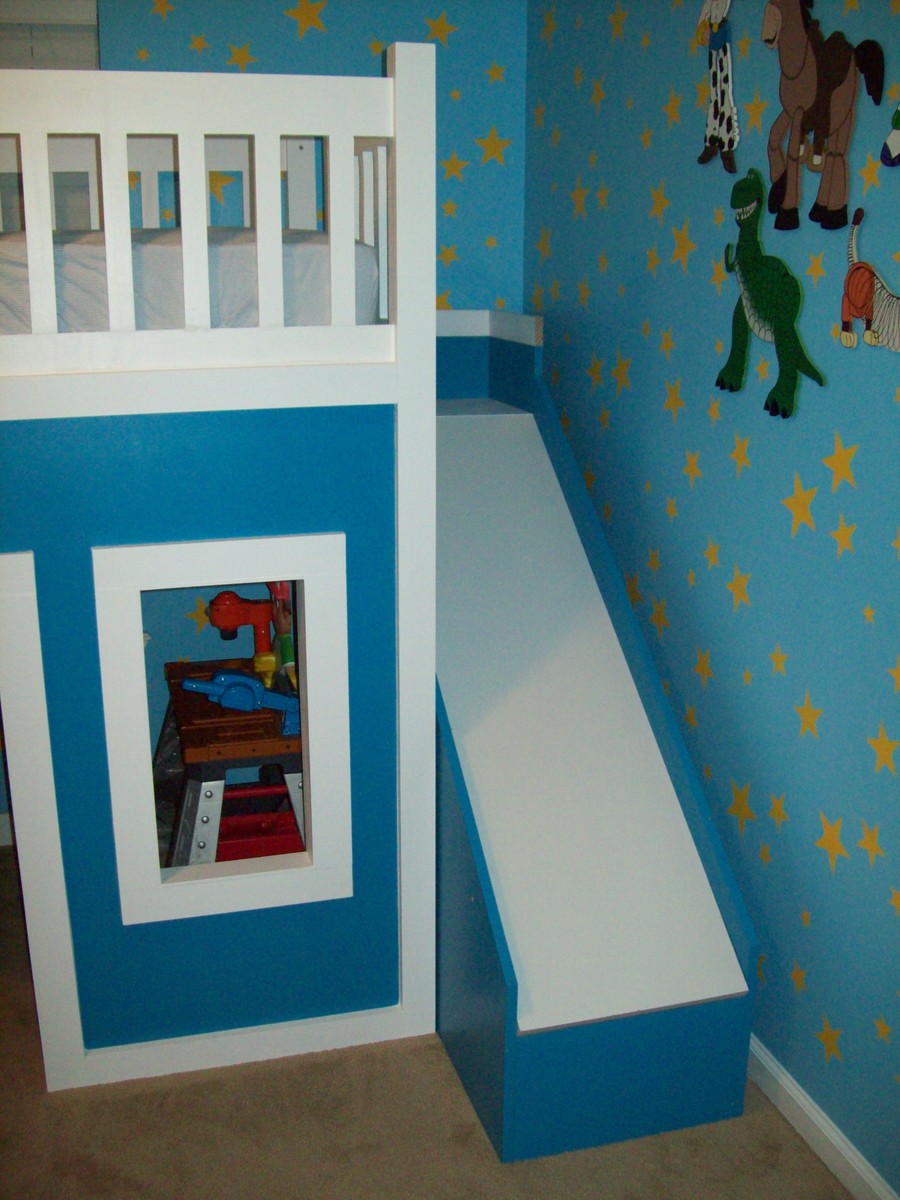
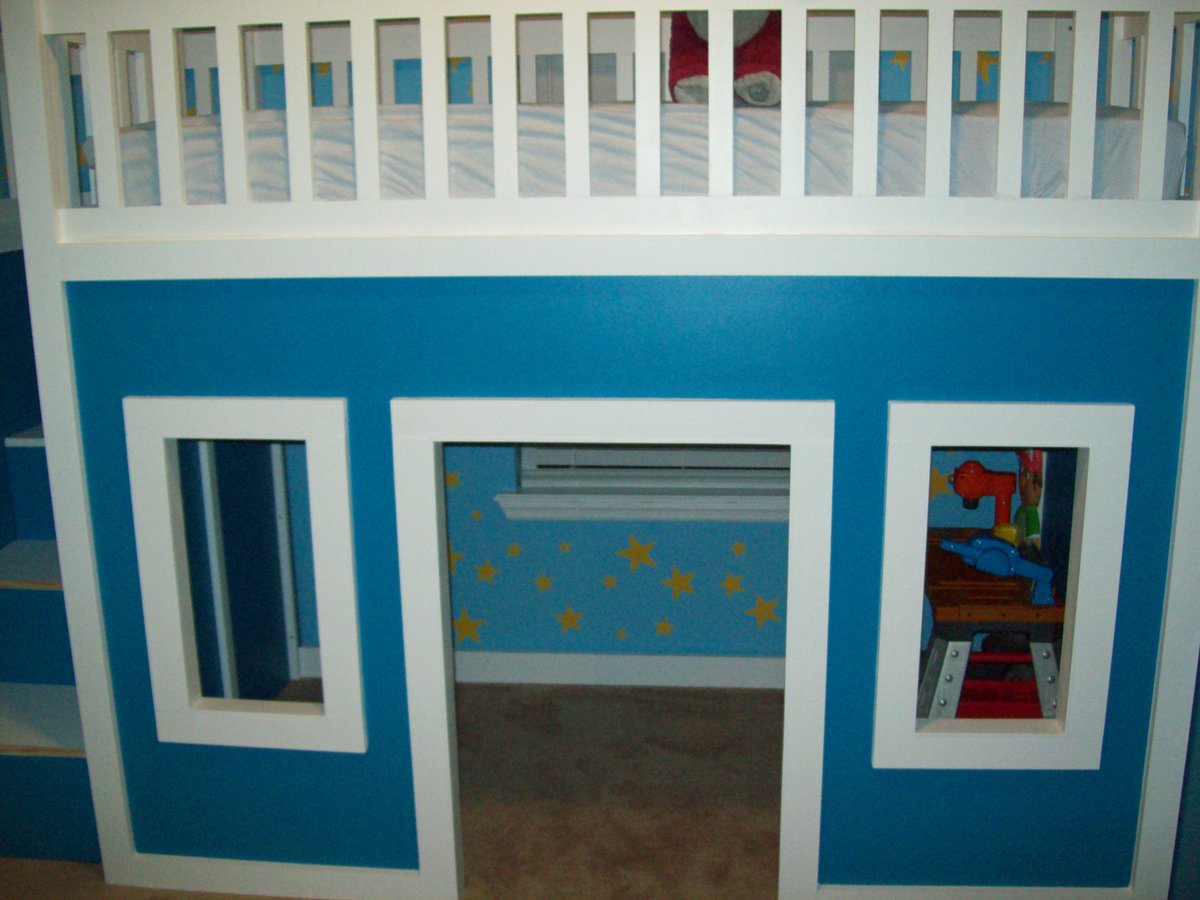
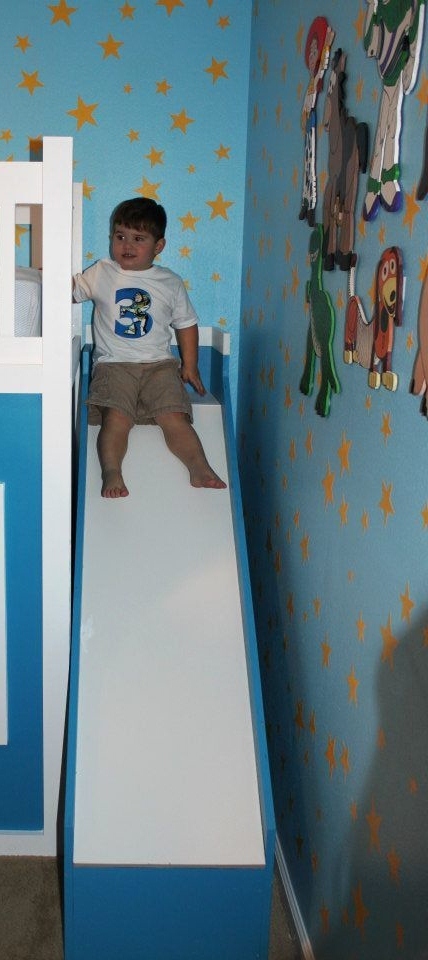
My son was about to turn 3 and I really wanted to redesign his bedroom as a birthday surprise. We went with a Toy Story themed room, he just loves Toy Story. I started off by painting the walls blue with yellow stars like Andy's room in the movie. I added some custom painted art work and then it was off to find a cool playhouse bed. My husband and I were shopping around and we could never really find what we were looking for in the store. So we decided to build one ourselves using plans from this website. I used the playhouse loft bed and the playhouse loft bed stair plans, for the bed and the stairs. I used the castle loft bed plan as inspiration for the slide. The project took us about 5 weeks from start to finish. We both have full time jobs and we did most of the work on the weekends. I looked at each plan very carefully and made notes. I had to modify the stair plans slightly to fit the space where we wanted to put the bed. The stairs look narrow, but they work just fine. My husband and I can both use them to get up in the bed. The stairs feature hinged stair tread with built in storage. We built them like that at first, but then later decided to make them stationary stair treads, with plywood. I didn't like the way the hinges looked and the top stair was so deep that I was worried my son would fall in there and get stuck. The storage idea was neat, but his safety was more important to me. The bed turned out really nice and VERY sturdy. Both my husband and I are able to get up there with my son (not at the same time). Another modification that I made was instead of slats to hold on the mattress, I used a piece of plywood. I wanted the roof in the playhouse to look finished, and I didn't want to see his bedding hanging down from the slats. I painted the top of the plywood white, where the mattress goes to blend in with the slats, and the other side was painted blue to match the walls inside the playhouse. I did modify the playhouse front facade to have 2 windows and one door. I like the symmetrical look. The total project cost about $400. I used birch plywood and select pine boards, and about 6 quarts of paint. I noticed AFTER we had finished the bed using the birch plywood, that Home Depot had cabinet grade plywood on a random end cap, that was just as nice for $12 less a sheet. If I could do it all over again, I would definitely use that!. I wanted the paint to have a nice smooth finish, without having to do a lot of sanding or patching. We had Home Depot cut the plywood to the dimensions we needed. I had my husband cut the rest of the wood dimensions listed in the plans, and then I painted all of them before we put the pieces together. I used a small roller and self priming paint. The paint finish looks great. After assembling the bed I can not imagine what I would have gone through trying to paint it after the fact. The slide was a bit tricky, I looked at the plan for the castle loft bed and attempted to use those dimensions, and for the most part they worked. But when we went to assemble the slide, we did end up recutting some of the wood to different dimensions. I used a piece of the melamine coated closet shelf material for the slide. It is already finished in white and its nice and slick, like a slide should be! I hate MDF, but for this it seemed the best fit. We cut the top edge at an angle to meet up with the slide platform. PLEASE BE CAREFUL with this material. After it was angle cut the edge was razor sharp and I sliced my fingers up. Once it was installed it butted up perfectly to the slide platform, and the edge was hidden and not a danger. But use caution during the install. Clamps are your friend! We used Kreg clamps for everything. They kept the wood in place while we were screwing the parts together. The coolest thing that my husband came up with was clamping two identical pieces for plywood together, and drawing the template for the slide support walls. Then he used his circular saw to cut them out. We ended up with two mirror image pieces. They looked awesome. I left them clamped together when I sanded the edges as well. We really didn't have any building experience other, than building tables and chairs for children, We got the deluxe Kreg jig kit and a miter saw on Craigslist for $50 each and they were both practically brand new. This was the first time we had ever used a Kreg jig and we are both addicted. That thing is the bomb. We locked my son out of his room for a week while we assembled everything. We had the big reveal at his birthday party and all of the guests were excited to see it after seeing my facebook teaser posts of our progress. There were 8 kids up there at one time and the bed did not budge. They all enjoyed the slide. I did the planning and paint and my husband did an awesome job making all of the cuts and sanding everything. We are both very proud of the final product. My son love his new big boy bed. DISCLAIMER: This bed is not recommended for a child under 6 years old. My son is mature for his age and we monitor him carefully.


Wed, 07/06/2016 - 10:05
Hi, my husband is building this bed for my 6 yr old daughter, but in purple blue and white. We adding the slide too. May I ask what size bedroom you guys have for your son, and did the bed fit well? Did you have to make any adjustments for it to fit in the bedroom? Thanks in advance! Your bed looks great! I hope ours turns out as good.
Christine N in PA
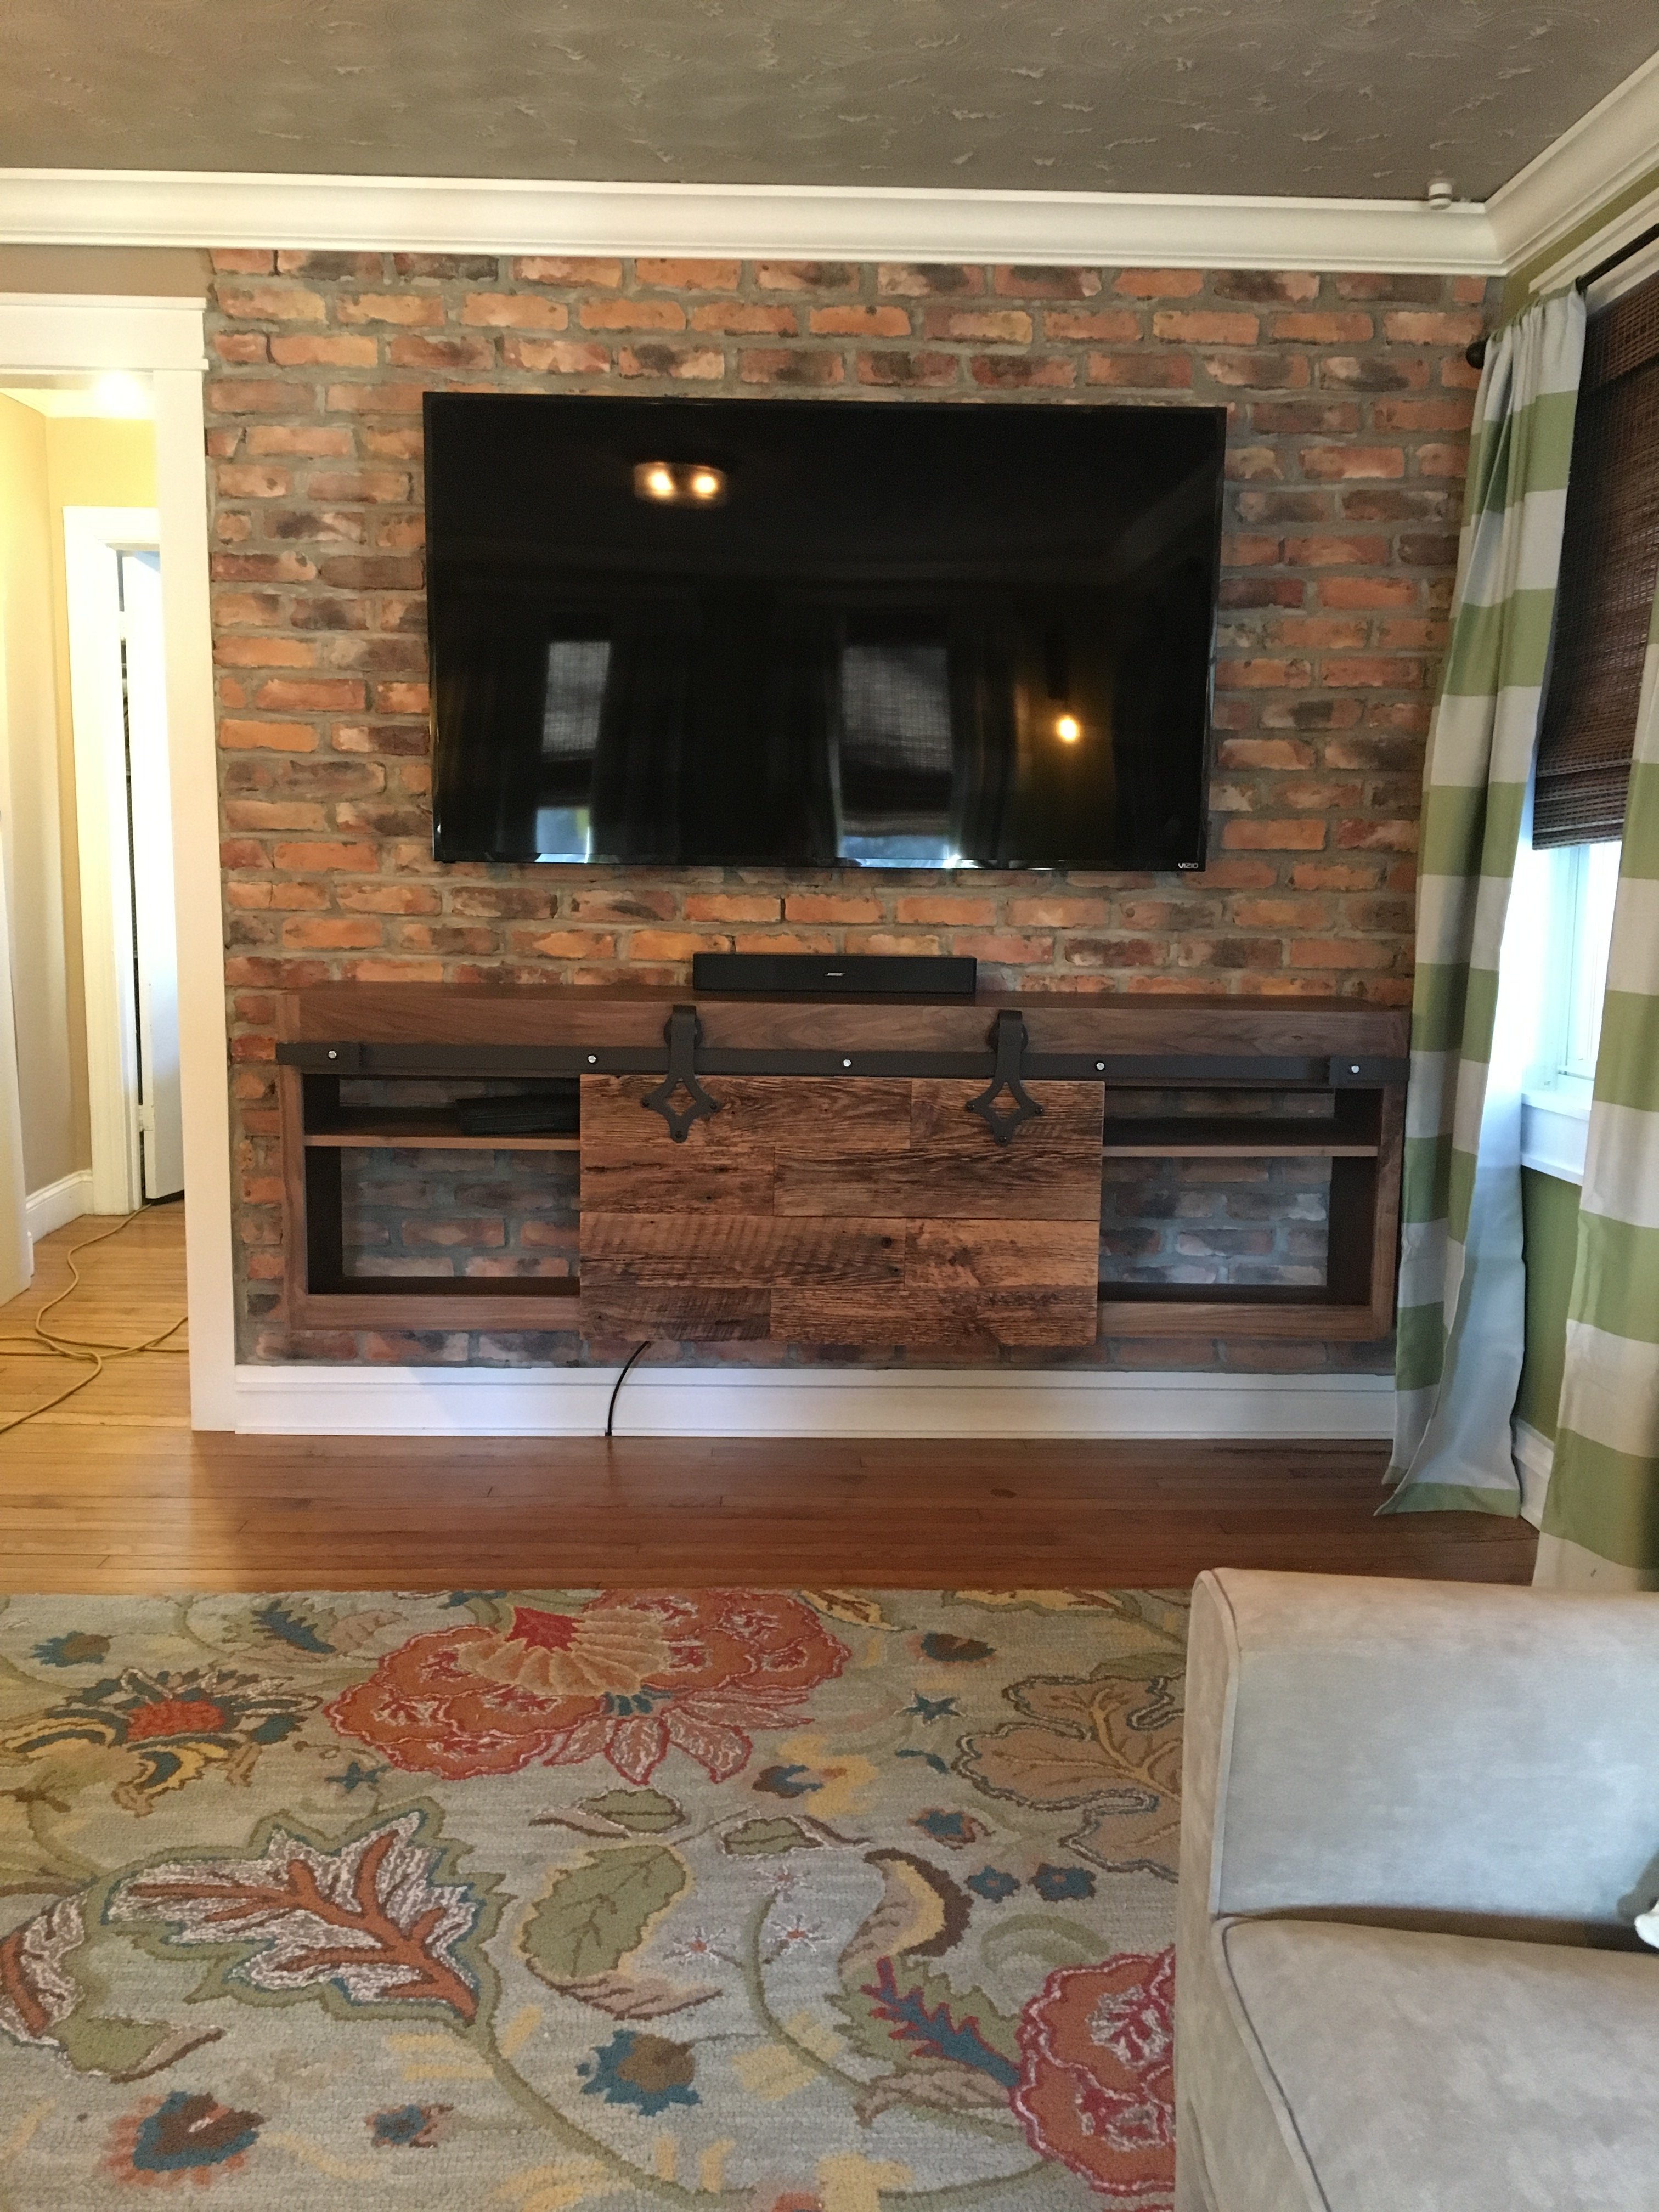
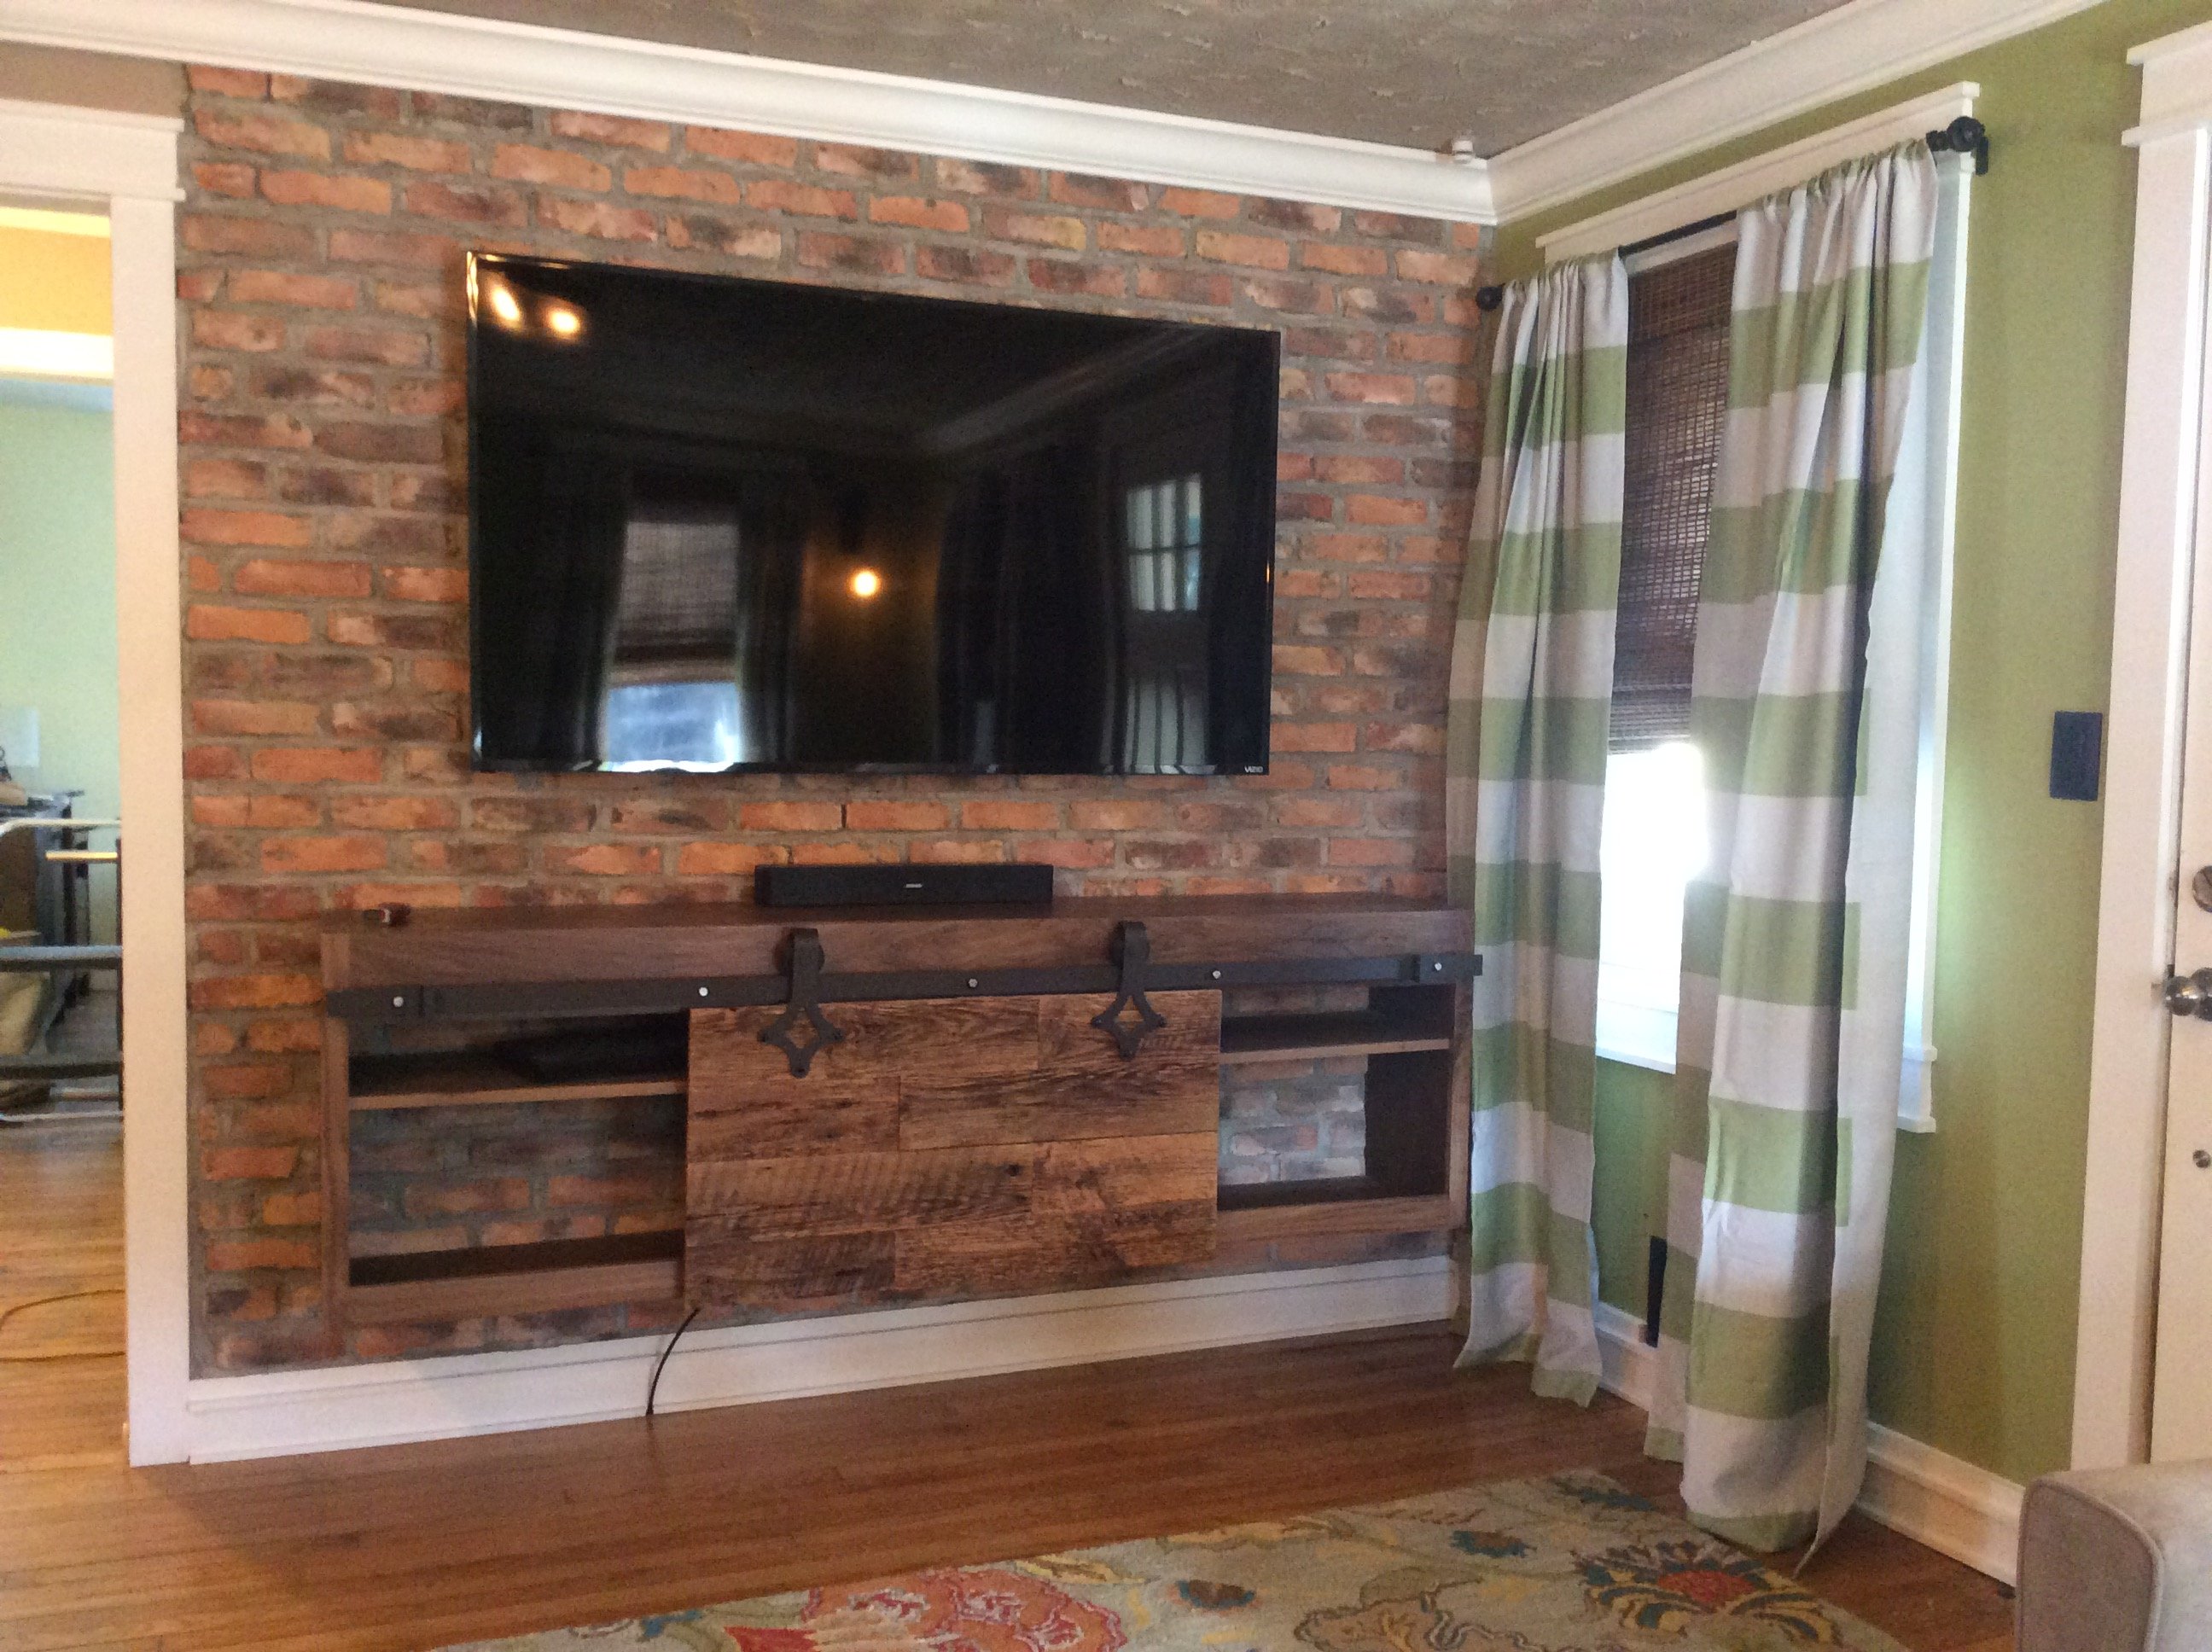
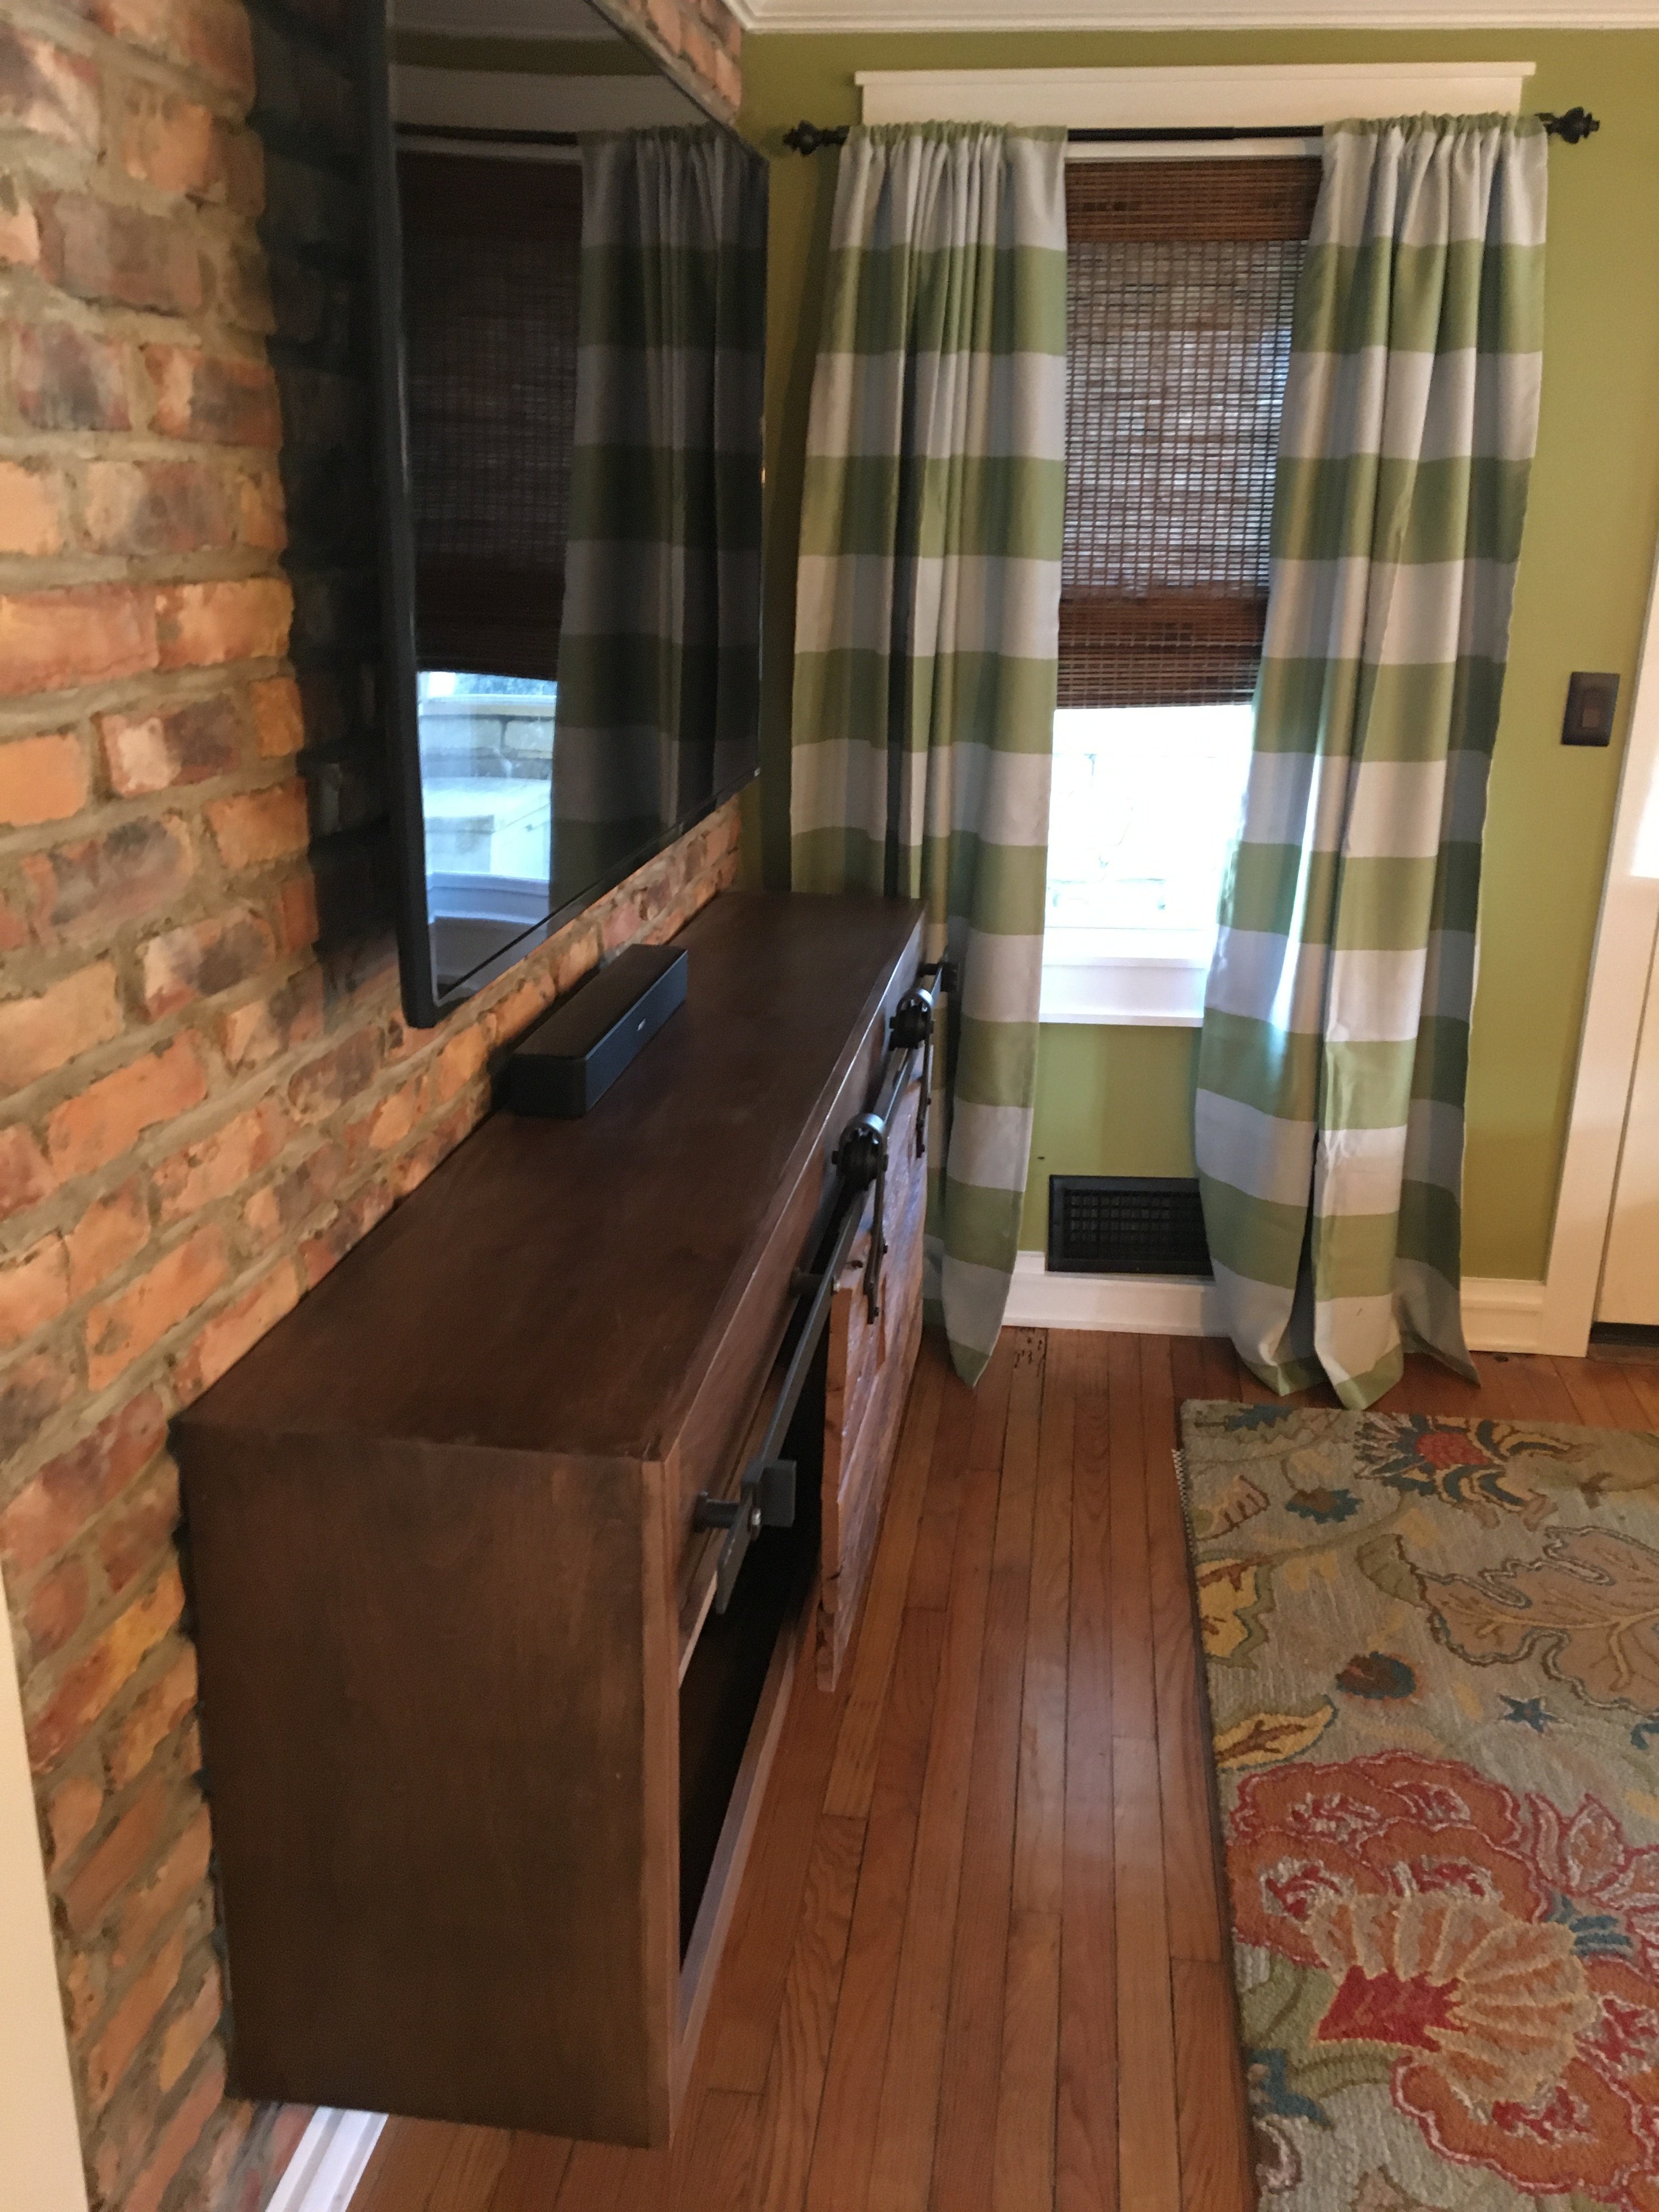
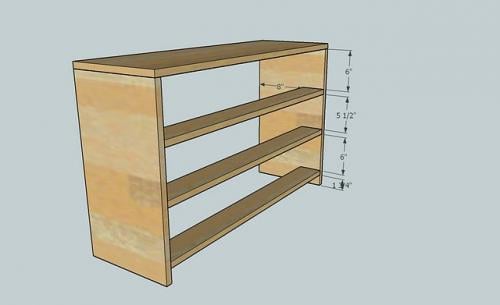
I felt a floating cabinet would make the room more spacious and wanted to showcase my brick wall so I designed and built this media cabinet.