Community Brag Posts

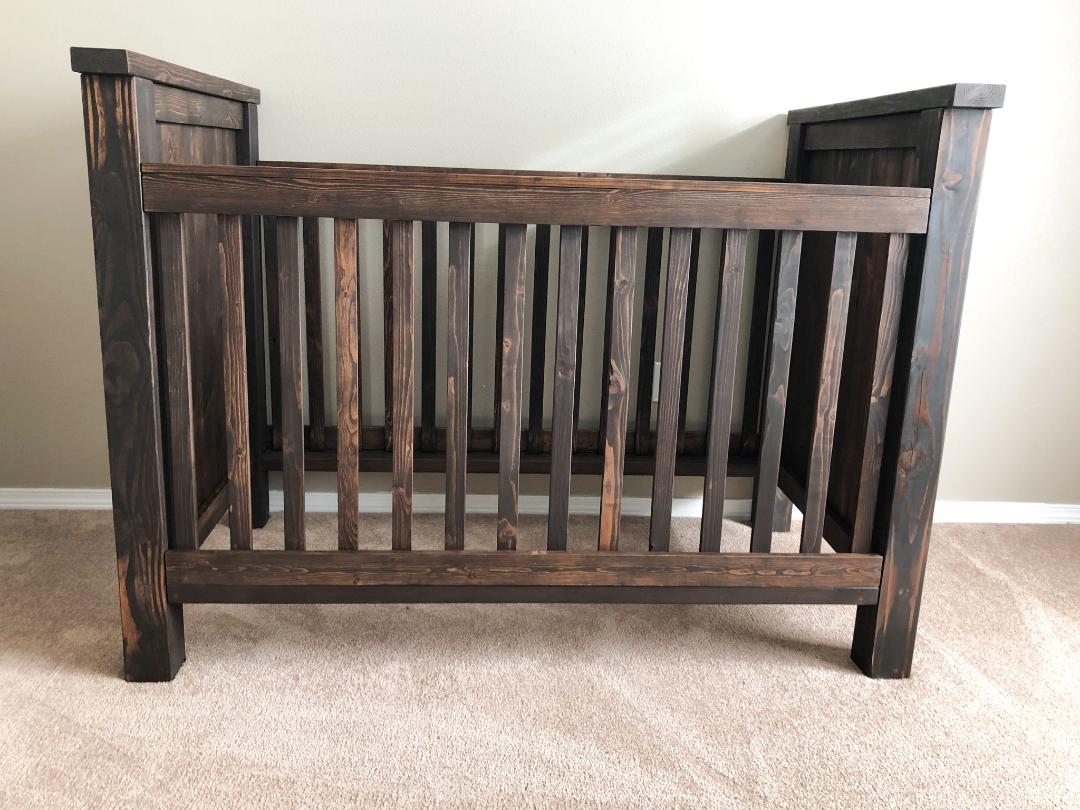
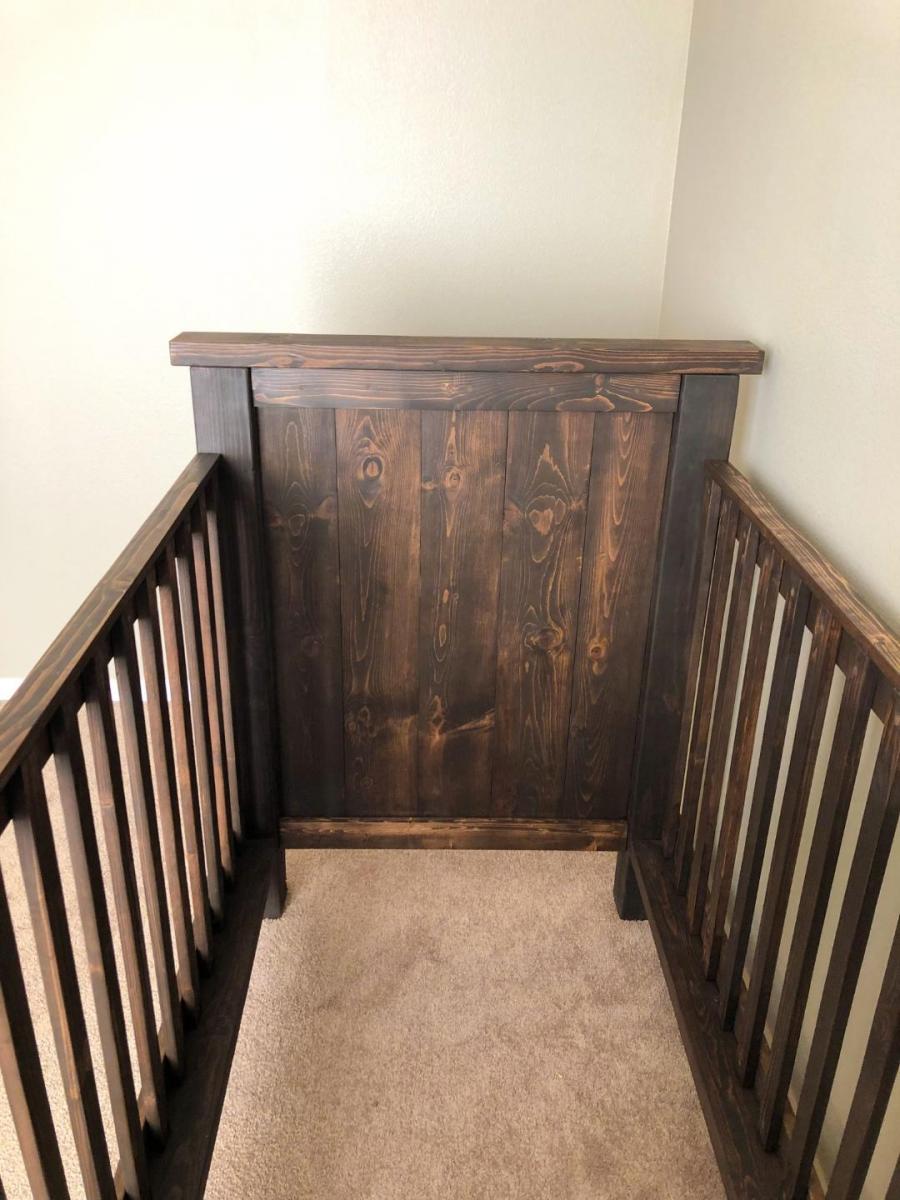
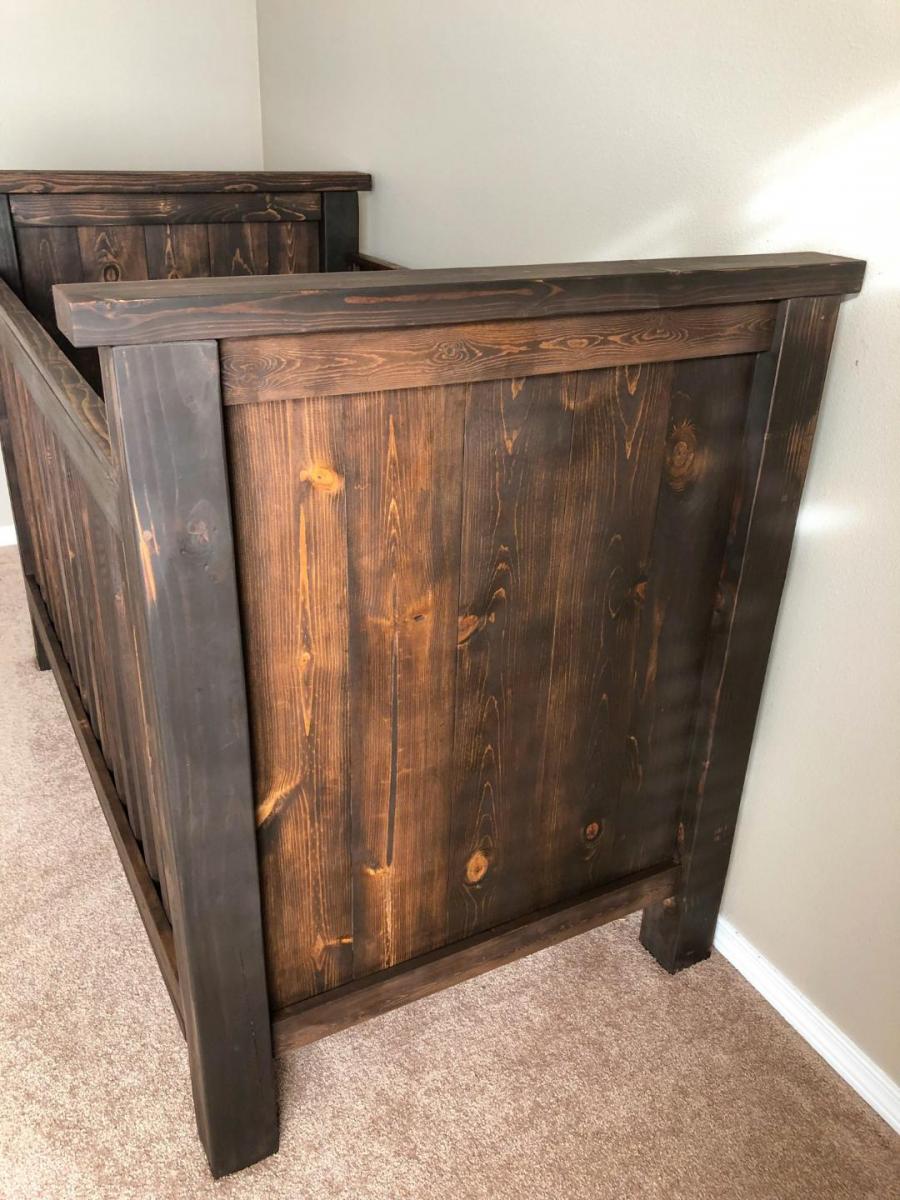
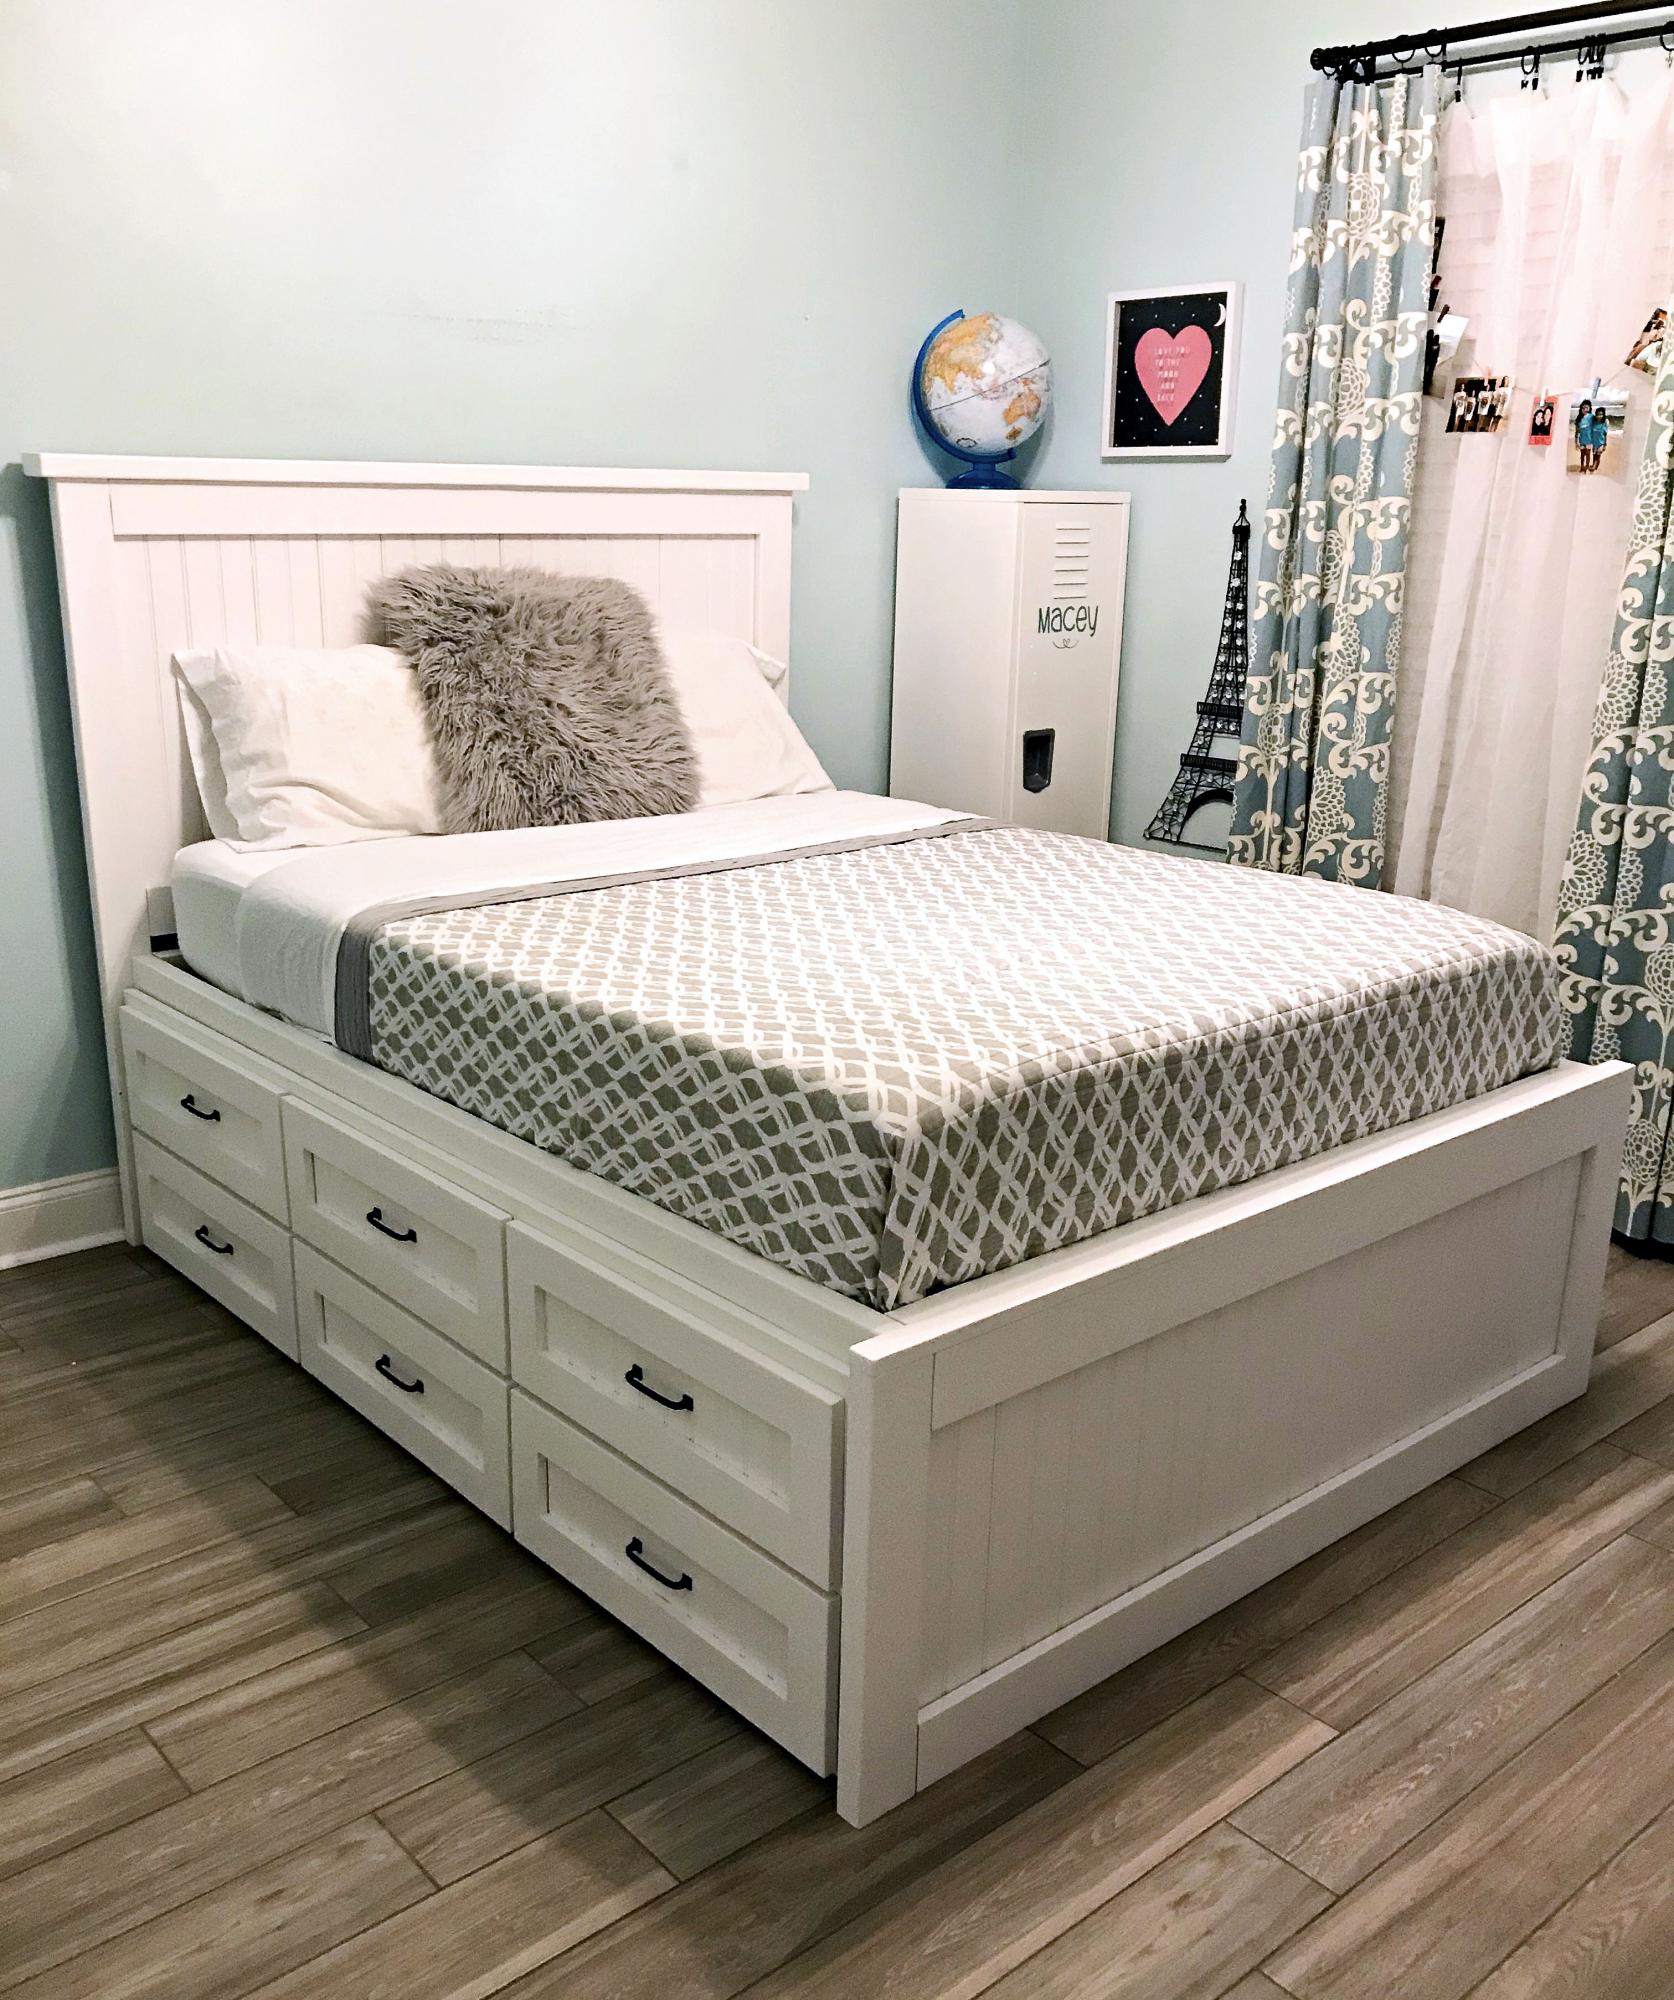
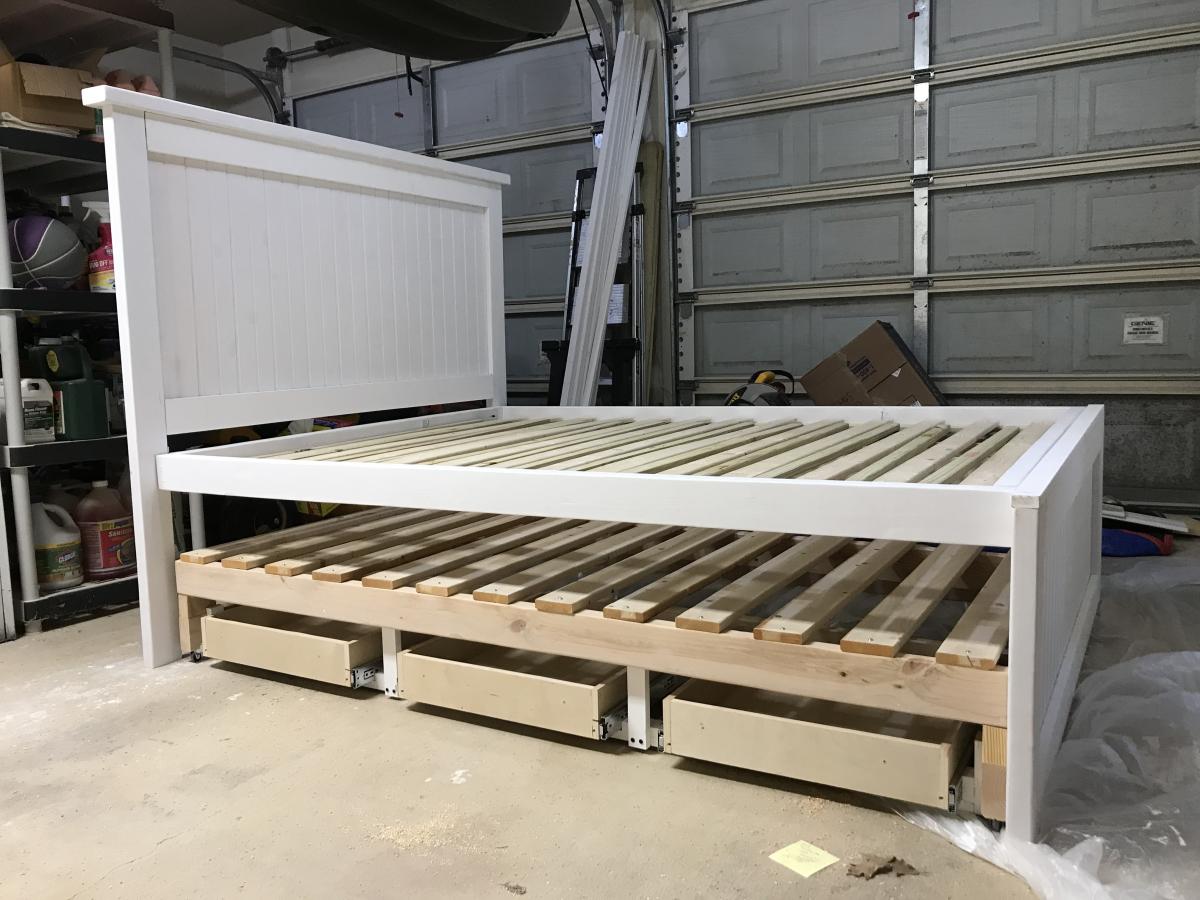
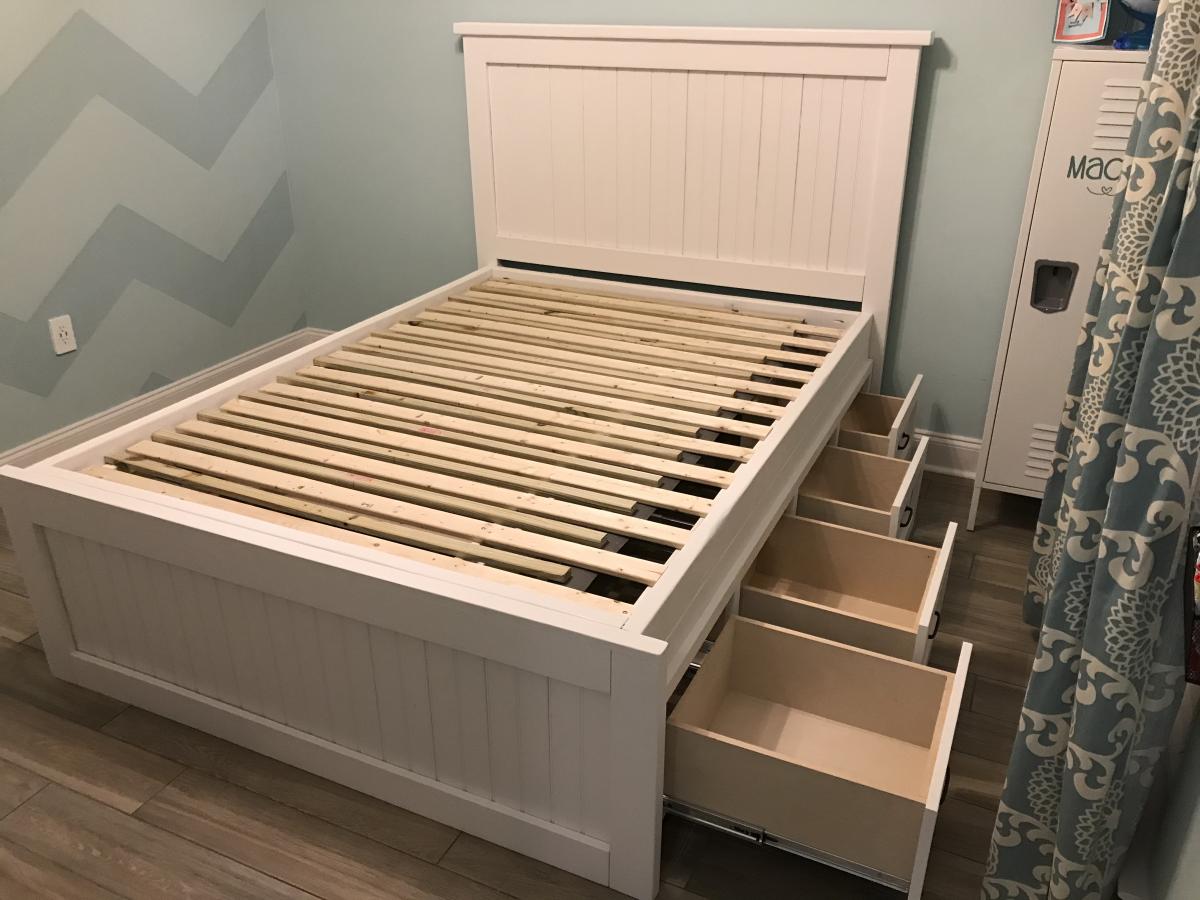
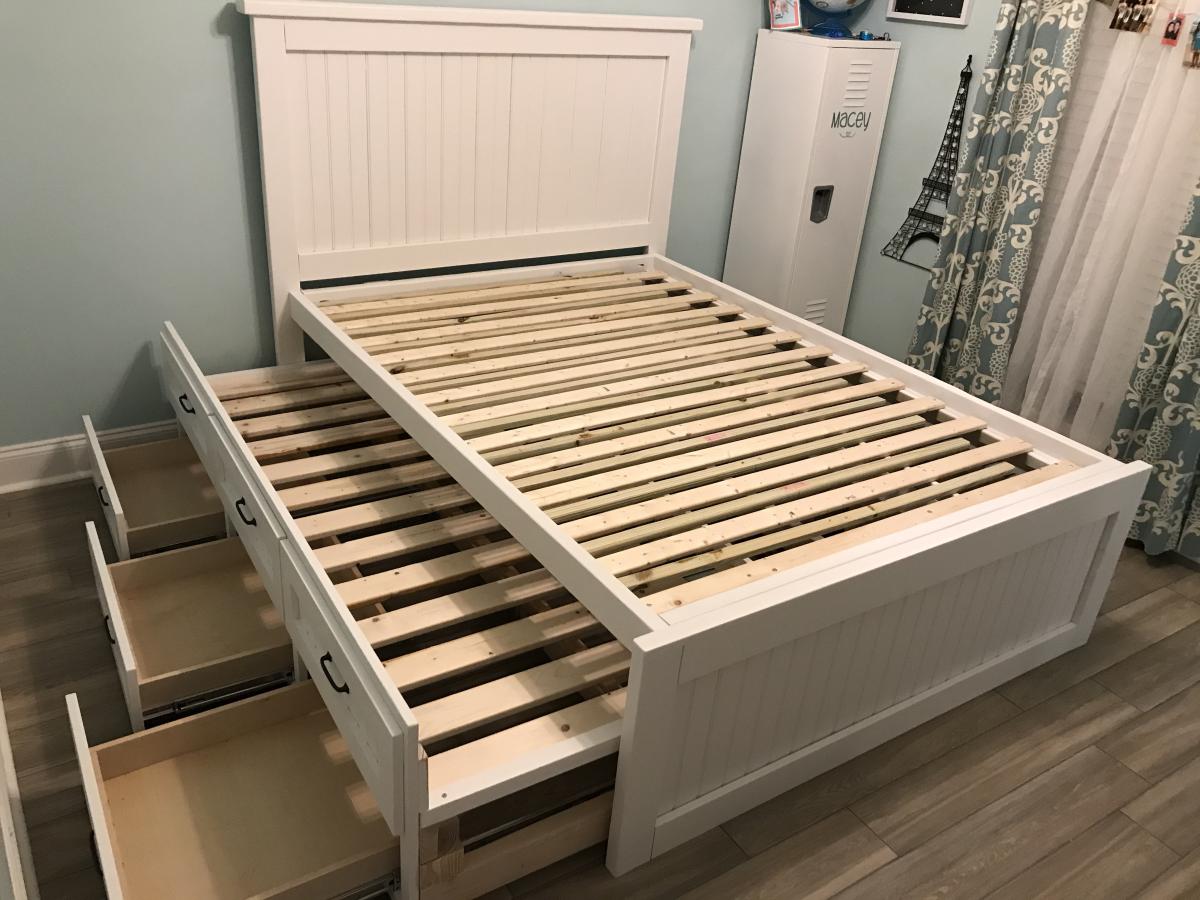
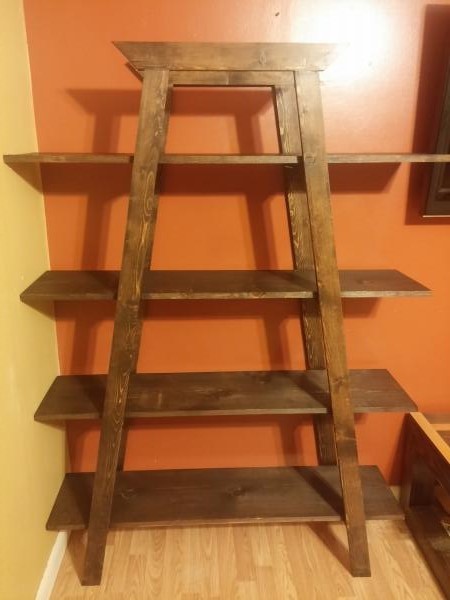
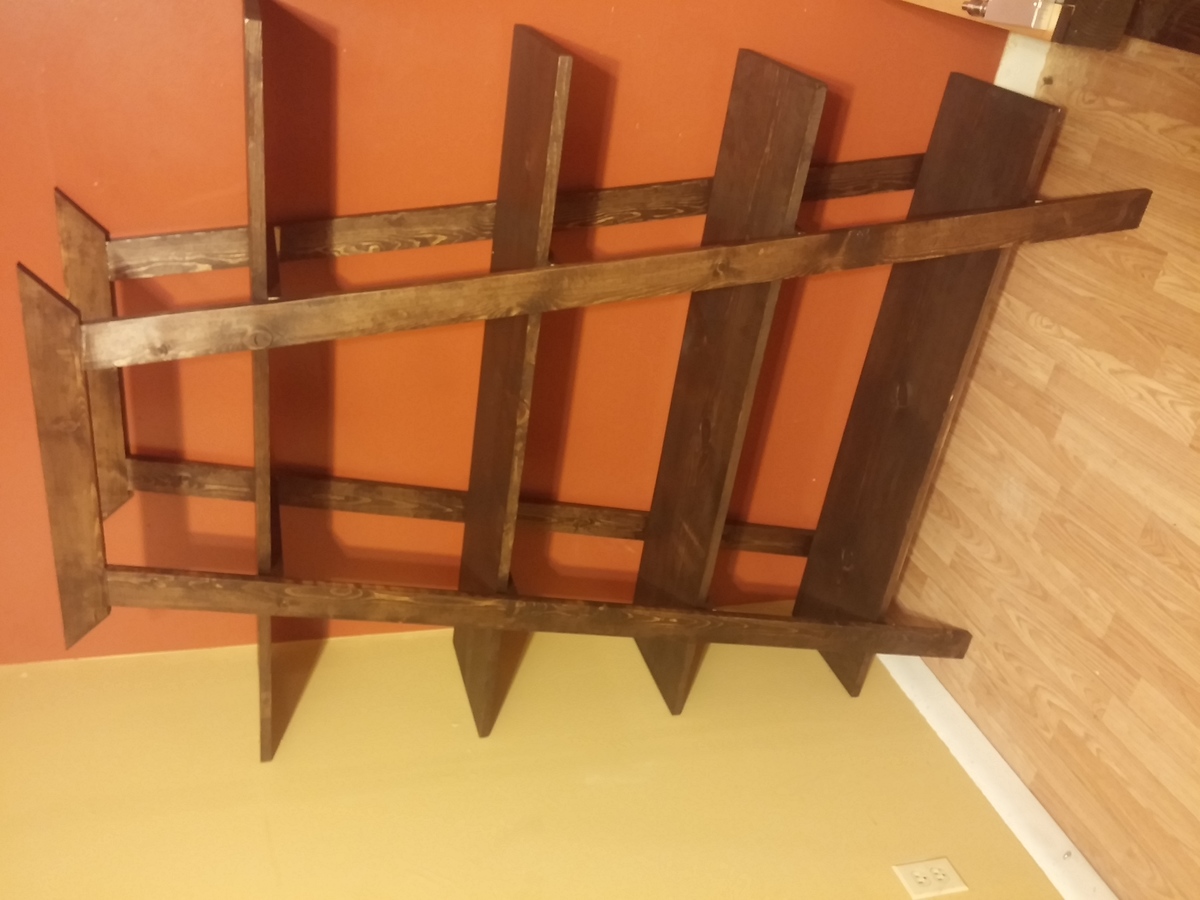
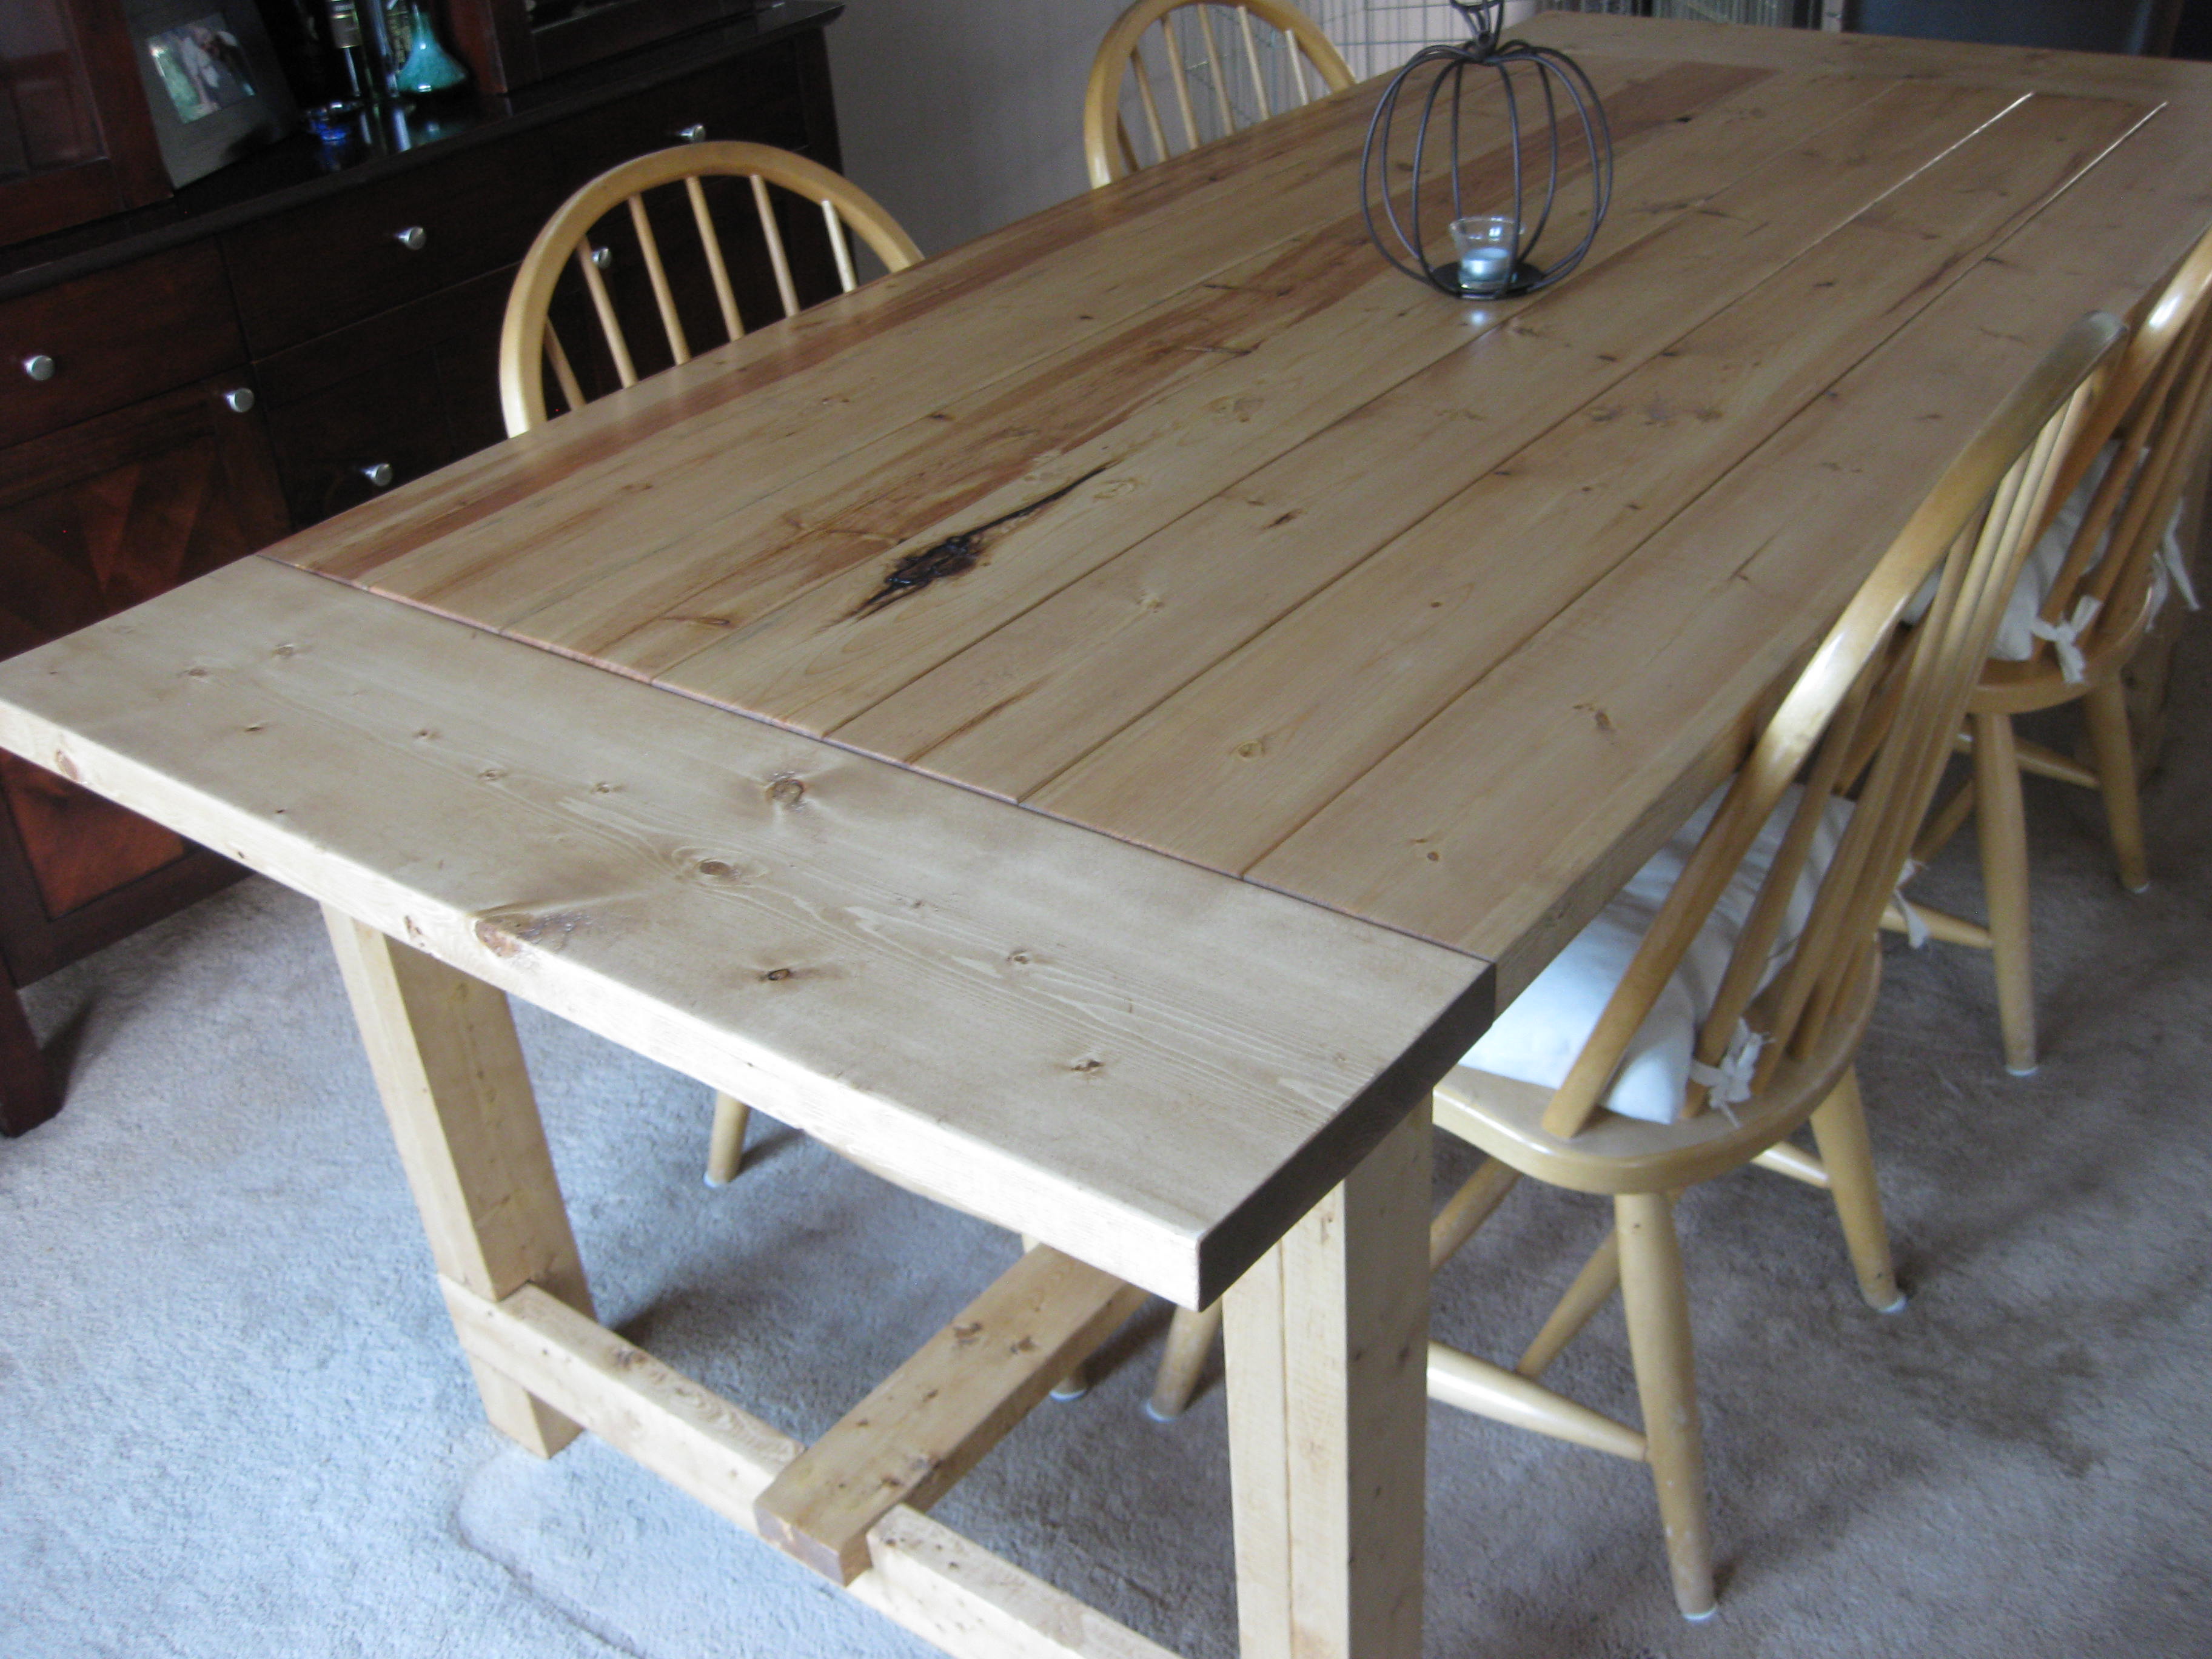
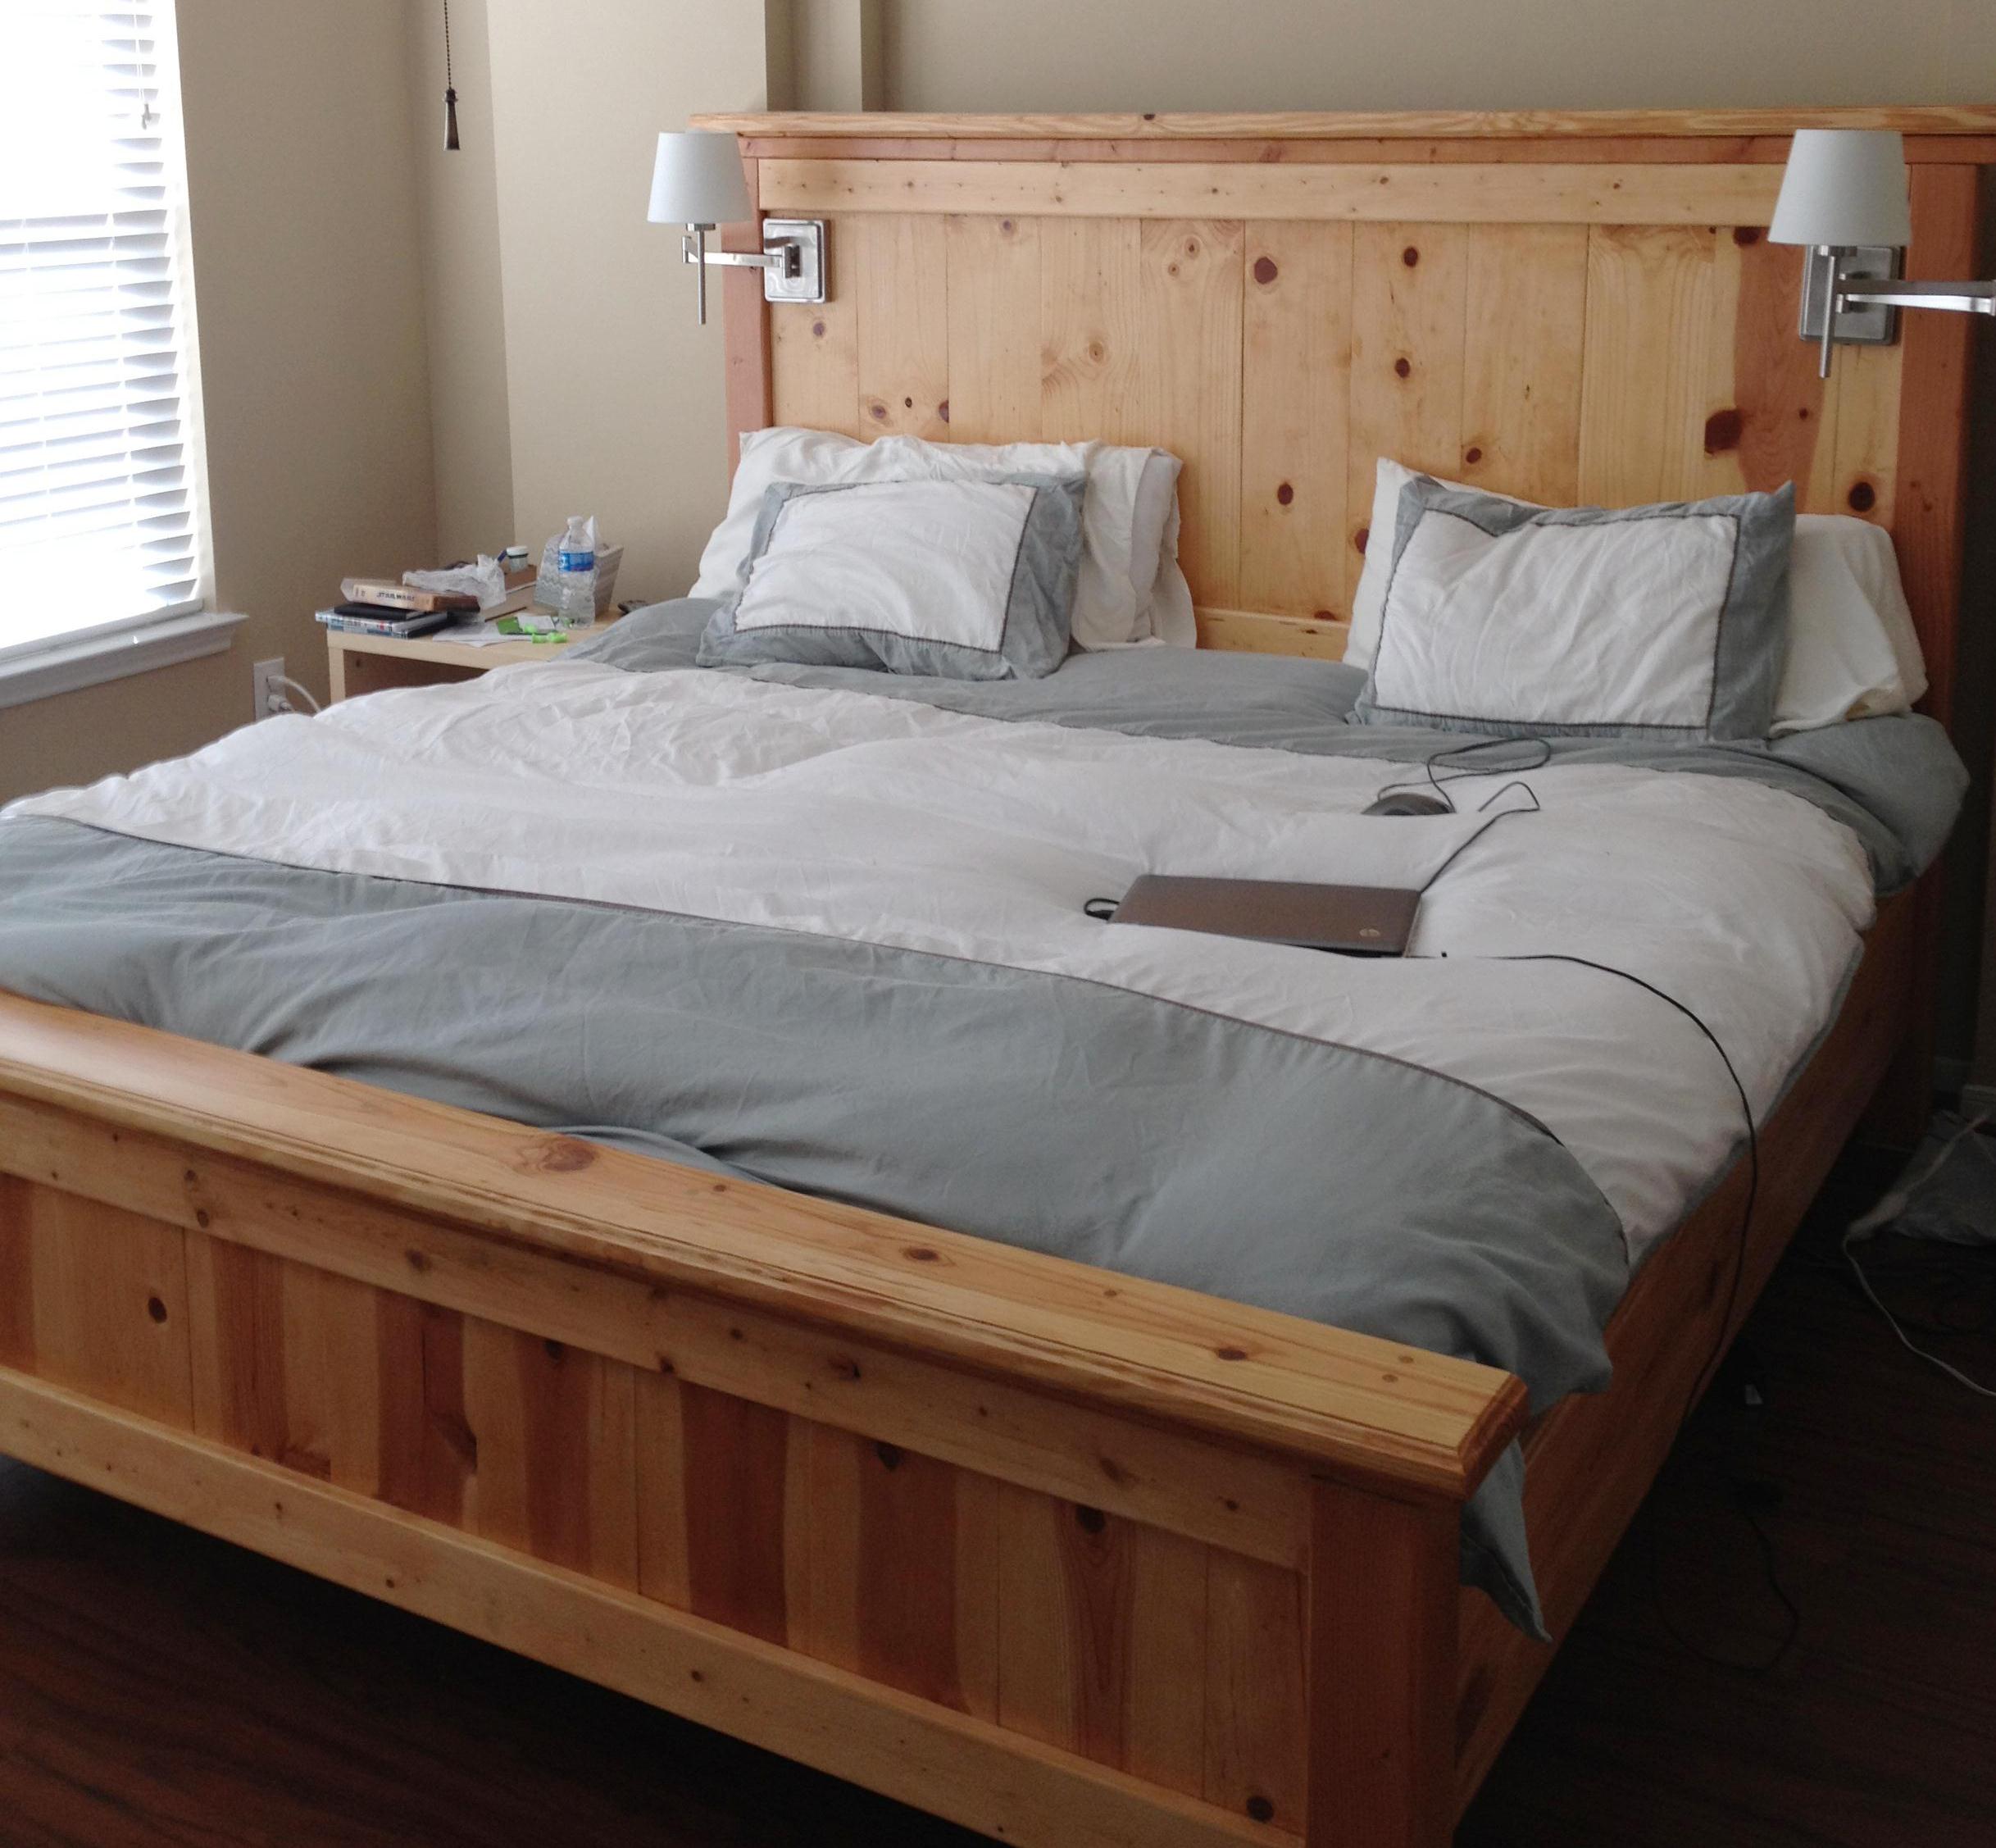
DIY Farmhouse Bed wth Boxspring
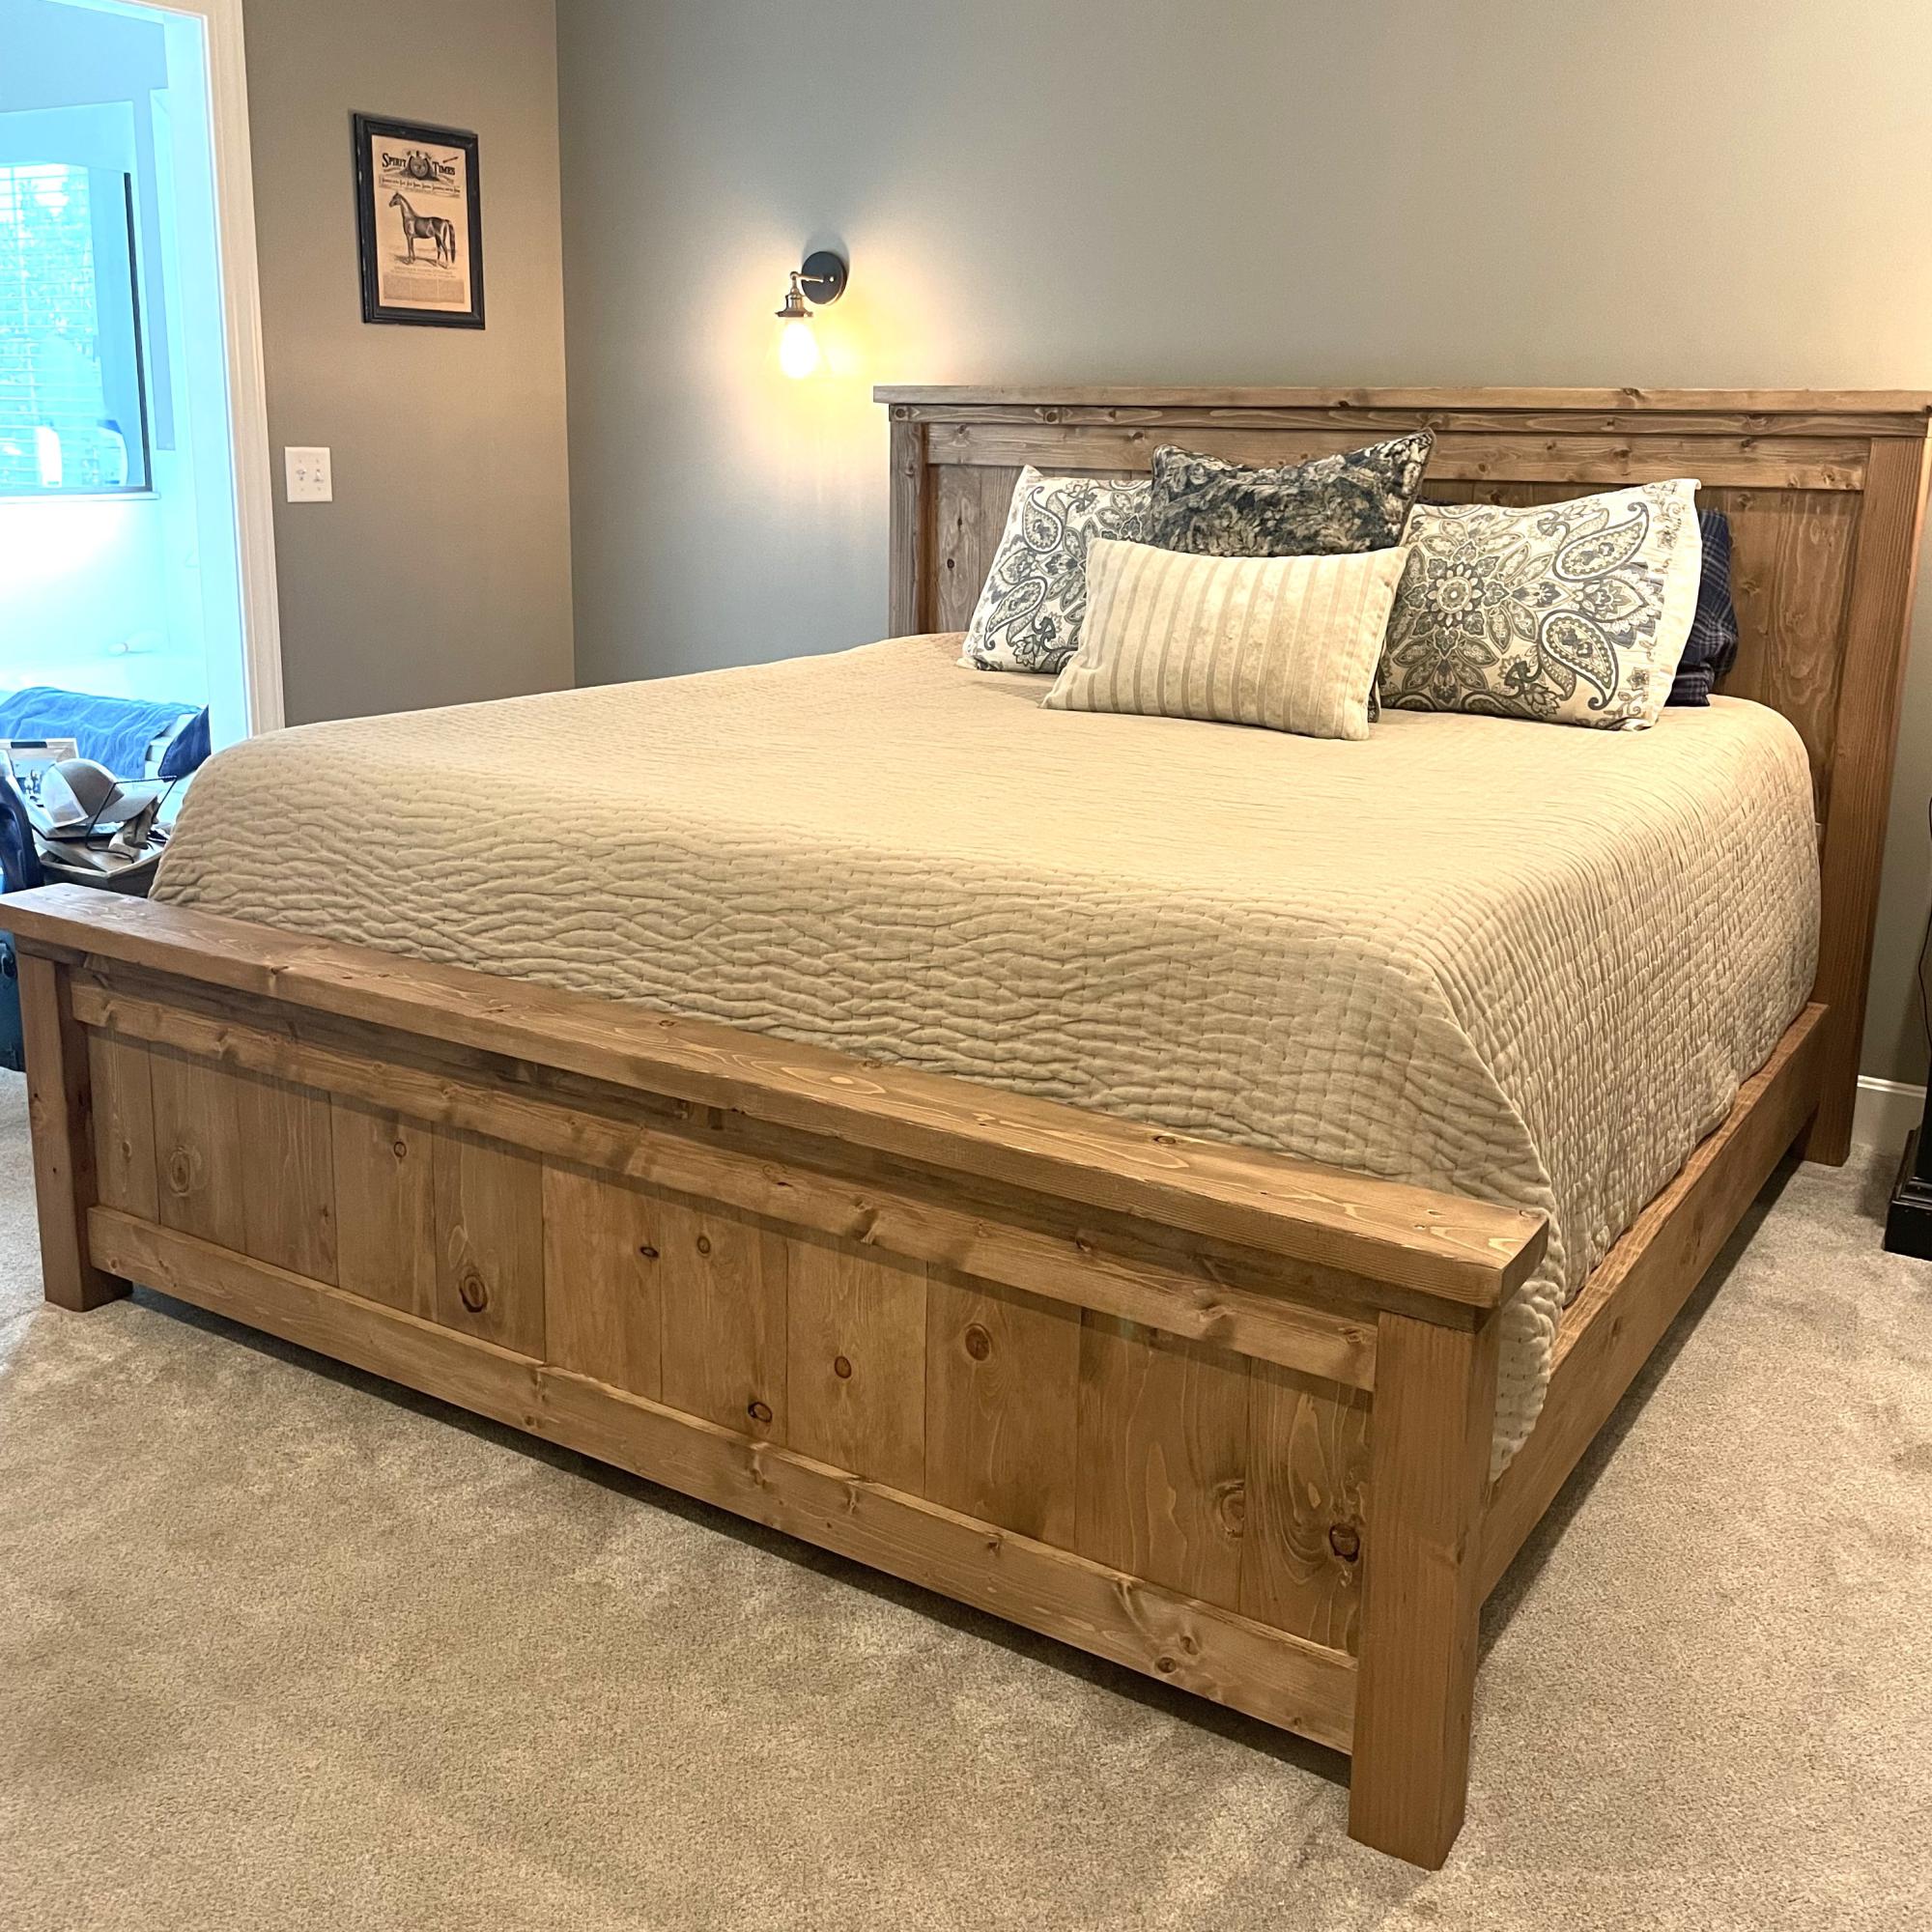
Submitted by Anonymous (not verified) on Sun, 07/16/2023 - 10:49

Wood = Pine
Finish = Minwax Special Walnut (after Pre-Stain)

This was a pretty straight forward build, but nice to have an extra set of hands. On the top board of the head/footboard, a countersink bit was used to recess the screw heads (otherwise, all fasteners in the plan are concealed). Then a mixture of glue/sawdust was used to smooth over the countersink hole. The whole project was sanded starting with 60 working up to 220.

We followed the plan, and in the photo this is the height of the bed with box springs and mattress. The bed feels sturdy and comfortable. It was a fun project and my first shot at interior furniture.
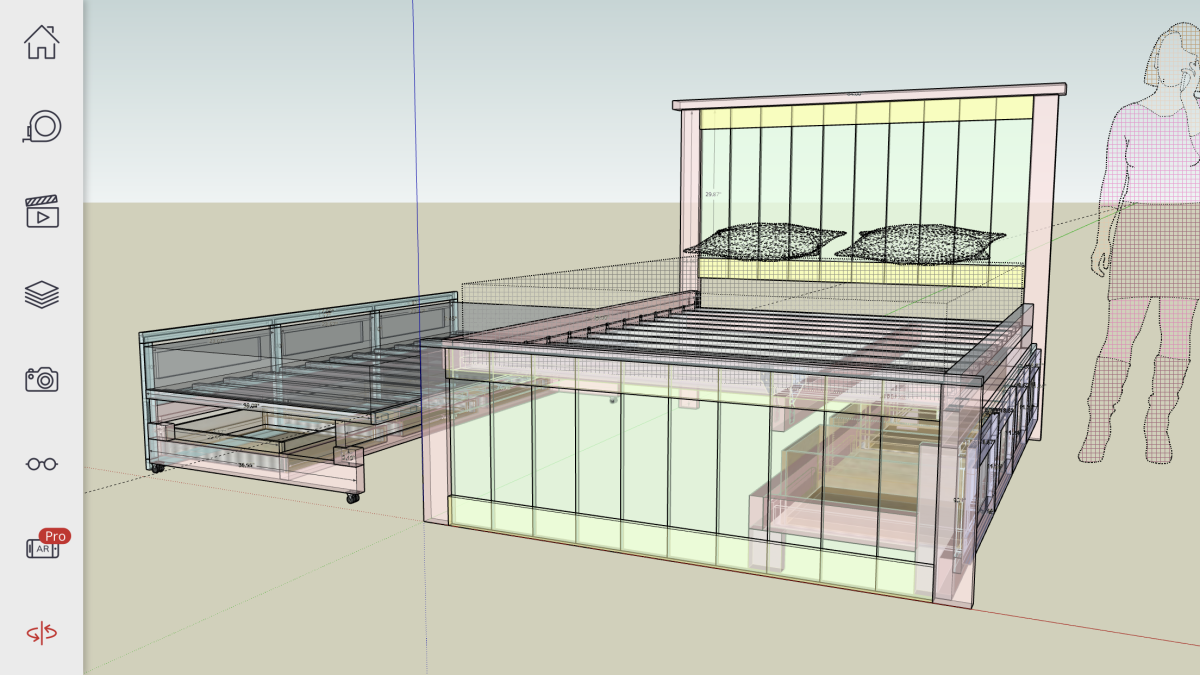
 

Bay Window Drawer Bench

Submitted by Anonymous (not verified) on Mon, 10/23/2023 - 09:22

This is inspired by mud room bench with drawer. Apparently I had to make quite some modifications as this is for a bay window bench with trapezoid shape instead of a rectangular. In the middle are 2 drawers, at both ends are corner cabinets. Ana's design worked beautifully as the foundation of my project.

Built from Plan(s)

DIY Stinctly Made Crib

Submitted by Anonymous (not verified) on Thu, 03/26/2020 - 10:15

While I found the plans a little difficult to follow as there were steps left out, missing measurements, and misinformation, it was an easy project and I'm so glad I made it. Even at 21 weeks pregnant it was totally doable alone. The only thing I needed my husband for was to hold the side rails at the correct height.

Estimated Time Investment
Week Long Project (20 Hours or More)
Finish Used
Kona by Varathane
Recommended Skill Level
Beginner

Wishing Well Planter

Submitted by Anonymous (not verified) on Mon, 04/01/2024 - 09:17

Just finished this wishing well, it’s not an Ana-White but thought I’d show it anyway. We are going to use it as a planter. Got the plans from construction 101.

Ck1998

Laundry Pedestal

Submitted by Kamoanui on Tue, 06/30/2020 - 09:42

This was quick build. First time for us using trim, so we wasted a few feet getting the angles right. We attached the legs directly to the frame, and did not use the metal brackets. We also did not build the floor frame. We measured how high/wide the laundry baskets ($3/piece at Target!) were, and made it to fit them. We added a piece of rubber mat to the top (bought at Lowe's). A few weeks later we helped our daughter and son in law build one for their new house!

Estimated Cost
$40
Estimated Time Investment
Afternoon Project (3-6 Hours)
Finish Used
White satin paint
Recommended Skill Level
Beginner

Full size storage bed with trundle

Submitted by ellehcim88 on Fri, 08/14/2020 - 15:14

Full size storage bed with trundle. Three drawers and a trundle on one side and four drawers on the other. I started with the farmhouse design (headboard and footboard) and modified it to make it not so heavy and I designed the rest using SketchUp. See more photos in blog link.

Built from Plan(s)
Estimated Cost
$1000
Estimated Time Investment
Week Long Project (20 Hours or More)
Finish Used
White satin finish latex paint
Recommended Skill Level
Intermediate

Modified Farmhouse table

Submitted by JMD1905 on Sun, 08/23/2020 - 15:38

I modified the Farmhouse Console Table to serve as a entertainment center for our new 75" television. I removed the center shelf so that we could place our taller knick knacks there. I also put a 'hidden' shelf at the top and painted it flat black to hide the cable box, power strip etc. I also added a back to hide the wires. It turned out nice.

Built from Plan(s)
Estimated Cost
$150
Estimated Time Investment
Day Project (6-9 Hours)
Finish Used
Green = Beir Premium Plus paint - picked color chart and mixed.
Top is Varathane stain - I mixed part Espresso and Red Oak.

Pallet wood potting bench.

Submitted by Anonymous (not verified) on Sun, 10/04/2020 - 19:34

Thank you Ana for the great plans! We adapted the project for wood we had on hand. It is only 40 inches wide instead of 42”. Our widest pallet board was only 40”.
Thank you for continuing to inspire us! We made two couches a couple of months ago. Great plans!

Estimated Cost
Box of screws!
Estimated Time Investment
Afternoon Project (3-6 Hours)
Finish Used
Potting bench.
Recommended Skill Level
Intermediate

Big Kids Picnic Table

Submitted by JoeP on Thu, 11/13/2014 - 16:44

Our kids love this table.  Everyone had to put their handprints on it!

Built from Plan(s)
Estimated Time Investment
Afternoon Project (3-6 Hours)
Finish Used
Orange left over paint, finger paint for the hand prints and satin polyurethane.
Recommended Skill Level
Beginner

Aromatic Cedar trinket box

Submitted by JoanneS on Fri, 12/05/2014 - 14:33

This was a project to use some pieces of left over ¼” thick aromatic cedar closet lining board.  I cut off the tongues and grooves with the sliding miter saw, and calculated the measurements for the box to fit the size of the wood.  For this build I used the micro-pin nailer with compressor, and ½” headless pin nails.  The finished box measures 4 1/8” tall, 6” long, and 3 3/8” wide.

Inside, a divided lift-out tray sits on rails made from small pieces of the cedar board glued to the inside.  The addition of an extra decorative board to the top made it ¾” thick, to work with a regular knob.  The inside of the box stayed unfinished to preserve the cedar fragrance.  This was an afternoon project.

Built from Plan(s)
Estimated Cost
The cost of this build is just for the knob, since the wood and finishing materials were already on hand.
Estimated Time Investment
Afternoon Project (3-6 Hours)
Finish Used
On this build I ended up with some discoloration from the glue. I re-sanded and touched it up with some Minwax express color in Mahogany on those areas to even up the color and make it all look natural again. Then everything received 3 coats of gloss polycrylic, topped off with an acrylic crystal knob from Lowes.
Recommended Skill Level
Beginner

Comments

Linda7

Fri, 12/05/2014 - 17:56

Joanne, you are the queen of trinket/jewelry boxes! I love all of your posts which show how something simple can be so different and special. These would make wonderful Christmas presents for loved ones, friends, or co-workers. Thanks for sharing.

JoanneS

Sat, 12/06/2014 - 04:58

Linda, thanks so much for the nice comment!  I have such fun doing hand built gifts for Christmas!  Thinking up how to decorate them and what to make them from is a big part of the fun!  smiley

pipe/wood bookcase

Submitted by ltodd on Thu, 04/11/2013 - 18:26

1/2 ' x 18" black pipe was used along with 1/2 ' flanges. The wood was re-purposed 2x6' pine lumber that had been used for pallets, that would have been thrown away. The boards were joined with a Kreg Jig, It will house my stereo components.

Estimated Cost
$150 pipe/flange costs
Estimated Time Investment
Weekend Project (10-20 Hours)
Recommended Skill Level
Beginner

Truss Shelves

Went a slightly different route, since I'm not a fan of furniture built using 2x4's. I opted to use 1x3"s for the supports. Still more than sturdy, and I think it adds a little to the look.

Built from Plan(s)
Estimated Cost
$58.87
Estimated Time Investment
Afternoon Project (3-6 Hours)
Finish Used
Rustoleum "Kona" stain, valspar semi gloss poly.
Recommended Skill Level
Beginner

French County Wardrobe

This is probably one of my favorite pieces I have built.  Challenging but fun.  I built it as two separate sections, an upper and lower cabinet to make it easier to carry indoors.  I added a full-extension drawer below for storage. The two-toned paint combination did take a lot of extra time. Because I used an airless spraying to paint I had to tape and cover each section separately. 


Built from Plan(s)
Estimated Cost
$300.00
Estimated Time Investment
Week Long Project (20 Hours or More)
Finish Used
Venus teal and creme brulee by Behr. Dark walnut stain for the top.
Recommended Skill Level
Intermediate

Comments

Wood Chuck

Fri, 03/06/2015 - 10:43

WOW it looks awesome the extra time spent on the painting was more than worth it looks spectacular. I bet you also could make a great profit selling this Wardrobe either on line or in a consignment shop, if I had the need for one and the money I would defiantly buy one!!

MrCoffee

Fri, 03/06/2015 - 13:54

I love the way the paint job came out on this and I really dig the having the molding on the top stained.

Calmly

Sun, 03/08/2015 - 07:36

This looks awesome! I love the the paint finish and it your profession work

TwoCuteKids

Mon, 03/09/2015 - 17:30

I agree this is your best so far...which is hard to say b/c all your projects are amazing! I love the style, the paint colors, the stained top, and the hardware!

whopua

Tue, 11/10/2015 - 11:13

Are there any available plans? I'd love to make this for my wife!

Anela

Sat, 03/19/2016 - 15:06

It looks really great! 

I have fallen in love with it the second I saw it and somehow I am now convinced that I need a new wardrobe ;) 

I guess you don't have plans for the wardrobe laying around - but would you mind doing a fast sketch (just a simple one on paper) with all the measurements noted? I would be thrilled to try building it myself in the summer. 

Greetings from Germany!

Anela

Sat, 03/19/2016 - 15:07

It looks really great! 

I have fallen in love with it the second I saw it and somehow I am now convinced that I need a new wardrobe ;) 

I guess you don't have plans for the wardrobe laying around - but would you mind doing a fast sketch (just a simple one on paper) with all the measurements noted? I would be thrilled to try building it myself in the summer. 

Greetings from Germany!

petemoore

Mon, 08/22/2016 - 07:32

its very nice but there are no plans

can you put up the plans or email me them please

many thanks

leftysgirl

Tue, 07/18/2017 - 05:43

Are there plans used for this beautiful piece? I do not see any links. Help please!! I absolutely need to make this armoire :) :) 

Garden Shed

Submitted by Anonymous (not verified) on Thu, 10/07/2021 - 16:20

This was my first big Build! Thank you Ana for the free and easy to read plans.

Built from Plan(s)

Comments

Reclaimed lumber Adirondack chair

Submitted by rkyount on Thu, 08/08/2013 - 13:23

For my brother's 35th birthday, I helped him build a fence and side deck on his house. Using the leftover lumber scraps and screws, I adapted the DIH Adirondack chair plans to build this for him. He wanted a big, sturdy chair with a wide arm rest that looks "rustic". I used 4x4 and 2x4 post scraps, deck boards, and fence pickets. I also widened the seat just a bit for comfort. This is definitely the perfect chair for him!

Estimated Time Investment
Afternoon Project (3-6 Hours)
Finish Used
Since it's all treated lumber, we'll just seal it whenever we do the deck with Thompson's Water Seal.
Recommended Skill Level
Beginner

Comments

rkyount

Fri, 08/09/2013 - 14:38

Thanks! I always enjoy building with your plans, and it was a bonus that I didn't have to buy anything to build this, since I used leftover materials.

Beadboard Cabinet

Submitted by jamie_C on Sun, 08/28/2011 - 20:26

Since we don't have a garage or any really good place to keep our tools, they end up all over the house while we're working on a project. So, we decided to build a cabinet that would look nice in our house, and also house our tools. We chose the armoire plan because it has plenty of space.

This project took us forever, so it's hard to really estimate the actual working time. We began working on it back in June, then we were evacuated because of a forest fire.... By the time we got back into our house and we were organized again it was the end of July.... and now finally the end of August it's finished. It took us a while, but it's a great addition to our house!

We modified this cabinet by using 1/4 inch beadboard backed with 1/4 plywood for the doors. We also modified the size of the armoire to make it deeper.

Built from Plan(s)
Estimated Cost
$125 approximately?
Estimated Time Investment
Weekend Project (10-20 Hours)
Finish Used
Sanded, then painted the outside with a quart of "creamed coffee" oops paint, and painted the inside with a sage green paint from Habitat for Humanity Restore.
Recommended Skill Level
Beginner

Comments

Farmhouse Table - Thanks Ana!!

I tackled the Farmhouse Table over a long weekend while my boyfriend was away - he was surprised needless to say!
I have not attempted any woodwork projects since grade 8, but this was alot of fun - I did not find it very difficult and loove using power tools :)
I made the matching bench, however I guess I did not stir the bottom of the can well enough and my bench is now red :/ soo I am going to either stain it dark or paint it white and use it as a mudroom seat!

*I also made mine shorter - 7ft long to fit in our dining room and adjusted the bench to fit.

Estimated Cost
$160 for table & bench inc. wood, screws, stain, sand paper
Estimated Time Investment
Weekend Project (10-20 Hours)
Finish Used
I sanded it until I was pretty sure the risk of splinters was eliminated. After pre-stain conditioner, it got a coat of Minwax 'Ipswitch Pine'. The result was perfect on the table (two coats), however I must not have stirred the can well enough as my bench turned out dark red :/ I wanted it to look like it's 100 years old.
Recommended Skill Level
Beginner

Comments

Maggie Jaye

Fri, 10/07/2011 - 17:15

Thank you so much Ana! We are in the process of renovating our house and your website has inspired me to take on so many more projects now!! :)

Margaret Kubiszyn (not verified)

Sat, 10/08/2011 - 19:46

I love your choice of stain - it is beautiful!

Guest (not verified)

Wed, 11/02/2011 - 04:52

I built a similar table and I am having problems with my kids getting food in between the pieces of wood. Do you have this same problem, is anyone having this same problem? Does anyone have any suggestion as to how to fix it, how to keep food and other particles from getting trapped between the cracks? Thanks! You did a great job!!

Guest (not verified)

Wed, 11/23/2011 - 15:00

I am building this table as we speak. The thought occurred to me as well concerning the cracks attracting crumbs. I believe using clamps to make the fit as tight as possible will help. Also some poly finishes may be appropriate with children which may even seal the cracks... if sanded and clamped well.

Maggie Jaye

Wed, 11/23/2011 - 15:11

I did try my best to clamp the wood together as tight as possible - due to the pieces of wood not being completely straight, they are there.

I haven't had this problem yet. I do use place mats when eating at the table, that generally stops any crumbs etc.That's probably the easiest way to avoid it :)

Thank you for your comments!

Farmhouse Bed King

Submitted by moldah on Wed, 01/11/2012 - 15:15

This was the plan that started my addiction! We had just gotten new mattresses, and we needed a new bed frame. All of the furniture stores have dark stains, and we wanted something natural and bright. I was searching one night found your site, and that was it. A few changes, increased the height of the headboard and footboard, wanted a slight overhang on the top of each as well. Also added an additional 2x4 between the legs of the headboard for support.

Estimated Time Investment
Week Long Project (20 Hours or More)
Finish Used
Natural
Recommended Skill Level
Beginner

Comments

Kate (not verified)

Wed, 01/11/2012 - 17:15

That looks great! The natural finish looks really great with your bedding. I love the higher headboard - we're planning to do the same with the farmhouse bed I'm planning so that my husband will be able to sit up in bed without hitting the back.

Did you end up using the boxspring, or is the mattress just in slats? I couldn't tell from your picture.

moldah

Wed, 01/11/2012 - 18:23

Hi, thanks for the positive response :) The mattress and box spring both are on here. In fact, I kept the bed itself on the original metal frame below, and added the side rails to hide it. Purchased the hardware for the side rails from Rockler

MichaelAndMelissa

Fri, 01/13/2012 - 08:42

All I can say is wow. Definitely showing this to my wife today. We had plans to do something like this but yours is up up and away! Excellent job!

moldah

Fri, 01/13/2012 - 15:48

I'm glad you like the lights. I go back and forth on them. I hated that I had to drill holes into the wood to run the cord, as it does not give us the option to remove later on. Also, if you go with the lights, you might want to put some double sided tape on the back. Thanks!

RyanJ (not verified)

Tue, 01/17/2012 - 11:15

The bed looks great. The routered edges are a nice touch.

Did you attach the bed to the original metal bed frame at all?

moldah

Tue, 01/17/2012 - 14:20

Yes, the 2x4 I put between the headboard legs for support, I did drill a hole on each side, and attached the top of the bed frame to that with bolts.

Szetoklin (not verified)

Tue, 04/03/2012 - 09:41

My husband just forwarded me a link of your bed.
It is SO SO beautiful!!! Love the reading light. Where did you get that by the way?
The bed is so pretty. Love the natural wood look and the knots.
We too have mostly dark wood stain in the house and love this light color look. Did you stain it or coat it with something?

igapo

Sat, 04/28/2012 - 15:26

Hi Moldah,

Very impressive and great addition with the lights. Can you tell me how tall your final headboard and footboard are? Thanks.

Elizabeth "Lizzie" (not verified)

Sat, 06/16/2012 - 04:46

LOVE IT! I love doing things like this and I am inspired by seeing your pictures!! I am especially impressed with the Star Wars case noted on your endtable LOL Right there I know you have great taste in films, too!!! I am going to do this project! Great job!

Usmc3mama

Fri, 08/09/2013 - 20:35

Since there were no plans we are making one similar. Thanks for sharing

Marybaileycole

Wed, 09/04/2013 - 17:10

Wow, this is so beautiful! Great Job! We are very amateur builders and I had a couple questions. Do you have a blog with more details? How did you achieve the routered edges? And also, do you mind sharing the cost of the project? Thanks!

rangers_31

Sun, 11/03/2013 - 08:44

By how many inches did you increase the height of the headboard and footboard? I am thinking about doing the same when I build this bed and was hoping for some guidance.

Modified Essential Entryway Bench

Submitted by Anonymous (not verified) on Mon, 06/05/2023 - 13:56

Worked with a client to create a boot bench with adjustable shelves. The Essential Entryway Bench was a perfect starting point! I extended the top trim to home the 4” cushion. I love Ana’s plans! Thank you!!!

Built from Plan(s)

Comments

Back