Community Brag Posts

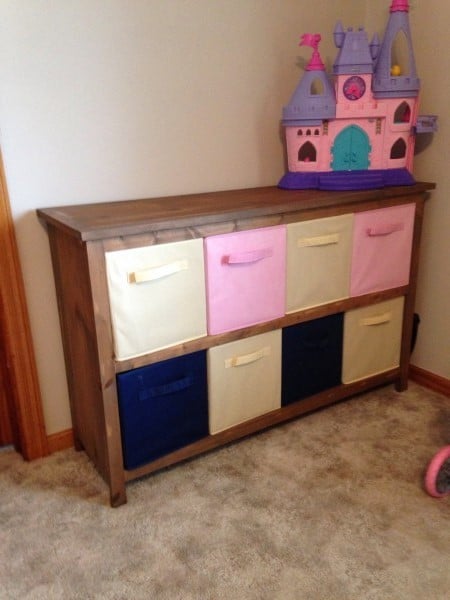
Printer's Console or Sneaky Litterbox Cabinet? Cat Litter Box Cabinet

Submitted by Joni on Sun, 11/25/2012 - 08:12

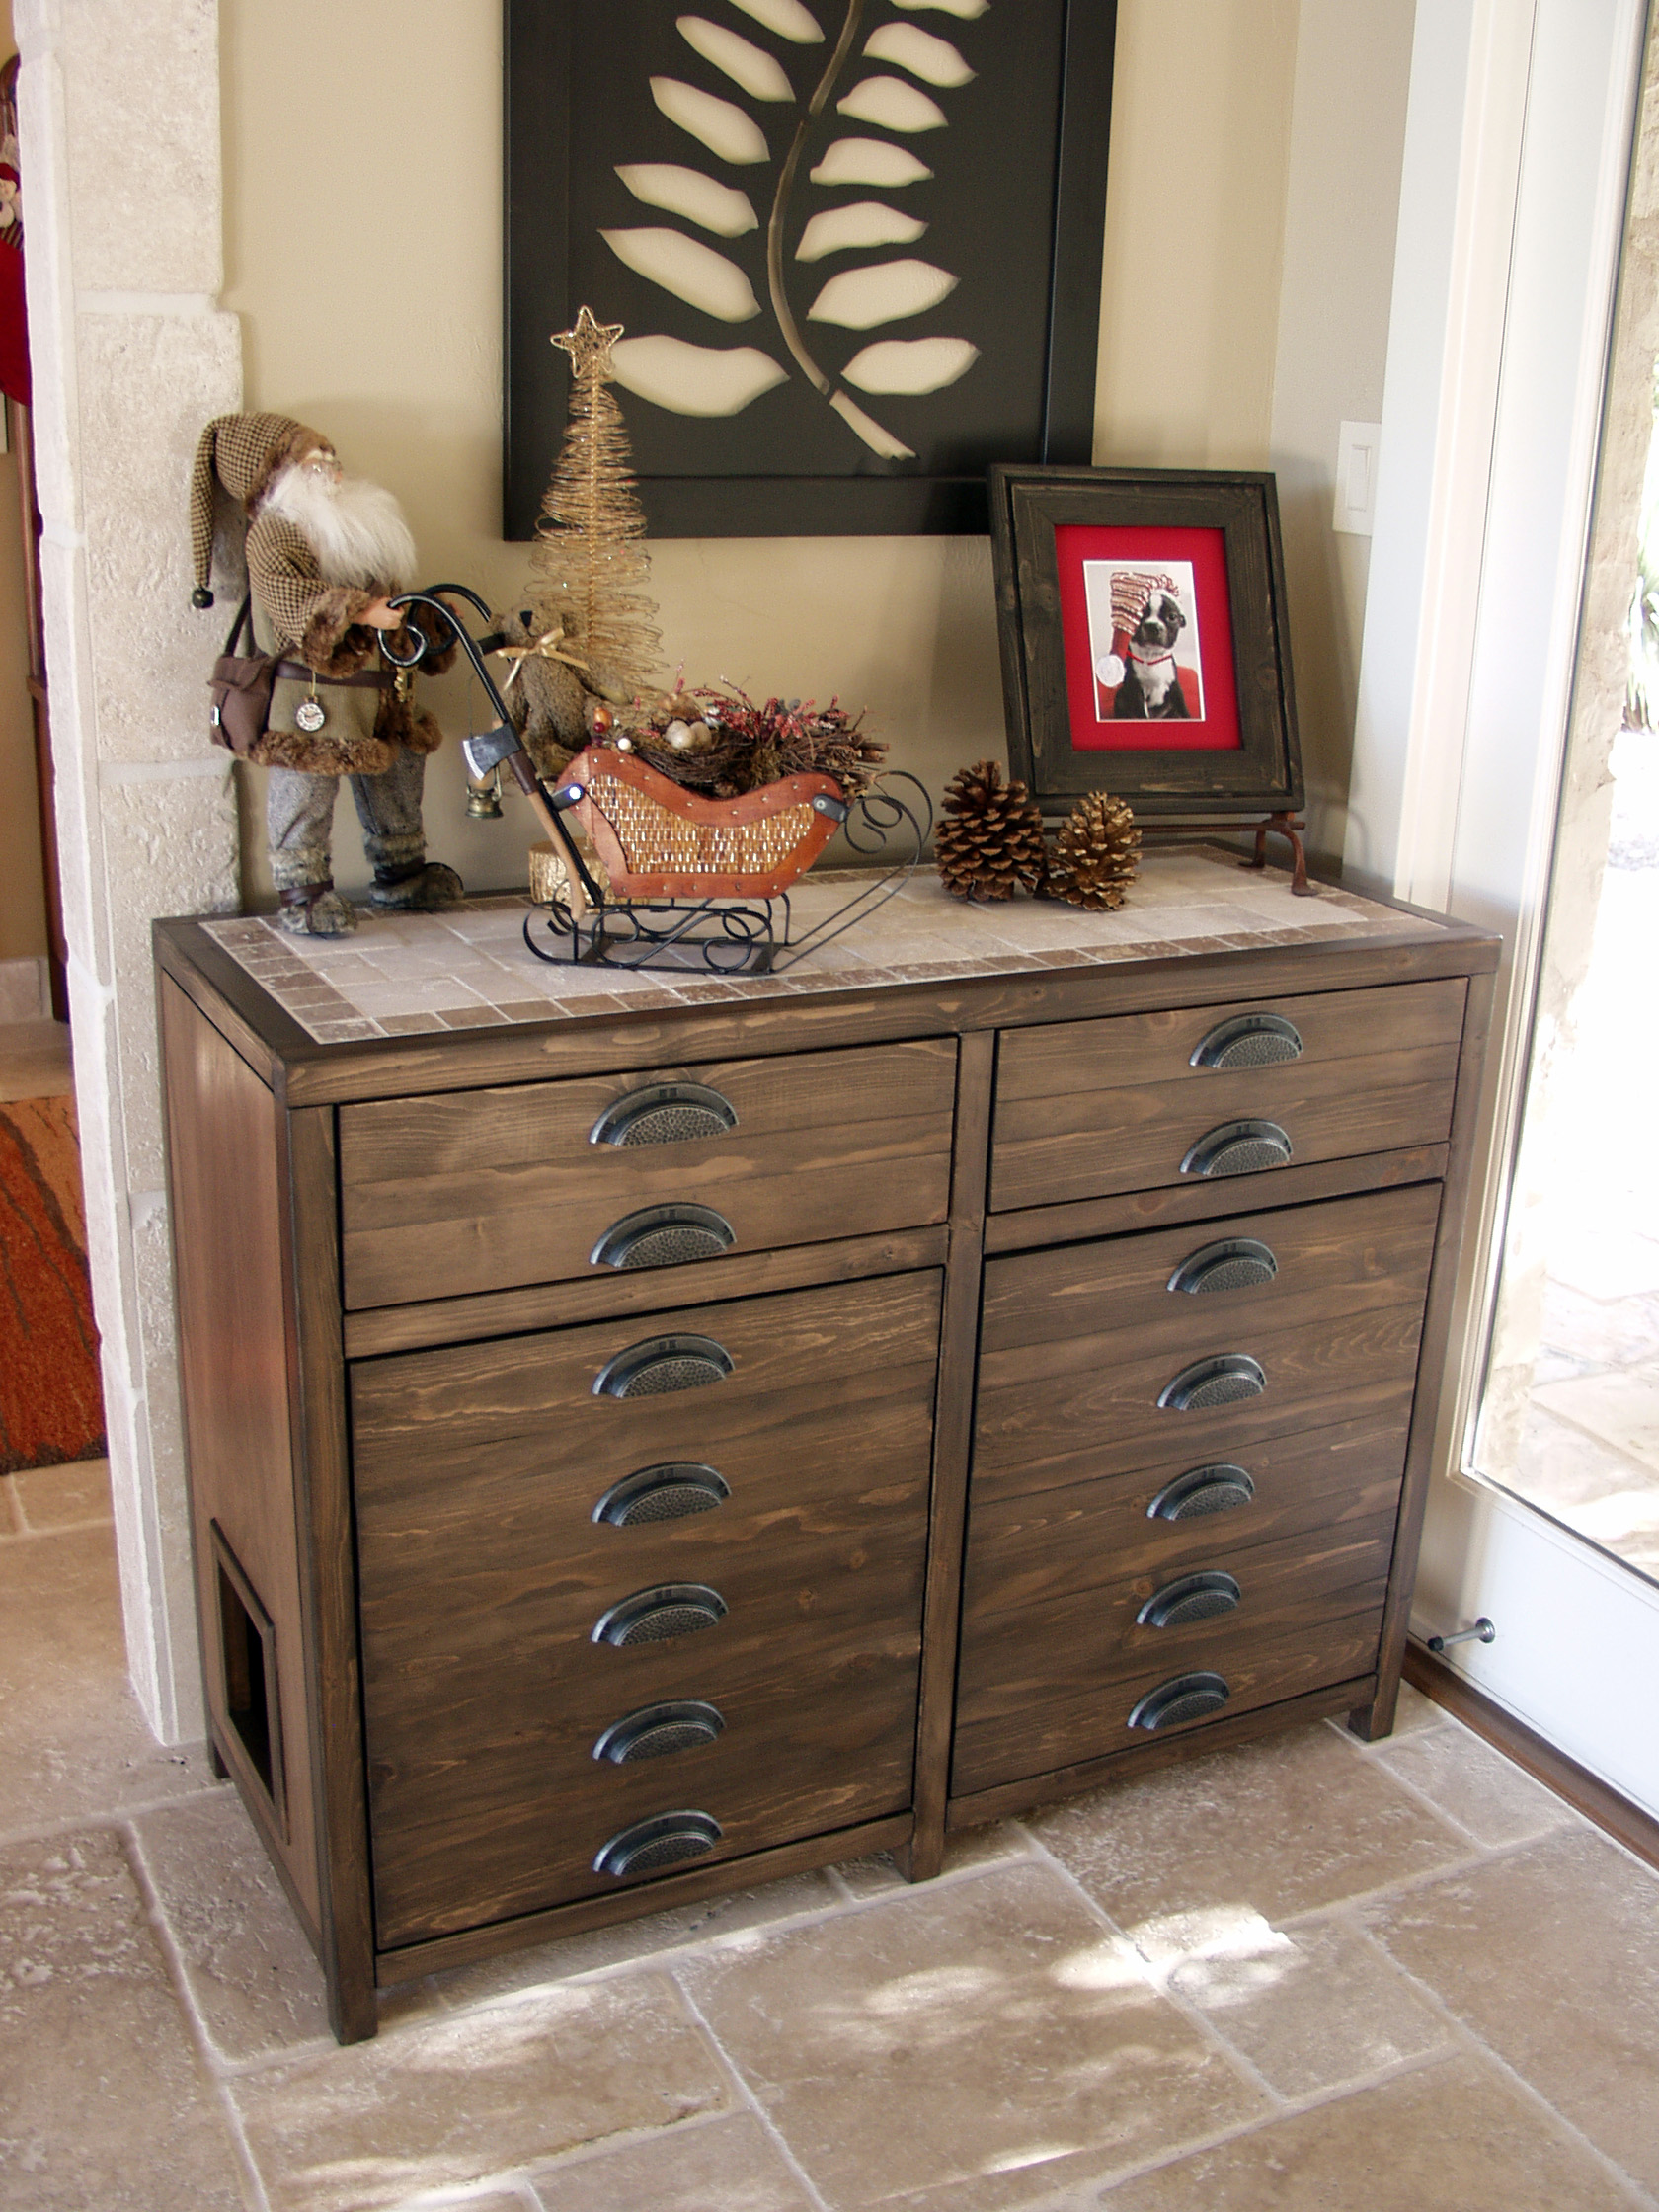
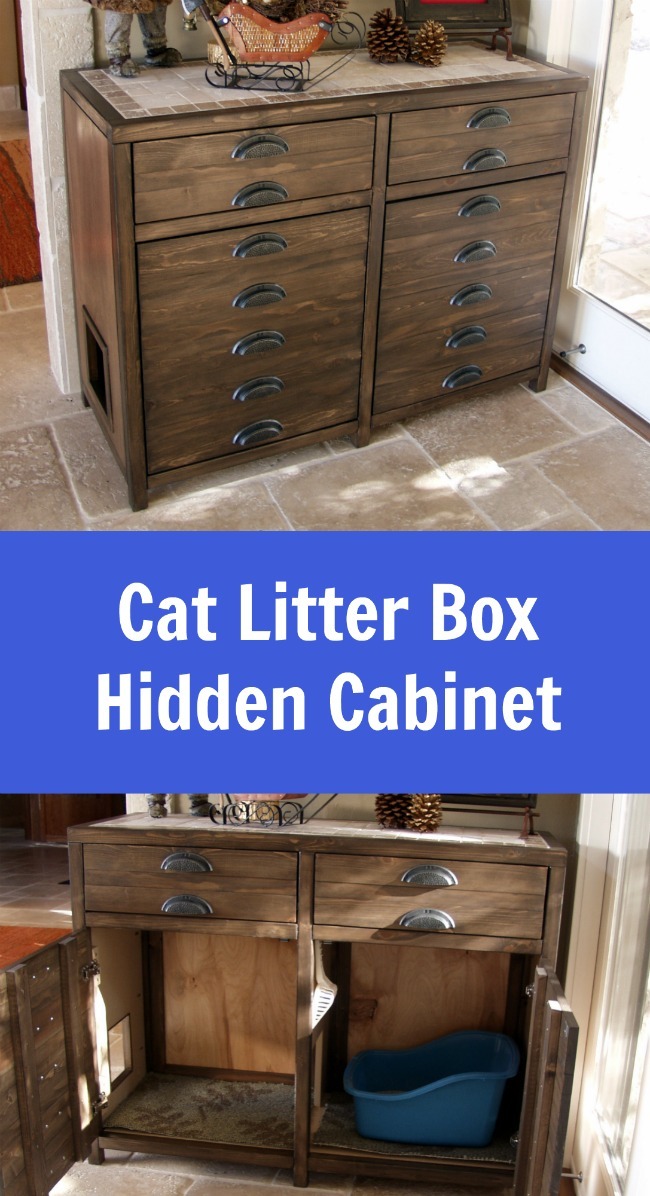
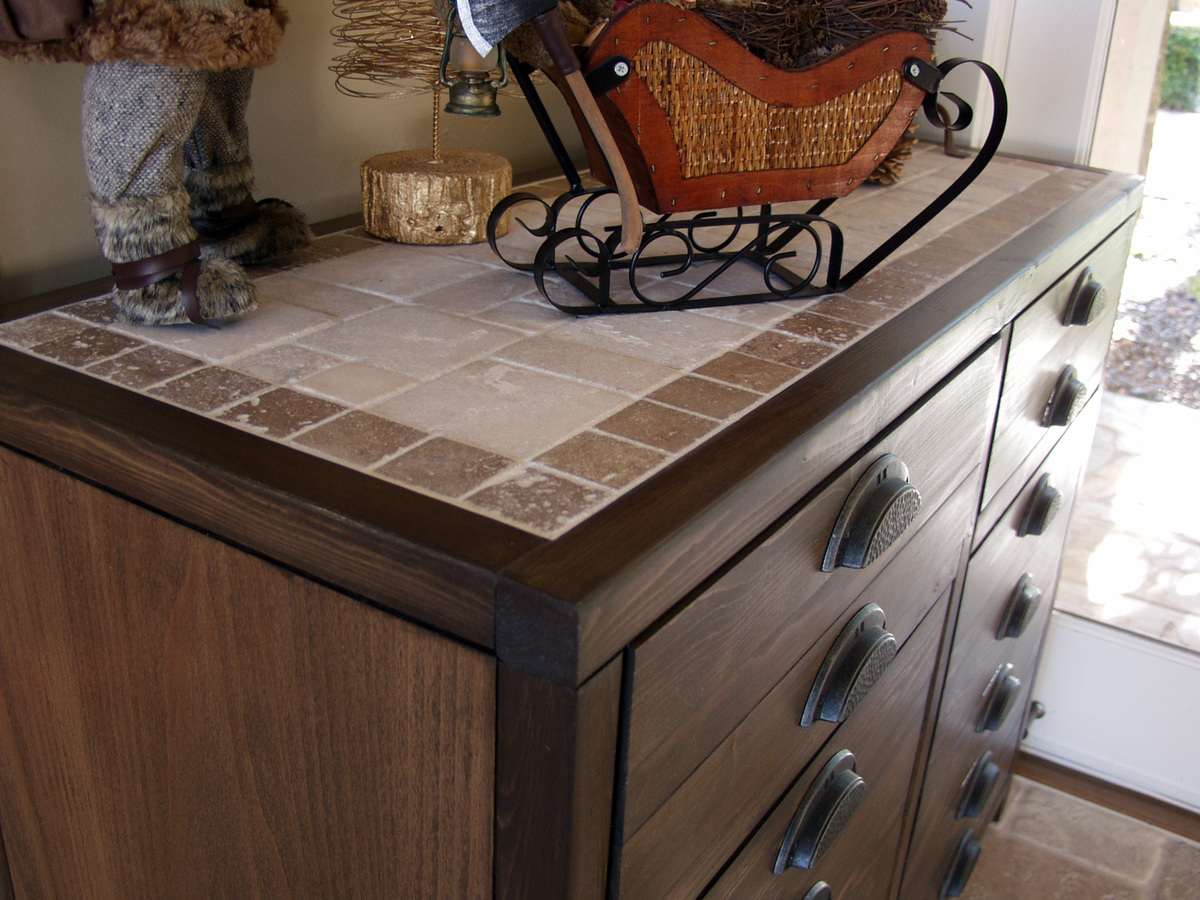
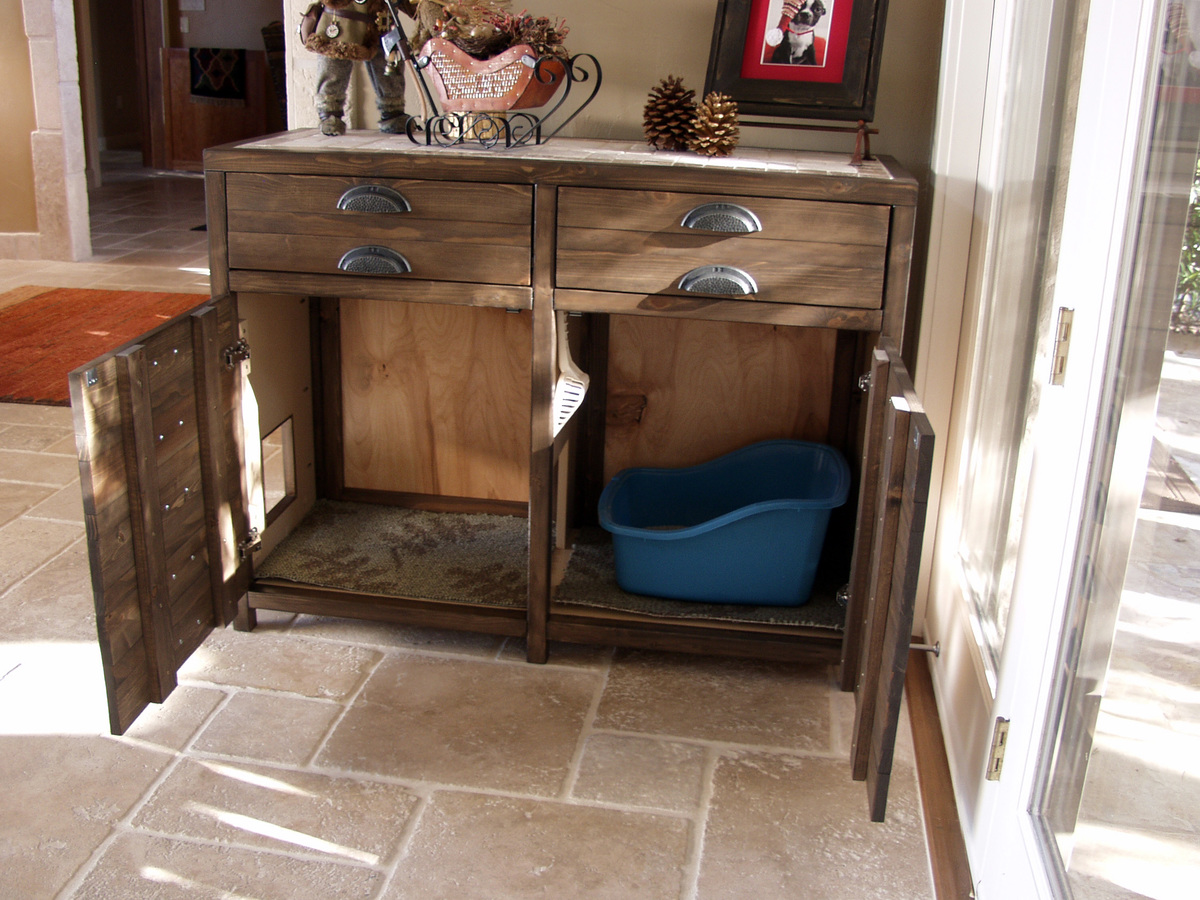
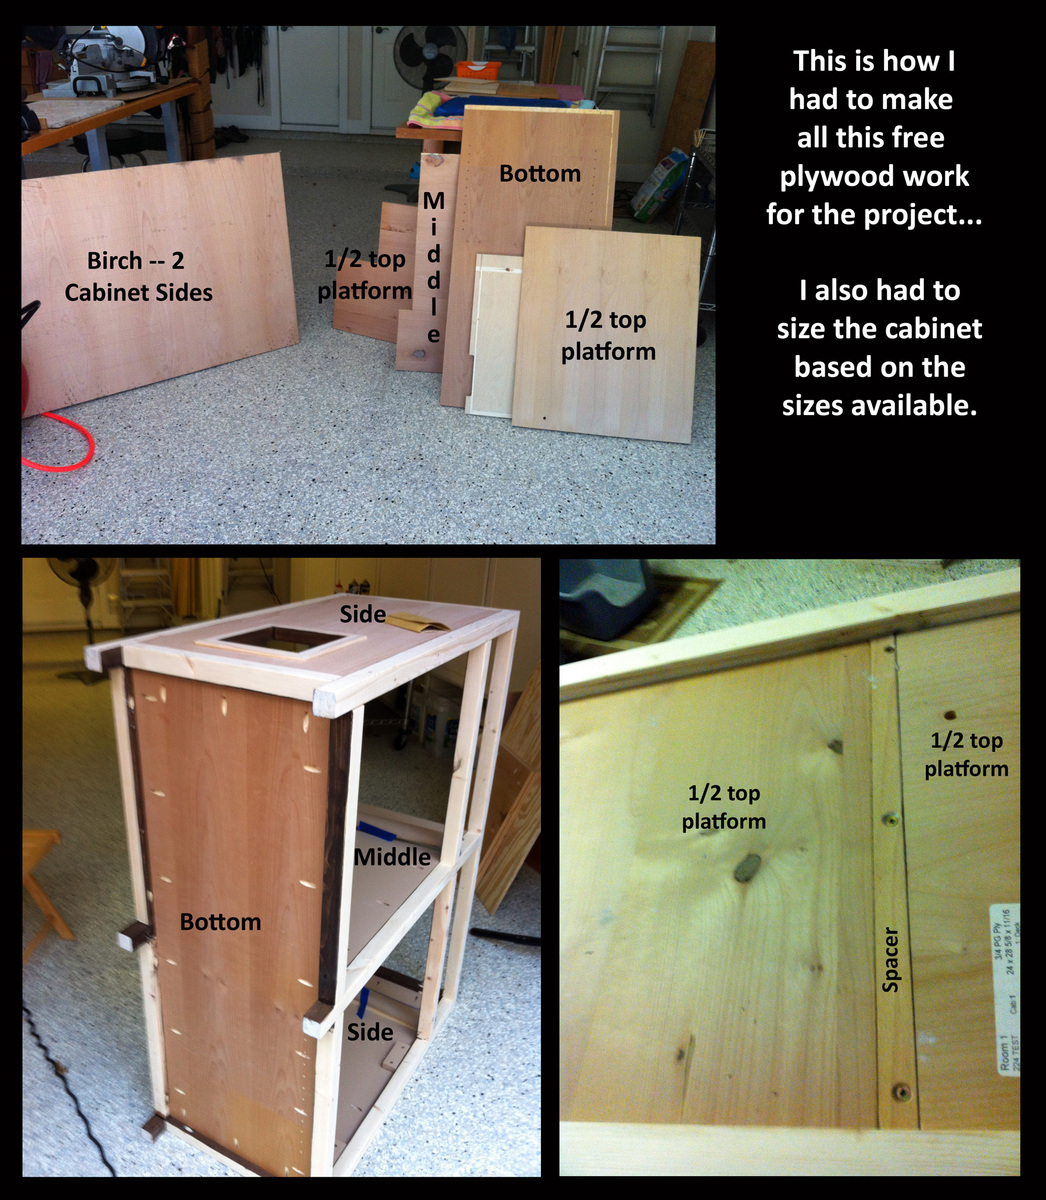
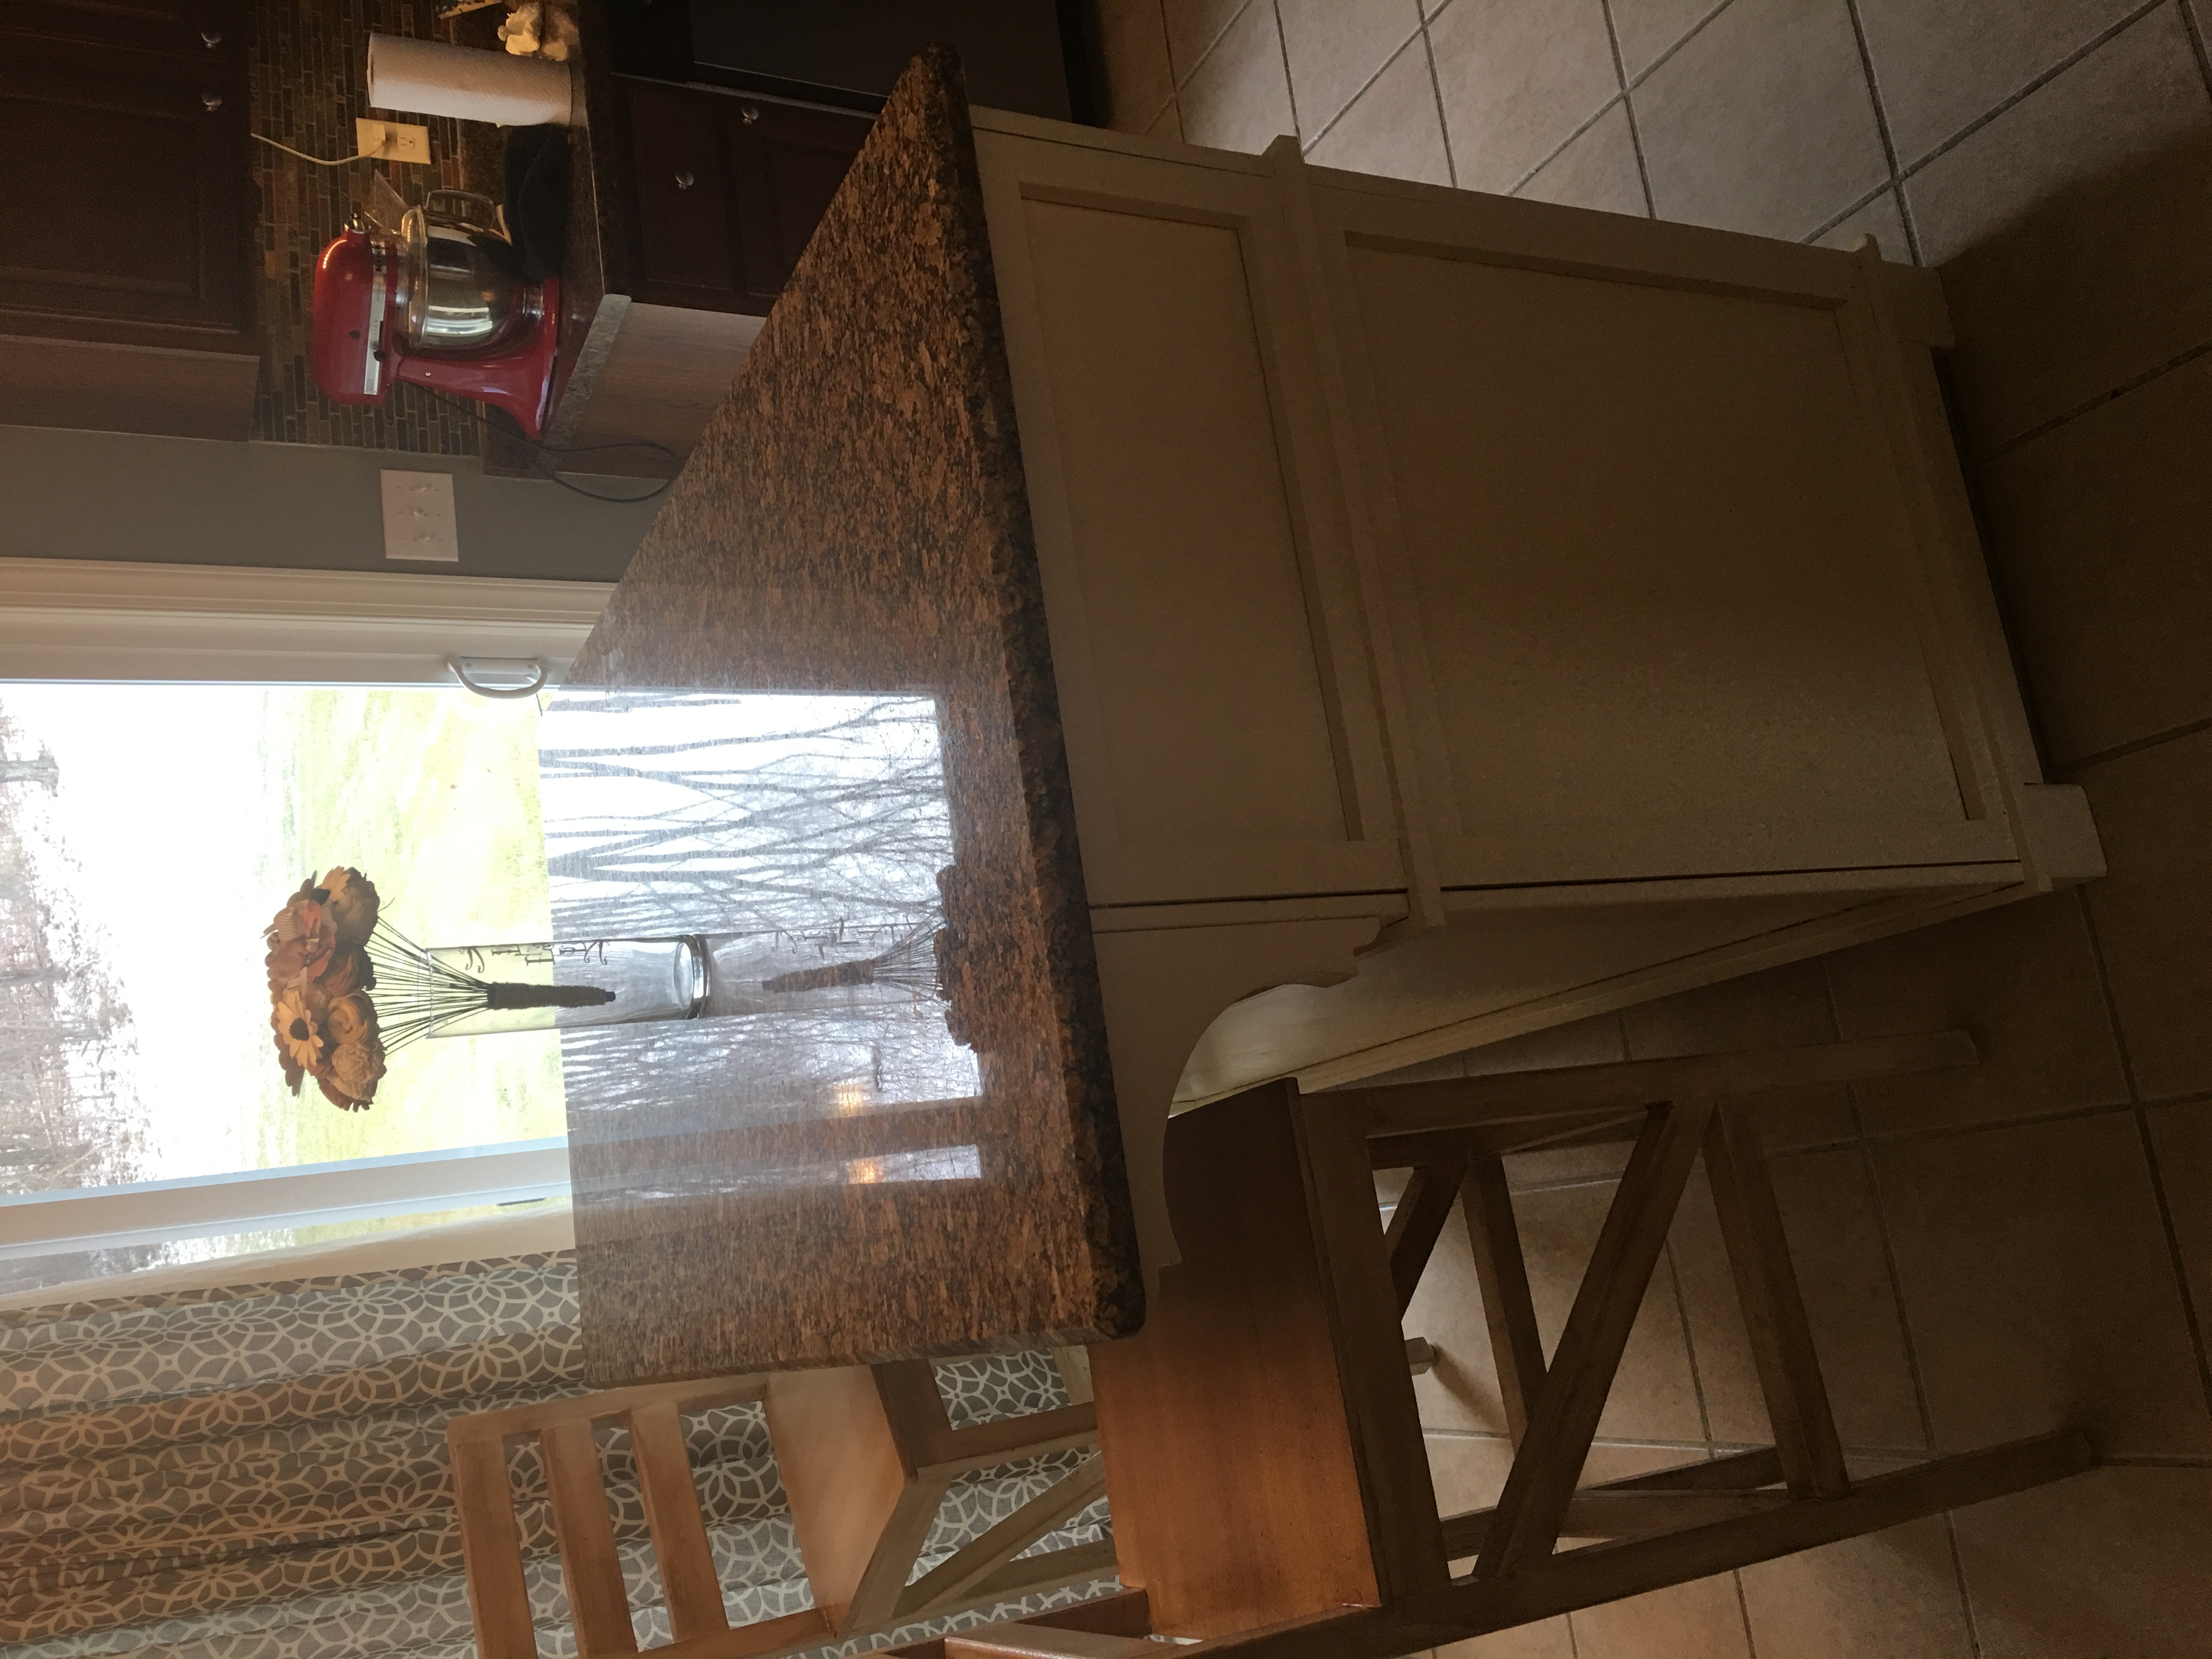
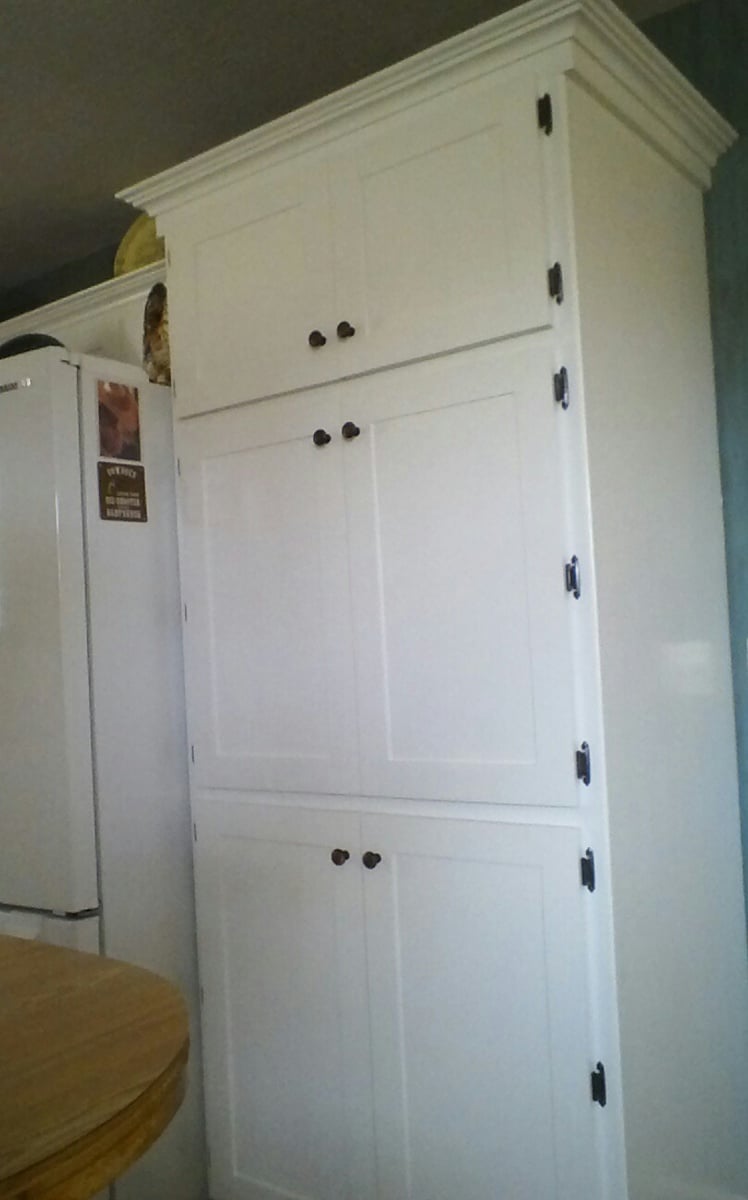
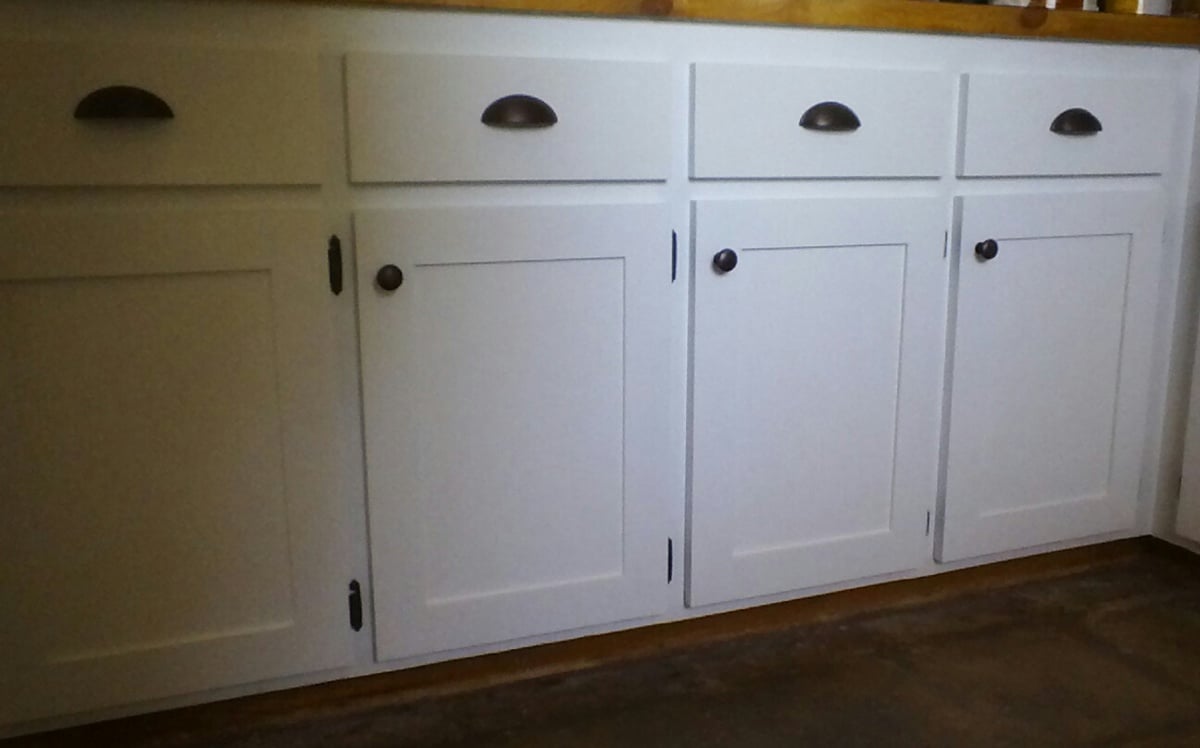
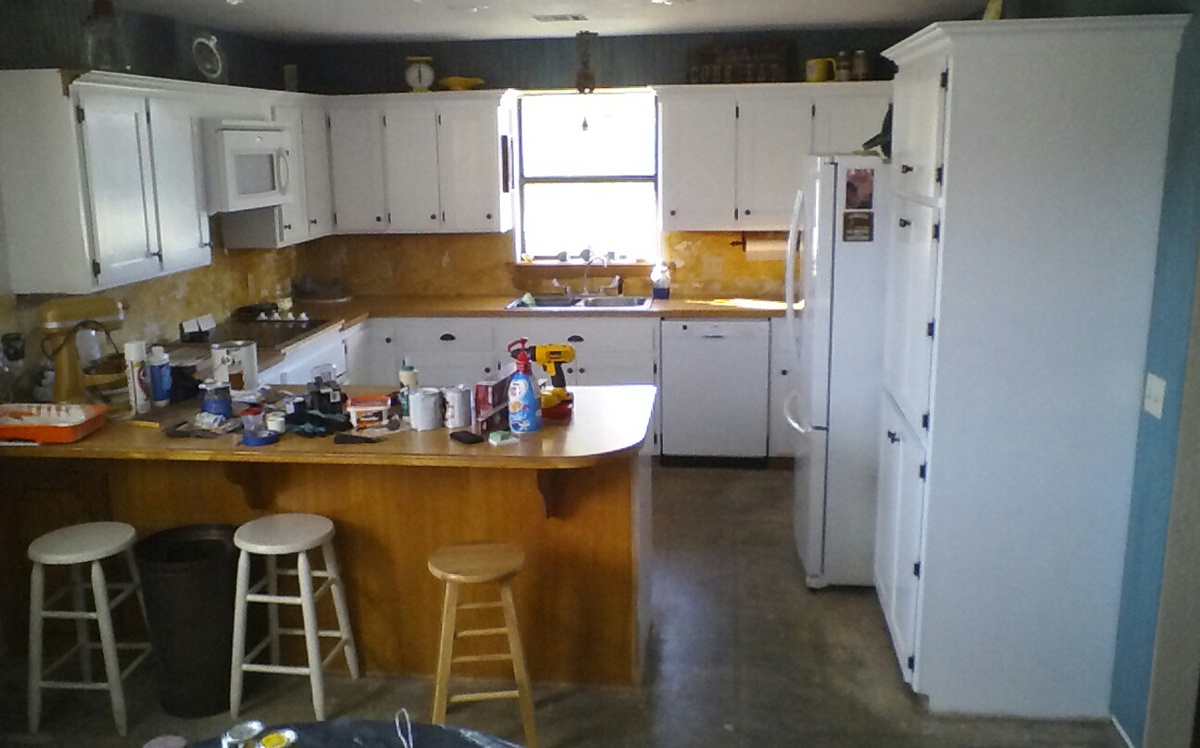
I had been wanting to build something to hide the litterbox for a long time. When I saw the Printer's Console plan, I knew this was the perfect plan for a cat litter box furniture. I loved that Jen Woodhouse's version was completely modified to her bar plan, so I thought I could modify for my litterbox idea. I modified the plans on size, as I was trying to use a bunch of mis-matched plywood. I also modified it to include a cat door, a cat passageway on interior panel, a vent on the back behind one of the drawers, and the stone top. I built a frame on the back to house the backing as an inset piece, as I didn't want it to be seen at all. I learned a very important lesson during this build. Not all 1x3s are created equal. Once I got my doors assembled, they were too big for the opening. I couldn't shave off the tiny amount needed, and couldn't make anything work short of starting over with 1x4s, sawing off a small amount, and cutting down the # of "drawers" (and handles). I wanted the inside to be fully finished (because cat pee on raw wood would not be good!). I had to finish certain "planes" prior to putting the thing together. I used kitchen and bath paint on the inside floor and sides for easy cleanup. The stone was carryover from construction on our house 12 years ago. The handles were an amazing deal @ $1.81/each .


Built from Plan(s)
Estimated Time Investment
Week Long Project (20 Hours or More)
Finish Used
Minwax Wood Conditioner, followed by a mix of American Walnut & Onyx Minwax water-based Stain. 3 Coats of Old Village Gel Varnish. On inside, I used a kitchen/bath paint.
Recommended Skill Level
Intermediate

Comments

blueskiesinNM

Mon, 06/17/2013 - 12:23

Love your use of the buffet. Our family has discussed making a piece of furniture like this for our smaller dog. Nice to see someone has done it! Our big dog has scheduled feedings but our little dog would prefer to be a free feeder. Poor thing chokes down his food in our pantry listening to our big dog breathing under the door waiting for him to finish. When he is done we open the door and the Big, greedy dog bolts in looking for left overs. A family member has to wait patiently for the little dog to finish so he can escape the pantry. I really don't want a doggy door in my pretty swinging bi-fold doors to my pantry which is also access to our kitchen.That would be a pain to have to keep closed all day. But this buffet idea is super cute! Thanks for the inspiration.

wayneled

Fri, 01/09/2015 - 22:01

I know this is an old post, but I'll ask anyway

I love this piece and am in the planning stages for ours. Thank you for sharing!

I am Wondering how you went about the table top. Did you install a 3/4 ply on top but not flush, allowing room for mortar and tile? If so how much room did you allow for the tile/mortar? 1/2 inch? How did you keep the surface of the tile level and uniform? Lastly, did you seal the tile with anything when you finished?

Aesthetically, the tile top really sets this piece off and I really want to make my own.

Thanks

Seasonal And Holiday

Rustic tv stand

Submitted by joslwea on Mon, 09/08/2014 - 09:54

Rustic tv stand made from pallets and reclaimed ship lap and 2x4's

Built from Plan(s)
Estimated Time Investment
Day Project (6-9 Hours)
Finish Used
Minwax early american
Recommended Skill Level
Intermediate

Comments

joslwea

Tue, 09/23/2014 - 20:39

I actually made this without the plans. I saw the picture on pinterest that wasnt linked to your site and just made my own plans for it. If I recall, I made it 5ft in length. BTW, big fan of yours! Your plans are so detailed and your pieces give me so much inspiration as a fellow furniture builder. If you have time I'd love for you to check out my facebook page, jennamaedesigns, and tell me what you think. I'm new to the building bizz but I love it! Thanks again for commenting

Thanks for a super project!

Submitted by Anonymous (not verified) on Wed, 12/28/2016 - 09:49

I used cedar, stainless steel rails and finished with marine spar varnish.  Gave to my son for Christmas to hold his smoker/barbeque!   Thanks for the super project idea!

Estimated Cost
$140
Estimated Time Investment
Afternoon Project (3-6 Hours)
Finish Used
Marine Spar Varnish
Recommended Skill Level
Beginner

Comments

Over the Bed tree house

Submitted by AbbaZabba on Mon, 09/07/2020 - 12:22

The directions on this aren't very clear and there's a few that I think are off all together. It came together fine with some adjustments and the kid like it so alls well that ends well, I guess.

Built from Plan(s)
Recommended Skill Level
Intermediate

Farmhouse table - Tobacco farm wood

The end result of this project was incredible. The table is 3ft x 6ft x 31inches - Built with Tennessee tobacco farm wood. I used KREG for all the joining, even the legs. Finished it with the one and only Annie Sloan Paint/Wax combination.

Estimated Cost
350.00
Estimated Time Investment
Week Long Project (20 Hours or More)
Finish Used
Annie Sloan - Paint: Old White - Wax: Clear and Dark
Recommended Skill Level
Advanced

Comments

Bookshelf Cubby for Fabric Drawers

Submitted by Niewenhuis on Thu, 09/11/2014 - 07:35

This was an easy build and I'm so happy with the finish. I used Hilary's oxidizing vinegar solution first. I didn't feel it was "grey" enough so I put on a coat of Minwax Weathered Grey. Let dry. Added a coat of Minwac Special Walnut and finished with Pastewax. Love, love, love!  They are very sturdy!

Built from Plan(s)
Estimated Cost
$30
Estimated Time Investment
Day Project (6-9 Hours)
Recommended Skill Level
Starter Project

Moore Kitchen island

Submitted by Swm1515 on Fri, 12/30/2016 - 11:45

My wife wanted an island so bad and didn't like any of the plans but this one. This was my first big project but it worked out well. In the front middle section, I went with a two trash can sliding cabinet. Took me around 36 hours to complete. I also found plans for tall bar stools that I used and made the chairs with the island. We found a stone place that had scrap granite that we bought cut to size. My wife loves it. Great Christmas present!! 

Finish Used
Behr antique white, minwax satin polyurethane
Recommended Skill Level
Advanced

Comments

mniehaus97

Sun, 01/01/2017 - 19:01

All I see is a PDF with the dimensions but not the step by step plans.  Can you please share the actual plans?  I am hoping to build two of these to go on either side of our fireplace.


Cheers,

Easy DIY Workbench on Wheels

Submitted by Anonymous (not verified) on Wed, 09/09/2020 - 13:26

I needed a workbench and Ana's easy plans were perfect for what I needed. I have a small one-car garage that I do my projects out of. The garage also provides storage for bikes, kayaks, gardening tools, etc. I customized the dimensions a little, making the bench only 30" deep to better fit the space available, and to add wheels to be able to roll the bench out into the driveway if needed. The lower shelf provides some good storage for me as well.

Estimated Cost
$90
Estimated Time Investment
Afternoon Project (3-6 Hours)
Finish Used
none
Recommended Skill Level
Beginner

Harriet higher chair stained

Submitted by deschudon on Fri, 11/30/2012 - 08:13

This is the perfect chair height for my 5 year old son. Was easy to build for a novice, and after a lot of sanding, I stained + varnished and it turned out quite nice, to match with the desk I made which we can see in the picture background. It does take 3 of the 2x2x8 instead of 2, but at $2.5 each... Total cost of approx. $7 since I made the seat and back rest out of the scrap I had. I'm thinking of making swivel stools for my kitchen out of the regular height plan. I also cut the seat a little larger to have about 1/4" overhang all around except at the back.

Estimated Cost
$7
Estimated Time Investment
Afternoon Project (3-6 Hours)
Finish Used
Minwax stain 1 coat + water base varnish.
Recommended Skill Level
Beginner

Changeable Play Stand

Submitted by vic b on Fri, 09/12/2014 - 19:49

I love this, so did our son.

Built from Plan(s)
Estimated Cost
mostly out of bits and pieces found in the shed
Estimated Time Investment
Afternoon Project (3-6 Hours)
Finish Used
paint
Recommended Skill Level
Beginner

My attempt at the Benchmark Media Console

Submitted by Anonymous (not verified) on Mon, 01/02/2017 - 11:05

Had oak from my family farm that made up the top and trimwork. Purchased oak board for the legs. Sides and middle/bottom shelf from maple plywood. Decided against the flip down doors. Wasn't happy with he fit of the main doors due to a little off-kilter craftsmanship on my part, so will probably leave it open and add crates / some shelves the same height as the top row giving like 6", 6", and 11" or so.

Built from Plan(s)
Estimated Cost
$225 due to cost of Oak board (had to buy entire board $120, but have 5ft uncut left) and Maple plywood ($60), and used TransTint Vintage Maple dye instead of stain.
Estimated Time Investment
Week Long Project (20 Hours or More)
Finish Used
TransTint Vintage Maple dye mixed with water (about 1oz for a large mason jar) and Spray on Poly in Clear Satin. Wiped on dye liberally, wiped off excess as I went.
Recommended Skill Level
Intermediate

Large tapered wooden plant boxes

Easy to follow plans and make adjustments with materials I already had lying around. Love them! Thanks for the plans Ana!

Built from Plan(s)

Comments

Happy Granddaughters

Submitted by delmar on Sat, 12/01/2012 - 21:18

Made for granddaughter who loved the McKenna bed at American Girl. She loved the ability to customize because she has the Kanani doll. Will paint light blue (Kanani's favorite color) and have Hawaiian print bedding.

Estimated Time Investment
An Hour or Two (0-2 Hours)
Recommended Skill Level
Intermediate

Doors galore

Submitted by rhonit on Tue, 09/16/2014 - 07:03

Just a couple of pictures from our kitchen remodel. My husband and I have built 59 cabinet doors for our house, kitchen, laundry and two baths. The cost of wood only $604 , we chose to use finished ply for the panels and poplar for the stiles and rails. We could not have done this with out Ana, thank you from the bottom of my heart!

We are still in the process of our remodel, but I wanted to show what a little time, sweat and very little $$ (compared to the $10,000 + quote) can get you with determination and a few basic skills.

Estimated Cost
Wood for all 59 doors $604, kreg srews $60, primer and paint $120 and new hardware - jury is still out on that one.
Estimated Time Investment
Week Long Project (20 Hours or More)
Finish Used
Primer and paint, paint is Cabinet and Trim from Ace
Recommended Skill Level
Intermediate

Kitchen Island

Built 4 foot kitchen island. Used mix of cedar (2x6 decking)for top and rest was Douglas fir wood from home depot. Legs were 2x6 nailed to 2x4 Doug fir wood. 1x4 pine was used for the shelves. Measured distance to hold wine bottles. Cost approximately $100.00 in wood. Miniwax ebony and jacobean was used for stain. About 50/50 mix. Epifanes wood gloss was used to varnish. It's a superior product to use, however can be pricey. Can use a poly if concerned about costs. 

Estimated Cost
$100
Estimated Time Investment
Day Project (6-9 Hours)
Finish Used
Stained mix of miniwax ebony and jacobean followed up with two coats of Epifanes gloss finish.
Recommended Skill Level
Beginner

Potting bench 2.0

Submitted by Claudiagay on Tue, 09/15/2020 - 14:38

Made it a bit wider, added a shelf and wheels.

Built from Plan(s)
Estimated Cost
90.00
Estimated Time Investment
Day Project (6-9 Hours)
Finish Used
Paint over stain for distressed look.
Recommended Skill Level
Beginner

X End Table

Submitted by Slrusch91 on Thu, 12/06/2012 - 05:01

Building is turning into such a blast for my husband and I. This is our second project and let me tell you, with a few extra tools and practice, it's getting easier! We will be finishing up the second one of these this weekend then starting on the X Coffee Table, to be followed by the X Console Table. We are due to buy our first home in January so we are waiting til we get our home to decide on a stain.

Built from Plan(s)
Estimated Cost
$80 for 2
Estimated Time Investment
Weekend Project (10-20 Hours)
Recommended Skill Level
Beginner

Truss coffee table

Submitted by mwoods on Thu, 09/18/2014 - 20:37

The first larger project I've done on my own. I distressed it some before staining it but no other changes were made to the plan. 

Built from Plan(s)
Estimated Cost
$23 for wood
Estimated Time Investment
Day Project (6-9 Hours)
Finish Used
Minwax Red Mahogany
Recommended Skill Level
Beginner

Love this table!

Submitted by Anonymous (not verified) on Sat, 01/07/2017 - 09:58

I have been wanting a longer entryway table and this one was the perfect length and style I was after! Thank you for providing these plans! You rock!

Built from Plan(s)
Estimated Time Investment
An Hour or Two (0-2 Hours)
Finish Used
Used stain in color honey
Recommended Skill Level
Starter Project

Garden Bench

Submitted by jayeled on Thu, 09/17/2020 - 11:13

This project was made using cedar. Most of the joints are dowels or mortise and tenon. It was my first time using this complex joinery and gave me a great sense of accomplishment. It was also complex recreating the plans in Sketchup

Recommended Skill Level
Intermediate

Comments

Rustic Buffet Table

I made this from scratch. I didn't follow a plan. I didn't pay for any of the materials either. I know a guy who has a saw mill and was able to score the top. I got the legs down my self from a tree in the woods. I didn't stain any of the wood either. I just put polycrylic on it. Overall I think it took about 4 hours to complete. More if you count the time waiting on the clear coat to dry. I notched out the legs to fit the skirts. The skirt is make up of wood that I planned to 1" thick and kreg jigged together. I then kreg jigged the skirt to the table top. I hope you like it.

Estimated Time Investment
Afternoon Project (3-6 Hours)
Finish Used
Polycrylic
Recommended Skill Level
Intermediate

Comments

sgilly

Tue, 12/11/2012 - 09:51

It's more like therapy for me, too. I'm glad you find it helpful. From a very grateful widow of a Vietnam vet, I thank you for your service.