Community Brag Posts

Solar Outhouse - By Deb

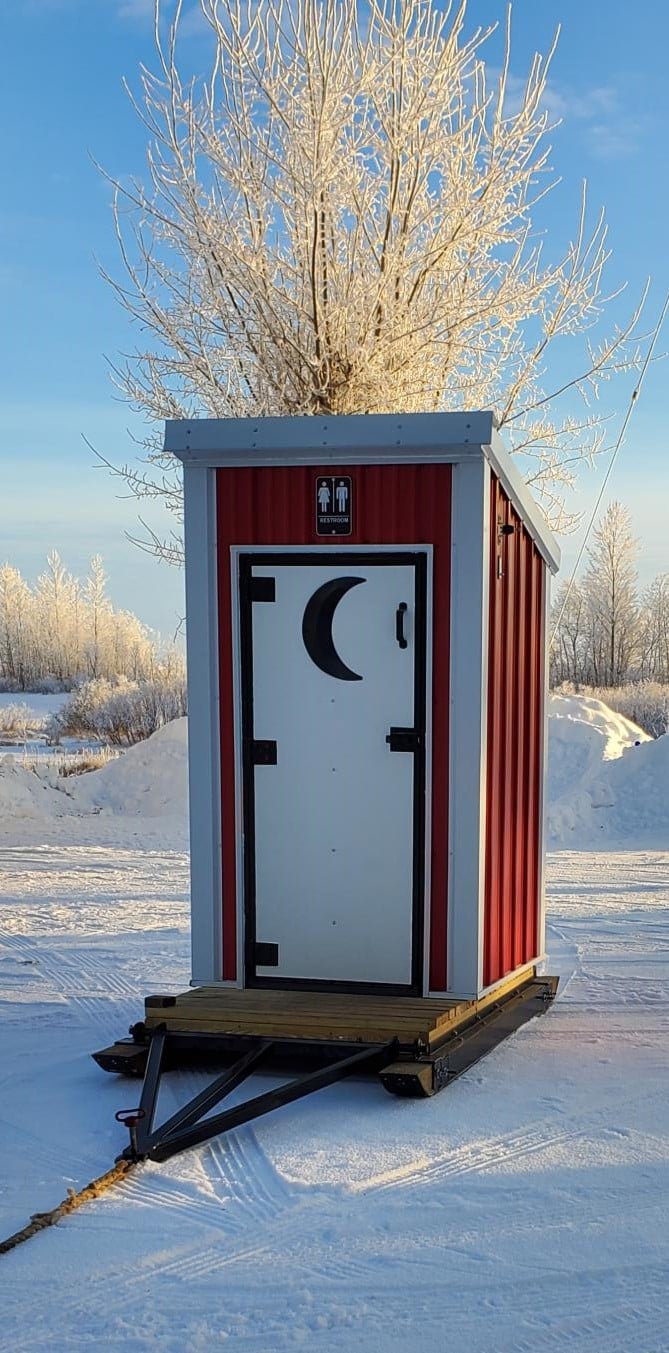
Your outhouse design was modified for a snowmobile club project as the building needs to be towed across a lake to a site next to a warming shelter.  An LED light with a timer switch and solar battery charger were installed to provide light in a remote area of Lake of the Woods.

A steel hitch and skids with hyfax were added to the design.

Thank you for providing a design that allowed us to make modifications for winter outdoor recreation accommodations.

Built from Plan(s)

Farmhouse Table and Benches

Submitted by nichole6 on Mon, 11/14/2011 - 06:45

We built this Farmhouse table in a week. Unfortunately, we didn't get it completely put together for four months. Now it is finished. It is our first project. We used pine and fir boards from our local lumber store. It is finished with red chestnut and dark walnut stain and then a couple coats of briwax dark walnut (love that stuff!!). The table is 96" and pictured here without the 15" bread boards that go on either end. The benches are 8' as well.

Estimated Cost
$125
Estimated Time Investment
Week Long Project (20 Hours or More)
Finish Used
Red Chestnut and Dark Walnut Stain and Briwax Dark Walnut
Recommended Skill Level
Beginner

Comments

wannabee

Sat, 05/24/2014 - 01:12

I loved your stain. I see you used two types of wood and two types of stain. Can you tell me more? Did you alternate the wood pieces? Did you stain the red chestnut first and followed it with dark walnut? I'll probably copy what you did :)

Kitchen Buffet

Submitted by bbcarey on Mon, 11/28/2011 - 07:20

We wanted a buffet for our kitchen- but couldn't find just the right plan. So I modified the "Dresser with open bottom shelf" slightly to remove one shelf and enclose the bottom with Doors. We matched the colors from our dining room set (black bases with stained seats and table top). The glass was purchased from a local company and is called 'cord glass' to match some other custom cabinets in our home. I do have the sketchup plans- been trying to clean them up so I can get a plan posted... but can email them in their current state if anyone wants them.

Estimated Cost
$400 (but can be done for less)
Estimated Time Investment
Week Long Project (20 Hours or More)
Finish Used
High quality latex with Floetrol additive for smooth finish. If I were to redo it I'd spray it on as it wasn't as smooth as I'd wished. I matched the top stain with our kitchen dining room set.
Recommended Skill Level
Intermediate

Comments

GotWood

Mon, 11/28/2011 - 10:42

Wow, BBCAREY! Great job! I love the way this looks and it shows that you put a lot of hard work into it. I like your choice in pulls... very nice, but doesn't pull any focus away from the buffet.

In reply to by GotWood

bbcarey

Mon, 11/28/2011 - 11:30

Thanks- I didn't say but this actually was my first BIG project from Ana-white. It did take me longer than I anticipated (two long weekends) the painting was probably the most time consuming as I was trying to get it 'spray on' like- but didn't quite achieve that look.

Re. the pulls; I think there was a total of 5 trips to Menards and HD with different options being considered- we finally went with these as due to the large drawer size all others seemed to be under-per-portioned. So thank you - glad to see it shows well.

Appreciate your comments!!

Tuyetti (not verified)

Wed, 11/30/2011 - 11:34

This is beautiful! You did an amazing job. This is exactly what I was looking for to finish my dining room. May I please see your plans? Thank you so much.

[email protected]

dhendy13

Mon, 11/28/2011 - 16:36

This piece if a beauty. Your hard work does show very well.

I would like it, if you don't mind, if you could send me the plans. That would be awesome. I will email you if I need to to get something explained.

Just moved into a new home and this piece would go great in the dining room.

Thanks,
dana
[email protected]

viola

Tue, 11/29/2011 - 10:13

Mr Carey, I love your buffet. I to would love to have your version of this plan doors and all. Thank you for sharing...Vi

StacieM

Tue, 11/29/2011 - 20:53

This is exactly the type of thing I've been wanting to make for our dining room. Great Job!

Crystal12345 (not verified)

Thu, 12/01/2011 - 19:54

Looks beautiful! Can I please have the plans as well? Been looking for something just like this to build. Great job! [email protected]. Thanks!

mexiian1

Sun, 12/18/2011 - 13:06

bbcarey, I love the way that this buffet looks. Is the top one solid piece of wood? I can't tell from the picture.

In reply to by mexiian1

bbcarey

Tue, 01/10/2012 - 14:48

The top is actually a 3/4" oak veneered plywood with 1x3 (sides) and 1x4 (ends) framing. I used a friend's biscuit joiner and glued the sides on with biscuits. I thought about using pocket holes but wasn't sure how to make the boards stay straight... and had used a biscuit joiner before - so opted for that. Let me know - I can send the google sketchup plans if you want them.

mexiian1

Sun, 12/18/2011 - 13:17

bbcarey, I love the way that this buffet looks. Is the top one solid piece of wood? I can't tell from the picture. Also, I would really like to see your plans for this too, if you wouldn't mind e-mailing me. Thanks!

Patrick (not verified)

Sat, 01/14/2012 - 16:14

My wife and I think that this buffet looks great. You have done a great job. We were thinking about making one also. Could you please send the plans to [email protected]. Thanks ahead of time.

amp024 (not verified)

Mon, 02/20/2012 - 12:41

The buffet is almost a replica of what i am looking for in our dining room except it will cost less than 1/2 the price to make it! I LOVE the buffet. Could you send me the plans please? [email protected]

amp024 (not verified)

Mon, 02/20/2012 - 12:41

The buffet is almost a replica of what i am looking for in our dining room except it will cost less than 1/2 the price to make it! I LOVE the buffet. Could you send me the plans please? [email protected]

nkpearson

Sat, 05/26/2012 - 22:11

The Buffet looks awesome! You have done an amazing job. I really like the glass doors.

Neal

Claudia Ingles (not verified)

Mon, 08/06/2012 - 04:07

Mr Carey, this buffet looks stunning!!!And I've been looking for one(ready to buy) for quite some time and nothing!!! Did you use spray paint to achieve the SO SMOOTH look? It really looks amazing!!!
Can I also receive your plans by email?Thank you!!
[email protected]

KATHY W (not verified)

Sun, 01/13/2013 - 20:02

This looks great!!! you did a wonderful job on it!!

tcaffrey

Tue, 02/26/2013 - 15:29

I would love the plans if you have them!!! Excatly what I have been looking for!! Thanks it looks great

bbcarey

Mon, 03/04/2013 - 19:25

I saw on another post that the sketchup model could be shared to the warehouse- which of course I knew but totally forgot. So- I've uploaded the model for this buffet to the warehouse and it should be able to be accessed from this link:
http://sketchup.google.com/3dwarehouse/details?mid=8acc2d1db12502a9cc04…

If I had the patience to work up an actual plan I would - but hopefully the sketchup model will help - there should be dimensions and I have the cut list in the model as well. Still let me know if you have questions and I would LOVE to see anyone else's finished project!

bbcarey

Wed, 12/18/2013 - 08:02

Glad it helped- I need to learn how to post a plan- but for now sharing the sketchup plan I am hoping helps (I have some other plans out there as well). I do all my projects ahead of time in Sketchup to plan for materials etc..

mommap7200

Tue, 10/06/2015 - 18:50

Any chance you still have these plans? I can't see them on sketchup.

mommap7200

Sun, 10/04/2015 - 19:11

Do you happen to still have the plans for this buffet? My email address is [email protected] if youre able to send them. I would love them. This buffet is really nice and the sketchup plans are not working for me.

My farmhouse table!!! 1st project

Submitted by wesleylp on Sat, 12/10/2011 - 10:01

My husband and I created this using farmhouse table plans and we're very excited. It took us longer to get done than most because we all ended up sick. :o) Total cost was under $100 and it is awesome!! Thank you so much for the plans!!

Estimated Cost
under $100.00
Estimated Time Investment
Weekend Project (10-20 Hours)
Finish Used
stain and poly finish.
Recommended Skill Level
Intermediate

Comments

wesleylp

Sun, 12/11/2011 - 09:29

We are currently making a bench and a version of the stackable chairs for our 8 foot table. WE are so excited. I have work to do but only want to help build now. :o)

Standing Outdoor Planter

Submitted by Anonymous (not verified) on Fri, 04/14/2023 - 06:42

A friend of mine has issues with her knees but loves gardening so I built this to allow her to continue gardening. She loved it.

I didnt follow any particular set of plans I watched several you tube videos and combined different ideas from the videos to develop my own plan.

Comments

Custom Storage Bench

Storage bench using Shelf Help by Judith Noffz

"What can I say … we love Ana White’s Shelf Help Now.
We both love the quality of the wood. You just can’t find that around here. I love that I can create what’s in my mind with a drawing and rob can take her template and build!!!"

Amelia's Play Kitchen

Submitted by Mskirko on Thu, 01/05/2012 - 09:07

A play kitchen stove and sink for my 1.5 year old daughter for Christmas!

This was my second woodworking project ever. It was VERY involved. It took me about 3-6 months of planning, ordering, buying, figuring out, and finally building the thing.

I used magnetic primer on most of it. Some magnets do stick to it, but I learned some very important lessons: Magnetic primer is MESSY and it doesn't sand very well, so when you paint it on, it should be done in the smoothest possible way in the smallest area. I primed with it using a roller and when I sanded it, got metal shaving dust EVERYWHERE (because the metal shavings in the primer keep it magnetic, obviously).

Made the curtain and matching towel. Next on the list: Matching apron and kids oven mitts!

Estimated Cost
$215
Estimated Time Investment
Week Long Project (20 Hours or More)
Finish Used
2 coats of magnetic primer, primer, 3 coats of paint, 1 coat polyurethane
Recommended Skill Level
Beginner

Gentleman's Valet

This is a gentleman's valet that I build for my sister in law's boyfriend as a Christmas present. It was also a good opportunity to try out my hand tool skills, since I cut all of the joinery by hand.

Estimated Cost
20
Estimated Time Investment
Day Project (6-9 Hours)
Finish Used
Boiled linseeed oil
Recommended Skill Level
Intermediate

Comments

JoanneS

Sun, 02/05/2012 - 09:20

Wow, this is gorgeous! Love the rich finish and the dove tail details, and the sliding top tray is so neat. Everyone in the family is going to want one! :) Joanne

viola

Sun, 02/05/2012 - 12:25

This would make a great gift for my husband and all the men in my family...

claydowling

Sun, 02/05/2012 - 19:12

Kristen you should try it yourself. You'd need to buy a joinery saw, but I just picked up a decent dovetail saw for $13, and a set of good chisels, but for $26 you can get a good set of 4.

My joinery isn't brilliant, but it's functional and doesn't look terrible. I'm pretty sure you could start knocking out some strong joints pretty quickly.

The upside is that it's faster than setting up power tools to make these joints. Hand cut dovetails will always be faster than machine cut, unless you're building a dozen boxes.

kristen

Mon, 02/06/2012 - 10:48

From here, your dovetail joints look great! I've always just skimmed past instructions for dovetails thinking I'd never put the time into constructing them. Perhaps I will investigate for future projects. The glue and nail option just goes quicker right now, with the list that looks like it just might take forever in this house!

claydowling

Mon, 02/06/2012 - 08:35

Those are very tight joints. Slightly too tight in fact. There was a small amount of hairline splitting on the side I didn't show, that I had to fill with glue and sawdust to keep from spreading.

My dovetails aren't bad, just slow for me to cut right now, especially cleaning out the waste. I bought parts for a small bow saw that should make that easier, once I get the thing built.

claydowling

Tue, 02/07/2012 - 08:35

The short answer is that I built a box, then built another box to go inside of it. A plan with dimensions wouldn't be a very good idea, because I sized this to match the $7 board I'd found at the hardwood dealer. Your lumber dealer almost certainly carries differently sized boards.

I'll think about a tutorial or video though. Box making is fun, rewarding, and can be profitable. Especially since most cabinets are just different variations on the box.

Justine

Tue, 02/07/2012 - 09:21

Alright, I will give it a try this weekend. Will let you know how it went! Thank you so much

claydowling

Tue, 02/07/2012 - 10:44

If you get any results, post some pics. If not here, feel free to put up a link on my blog. Always good to share ideas and results.

Kat Roberts

Thu, 02/09/2012 - 19:17

Your work is gorgeous! I'm definitely stealing this idea for my husband's birthday as well as all the men in my family, who all have birthdays this spring. :) Only thing is, I'm using tools, my hand tool skills are no where near as good as yours.

Also, I appreciate the tips you've posted on other project plans, they really help clarify some of the smaller details overlooked by the designers for beginners like me.
Hope to see some more projects from you soon!

claydowling

Thu, 02/09/2012 - 20:06

Hand tool skills actually develop pretty quickly, and one of the reasons it's gaining popularity. You can use scrap wood to learn how to make joints. The first ones will be rough but with even a little bit of practice they'll improve.

The tools are also getting cheaper. I just bought a decent dovetail saw for $13 from Tools For Working Wood, and $26 will buy you a decent set of chisels from Narex.

Christopher Schwarz and Logan Cabinet Shoppe are two good sources for hand tools articles, including videos. There are also good books on the subject. My first text was Hand Tool Essentials, but I'm told there are others worth looking into for first books.

claydowling

Fri, 02/10/2012 - 07:30

The Essential Woodworker is the alternate starting text I was thinking of. I haven't read it yet, but heard it recommended by a few sources as a good place to learn about hand tool woodworking. I just ordered a copy for myself. Amazon sells it too, but for considerably more, and I've heard unpleasant things about the binding on the copies available on Amazon.

If the book turns out to be any good I'll post a review on my blog.

Kat Roberts

Fri, 04/20/2012 - 21:48

Please do!
Thank you for the tips and information, I'll definitely be starting on hand woodworking soon. I love the results of hand vs. machine woodworking, it's just sleeker and has more of a homemade quality.

claydowling

Sat, 04/21/2012 - 04:56

I did finally buy the book, and I've reviewed it at http://claydowling.com/articles/02242012-1350/getting-started-woodworki…

There's also a new video coming out (or maybe it is out), that I wrote about: http://claydowling.com/articles/04022012-0947/learning-use-hand-tools I've ordered my copy, but I won't have it in hand until next month. I grabbed is specifically for the information on block planes. I own them, but I've had the least consistent results from them of all my tools.

Guest (not verified)

Mon, 04/02/2012 - 18:27

Thank you for posting . I always learn something from you.

King Bed Frame for adjustable base

Submitted by Anonymous (not verified) on Tue, 10/08/2019 - 05:50

I could not find a frame which would accommodate my new adjustable king base. Modified Anna's plans by increasing the height of the headboard and footboard. Finished with chalk paint and antique finish for a rustic look. Side rails attached with mortises to allow for moving bed in 4 pieces if needed. Love my new bed

Estimated Cost
$300
Estimated Time Investment
Weekend Project (10-20 Hours)
Finish Used
Chalk paint (purchased from Habitat for Humanity re-store) using recycled paint. Finished with three coats of Annie Sloan wax
Recommended Skill Level
Intermediate

Comments

khowe791

Sat, 11/30/2019 - 03:31

Hi! We are making this headboard this weekend. We want to increase the headboard height and footboard as well. Do you happen to know the cut measurements or how you adjusted the height of the 1x6 (or 1x8 as others used) to make it work? Yours looks perfect! Thank you in advance for any feedback! 

Scroll Legged Console made by RW Creations

Submitted by Anonymous (not verified) on Wed, 03/02/2016 - 12:01

I found these amazing plans from Ana's website here.  Couldn't be easier!  I modified mine a bit to fit the space and used recycled pine wood for my project!  The Scroll legs I used my jig saw to cut them out with the great stencil provided in these plans.  I was really happy with the result, as I only had minor sanding to do to make them match up when I glued them together.  Since I was painting this piece I used dry wall mud over the seams on the legs to hide the joints (a lot less expensive than wood filler).  Since it was all recycled wood I had to do a lot of sanding but it saved me a lot of money!  So very happy with this project!  Thanks for again for the amazing plans!!!


Randi Wolf

RW Creations

Estimated Cost
$150-$200.
Estimated Time Investment
Weekend Project (10-20 Hours)
Finish Used
I stained the piece with a dark walnut stain. I then painted it a Chalked Ivory. Sanded the edges to bring the dark weathered look through and then sealed it with Varathane Triple thick polyurethane.
Recommended Skill Level
Intermediate

Comments

Laundry Pedestal

Submitted by cdbaker82 on Tue, 02/21/2012 - 13:01

I liked Sausha's design, but I wanted a more "built in" look for the one I built. I didn't follow the plan much, but used it for ideas

Estimated Cost
$45-50
Estimated Time Investment
Weekend Project (10-20 Hours)
Finish Used
Regular Latex Wall Paint
Recommended Skill Level
Intermediate

Comments

Jelly Cupboard(s)

Submitted by bbomer on Fri, 12/27/2013 - 09:48

I have built several of these Jelly Cupboards since the plans came out. Everyone really likes them, and they are super fast and easy to build. The last one had glass doors that turned out pretty well. I like to use plywood beadboard on the back to give it a little more character. I also like to use 'hardware cloth' for the mesh type doors (found at farm stores). It usually has openings about 1/8" or less but not as tight as screen, which looks perfect.

Edit: For hardware part numbers and sources please see: http://grvland.com/wordpress/2012/02/07/jelly-cupboard-project/

Built from Plan(s)
Estimated Cost
$50-$100
Estimated Time Investment
Weekend Project (10-20 Hours)
Finish Used
Black Walnut Danish Oil, Wax Free Shellac, Latex Paint (dark), more latex paint (light), sand back, Water-based Poly
Recommended Skill Level
Beginner

Comments

romanweel

Tue, 12/31/2013 - 00:51

Really lovely work! I scoured a couple of those pretty butterfly hinges by pure luck a while back, and I know where to find more...but those strap hinges! Where did you get them? I can't seem to find them for a decent price (Ohio).

bbomer

Tue, 12/31/2013 - 07:15

The strap hinges are from Acorn Manufacturing. I had to order them because I could not find anything like them locally. For some reason I can not post links in the comments, but the sources are linked on my blog, grvland dot com (no spaces and a . obviously). Just search there for Jelly Cupboard and you will find the source links in the earlier of the two posts. I will also see if I can add a direct link above.

Coffee table

Submitted by Anonymous (not verified) on Wed, 10/23/2019 - 18:42

Love this coffee table. I built it for my daughter and she was very happy.

Built from Plan(s)
Finish Used
Dark walnut
Recommended Skill Level
Intermediate

Adirondack Chair with Fun Finish!

Submitted by Anonymous (not verified) on Tue, 07/11/2023 - 07:54

I love this chair. Thanks to Ana-White! I added a little pop to it. The red buttons are screw hole plugs I bought from one of the big box stores. A one inch strip of pine I painted red to coordinate with the blue.

Patrick


Pin For Later!

Adirondack Chair with Fun Finish!

Rustic X Console Table as TV Stand

Submitted by Anonymous (not verified) on Sun, 03/27/2016 - 08:19

Hubby followed the plans exactly, using cheap whiteboard from Lowe's. I stained using Minwax dark walnut and a water-based Minwax poly with a matte finish. I would only use this kind of wood again if I were painting the project. It is hard to stain and my options were limited, because the wood doesn't take stain well. Love how "pottery barn" it ended up coming out, though!

Built from Plan(s)
Estimated Cost
$50-100
Estimated Time Investment
Weekend Project (10-20 Hours)
Finish Used
Minwax dark walnut
Recommended Skill Level
Beginner

DIY Wood Outdoor Chair with Deep Seat Cushion

Submitted by Anonymous (not verified) on Thu, 08/10/2023 - 12:27

Using just basic tools, I was able to build this super comfy outdoor chair for the fraction of the cost. With a couple of modifications, Ana White's design plan made for a perfect fit for the new deep seat cushions I had found on fb marketplace.
 

Seasonal And Holiday

Mini Farmhouse Bedside Tables

I made two of these bedside tables for our master bedroom and I LOVE how they turned out. Really like the white with my red mahogany headboard. These weren't too difficult to build. The only problem I ran into was trying to fit my drill in some of the tight spaces to get some of the screws in. I had to do a few of them by hand with a small screwdriver. I mostly used leftover scraps to build them. The tops are made of several boards kreg jigged together rather than one big piece. I was a little nervous about the drawer because I have never made one before, but it wasn't as bad as I thought and it came out just about perfect! yay.

Built from Plan(s)
Estimated Time Investment
Afternoon Project (3-6 Hours)
Finish Used
I used white primer and two coats of white paint. Still need to give them a couple of coats of polycrylic...
Recommended Skill Level
Beginner

Comments

JoanneS

Tue, 01/14/2014 - 16:39

Love this nightstand, it's the perfect size, not too big or too small. Your white finish looks great, and the drawer looks perfectly even. Great job!

ACEuhheartz

Sun, 02/09/2014 - 10:47

Awesome job with your drawer! I just finish build my mini table now and getting ready to cut up another woods for the drawer part, what size is your front drawer? Is it 11 1/4? What about the length? I want to make sure I measure it right before I cut em soon.

tricia.flores

Tue, 02/11/2014 - 18:29

Sorry, I just saw your questions! Yes the drawer front is 11 1/4 wide, and the length of the drawer is 11 1/2. I just followed Ana's cut list exactly for the mini farmhouse bedside table. Since you already have the table built you can measure the opening for the drawer to make sure it will fit.

Back