Community Brag Posts

My version of the large wood pet kennel end table

I made this from scrap plywood in our garage for my step-daughter's five-month-old new boxer/lab mix Marley. I used my Kreg rip-cut and pocket hole jig. I even drilled pocket holes to put the four sides together.

That, however, is not Marley in the picture. That is our older Catahoula Leopard Dog Oreo. Marley's owner and her mom chose the color scheme and painted and afterwards, I hung the hardware back on.

The only change I made was to use 1x3 for the entire door rather than 1x2s for the sides.

Thanks for the plan Ana. You are great.

Built from Plan(s)
Estimated Cost
$10
Estimated Time Investment
Day Project (6-9 Hours)
Finish Used
Flat Behr paint.
Recommended Skill Level
Beginner

Potting Bench

Submitted by beansurfin on Wed, 06/13/2012 - 15:13

I made this potting bench as a plant rack/stand for my wife for the back porch. She has had the plants on the ground and now this will give her some place to put them on as well as not having to work on the ground. I changed the dimensions to fit our space as well as used 1x4's mostly since it is what I had. I used 1x6 for part of the back legs so as to have a deeper shelf. I also made it to have additional shelves that are a bit adjustable to (3) different levels. I also changed the front a bit so it is closed in. Thankfully you can't tell in the pictures much but this was my first time trying to stain something. Definitely not my forte. Hopefully will get better with time and experience. Thank you for posting the plans for to build from.

Built from Plan(s)
Estimated Cost
<$100
Estimated Time Investment
Weekend Project (10-20 Hours)
Finish Used
Stain as well Helmsman Urethane.
Recommended Skill Level
Beginner

Comments

Custom Mug Stands

Submitted by vendo on Tue, 12/26/2023 - 13:39

These are fun and easy handmade Christmas gifts. Easy to modify hardware and finish to get different looks depending on the mugs you choose to pair with it!

Built from Plan(s)
Seasonal And Holiday

Refinished Stairs

Submitted by JoanneS on Sun, 07/01/2012 - 08:23

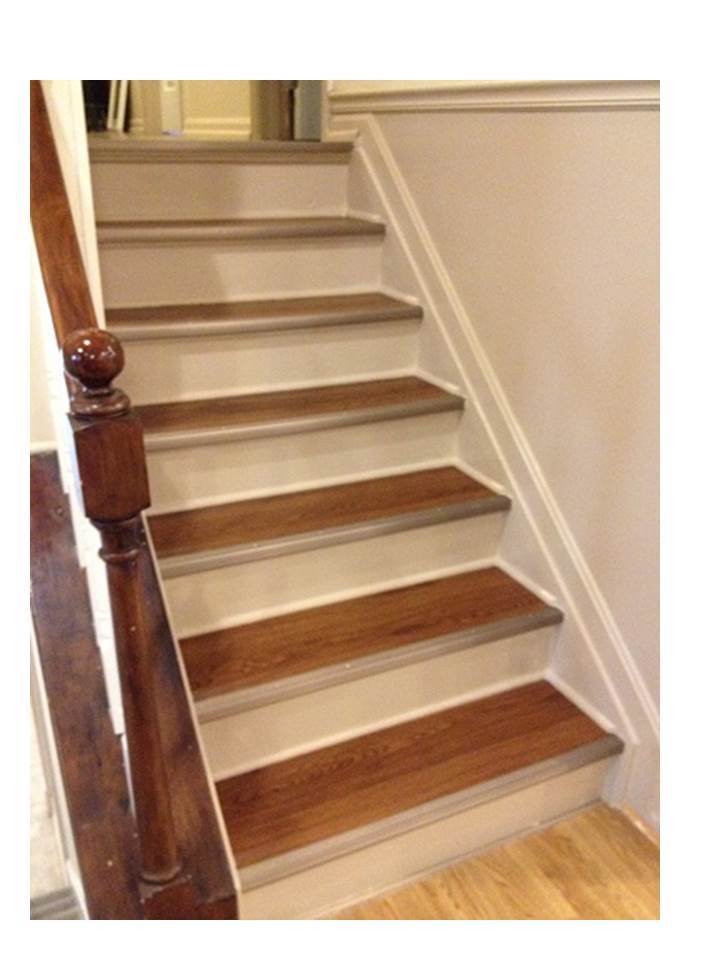
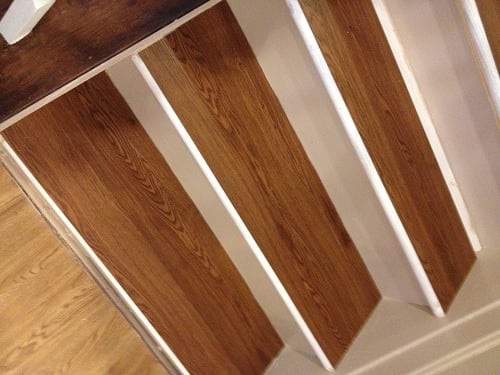
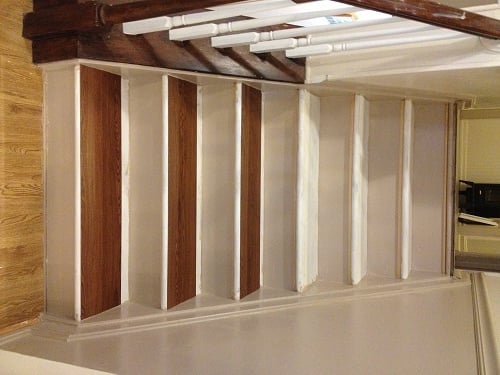
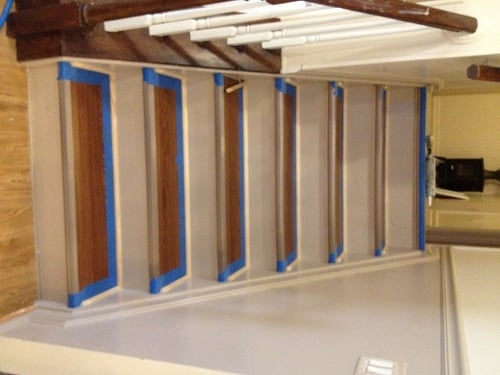
Finally got rid of the yucky worn-out carpet on the stairs. Instead of painting or staining the tread surfaces, I sanded, filled in holes, primed with a high quality primer, and used luxury vinyl flooring planks on the top of the treads, and finished the fronts with pewter stair nose. The risers and skirt boards were sanded, primed, and painted with 2 coats of semi gloss paint. Below the front edges of treads and where the treads meet the risers and skirt boards, added a finishing touch with some trim. This project was time consuming and I had sore muscles all over from crawling up and down those steps, but I think the finished result was worth it. They look much nicer, and we can get dust and dog hair off of the steps with just a Swiffer. Plus, it only cost about $200 to do 2 sets of stairs (6 steps up and 6 steps down).

So, why didn't I stain or paint the tread surfaces? I originally planned to, and did a lot of reading and research on what to use. But, I was worried about slipping on the stairs. Mom (who lives with us) isn't as mobile as she used to be due to a hip replacement and arthritis, and I was worried about her slipping on the smooth tread surfaces. Even if I'd used slip resistant paint, I was still worried about her foot slipping off the round bullnose at the front of the tread (that's happened to me with the carpeted stairs). The vinyl planks have a textured surface. We have these on several of our floors throughout the house and they aren't slippery for her feet. The stair nose has ridges and also is a bit squared, so it doesn't allow your foot to slip off of the front edge.

I know this is non-standard from what most people would expect to see on stairs, and we'll surely have to change it if we ever sell our house, but in the month we've had this project complete, so far it has been great.

Estimated Cost
$200
Estimated Time Investment
Weekend Project (10-20 Hours)
Finish Used
Pulled up a huge number of staples and tack strips, filled in holes with wood filler, sanded with 80, 150 and then 220 grit sandpaper, vaccuum and tack cloth wipedowns. Primed with Zinsser Bullseye primer. 2 coats of Ace Royal semi gloss in Wishbone on risers, skirt boards and trim. Tread surfaces are luxury vinyl plank with pewter stair nose edge.
Recommended Skill Level
Intermediate

Comments

SunnyL

Mon, 10/07/2013 - 16:00

How have your stairs held up over the last year? I'm considering doing the same thing. I'm worried about them being too slippery (my planks are not textured) and the fact that the manufactuer says not to use for stairing. Your stairs look great!

JoanneS

Mon, 10/07/2013 - 16:33

Thanks SunnyL! The stairs are holding up great! The stair nose makes it so your foot doesn't slip off the end, and they sweep up beautifully. We have 2 beagles that shed a lot, and it's a cinch to get the dog hair off the stairs ;).

I'm not sure about doing this with a slick surfaced plank, though... One of the reasons I chose to use this particular plank is that it's textured and not slick at all.. These have the adhesive on the back and haven't moved or lifted a bit. This is the one I used, it was a great price and is wearing beautifully.

http://www.lowes.com/pd_33259-84875-WD4011_0__?productId=3032606&Ntt=vi…

Good luck on your project! :)
Joanne

Modern Farmhouse Nightstands

Submitted by Anonymous (not verified) on Tue, 01/09/2024 - 08:28

I downloaded th minimalist modern nightstand plans nearly a year ago and just got around to building them last week. Actually I modified them quite a bit because I had a small space to work with and because I wanted them to follow the design theme of some of the other furnishings and features I had made for my basement renovation. In particular I changed the top and made it out of oak stair treads. I also added pop-up electrical/USB sockets as well. I really appreciate the sequencing in the plans. Though I made some dimensional and design plans, I followed the sequencing steps. It made the project much easier to complete-particularly the drawer construction and fitting. If I had done it on my own, I would probably have permanently installed the middle shelf before fitting the drawer which would have made fitting the drawer and drawer front much harder. Thanks for teaching me that.

Craig Holstedt

Comments

Fancy X Farmhouse Bench

This didnt take long at all 2 - 3 hours at most. Really easy and turned out great. 

Built from Plan(s)
Estimated Cost
35
Estimated Time Investment
An Hour or Two (0-2 Hours)
Finish Used
None at this time but plan to do a expresso stain on the top and probably a cream color paint on bottom.
Recommended Skill Level
Beginner

Farmhouse Craftsman Table

Submitted by Monique on Fri, 05/22/2020 - 20:55

This was such a fun project! We changed up the dimensions, removed the stretcher so that we could put chairs on the ends, and added these fun craftsman removable table legs! I put tons of information of my blog!

Estimated Cost
150
Estimated Time Investment
Weekend Project (10-20 Hours)
Finish Used
Minwax Ebony
Minwax Polyurethane in Satin
Recommended Skill Level
Beginner

Custom Rustic Hall Tree w/Bench

Submitted by Anonymous (not verified) on Sat, 05/30/2020 - 10:39

Thanks for the inspiration Ana! My daughter wanted a custom size hall tree and bench with a light switch cut out - basically your plans with an ebony stained poplar seat and bead board backing (to match her wainscoting). I had a little crown left from another project so I added a little detail to the top shelf.....And a Couple of lower level Hooks for the grandkids coats! She loved it and it was fun to make!! Mike in Columbus, OH

Built from Plan(s)
Estimated Cost
$98.00
Estimated Time Investment
Weekend Project (10-20 Hours)
Finish Used
Ebony varathane stain(seat) with varathane ultimate polyurethane oil based semi gloss Interior finish on seat(4coats)

Kilz2 primer/stain blocker interior white

Finish paint Behr marquee Semi gloss custom white to match room color.

Seat sanded to 400 all other areas to 220 before paint. Between seat coats of ur at hand used 0000 steal wool lightly with soapy water mixture.
Recommended Skill Level
Intermediate

First build--shoe cabinet!!

Submitted by Anniecat on Fri, 05/16/2014 - 23:40

Had a horribly messy front entrance so really needed this shoe cabinet. It's dimensions suited my space better than an Ikea one, and accommodated more shoes. This being my first project, I am glad I started with this instead of a loft bed, since I made alot of mistakes (& corrections) along the way. Although some of the problems occurred because of pieces that ended up being convex. I chose to fill in the gap between the two boards on the front of each bin. It worked out really well.
Really love the Kreg Jig! So worth the investment.

Could not figure out how to properly use magnet catches. Did apply one to one side of the top drawer but it doesn't work too well--pulls the bin too far in. 

Built from Plan(s)
Estimated Cost
$80
Estimated Time Investment
Week Long Project (20 Hours or More)
Finish Used
Used latex primer (which I hated because it behaved like an alkyd & destroyed a couple of brushes) & high gloss paint for high durability.
Recommended Skill Level
Beginner

Ana's Favorite Adirondack Chair Plans

I've made 6 of these chairs! This was only my third woodworking project and I'm really happy with how they turned out. They are just the right size for me, I'm 5' 5", and my husband, he's 6'1". They are very comfortable and look great around the fire pit.

Estimated Time Investment
Afternoon Project (3-6 Hours)
Recommended Skill Level
Beginner

Cedar Planter with X Trellis

I made this project to add a little life to the front a flip house I just finished.  I had an awkward spot, and I was able to easily modify this plan to fit the space.  Thank you for the inspiration!

Built from Plan(s)
Estimated Cost
$30
Estimated Time Investment
Afternoon Project (3-6 Hours)
Finish Used
Minwax Special Walnut
Recommended Skill Level
Beginner

Teen loft bed

Submitted by Anonymous (not verified) on Mon, 06/22/2020 - 20:34

Combined two plans found on this wonderful site with our own revisions to provide a larger desk work area (20" deep). I also added a small shelf to allow for setting a book, water, whatever on it without getting out of the bed. As my first "indoor" project there were several lessons learned - one is to buy the higher grade lumber for the primary components including legs and beams. I did not do this and I had to spend more time than I should've finding good square, straight wood. Another lesson was that staining and polyurethane coating are a skill that requires a lot of practice and time. I and my daughter are thrilled with the final result but choosing to stain/poly it likely doubled the overall build time. Still no regrets, though. My 12 yo daughter just loves her new bed and thanks to this site for the spectacular ideas.

Estimated Cost
$600?
Estimated Time Investment
Week Long Project (20 Hours or More)
Finish Used
I used Minwax Cherrywood gel stain (2 coats) and Minwax Fast Drying Polyurethane (3 coats). For the gel stain, apply with cotton rag and do NOT let it sit on the wood for more than 10 minutes before wiping it off. Before applying first coat, vacuum the wood especially the knots, wipe all with white cloth, wipe with cloth dampened with mineral spirits and let dry, then wipe with tack cloth, then apply stain. AFTER the first coat and between all subsequent stain coats, let fully dry and wipe with tack cloth before applying poly. For the first poly coat, wipe with white cloth, then wipe with tack cloth, and apply poly using a china brush (specific for finishing). Submerge your brush in mineral spirits and press down to eliminate bubbles, then wipe it along newspaper until mineral spirits are nearly gone from the brush. Cut the first coat of poly 25% with mineral spirits and brush on in even strokes. AFTER the first coat, sand lightly with 220 or 320 sand paper, vacuum all dust, wipe with white cloth, then with cloth dampened with mineral spirits and let wood dry, then wipe with tack cloth, then apply second coat with full strength poly using the same process of first eliminating the bubbles from the brush. Repeat that process for all subsequent coats. Then let dry for several days before assembling the bed.
Recommended Skill Level
Intermediate

Mud Kitchen for 2

Submitted by Anonymous (not verified) on Sun, 04/07/2024 - 18:25

Mud kitchen made from scraps for my coworker’s kids. (Mud kitchen is a little kitchen to make mud pies and let the little imagination play.) They love it!

Aminnie Laws

Built from Plan(s)

Tapered Wood Planter

Submitted by Anonymous (not verified) on Wed, 04/24/2024 - 10:53

Made this for our patio area very fun build, my wife loves it so of course she wants another one! Back to the wood stove.

Blair K

Built from Plan(s)

Double Wide Camp Loft Bed!

Have two boys who where in need of more floorspace to play. Saw the great plans for the Camp Loft and decided to make a double wide. One platform and two beds.

All in all went together as designed. Eliminated the stairs for a ladder. Works great if you have a long wall.

Estimated Cost
$85 for all the wood; 50 for stain and poly
Estimated Time Investment
Weekend Project (10-20 Hours)
Finish Used
Minwax
Recommended Skill Level
Beginner

Comments

Little Chunky Bench

Submitted by SaraLodise on Fri, 09/23/2016 - 13:06

A requested one-seater bench. Made of cedar and finished with spar urethane.

Built from Plan(s)
Estimated Time Investment
Afternoon Project (3-6 Hours)
Recommended Skill Level
Intermediate

Comments

Cedar Street Number Planter

I was looking for a way to give our house some better curb appeal and decided our stree numbers could use a facelift.  The majority of money spent on this project was for the numbers since I had enough spare cedar laying around.

house number planter

Estimated Time Investment
An Hour or Two (0-2 Hours)
Finish Used
Sedona Red
Recommended Skill Level
Starter Project

Comments

Shiplap Bathroom - DIY Vanity

Submitted by Anonymous (not verified) on Tue, 10/11/2016 - 13:52

It had come time to renovate our powder room bathroom. We were on a tight budget so we decided to build our own vanity & add a little twist to it! We splurged on the granite countertop, vessel sink  and faucet. Thanks to Ana White we built our vanity for less than $10! The plans were easy to follow . . . .we are so proud of our wood vanity!  link to our blog: http://www.houseofrumours.com/shiplap-powder-room-diy-vanity/


Estimated Cost
$10
Estimated Time Investment
Afternoon Project (3-6 Hours)
Finish Used
none. slightly sanded and used wood oil.
Recommended Skill Level
Beginner

Half-high stool (based on Vintage Bar Stool project)

Submitted by hobbywood on Fri, 09/14/2012 - 04:09

I tried to repeat the Vintage Bar Stool project from ana-white.com, modifying it to my place dimensions. I'm gonna use them on the balcony which has rather high fence, so the table you can see on photo is higher than the average table. So, the stool should be higher too. And than I saw the Vintage Bar Stool project and desided: here ir is!

You can visit my blog to see some photos of the process of the making these stools. Pls. note that English is not my native language. The blog link leads to the page in Russian.

Built from Plan(s)
Estimated Cost
approximately 1200 russian rubles (37 usd)
Estimated Time Investment
Day Project (6-9 Hours)
Finish Used
not yet
Recommended Skill Level
Starter Project

Hamilton Park Home DIY Adirondack Chairs

Submitted by Anonymous (not verified) on Wed, 07/15/2020 - 08:23

I am long overdue to share these Adirondack chairs that I made last fall. I followed the exact plans for Ana’s Adirondack Chair to make my own. These chairs have such a simple, clean, modern style that I love. Adirondack chairs, no matter what style, are just an all-around classic!

Built from Plan(s)
Finish Used
Stain
Recommended Skill Level
Beginner

Comments

Seasonal And Holiday
Back