
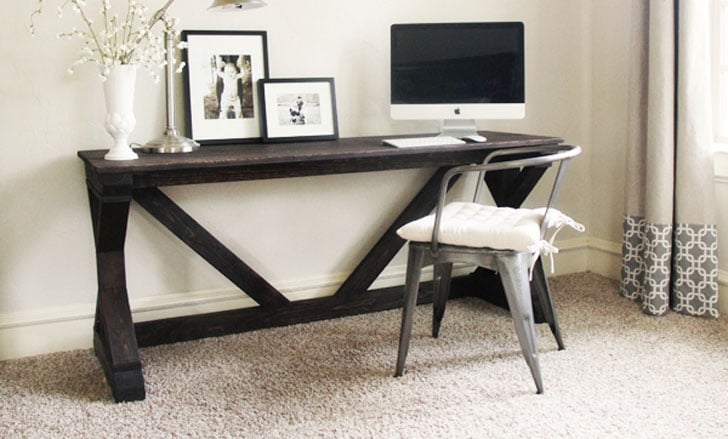

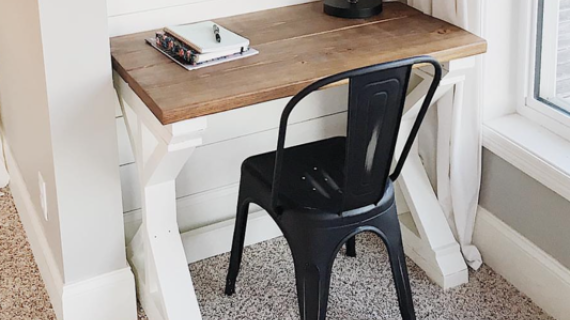
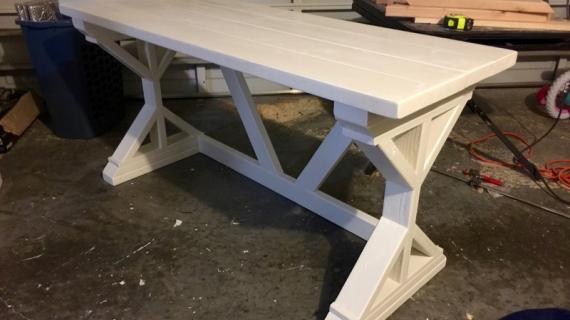
You can build this desk with just a few tools and off the shelf lumber. This farmhouse style desk looks like a million bucks, but only cost $55 to build. Free plans with step by step diagrams, shopping and cut list by Ana White.
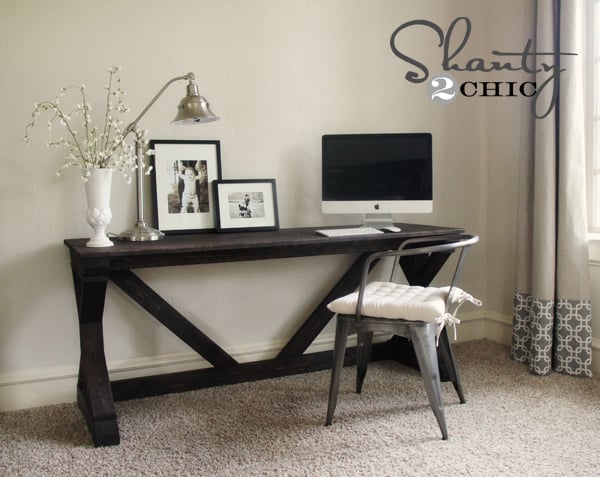
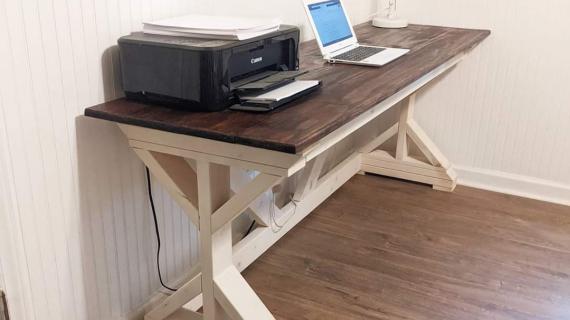
photo credit Whitney from Shanty2Chic
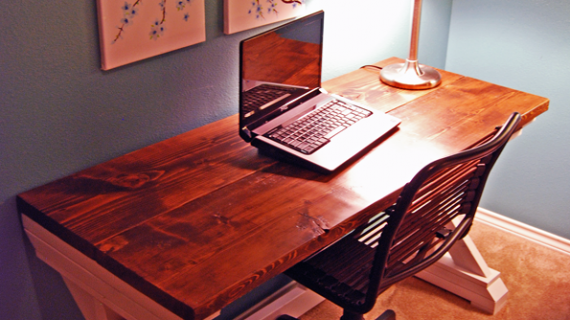
Here's from Whitney: I was in need of a new 'blogging' desk for my bedroom, but couldn't find exactly what I wanted. I love my fancy farmhouse table, and knew just who to call to help me draw up a desk inspired by that look. I was wanting something functional, but also pretty since it will be in my bedroom. I think it is perfect. I made it in just a couple hours, and spent less than $55 in wood... Woohoo! Thanks so much for working with me on this Ana!
Pin for Later!

Preparation
- 5 – 2x4 @ 8 feet long
- 1 – 1x4 @ 8 feet long
- 2 – 2x12 @ 6 feet long OR 4 – 2x6 @ 6 feet long
- 2 ½” self tapping wood screws for countersinking
- 2 ½” Pocket Hole screws
- 2 – 2x4 @ 20”
- 4 – 1x4 @ 18”
- 8 – 2x4 @ 10 ¾” (long point to long point, both ends cut NOT parallel at 45 degrees off square)
- 4 – 2x4 @ 21” ¾” (long point to long point, both ends cut NOT parallel at 45 degrees off square)
- 4 – 2x4 @ 21”
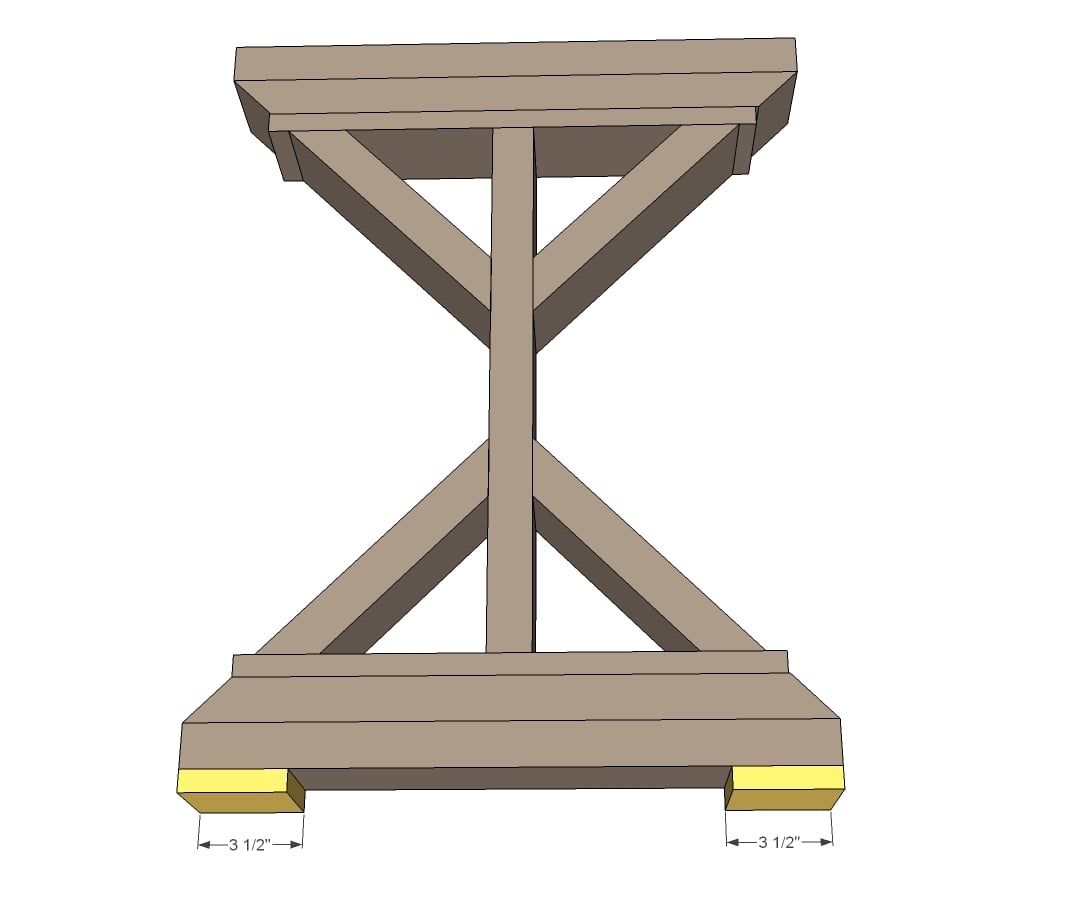
- 4 – 1x4 @ 3 ½”
- 3 – 2x4 @ 59”
- 2 – 2x4 @ 30 ¾” (long point to short point, both ends cut parallel at 45 degrees off square) - CUT TO FIT
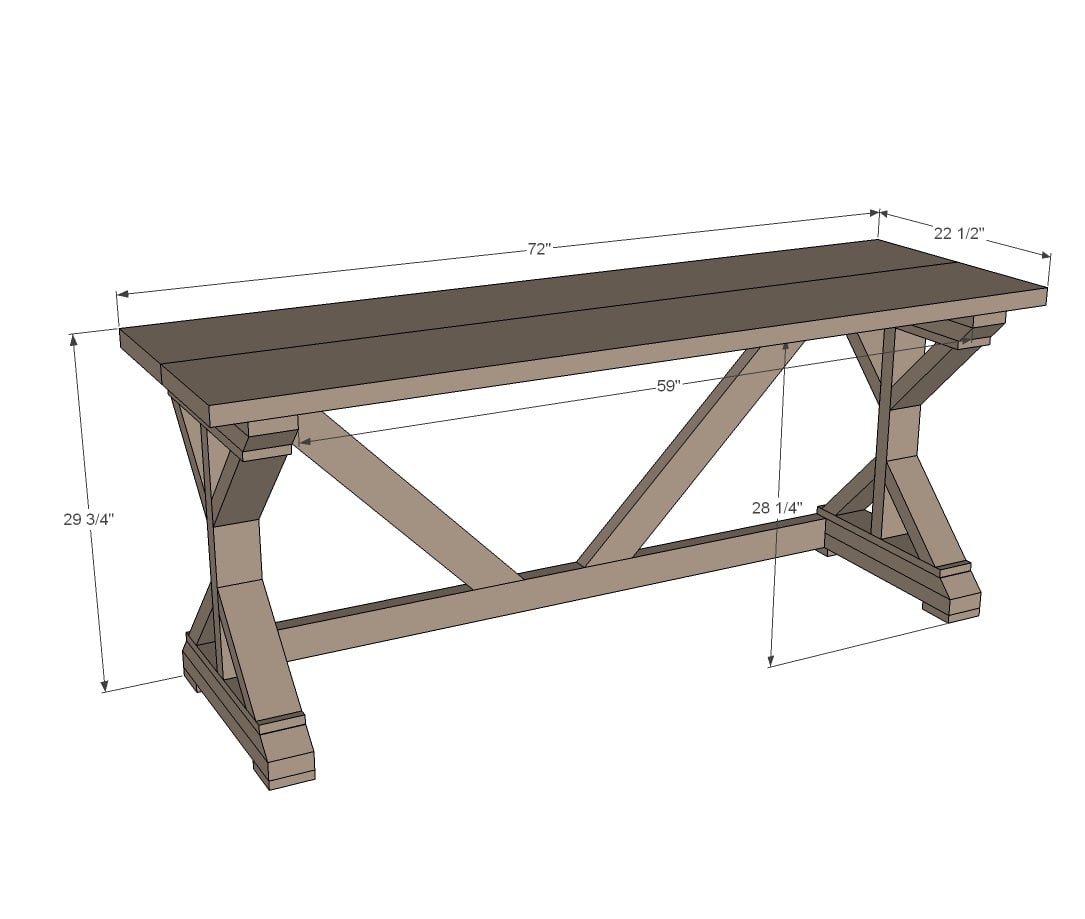
- 2 – 2x12 @ 72” OR 4 2x6 @ 72” - Tabletop


Please read through the entire plan and all comments before beginning this project. It is also advisable to review the Getting Started Section. Take all necessary precautions to build safely and smartly. Work on a clean level surface, free of imperfections or debris. Always use straight boards. Check for square after each step. Always predrill holes before attaching with screws. Use glue with finish nails for a stronger hold. Wipe excess glue off bare wood for stained projects, as dried glue will not take stain. Be safe, have fun, and ask for help if you need it. Good luck!
Instructions
Step 1
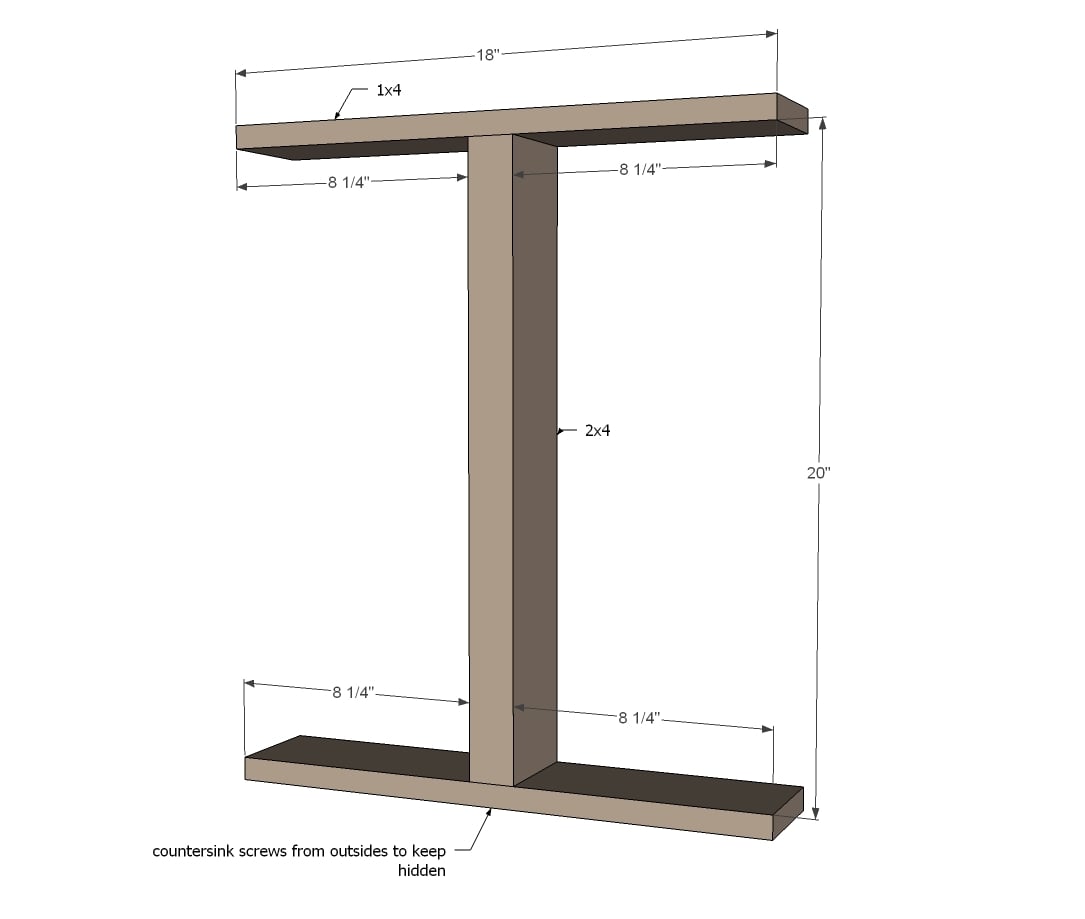
Start off by making two giant Is.
Step 2
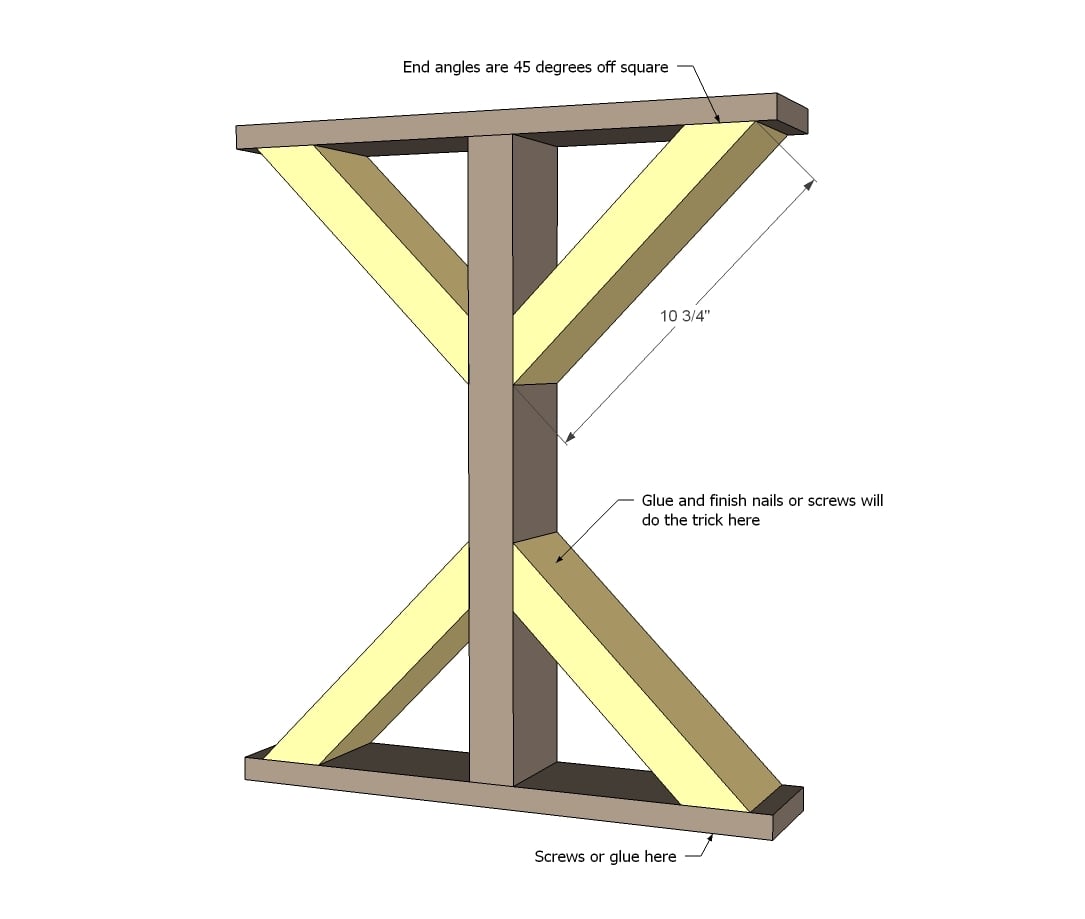
And then add the bracing with the countersink bit.
Step 3
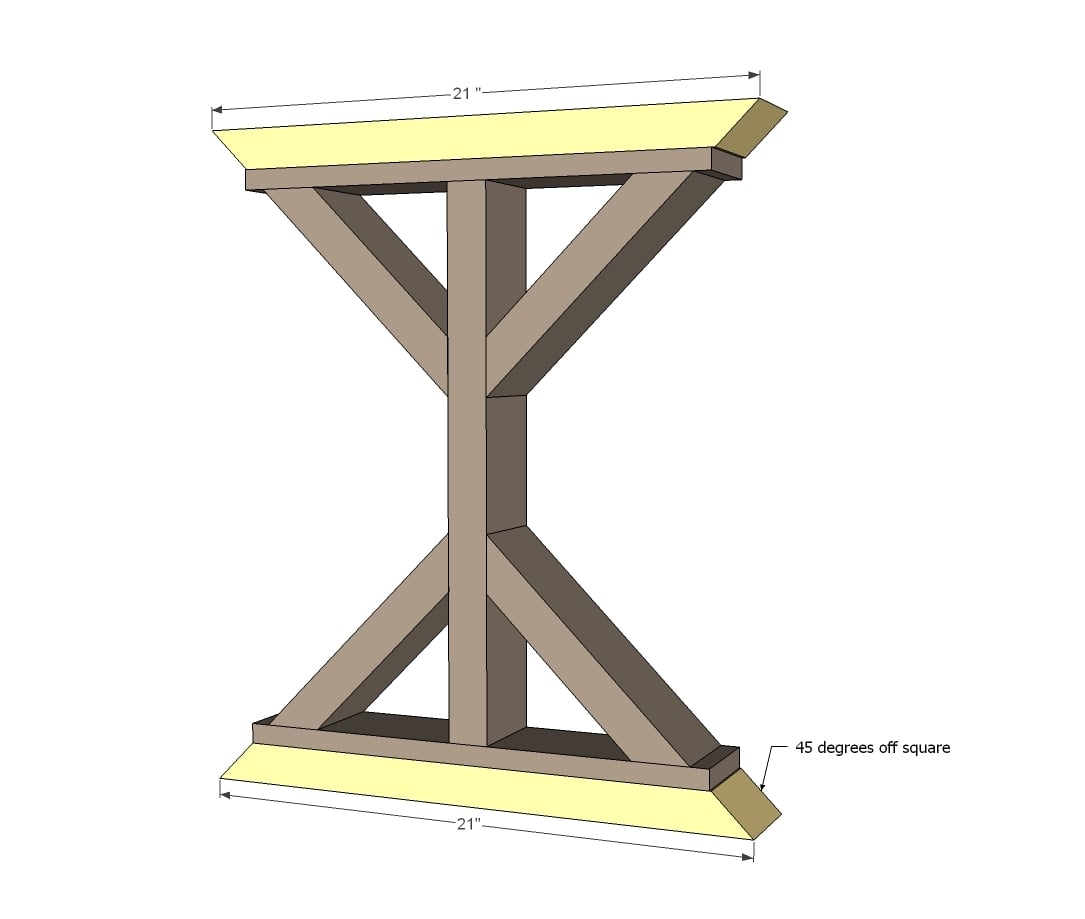
Followed by the top and bottom, ends mitered.
Step 4
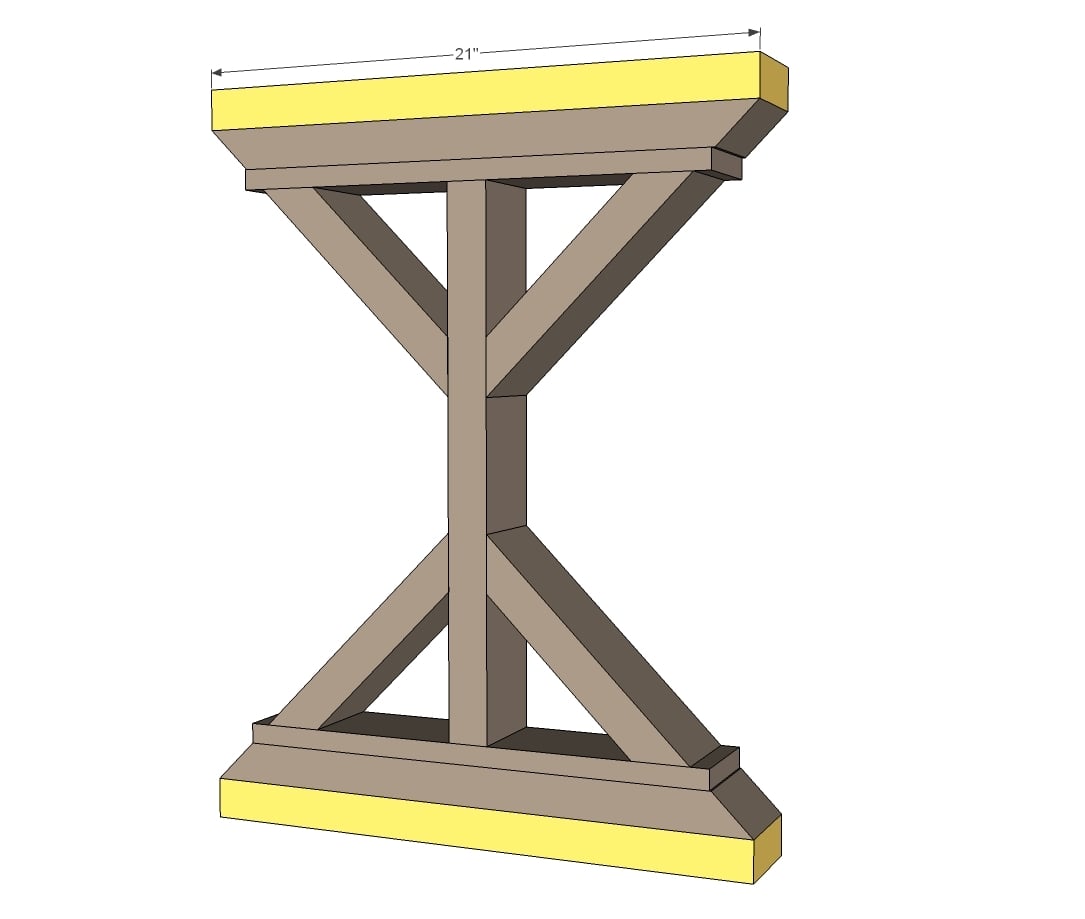
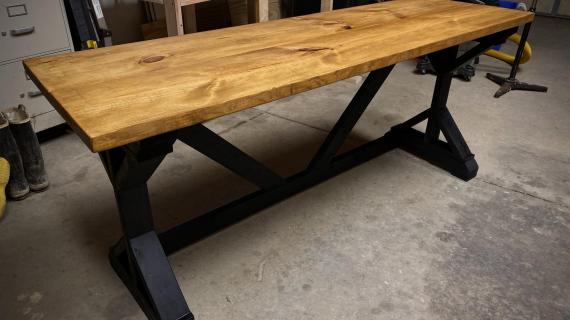
And then an easy step, just glue and screw the 2x4s on top. It's the stacking that makes these legs so beautiful!
Step 5
Step 6

Now it's starting to look like a desk!
Step 7

Now add the cross bracing ...
Step 8
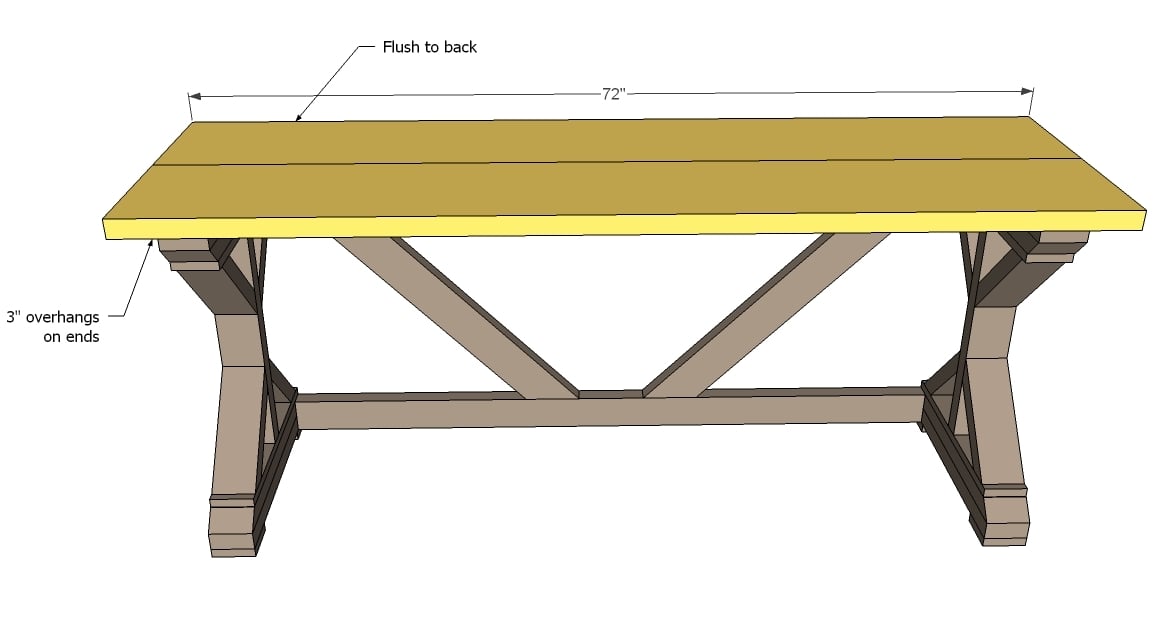
And finally the top! If you are using pocket holes, I recommend building top first, and then attaching top to base. Also, you could substitute out plywood for the top for a smoother writing surface.
It is always recommended to apply a test coat on a hidden area or scrap piece to ensure color evenness and adhesion. Use primer or wood conditioner as needed.


Comments
annalea
Mon, 08/27/2012 - 12:17
Wow.
I really love this one . . . I wonder if a set of square 3.5" "bun" feet would push this over the top to astounding. I LOVE it as it is, though.
(Like maybe some of these? http://www.osbornewood.com/Square-Feet.cfm)
townsean
Mon, 08/27/2012 - 12:36
lovely!
I loooove this plan! I am needing a craft table and this would look perfect! If I wanted to increase the height to make it more appropriate for crafting use would I increase the height of the cross bars and legs by the same measurement?
townsean
Mon, 08/27/2012 - 13:31
The more I think about
The more I think about it...it would end up widening the table as well :(
Q (not verified)
Fri, 11/23/2012 - 22:10
At a glance, I think you
At a glance, I think you could adjust the height of the center straight 2x4 on the end, then cut your angled 2x4's accordingly, without widening your base. You will need mitre saw. Good luck!
smacneil
Mon, 08/27/2012 - 12:56
That's it!!! My anniversary present to hubbster!
I'm buying the materials TODAY and starting on this. I'm not even joking. This is PERFECT! I've been trying to modify the Rustic X console into a computer table but it just wasn't looking right.
This is bang-on. Way to go ladies!
Warren (not verified)
Tue, 08/28/2012 - 00:42
Great Lathe Stand as well.
Great plan Ana, i plan to make this one as a stand for an old Lathe i was recently been given, if i thicken everything up it should be stable i think.
smacneil
Tue, 08/28/2012 - 07:33
question... I don't get the measurement here
"2 – 2x4 @ 30 3/8” ¾” (long point to short point,..."
30 3/8" at parallel 45deg I get... but what's the 3/4" long to short point?
(see, I wasn't kidding... I'm cutting right now! LOL)
egroth@hartene…
Mon, 09/21/2015 - 05:35
Is it 30 3/8 or 30 3/4?
I don't understand the measurement for this cut either and am unable to see the previous response. Is it 30 3/8" or 30 3/4"?
The-Crafty-Cowgirl
Tue, 08/28/2012 - 18:23
How to Attach Top
I have now found my Labor Day Weekend project! And just in time to be completed for this semester's first round of tests!
But I did have one question, what would be the best way to attach the top? I have a pocket hole kit - I would obviously use that to attach the table top pieces together, so would I add pocket holes to the inside of the top piece attached in step 4?
smacneil
Tue, 08/28/2012 - 19:04
note... might want to get 1 extra 2x4
I'm not sure if it's because I am not advanced enough in my cut planning but I ran short of 2x4. I got one more to cover what's left.
Also, for the Canadians reading this, as always make sure you adjust the plans for your local dimensions. Our studs are not the same dims as in the USA.
I finished a dry-fitting assembly of mine (minus the back cross supports whose dimensions I haven't yet worked out) and it built very well.
I had to go with 2x6s for the top and some of them worped by the time I got to them. other than a planer does anyone have any ideas on how I could straighten them?
Crystal A (not verified)
Thu, 08/30/2012 - 11:05
According to the cut list,
According to the cut list, there are 4- 2x4's cut at 21 3/4 long point to long point, but according to the drawing of how the desk is built, those pieces should be just 21" I think. I am building it right now, and it's not working out just right because of that. I'll need to go do some recutting.
JBTater
Sun, 09/19/2021 - 10:38
You and I did the same thing…
You and I did the same thing. I had to re-cut because those pieces were 3/4" too long. The plans should be revised, IMO.
I previously have built the farmhouse table based on plans from here, and it came out beautifully. This project will also be great - the legs are perfect after you cut those pointy bits down to 21".
I know how to read plans - I mean, I've also built boats and numerous other other projects. I didn't enjoy having to think it through to make it fit.
Milca (not verified)
Sat, 09/01/2012 - 15:01
Love the table!
I actually made myself the original plans but had shorten it a bit and used 4 2x8's for the top and moved the brace towards the back, and am using it in my office (30" deep). Love how the top was reinforced with an extra 2x4, that's what missing on mine.
Also, I attached everything together using metal corner type braces so I can take everything apart easily since it doesn't fit through my doorwar or hallway to the office. I know PH's would have worked well for this too, but figured the holes from screws/brackets would be less visible than PH's since everything is cheapo studs stained to a beautiful walnut!
Love your work Ana, keep them coming :) [Soon I'll have an Ana White house lol]
buffy0506
Wed, 09/05/2012 - 04:44
Love this desk!
I was planning to build the Sawhorse Desk for my daughter's room renovation, but this has much cleaner lines and will grow with her better. Any ideas how to adjust the back angle brackets if I make the desk only 48" wide? I can adjust the angle, I'm just not sure that would look best...
In reply to Love this desk! by buffy0506
claydowling
Wed, 09/05/2012 - 18:49
Keep the angle?
I like the angle that's there. How about keeping the angle the same and just adding a pair of uprights? In my mind it looks great, but of course, my mind is a weird little place. Before you build it, try a drawing, because it's not like I've actually tried this.
buffy0506
Thu, 09/06/2012 - 07:26
Angles!
I know, I really like the look as it is - I'll definitely draw it out first, but I think I might end up with a 3rd X for the back. Wish I had more room to build it as specified, but for a small bedroom space is tight.
srb615
Tue, 12/29/2015 - 18:18
24 inches at 30 degree angle.
24 inches at 30 degree angle. I just made mine that's 48". Took me several cuts but I finally figured it out!
Steve LaVoise (not verified)
Mon, 09/10/2012 - 11:49
Love it! I built it this
Love it! I built it this weekend... The only issue with the original plan is that "4 – 2x4 @ 21” ¾” (long point to long point, both ends cut NOT parallel at 45 degrees off square)" needs to be 21" not 21 3/4"
It came out great though!! Thanks!
Meagan (not verified)
Fri, 09/28/2012 - 02:07
Do you think it would be
Do you think it would be possible to widen the table top by 5-10" without compromising the stability?
D_arren (not verified)
Tue, 10/09/2012 - 10:32
6, 2x4 are needed
You need 6, 2x4x8. If you add up the 2x4 material list your still way to short with 5 of them
Logan (not verified)
Tue, 10/09/2012 - 10:34
6, 2x4 are needed
You need 6, 2x4x8. If you add up the 2x4 material list your still way to short with 5 of them
Lianna (not verified)
Tue, 10/09/2012 - 18:06
Hi, I like this plan very
Hi,
I like this plan very much. But I wonder if using 2x2's in place of the 2x4's would suffice and be strong enough? Any thoughts?
John Rasmussen (not verified)
Tue, 10/16/2012 - 15:54
$55 Fancy X Desk
I am using to 2x12s for the top. The plan only shows two 2x4s for the top support. One 2x4 is shown at the rear with a 1 1/2" inset. Should the other 2x4 be at the rear of the front 2x12?
Also, how are the 2x12s attached at the sides.
Thanks
Christian W (not verified)
Sat, 12/01/2012 - 16:58
Slight Modification
I needed a large computer/drawing table with lots of surface so I swiped you leg/base design for this and substituted an old hollow-core door as the desktop and trimmed its sides out with some doorstop to give it a nicer edge and more finished look and to cover the slight indentations from the the hinge cutouts. Also the hole from the doorknob is ideal for feeding cords through. The leg dimensions needed to be altered slightly to fit the wider top and some more center structure was added to support any weight. Huge thanks for the design and inspiration!
In reply to Slight Modification by Christian W (not verified)
patriciatruel
Mon, 09/21/2020 - 06:13
See your modified desk?
I would love to see your modified desk!
Danny Bartsch (not verified)
Sat, 12/08/2012 - 14:10
I find my self having to make
I find my self having to make a lot of changes to the plans. I know this could be due the nature of how construction grade lumber is cut, but sometimes it seems really off, oh well it could just be me :-P but thank you so much for your effort. This will be the 2nd plan I build for my wife! Hopefully I can get some good pictures of both soon! Thank you again!
AlyssaWalters6 (not verified)
Thu, 12/27/2012 - 18:03
Can i easily shorten this desk?
I LOVE this desk, but it is going into space that is 60" wide. Will it be easy to shorten it from 72" to 60" without much of a problem? (I realize the cross bracing lengths and the boards connecting the sides will need to be sized down -- does anyone have any suggestions for doing that easily?) This will be my first build, so I'm seeking input before I start next week! Thanks so much!
Cheyanne (not verified)
Thu, 12/27/2012 - 19:36
I LOVE this desk! My husband
I LOVE this desk! My husband built me the Fancy X table and benches for our dining room and this is the perfect style desk for my craft room! This site rocks! Thank you for the great plans!
AlyssaWalters6
Mon, 01/07/2013 - 12:31
Here is a link to my brag
Here is a link to my brag post for this plan! If I can do this, YOU TOTALLY CAN!!
http://ana-white.com/2013/01/my-first-build-55-fancy-x-desk
bkwoody
Sat, 07/06/2013 - 21:26
Great desk... curious about the top.
I love the simplicity of this desk and plan on building it this week. However, I have one question: when building with 2x's there is always a gap between boards when, for example, using them for the desk top (crumb catchers). Is there a way to eliminate this other then using 1x's or one solid piece?. For Rigidy i contemplated using 1/4 " plywood with 1x12s on top, since the 1xs by themselves would bend without support beams.
In reply to Great desk... curious about the top. by bkwoody
claydowling
Mon, 07/08/2013 - 06:34
Getting rid of the gaps
The grooves from joining boards side by side into a panel are annoying. If you have a table saw you can rip the edge to get rid of the curved edge, and then edge join the boards with glue. You can also use a jack plane to get a similar result. Panel glue-ups are probably beyond what Ana is trying to do here though. Startwoodworking.com, Fine Woodworking and Popular Woodworking all have good articles on panel building though, as well as a number of youtube videos. Worth checking out if you don't mind stretching yourself.
mattmasulis
Tue, 11/19/2013 - 20:33
Finished this project!
Great desk! Mine is finished and I love it!
housefullofboys
Fri, 08/08/2014 - 10:57
my first time! Ack!
I'm looking to make this my very first build (I'm in desperate need of a home office desk). What is the best way to attach the top of the desk to the base? Just screw it on? Sorry, I'm just terribly unfamiliar with all of this.
In reply to my first time! Ack! by housefullofboys
mattmasulis
Sat, 09/13/2014 - 17:07
Pocket holes
I attached mine from underneath with pocket holes. If you don't have a Kreg Jig you can still attach it from underneath by drilling pilot holes through the 2 x 4 braces that the top sits on and using 4" screws. You will definitely need the pilot holes. Without them getting a 4" screw all the way through a 2 x 4 is difficult. Hope this helps!
jrbamberg
Mon, 09/22/2014 - 11:08
long point to long point, both ends cut NOT parallel at 45 degre
Great desk. This isn't my first project, but my first with miter cuts with a sliding miter saw. I did figure out how to do the 45 degree cuts, but a video or link to a helpful video of how to make 45 degree cuts would be very helpful for your users. It took a lot of time trying to figure out how to cut them on the same 2x4. I saw a bunch of videos on YouTube for cutting miters but they all showed a cut on one end like molding, but nothing on both sides of the boards and how to measure for that. For future reference I would love to see a video on how to do this so I don't end up wasting wood by incorrectly setting up the saw, measuring, and cutting. Help us out when you have time, I think we would all love to see it. Thank you for your great projects. Now that I have a sliding miter saw I'm all in on this woodworking stuff. Love it already.
Comfysocks
Mon, 12/28/2015 - 15:14
Couldn't agree more!
It would be very helpful to have a video or blog that would explain how to assembly the cut list correctly to minimize waste. That seems to be the hardest part of the process!
mtairymd
Sat, 03/07/2015 - 13:54
My try at a matching book shelf
http://ana-white.com/2015/03/DIY_furniture/rustic-book-shelf
jleigh333
Thu, 03/26/2015 - 10:24
LOVE this but I'd need a specific size
I absolutely love this desk but I'd have to build it to fit the small space next to my bed. It would need to be 18" x 48" and I just don't know how to adjust the plans to make it the size I need.
wrsjk
Fri, 02/26/2016 - 17:05
Granite top?
Do you think it will support granite?
molonlabe
Sun, 02/28/2016 - 13:54
So much missing information.
Love the desk, currently building, but it is shocking how many important details are missing.
Materials: PH Screws
- What are PH screws? Do you mean Phillips Head? Why does it matter what the heads are?
Cut List: 2 – 2x4 @ 30 3/8” ¾” (long point to short point, both ends cut parallel at 45 degrees off square)
- What is 3/8" 3/4"?
- Adding in long to long just makes things confusing. If you measure a boards length, you always measure the actual length. At least is it not common sense to do that?
Step 1: You list "finish nails" yet do not have those in your materials. And you just have the diagonal boards thrown up there, no guide to distance, it is easy to have the two boards not be even if you aren't very careful.
Step 5: those 59" 2x4s are 3 1/2 inches wide, you have them being the height of the width of two 2x4s. Which is not the case. 3 1/2" > 1 1/2" + 1 1/2".
Why not post the sketchup file so we can actually view the item at different angles? That would be great, plus then we can scale the item if we want or identify errors.
All that aside, thank you.
Larry St Croix
Sun, 02/28/2016 - 20:31
PH screws or nails and glue
What are PH screws?
Pocket hole screws, which have their own special head. If you don't have a Kreg jig all is not lost. You can glue the wood and either use finish nails by hand, or a brad nailer. It is an either/or scenario, using both methods would certainly be secure but maybe a tad overkill.
Wallawalla
Sat, 07/09/2016 - 17:47
Please add drawers
Ana, I love this desk! I love your site too! I asked my hubby for one of these for my birthday but I would really love it to have drawers since it will be used as a vanity. Could you put a plan up with added drawers?
BBoy2030
Sun, 02/04/2018 - 03:11
More Woodworking plans
I personally got started about 2 months ago and am already creating my own projects, and did it all thanks to the help of a set of 16,000 Woodworking plans that are so easy to follow - literally anyone can do this.
I'm sure this will provide tremendous value to anyone who's starting out with this. You can check it out here: https://tinyurl.com/y7gyxo2l
jayhawkcwe
Tue, 02/18/2020 - 09:56
you need six 2x4s. also the…
you need six 2x4s. also the four 21 3/4" cuts should be 21" even. You'll find this out when you try to stack a 21" straight cut on top of it and it's 3/4" too long. Other than having to go back and get another 2x4, it was a pretty easy build. Figuring out how to attach the 45 braces to the main vertical leg piece was interesting. This design would benefit from a 4x4 leg.
patriciatruel
Mon, 09/21/2020 - 06:17
I love this desk!
How have I NOT seen this desk before now! I built her last night...finished about 11:30...and everyone was asleep already and i haven't been able to show to anyone yet... :( It's going into one of my short term rentals for nurses...perfect compliment in the little house!