
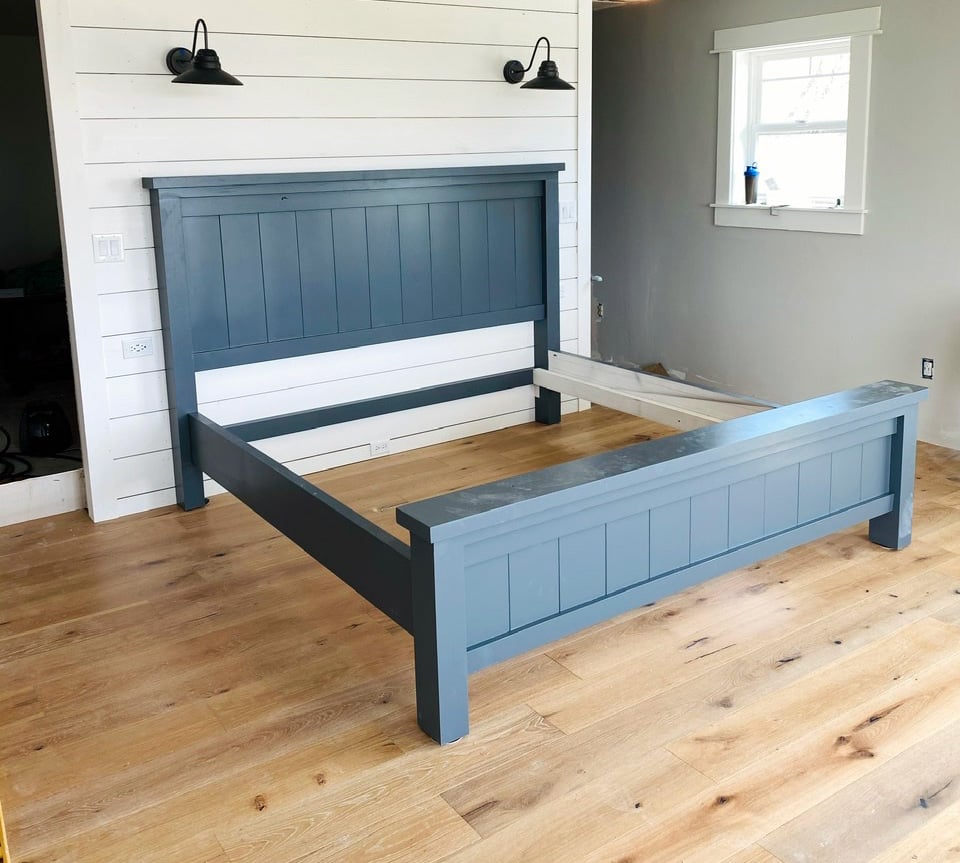

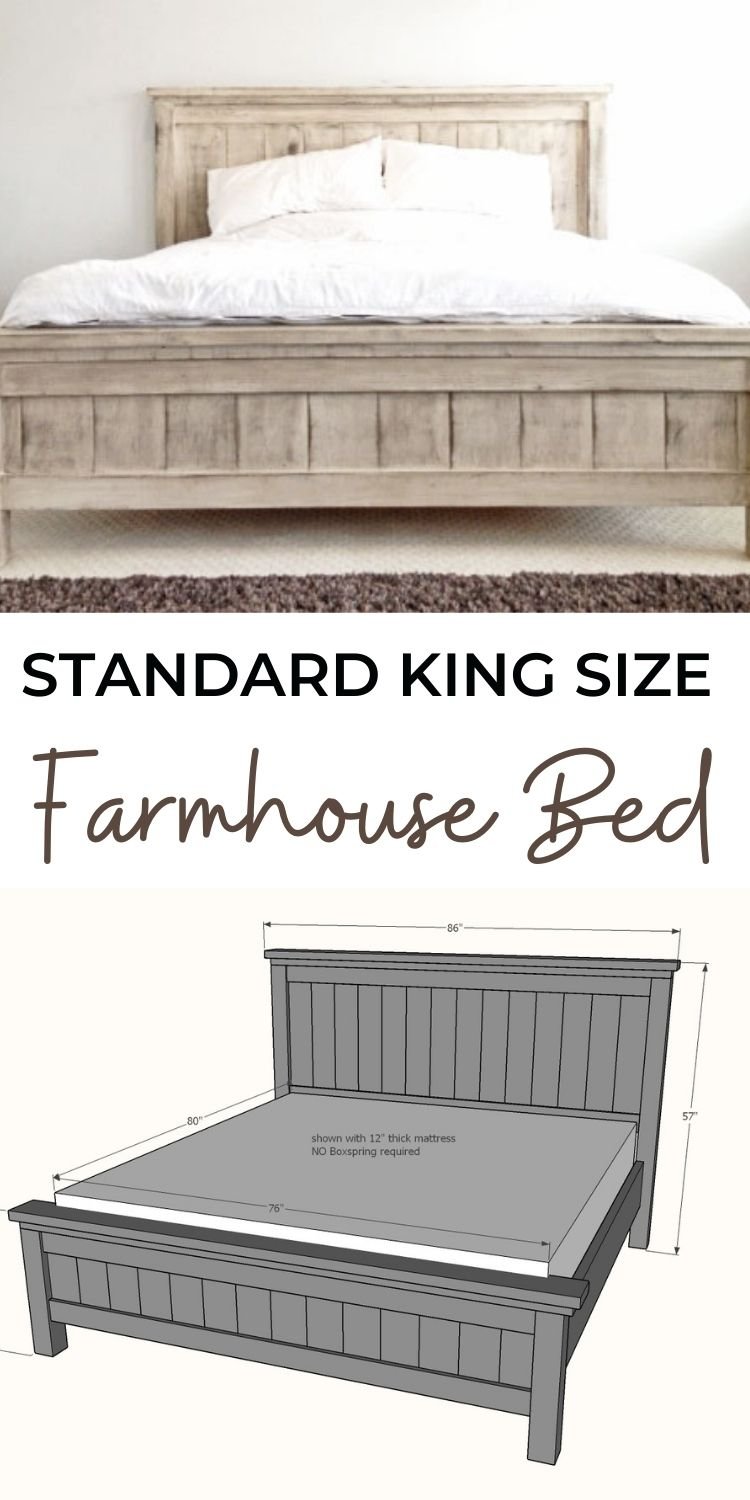
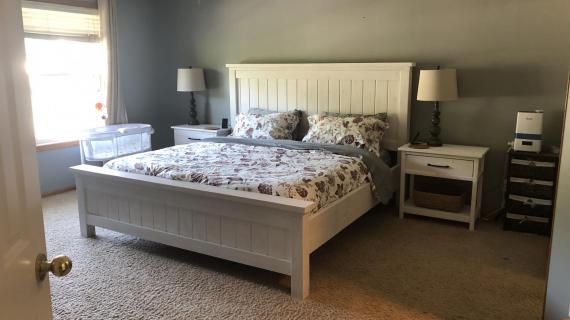
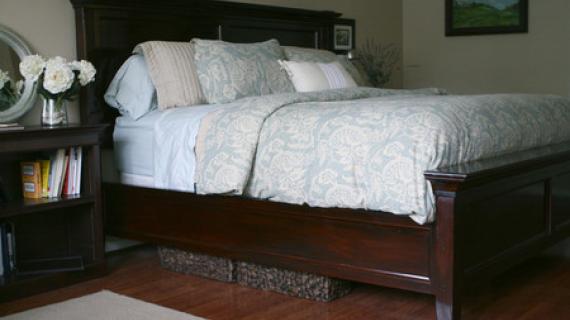
This stunning (and extra sturdy!) Farmhouse King Bed frame costs just a fraction to build vs buy. It's made of solid wood and you won't need a ton of tools to whip it out. You'll love the step by step diagrams, shopping list and cut list.
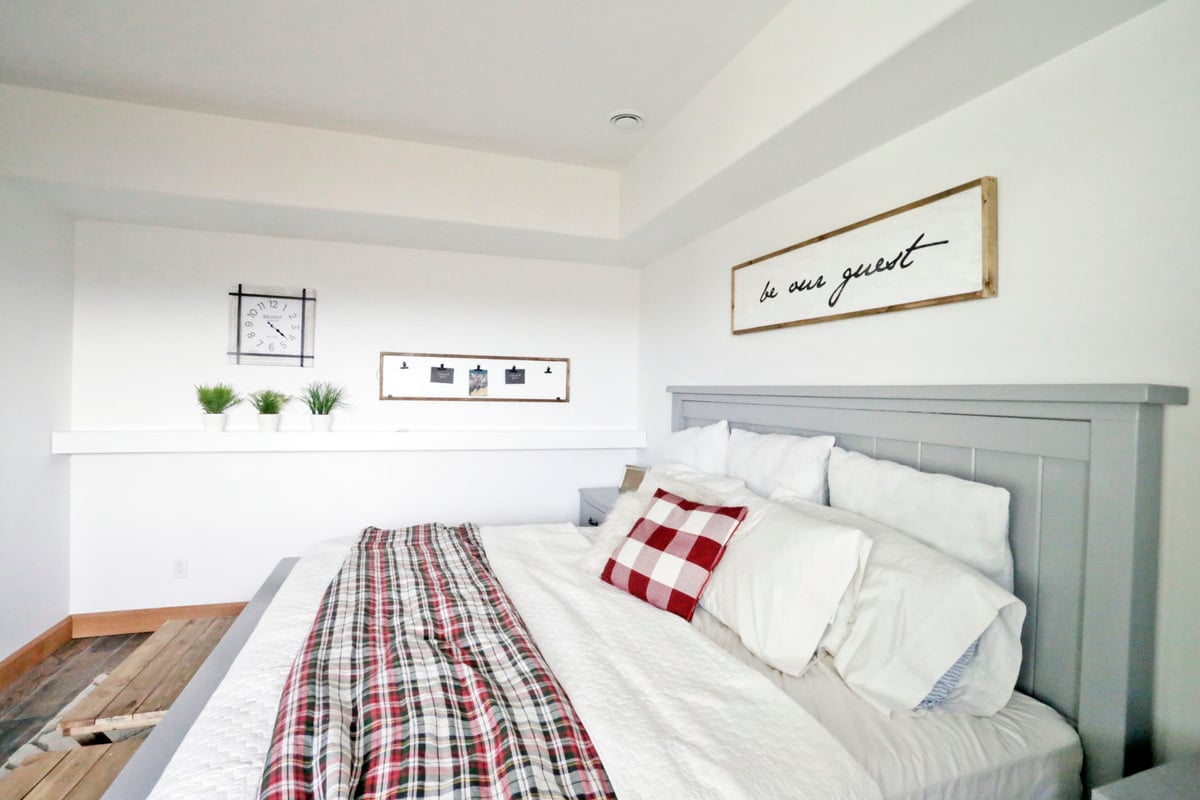
We also have Queen Farmhouse Bed Plans, and check out our full room build with this bed and matching nightstands.
The very first real project that I ever tackled all by myself was this EXACT Farmhouse Bed in King size.
I remember being stunned at how well the project turned out. And here we are, over a decade later, and it's still just as beautiful, just as sturdy, and I'm just as stunned.
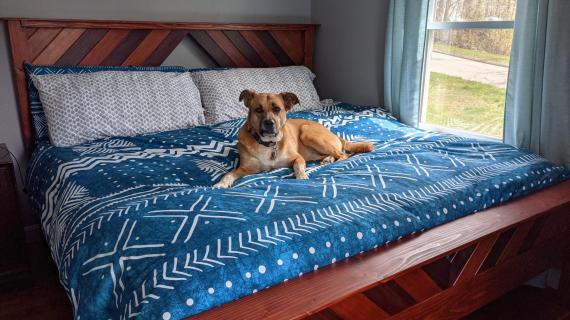
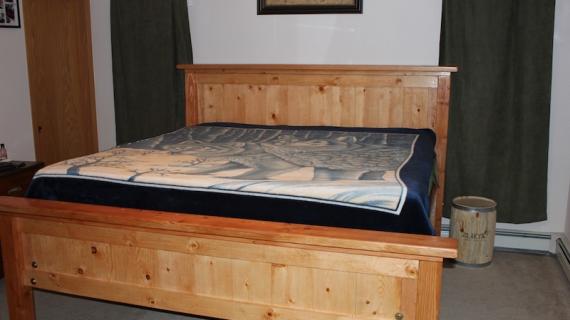
The farmhouse beds have been built thousands of times and is a reader favorite.
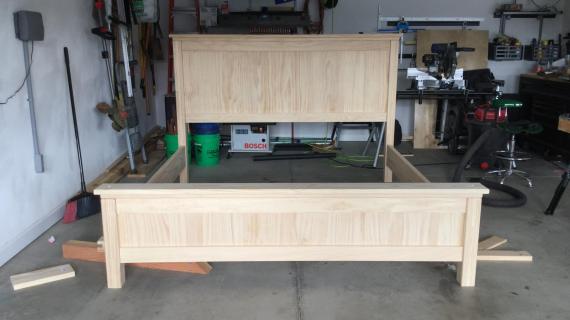
What Wood Do You Use
We use standard off the shelf lumber to build - just framing lumber and common boards. You can of course build with any type of wood, just make sure your material dimensions match dimensional lumber sizes (for example a 2x4 is actually 1-1/2" x 3-1/2").
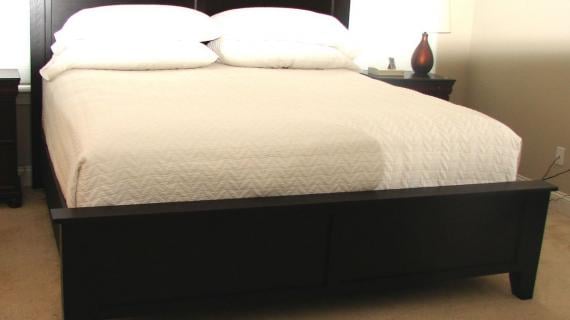
Matching Nightstands
This bed is quite substantial and deserves matching nightstands. I have put together nightstand plans that are designed to match - so you can get a full bedroom furniture set!

Updated Farmhouse King Bed Plans
We have updated these plans to be easier to build and not require pocket holes. You can still access the old plans here.
If you need a different sized farmhouse bed, check out all our farmhouse bed plans here.
Pin For Later!

Preparation
2 - 4x4, 8 feet long
1 - 2x2, 8 feet long
7 - 1x6, 8 feet long
4 - 1x4, 8 feet long
2 - 2x6, 8 feet long OR stud length
2 - 1x10 OR 2x10 @ 8 feet long
18* - 2x4, 8 feet long OR stud length
2 small L brackets (1-1/2" wings)
2 straight brackets (6" overall length)
150 - 1-1/4" brad nails
150 - 2-1/2" self tapping wood screws (try SPAX or similar)
*Includes 11 2x4s for the mattress slats. You can substitute 1x4s, 1x3s, ripped plywood etc for the slats if you have other materials on hand
HEADBOARD CUT LIST
2 - 4x4 @ 54" - headboard legs
2 - 2x2 @ 30" - headboard cleats
14 - 1x6 @ 30" - headboard panel
2 - 1x4 @ about 77" - measure and cut to fit
1 - 2x4 @ about 84" - measure and cut to fit
1 - 2x6 @ about 86" - measure and cut to fit
FOOTBOARD CUT LIST
2 - 4x4 @ 21" - footboard legs
2 - 2x2 @ 8" - footboard cleats
2 - 2x2 @ 3" - footboard cleats
14 - 1x6 @ 15" - footboard panel
2 - 1x4 @ about 77" - measure and cut to fit
1 - 2x4 @ about 84" - measure and cut to fit
1 - 2x6 @ about 86" - measure and cut to fit
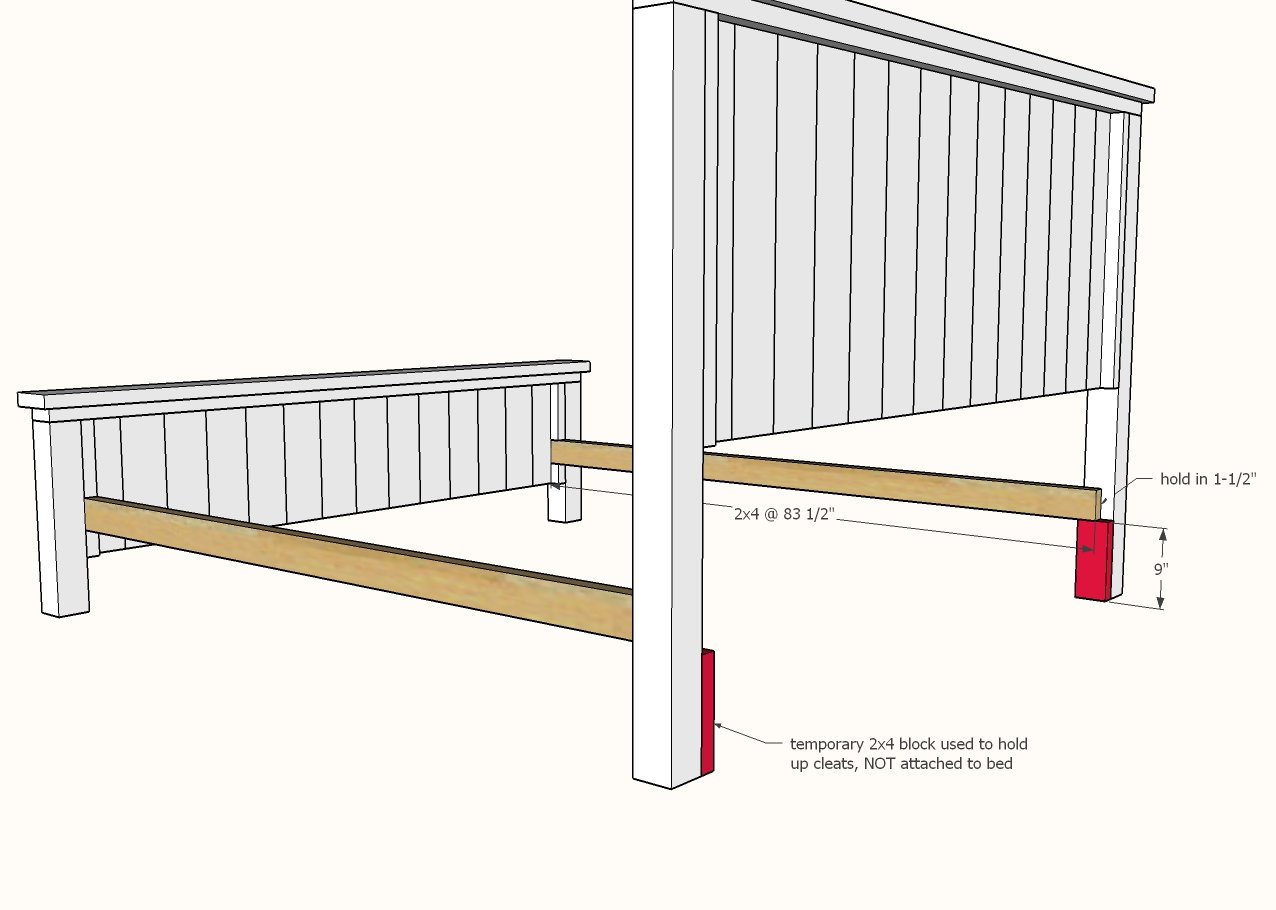
MATTRESS SUPPORT FRAME/SIDERAILS
4 - 2x4 @ 83-1/2" - mattress supports
1 - 2x4 @ ~77" - headboard tie in - cut to fit
4 - 2x4 @ 12-1/2" - center legs
2 - 1x10 or 2x10 @ 80"
11 - 2x4 @ ~77" cut to fit - mattress slats


Instructions
Step 1
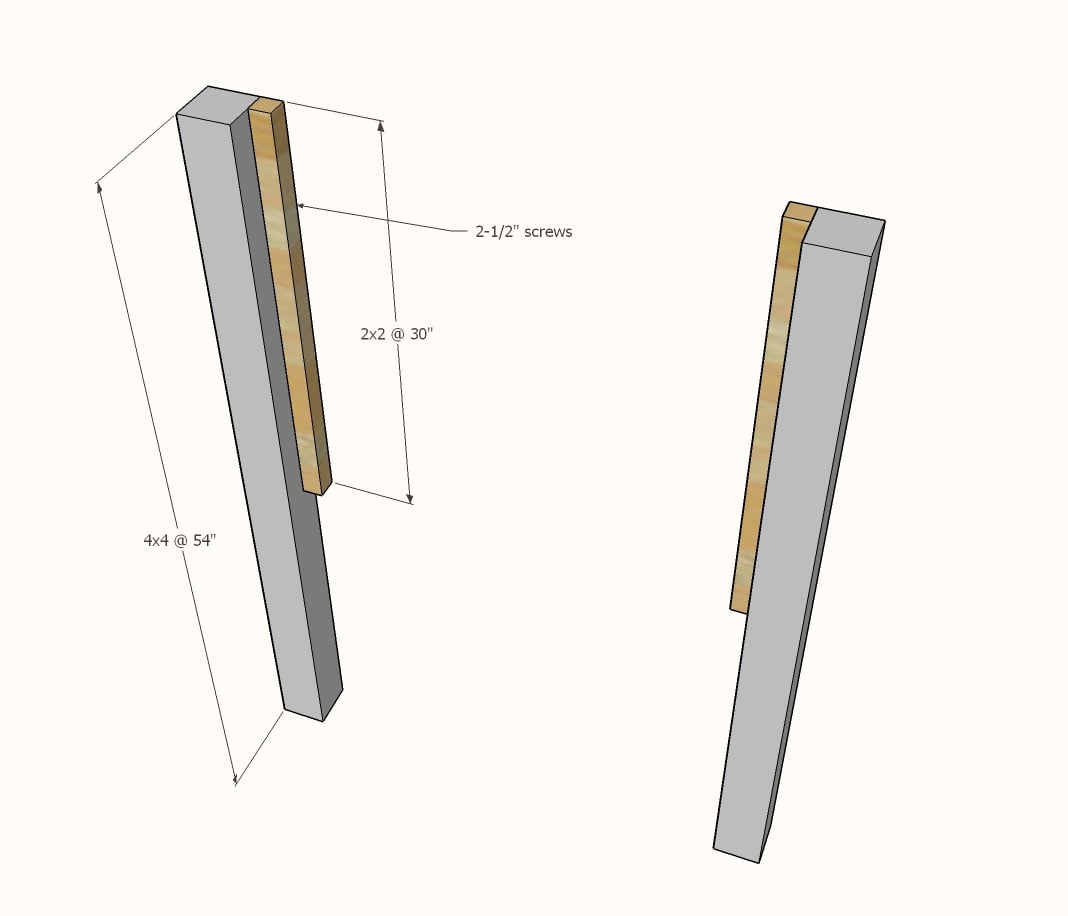
Attach 2x2 cleats flush to the back of the legs, with 2-1/2" screws
NOTE: Pocket hole users can skip this step
Step 2
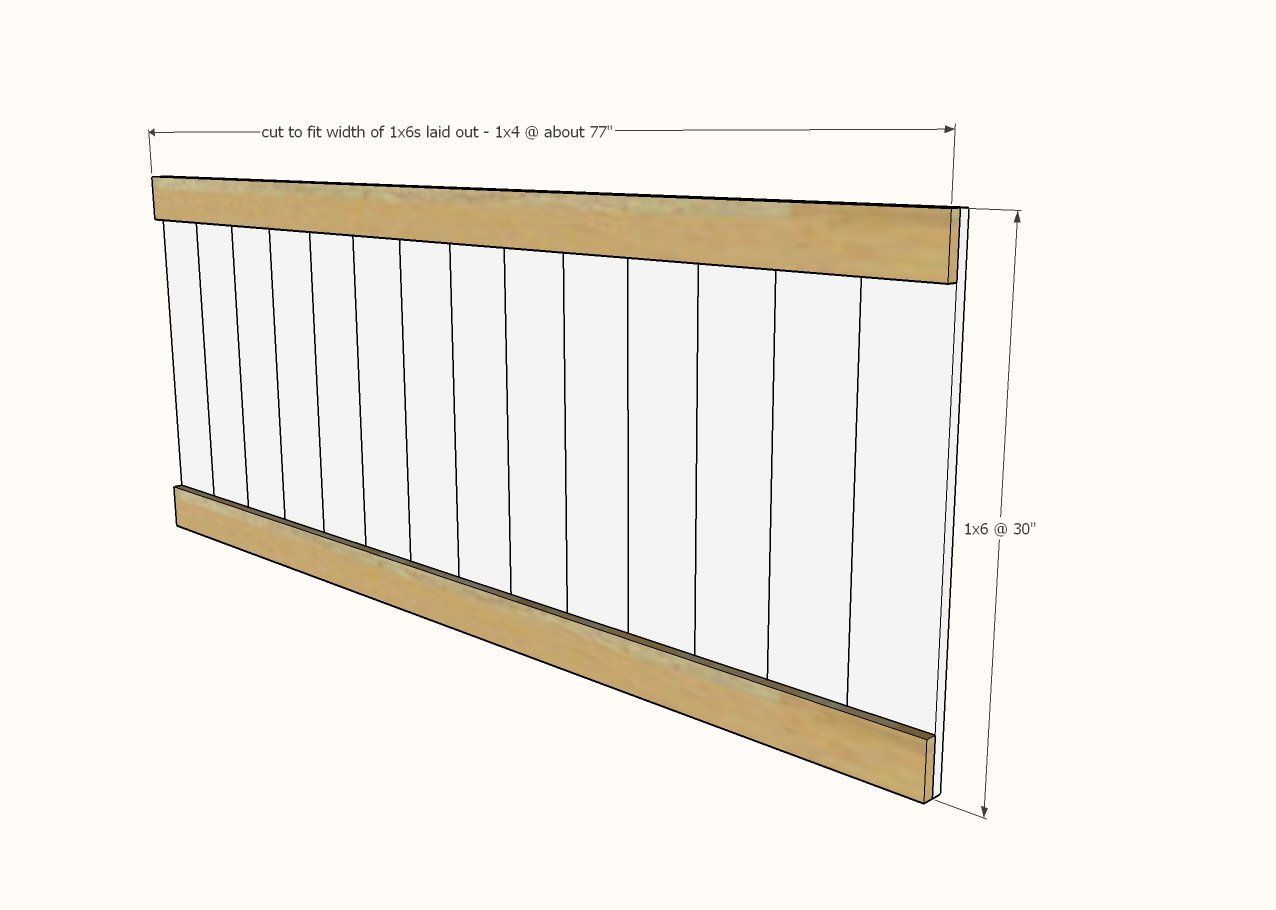
Layout the 1x6 headboard panels, and measure the overall width.
Cut 1x4 boards to this measurement.
Attach 1x6 boards to the 1x4s with glue and 1-1/4" brad nails from the back side to hide nail holes.
Make sure you apply glue between the 1x6 boards as you go.
Check to make sure that the panel is constructed square (NOT a parallelogram)
POCKET HOLE USERS: Attach 1x4s to the 4x4 legs with 3/4" pocket holes and 1-1/4" pocket hole screws. Then nail the 1x6s to the 1x4s inside the headboard panel.
Step 3

Attach panel to the 2x2 cleats with 2-1/2" screws and glue. Also attach with a few 1-1/4" nails through front side into the 2x2 cleat where there is no 1x4.
POCKET HOLE USERS can skip this step
Step 4

Measure the top overall width. Cut a 2x4 to this width. Attach with glue and screws to top of headboard.
Step 5
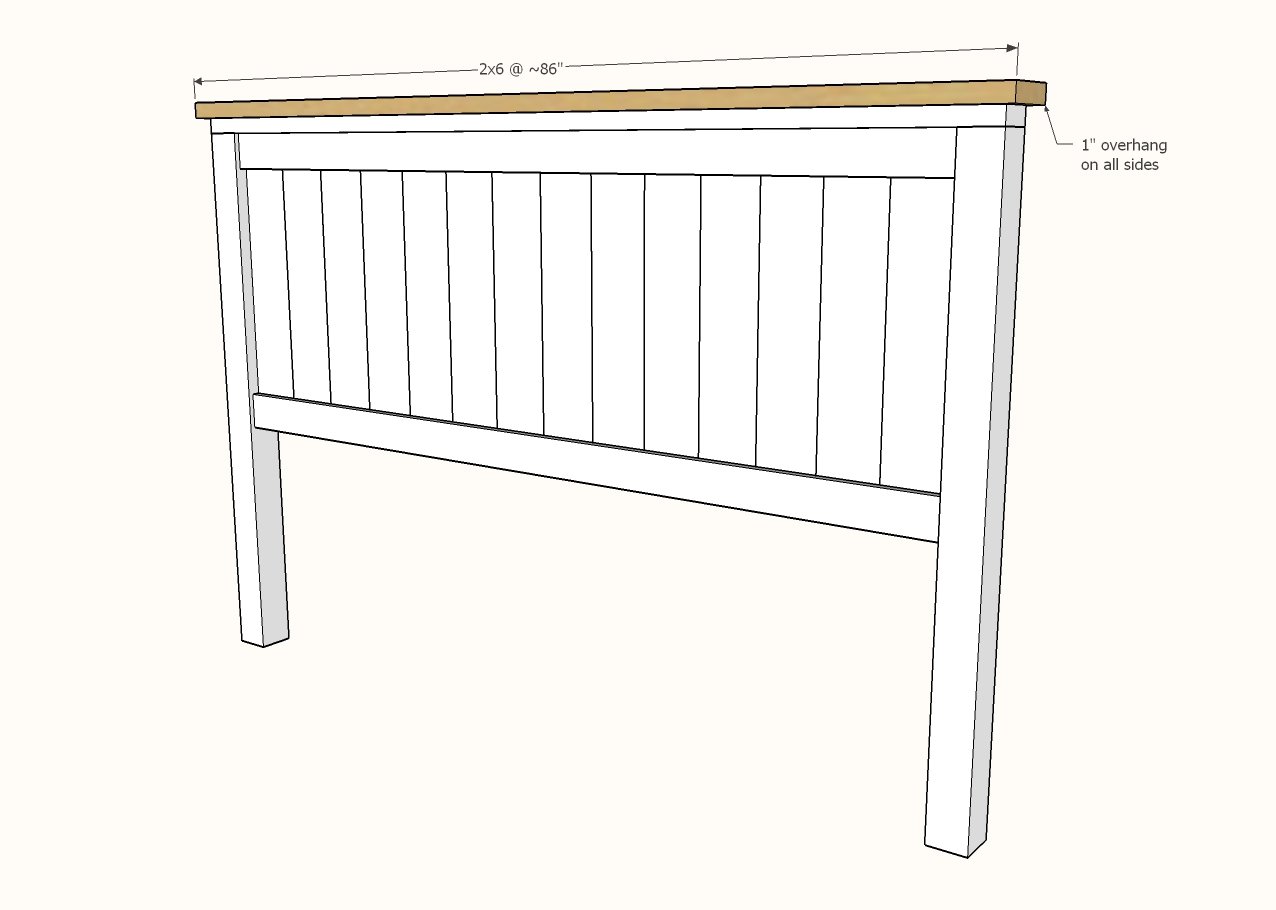
Cut a 2x6 2" longer than the 2x4.
Attach with 1" overhang on all sides with 2-1/2" screws and glue.
This completes the headboard build.
Step 6
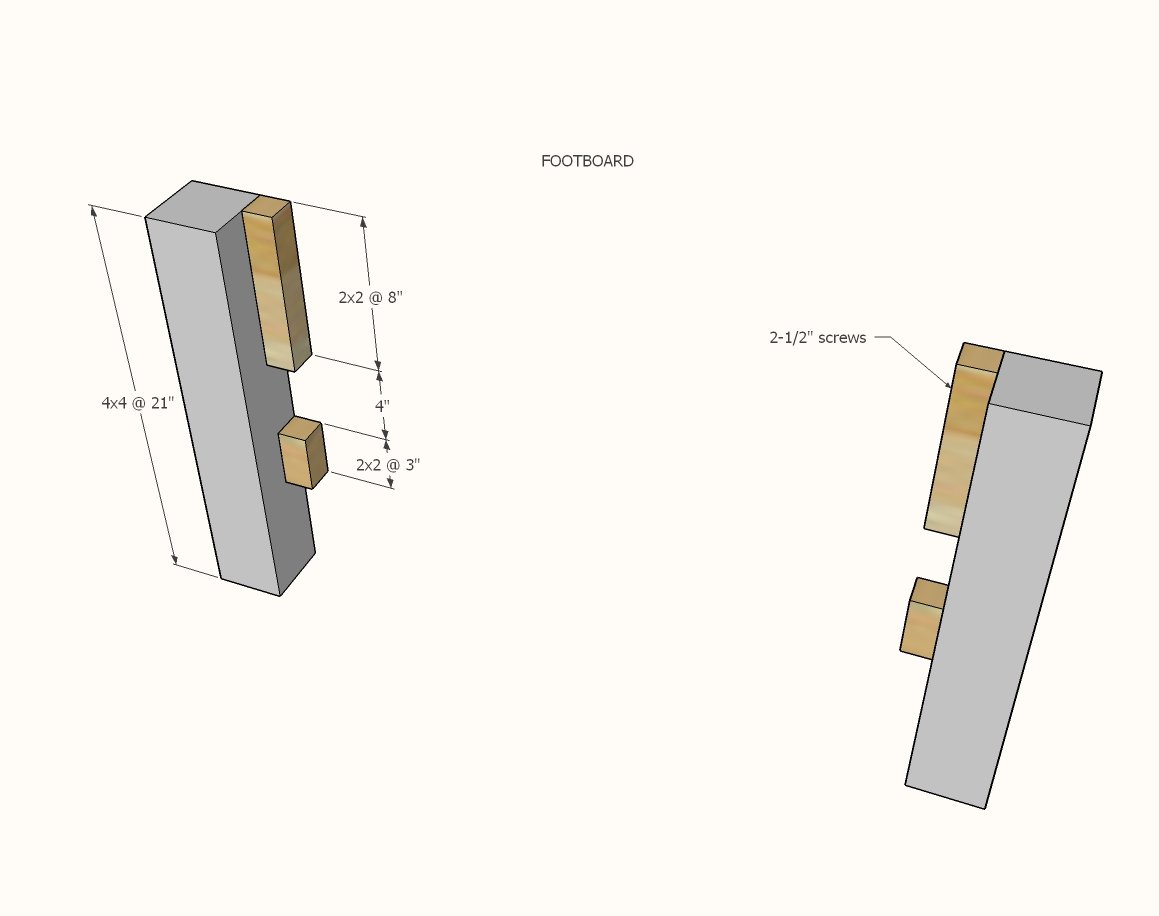
The footboard is constructed the same as the headboard, with the exception of the 2x2 cleats on the back so that the siderail cleats can notch in.
If you have trouble with your smaller 2x2 splitting try predrilling holes.
Step 7
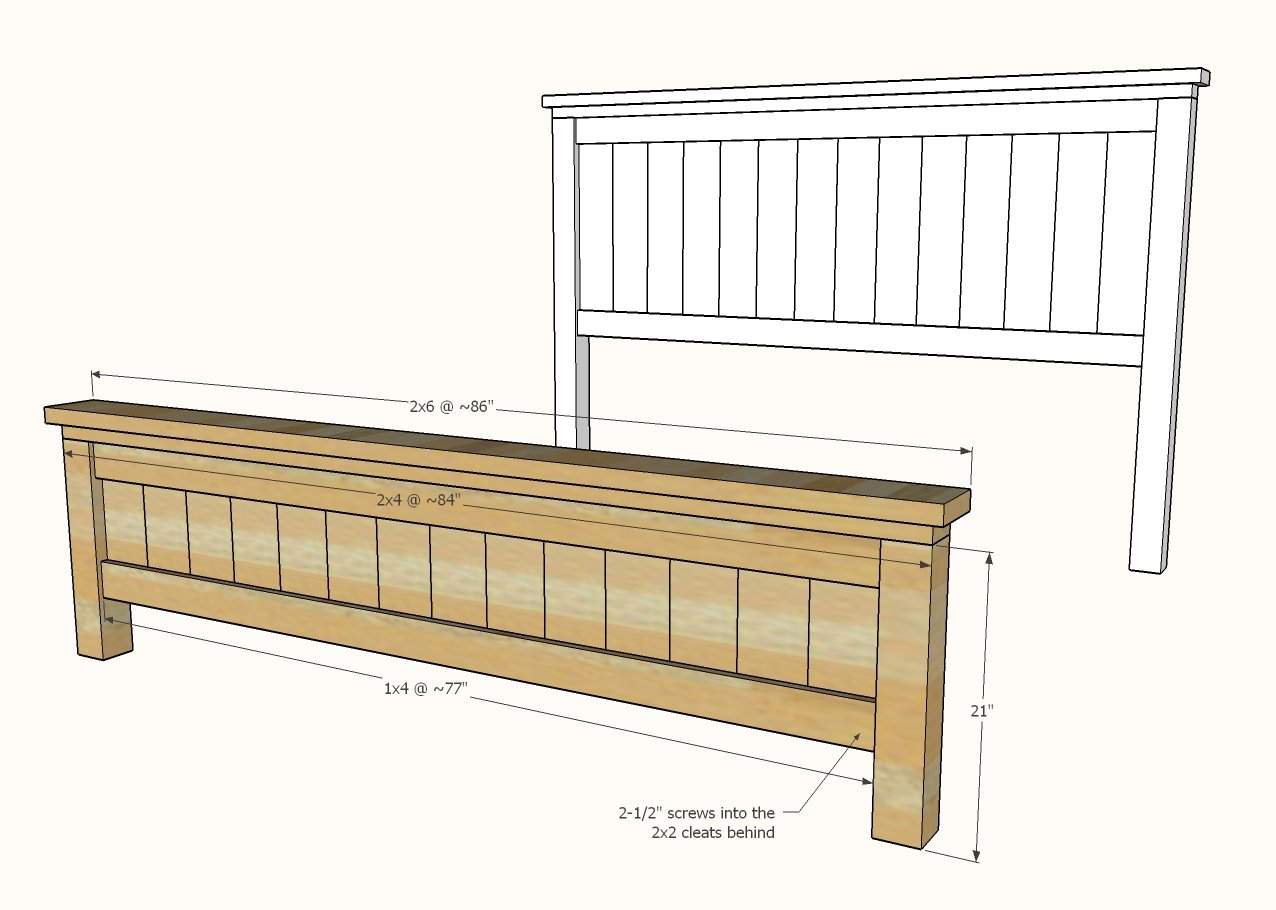
Finish construction of the footboard exactly as you did the headboard.
Step 8
Attach siderail cleats inside the footboard and to the headboard legs. Use 2-1/2" screws to secure.
This completes the footboard.
Consider painting or staining your footboards and headboards and siderails now - then move all the pieces into the room for final assembly.
Step 9

Attach headboard support piece between the siderail cleats.
Step 10

Build the center legs - space the legs about 1/3 the way down - you don't have to be exact here.
Step 11

Attach the center legs inside the bed, splitting the spacing by about 1/3
Step 12

Attach siderails to the siderail cleats.
We recommend using brackets to attach siderails at the top to the headboard and footboard.
POCKET HOLE USERS: Drill a pocket hole at the top and attach.
Step 13

Cut slats and lay about 4" apart in the bed.
Screw down with 2-1/2" screws.


Comments
hpu2002
Thu, 10/30/2014 - 18:56
Ana I love your plans. I
Ana I love your plans. I have built a coffee table, farmhouse table, and now this bed. I noticed in the comments that several people would like the regular dimensions for a standard king.
Here is what I did:
First of all. Yes instead of 4 1X8's you will need 5 I cut 9 1x8 boards at 30'' for the head board pannel pieces. I cut 9 1 x 8 pieces at 15 '' for the foot board. NOTE: instead of using 1x3's at the ends of thepannel pieces. I cut 2 1x6 boards at 30'' and 2 at 15'' to replace those. That way it off sets the 4 inches for the head board and foot board to make it 76'' instead of 80''.
The rest of it was pretty easy: I just took off 4 inches on the long items ie:
Instead of the panel trim pieces "4 1x4 at 80'' I made them 76 inches
For the bottom header inseat of 87'' i made it 83'' (headboard and foot board"
For the top header instead of 89'' i made it 85'' (headboard and foot board)
I hope this is not confusing. I also used 2x4's at roughly 72 inches and then some begboard as a "box spring and support" for my 12 inch memory foam mattress. I will upload a pic when I can.
Dave
hpu2002
Thu, 10/30/2014 - 18:59
I forgot to tell about the
I forgot to tell about the side boards. I used 2x12's at 82'' (to add a little room) and used lag bolts to screw them it at 1 inch on each leg.
mikepattenson
Tue, 05/26/2015 - 16:10
After the yard, the next
After the yard, the next thing we focused on was our bed. We’ve always dreamed of having a bed big enough for us to each spread out in without touching each other. Romantic, I know, but I’m sorry… our bodies radiate heat. I surfed the internet and pinned bed frames I liked but kept coming back to the same Pottery Barn King Bed. Being the cheapos we are, we didn’t exactly want to pay for the oh-so-trendy $1,600 name-brand bed I had my eye on.
I started searching DIY projects on Pinterest and came across a DIY Pottery Barn Farmhouse Bed – PERFECT!
We decided to add a few inches to the height of the head board and foot board because I wanted our bedding to fall just below the foot board, not the other way around. We had a saw, a drill, and some wood glue…that’s it. No saw horses, no clamps, no nail gun or compressor. We’re not experts, we’re cheap, remember? We made do using our boat trailer as a sawhorse… Creative!
Now if you're like me who are having a hard time looking for woodworking plan for a project, I highly suggest to DOWNLOAD your own collection for future use..CHECK the link below for reference.
picinichml
Sun, 06/07/2015 - 20:51
Cal king measurements
Hi, this is a beautiful bed! We've got a Cal. King mattress and I would like to know if there are plans for that.
garzalesley
Mon, 09/14/2015 - 10:44
side rails?
are there measurements for the side rails? I didnt see any.
sydsogi120
Tue, 09/15/2015 - 07:59
squeaks??
We've made this bed and it squeaks. Does anyone have any advice to stop the squeaks? Thanks!!
erik83
Tue, 10/13/2015 - 10:40
Dimensions to European measurements
I saw this farmhouse bed on this website and would like to make it also for our bedroom.
But the problem is that live in the Netherlands and all the measurements here are in cm and meters but all the dimensions in the description are written in USA measurements. With Google I'm able to convert the feet and inches to cm, but what I don't understand are the numbers 1x8, 4x4, 1x3, 2x4, etc.
Can someone tell in what dimensions this is written...inches, feet, or ...
Thanks for your help,
Greetings,
Erik
ktqb
Tue, 01/05/2016 - 10:30
They are in inches :)
They are in inches :)
ktqb
Tue, 01/05/2016 - 10:29
Side rails
Hi Ana,
I can't seem to search your plans for the Queen Sized with Arch and the Queen sized farmhouse bed. Do you have the links to these plans so I can look up the plans to the side rails. Thank you!
In reply to Side rails by ktqb
Ana White
Thu, 01/07/2016 - 09:30
This one?http://www.ana-white
This one?
http://www.ana-white.com/2009/11/plan-love-farmhouse-bed-now-with-arch…
WWRookie
Tue, 01/19/2016 - 06:02
Farmhouse Storage Bed
Just a quick question about the Farmhouse storage bed, I'm about to start this project but when I noticed the storage boxes are made of plywood and the face of the drawers don't cover the entire side won't that leave the unfinished edge of the plywood exposed? I plan on staining this bed and not painting it, won't that look bad?
amspringer
Thu, 01/28/2016 - 09:39
Frame floor for King size
Hey! I am new to DIY projects and this will actually be my first project since our bed is currently on the floor. I want to do it this weekend but i am trying to figure out how many 2x4's i will need for the frame floor since we have the two box springs. also what was the size of the plywood that you put on top of the slats? TIA.
KansasDad12
Thu, 01/28/2016 - 19:41
box springs ?
I'm getting ready to build a variation of this bed, basically using the footboard and the side rails/frame. But where I'm kind of stuck, is I'm trying to figure out dimensions for incorporating my box springs without making them visible. Are most people not using box springs with their beds? We have a Tempurpedic and you have to use the box springs with them.
amspringer
Fri, 01/29/2016 - 08:42
same issue
i have the same issue. we just got a king tempurpedic with the dual box springs (HEAVY!!!) and trying to figure out the foundation for this bed! i really want to make it this weekend so im hoping i can figure it out
kb12
Fri, 07/15/2016 - 22:03
Simplify
Ana I fell in love with this bed as soon as I saw it. Even though we know nothing about building looking over the plan it seemed pretty straight forward. So went out and bought the cut list but when I printed out the plan to begin my project I saw some missing information. How are the side rails attached to the head and footboard? I see a lot of questions about the dimensions of the bed not being standard but some are saying that because of the way that the rails are attached that this is standard? And lastly I read one of your posts that says something about your plan being angled because you didn't have the room, I really didn't understand this, what part is angled? Sorry for so many questions
jlharrison
Wed, 07/27/2016 - 15:29
Absolutely Love how this is
Absolutely Love how this is color coated. This makes a visual person like myself VERY HAPPY!!!
jlharrison
Wed, 07/27/2016 - 20:57
I love how detailed this plan
I love how detailed this plan is. Color coded and each step including measurements. Do you have a set of plans for the queen version of this bed that are as detailed as the king version. I am new to this site and woodworking in general so this makes it way easier for me to understand!!!
Any help or suggestions would be greatly appreciated!!
Chayah L
Sat, 08/13/2016 - 18:01
Major issue with lumber list!!!!
There are two significant errors in the plan, -and shopping list for this project.
1. To build the head and footboard, you will need AT LEAST 6 1x8s, not four as listed. We reduced the height of the headboard by five inches to fit a funny spot in our bedroom, and we've still come
up VERY short.
2. The 1x3s listed are not even close to wide enough to make the frame the proper width. 8x1 are actually closer to 7.25" when well dried, and 3x1 are more like 2.5. That is 77.5", which is a BIG gap, and doesn't create enough frame space for a king bed!! Measure the wood you have - you'll probably want to go up to 1x4s at least. So, because of all of this, my husband and I didn't get to build our new bed today as planned with our only day off for forever, but instead spent it cursing and frustrated that the lumberyard was closed.
Beautiful project - hope we get to finish it without any other glaring problems.
BrianneD
Mon, 10/17/2016 - 07:08
reclaimed wood
Hi, I am new to the site, i should be working! Love this bed. I am upgrading from a queen bed to a king with little money so love that I can make this beautiful bed for so little. Can it be made with re-claimed barnboard? I see you used pine from a hardware I believe. Just wondering if you think thats possible. Also your plan does not include side rails. Is there a seperate plan for that? I am so excited to get started!
tvandiver88
Fri, 11/04/2016 - 09:43
paint and stain color
does anyone know the color of paint and stain color that was used for this bed?
mtz_lin
Tue, 11/08/2016 - 07:38
Ana, I am in the process of
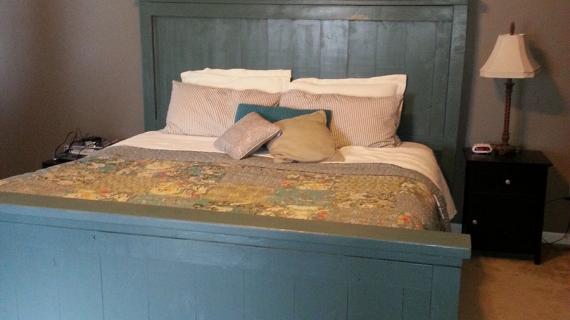
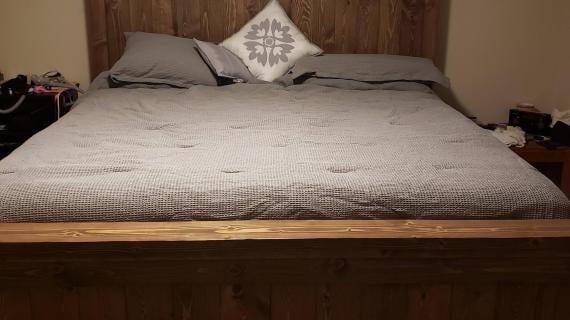
Ana, I am in the process of building the King size farmhouse bed plan. I really want to make the side rails with slats for my box spring and mattress to sit on. the foot board it so short (which I like) but I don't want my mattress towering over my footboard. Would you reccomend making longer 4x4's for the footboard. Or at what height would you attach the rails so that my mattress isn't too high. I love the picture posted at the top of this page and that is what I am going for. Thank you!
mydivinehome
Tue, 12/13/2016 - 12:39
New Blog Post
I was on here last week looking for answers to my questions. My husband and I were planning on building our own farmhouse king size bed and I could not figure out how long or high the side rails needed to be. I realized this was meant for a 80" wide mattress too. We also had no idea where to find the frame plans. So I went for it and built and designed everything myself. Not sure if there are new plans yet but if you need some questions answered you can checkout my blog post!
https://mydivinehomeblog.com/2016/12/12/ana-white-king-farmhouse-bed/
Arwsgirl
Sun, 12/18/2016 - 06:02
Support question.
We do not have box springs. How would you modify this plan for that?
John13
Mon, 01/09/2017 - 18:42
Side Rails
Hi Ana;
Just a little stumped on a few things. A) How High did you mount the side rails and B) What hardware was used to attach the side rails. - Loving the site!
In reply to Side Rails by John13
Clint Porter
Tue, 04/18/2017 - 19:26
Hi John,
Hi John,
I'll take a shot at this since nobody has replied. I made two of these beds for my daughters but in a twin size. I ran into the same problem with the bed rails. After a little digging I came accross some hardware that Rockler sells. I'll add the link to the bottom of this post and pictures of what it looks like on their beds.
As far as the height of the bed rails, what I did (not initially but after multiple attempts) was take the thickness of my mattress and box spring which was 26", get a piece of wood or ruler or whatever you can make to the height of your mattress and box spring and just hold it up against the head board and see where you want the height of your mattress to be when its all built. Once you found that sweet spot, mount the top of your bed rail so that its flush with the top of your box spring. This is important if you are going to use a bed skirt otherwise your bed skirt will be coming up over the bed rail and will just look weird. That should solve that issue. Here is the Rockler link http://www.rockler.com/5-surface-mounted-bed-rail-brackets. Also here are some pictures of my beds and the side rails. https://imgur.com/gallery/Bbv6Y
Hope that helps
Spcschaffer
Tue, 06/19/2018 - 06:15
Frame with a box spring
I would like a way to make this bed come apart easily and noticed that some have used bed mortis brackets to mount on the out of the posts rather than on the inside with screws.. this is a great technique but by my by my calculations that would leave you an 83” in width from side rail to side rail versus the 76” that you end up with in this plan by putting the rails on the posts in the inside with screws.. I use a box spring and mattress and 2x10 as rails to hide the box spring as well.. so after lots of thinking if I mounted the rails on the front of the posts using the mortis brackets and shortened the headboard and footboard to 76” or 76.5 inches would this make up for the excess space that you get by not putting the rails on the inside of the posts? I am really needing something for a box spring to be used on this bed and the bed is easily taken apart... can you please help?
Respectfully,
Theresa
Nor
Tue, 05/28/2019 - 17:57
Thank you for updating this…
Thank you for updating this plan. It's so much easier now to follow for a standard king. Just in time too because our king mattress is on its way.
Smalltownbigdreams
Fri, 05/31/2019 - 09:41
Could you explain further…
Could you explain further how you are attaching the center legs through the panel? Are you angling the screws from the center leg into the panel?
KariAnn0929
Mon, 06/10/2019 - 12:04
I notice that we are…
I notice that we are supposed to put screws into the footboard from the front paneling and top to secure the pieces of wood. How does one go about hiding these screw holes? Would wood filler or putty work?
foster428
Mon, 09/16/2019 - 12:18
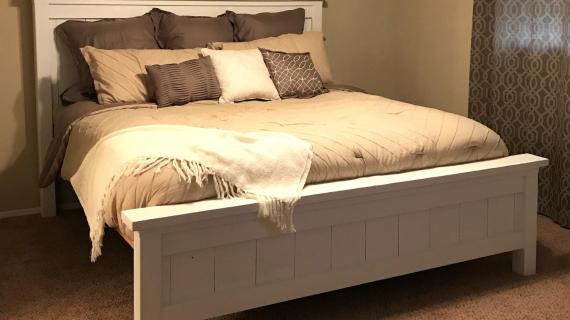
Hi. We are almost done…
Hi. We are almost done making this bed and super excited. We love the color you use in the first picture - what stains did you use/ do you have instructions on how we can make it look like this? Thank you!
rbernier09
Thu, 10/03/2019 - 10:51
Screw thread size
What size screw to use? #8 or #10? Thanks.
In reply to Screw thread size by rbernier09
Ana White
Thu, 10/03/2019 - 14:39
If you can get a #8 that…
If you can get a #8 that would be better. The #10s are so much harder to drive and tend to split wood more often.
countrylmart90…
Sun, 10/27/2019 - 08:20
stain finish
What type of stain was used to get the white washed look in original king size bed photo?
chileansurfbum
Sun, 12/15/2019 - 03:25
Box spring
Does this work with a box spring?
palletshub
Wed, 12/25/2019 - 21:56
this is a nice blog and you…
this is a nice blog and you explain very well
sxewhodey
Sun, 01/05/2020 - 10:27
One way to possibly improve a great plan?
The good: Design, shopping list, and steps are very well done.
I felt the only improvement this could use was to make the plans a bit more mobile. I am moving in a month so I went ahead and built this, but then I realized I can't assemble the three separate elements and put them together after the move. It requires screws and more of a permanent assembly instead of the common lock into place rail. I know it's not steel, but a dowel pinning system, or a fancy Interlocking joint to hold the rails would be awesome. Headboard and footboard look awesome this far though, and the only major challenge was making a King Size bed in a 10x16 shed 😁
Rosenbergderek34
Sun, 01/05/2020 - 21:25
Paint??
I’d like to build this for my wife. I was curious what paint did you use?
KaraD
Thu, 02/13/2020 - 09:26
Paint color
Anna -
I wanted to know what color stain or paint you used on this king size bed. It’s beautiful.
jusgre
Wed, 03/25/2020 - 12:01
Love it, but more 2x4s needed
We loved these plans and they produced a stunningly beautiful result.
One thing I'll add is that Casper mattresses require gaps of no more than 3 inches between the support slats, so we needed to buy a bunch more 2x4s to narrow down those gaps.
keisiming88
Mon, 05/25/2020 - 17:13
Stain Color
Hi! My fiancé just built our bed following this plan and I absolutely love it :). I was wondering if you could tell me what stain you used in the first picture on this post (not the grey but the weathered look)?
Thank you!
Texan59
Thu, 06/25/2020 - 11:49
Headboard question
Hi, great plan! I have a question,
On the headboard, does it come down far enough where pillows won't go between the mattress and bottom of the headboard?
rwildgoose
Fri, 07/10/2020 - 19:29
What color is the stain used…
What color is the stain used in the first photo? I love the gray weathered look.
jaycobkramer
Fri, 07/17/2020 - 13:51
Paint or strain color
I love the design. I have the lumber in the garage and about to put it into motion. One question about color: What paint or stain did you use in the initial picture. It's the distressed off white color with black or brown coming through the off white color?
awcahoon
Sat, 08/08/2020 - 09:29
Pocket Holes or Not?
I want to build this bed and I'm trying to figure out if I should go with pocket holes vs no pocket holes. Any thoughts about that? I have the pocket hole jig and I get that it's easier to build without them. I assume that there are visible screwheads with this plan and wondering if the bed looks better without them. Any other considerations?
NyRangers34
Mon, 09/14/2020 - 07:57
Cove molding?
Does anyone have pictures of this plan with cove molding inside the panels and under the 2x6's? Thinking of adding a tiny bit of detail.
Redskins1
Sun, 09/20/2020 - 16:28
What is the finish/stain on…
What is the finish/stain on the bed in this photograph? Built it this weekend and want to copy what you have! LOVE it!!! Thank you!
MrWiggles
Mon, 09/28/2020 - 07:44
Just built this bed - thanks…
Just built this bed - thanks so much, Ana, your directions made it easy. I had to alter the plans for a 10" thick foam king mattress but all I had to do was lengthen the headboard slats and cleats by 2 inches, or there would be a big gap between mattress and headboard. Also for the center legs I used pocket holes to attach to the footboard - I didn't want to use screws through the footboard, keep it clean. This site rocks!
Justify
Tue, 09/29/2020 - 07:39
It's a useful idea.
It's a useful idea.
NyRangers34
Fri, 10/02/2020 - 18:27
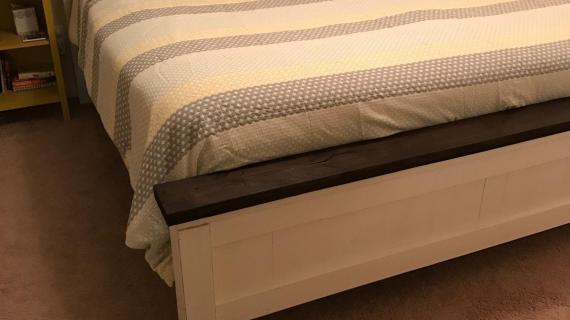
Mods for 5" box spring
Great plans. Changed some specs to fit a 5" box spring and rails 8" off the floor. Also adjusted the rail and support length to give some space for comforter and quilt to tuck between footboard and mattress. and instead of screwing through the footboard panels into the two by four middle supports, use 2x2s at the same level as the side cleats on the footboard for the side supports and toenail or toe screw into those.
spencemj
Mon, 10/12/2020 - 14:08
What is the paint style on…
What is the paint style on the bed at the top picture?