
We couldn't find a mid-height, double loft bed for our daughter that we liked that wasn't ridiculously expensive, so we decided to build one ourselves! I found some awesome plans on this website and played around with a few until I created exactly what we wanted. I mostly used the Full Size Farmhouse Bed plan but also used some aspects from the loft bed plan for the guardrails and the bottom rails. Then we went out and bought the wood and started building! This is really the first thing that I have ever built (my husband has never built anything either) and it turned out so well. I think it is gorgeous and I am so proud of it! This is my first brag post so forgive me if I am doing it wrong! Lots of instructions on how I built it below, so scroll down if you just want to see the pictures.
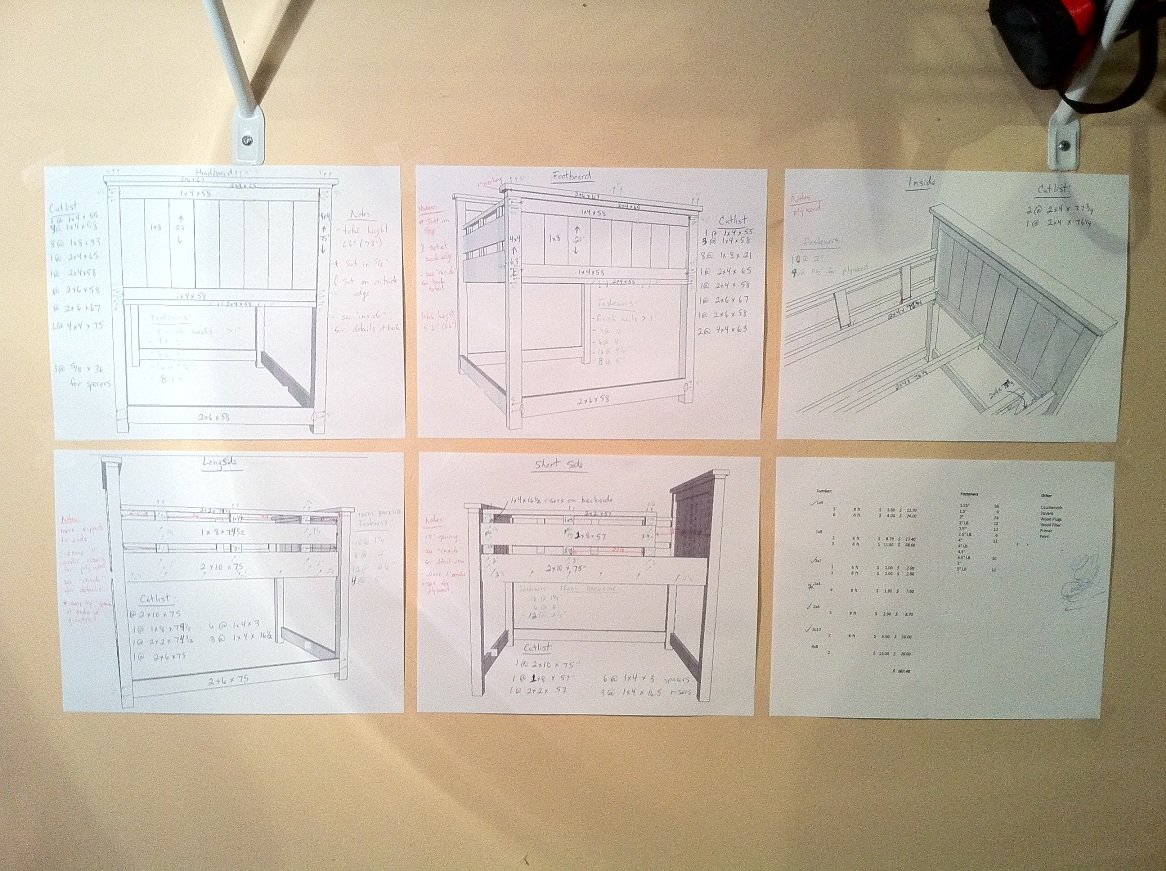
I used Google Sketch-Up to build the bed first and to tweak the plans. Below I will explain some of the changes that I made.
- I actually did not trim anything off of the ends of the head board or foot board as shown in the Full sized bed plans. I just built the bed to be as wide as 8 x 1x8s and adjusted the plan accordingly. I figured that if I had to climb up there to change the sheets, the extra room around the mattress would be appreciated. The 1x8s that I used were 7 1/4" wide.
- I bolted a 2x4 to the 4x4 posts right under the foot board and headboard panels for the side rail supports to sit on. I wanted it to be extra strong as the bed was going to be up high and I figured the bed would take a lot of abuse from the kids.
- The siderails were made from a 2x10 glued and screwed to a 2x4. The 2x4 sits on top of the 2x4s at the bottom of the headboard and footboard panels and is screwed into the 4x4 posts. The 2x10s are also screwed into the 4x4 posts.
- Since the mattress would be sitting up higher on the headboard and footboard than in the original plans, I added 3" to the length of the 1x8s used in the panels.
- I had planned to make a slatted base out of 1x4s to support the mattress so I also placed 2 x 2x4s on edge lengthwise down the middle of the bed to support the slats. Those 2x4s are also supported on top of the 2x4s at the bottom of the head and foot boards. The inexpensive 1x4s here are very rough on the one side which I did not want touching the mattress or for the kids to get splinters from while playing under the bed. The nice ones were super expensive at around $18 for a 14' board. It turned out to be less expensive and much less work to buy a queen sized slatted bed base from the big Blue and Yellow inexpensive furniture store here and trim the ends of the boards to length with my mitre saw. n even bigger bonus is that the wood is already finished and didn't require anything further than screwing it down to the supports.
- I made the height of the area under the bed 45" (just tall enough for DD to stand under for now) and adjusted the length of the 4x4 posts accordingly.
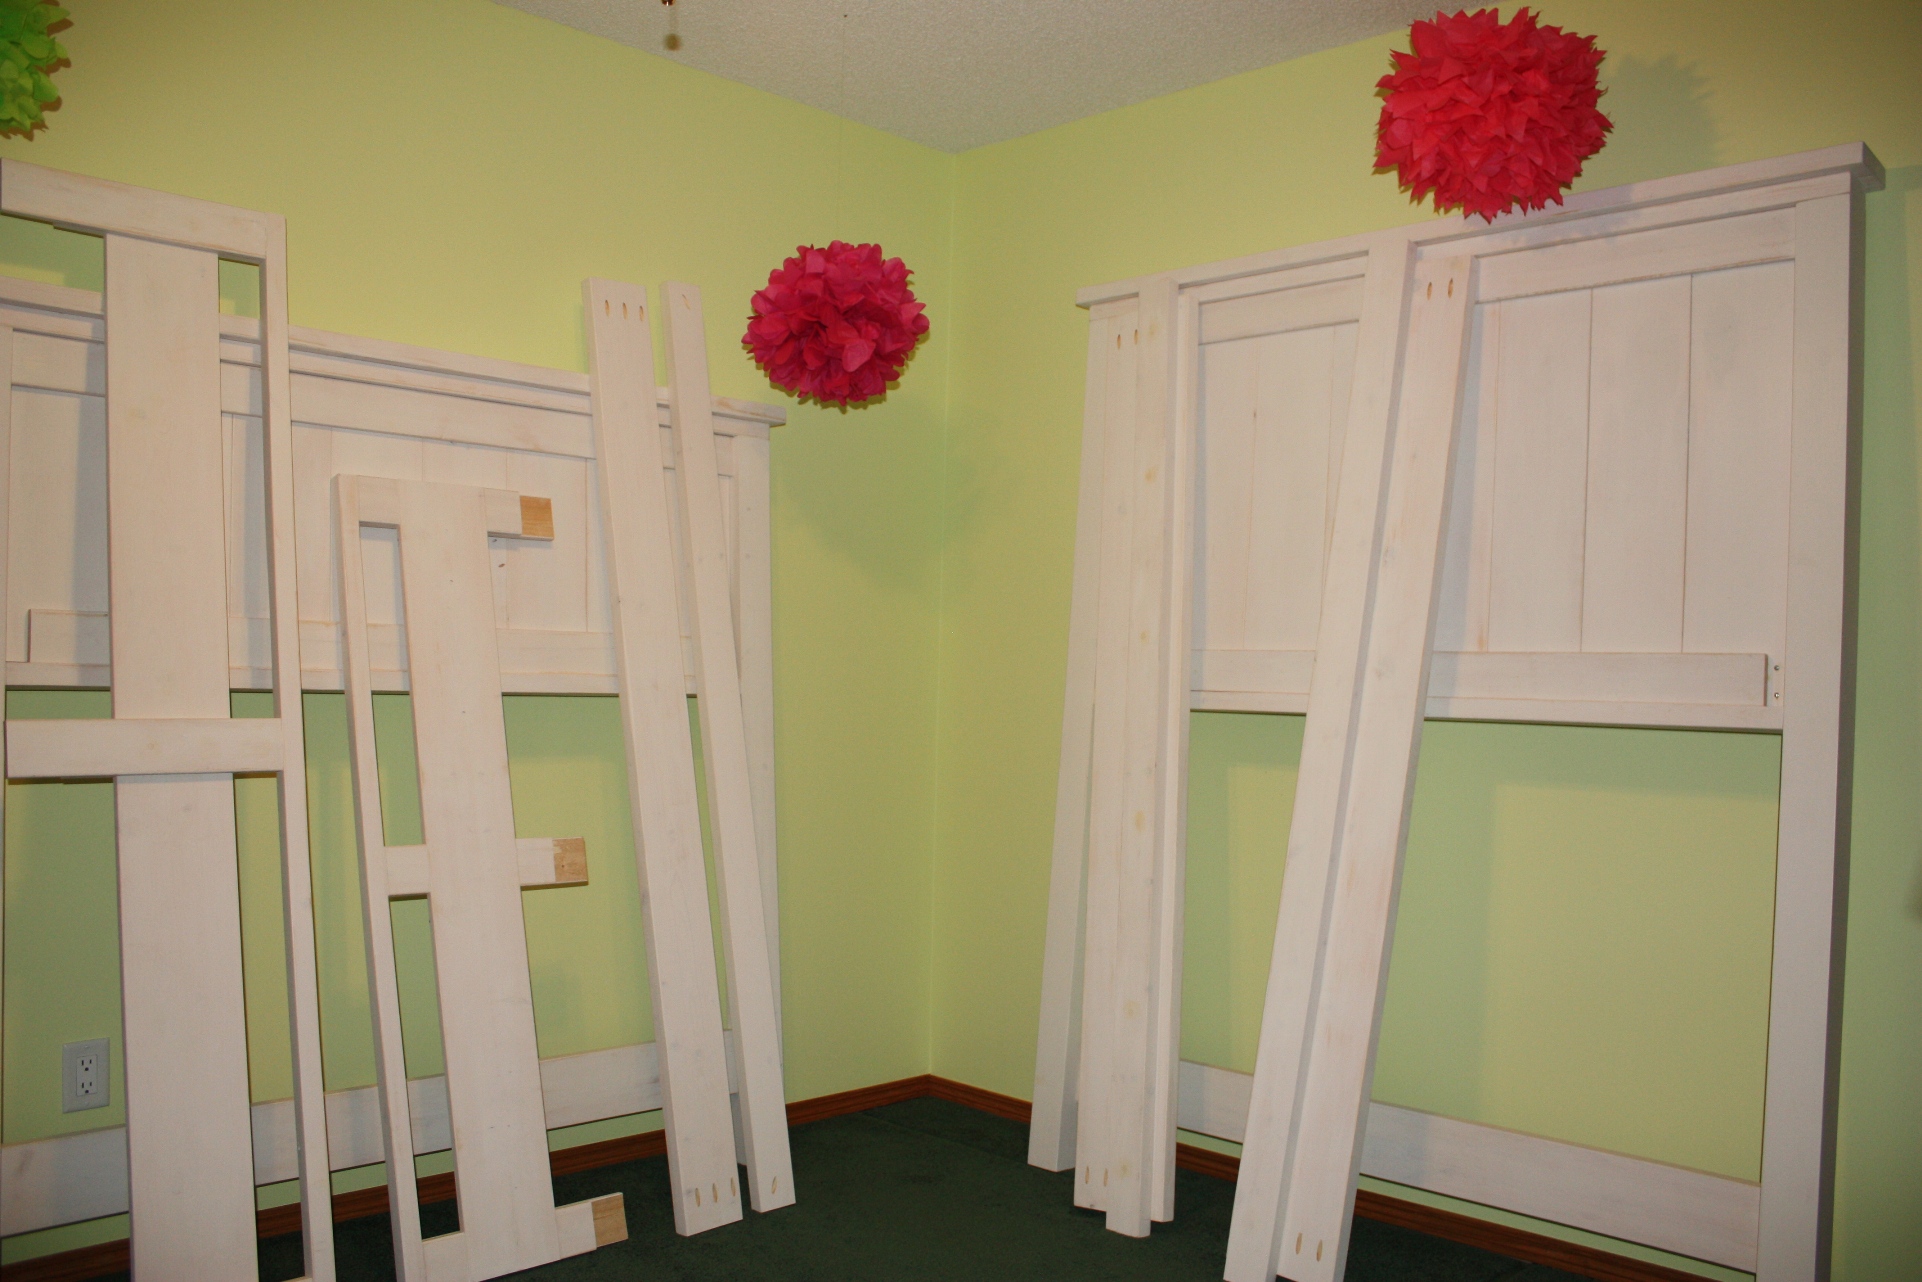
- I assembled the bed into different large pieces before bringing it inside. The headboard and footboard are 2 solid sections that cannot be taken apart. The side pieces are made to be able to come off if we ever need to move the bed.
- I couldn't find any really good instructions anywhere on how to build a ladder or to change ladder plans to suit our needs so I built it after the bed was built. I found it easier to envision this way and to figure out the angles. I build the ladder out of 2x3s.
I have the Google Sketch-Up plans for the bed (minus the ladder) if anyone is interested, but as I said before, I am not an experienced builder so I do not think I should post them here. Maybe someone can use them as a base to create their own plan with though. I found Sketch-up to be a very valuable tool as I actually "built" the bed virtually before ever touching the wood. It helped me figure out what order to put things together in and also allowed me to perfect my design before making any cuts. It still took many trips to and discussions with people at my local Orange store to figure out what kind of fasteners to use and where to use each type. I brought printouts of my plans so that they would be able to help me better.
A couple of finishing touches that I did:
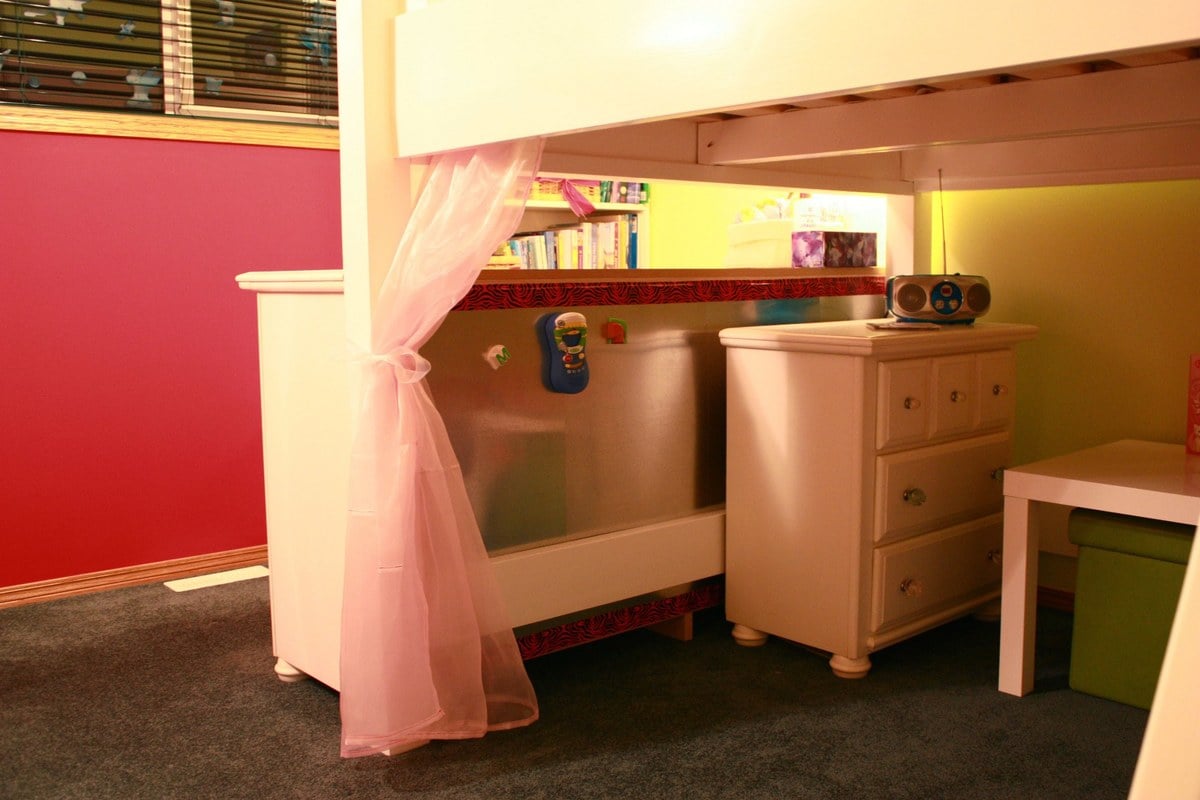
- I sewed some pretty curtains and hung them from aircraft cable and eye hooks under the bed.
- The back of her dresser was exposed under the bed and did not look very nice so I created a magnetic wall by screwing some inexpensive metal sheets meant for ducts to the back of it. I have temporarily covered all of the exposed edges with pink patterned duct tape but plan to trim it out at some point.
Hope you like it!
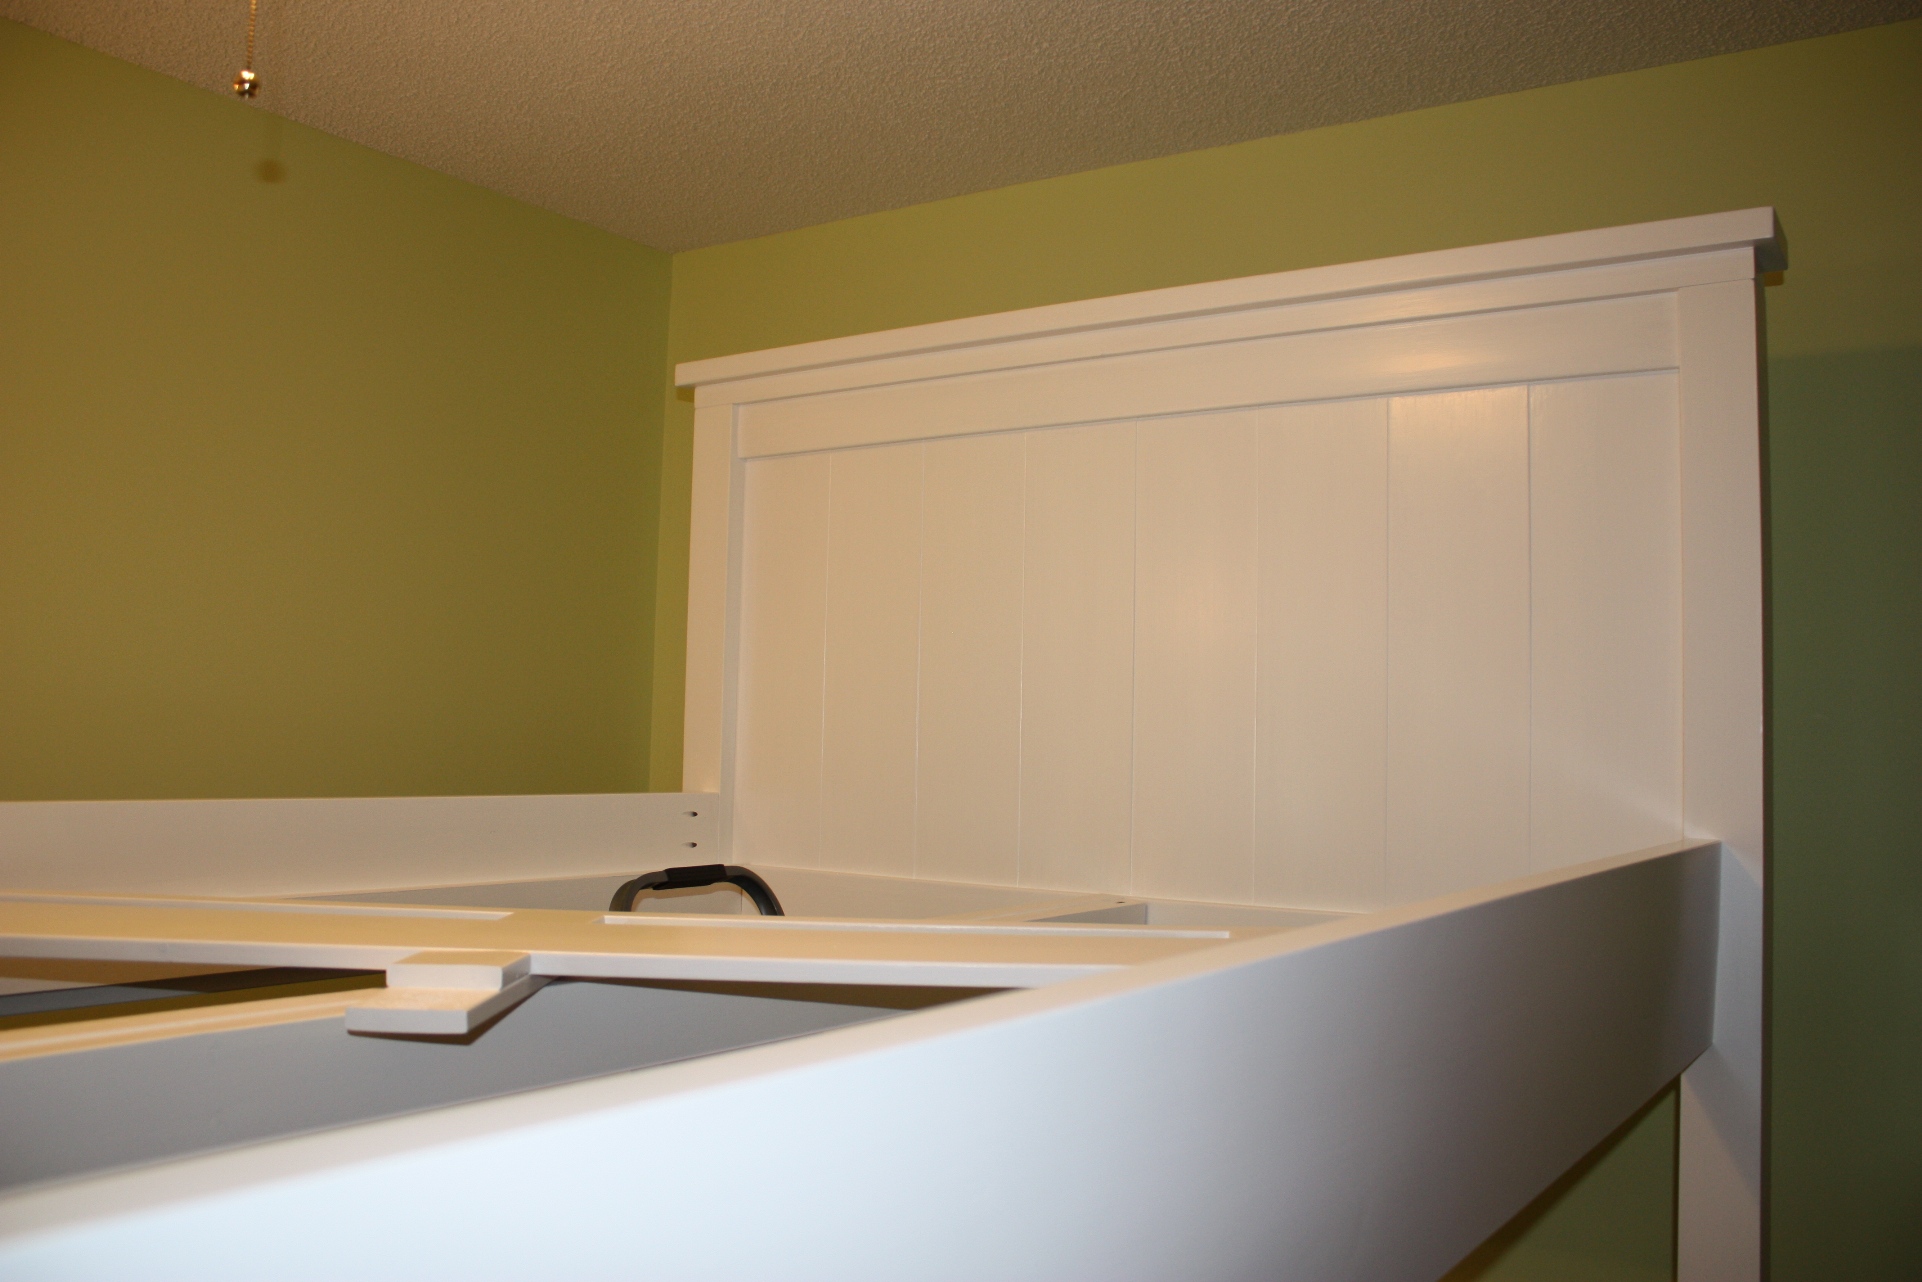

After the bed was assembled, I put the first coat of paint on the back of the headboard (to test it out where no one will see), I found I didn't like how the paint was sitting in the gaps and seams so we went around the entire bed and used Dap Alex Paintable Caulk to fill them in. We didn't fill the gaps in entirely as we wanted to keep the texture, we just filled them in enough so that the paint would sit on top of the Dap instead of flowing right through in some places. Then I painted the entire bed. I left the side guardrails off and painted them separately before installing.
The paint used was Benjamin Moore's Advance in Pearl finish. The colour is a warmish white called Polar Bear. BM's Advance paint is a water-borne alkyd paint so (from what I was told) it acts like an oil paint but cleans up like a latex paint. I do not have any experience painting with oil-based paints. I originally tried to roll the paint on with a foam roller as advised at the paint store but I did not like how the finish looked. Again, it was just the first coat on the back of the headboard that no one will see. It left lots of tiny little bubbles in the paint. I eventually settled on rolling the paint on with a microfibre roller and then brushing it out with a natural bristle brush. You can see still the brush strokes, but they are fairly subtle and I actually like how they look. It only took two coats and I love how the finish looks. Painting with this paint probably took a little longer than if I had used another type of paint as you need at least 16 hours between coats and then 3-5 days for it to cure. Hopefully it turns out to be as durable as advertised and it was worth it. It was also quite pricey at $70/gallon here in Alberta but I only used just over half of the can so I will be able to use the rest for the next project.
Comments
benzo7310
Sun, 01/05/2014 - 15:07
Plans Please
I hope you are still reviewing this site, as I am in LOVE with this bed and would love for you to share the plans with me.
Thanks! Jennifer
[email protected]
rhrichardson
Mon, 03/03/2014 - 02:02
Plans Please!
Would you mind sending me these plans? rhrichardson @ yahoo . com
Thank you!
siuvinson
Thu, 03/06/2014 - 12:42
plans request
Could you please send me your plans? Email is: [email protected]
Thanks!
roastedbuffalo
Fri, 04/25/2014 - 07:33
Great Looking Bed
I would love to have the Google Sketch file. Please send it to [email protected].
allicat544
Thu, 05/15/2014 - 10:06
Beautiful work! May I have the plans too?
I would love to see a copy of the plans too, if you wouldn't mind sharing! I'm having the same problems finding a loft bed for my daughter's room. My e-mail is [email protected]
Anuyk
Sun, 06/08/2014 - 06:39
request for google sketch up
Thanks for sharing your awesome plan
would like to get copy of sketch up (anuyk at hotmail.com)
Thanks
3deacs
Fri, 07/04/2014 - 13:05
This is amazing!
My girls would absolutely LOVE this bed! Would you mind sending the plans to me at [email protected]
Thanks so much!
Well done!!!
J_Jones
Fri, 07/04/2014 - 23:09
Love this loft bed!
Can you please send me the plans too - [email protected]
Thank you!
miriam2014
Tue, 09/02/2014 - 16:42
Can you email this plan?
My email is [email protected]. Any advice on lengthening supports for the lofts?
Thank you!
NceLea
Sat, 09/20/2014 - 20:52
In OZ, mid-low beds are VERY scarce and extremely pricey!!
After trying to find a mil-low bed I am finding it hard to find a mid-low bed for my daughter's small box size room. Then I came across your posting. Could you please send the plans to [email protected].
Kind Regards
Ncelea
Carly Diaz
Wed, 10/01/2014 - 08:52
Loft Bed
Could I please get a copy of these plans?! This bed is perfect. Thank you.
[email protected]
klmoore93
Mon, 10/06/2014 - 06:21
plans please
I was planning on building the loft bed for my daughter and then I saw your picture and I fell in love with it! Can you please send me your plans? I hope mine turns our as well as yours! [email protected]
brparlier
Thu, 10/16/2014 - 19:20
Oh please, please, please......
I had already decided on a plan and made the modifications to it when I found the bed that you made. Out the window!!! I'd appreciate it so much if you could email me your plans at [email protected]. Thanks for sharing your wonderful work - this will be my first big project, too!
mikebabb
Tue, 11/04/2014 - 19:20
Copy of Plans
I've spent many hours looking for a loft bed like this. Can you email me the Sketchup plans to [email protected]?
Thanks,
rookiedave
Fri, 11/28/2014 - 15:07
beautiful
I know this is an old post but this bed beautiful. Would you happen to still have the plans? Can you send them to me?
carlye_hopkins
Mon, 01/26/2015 - 08:26
plans
did you ever get the plans sent to you??
amycvs
Thu, 01/22/2015 - 08:22
Copy of Plans
I love this bed! Can you please send a copy of plans to [email protected]? Thanks!
carlye_hopkins
Mon, 01/26/2015 - 08:25
Plans
I have been looking for a farmhouse loft bed plan for months now.. I would absolutely love to have these plans. [email protected]
bozig
Tue, 01/27/2015 - 21:34
Farmhouse Loft Bed for Double Mattress
Can you please send me your plans and cut list for the Farmhouse Loft Bed for Double?
bozig
Tue, 01/27/2015 - 21:36
Farmhouse loft bed for Double Mattress
Email to [email protected]
Roomdiva
Sat, 01/31/2015 - 08:19
Mid loft bed
This is awesome. It is what I have been searching for. Could you email me the plans? Thank you. [email protected]
gina10151
Tue, 05/19/2015 - 00:39
plans
HI, This will be my first time building anything as it was with you. I know I may be crazy I don't even know what google sketchup is but could you please send me the plans for this as well? I will never be able to figure it out on my own.. My boys love this bed and are determined I will build one for each of them.. Not sure if you have the plans in anything but google sketchup but if not. I will attempt to learn it.
Email is [email protected]
chesch
Thu, 06/25/2015 - 09:19
plan request
This looks beautiful, can you post the plans? (I have google sketchup as well)
MSBEFF
Wed, 07/22/2015 - 18:37
Plan request
I am ready to tackle this project, could you please email the plans to [email protected]
Thanks,
Beth
MSBEFF
Wed, 07/22/2015 - 18:37
Plan request
I am ready to tackle this project, could you please email the plans to [email protected]
Thanks,
Beth
MSBEFF
Wed, 07/22/2015 - 18:38
Plan request
I am ready to tackle this project, could you please email the plans to [email protected]
Thanks,
Beth
joshhirst13
Mon, 05/16/2016 - 14:35
Loft Bed Plans
Hi my wife and I really like this loft bed and would like to build it for our daughter. Could you please email me the plans. I would really appreciate it.
Thanks,
Josh
[email protected]
Juliette1373
Fri, 08/11/2017 - 13:54
plans
does anyone still have those plans on sketchup? i just found it and it's gorgeous, I would love to build this for my son. If you have the plans from Dirtsquirt I would love to have them. Here is my email
[email protected]
Mamabetts
Fri, 12/29/2017 - 10:26
Plans
I love your modified version, could you share your plans with me please?
Juniperlily217
Tue, 09/11/2018 - 06:59
Plans
If anyone has these plans, could you please message me so that I can provide my email address privately and get emailed a copy? Thank you so much!!!!
murphys_law
Wed, 04/29/2020 - 21:38
Plans for loft bed
Does anyone have the plans to this bed? I’ve tried to piece it together but would like a reference to compare it to.
Saldo
Tue, 09/21/2021 - 14:51
Plans Please
Could I please have the plans - [email protected]