Reclaimed Wood Round Coffee Table
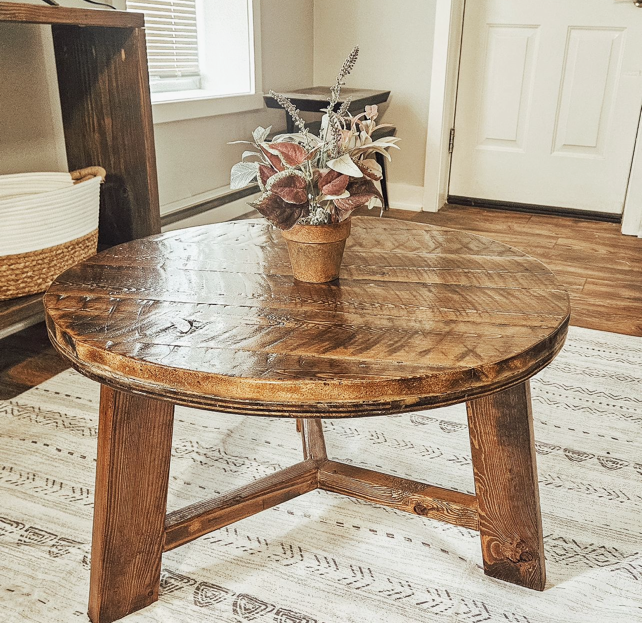
Rustic Round Wood Coffee Table by Three Tulips Woodshop on Instagram
Built from Plan(s)
Rustic Round Wood Coffee Table by Three Tulips Woodshop on Instagram
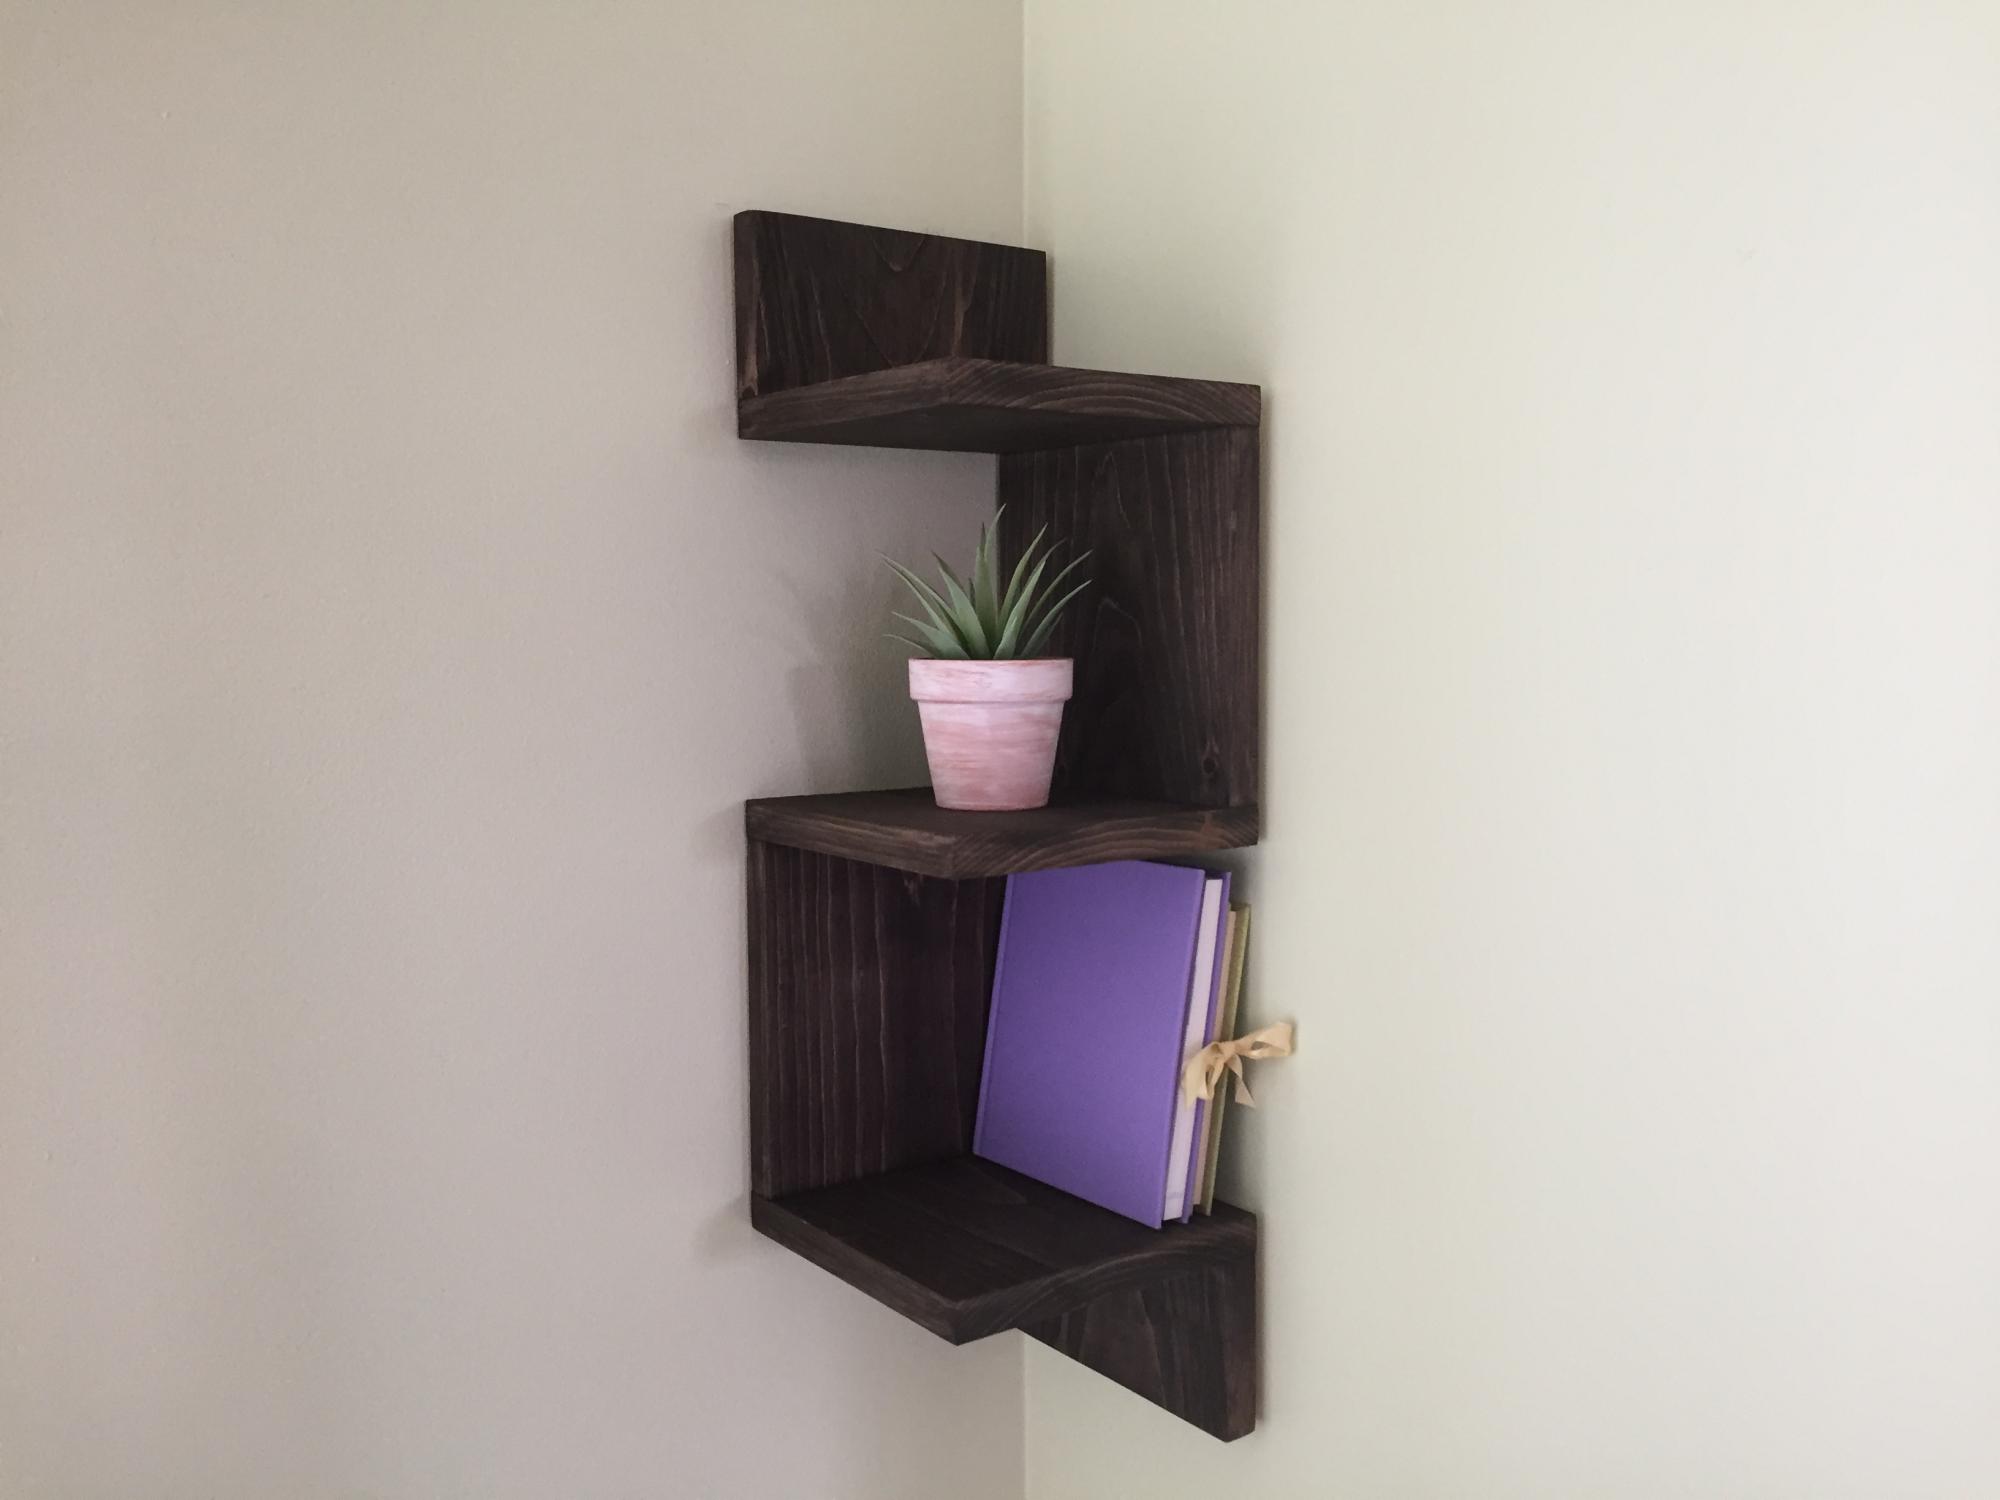
I built these beautiful corner shelves for a friend. It is a great beginner project. I used a 1x8 board but you could also use a 1x10 board. You could also build 5 shelves instead of 3. I used pocket hole joinery.
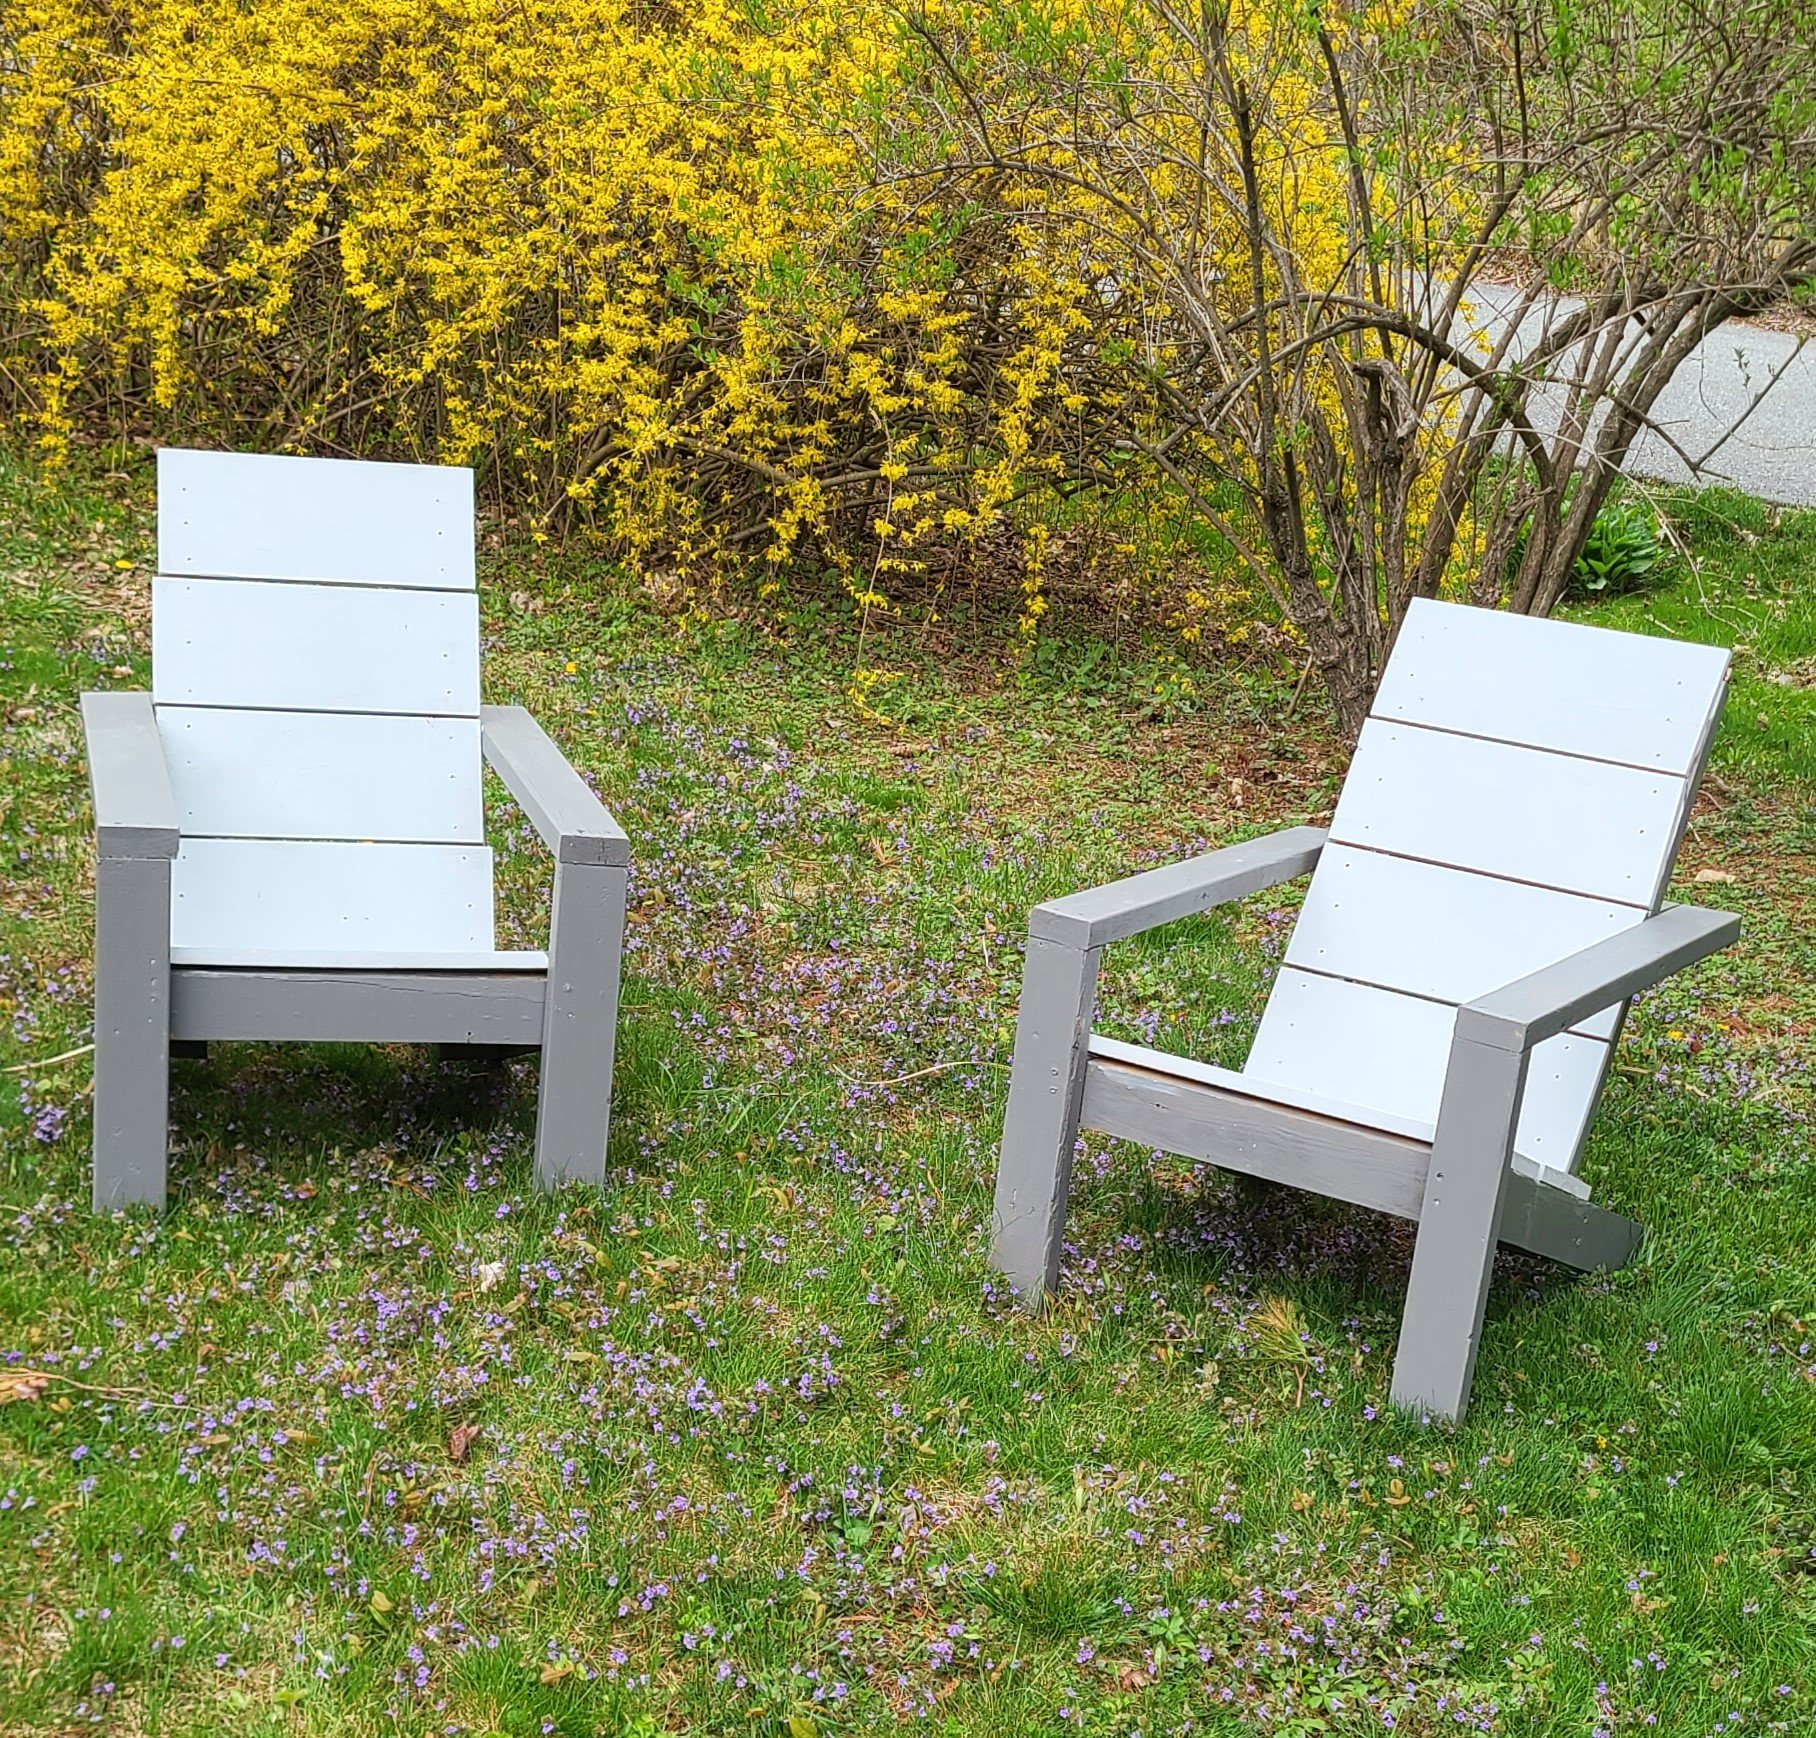
I made these two Adirondack chairs. I decided to put a deck stain on them (Cape Cod Gray and Pewter)
Greg Porpora
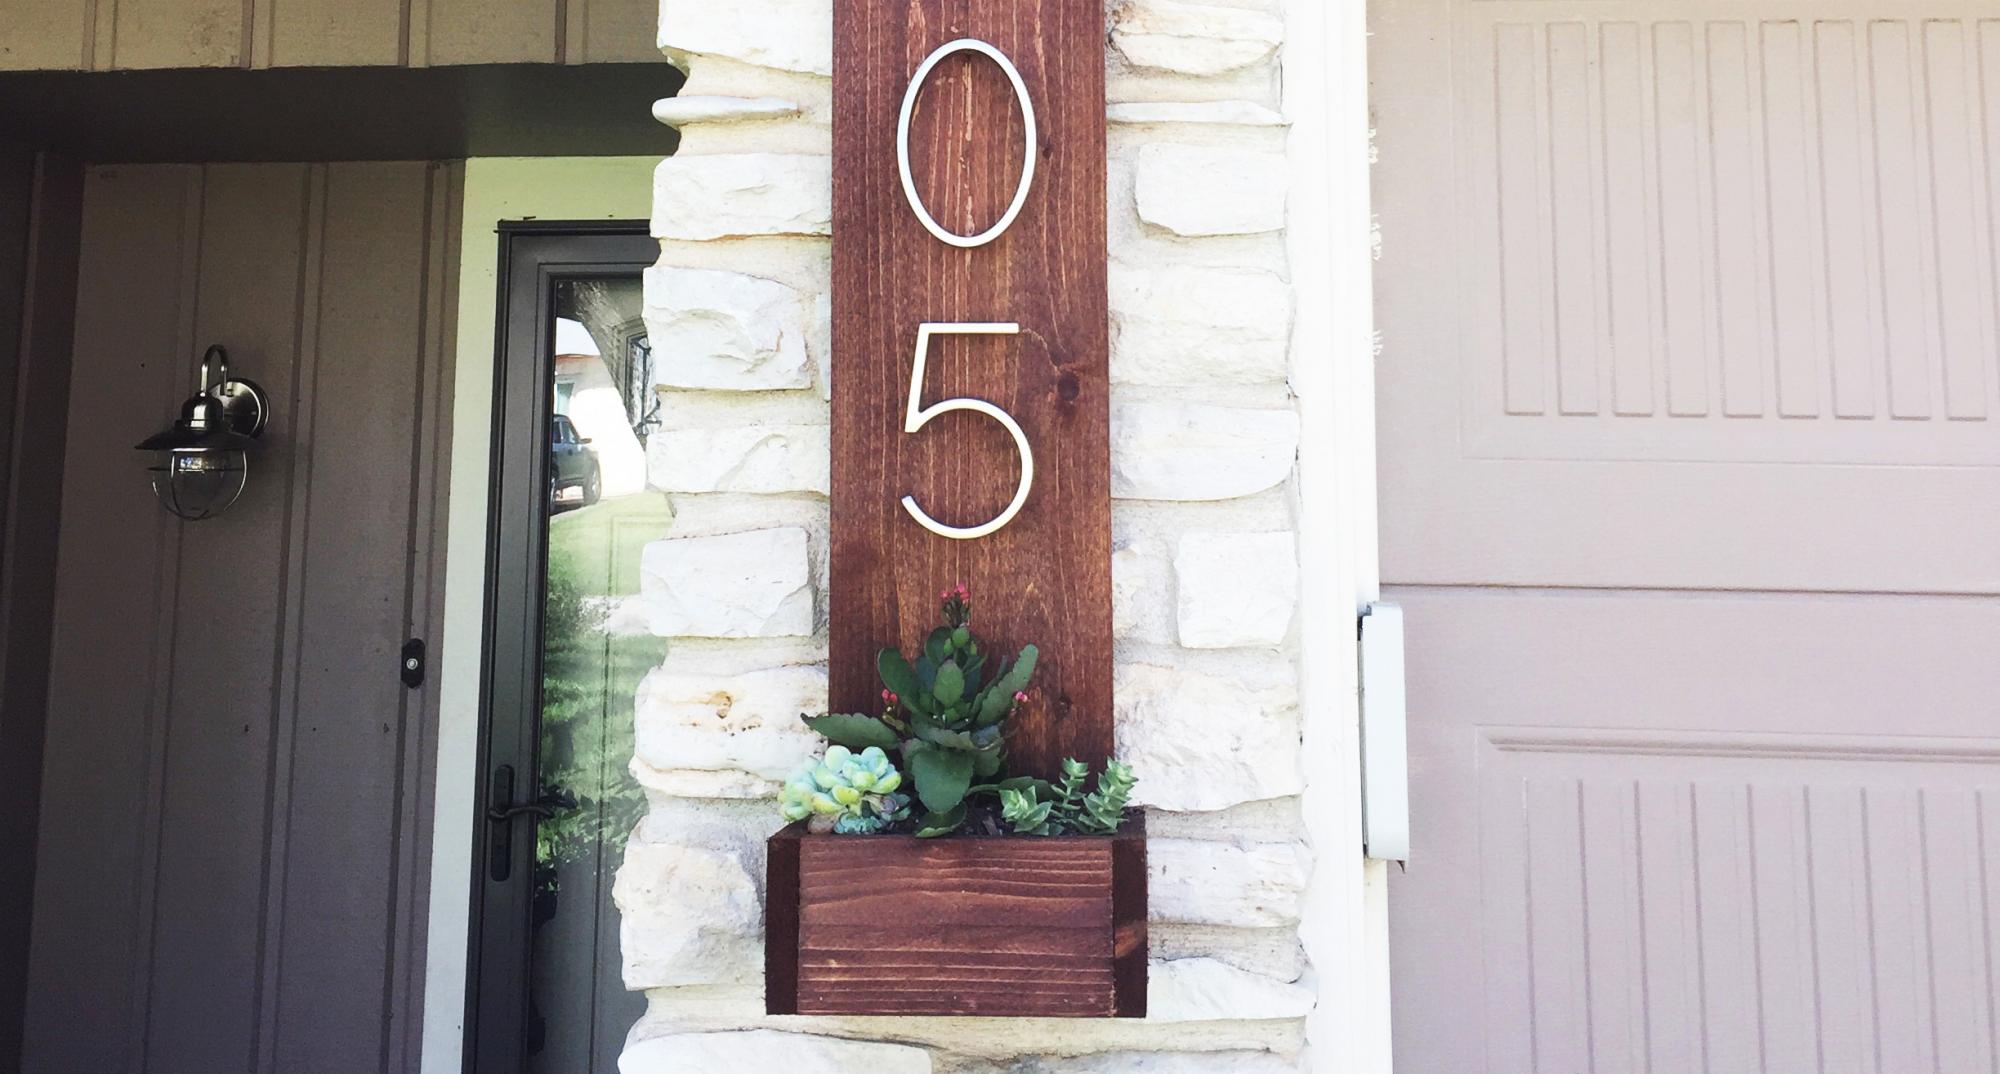
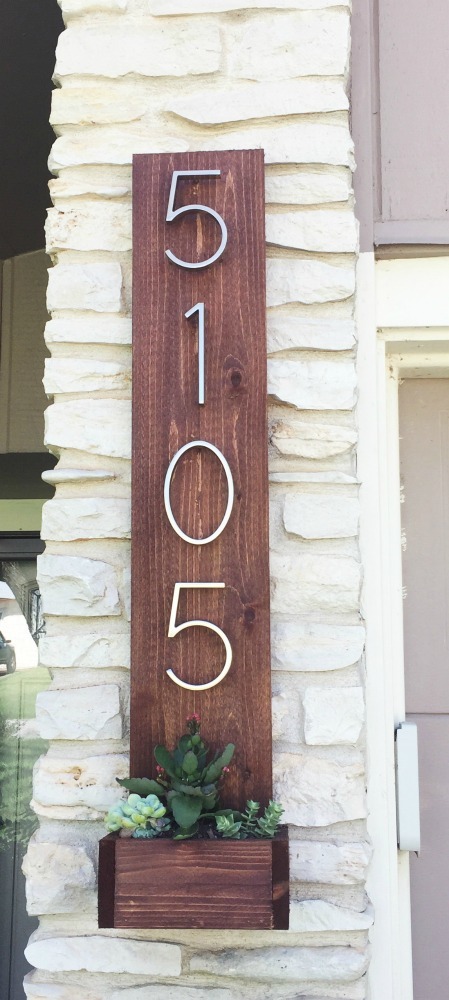
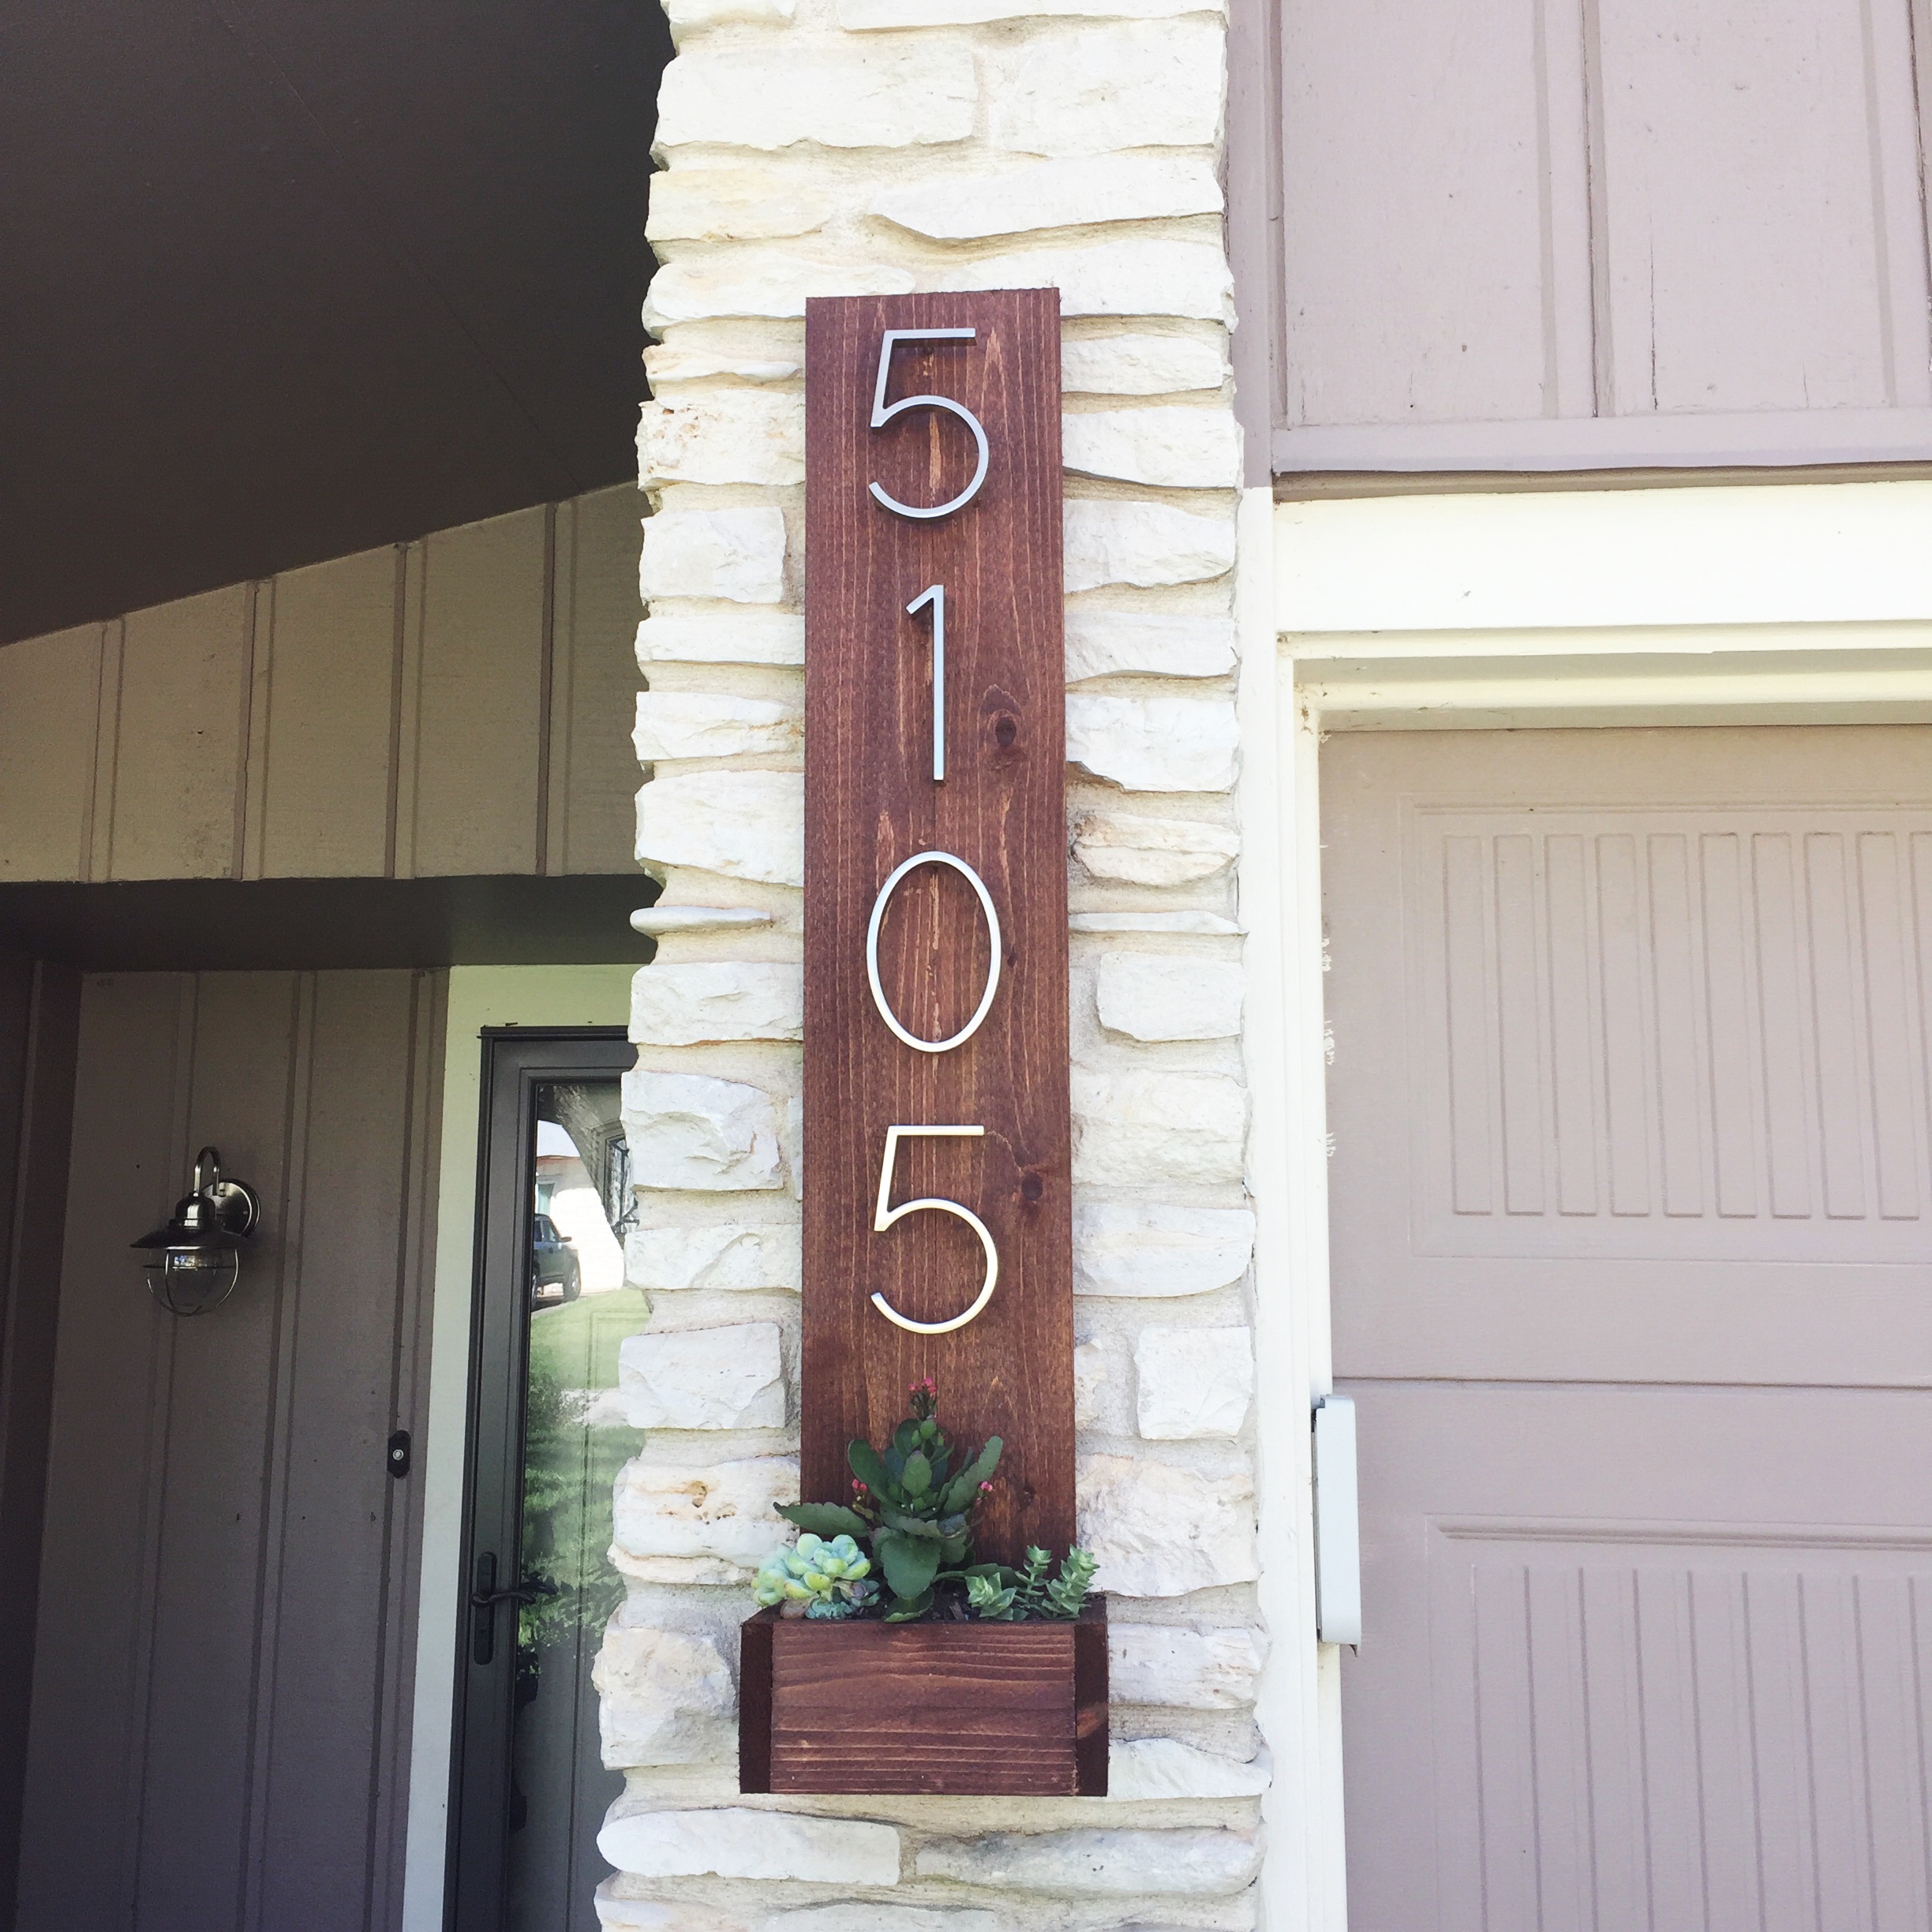
I was looking for a way to give our house some better curb appeal and decided our stree numbers could use a facelift. The majority of money spent on this project was for the numbers since I had enough spare cedar laying around.
In reply to Numbers by jesseamber
Mon, 10/10/2016 - 09:02
I got them from Home Depot. I think you can also probably find them online through Amazon.
In reply to Numbers by jesseamber
Mon, 10/10/2016 - 09:03
I got the numbers at Home Depot. I'm pretty sure you can also find them online through Amazon.
Mon, 10/24/2016 - 15:34
So pretty! What are the measurements. Did you use real plants ?
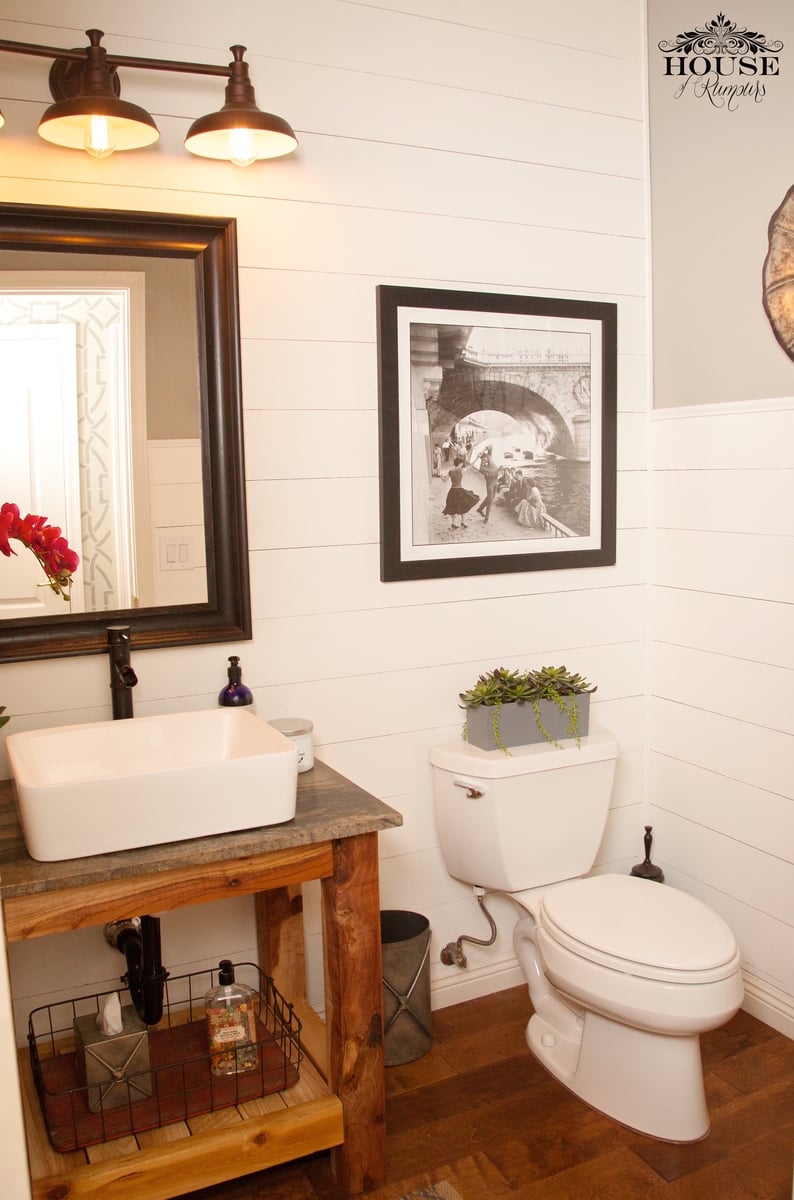
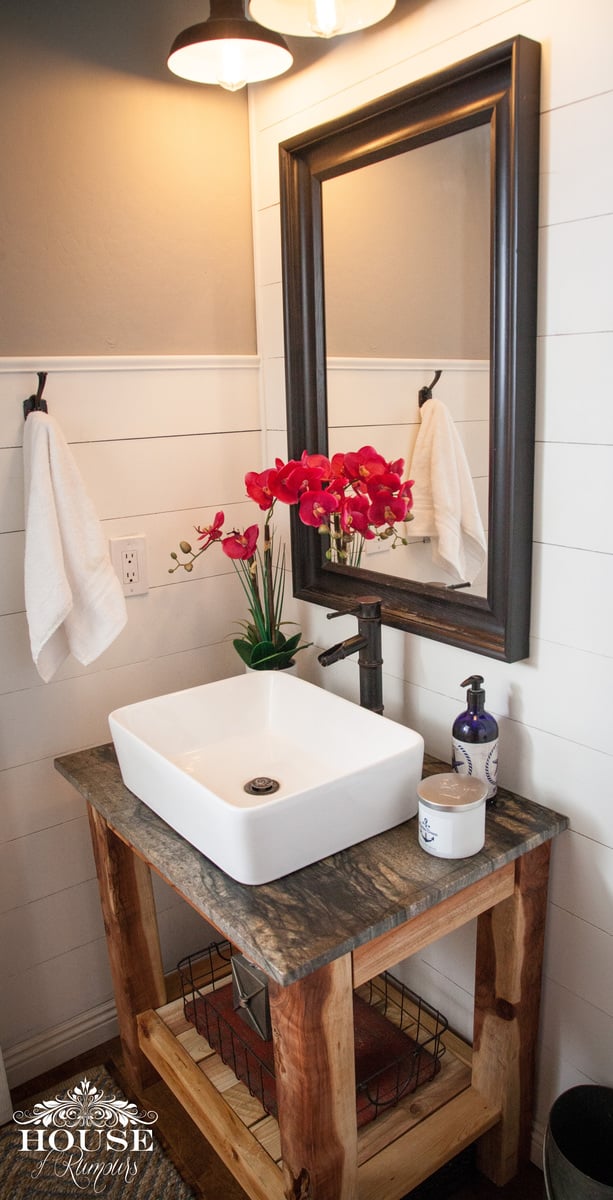
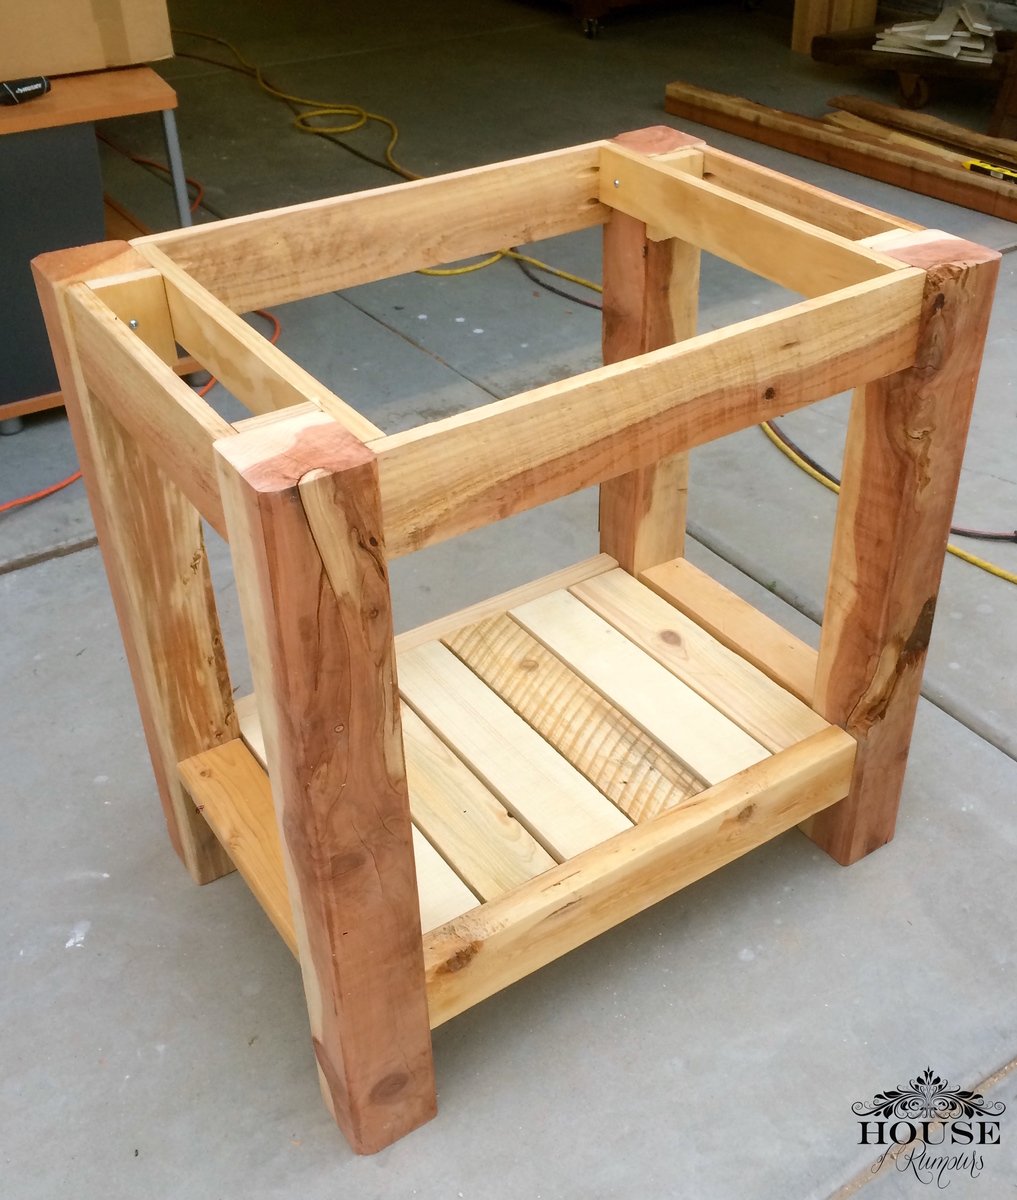
It had come time to renovate our powder room bathroom. We were on a tight budget so we decided to build our own vanity & add a little twist to it! We splurged on the granite countertop, vessel sink and faucet. Thanks to Ana White we built our vanity for less than $10! The plans were easy to follow . . . .we are so proud of our wood vanity! link to our blog: http://www.houseofrumours.com/shiplap-powder-room-diy-vanity/
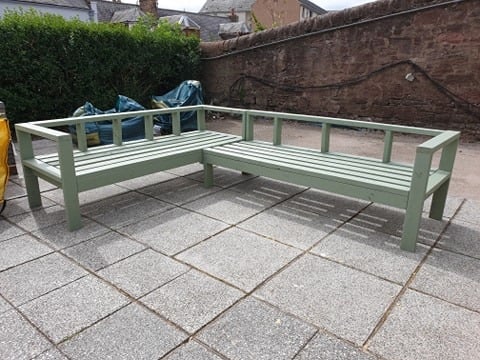
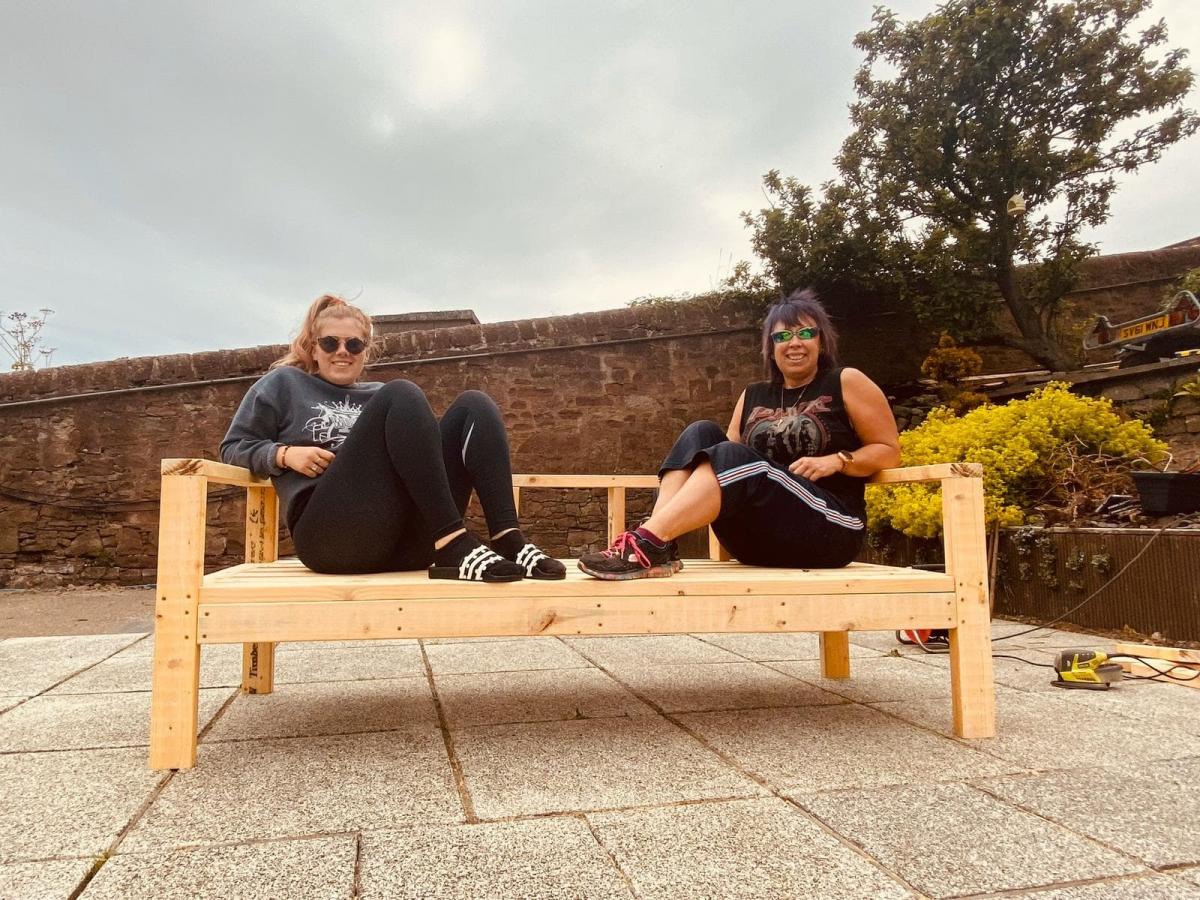
Ana, First time I have every attempted any kind of woodwork/building furniture other than building Ikea stuff. The plans were very easy to follow and now I want a chop saw for xmas. I roped my daughter in to help me and we completed the project in 2 days. Husband was totally blow away by our achievement. I love it and feel accomplished. Away to work on the table and further benches/seating over the next few weeks. Pauline
This was the second building project I've ever completed. I had to make a few adjustments to make it fit the size of ray's closet, but it was totally worth it. most of the work was in the measuring, sanding, and sealing of the wood. Ftting the frames can be a little tricky if your planks aren't perfectly straight. Otherwise, this project was pretty straight forward and can be done in just a few days depending on how much time you have to dedicate to it. Thanks Ana!
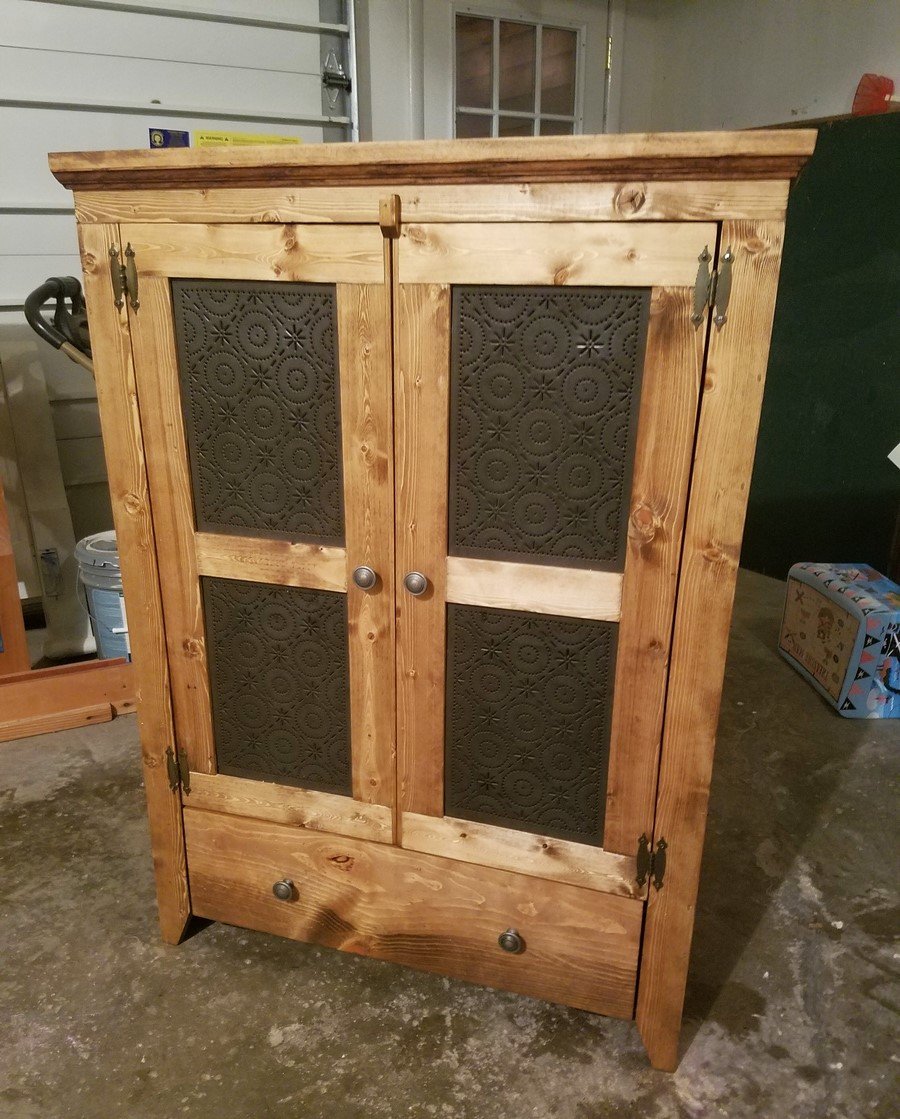
This project was built for my mother as christmas gift. Very easy to do, I based it off of Patrick's jelly cupboard plans and ana whites pie Chest idea. I modified mine to allow for a drawer/door at the bottom.
http://www.ana-white.com/2015/10/DIY_furniture/pie-safe
http://www.ana-white.com/2011/12/plans/patrick039s-jelly-cupbard
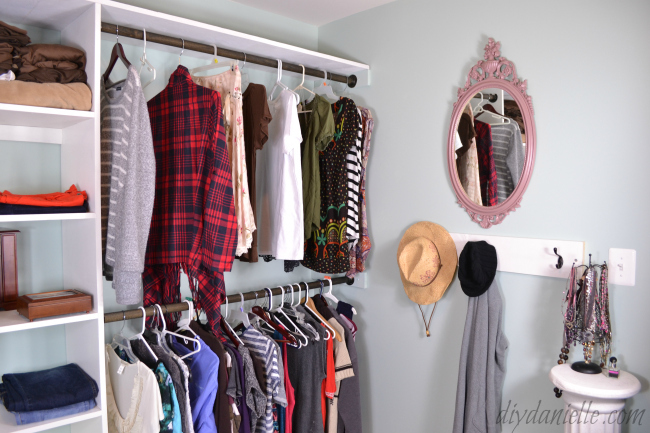
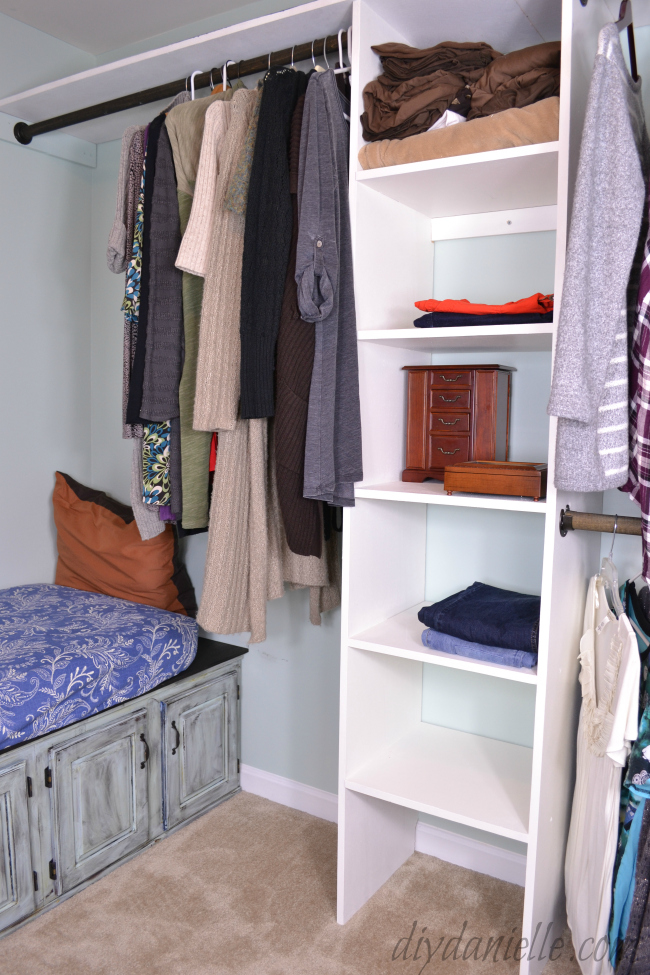
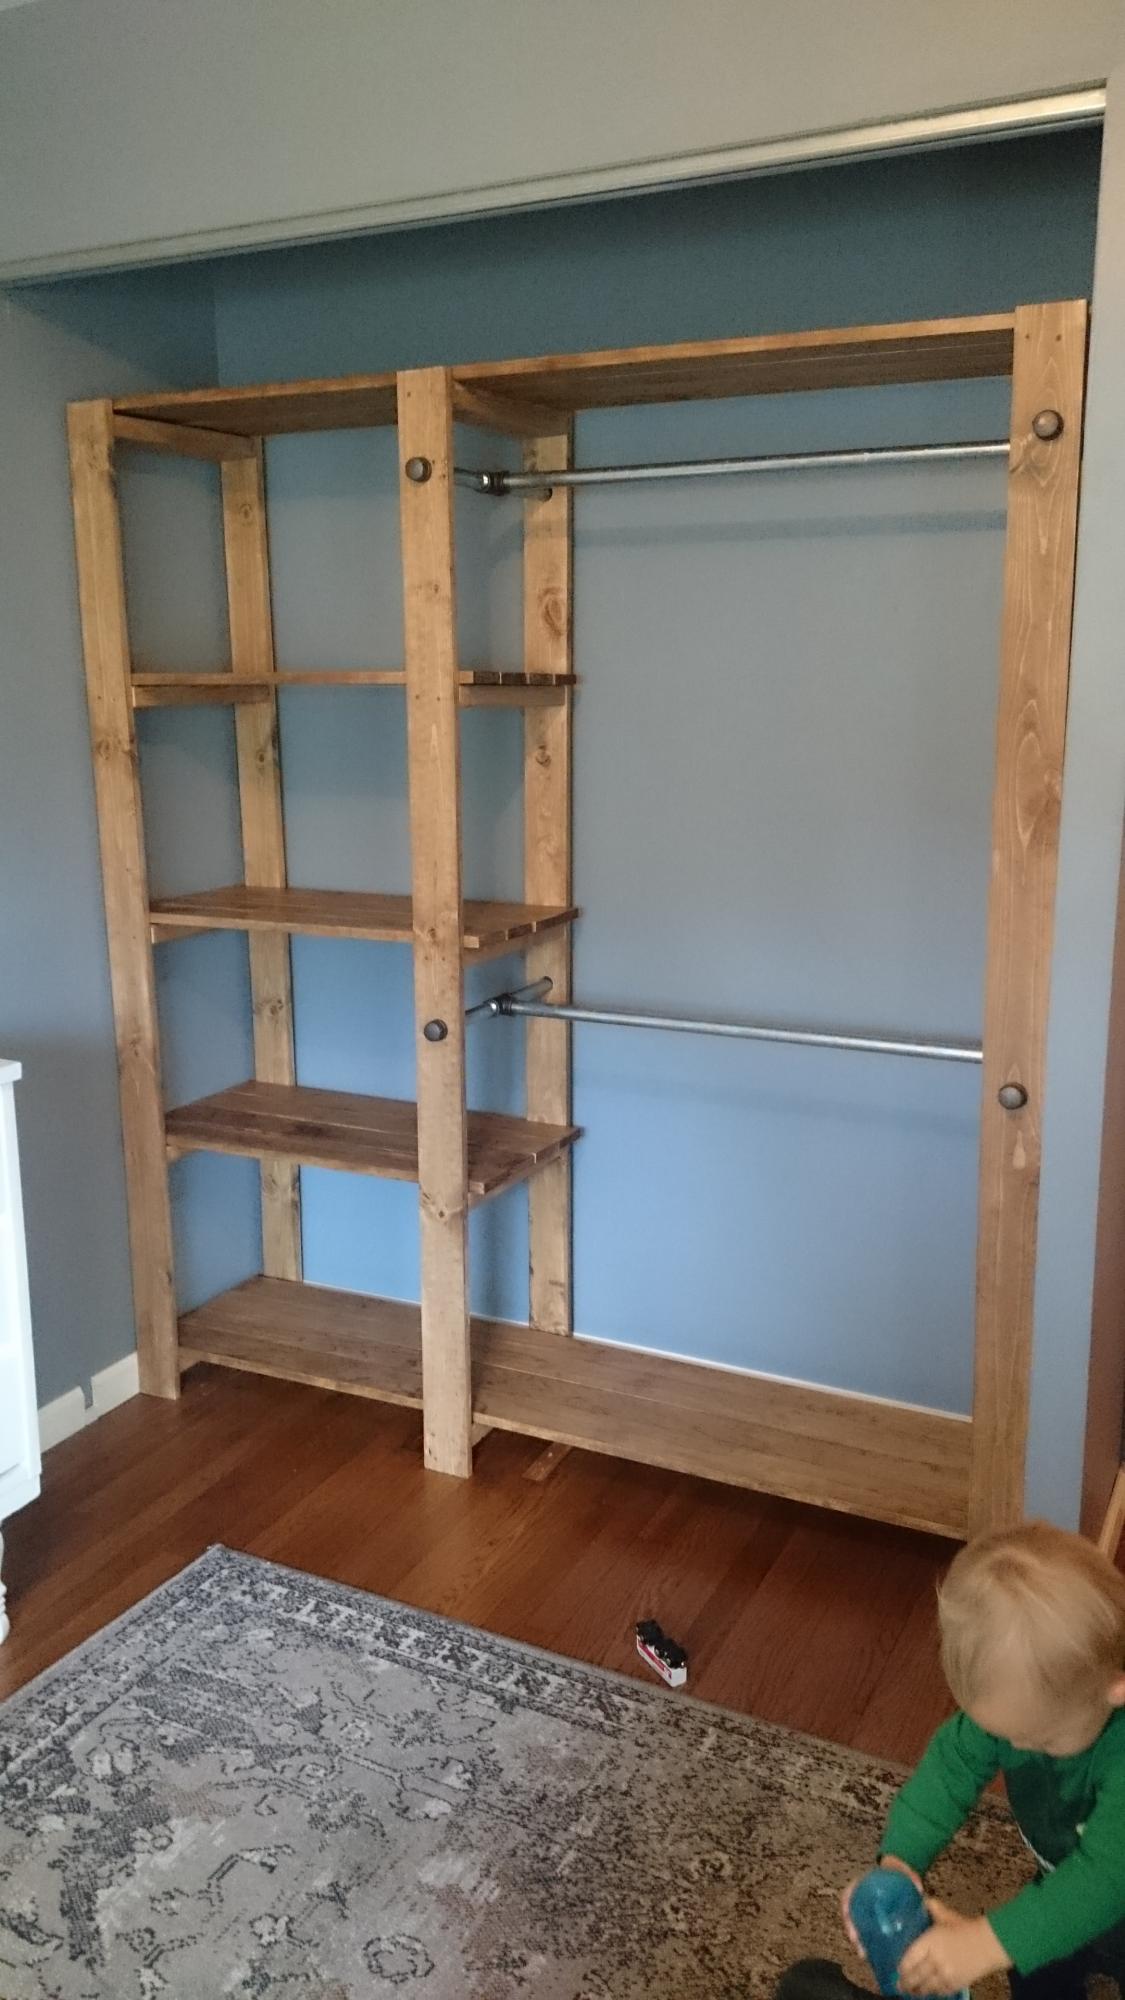
We used the plan about using one sheet of plywood to make a closet organizer (http://www.ana-white.com/2013/03/plans/closet-organizer-one-sheet-plywo…) to make several shelves for our master closet.
We added a seating area with hidden storage, using an upcycled crib mattress for the seat (instead of buying new materials to make a seat cushion).
We added multiple wood dowels for the rods across. There is wood across the top of the whole closet system so we can store things up above.
This project added a lot of extra storage for us and we're so happy with how it came out. The shelves were pretty reasonable to build.
Read more: http://www.diydanielle.com/2017/01/how-to-build-walk-in-closet.html
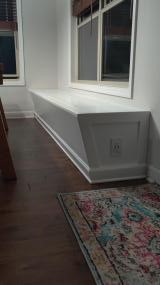
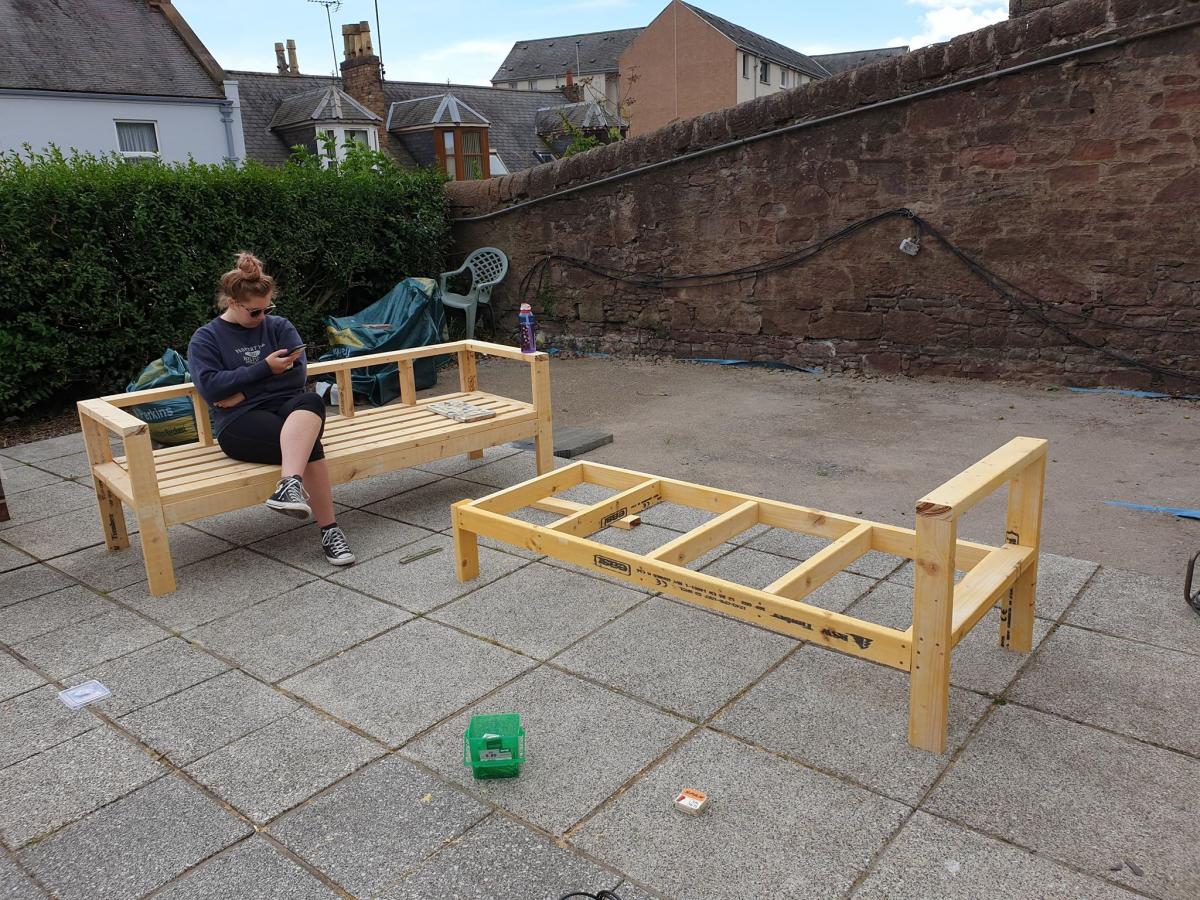
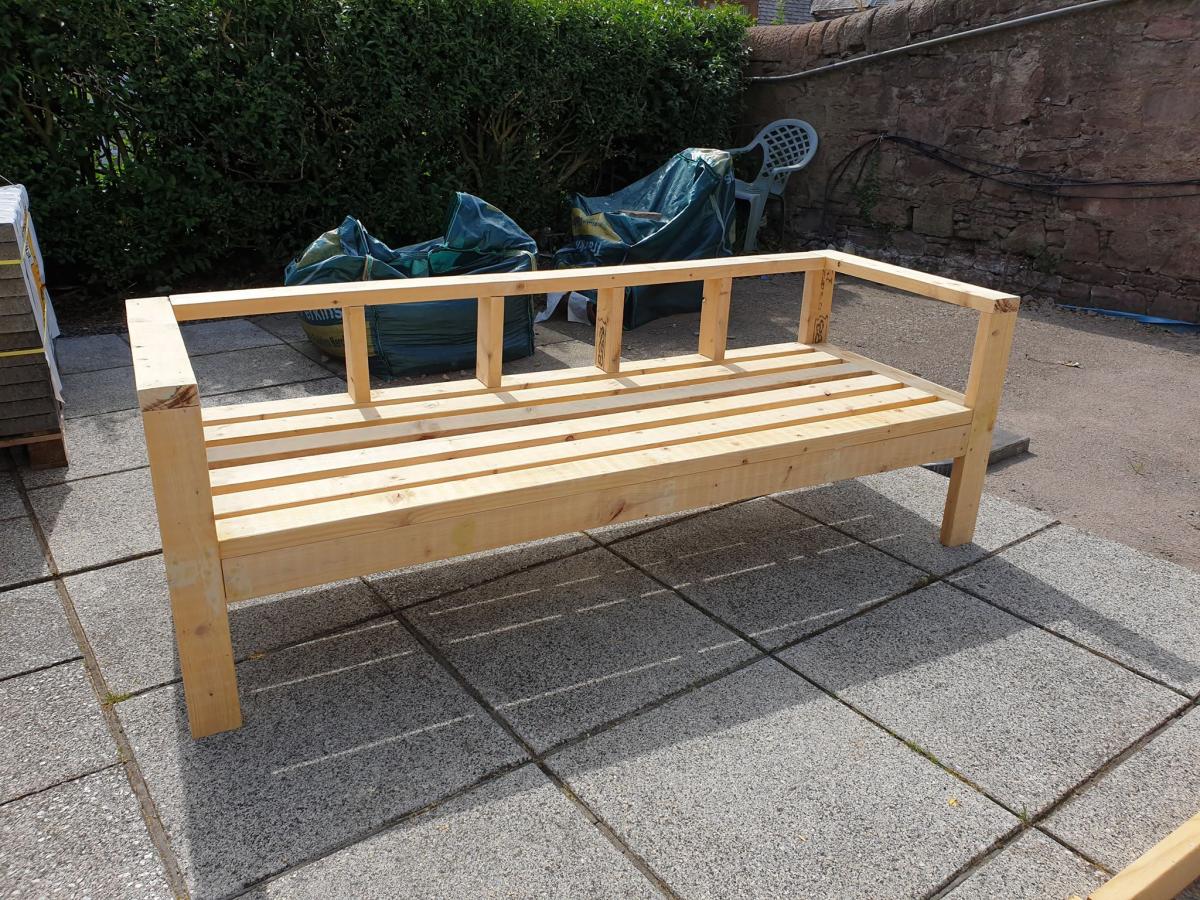
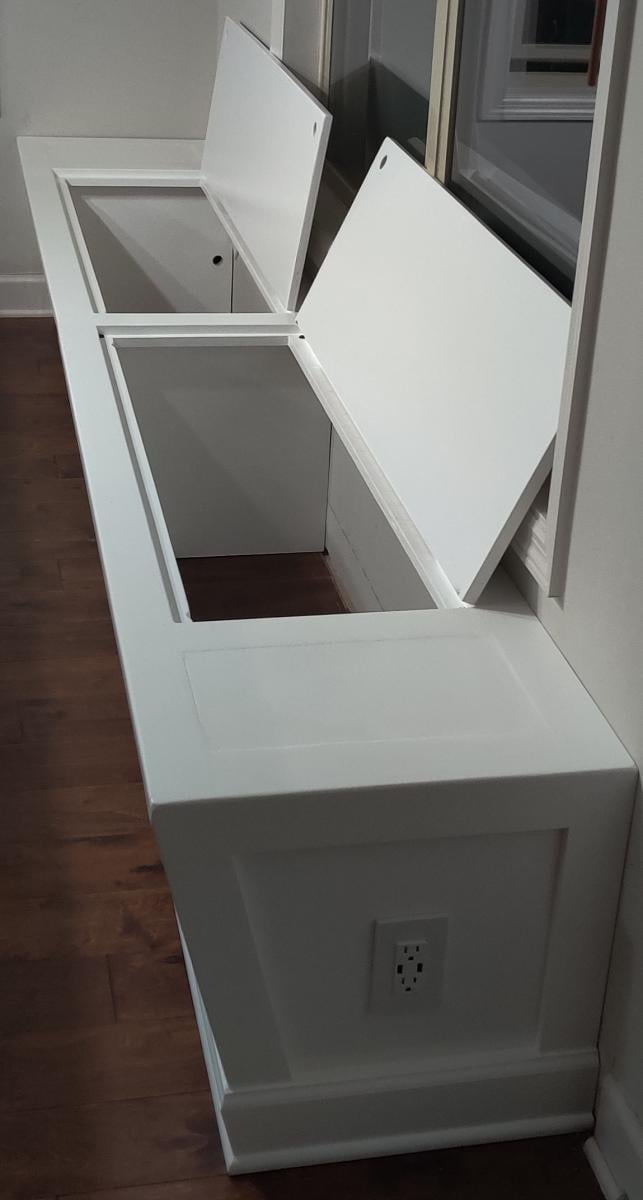
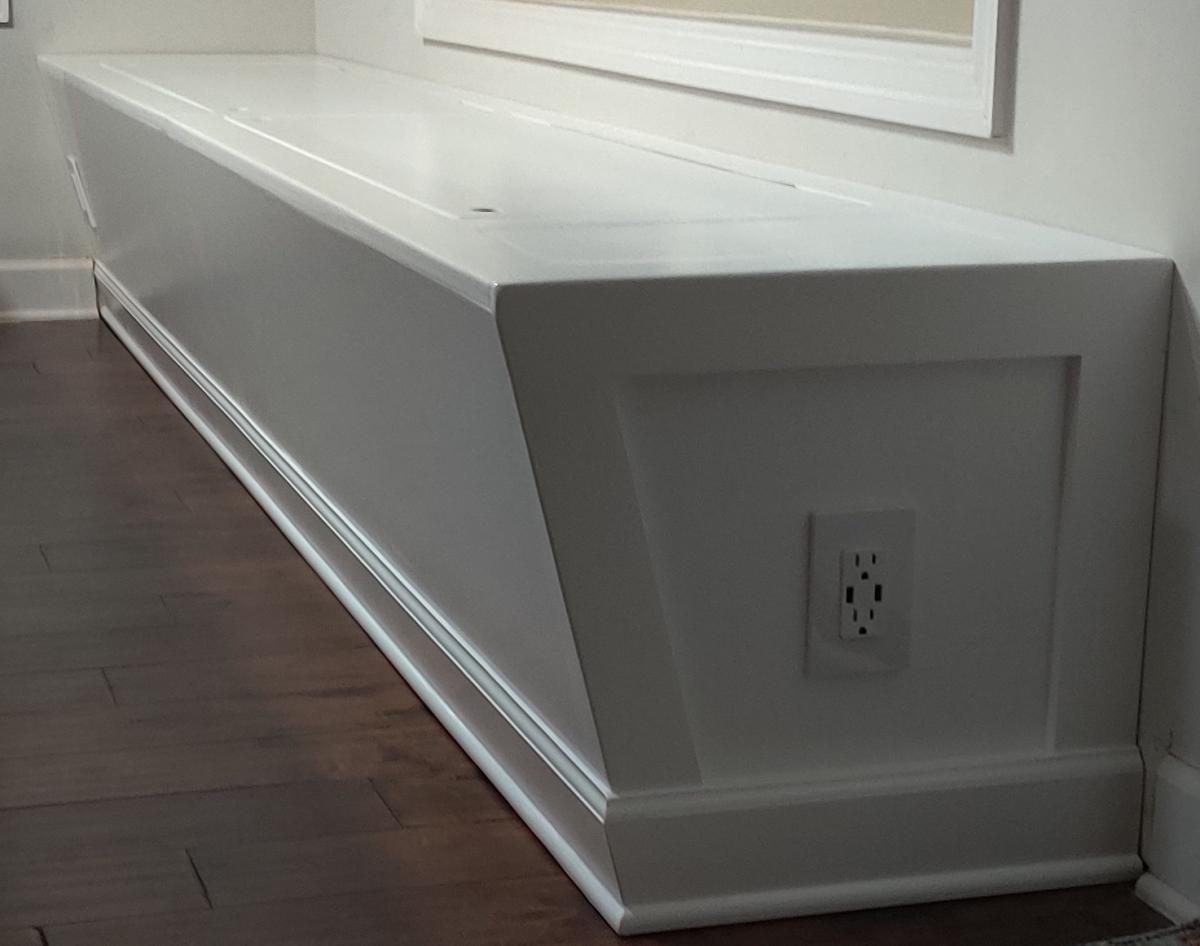
I took part of your built in dining bench idea and made my own custom bench. I made a farm house dining table for a family and once it was built and delivered she asked if I could build her a banquet. I had never done anything like it before, let alone install it permanently in some ones house. Because of the way I made the table I couldn't use a straight front face bench, I had to put an angle on it to allow for the table to be up close to the bench. This bench is 10' long, has two USB electrical outlets built in, and two 43" storage compartments. I enclosed the two ends of the bench for the wiring of the outlets so that no wires were exposed.
Fri, 10/23/2020 - 13:30
Love the look, added storage and electrical possibilities, thanks for sharing!
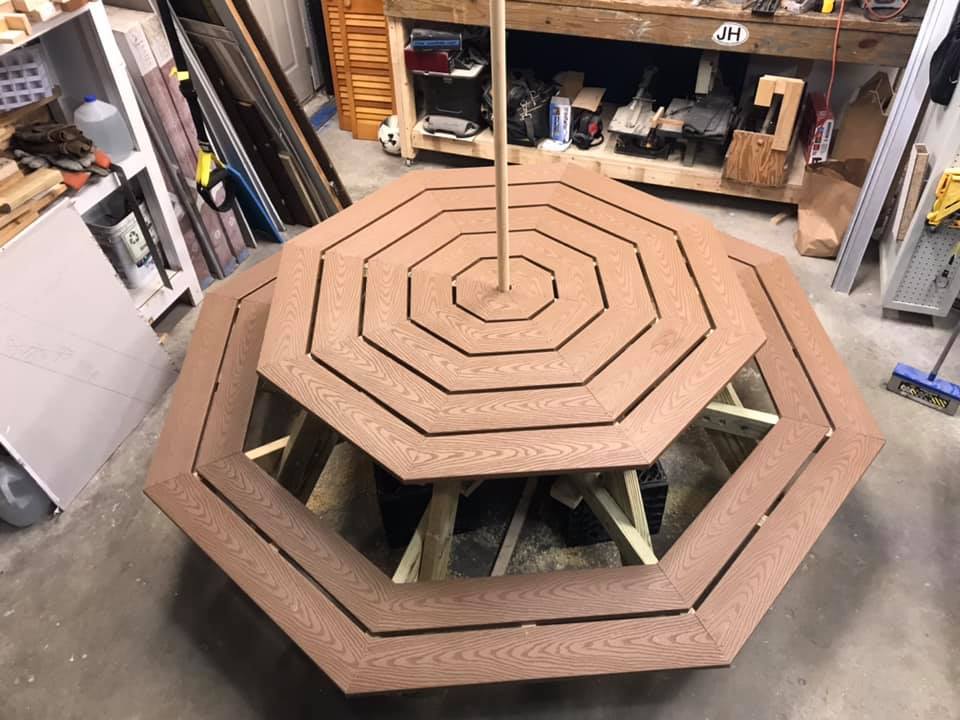
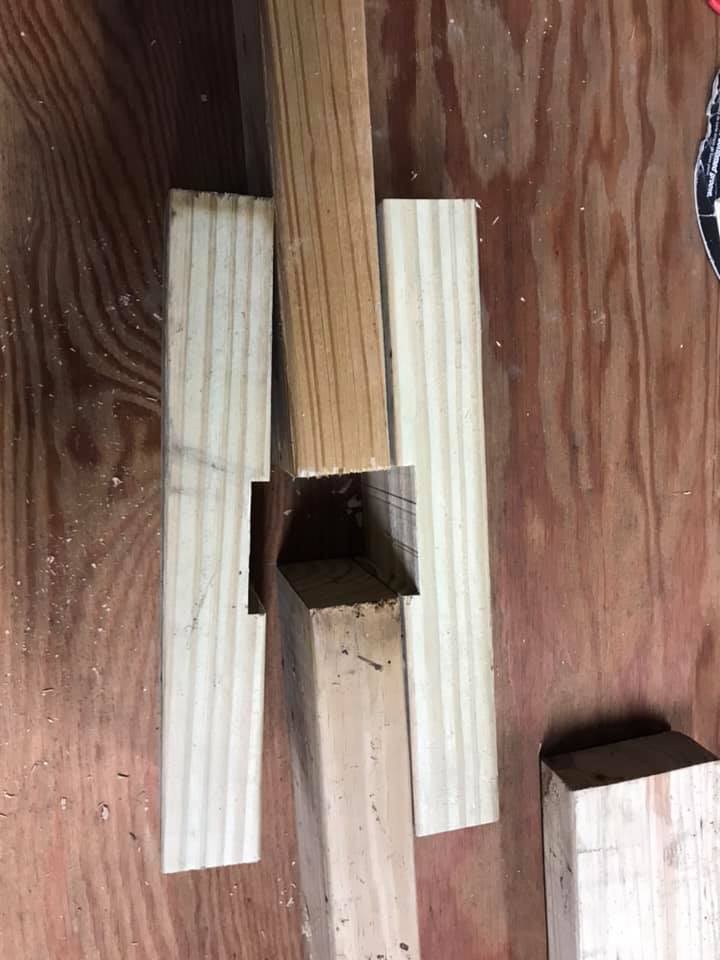
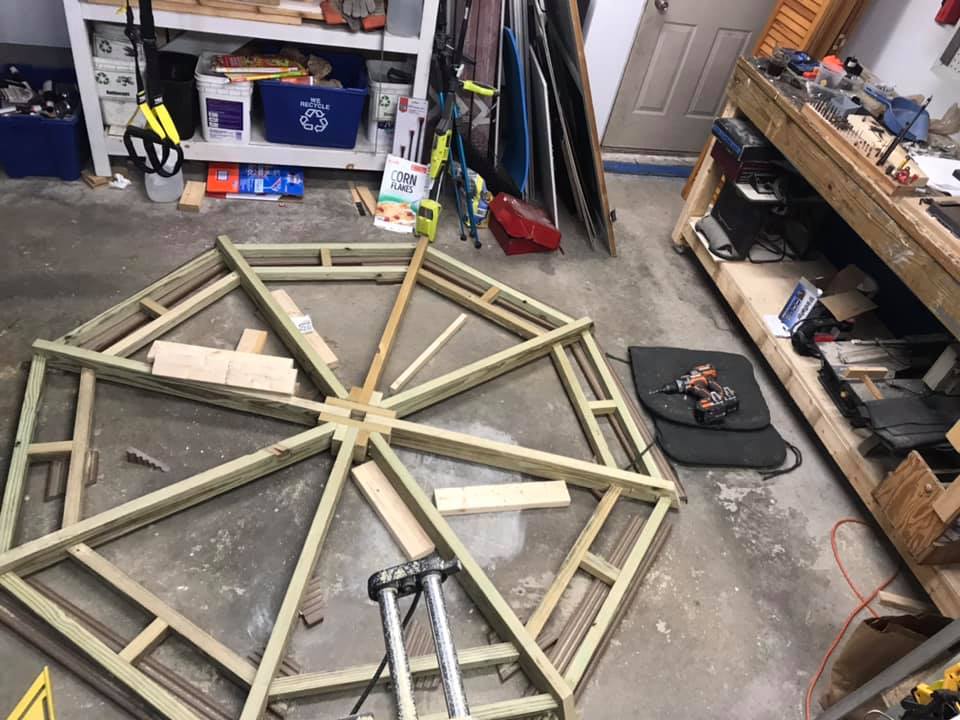
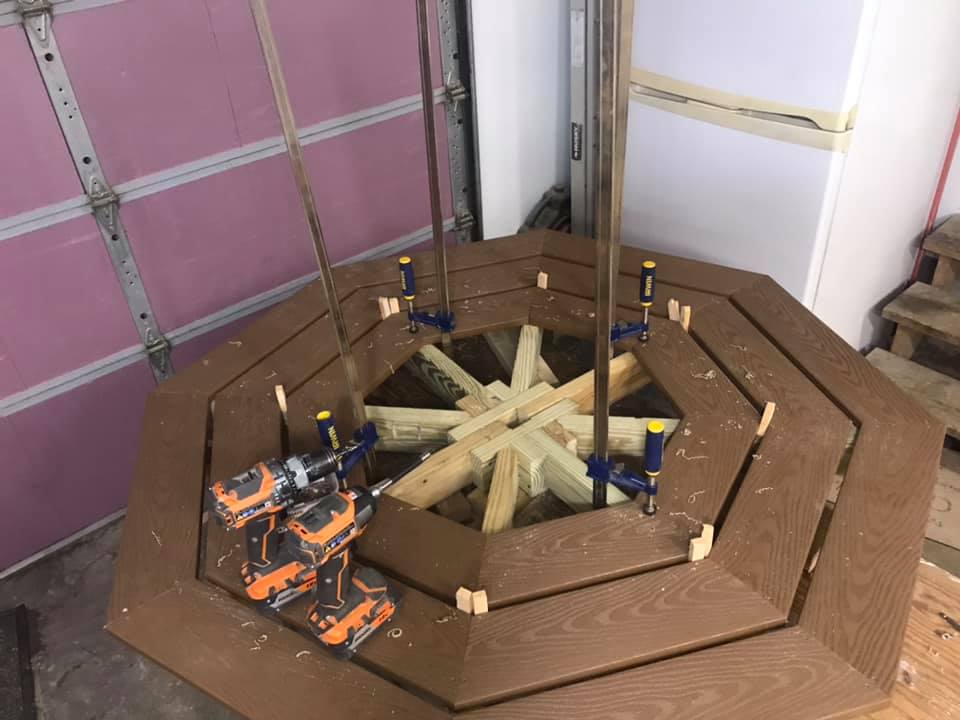
I built the octagon picnic table, and modified in a couple of ways.
1) Due to project deadline (Christmas) (and cost) I opted for composite decking for a finished top and bench, and pressure-treated 2x framing stock. Builder beware! Composite decking can be 5 1/4" wide, which impacts the spacing between the pieces, which means re-calculating most of the table-top pieces. Also, I added lateral structure underneath the benches (more weight!)
2) I really wanted that hole in the center, and hope that my solution (which slightly weakens the overall structural integrity) withstands the test of time.
Farmhouse Trestle Table
6' Table
Check my work at https://www.facebook.com/Custom-Patio-Retreats-1764656797122875/
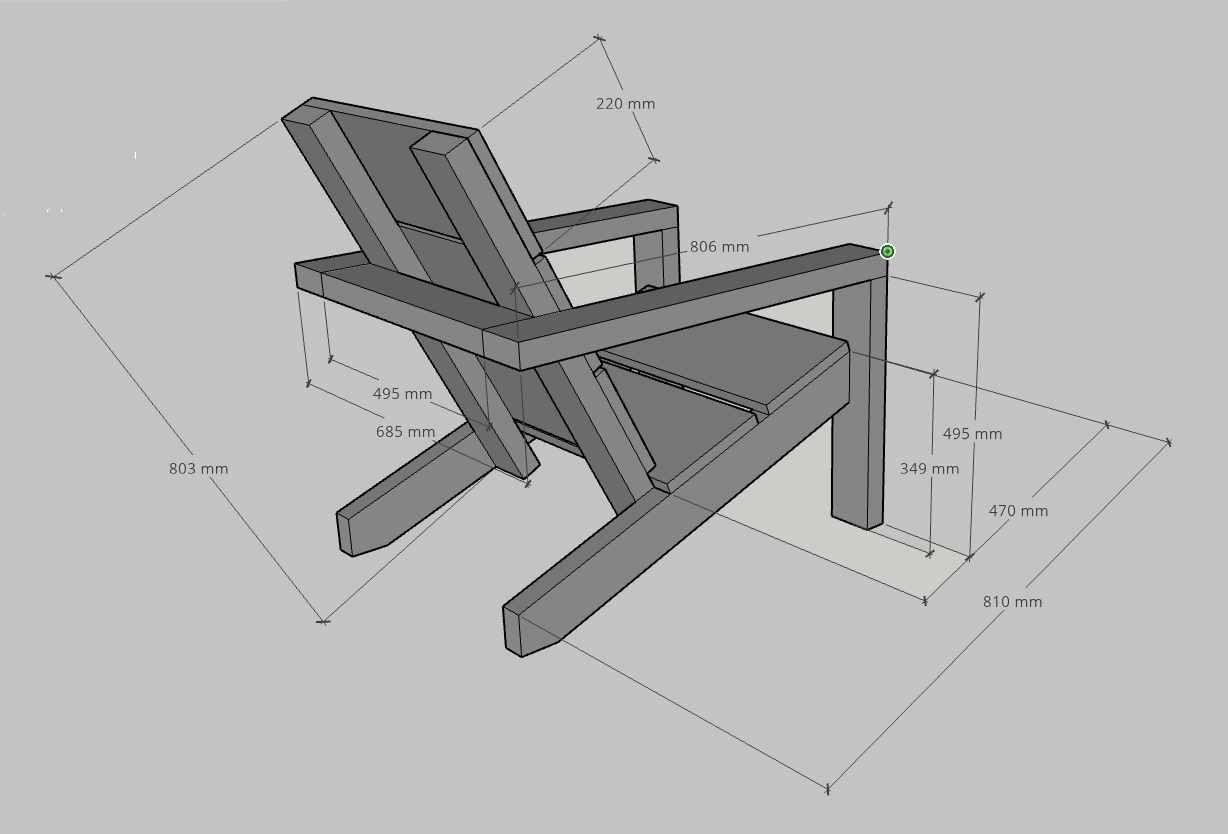
Unfortunately I didn't have the chance yet to build these amazing chairs, but in preparation I figured out what the measurements would be in mm's so I thought maybe other people would like to use it as well :-)
I built this for my niece and she loves it. I followed the plans with very few tweaks, but used custom pink stain as an accent.
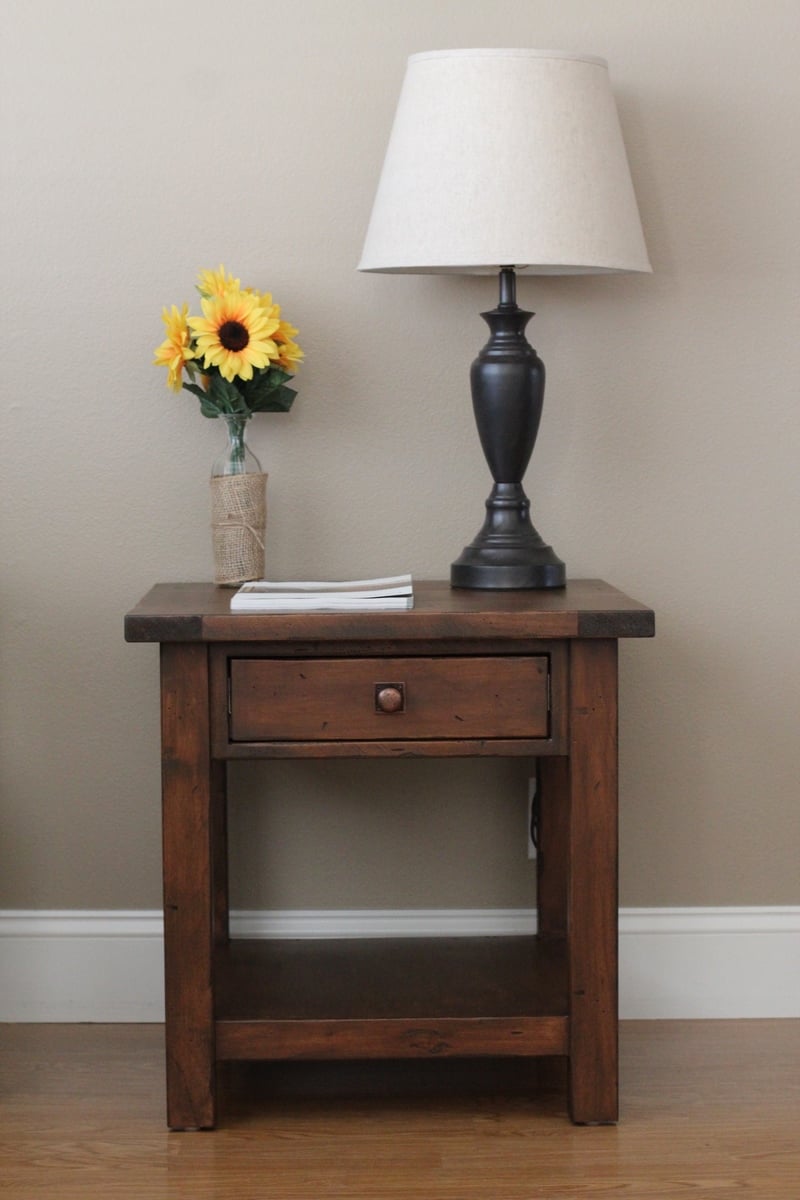
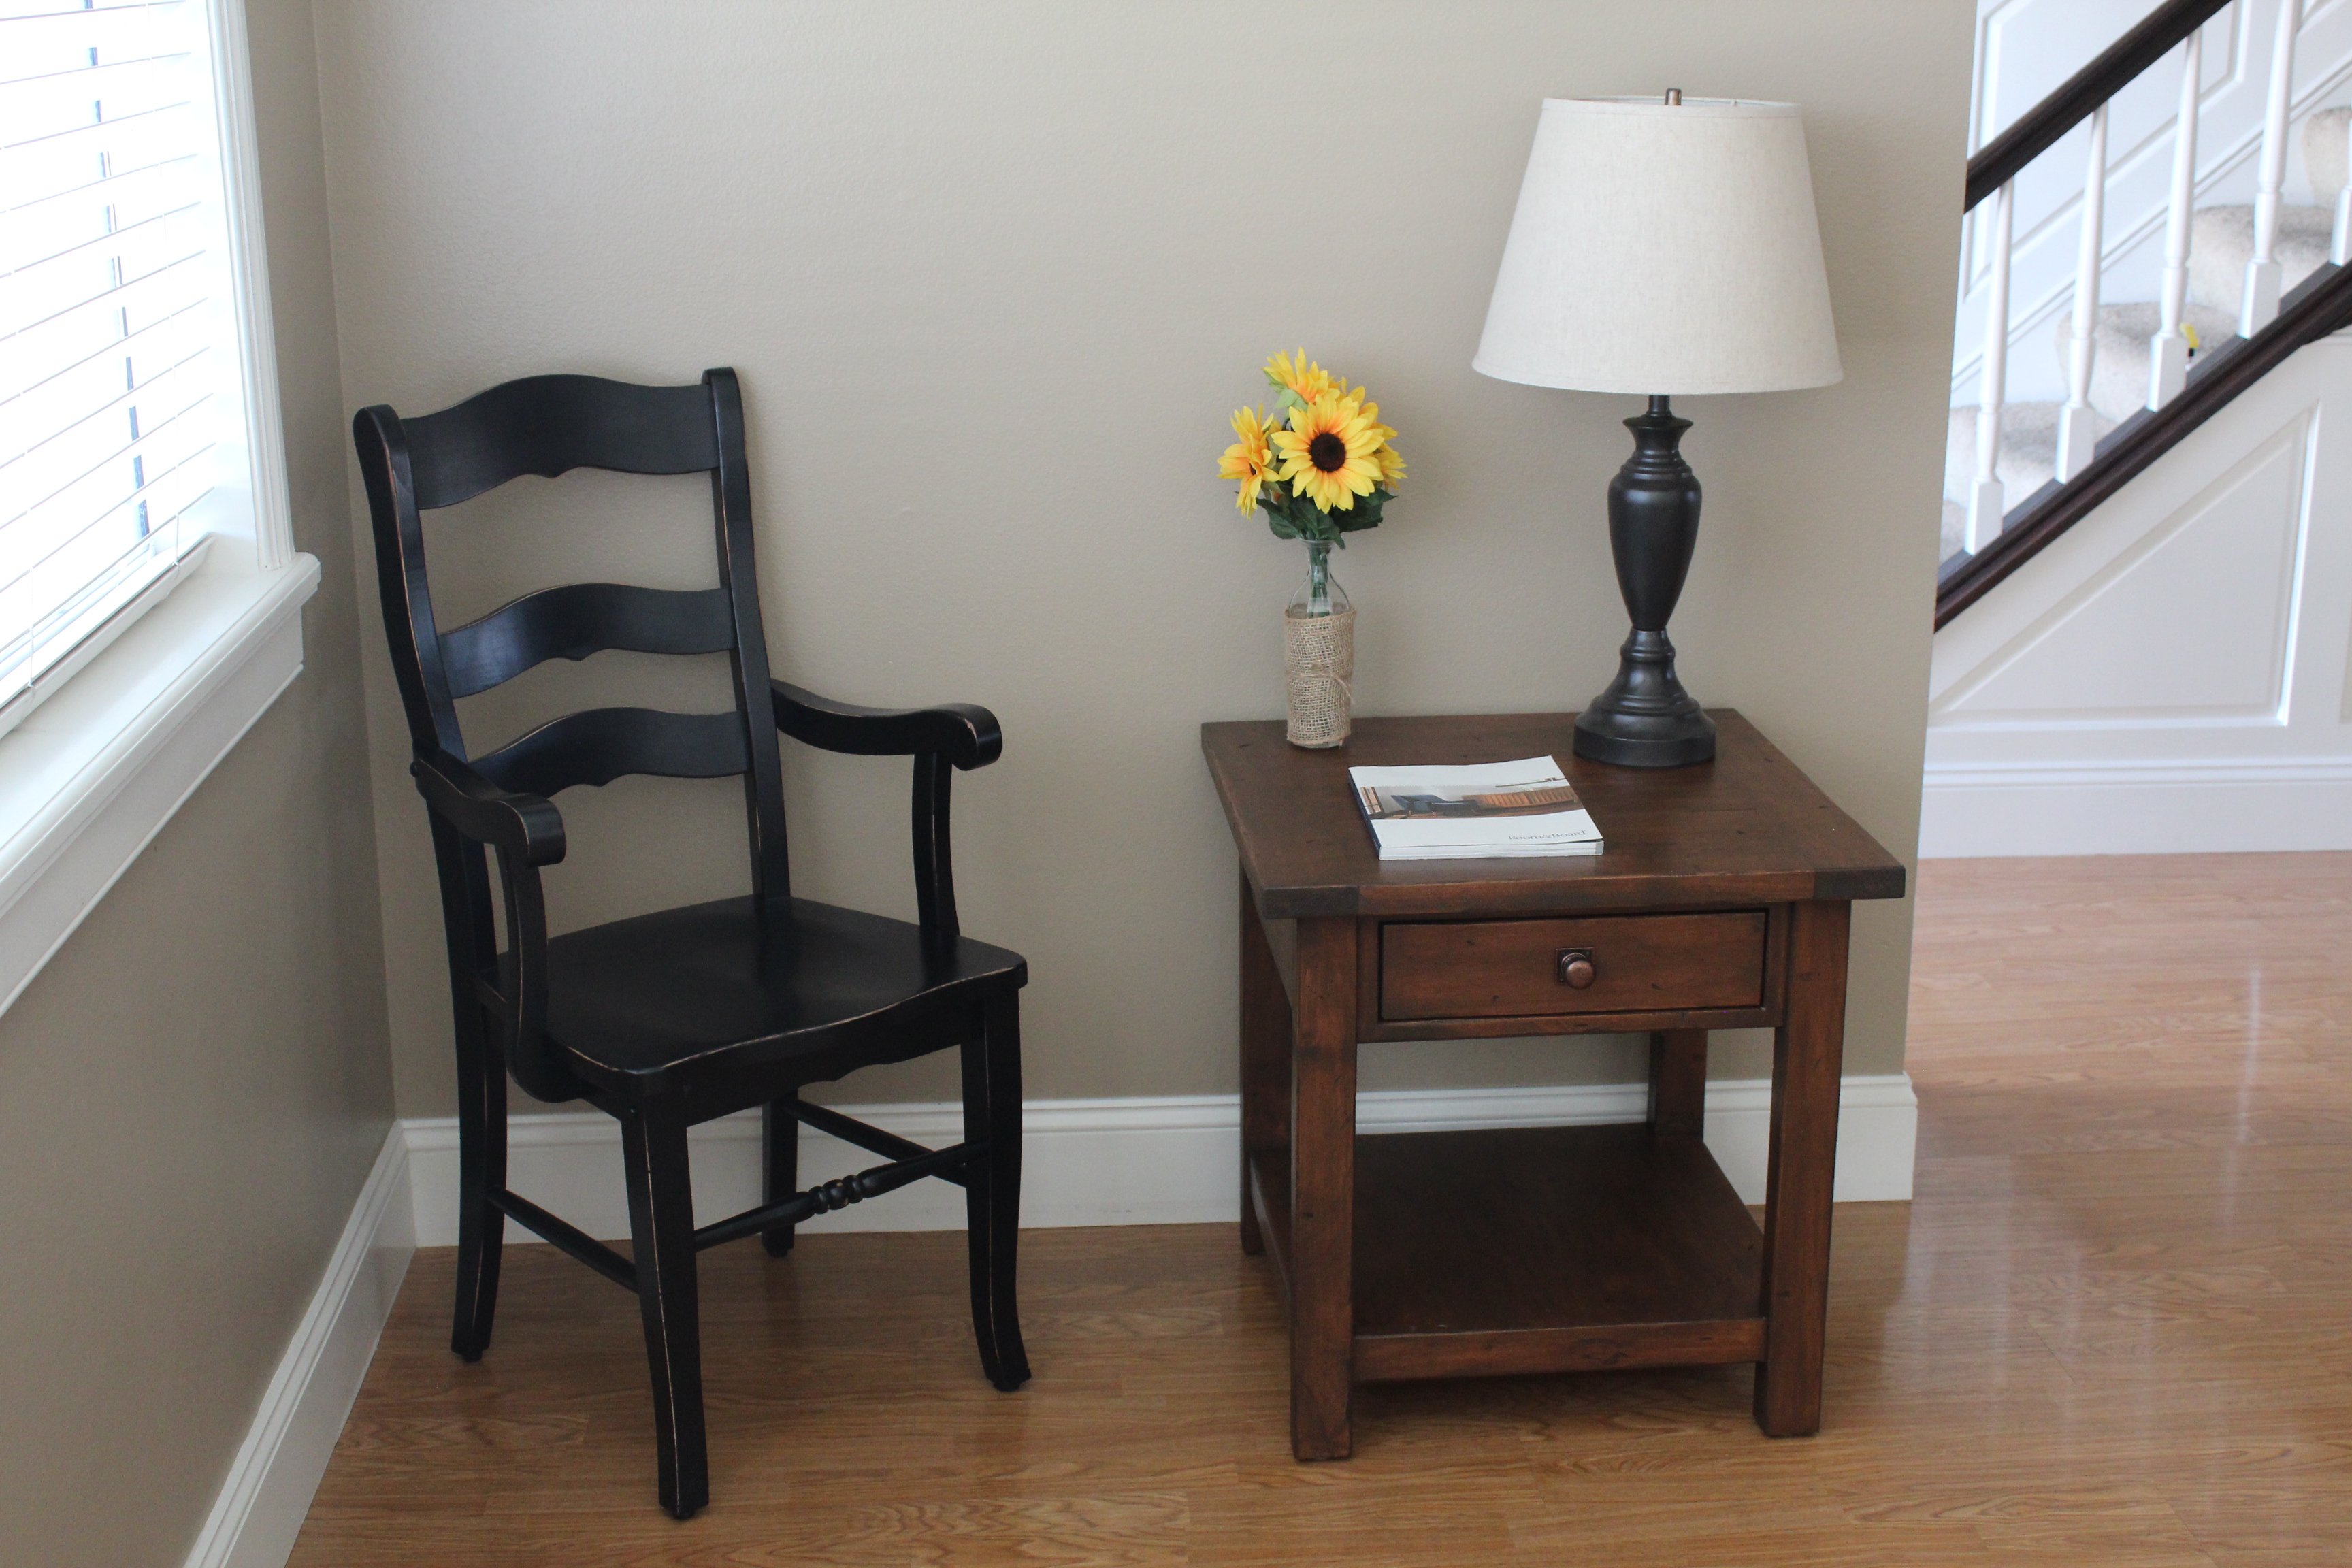
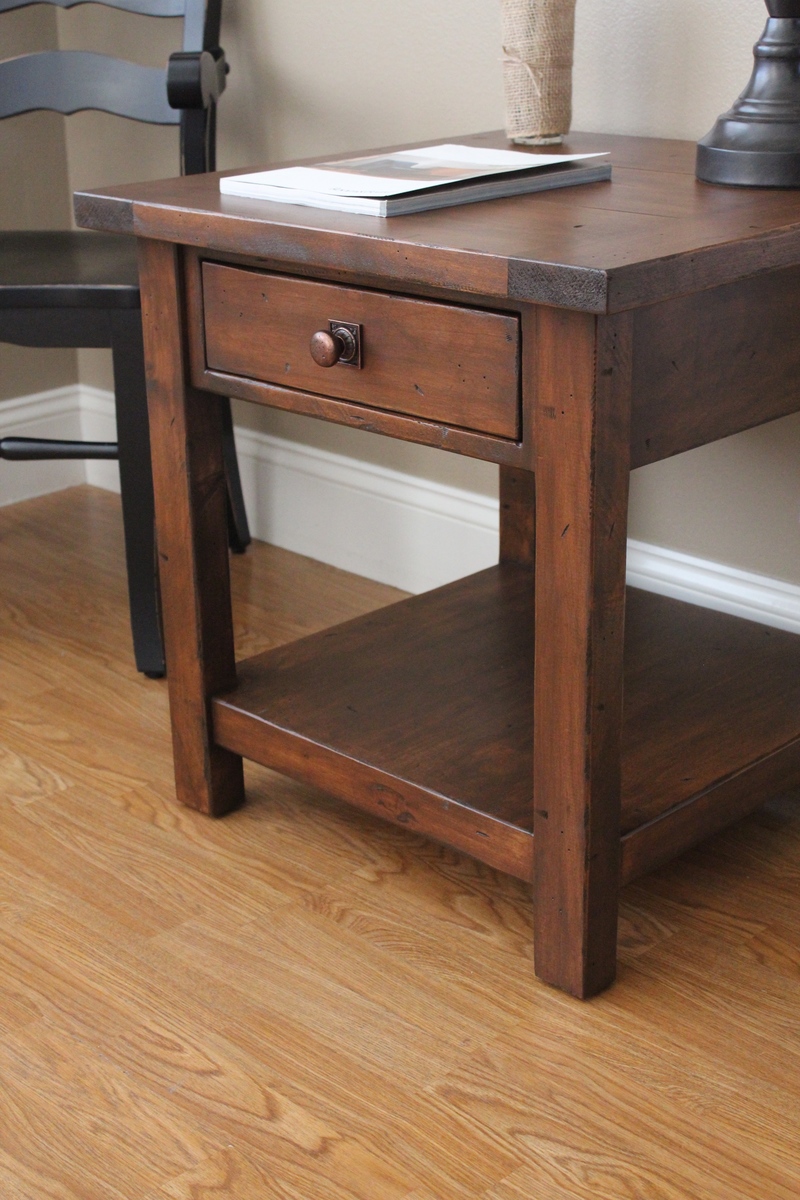
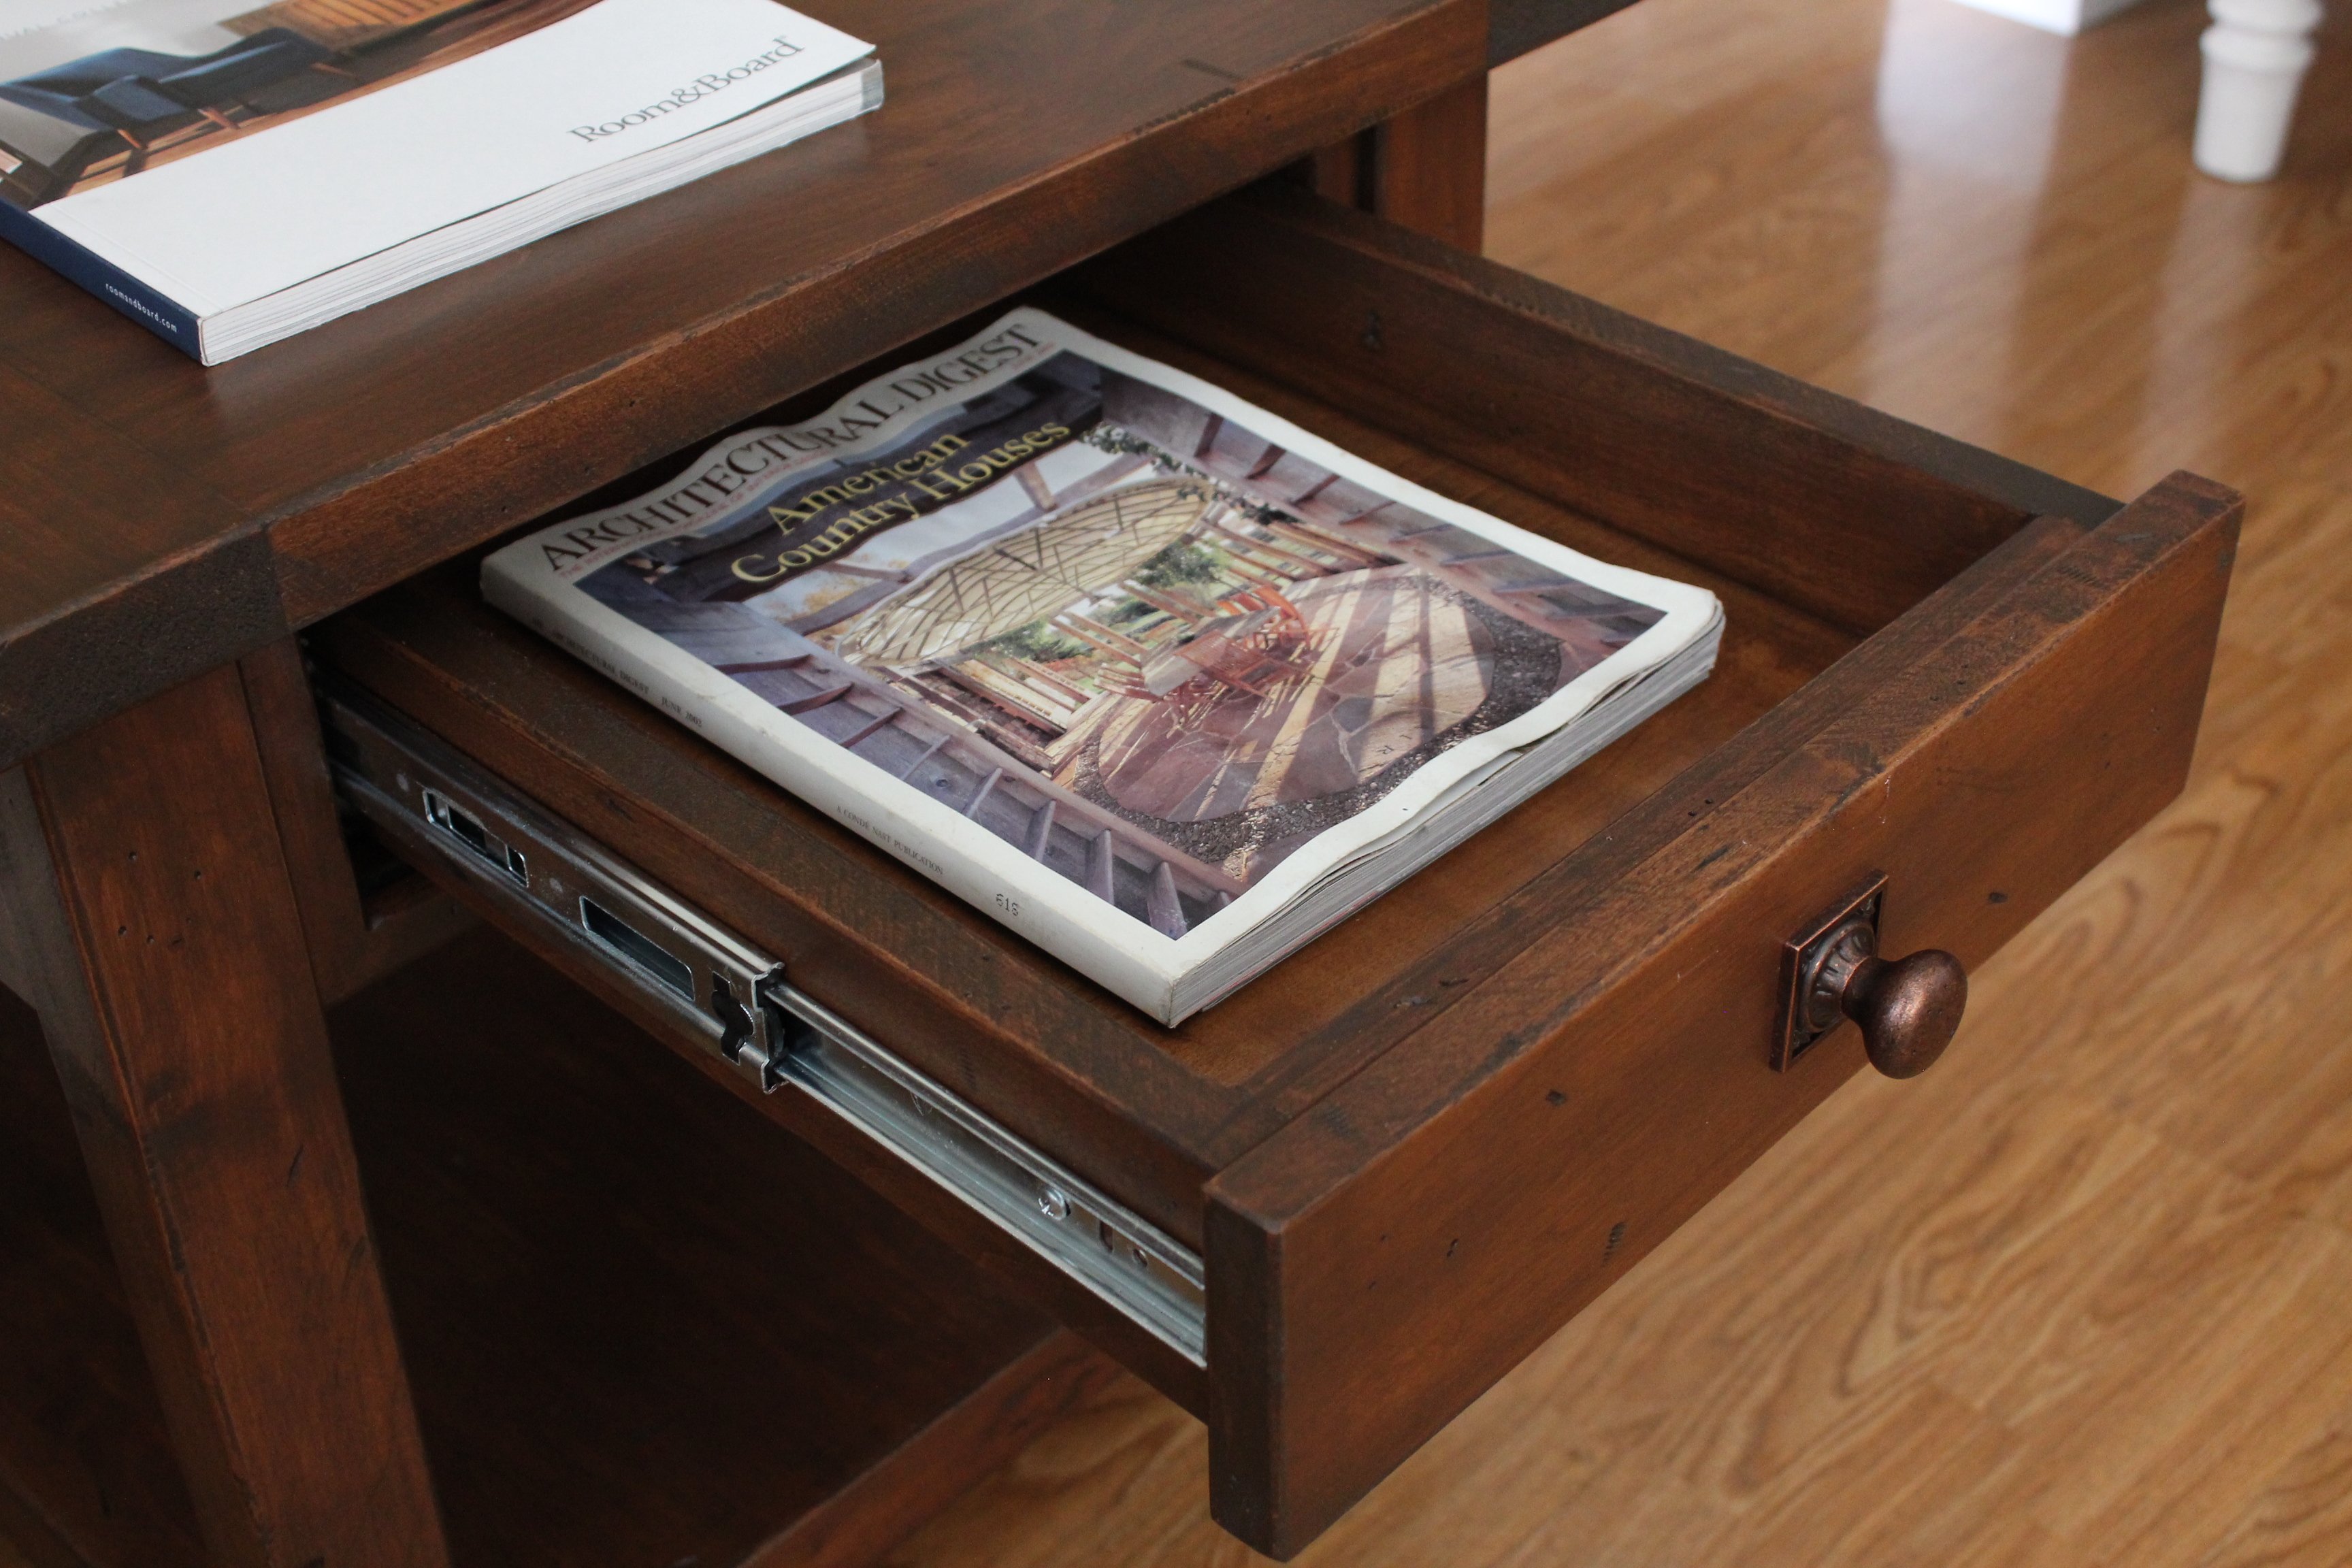
I took the plans for ana white's benchwright coffee table and created this end table. This is an exact replica of the Pottery Barn benchwright end table. The wood was distressed by hand and finished with dye, dark walnut gel stain and three coats of satin poly.
- Brad
Mon, 02/09/2015 - 14:33
Your finish work is phenomenal. Closest I've seen to pulling of the PB finish. What color transtint do you use? Any other finishing tips? I've build a couple of knock off PB pieces, but haven't nailed the finish yet.
In reply to Great finish! by marenras
Mon, 03/09/2015 - 22:10
Hi. Thank you for the compliments. First of all, using Alder vs douglas fir or pine plays a big difference in the finish look, but start with pine and see where you get using this process. I first mix de-waxed shellac with a few drops of medium brown transtint dye. It MUST be de-waxed shellac. Experiment with the amount of dye added. I spray one coat of that shellac and dye mixture on the wood. The shellac seals the wood allowing for even stain absorption and a non-blotchy finish. The dye obviously darkens the wood. Then I apply one to two coats of gel stain. I like general finishes antique walnut color. At the next step I sometimes add a glaze, and sometimes I don't, it just depends on what I am seeing. Lastly I seal the wood with a water based poly. Good luck!

Tue, 03/31/2015 - 10:04
I love the finish you've done on these, and like someone else said it is the closest to PB I've seen yet! I am trying to fix a horrible stain job I did on a project and had a quick question. When you said you sprayed the shellac and dye, do you mean with a spray bottle? Also what kind of de-waxed shellac did you use? I've never used shellac and I see they have flakes and premixed stuff. Thanks!
In reply to Wow! Awesome job! by colleenps
Thu, 04/09/2015 - 15:25
Hi There. Sorry for the late response. The spray the shellac with the dye using a HVLP sprayer. Google HVLP sprayers. They are very cheap and will help out tremendously. I don't recommend using shellac flakes, they can be challenging for a beginner. I use premixed shellac. I use de-waxed shellac because you can apply polyurethane over it. If you plan on applying shellac as a top coat instead of poly you don't have to worry about de-waxed.
Thu, 03/24/2016 - 11:41
This is absolutely beautiful and what I've been looking for to match my Benchwright coffee table!! Do you remember the dimensions you used?
Fri, 01/21/2022 - 09:26
I really like your take on this PB table. It looks like you changed it significantly from the console table plans from which you derived it, and I have a couple questions. First, the legs do not look like 2x4s; what are the dimensions you used? Second, the bottom shelf is much thicker than the 1x12 from the plans; what lumber did you use? And how is this bottom shelf attached to the legs? Square-notched to fit around the corners of the legs?
Although I didn't build this from a plan I wanted to be sure and share it as it is because of my experience building from Ana's plans that I felt comfortable giving this a shot.
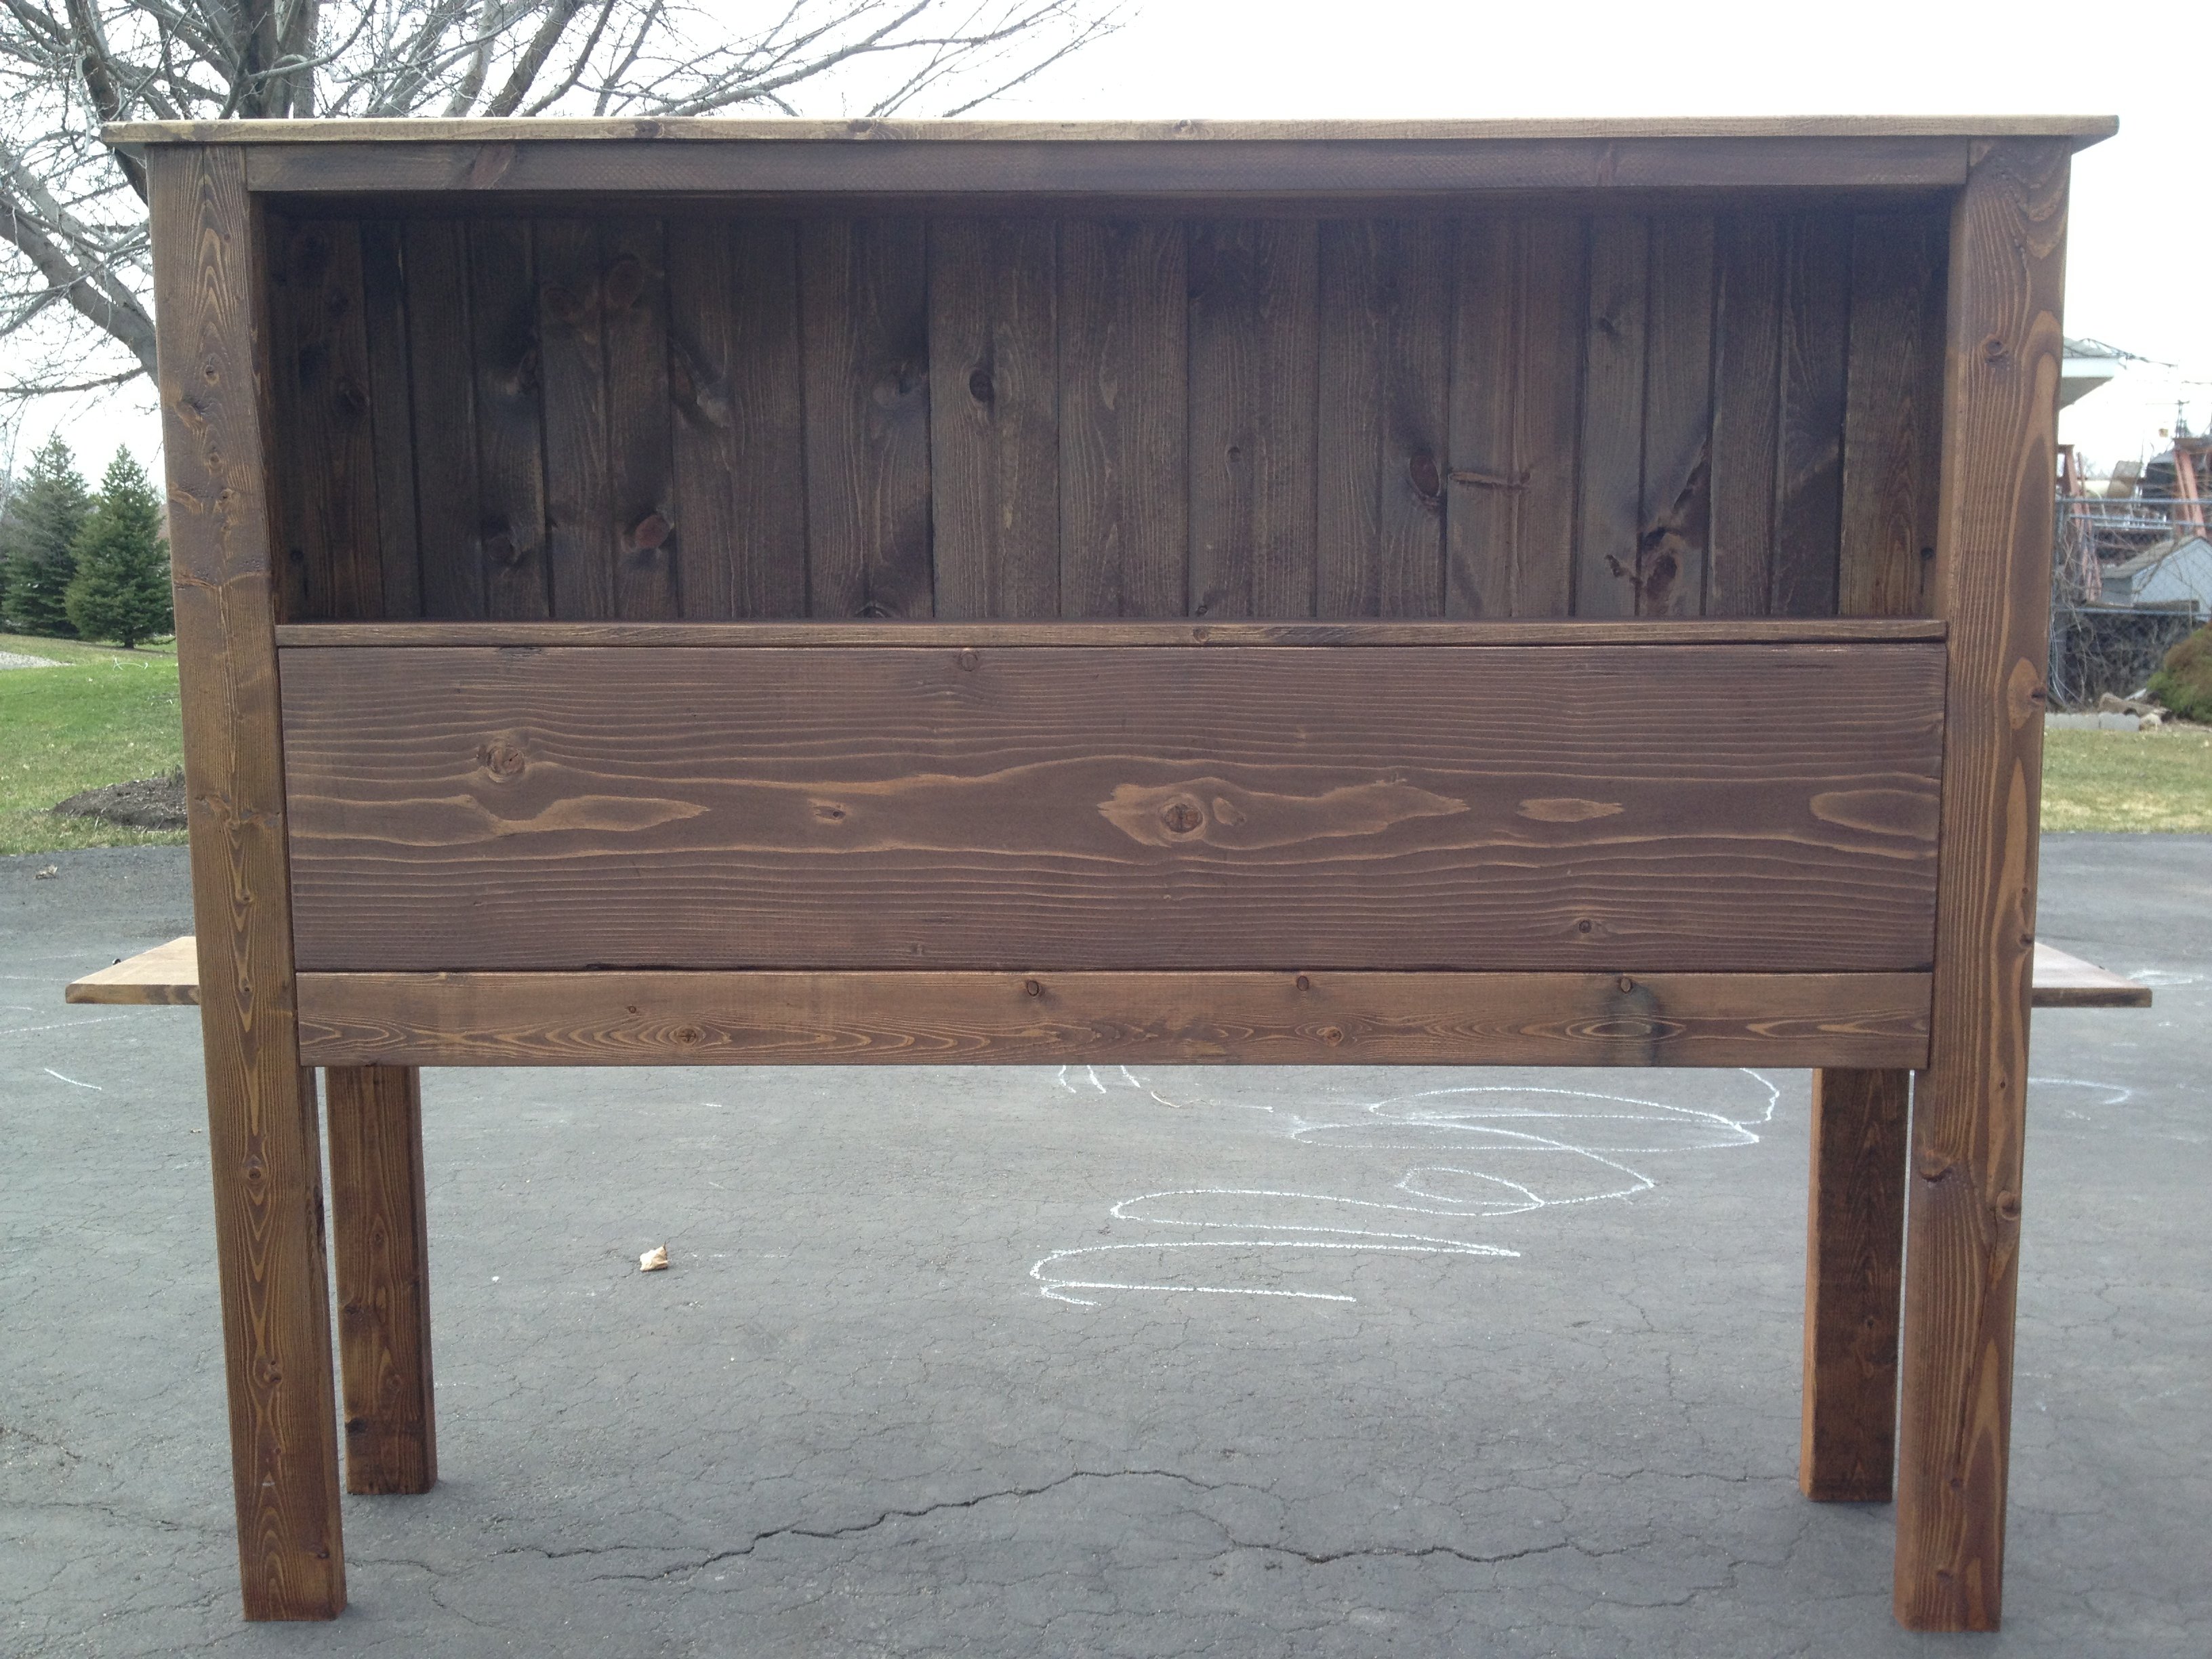
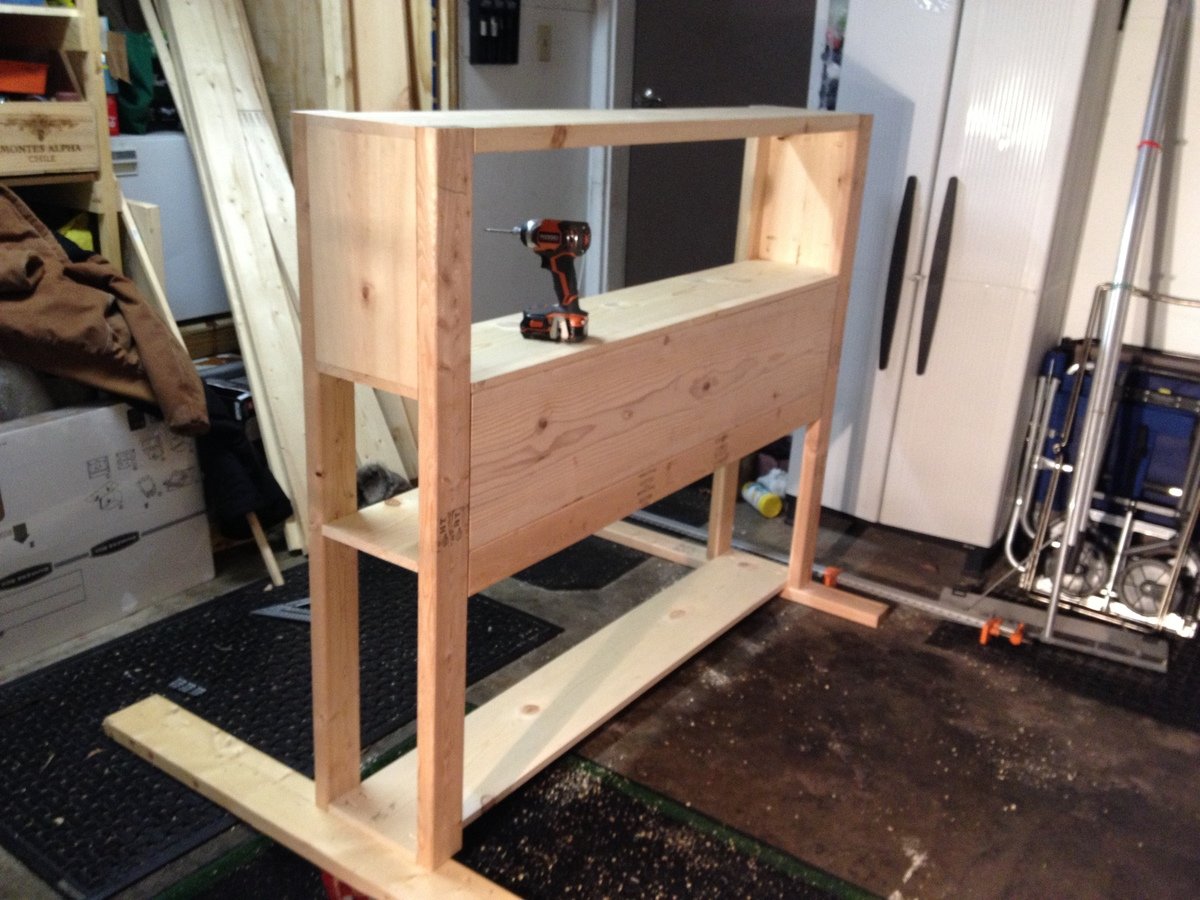
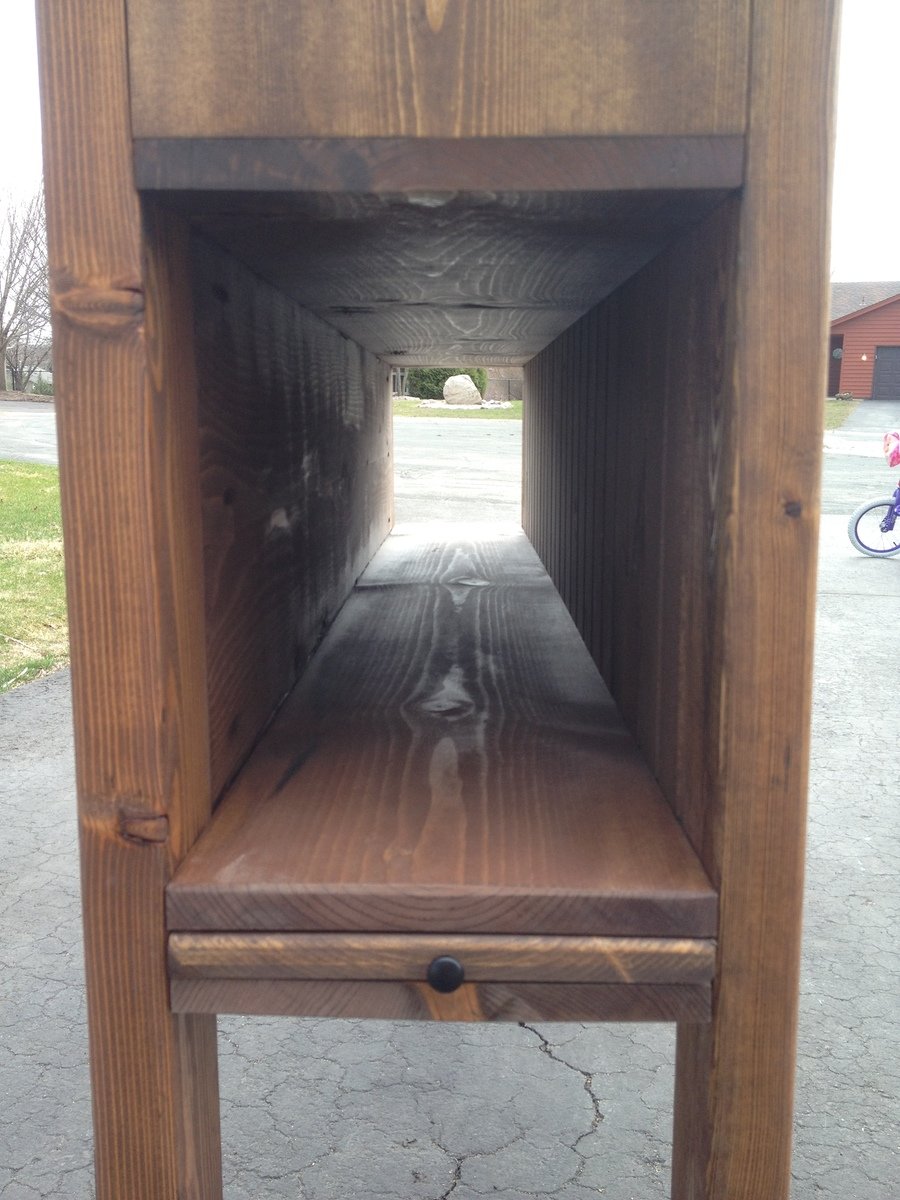
My in-laws were just updated their lake cabin and wanted a storage headboard as space is a premium and it will be the only furniture in the guest rooms. It is unique as it has shelves on either side which can pull out to function as a small night stand, perfect for cell phones, books etc. The back of the piece is tongue and groove knotty pine which for the more rustic look they wanted.
I will probably do things a little different when I build the next headboard but overall I am satisfied with the end result. I chose not to do a lower storage area, mainly to keep the cost down. It could be done very easily but this piece is already very heavy and that there is plenty of storage.

Sun, 01/17/2021 - 15:15
Is it possible to get the plans for this headboard. My teenage son really wants a head board with storage.
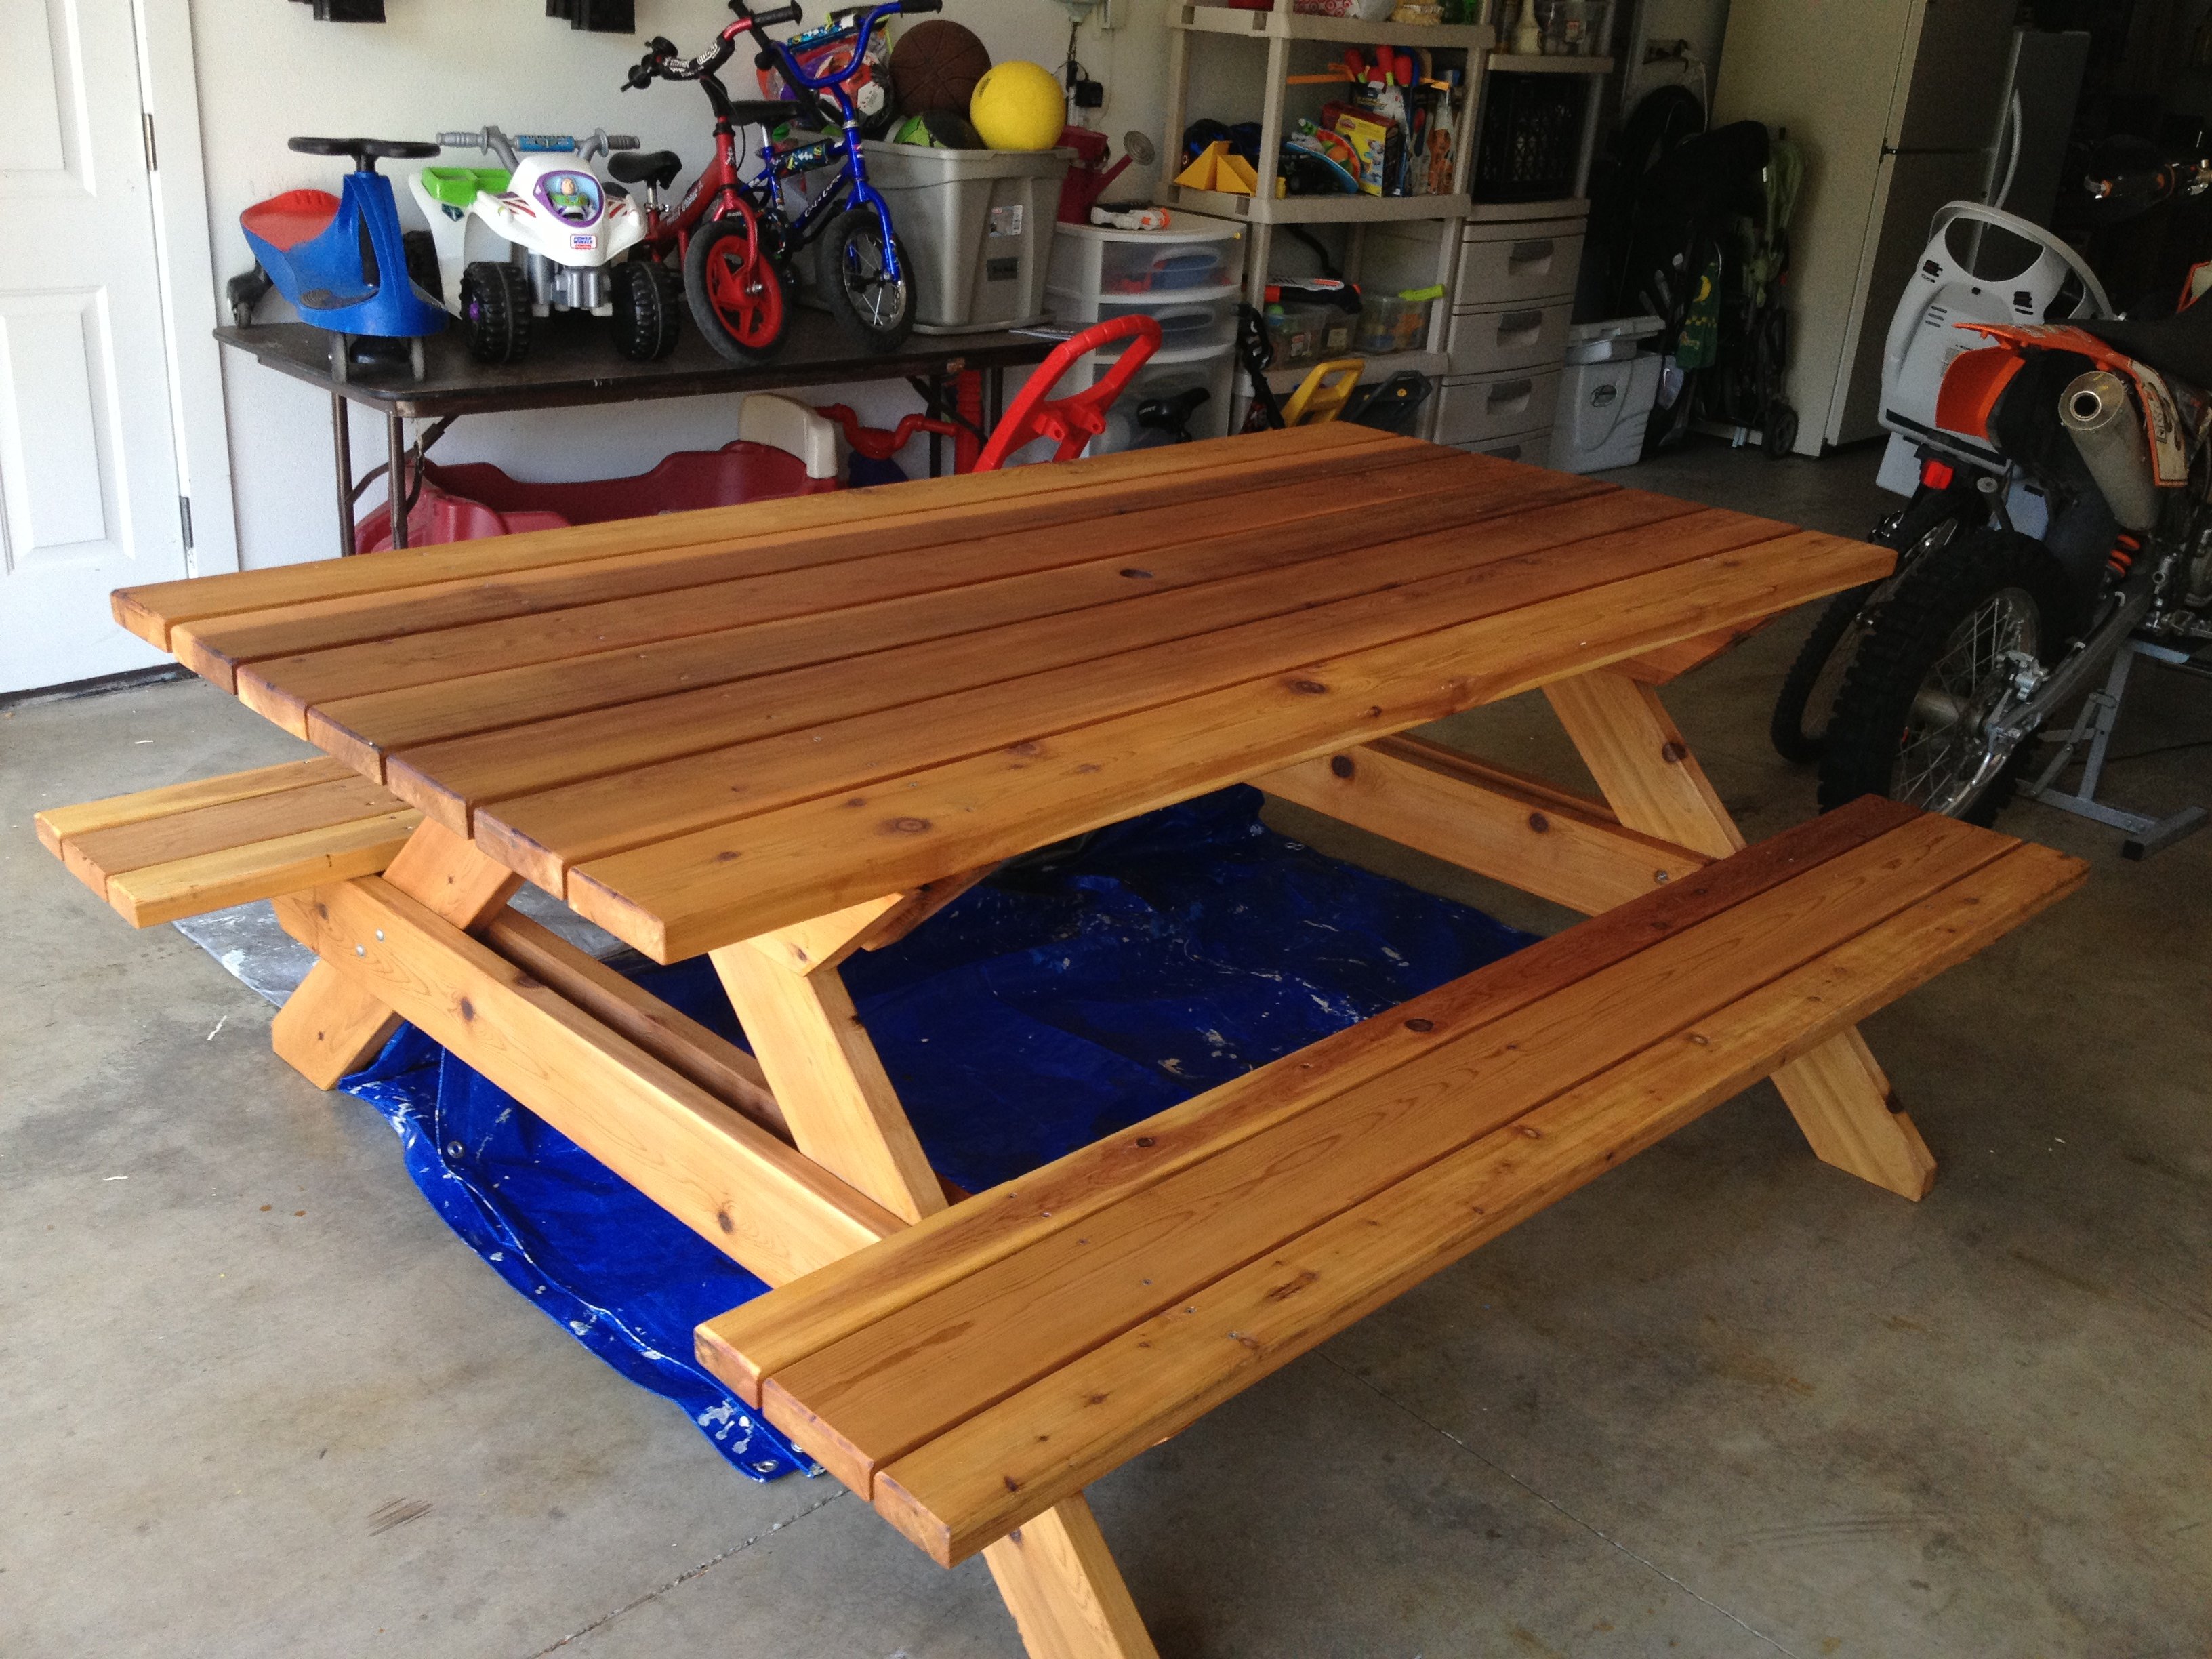
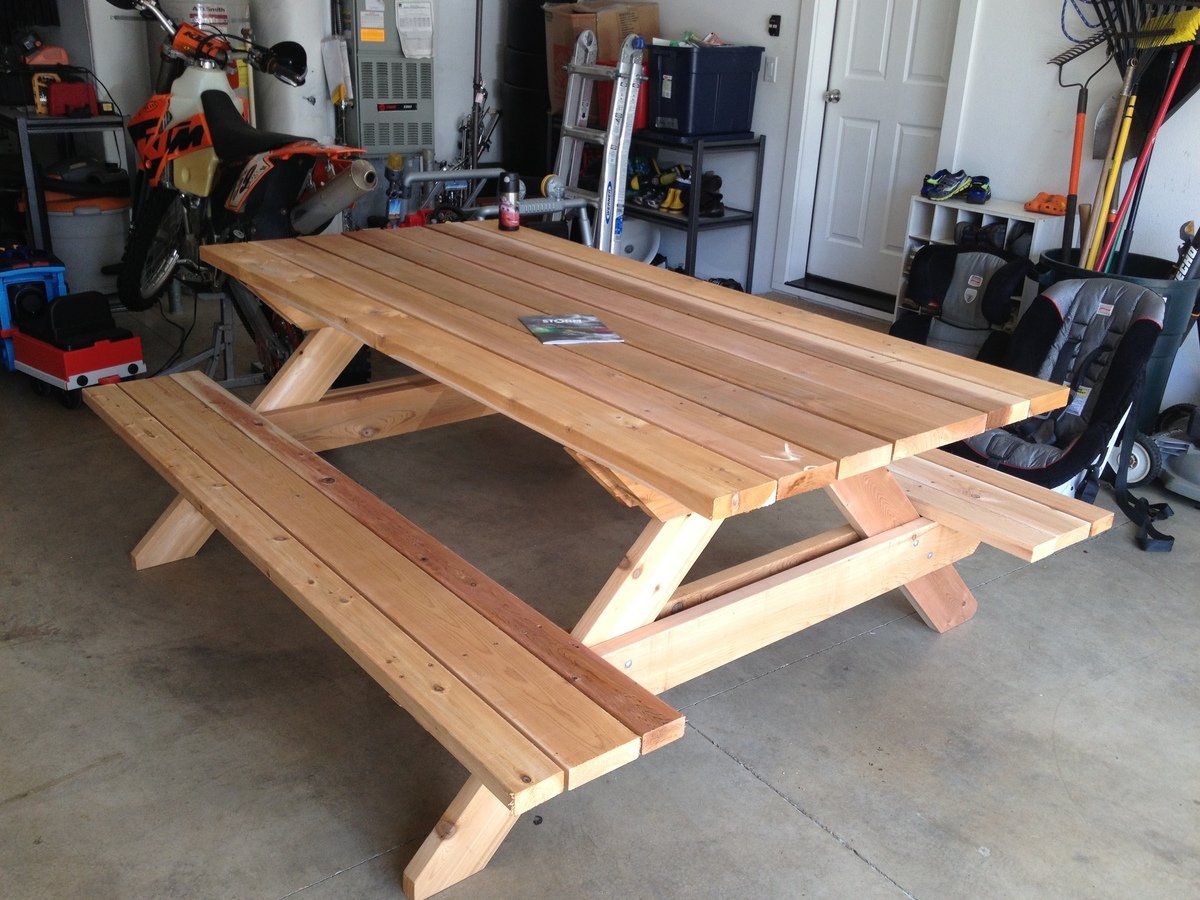
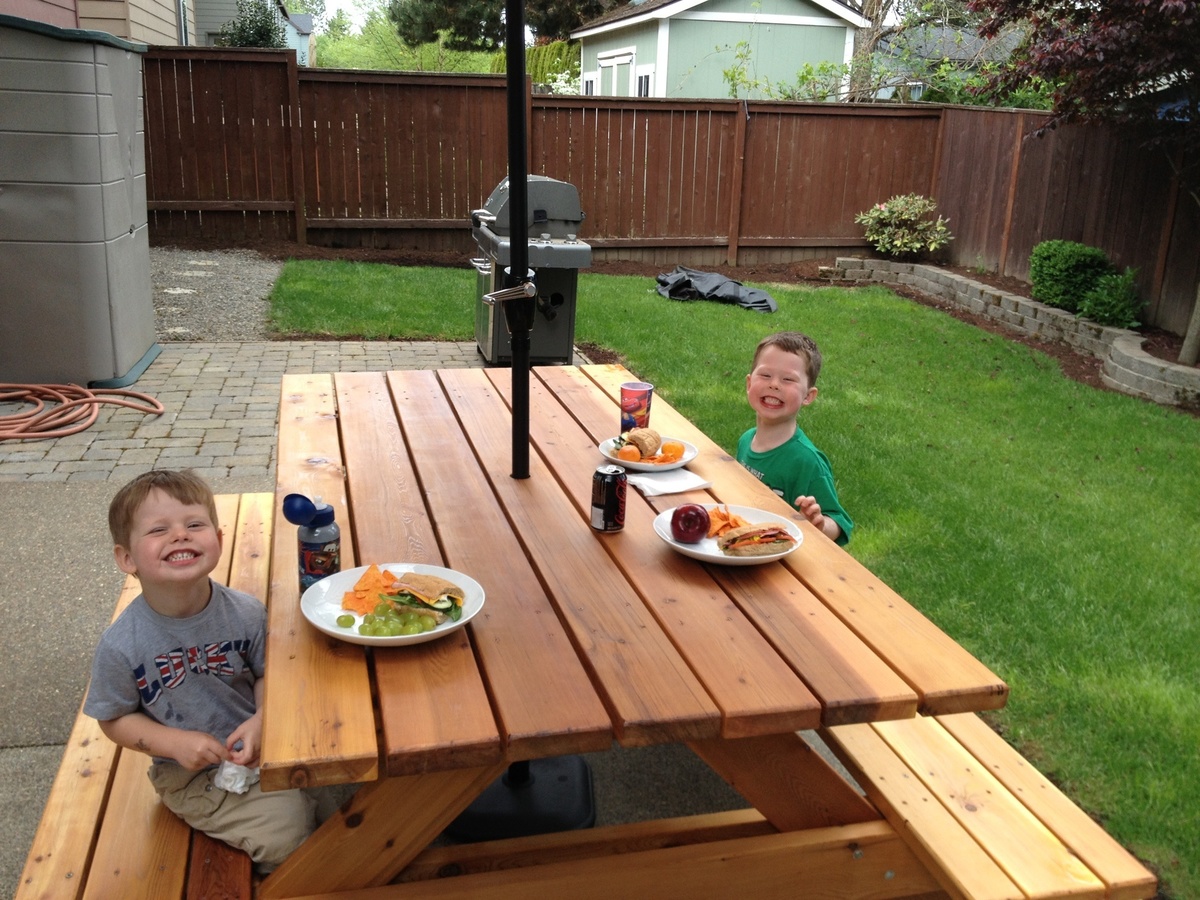
My wife started looking at expensive patio sets, which I thought were not worth the price, so I decided to build a picnic table. This is not the cheapest table out there, but it's built to last for years!! I used a high quality cedar as I got a price cut from a friend. I also used deck screws, so there would be no rusty screws!! The table top measures 7' long and looks like one you would see at a state park, notHome Depot!

Thu, 08/25/2016 - 09:48
Really like the picnic table - do you have plans for this? (I'm new to this site so apologies if they are here but I just could not see where?).
best wishes
Gerry
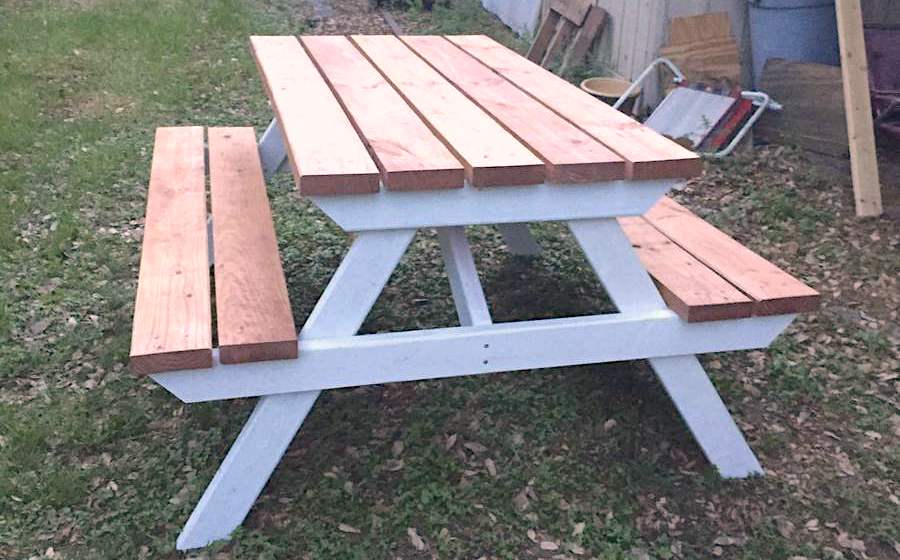
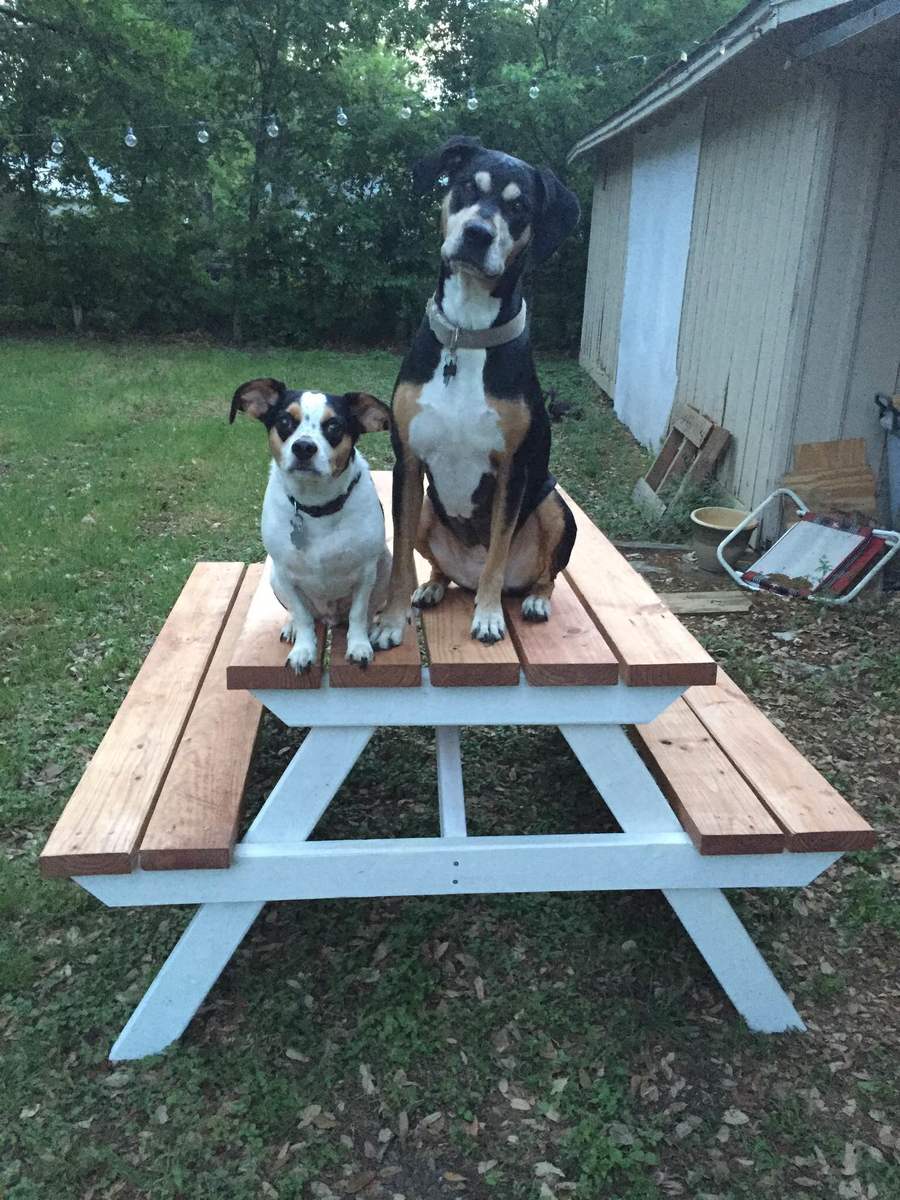
I made this picnic table for my upcoming wedding with the intent of using it as our guestbook. I'm hoping to have people sign, carve, and woodburn their names or a message on the table. I painted the legs and supports white and stained the top and seats with a cherry stain. I still need to put some finish on the whole thing, but overall I'm really happy with how it turned out. And so are my dogs.
Mon, 04/13/2015 - 09:46
I love your idea for a picnic table as a guest book! There are several brags showing benches used as guest books on this site, but no picnic tables. Not wanting to sound like a know-it-all, I would caution you to use paint pens rather than a permanent magic marker if you have guests who aren't comfortable using a woodburning pen (such as an elderly person). Magic marker ink smears when you apply a finish over it. (I read a comment from a mom who made her daughter a guestbook bench. They used permanent magic marker, then applied a poly finish over it, which then ruined all of the signatures.)
Mon, 04/13/2015 - 11:08
Thank you for your suggestion about the paint pens. I hadn't had much time to do research and was planning on just using sharpies. But now I can avoid making that mistake. :)
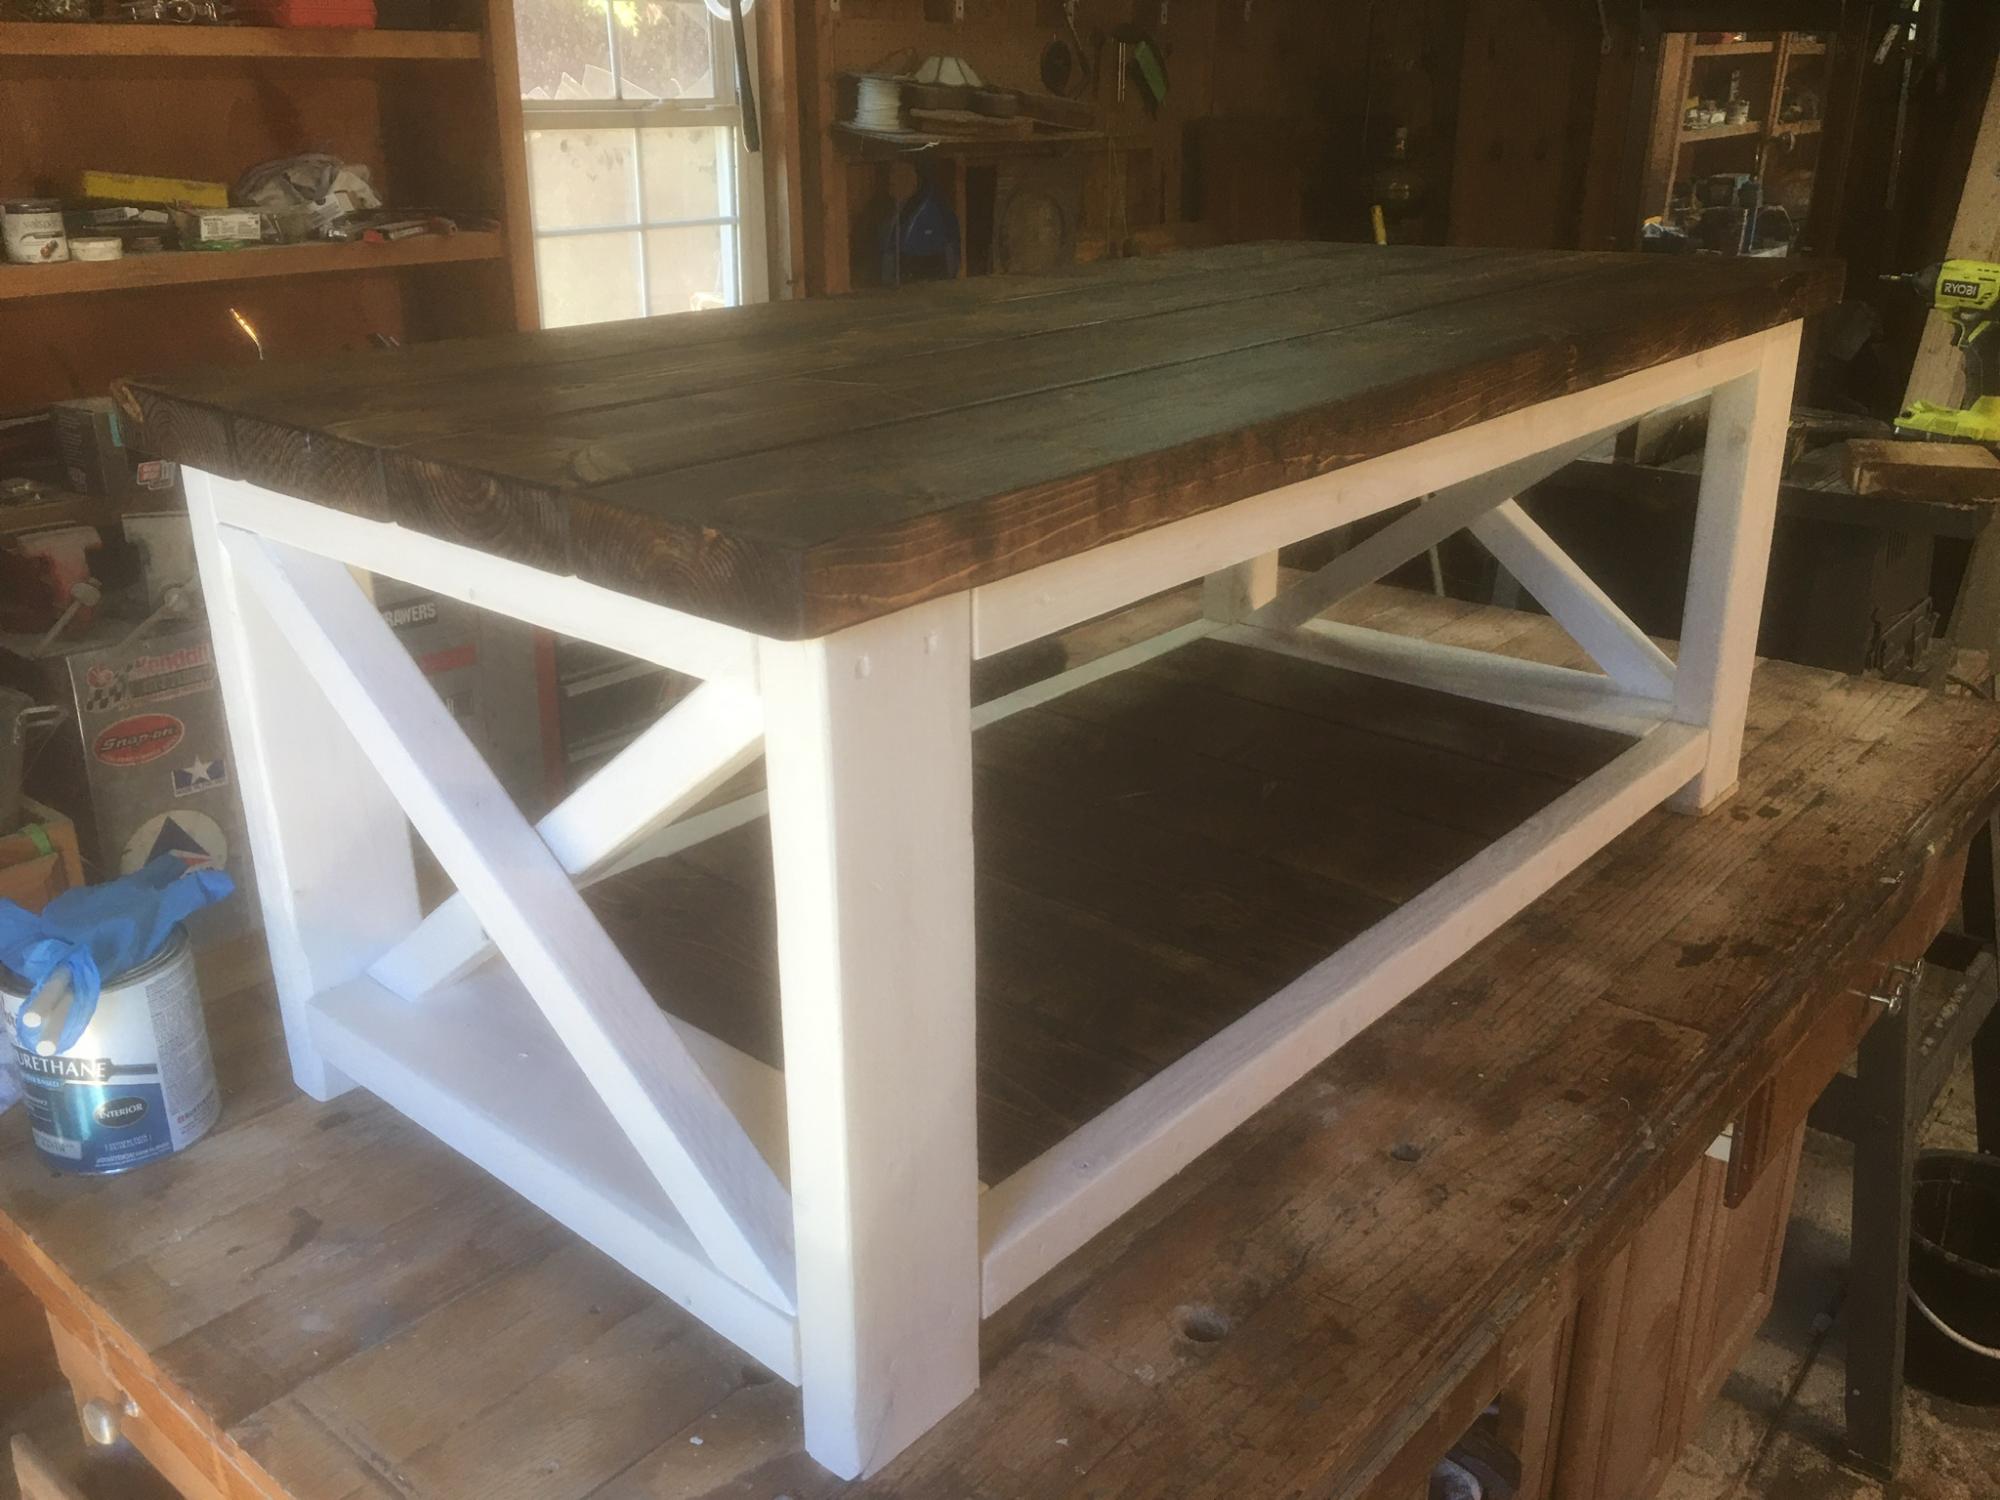
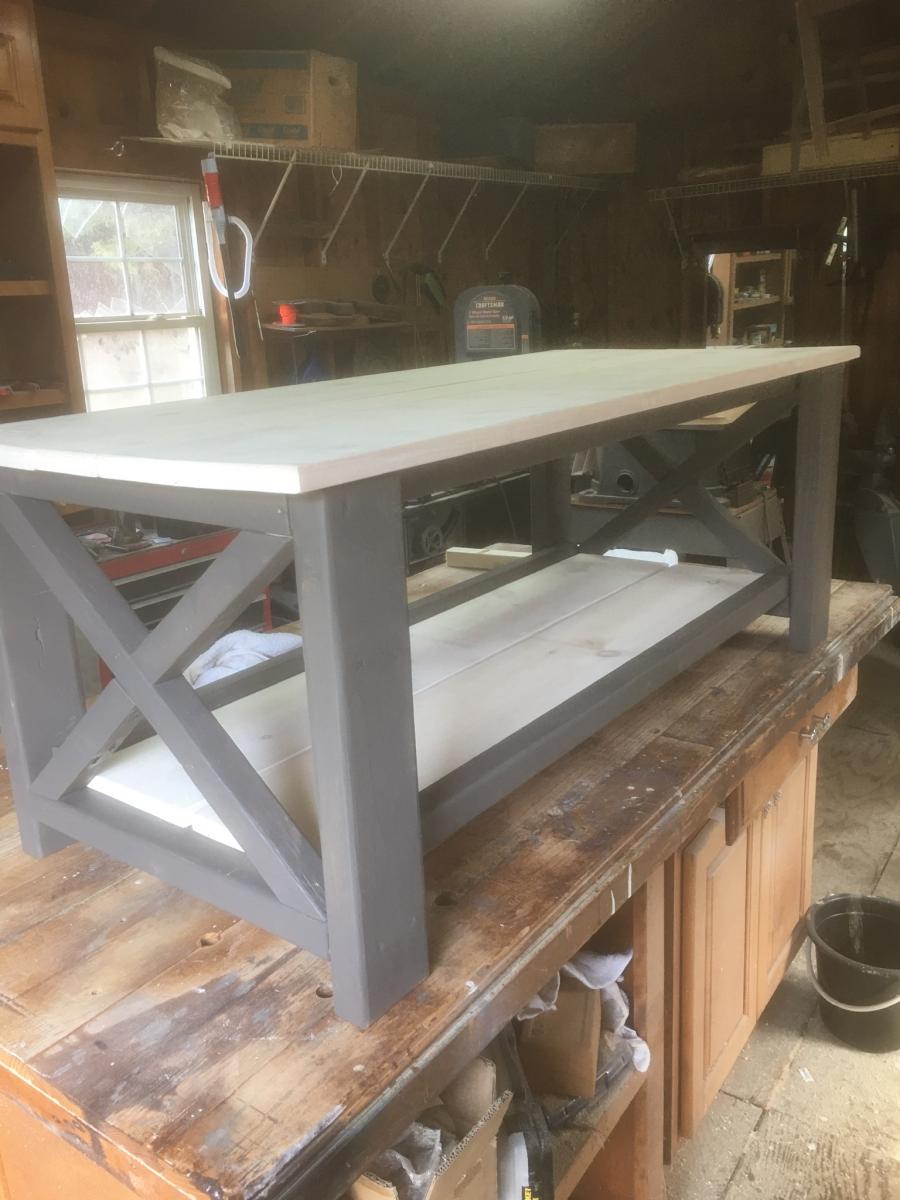
The first pic is the rustic x with 2x6. These plans are easily modified. The second is the rustic x with 1x material. Both projects were fun to complete!
Wed, 10/06/2021 - 09:37
Thanks for sharing, love the finish choices and the different tops!
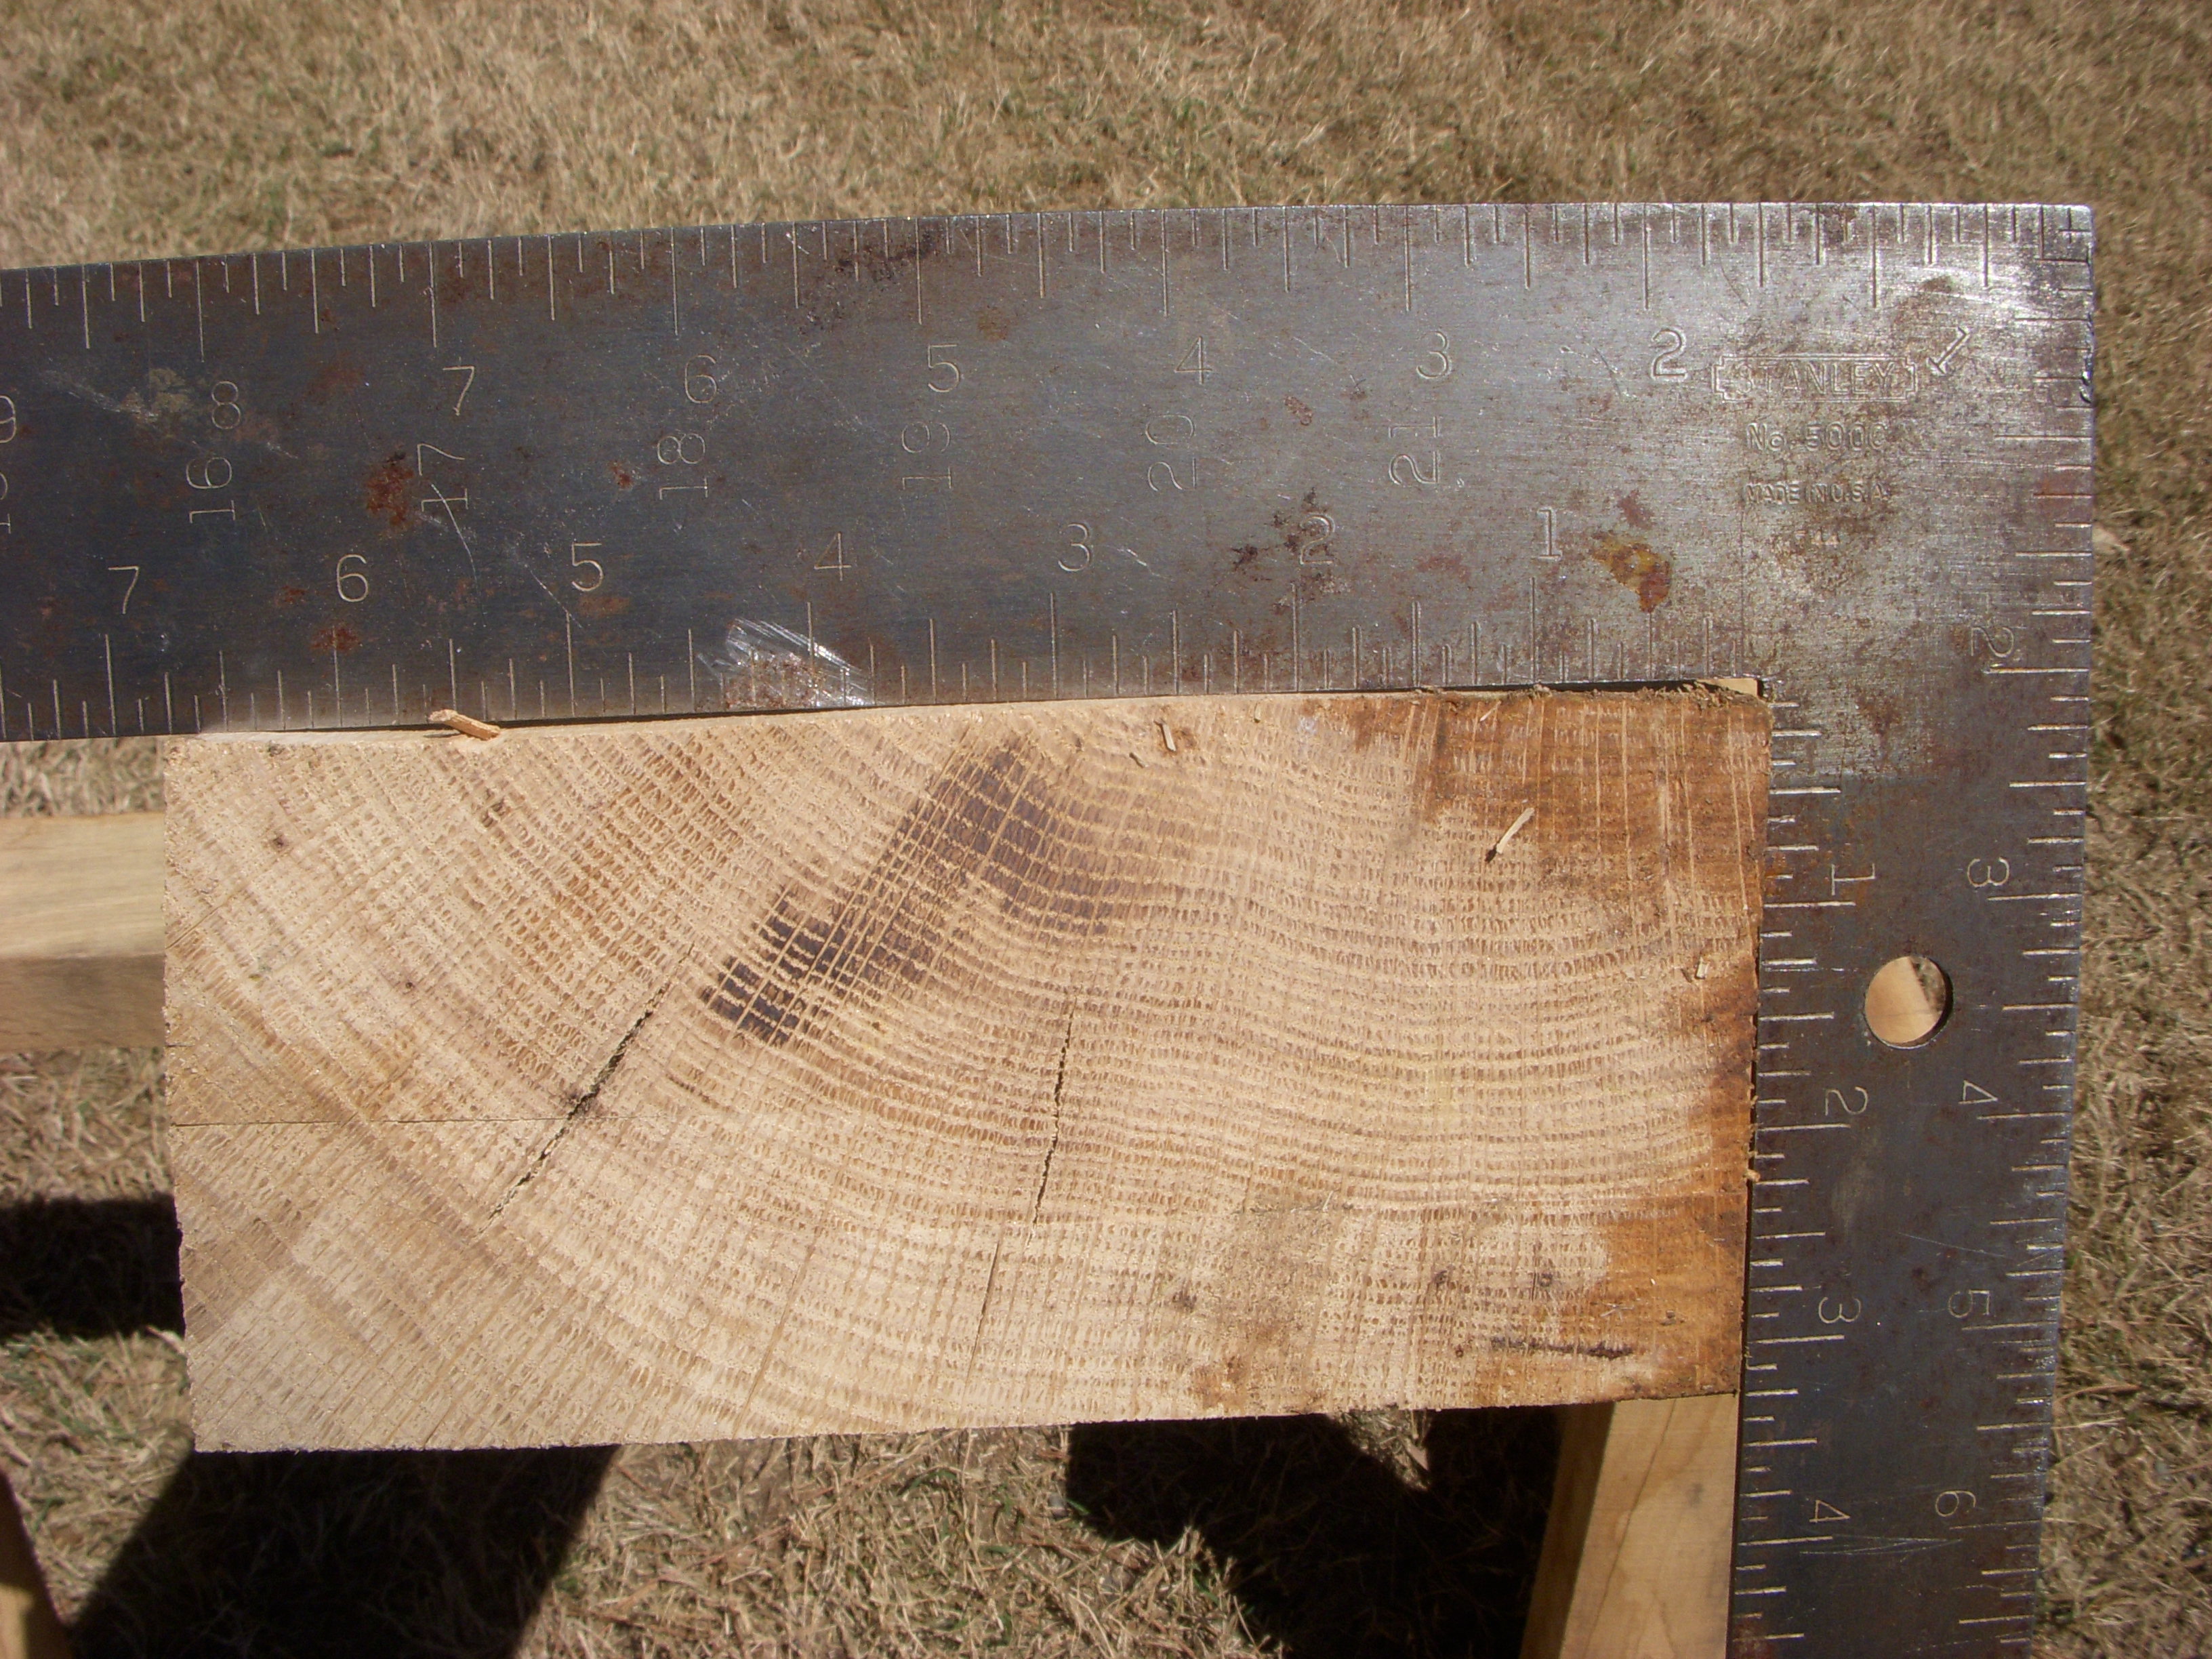
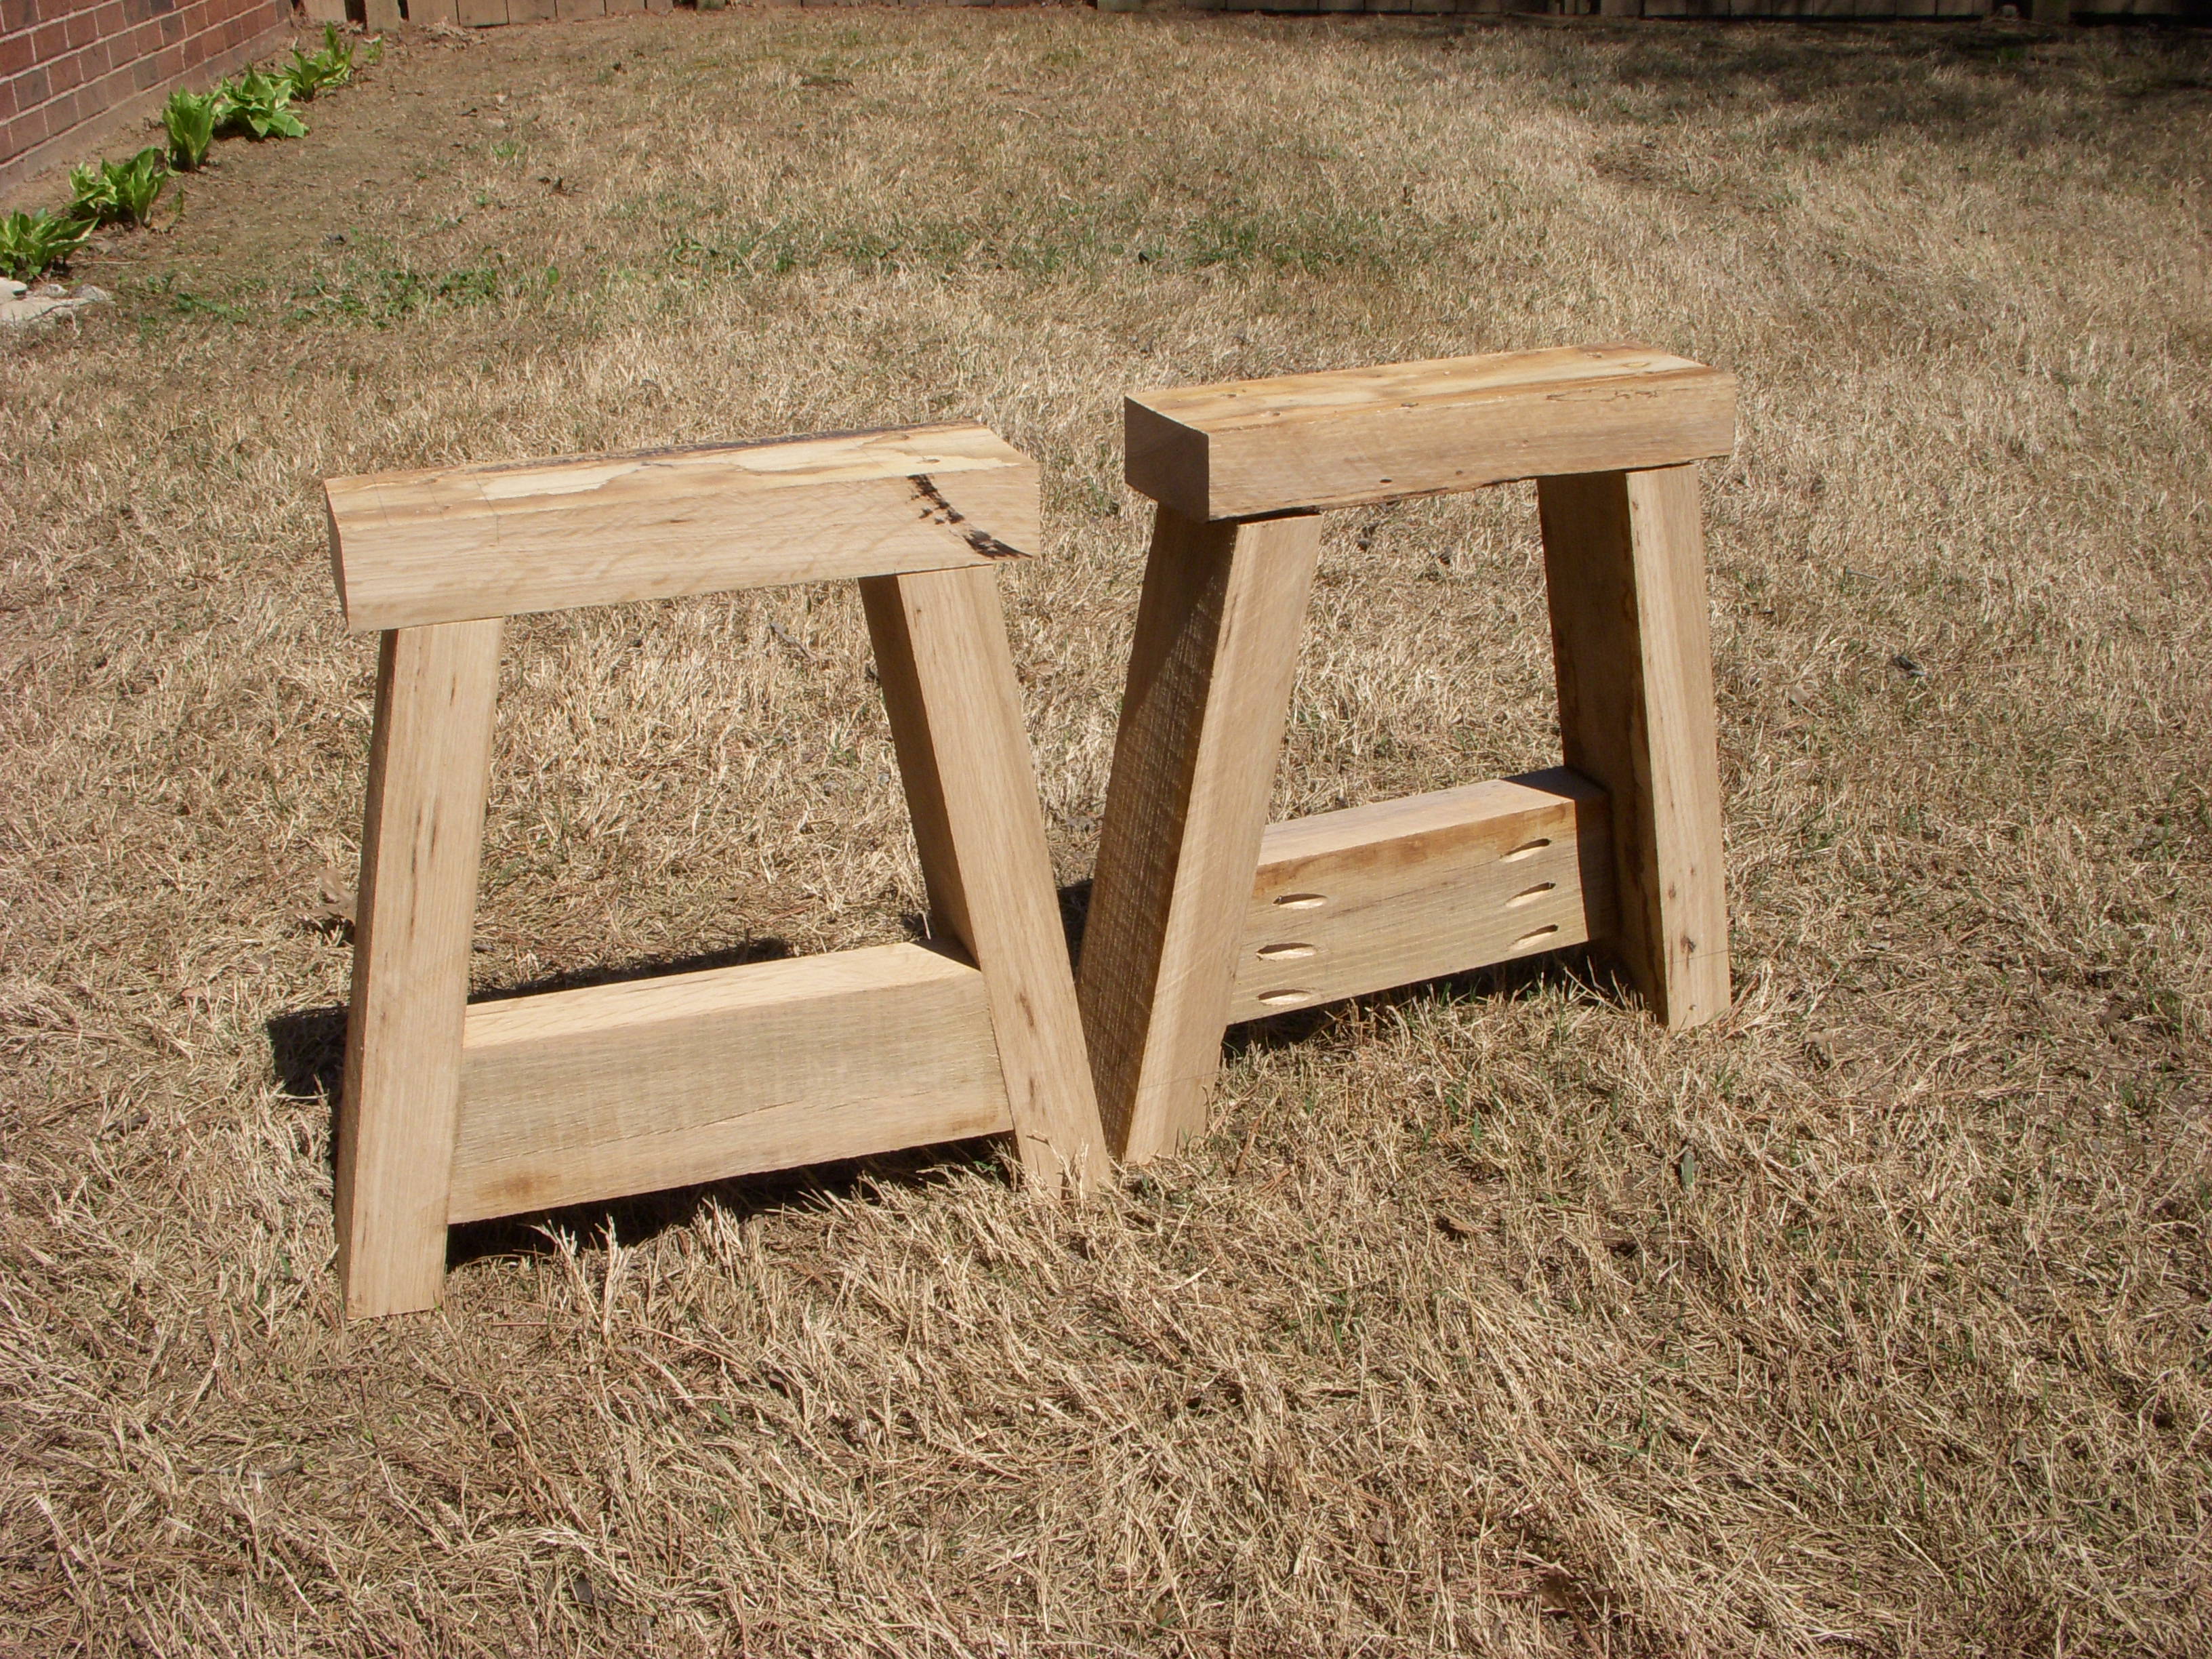
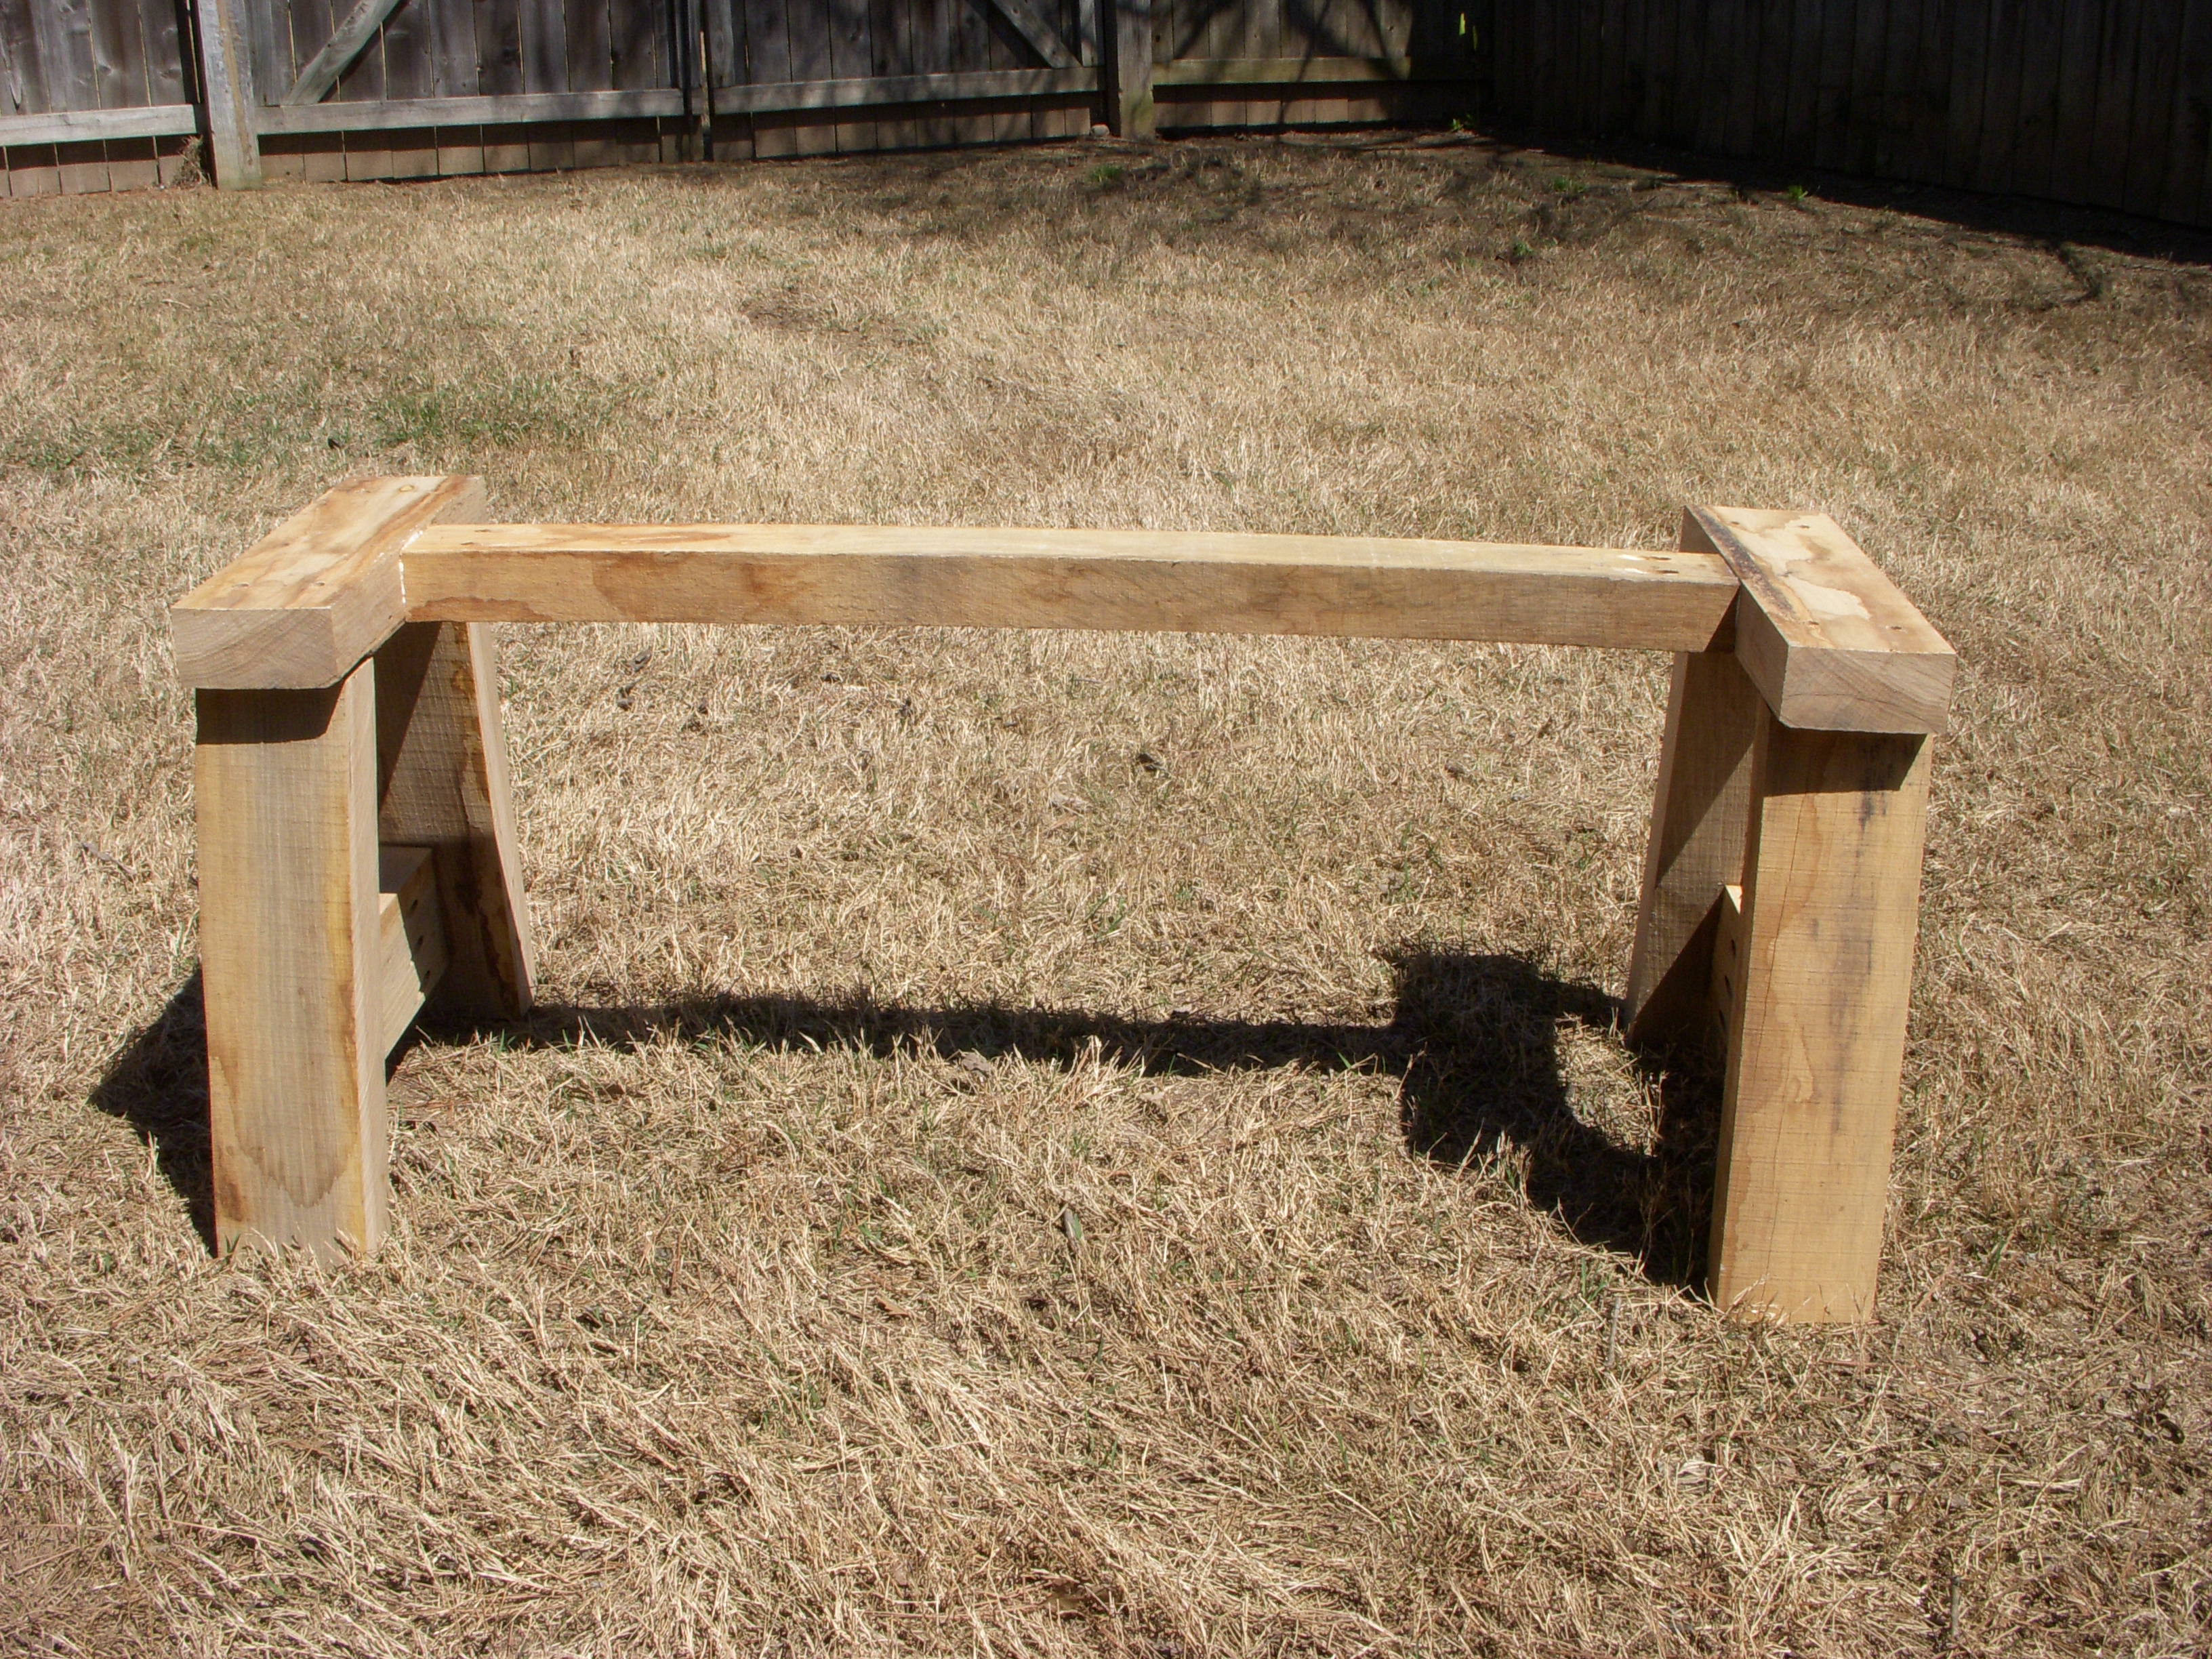
My wife saw the examples of the Providence Bench on this website and thought we could use one on our front porch. We had some heavy lumber from a huge pin oak tree that we had taken out of our yard, and that was used in the construction. In one of the attached photos, you can see the cross-section dimensions of the two top boards are 6-3/4" x 3-1/4". The legs, main beam, and angle braces are rough cut, full dimension 2 x 4's. Due to the lumber dimensions not being the same as standard commercial lumber, I had to vary the dimensions slightly. Because of the dense, thicker lumber, construction took longer than it would of had I used pine or other softer wood. I used a Kreg jig attachment to drill the holes for the screws. We painted it with Sherwin-Williams 1021 Hi-Tech Black exterior grade acrylic paint. The final weight is about 105 pounds.