Deck swing
Used left over deck boards
I built this outdoor play area for my kids this past summer. The area under that portion of the deck was always messy and muddy and so I wanted to make use of it. I built the deck and anchored it with lag bolts to the deck supports. On the one side I used rubber mulch and on the other there is play sand. I dug holes in various locations and filled with gravel to allow for drainage under the sand and mulch. For the awning I used plain cedar shingles. I added a shower that is just regular 1/2" metal pipe with a hose adaptor. The shower wall and fence are just old pallets that I had for a while, cut to size, which was pretty much random but they came out great. I added a misting system under the awning that works great, the kids love the cool mist on the hot days. Overall, a heavy job ripping up the grass, moving the wood, gravel, stones, sand and mulch, but a fun deck build and even better experience doing this with my kids by my side!
Tue, 01/13/2015 - 09:37
What an amazing use for a weird outdoor space ! You are genius !
Wed, 01/14/2015 - 06:21
I love it! I'm now trying to convince my husband to let me add a slide to the deck. Who wouldn't love that?!
Based on the rustic x console plans with a few small changes to cater to the space available.
Built entirely from 2x4 with the exception of the X's which are 2x2; I choose to use half-lap joints to make these, ordinarily I'd have these a lot neater but chose to leave them visable to add the the rustic feel.
For the finish I've oxidised the wood with a steel wool and white vinegar solution and then applied a light grey wash over the top.
I made 2 for my bare front patio
We are a homeschooling family and desperately needed bookshelves. My husband made this entertainment system to reclaim space in style. It's gorgeous and functional! Thank you Ana for the plans!!
Base was made from recycled timber and the top was made with new pine.
The rails were made from curtain rails.
One end has wheels for easy moving.
In reply to Amazing! I love the two tone by Ana White
Thu, 09/07/2017 - 05:50
Thank you :)
Sun, 08/11/2019 - 22:41
Hi,
All of the base was made from free pallet Wood and the timber top was one line length of new timber which cost about $8 and the wheels I had in the shed and the curtain rail was a couple of dollars from Bunnings. The paint and stain I already had.
I hope this helps. 😀
We love this fence refresh from the previous owner's solution to enclosing the pool equipment and a/c unit! It was the first time we fastened something to our house - drilling through stucco in the process. That was a big deal for us diy-ers! We made the frame out of 4x4's (which ended up being the most challenging part to the whole thing), applied the horizontal fencing boards and then used one of those $15 fence hardware kits - it was a great project that has made a huge difference in our backyard. Yay!
Fun build. Plans were easy to follow!
I made the shim bed a long time ago and really liked the look and height of the apothecary side table. I can put all my books and stationary and the stuff I want stashed next to my bed. I modifyied the plan slightly to have shims make up the front panels so it has a slight rustic feel to it and matches my bed. Thanks to Ana's plans I am starting to make my own bedroom set for under $300 bucks and completely to my taste.
My sister needed a day bed for her guest room. I modified the Modern Outdoor Chair plans to fit her needs. We used an old door she found, even using the hinges as a means to attach the door to the bed frame. This was my first real project.
Made from all reclaimed or scrap wood
Built this to give my daughter more space for her books. She picked the color (she's 6), and my 9 yr old son helped paint it.
Actually built this last Summer, but just now getting around to posting it up. Made it with Cypress, if I remember correctly, which is cheaper than Teak or other woods, but it's hard to stain because of the natural oils, and tends to flake a bit. Didn't come out too badly, though, if I do say so myself. Here's my little girl helping to show it off.
Loved how these plans were so easy to follow and certainly appreciate the accompanying video.
Tue, 12/21/2021 - 10:20
Thank you for sharing, love the raw look and the build is fantastic!
We are getting a puppy in a couple weeks and we want to crate train her. We have a small house so the only place we have to put the crate is in the living room. Needless to say, we needed a way to make the crate look good in our living room. That's when I found the plans for the rustic x-end table. The dimensions were almost the same as the dog crate. I only had to change the dimensions by a couple inches and wallah! Now the crate doesn't look out of place and I have a place to put my laptop and phone! I ended up ripping the 2x6's just a saw blade width down to get rid of the rounded edges and that made the top come together smoother. I also planed down the top a bit as well. In some spots, you can hardly tell they were 2x6's laminated together! I used two different stains on it. The first coat was a tudor stain but I wanted to warm it up a bit so I put a coat of antique walnut on it as well. I am very very happy with how this turned out. Now my husband would like me to build a coffee table to match!
Thu, 02/25/2016 - 08:59
This entire site is click bait. yet to see one actual plan. its like all stolen data from pinterist. which is equally as bad
I needed chairs that would fit on my narrow front porch. This plan was great because I was able to resize it to 20x20. I used 1x4s that I already had and some wood glue. They turned out solid. I made the tryde table with left over wood. That one is 17.5x17.5. Super happy with the results. We are doing the garage shelves right now. I have a list of other things I want to make thanks to Ana's wonderful website.
Ana's little crates go perfect in our beach themed bathroom. I altered Ana's plans a little. I changed the dimensions to 12 x 11 1/4, and I did not use lath sticks for the crate slates because I wanted something sturdier. I had some left over 2×12 wood from a previous project, so I cut off 3/4 in wide pieces to make the crate slates. The wood grain gives character to the crates and makes it look more weathered.
7’ long table using 4 2x8’s on top with 2 2x4’s in the middle. The bench is also 7’ long. I changed up the bottom on the bench to make it super sturdy (added angle braces).
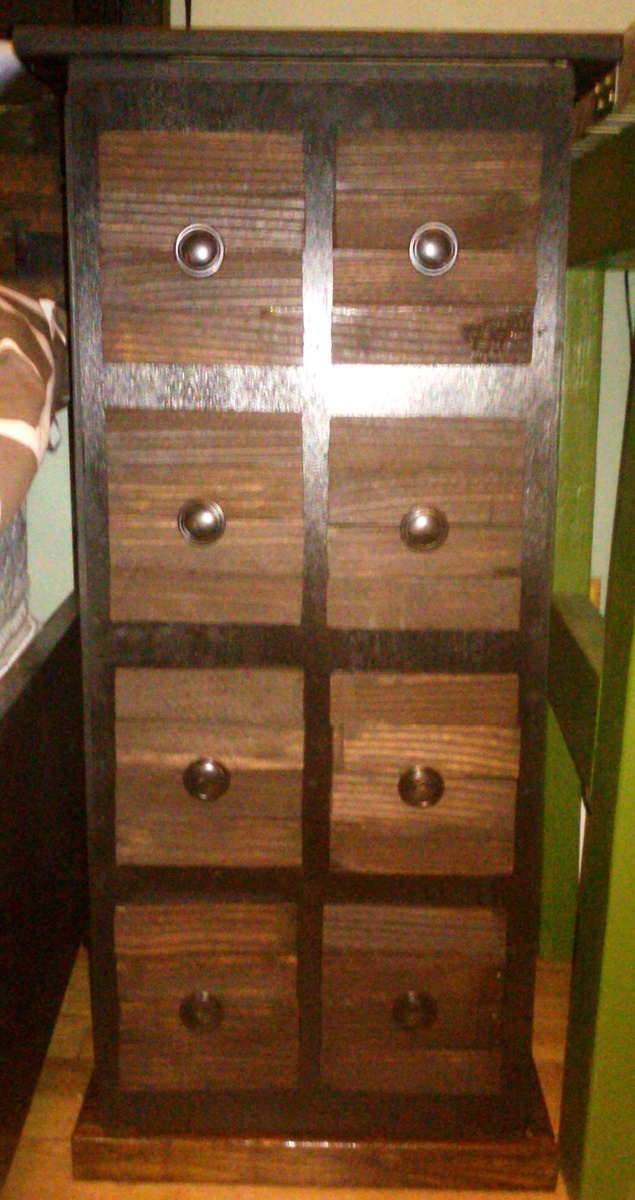
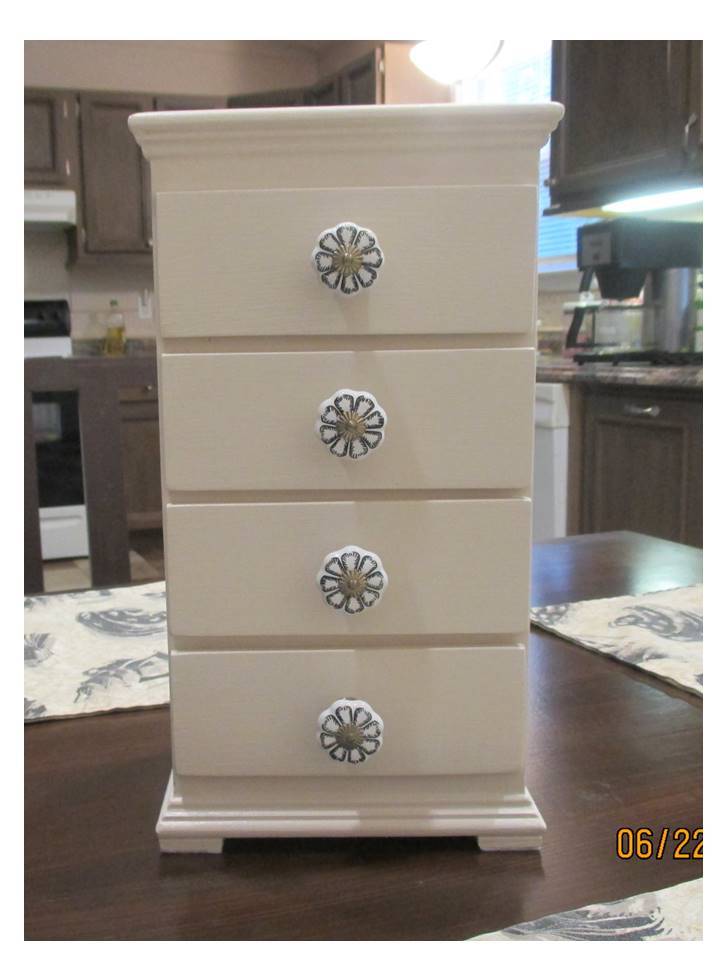
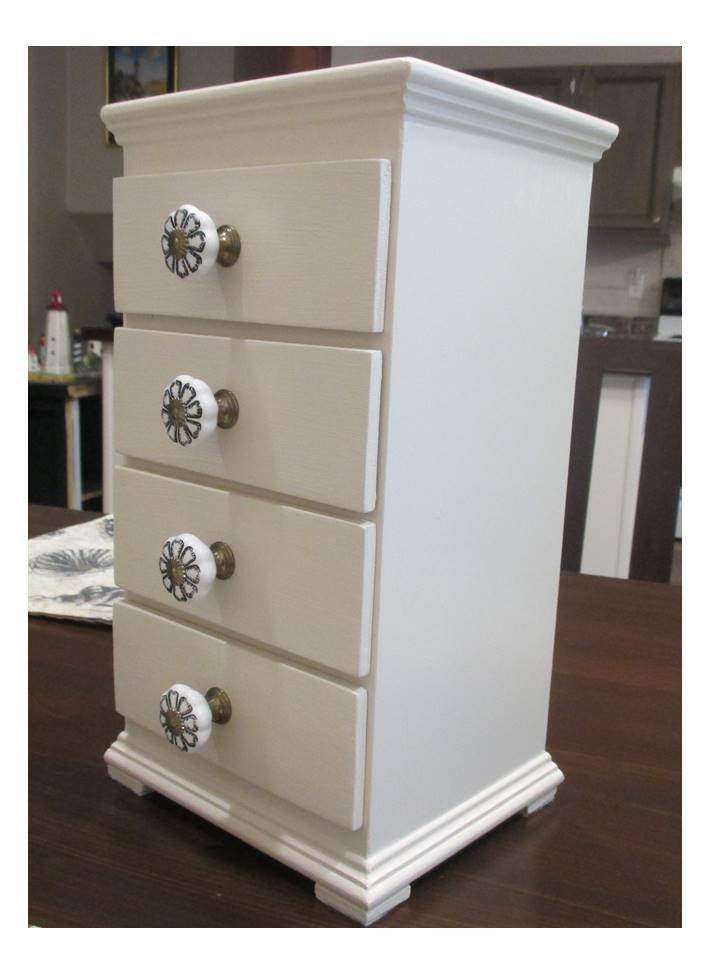
This project is a 4-drawer variation of the Easy Jewelry Box, made with select 1x6 for the top & bottom, craft boards for the box and drawer sides, with craft board overlay drawer faces. No plywood is visible on the outside on this build.
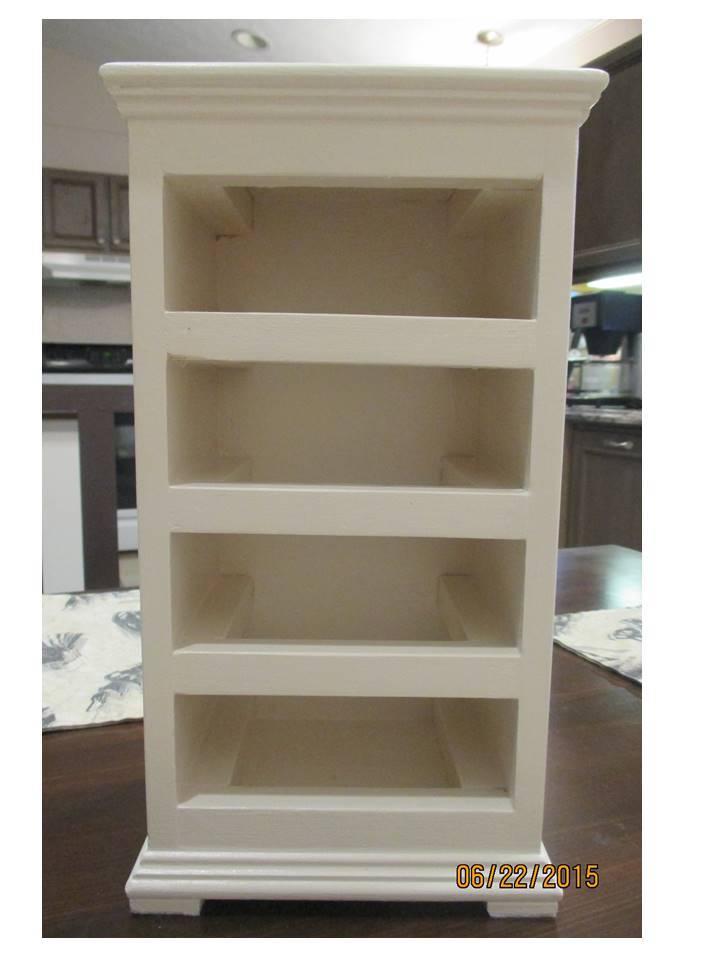
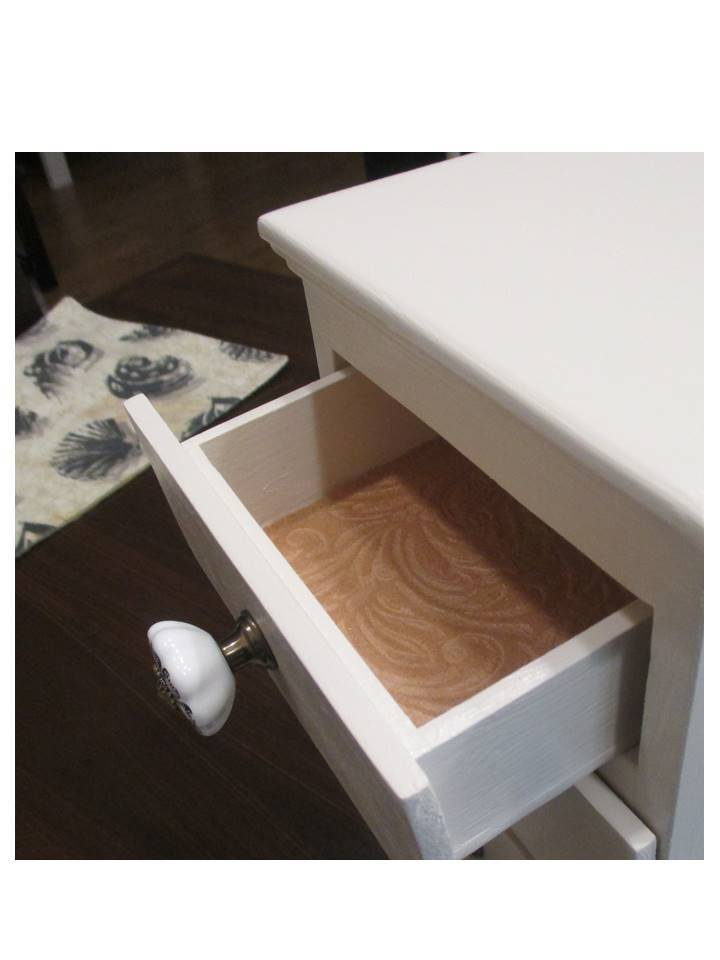
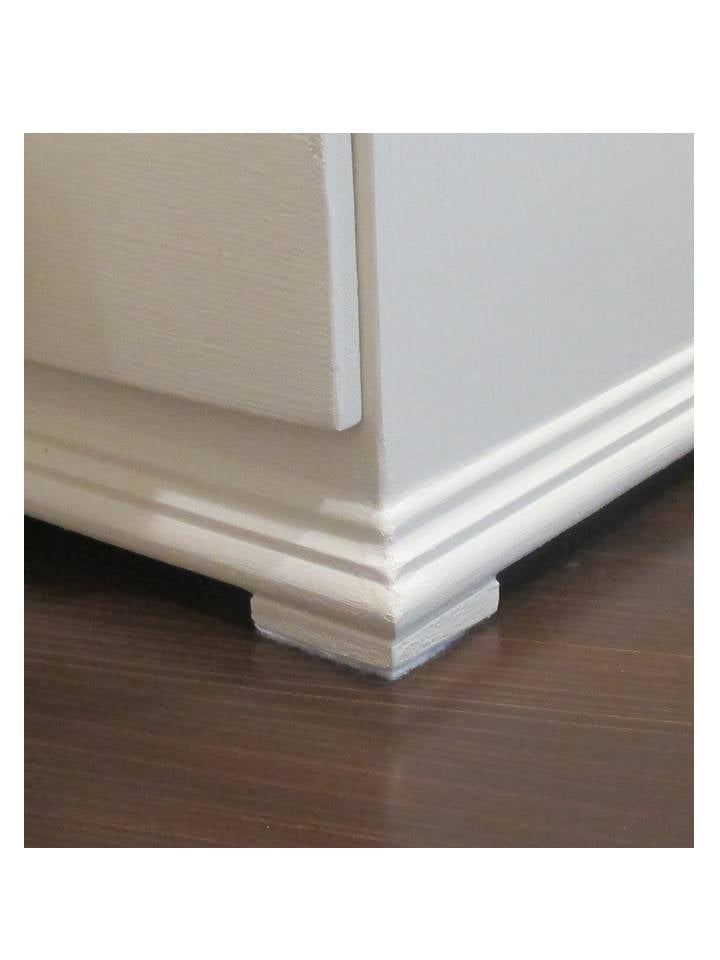
This version has a smaller footprint and is much lighter than the original plan, built using the thinner craft boards, and the drawers slide on S4S instead of full shelves. The drawers are 1/8" shorter than the box depth to ensure they don't touch the box back, so the overlay fronts lay flat to the box. The overhangs are ¾” wide mini colonial moulding, and the feet are squares of 1 1/8” lattice scrap. The design includes a toe-kick and top-kick which allows room for both overlay drawer faces and top/bottom overhang.
I spent a couple of hours redesigning the plan to get this as light as possible, while making the most of the usable space within the footprint, and leaving no plywood edges visible on the outside. The build itself took about 6 hours, including the build, sanding, finishing, and decorating.
I modified the Fancy X Farmhouse Table plan to shorten the table to 6 ft instead of 8 ft and added breadboard-style ends. Jacobean stain.
This was my first project and it come out beautifully. I did learn a valuable lesson - if you are going to build something in the basement, make sure it fits up the stairs. Not sure if you can tell from the picture but this ended up 6 inches shorter than the plans. Can wait to find my next project!