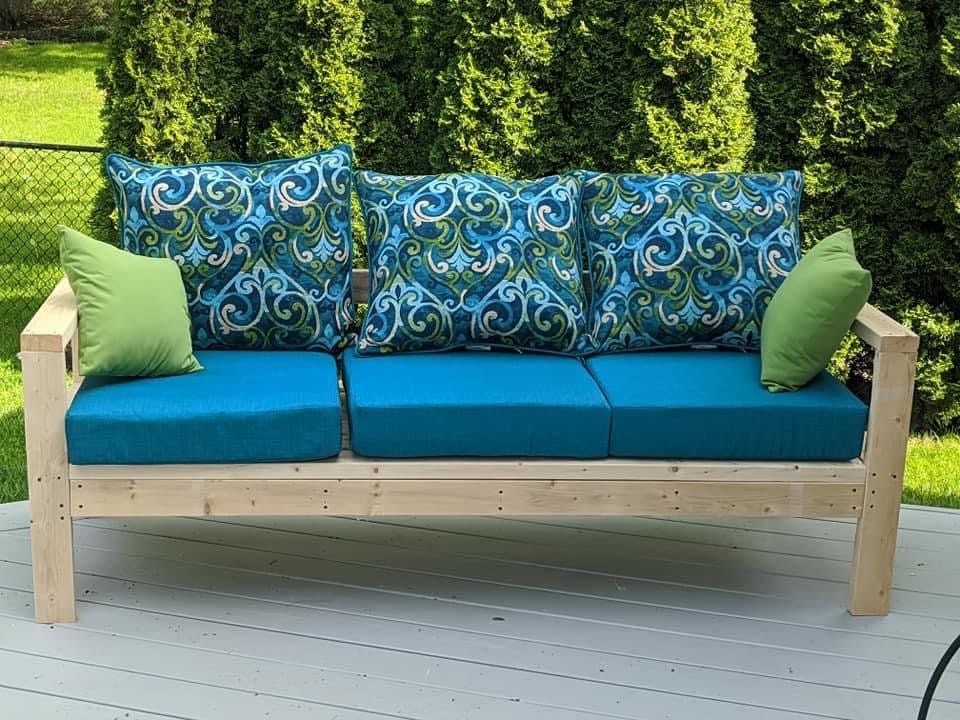
Outdoor double bench and Adirondack Chairs!
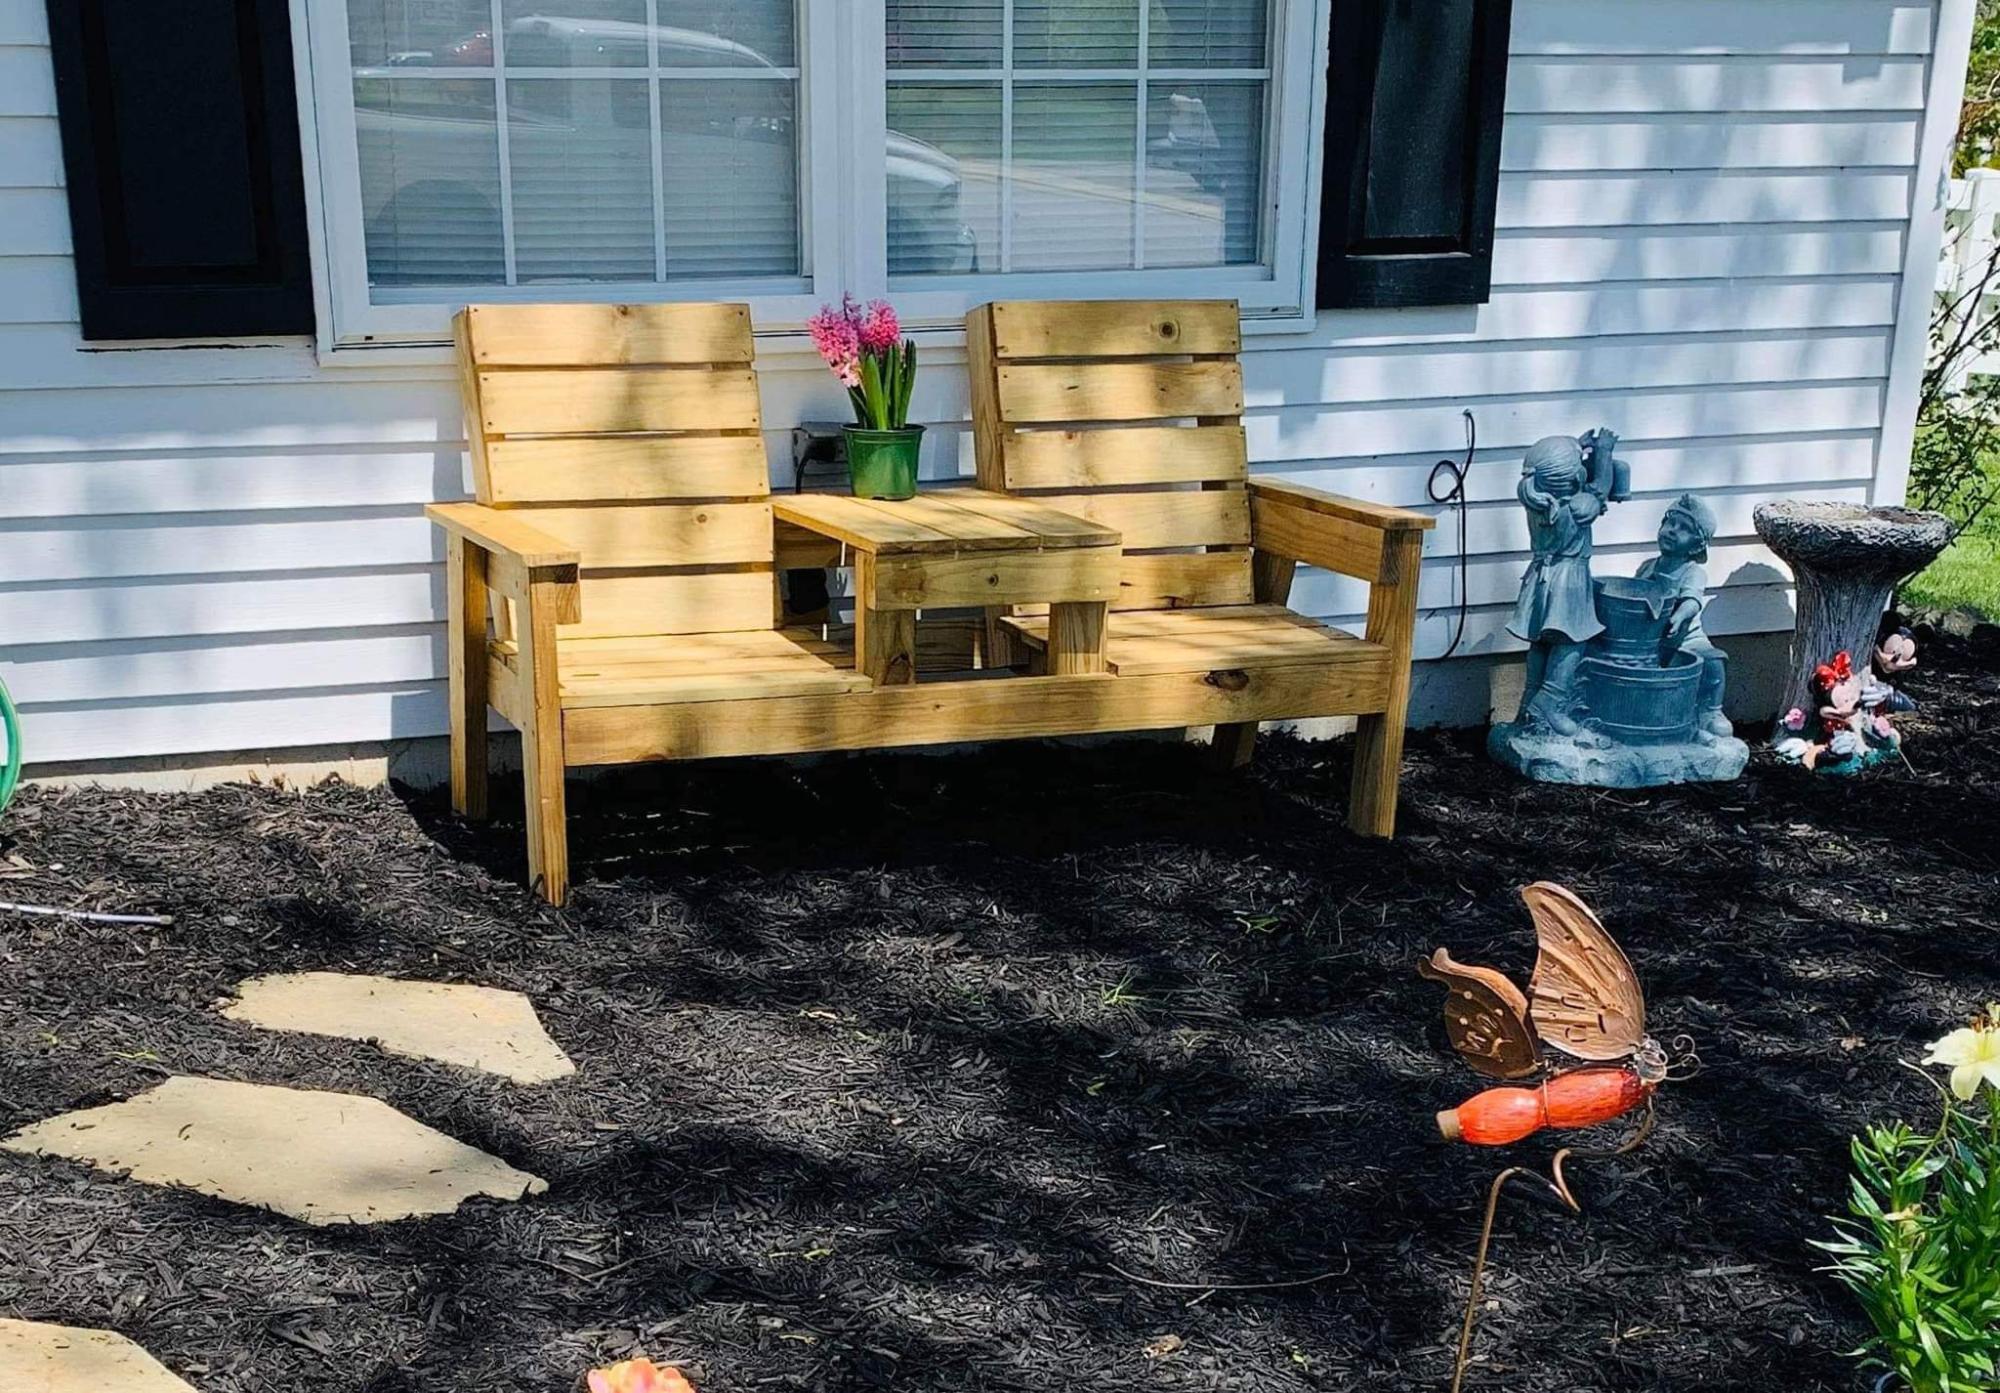
Nice outdoor bench and adirondack chairs by Nick!
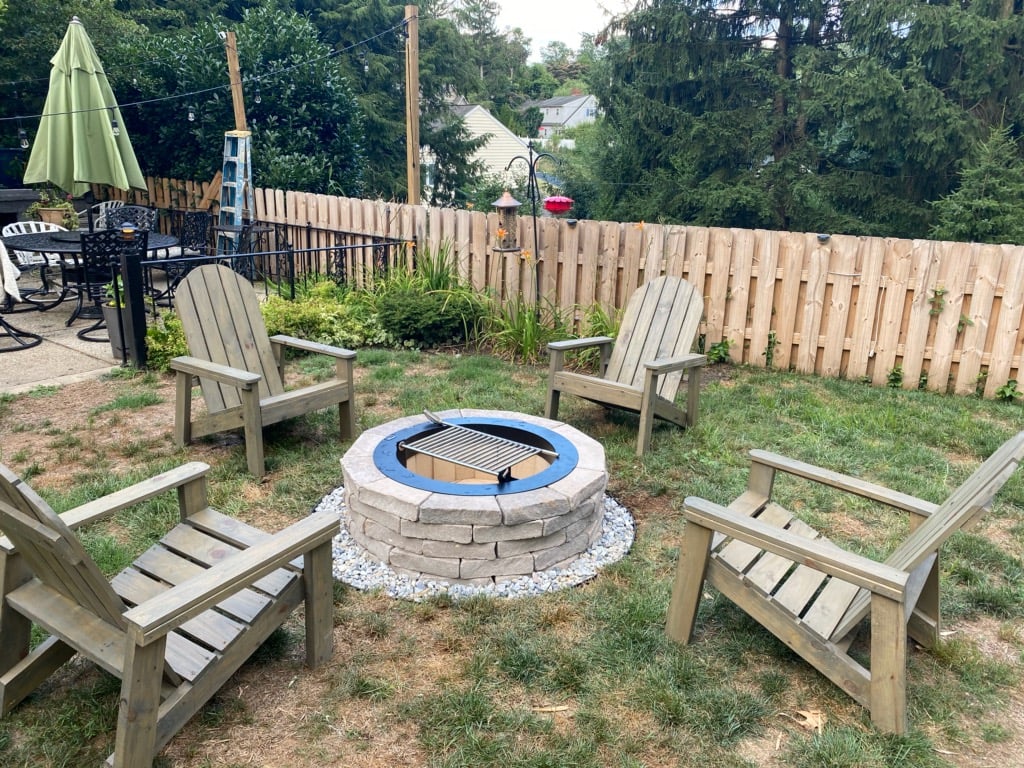
Nice outdoor bench and adirondack chairs by Nick!
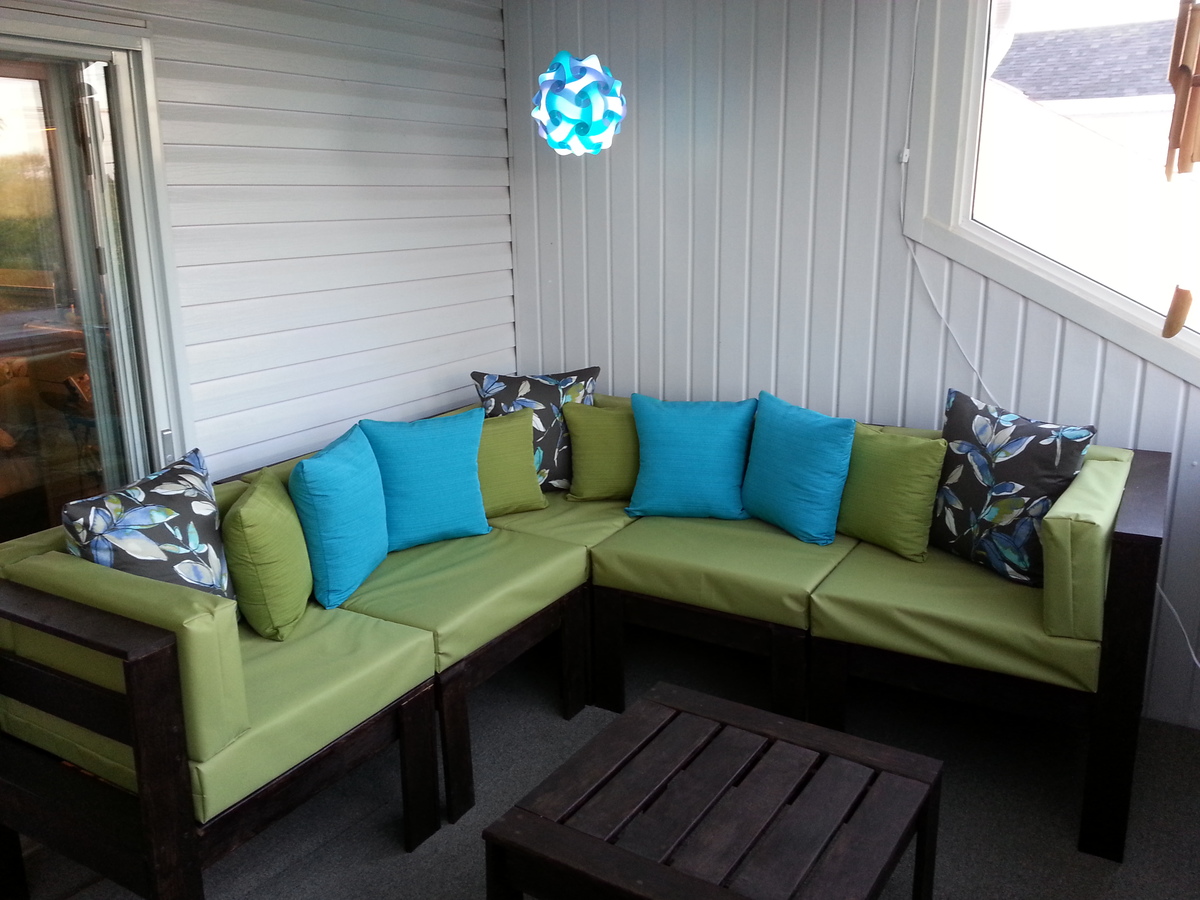
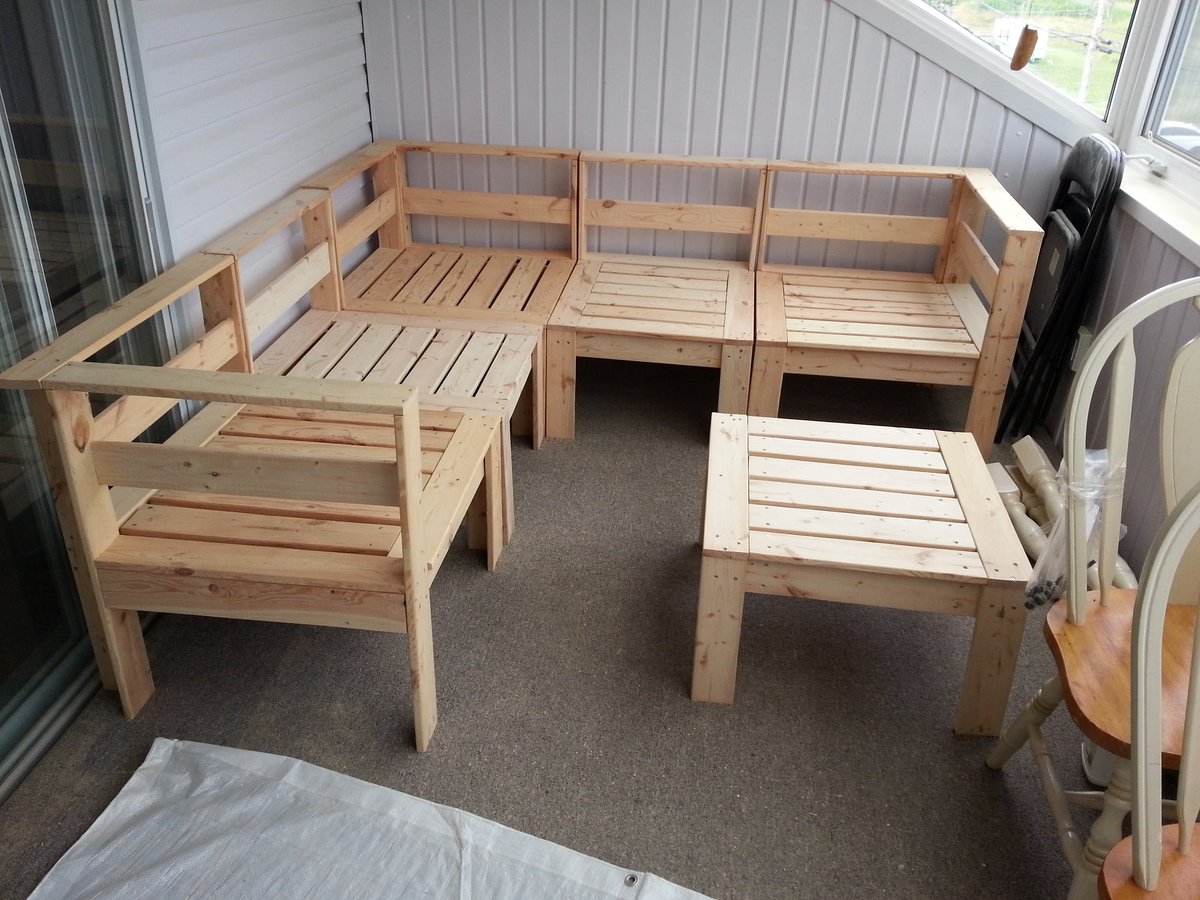
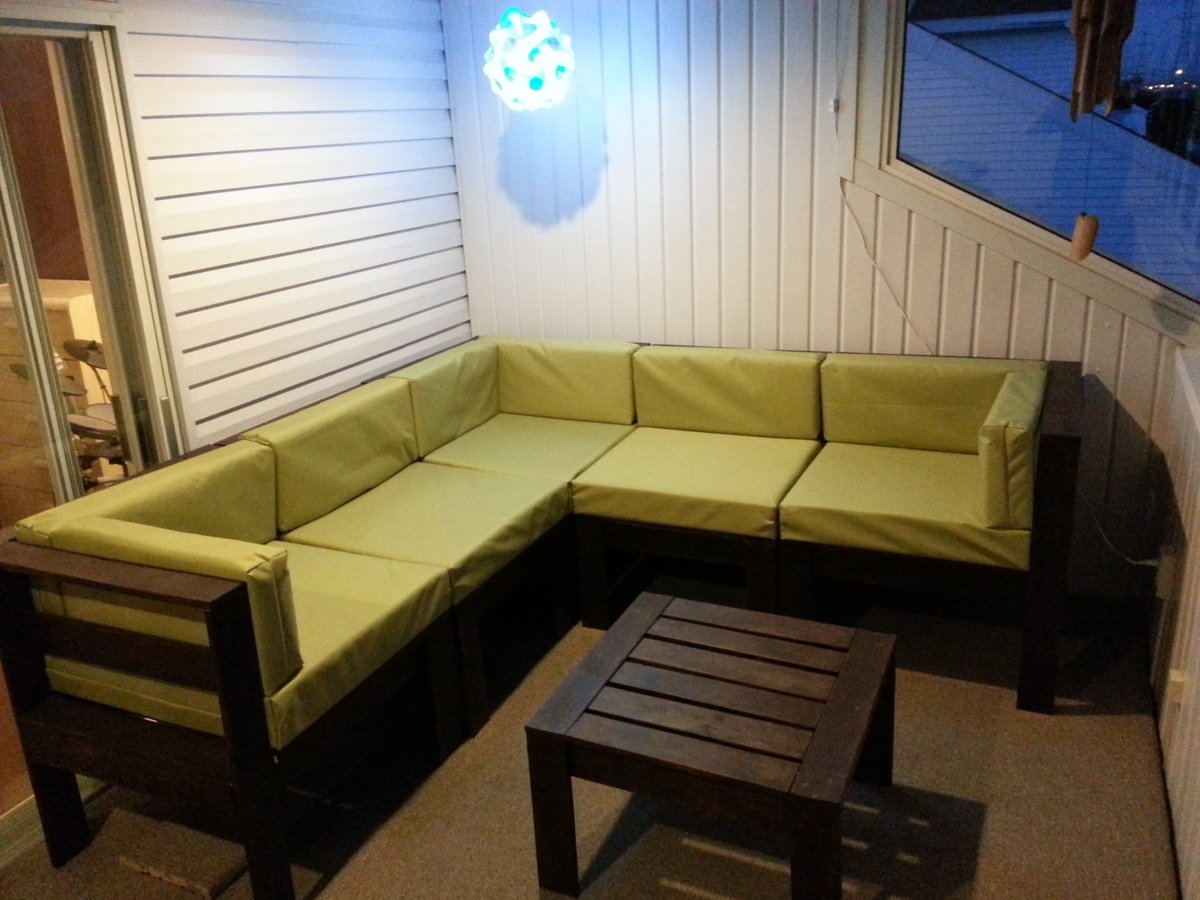
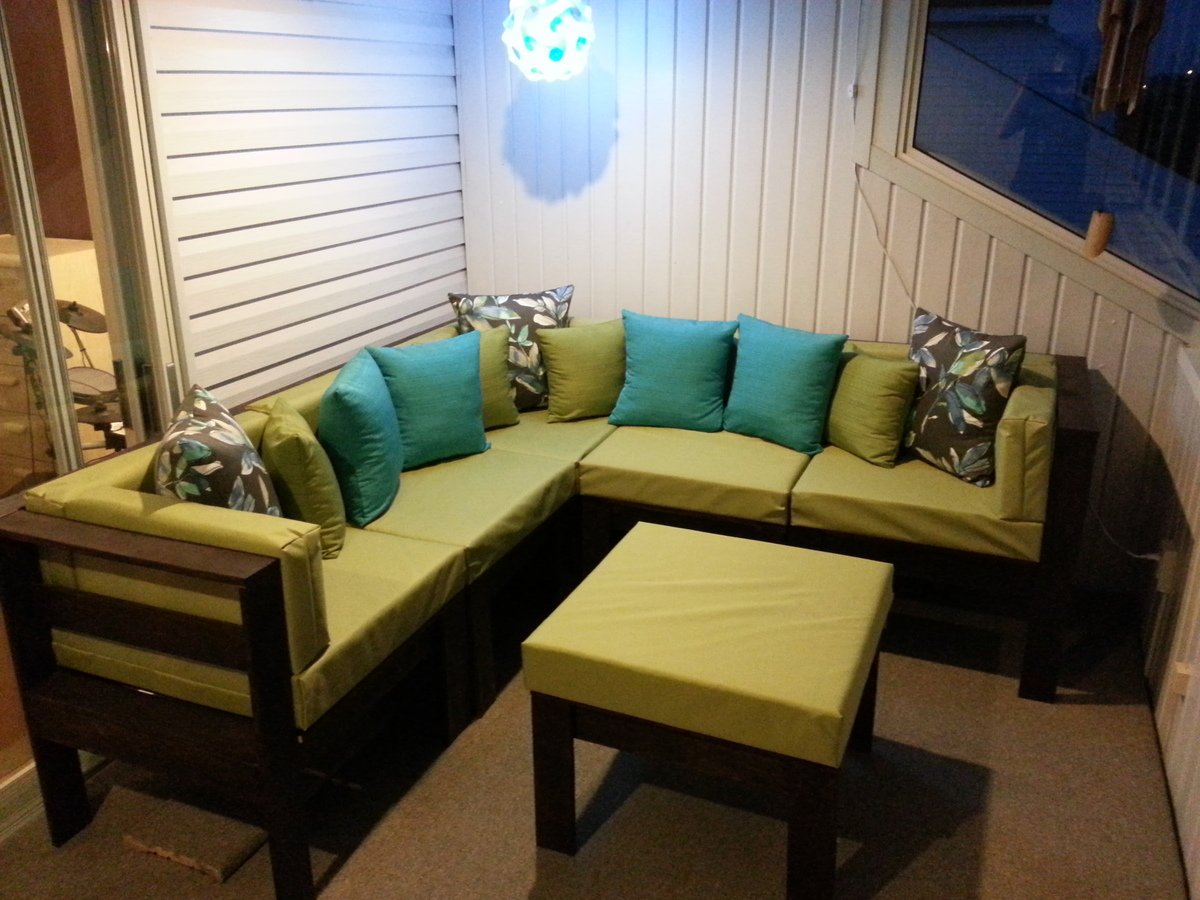
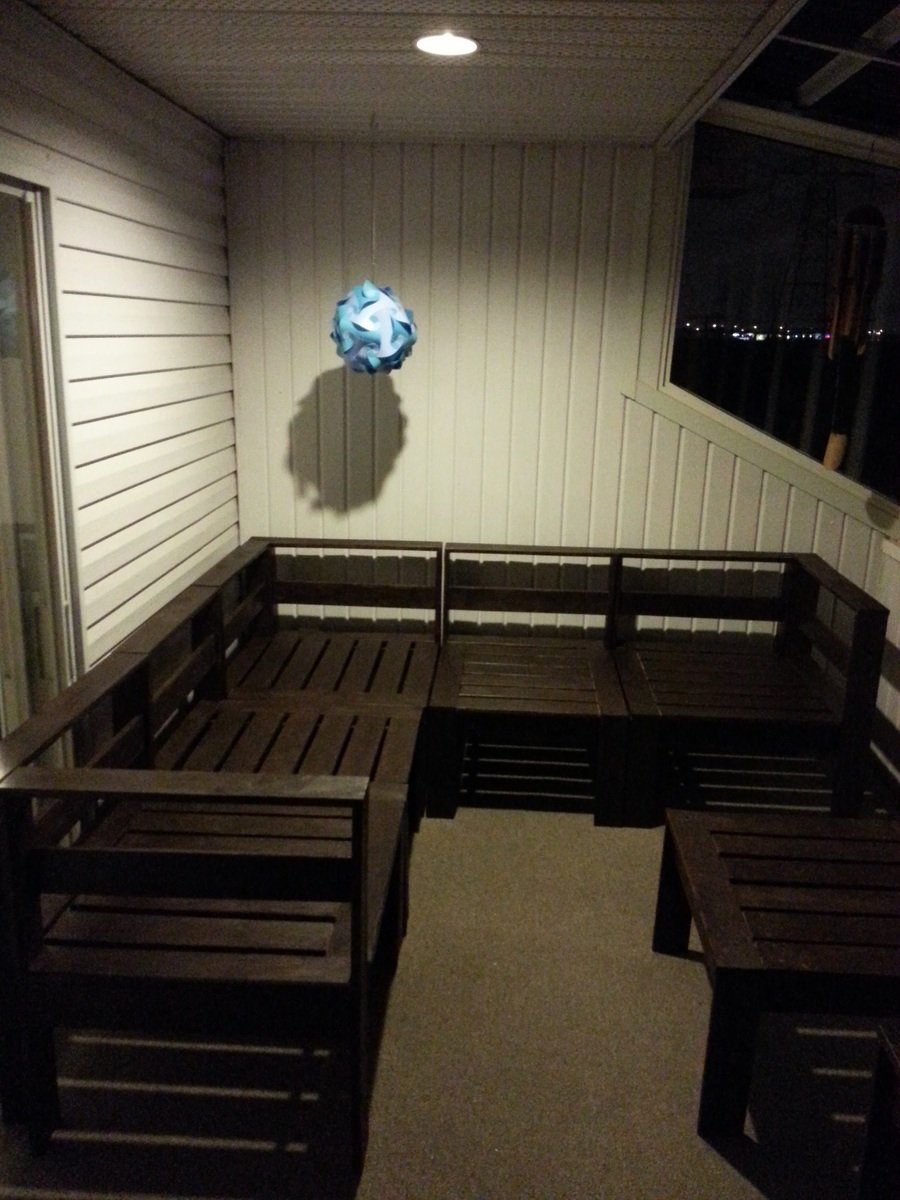
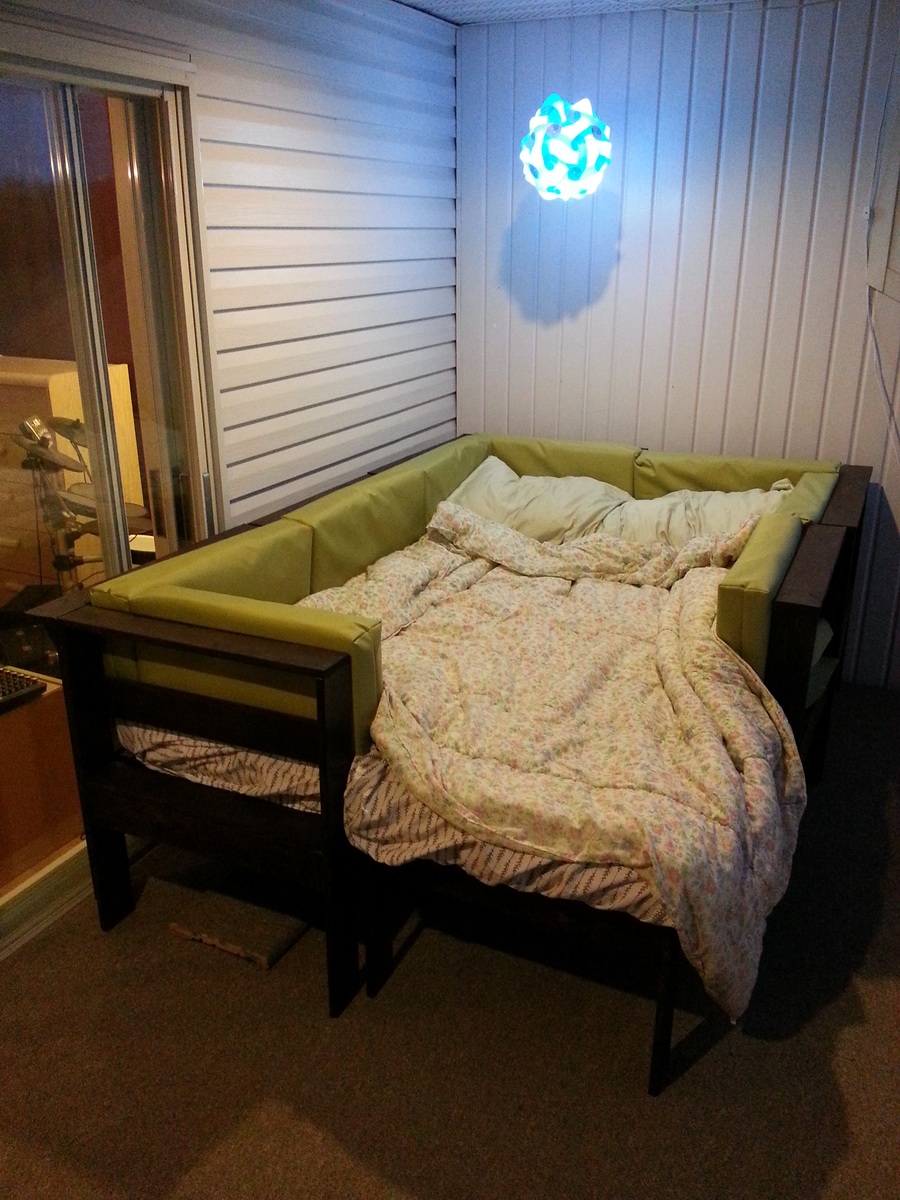
First ever woodworking project!
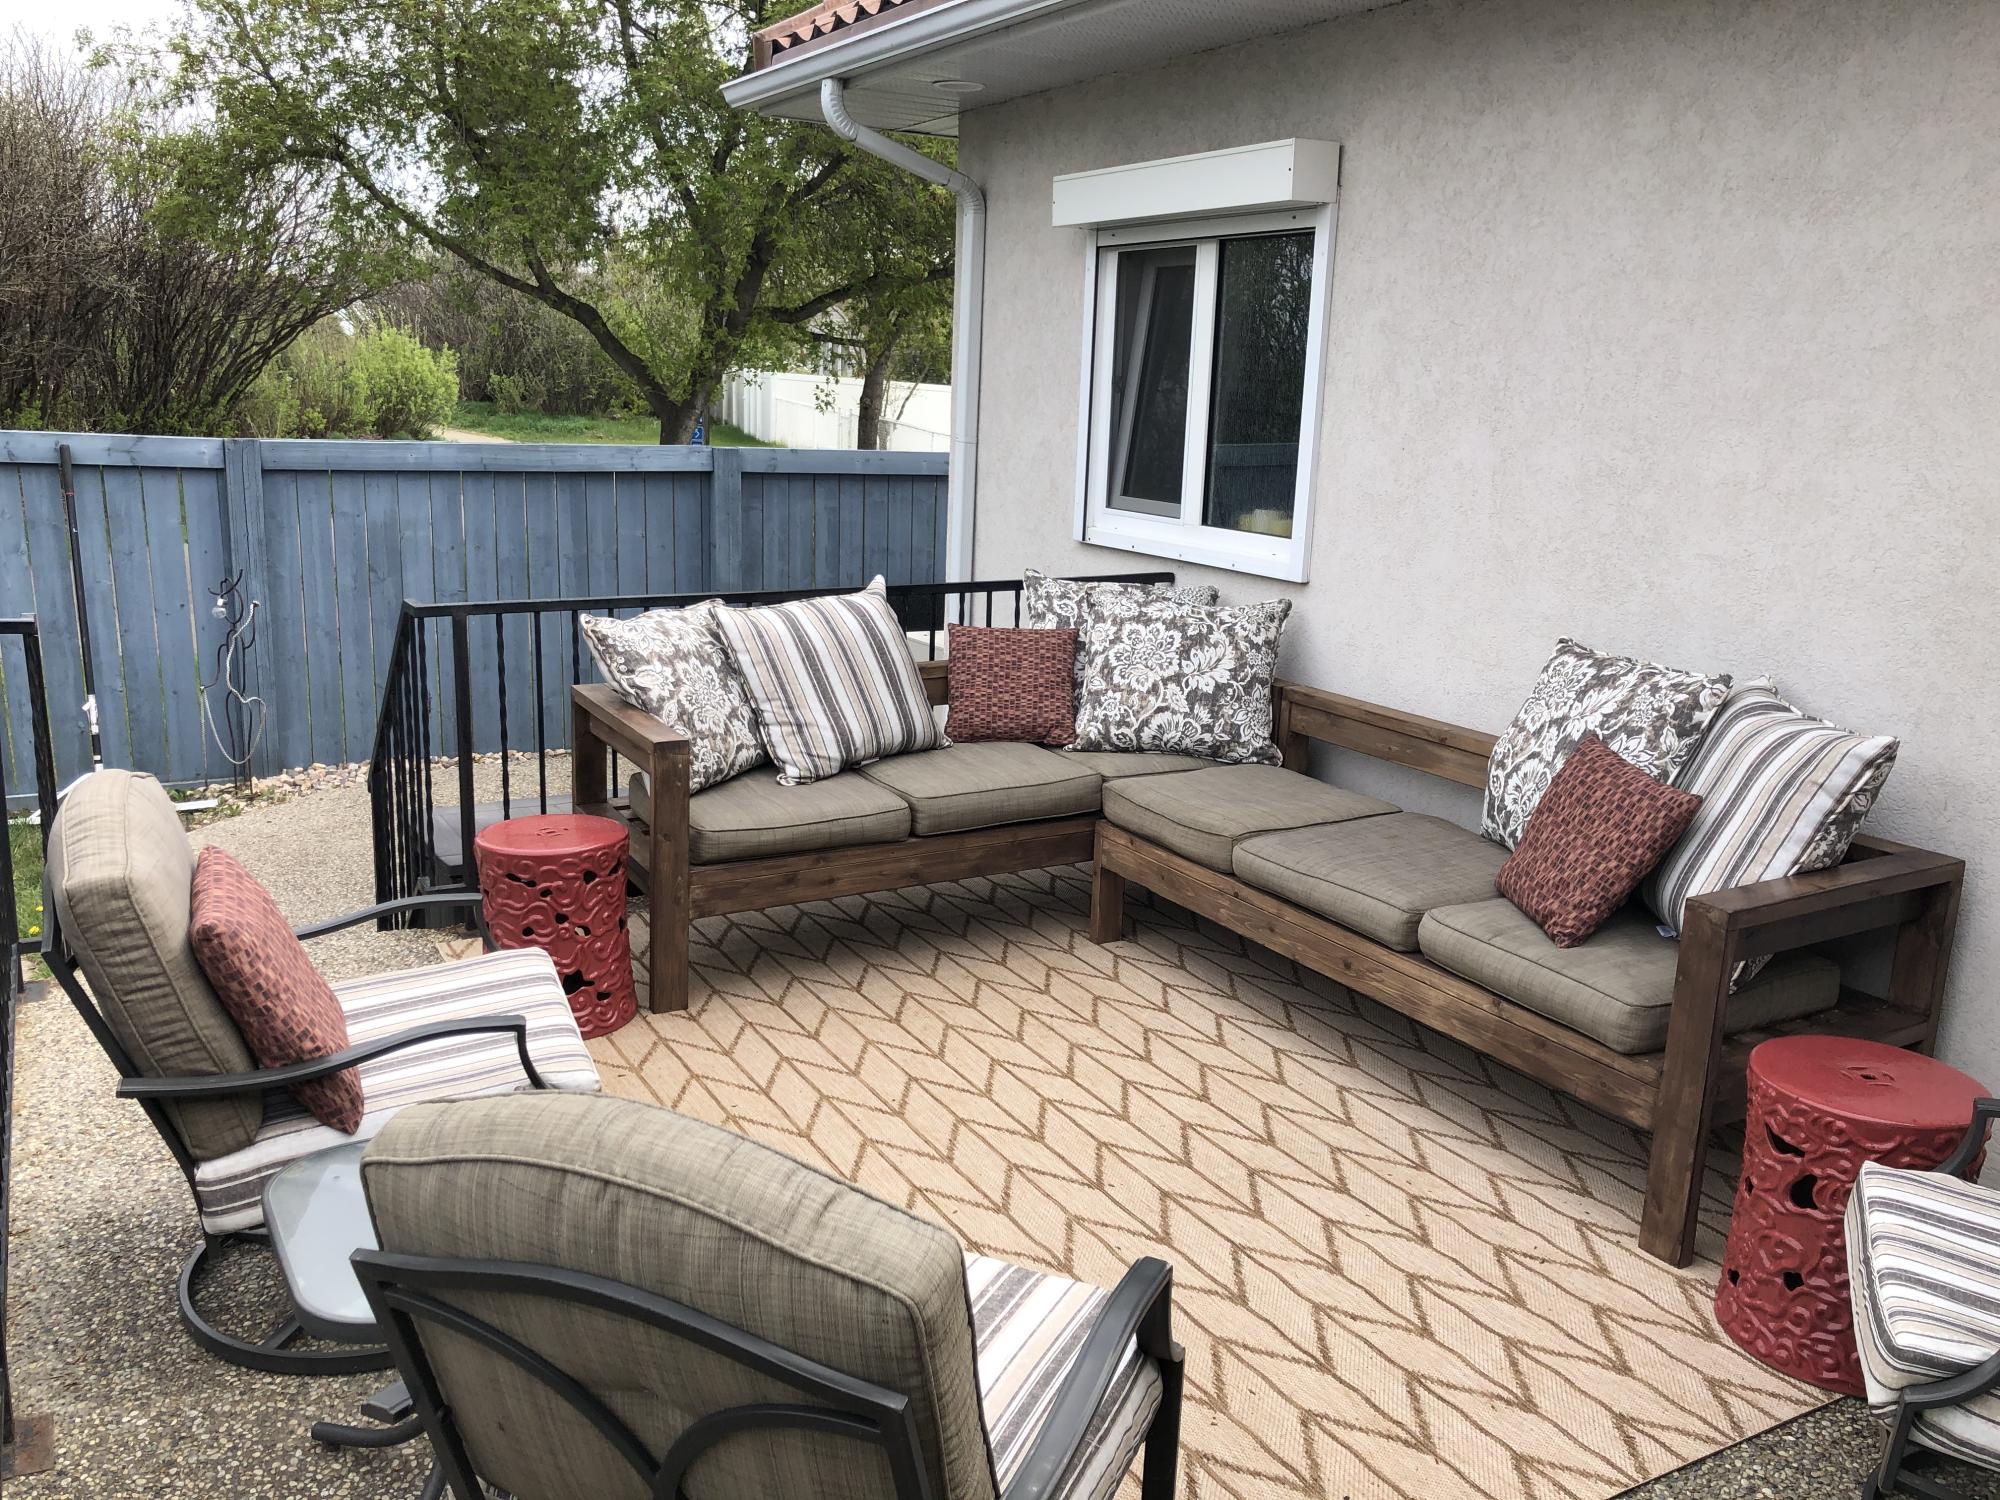
I wanted to add a sectional in my veranda, but all the models at stores around my place were at least a 1000$ and didn't had the proper dimension. The plan given on this website was ideal for my space, since my veranda is limited in space (was converted from a balcony, 7'x14').
The whole project went slowly since I did it part time, but overall it went well. However, the entire project from A to Z was time-consuming since I decided at the beginning to do the wood working AND the sewing part, and I'm a beginner that doesn't have any experience in any of these fields. I did literally everything by myself, from cutting 148 pieces of wood with a rented mitre saw, sanding each single one of them, staining the assembled chairs and table after assembly, cutting various pieces of foam for my cushion with 72"x30" sheets of foam, and lastly do the sewing of all the green cushion AND the smaller squared cushions. That was a lot of things to learn for a first timer and fortunetely I was enough motivated to do them, and most importantly patient. I had the moral support of my girlfriend during the whole project and showing the progress of the project to my friends, family and coworkers did help a lot to keep me motivated to finish the project.
I learned a lot from this project, whether it's wood cutting, sanding, assembly, staining or machine sewing. These skills will help for future projects for sure!
Thank you very much Ana for helping me, with these simple plans, learn new skills that enabled me to create something amazing!!!
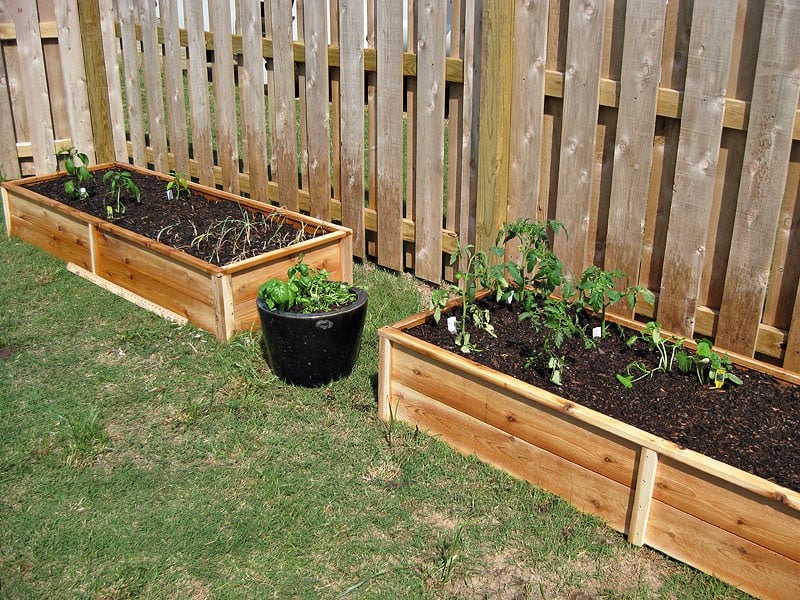
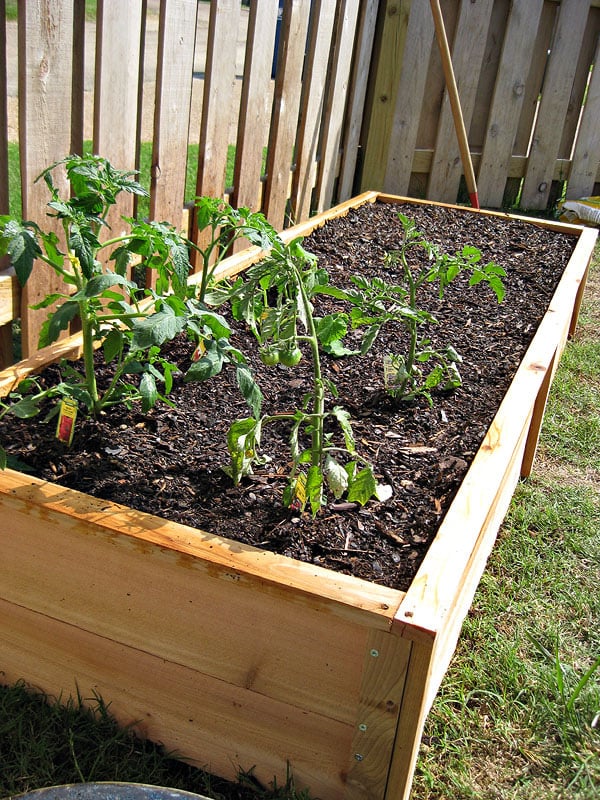
Since moving and finding Knock Off Wood, we decided now would be a good idea to try some gardening (again...after failed attempts!) These beds are so simple but beautiful out in the yard and for the first time I actually have vegetables growing. We used the cedar fence posts just as Ana suggested.

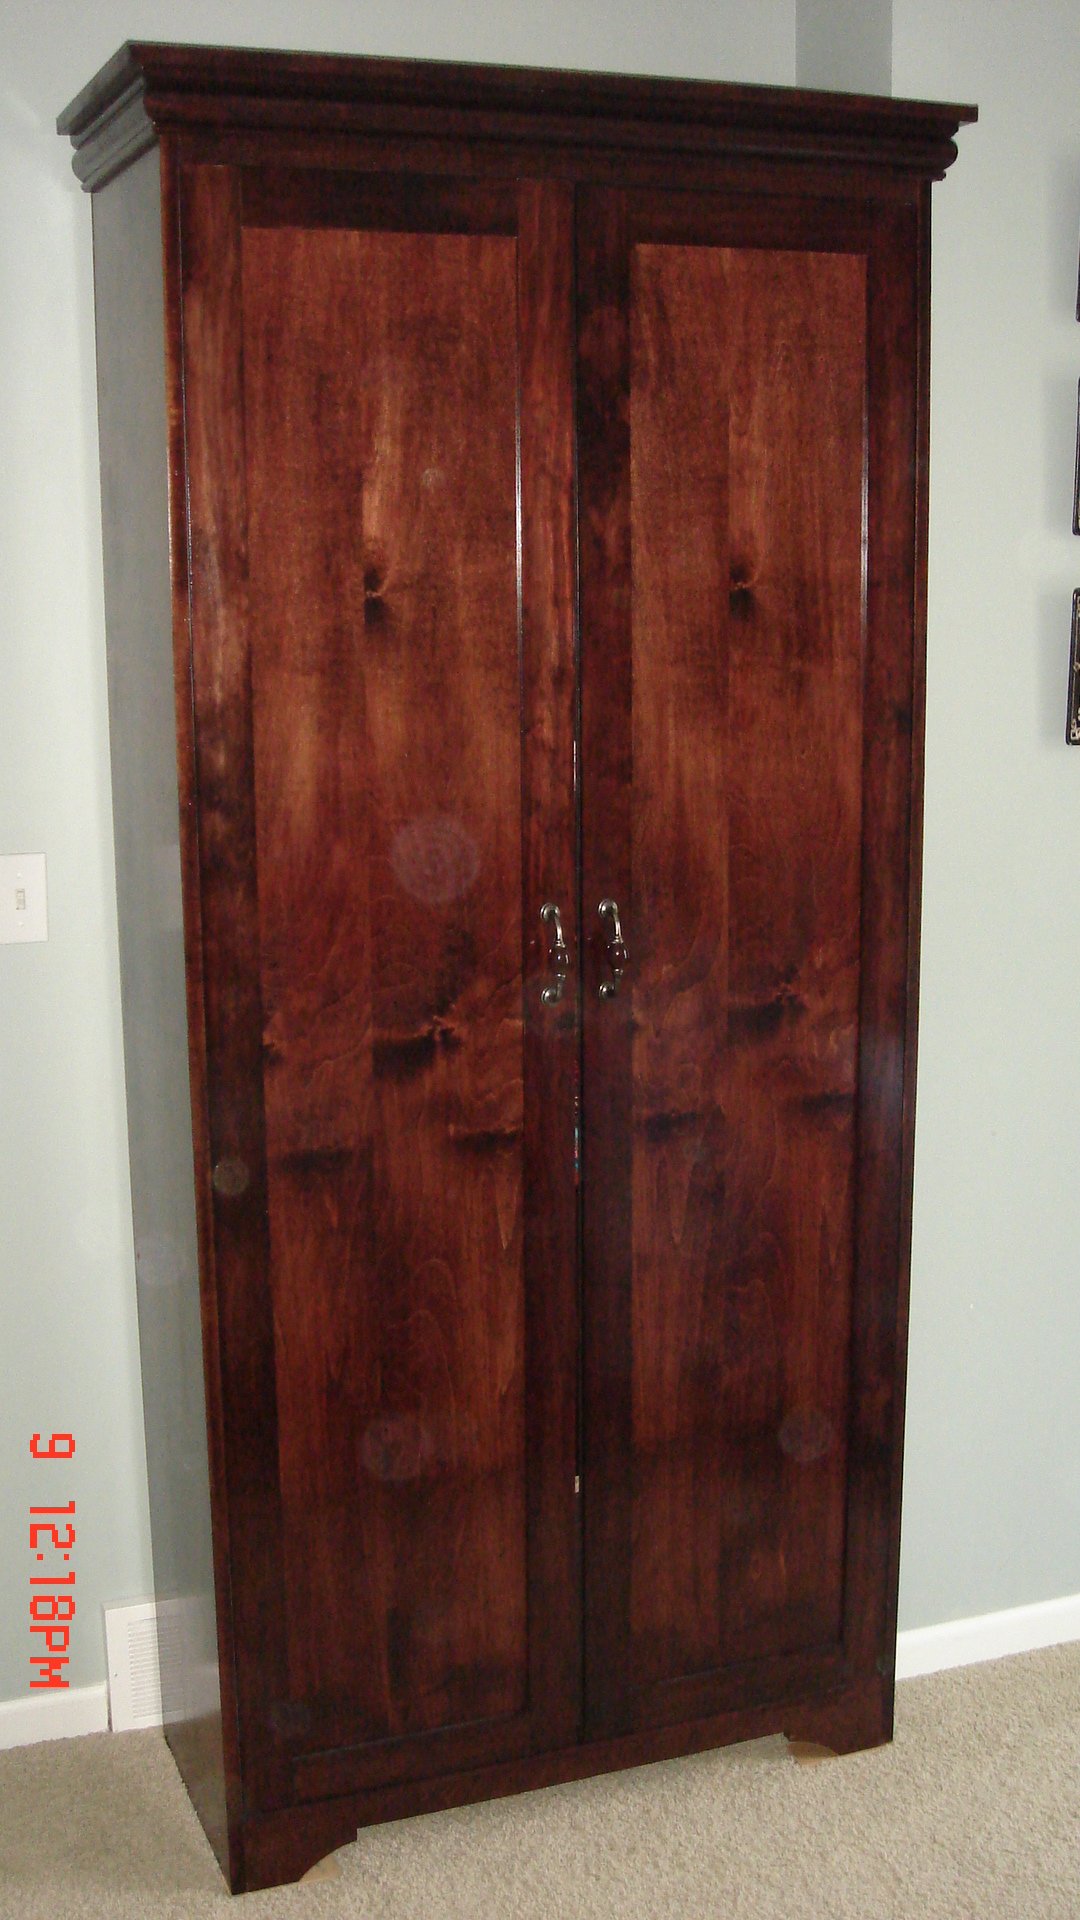
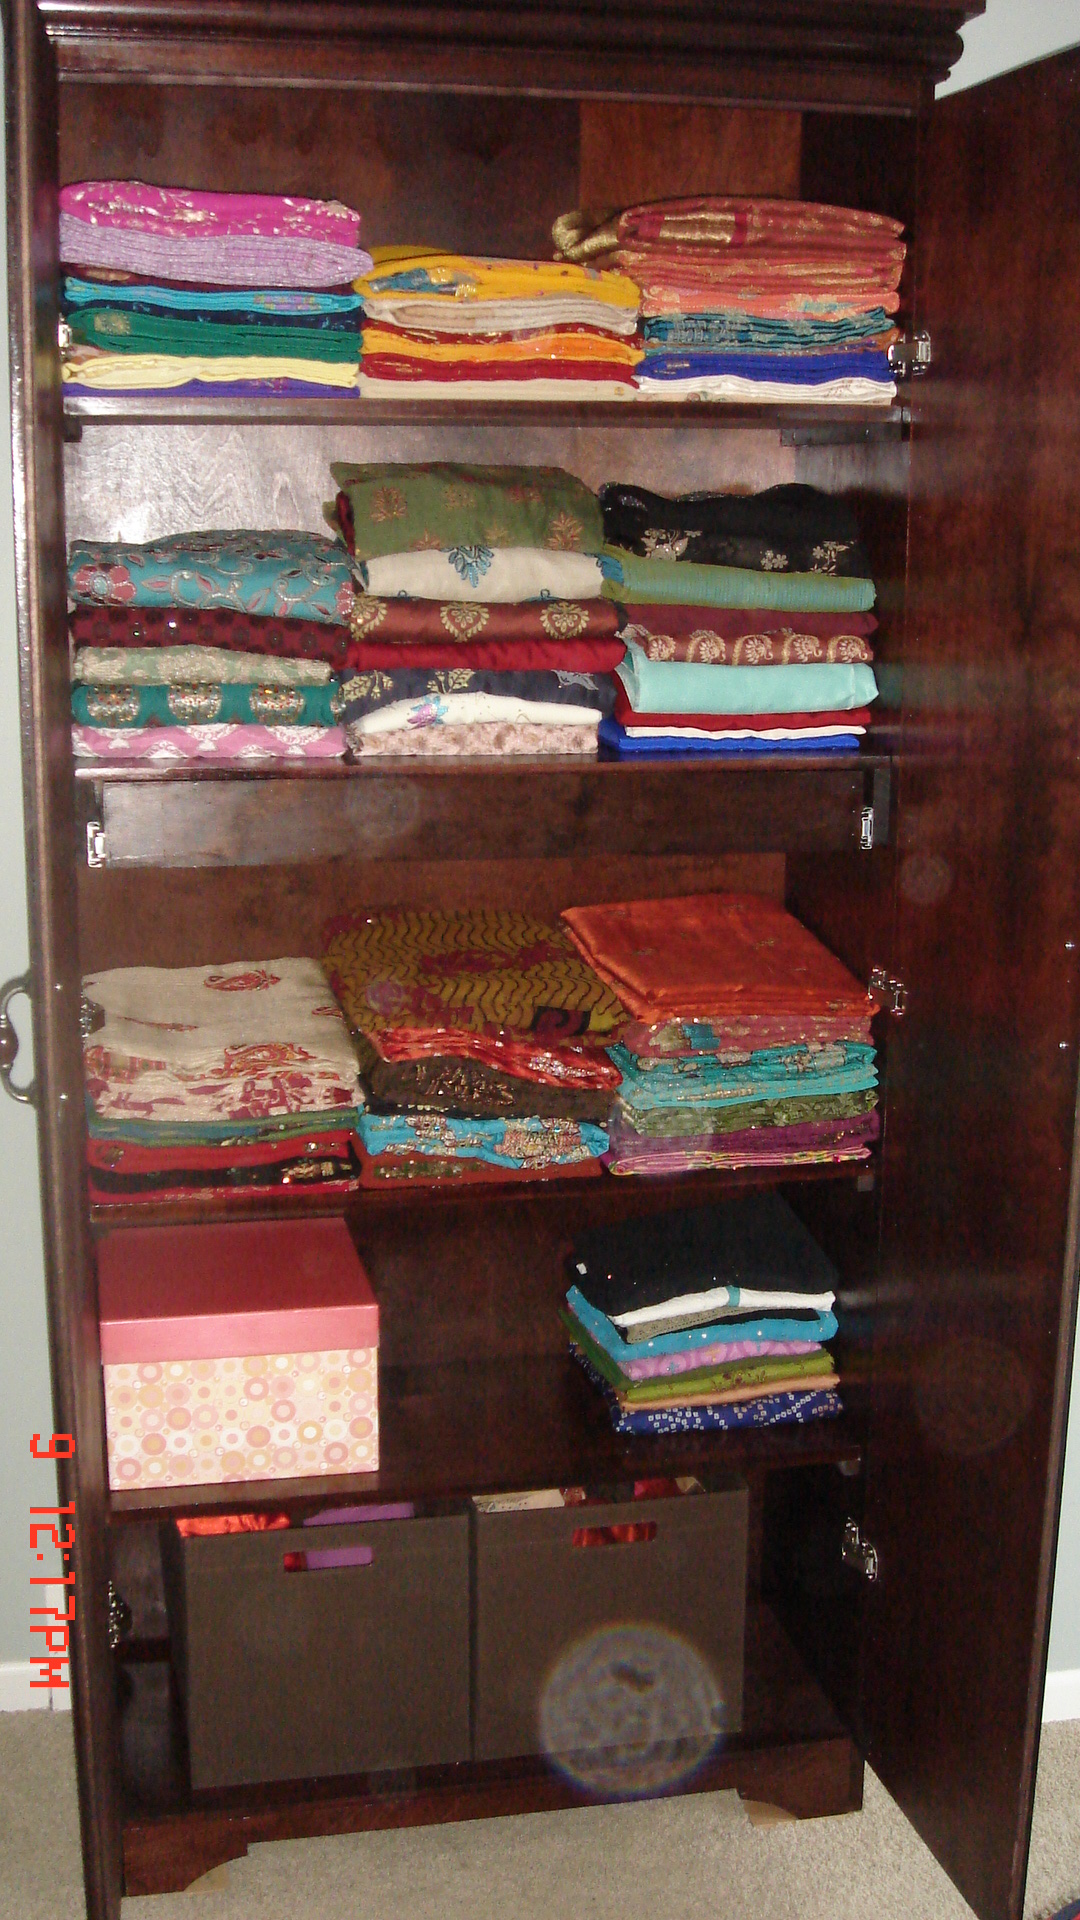
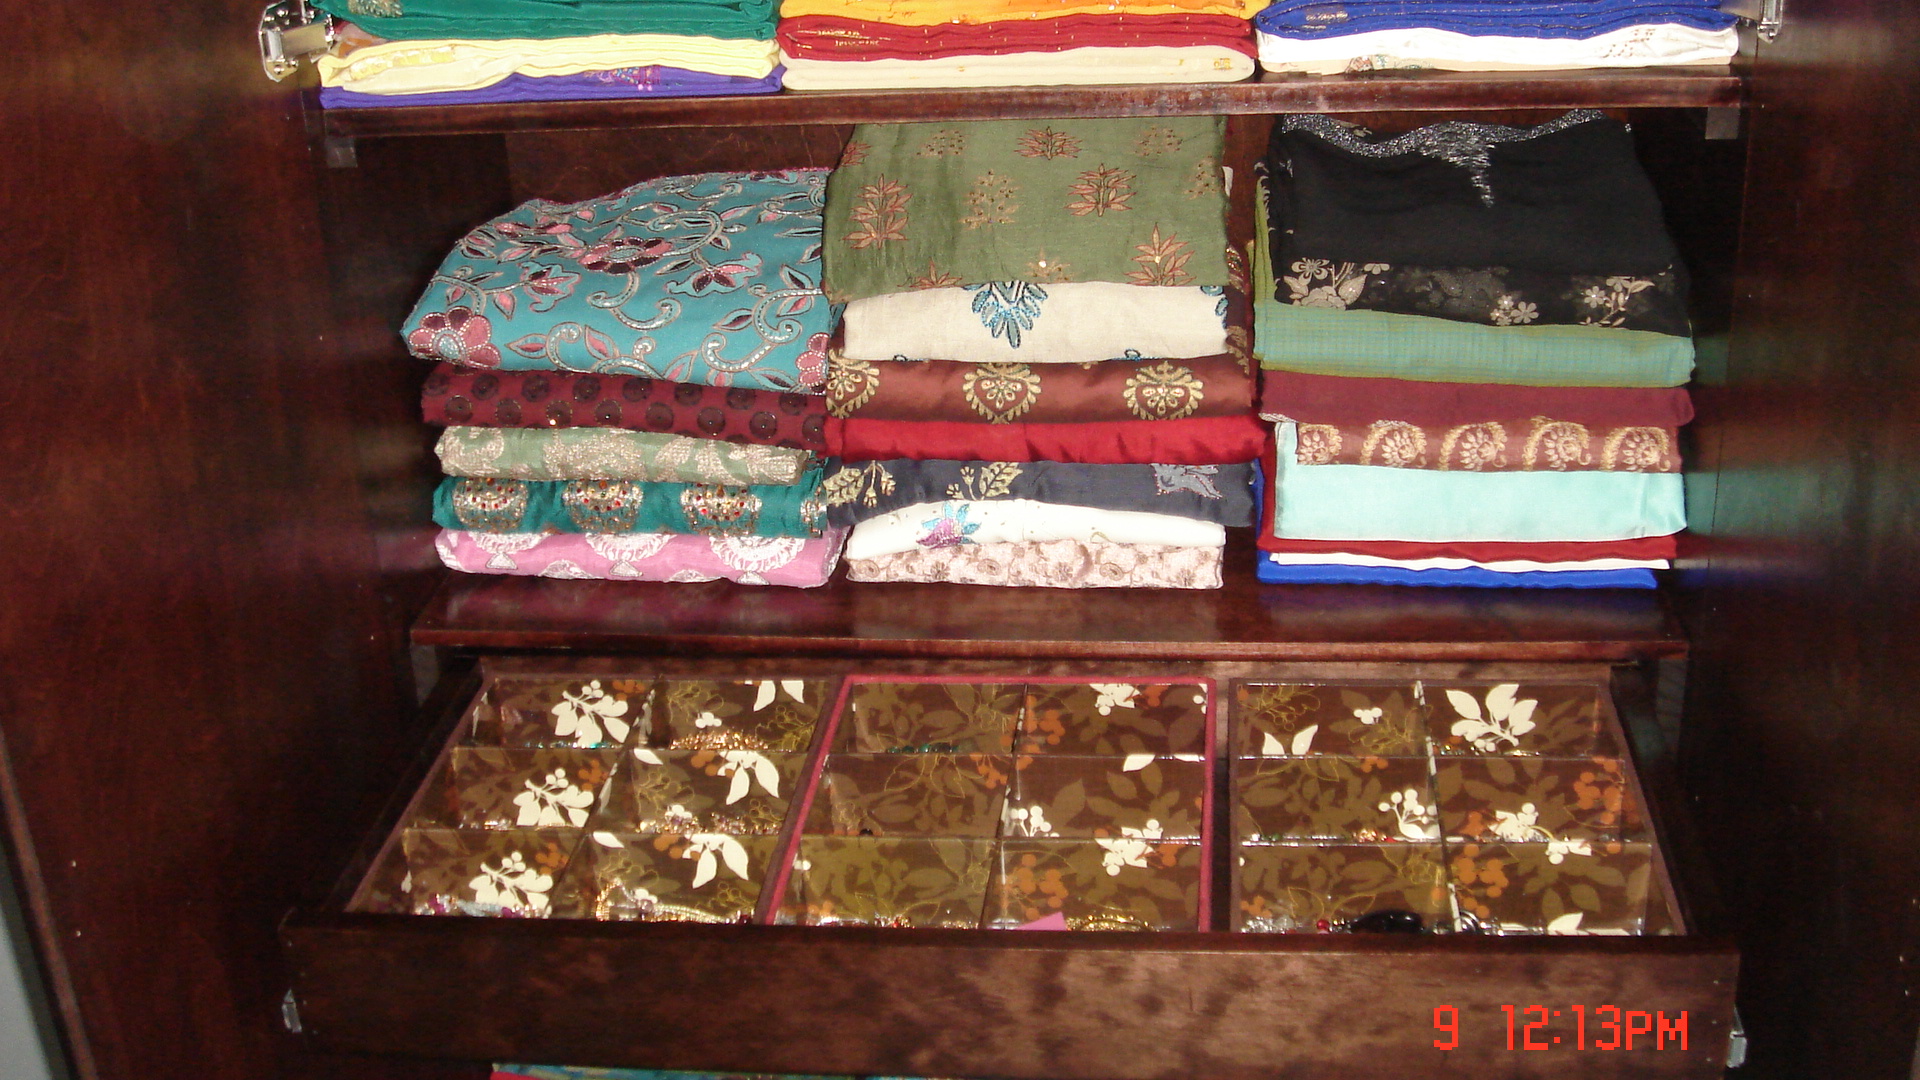
Second project we under took after stumbling over this blog. The armorie fit well in our bed room and has enough space for all my Indian sarees. Added a jewelery drawer in the middle. Love your blog Ana, thanks for the great work you do. Next project is to build a bed to match the armorie.
Sat, 07/09/2011 - 18:42
Love the finish and detail, beautiful inside and out. The jewelry drawer is a super idea! Super job- Love it! :) J
Sun, 07/10/2011 - 09:34
It's beautiful! I had posted a comment earlier, but the site must have eaten it.
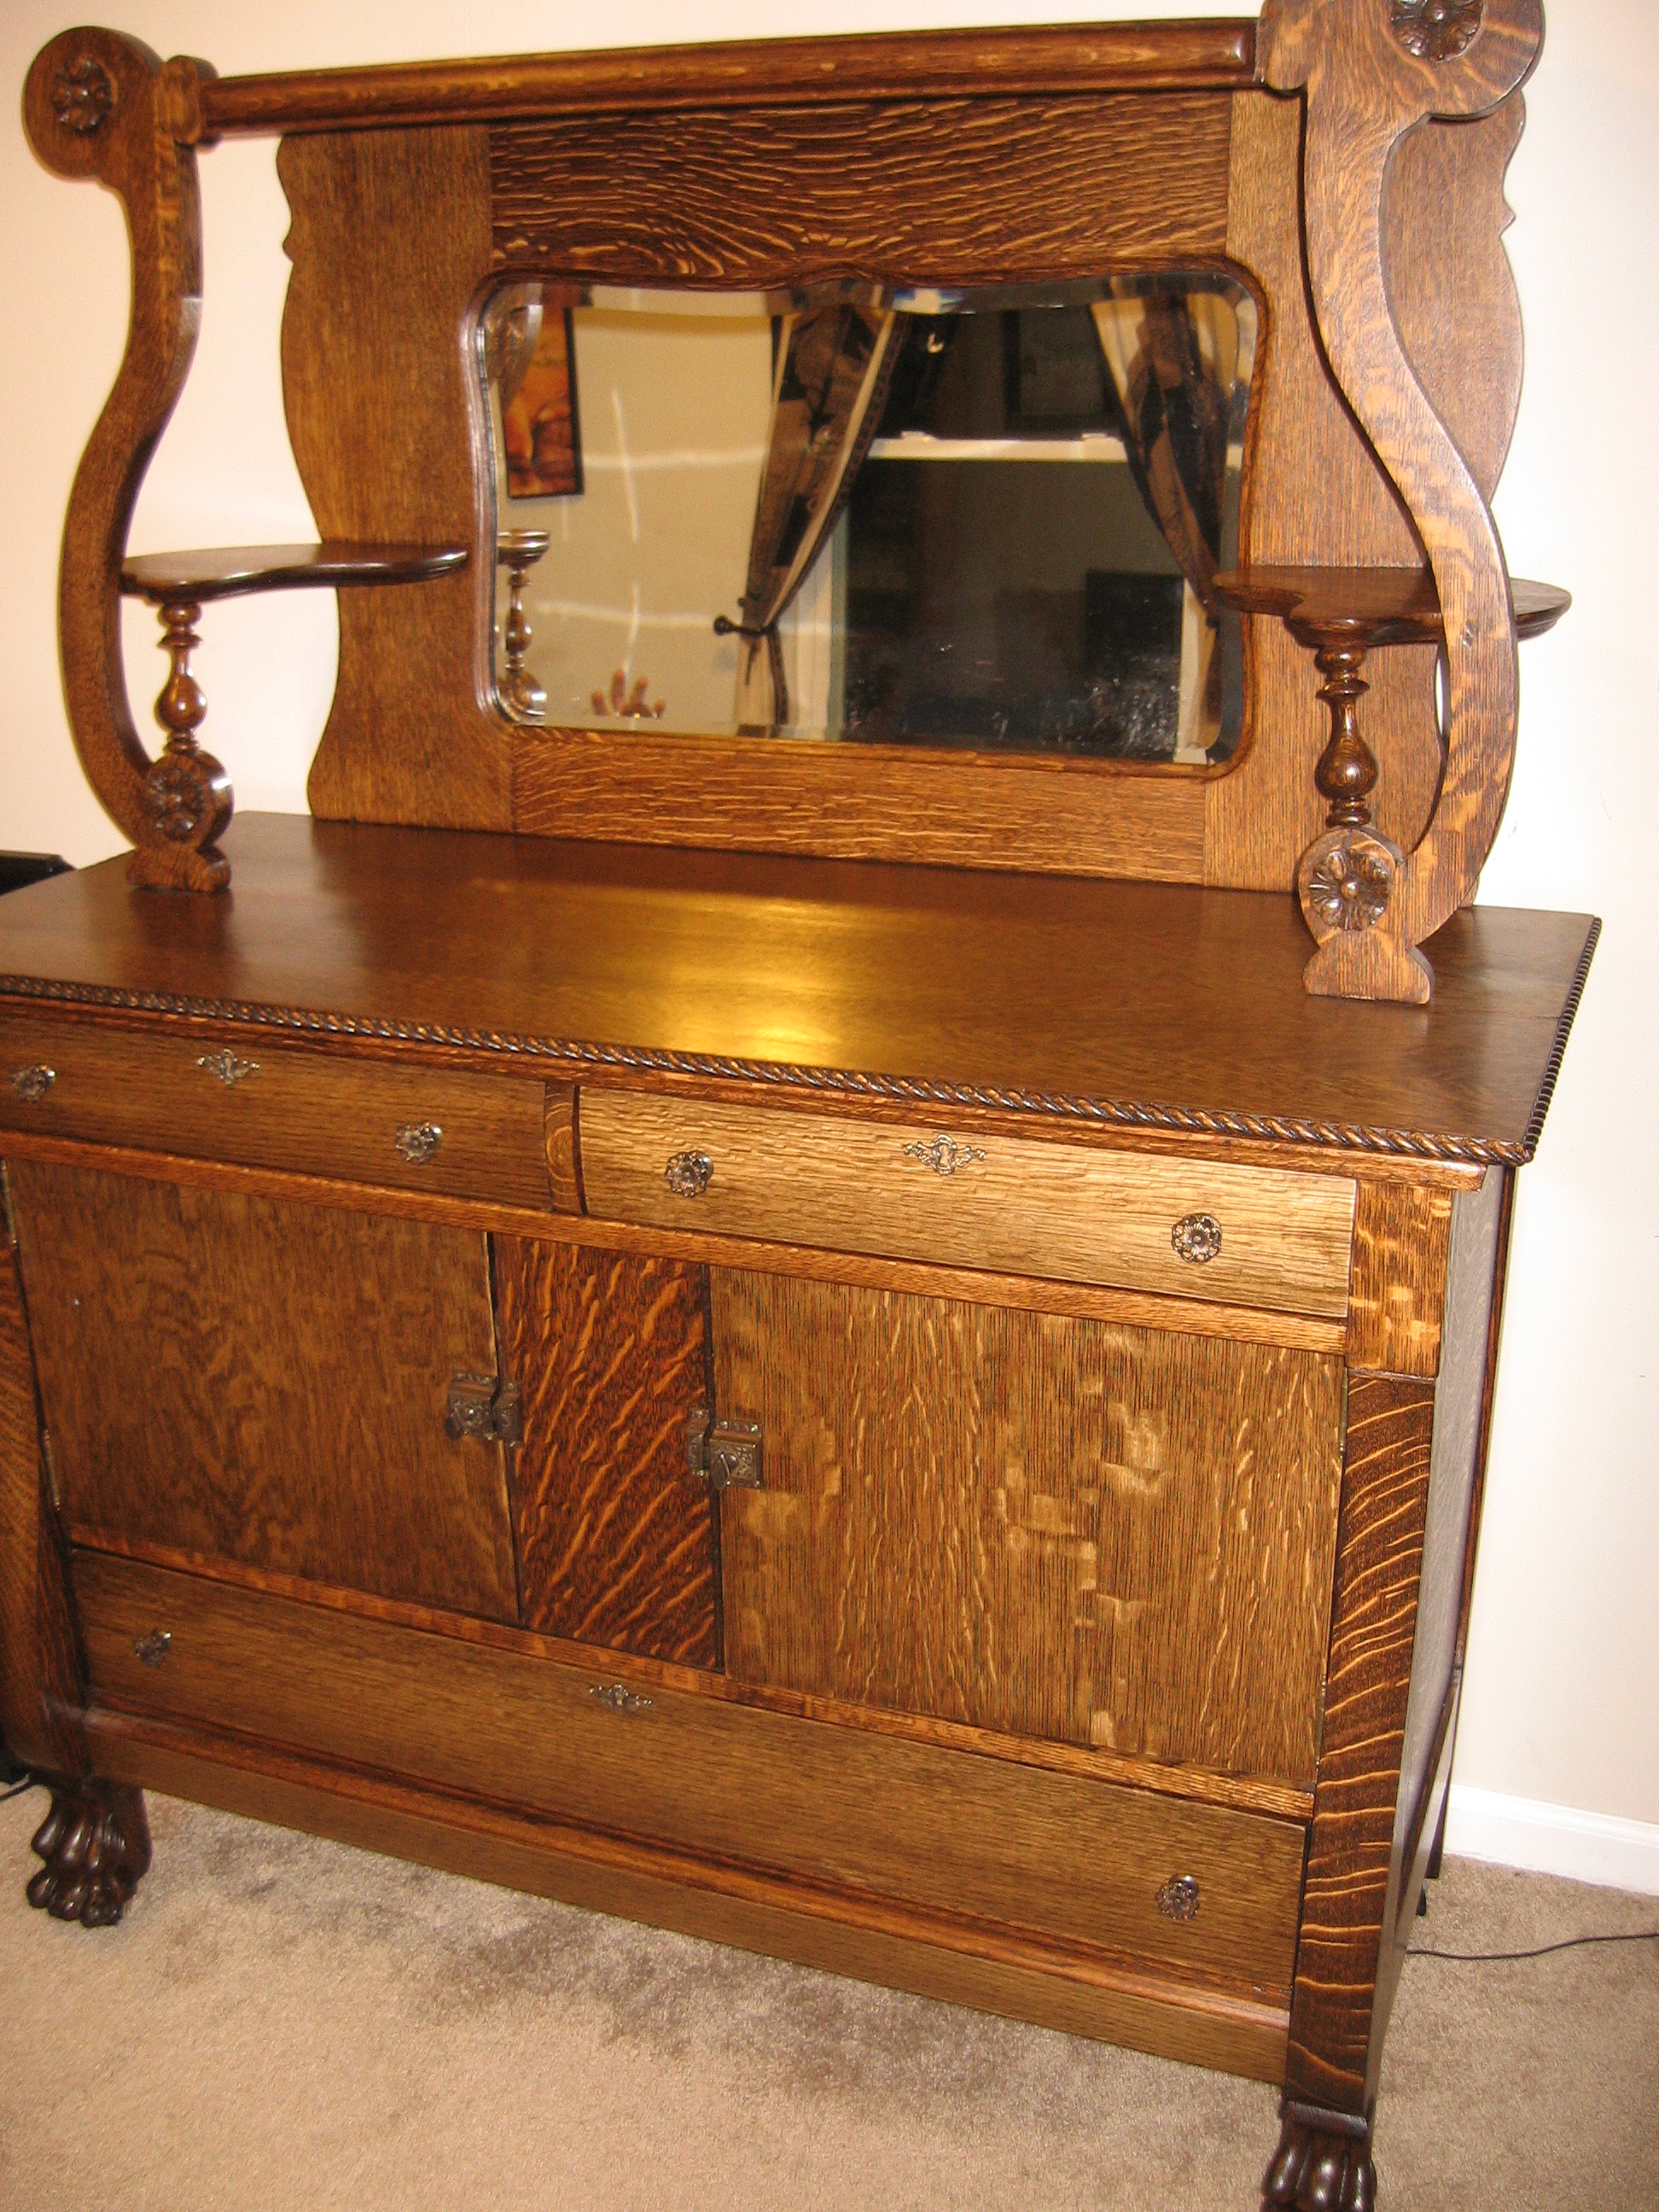
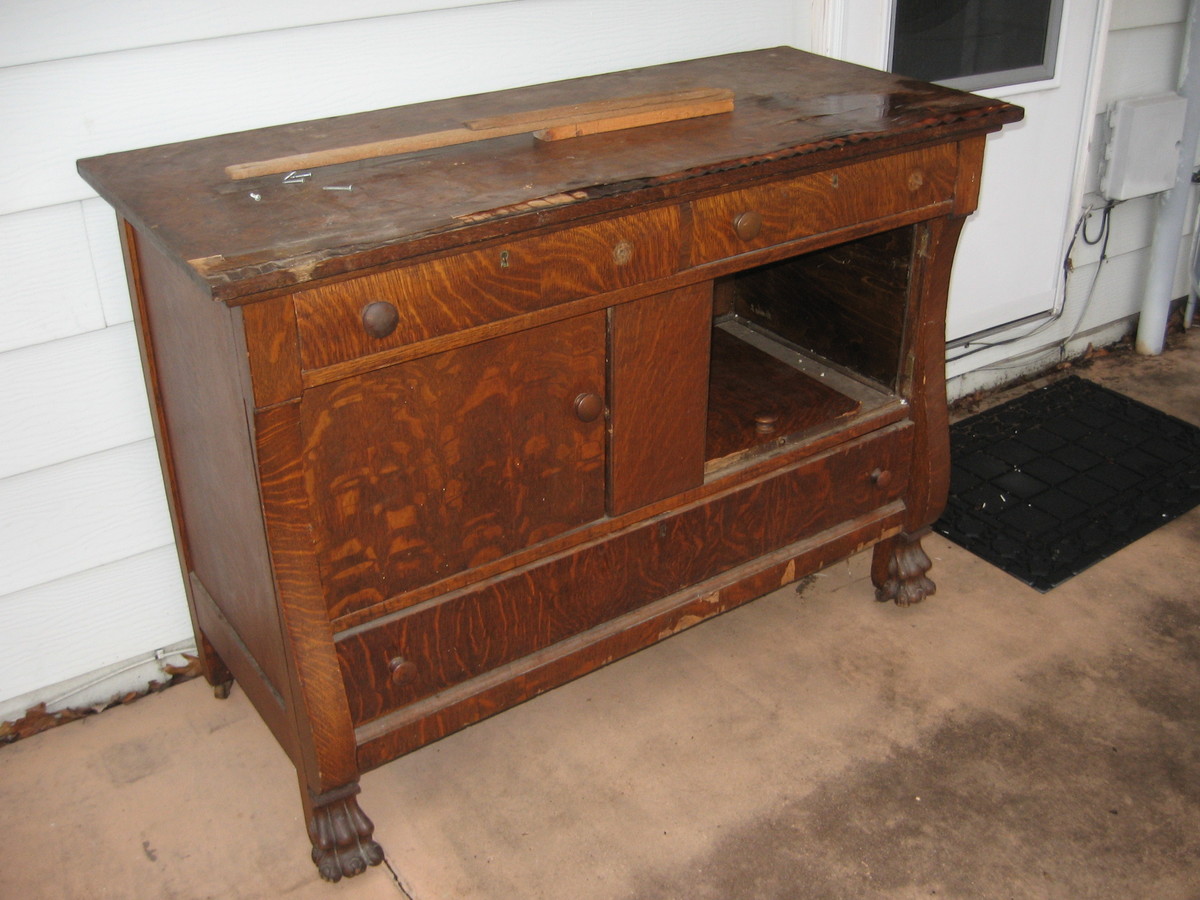
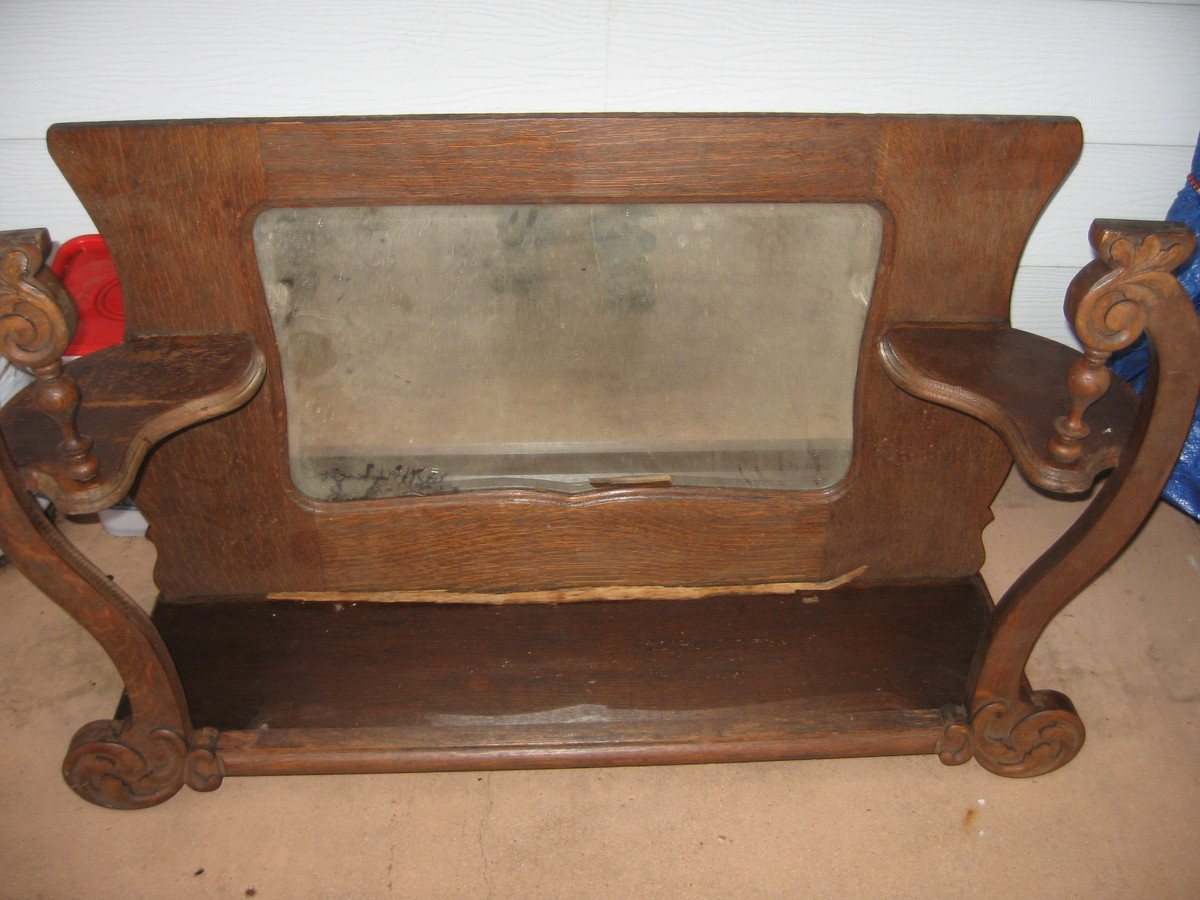
I found this buffet on Craigslist. I bought it from a young lady that told me her grandmother owned it prior to passing. It had obvious water damage, especially to much of the veneer.
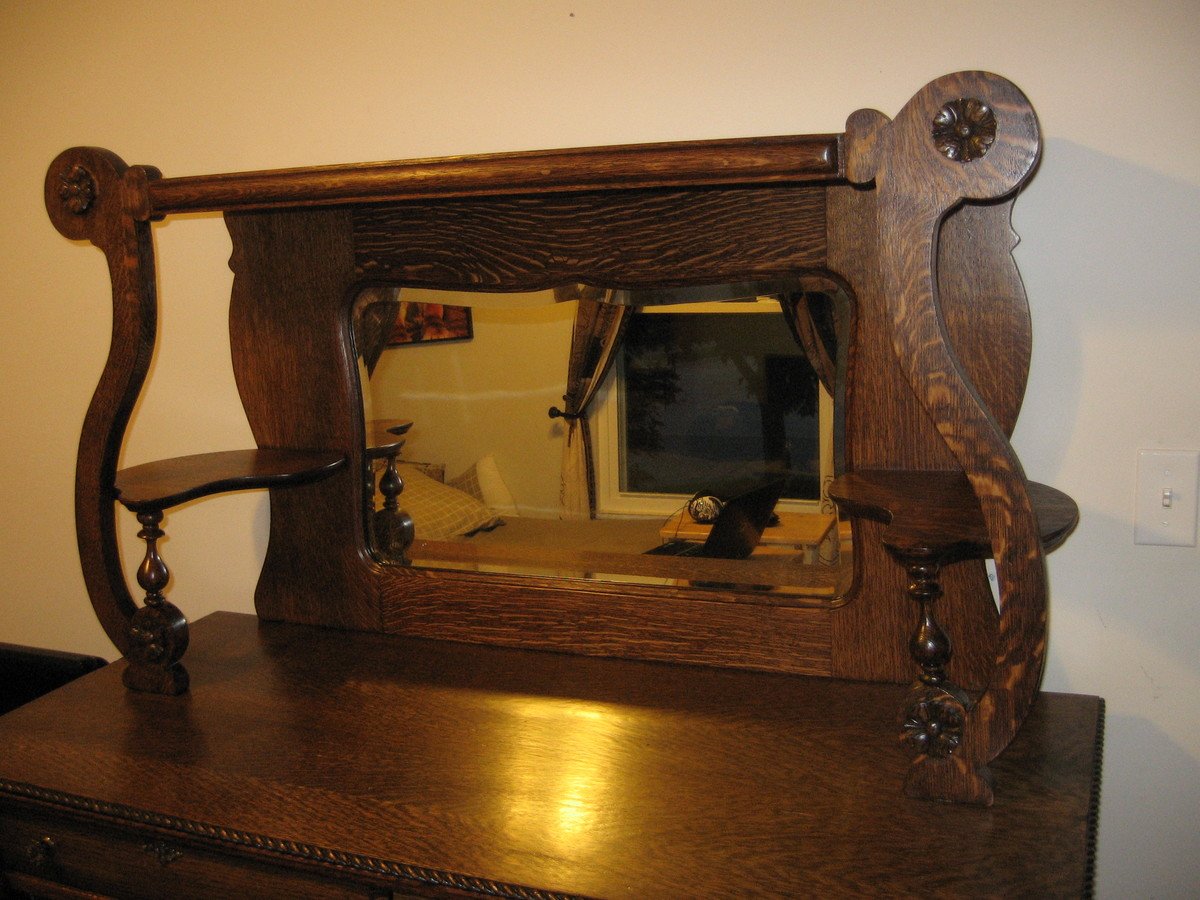
Starting with the top portion, the mirror was removed. The silvering was shot and I shipped it to Madison Glass in Nashville, TN. I stripped it and repaired the cracks and splits it had. The appliques were all broken and brittle. These were replaced with four new oak rosettes. It was stained and polyurethane was applied. I made a new back to cover the mirror when I got it back.
The bottom section was in really bad shape. The water damage had ruined all of the veneer on the top of the bottom section. It also had an obvious sag. I took the top of the lower section off. I used a plate joiner and wood glue to put these back together. I then flipped it over to fix the sag. A 3/4" section was missing. So I used some oak rope trim to make up the difference.
I rebuilt all of the drawers which included new bottoms. I replaced the drawer stops. The cabinet door were all broken so I made new ones using 3/4" oak plywood. I put the nicest side facing in and put new veneer on the door front. In fact the fronts to all of the drawers received new veneer. I also rebuilt the entire inside with 1/4" oak plywood and oak trim. I also put new casters on the piece. I then stained and applied poly to the base.

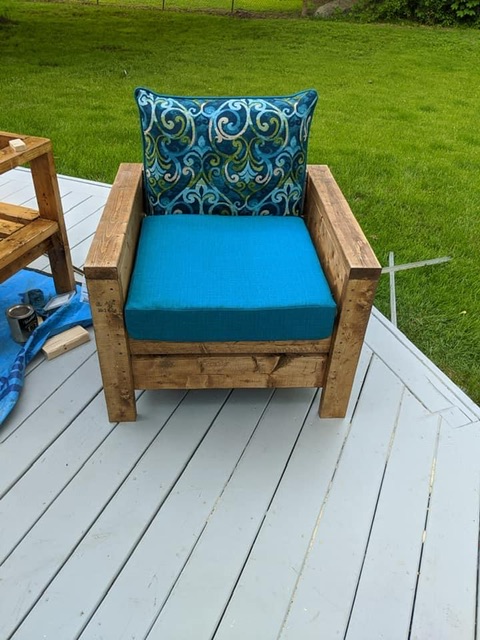
Beautiful, practical and afternoon naps are so comfortable!
Made from cedar 2x4s and semi transparent stain. I mixed and matched new cushions with ones I already had. I will be adding the matching coffee/end tables soon.
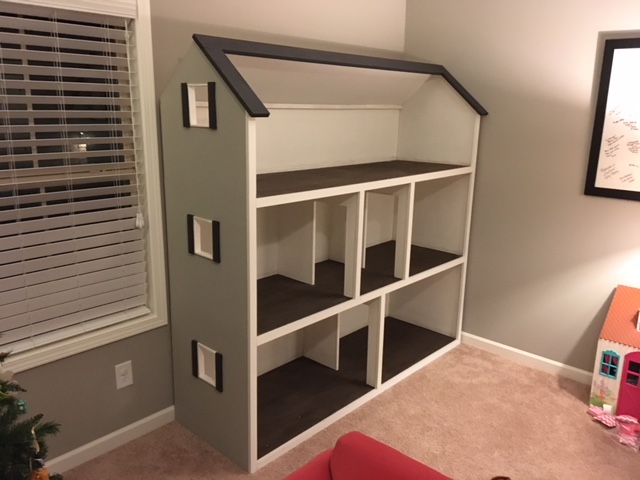
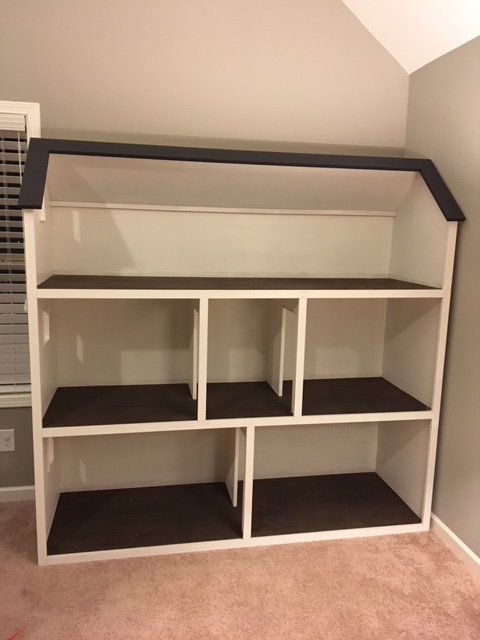
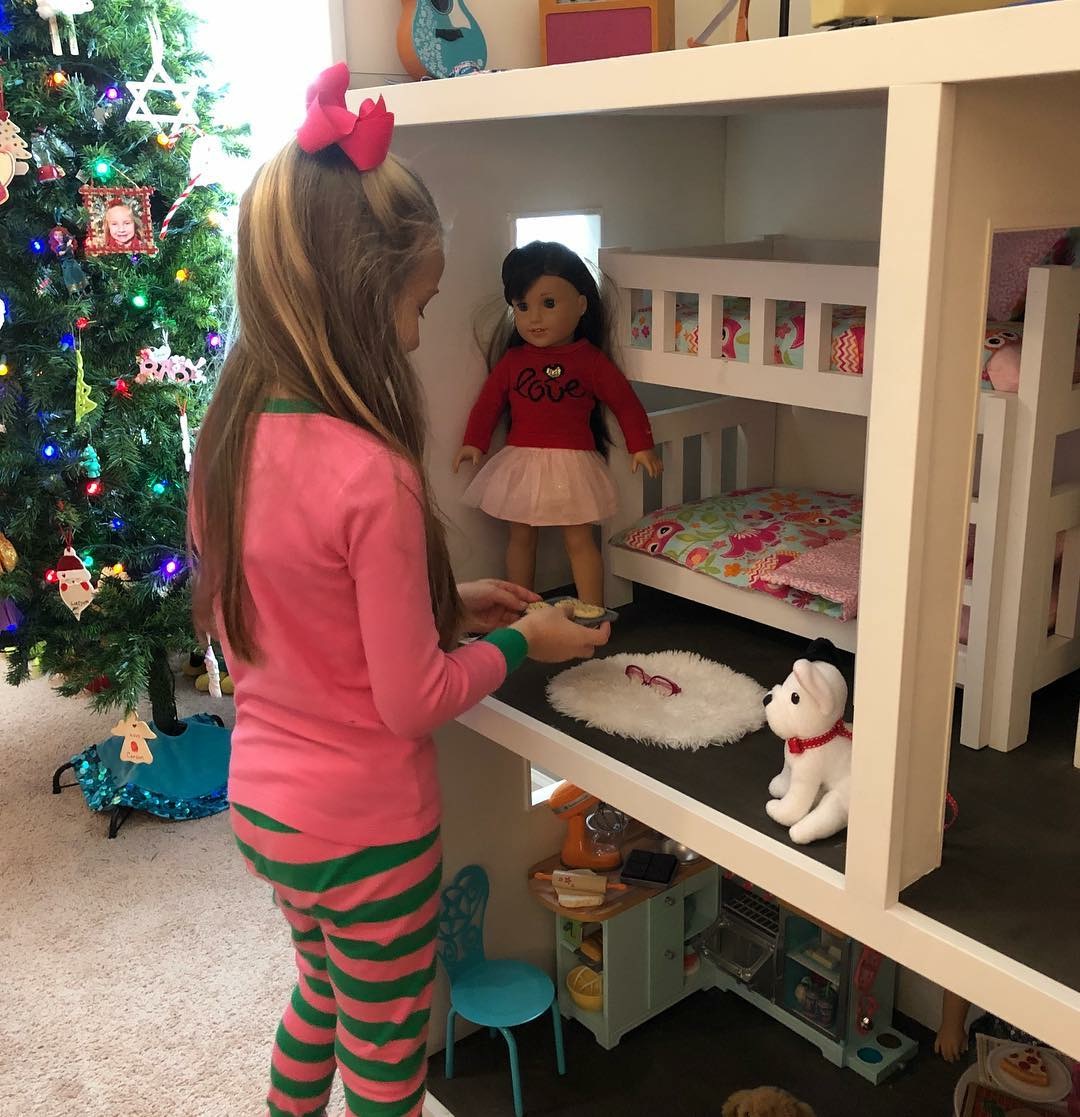
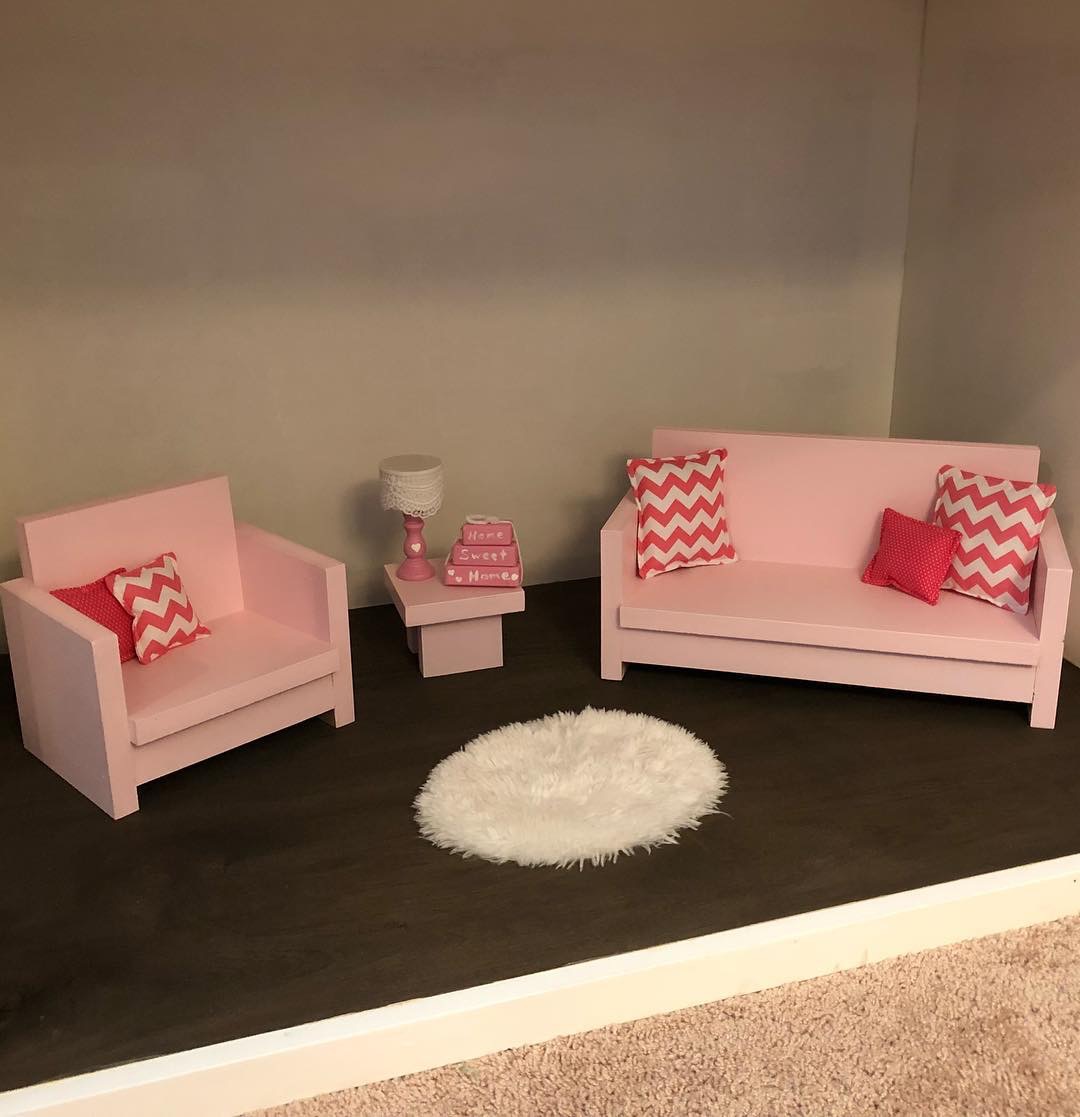
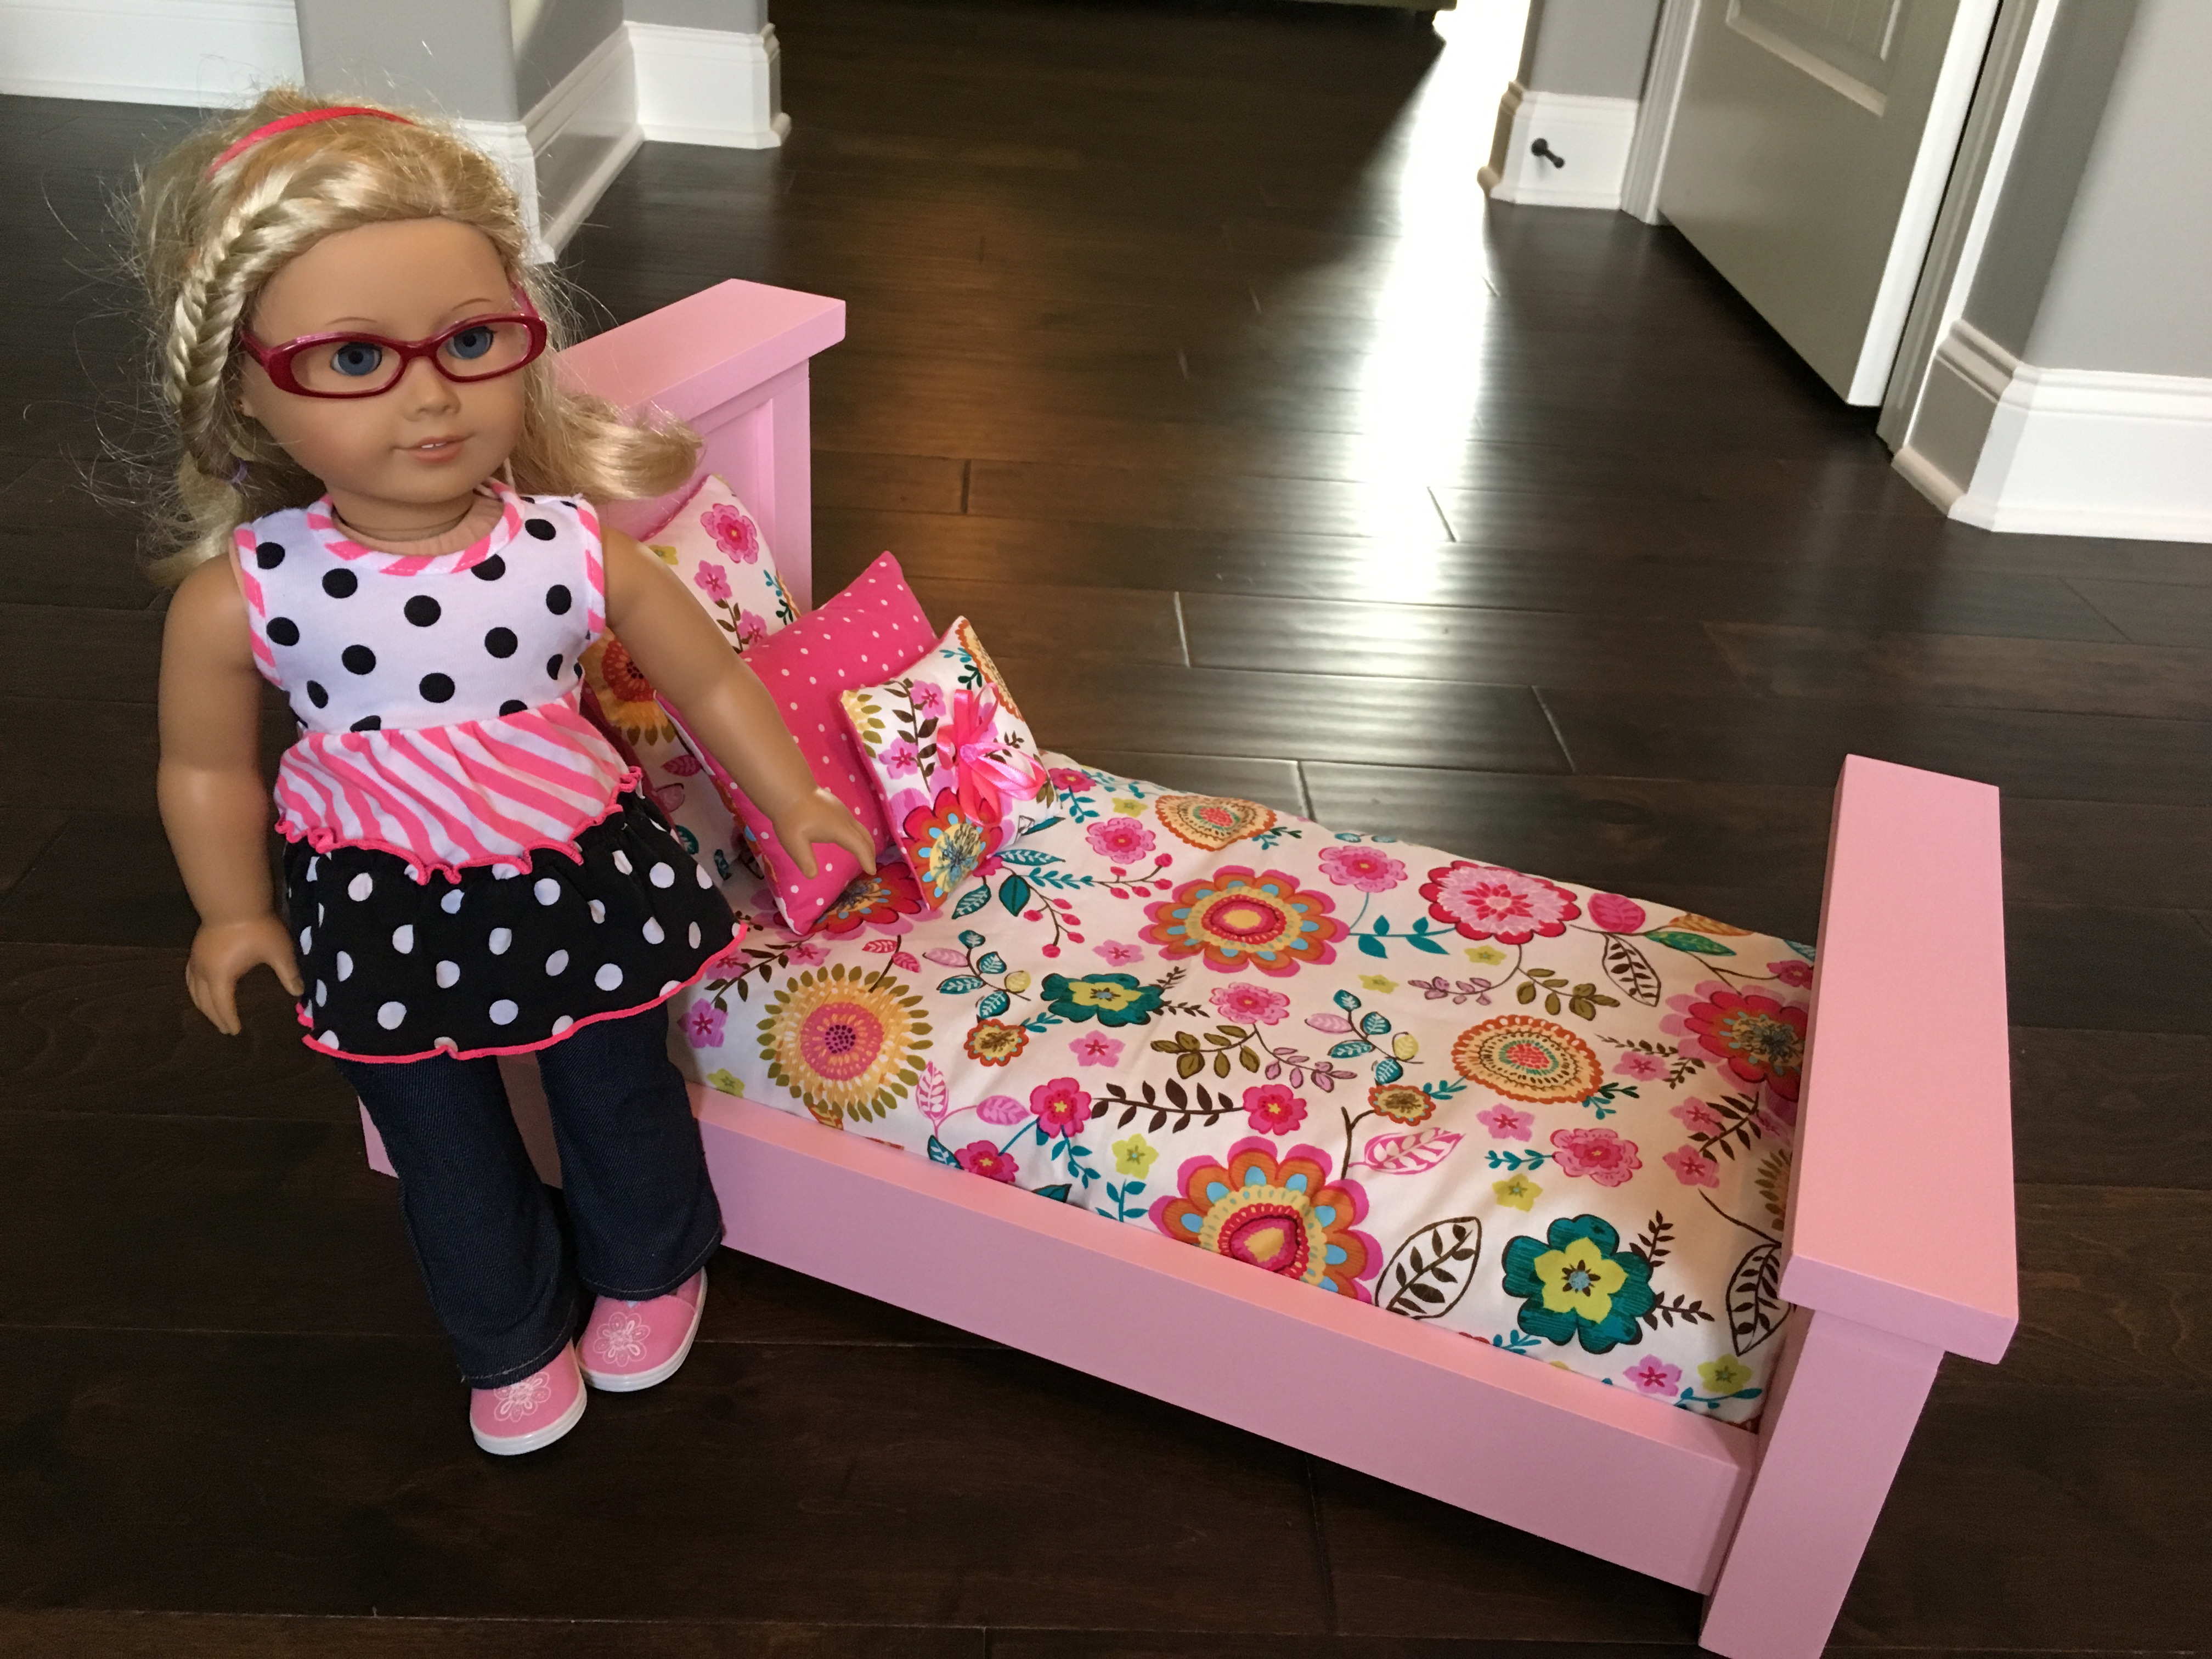
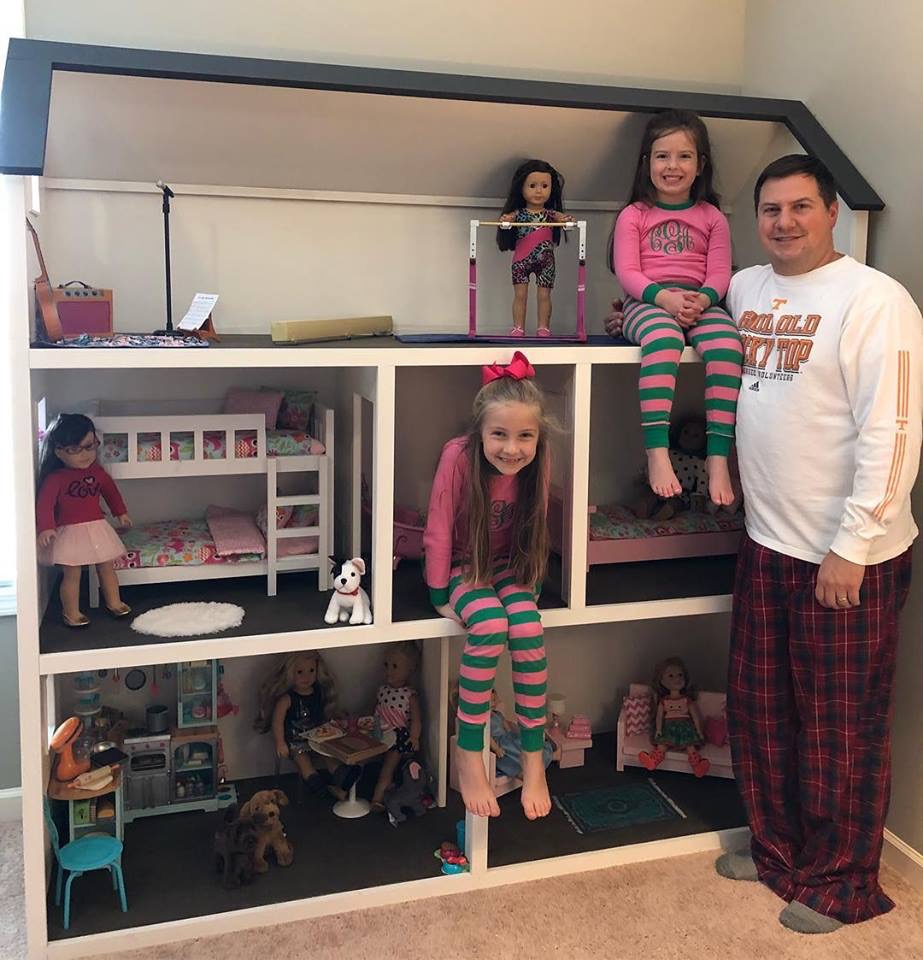
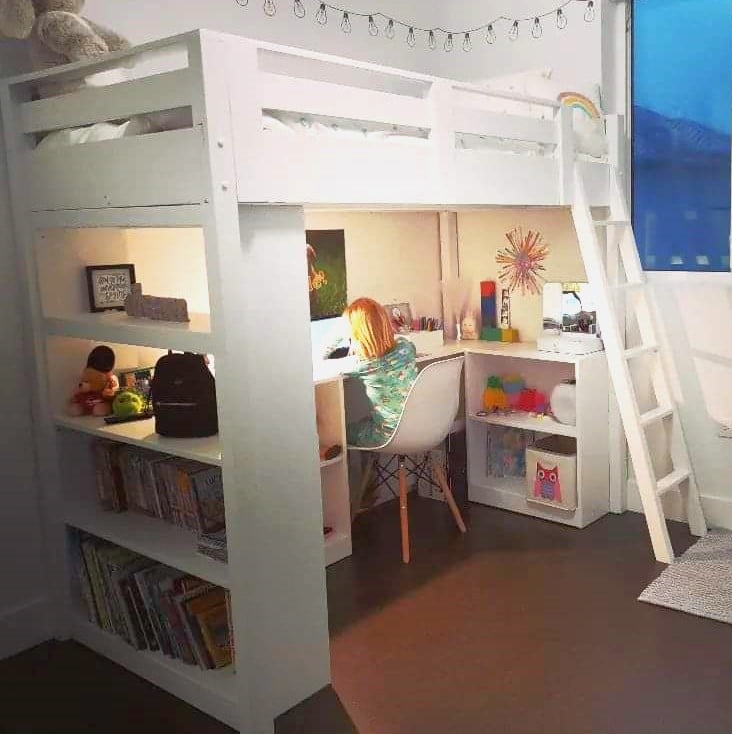
I've been building Ana White American Girl doll furniture for my two daughters for the last three years, culminating with my biggest build of all - a modified version of Ana's dollhouse.
My wife kept telling me it would end up being huge, and she was right. The great news is that it doubles as storage when the girls aren't playing! 2 Bedrooms, kitchen, living room, bathroom, and upstairs bonus room for dance and gymnastics. 78" tall x 76" wide, mounted to the wall studs for safety. Lots of joy in our home on Christmas day. Thanks Ana!
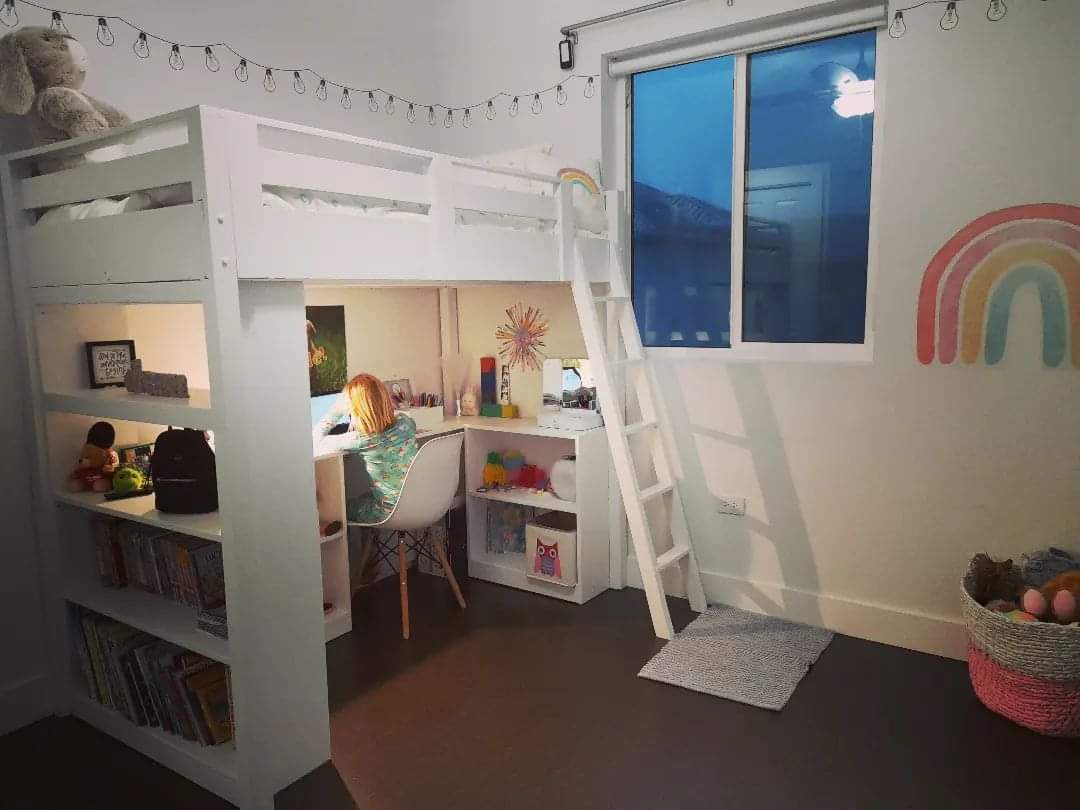
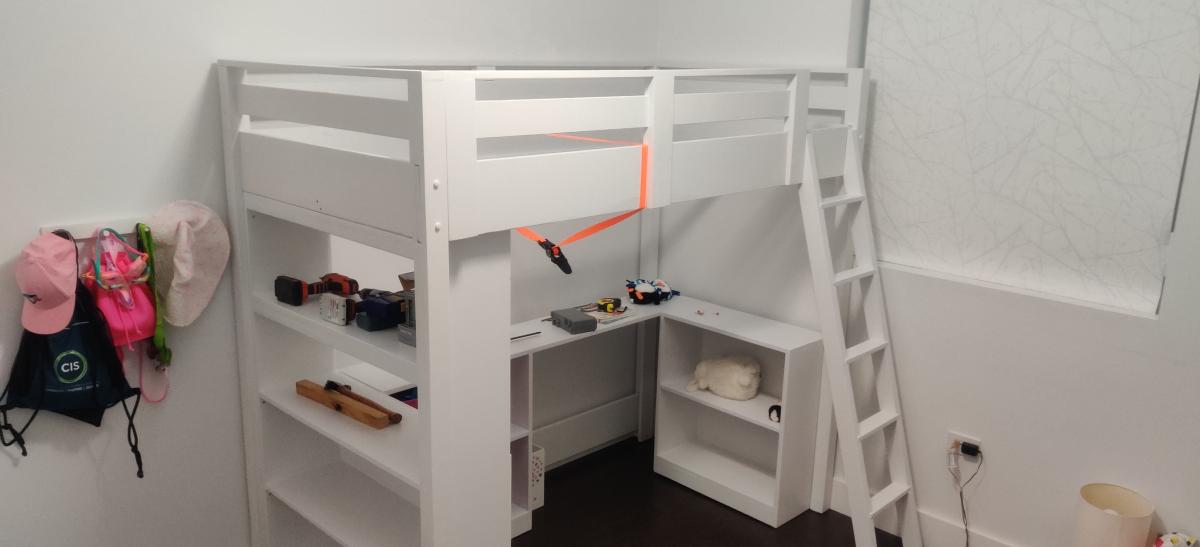
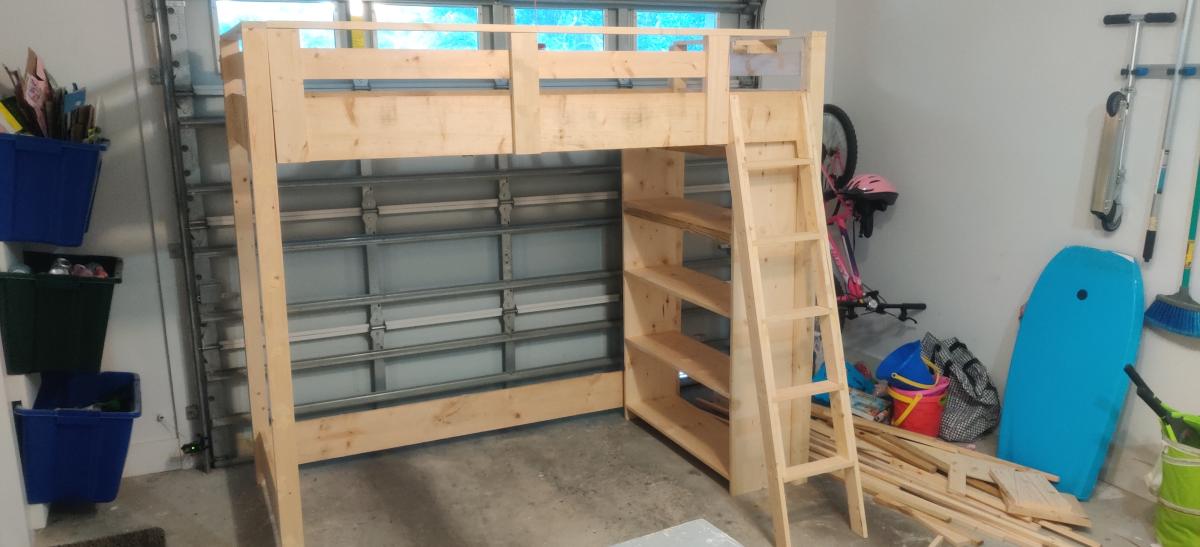
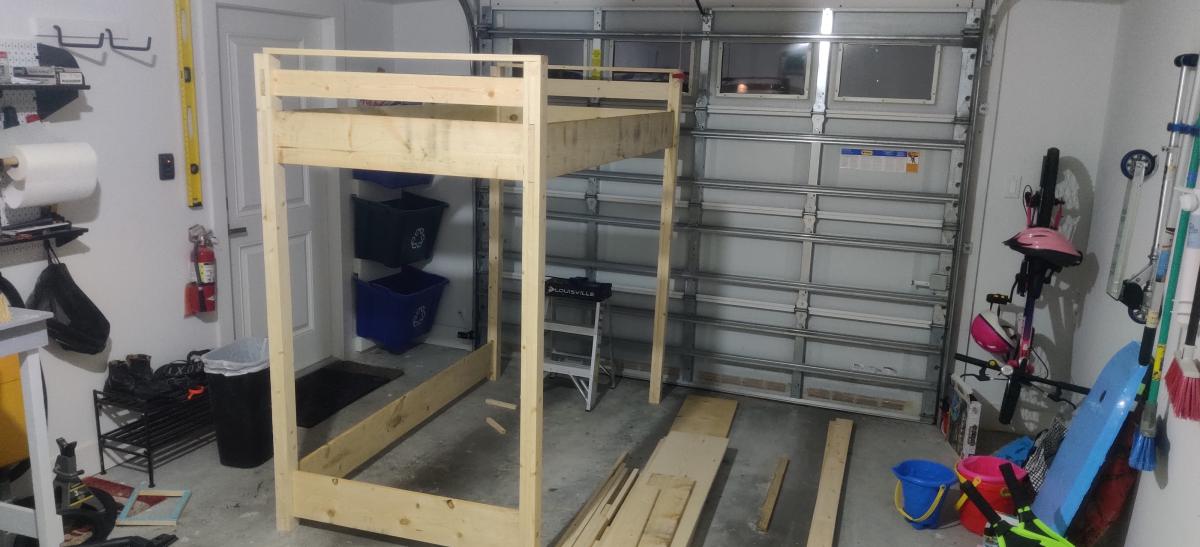
I built this for my daughter and more or less followed the plan without changes. I wasn't able to get hold of 1x3 so had to rip 1x4s which was a little time consuming. In hindsight I would probably increase the depth of the desk as it's a little shallow but not a huge problem.
I primed with two coats of BIN Primer as there were a lot if knots in the wood and I heard this is the best to cover then. It was a lot more expensive but hopefully worth it. Finished with latex semigloss.
Fri, 12/30/2022 - 10:19
You did a fantastic job, it looks amazing in the space! Thanks for sharing.
This bench was so easy to build! It's the first project that I've built completely with the nail gun. Wow does that speed up the process! Thanks again for the great plans, Ana!
This was incredibly easy to build for a semi-newbie! The shopping list and cut list were a huge help! We love Ana-White.com!!!
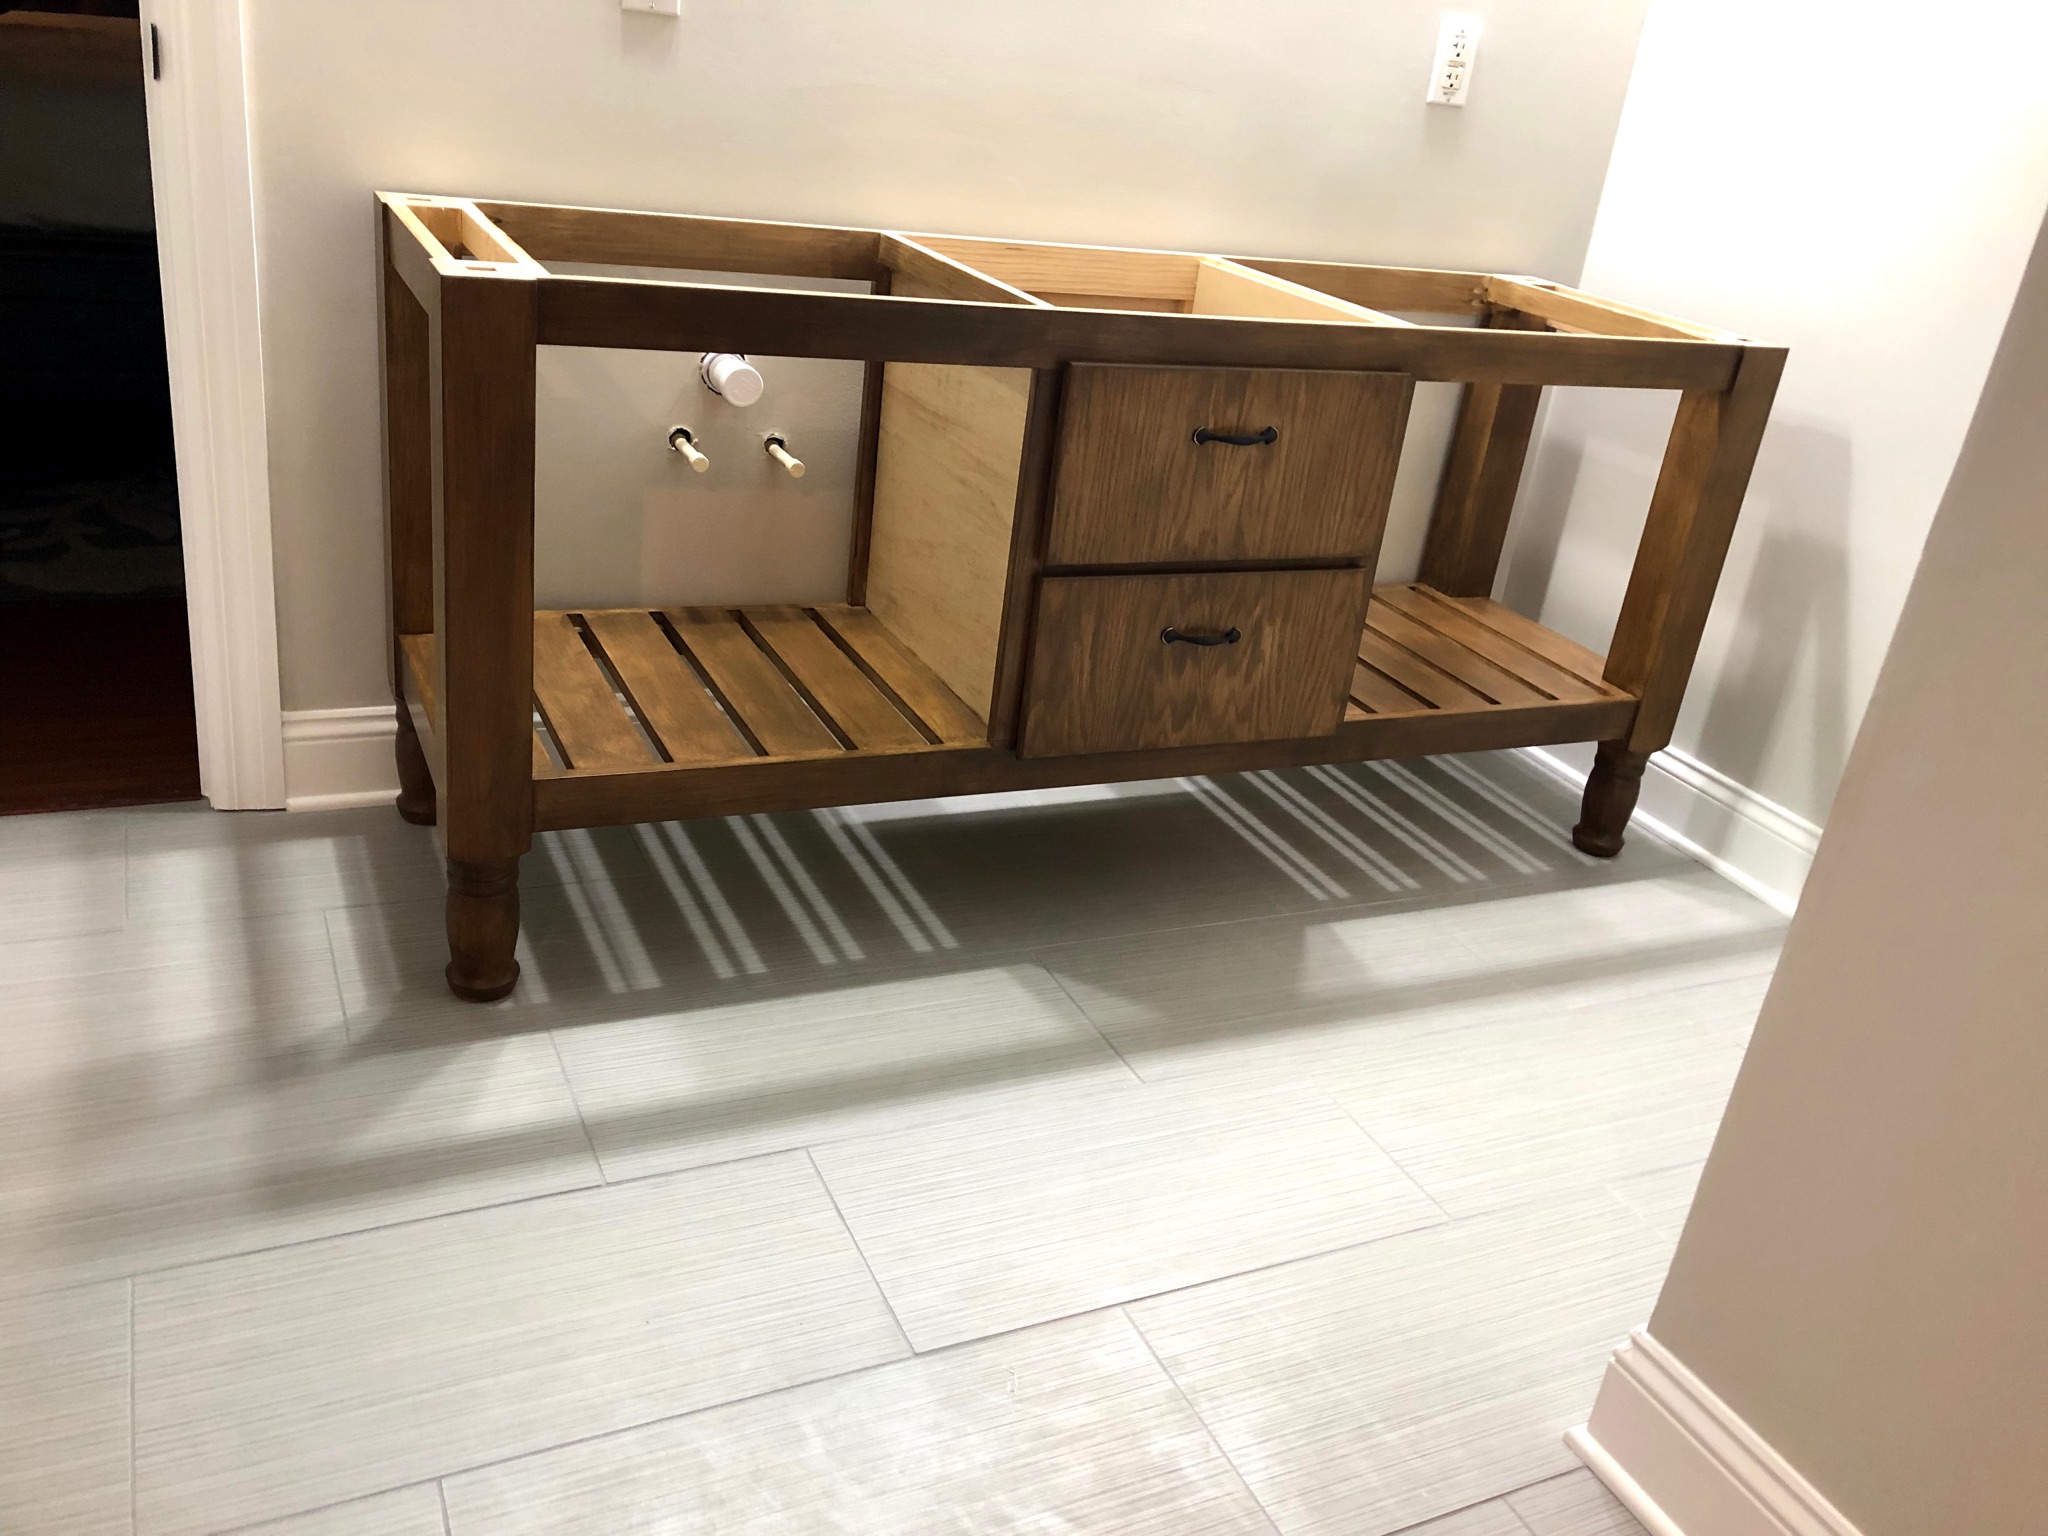
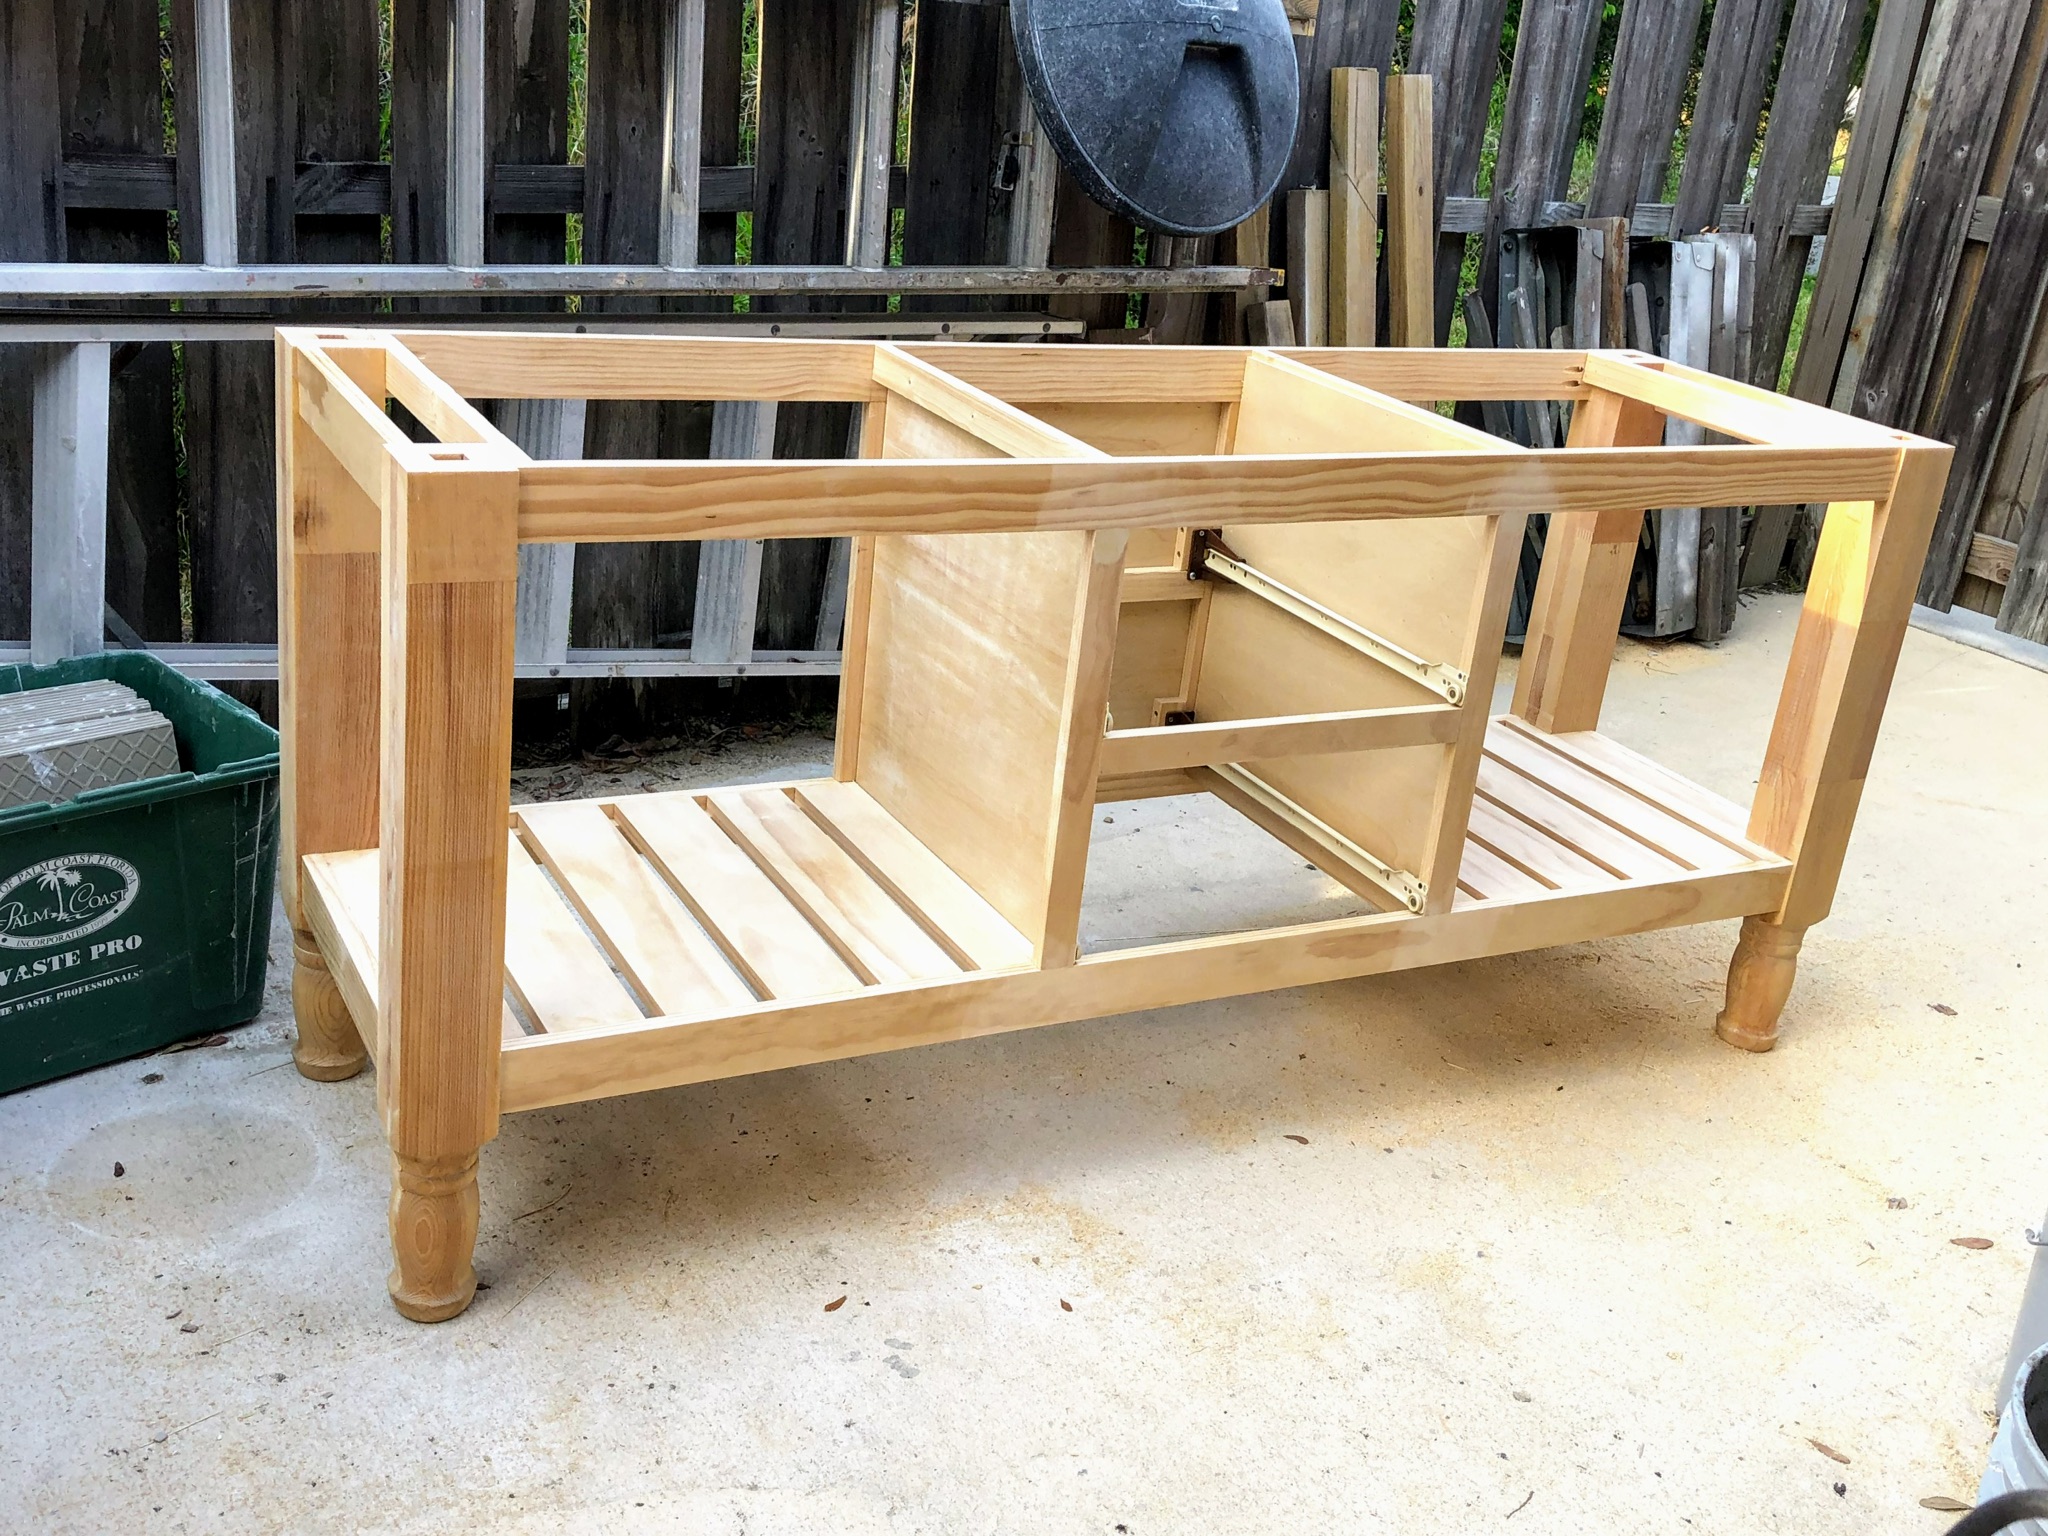
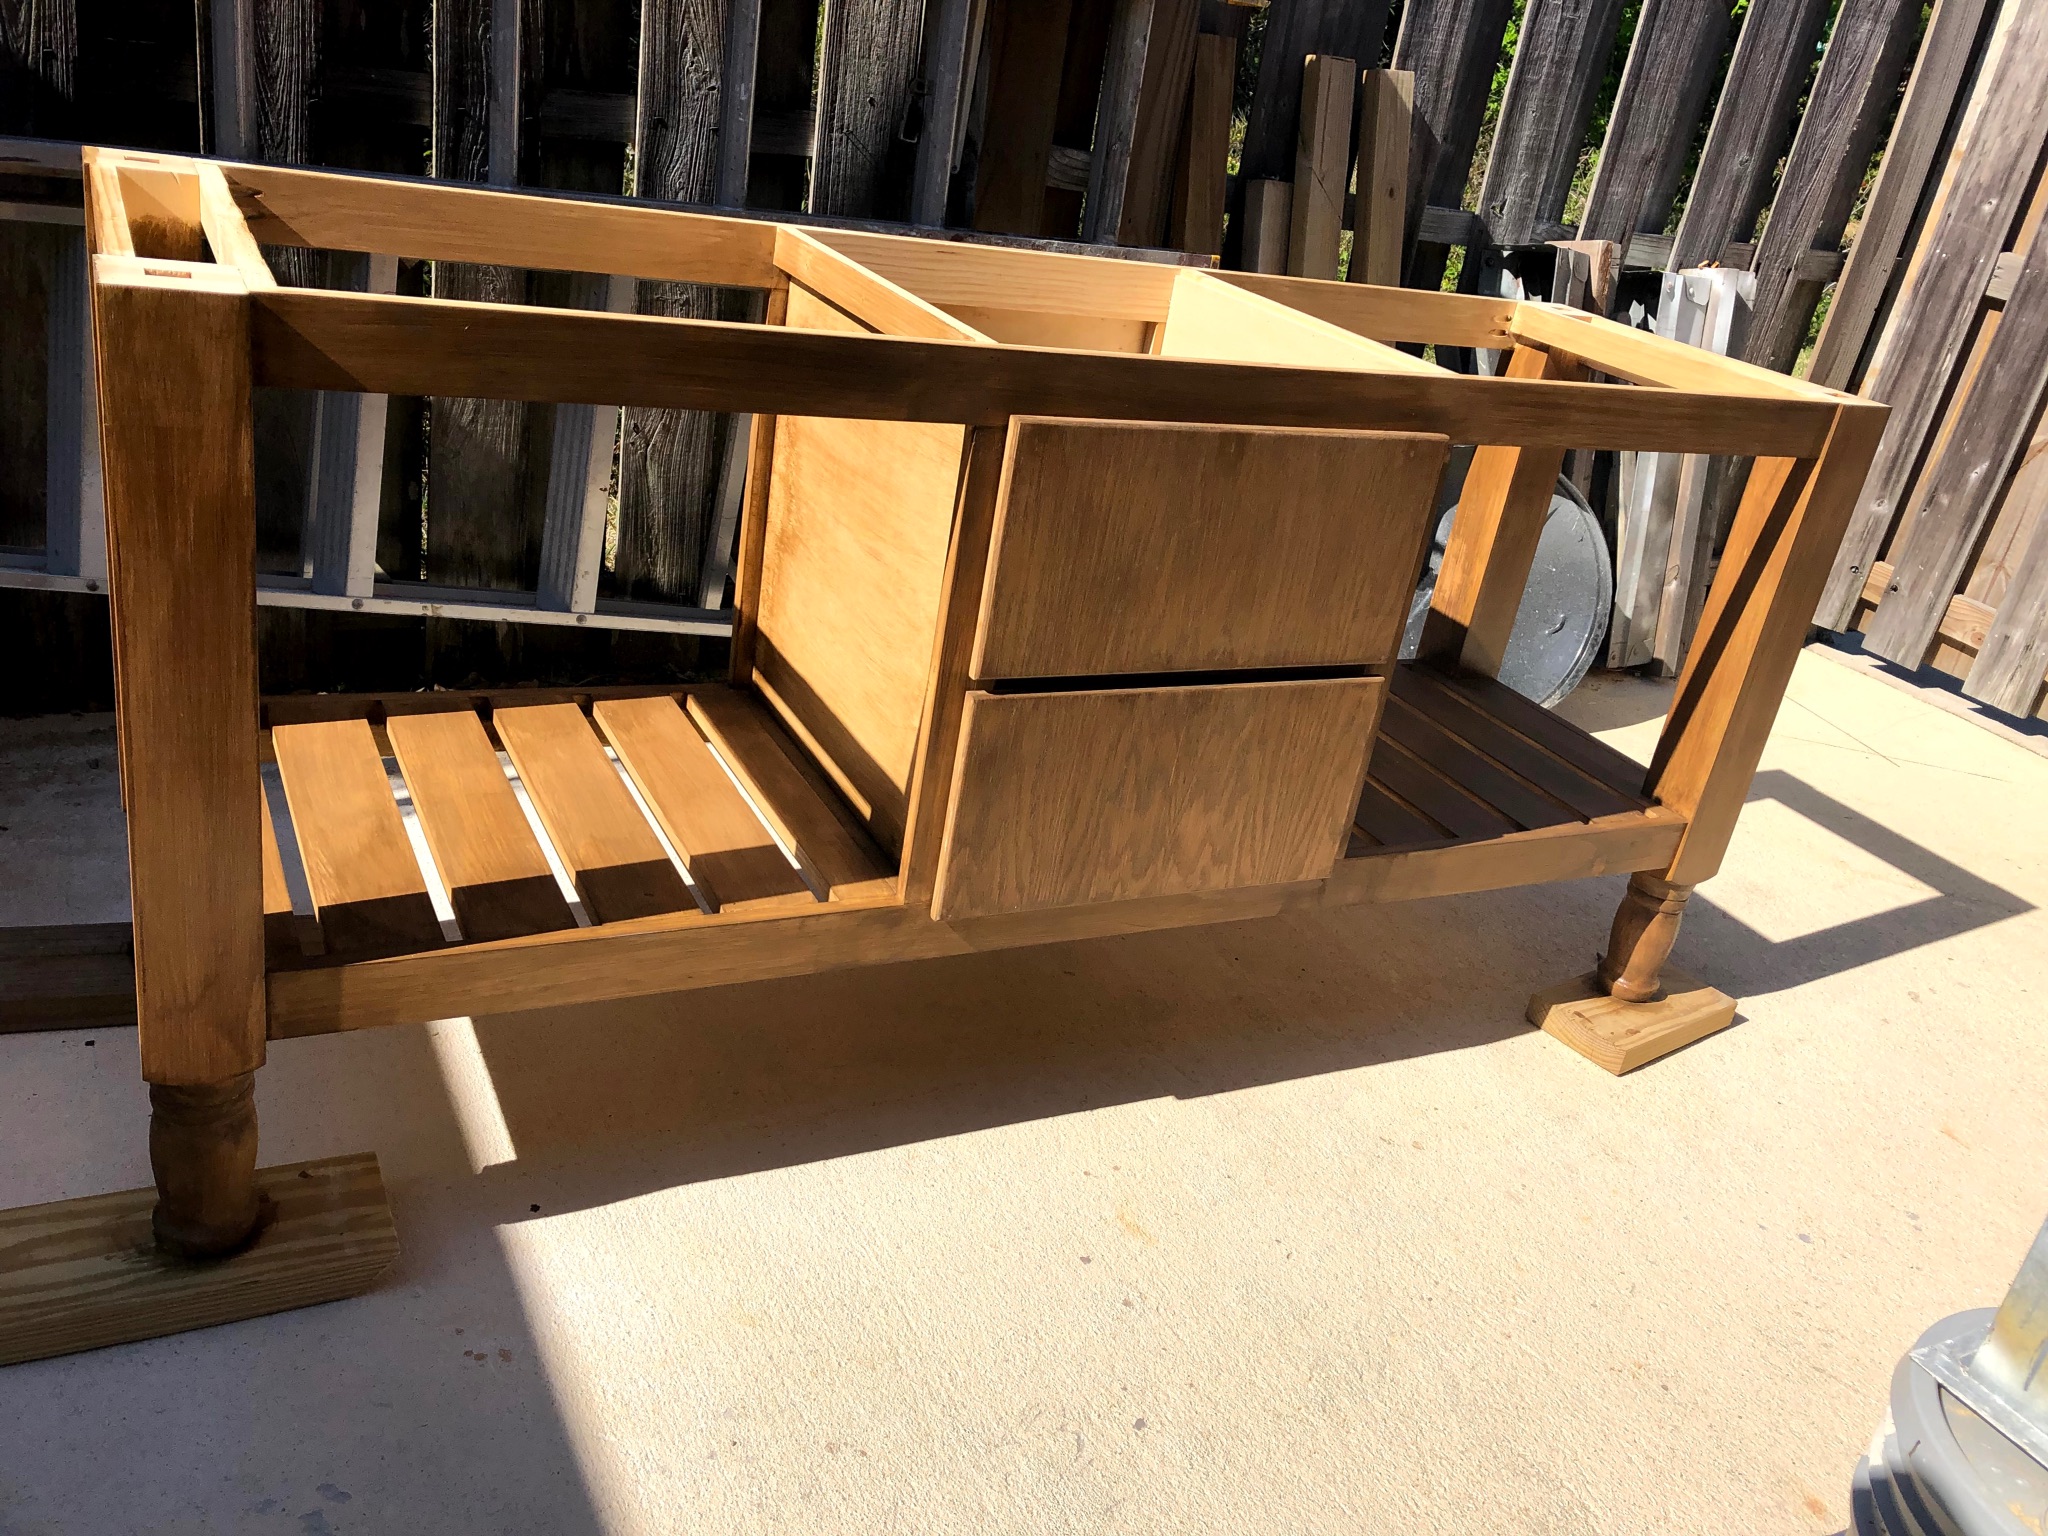
We needed an inexpensive alternative for our master bathroom remodel. After looking at Ana-White.com, I decided I should build a vanity myself.
I had been gifted some newel posts, which I thought would work great for legs. The aprons and shelf slats were made with "choice" pine that I purchased from a big box store. I had two drawers leftover from a piece of furniture that was repurposed and I added new fronts from a piece of wood left from that same piece of furniture. I also had some leftover 1/4 inch plywood that I used to partition the drawers.
The overall length once the counter is installed will be 72 1/2 inches by 23 inches wide. Because we are using vessel sinks (sitting on the countertop) I choose to make the base of the vanity 32 inches high.
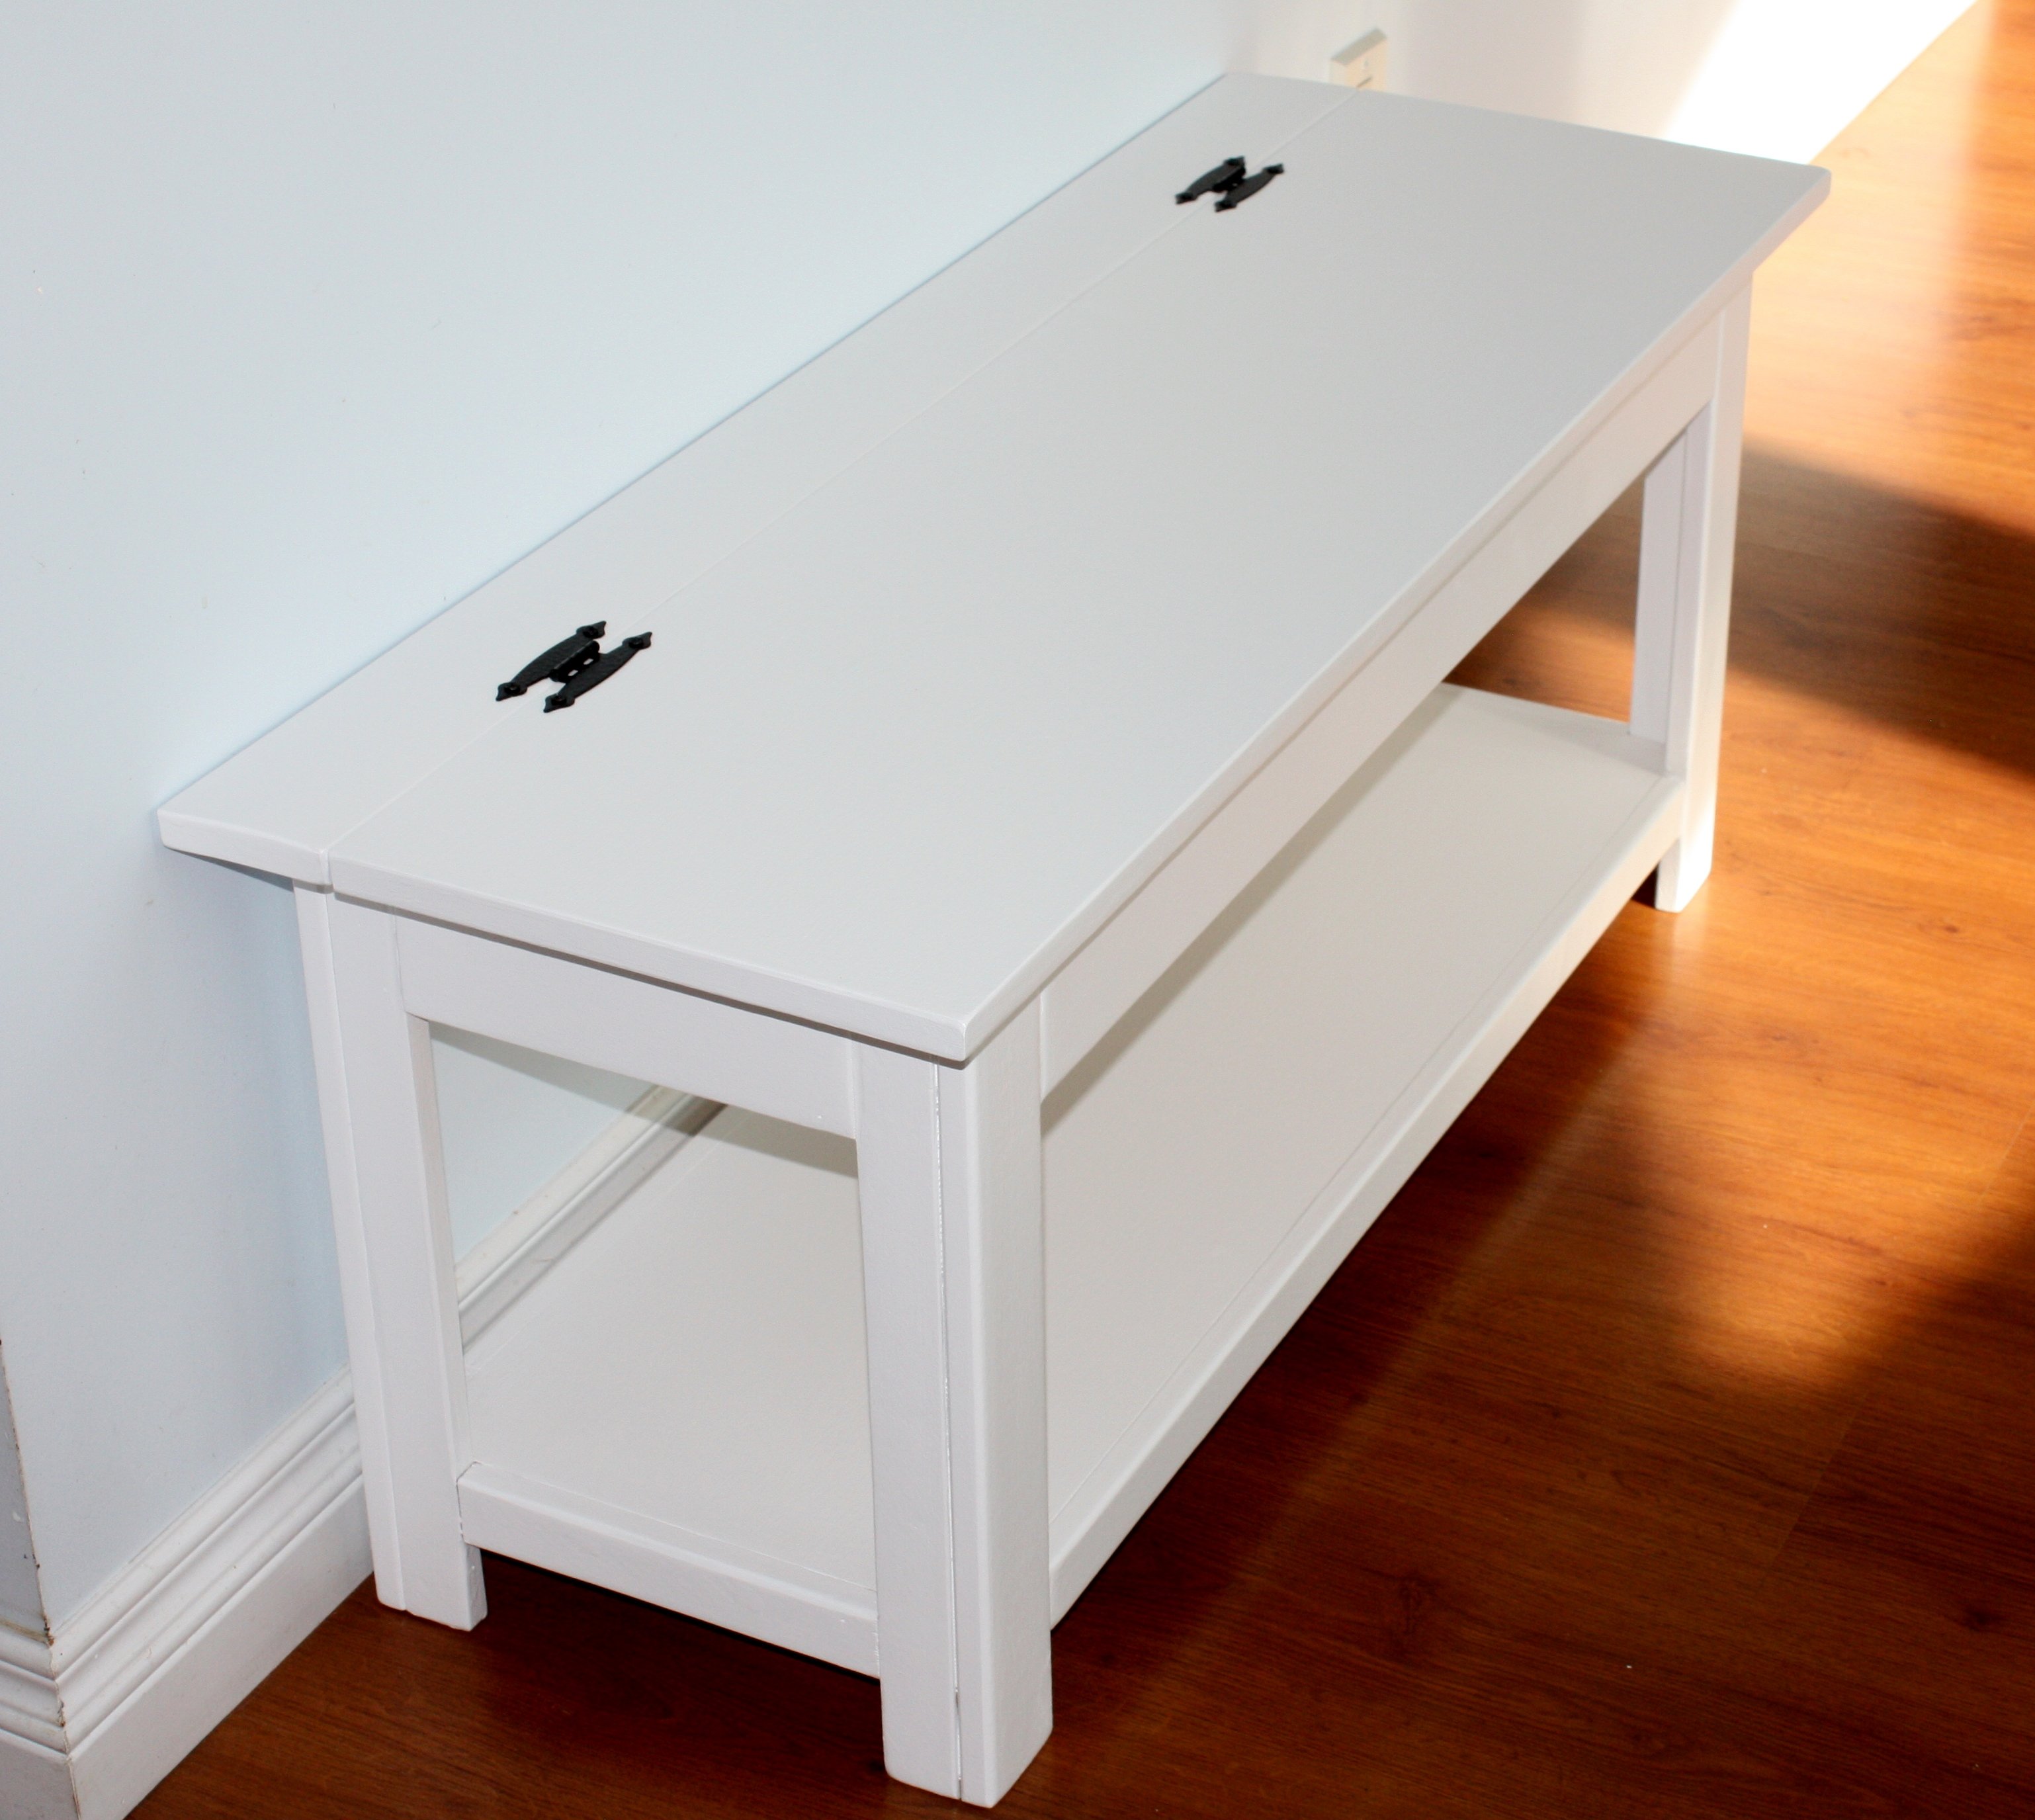
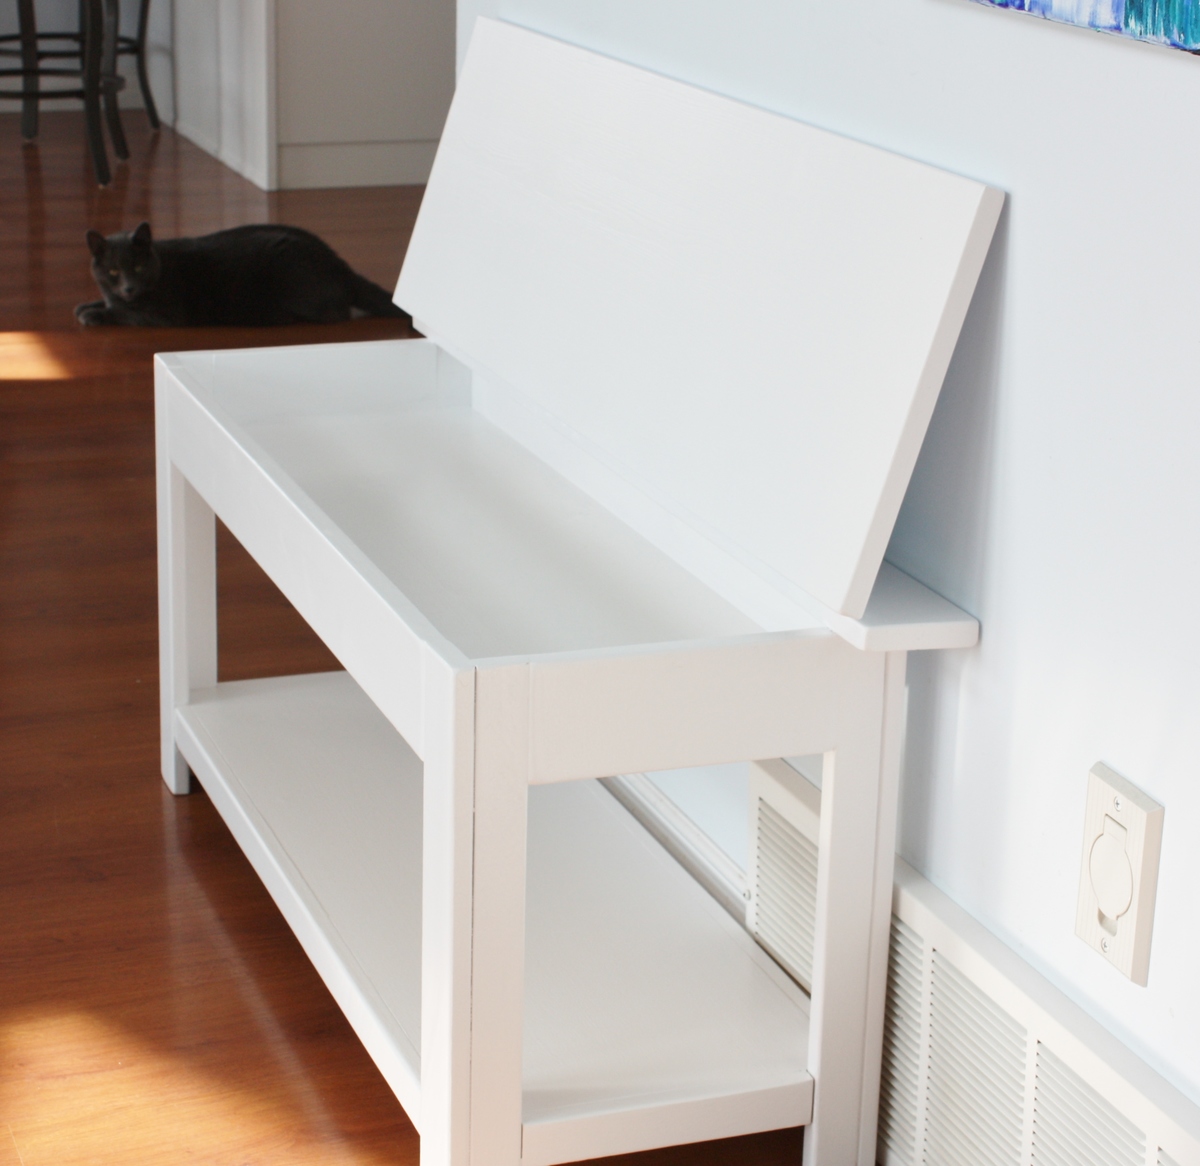
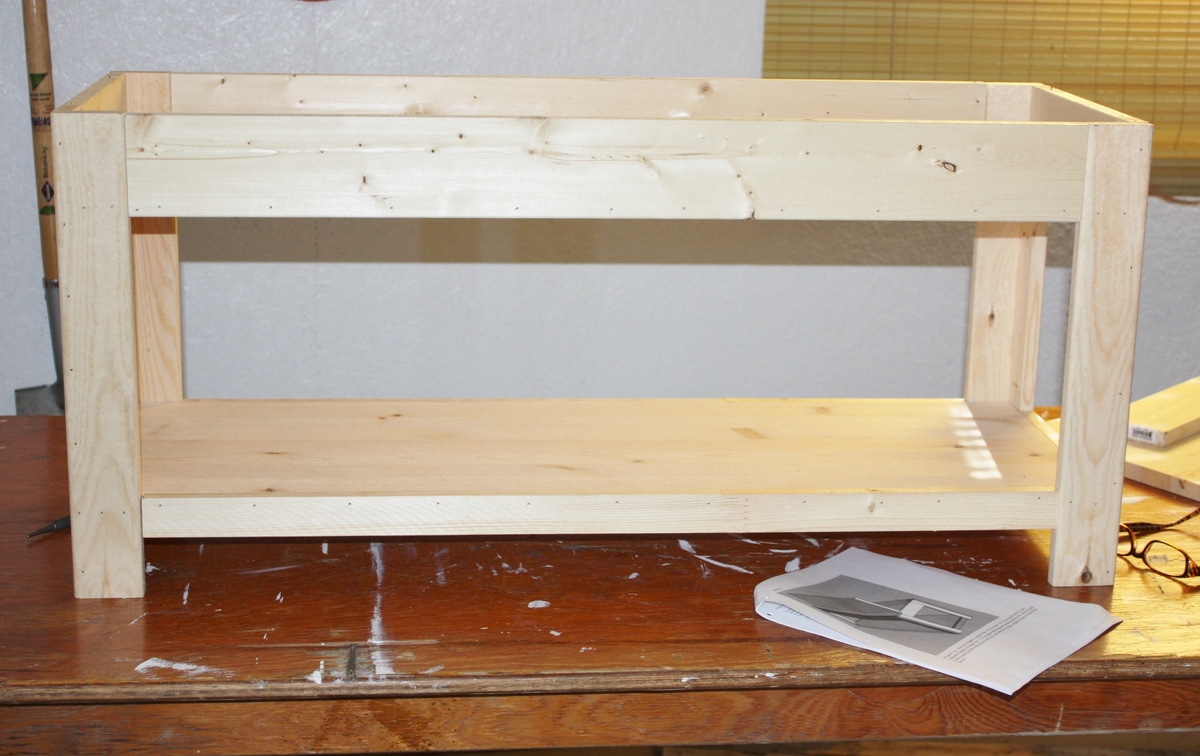
Thank you for the awesome banquet plans! The banquet will have cushions added and be a nice place to put an extra table for the kids at holidays. It is also amazing storage.
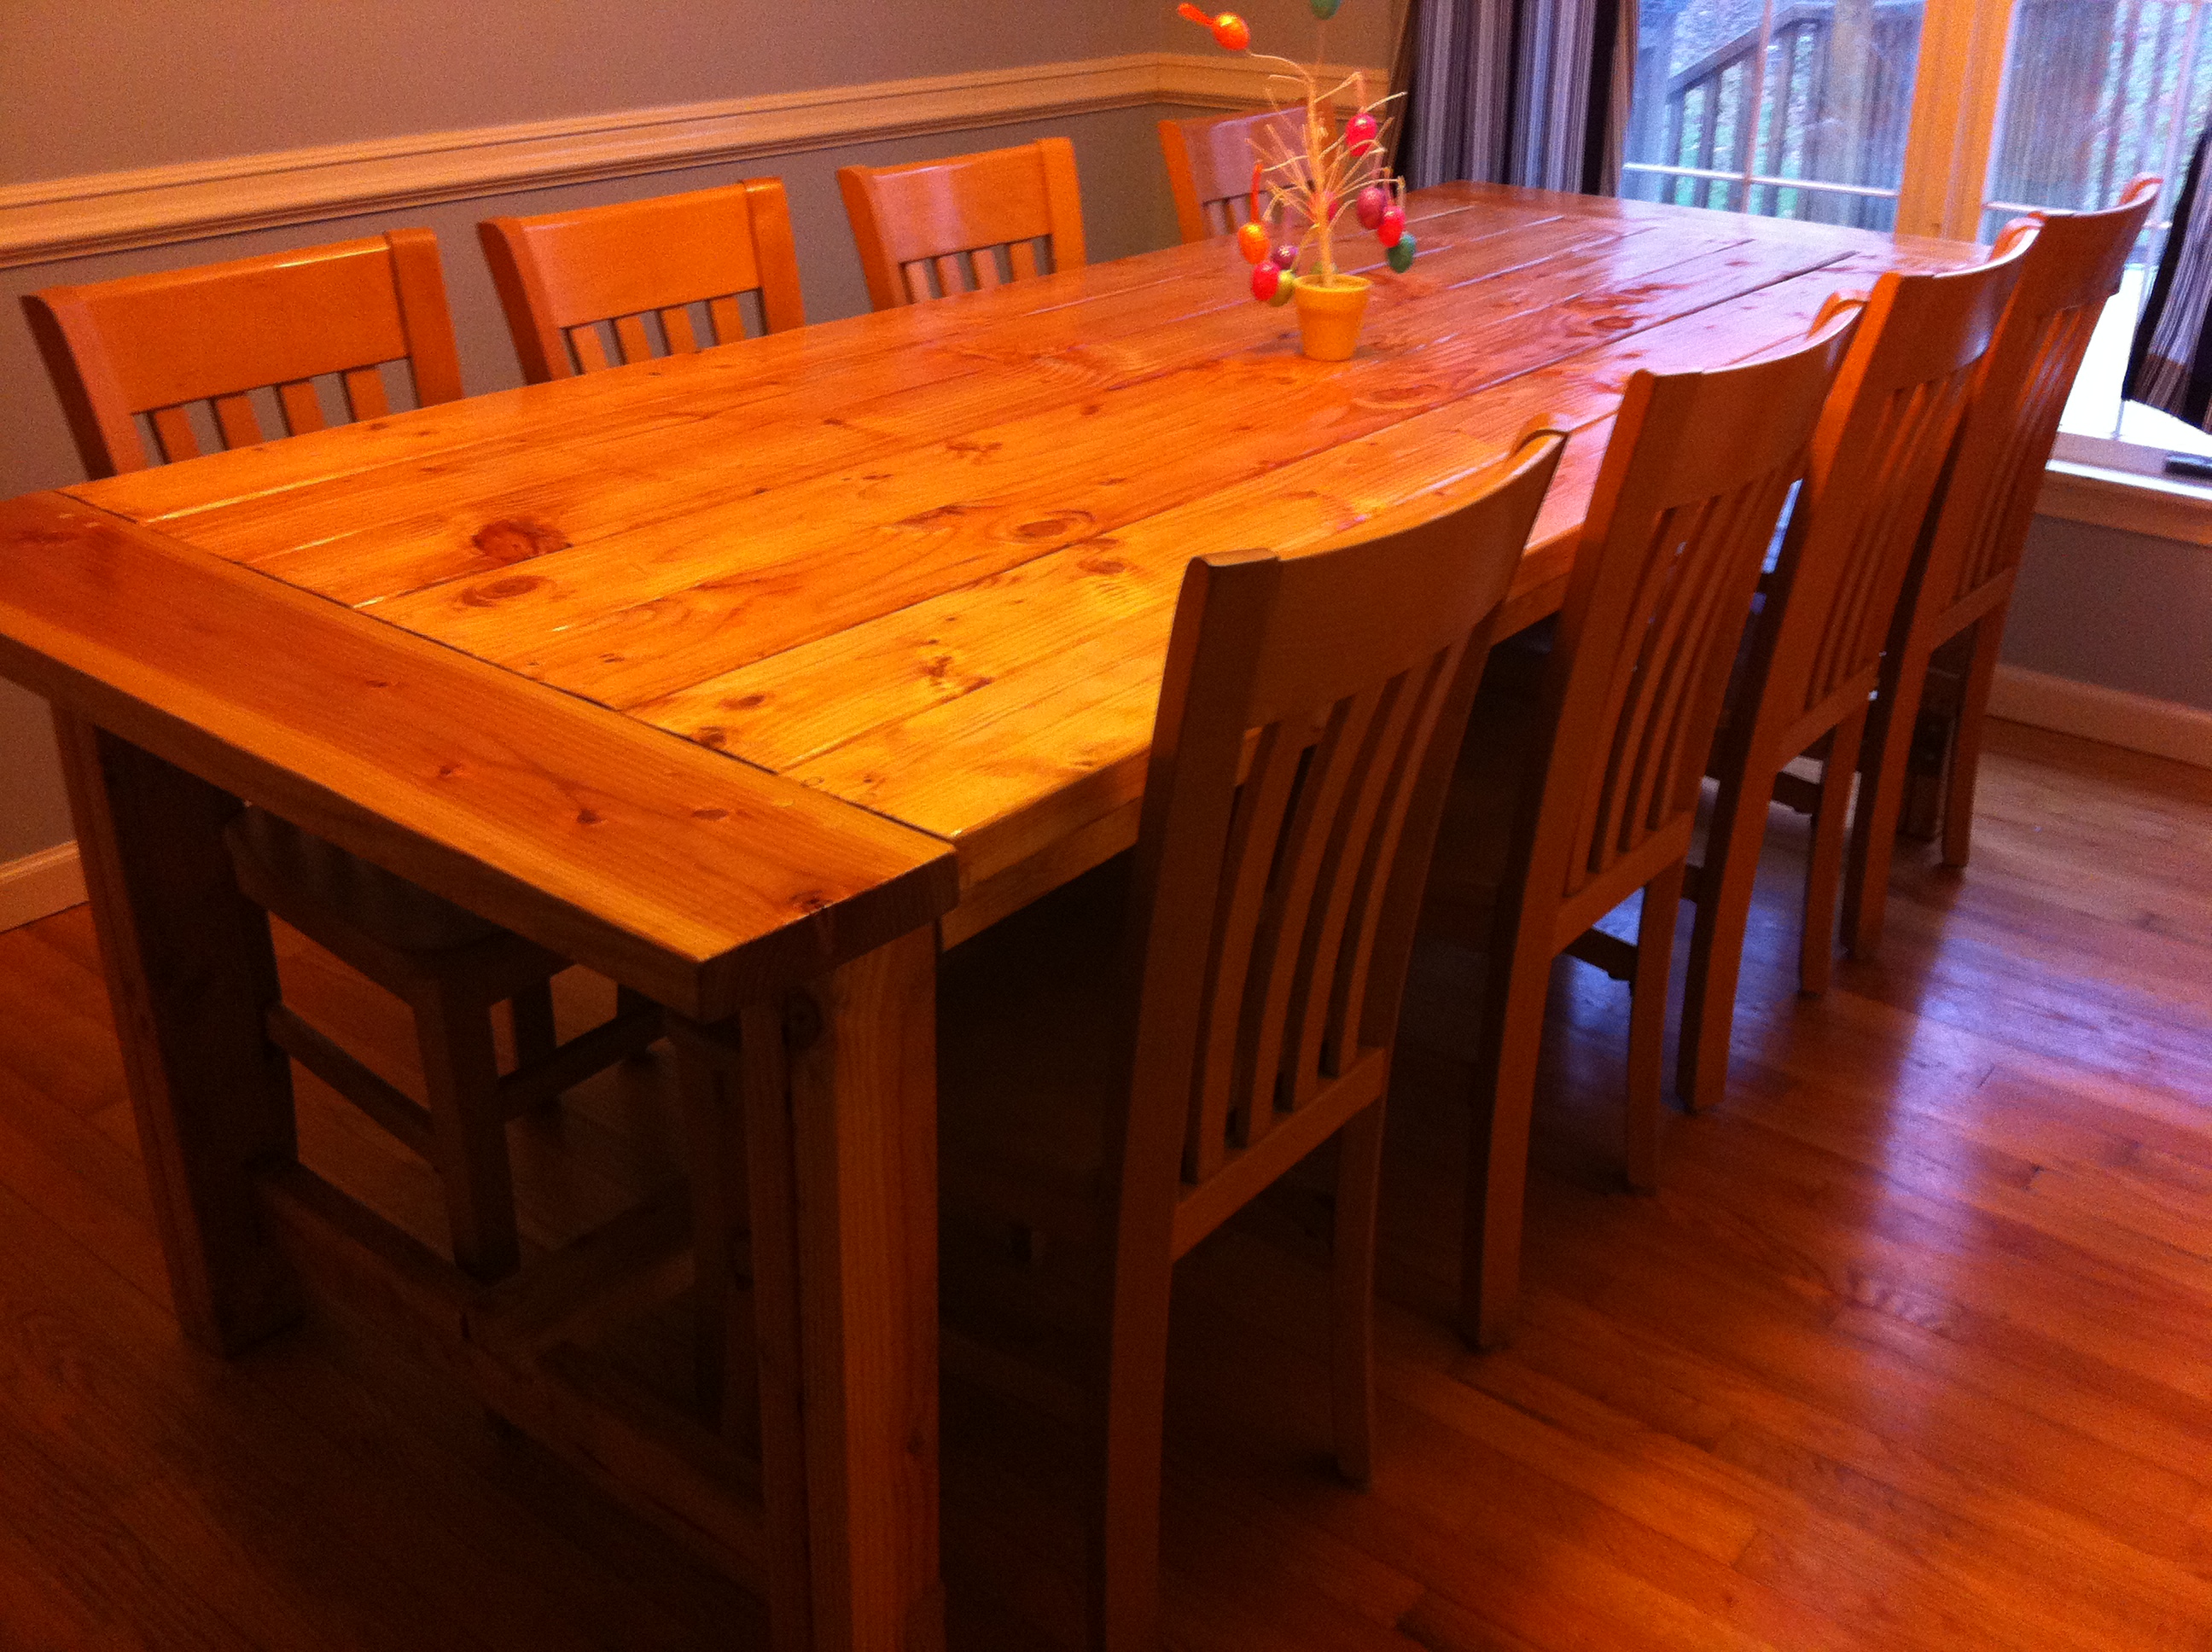
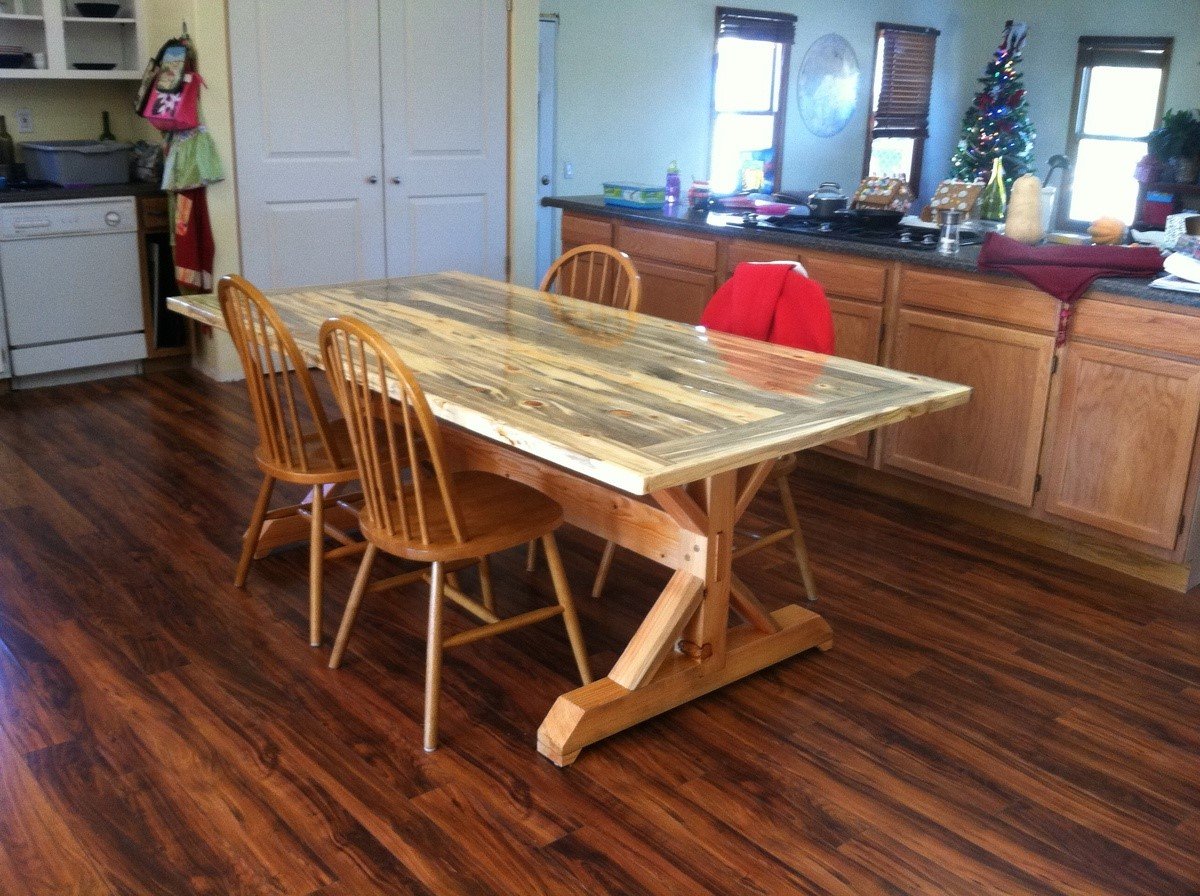
We used Ana's farmhouse table plans. Everyone compliments us on it; even thought that we purchased it at Restoration Hardware.

Fri, 10/28/2011 - 06:20
I like the table, but how do you attach the breadboard ends to allow for expansion and contraction of the wood? How did you flatten such a large tabletop with all those knots? Did you use a super-industrial flatbed sander or did you just use hand planes?
Fri, 10/28/2011 - 10:36
Gorgeous table!
It turned out really nice. I have some of the same questions as above (for all types of projects large expanses of joined up wood).
Does wood expansion and contraction cause any problems with wood attached with the Kreg Jig?
How do you get things smooth when joining up several pieces of wood? Are you using a belt sander? Just letting things end up where they may? Hand planes?
A big industrial planer is out for us. We don't have the room and I don't have the expertise. I'm hoping the planing/sanding is simple and easy, since I am way new to all this!
I'm not sure, but I *think* there is going to be a Kreg Jig and some wood coming my way for my birthday next month! I am so excited I could just scream (but I'll still act surprised LOL).
OK, sorry to just go crazy with a long post here. Your table looks wonderful! You guys did a great job!

Fri, 10/28/2011 - 18:48
There are no wood movement problems along the long pieces, Those will expand and contract together. You can get problems with the cross piece on the ends.
As far as leveling the pieces, it's generally not done with this kind of furniture. But if you decided that it did need to be level, hand planes are the only good solution. I just did a table top, and it was moderately strenuous, but it didn't kill me, and it's very nice now.
If you want to learn how to do it, there are good books and videos on hand tools that discuss it. I grabbed Hand Tool Essentials as well as looking at a couple of good online videos from Chris Schwarz.
Fri, 10/28/2011 - 19:38
Hey Clay,
Thanks for the information. I will go do some research to see what I can learn about hand planing for when the project demands it. I'll also go look for some Chris Schwarz vids, too.
I appreciate the input!
Sun, 10/30/2011 - 13:52
Thank you for the kudos!
To answer some of the questions - there is a small gap at each end where the breadboards are attached that should allow for some expanding and contracting. As for finishing the top, we did not use a planer, just a palm sander. We were going for the rustic look, so the small imperfections give it some of that character we were trying for. After sanding we just put a couple coats of poly - the color of the natural wood with poly perfectly matched the chairs we had, which made it easy!
Sun, 10/30/2011 - 14:54
Thanks, Nicole!
Your table really turned out beautifully. I love a bit of a rustic/cottage-y vibe, so I'm glad to hear that a palm sander did the trick. I'm not too intimidated by a palm sander, so that's another bonus.
You guys did a great job!
In reply to Thanks, Nicole! by Cindy from Indiana (not verified)
Tue, 06/19/2012 - 20:01
I was recently diagnosed with Vibration Induced White Finger (yes it is a real malady) caused by over use of vibrating tools. I think the culprit was the palm sander. If you are concerned choose a rotating sander that has vibration control. I got one for Father's Day and it is great. I have not had any problems sanding surfaces down to smooth and level with 60 grit paper even with knots. Then I just go to 100 grit and then 150 grit and the surface is great.
Fri, 12/20/2013 - 07:20
First of all, this looks great! I am going to attempt to build one. Two questions at least for now....
1) How long is your table? Unless you have narrow chairs, I don't see how 4 chairs would fit comfortably on the sides.
2) Where did you get your chairs? They also look great with the table.
Again, Great Job!!
TC
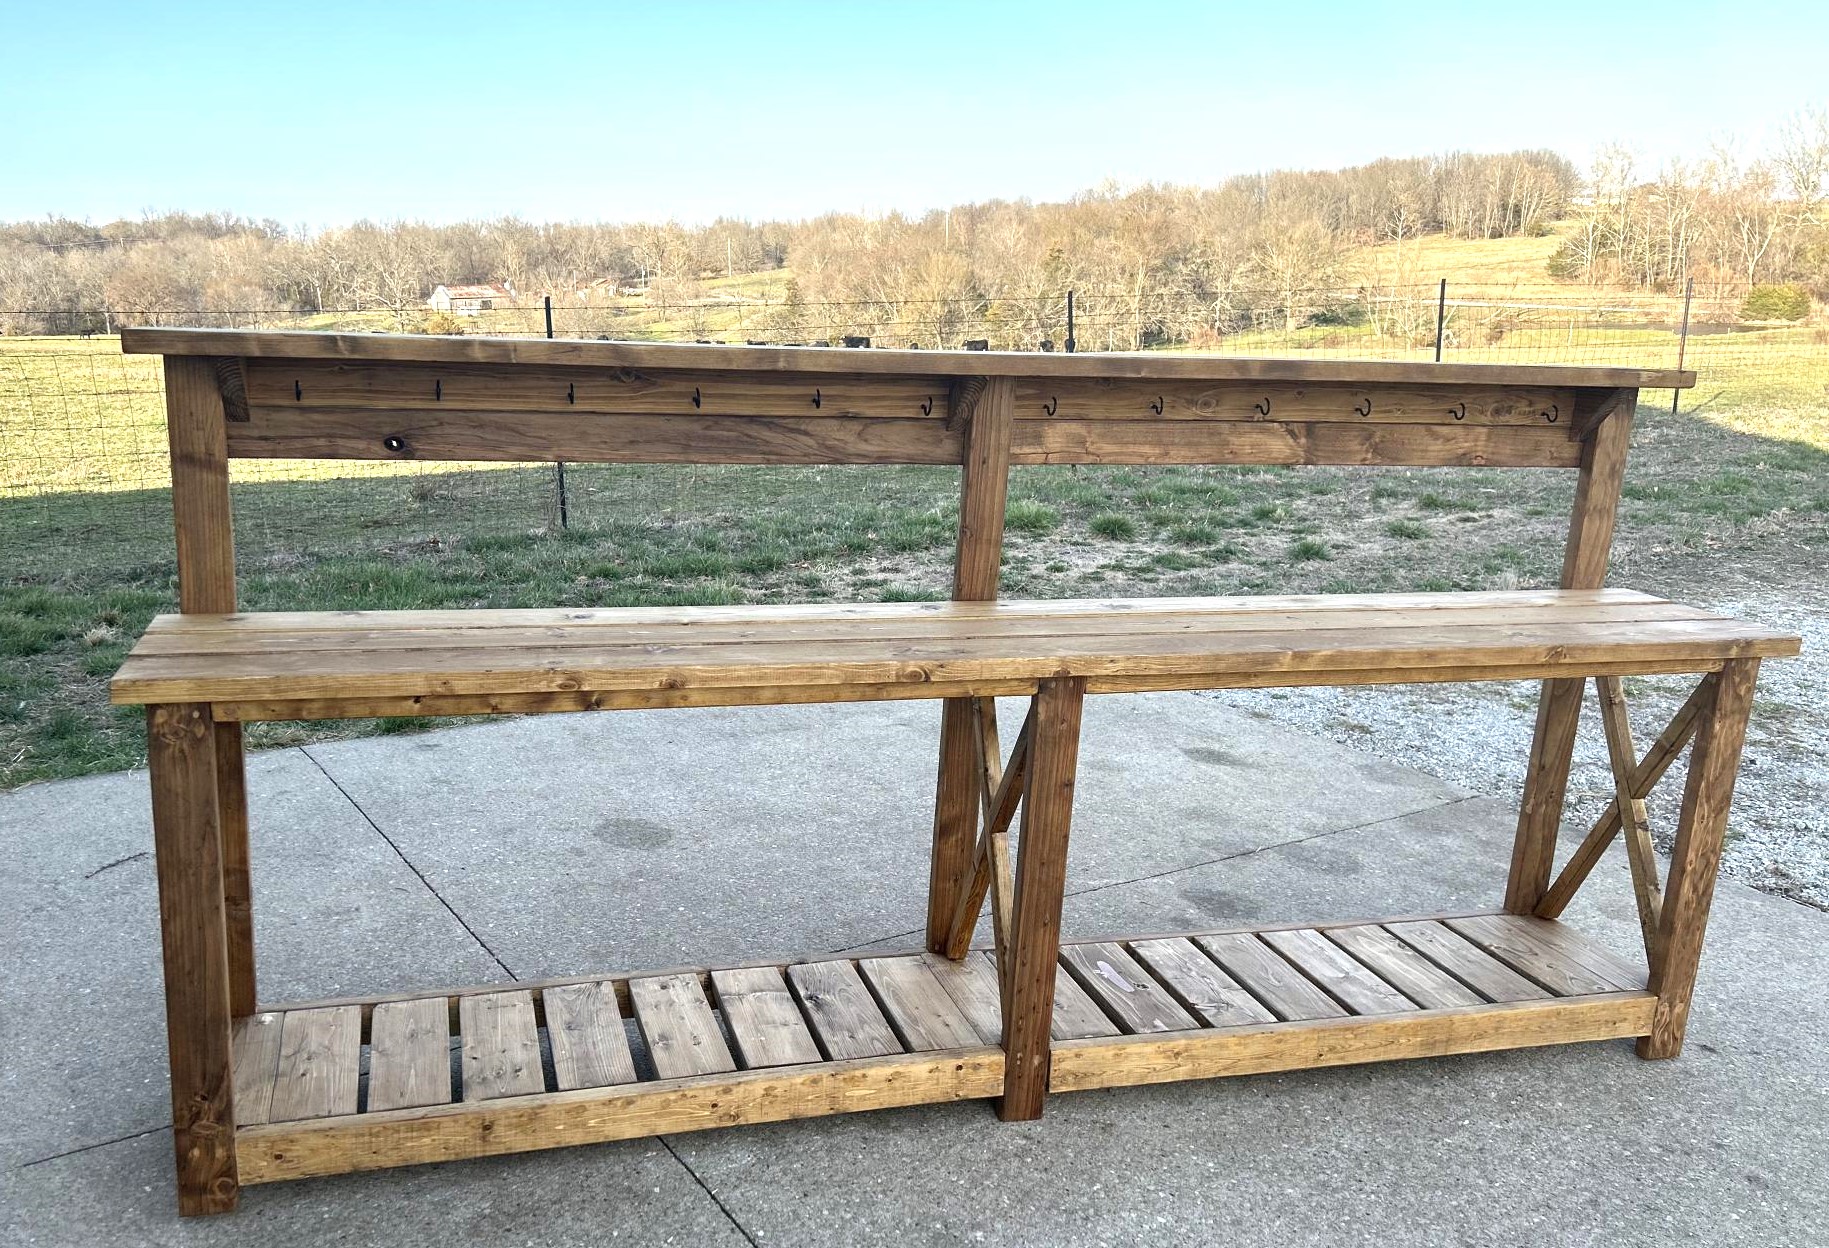
I built this 10’ long potting bench to fit into a 12’ barn stall. It fills the need to have a work surface plus room for storage on top and underneath. The hooks provide a place to hang my many hand tools and my Bluetooth speaker.
Fri, 03/10/2023 - 12:19
This is such a great idea for a house stall! Thank you for sharing that it can be done.

seven years ago we built this bed. It takes the place of needing a dresser. See more on my Instagram account.
I needed patio furniture and happened to come across Anna White’s site. It is a great beginner’s project. I was so happy with how they turned out.
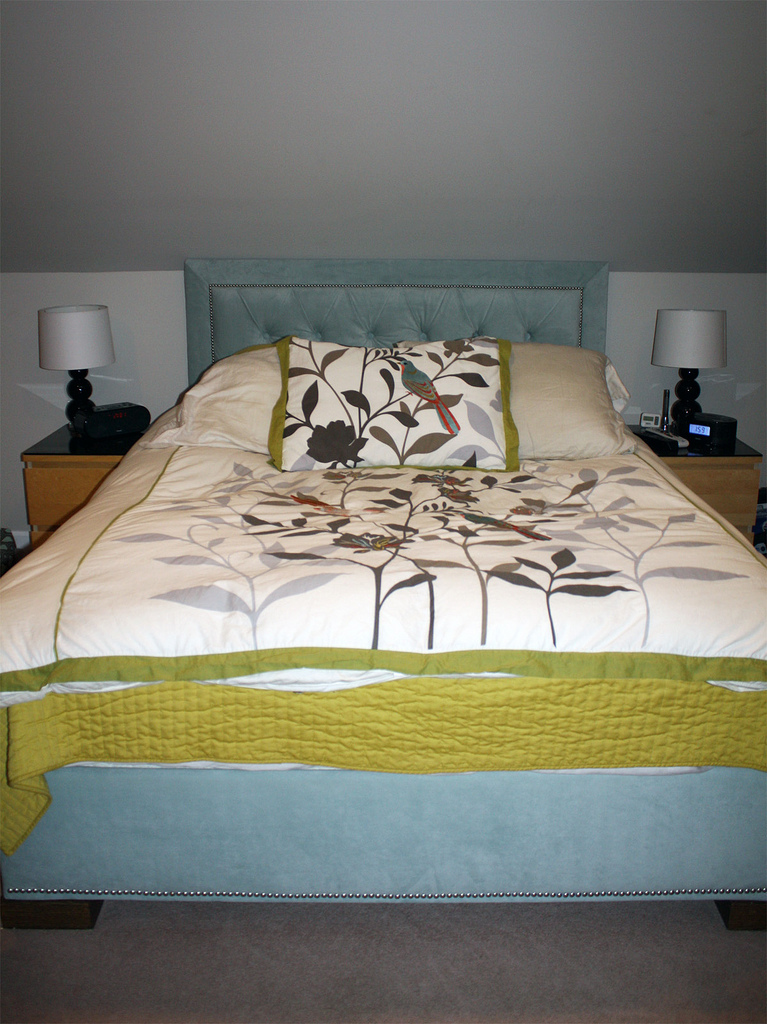
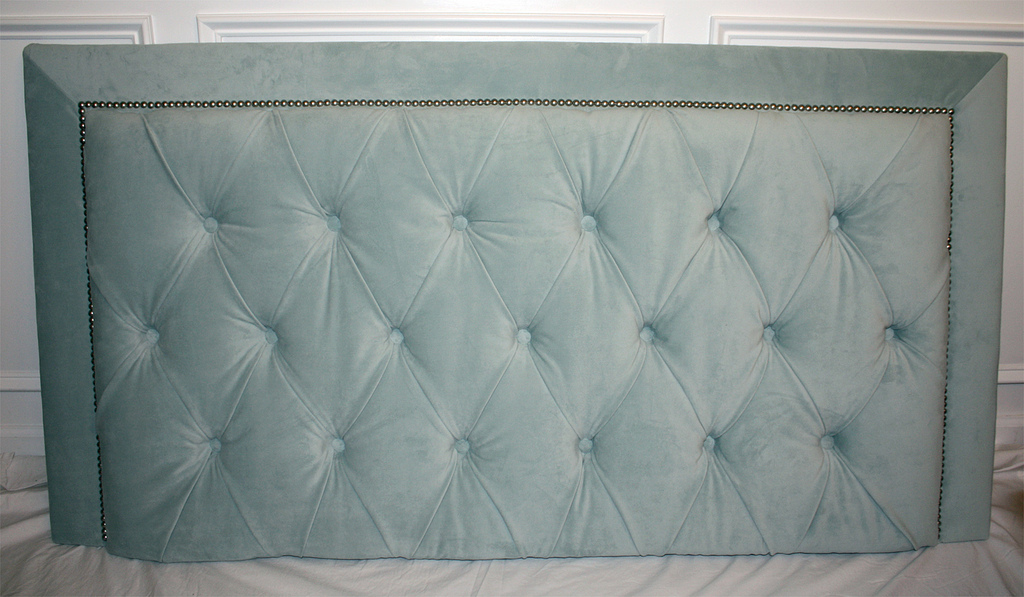
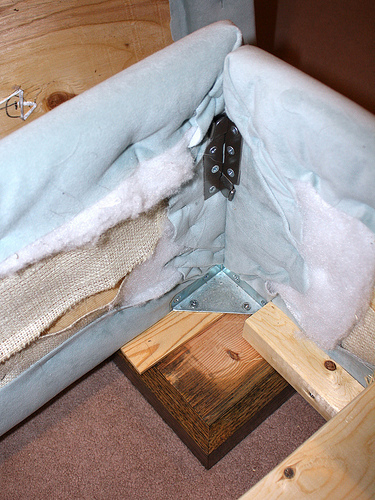
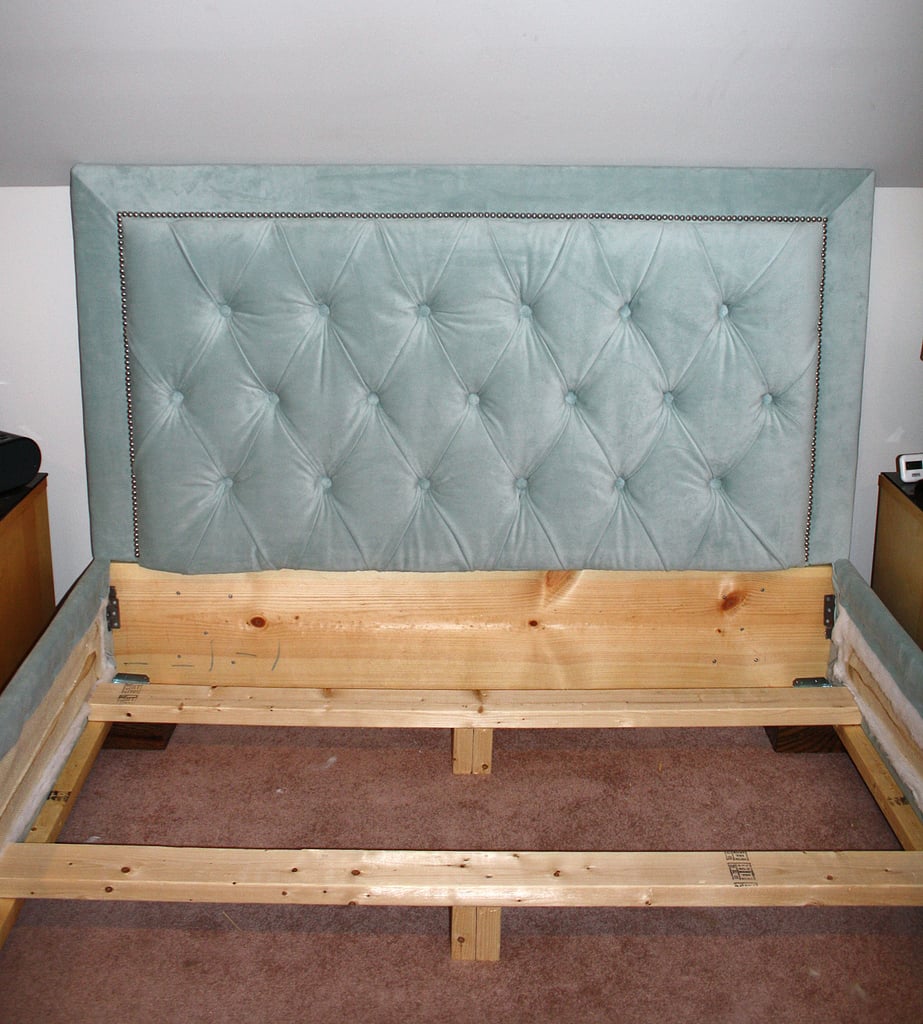
I used Ana's chunky leg bed frame plan with a few modifications for the bed and tutorials found online for the headboard. For more info visit my blog.

Tue, 01/10/2012 - 18:21
The whole thing is beautiful, but love that headboard, especially. I can't get into your blog. It won't work. It tells me page not found.
Sat, 07/28/2012 - 18:20
Beautiful!!! You did a fantastic job on this bed!!! I am wondering how far apart you spaced the buttons?
Thanks,
Janelle
Fri, 06/06/2014 - 03:49
I wanted to make one just like yours but do the tafting all the way to the edge of the headboard. I'm wondering though, how much fabric did you use? Thanks!
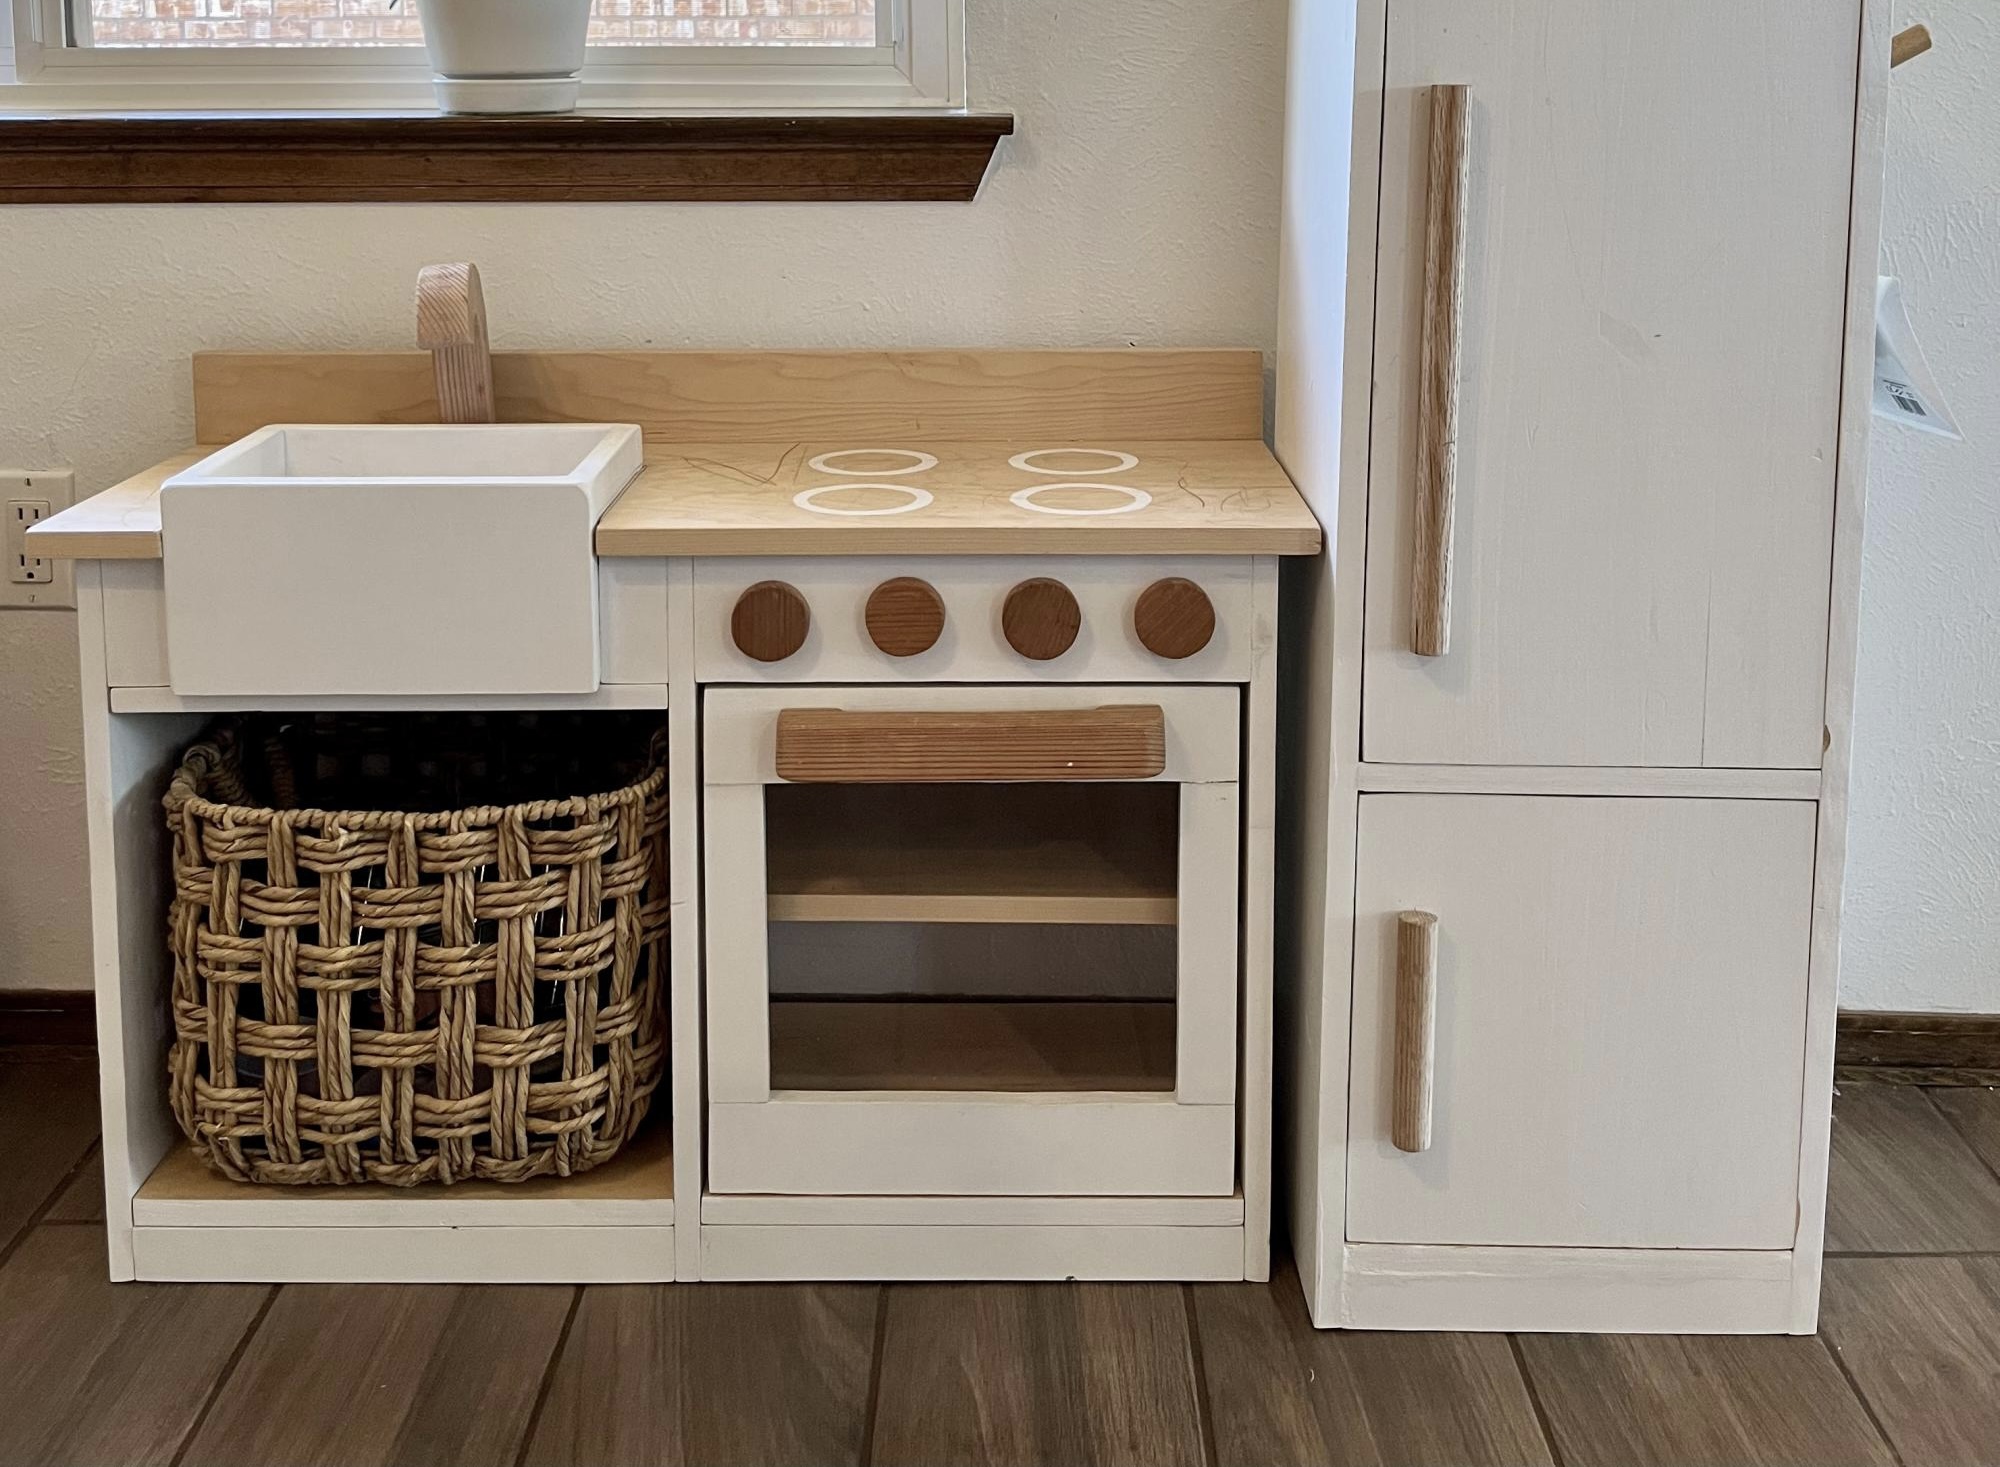
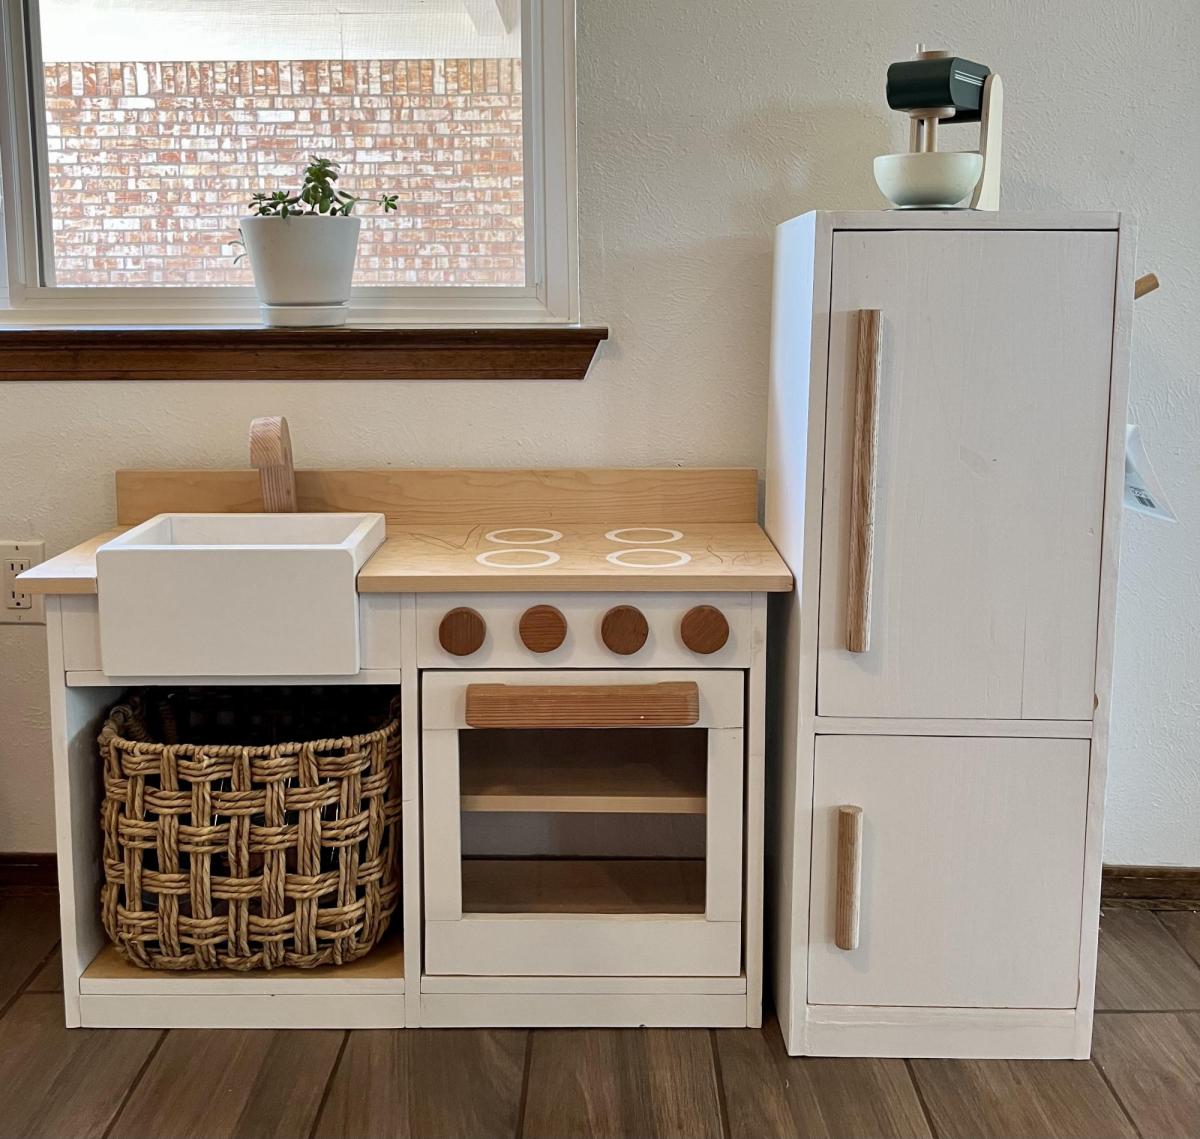
I made this play kitchen as a Christmas present for my kids, and it’s been a big hit! It’s built mostly from leftover hardwood plywood, and a couple of 1x12 pine boards. The oven knobs and faucet were cut from redwood scraps and attached with 1/2” dowels to freely rotate. The vertical surfaces were painted with leftover house paint and sealed with water-based polycrylic. It was a fun build, and I learned some new skills (like installing hinges)! Thanks for the plans!
Mon, 06/05/2023 - 07:50
WOW, this is just too cute, can I get one in my size please! Thank you so much for sharing, love your finish choices.
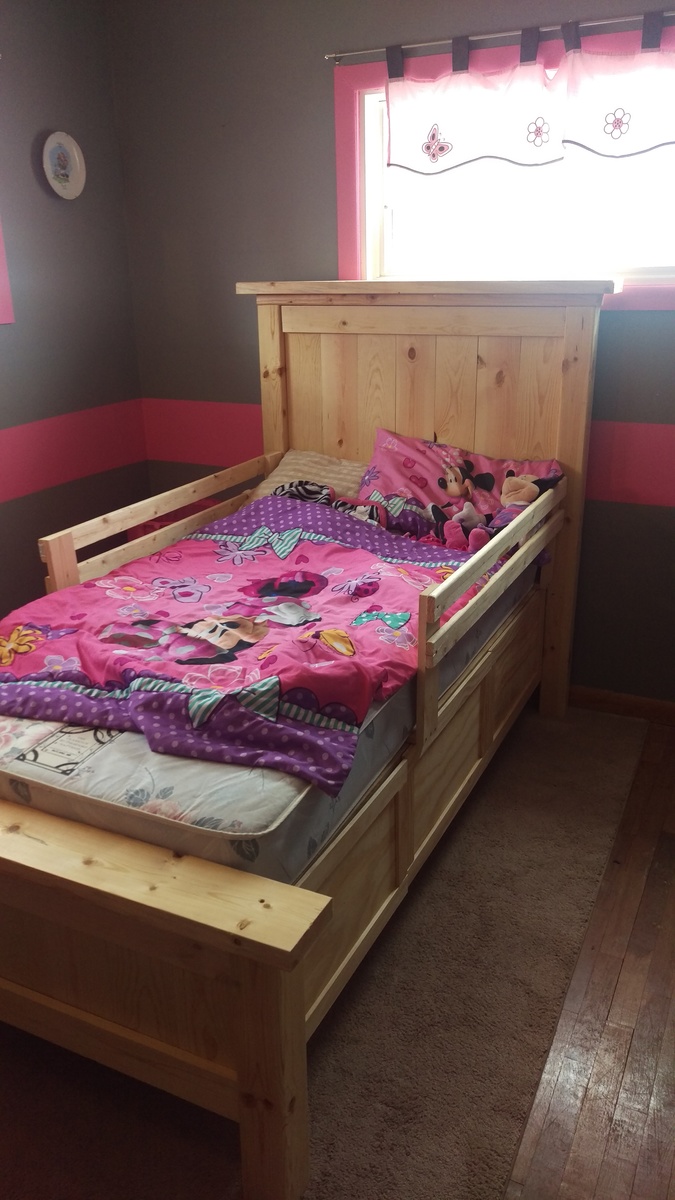
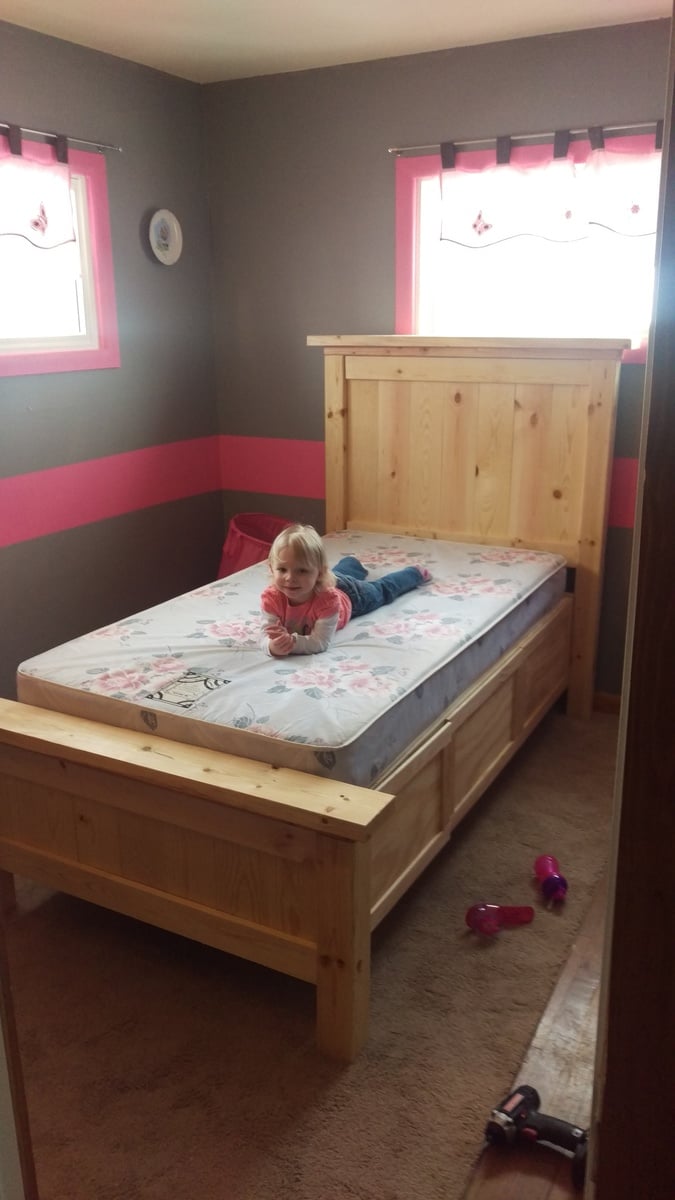
I was looking for a bed for my daughters room. She does not have much storage or room so this plan worked perfect. Took about two days so a great weekend project. Built with love unlike from a store.

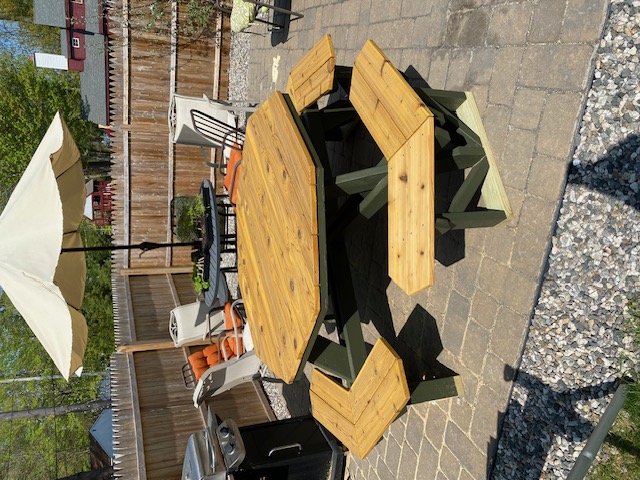
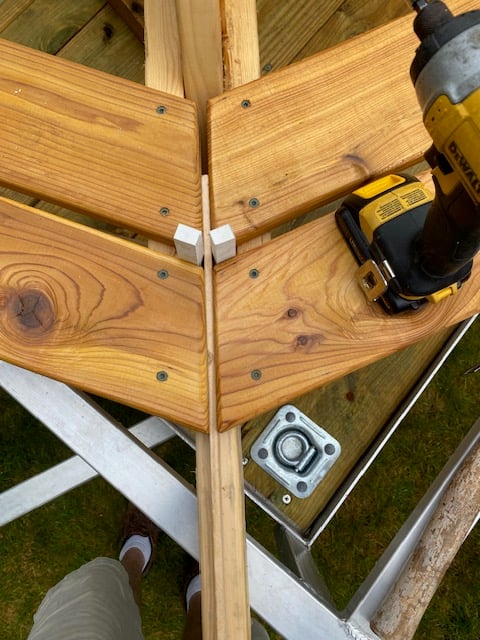
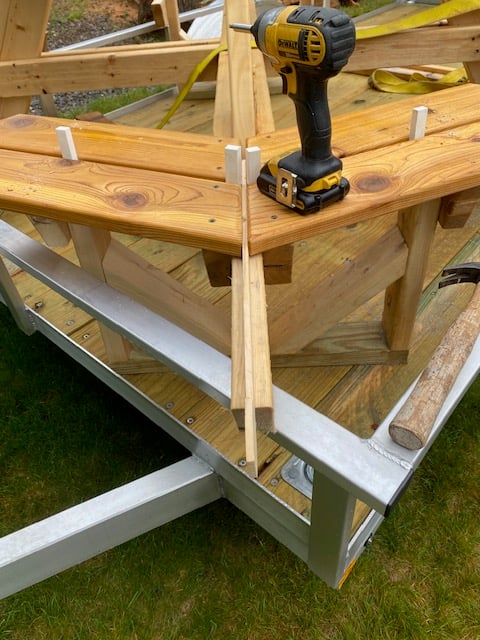
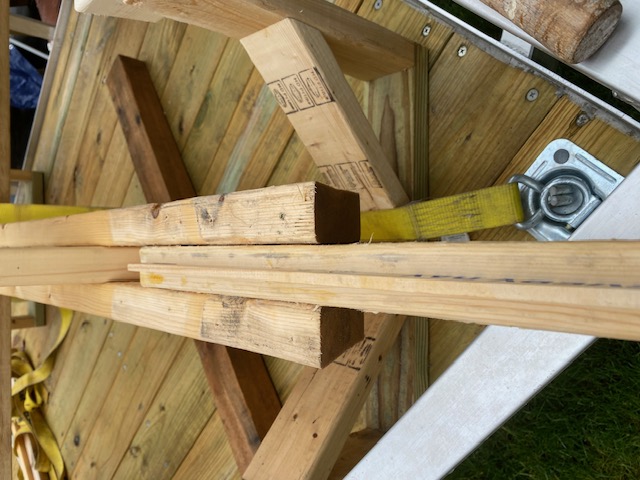
I downloaded the plans for the octagonal table. I have made several and used a few different woods, made a few minor design changes as well as creating a routine and using a jig or two. This jig fits in between the two boards that form the seat support frame. I used a large paint stick and a scrap piece of 2 x 4. Using a table saw, I cut a groove in the 2" edge, approximately 1/2" deep, this took two passes (pass it through, turn it and pass again), a slight adjustment and another two passes. Insert the paint stick and seat all the way down. Place jig between seat support frame, might be a little snug or use a clamp to hold in place. Adjust so just the paint stick sticks up enough to separate seat boards. With seat boards against the jig, it forms the perfect angle/guide to match cuts. I also used 1/2" spacers to create consistent spacing. Love the various plans you make available as well as your videos.
Beetle kill table. I chose to mortise the support and use pegs for effect. As such used 4x4 for leg uprights. Made the top removable because it's heavy!

Wed, 08/03/2016 - 09:59
That table looks awesome ! I am in the process of making one similar i went to a local mill and they had ambrosia maple to make the table topper and i am making the base. I was wondering how you went about making the table top removable did you use threaded inserts ? also how did you get the cross support cut out done? Last question i have is where did you find the 4x4 material i am in eastern north carolina and it seems it doesnt exist around here. thank you for sharing
