Community Brag Posts
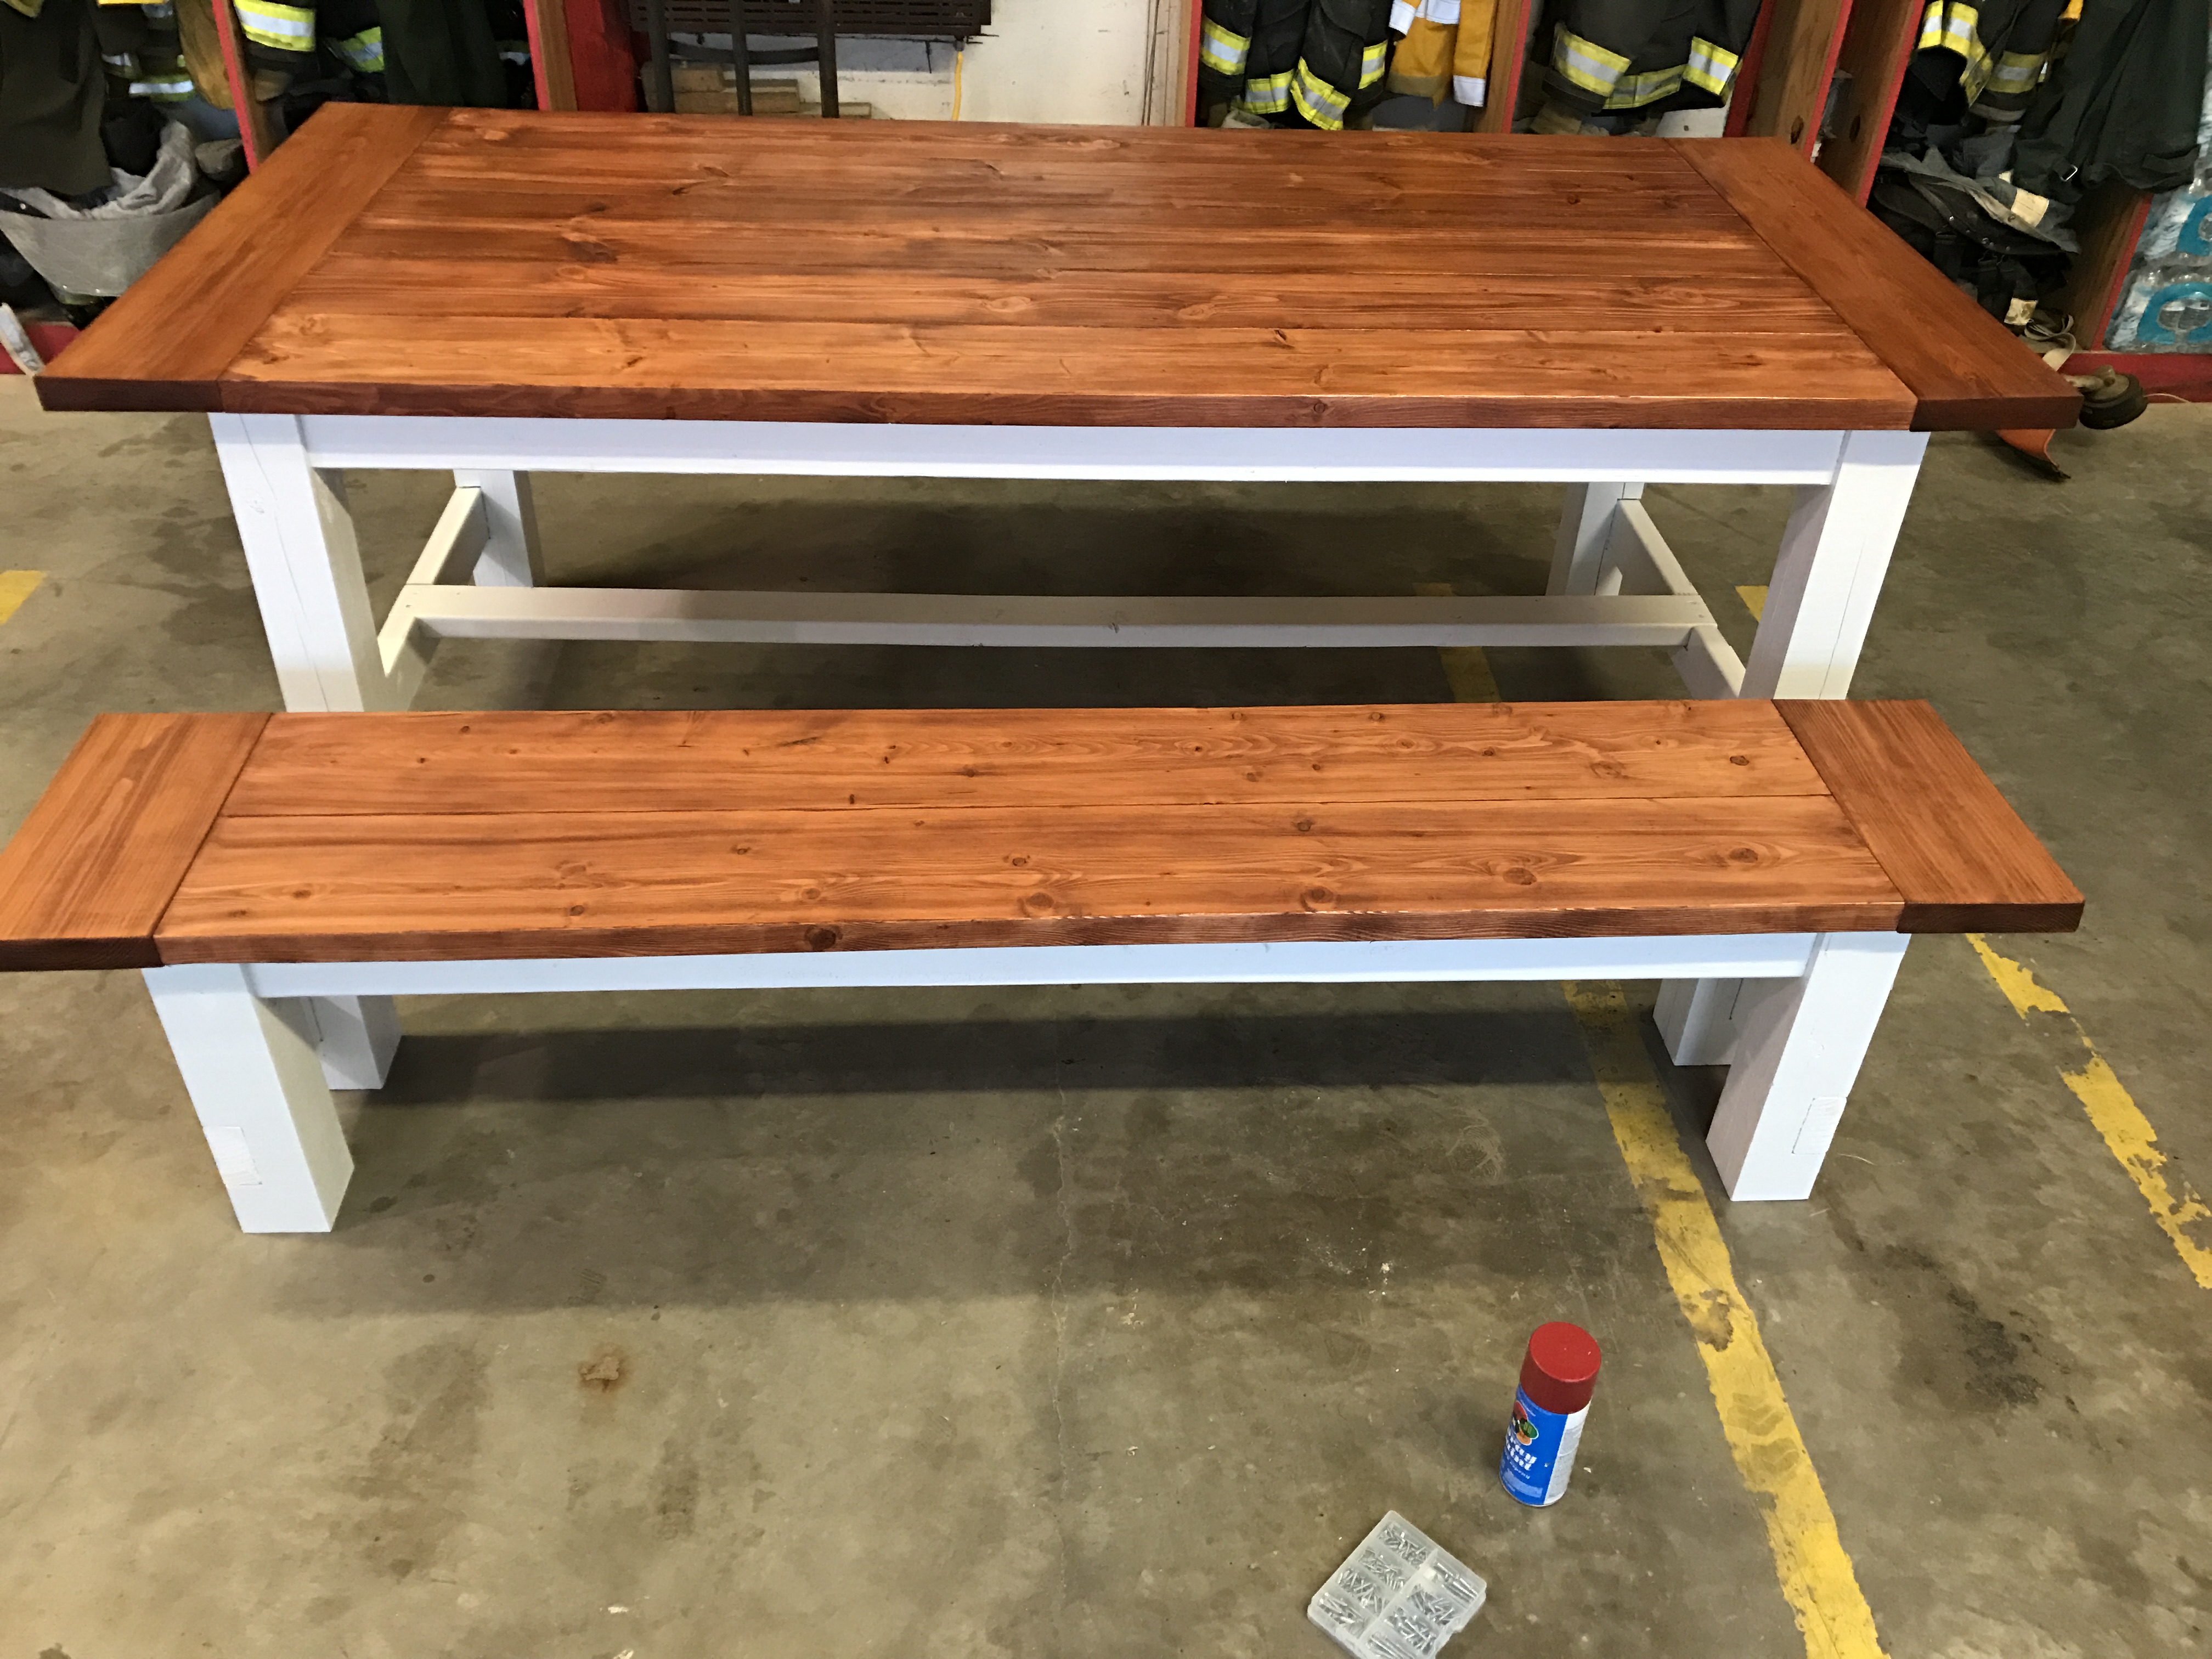
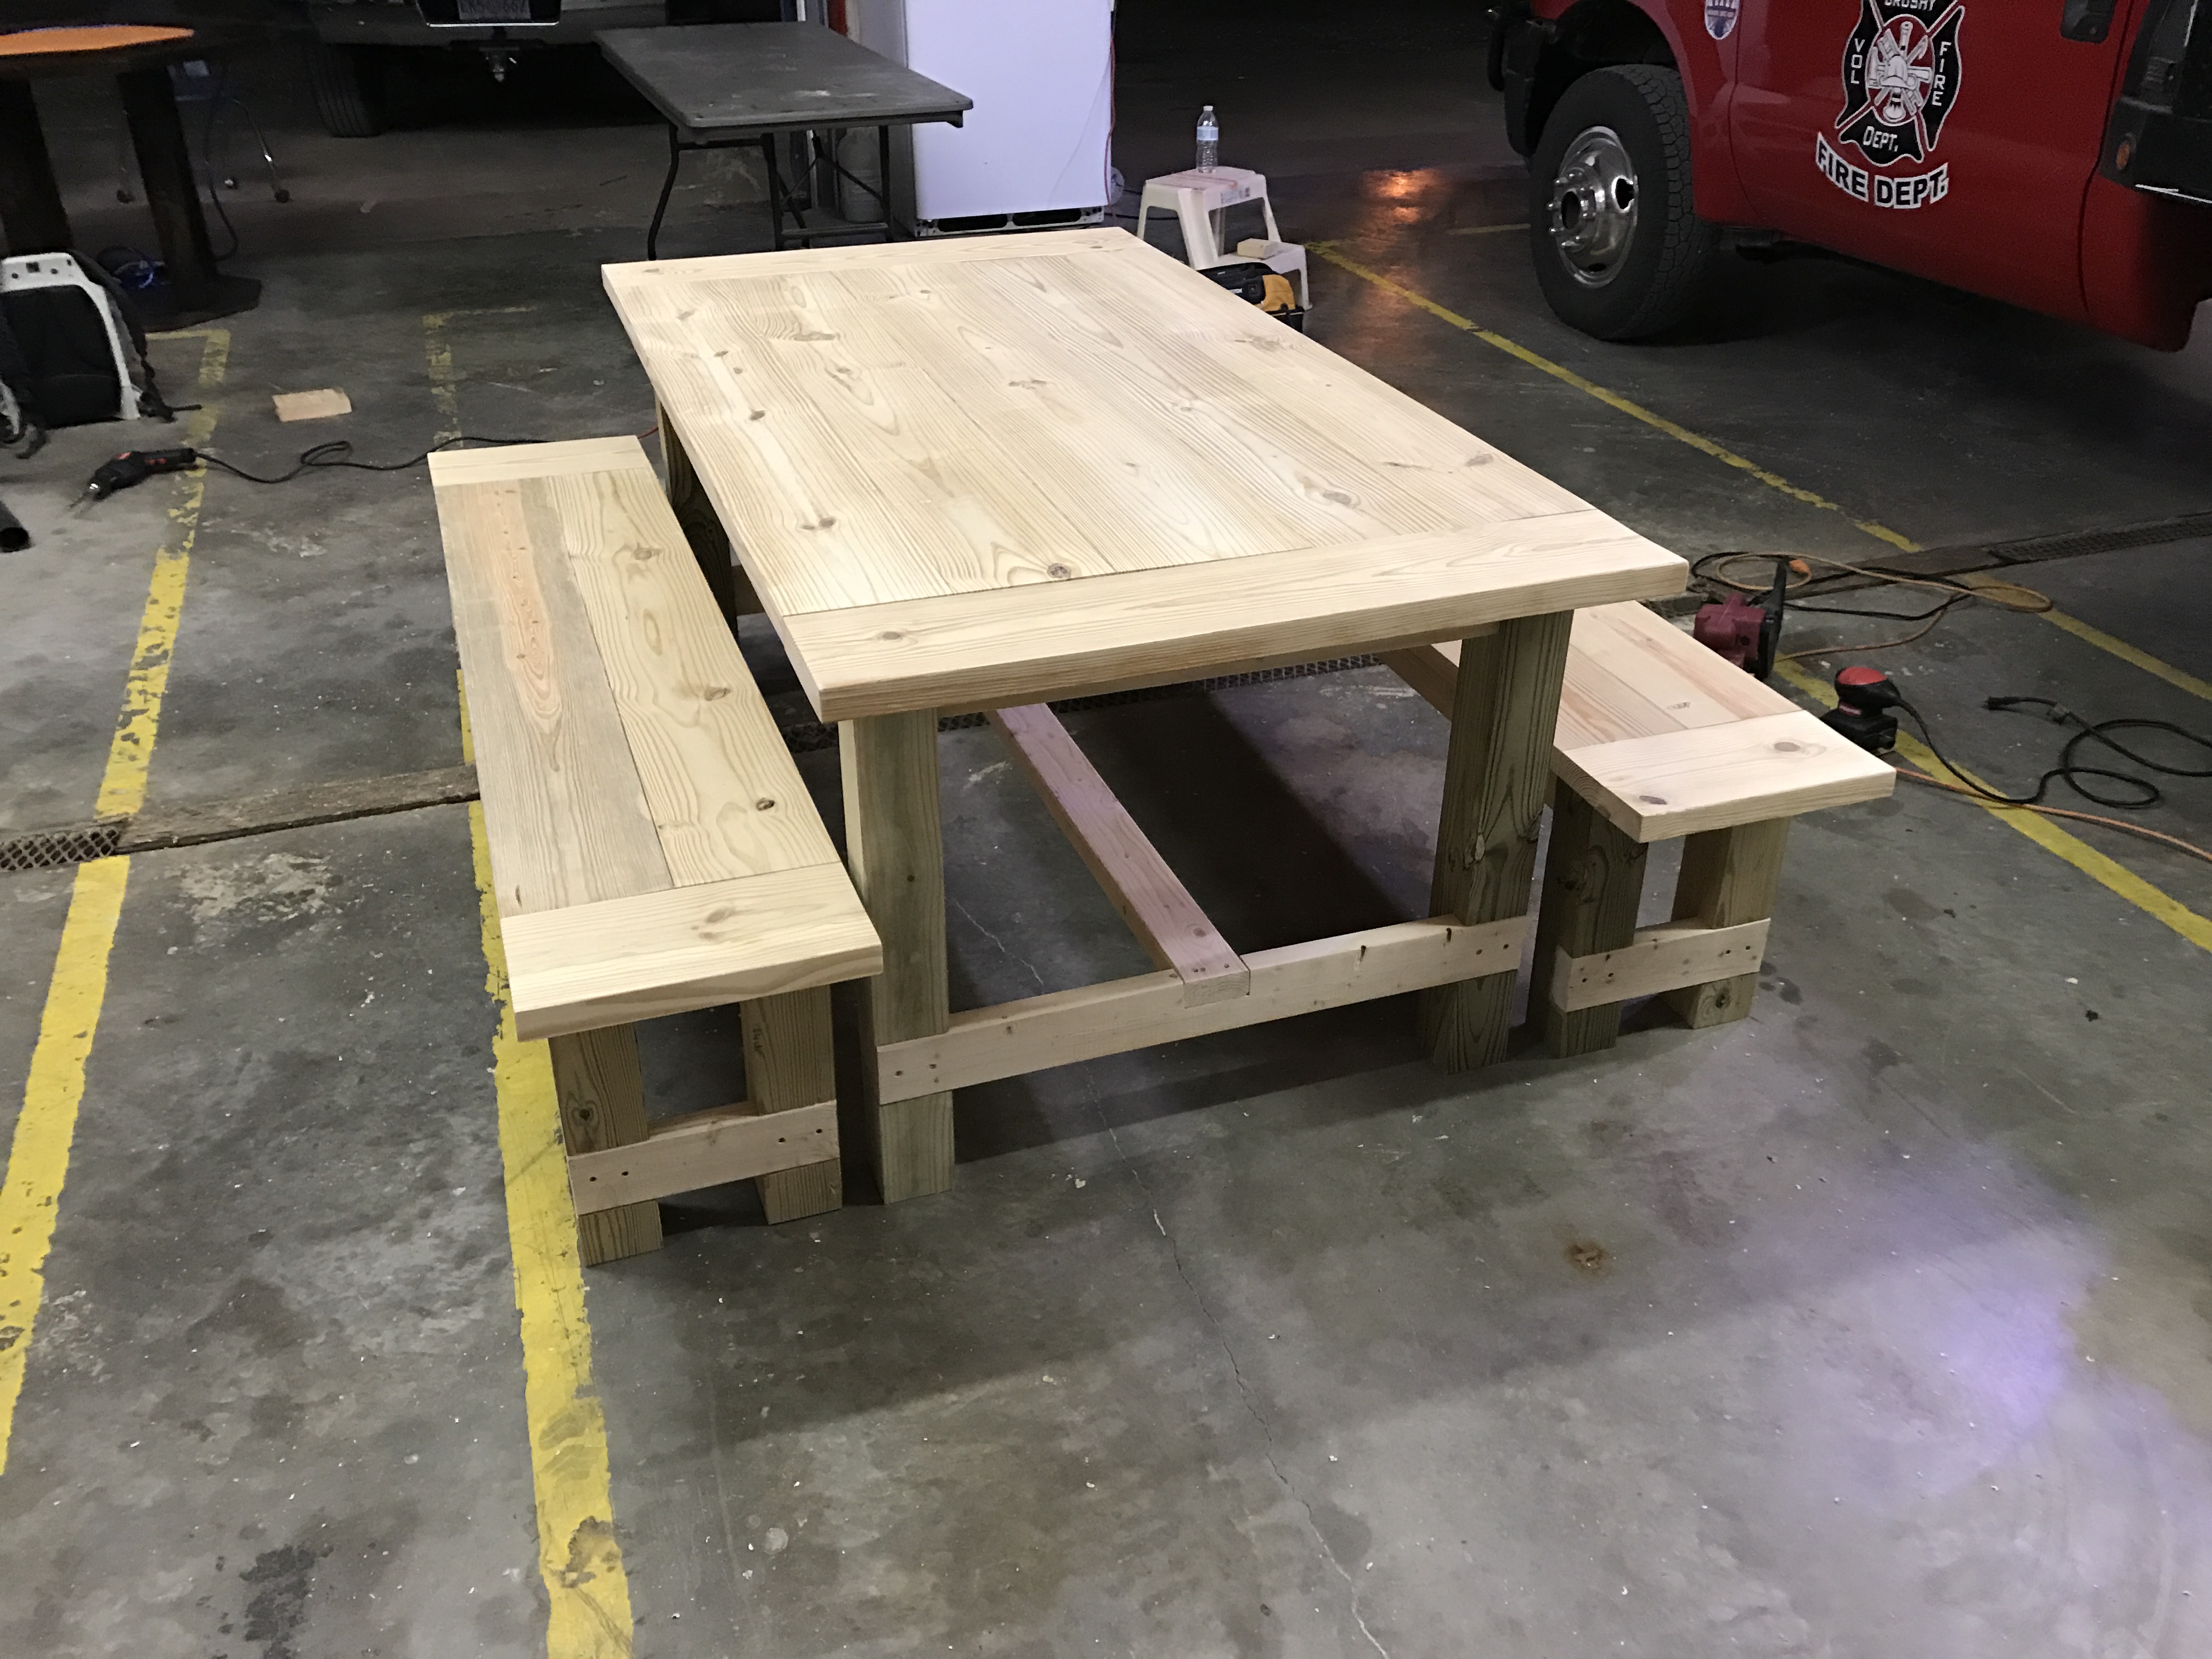
Farmhouse Table
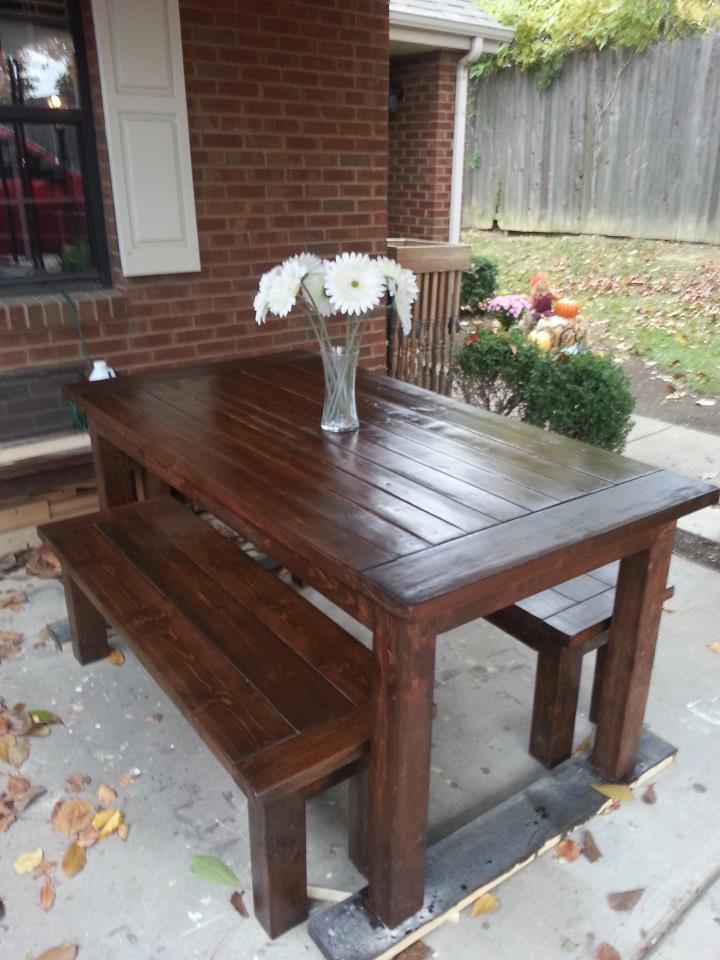
I used the idea of the Farmhouse Table and Coffee Table to build this table and benches. I used simple whitewood for the table because it's cheap. This table doesn't take long to build, only a few hours. But this time I used oil-based stain and had to swap out a few boards because they were warped so it took longer than expected.
Estimated Time Investment
Weekend Project (10-20 Hours)
Finish Used
Some type of Minwax Walnut stain.
Recommended Skill Level
Beginner
Comments
Thu, 03/14/2013 - 13:32
love it great patio table.
love it great patio table. what are the dimensions, looks great for 4 people
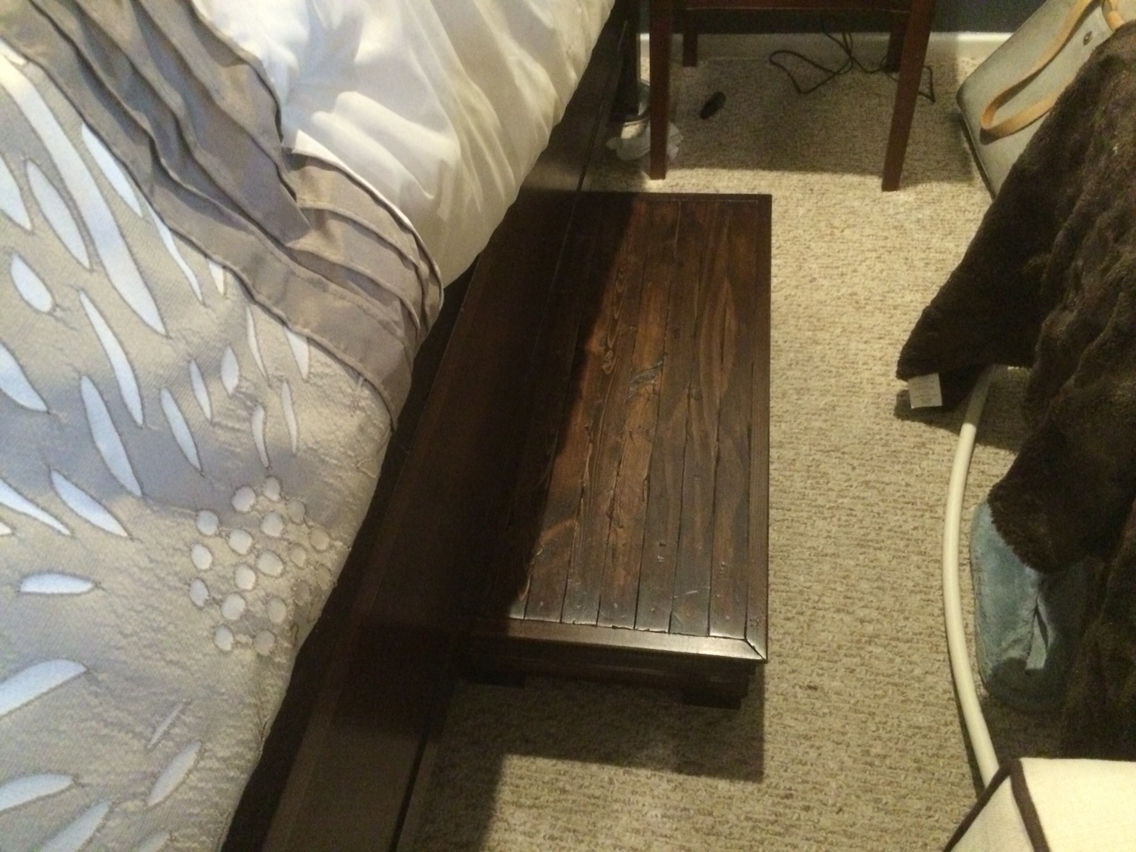
Bed steps
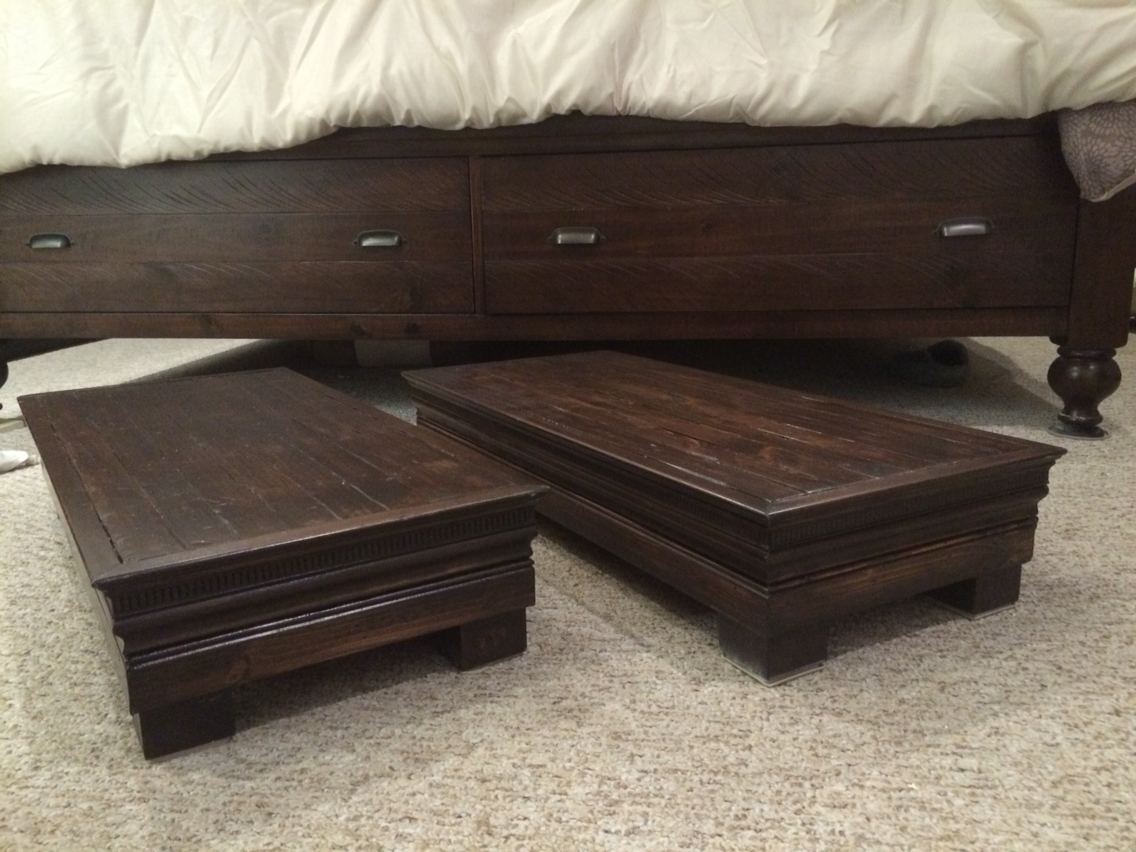
I could have sworn this project was inspired by a stool I saw on here but I just spent way too long trying to find it. I wanted these to match our bed frame, which is really tall combined with our mattress. We needed stools that could be comfortably stood on with two feet, but could also slide under the bed when not in use. This was my first "finished" DIY project besides a dog house I made from plans from Lowe's. This was the first time I planned it and created it myself. They are very sturdy and look like they came with the set. I am very happy with them. I took my time on them because I was doing a lot of learning and wanted to get it right. I distressed the wood with chisels, files and carving knives.
Estimated Cost
I'm guessing around $50 in wood.
Estimated Time Investment
Weekend Project (10-20 Hours)
Finish Used
General finishes Java gel stain with satin exterior top coat.
Recommended Skill Level
Beginner
Comments

Shoe Dresser
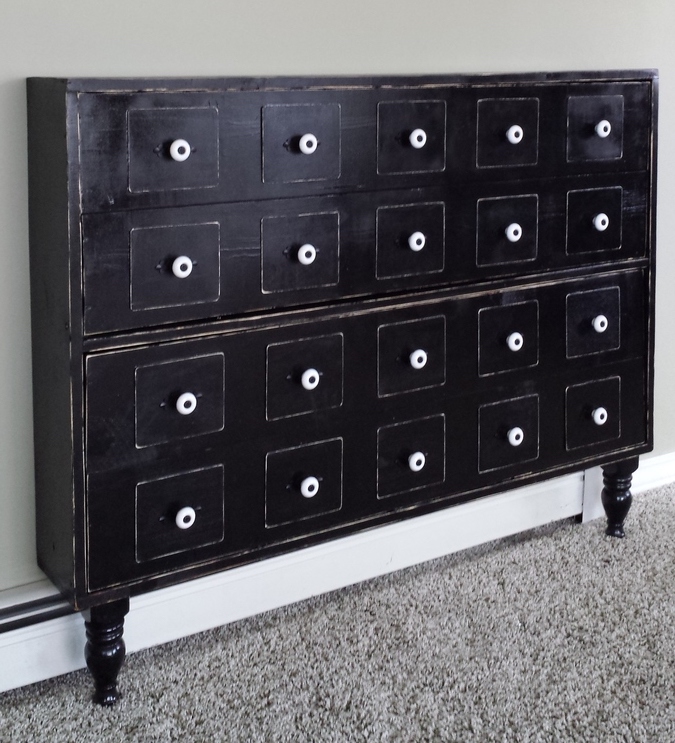
Loved this project! We had an old headboard so my wife came up with the idea to cut off the top posts and use them as legs.
Built from Plan(s)
Estimated Cost
125
Estimated Time Investment
Day Project (6-9 Hours)
Recommended Skill Level
Intermediate
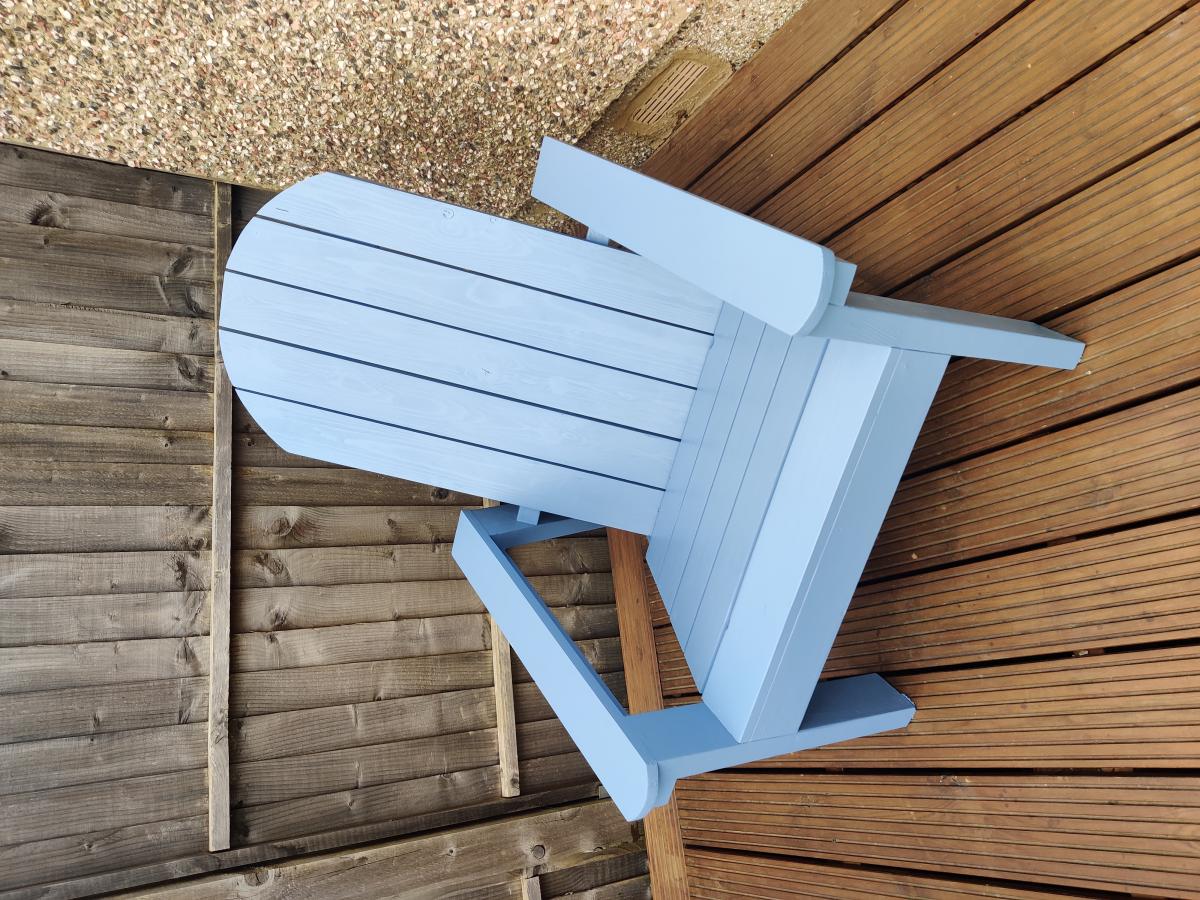
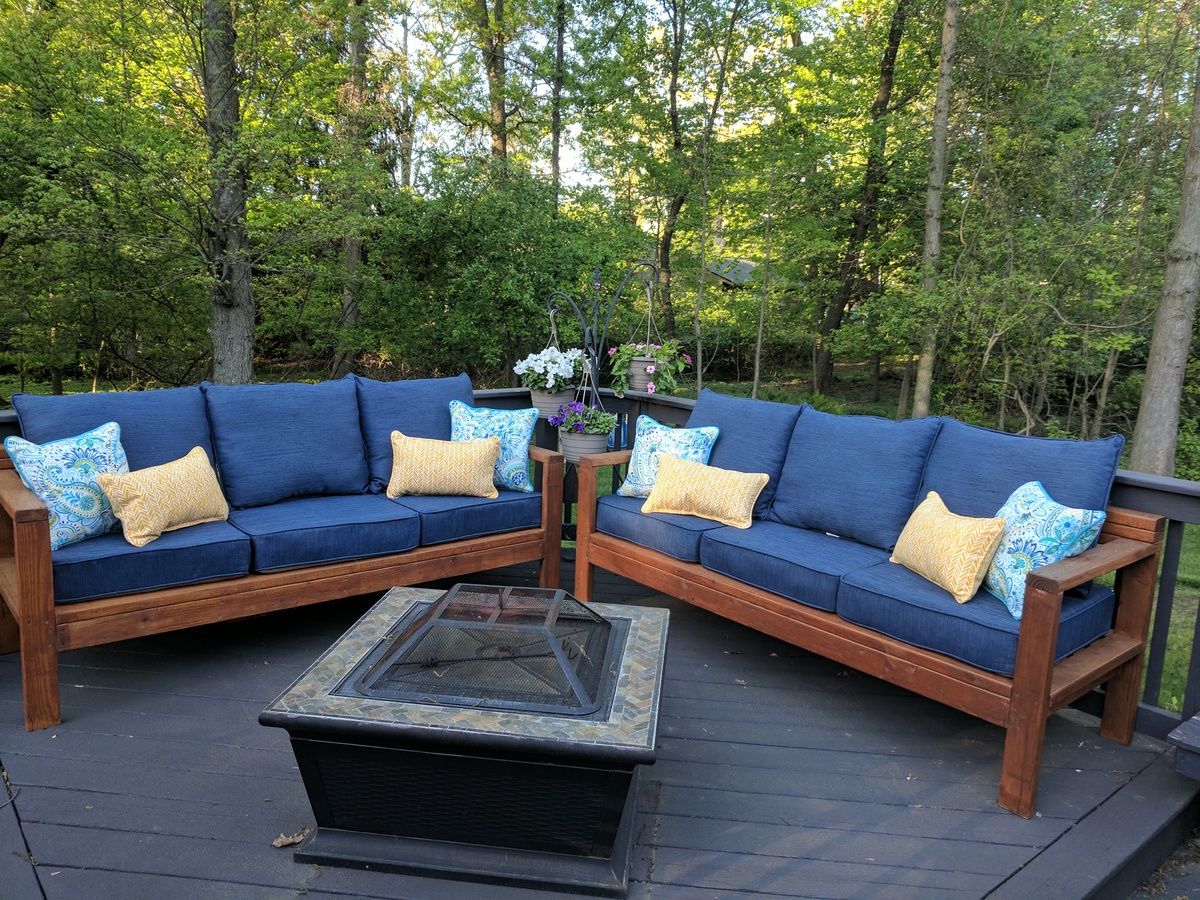
Deck chairs
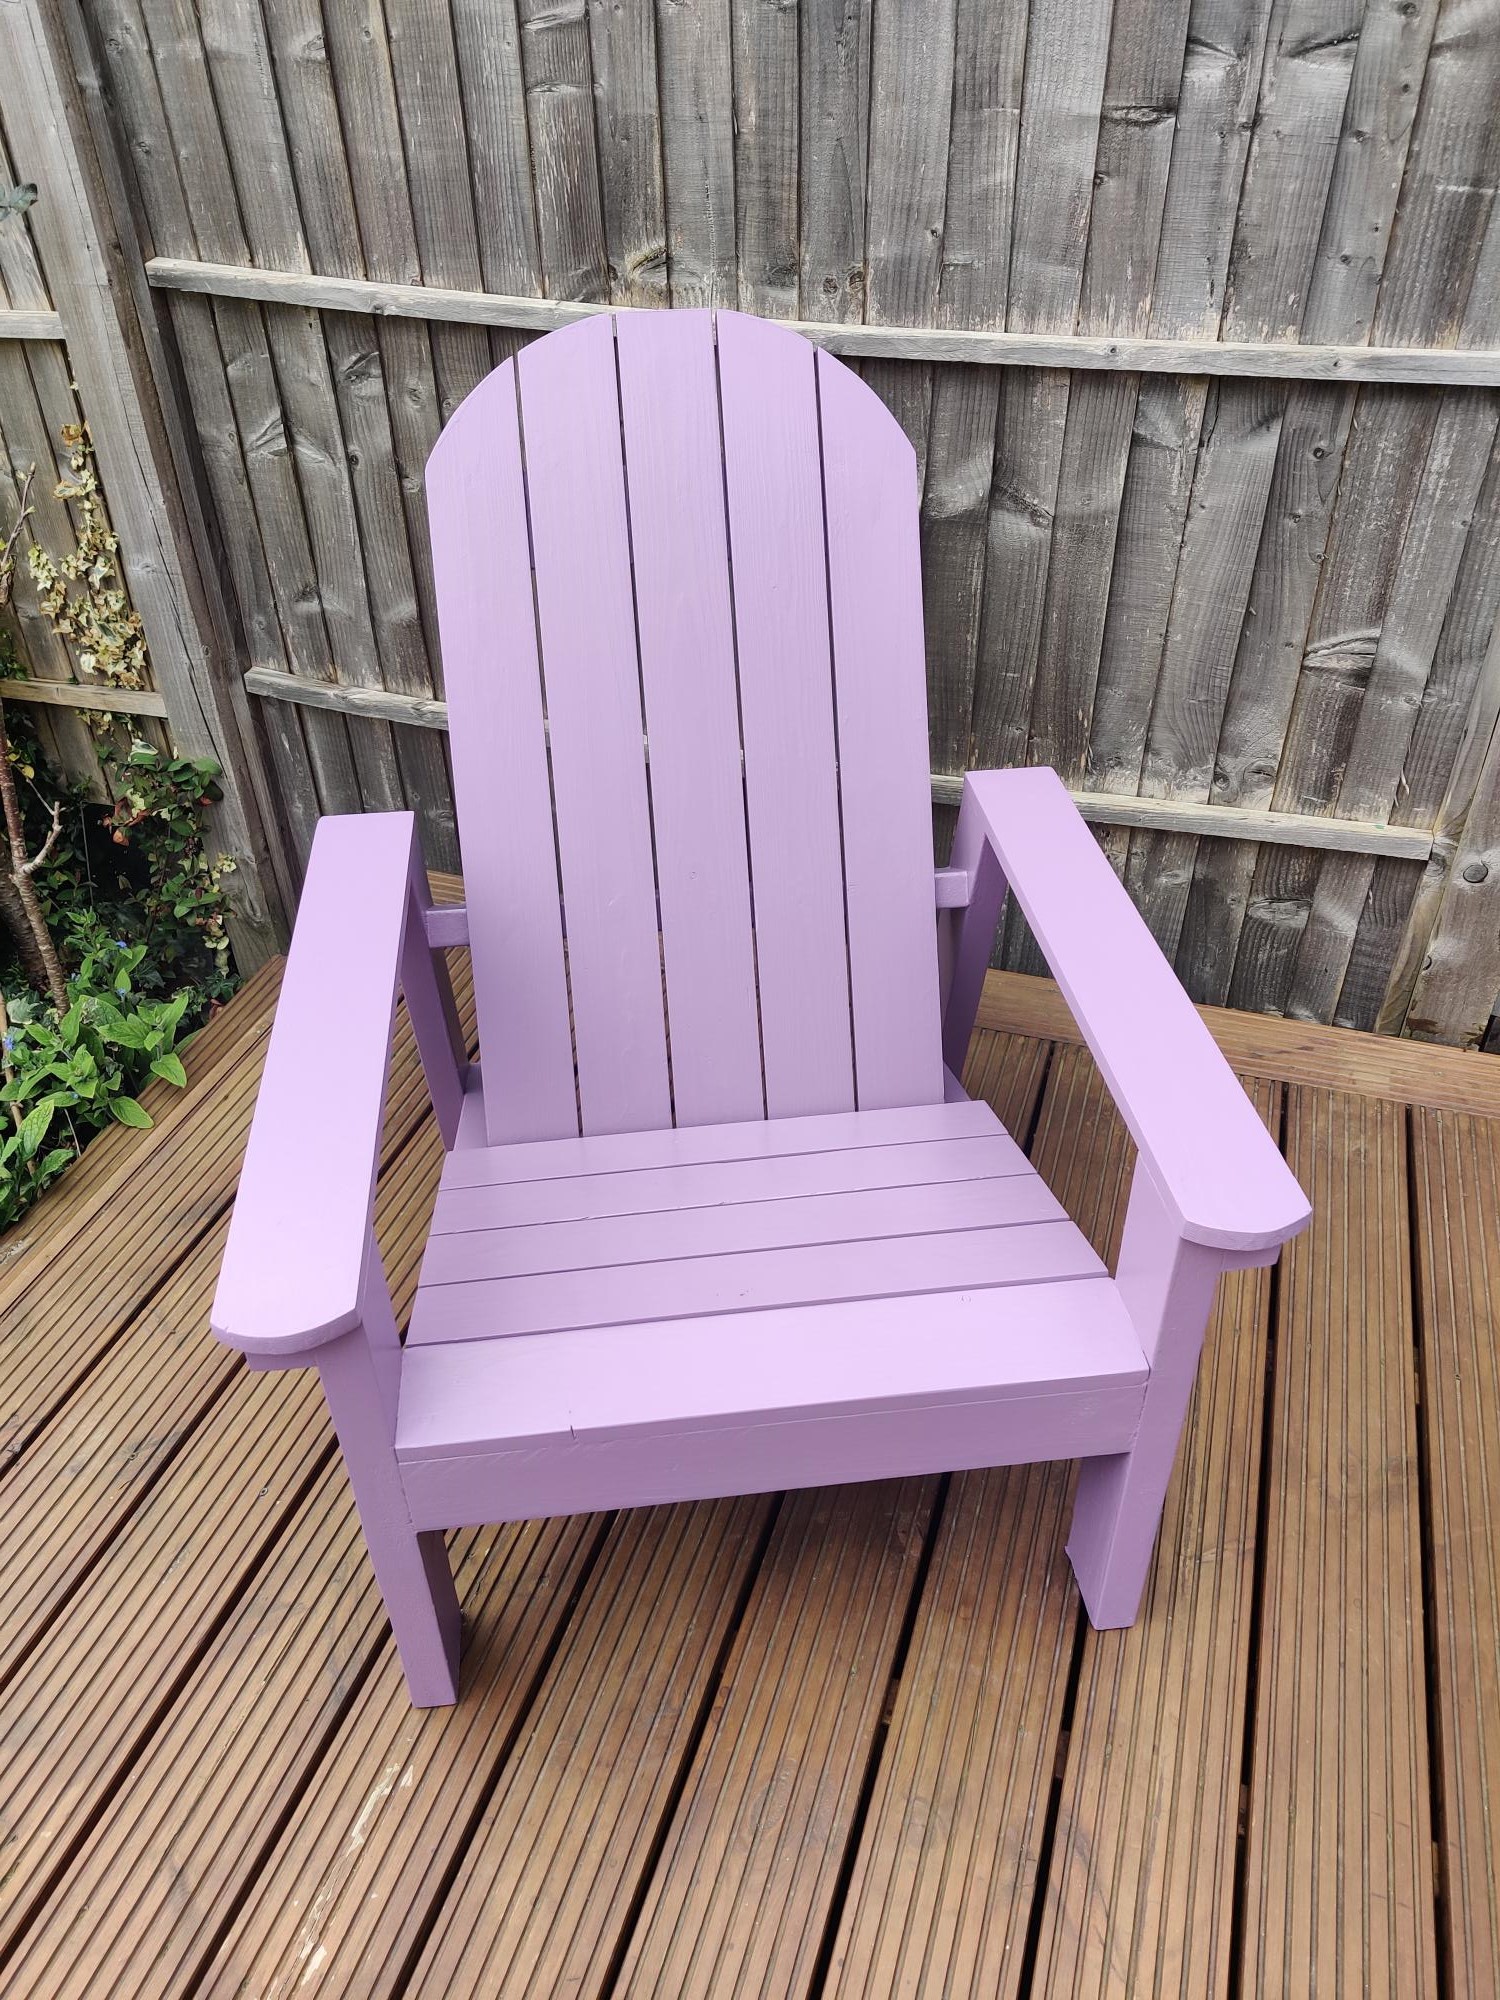
These are my second ever project. The plans were really clear to follow so thank you for sharing them. The spacing between the seat and back slabs is a bit less than what it says in the plan because I live in the UK and the dimensions I could find were a bit different. Overall assembly didn't take too long, maybe 10-15 hours for both. Finishing seemed to take ages between filling the screw holes, sanding etc. Really happy with the end result!
Built from Plan(s)
Finish Used
Cuprinol garden shades
Recommended Skill Level
Beginner
Comments
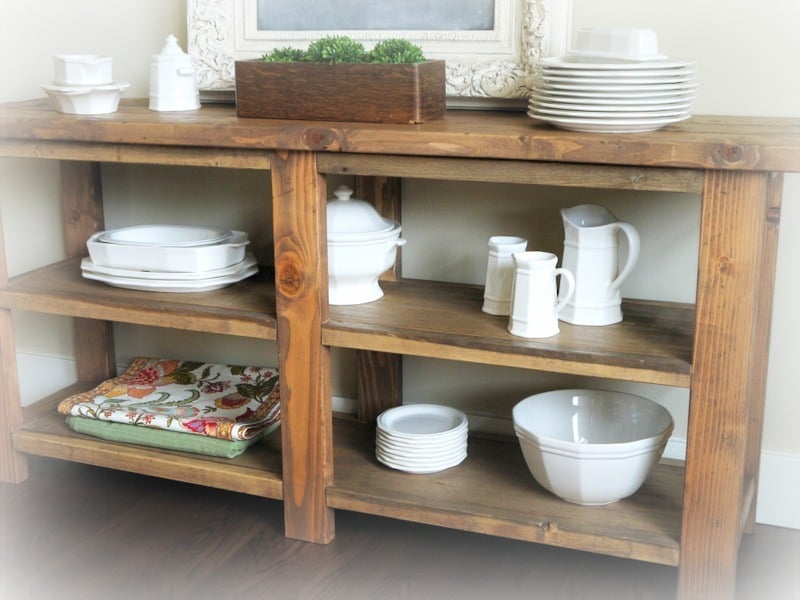
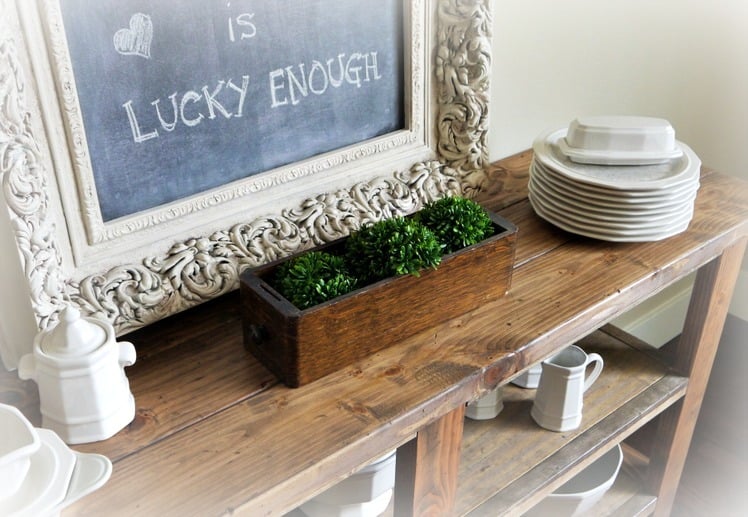
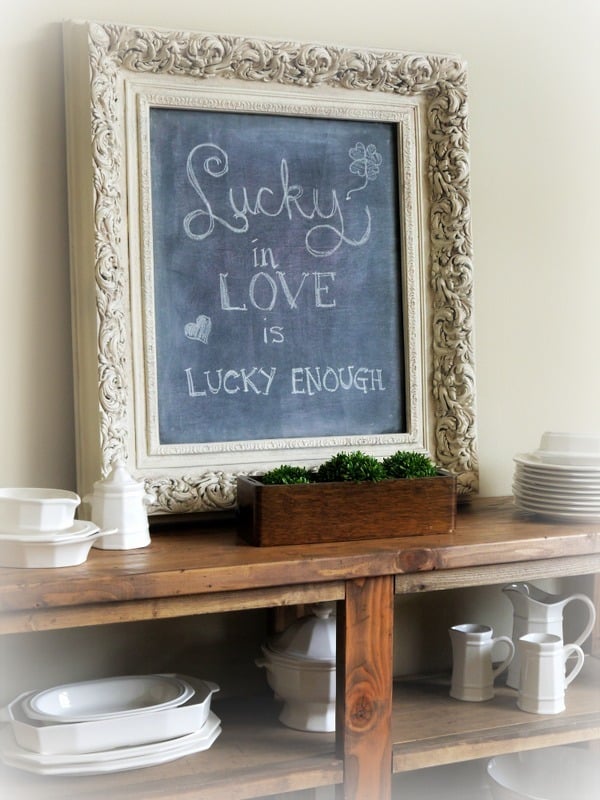
Rustic Buffet Table
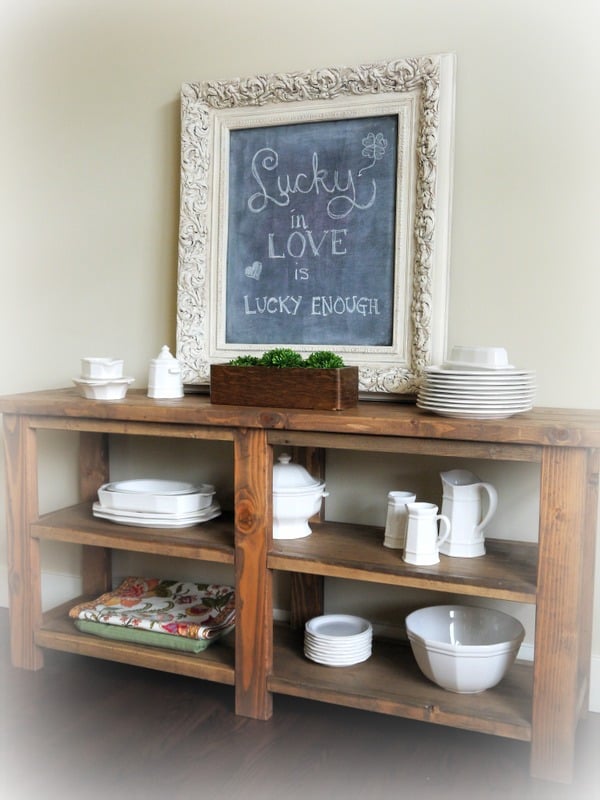
Love how this rustic buffet / console table turned out! It was made as a companion piece for a Farmhouse - style table. Modified to be shorter (64"), and made without the decorative hardware or the "X" detailing from the original plan.
Built from Plan(s)
Estimated Cost
$55
Estimated Time Investment
Day Project (6-9 Hours)
Finish Used
Custom mix of Minwax Weathered Oak + Antique Walnut Stain. Three coats of hand-rubbed polyurethane.
Recommended Skill Level
Beginner
Modified Fancy Hall Tree
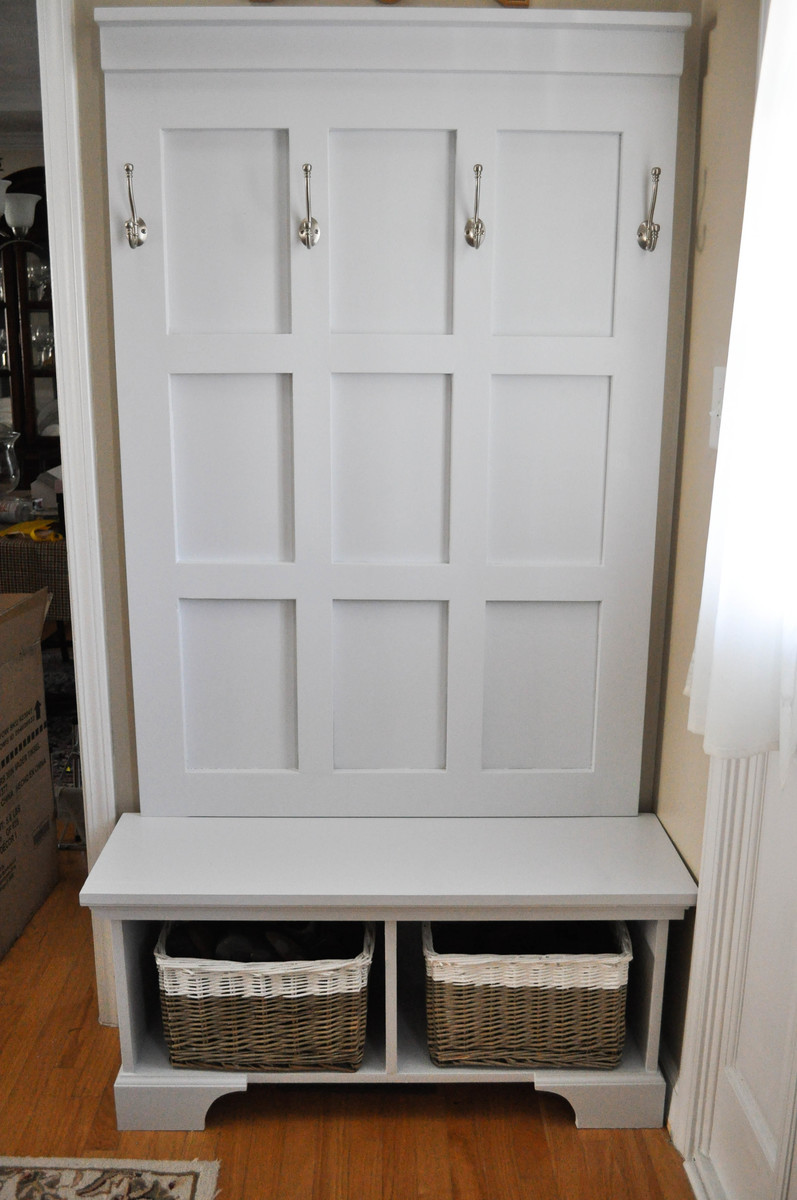
Modified the dimensions to 13 inches deep, 40 inches wide and a lower clearance of 4 inches to accommodate a vent diverter for an exsisting heat vent.
I used Maple Plywood (3/4 inch) for the bench, and 1/2 inch for the back (to allow maximum seating depth on the bench). The paint was leftover Valspar reserve paint from a recent bathroom project... and the paint dipped baskets were found at a local store called "the christmas tree shops" for under 25 dollars for both!
The project came in at just under $150 - well below our budget if we had purchased something in store. It was mounted to the wall for safety, as we have a dare devil toddler!
Built from Plan(s)
Estimated Cost
$140
Estimated Time Investment
Weekend Project (10-20 Hours)
Finish Used
Valspar Satin in Fragile Blue
Recommended Skill Level
Beginner
Comments

A-Frame Chicken Coop - Easy to Clean

Thanks for the free plans. I did have to make modifications for the doors. i hid the hinges to give it a clean look. i used cedar for the trim and Plywood Siding Panel T1-11 4 IN OC (Common: 19/32 in. x 4 ft. x 8 ft.; Actual: 0.563 in. x 48 in. x 96 in.) for the doors. i used a metal flashing for the roof so it will vent.


Built from Plan(s)
Estimated Cost
$250
Estimated Time Investment
Week Long Project (20 Hours or More)
Finish Used
BEHR Transparent waterproofing finish (Cedar Natural Tone) NO 501
Recommended Skill Level
Intermediate
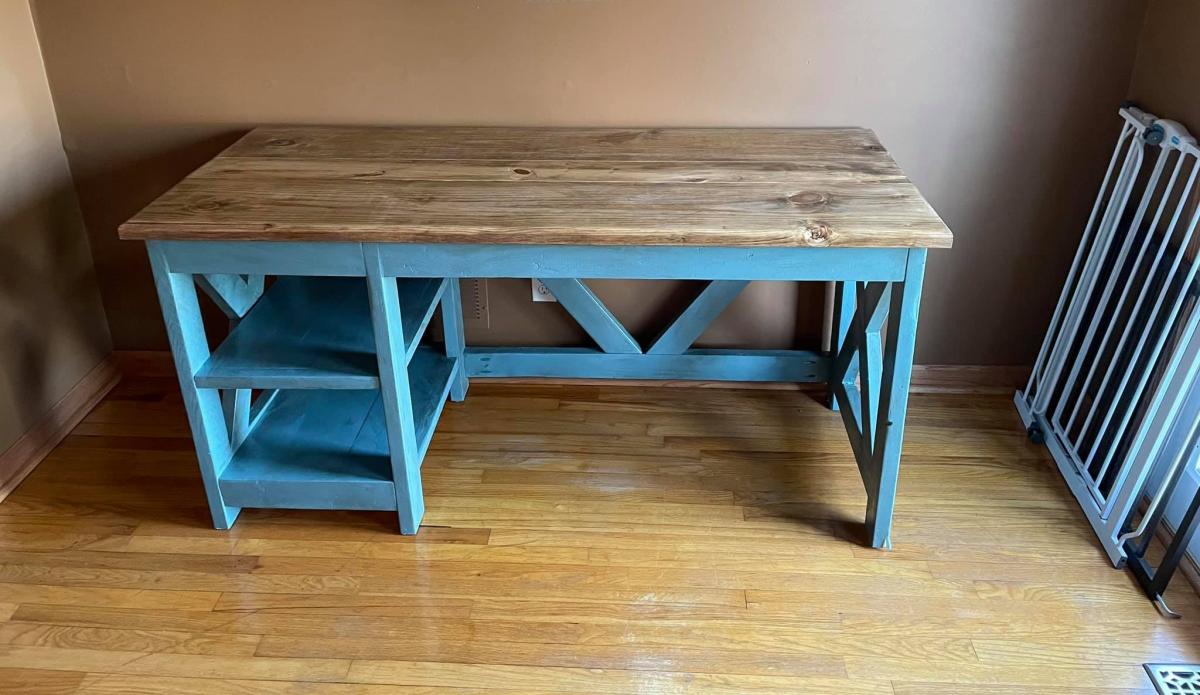
Desk
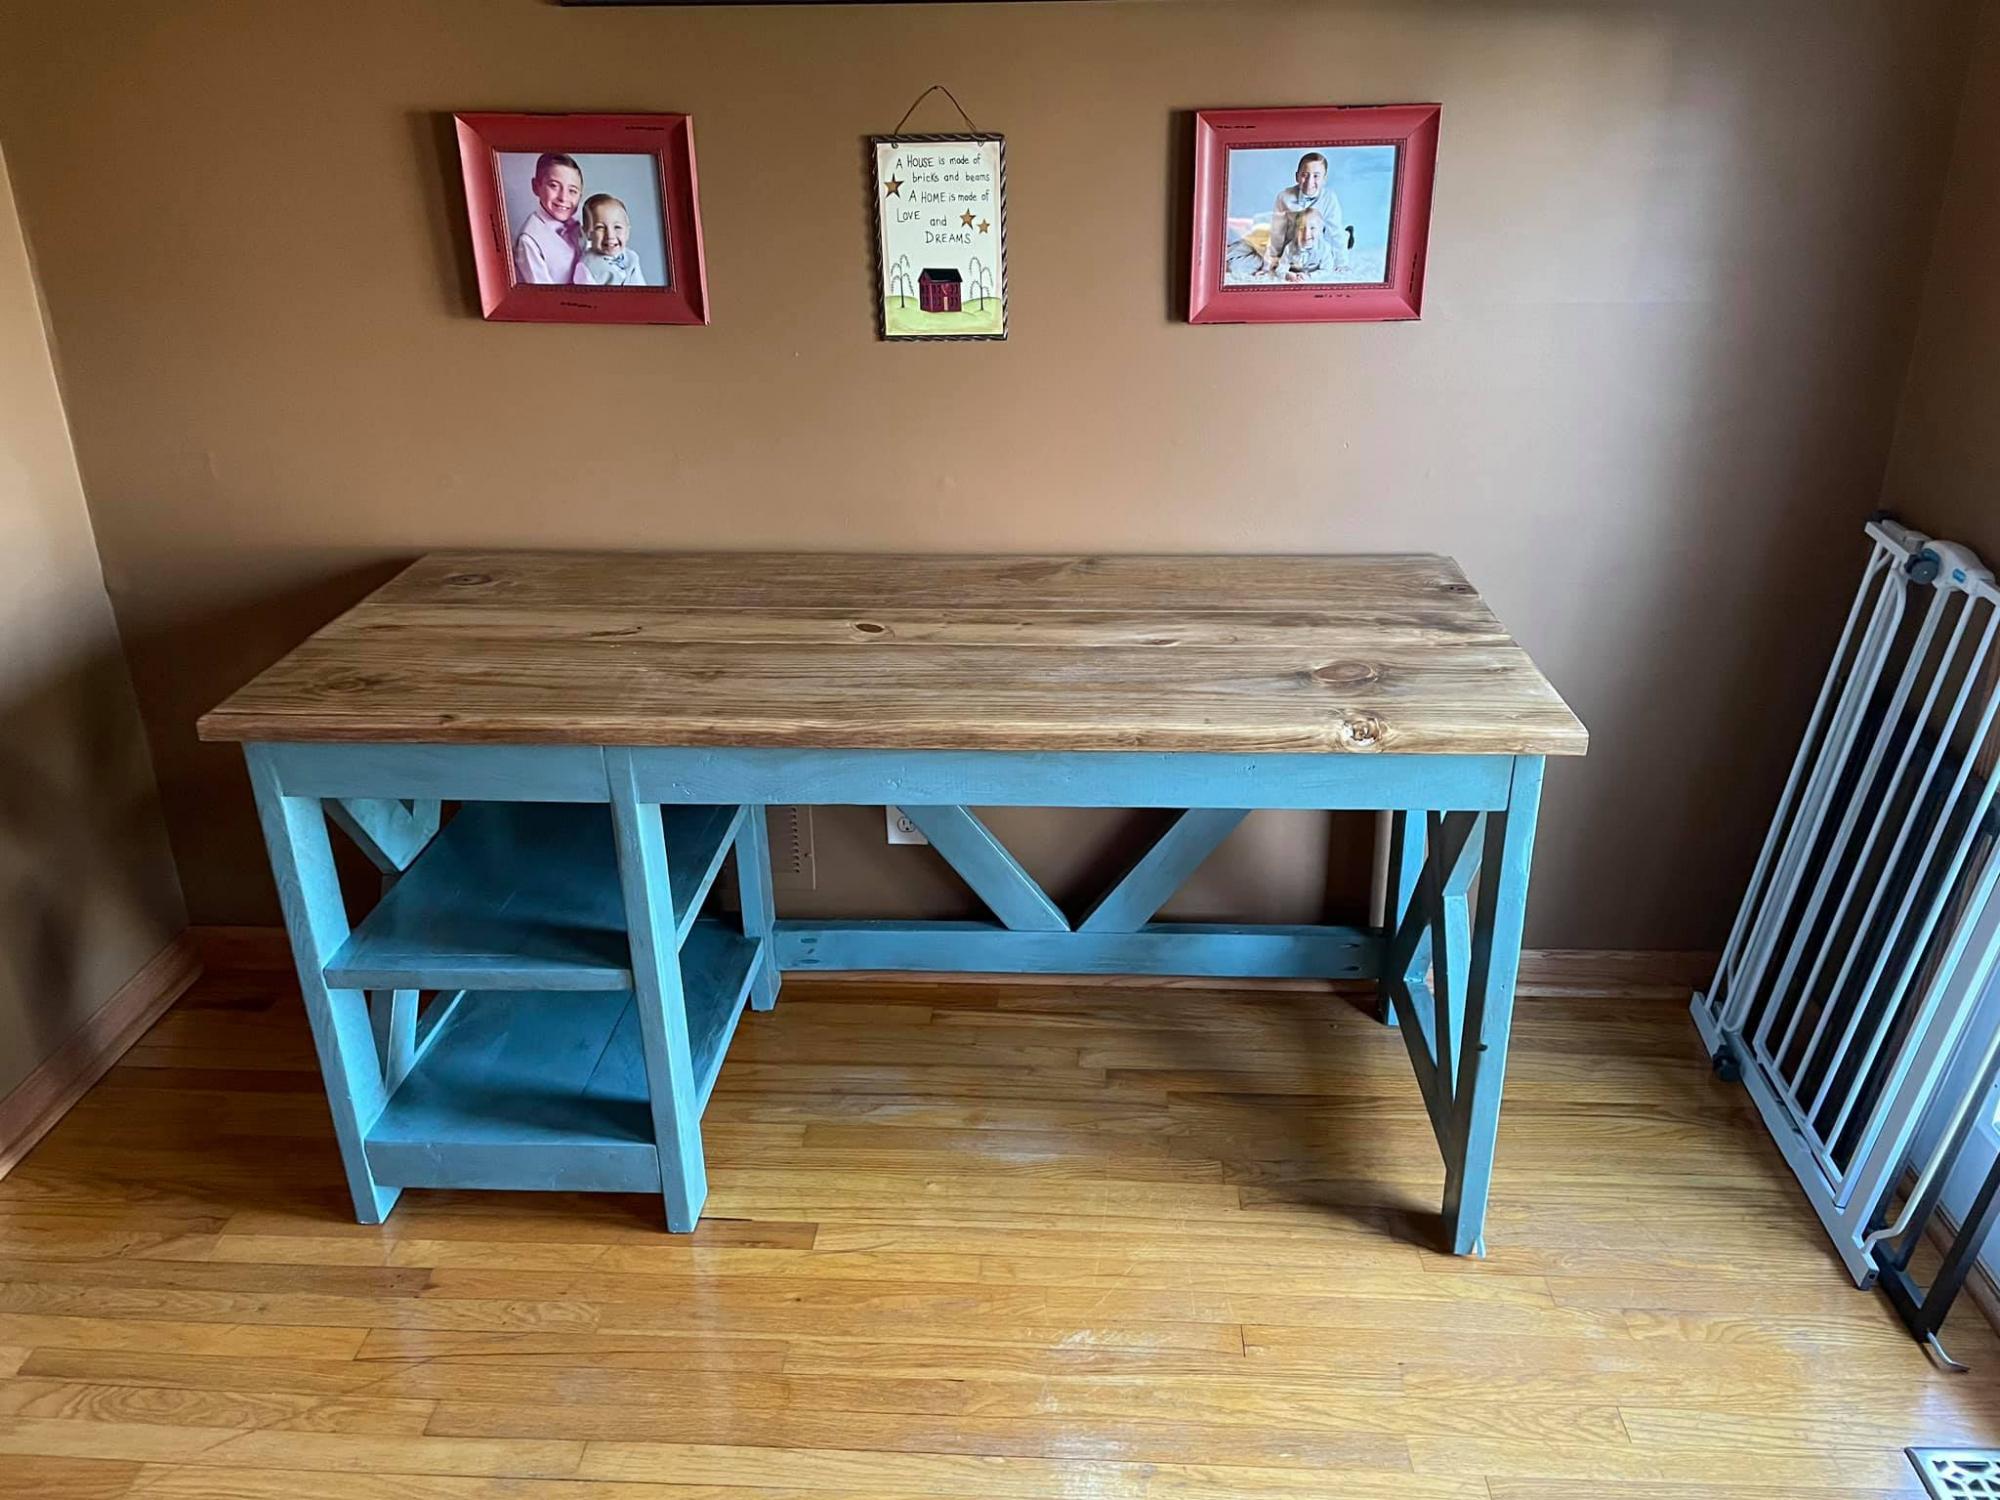
Desk made with Farmhouse Desk modified with 2x6 top
Built from Plan(s)
Comments
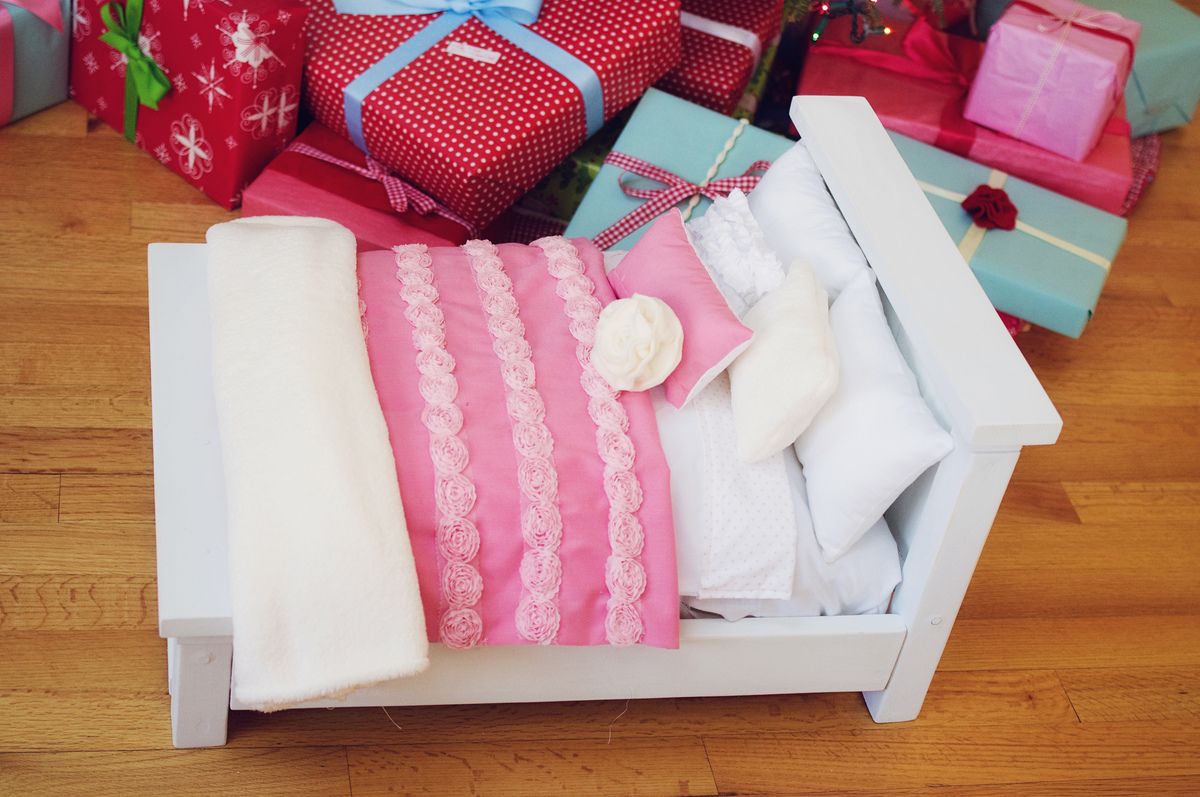
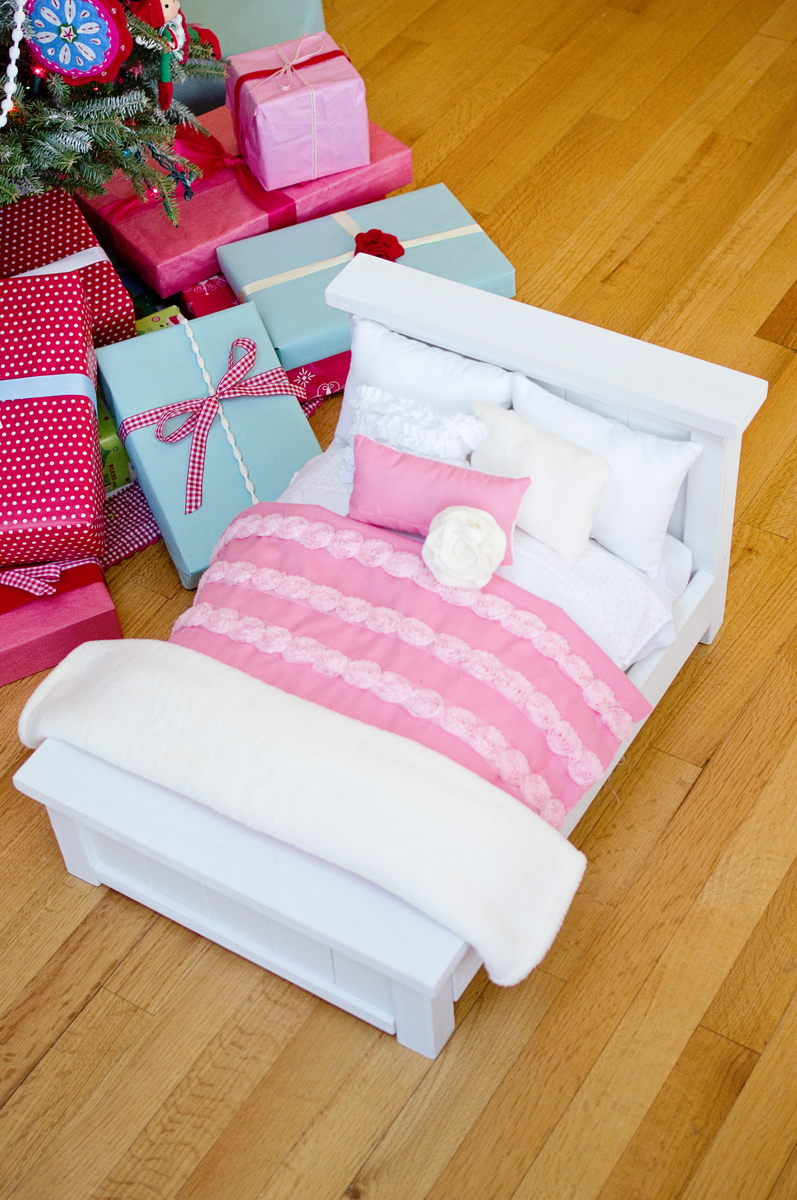
Christmas Farmhouse Doll Bed 2
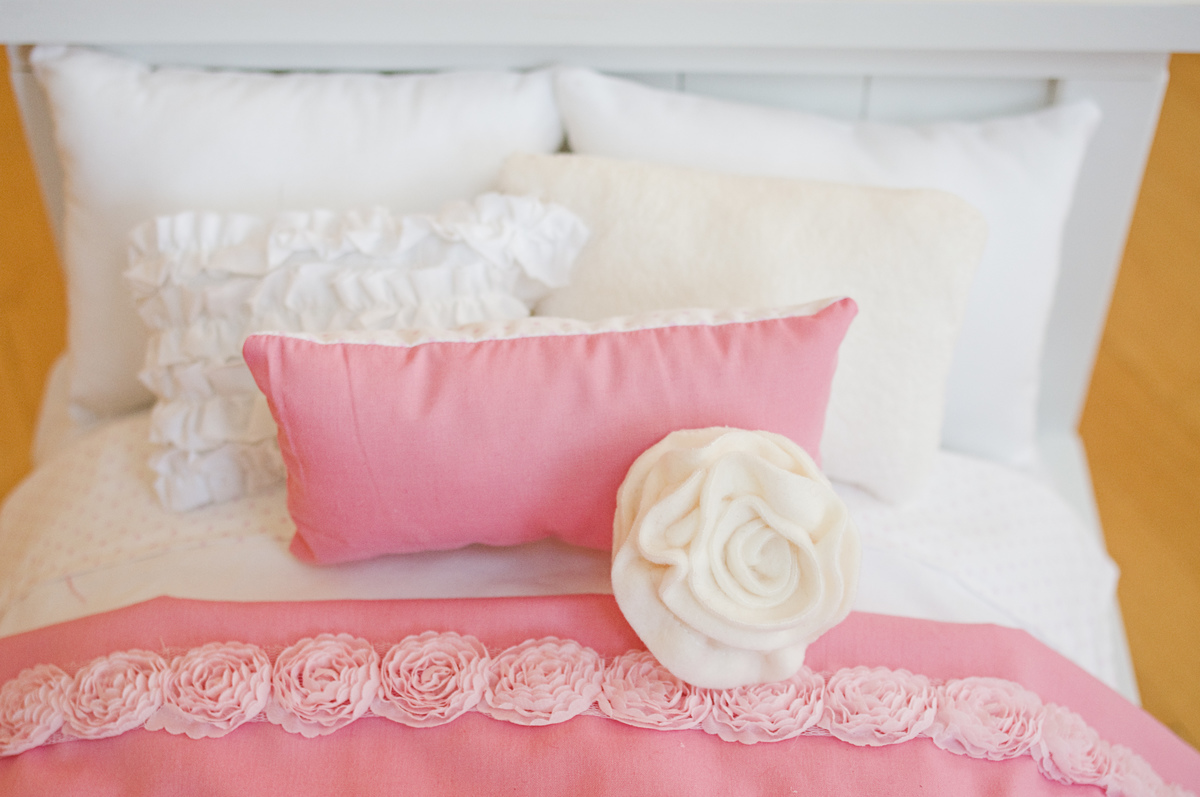
Made this for our daughter's American Girl doll for Christmas. The mattress is a basic box pillow, made out of the cheapest bleached muslin from Joann, and stuffed with polyfill. I had to make a couple before I got it right. It needed to be a little longer and wider than the dimensions of the bed to fill the space all the way. It's been a while since I made them, but I'm pretty sure I cut the box corners at 2" and added an inch to the width and length of the actual bed measurements, plus a 1/2" seam allowance on each side. It makes for a feather bed look. The coverlet is 2 pieces of broadcloth sewn right sides together (leaving an opening to turn) and then turned right side out. Then I sewed trim in rows down the front. The blanket at the foot of the bed is furry minky fabric from Joann. It was really fun to build this bed and design the bedding. Thanks for the plans! My daughter loved this!
Built from Plan(s)
Estimated Cost
$15
Estimated Time Investment
Afternoon Project (3-6 Hours)
Finish Used
white spray paint
Recommended Skill Level
Beginner
Comments


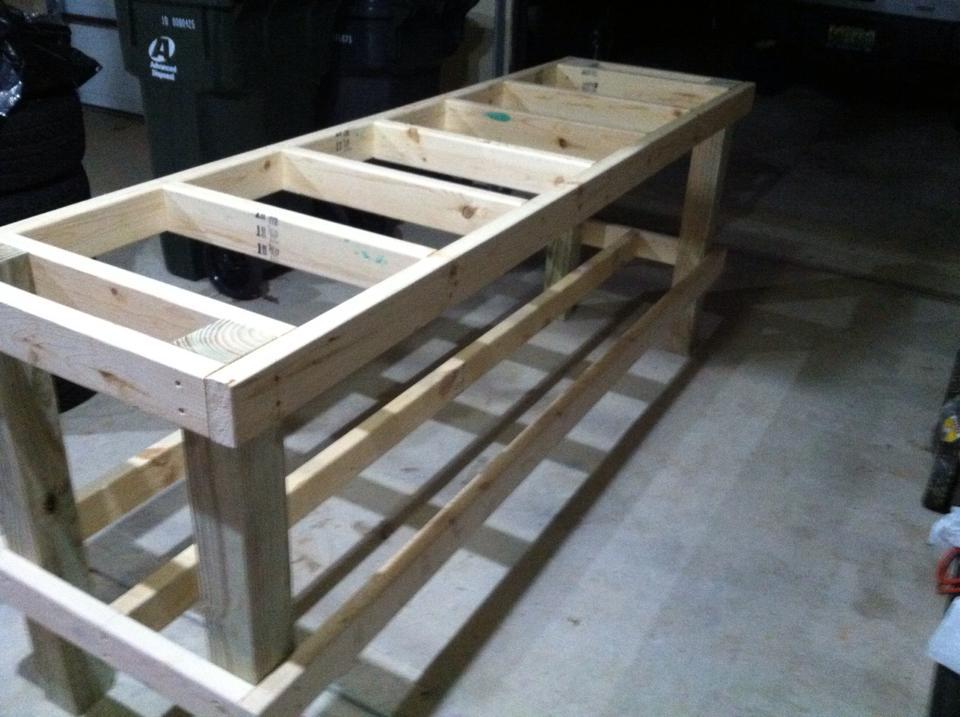
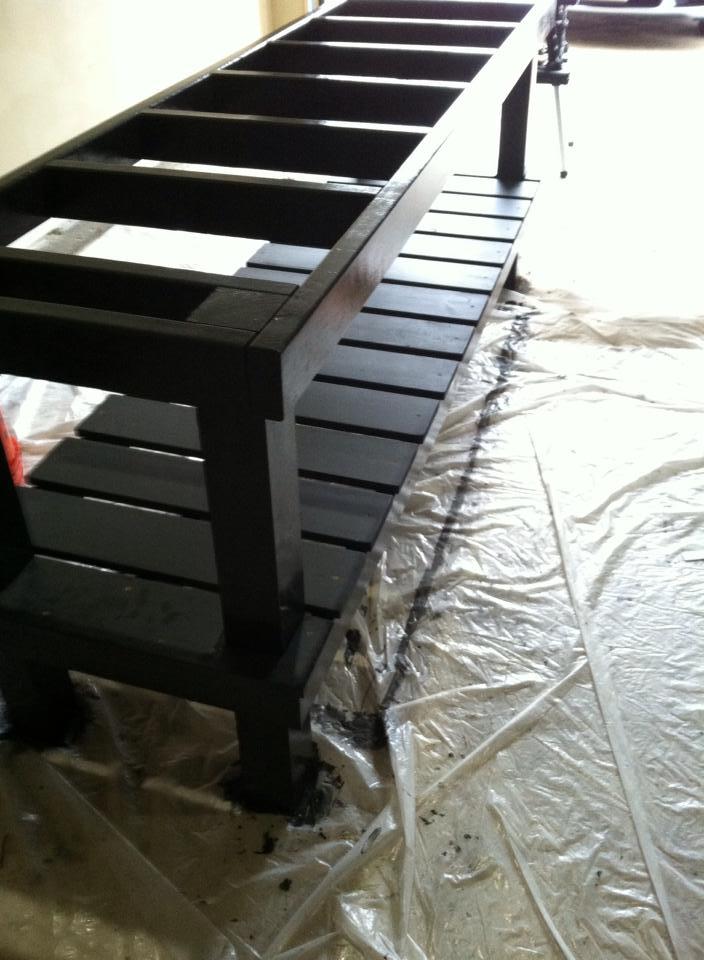
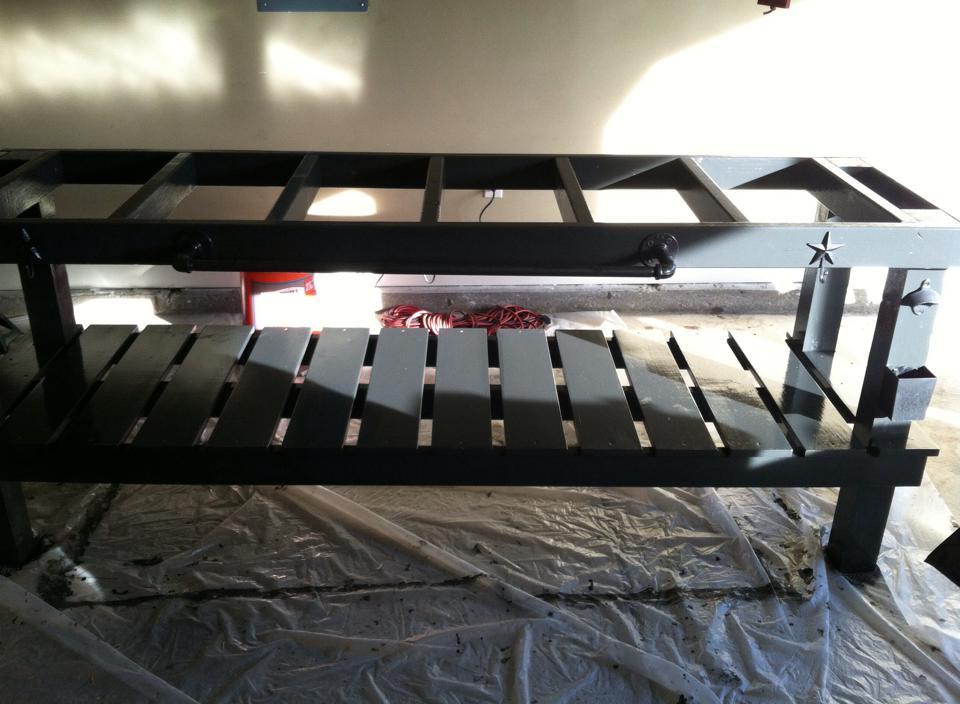
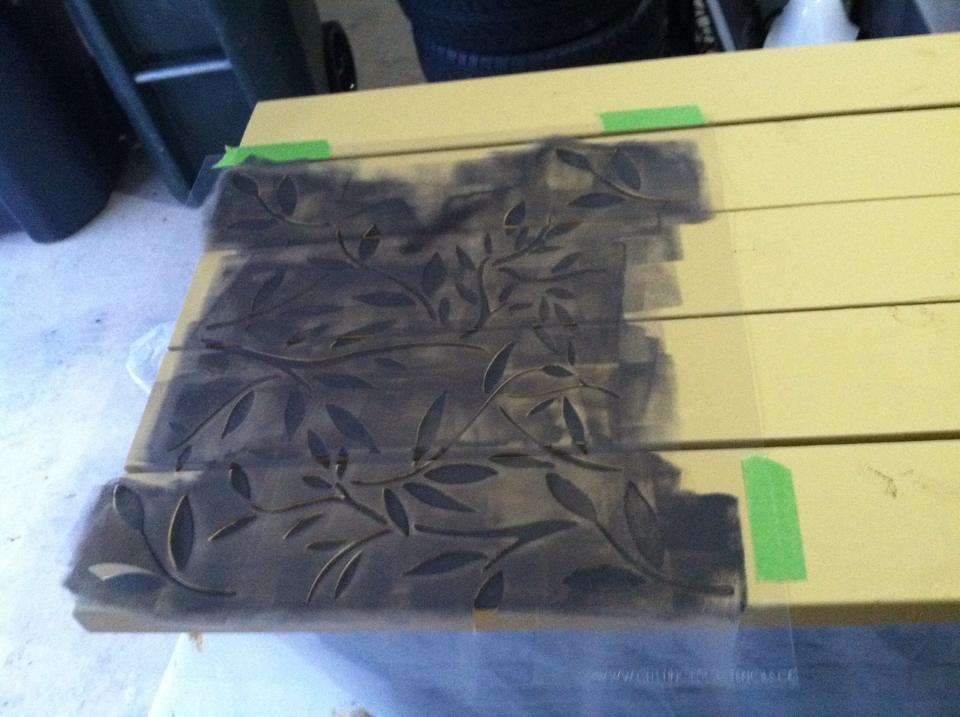
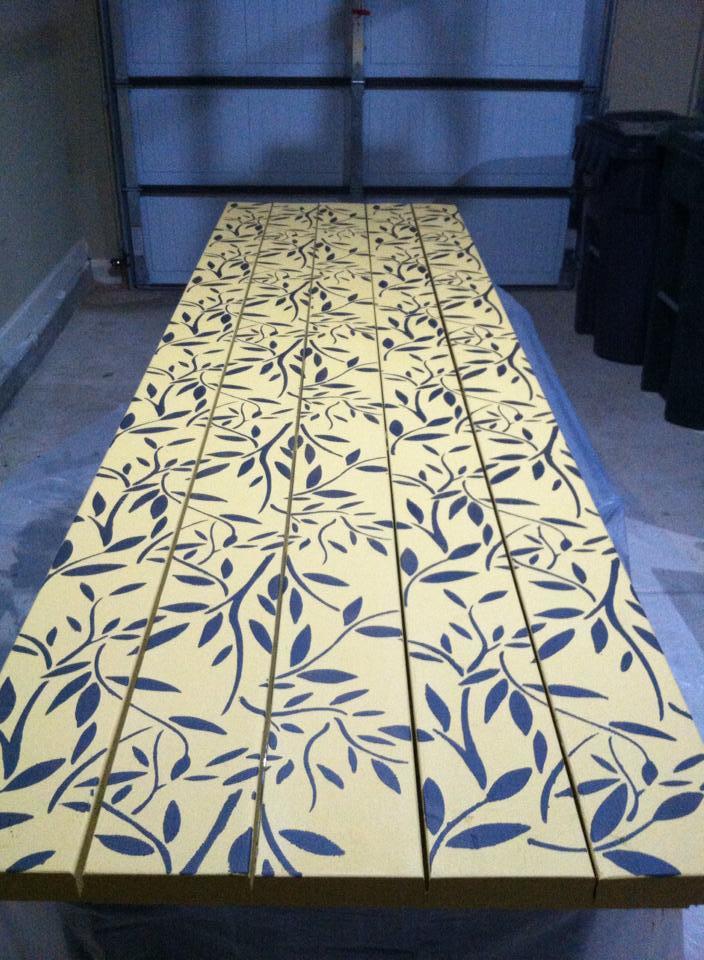
Buffet Table
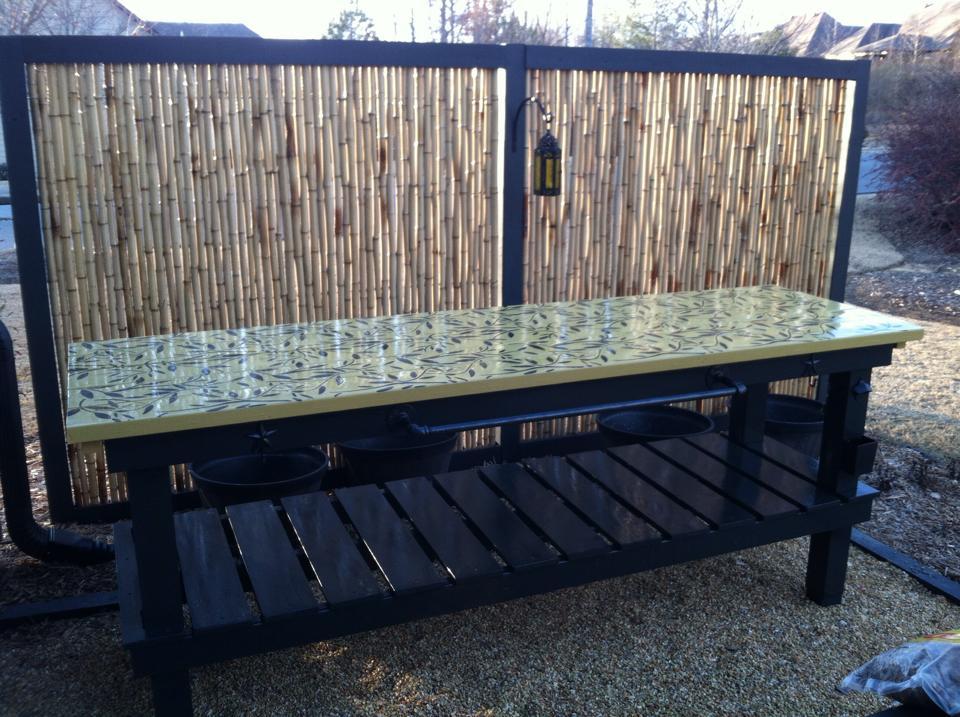
I changed the dimensions to fit the entire width of my framed pea gravel patio and stenciled a design on the table top.
Built from Plan(s)
Estimated Time Investment
Week Long Project (20 Hours or More)
Finish Used
I used a dark stain on the base and exterior latex paint on the top then covered the entire project with TWP 300 wood protectant.
Recommended Skill Level
Beginner
My diy dust collector
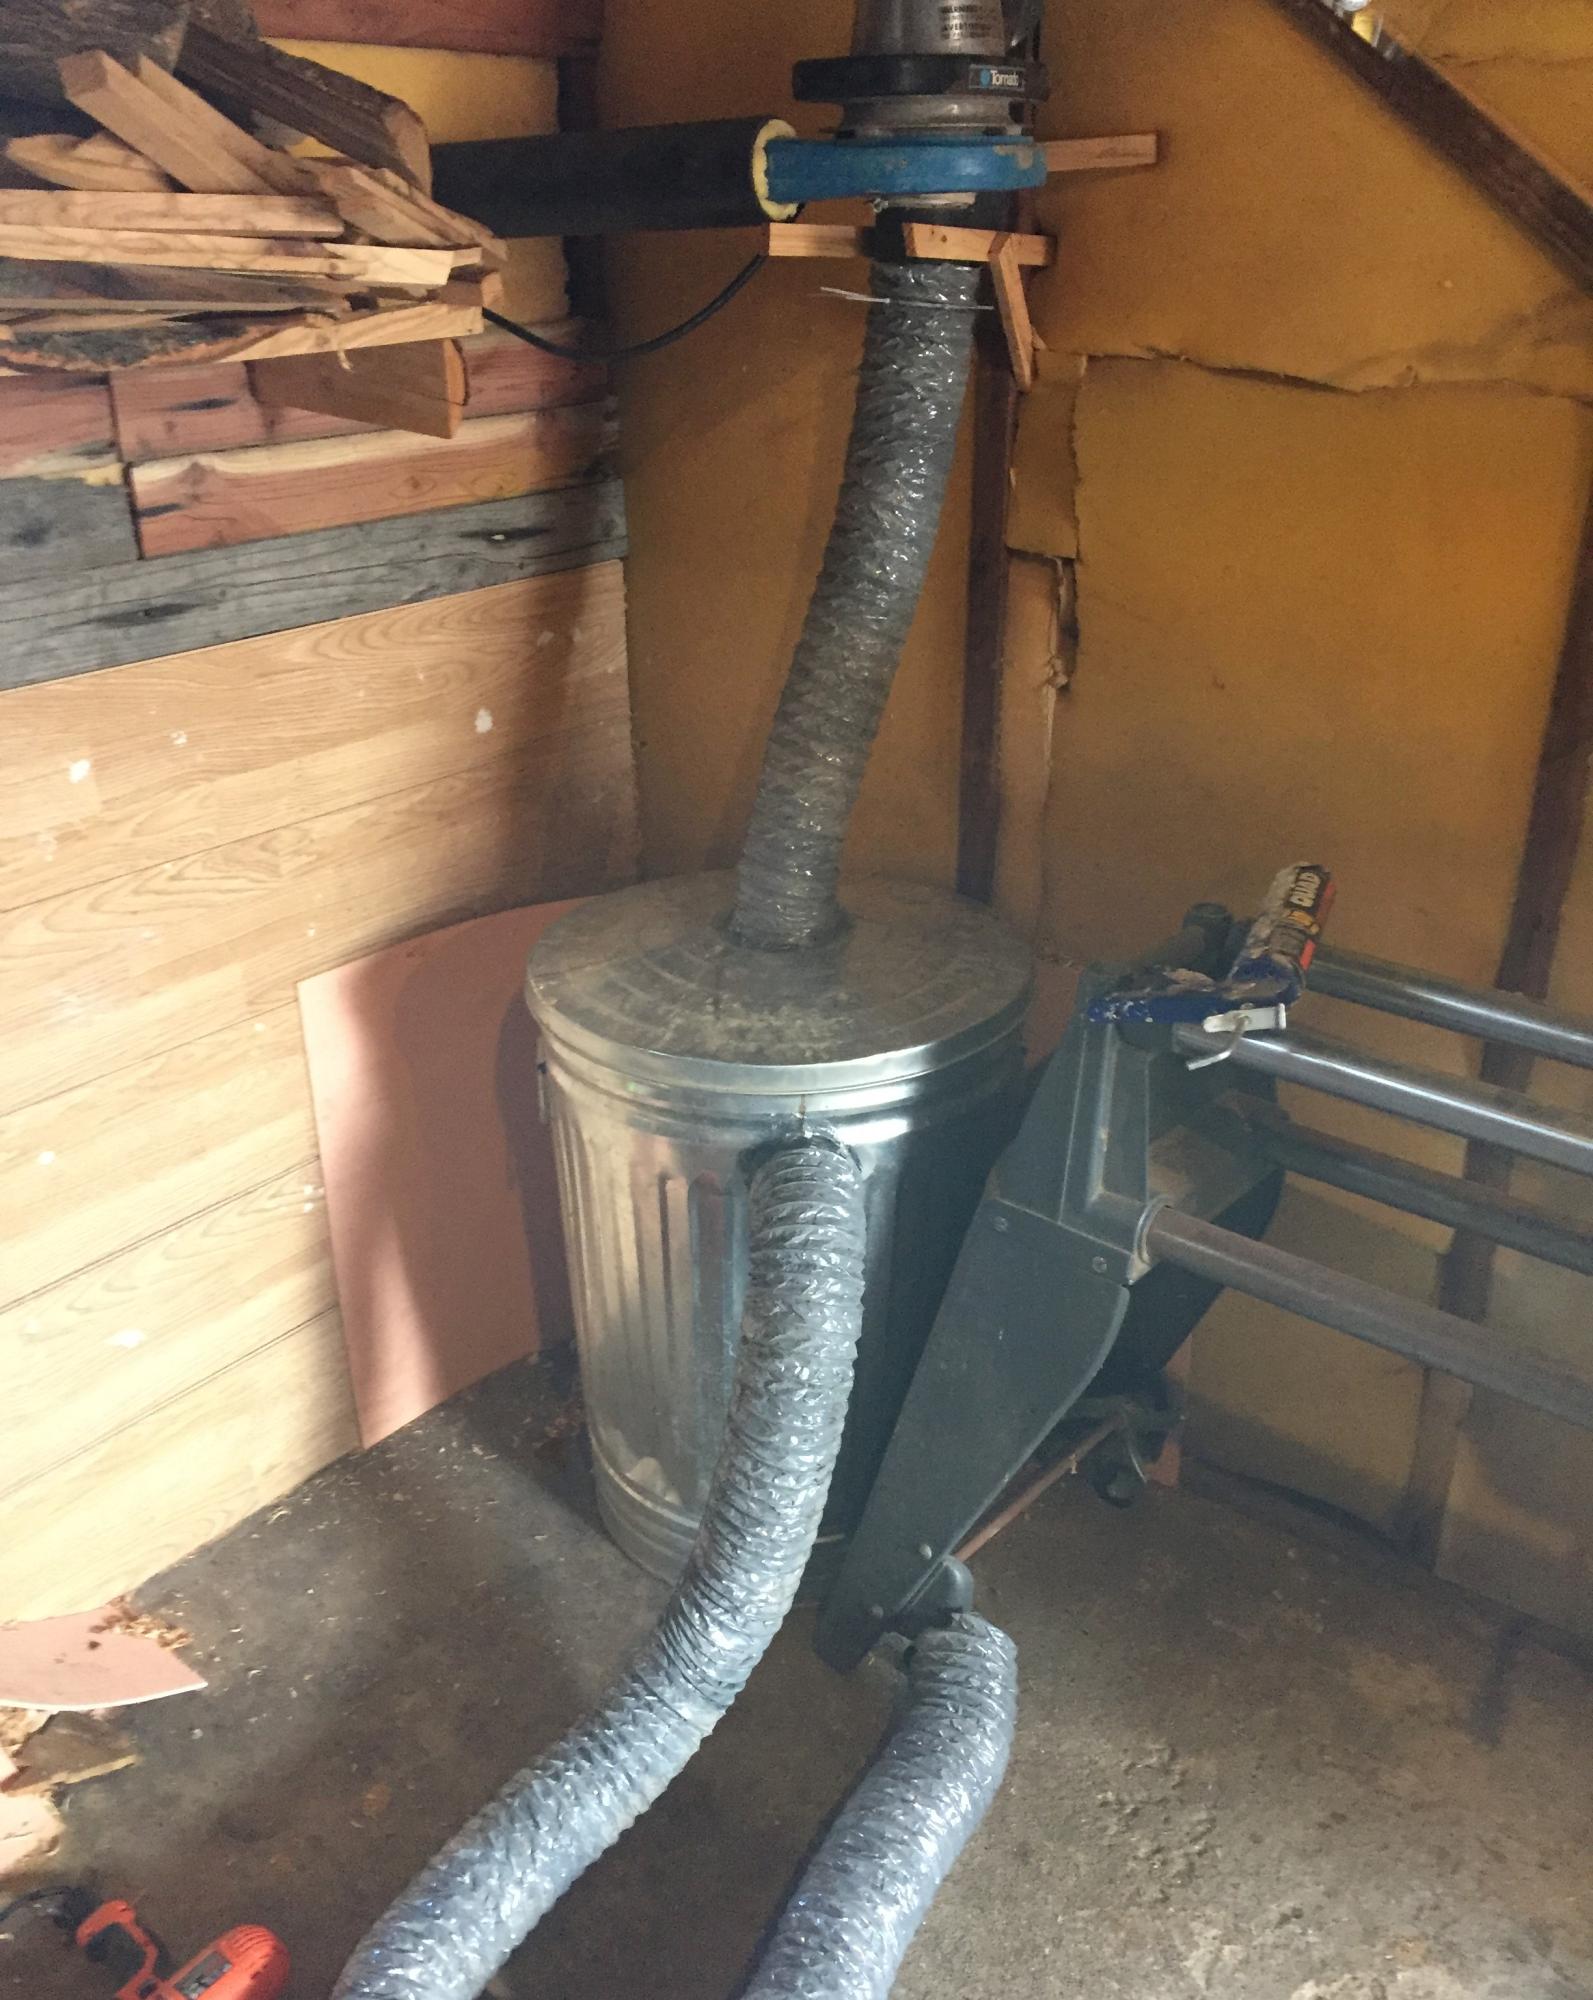
This was a super easy, super simple project that took me about an hour and a half and was essentially free! Had I not had the blower fan given to me, I'd have used the leaf blower we have that has barely ever been used.
Estimated Cost
Free fitty
Estimated Time Investment
An Hour or Two (0-2 Hours)
Finish Used
None
Recommended Skill Level
Beginner
Beginner farmhouse coffee table
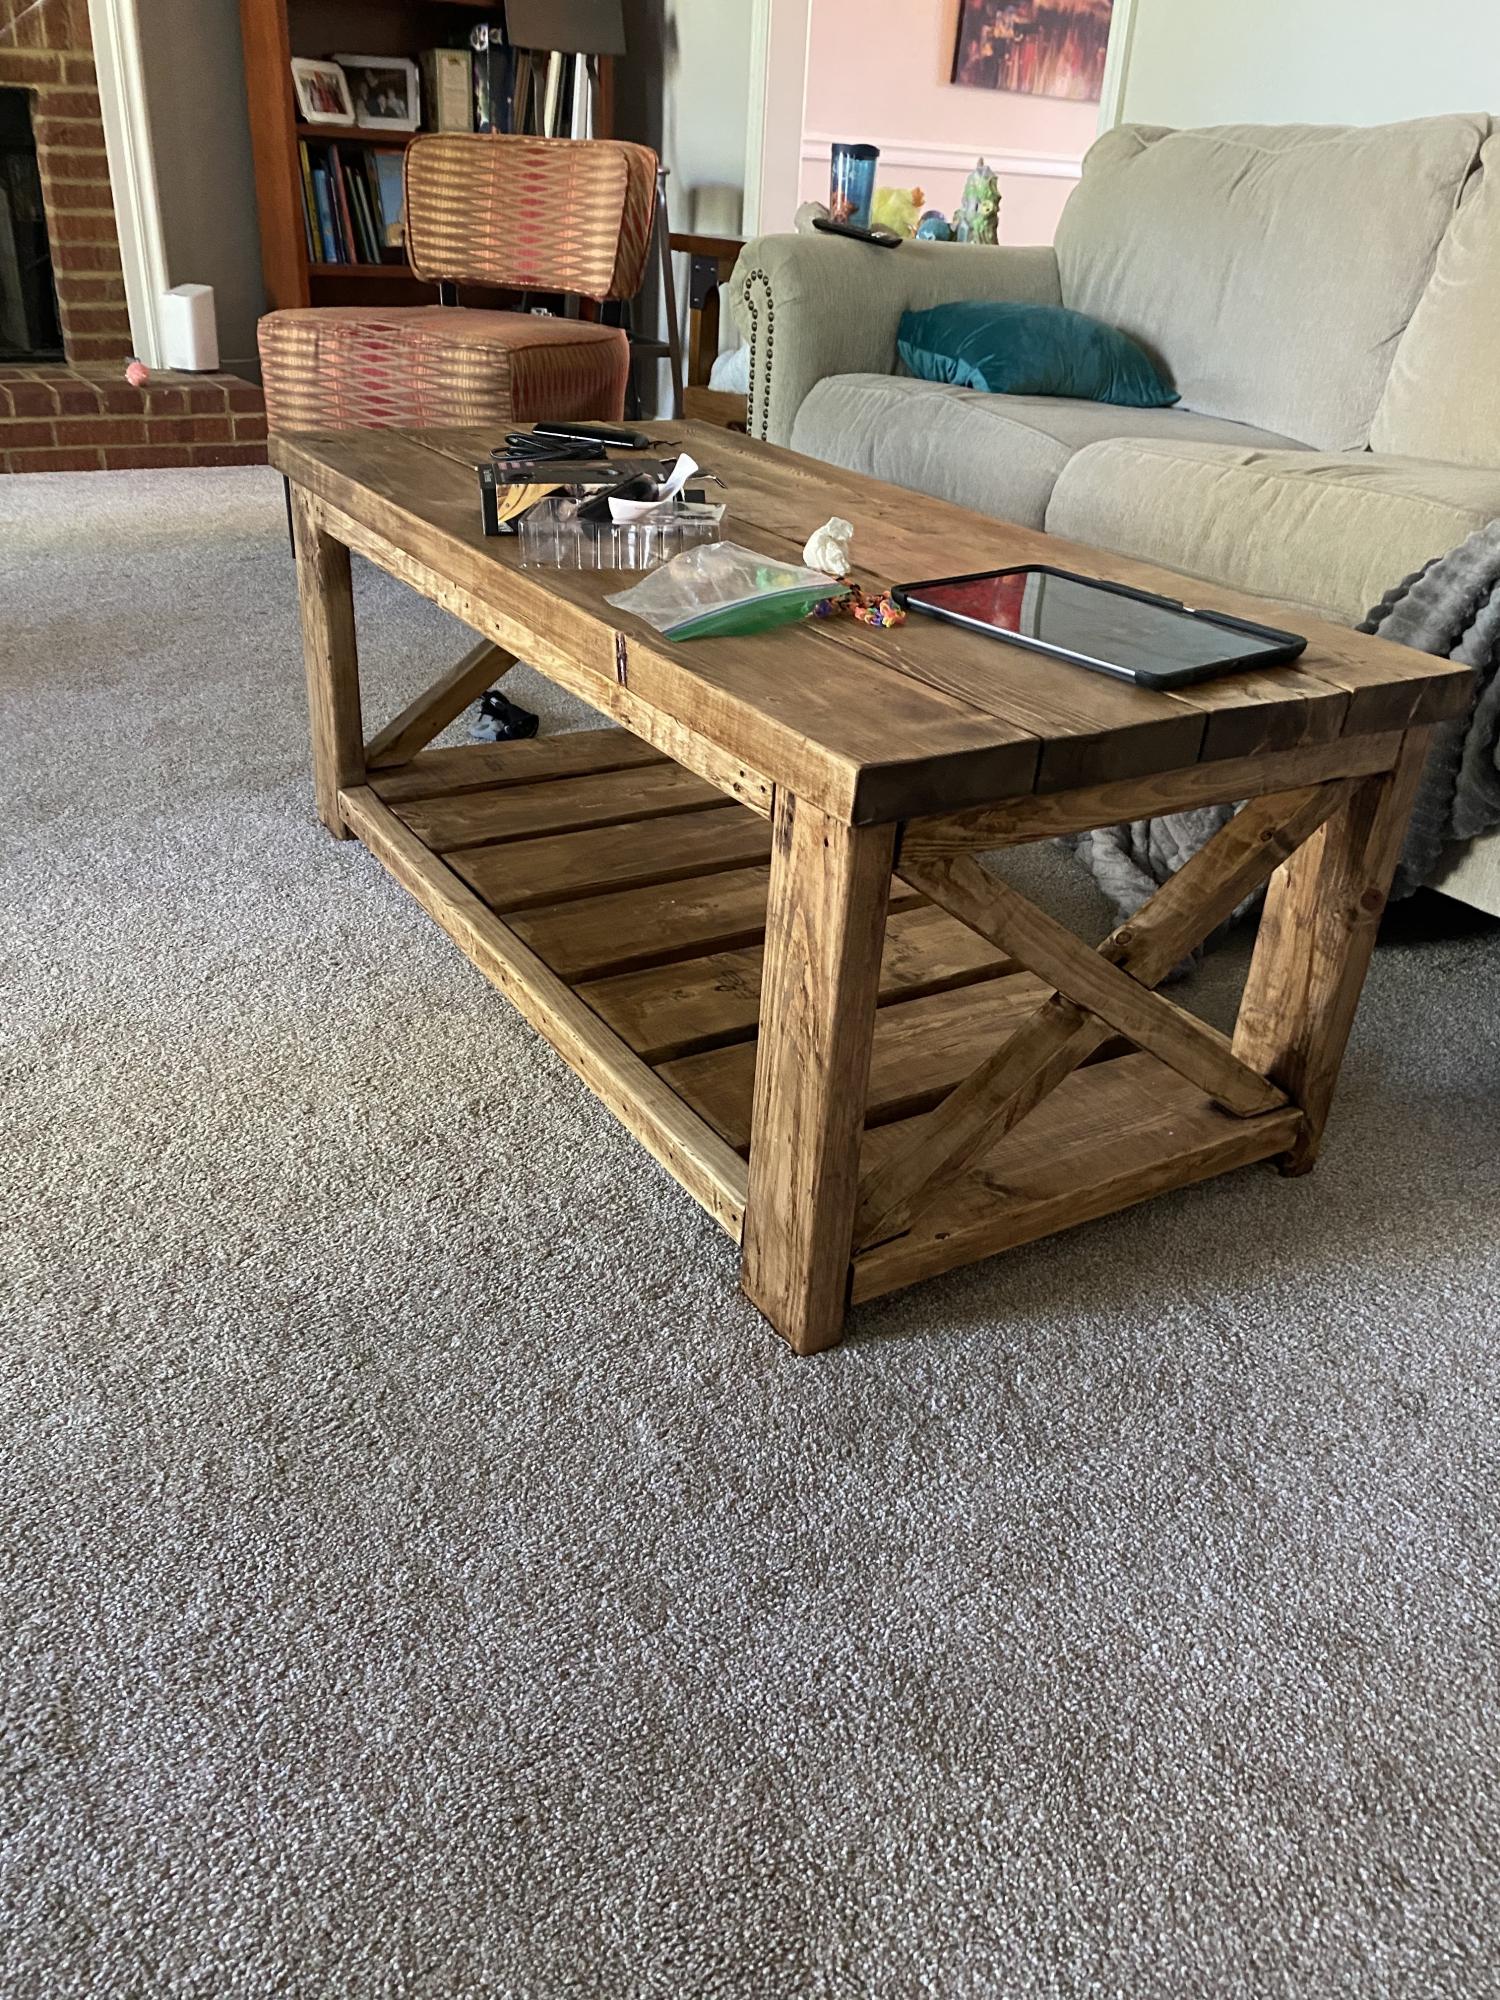
This is my 2nd project (first was the open shelves), but my first "bigger" project. Lovethe plans, the X crosses were tricky with just a circular saw. I am investing in a miter and looking to get into some tougher projects as I just purchased a home.
We just did a little stain to keep that natural wood look.
Built from Plan(s)
Estimated Cost
$65
Recommended Skill Level
Beginner
Comments
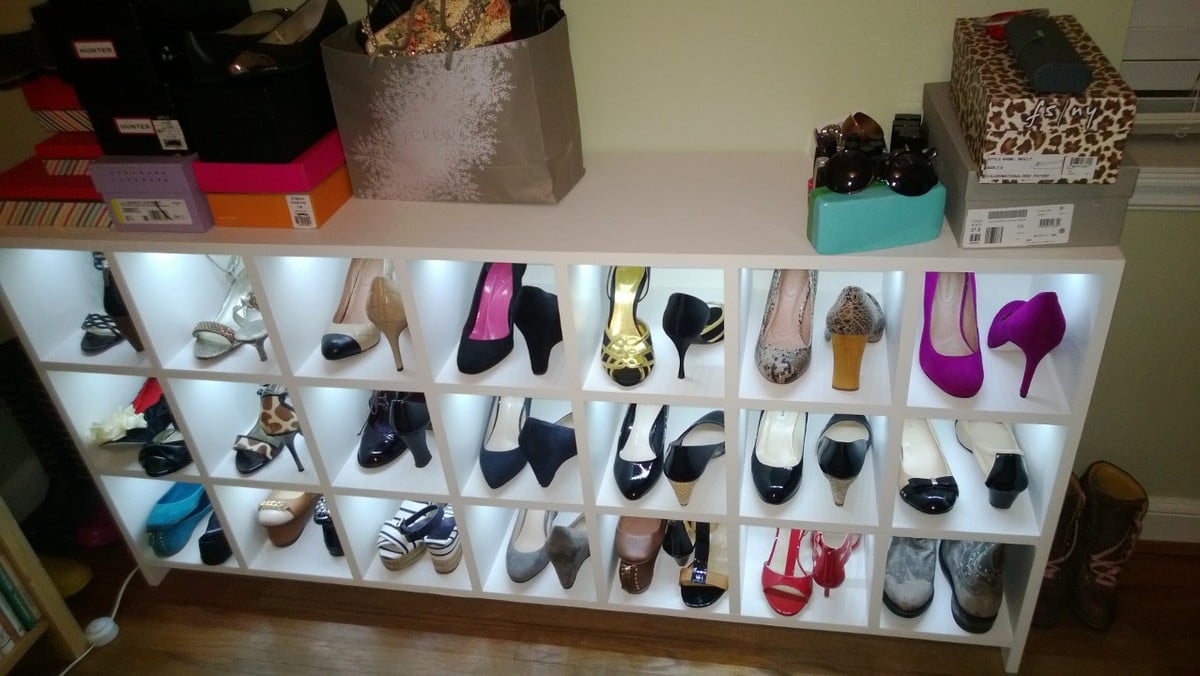
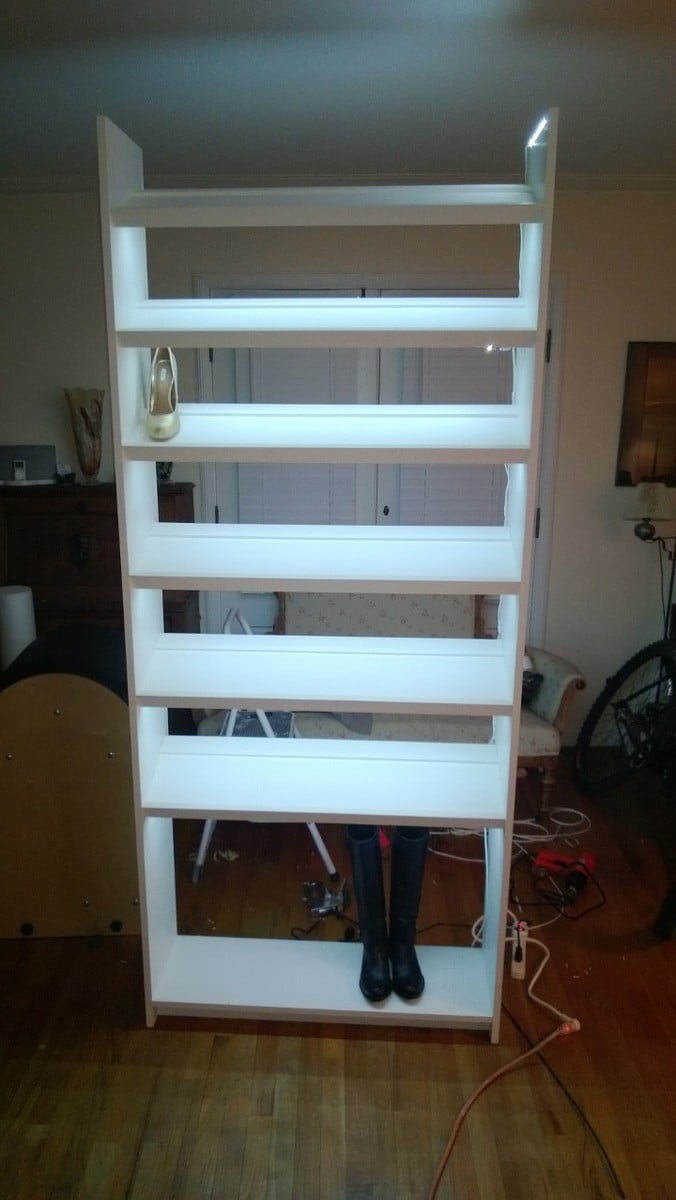
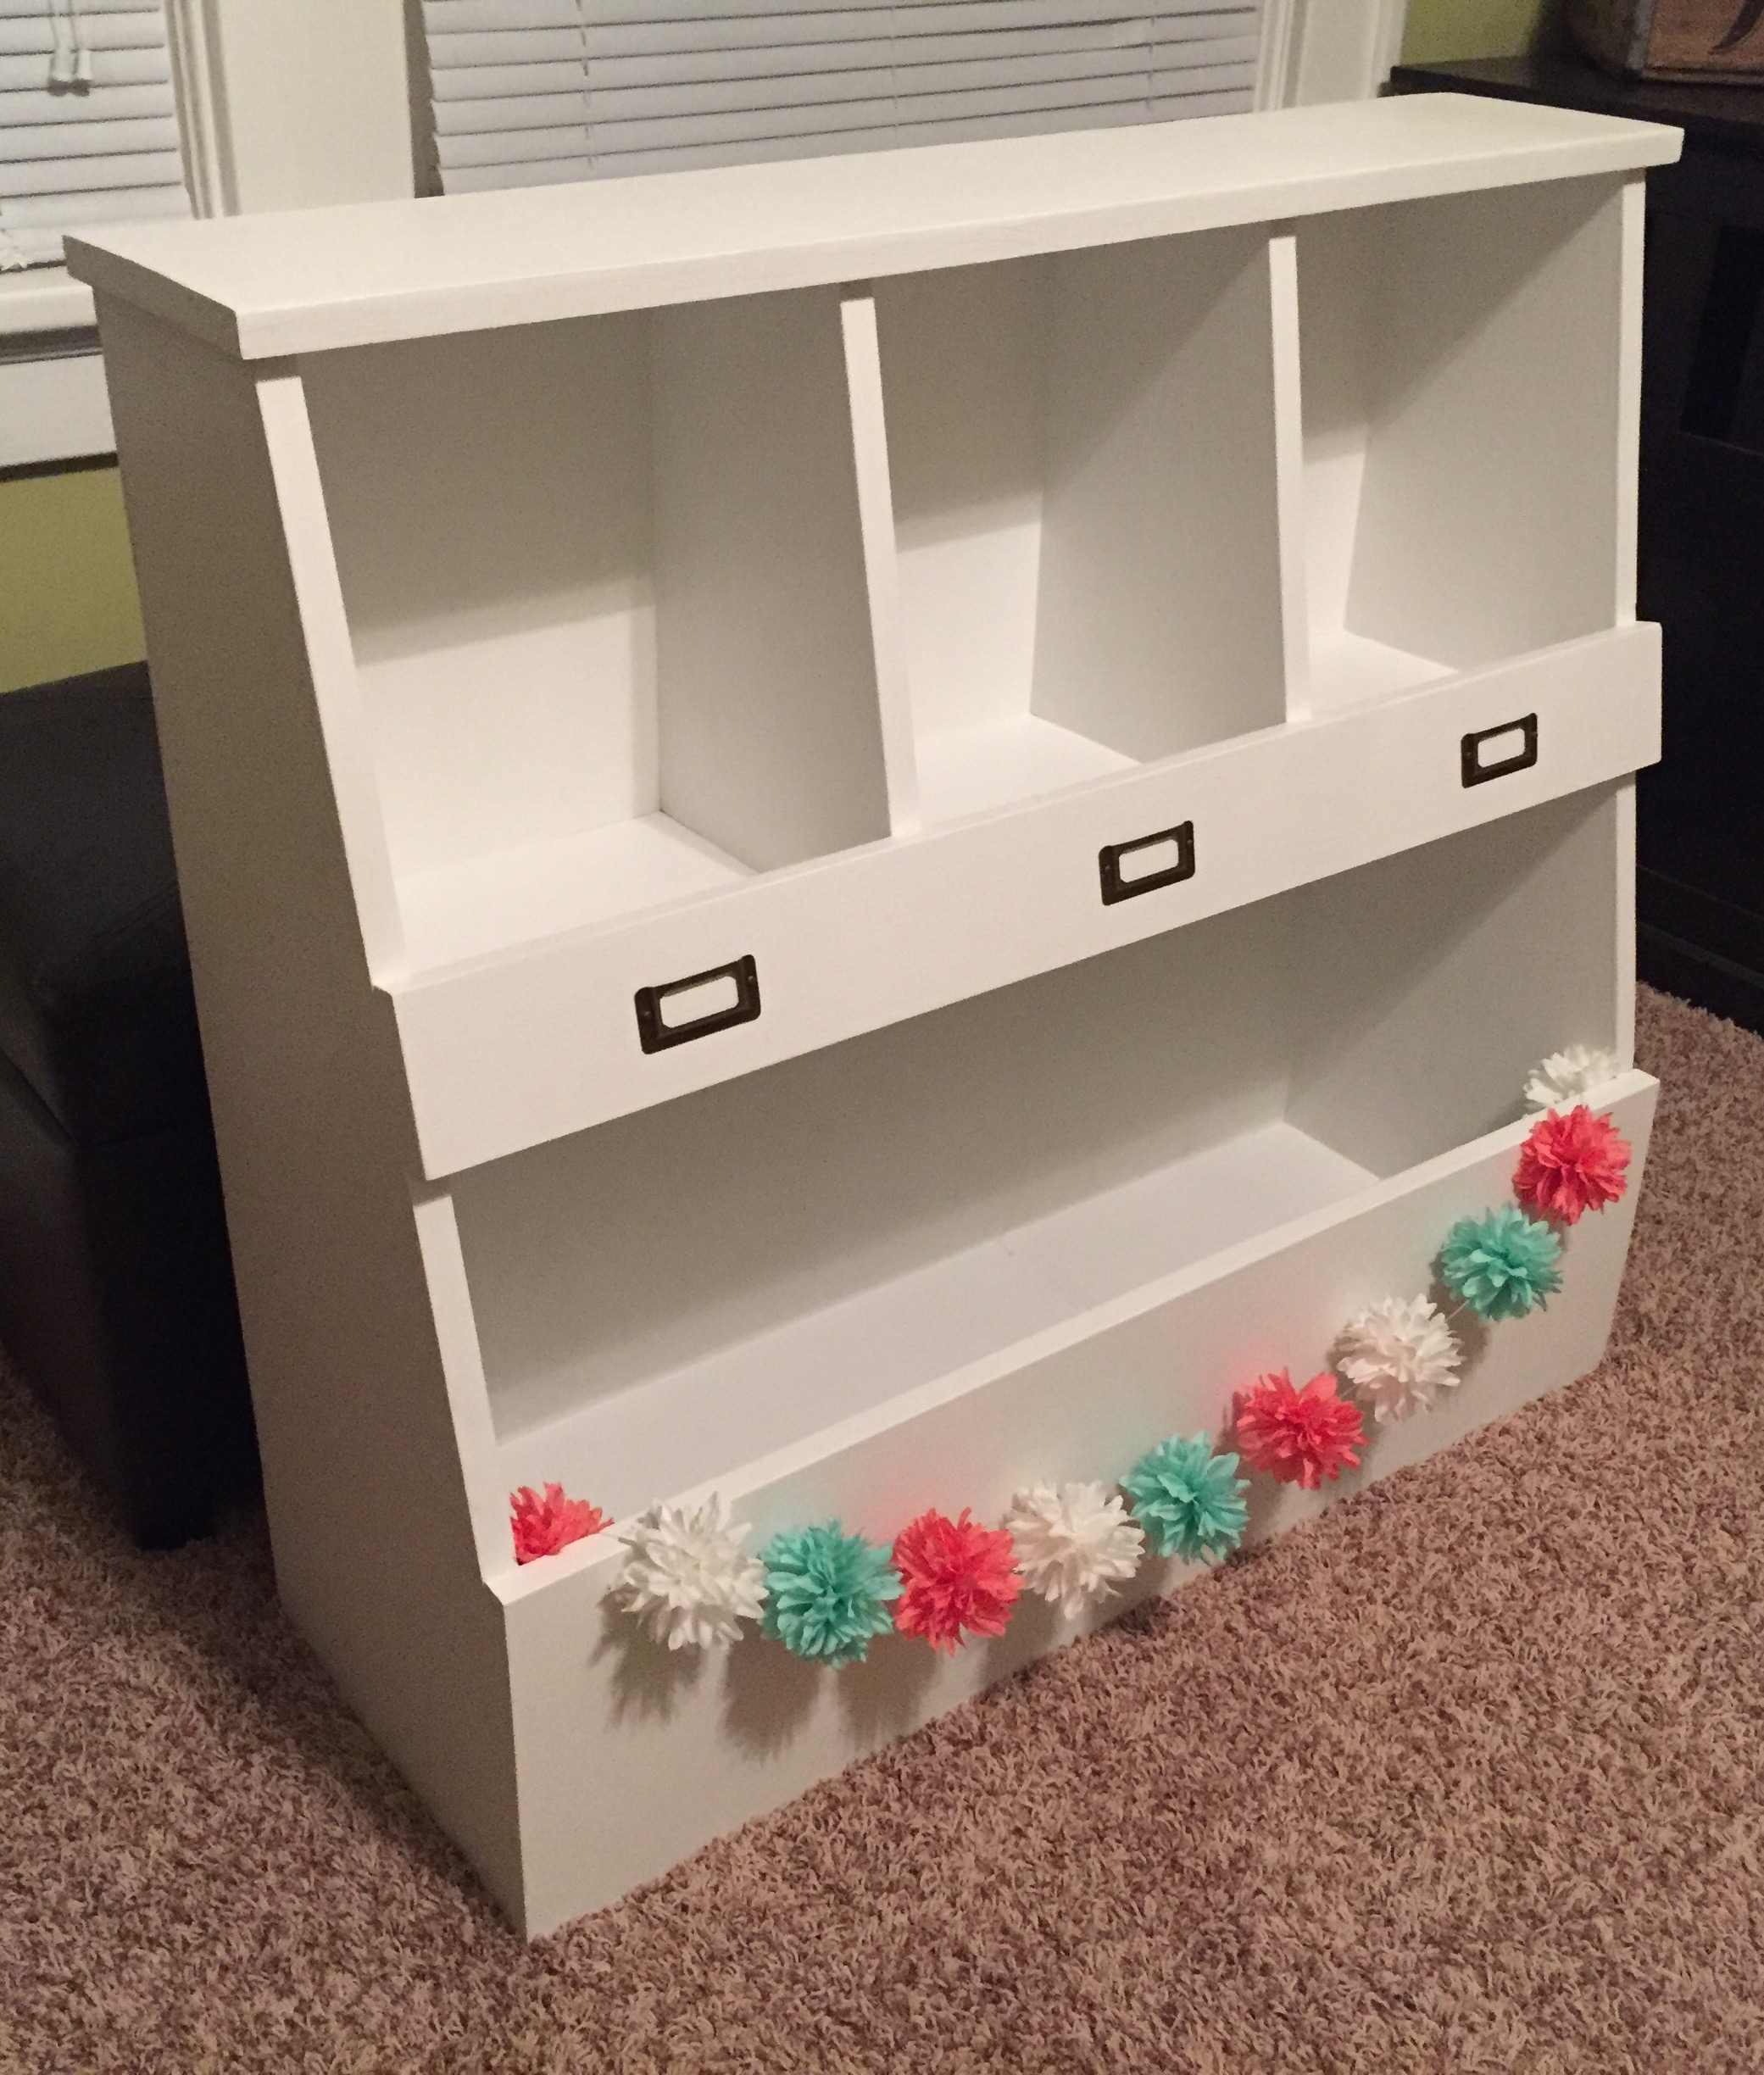
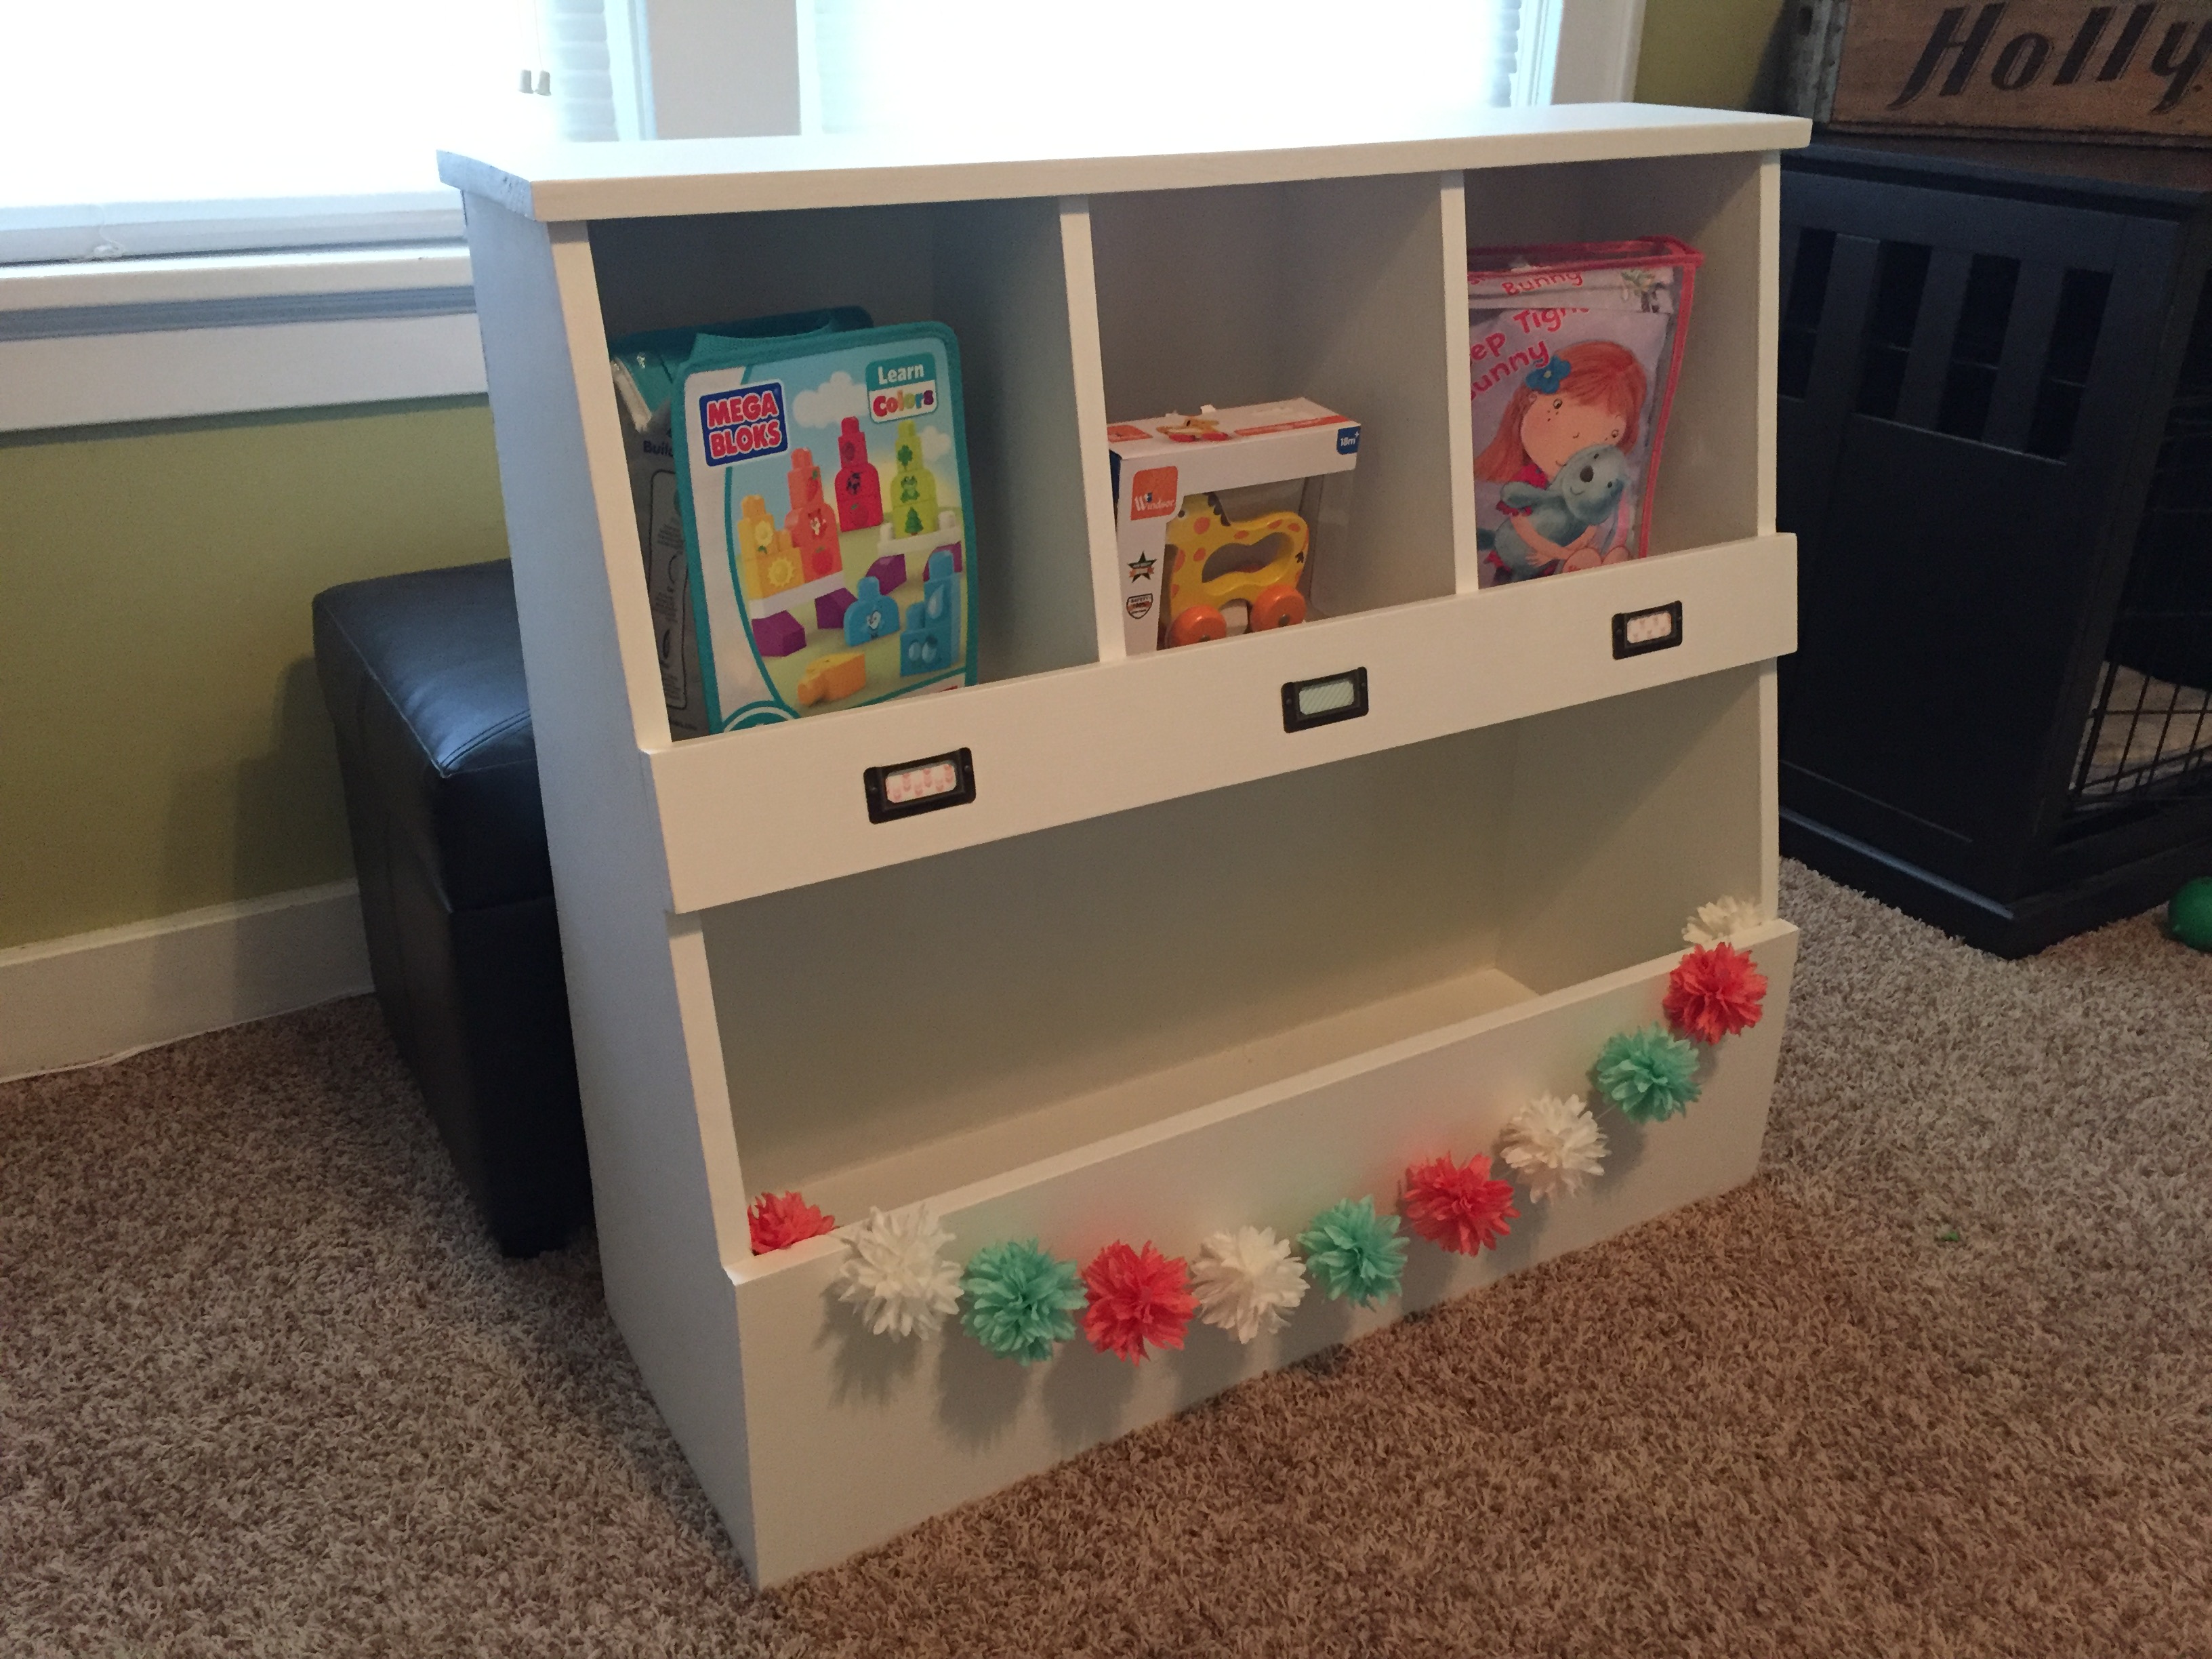
Adapated shoe cubby to on its side with LED lights.
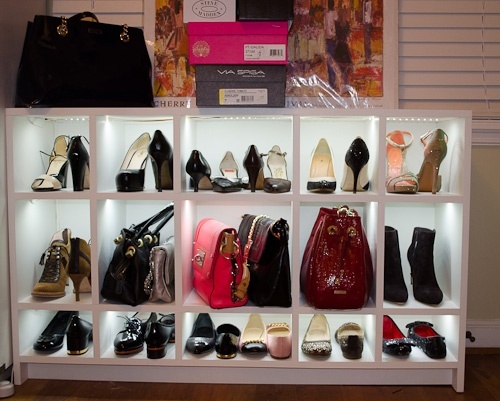
This is an adaption of the shoe shrine shelves. Since I didn't have a closet or other room than the bedroom to put these, I put them on their side. I modeled these off the shoe shrine shelves.
Each cubby is 11 3/4 deep x 8 x8 for the long version. The 2nd version I made was only 48 inches wide and did not divide well so I simply left the center cubby wider. I also made the 48" version to have different height shelves for purses in the middle and flats on the bottom.
I basically flipped the shoe shrine's on their sides and added LED lights. This also inspired a tall version for a cubby we had upstairs.
I used a panel saw to cut the plywood and then assembled with a Kreg pocket hole jig for horizontal pieces and biscuits for the top and the dividers. I did not want to fill the holes or I would have used Kreg instead of the biscuits.
I used 3/4" paint grade plywood and a 1/4inch back panel.
LED lights came from LED wholesalers on amazon. This step requires electrical knowledge! Not much more than a wiring a light but do not attempt if you are not qualifed to do so. LED strings required a fine tip soldering iron, wire and heat shrink.
Built from Plan(s)
Estimated Time Investment
Week Long Project (20 Hours or More)
Finish Used
Latex Behr Swiss Coffee sprayed on.
Recommended Skill Level
Intermediate
Comments

Fri, 03/22/2013 - 08:18
Great job! Your closet now
Great job! Your closet now looks like a fancy shoe boutique!
Fri, 03/22/2013 - 11:50
Thanks!
The LED's came after we designed them. I was like there is no light where these are going and its hard to see inside the cubbies. This is true for the bottom cubies which are only 5 inches tall. So for 30 bucks a cabinet it was a quick and easy addition that really made them pop. Only downside is it can make the room look like you are in Nordstom's :) so she doesn't leave the lights on regularly.
Thu, 09/18/2014 - 01:42
Nicely done!
Very nicely done. Do you mind telling me more about which particular LED product you used and the process to wire them in? Did you mill out any part of the cabinet to set the lights? How are they activated? Thanks in advance. You can also email me at [email protected]. Much appreciated!
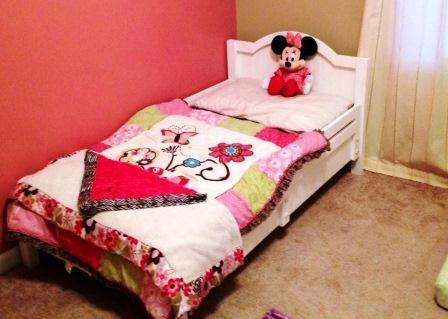
First bed for granddoughter
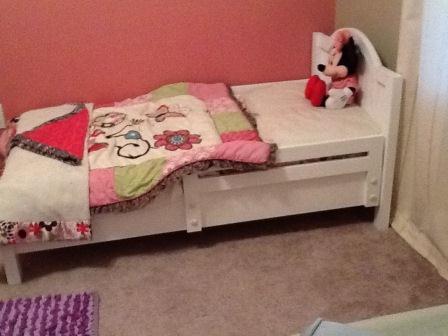
I made this for my granddoughter.
Built from Plan(s)
Estimated Cost
$45.00
Estimated Time Investment
Weekend Project (10-20 Hours)
Finish Used
white paint
Recommended Skill Level
Beginner
Comments
Toy Box with Cubbys
This was my first real woodworking project. This design was perfect for my one year old niece. Used Rustoleum Chalked Linen White and Clear Matte Topcoat. Made sure to use Zissers Bullseye on all the knots in the wood so they wouldn't bleed through, although I should have primed the entire piece. Pretty simple to make, with the angled cuts being the hardest. Found the label holders at Hobby Lobby in the scrapbook section.
Built from Plan(s)
Estimated Cost
$90 for wood, screws, glue and paint
Estimated Time Investment
Day Project (6-9 Hours)
Finish Used
Rustoleom Chalked Linen White and Clear Matte Topcoat
Recommended Skill Level
Beginner
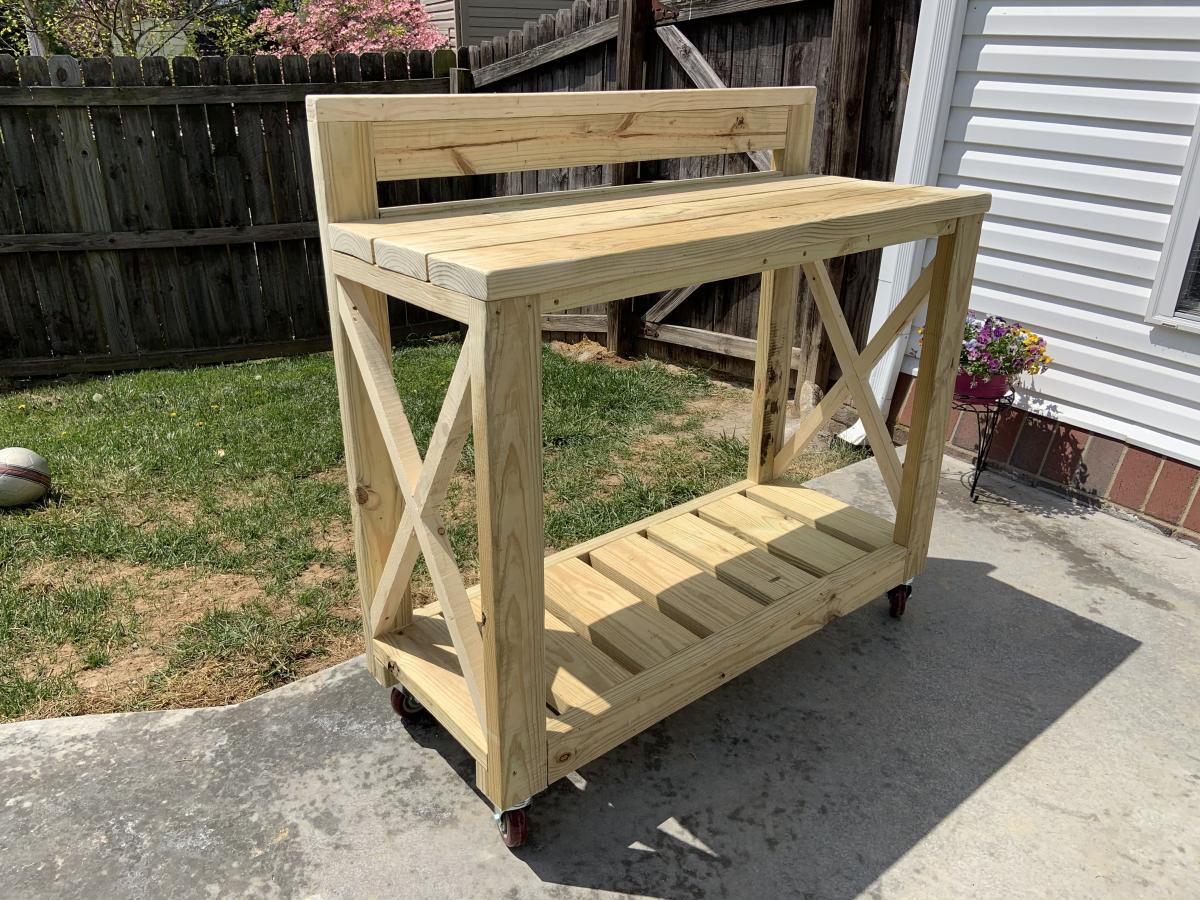
Potting Bench turned wood storage & deck table
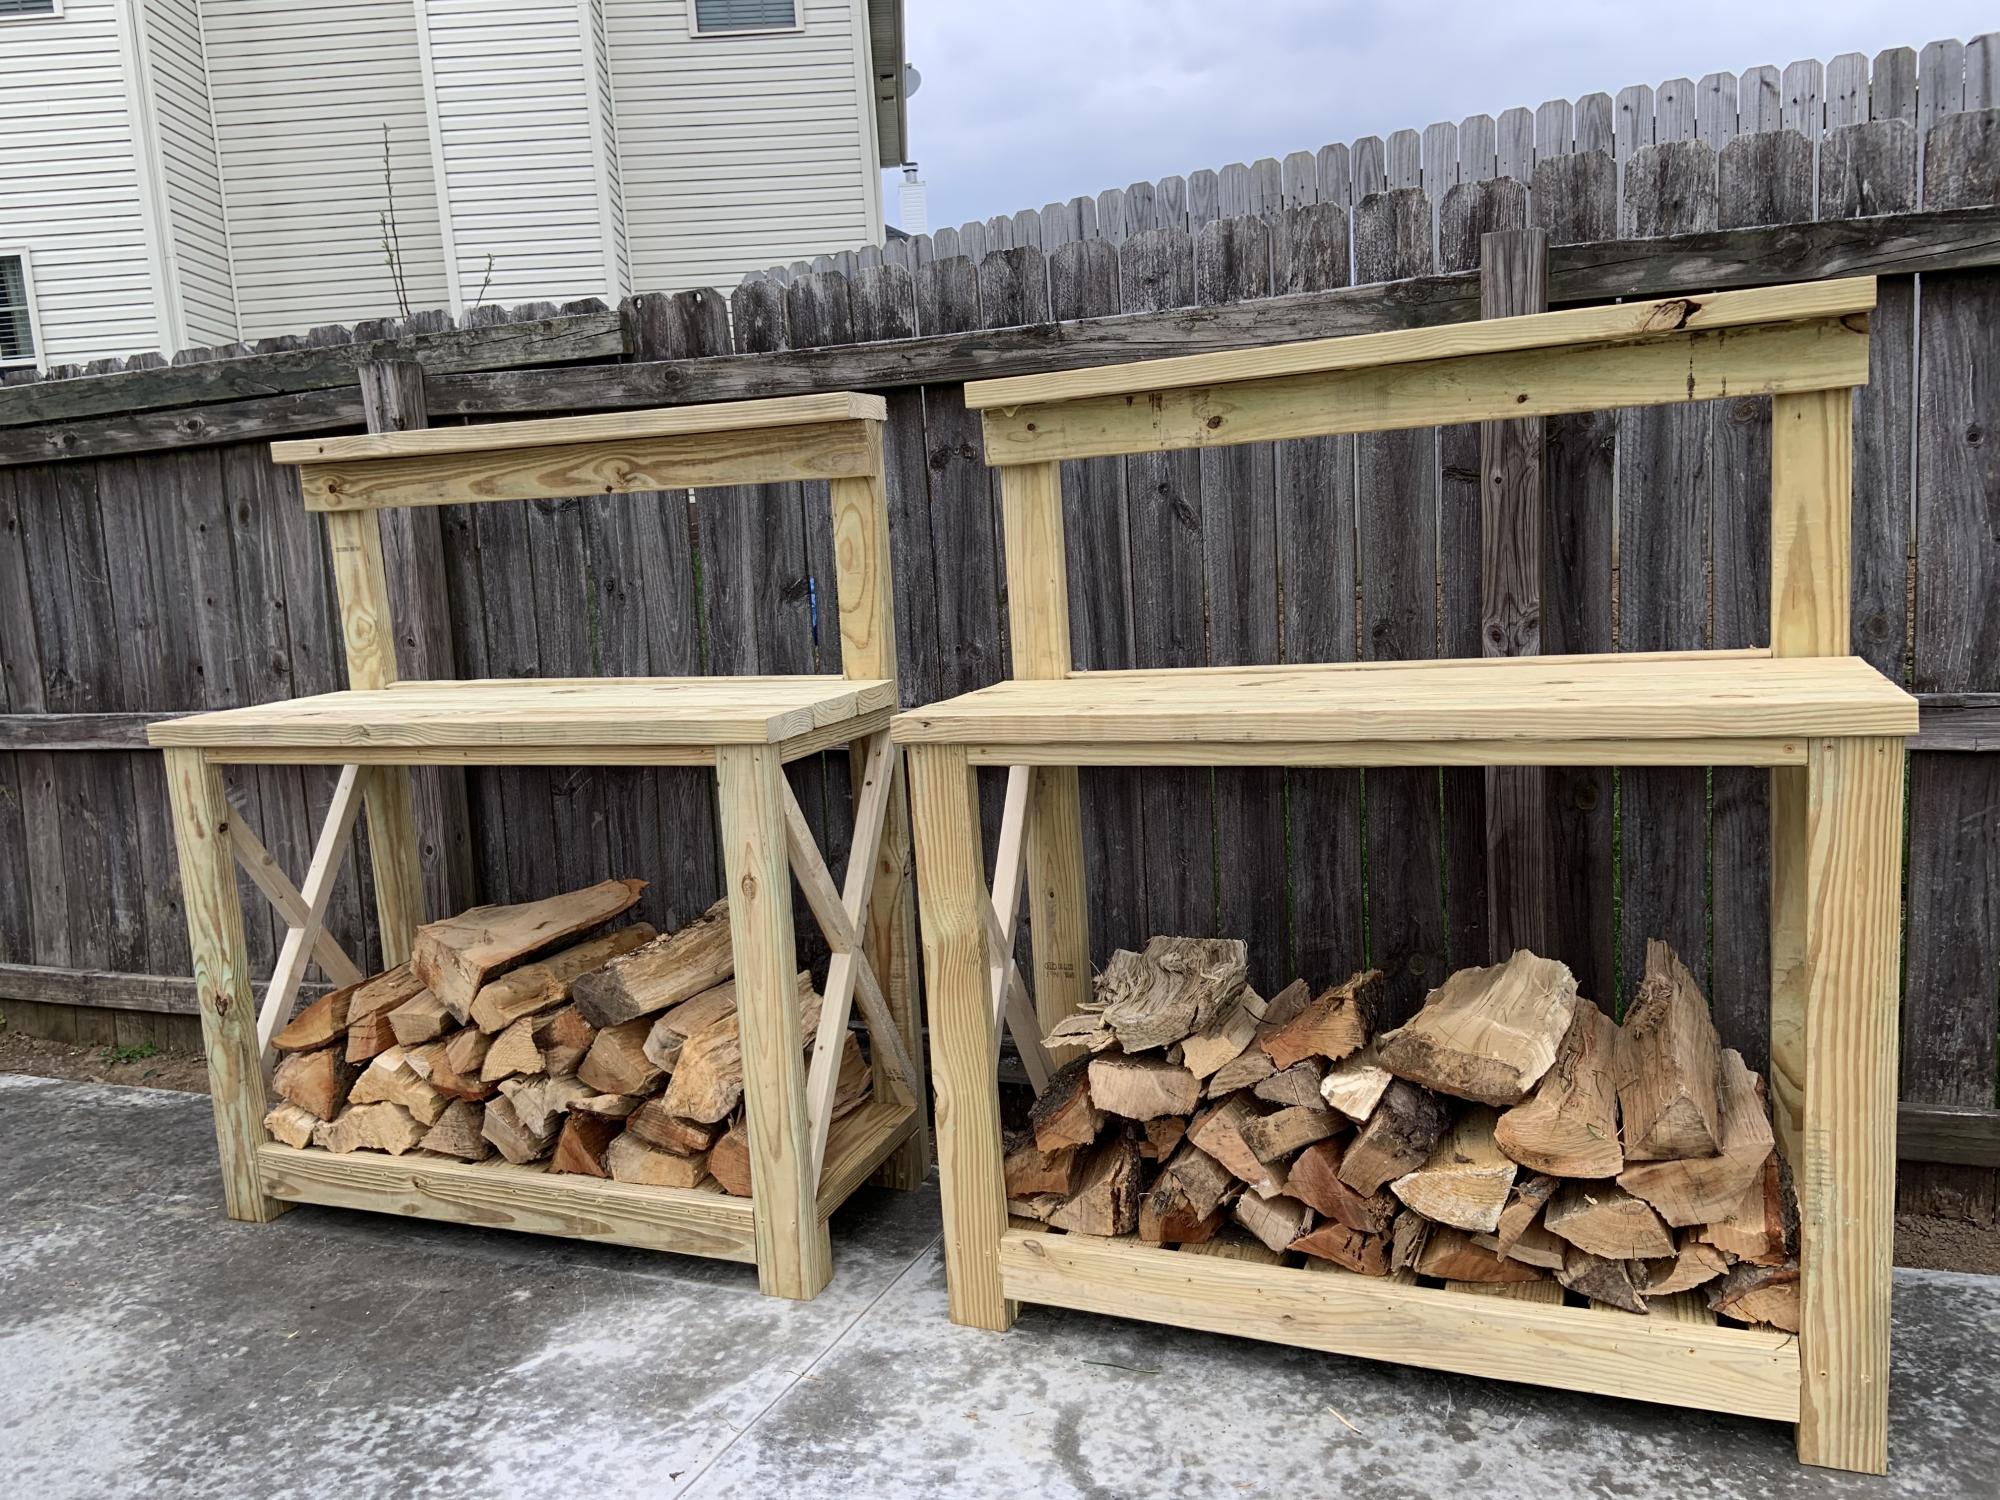
Thanks for the design, we modified the bottom cross brace to be 2x4's in order to carry the weight from the wood, and then on the third table removed the bottom of the legs and put casters on the bottom and gave it a shortened (height) top with a 2x4 cross beam capped by a 2x2 (we also didn't overhang the top boards except on the front edge on this table). We are using these for patio serving tables and quick access to some firewood for our fire pit and a chimenea on the other side of the yard.
We will sand and stain eventually as well. They were made out of pressure-treated lumber.
Estimated Cost
$100-120
Estimated Time Investment
Weekend Project (10-20 Hours)
Finish Used
Unfinished.
Recommended Skill Level
Beginner
Comments
Sienna's loft bed!
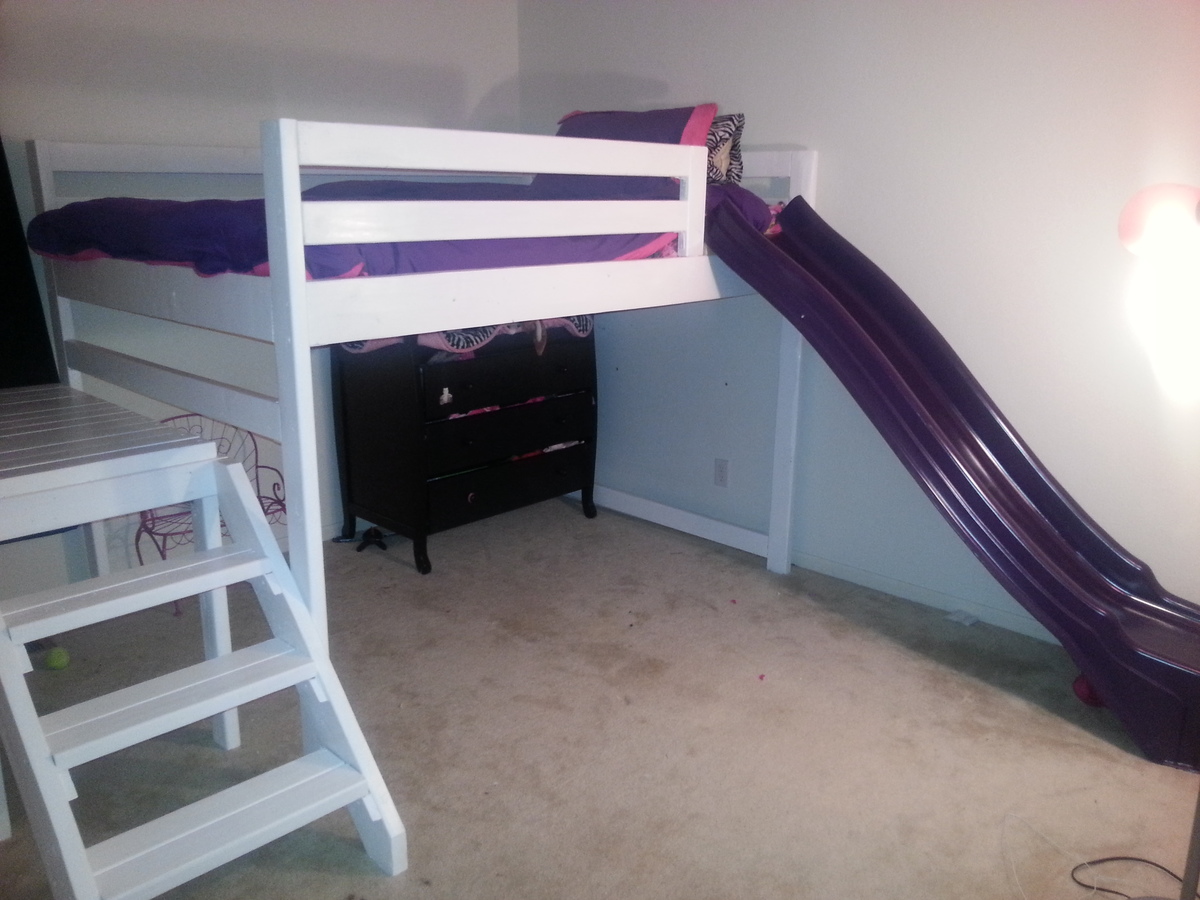
I started with the Camp style loft bed, and modified it. Since we had a full sized bed, we knew that we needed it to be wider. Also, we knew we wanted a slide, since baby girl LOVES slides. We found one on CraigsList that was too long, but we cut it down and found a way to attach it. We also aren't very good carpenters (yet), so we had some issues with our stairs being wider then our platform, and had to add an extra piece. Overall, this project took us 3 weekends and a few nights after work. Also, we were using the plans which suggested it would only cost around $50, wasn't quite the case with us...I am pretty sure we spent over $200, but we didn't really have paint, sandpaper, the slide, etc. So that is pretty all-encompassing. Very happy with our results, and We cannot wait for the baby girl to see the outcome!
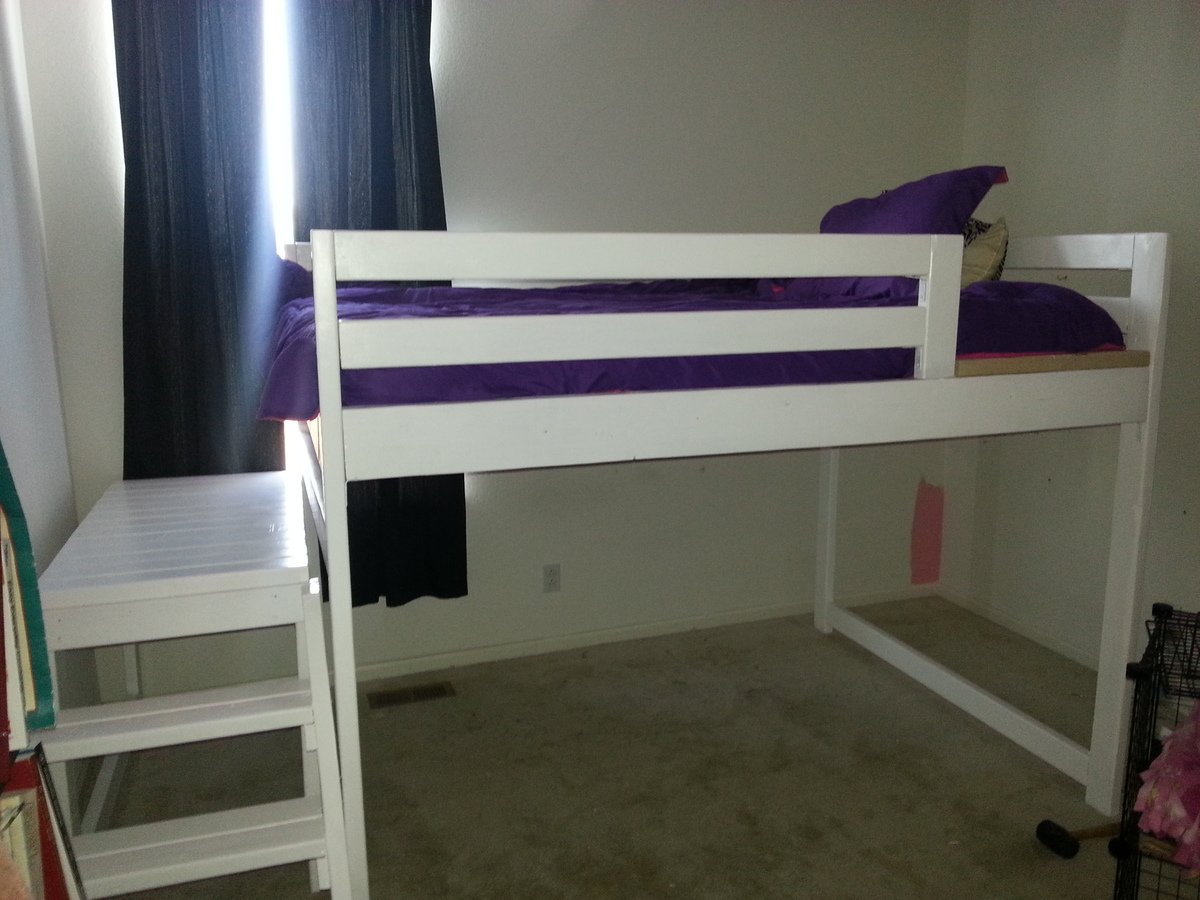
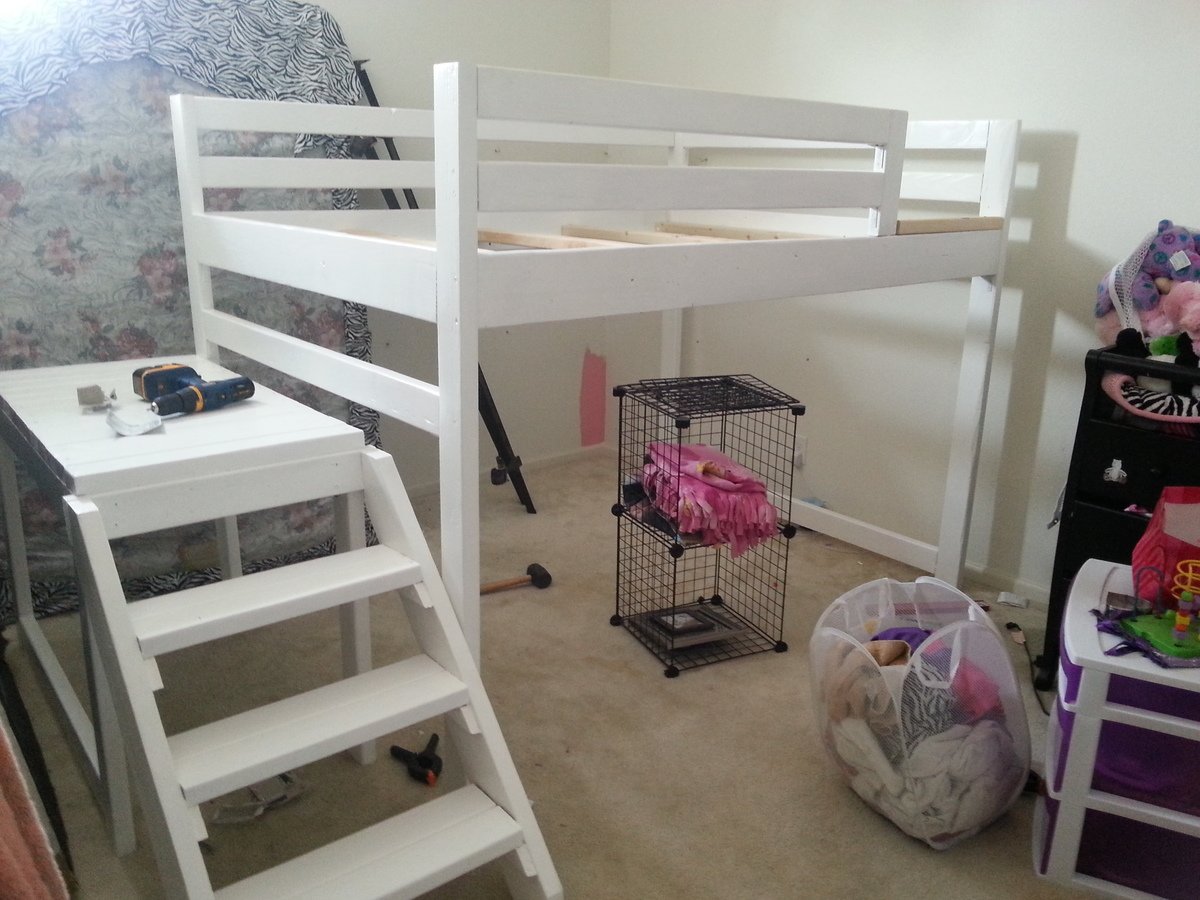
Built from Plan(s)
Estimated Cost
250
Estimated Time Investment
Week Long Project (20 Hours or More)
Finish Used
white latex paint.
Recommended Skill Level
Starter Project
Comments
floating shelves
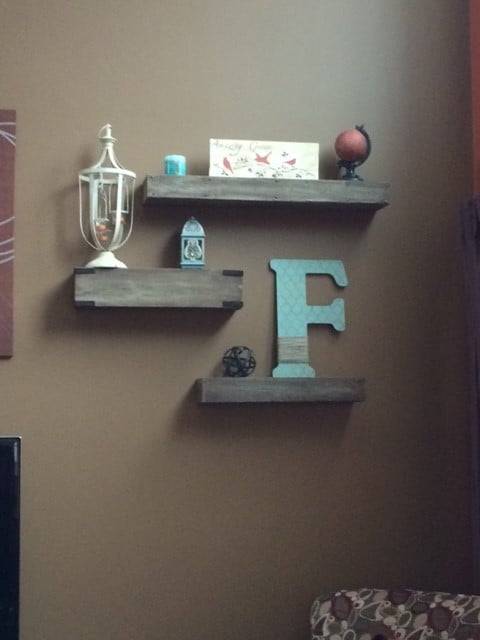
These shelves were easy and easy to customize the size according to your needs. They are fun to decorate and add a rustic flair to my living room.
Built from Plan(s)
Estimated Time Investment
An Hour or Two (0-2 Hours)
Finish Used
I distressed the wood then used grey chalk paint and dark wax
Recommended Skill Level
Starter Project
Extra long buffet

Slight variation on the extra long buffet. Instead of drawers I substituted for 2 additional cabinet doors. It stands 40" tall, 96" long, and 20" deep.
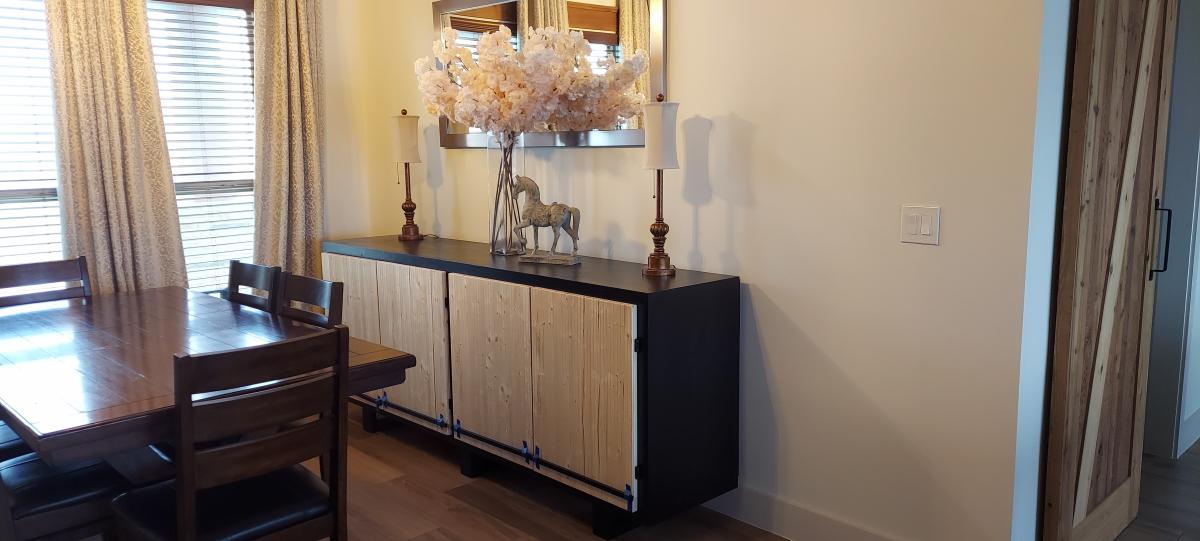
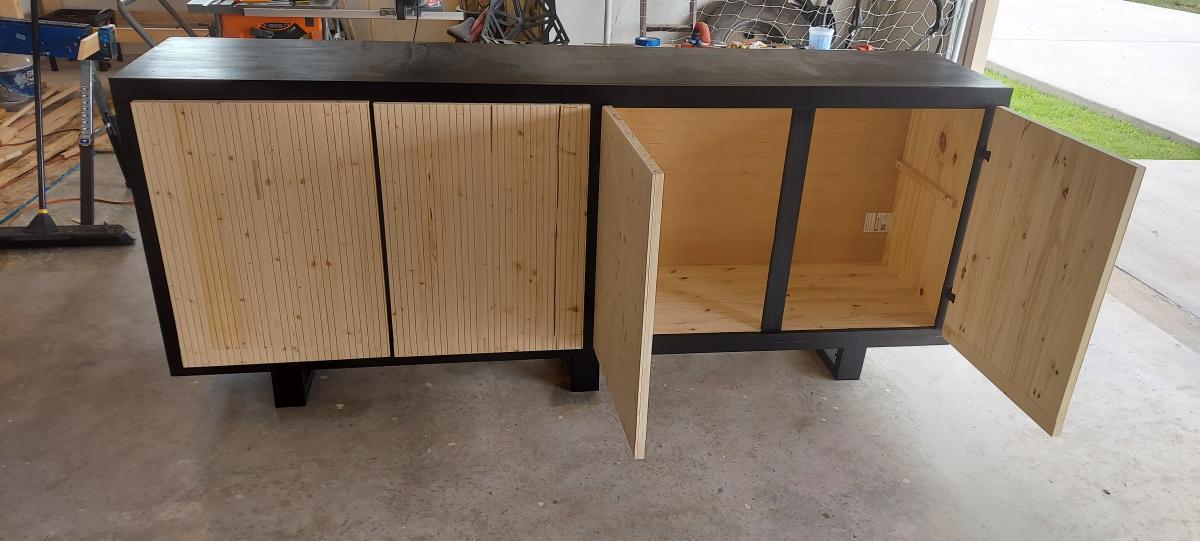
Built from Plan(s)
Estimated Cost
$200
Estimated Time Investment
Weekend Project (10-20 Hours)
Finish Used
Black paint and natural wood.
Recommended Skill Level
Intermediate