Community Brag Posts

Modern Farmhouse Collection tables

Submitted by jeep97jc on Fri, 10/04/2019 - 19:17

Saw this table and had to build it, love it, easy and fairly quick to build, I also built the console table after seeing the finished coffee table. I also want to make matching end tables. Love this site and how easy it is to build projects with the plans, my go to when finding projects,  Thank you

Estimated Cost
$40-$60
Estimated Time Investment
Afternoon Project (3-6 Hours)
Finish Used
Minwax Classic Grey, Rustoleum Polyurethane Clear
Recommended Skill Level
Beginner

Wine Rack

Submitted by Bredimi on Tue, 02/07/2012 - 15:35

I loved the Holman Entertaining Shleves from Pottery Barn, however, I didn't like the price. Taking the $10 ledge plans and modifying them, I set out to make my own. I used a 1 x 10 (bottom), 1 x 6 (back) and a 1 x 3 (front). They are 23 7/8 inches long to get the 3 shelves out of 6 foot boards. To get the holes to hold the top of the bottle, I used a 1 and 1/4 inch forstner bit. Since I had gift cards left from Christmas I splurged on the wood and bought the select pine.

Built from Plan(s)
Estimated Cost
I had gift cards, but my out of pocket expenses for the 3 shelves was $22.89
Estimated Time Investment
Afternoon Project (3-6 Hours)
Finish Used
I painted them Valspar Lincoln Cottage Black
Recommended Skill Level
Intermediate

Comments

babysteps

Tue, 01/14/2014 - 10:55

I love your adaptation of the original design. I have been looking for an example of someone who made this plan into a wider shelf. Has it held up well? I was worried about the stress on the joints when you make it deeper. Has yours handled the weight of the bottles?

American Girl Doll House

Submitted by Anonymous (not verified) on Sun, 10/06/2019 - 18:59

This Project was a Challenge mostly because of its size. Standing 6ft Tall and 4ft wide it was hard to handle at times but easy enough and fun to build.
I followed Ana's Three Story American Girl or 18" Dollhouse plans.
We also made the American Girl or 18" Doll Sofa or Couch.

Estimated Cost
$150
Estimated Time Investment
Weekend Project (10-20 Hours)
Finish Used
I used White Latex Paint and Walnut Mini Wax stain for the floors
Recommended Skill Level
Beginner

Ana White Inspired Farmhouse Table - "The Gathering Place"

This is my first made-from-scratch table, and I'm really proud of the result!

I made this table for my amazing in-laws. They just moved into a beautiful new home with a spacious, open dining area, and they've been looking for a large table that our growing family can gather around.

We customized Ana's design by making the table larger and by transforming the ends of the table into extendable 10" table leaves.

The final dimensions are:

Height: 2.5'

Width: 3.4'

Length (fully extended): 10'

It took two weeks to make, predominately evenings and weekends, and/or whenever my baby girl was asleep! 

Estimated Cost
$300
Estimated Time Investment
Week Long Project (20 Hours or More)
Finish Used
I used an Espresso-colored stain with a water-based satin sealer. The water-based sealer provides a crystal-clear finish so that the Espresso color is untainted, and since the sealer is thin, the table retains the natural feel of the wood, (though the whole table was sanded so there aren't any splinters. Don't want it THAT natural!)

I let it air dry outside for 48+ hours to ensure the stain was completely dry before being sealed, and to detract from the stain smell.
Recommended Skill Level
Intermediate

Triple Pedestal Table 12ft long

Submitted by Anonymous (not verified) on Sat, 03/26/2016 - 12:01

First DIY, my twin brother and I decided to build a table for my parents; as they are currently remodeling their house. Thank you so much for these easy-to-follow yet very thorough set of plans! We made some adjustments to the length and width: 144inches (12ft) long by about 45inches wide!! It's a monster of a table! We made the legs wider as well to compensate for the adjustments of the table top. We are all extremely happy with the results- thanks!

Built from Plan(s)
Estimated Cost
$160
Estimated Time Investment
Weekend Project (10-20 Hours)
Finish Used
Early American
Recommended Skill Level
Beginner

Tardis Murphy Bed

Submitted by alleysrats on Thu, 04/07/2016 - 19:40

I took the original plan design for a Murphy bed - it was inspired by a Dr. Who themed bed that used a Murphy Bed Kit - I've used Ana White's plans before and thought why spend $$$ on a kit when you don't have to.  I few trips to the store and a weekend later I have my very own Tardis Murphy Bed.  It cost about $140 to build not including the mattress and accessories cost (light kit/upholstery panel/police box sign etc) I raised it up about 4" to attach legs and added some puck lights for a lighting effect.  I think it came together rather nicely.  I just have to add handles and the magnetic closures and it will be all done.


It took me all weekend to build by myself - had my brother help me with mounting the mattress box in the cabinet.  I would suggest having wood cut at the lumbar yard as it is difficult to cut the 8 and 12" boards unless you have a bigger table saw that I do.

Estimated Cost
$140 not including accessories which added about another $40 to cost. Mattress was additional $180.
Estimated Time Investment
Weekend Project (10-20 Hours)
Recommended Skill Level
Beginner

Comments

Free- Standing Faux Mantle

Submitted by Anonymous (not verified) on Sun, 12/15/2019 - 19:25

I added a 1x12 as a base so that it could be free-standing, in case we ever want to move it to a different spot. I also added an insert by gluing slices of tree branches to a piece of plywood . This was a fun, quick and easy project, even for a relative beginner. I love the character it adds to this room!

Kendra Side Table

Thanks for the GREAT plans. Slightly modified to allow more space on the top shelf.

Estimated Cost
40.00
Estimated Time Investment
Day Project (6-9 Hours)
Recommended Skill Level
Beginner

Comments

Linda7

Sun, 03/09/2014 - 15:23

Lauren,
They are found on this site called the "Kendra Storage Console". Click on "plans" in the tool bar above, type in that title, then hit "apply." The original plans will pull right up.

JoJo Lynn

Thu, 01/29/2015 - 20:01

I too was looking for the plans on this and i clicked on plans but when i entered Kendra Side Table it came up as no results found. Is this not the name listed above? Am i doing it wrong?

Jodi

Simple Outdoor Bench

My sister wanted this to go with the Simple Outdoor Chairs I had built her for her birthday. I added a 2x4 between each leg to make it more stable and shortened it by one slat to fit the cushion. This was very easy to build and would make a great beginner project.

Built from Plan(s)
Estimated Cost
Scraps from other projects and leftover paint from chairs
Estimated Time Investment
An Hour or Two (0-2 Hours)
Finish Used
Flat black exterior spray paint with exterior gloss clear coat
Recommended Skill Level
Beginner

Shed Chicken Coop and Run

Submitted by mikesofka on Tue, 05/12/2020 - 09:27

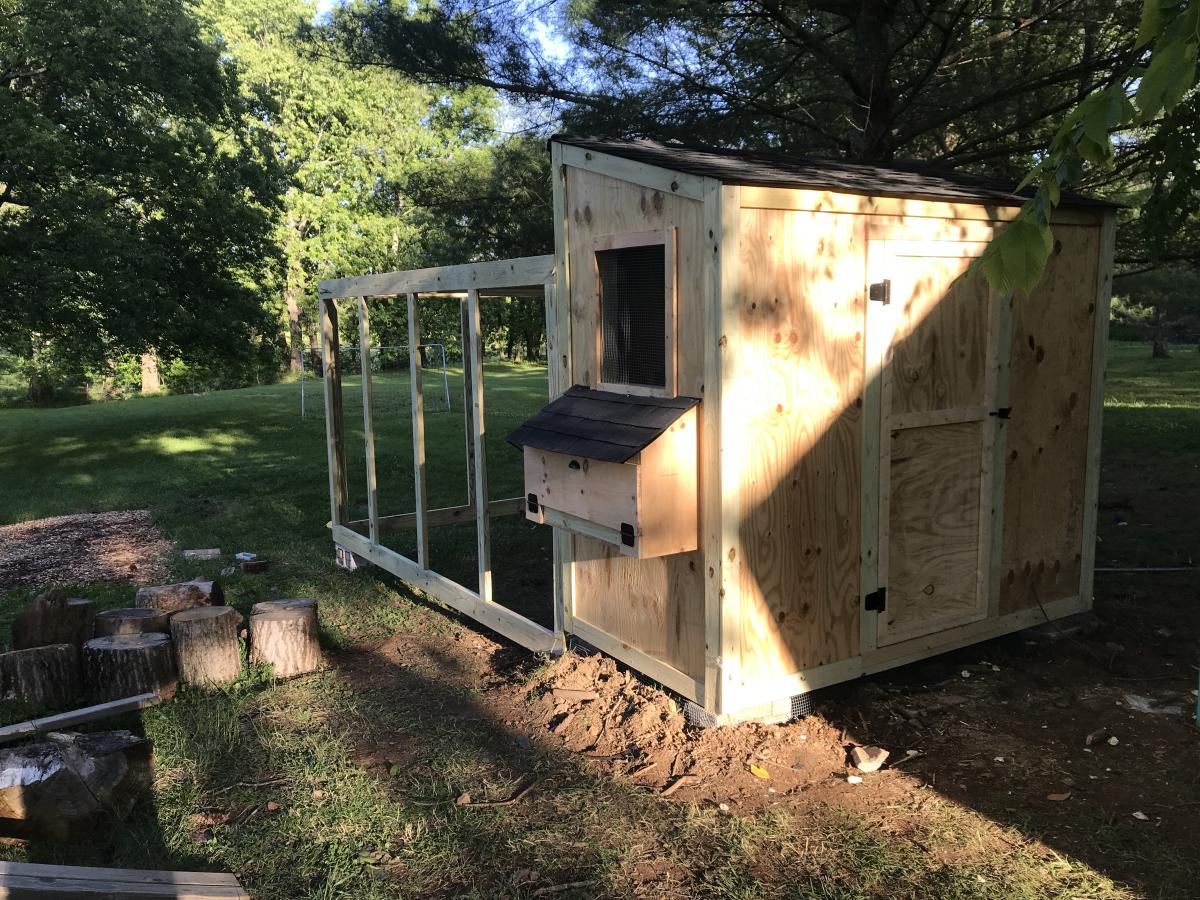
I had such a fun time on this shed coop/run build! My wife and I have 5 children and it was fun involving them in building everything about this coop and run. They have a wonderful sense of accomplishment in looking at what they helped build.

A few notes, while this what a fairly straightforward build, there are a lot of little intricacies to be aware of. Such as:

• Make sure your chicken coop is about a foot off the ground. It's best to do that so critters such as rats and snakes don't make their home under the shed and potentially eat their way through the floor.

• It is highly advisable to dig a trench about a foot to a foot and a half deep around the coop and the run and attach chicken cage fencing from the bottom of the coop/run into the trench, and then taper the cage fencing outward. This will prohibit critters such as raccoons from trying to dig under the coop.

• When you attach the poultry netting to the outside of the chicken run, staple one side really well, then move to the other side and pull the netting fairly hard to make the netting as tight as possible. (Also, be careful when putting the netting across the top of the run to not fall off the ladder as I did and dangle there until one of your kids comes to help you! Ha! :D )

Thank you, Ana, for posting these plans! We are so excited to get our little chickies out into their new home as soon as their feathers come in!

Estimated Cost
$800
Estimated Time Investment
Week Long Project (20 Hours or More)
Recommended Skill Level
Intermediate

Kids Bathroom Step Stool

Submitted by mchipser on Thu, 07/12/2012 - 12:41

I built the entire project to plan.. I did however engrave my daughters name instead of painting it on.. I think it gives a little more personal touch..

Built from Plan(s)
Estimated Cost
$40
Estimated Time Investment
Day Project (6-9 Hours)
Finish Used
Double Chocolate paint (left over from previous project)
Pink Paint (on hand from wood burning projects)
Recommended Skill Level
Beginner

Comments

kdelehoy

Fri, 03/29/2013 - 16:18

I was curious as to what tool/s you used to complete the engravement, this is a nice touch and I would like to do this for mine as well.

Portable Workbench

Submitted by atlayank on Mon, 05/25/2020 - 17:27

I have a small workshop so this workbench allows me to bring the work outside. It was my first project and I think it came out great.

Built from Plan(s)
Estimated Cost
$100
Estimated Time Investment
Day Project (6-9 Hours)
Finish Used
None
Recommended Skill Level
Beginner

2x10 Step Stools

Submitted by msyoung22 on Tue, 08/16/2016 - 07:26

My kids needed a step stool and I had some scrap wood (2x10) left over from a previous project

Estimated Cost
20 dollars
Estimated Time Investment
Weekend Project (10-20 Hours)
Finish Used
Minwax (weathered oak stain)
Minwax polycrylic protective finish
Recommended Skill Level
Starter Project

Comments

kristyzed

Wed, 08/17/2016 - 20:40

These are great.  Can you share dimensions and if there are any angle cuts on the legs?

msyoung22

Thu, 08/18/2016 - 20:12

Thank you! The dimensions are the same as the Ana White "Simple 1x10 Single Step Stool" except I used 2x10's instead of 1x10's like the plans called for. I also used some scrap pallet wood to make a design on the top of the stool. 

- Stool height: 7 1/2" for legs, 1 1/2" for top, and 1/2" for scrap pallet wood; which gives a total height of 9"

- Stool width: 9 1/4" x 16"

- 5 degree angle cuts were made on the legs

Wood Garage Shelves

Submitted by Anonymous (not verified) on Tue, 02/20/2024 - 08:40

This was made using Ana's "Garage Shelf" plans. I modified it for a corner spot between two exiting cabinets, so it took a bit of thought, but the Ana's technique for the build made it so easy.
AND I used up scrap wood that I'd been hording in the garage for the build.
Thank you Ana!

Simple White Outdoor Chair

Submitted by klray on Wed, 05/21/2014 - 21:47

These chairs followed the simple white outdoor chair instructions. There were a few adaptations. I used 2x3s instead of 2x2s for the legs, like in the simple white outdoor loveseat instructions. I purchased my cushions from Target, and their dimensions are different than the cushions used in the instructions, so I changed some of the chair dimensions. I created the pattern for the ottomans, but it is very much based on the simple white outdoor chair instructions.

Fun project and happy with the results. Staining instead of painting probably made the project take twice as long.

Finish Used
Minwax Ipswich Pine - 2 coats,
Deft Exterior Polyurethane semi-gloss- 3 coats
Recommended Skill Level
Beginner

Comments

sojaco

Thu, 05/22/2014 - 13:37

Your chairs are gorgeous - I feel compelled to go copy your handiwork immediately. :)

Would you mind sharing a link to the Target cushions you used? They look great on your chairs.

klray

Sat, 05/24/2014 - 10:56

Thanks!

Threshold Outdoor Deep Seating Cushion:
http://www.target.com/p/threshold-outdoor-deep-seating-cushion/-/A-1508…

Threshold Outdoor Deep Seating Back Cushion:
http://www.target.com/p/threshold-outdoor-deep-seating-back-cushion/-/A…

Just a note on the cushions, they are beautiful and highly economical, but that also means they likely aren't as supportive as cushions 2 or 3 times their price and the covers do not have a zipper, so you can't wash them. That being said, I am happy with cushions.

CreativeChaos

Fri, 05/23/2014 - 07:44

I built these chairs and love seat last summer and have sat on them wishing I had ottomans! You inspired me to build the ottomans. I have the same Theshold cushions from Target and they are great! Good job!

klray

Sat, 05/24/2014 - 11:09

Thanks!

The only tricksy part about the ottomans for me was attaching the "armrests". There isn't enough room to use the pocket hole screws after attaching the side aprons. I tried screwing the "armrests" to the legs before the aprons, but that just caused problems. In the end I screwed the side aprons and legs together and then screwed the "armrests" down from the top. I used wood filler to fill in the holes above the screw heads. So it isn't quite as clean looking, but worked for me.

amorg11

Mon, 06/08/2020 - 10:36

These chairs came out amazing!!! The only struggle was to find inexpensive cushions but worth every penny. Have had so many complements. Love them! Your instructions are so detailed!

jkess44

Tue, 06/09/2020 - 13:33

These look great! we just put together a section and would like to move on to the chairs. I was hoping to find ottoman plans, do you have the plans you used? If so can you please share?