Community Brag Posts

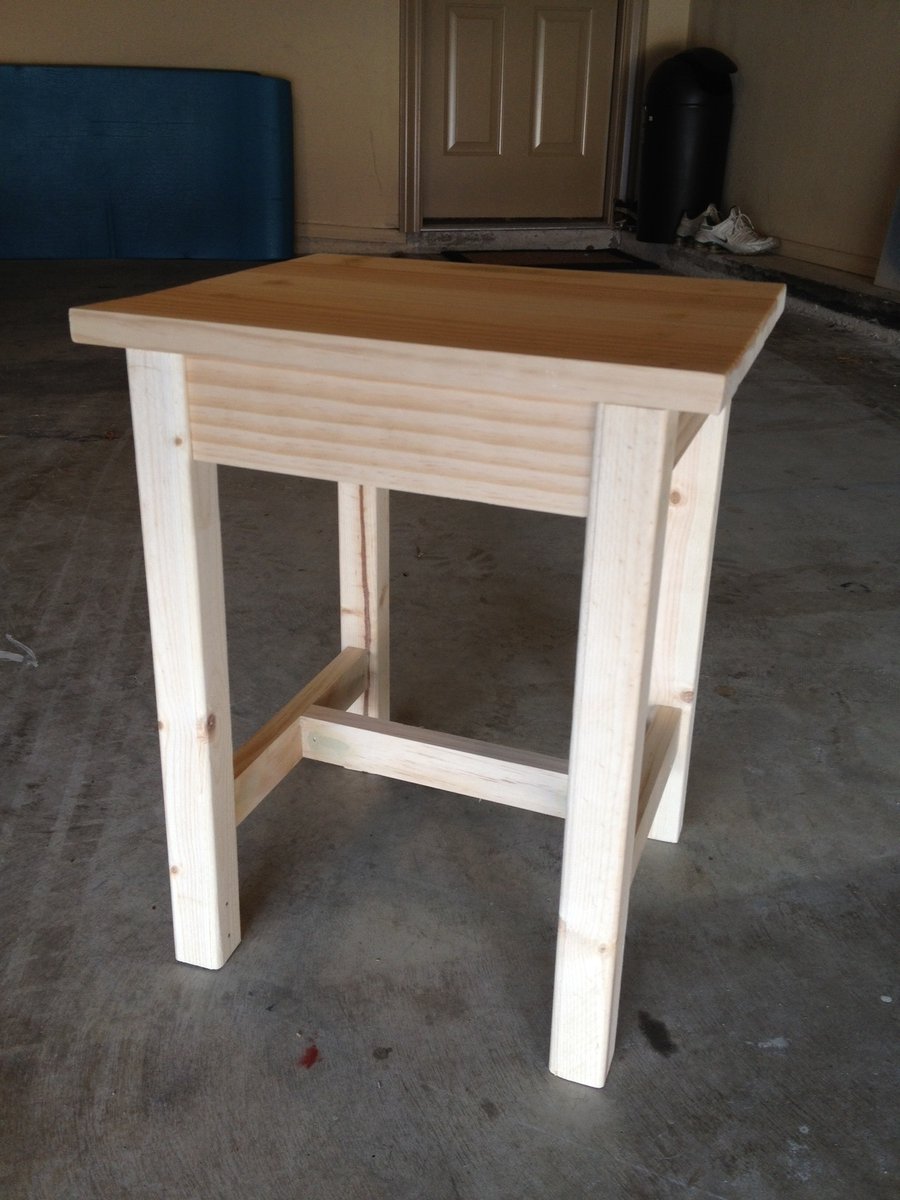
Rustic End Table without the X
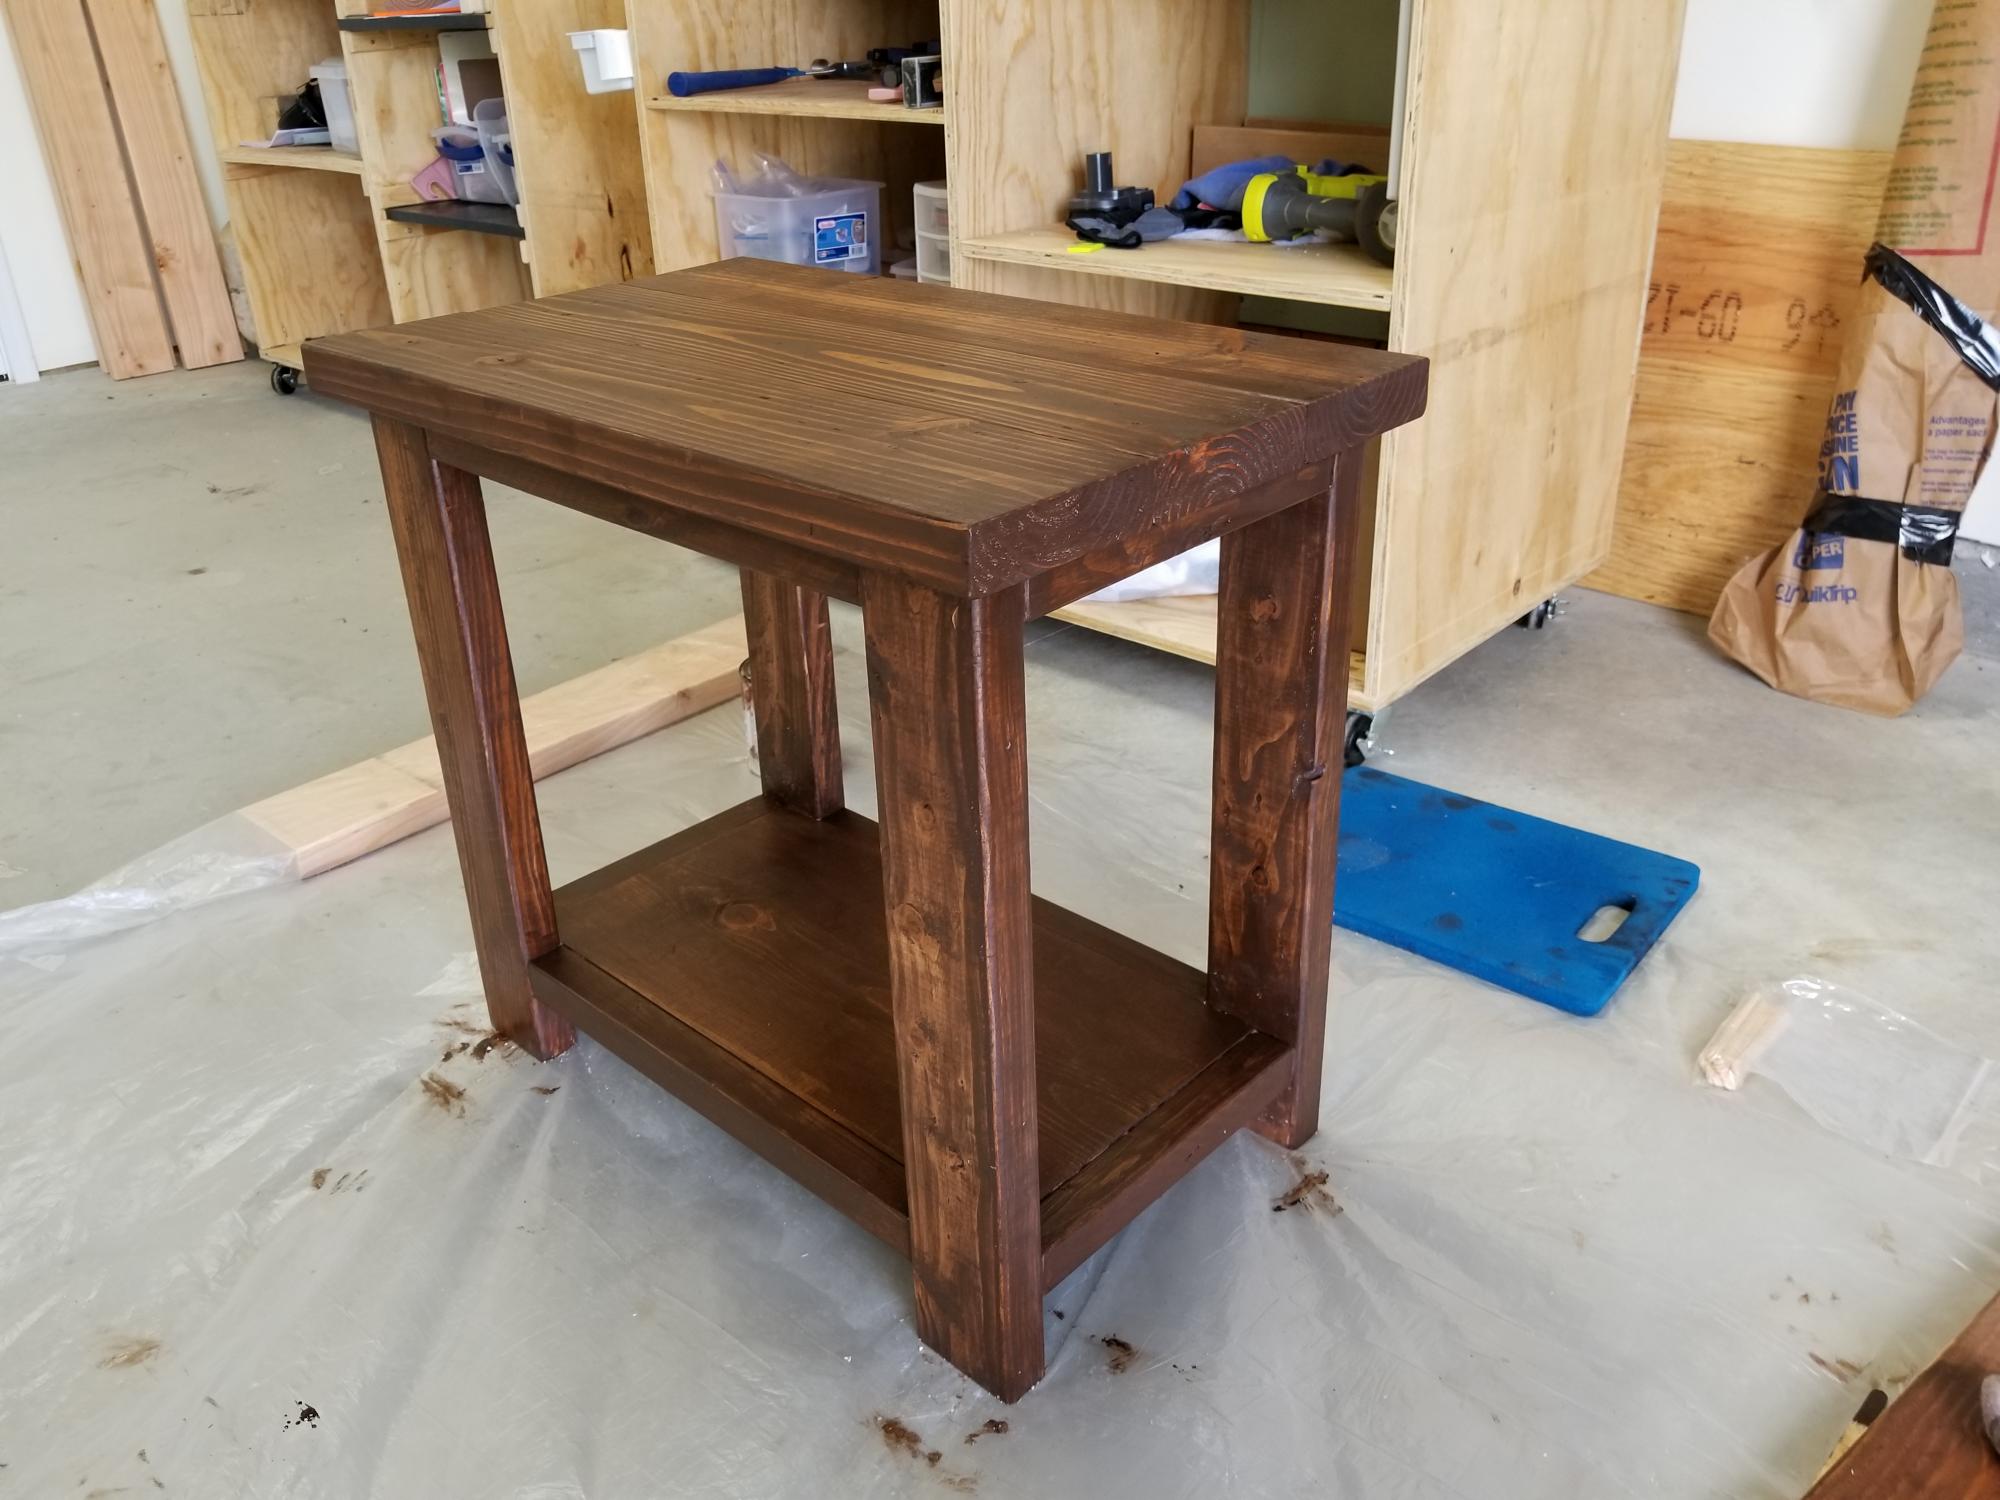
I built this for my son's first apartment to match the Rustic X Coffee Table I built. His living room is small so I needed to make a narrower version of the end table. Because of this, I decided to not build the "X". It turned out great! Thanks Ana!
Built from Plan(s)
Estimated Cost
$45
Estimated Time Investment
Afternoon Project (3-6 Hours)
Finish Used
Dark walnut stain, then a coat of satin wipe on polyurethane to seal it
Recommended Skill Level
Beginner
Round Accent Table
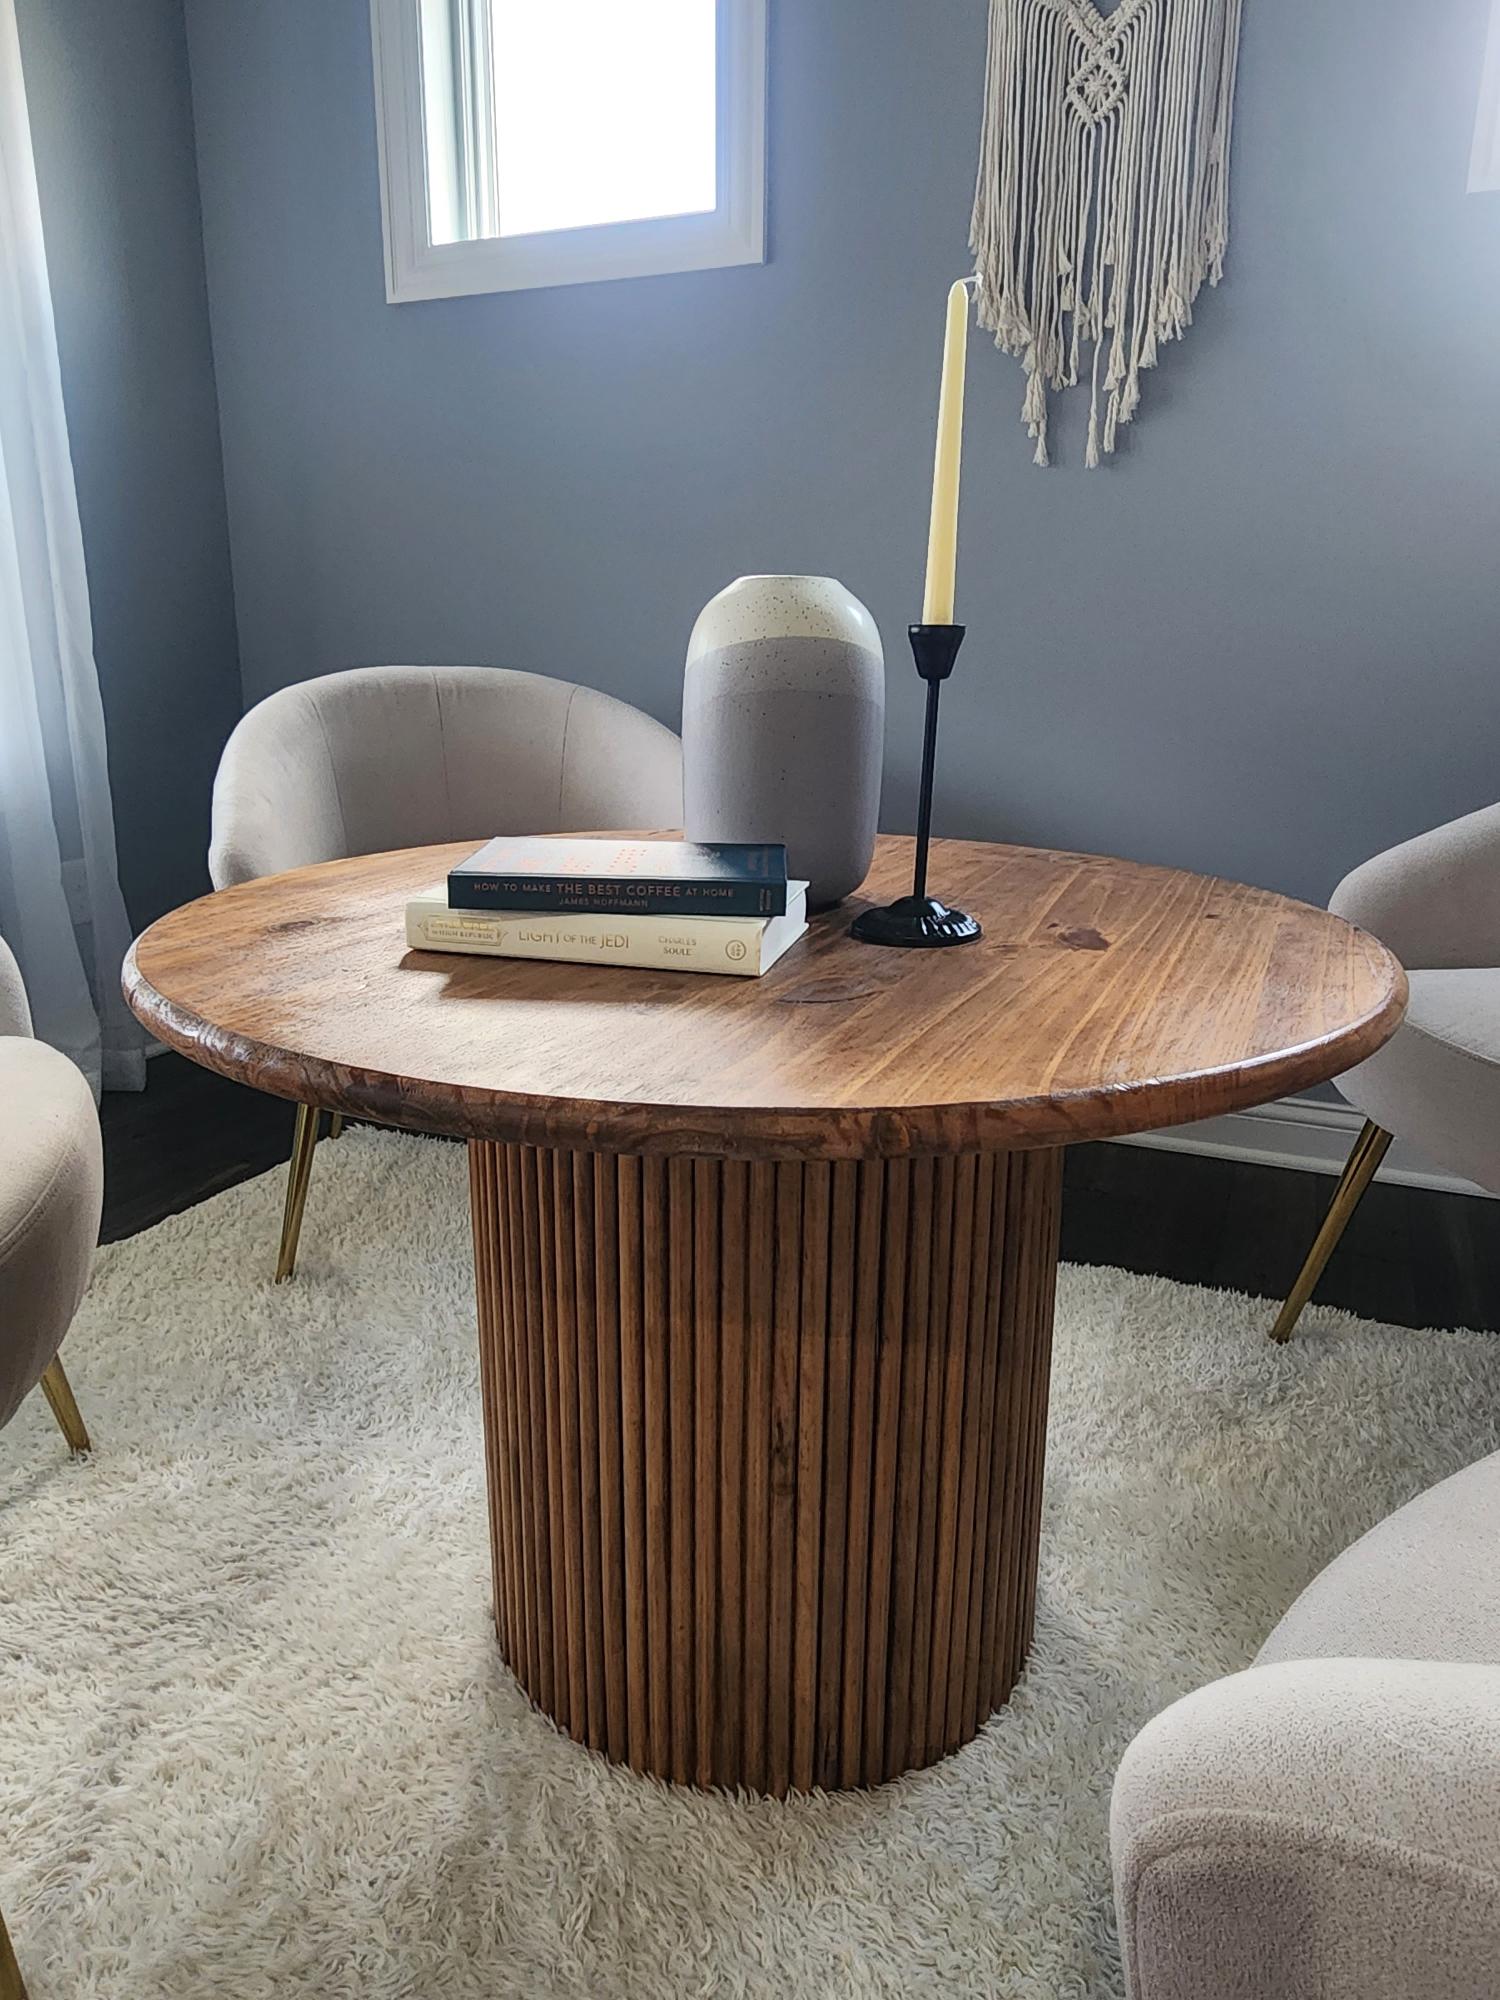
This is my very first build ever! I learned so much from this project. I also bought my first power drill and brad nailer for this project. My husband helped me cut the wood pieces to my measurements and I did everything else. I never knew how fun woodworking can be!
Emily Mangiaracina
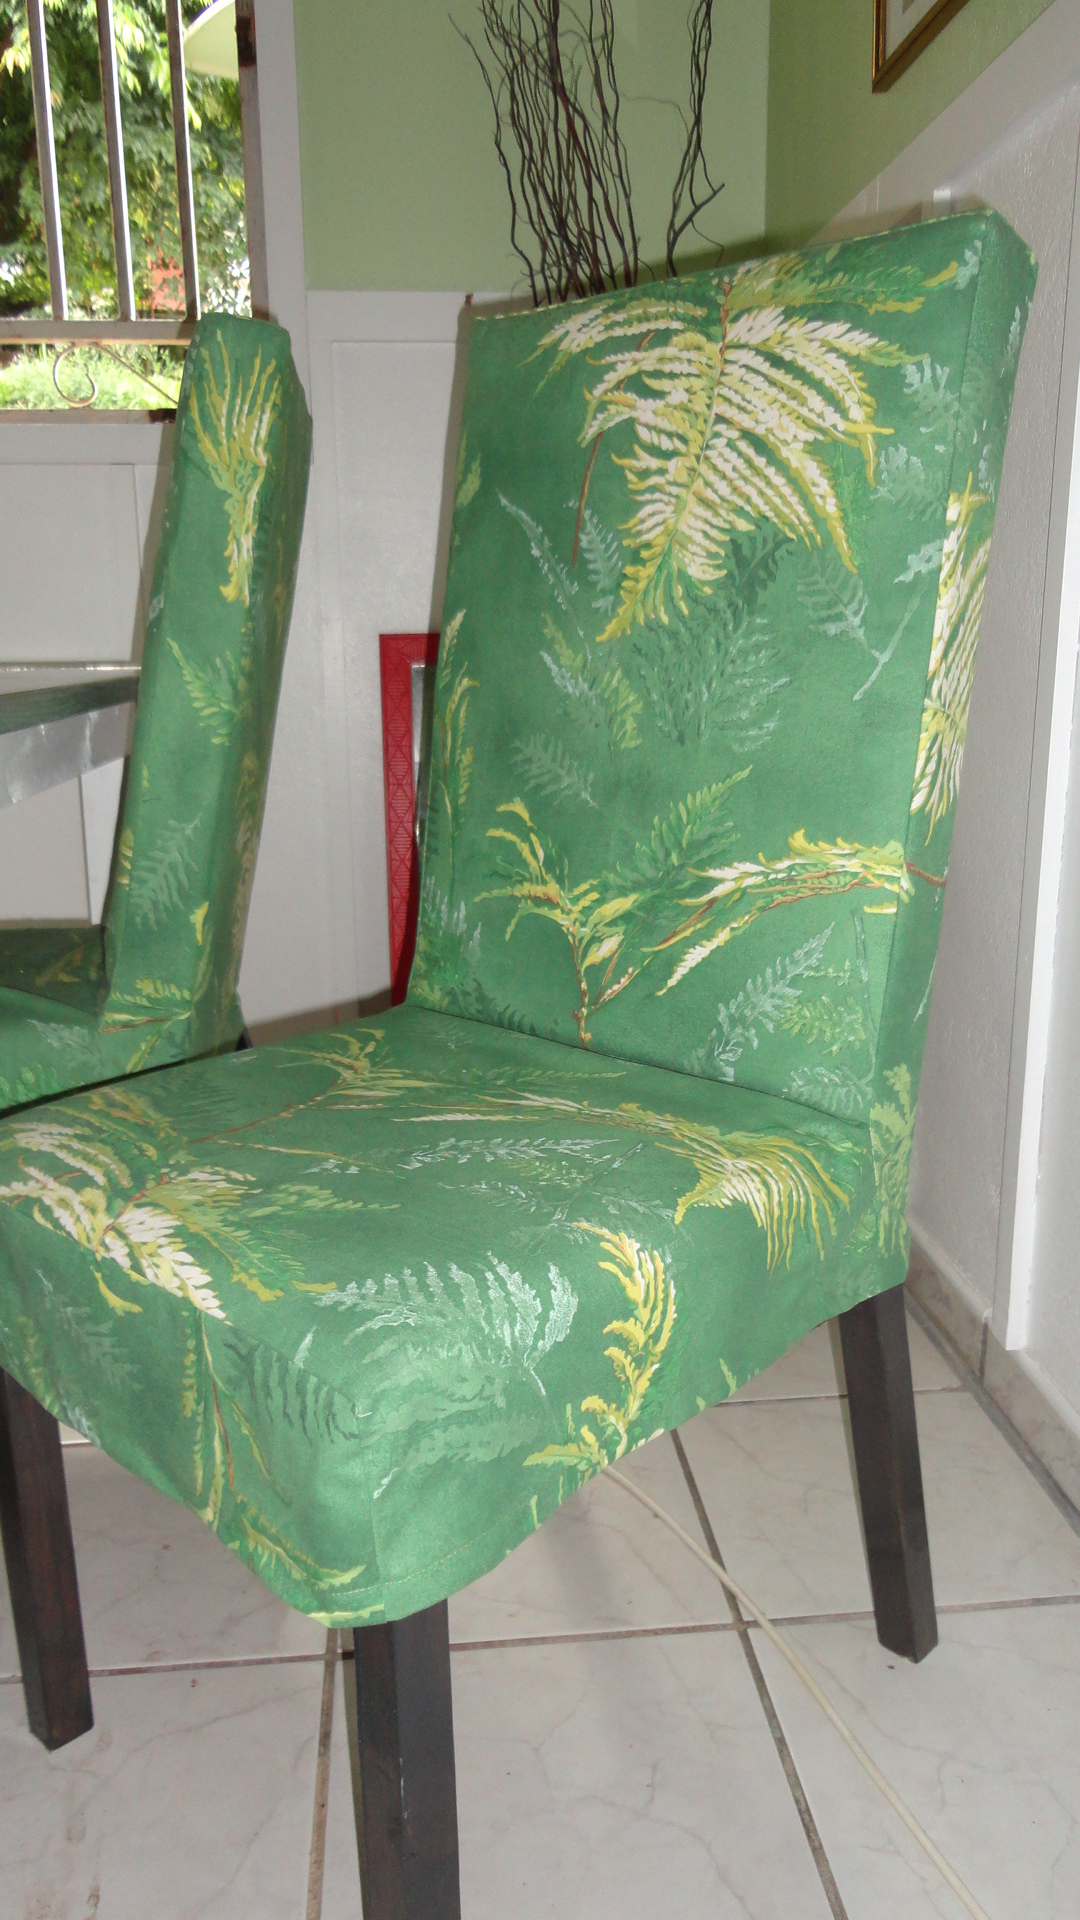
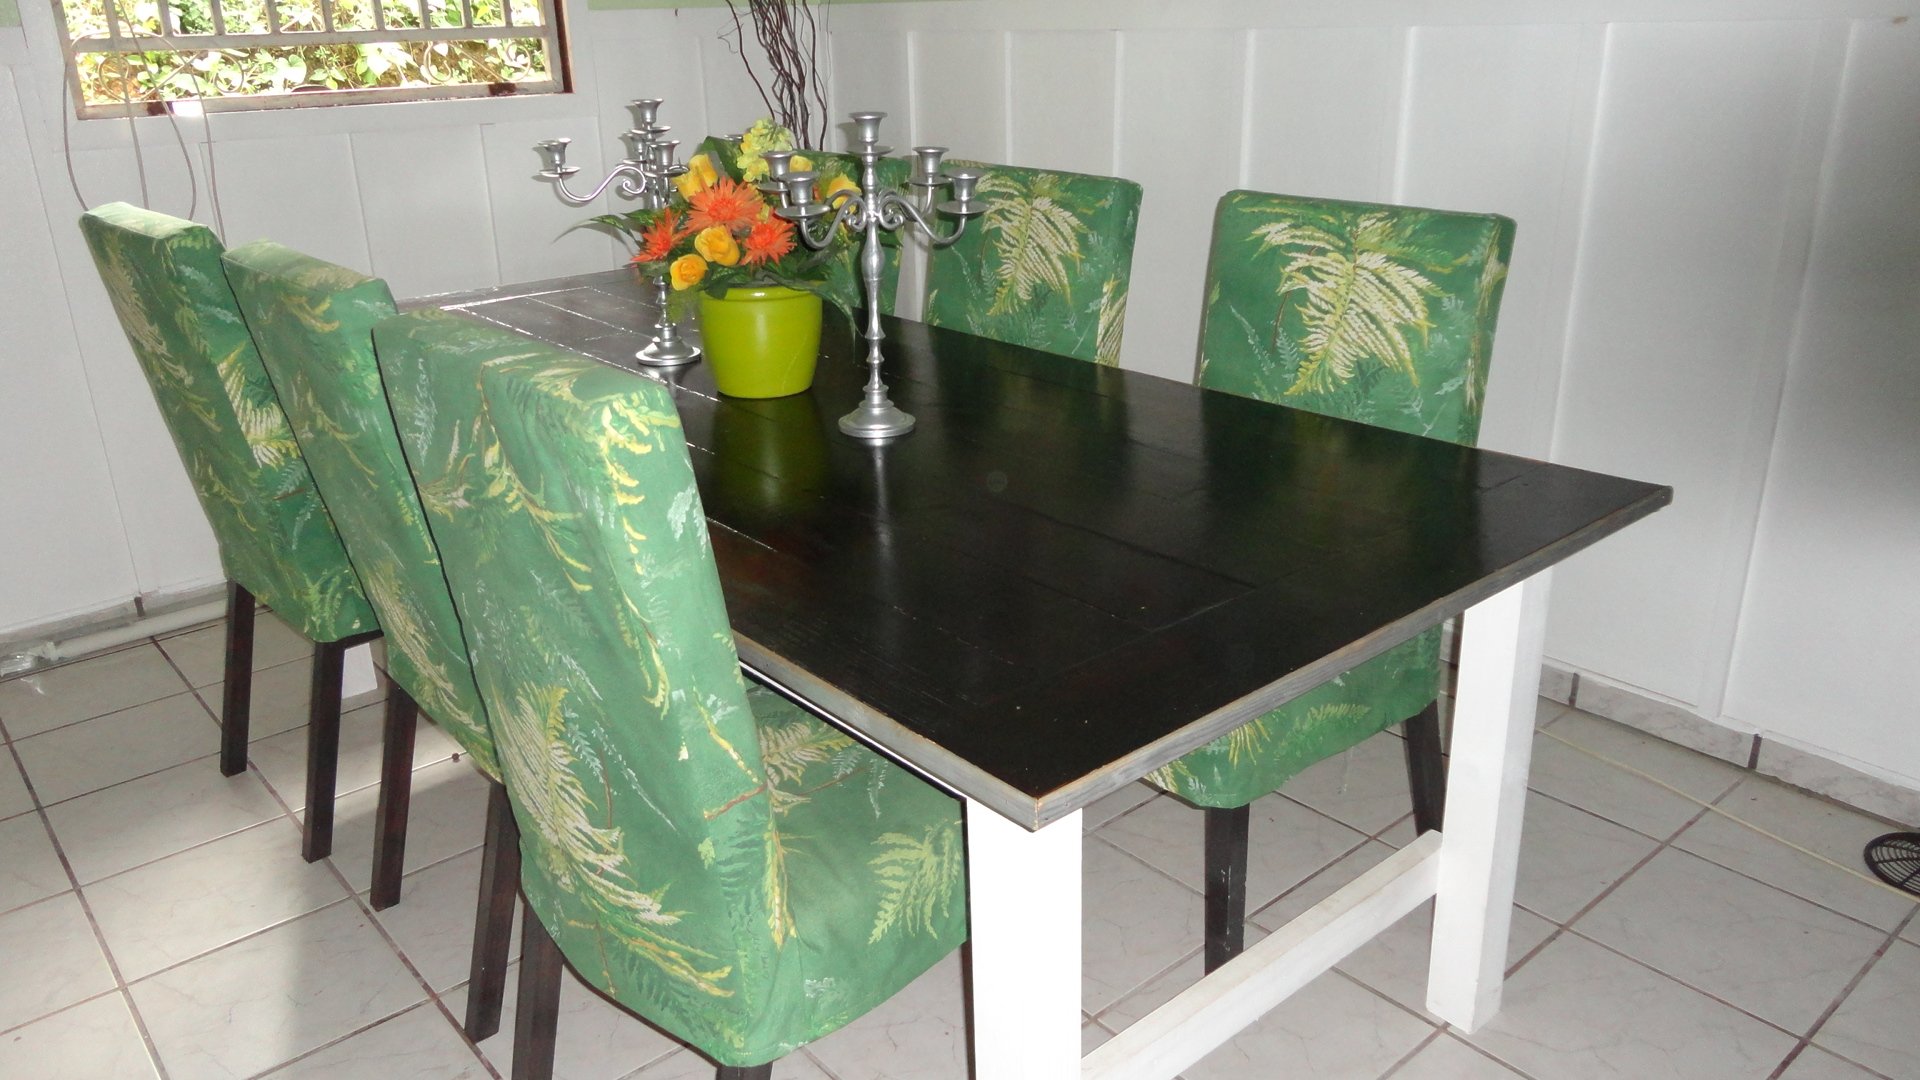
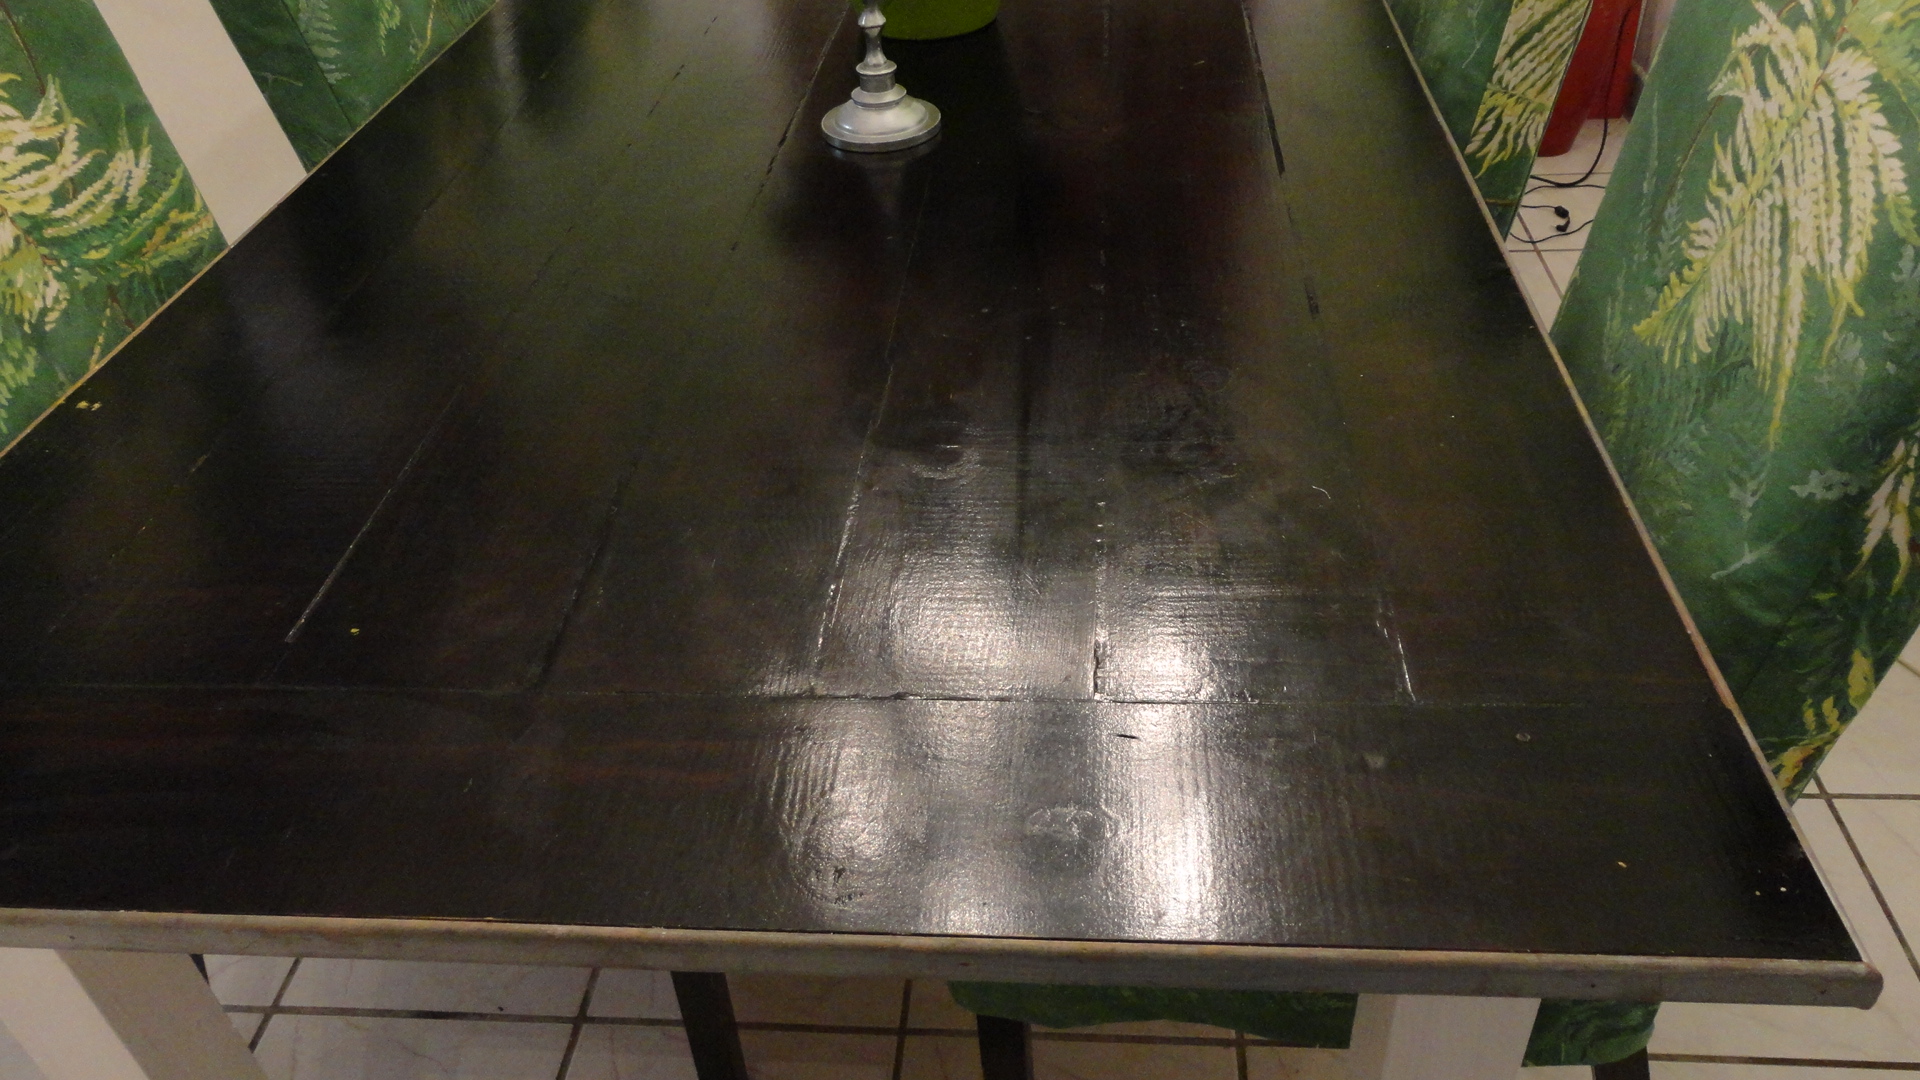
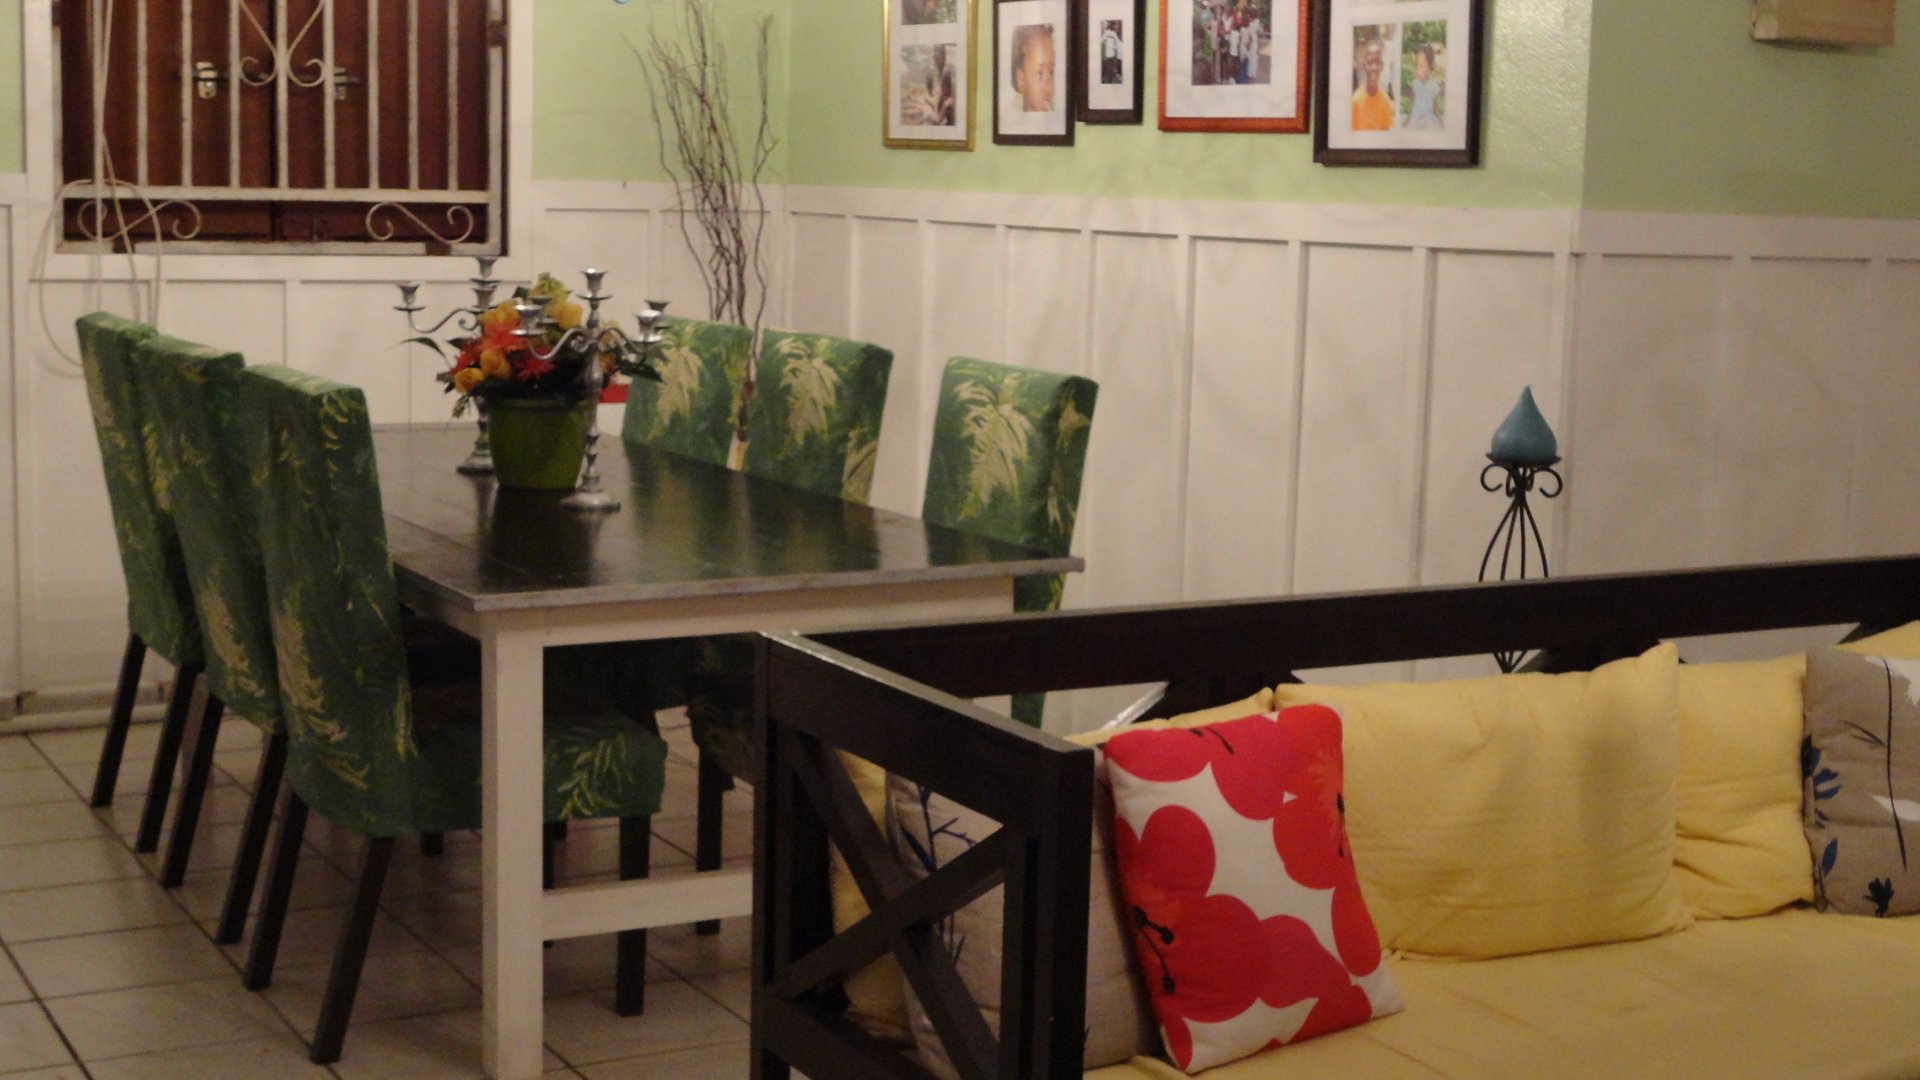
New Dining Room
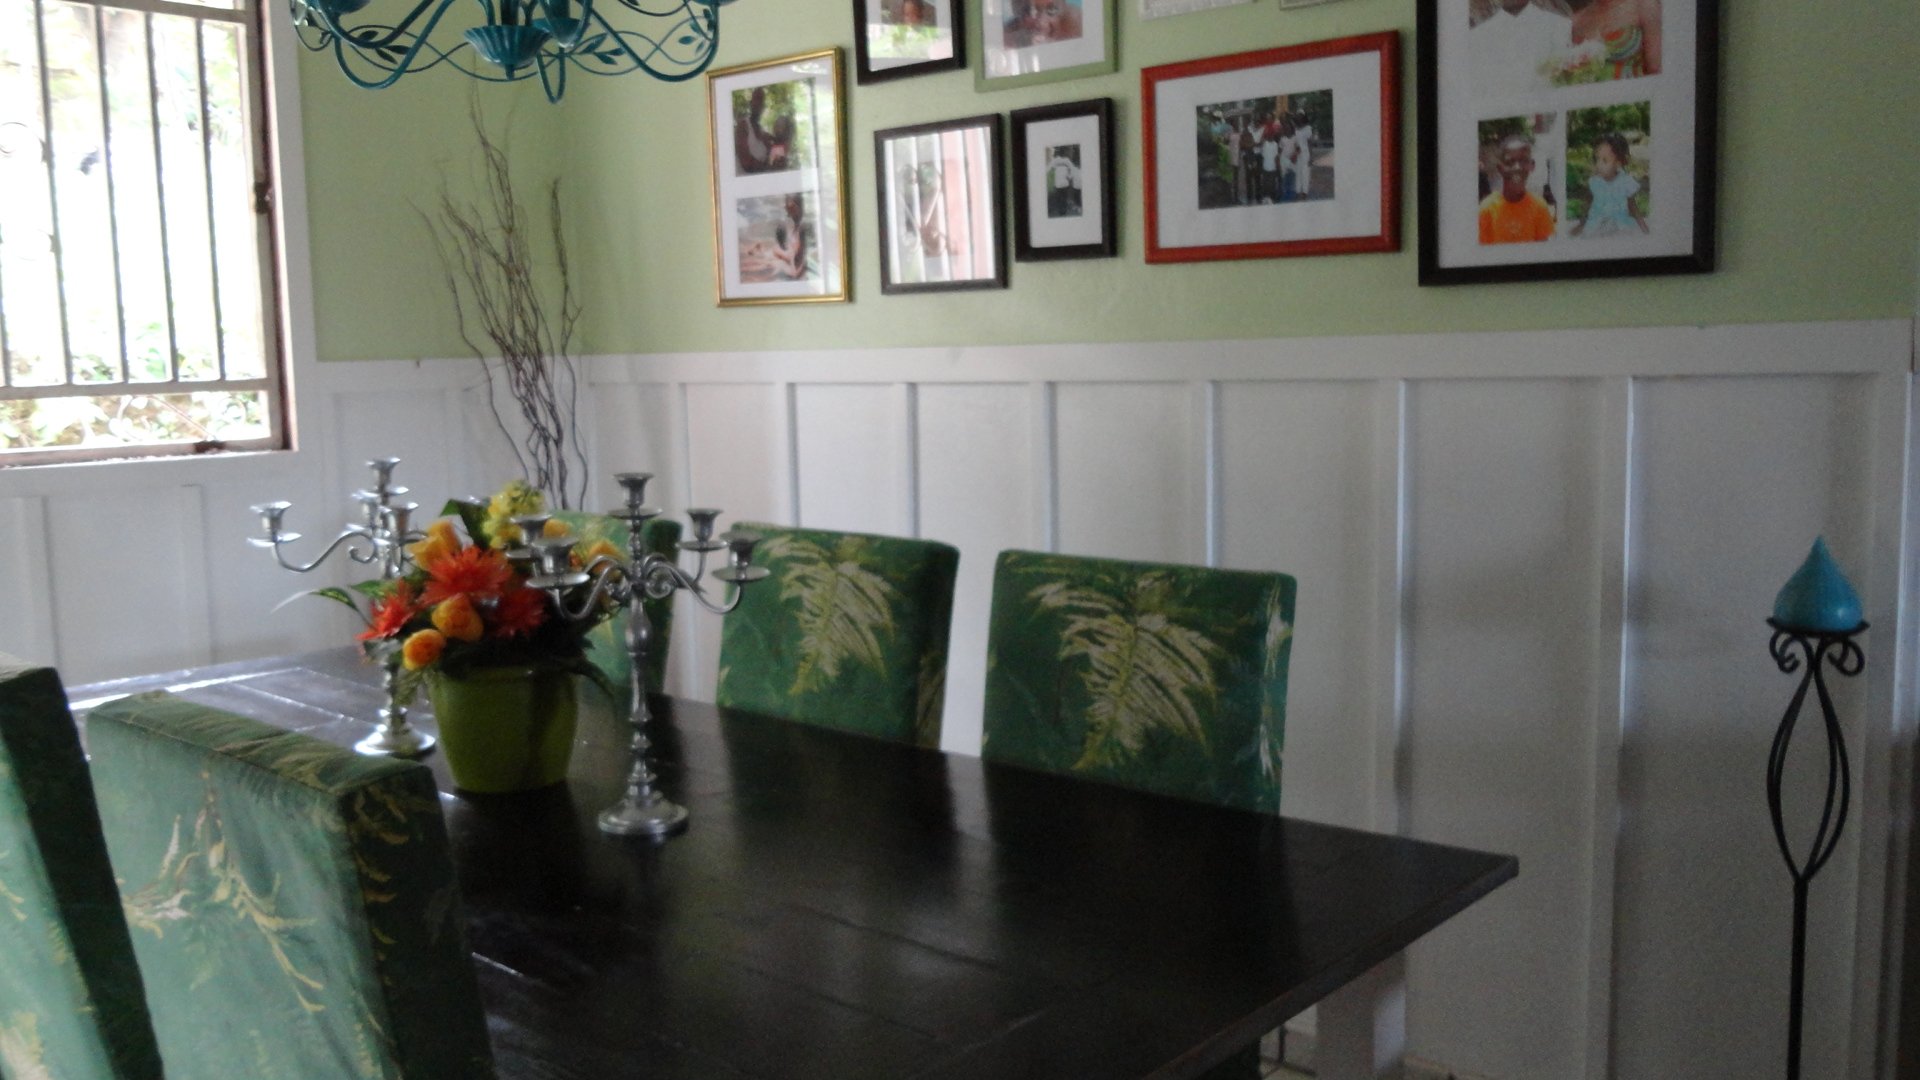
New dining room with a board and batten, farmhouse table and six parson chairs.
Thanks Ana!
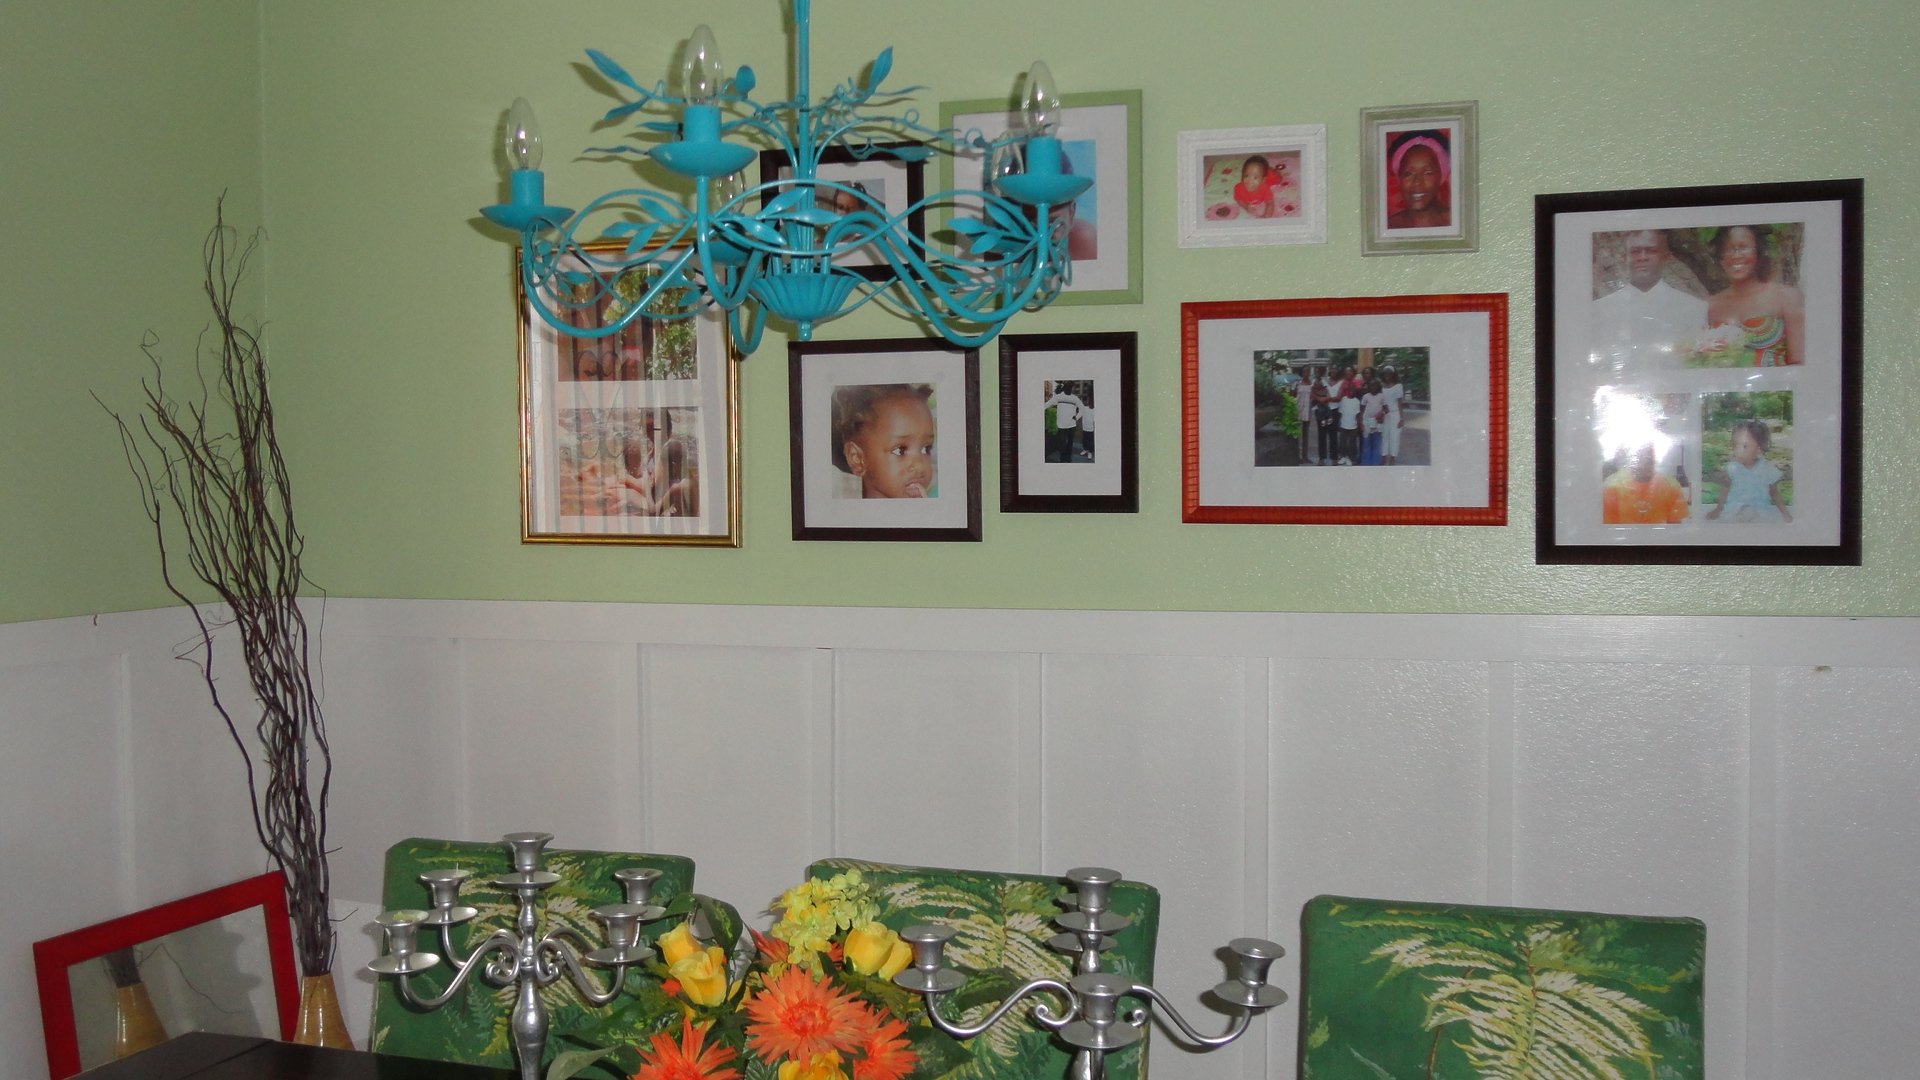
Built from Plan(s)
Estimated Time Investment
Week Long Project (20 Hours or More)
Finish Used
wengue stain and white paint.
Recommended Skill Level
Beginner
Comments

Mon, 03/19/2012 - 18:15
Awesome job!
This room is absolutely gorgeous! You did an awesome job- love all the finishes and colors, and the fantastic chairs!

Tue, 03/20/2012 - 23:19
Agreed! Huge accomplishment!
Agreed! Huge accomplishment! I can't believe you made 6 chairs! And they all look so nice and well made! Thanks for sharing, it's a lovely room!

Wed, 03/21/2012 - 01:54
I love the painted
I love the painted chandelier! This is a cool room, and you made the whole thing. wow.

Wed, 03/21/2012 - 09:16
Thank you!
Thank you for all these compliments. I don't speak English very well because I'm french but I will try to make me understand. I built a chair with the modifications to see the result, then, I made all the cuttings with my miter saw for the 5 other chairs, then I made every chair within half an hour. I cut all that it was necessary foam and fabric in one step and I sewed everything for covers. To make covers, I made a paper pattern, then I sewed them in 10 minutes.
I am very happy I found this site with all that wonderful projects. It's my favorite site . Thank you Ana, you changed my life!
Thu, 12/13/2012 - 17:48
Slip Cover
The covers of the chairs come out. I used ana's plan to make chairs and covers. I modified the cover's plan to fit the chairs because I made them taller. It is very practical because I have a four-year-old girl even if I have no cat and no dog =)
http://ana-white.com/2010/11/plans/drop-cloth-parson-chair-slipcovers
Thu, 07/18/2013 - 12:37
Beautiful!
I love your chairs and especially like the extra height. How tall did you make the backs of the chairs?
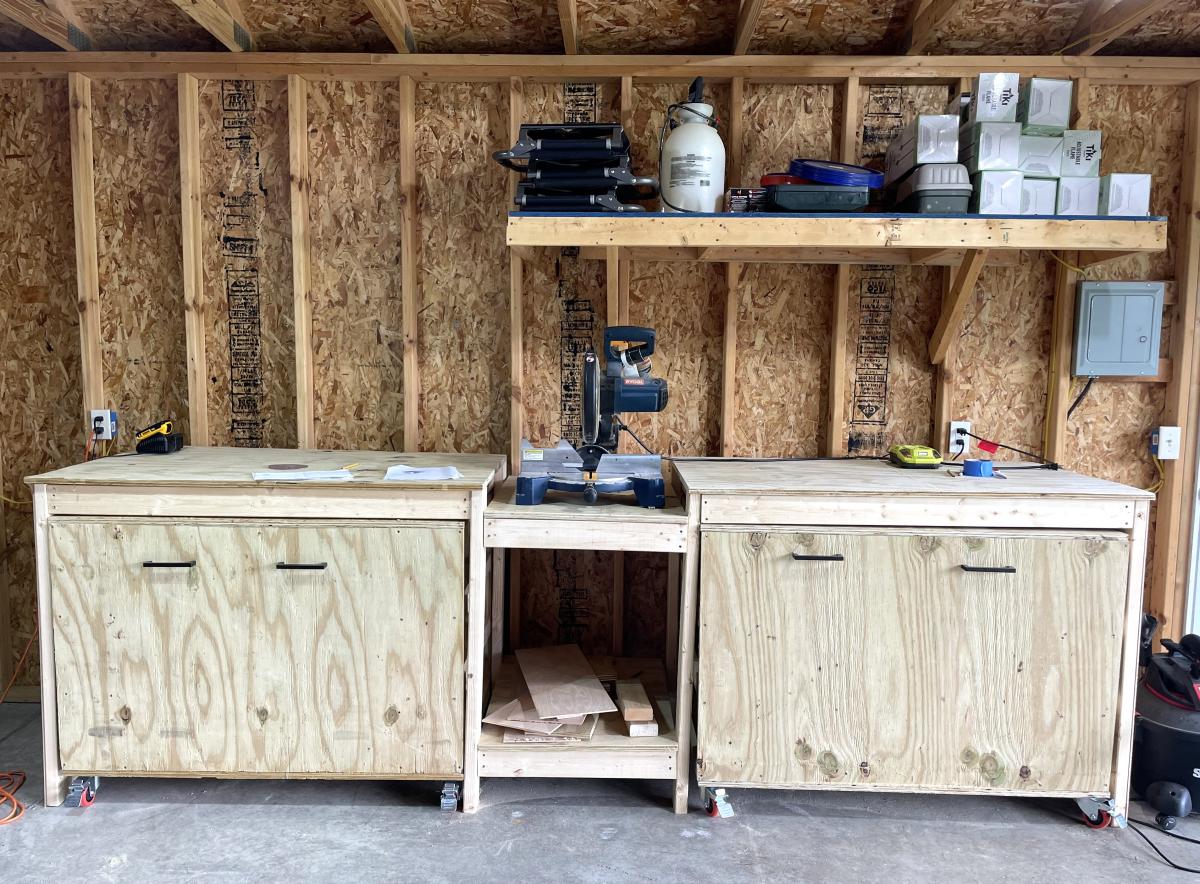
My First Brag
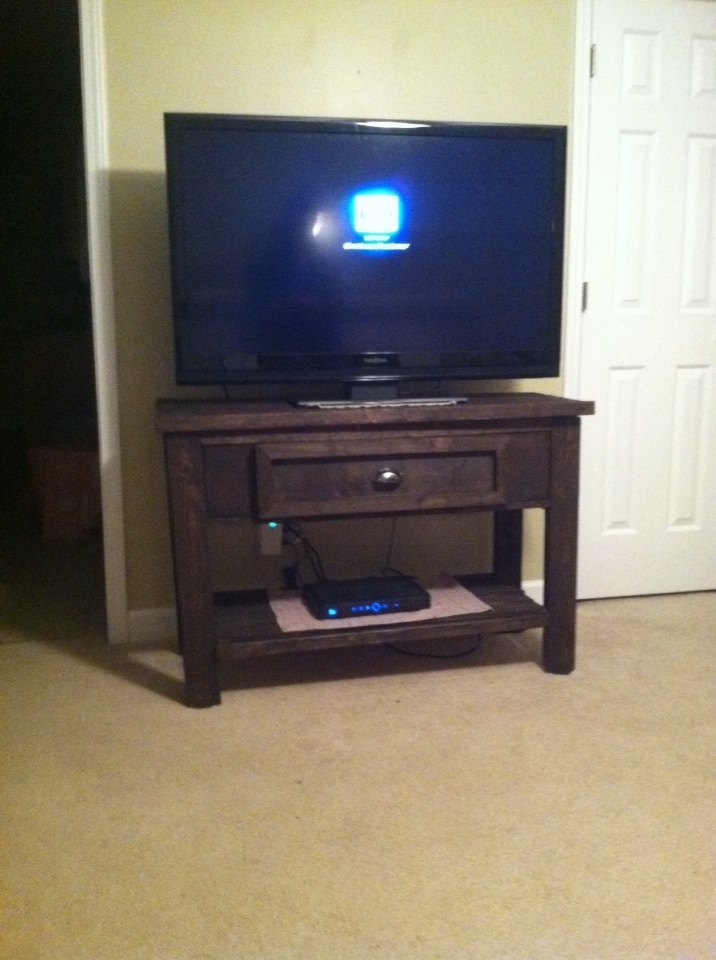
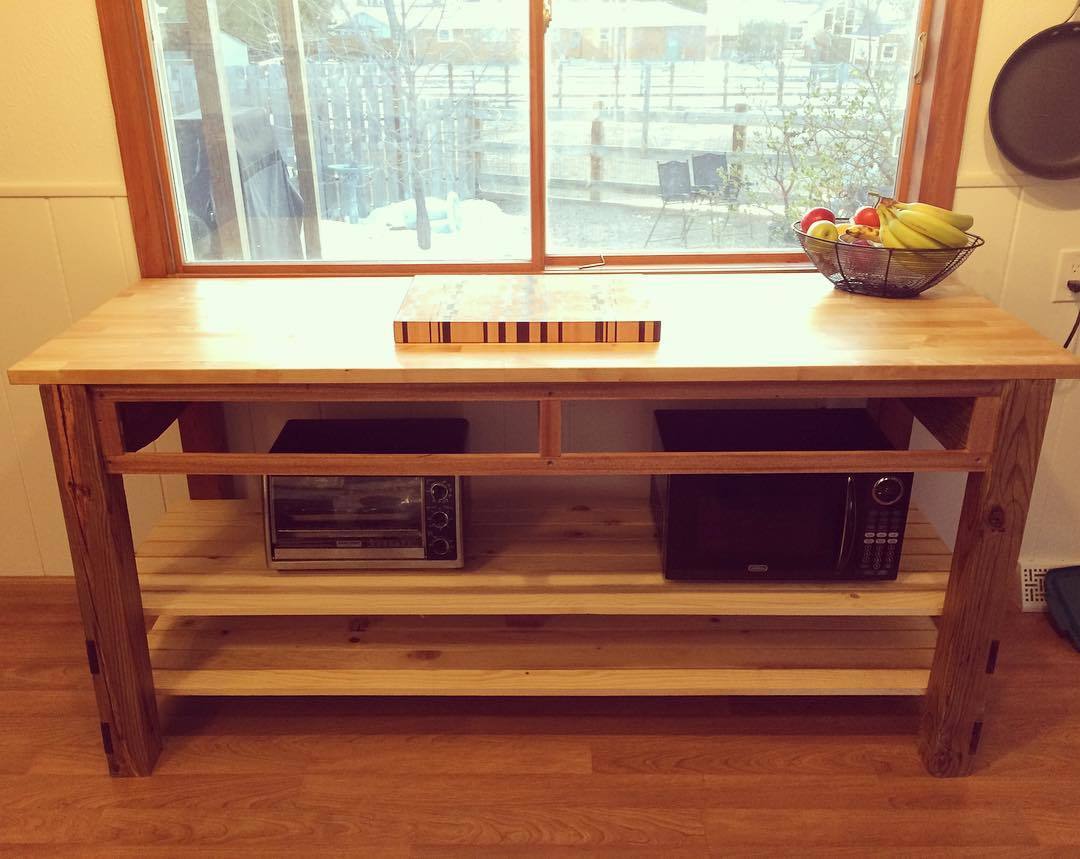
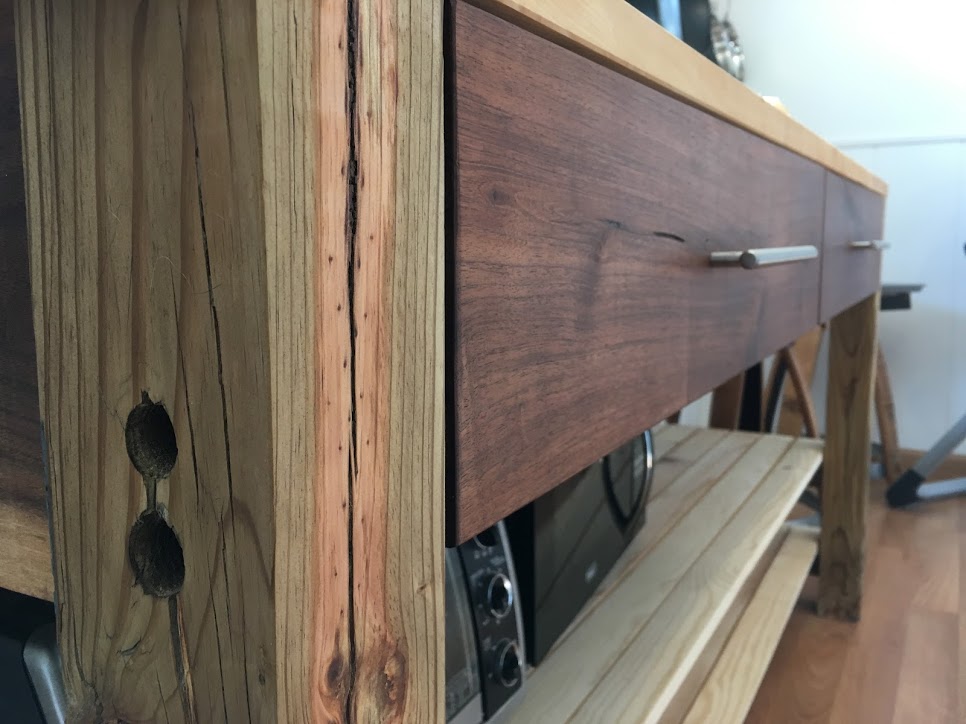
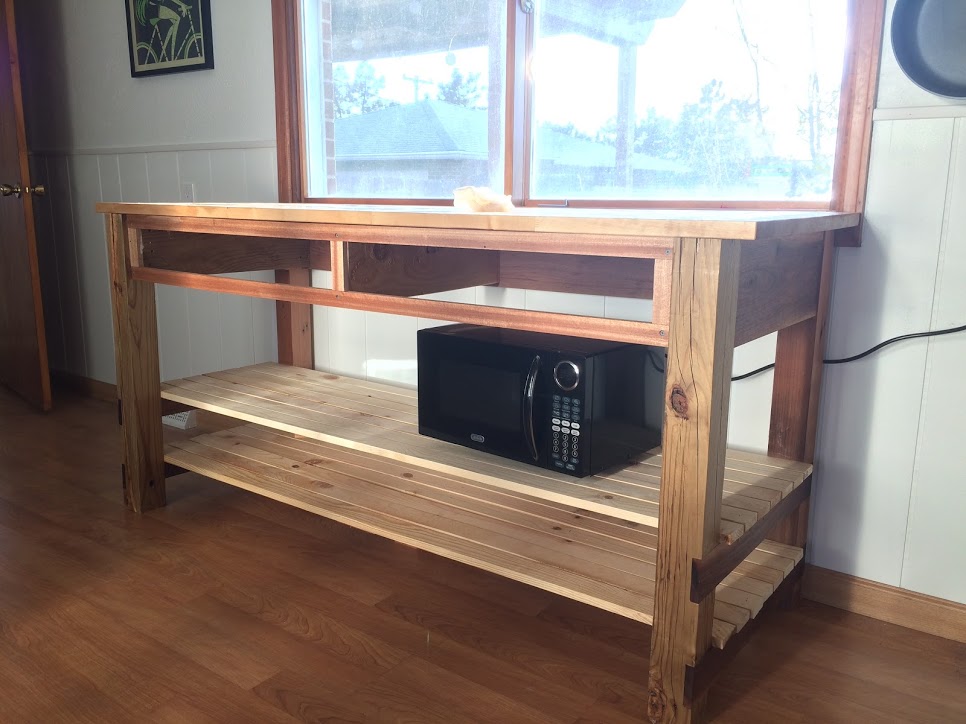
I used the plans from the Ridge Media Console, but modified it a tad. I adjusted the measurements for my space and used pallet wood for the lower shelf. I also decided to make a drawer instead of the flip down storage.
Built from Plan(s)
Estimated Time Investment
Weekend Project (10-20 Hours)
Finish Used
Kona
Recommended Skill Level
Beginner
Entry table built for a sailor
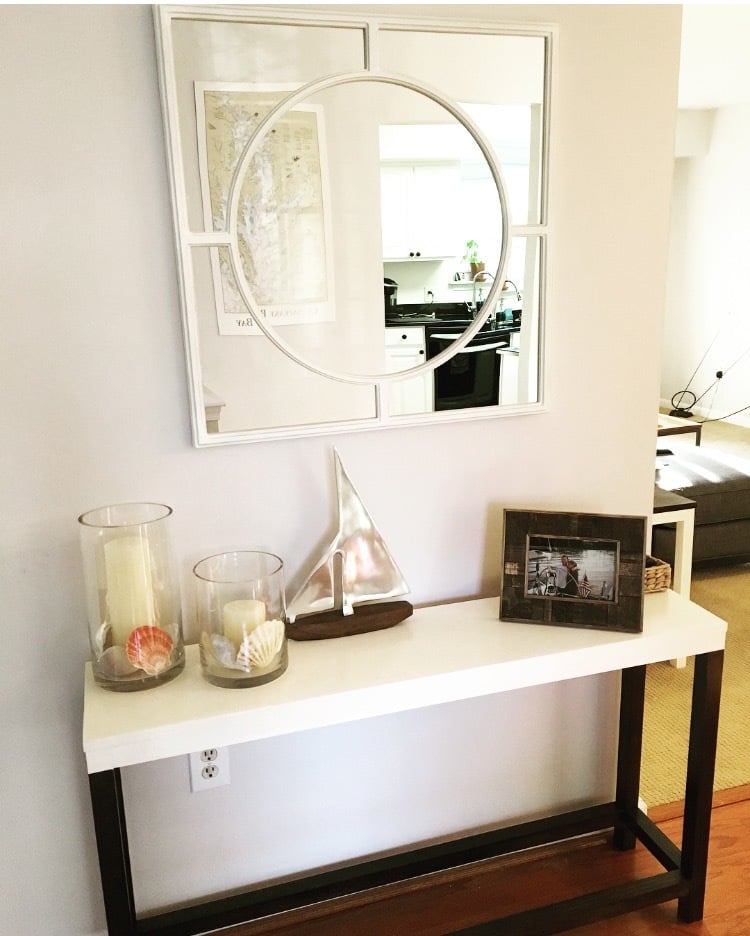
This table is the perfect size to fit our entry way, I just love the dark walnut bottom with the white top. It is just the right piece in its space, and was super simple to put together. We modified the plans a bit, instead of using liquid nails we used the kreg tool and screws to assemble. We also just used one board for the top of table and taped off more of the base and painted it white to give it the illusion of a thick top.
Estimated Cost
$50
Estimated Time Investment
Day Project (6-9 Hours)
Finish Used
Walnut stain on the bottom (2 coats)
A simple bright white paint on top we had from painting trim around the house (3 coats)
A simple bright white paint on top we had from painting trim around the house (3 coats)
Recommended Skill Level
Intermediate
Barn Door Console
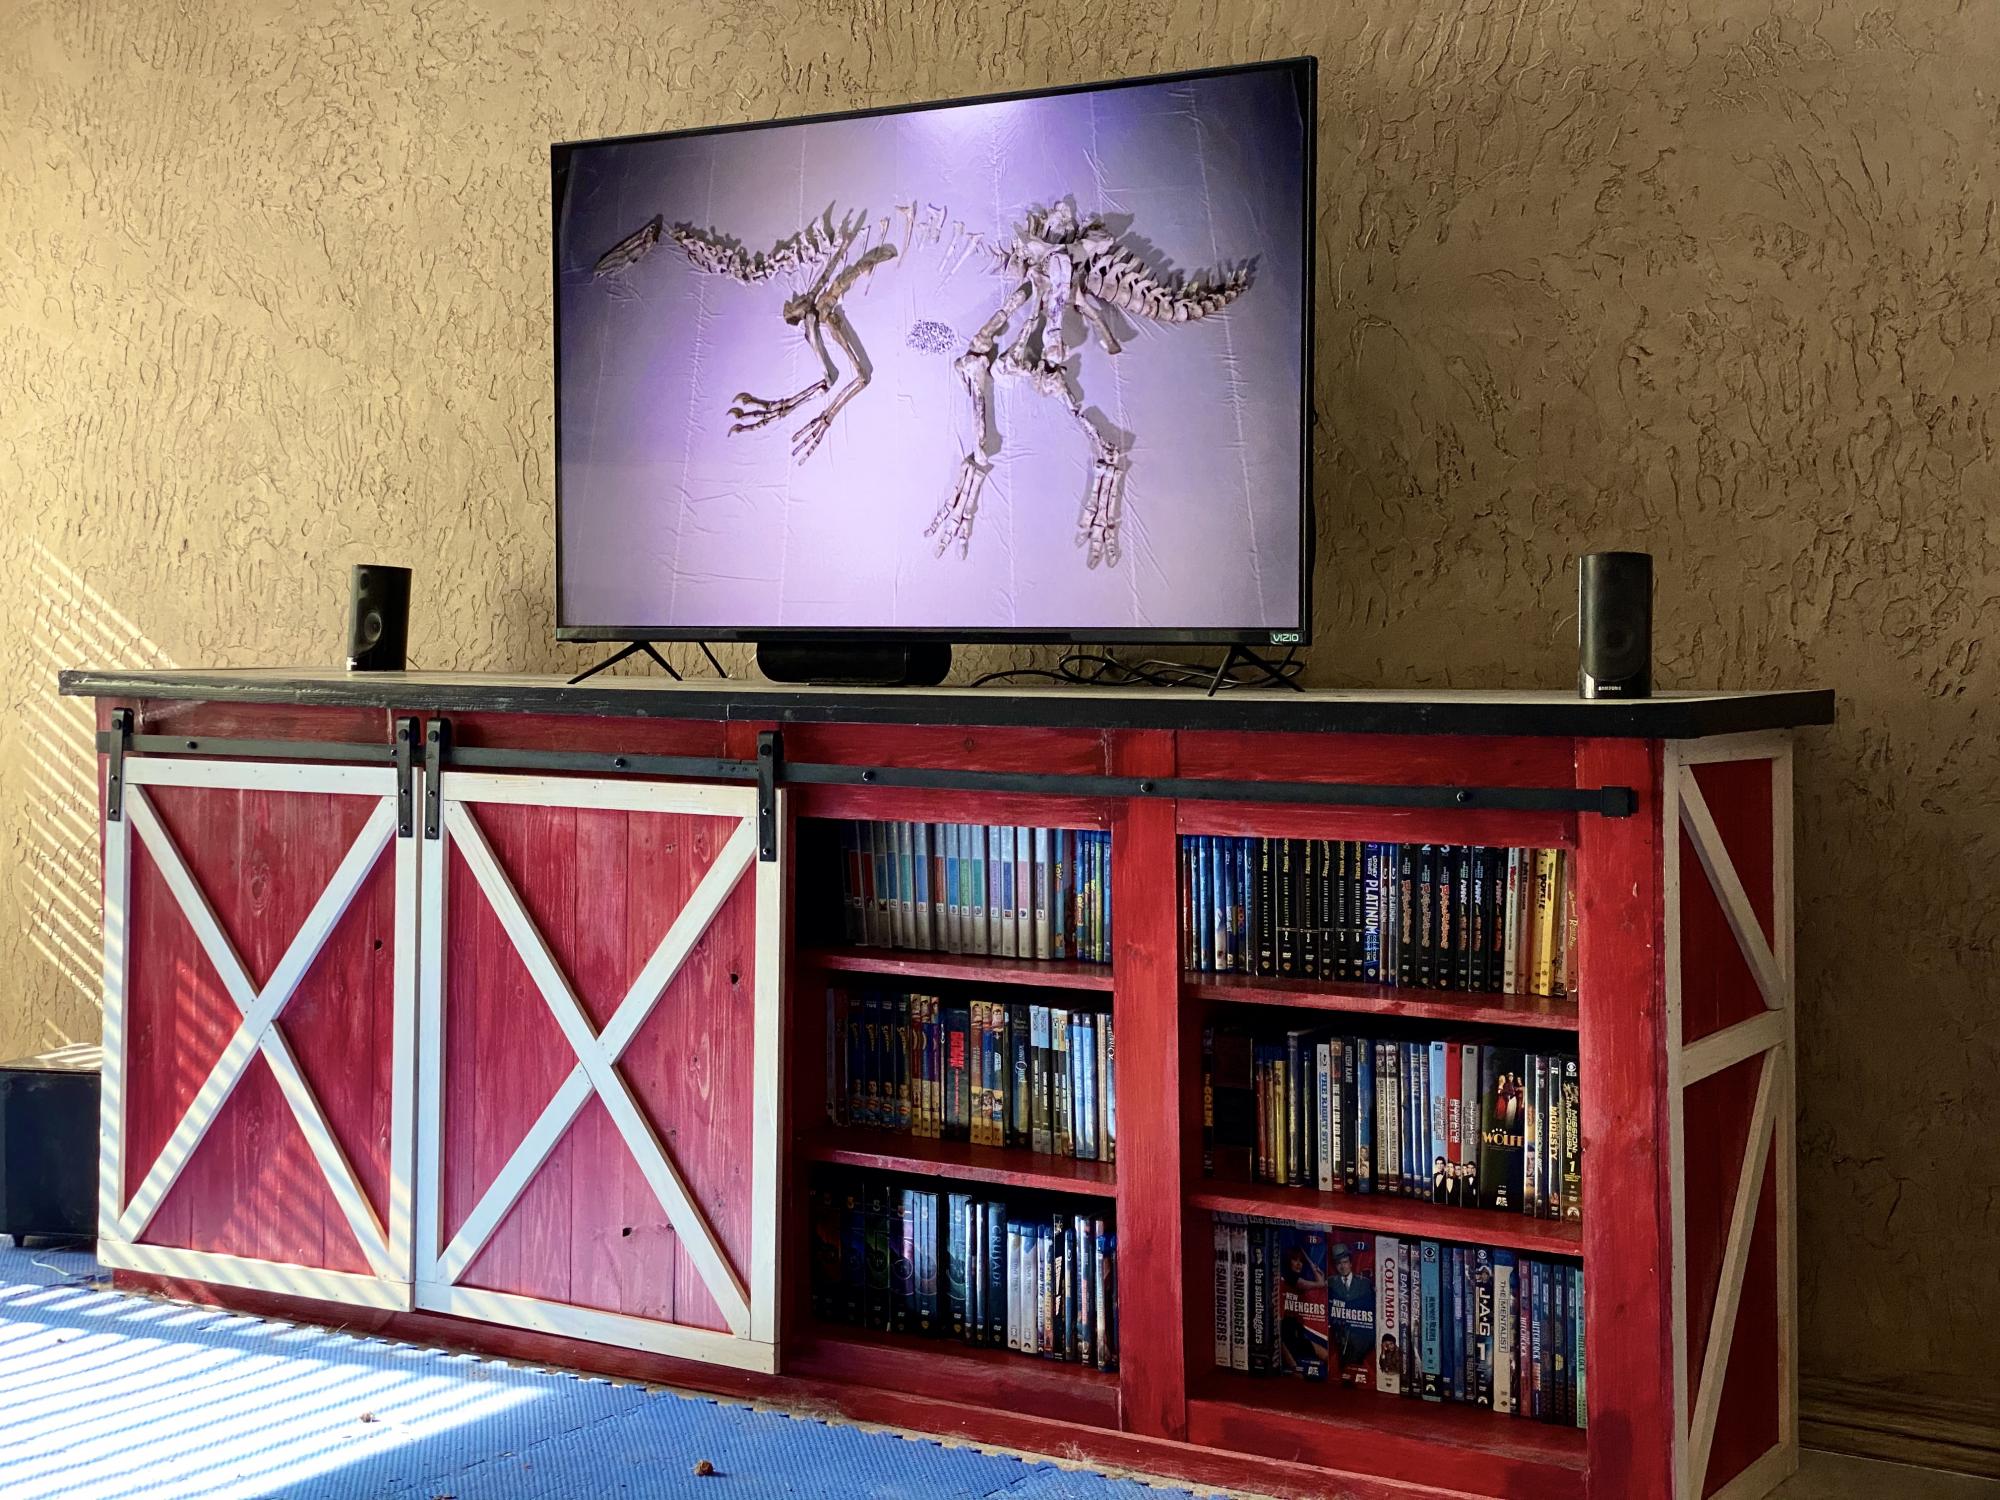
Built from plans on this website, with some modifications.
i used 8-ft x 16-in x 3/4-in edge-glued boards from Lowe’s for the shelves. Instead of cutting the boards to length, I widened the console slightly to accommodate.
I added an extra shelf to increase storage. I also added vertical dividers between the shelves to increase strength and prevent sagging.
The top is an 8-ft x 20-in edge-glued board with a piece of 1x4 board added on at each end. I then added strips of 1x2 underneath on all sides to create an overhang. The top is not fastened on with screws or any other fasteners. Its weight keeps it in place, and being removable will make it easier to move the console, if necessary, in the future.
I couldn’t find a commercial stain that had the “red barn” look I wanted, so I used latex paint thinned with an approximately equal amount of water.
Built from Plan(s)
Estimated Time Investment
Week Long Project (20 Hours or More)
Finish Used
The red stain is Sherman Williams “Sun-Dried Tomato” thinned with an approximately equal amount of water. The white wash on the trim is Valspar “Navaho White”, thinned the same way.
The top is painted with three coats of Sherman Williams “Caviar” (not thinned).
For a protective finish, I used four coats of Minwax Wipe-on Water-based Polycrilic on the top. I decided I didn’t like the wipe-on poly, though — wiping it on was too messy on my hands — so I switched to brush-on for the rest of the project. That received three coats in critical areas, two coats in places unlikely to see much wear.
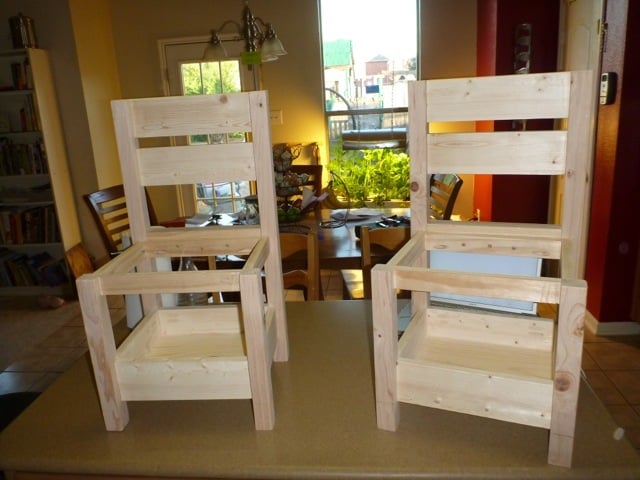
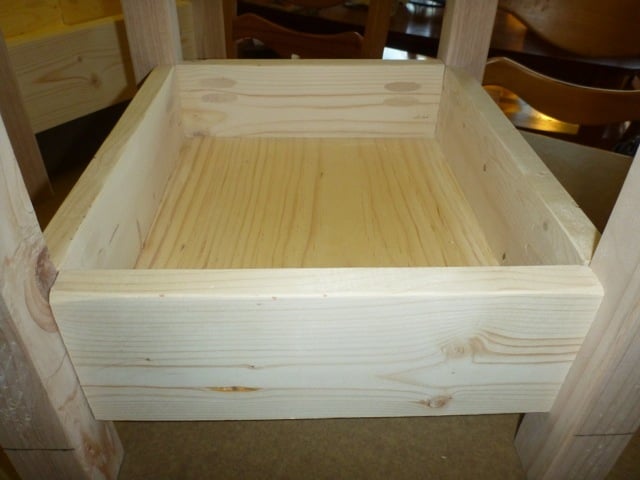
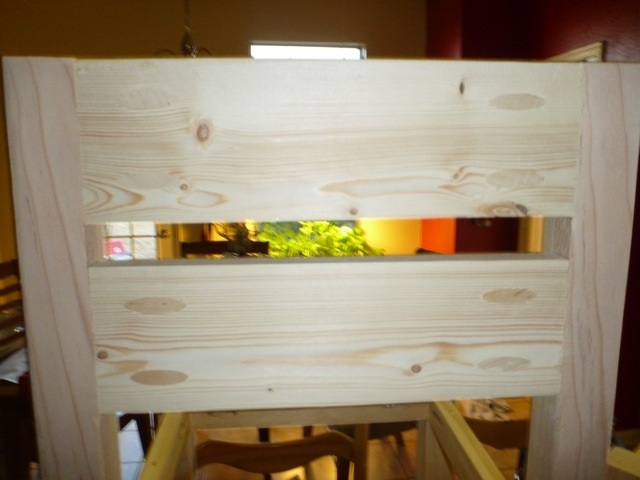
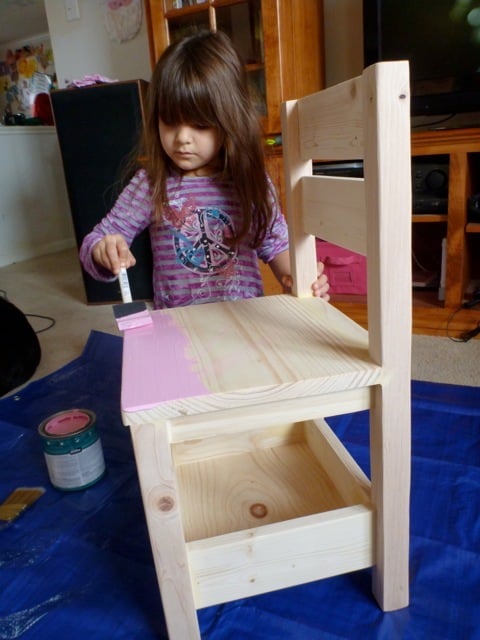
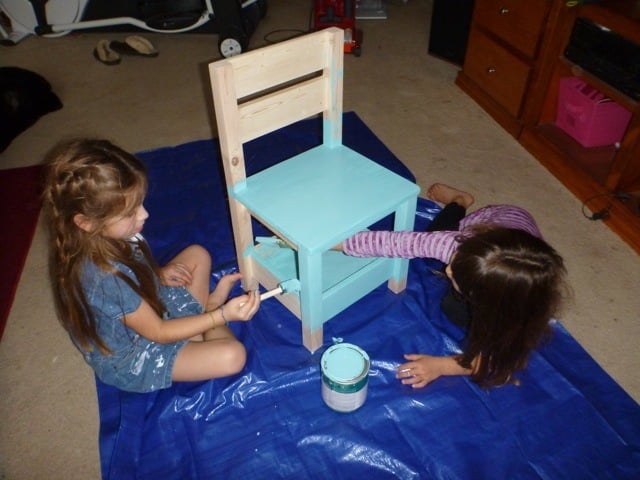
The girls storage chairs
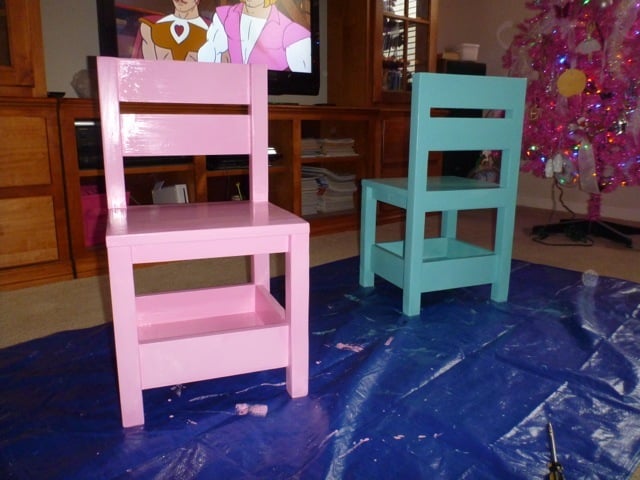
We have not added the final details but the chairs are already getting regular use. They are very sturdy so the girls use them for climbing as much as they do for sitting. I was a little worried that my chairs would not sit correctly but following Ana's "trick" for leveling them out worked like a charm. Now we just have to find the time to make two more so the girls will have room to accommodate friends when they visit... but there is that long list of other projects on my "to do" list... Thanks Ana! we are growing more confident every day! ;-)
Estimated Cost
30ish
Estimated Time Investment
Weekend Project (10-20 Hours)
Finish Used
No Voc semi gloss for easy cleaning...
Recommended Skill Level
Intermediate
Comments
Bathroom Wall Storage
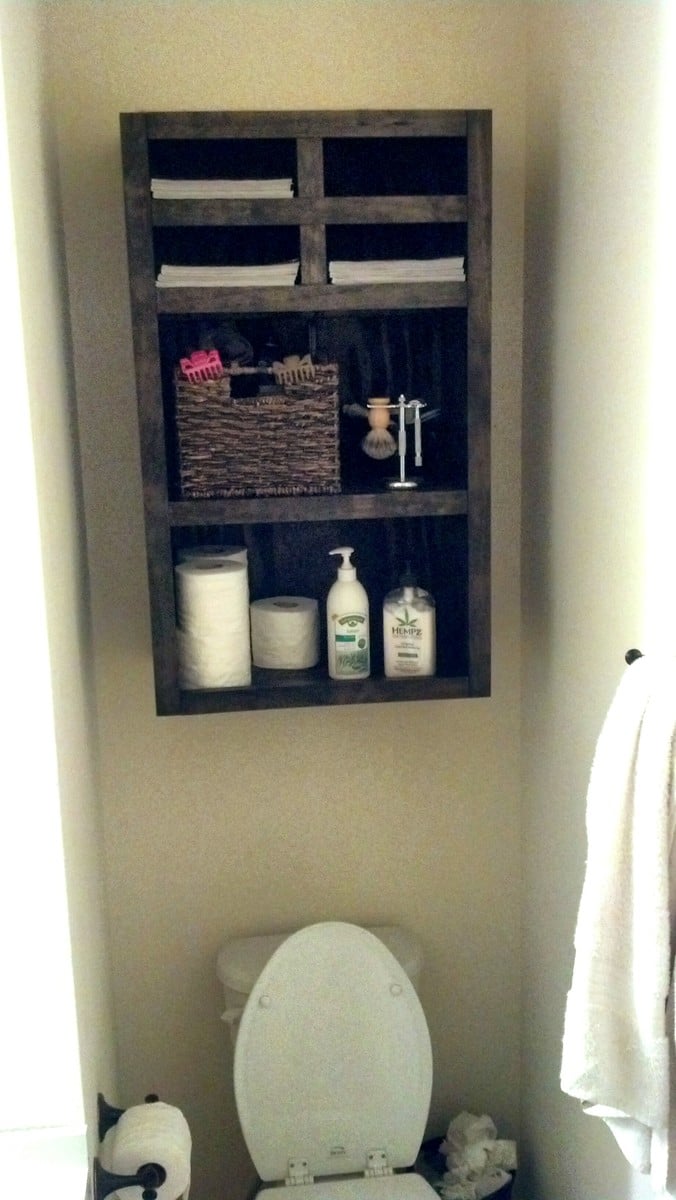
Modified to hang above the toilet for some added bathroom storage.
Built from Plan(s)
Estimated Time Investment
Afternoon Project (3-6 Hours)
Finish Used
Minwax Dark Walnut
Recommended Skill Level
Beginner
Comments

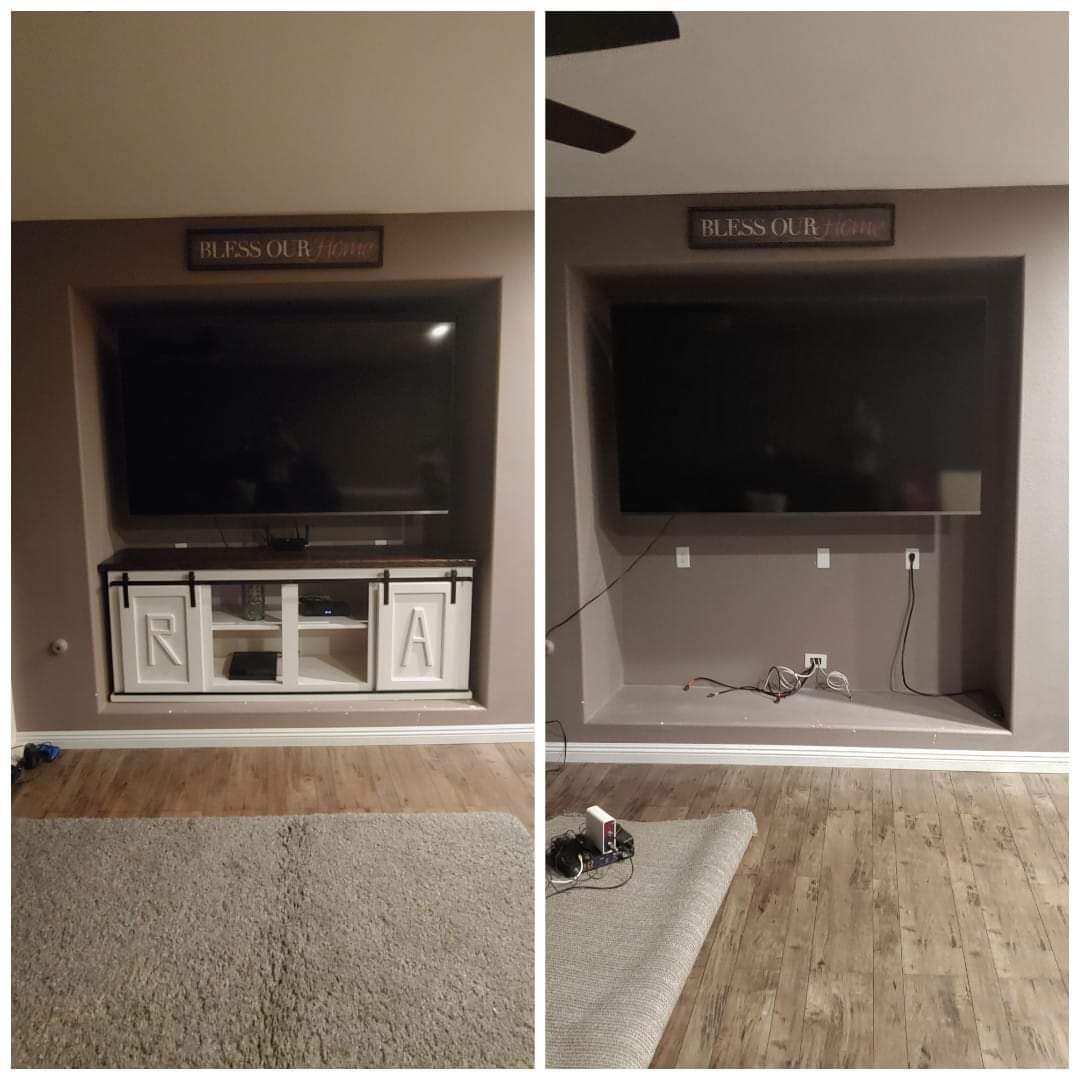
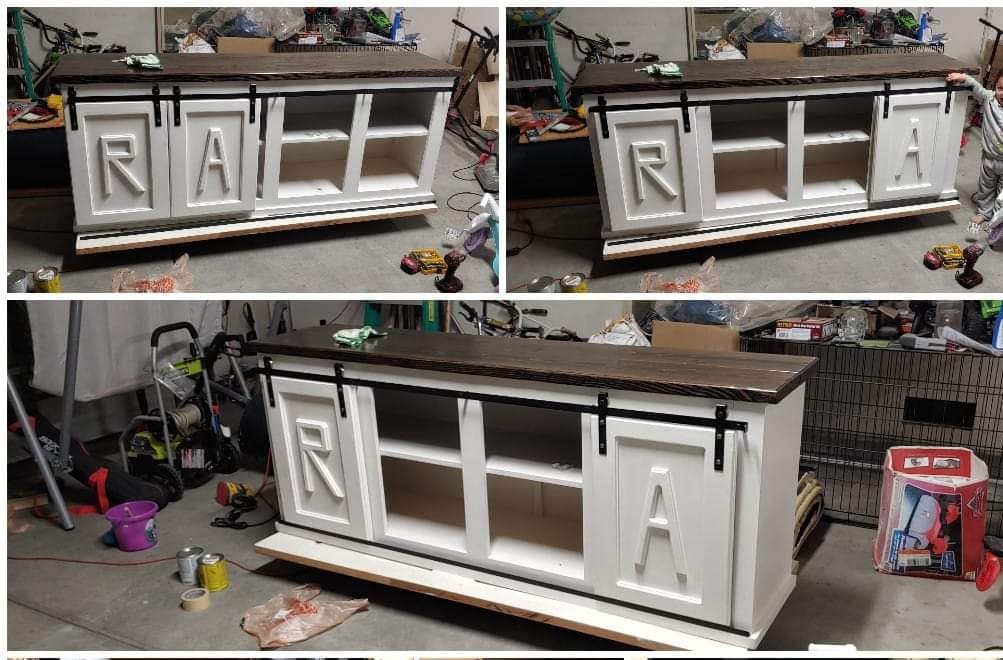
Grandy Sliding Door Console
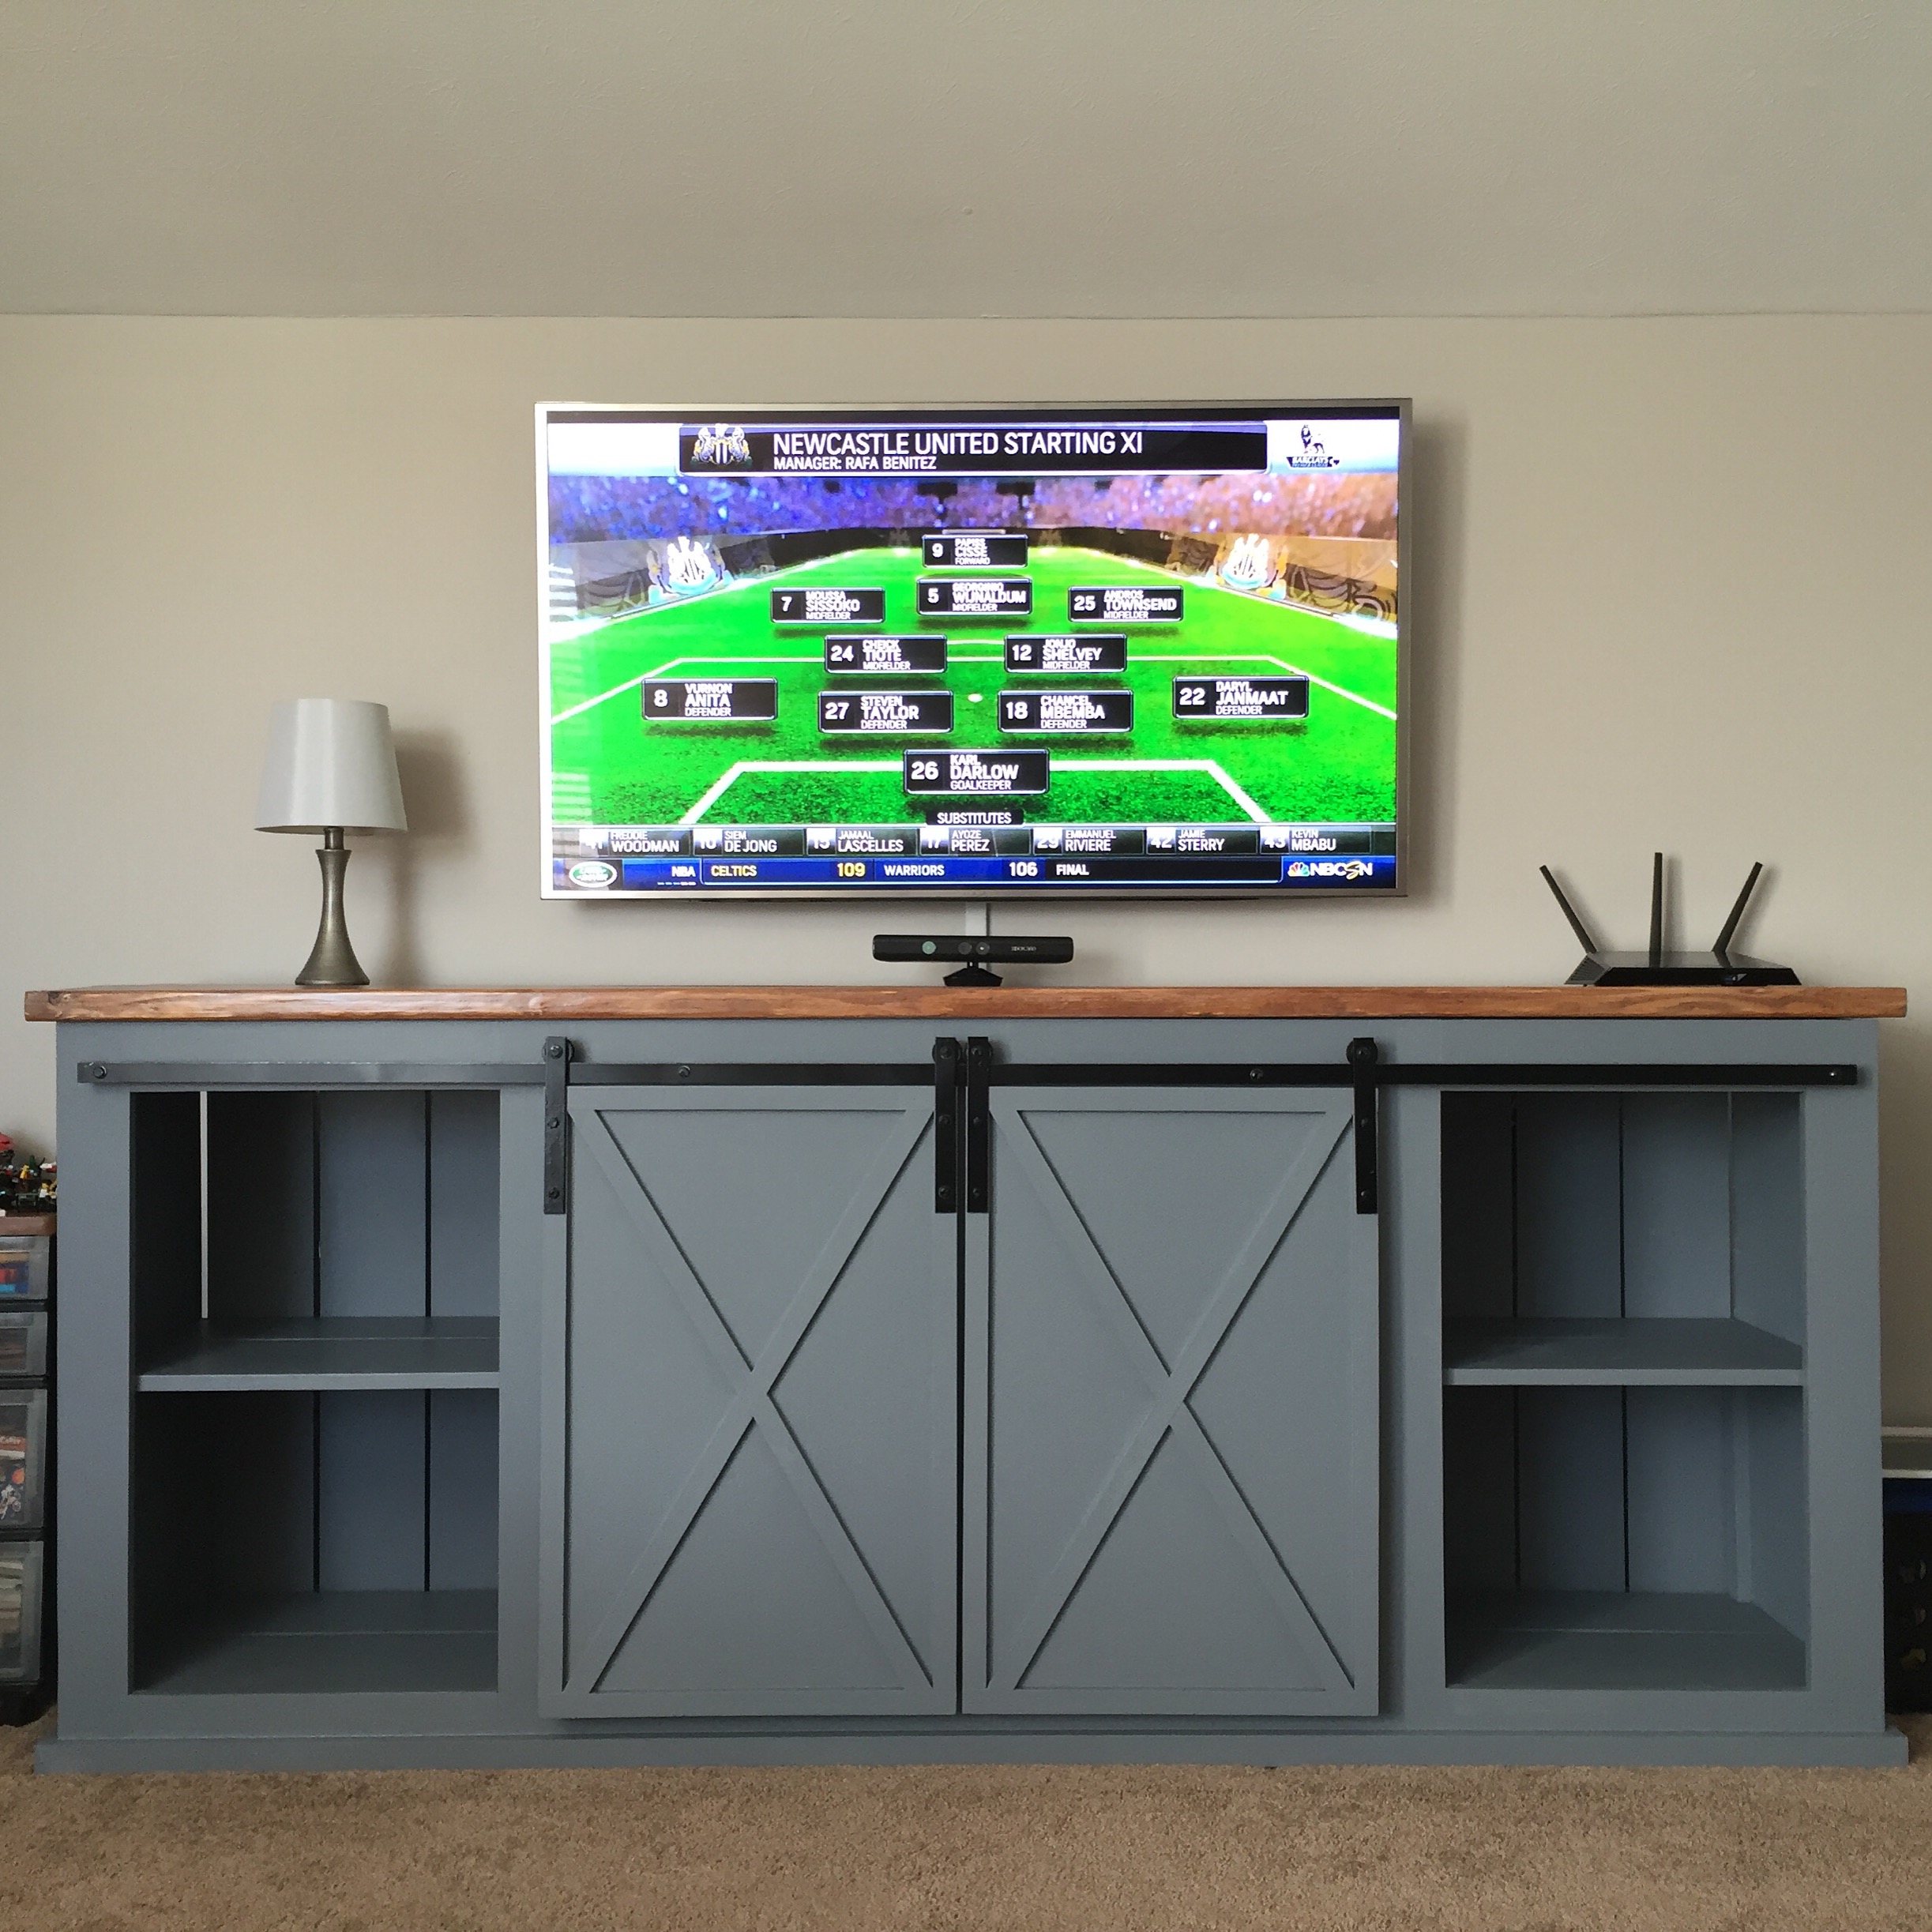
We were needing a new tv console for our boy's playroom and this was a lot of fun to work on. This was the first piece of furniture I have built and I was able to follow the plans pretty easily.
Built from Plan(s)
Estimated Cost
$250
Estimated Time Investment
Week Long Project (20 Hours or More)
Finish Used
Serious Gray from Sherwin Williams
Recommended Skill Level
Intermediate
Comments
Tue, 04/05/2016 - 07:57
Door hardware problem?
My doors are sticking out over 1 inch at the bottom. Any suggestions why?
Wed, 04/06/2016 - 07:05
Door Hardware
Ana,
I was wondering how you were able to fabricate the door hardware? Your plans don't seem to include them in the overall plan area. Can you provide this information please?
Thank you.
Sat, 08/08/2020 - 09:46
What hardware did you use…
What hardware did you use here? I have been having trouble finding hardware small enough to fit in the 3.5" space above the doors, and I do not have the tools to create my own hardware.
Thanks!
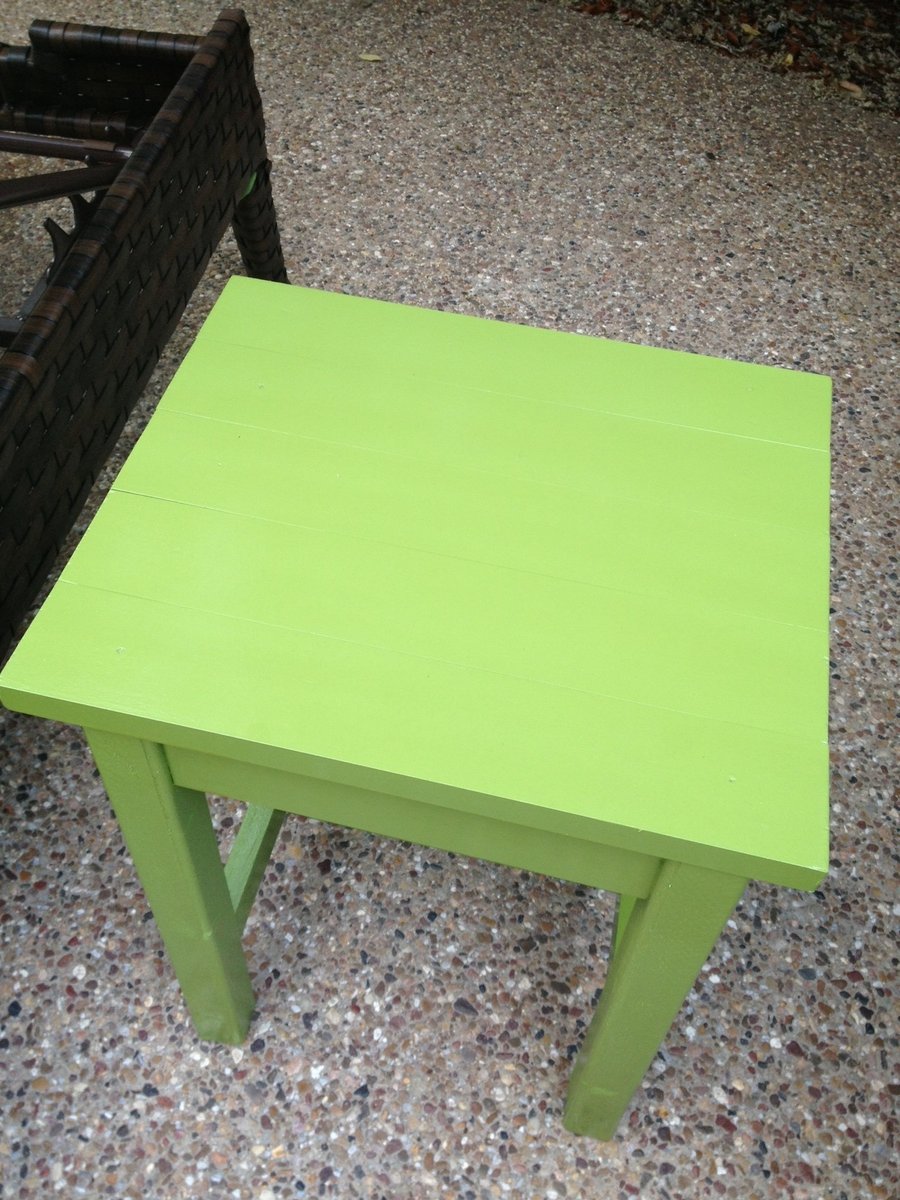
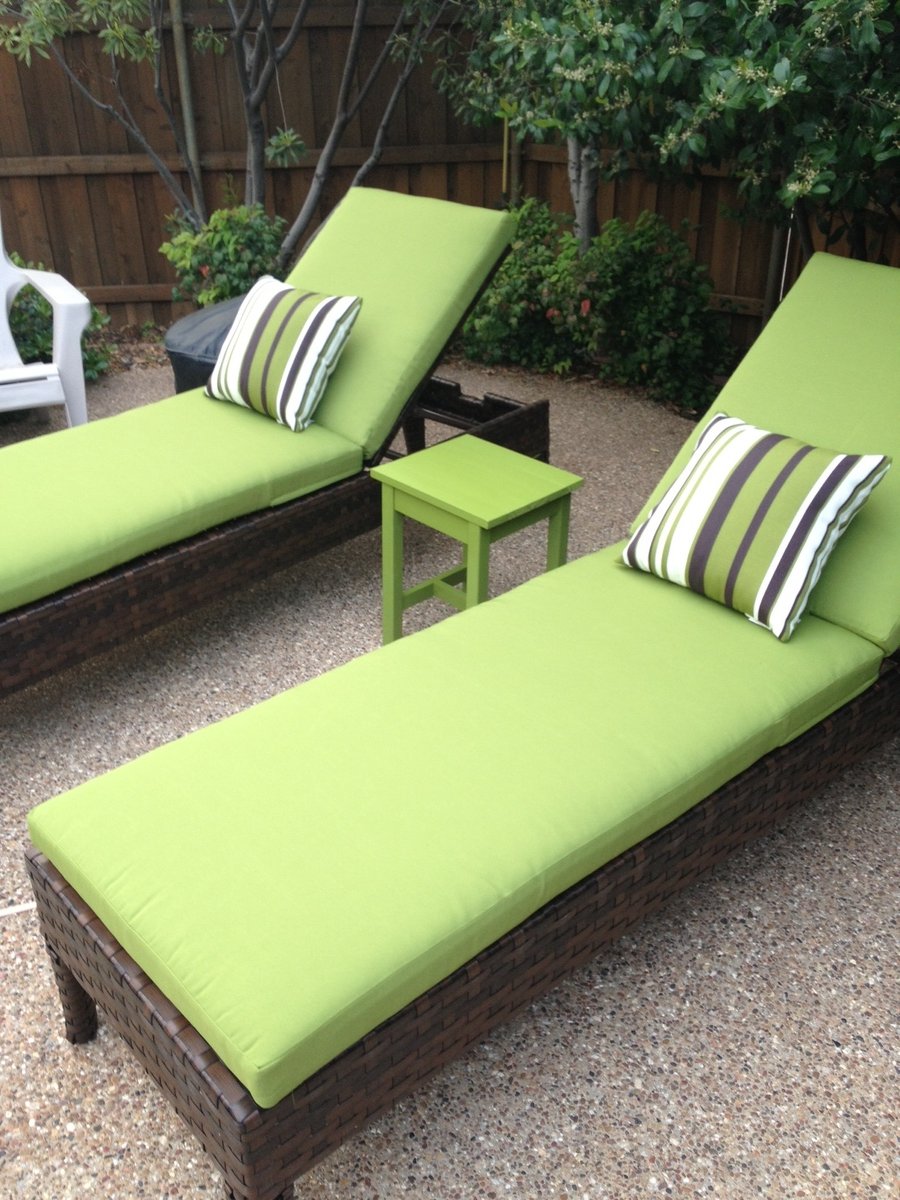
Rustic X Coffee Table With Side Tables
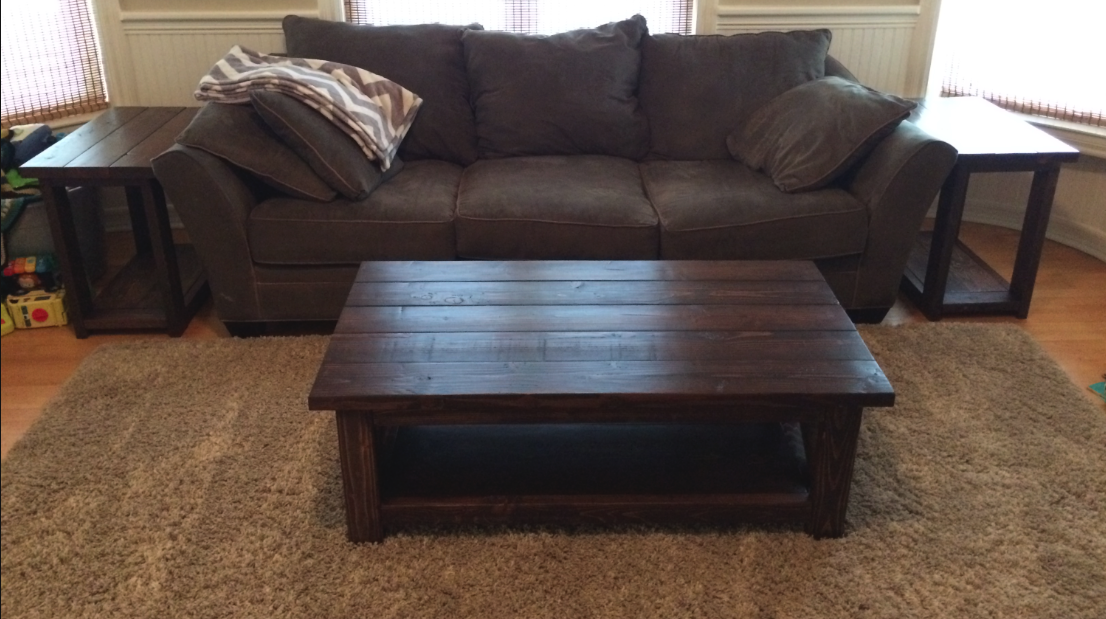
I made this one a while back, it looks similar to the new one you made, I don't remember if this was an earlier version you made or something else I saw online. This table came out amazing and very sturdy.
It took a few days to build. I like my projects to be smooth so I sanded all the boards from 80 - 220, then pre stained them all, put 3 coats of poly and then sanded with 400 and 600 for the finish. Once that was completed I assembled the table and I used extra screws where I could to ensure that it wouldn't become loose after moving it around so much. I was able to make 2 side tables with some of the left over wood.
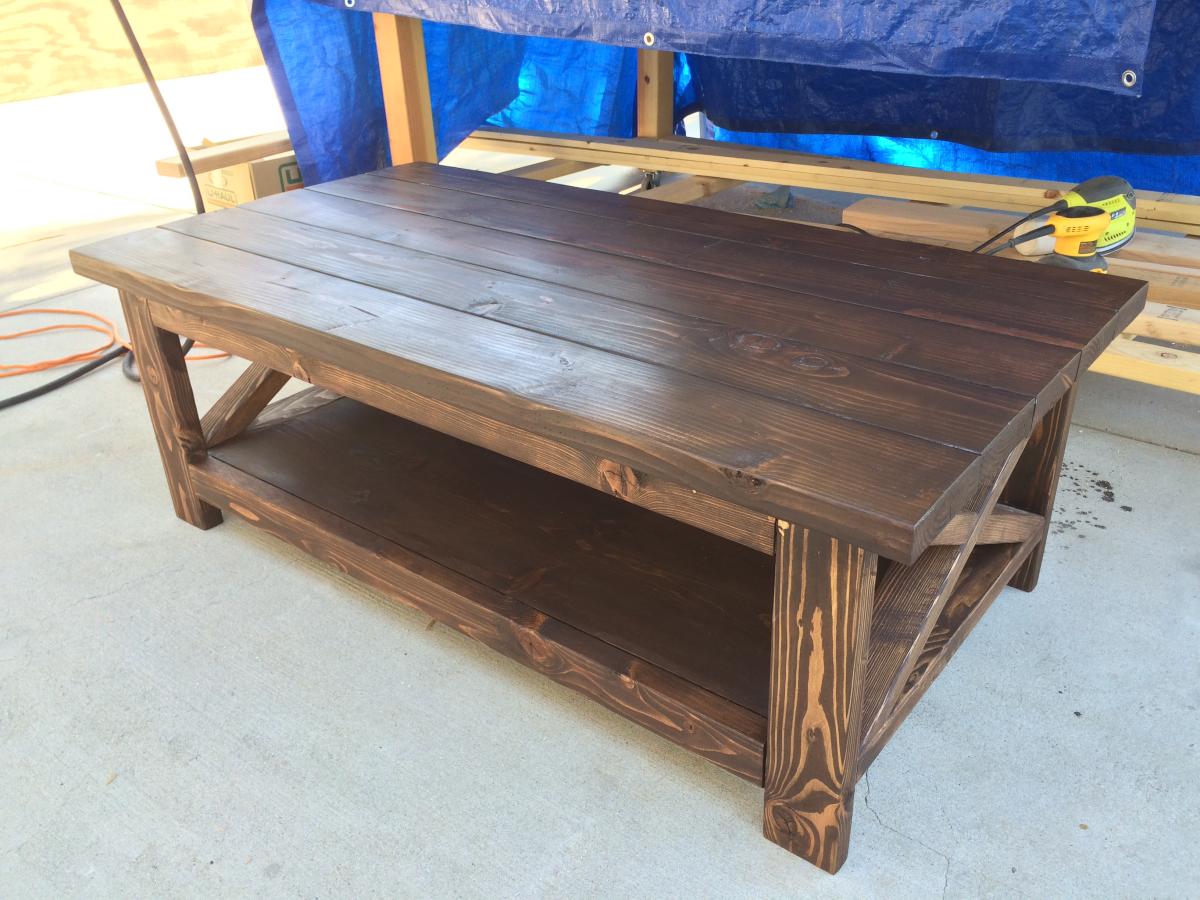
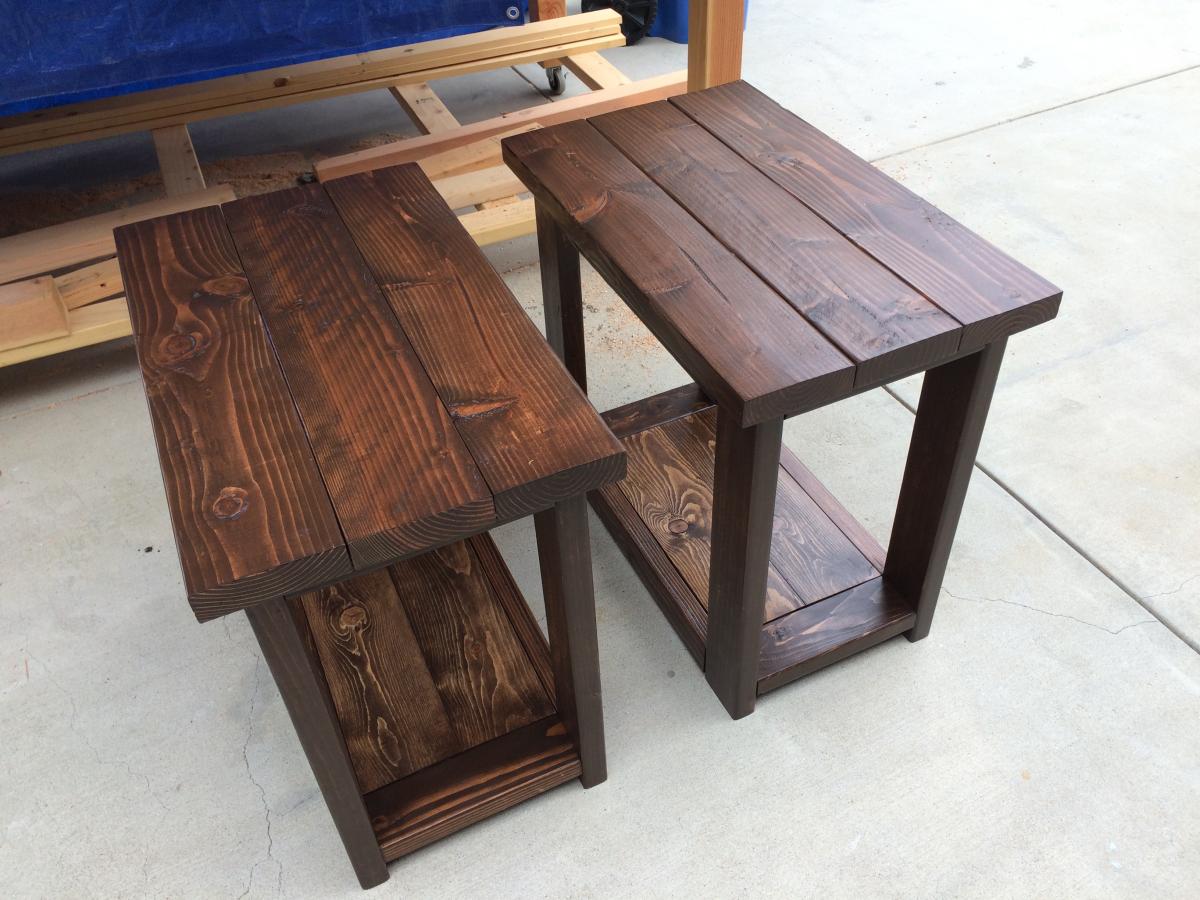
Estimated Time Investment
Weekend Project (10-20 Hours)
Finish Used
Dark Walnut
Recommended Skill Level
Beginner
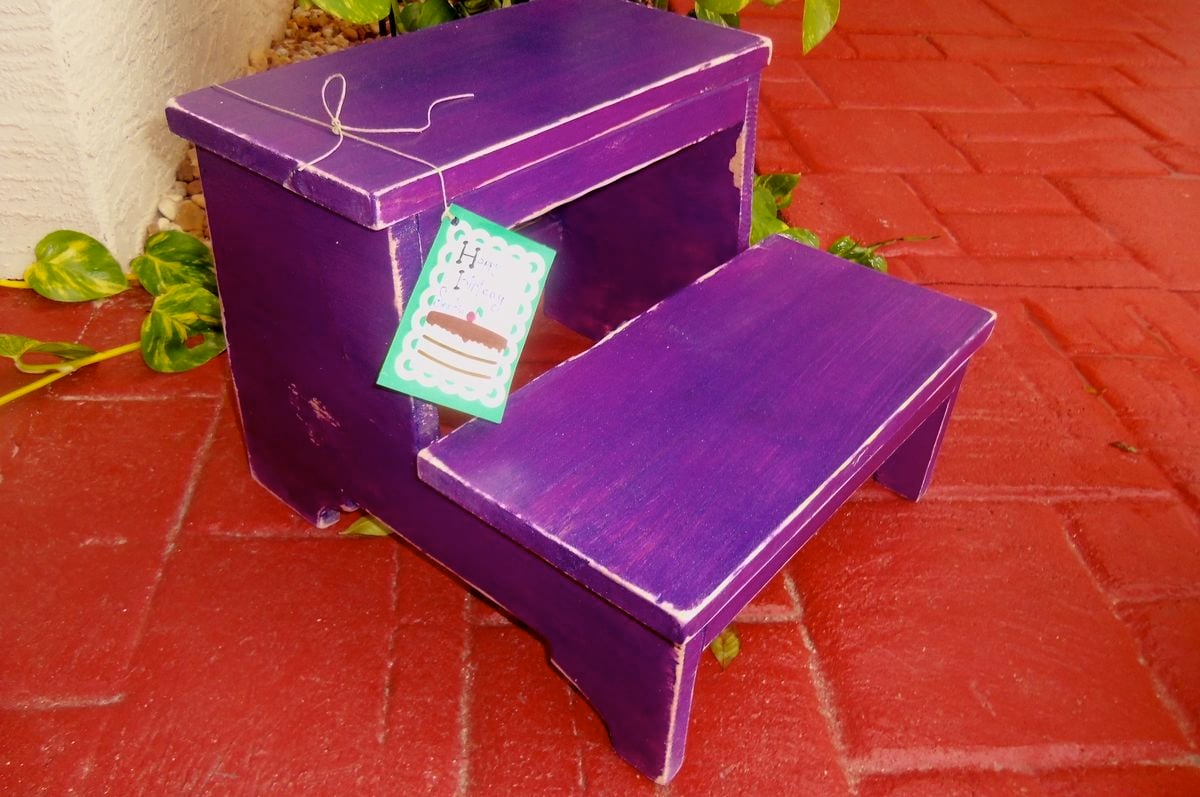
Step Stool for Birthday Present
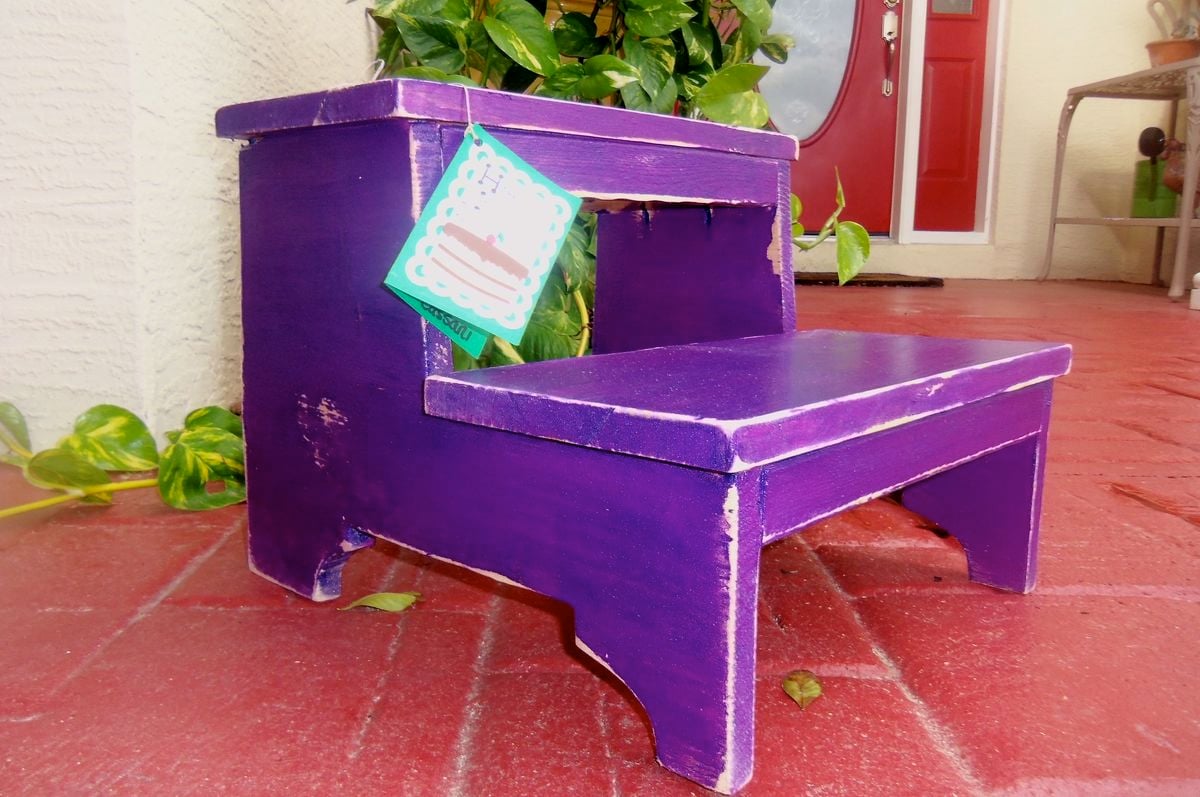
Loved this project. I bought a jig saw, and I had so much fun. I bought the black and decker one it was around $25.00 and works great for small projects like this one. Another birthday present for a beautiful girl who is turning 5 and I know there is always space for a step stool in the house with young ones. Hope she likes it.
Thank You Ana I have been having so much fun!!
Built from Plan(s)
Estimated Time Investment
Afternoon Project (3-6 Hours)
Finish Used
Purple paint and Martha Stewarts Purple Glitter paint. Use Glitter paint over a base color or else it looks streaky and takes way to much time. Also sanded lightly to keep it vintage like I like at http://chippedandcrackled.blogspot.com/
Recommended Skill Level
Beginner
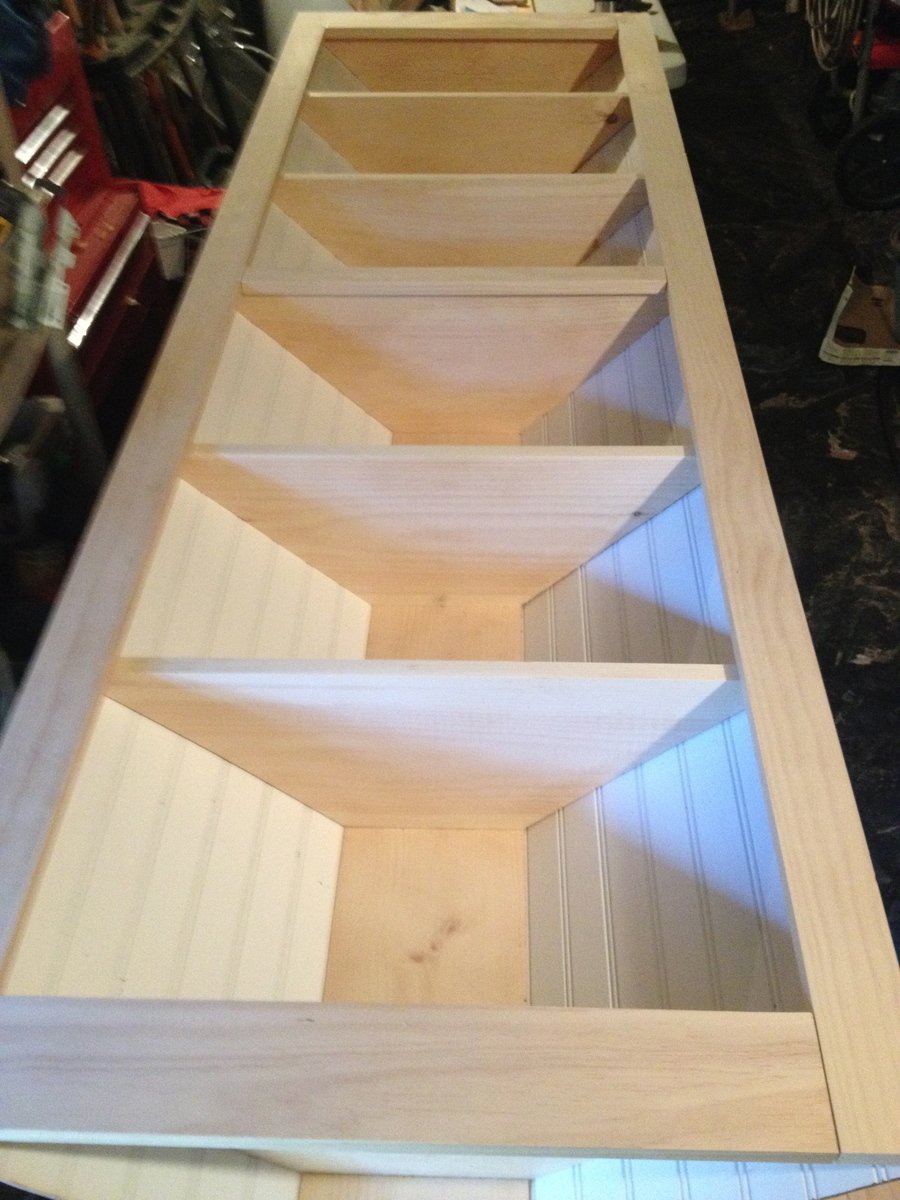
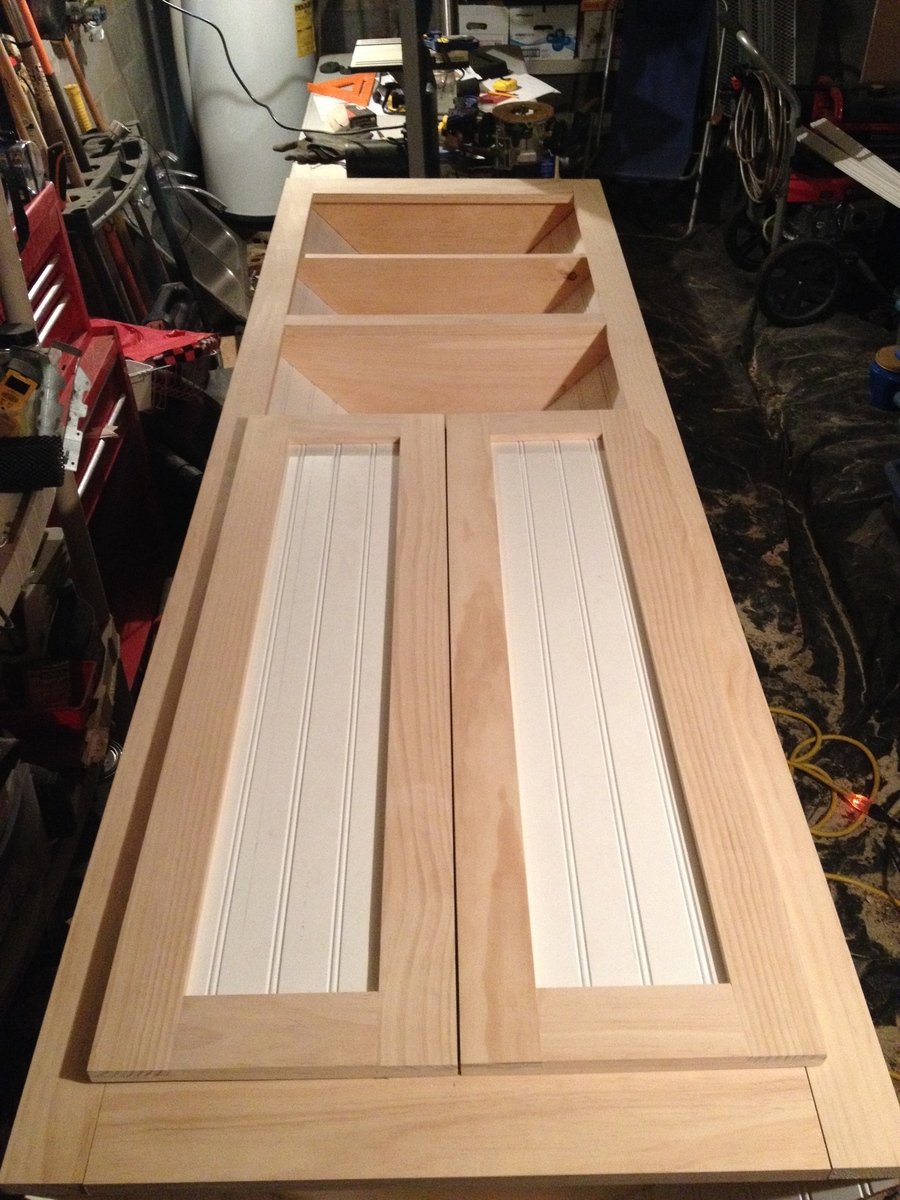
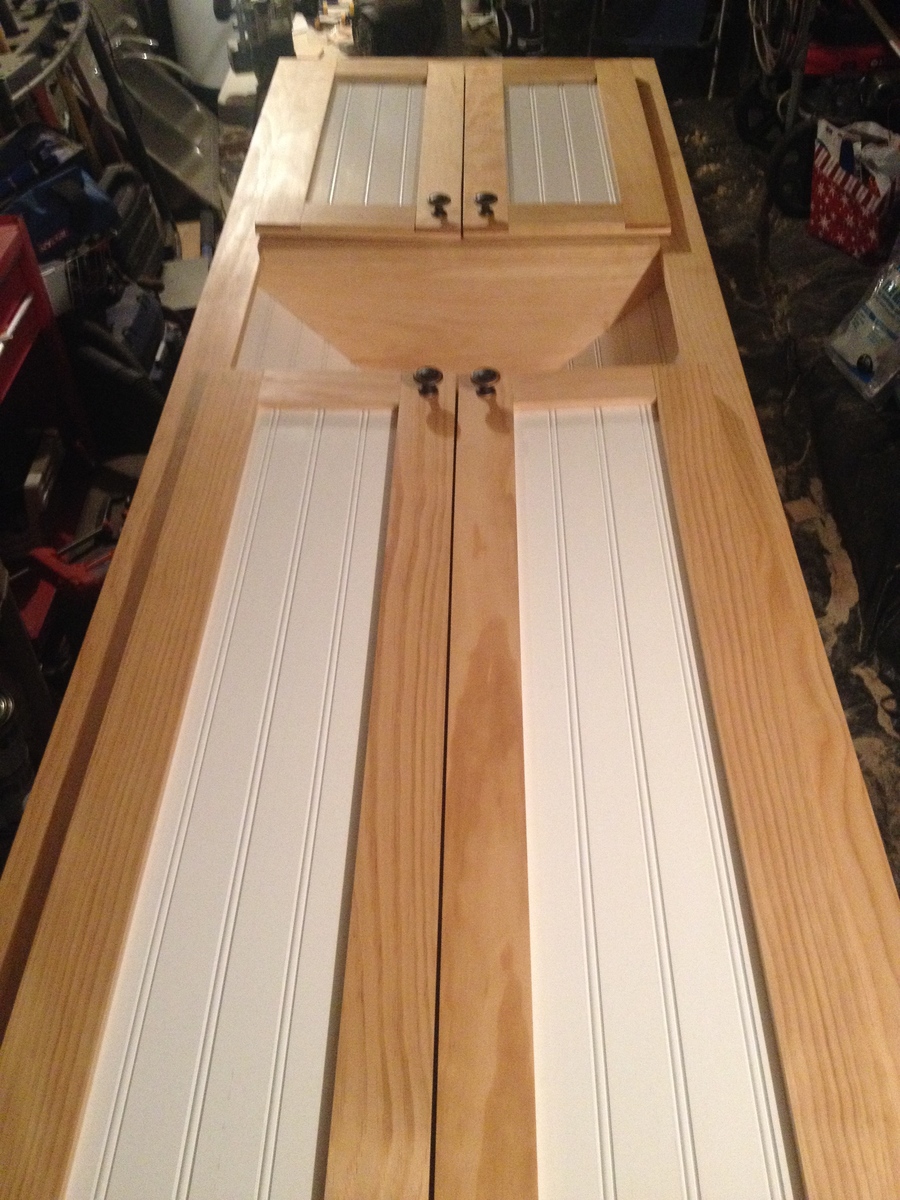
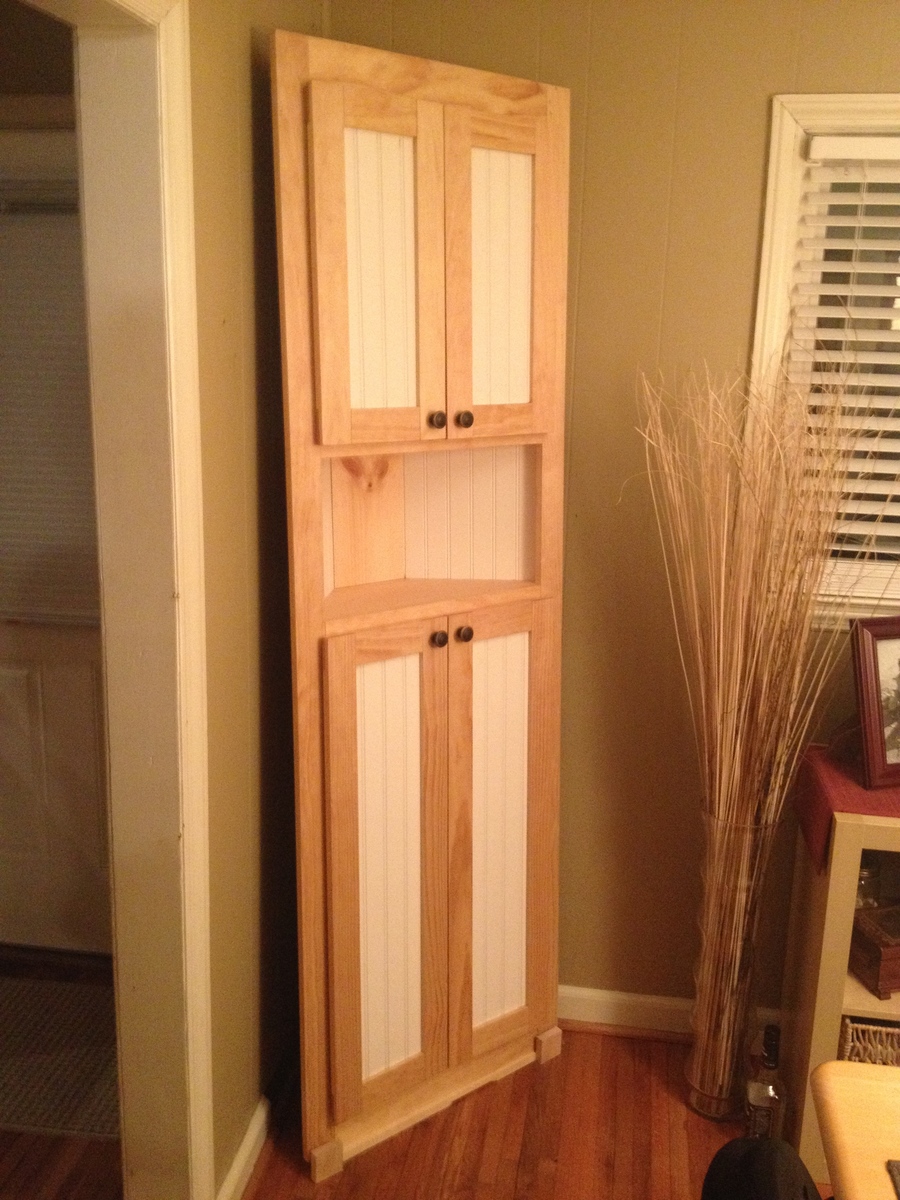
Corner Cabinet
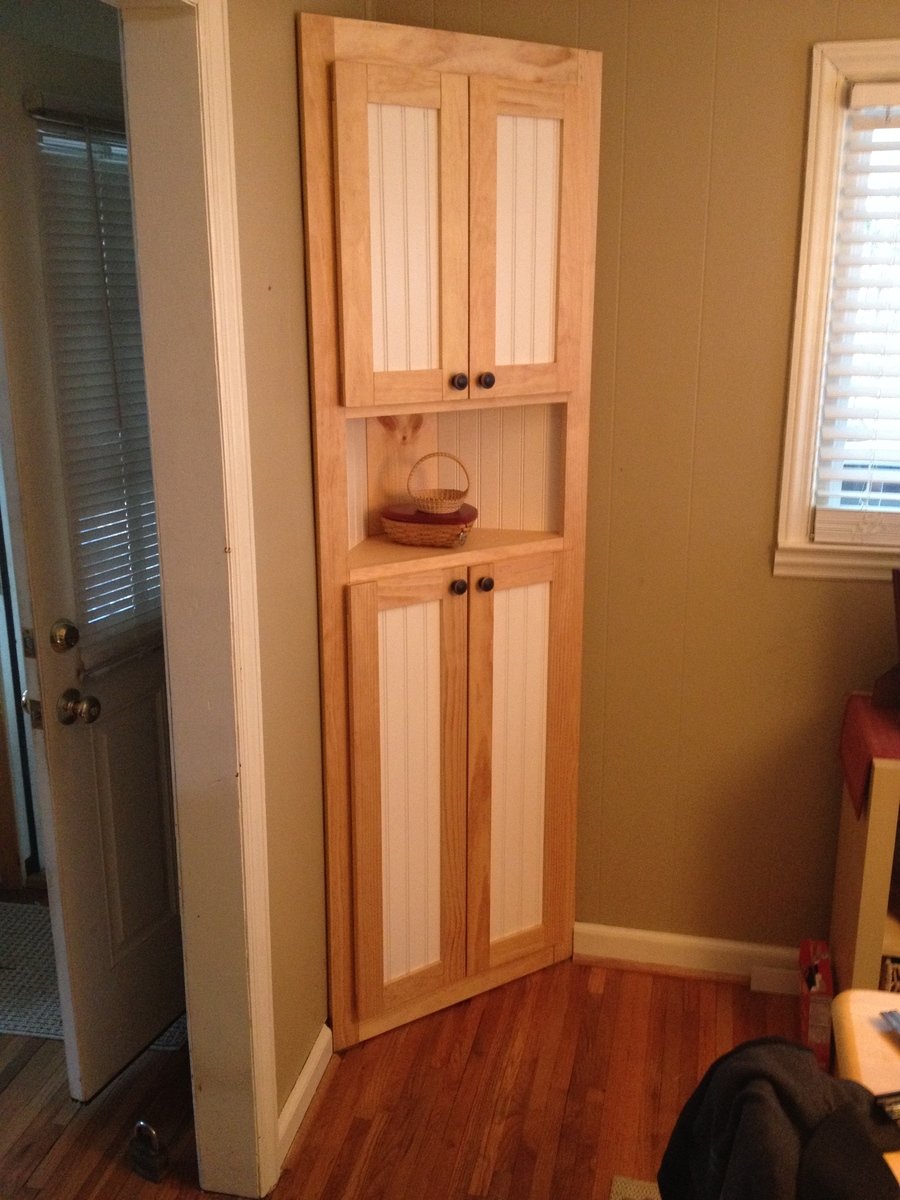
This was a corner cabinet I made. The purpose of this cabinet is to be used as a pantry. My kitchen is quite small, and in turn I was always having to sacrifice cabinet space for pantry items. Total man hours was about 20 give or take the occasional trip to HD or Lowes.
I found this project quite enjoyable. I don't have much of a workshop area so space was tight. I had to constantly move my tools around to make room for the cabinet while I built it.
The plans supplied by this website were simple and straight-forward. I didn't need any specialty tools or have to use any weird joinery. All in all I would give this project an 8 out of 10. There were a couple of areas I feel I can improve on.
After having posted this picture on several social media sites my friends took notice, Now I'm getting all kinds of requests. Not sure if I will entertain any. It's just nice to see a vision come to life.
Thanks for the taking a gander at my work.

Built from Plan(s)
Estimated Time Investment
Weekend Project (10-20 Hours)
Finish Used
Following the instruction on the bottle. I first applied three coats of wipe-on Teak Oil finish (Found at your local HD or big box retailer). Sanding with 220 between each coat. After all those coats were dry, about 72 hours, I applied two coats of wipe-on Polyurethane (again, found at your local HD). Before applying the last coat of wipe-on Poly I lightly rubbed the surface down with 0000 steel wool. This rubbing was done again after the last coat of wipe-on Poly was applied. I really feel this set the piece off and made it that much better. Be advised...I also used a tack cloth to remove any dust and debris between each coat of finish applied.
Recommended Skill Level
Intermediate
Comments
Mon, 01/13/2014 - 15:50
What a Great Result
I also built a corner cabinet from the same plans and yours is by far the best. You obviously have the patience it takes to get the best out of your project. Looking for more from you.
Tue, 04/08/2014 - 18:33
Corner Cabinet
Thank you so much for your vision! I've been looking for the perfect corner cabinet for at least a year! All the other plans within these plans are ok and would've worked, but I just felt like I wanted something more. I am in love with your doors! They look great! I may make mine a bit larger, but will most definitely add doors the same way you did. Unfortunately, it's not on the top of my priority list, but it will be this summer!!! Great work!
Rachel
www.illjustpaintit.com
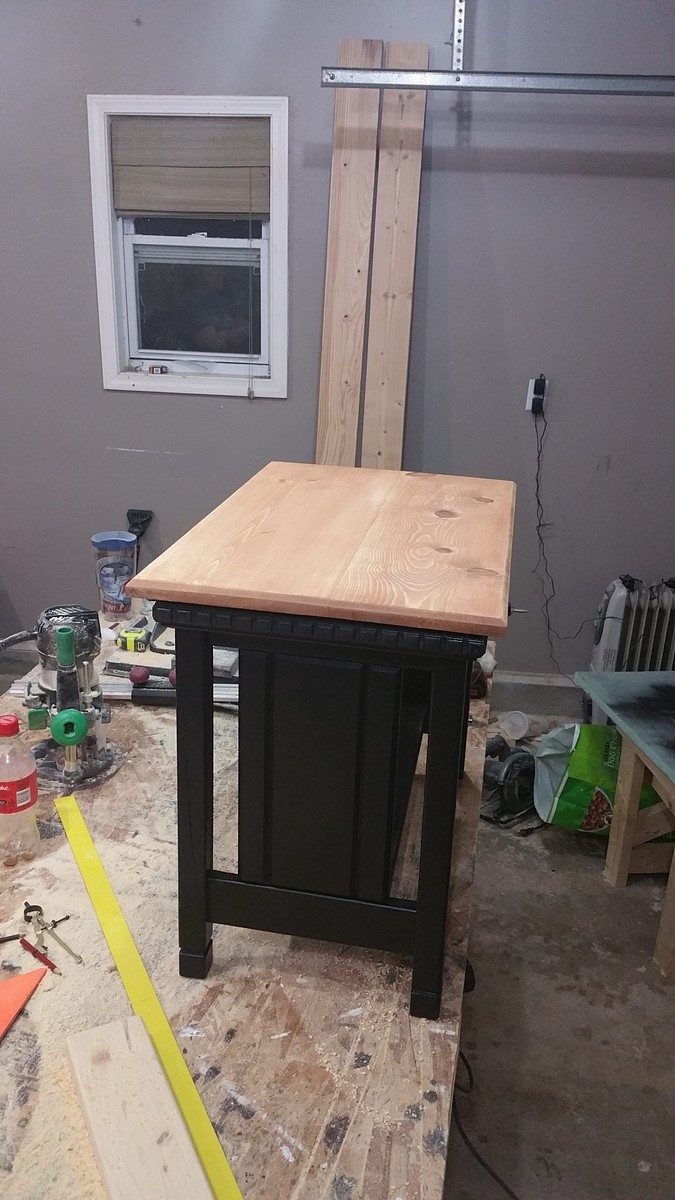
Kitchen Island from reclaimed wood!
I found these plans and modified the dimensions to work in my space. The top is solid birch, and the legs are cedar 4x4s I found in a shed on my property. The side skirts rear skirt, shelf supports, and drawer fronts are solid walnut I have had laying around for years. The face frame was a door jam in my house made from solid mahogany. It came out nice, especially since it's my first time building anything like this! Thanks for the plans!
Built from Plan(s)
Estimated Cost
$200
Estimated Time Investment
Weekend Project (10-20 Hours)
Finish Used
Mineral oil and beeswax
Recommended Skill Level
Intermediate
Barn Door Console
Needed a entertainment console to fit under my tv. Built this Barn Door Console project. Measured approximately 84" W and approximately 36" H.
Sanded, painted and stained the top piece.
Hardware I made from 1/8" thick flat uluminum bar and pulleys. Did a little research and helped a lot.
Built from Plan(s)
Estimated Cost
$200-230
Estimated Time Investment
Weekend Project (10-20 Hours)
Recommended Skill Level
Intermediate
Outdoor adirondack side table
This was my very first furniture-building project. I was pleasantly surprised with how it turned out! It's definitely not perfect, but with some practice I plan to try bigger projects! It was a little more expensive than I would have liked because I had to buy a pocket hole kit that was $40, but hopefully I will be able to use the kit for future projects.
Built from Plan(s)
Estimated Time Investment
Afternoon Project (3-6 Hours)
Finish Used
Rustoleum white spray primer (1 can, 2 coats), Rustoleum satin eden spray paint (1 can, 2-3 coats), and Minwax helmsman spar urethane clear gloss spray (1 can, 2-3 coats)
Recommended Skill Level
Starter Project
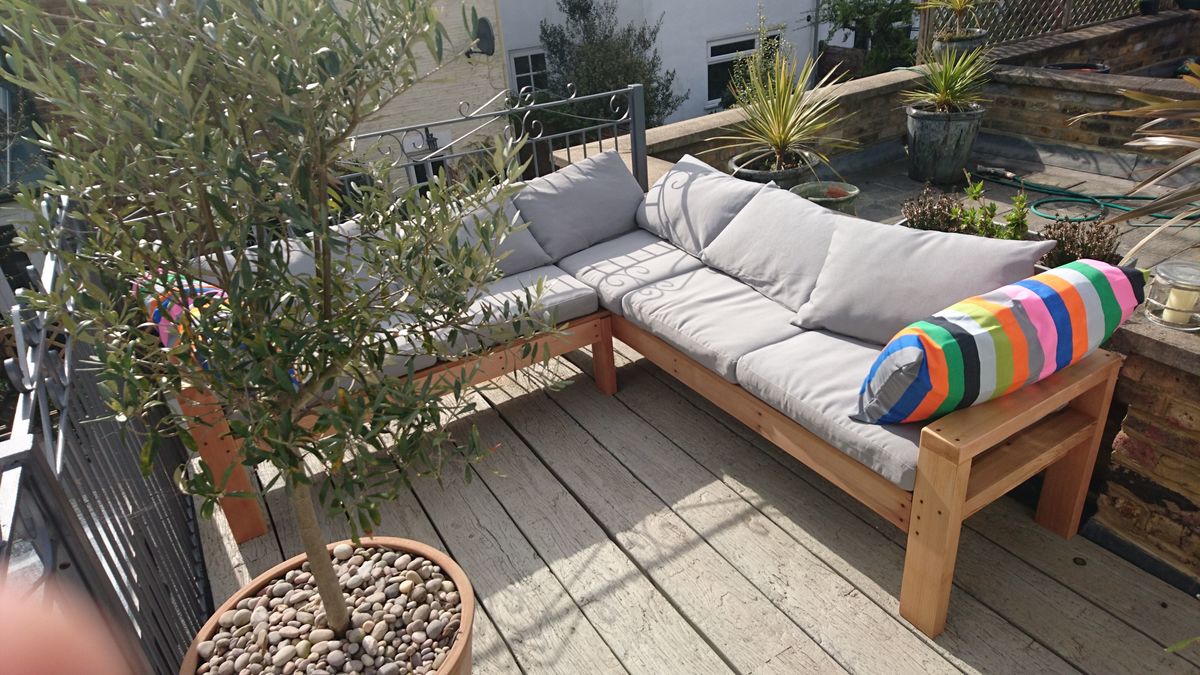
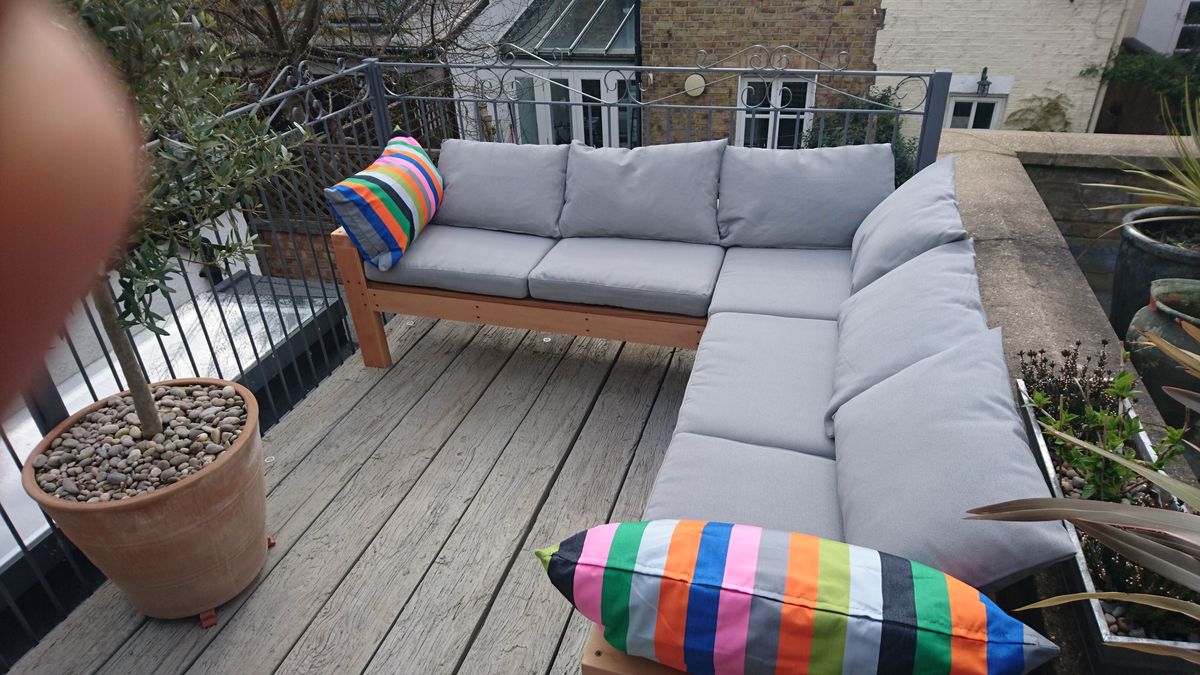
My Rustic X Coffee Table
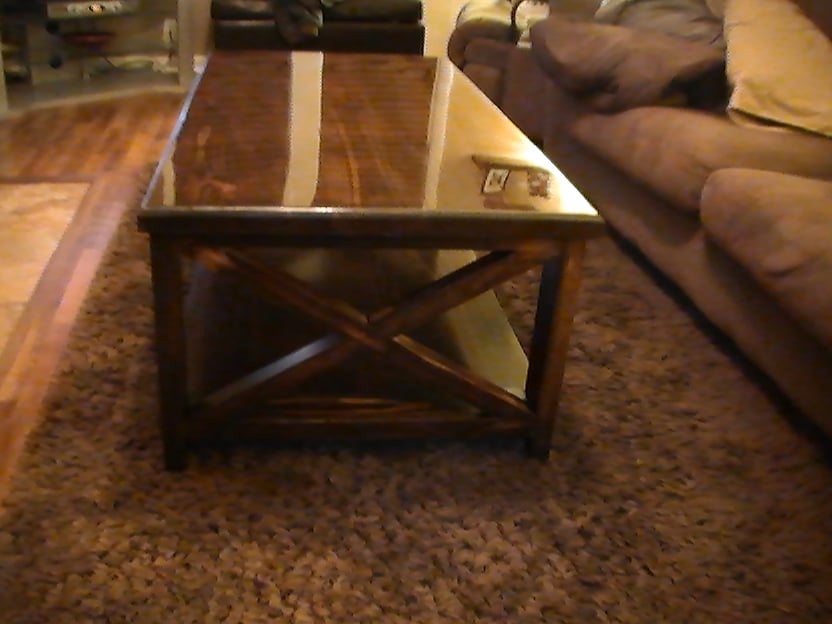
I chose the Southern Yellow Pine because of its strength for furniture. Also I have used the pour on finish before with good results. The wood was a special order thru Menards and took about a week to get.
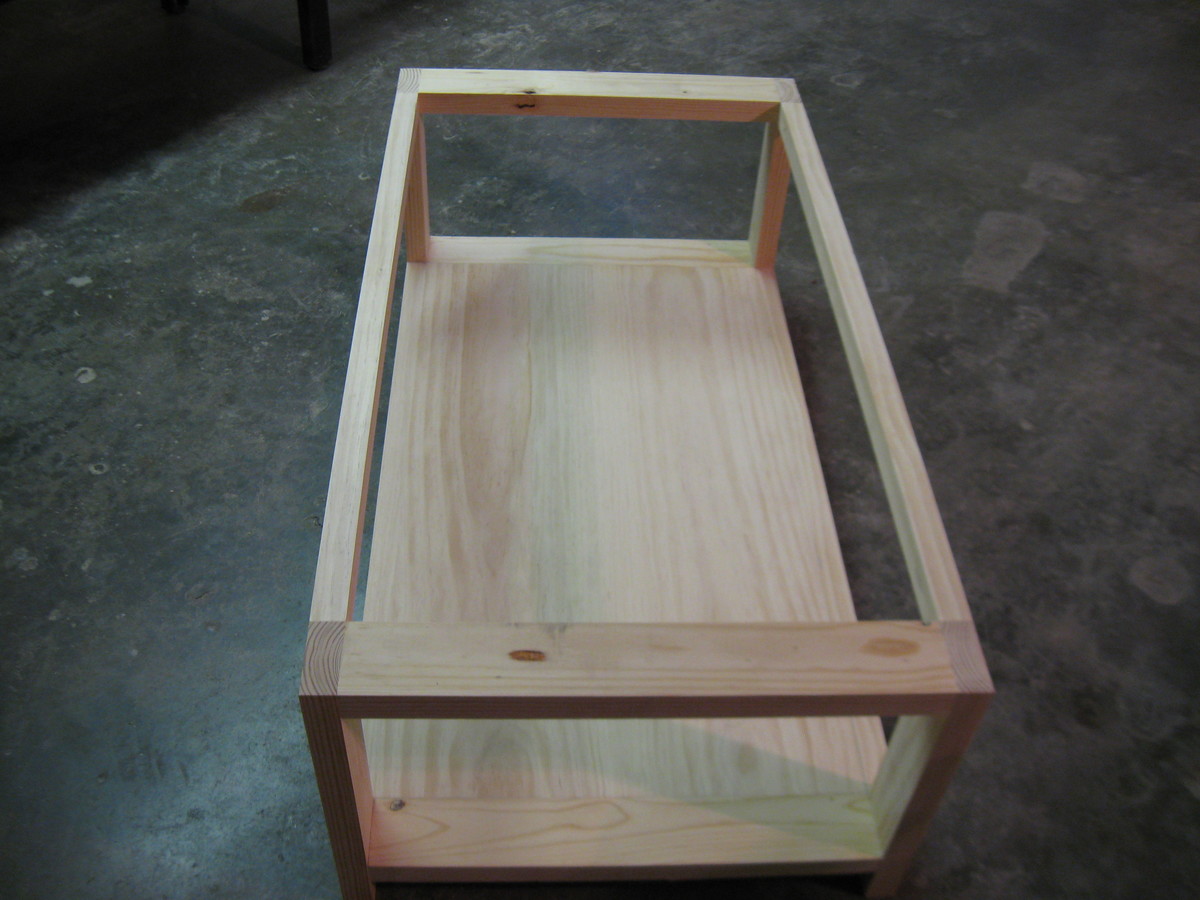
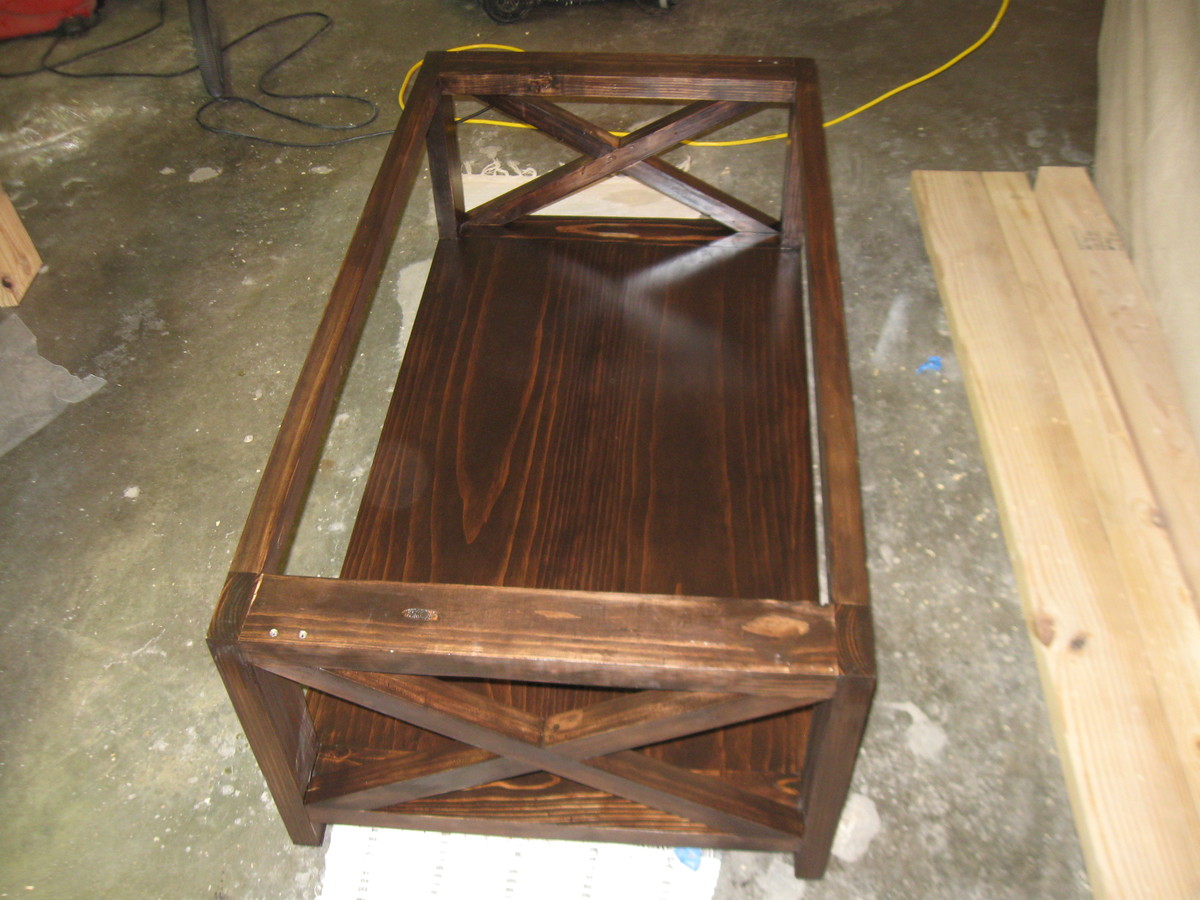
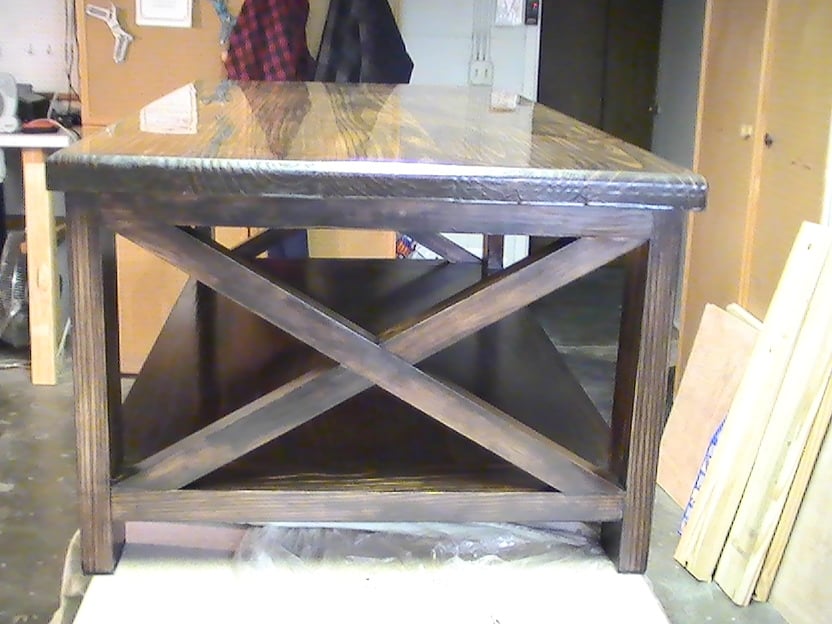
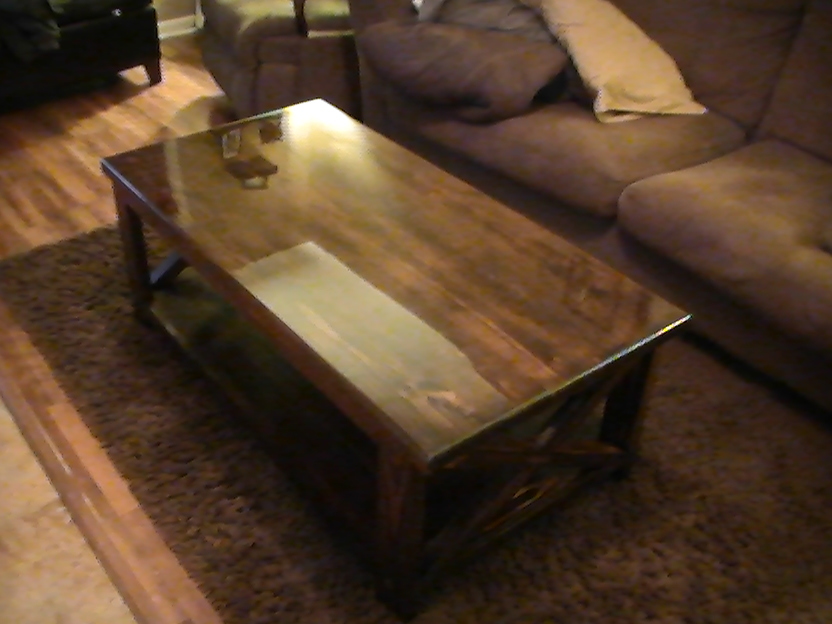
Built from Plan(s)
Estimated Cost
$200.00
Estimated Time Investment
Week Long Project (20 Hours or More)
Finish Used
Minwax Pre-Stain
Rust-oleum Varathane Kona Stain
Minwax Semi-Gloss Poly-Urethane on sides and bottom
EnviroTex Pour-On High Gloss Finish on top
Rust-oleum Varathane Kona Stain
Minwax Semi-Gloss Poly-Urethane on sides and bottom
EnviroTex Pour-On High Gloss Finish on top
Recommended Skill Level
Intermediate
Comments
Toy Car
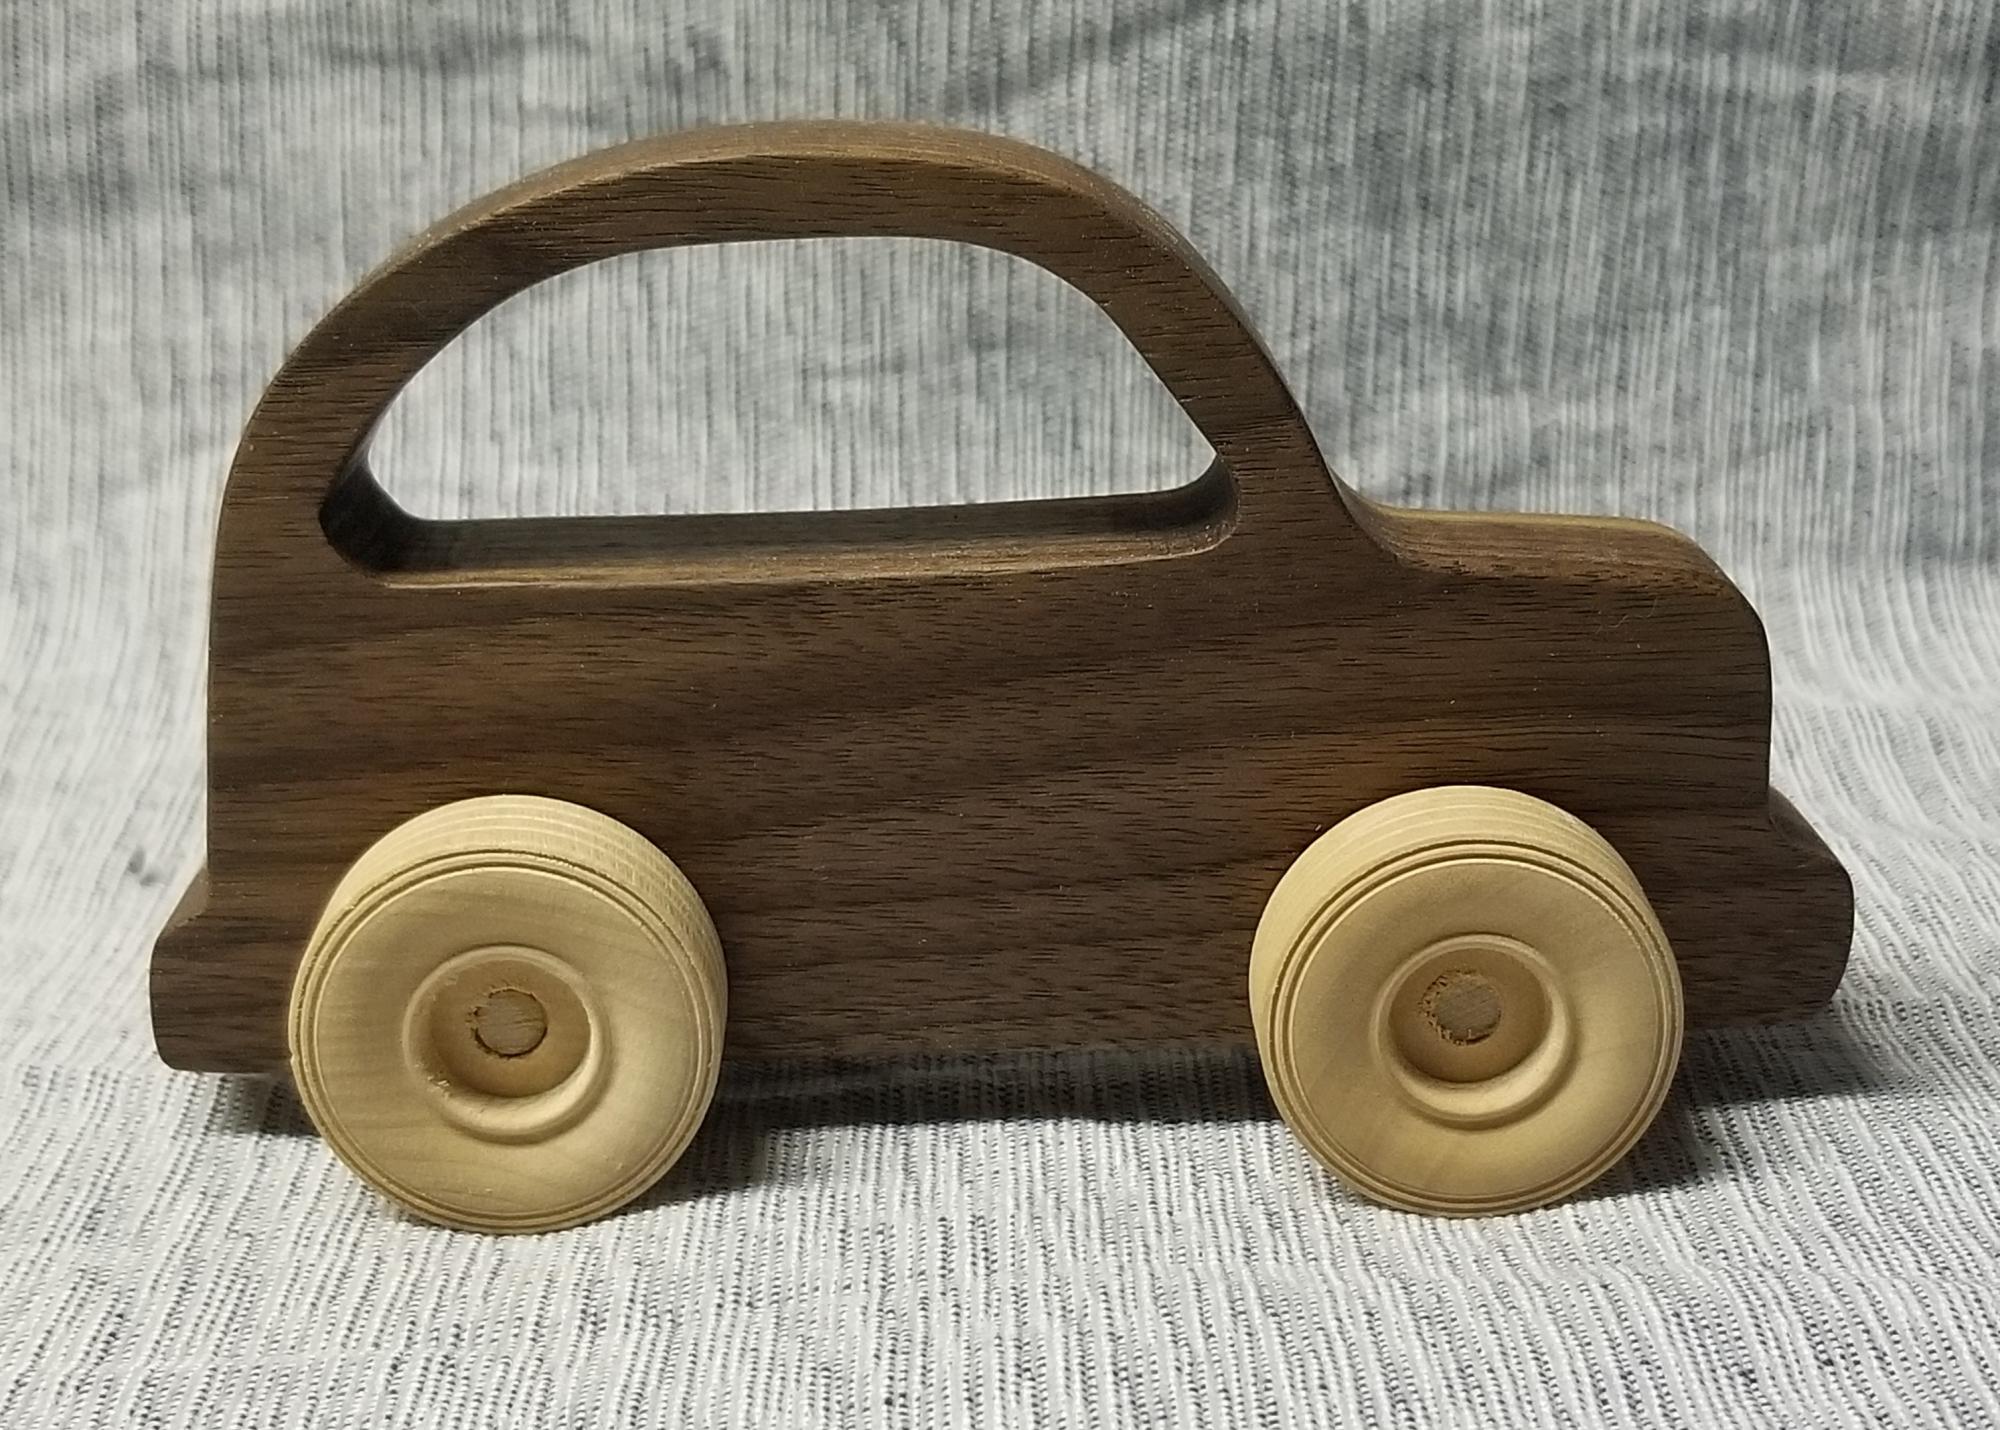
Instead of pine and paint, I used Walnut, finished with foodsafe Osmo Top Oil for a durable finish. I also made the truck out of Padauk for an orange color.
Built from Plan(s)
Estimated Cost
$4
Estimated Time Investment
An Hour or Two (0-2 Hours)
Finish Used
Osmo Top Oil
Recommended Skill Level
Beginner
Essential End Tables
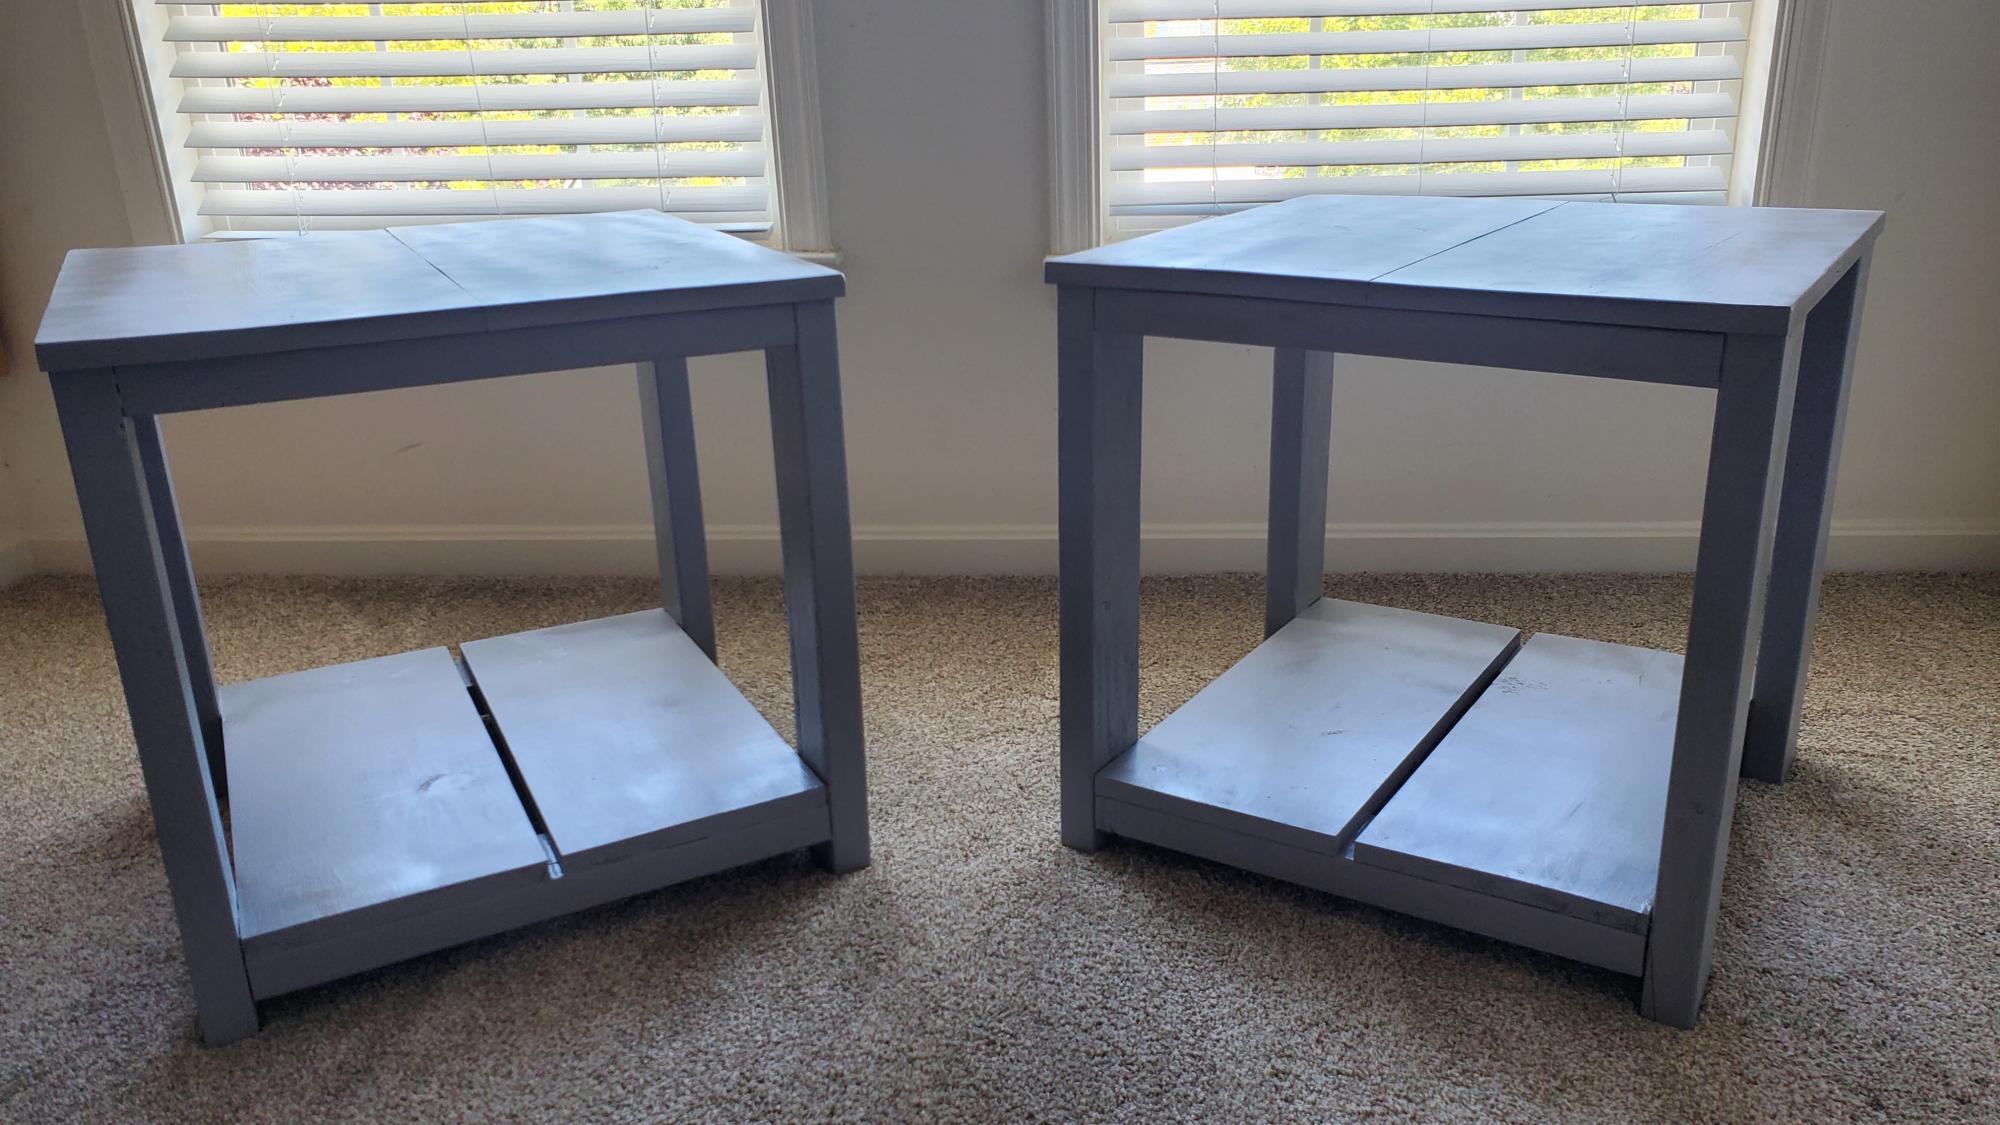
Plans are 2x4 Nightstand https://youtu.be/gLYuisY7i-M and color is from DIY Nightstand https://youtu.be/FR8x_PFPGXM
I loved the simplicity and my wife loved the color.
Thank you
Built from Plan(s)