Community Brag Posts

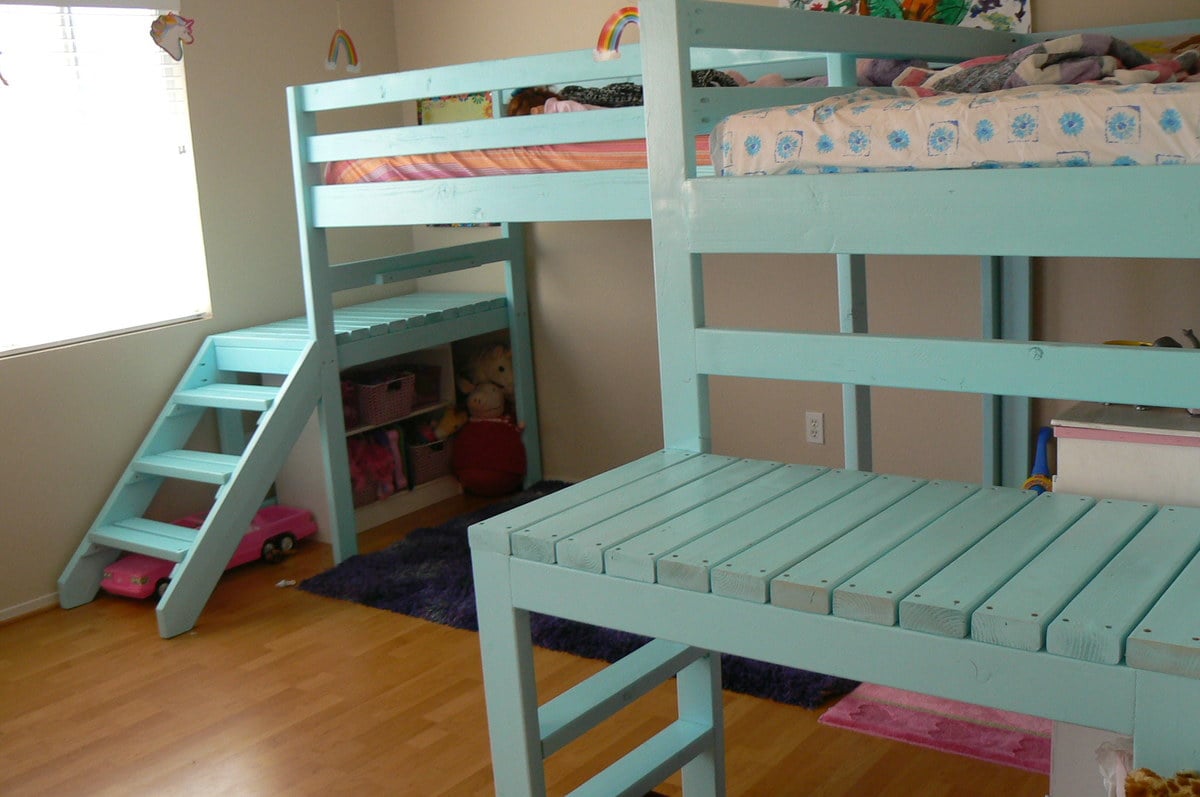
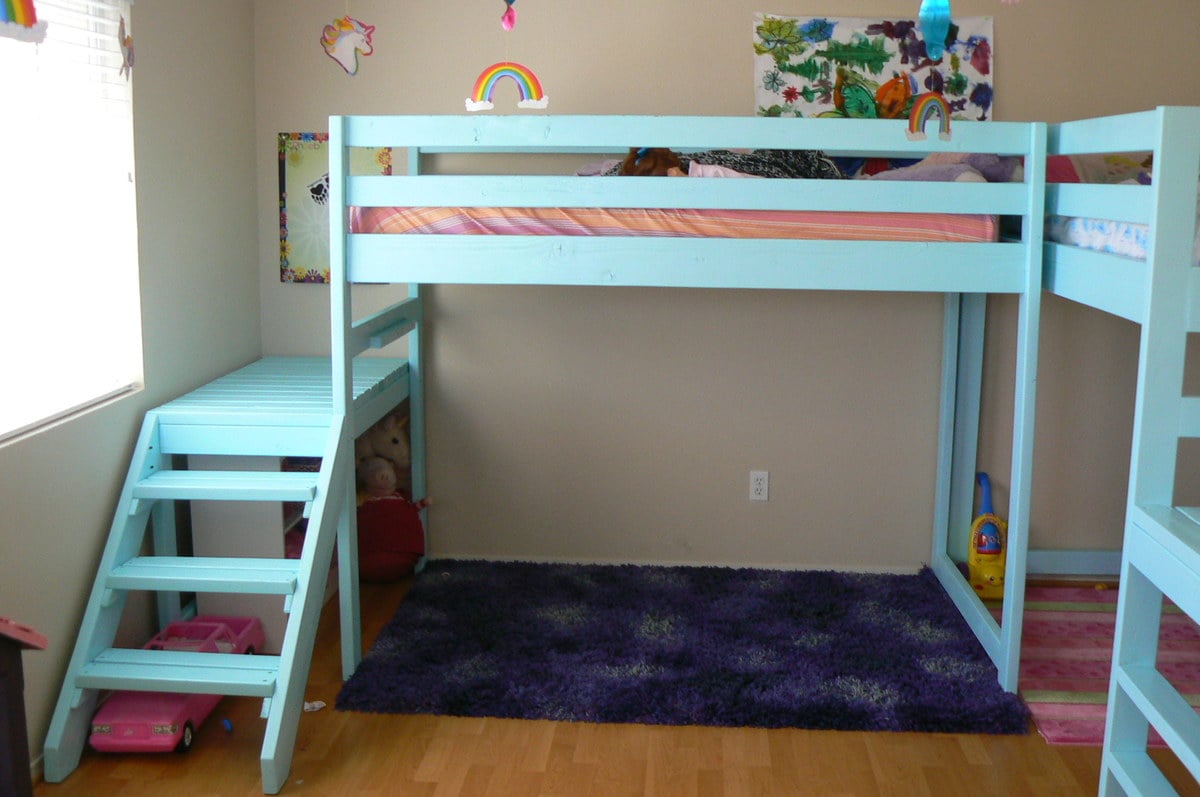
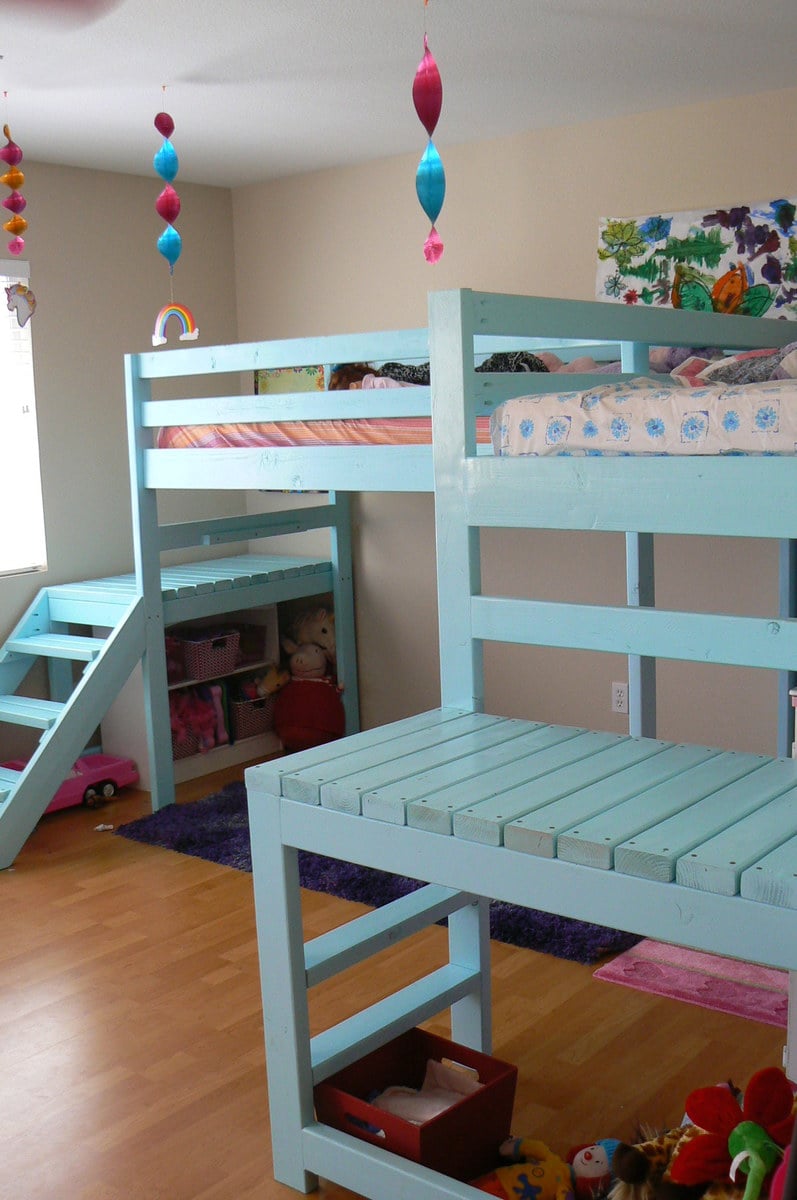
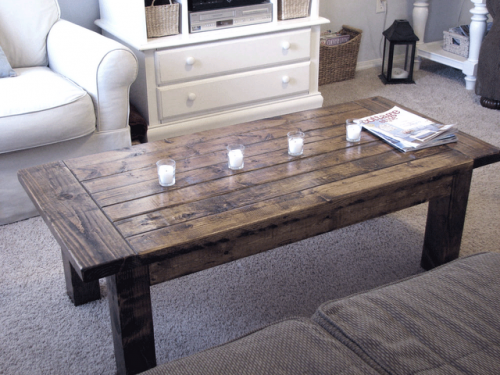
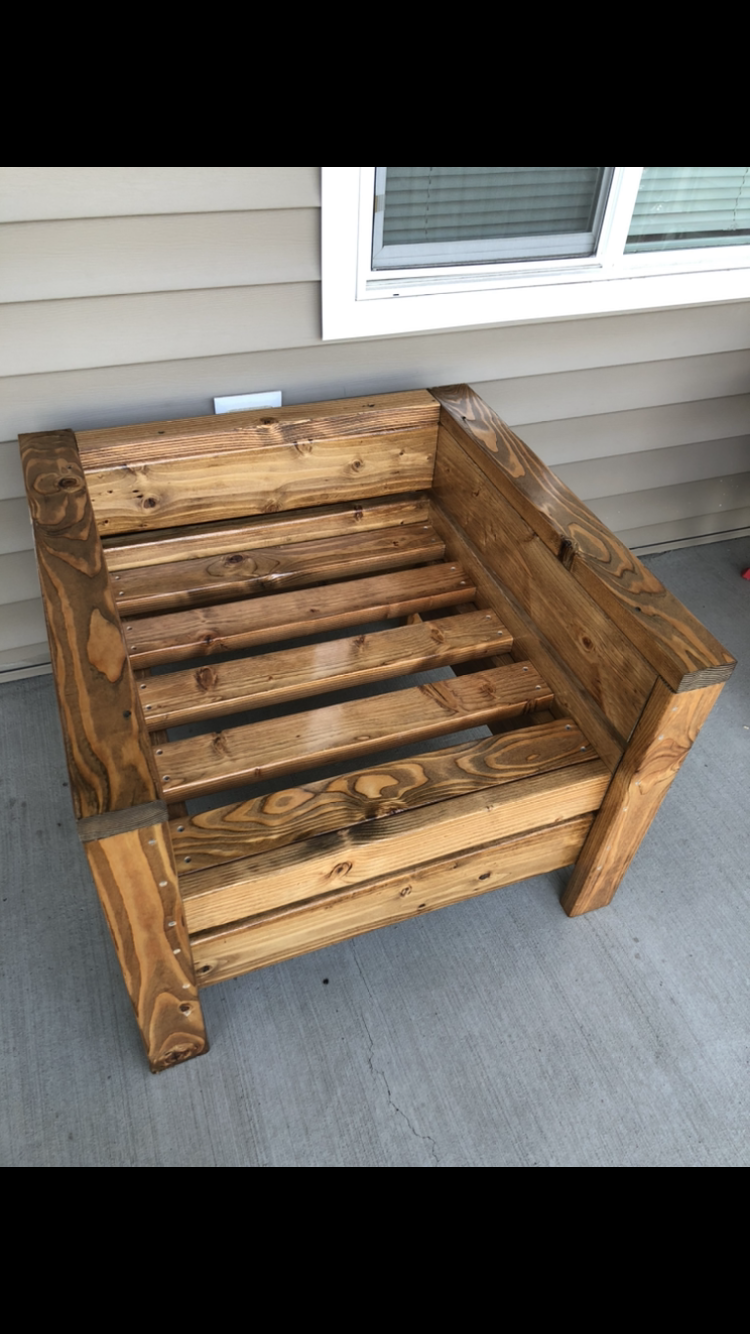
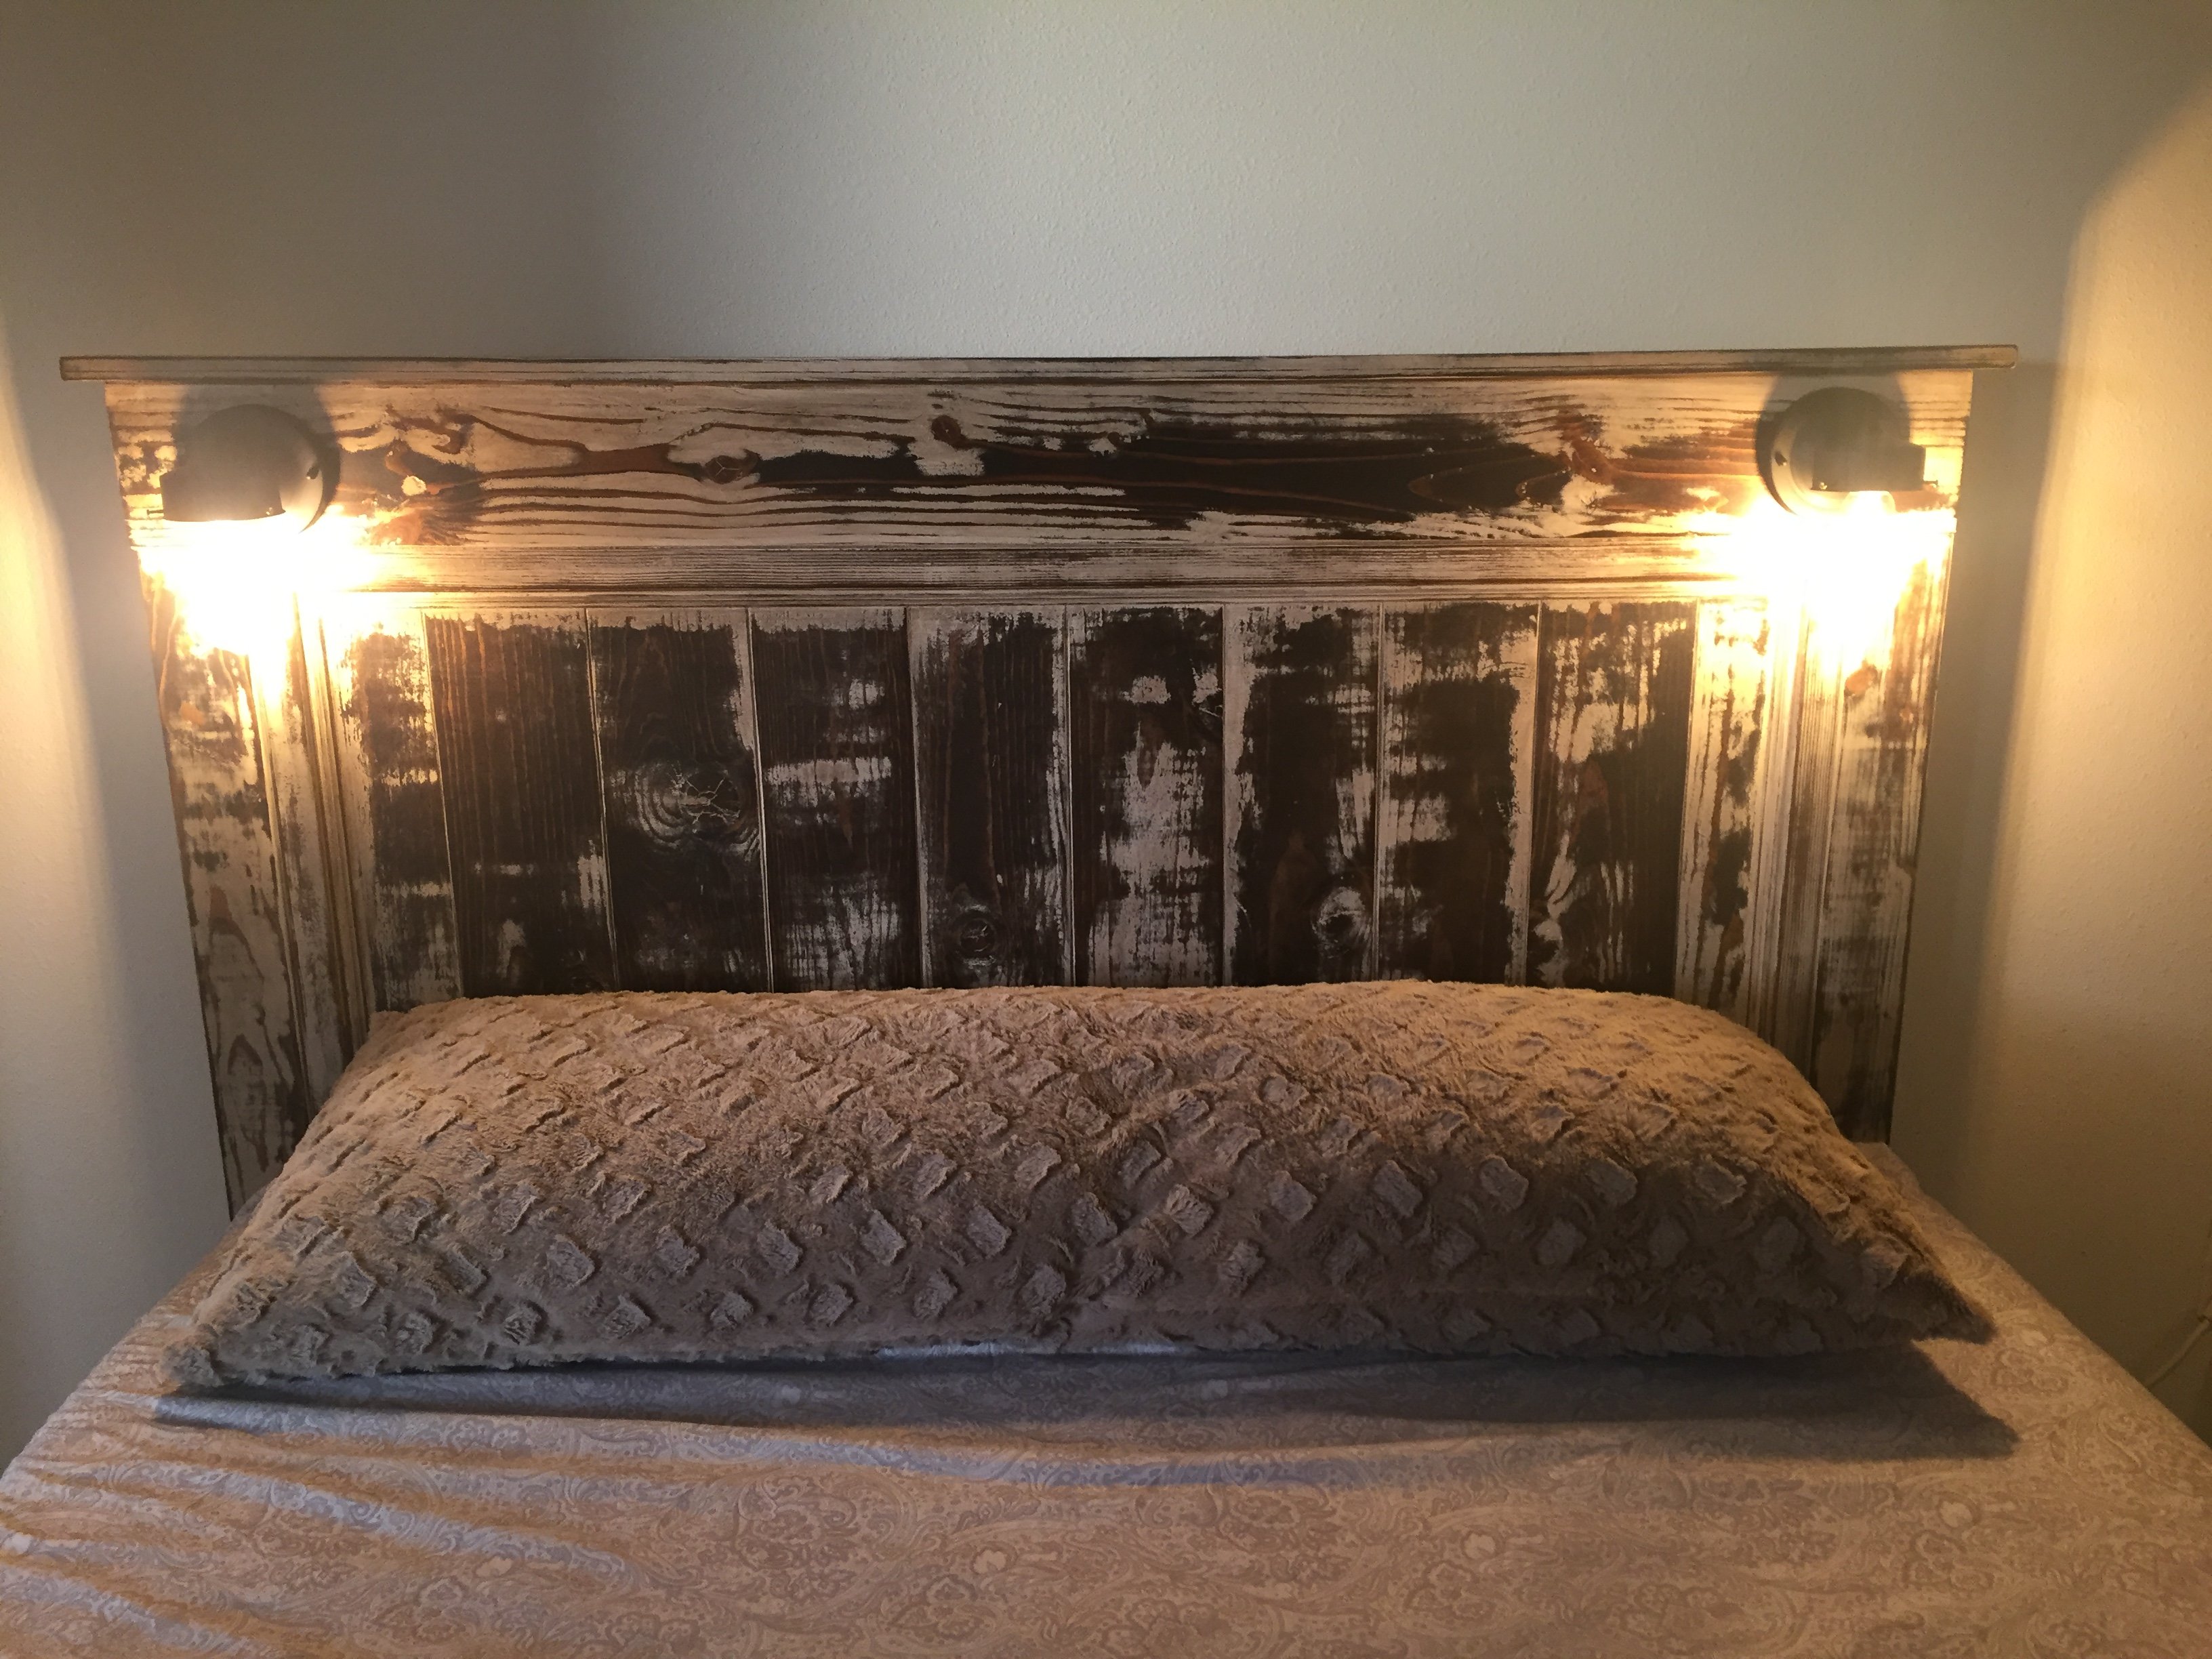
4x4 Truss Beam Table

Submitted by CJaq7 on Wed, 10/29/2014 - 18:56

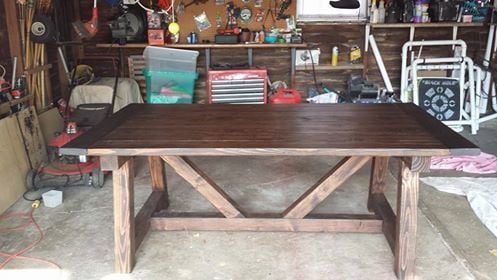
Built for my son and daughter-in-law. Love it

Built from Plan(s)
Estimated Time Investment
Week Long Project (20 Hours or More)
Finish Used
Minwax Dark Walnut with Minwax Ultimate Poly Matte
Recommended Skill Level
Intermediate

Firewood Shed using Round Posts and 2x4s

Submitted by tommybo76 on Mon, 04/15/2013 - 15:50

I used the basic design principles from Ana's site but decided to use 3.5x6.5 round fence posts (purchased at my local Tractor Supply Company) for a different look plus they are a little cheaper than 4x4 posts. I also used pressure treated 2x4s for some added strength and perhaps longer durability. I used Ana's cedar fence pickets idea for my roof (these pickets are used as walls on one of the other shed plans on this site). I didn't need a very robust roof as my firewood shed sits underneath the deck which provides a lot of protection from the rain. I attached the structure using 3 inch deck screws and the roof with 1.5 inch deck screws (nails would have been more than adequate for the roof but I had the screws on hand).

I did run into some problems due to my design changes. Most of my issues involved attempting to square up the round posts which are much closer in shape to a jagged stick than dimension lumber such as a 4x4 post. If I had to do it over again I would not have used the round posts. Constant tweaks and adjustments to the posts significantly delayed my build time and frustrated me at times. I was just barely able to wedge my woodshed in between the 2 deck posts which actually came in handy as I was able to secure the shed to the deck posts with 3 inch screws...making the shed very solid! The final issue I discovered after loading up my wood shed. The 2x4s at the bottom of the structure began to sag. I fixed this by using my floor jack to raise them up and placed 8 inch tall 4x4s underneath (2 in the front and 2 in the back).

Overall I'm happy with the way it turned out and I really love all the plans on this site...GREAT ideas!!

Built from Plan(s)
Estimated Cost
$90
Estimated Time Investment
Day Project (6-9 Hours)
Recommended Skill Level
Beginner

Queen Murphy Bed

Submitted by Jenga on Sun, 12/06/2015 - 12:59

Not too bad of a project but had to a good bit of guess work so I could changed the plans for a queen size bed and flip in on its side.

Estimated Cost
$200 if you already have the bed
Estimated Time Investment
Week Long Project (20 Hours or More)
Finish Used
White Paint and laminate flooring left over from the floor.
Recommended Skill Level
Beginner

Comments

Arilie

Sun, 05/29/2016 - 18:50

Good evening!

I am new at wood working, and would be very interrested in knowing the different measurements you changed to get from a twin to queen murphy bed. If it is posted on this page, I tried but couldn't find it. Thank you for your help. Have a good day.

Marie-Julie

Minnie Mouse Kids Chair

Submitted by Sketch1999 on Sat, 07/20/2019 - 18:56

I took a shot at the Minnie Mouse Adirondack chair for a birthday present.  

Built from Plan(s)
Estimated Cost
$40
Estimated Time Investment
Day Project (6-9 Hours)
Finish Used
Rustoleum enamel paint
Recommended Skill Level
Beginner

Comments

2x4 sectional outdoor sofa

Submitted by Anonymous (not verified) on Tue, 05/12/2020 - 08:10

My first Ana White project. My friend Shelley and I are RN's, and she got me hooked on woodworking. I started with cushions from Lowes ( in the sizes that you recommended)to see if I loved the sectional for a few years. I loved it so much I decided to have custom Sunbrella fabric ones made. Even though the custom ones were more expensive, it has been worth it. They go perfect with my California Mission style home. Now I want to add the armless one and make it a U-shape. I did add a piece at the bottom back of each sofa to hold the cushions in. The seat cushions would slide out the back when sitting on the sofa. I made the coffee table to match. Our family loves it!

Estimated Cost
building materials for sofa $250. Custom Sunbrella Fabric cushiosn $2000
Estimated Time Investment
Weekend Project (10-20 Hours)
Finish Used
Stained with Carrington Minwax and sealed with spray Shellac
Recommended Skill Level
Beginner

Comments

Two Camp Loft Beds

Submitted by Tjslove04 on Tue, 08/28/2012 - 21:00

Ana read my mind! I was telling my husband that I wanted "L" shaped loft beds for our girls abouttwo weeks before she posted these plans! As soon as I saw them we went and got our lumber. So excited to have these done and the girls love them!

Estimated Cost
$75 each
Estimated Time Investment
Weekend Project (10-20 Hours)
Finish Used
Bher premium paint
Recommended Skill Level
Beginner

Comments

mskatiesartstudio

Thu, 09/13/2012 - 13:05

I saw another post where they did horizontal 2x4s instead of stairs. I see that you did one of each. Could you tell me what your thoughts are on how the kids like them....if the 2x4 steps are easy to get up and down on....
We are adopting and we're not sure what age children we will get....so, I want to make sure they are easy to navigate. Any thoughts???

Thank you!

Tjslove04

Tue, 09/03/2013 - 09:30

we id the stairs for our 3 year old and the ladder for our 5 year old. She has no problem getting up and downthem but our 3 year old doesn't like to come down the ladder ones. The stairs are really nice and make the bed easily accesable even for me. =)

melncurt

Wed, 02/04/2015 - 18:48

What are the overall dimensions with the two landing areas and stairs? I really like this idea, but the bedroom is not super big. Thanks!

Library Book Cart

Submitted by Terukosan on Wed, 09/12/2012 - 22:54

I built this book shelf for my daughter.

I made both the top and the bottom shelves an angled.
I used a finishing nail punch to emboss the name.

I mixed 3 different color stains to match the other furniture.

Used 2" caster wheels from Home Depot.

Built from Plan(s)
Estimated Cost
$55
Estimated Time Investment
Day Project (6-9 Hours)
Finish Used
Minwax wood finish (Golden Pecan, English Chestnut, Red Oak), Minwax Wipe-On Poly
Recommended Skill Level
Beginner

Comments

tommirhea

Fri, 09/14/2012 - 09:39

This is so pretty, I love the name in it! How wonderful. When you mix your stains, how do you know how much of each? Is is just a trial and error type of thing?

Terukosan

Fri, 09/14/2012 - 12:06

Hi tommirhea,

Thank you for your nice comment!

Mixing stains is just a trial and error. Pour into empty yogurt cup and mix with form brush. I like rustic looks, so, I don't care if color is not even ;-)

Have a nice weekend,

Sunny

tommirhea

Fri, 09/14/2012 - 12:14

Okay, thanks. I think I will try it on the desk I am going to make. I don't always love the color of stains, but never thought I could just dump different ones in to make my own :) I like rustic looks as well, makes it more unique.

Modern Outdoor Chair from 2x4s and 2x6s

Submitted by gooch1775 on Wed, 07/15/2020 - 19:52

Stained with Minwax Early American, and sealed with Polyurethane. In the process of completing a 2nd to make a set

Estimated Cost
About $30-40 per chair
Estimated Time Investment
Week Long Project (20 Hours or More)
Finish Used
Minwax Early American stain and sealed with polyurethane.

Applied wood conditioner prior to staining. Let stain sit for about 5 minutes before wiping off excess. Let dry overnight. Applied 2 coats of Minwax oil based satin polyurethane. Let dry overnight between coats.

I didn’t want to be poked in the rear when sitting, so I sanded everything to 120 grit prior to starting. (Reason why it took so long)
Recommended Skill Level
Beginner

Using Ana White’s Garage Cabinet Plans

Submitted by Anonymous (not verified) on Wed, 04/20/2022 - 09:23

Thank you so much for the two videos we watched of you and your husband explaining and demonstrating how to build garage shelves. We used your plans as a guide. We chose to add shaker style doors to create cabinet shelves. We absolutely love them. We are not handy as you can see we had a living room lamp for a work light and a lifetime table as a work bench. Thank you!
The Paulsons

Comments

Folding Workbench

Submitted by MrsCordz on Fri, 10/11/2019 - 07:47

We chose this project because we have a small garage and space is at a premium.  The dimensions of this build fit well in our limited space and allowed us to organize items such as paint, stain, screws and nails into one central location. I chose 2x4's on the sides to give it a more stable feel. Our garage and parking lot are all sloped and with the 2x4's this prevented the twisting. It feels solid and the wheels are smooth. We picked everything up at Home Depot. The screws that came with the hinges are to long and my husband used the Dremel to grind them down. You could just buy shorter screws.  This is one of my firsts builds and I've definitely learned a lot of lessons along the way. Measure, measure, then measure again before you cut a piece and use a level surface to make level pieces. Overall, everyone in my family played a part in helping me build this piece and so I love it and will cherish this piece and the memories always. Thanks Ana for all your fun videos, sharing your life with your family, and providing resources like this plan to us for free. I'm thankful for my son who bought me a compound miter saw for Mother's Day and other family for buying me a Ryobi circular saw. I'm truly blessed and loved. Thanks

Built from Plan(s)
Estimated Cost
120
Estimated Time Investment
Weekend Project (10-20 Hours)
Finish Used
I'm leaving it in the raw due to the nature of the piece. I may put a clear coat on it later.
Recommended Skill Level
Beginner

Comments

First Project

Submitted by dragondad on Thu, 08/06/2020 - 11:34

Well, I started with one chair and finished with a full set. Not bad for a first timer. Definitely room to improve. Little tip if you're going to make this amazing set... raise the backs as they are too low with thicker cushions. I built a casing to go on top after the fact. Pretty happy with how it all turned out. Thanks Ana for the plans... now onto the next project!

Comments

Just My Size Closet

Just My Size Closet!

Built this from Ana's plans with a few modifications.

Started with a big empty box after ripping the old stuff out and finished with this look.

Adjustable shelves and all !

Built from Plan(s)
Estimated Time Investment
Weekend Project (10-20 Hours)
Finish Used
Whatever white paint my wife bought !!
Recommended Skill Level
Beginner

Garage Storage

Submitted by wabilinski on Mon, 09/28/2015 - 10:48

My wife was needing some extra storage in the garage for seasonal decor totes.

So, of course, I first go to Ana White's website. Voila, I found the perfect plans for the space I had to work with.

- The final product ended up being 72"Hx54"Lx21"W

- I used a counter sink bit to pre-drill screw holes so the heads would be slightly below the surface of the boards. This way the totes would not get caught on or damaged by the screws.

Estimated Cost
$90 for wood and screws
Estimated Time Investment
Day Project (6-9 Hours)
Finish Used
N/A - left unfinished
Recommended Skill Level
Beginner

Outdoor chair frames and coffee table

I built a set of chairs and a coffee table for our newly designed outdoor area. These look amazing and people love sitting on them and hanging out outside our house.

Comments

Seasonal And Holiday

HERB GARDEN PLANTER

Submitted by Codding58 on Tue, 04/05/2016 - 10:18

This project was a super easy and fun build that I made for my mother's herbs. In total I spent probably around $12 in material, and only spent about 2 hours building it. Came out great!

Estimated Cost
$12
Estimated Time Investment
An Hour or Two (0-2 Hours)
Finish Used
none
Recommended Skill Level
Beginner

Comments

In reply to by jfwoodworking

Codding58

Tue, 04/26/2016 - 14:13

Being that its going to be holding moist soil, and inevitably warping some, I didn't want to waste too much money on better wood, so i went with cedar fence boards (5 1/2") for this build. It DID move around a little when I first watered, but everything has held together fine, and I defiantly think it will add to the "rustic" look for my herb garden planter. i will try to upload some pictures as it "ages"

Kids Tree Fort

Submitted by Anonymous (not verified) on Sun, 05/31/2020 - 09:27

Built a fort for the boys with two climbing walls, a spot for their toys, and added some hammock swings

Estimated Cost
~$600
Estimated Time Investment
Week Long Project (20 Hours or More)
Finish Used
No stain, left natural
Recommended Skill Level
Advanced

Weathered Fancy Farmhouse Bed

What a great project. This was a lot of fun to build, I built it on our patio in our apartment. I made some mistakes, but it was fun. Thank you for the plans. I hope you like the pics. Comments or questions welcomed!

Built from Plan(s)
Estimated Cost
350
Estimated Time Investment
Week Long Project (20 Hours or More)
Finish Used
Latex White Paint + Dark Walnut Stain
Recommended Skill Level
Beginner

Comments

mystartgroup

Fri, 10/21/2016 - 14:30

By the way the lights are actually LED bulbs and they give off little to no heat what so ever. I love that the lights are a warm light and not a white light. They are connected to the socket that is controlled by our light switch. My wife is very pleased.


As stated, this is my 3rd project ever and all 3 are from Anna's plans. Thank you so much for posting these. Come end of next year, all of our furniture will be hand made with my son and I and all are from Anna White. We are having a great time and putting our own spin on all of the items. This is so cool. Thanks for making this easy and doable. I never thought we would have this skill. 


Thank you, again.

My new and amazing outdoor bench

Submitted by ישראל on Sat, 11/16/2013 - 21:57

Thank you for the easy and fun bench plan.
It was really easy to install.
Even my 2 little daughters had fun (-:

Estimated Time Investment
Afternoon Project (3-6 Hours)
Finish Used
Bondex walnut
Recommended Skill Level
Starter Project

Comments

Chachamation

Thu, 10/02/2014 - 07:21

This is absolutely amazing!

This "ישראל" person is super talented comes to the final touches!!  From now on, I will start following your work...

Expanded Dream Dollhouse

Submitted by bellenh on Sun, 01/12/2020 - 17:13

We chose the Dream Dollhouse plan because all four grandchildren could play with it at the same time.  We also wanted to make the dollhouse entirely by hand - including much of the decor.  The original plan was expanded by raising each floor 2 inches (to allow for the repainted Susy oven cabinets); and an attic was added to allow all the third floor walls to be full height.  Interior walls were increased (7, 9 and 12 inches) to accommodate Barbie-sized furniture.  Eliminating the stairs and adding an elevator also increased usable floor space.  The wallpaper was scaled from online wallpaper images or designed to coordinate with the space.  All the bedding, rugs and the living room furniture were made by hand.  Some plastic Barbie or Susy doll furniture was repainted.   All the art and photos are specific to each grandchild.  Both the fireplace and chandelier will light.  The floors are cut from vinyl floor tiles.  The shingles are cut from jumbo craft sticks.   The completed house took 2.5 months with some very long days  as we were on a Christmas deadline!   We intend to make a 2-car garage topped by a deck (and maybe a pool) that can sit next to the house this summer.

Finish Used
white paint with primer for all wood surfaces, sticky vinyl tiles cut into strips for flooring, jumbo craft sticks for shingles, t-tracks (from a workbench system) for the metal elevator slides.
Recommended Skill Level
Beginner

Modern Outdoor Chair - High Back Adirondack

Modified with a high back and modern adirondack arms.

The base of the chair is built exactly to the plan except that the arms are done in a modern adirondack style.

The back was made independently to fit inside the base and then attached to the plan base.

Very comfortable but very heavy chair even without the modified back.

Not stained yet obviously.

Cushions are hard to find I think I would make it slightly smaller next time and maybe even find the cushions first and alter the plan to fit.

Estimated Cost
$45 Can
Estimated Time Investment
Afternoon Project (3-6 Hours)
Finish Used
None yet
Recommended Skill Level
Beginner

Comments