


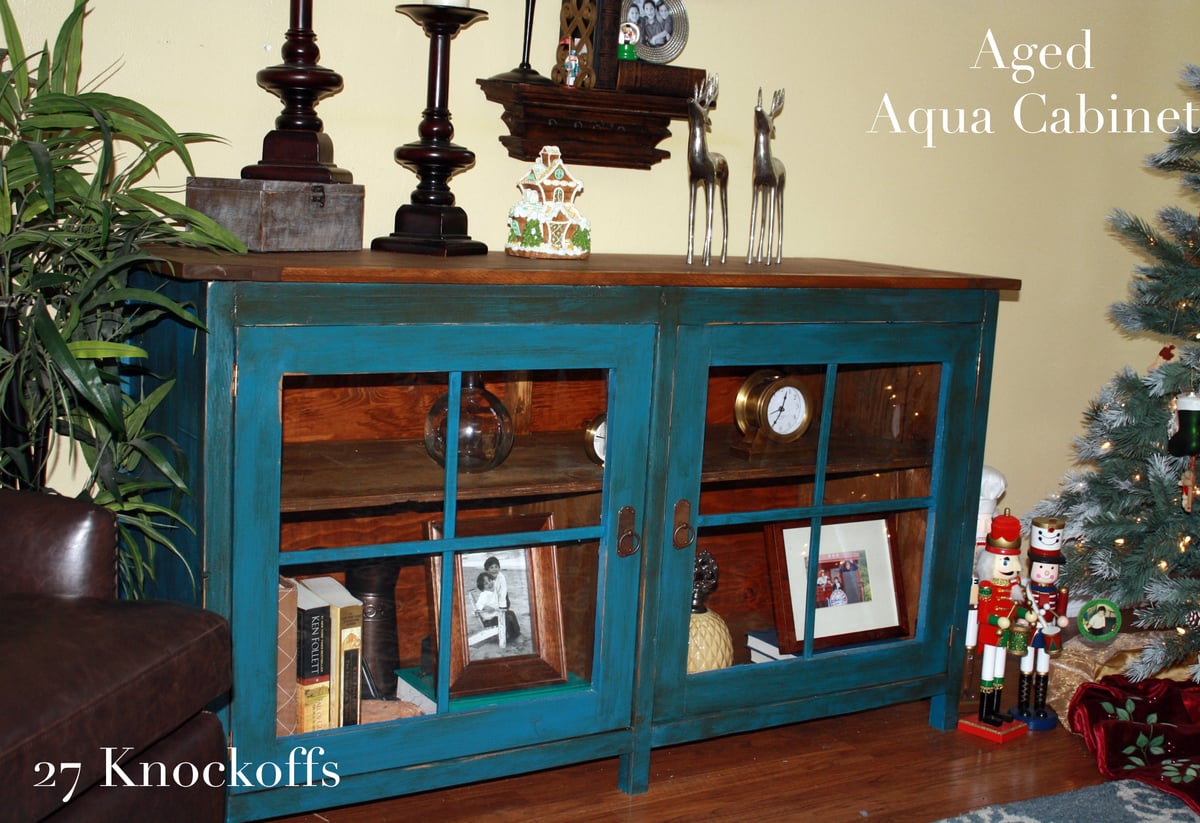
This is one of my favorite knockoffs. I fell in love with Ethan Allen’s Ming Media console. However, I didn’t love the $1800 price tag. I went to Ana White’s website and found a similar plan. Ana has over a 1,000 free D.I.Y plans. Here is the plan I modified: http://ana-white.com/2011/10/benchmark-media-console
Ana showcased my DIY aged aqua cabinet on her site. Since then, I’ve had a lot of questions asking how I finished this piece. So, I thought I would explain how I achieved my aged aqua look with vaseline. Yep, vaseline. It was easy, cheap and fun! Read on.

Preparation
Paint
Chalk Paint
Clear and Dark wax
VASELINE
120, 150, 220 grit paper
Steel Wool #3,
Minwax Pre-Stain Conditioner
Minwax stain Provincial

Please read through the entire plan and all comments before beginning this project. It is also advisable to review the Getting Started Section. Take all necessary precautions to build safely and smartly. Work on a clean level surface, free of imperfections or debris. Always use straight boards. Check for square after each step. Always predrill holes before attaching with screws. Use glue with finish nails for a stronger hold. Wipe excess glue off bare wood for stained projects, as dried glue will not take stain. Be safe, have fun, and ask for help if you need it. Good luck!
Instructions
Step 1

STEP 1: PREPARE WOOD
I sanded the entire cabinet with my handy palm sander. I started with 120 grit, then sanded it again using a 220 grit. Take a damp rag and wipe away sanding residual.
Step 2

STEP 2: PRE-STAIN
Pre stain your wood to help stain penetrate wood evenly. I used Minwax’s pre stained wood conditioner. I am sure any wood conditioner would work as well. Brush on with a foam brush and let sit for 20 minutes. Wipe away any excess with a cloth.
Step 3

STEP 3: STAIN
Stain your wood with the color of your choice. I just happen to LOVE Minwax’s Provincial right now. I didn’t stain the entire cabinet ($$ saving tip). I only stained the areas I planned on distressing. Ask yourself where normal wear and tear would occur. For example, the corners, edges, raised areas and doors. I applied the stain using a sponge brush. Brush on, let it sit for a few minutes and then wipe off. I let it sit and dry (about 30 minutes).
Step 4

STEP 4: SAND and apply VASELINE
Lightly sand it again using 220 grit. Get a small amount of vaseline and place on the areas you want to distress, ie….the areas you want the stain to show through. Keep in mind that you want to dab it in areas where natural distressing occurs (like I mentioned above in step 3). The vaseline makes the top coat of paint practically fall off with ease so apply it wherever you want to distress the piece later. You can almost wipe it off with a rag so you have to be careful where you put it. Don’t overdo it though. The vaseline smears easily and can leave you with larger exposed areas after distressing that you may not want.
Step 5

Step 6

I purchased all my paint from Home Depot, even the chalk paint (TIP: one stop shopping makes life easier). Here are the colors I used:
Behr; Song Bird
Ralph Lauren; Reservoir Blue
Americana Decor Chalk Paint in Tresor.
After I mixed the three (about a 1:1: ratio), I settled on this lovely teal color. Start painting. I put 2 coats on. Let fully dry between each coat. Tick…tock…tick…tock. I am not patient, so waiting was very hard, but very necessary.
Step 7
STEP 7: DISTRESS
After your paint has dried you are ready to begin distressing. I used my Ryobi corner cat sander with 150 grit paper. I also used course steel wool (#3) to get into the areas my sander wouldn’t. You can use what works for you. I focused on the front of the dresser (sides, doors, etc…) for a heavier distressing. Begin on the places you applied vaseline. The paint in these areas will easily peel off. Add other distress marks as desired. You can distress as much or as little as you want. I didn’t want a lot of distressing, so I chose to go light on the sanding. (TIP: there are no mistakes that can’t be fixed. If you distress too much in one area, start at step 4 above and re do the area). Make sure to clean off any sanding debris that remains.
Step 8
STEP 8: WAX
Watch the magic come alive. I used Annie Sloan clear and dark wax all over. I’ve used Americana Decor wax in clear and dark in the past and it works just as well (TIP: Americana Decor is cheaper than Annie Sloan). I just happened to have Annie Sloan’s waxes on hand and her stuff is amazing. Apply the clear wax first. I used a 2.5″ Purdy bristle brush from Home Depot. For more information on how to apply Annie Sloan waxes, please refer to her website: www.anniesloan.com. Annie recommends applying a lot of wax, but then taking loads of it off! She says that we need to spread it all over making certain it really soaks into the paint and crevices. However, it costs a small fortune and I didn’t want to waste any wax (or $$). I applied a small amount all over with light brush strokes. After applying it, wipe it off pressing into the paint so it absorbs in. I usually apply it with a brush and then wipe it off with a rag. Now, after you have applied a layer of clear wax, brush your dark wax either all over or in the areas you want to give an aged effect. I chose to brush it all over. Then take a rag and remove any excess dark wax. (TIP: Always apply dark wax over clear wax. This will have better control over your toning layer or antiquing effect.).
Let the wax dry. It has to DRY!! Another moment where I have to exercise patience. (TIP: wax right before you go to bed. When you wake in the morning, it will be ready to buff).
Step 9
STEP 9: BUFF
Take a clean, soft rag and buff it. The more you buff, the more shine you get.
Step 10
ENJOY your new AGED AQUA color.
It is always recommended to apply a test coat on a hidden area or scrap piece to ensure color evenness and adhesion. Use primer or wood conditioner as needed.
