

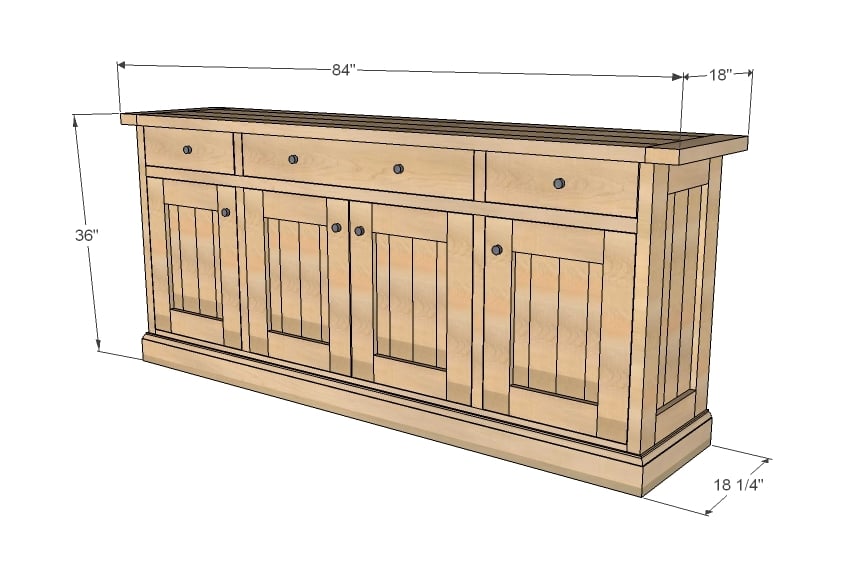
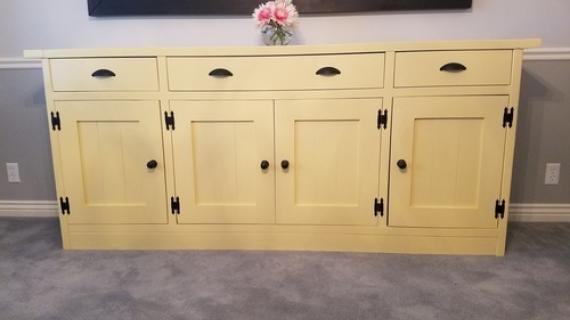
Free plans to build a huge wood sideboard using common lumber and minimal tools. Step by step plans include diagrams, shopping and cut list and lots of reader submitted photos.
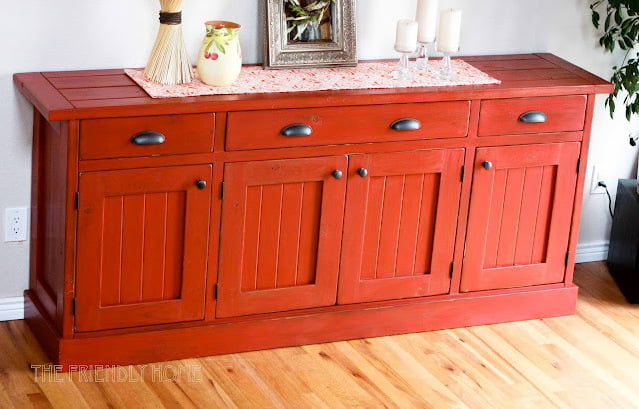
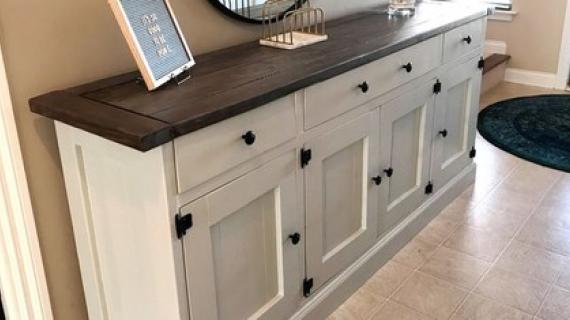
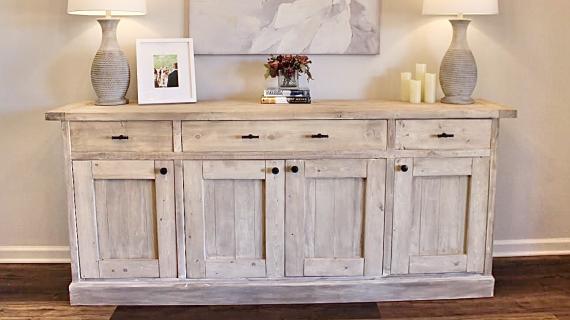
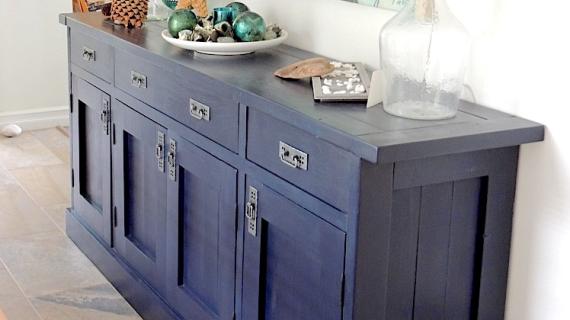
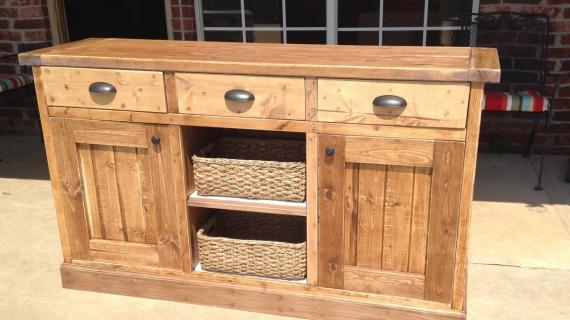
Or how about amazing, beautiful, stunning, glorious? Hillary's sideboard, inspired by Restoration Hardware Salvaged Wood Sideboard, retailing for no less than $2995, made of reclaimed pine, can be yours with some elbow grease and a flatbed cart full of lumber.
Preparation
- 6 – 2x4 @ 8 feet long
- 2 – 2x6 @ 8 feet long
- 7 – 1x4 @ 8 feet long
- 2 – 1x2 @ 8 feet long
- 1 – 1x6 @ 6 feet long
- ¼” thick x 3 ½” wide boards for door panels or ¼” plywood or paneling
- 1 – sheet ¾” hardwood plywood
- 10 feet of 4 ¼” base moulding
- 3 – 15” drawer slides
- 2 ½” pocket hole screws
- 1 ¼” pocket hole screws
- 1 ¼” brad nails
- 2” brad nails
- 1 – sheet ¼” plywood
- 4 - 2x4 @ 34 ½” (Legs)
- 4 – 2x4 @ 10 ½” (Panel ends)
- 6 – 1x4 @ 23 ½” (Side Panels)
- 2 – 2x4 @ 75 ½” (Bottom Supports)
- 1 – ¾” plywood @ 16 ¾” x 75 ½”
- 2 – ¾” plywood @ 16 ¾” x 30 ¼”
- 2 – 1x4 @ 18 1/8”
- 2 – 1x2 @ 75 ½”
- 2 – 1x2 @ 5 5/8”
- 2 – 1x2 @ 22 3/8”
- 2 – 2x4 @ 18”
- 2 – 2x4 @ 77”
- 2 – 2x6 @ 77”
- 8 – 1x4 @ 22 ¼”
- 8 – 1x4 @ 11” ¼” x 3 ½” hobby stock for backs of doors or ¼” plywood or paneling
- 2 – 1x4 @ 16 ¾”
- 6 – 1x4 @ 15 ½”
- 2 – 1x4 @ 33 3/4” (Measure and fit)
- 4 – 1x4 @ 15 5/8” (Measure and fit)
- 1x6 for drawer faces – cut to fit
- 1 – ¼” plywood @ 77” x 32” (Back)


For long term durability and more professional results, I recommend using a pocket hole joinery system for wood joints. Here is a video with tips for using a pocket hole jig:
Instructions
Step 1
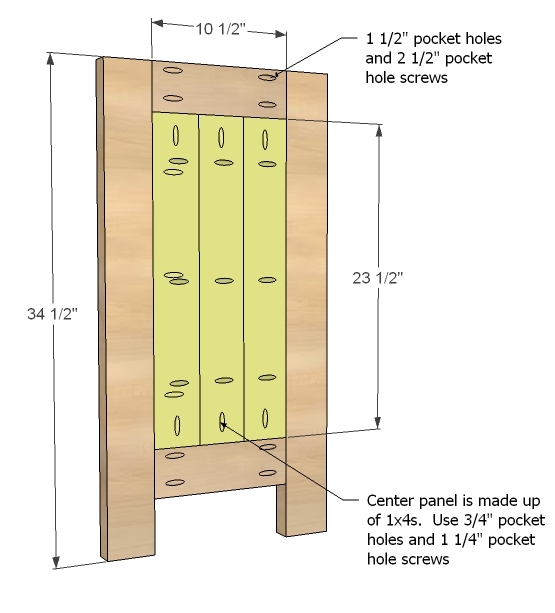
Starting on the inside 1x4 panel and working your way out to adding legs, build your ends with 1 1/2" pocket holes and 2 1/2" pocket hole screws, hiding your screws on the insides. Keep all edges flush. Remember that the backs are flush, but the outer side is not, with the 1x4 panel inset.
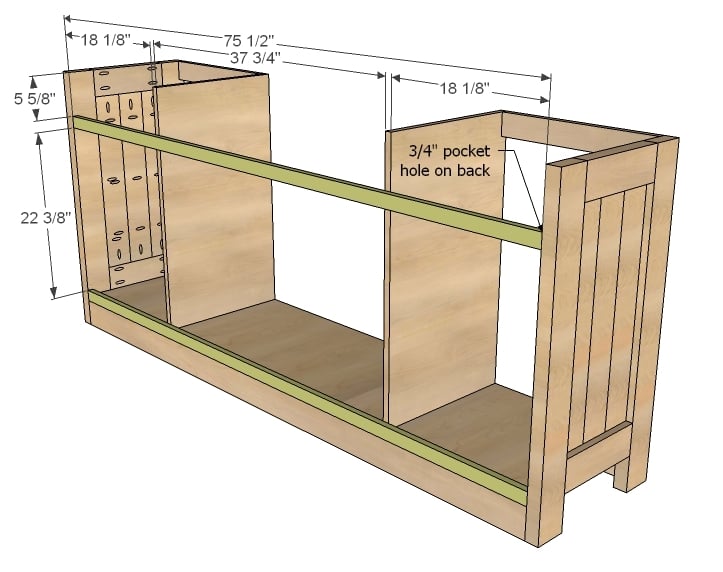
Step 2
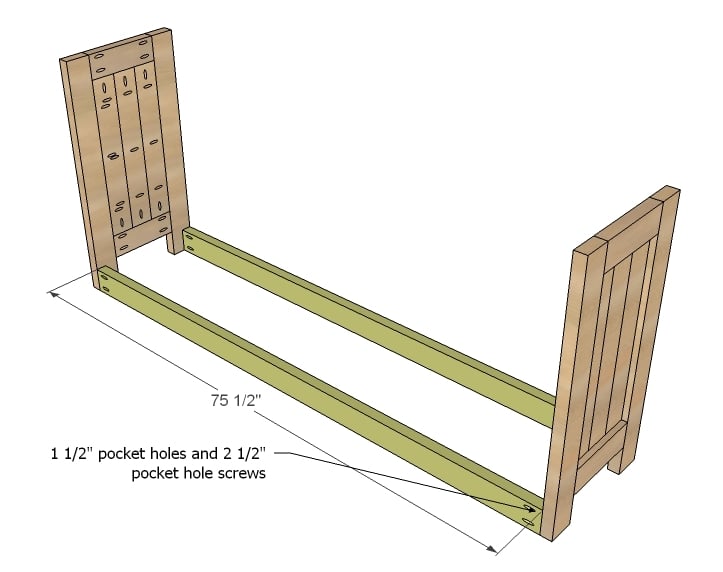
I really wanted this sideboard to NEVER sag in the middle, so these boards are more for support than anything. I recommend attaching with 1 1/2" pocket holes and 2 1/2" pocket hole screws from the back side to hide. Set aside, we'll work on the storage part now.
Step 3
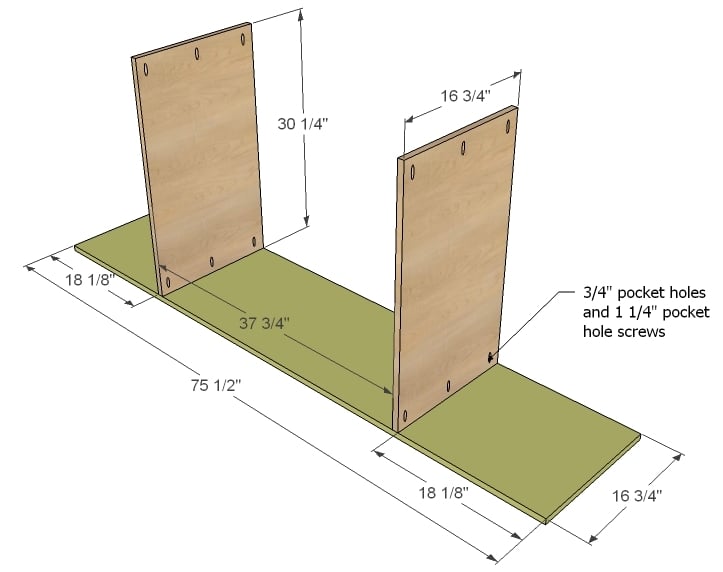
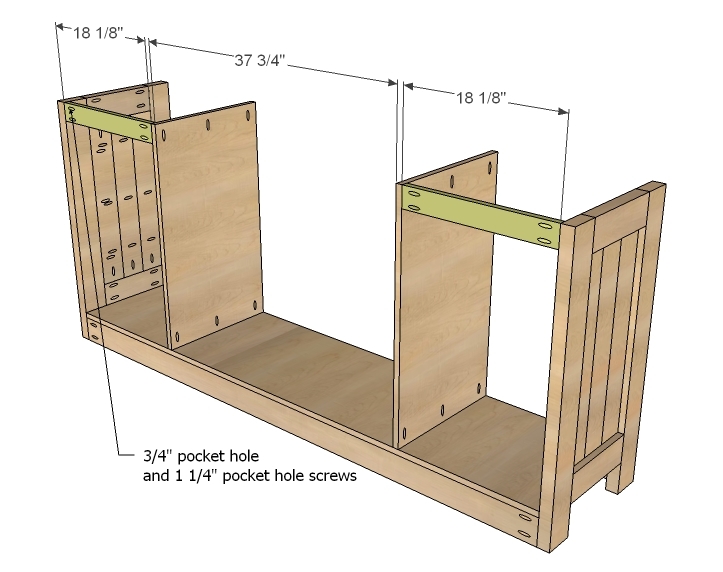
For the storage part, attach plywood dividers to bottom very carefully, making sure joints are square.
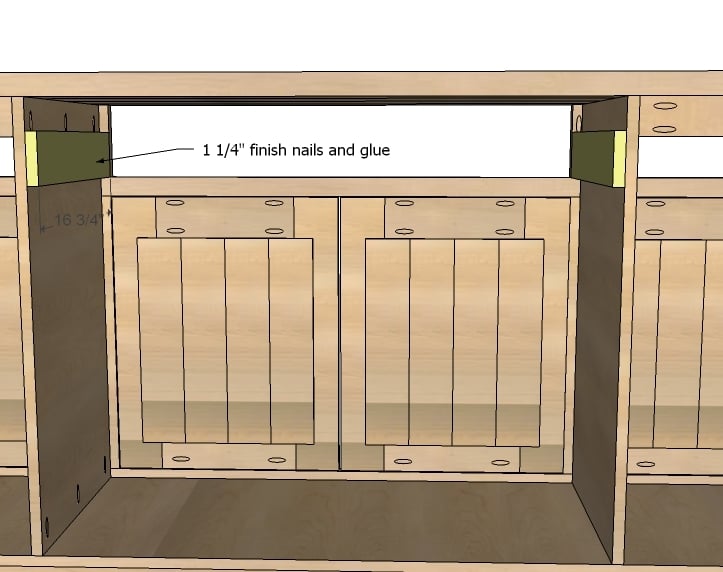
Step 4
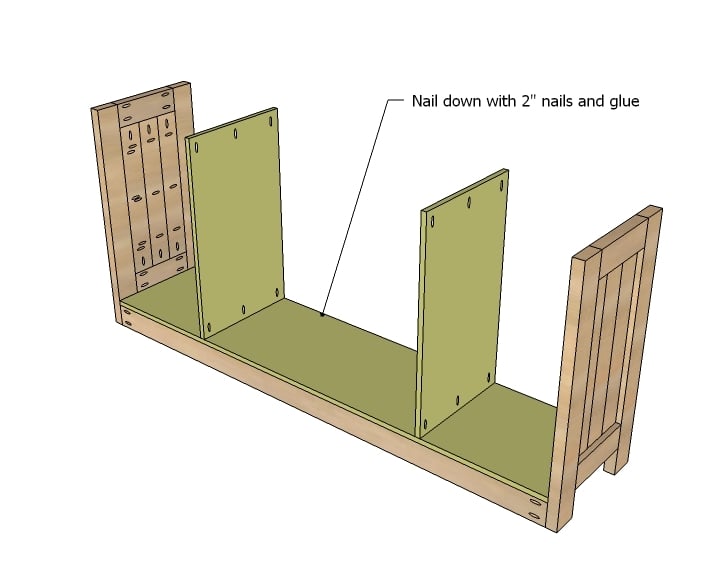
Then fit the center divider into the base as shown above. Fit flush to back.
Step 5
Step 6
On the front, add trim, being very careful to make sure your trim is square and straight. Remember, we've got drawers to fit.
Step 7
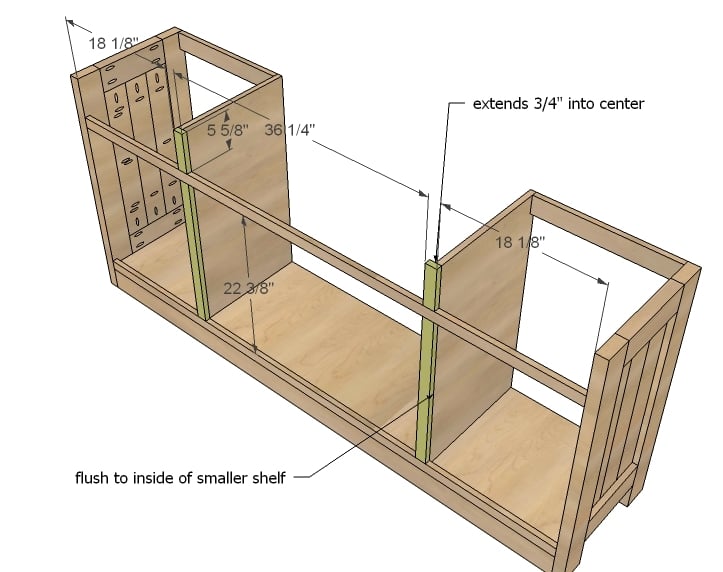
The remaining front trim is flush to the inside of side cabinets, overhanging the center cabinet.
Step 8
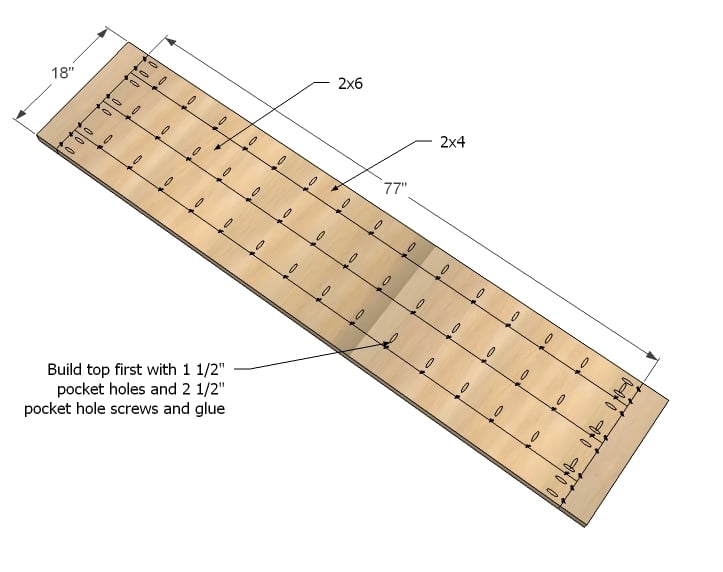
Build top as shown in diagram.
Step 9
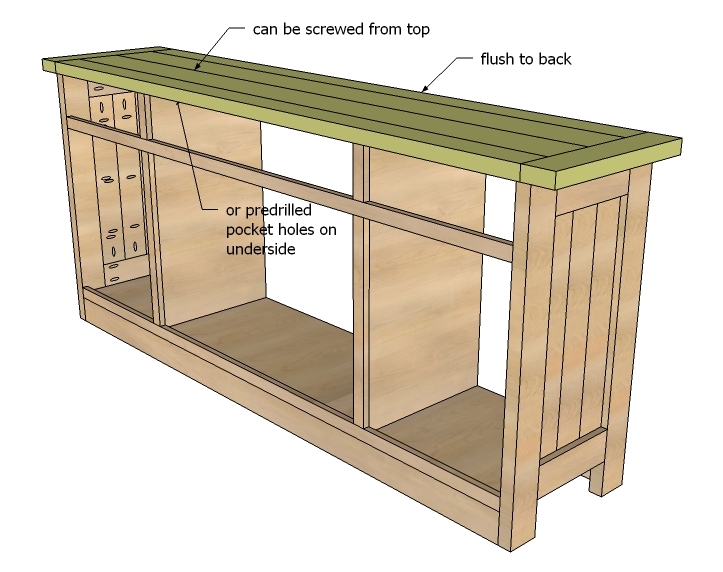
You can attach top now, or as Hillary recommends, attach top after installing drawers.
Step 10
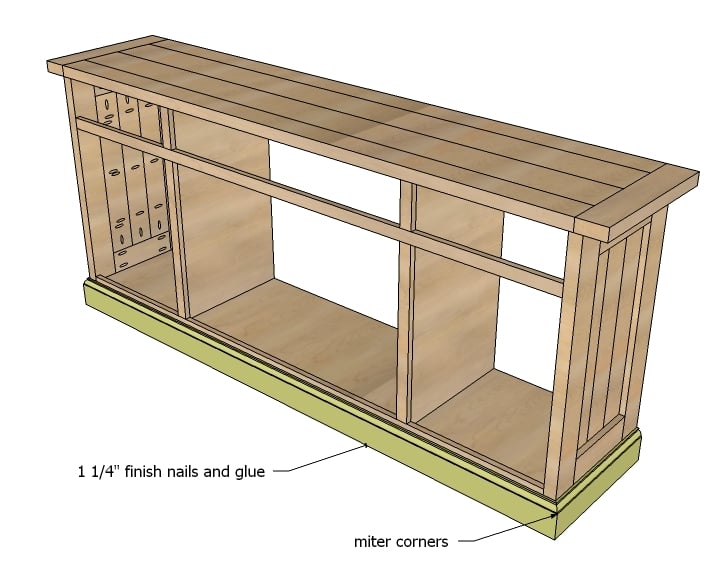
Cut baseboard, mitering corners to fit bottom. Nail on with glue.
Step 11
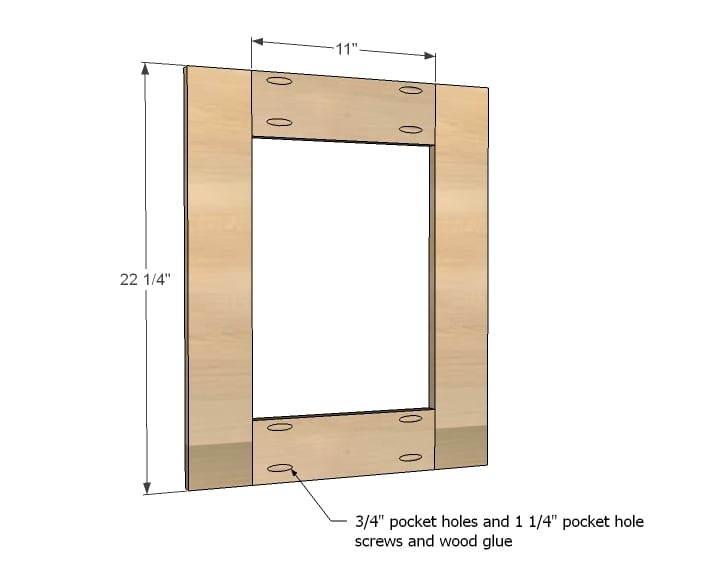
Build your door frames as shown above.
Step 12
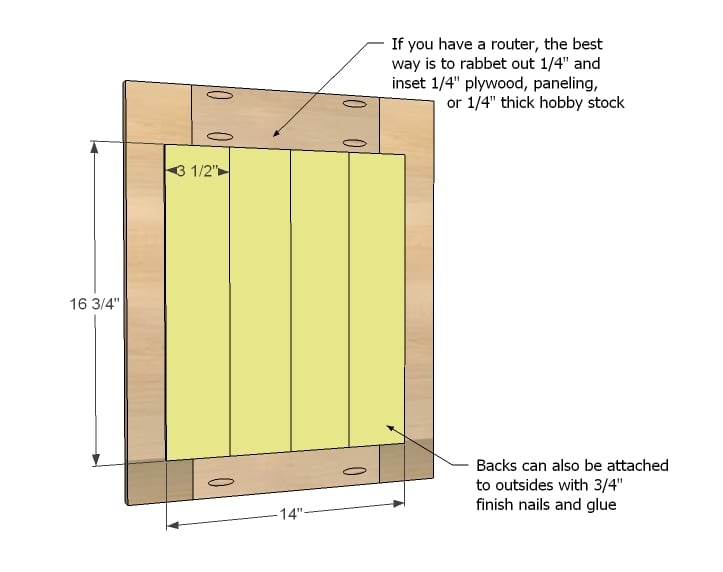
Then attach hobby stock to centers to complete doors.
Step 13
These are for the drawers.
Step 14
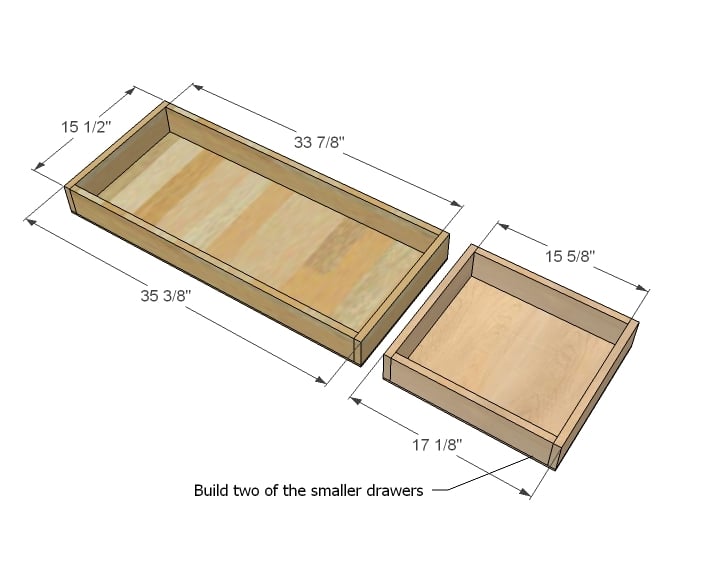
Build drawers to fit openings. Remember, most drawer slides require 1/2" clearance on each side, or 1" overall. It's always a good idea to double check measurements with diagrams before building drawers.
Here is a video on installing drawer slides
Step 15
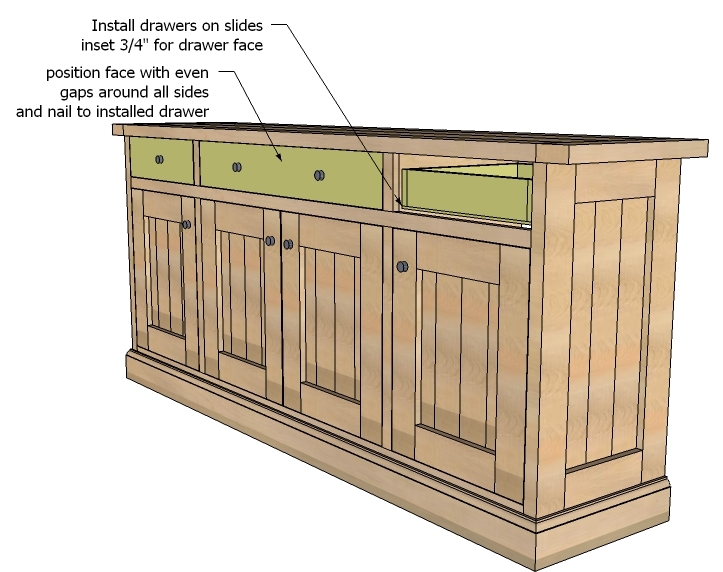
Install drawers with slides, set in 3/4" for the drawer faces. Then cut drawer faces and attach to drawers with 1 1/4" finish nails and glue.
Step 16
Add back. I really loved how Hillary inset her back.
Step 17
And finally, add shelves.
It is always recommended to apply a test coat on a hidden area or scrap piece to ensure color evenness and adhesion. Use primer or wood conditioner as needed.

Comments
Marion (not verified)
Mon, 02/27/2012 - 09:44
Stunning.
This is absolutely beautiful. Really. Stunning. I'm headed over right now to check out Hillary's site. My home is slowly filling with furniture from Ana's site, and this is going on my to-do list right now. I was brainstorming and searching on pinterest for sideboard ideas, but this one is perfect and gorgeous. Thanks, once more, to Ana and to Hillary.
Robohead
Mon, 02/27/2012 - 12:16
That is really nice! I keep
That is really nice! I keep changing up my "to-do" list with different console tables and this one here is now the current favorite. I hope I can get it built before you post another one that I like even more. :)
Cgoode (not verified)
Tue, 02/28/2012 - 06:52
Loving this! Thanks for
Loving this! Thanks for another great plan Ana. Hillary your cabinet is gorgeous Please tell me ya'll are going to have plans for the vinters hutch.
Lori E (not verified)
Tue, 02/28/2012 - 11:19
Beautiful!
This is absolutely beautiful, and just what I need for my dining room! Thanks for another great plan, Ana!!
Daly @ ShadeSeed (not verified)
Thu, 03/01/2012 - 11:57
This the one!
I've been looking at another one of your console tables an I liked it but I prefer them without the little legs. This is what I want!
Janice (not verified)
Thu, 03/01/2012 - 15:41
Awesome cabinet! Thanks for
Awesome cabinet! Thanks for the building instructions. Now to find the time!
Joy in the storm (not verified)
Tue, 03/06/2012 - 04:55
So cool, but need smaller
This cabinet is just what I was looking for, but to big for my space. I am new to make your own furniture, but really excited about all the possibilities. How would I figure out what is needed to just create the middle section? Thanks...and love your site! Congrats on the Homies too (that is how I found you! =)
Hillary (not verified)
Mon, 06/04/2012 - 13:50
modifying for a smaller space
Hi, Joy.
I would just go through each step of the plans and write down what modifications you need to make. There is really no easy way...it just takes some time. Good luck!
Laura Fama
Tue, 03/13/2012 - 18:37
Love this!!!
Love this!!!
MrsKeatz
Sun, 03/18/2012 - 19:53
Love it!!
My question is what kind of hinges did you use? Me and hinges have not been getting along lately and I figured better to ask than to drill holes trying to figure it out myself! Thanks!
Hillary (not verified)
Mon, 06/04/2012 - 13:43
hinges
Hi, MrsKeatz. I linked to the source for the hinges in my original blog post. Check it out! http://thefriendlyhome.blogspot.com/2012/02/gigantic-rustic-sideboard.h…
I love those hinges. They are super easy to adjust -- nearly fool-proof. :)
heather_d
Sun, 04/22/2012 - 06:30
Building it right now!!
Hi Ana and Hillary- love these plans! Thank you very much for this. We are cutting the wood for this plan right now and am so excited. We are following the plans exactly so I have a couple quick comments/questions. We found it vey helpful with the cut list when you had what it was for in parentheses- keeping it all organized. Did we miss the interior shelves in your plans? Is hobby stock like beaded board that snaps together in different boards. or is it beaded board that is like a panel? (Canadians). Thank you
PS. How do you stop the ends of Purebond from getting chewed up going through the table saw? Heather
Hillary (not verified)
Mon, 06/04/2012 - 13:47
questions
Hi, Heather. Sorry it took me so long to find this question!
It sounds like you need a new blade on your table saw -- one for finer cuts. That will keep your plywood from getting as chewed up. I just replaced the ones on my miter saw and my circular saw recently and it makes a huge difference. The stock blades are for rough cuts.
Hobby stock is 1/2" thick or thinner, and in lots of different widths.
I think the plans might have left out interior shelves. I have a vague memory of buying extra wood for them.
I hope your console came out well!
Kate M (not verified)
Thu, 06/21/2012 - 07:02
Missing lots of instructions
I have built over 30 different things on this site and up until now had ZERO problem with anything, but this plan is missing a good bit of info. If you are not experienced I would not try tackling this one. No where in the directions does it tell you what to make the bottom of the drawers with not to mention you are missing wood for shelved etc at the end so you have to go back to the hardware store. It is a very beautiful piece but you will need to go through the plans and be able to decipher what is not told or explained before you start.
d rob (not verified)
Thu, 07/12/2012 - 10:26
Missing Info
There are definitely a few things that have been left out.
You will need at least one more 1x2 at 8'. This is to complete the trim.
If you plan on making shelves, you will need to buy extra wood for that, along with another 1x2 for trim. I decided to use my router to just round the edges of my shelves so I didn't need the 1x2.
There is no wood in the supply list for the back of the sideboard as well as for the bottoms of the drawers. I just picked up a 1/4" sheet of plywood and was able to use it for the drawers and the back. BUT, I used my rabbet router bit to inset the 1/4" piece onto the back of the sideboard. Otherwise, the 4x8 sheet of 1/4" plywood still isnt enough wood. (A 15.5" cut for bottoms of drawers leaves 32.25" left on the sheet but the height of the sideboard is 34.5". SO, I made sure to inset the backing so I didnt have to buy even MORE lumber.)
As for the drawers, you will need another 1x4 at 8' to complete the drawer building.
As for the faces of the drawers, a 6' piece of 1x6 is ALMOST enough but runs just a lil short. You will need a 1x6 at 8' instead of what the plans call for.
I am still in the process of building, but those are just a few of the things that were wrong with the plans. With so many extra trips to the big blue and orange stores, this project has ended up costing much much more than I expected!
It is a beautiful piece though, my wife will absolutely love it, and I have loved working on it. Thanks Hillary!
Hillary (not verified)
Wed, 08/01/2012 - 12:23
Thanks, Rob, for your help
Thanks, Rob, for your help with this! Yes, the plan is missing a few bits. I should have kept better track of those as I build the piece for Ana! You're right -- it isn't a cheap plan. I think I spent just shy of $400 for all the supplies. Compared to buying it retail, it's still a bargain, right?
d rob (not verified)
Wed, 08/01/2012 - 13:17
$400 but well worth it
Yeah I think I spent around $400 as well. It turned out WAY better than I expected. The drawers and doors kicked my butt and were slightly frustrating (mostly because I am not an advanced carpenter) but it looks awesome in our living room! It looks very expensive and my wife is happy, so I am happy too! I wish I could send a pic to show how good it looks...
Hillary (not verified)
Tue, 08/07/2012 - 23:22
Submit a brag post with
Submit a brag post with photos! I'm so glad you're happy with how it turned out.
Laurie Falk (not verified)
Mon, 09/17/2012 - 19:43
Missing Pieces
Does anyone know if these missing pieces got corrected in the plans? I just want to make sure I'm planning the right way! :)
Nicholas s (not verified)
Thu, 07/12/2012 - 19:21
Just curious as to what type
Just curious as to what type of wood you used or the dimensions you gave above. Also any alternative that would work nice compared to the type you used?
Hillary (not verified)
Wed, 08/01/2012 - 12:26
I used bottom-of-the-barrel
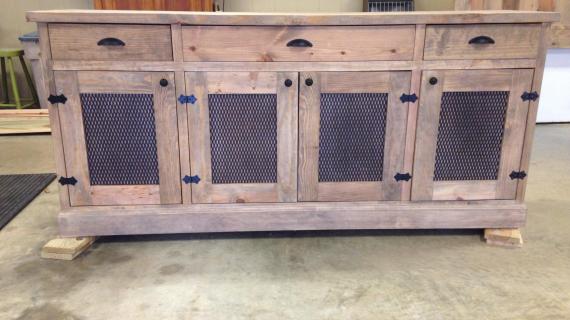
I used bottom-of-the-barrel cheap-o 2x4s, 2x6s, and #2 pine because I was going for a rustic look. You could definitely upgrade to straighter, clearer, nicer wood depending on the look you want!
laceywils
Mon, 08/20/2012 - 15:40
hutch
I love this! Hubby and I are going to try to build this for our dining room...any suggestions on a hutch?
Steve Lawrence
Mon, 09/10/2012 - 15:13
Pocket Hole Confusion
New to all of this and already confused! When you call out separate dimensions for the pocket holes and the pocket hole screws, what does that mean. I understand the length of the screw, but looking at the Kreg Jig, aren't all the holes the same size? What's the difference between a 3/4" pocket hole and a 1 3/4 " pocket hole? (Yes, I know the easy answer is 1"; but you know what I mean!!)
Quintin79
Mon, 09/10/2012 - 16:13
The 3/4 is for your 1x
The 3/4 is for your 1x dimensional lumber and the 1 1/2 is for your 2x dimensional lumber. Reasoning is if you actually measure a 1x4 it is 3/4x3 1/2. 2x4 is 1 1/2x3 1/2.
BJW1262
Fri, 03/01/2013 - 12:09
Just Finished
Just posted a brag about this project. Thank you for the awesome plans. I inset the back as described in your blog and it worked fantastic. I needed the extra storage space so I opted to remove the drawers and extend the cabinet doors. I had a lot of fun building this one.
ellawilliams
Mon, 09/02/2013 - 06:52
rescaled for a tiny cottage!
I've just finished this build with my fiance (brag posted) and we had to completely rescale the whole thing in order to allow it to fit into our cottage. The instructions you gave allowed this to be MUCH simpler than it could have been but my main bit of advice to anyone changing anything is work out the key dimensions (in our case all of them! h x w x d) and then all the new lengths you 'should' need but measure and cut the wood as you go! We are fairly new at this and naturally made the odd mistake but this approach meant that we could adjust as we went and it still worked out using the estimated wood and we found our miscalculations by double checking each required cut length on the actual build instead of trusting our (as it turned out slightly off in places) initial calculations.
Good luck to anyone attempting this - it was great fun and looks fantastic! Thank you!
http://ellawilliams.wordpress.com/2013/08/31/planked-wood-sideboard-a-l…
Duckincrazy
Mon, 11/25/2013 - 10:08
Hinges
Curious about what type / style hinges used for the doors I'm done to that point just not sure which to use.
camjohns
Thu, 12/12/2013 - 06:13
Attaching top to base
So i am engaged in this project as my first one and loving it! as im getting to the point of attaching the top to the base and was wondering where all the points of connection were? I saw in photos and diagram that it uses the plywood dividers and the spacers in the back, but where else does it screw to? it just seems that there would be more, but not sure where.
do i drill pocket holes in the side panel on both sides and attach there as well?
thanks!
mamabee0809
Sun, 12/29/2013 - 12:31
matching hutch
Has anyone attempted a hutch to go on top of this? I am planning on building this as my next project and I would like a match hutch as well.
jfeezie
Fri, 01/03/2014 - 13:33
Baseboards
Hello! I'm to the point of the build where the instructions say to install the baseboards....only I don't see any baseboards on the cut list! I'm wondering what I should use here?? What have others used? Should I just use a 1x5? Or something else?
Nicupson
Thu, 08/28/2014 - 09:50
Shrink?
I LOVE this piece! It is what I am looking for, though bigger than what I need. I'm afraid that if I try to 'shrink' it down it will lose the look.
Ideally I would want something like this that was 30" tall, 16" deep and no longer than 6'. But would that make the doors look odd and stumpy, and the drawers too small to be of any use? Any idea where I could go for help in figuring out the best way to size this project down?
Thank you! ~ Nicki
booksnotbombs
Thu, 08/28/2014 - 14:40
If you do some creative
If you do some creative searching of the brag posts, there are a few people on here who have made it smaller by keeping each cabinet the same size, but bringing it down to 3 cabinets w/ drawers instead of four. Does that make sense? They just had to decide which way they wanted the doors to open.
Cassie84
Sat, 07/11/2015 - 22:03
HINGES
I clicked on the link for hinges, but it's not good anymore. where can I buy decorative surface mount hinges for a good price?
cpoe
Mon, 09/14/2015 - 08:26
Pallet Wood
Has anyone made this out of pallet wood or have plans for pallet wood? I have a lot of pallets and would love to use them to make this project!
DWinMadison
Fri, 10/30/2015 - 13:08
Planning to Build this Sideboard
I have enough cypress left over from some other projects to complete most of this project. My problem is I hate to build the entire piece out of cypress then have to use plywood for the door panels. I cannot find cypress plywood nor can I find a local mill willing to plane lumber down to quarter inch thickness. Any suggestions?
DWinMadison
Mon, 11/02/2015 - 13:34
Routered Edges?
I started working on this project this weekend in cypress. Got the sides completed. As I'm working, I'm thinking the front and side-facing edges should be routered by 1/4" to soften them a bit. Thoughts? Suggestions? Experiences?
DWinMadison
Mon, 11/02/2015 - 13:38
Routered Edges?
I started working on this project this weekend in cypress. Got the sides completed. As I'm working, I'm thinking the front and side-facing edges should be routered by 1/4" to soften them a bit. Thoughts? Suggestions? Experiences?
countryglamdesigns
Tue, 01/05/2016 - 10:46
Hi Ana,
Hi Ana,
How can I add shelving instead of the drawers?
bootlucky
Fri, 03/11/2016 - 12:03
I have a suggestion on Step 6
I have a suggestion on Step 6. Extending the trim into the center makes getting european style door hinges for the project tough. If you extend the trim the other way, then you are dealing with frameless, inset doors and those type of hinges are readily available. This is my first big project and the hinges are giving me fits!
Marina Botha
Tue, 05/31/2016 - 02:30
Metric
Hi All,
Is it possible to get the measurements in Metric format. I am in South Africa.
In reply to Metric by Marina Botha
Ana White
Tue, 05/31/2016 - 12:30
http://www.ana-white.com/diy
http://www.ana-white.com/diy_forum/forums/converting-plans-metric/home
KJ935
Wed, 09/28/2016 - 10:05
Updated plans for the planked wood sideboard
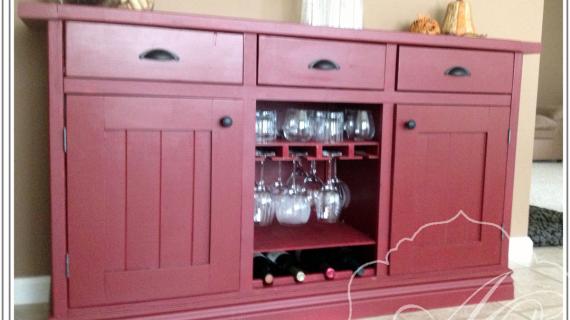
You recently updated this design with doors that can be seen through and a built in wne rack. (If was stained a dark wood color) Would you be able to share those adjust plans? It would look perfect in my dining room with the famehouse table we have previously built. Thanks.
jjalbert19
Tue, 10/25/2016 - 13:14
issues with top and frame
I am currently in the Middle of this build and I am ready to get the top on and am noticing that I have a lip on one end then go flush near the middle and the have a lip again.. I have checked everything and I am Square on all parts. any suggestions on how to fix this or was this an issue for anyone else?
craw4dz
Sat, 10/29/2016 - 20:49
Hutch?
I love this and am planning on building it to replace an old particle board china hutch I sold. Any chance you have plans for the top part of the hutch? With cabinet drawers? I'm sure I could figure something out, but I'd love some guidance :) Thanks!
In reply to Hutch? by craw4dz
Ana White
Sun, 10/30/2016 - 14:30
Some options to be
Some options to be modified
http://www.ana-white.com/2012/10/plans/shanty-hutch
http://www.ana-white.com/2013/06/hutch
http://www.ana-white.com/2011/01/rustic-hutch-for-the-workbench-console…
Hope this helps!
Jame31
Fri, 01/31/2020 - 08:02
Material Cost?
Very cool! I was wondering if you could tell me the 'ballpark' material cost for this project?!
bcahall
Sat, 11/14/2020 - 02:03
Original link to beffet
I can't get the link to Hillary's page, how do you keep the drawers in place? And what type of hinges were used?
Peggy 3
Sun, 12/11/2022 - 08:27
link to PDF not working
The link to PDF does not work and when I try to print the page, all I get are the comments.