
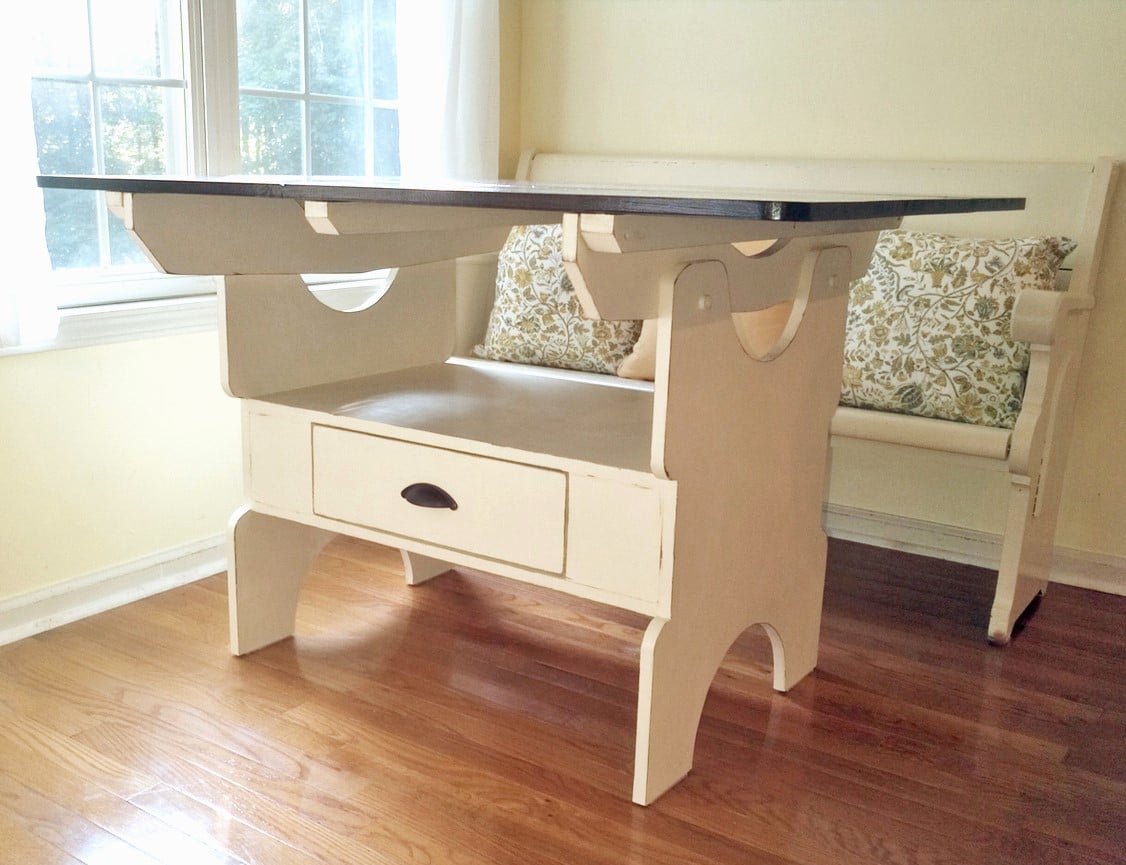

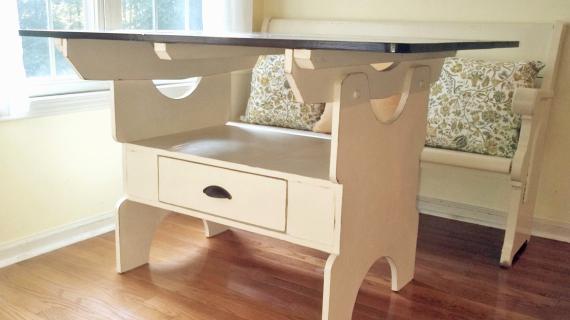
How to build a vintage style storage dining table. Free woodworking plans by Ana-White.com
Preparation
- 1 - sheet 3/4" plywood ripped into strips 19", 22" and 5 1/2" , all 8 feet long
- 1 - 1x2 @ 4 feet long
- 1 - 2x2 @ 6 feet long
- 1 - 1x4 @ 6 feet long
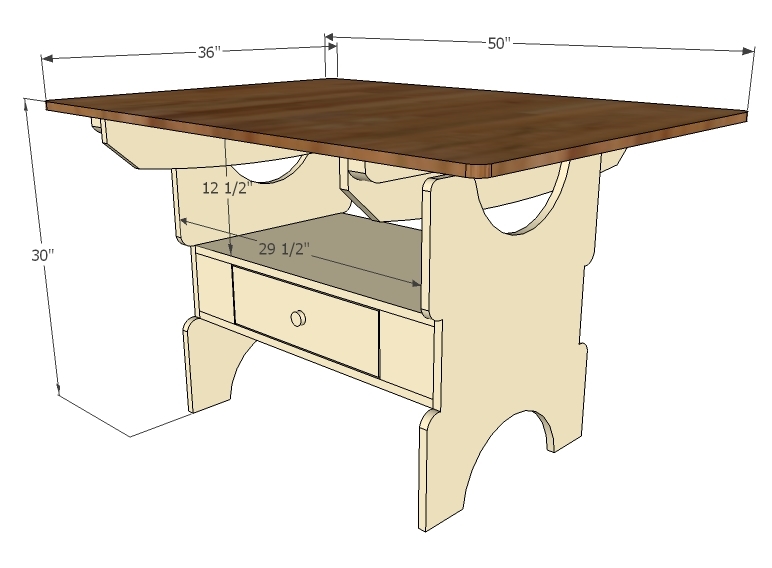
- 50 x 36 tabletop
- 2 - knobs or handles
- 2 - 3/4" plywood @ 19" x 29 1/2"
- 4 - 1x6 @ 5 3/4"
- 2 - 1x2 @ 17 1/2"
- 2 - 3/4" plywood @ 22" x 27"
- 2 - 1x6 @ 36"
- 2 - 2x2 @ 36"
- 1 - Tabletop 50" x 36" (planked or you can use plywood trimmed or edge banded)
- 2 - 1x4 @ 17 1/2"
- 2 - 1x4 @ 16 3/4"
- 1 - 1/4" or 3/4" plywood @ 17 1/2" x 18 1/4"
- 2 - 1x6 @ 18 1/4"
When you cut your panels from plywood, consider ripping into strips 19" and 22" wide, and then cutting your pieces from those strips. This will ensure greater accuracy. To save on materials, consider cutting scraps into 5 1/2" wide widths and using these strips to replace 1x6 boards in plan.


Please read through the entire plan and all comments before beginning this project. It is also advisable to review the Getting Started Section. Take all necessary precautions to build safely and smartly. Work on a clean level surface, free of imperfections or debris. Always use straight boards. Check for square after each step. Always predrill holes before attaching with screws. Use glue with finish nails for a stronger hold. Wipe excess glue off bare wood for stained projects, as dried glue will not take stain. Be safe, have fun, and ask for help if you need it. Good luck!
Instructions
Step 1

You can use either 3/4" pocket holes and 1 1/4" pocket hole screws and glue or 2" screws to attach. Keep outside edges flush and square. TIP: If you are using pocket holes, go through the entire plan and mark all pocket hole locations and get drilling before any assembly.
Step 2

Next, add the drawer guides. Take a second to ensure the drawer area is square, as you will only have a 1/4" of total play around the drawer.
Step 3

Attach top of storage box to sides.
Step 4

Take your time drawing carefully out your end patterns. The ends do not have to match my suggestions, but they do have to match each other. Once you have one cut, use it as a pattern to cut the other. Clamp the two cut ends together and sand all rough edges until the two match. Then attach to the center storage area with screws and glue.
Step 5

Step 6

You can make your tabletop from just about anything. The best solution is joining hardwood boards together on the underside with 3/4" pocket holes and 1 1/4" pocket hole screws. Another option is to use 1/2 sheet of hardwood plywood, cut to 47" x 33". Then attach edge to edge 1x2 frame around all sides to create a sturdy and decorative wood edge to the tabletop. Would be beautiful in Purebond Plywood for sure!
Step 7

Now the tabletop should just fit right over the base. Attach through sides into the 2x2 supports with 2" screws.
Step 8

For this drawer, I just went the simplest possible route, figuring the drawer is not high use and wanted to keep it simple. This drawer is just a 1x4 box with plywood on the bottom.
Step 9

Make sure the drawer fits in the opening. I like to rub the drawer bottoms with candle wax to make for a smoother slide.
Step 10

And then just position the drawer faces over the drawer boxes, shimming so there is an even 1/8" gap all the way around, and attach with 1 1/4" finish nails. Then also attach from inside with 1 1/4" screws. TIP: Attach hardware first to drawer face so you don't have to drill through a second layer of 1xs to access the hardware screw - depending on your type/style of hardware.
It is always recommended to apply a test coat on a hidden area or scrap piece to ensure color evenness and adhesion. Use primer or wood conditioner as needed.

Comments
Skye Giroux (not verified)
Thu, 02/16/2012 - 08:27
I LOVE this table - I've been
I LOVE this table - I've been in love since Pottery Barn first put it up on their site! I'm sooo happy you made a plan for it, because even though I don't have a dining room and therefore no space for a table larger than bistro size, I can't wait to live vicariously through everyone else who builds it :)
Guest (not verified)
Thu, 02/16/2012 - 08:31
TILT TOP TABLES
Very cool plan Ana. I thought that this table may be a tilt top table. As a FYI, tables like this (with the top that tilted back and made the table into a bench) were a very popular and useful piece of furniture during the American Colonial Period in history. Houses were small, and furniture needed to be extremely useful. There was little room for a decorative piece of furniture. So the table / bench evolved from the fancier earlier version of a tilt top tables (not a bench also). (I noticed that on the Pottery Barn site, it says FIXED trestle table). I wonder if this table could be modified so that the top would pivot back? Thanks for this plan Ana!!
In reply to TILT TOP TABLES by Guest (not verified)
Ana White
Thu, 02/16/2012 - 09:16
Always a step ahead!!! I did
Always a step ahead!!! I did not know that this style table is actually inspired by the vintage tilt top tables. By simply using bolts and holes to attach top to sides, the table should tilt. Thanks for making me smarter!
derrydown
Mon, 02/20/2012 - 06:34
I've been searching around
I've been searching around for a settle table plan and yours is just great. By attaching the long 1x6's to the table top instead of the base, you can pivot the top back to make the settle back. I particularly like the drawer. Here's a link to a similar table showing the way the top pivots.
http://www.popularwoodworking.com/articleindex/country-settle-table
Guest (not verified)
Thu, 02/23/2012 - 21:17
This is on the to do list as
This is on the to do list as a gift....but could use a corner breakfast nook style bench for it.
noonoo
Thu, 06/07/2012 - 06:24
Tilt Top Tables
This one caught my eye as I had been researching early furniture. It's hard to see in the picture from the popular woodworking website, as it's so dark. The more primitive style would use holes like you suggest but with short dowels threaded through. So four dowels one in each corner. The front two dowels would be removed and the table would tilt using the back dowels as the hinge. All the dowels could be removed and the top could come right off too. The dowels could be just ordinary cylindrical or shaped so they had a bulbous knob at the end to grab hold of more easily. The base could be smaller too if it's more of a one seater that you want and a decrease in table top size. If making the top using planks of wood instead of one big piece, the planks need to be horizontal to your back when you're leaning against it when it's tilted, for strength.
Hobb Nathan
Fri, 11/08/2019 - 05:09
I like your table design…
I like your table design especially I would like the Hardwood Flooring